
Are you ready to dive deep into the world of networking? Setting up a virtual lab on Kali Linux 2022.3 is one of the most powerful steps for a network engineer. Thanks to Cisco Packet Tracer 8.2, you can now carry a whole data center in your pocket!
First of all, with this strong simulation tool, you can manage Cisco Routers, Switches, and Firewalls as if they were in real time. You can build complex network setups in seconds without spending a lot of money on real hardware.
A wrongly set up installation can lead to dependency errors on delicate systems like Kali Linux. But do not worry! In this guide, we will look at all the steps needed to finish the installation as quickly and smoothly as possible.
In the end, finishing this installation will take your cybersecurity and network management skills to the next level. Let us open the terminal and get started!
Since Kali Linux is based on Debian, the setup logic of the two systems is largely the same. Checking if Packet Tracer works with Debian 13 will make your future moves faster. There is no need to worry, as the basic building blocks stay the same.
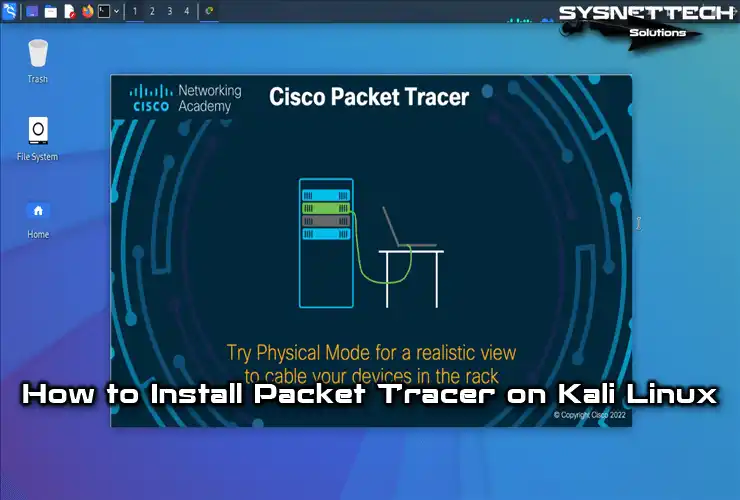
How to Set Up and Use Packet Tracer 8.2.0 to Prepare for Cisco Exams on Kali Linux 2022.3
Cisco Packet Tracer is a free network simulation program for Cisco Networking students and includes multiple network devices, personal computers, and security devices.
You can download and install the Packet Tracer network software, which is distributed completely free of charge, on your Windows, Linux, or macOS computer after registering on the Netacad website.
You can improve your basic networking knowledge by installing Cisco network simulator software on Kali Linux, one of the Linux distributions that are widely used to perform security tests and penetration analyses of your existing network.
Cisco is developing this tool not just for Linux, but for all major platforms. If you’re interested in network simulations, you might want to work on different systems as well. We have a ready-made guide for configuring Packet Tracer in Windows 11 and 10 environments. This way, you won’t limit your lab work to a single ecosystem.
How to Download and Install Packet Tracer
You can get Packet Tracer software for Linux from the official Netacad website. Or, you can use other online places. For a guide on how to get it without making an account, please see our simulator download guide.
Step 1
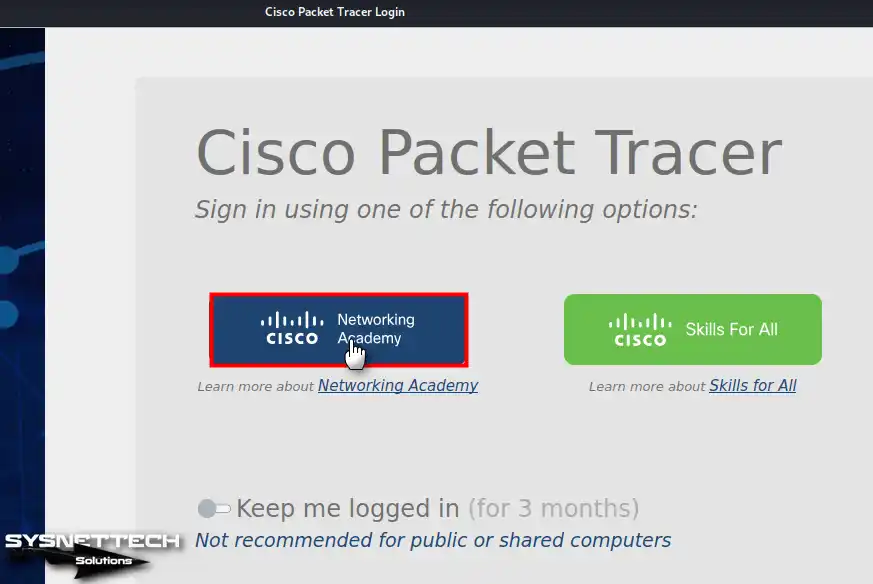
To get the Cisco network simulator program from Netacad, first visit the official website. Then, click on the Log In or Login button on the main page.
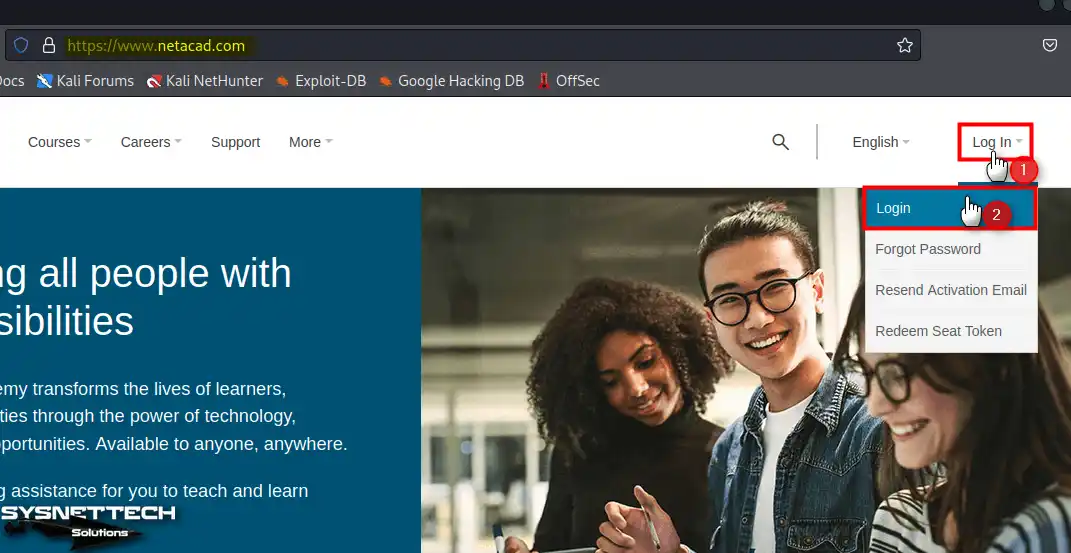
Step 2
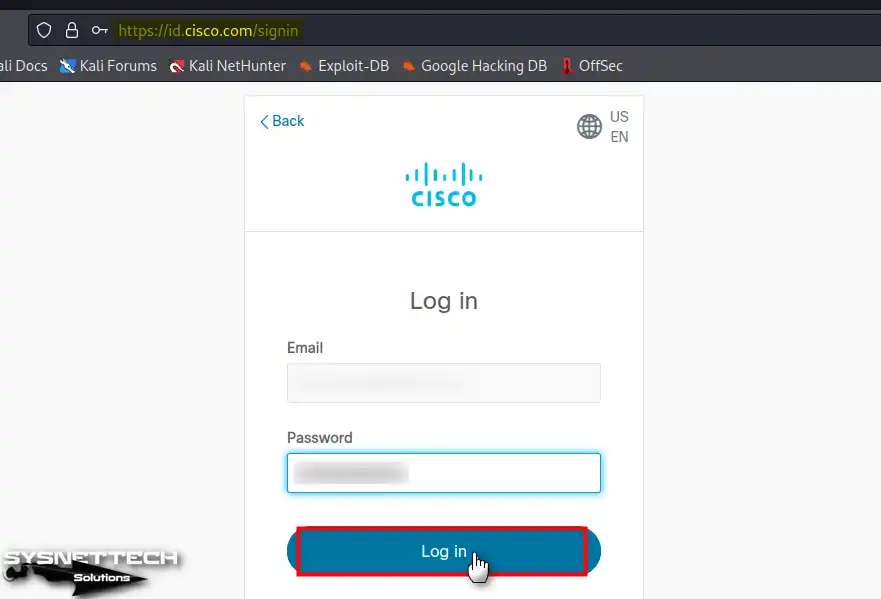
When you are redirected to the Cisco login webpage, type your Cisco account information and click login again.
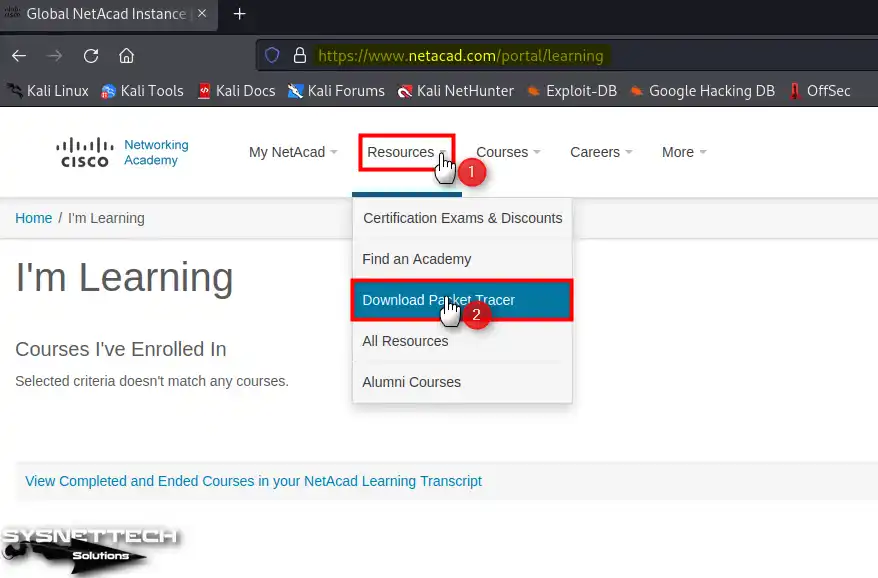
Step 3
After successfully logging in to Cisco Networking Academy, click Resources / Download Packet Tracer from the menu.
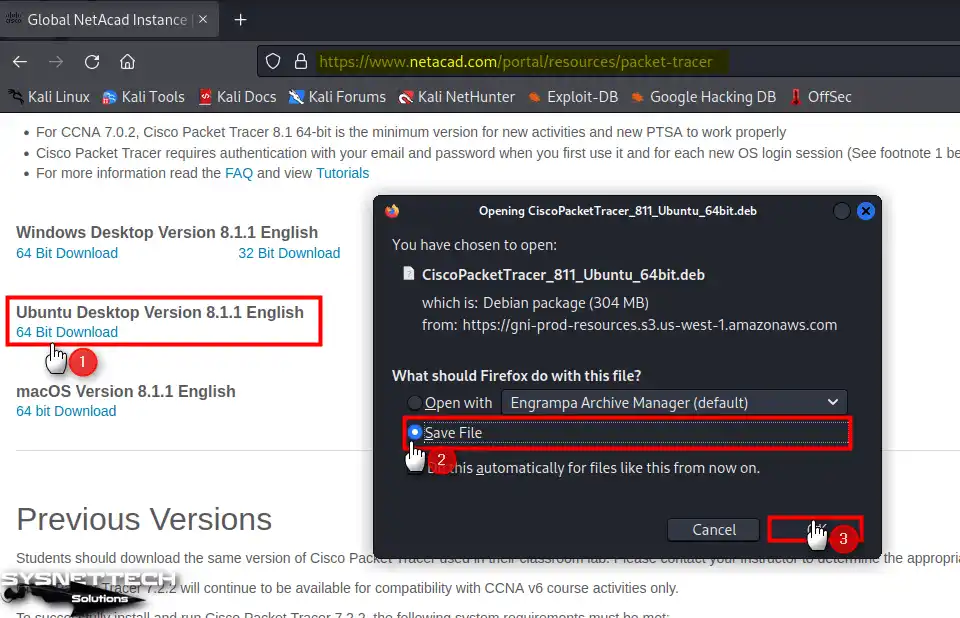
Step 4
Click on the 64-bit Download link in the Ubuntu Desktop Version 8.2.0 English title on the download page, choose to save the deb file to your computer, and click OK.
Step 5
After downloading the Packet Tracer.deb package, open the terminal by pressing CTRL + ALT + T and execute the “cd ~/Downloads” command to go to the Downloads location and check the downloaded deb package when you view the contents of the folder with the “ls” command.
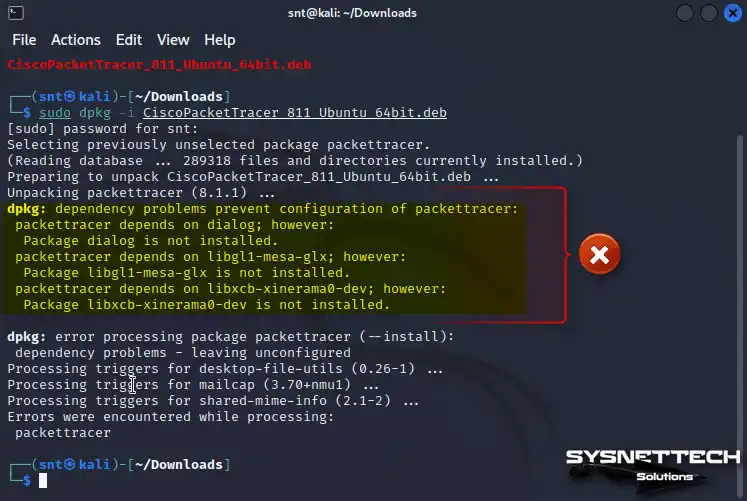
To install the PacketTracer.deb package on your Kali computer, execute the “sudo dpkg -i FileName.deb” command in the terminal.
cd ~/Downloads
ls
sudo dpkg -i CiscoPacketTracer_811_Ubuntu_64bit.deb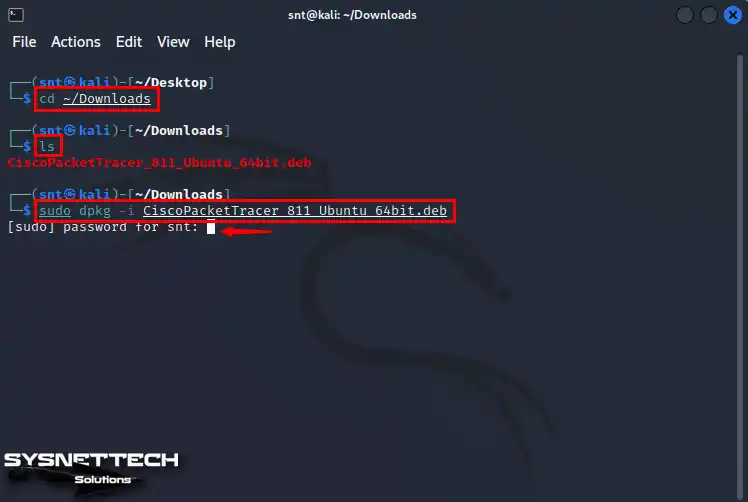
Step 6
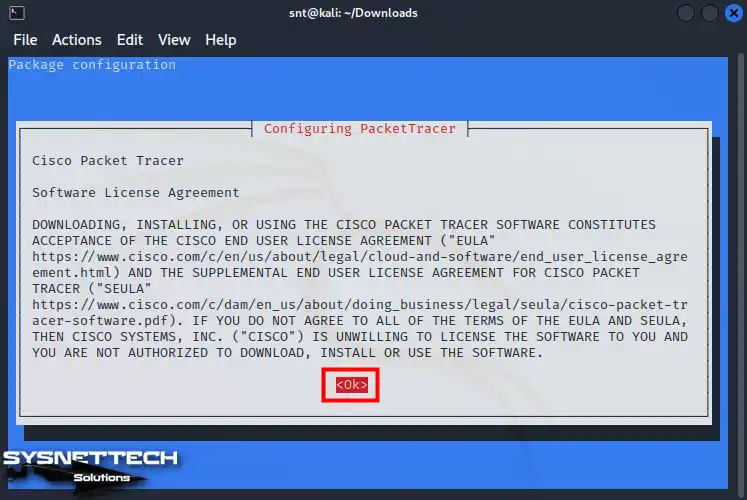
During the installation phase, press Enter at the OK option to read and accept the license agreement of the Cisco Packet Tracer software.
Step 7
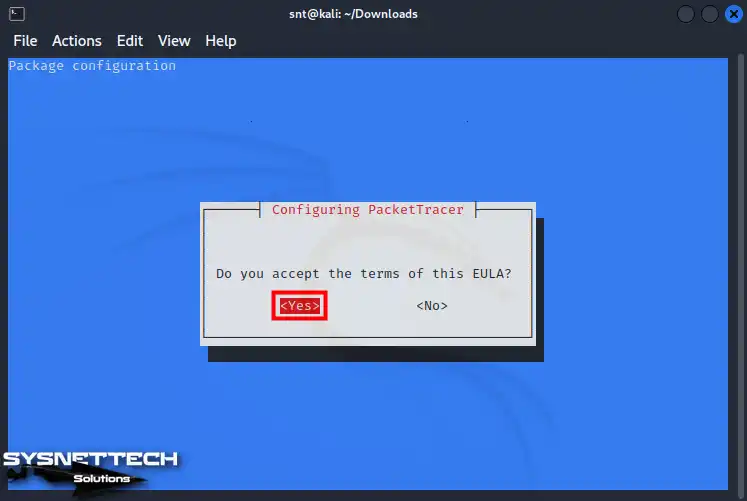
Likewise, press Enter on Yes to accept Packet Tracer’s EULA license terms.
Step 8
After accepting the license terms, you can see that the dependent packages libgl1-mesa-glx and libxcb-xinerama0-dev must also be installed in the terminal while the installation continues.
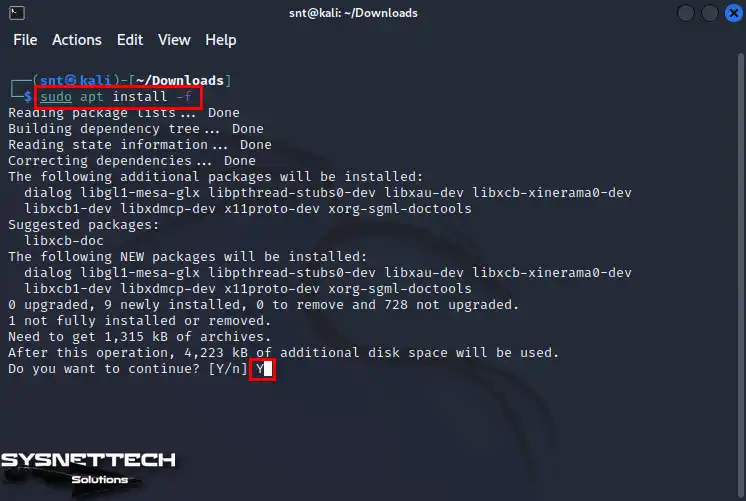
To force the installation of these packages, you need to execute the “sudo apt install -f” command in the terminal or manually download and install these packages.
Dependency errors are not only found in Kali; they are common in other Debian-based systems as well. Following the setup steps on Ubuntu will give you a different view. You can compare the problems here with the package manager commands there.
Step 9
To install dependent packages for Packet Tracer, execute the “sudo apt install -f” command in the terminal, and then after checking the packages to be installed, press the Y key and then Enter to continue.
Step 10
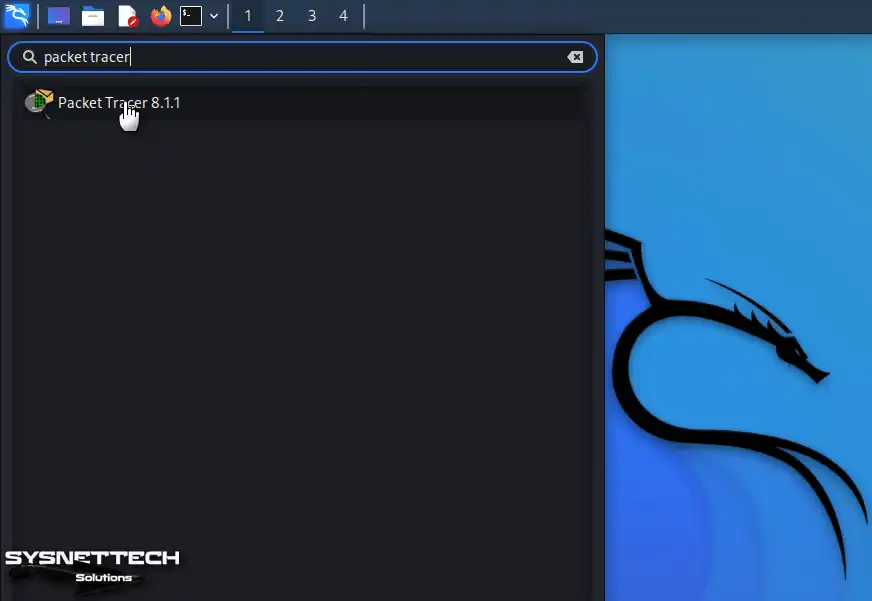
After completing the installation of the Cisco software, you can see that the program has been successfully installed when you type “packet tracer” in the search bar in the start menu.
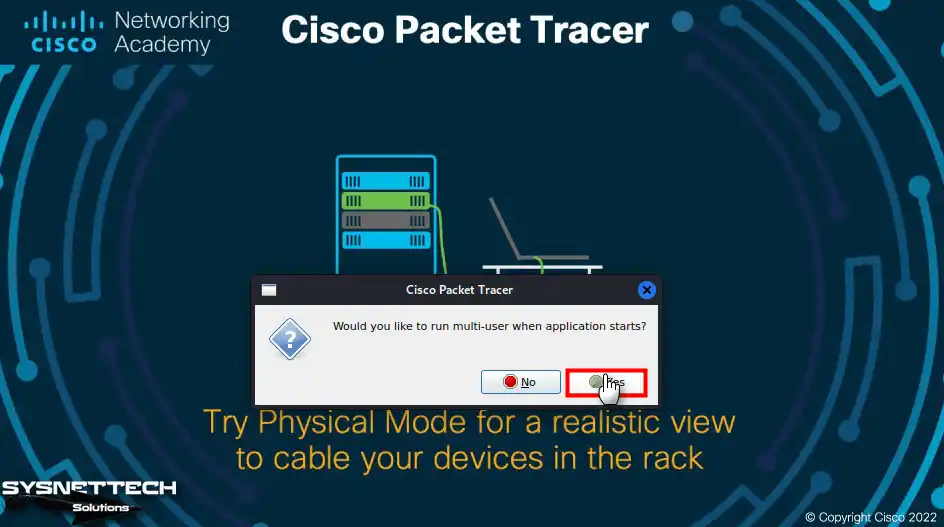
Step 11
Run the Cisco Packet Tracer and click Yes to confirm the Multi-User feature to run at startup.
Step 12
In previous versions of Packet Tracer, you could log in to the program as a guest, but now you need to log in to Netacad. So, on the login screen, click Networking Academy.
Step 13
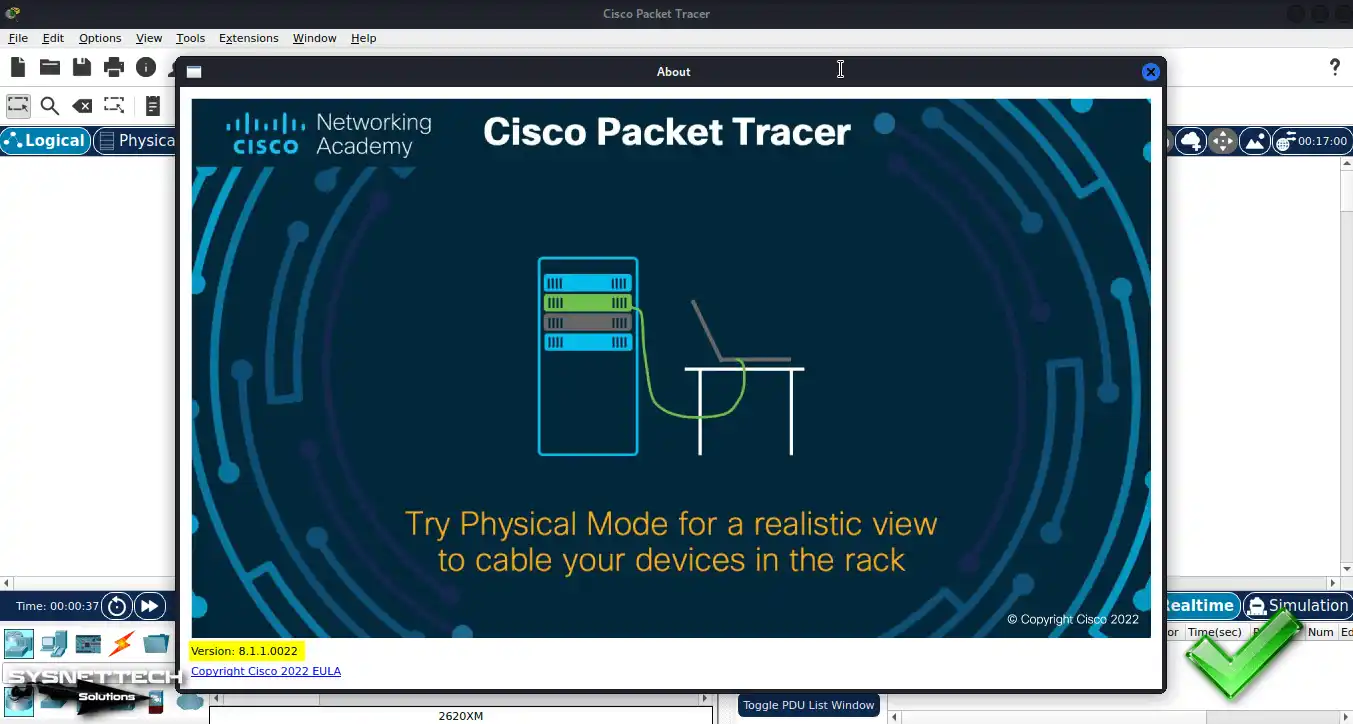
After logging into Netacad, you will see the logical workspace of the program. You can also check the version of the program by clicking Help / About.
How to Create a Desktop Shortcut
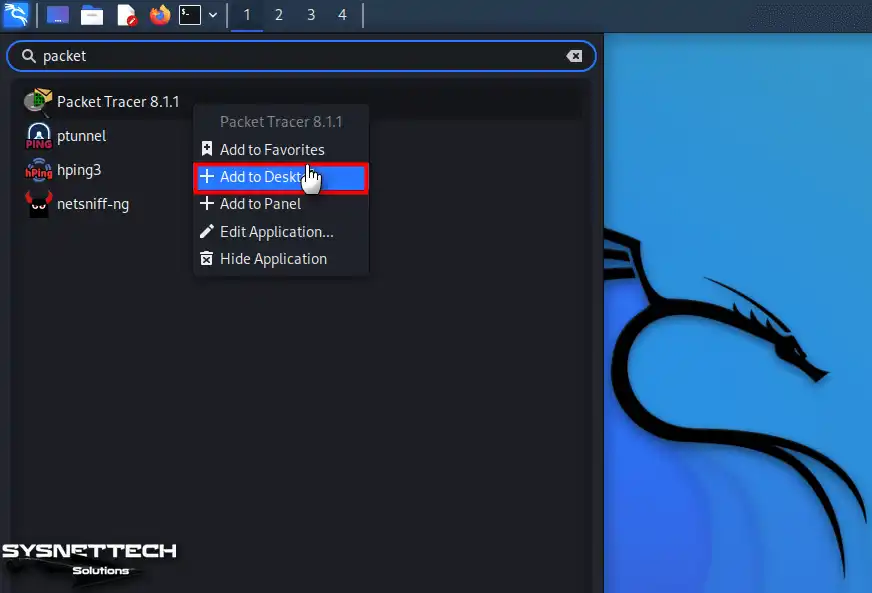
It would be best if you created desktop shortcuts so that you can access and run the programs you have installed on your Kali Linux system faster. For example, after installing the Cisco simulation program, you can create a desktop shortcut by right-clicking on the program’s icon from the Start menu and clicking Add to Desktop from the options that appear.
Step 1
To create a Packet Tracer shortcut, list the program in the start menu, right-click on it, and then click Add to Desktop.
Step 2
Another way to create a desktop shortcut is to use the terminal. To create a shortcut for Cisco software, execute the first command below in the terminal to copy the shortcut from Applications to the desktop, and then edit the executable permissions of the shortcut with the “chmod” command.
cp /usr/share/applications/cisco-pt.desktop ~/Desktop
chmod +x cisco-pt.desktop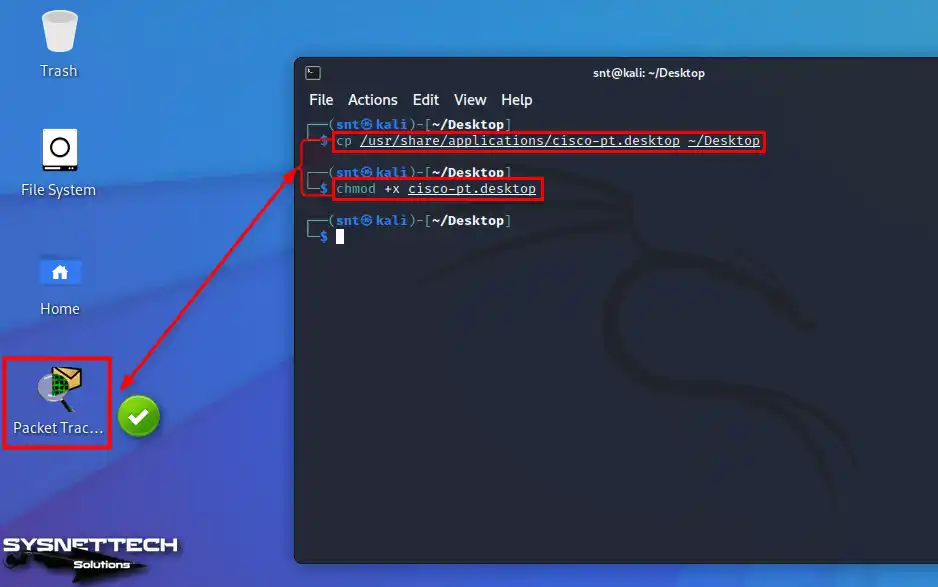
How to Create a New Project
After installing Cisco Packet Tracer on Kali Linux, you can now create new projects and test how devices communicate with each other to prepare for your Cisco exams or improve your networking experience.
Step 1
You can quickly start creating a network topology by dragging and dropping the relevant devices from the devices section to the logical workspace of Packet Tracer.
For example, let’s examine how to configure DHCP to assign IP addresses to devices connected to a Cisco Router automatically.
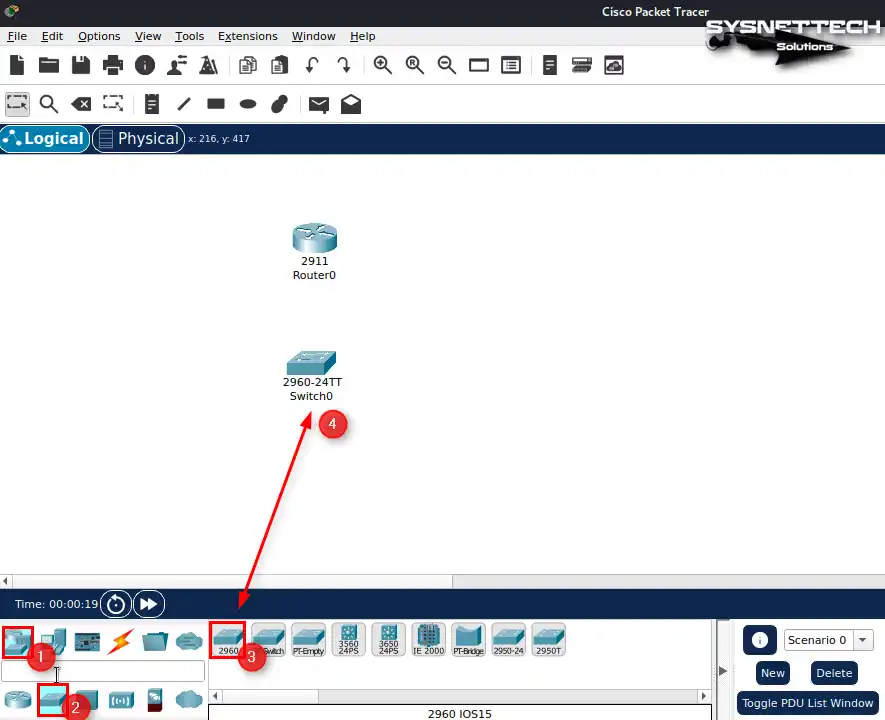
After clicking on the Cisco Router group from the Devices panel, add the Router 2911 model to the workspace from the device category on the right.

Step 2
Click on the Cisco Switch category and add the Switch 2960 model to the workspace.
Step 3
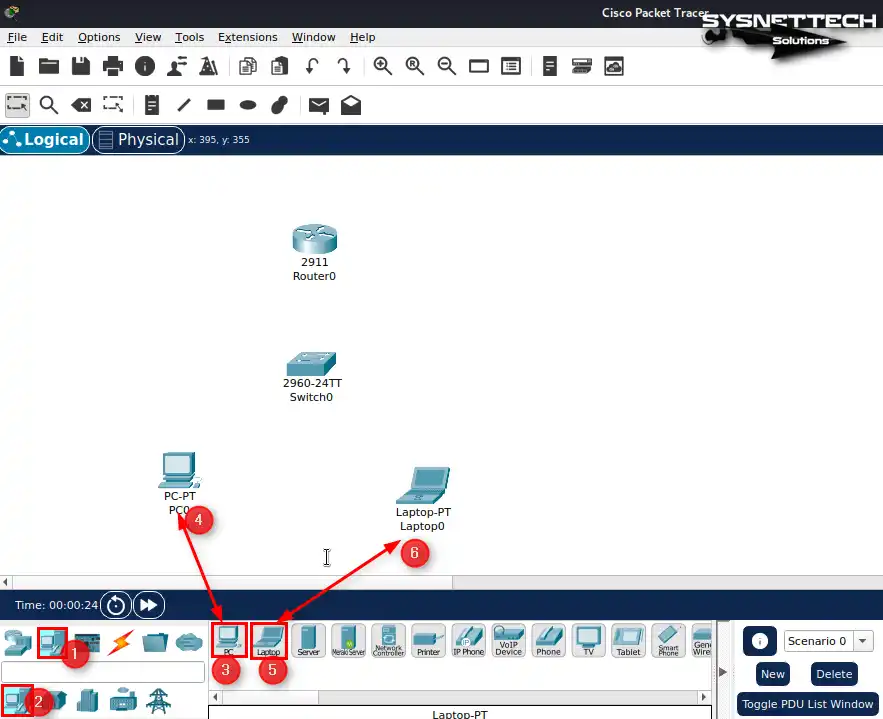
Click on the category of computers from end-user devices and add one desktop computer and one laptop computer to the workspace from the drop-down list.
Step 4
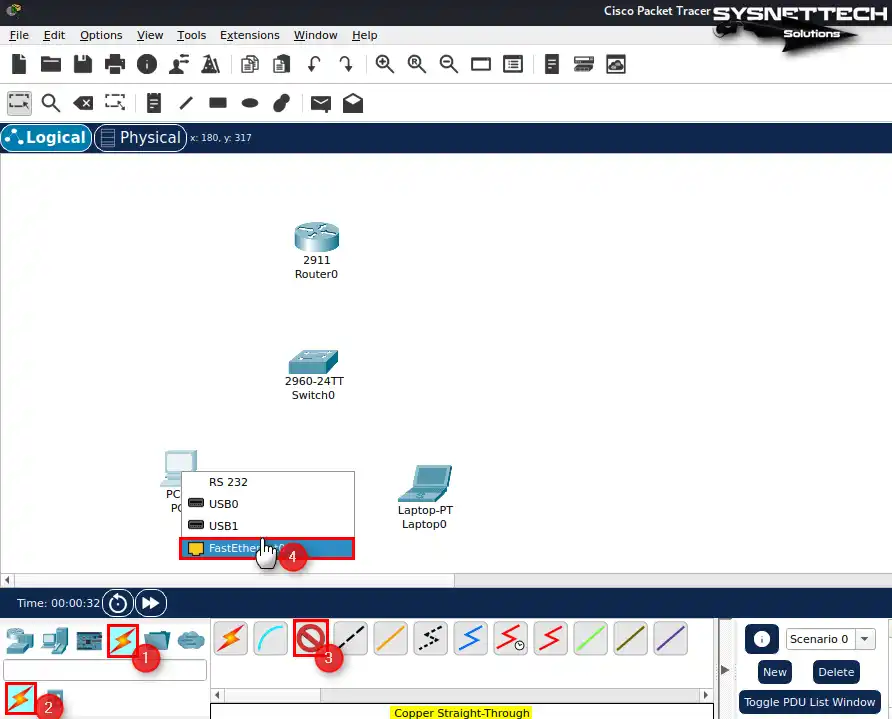
After clicking on the wiring option, select Copper Straight-Through from the cable types category, and then click on PC0 and connect one end of the cable to the free port FastEthernet0 and the other end to one of the free ports of the Switch.
Likewise, connect Laptop0 to the Cisco Switch using a flat copper cable.
Step 5
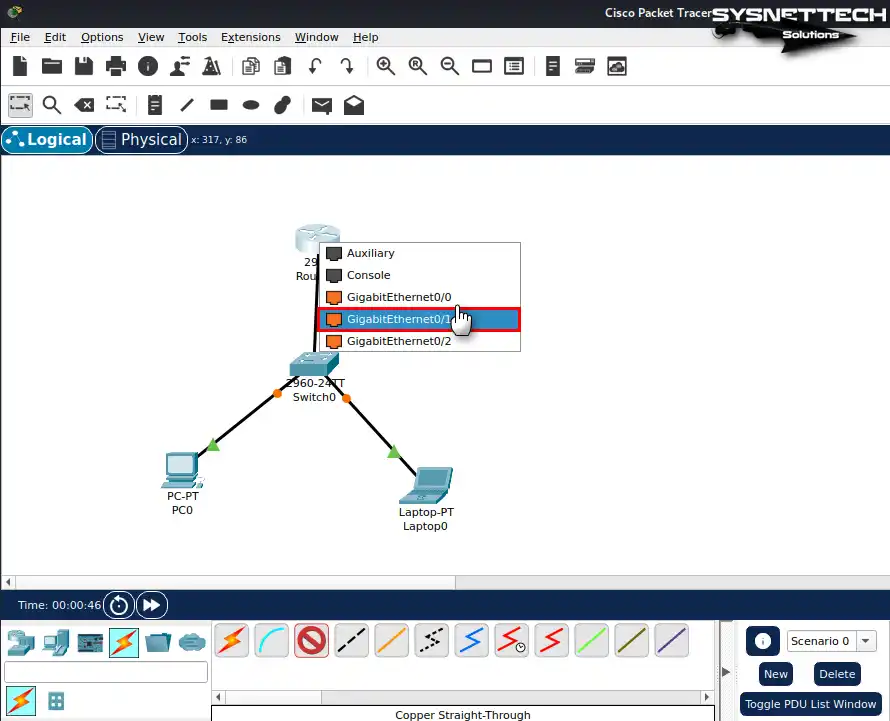
After connecting the computers in the working environment to the Switch, connect both devices with the GigabitEthernet port since the network connection between the Router and the Switch must be fast.
Step 6
Click on the Router to open the CLI configuration window and execute the commands below to assign an IP address to the GigabitEthernet port connected to the Switch.
Router> en
Router# conf t
Router(config)# interface gigabitethernet 0/1
Router(config-if)# ip address 192.168.1.1 255.255.255.0
Router(config-if)# no shutdown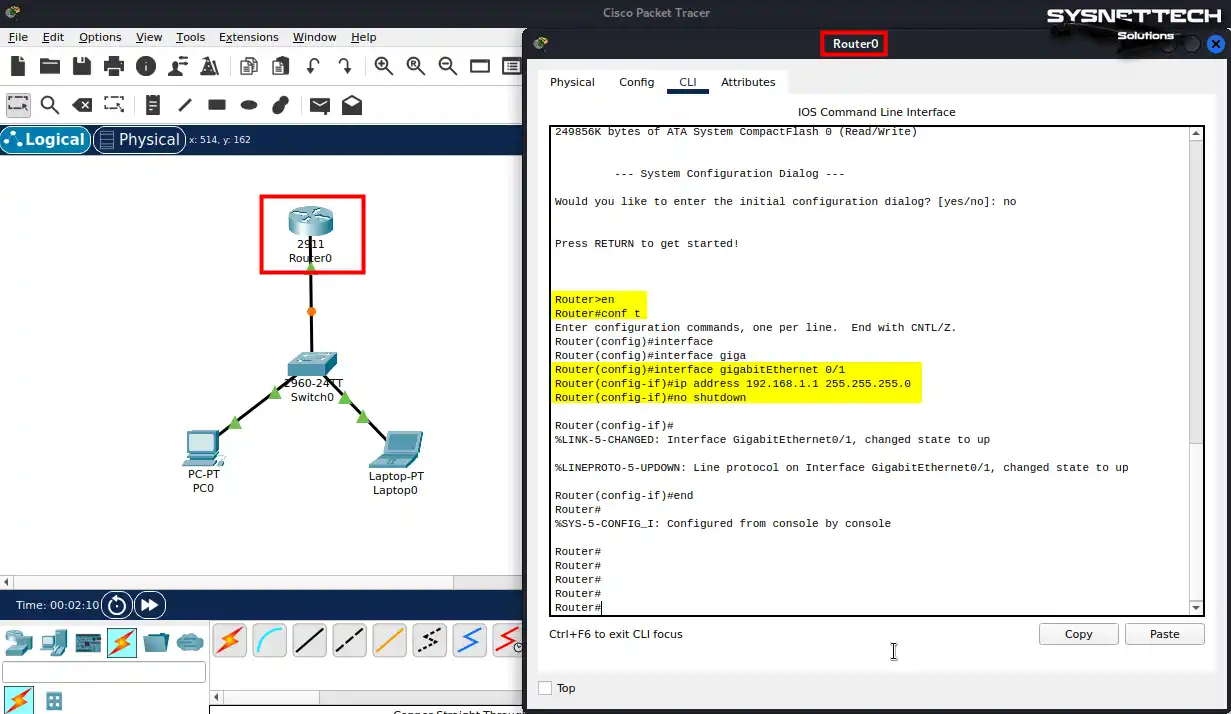
Step 7
Instead of manually assigning IP addresses to computers on the same network connected to the Router, you can automatically add IP addresses to every device added to the network by configuring a DHCP server.
Router> en
Router# conf t
Router(config)# ip dhcp pool LAN1
Router(dhcp-config)# network 192.168.1.0 255.255.255.0
Router(dhcp-config)# default-router 192.168.1.1
Router(dhcp-config)# dns-server 192.168.1.1
Router(dhcp-config)# exit
Router(config)# ip dhcp excluded-address 192.168.1.1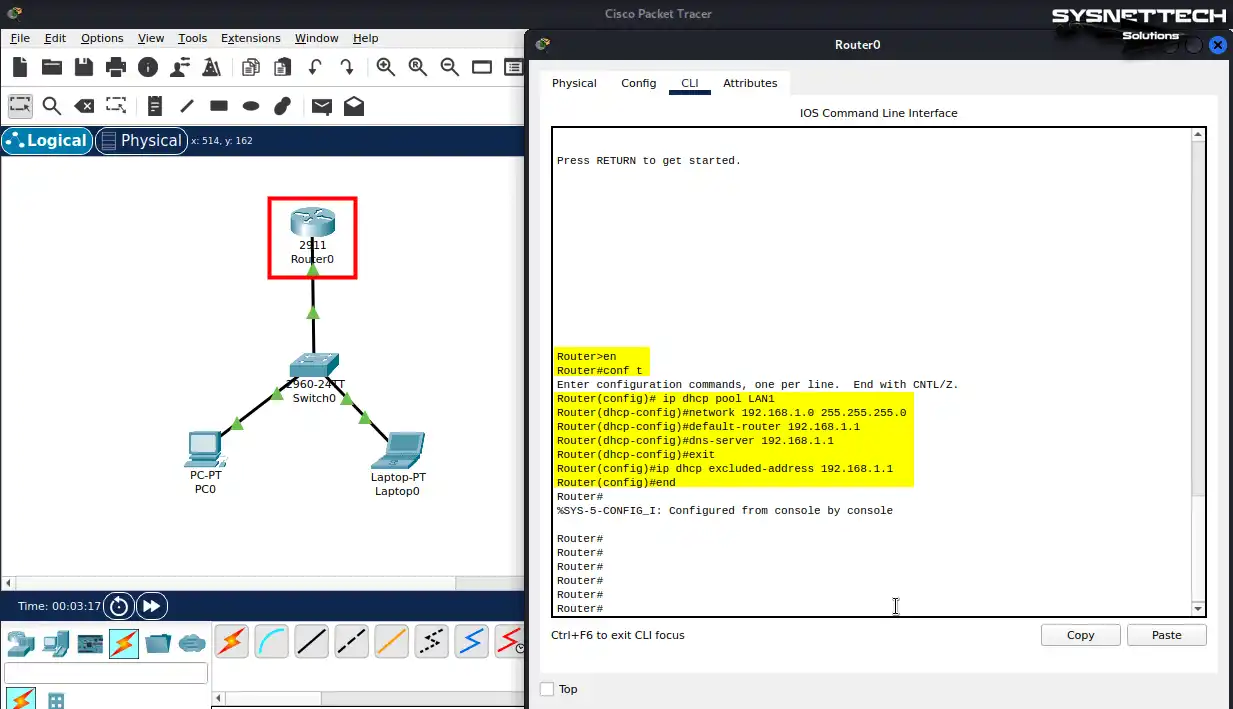
Step 8
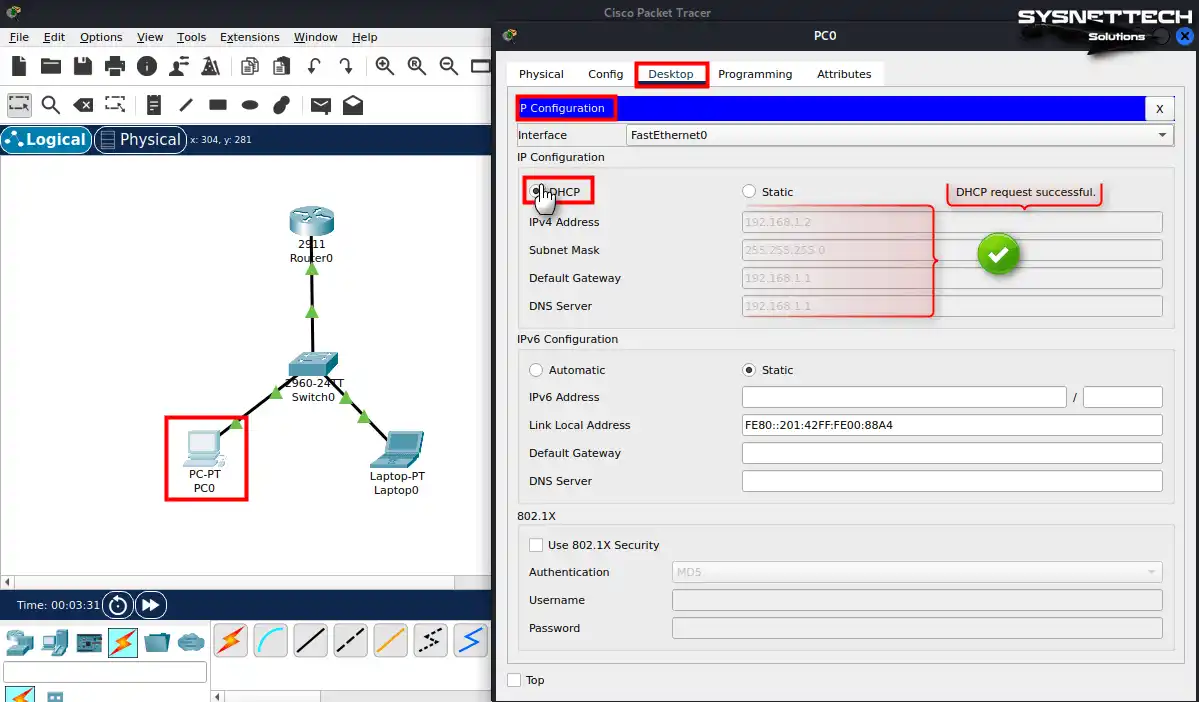
After configuring the DHCP server on the Router, let’s configure the IP of the computers in the workspace.
Click on PC0 and open Desktop / IP Configuration in the window that opens. Change the Static option to DHCP for PC0 to obtain addresses automatically and check that it has received the defined addresses.
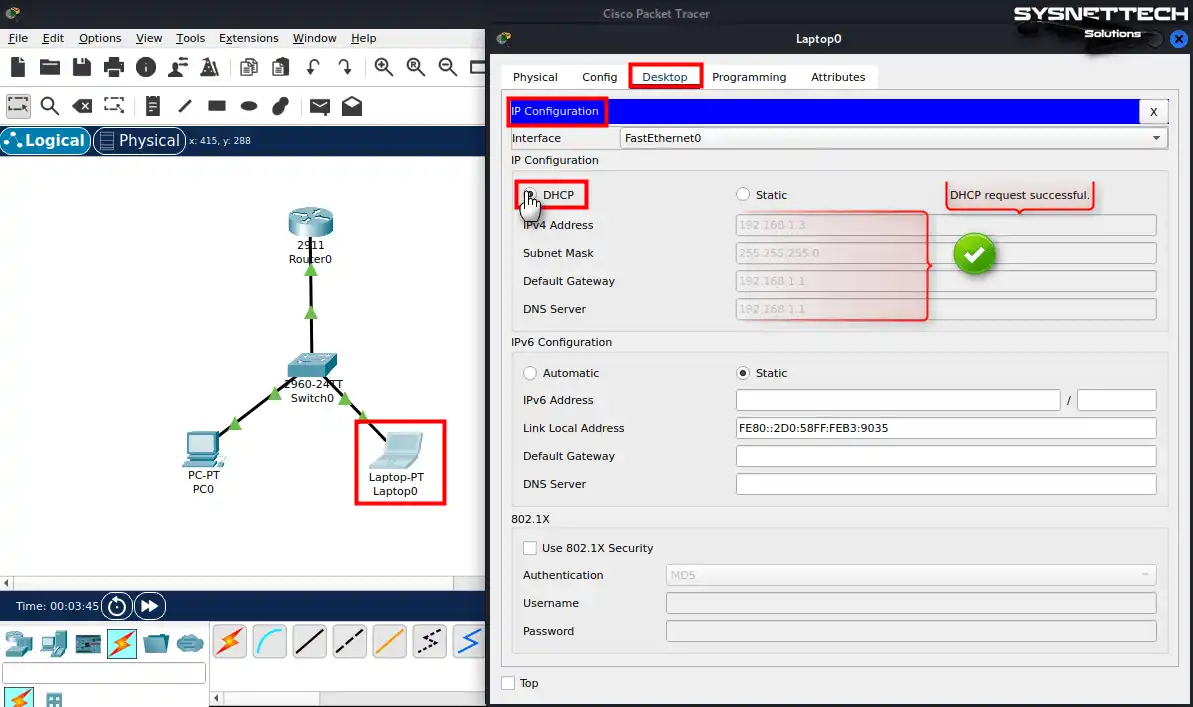
Step 9
Likewise, open the network settings of Laptop0 and check that it gets an address from the defined IP block after enabling DHCP.
Step 10
After the computers on the network successfully get the automatic IP address and other information from the DHCP server enabled on the Router, you need to check the connection between the devices.
After clicking PC0, open Desktop / Command Prompt and test the network connection by pinging the Router and Laptop0.
C:\> ping 192.168.1.1
C:\> ping 192.168.1.3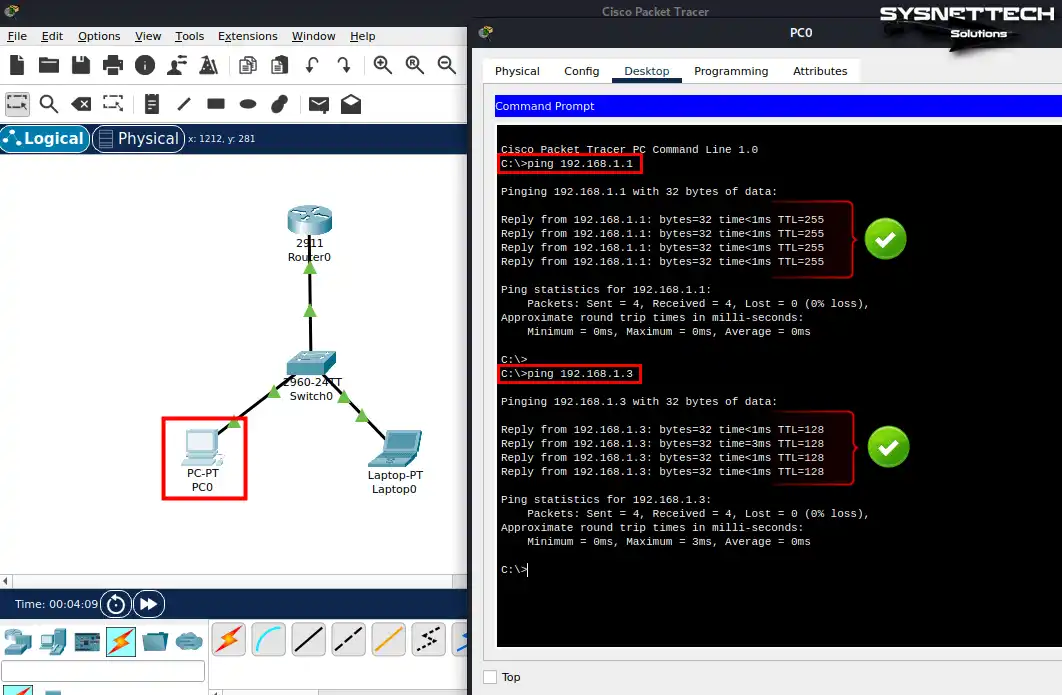
Step 11
Likewise, ping Router0 and PC0 from Laptop0 and test the network connection.
C:\> ping 192.168.1.1
C:\> ping 192.168.1.2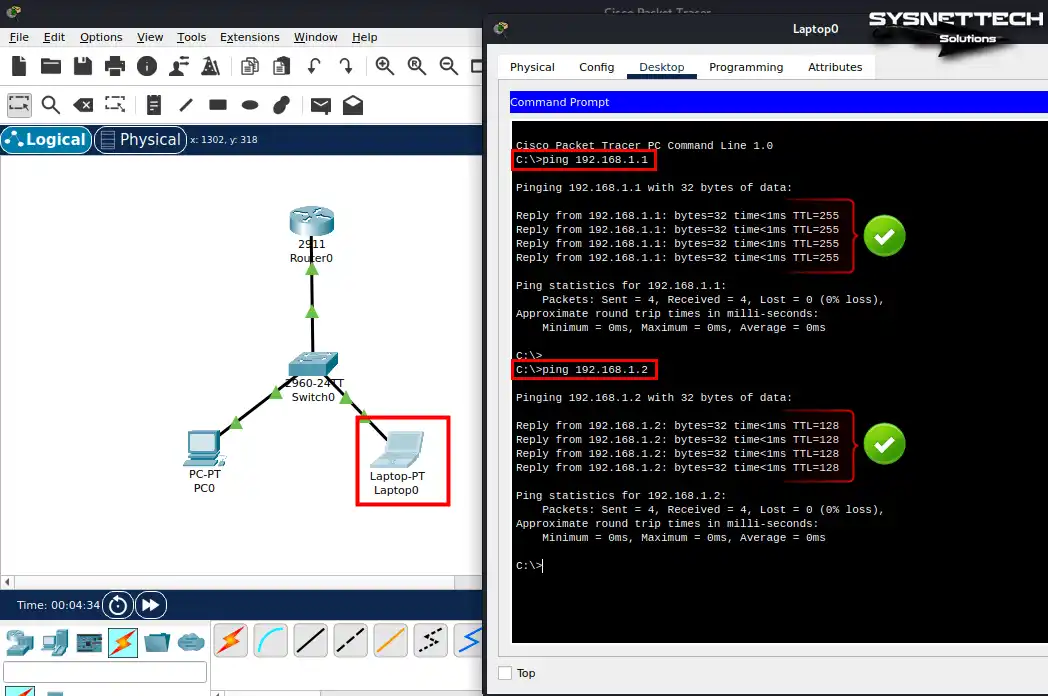
How to Uninstall Packet Tracer from Kali Linux
When you plan to uninstall the Packet Tracer software from your Kali computer, you can quickly do this with the terminal.
Step 1
To thoroughly delete the Packet Tracer program from your system, execute the command below in the terminal.
sudo apt remove packettracer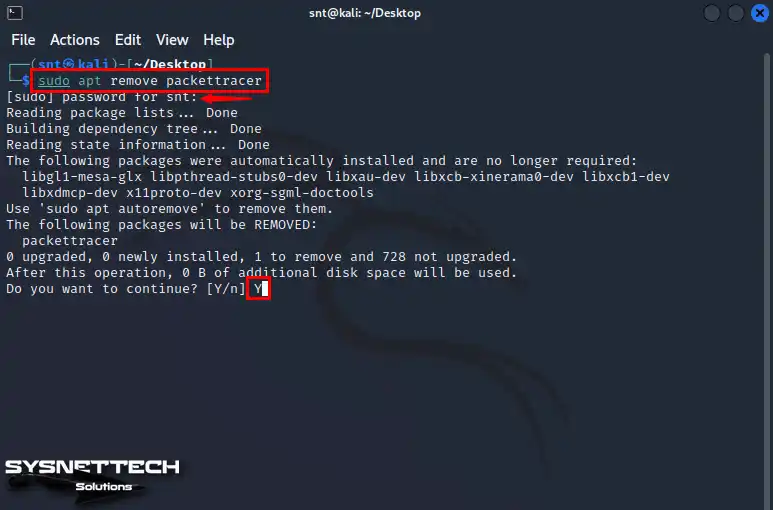
Step 2
Execute the command below in the terminal to delete the desktop shortcut you created in the Kali desktop location.
sudo rm -rf ~/Desktop/cisco-pt.desktop
Step 3
Finally, after uninstalling Packet Tracer, execute the below command to delete dependent patch packages as well.
sudo apt autoremove && sudo apt autoclean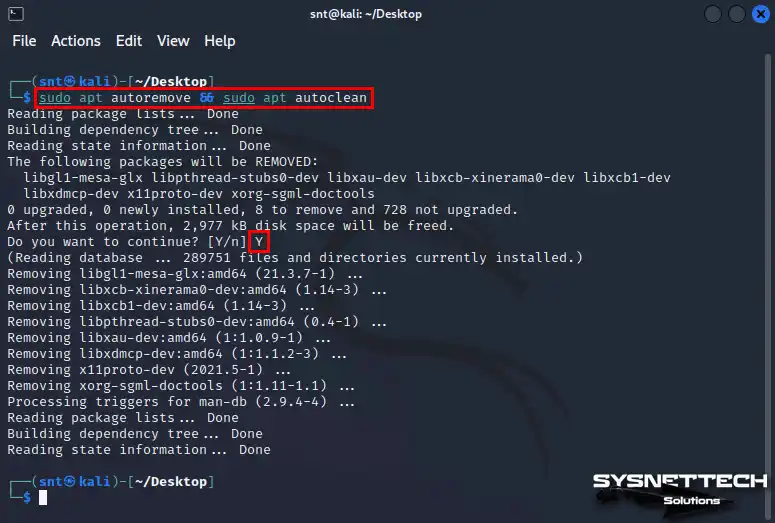
Video
Installing Old Versions
1) Packet Tracer 7.2.2
- After downloading the program to your computer, copy the PacketTracer-7.2.2-ubuntu-setup.run file to the folder you created on the desktop, and then open the terminal in it.
- After configuring the file permission, run the below command in the terminal to start the installation.
./PacketTracer-7.2.2-ubuntu-setup.run
- Do not change the default location in the Installation Folder window, and click the Next button to continue.
- After reading Packet Tracer’s license agreement, accept it and continue by clicking Next.
- Click install to start the installation.
- After completing the installation process, click Finish.
- Type packettracer and press Enter to run CPT in the terminal. If the program cannot start, you need to install its dependent packages.
- Open the Kali sources list with the nano /etc/apt/sources.list command, add the address below to the list, and save the file.
deb https://ftp.debian.org/debian stable main contrib non-free
- Execute the “apt update” command to update the Kali repository list.
apt update
- One of the most critical dependent packages for Packet Tracer is libpng. Run the following command in the terminal to download libpng.
wget http://ftp.us.debian.org/debian/pool/main/libp/libpng/libpng12-0_1.2.50-2+deb8u3_amd64.deb
- Run dpkg -i libpng12-0_1.2.50-2+deb8u3_amd64.deb to start the libpng installation on Kali.
dpkg -i libpng12-0_1.2.50-2+deb8u3_amd64.deb
- While installing libpng, you may get an error like the one below in the terminal because this software requires the multiarch-support package to run. Run the apt install multiarch-support command to install the multiarch package in Kali.
apt install multiarch-support
- After trying to install libpng again, you can see that the Cisco software works fine.
- Click the Confirm Guest button to log in without opening a Cisco login on the software.
- After running Cisco Packet Tracer 7.2.2, you can check the new version in Help / About!
2) Packet Tracer 7.2.1
- Execute the “sudo nano /etc/apt/sources.list” command in the terminal and add the “deb https://ftp.de.debian.org/debian jessie main” repo and press Ctrl + X / Y / Enter to save settings press it.
sudo nano /etc/apt/sources.listdeb https://ftp.de.debian.org/debian jessie main
- After updating the repository list, execute the following commands in order to start the installation.
cd Desktop/mkdir CPT72tar -xvzf Packet\ Tracer\ 7.2.1\ for\ Linux\ 64\ bit.tar.gz -C CPT72/
- Go to the CPT72 folder in the terminal and execute the “./install” command. After the installation starts, press Enter to accept the license agreement.
- For the following steps, complete the installation process by pressing the Enter key.
- To run the program, go to “cd /opt/pt/bin” and execute the “./PacketTracer7” command.
cd /opt/pt/bin./PacketTracer7
- If you get the “libpng12.so.0” error at this step, go to the next step and install the libpng12 package.
sudo apt-get install libpng12-0
- If you encounter the following “libcrypto.so.1.0.0” error after trying to rerun Packet Tracer, follow the steps in this article.
- To create a desktop and start menu shortcuts for the Cisco program, follow the commands below in the order in the terminal.
cp /opt/pt/bin/Cisco-PacketTracer.desktop ~/Desktop/chmod +x ~/Desktop/Cisco-PacketTracer.desktopcp ~/Desktop/Cisco-PacketTracer.desktop /usr/share/applications

7 People Shared Their Experience
Thanks for the illustration, but for now the Cisco Packet Tracer installation file is no longer with the extension .run, now has .deb extension and I’ve tried my best to find a solution but doesn’t work… I’ve tried a command ‘sudo dpkg -i PacketTracer_730_amd64.deb’ but still fails to unpack
Can you please help me with this, I’m Kali user, a bit new to it.
As of recent (Jan 28), Cisco PT has released a new version 8.0. On Feb 24th 2021, Kali released the newest update 2021.1. I was able to successfully install PT 8.0 on the newest distribution of Kali in the following order.
1. Download PT 8.0 from Cisco
2. Open terminal and enter the following: $ sudo apt-get install /home//Downloads/PacketTracer_800_amd64_build212_final.deb
Note: The ‘user’ should be replaced with your username, and without the parameters , and your download filepath may not be the same as mine; otherwise, this method worked for me, as I hope it works for you.
Edit: remove double backslash between home & Downloads, and use only one.
the packet tracer location was changed to https://www.netacad.com/portal/node/488
You are son amazing I really appreciate
Thanks, bro!
I’m having trouble installing 8.2.2, when trying to fix the missing packages it removes packettracer instead of installing the packages and when i try to do it manually i get an “no installation candidate” error. help is greatly appreciated