
Do you want to use Packet Tracer on Ubuntu, a prevalent type of Linux? This software helps you practice and get better at networking. If you do, we’ll show you how to install the Cisco simulator software on Ubuntu in this easy-to-follow guide.
If you like learning about computer networks, you might be getting ready for Cisco exams. In the Packet Tracer software, you can practice the topics from the exam syllabus. This helps you learn how to plan, set up, or fix a network.
It doesn’t matter if you know a lot or a little about this stuff. So, you can use this tool to get better at computer networks in a more advanced way.
How to Install Packet Tracer 8.2.0 on Ubuntu 22.04, 22.10, 23.04, or 23.10
People getting ready for Cisco exams like to use Packet Tracer (PT) to begin. They begin by installing this network software on Windows, Linux, and macOS systems to create network designs. While it’s simple to install on a Windows PC, it is more challenging on Linux systems.
You can install the Cisco network simulator software or any program on Ubuntu. But you need to know a few simple terminal commands. For instance, when adding a program on Linux, you might have to get some extra packages.
In the older versions of Packet Tracer, like 7.1, the setup files ended with .tar.gz. But in version 7.2, they changed it to .run. Now, in the latest version (8.2), the setup file is .deb.
In Packet Tracer 8, there are different things you can do with network devices in your project. One of them lets you see and control them on your computer like they’re genuine. It also enables you to connect them using a network controller.
How to Download and Install Packet Tracer
Before you install the Cisco network simulator, you need to sign up on the Netacad website. After that, you can begin the setup by getting the software for Linux systems.
Step 1
To begin, open the web browser on your Ubuntu computer. Next, visit the Netacad website. Put in your username and password on that page, and then click “log in.”
Now, click on “Resources” on the Cisco Networking Academy homepage. Then, choose “Download Packet Tracer” from the list that drops down.

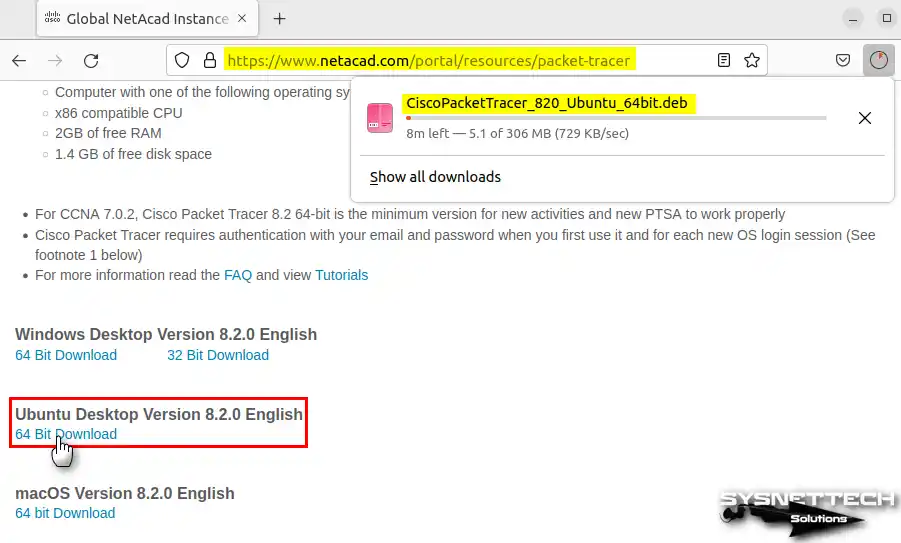
Step 2
After scrolling down the webpage a little, you will see “Ubuntu Desktop Version 8.2.0 English”. Here, click on the 64 Bit Download link.
Then, save the CiscoPacketTracer_820_Ubuntu_64bit.deb file to your PC.
Step 3
Take a look at the Packet Tracer file with the “.deb” ending that you downloaded. Now, to install it, first press CTRL + Alt + T to open the terminal.
Now, type in the command “cd ~/Downloads” to go to the right place.
Lastly, type in the command “sudo dpkg -i CiscoPacketTracer_810_Ubuntu_64bit.deb” in the terminal. This will kick off the installation of the deb package right away. But remember, you have to enter the password for your Ubuntu system’s root account.
sudo dpkg -i CiscoPacketTracer_820_Ubuntu_64bit.debNOTE: You can install the PacketTracer.deb package using this command.
sudo apt install ./CiscoPacketTracer_820_Ubuntu_64bit.deb
Step 4
Accept the license agreement by pressing Enter in the Configuring Packet Tracer window. If you have any questions, you can visit Cisco’s official website, which is in the description.

Step 5
Likewise, on this screen, you must accept the EULA terms of the software. That is, read the license terms and press Enter on Yes to confirm these terms as well.

Step 6
When we install Deb files on Linux systems, we use the dpkg command. This command takes the files from the deb archive and installs them. But sometimes, you might have to install other packages when installing in Packet Tracer.
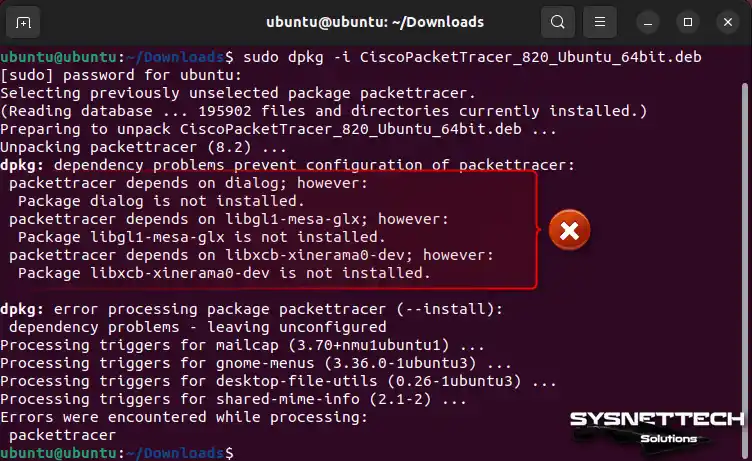
Step 7
When you unpack the Packet Tracer, you’ll see it needs some packages, like the ones in the picture. To solve this, use the “sudo apt install -f” command.
Then, confirm the necessary packages, such as libgl1-mesa-glx or libxcb-xinerama0-dev. To do this, answer the question in the console with Y and then press Enter.
sudo apt install -f
Step 8
You got the needed packages for Packet Tracer 8.2 from Linux servers, and you’ve installed them. To begin, use the “packettracer” command in the terminal to run the simulator software.
packettracer
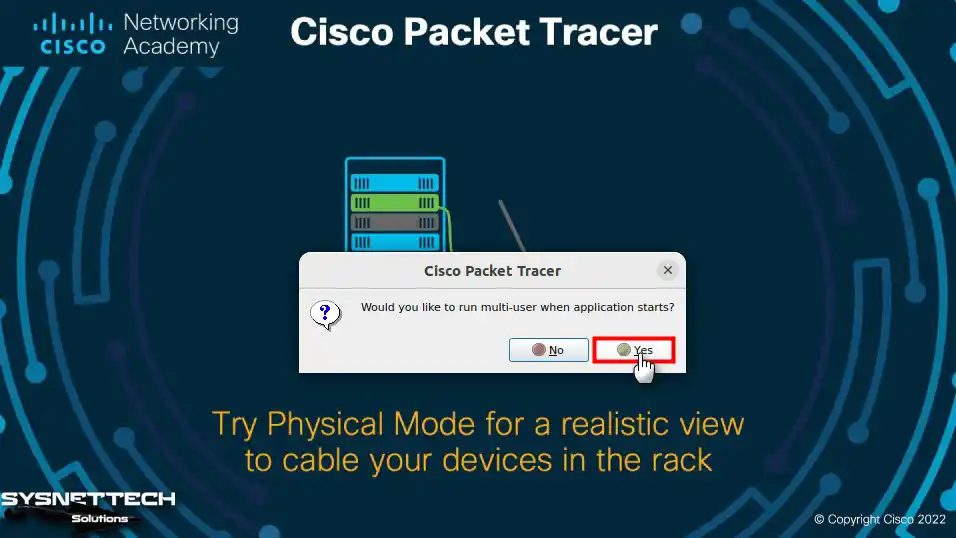
Step 9
You can experience the networks of different structures you create in your simulator on more than one PC. That is, it means you connect with software that’s running on the same computer or a different one.
This is where you can use this great feature, “multi-user.” If you need this and want it to be active every time you start the application, click Yes.
Step 10
In older versions of Packet Tracer, you were allowed to save up to 3 projects. This was typically for users who chose not to log in. But in new versions, you now have to log in to Netacad.
In this step, you might see an error when you try to log in to Netacad. This error usually happens when the login screen is black or white. If you can’t log in, try turning off your internet for a bit. If that doesn’t help, you’ll need to make a permanent fix by editing the cisco-pt.desktop file.
To fix the PT login problem, open the terminal. Then, enter the command “sudo nano /usr/share/applications/cisco-pt.desktop”. Take a look at the content of the Cisco-pt.desktop. In essence, change the Exec value to the following values.
Change (Exec=/opt/pt/packettracer %f)
To (Exec=/opt/pt/packettracer --no-sandbox %f)
Step 11
As soon as you hit on Cisco Networking Academy, type in the email you used to sign up and click Next.

Step 12
Finally, type your Netacad account passcode and click Log in.

Step 13
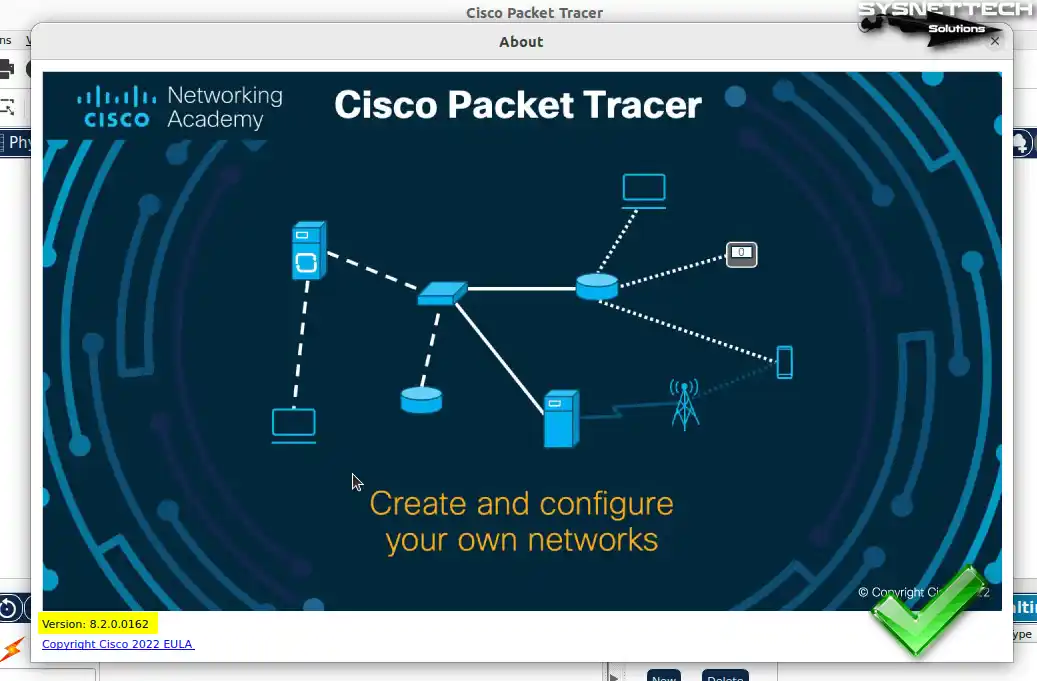
Now, checking if you have the newest Packet Tracer version is an extra thing to do. To see the version, click Help / About, and you’ll find the version number.
How to Create a Desktop Shortcut
You’ve installed the Cisco Packet Tracer on Ubuntu successfully. But there are a few settings to fix. After you finish, you won’t see a shortcut on the desktop. So, you have to copy the PT shortcut to the applications, which is the desktop.
Step 1
You can quickly copy the PT shortcut from applications to the desktop. Just type in the command below in the terminal to create a desktop launcher.
cp /usr/share/applications/cisco-pt.desktop ~/Desktop/
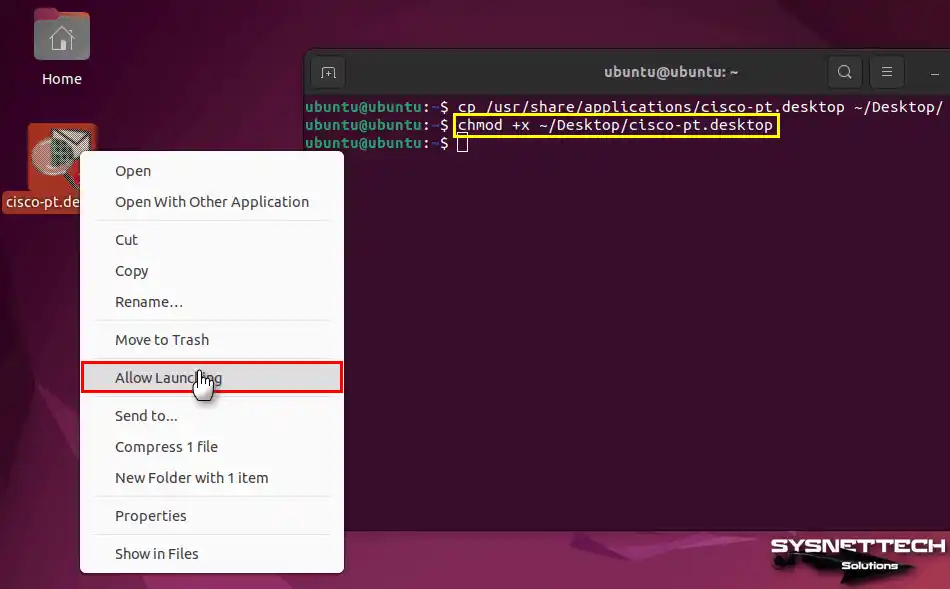
Step 2
After copying the shortcut, execute the command “chmod +x cisco-pt.desktop” to make the file executable.
chmod +x ~/Desktop/cisco-pt.desktopIf the Packet Tracer desktop shortcut is still not active, you should allow it. To do this, right-click on it and click Allow Launching. After this process, you will see that the desktop shortcut is active.
How to Create a New Project
After running in Packet Tracer, you can start making new projects to get ready for your Cisco exams. This way, you can study different network setups and get a better grasp of network protocols.
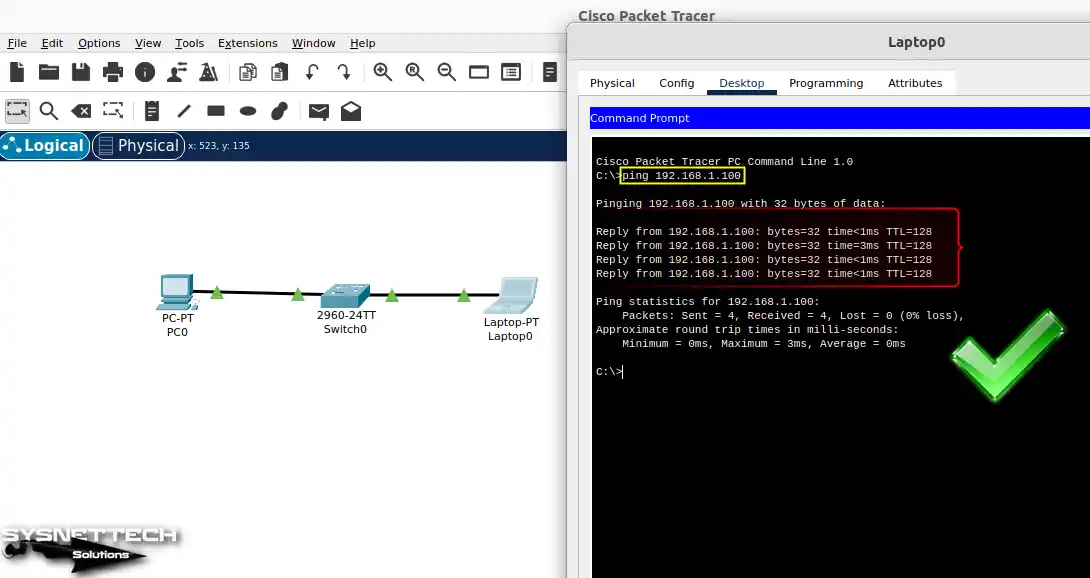
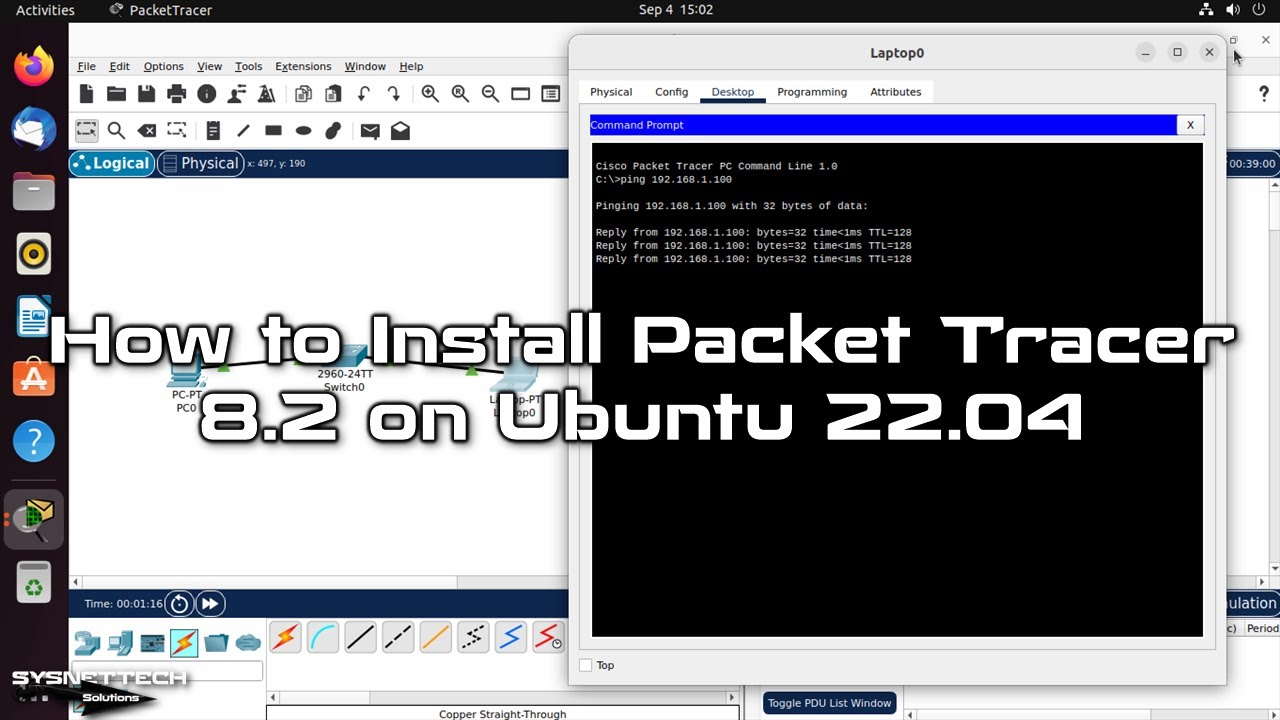
For example, let’s connect a desktop computer and a laptop computer to a Cisco Switch.
Step 1
Now, let’s add some devices to the workspace. First, click on end-user devices from the Device categories. Here, you will see devices such as PCs, Laptops, Servers, phones, or TVs. From here, add a PC and a Laptop to your project.

Step 2
Of course, you should add a Switch to establish a network connection between the PC and the Laptop. Click on the Switch group from the Network Devices category. Then, add the 2960 Switch to the workspace between both devices.

Step 3
Click on the cabling option to link the computers you added to the Switch. Then, choose the Automatically Choose Connection Type option.

Step 4
After cabling the computers to the Switch, click PC0. Then, click IP Configuration on the Desktop tab.

Step 5
Type the static IP address 192.168.1.100 in the FastEthernet0 interface of PC0. Also, enter 255.255.255.0 in the Subnet Mask section.

Step 6
Likewise, configure Laptop0’s IP as 192.168.1.200 / 255.255.255.0.

Step 7
Now, open Command Prompt to ping PC0 from Laptop0.

Step 8
Execute the ping 192.168.1.100 command from Laptop0 to PC0. So, through this process, you will ping and test the network connection.
Step 9
Likewise, run ping 192.168.1.200 at the command prompt of PC0. So, check the connection by pinging Laptop0.

How to Uninstall Packet Tracer from Ubuntu
Suppose, for some reason, you’re using different software. In that case, consider removing Packet Tracer from your Ubuntu computer. If you want to do this, you can use a simple command in the terminal.
Step 1
Open Terminal and type in the command “sudo apt remove packettracer”. You will see some extra packages installed, but no longer necessary. To get rid of all these, type Y and hit Enter.
sudo apt remove packettracer
Step 2
Also, remove the desktop shortcut you made for Packet Tracer.
sudo rm -rf ~/Desktop/cisco-pt.desktop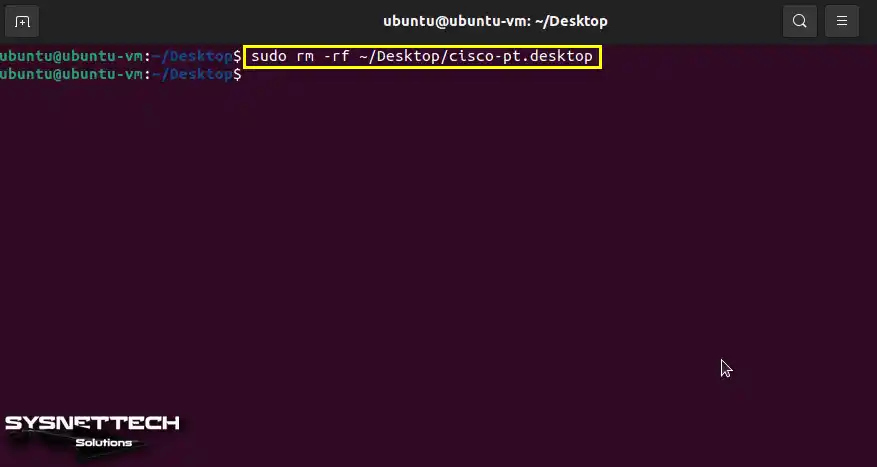
Step 3
Finally, after removing a program in Ubuntu, you should delete the unnecessary files from the installed packages. This helps prevent your system’s cache from getting too big. Now, type in the command below to clean up those leftover files.
sudo apt autoclean && sudo apt autoremove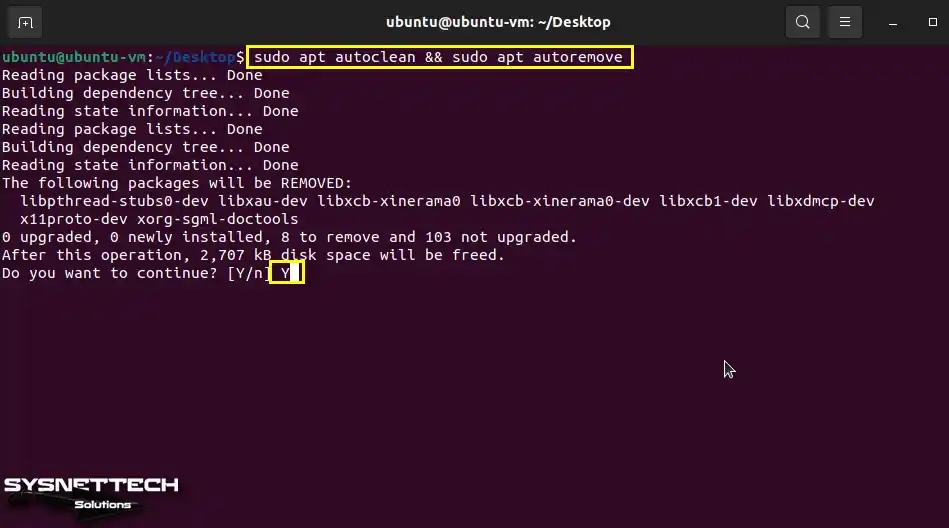
Video
Installing Old Versions
Cisco Packet Tracer 7.2.2
- To install Packet Tracer, first run and open the terminal. Then, change the permission of the file with the chmod command as follows. Then, start the installation process with the ./PacketTracer-7.2.2-ubuntu-setup.run command.
chmod +x PacketTracer-7.2.2-ubuntu-setup.run
./PacketTracer-7.2.2-ubuntu-setup.run
- When the PT Setup Wizard window shows up, click the Next button to start the installation.
- In the Installation Folder window, you’ll notice an option already chosen by default. Just keep going without making changes; stick with the /opt/pt/ location.
- In the License Agreement window, agree to the PT license and click the Next button.
- In the Ready to Install window, you need 307.58 MB of disk space for installation. Click the Install button to confirm this disk space requirement.
- As soon as you click the Install button, it will ask for the authorized password for your sudo account. Here, type your account’s root password and continue with OK.
- Wait as the computer copies the files needed for Packet Tracer.
- Once the Wizard finishes installing, start the program by clicking the Finish button.
- Try to open the simulator by executing the packettracer command in the terminal. In this case, you will receive an error for PT. The cause of this error is dependent packages that are not installed on your Linux system. That’s why one of the indispensable packages is Libpng. Now, use the commands below to download and install Libpng.
wget https://ftp.us.debian.org/debian/pool/main/libp/libpng/libpng12-0_1.2.50-2+deb8u3_amd64.deb
sudo dpkg -i libpng12-0_1.2.50-2+deb8u3_amd64.deb
- You need to install the multiarch package as well. Also, install the Multiarch package in Ubuntu.
wget https://archive.ubuntu.com/ubuntu/pool/main/g/glibc/multiarch-support_2.29-0ubuntu2_amd64.deb
sudo dpkg -i multiarch-support_2.29-0ubuntu2_amd64.deb
- This time, you will receive the error (unable to install the new version of ‘/usr/lib/x86_64-linux-gnu/libpng12.so.0’: No such file or directory). Now, extract the deb package to the folder and copy the libpng12.so.0 files to /opt/pt/bin/.
mkdir cpt; dpkg -x libpng12-0_1.2.50-2+deb8u3_amd64.deb ./cpt
cp ./cpt/lib/x86_64-linux-gnu/libpng12.so.0 /opt/pt/bin/
- After fixing the libpng12.so.0 error, rerun the same command. Then, complete the installation and use “packettracer” to test.
- After setting up PT 7.2.2, a shortcut doesn’t show up on its own. You’ll need to create it manually.
cp /opt/pt/bin/Cisco-PacketTracer.desktop /home/user/Desktop/
chmod +x Cisco-PacketTracer.desktop
Packet Tracer 7.2.1
- Open the terminal by hitting the CTRL + Alt + T keys, and unzip the Packet Tracer.tar file into the folder.
mkdir CPT72
tar -xvzf Packet\ Tracer\ 7.2.1\ for\ Linux\ 64\ bit.tar.gz -C CPT72
- Use the command below to run the install file in the CPT72 folder. After that, press Enter to finish the installation.
./install
- Execute the cd /opt/pt/bin/ command in the terminal to go to the installation location, and then execute the ./PacketTracer7 command to run the program. If the program cannot start, you need to install libpng12.
.wget http://ftp.us.debian.org/debian/pool/main/libp/libpng/libpng12-0_1.2.50-2+deb8u3_amd64.deb
dpkg -i libpng12-0_1.2.50-2+deb8u3_amd64.deb
- Once you install the needed package, rerun the command ./PacketTracer7.
- Now, go to the /opt/pt/bin/ folder to make a desktop shortcut. Then, copy the Cisco-PacketTracer.desktop file like this.
- Type the command “gedit Cisco-PacketTracer.desktop” in the terminal and press Enter.
- Change the Exec section in the file to /opt/pt/packettracer and save the file.
- Use “chmod +x Cisco-Packet Tracer.desktop” to make the desktop shortcut executable.
- For the start menu shortcut, copy it to /usr/share/applications.
sudo mv Packet\ Tracer\ 7.2.1.desktop /usr/share/applications
- Double-click on the file to run PT 7.2.1. After that, click on the Trust and Launch button in the window that opens.
Packet Tracer 7.1.1
Running the 7.1.x (7.1.1) versions of Packet Tracer on Linux are almost the same as the steps above. But, as we said, you may need to install different dependent packages for the program. So, download and install the dependent packages for version 7.1.1 using the commands below.
sudo apt-get install libqt5webkit5 libqt5multimediawidgets5 libqt5svg5 libqt5script5 libqt5scripttools5 libqt5sql5wget https://mirrors.kernel.org/ubuntu/pool/main/i/icu/libicu52_52.1-3ubuntu0.8_amd64.debsudo dpkg -i libicu52_52.1-3ubuntu0.8_amd64.debwget https://ftp.debian.org/debian/pool/main/libp/libpng/libpng12-0_1.2.50-2+deb8u3_amd64.debsudo dpkg -i libpng12-0_1.2.50-2+deb8u3_amd64.deb
Installing Old Versions > Video
| Ubuntu & PT Version | YouTube Video / Slide |
|---|---|
| 16.10 & 7.0 | Watch |
| 17.04 & 7.0 | Watch |
| 17.10 & 7.1 (With Wine) | Watch |
| 17.10 & 7.1.1 | Watch |
| 18.04 & 7.1.1 (With Wine) | Watch |
| 18.10 & 7.2.1 (With Wine) | Watch |
| 18.10 & 7.1.1 (With Wine) | Watch |
| 18.10 & 7.1.1 | Watch |
| 19.10 & 7.2.2 | Watch / Slide |
| 20.10 & 8.0 | Watch / Slide |
| 21.10 & 8.1.0 | Watch / Slide |
| 22.04 & 8.1.1 | Watch / Slide |
| 22.04.1 & 8.2.0 (NEW) | Watch |
Conclusion
In short, installing Packet Tracer on your Ubuntu system was very easy, as you saw. It will help you get ready for Cisco tests and grow your network smarts. This way, you can boost your network skills with this practice tool.
In these steps, I gave simple, one-by-one orders for both new and old types. This way, you can finish the setup job easily, no matter which type you pick.
With this strong practice tool, you can work in a safe space. You can test fix-it cases by trying different network plans.
In short, finding the parts of Packet Tracer will help you get good at running and planning networks on your learning path.
While working on fake networks, you will get better by learning the right ideas during your study time.
Also, we have guides that let you easily add the Cisco practice tool to other systems. For one, be sure to see our guide for installing Packet Tracer on openSUSE. Just like the OS we set up, you can keep working on SUSE.

9 People Shared Their Experience
Hello Sysnettech solutions, am getting the following error: Connecting to archive.ubuntu.com (archive.ubuntu.com)|2001:67c:1360:80:01::24|443… failed: Network is unreachable. While trying to install the multiarch package for PT 7.2.2
There seems to be a problem with his network. If you cannot download and install the multiarch package from Ubuntu servers, manually download and install it here.
Can you show us how to install Packet Tracer in ubuntu 20.04, please!
This article was of a great help .
Thanks to the author for covering all the steps in detail leaving no ambiguity in the user.
Thanks again !!
You’re welcome. Thanks for your comment.
Good tutorial. Can you make other to install proteus 8 professinnal in ubuntu 22.04?
Tank for this helpful tutorial.
Thank you very much!
You’re welcome, Adriana!