

In this article, we will examine how to set up and use the Cisco Packet Tracer 8.2 (8.2.0) simulator program on Linux Mint 21 Vanessa distribution for people or students who are preparing for Cisco Routing or Switching exams or who want to improve themselves in computer networks.
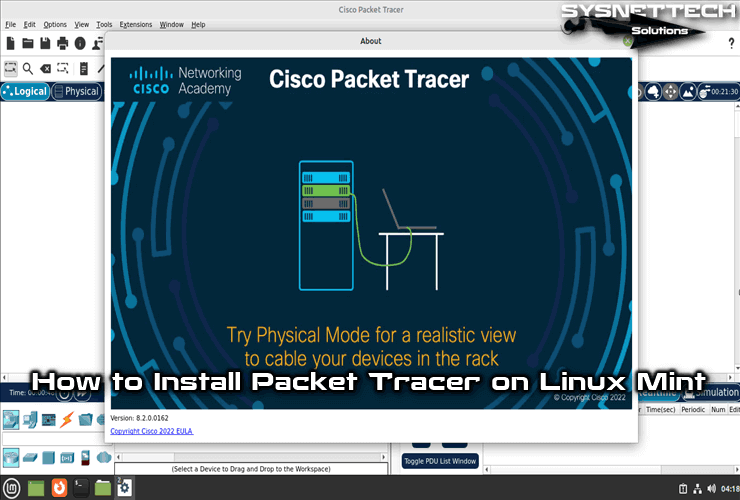
How to Install and Use Packet Tracer Network Simulator on Linux Mint 21 Vanessa
As you know, the latest version of Packet Tracer, one of the most popular network simulation programs used to prepare for Cisco exams, was recently published by Cisco Networking Academy.
You can easily install and use the Packet Tracer network simulator program developed by Cisco on Linux distributions instead of Windows operating systems.
The latest version of the Packet Tracer network simulator program is 8.2.0. You can download this version from the Netacad.com official site. If you do not have an account, see Creating a Cisco NetAcad Account to create a new account.
If you are using a Microsoft Windows-based system, I recommend checking out our guide to installing Packet Tracer on your PC.
How to Download and Install Packet Tracer
You can also easily install it on Linux distributions such as Linux Mint, Ubuntu, or Debian. After determining your system preference, you should download the Cisco simulator software to your computer.
If you want to get it from our site, you can visit our Packet Tracer download guide. Alternatively, you can also download it from the official website after creating a new account on NetAcad and logging in.
Step 1
To obtain the new version of Cisco software, visit the NetAcad website. Then, click on the Login option, as shown in the image below.

Step 2
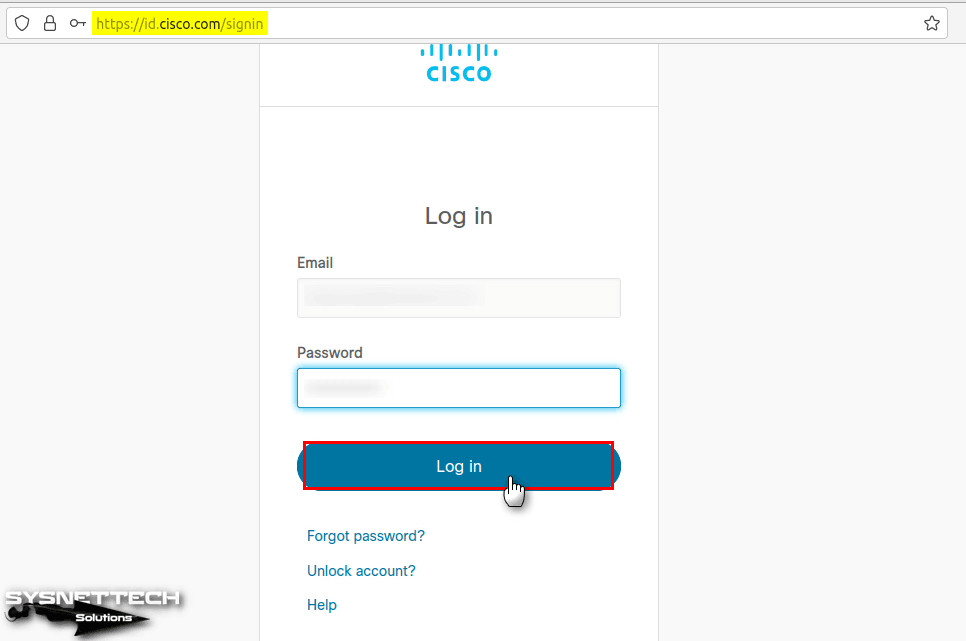
You need a Cisco account to log in to the NetAcad website. Therefore, you will be redirected to Cisco’s login webpage.
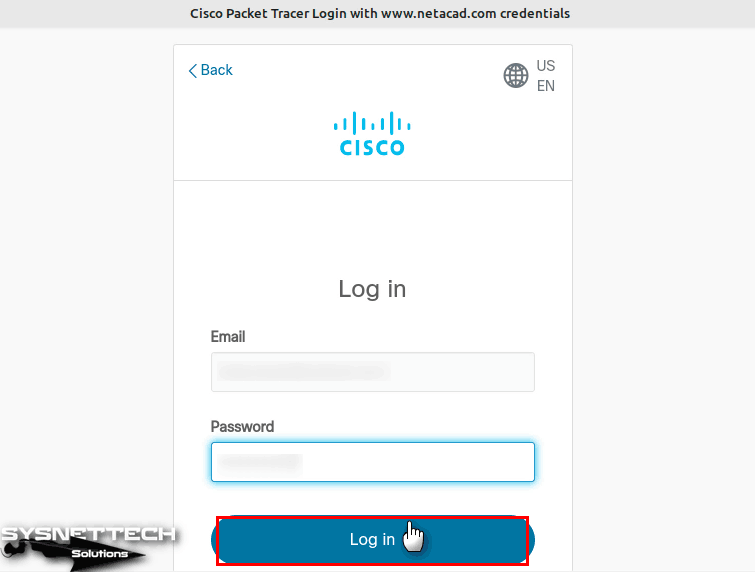
After typing your e-mail address and password for which you created the Cisco account, click the Login button.
Step 3
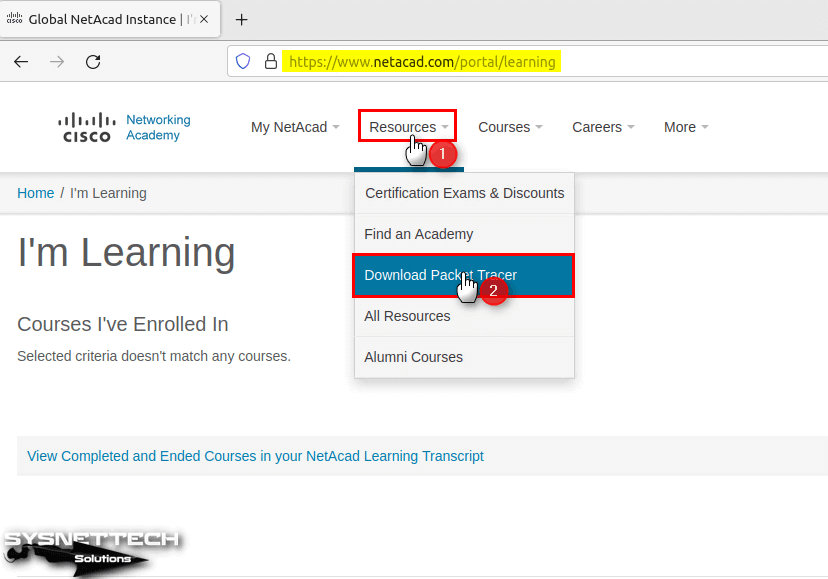
After logging in to Cisco Networking Academy, click Resources / Download Packet Tracer from the menu.
Step 4
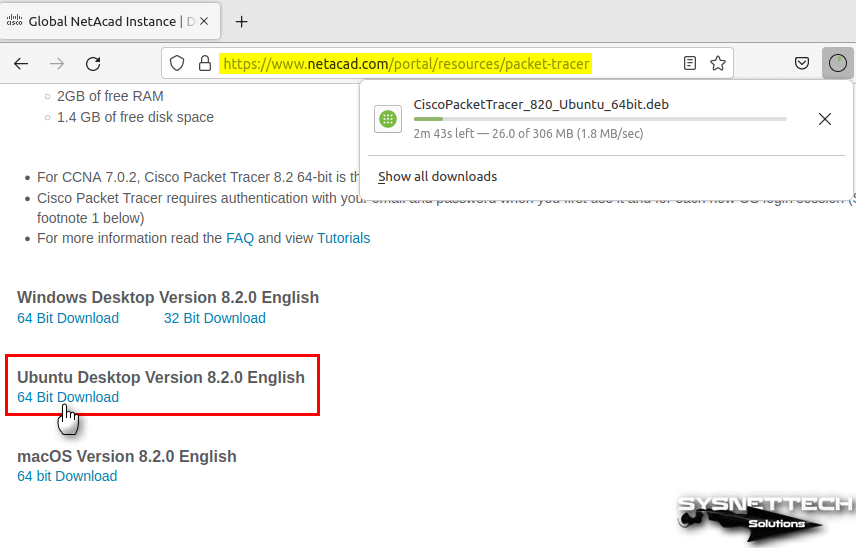
After scrolling down the webpage a bit, click on the “64-bit Download” option under “Ubuntu Desktop Version 8.2.0 English” and save the .deb package.
Step 5
After downloading the Packet Tracer.deb package to your computer, open the terminal by pressing Ctrl+Alt+T in the Downloads location and execute the “sudo apt update” command to update the software package list according to the configured resources.
sudo apt update
Step 6
You can use the “ls” command in the terminal to list the files in the Downloads directory. Execute the command “sudo dpkg -i CiscoPacketTracer_811_Ubuntu_64bit.deb” to install the package with the .deb extension you downloaded.
sudo dpkg -i CiscoPacketTracer_820_Ubuntu_64bit.deb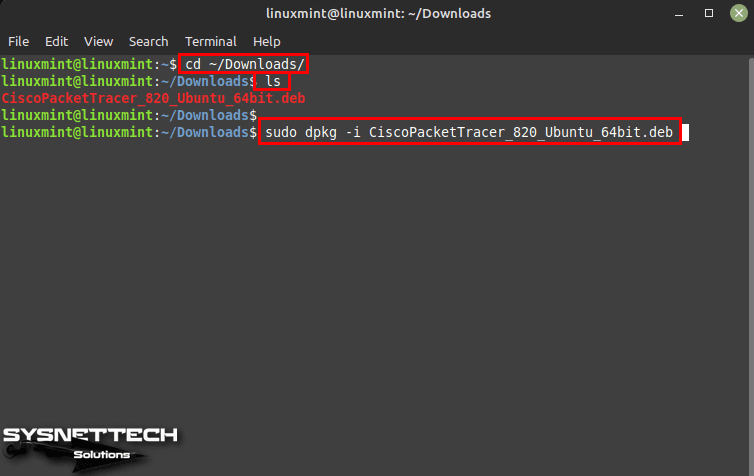
Step 7
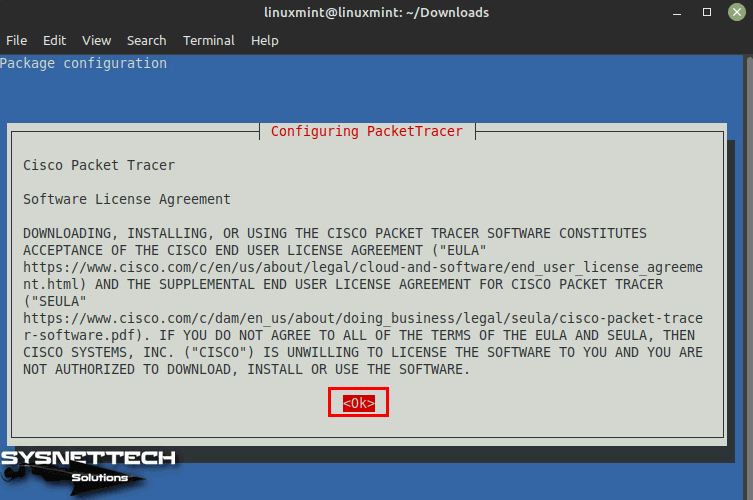
When the Configuring Packet Tracer window opens, press Enter to accept the license agreement of the simulator software.
Step 8
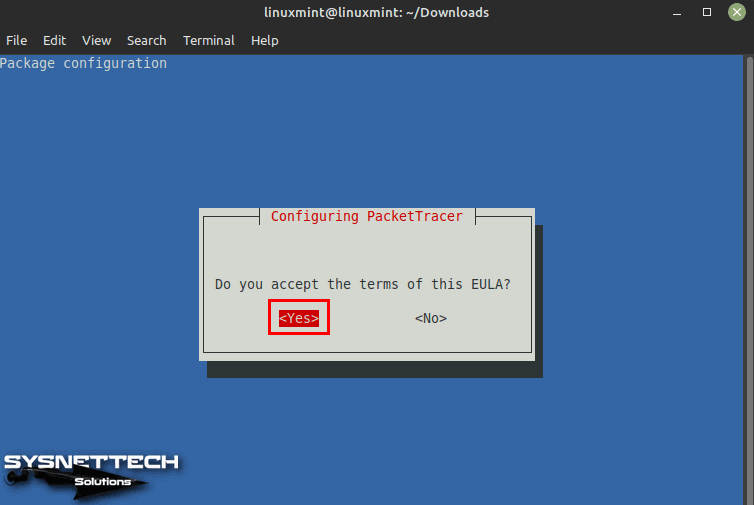
Press Enter to accept the EULA license terms for Cisco Packet Tracer.
Step 9
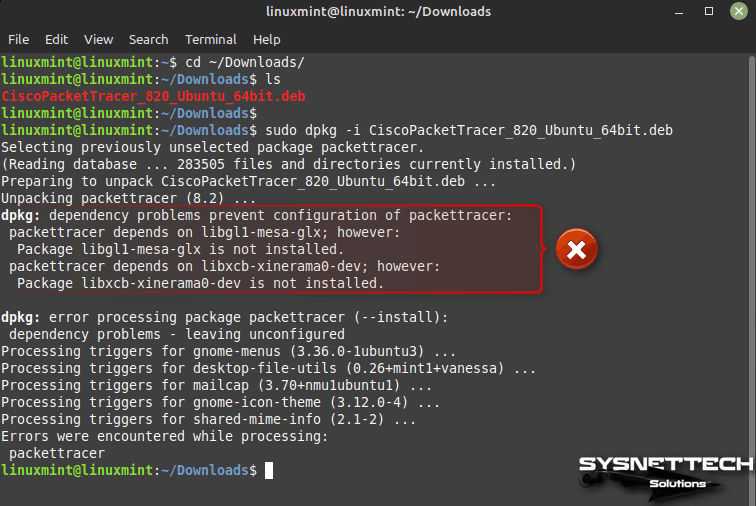
Once the installation is complete, you will not be able to run Packet Tracer because it requires the installation of its dependent packages. Go to the next step to install the necessary software for the Cisco simulator.
Step 10
To force the discovery and installation of dependent packages from repository addresses, execute the “sudo apt install -f” command in the terminal and confirm additional disk usage.
sudo apt install -f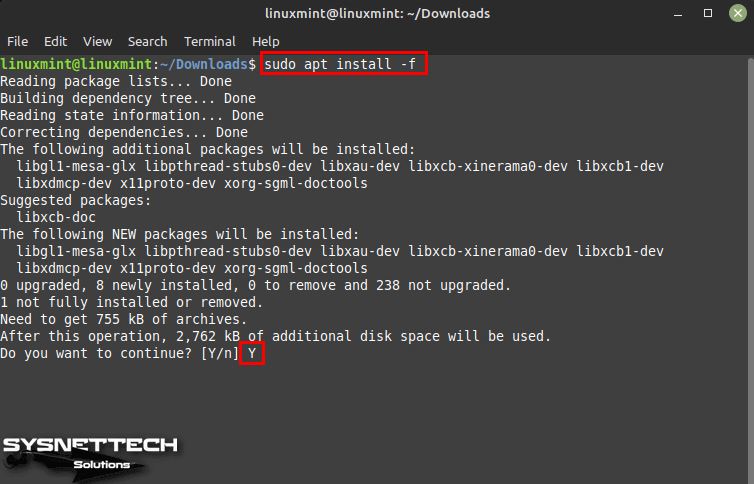
Step 11
After installing the necessary packages, execute the “packet tracer” command in the terminal to run the program.
packettracer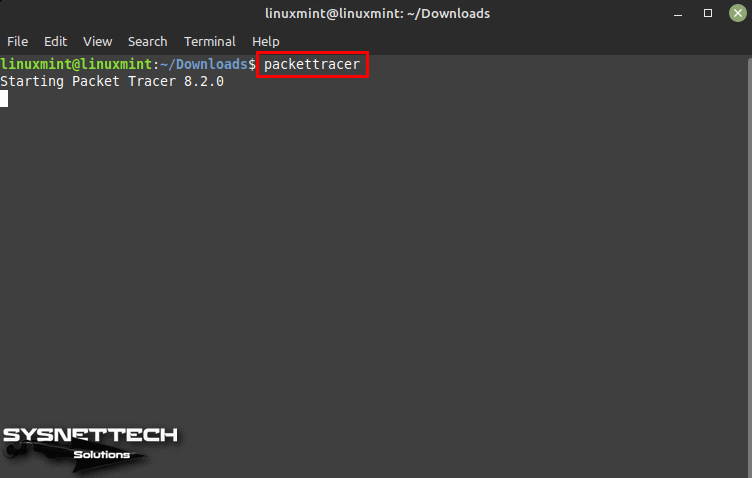
Step 12
Click Yes if you want the multi-user feature to be active every time you start Packet Tracer.
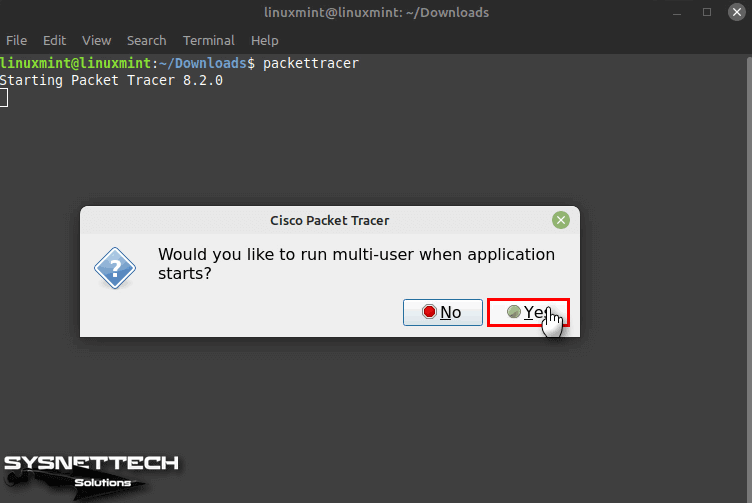
Step 13
When the Cisco Packet Tracer Login window opens, click Networking Academy.
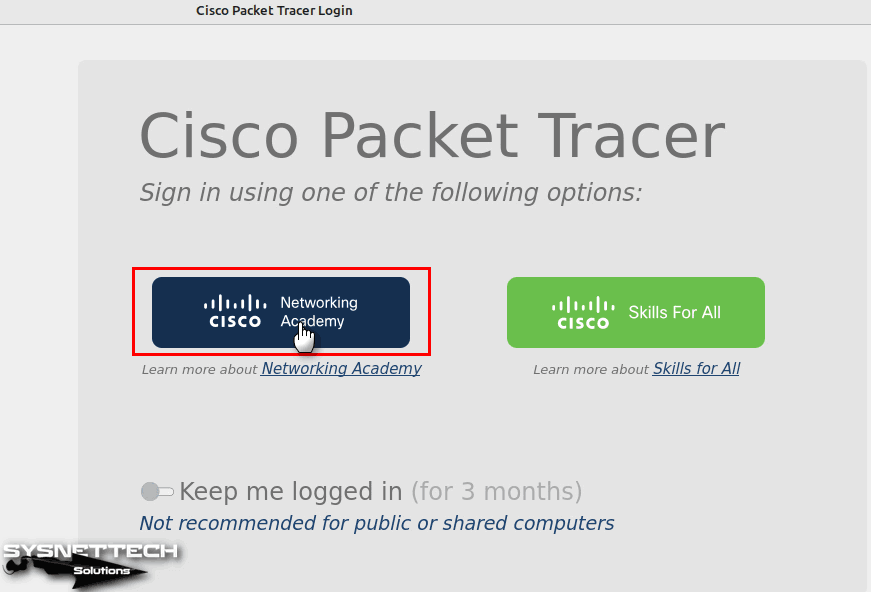
Step 14
Re-type your Netacad account information and log in.
Step 15
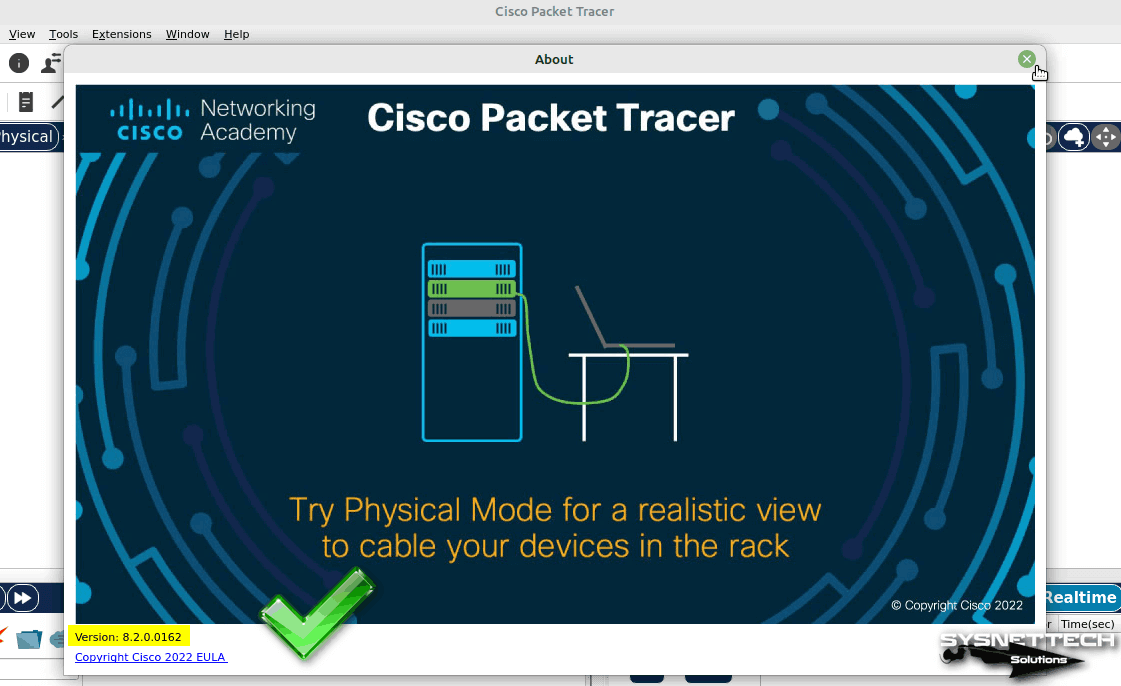
You can now start using Cisco networking software on your Linux computer. You can determine the version of the program by clicking the Help > About option from the tool menu.
How to Create a Desktop Shortcut
You can access the program faster by creating a desktop shortcut for Packet Tracer.
Step 1
To create a shortcut for the Cisco simulation program, execute the following commands in the terminal to assign executable permission.
cp /usr/share/applications/cisco-pt.desktop ~/Desktop/
chmod +x ~/Desktop/cisco-pt.desktop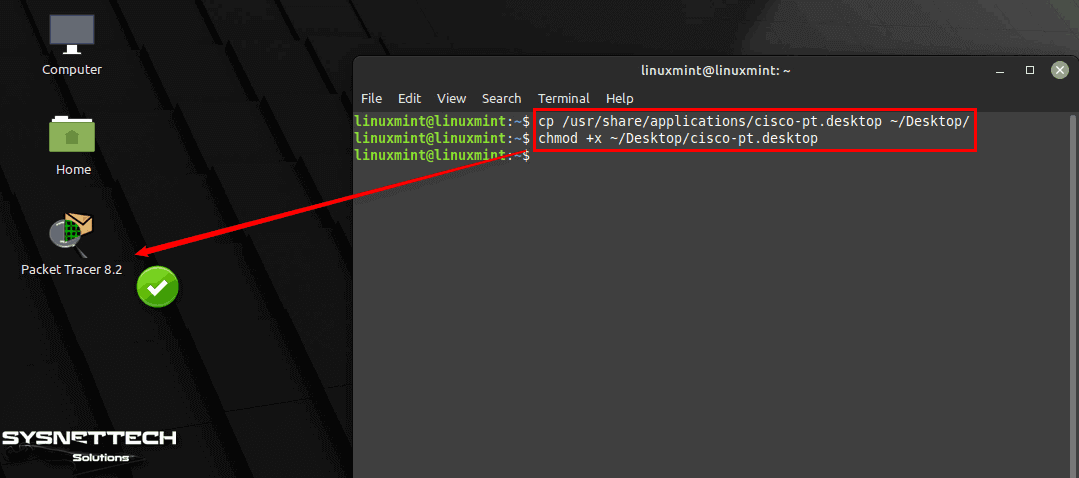
Step 2
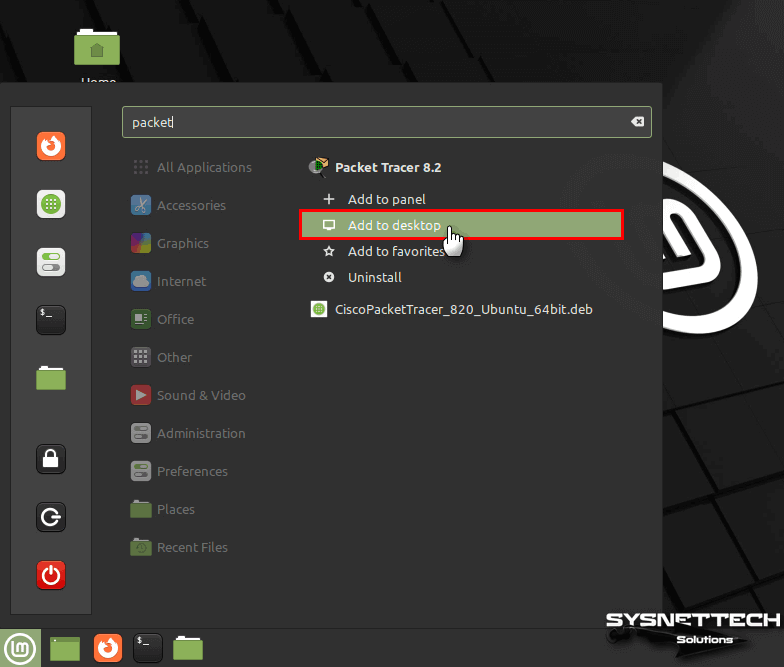
You can easily create a desktop shortcut from the start menu without using a terminal. To do this, locate the program, right-click on it, and then select ‘Add to Desktop’.
How to Install Packet Tracer with User Interface (GUI)
You can install any program on Linux Mint using the terminal or the graphical user interface (GUI). For example, to establish the deb package, you can double-click on it to open the wizard and install your software.
Step 1
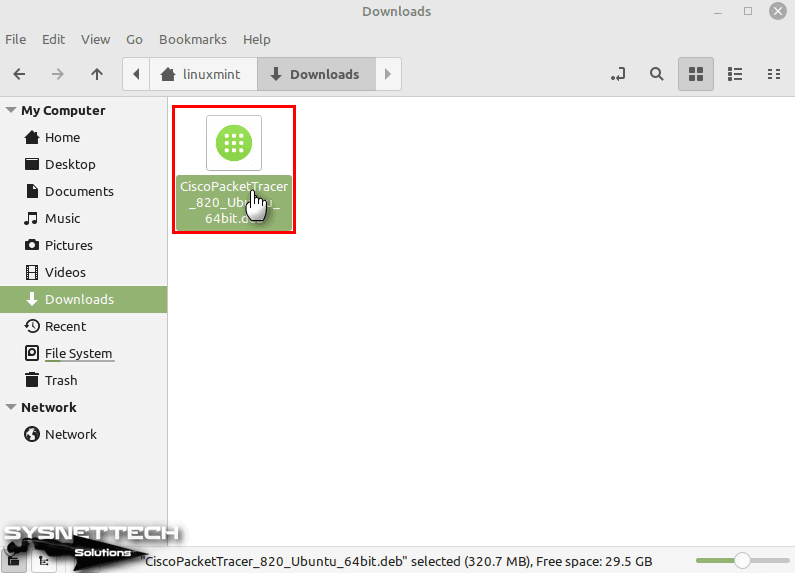
Please navigate to the location where you downloaded the Packet Tracer.deb package and double-click on it.
Step 2
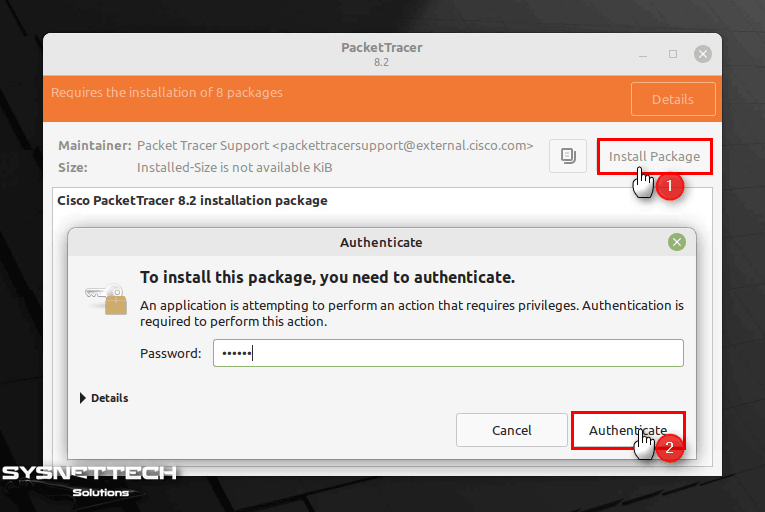
After clicking “Install Package” in the Cisco Packet Tracer Installation Package window, type your root password and click the “Authenticate” button.
Step 3
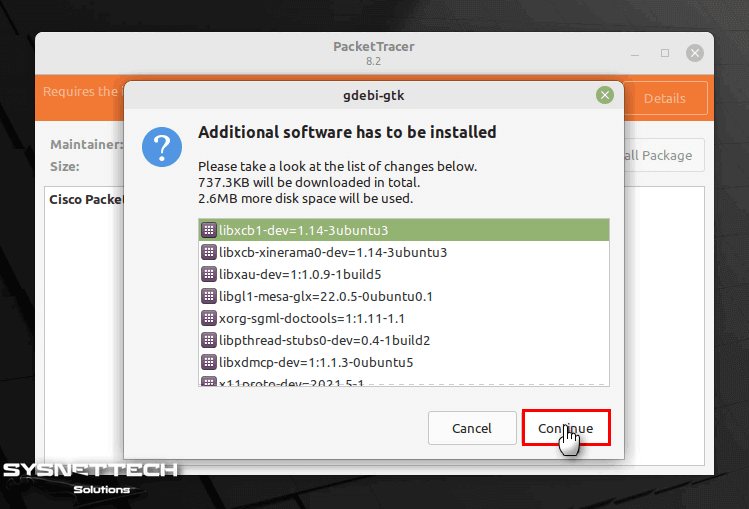
Click Continue in the window that lists the additional software that needs to be installed.
Step 4
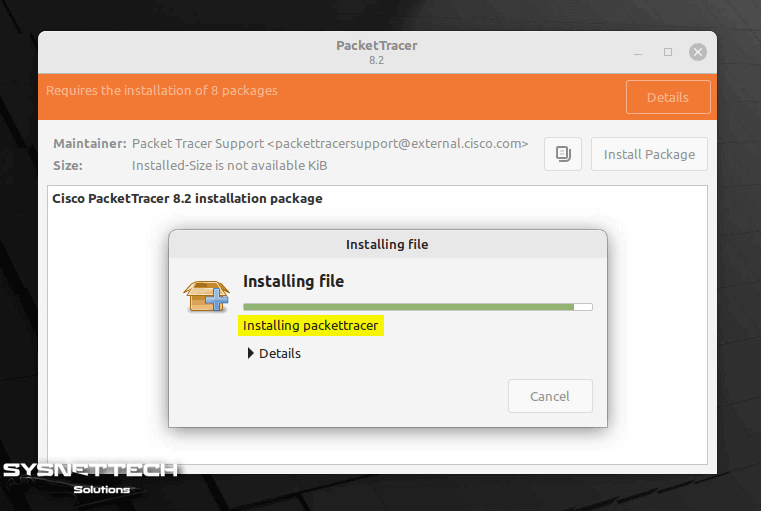
Please wait while the additional packages for the Packet Tracer software are being installed.
Step 5
When you search for Cisco software in the start menu, you can see that it is installed on your system.

How to Create a New Project
After installing Packet Tracer on Linux Mint, you can create topologies to better understand computer networks by creating a new project, or you can start learning to configure Cisco routers or switches.
Step 1
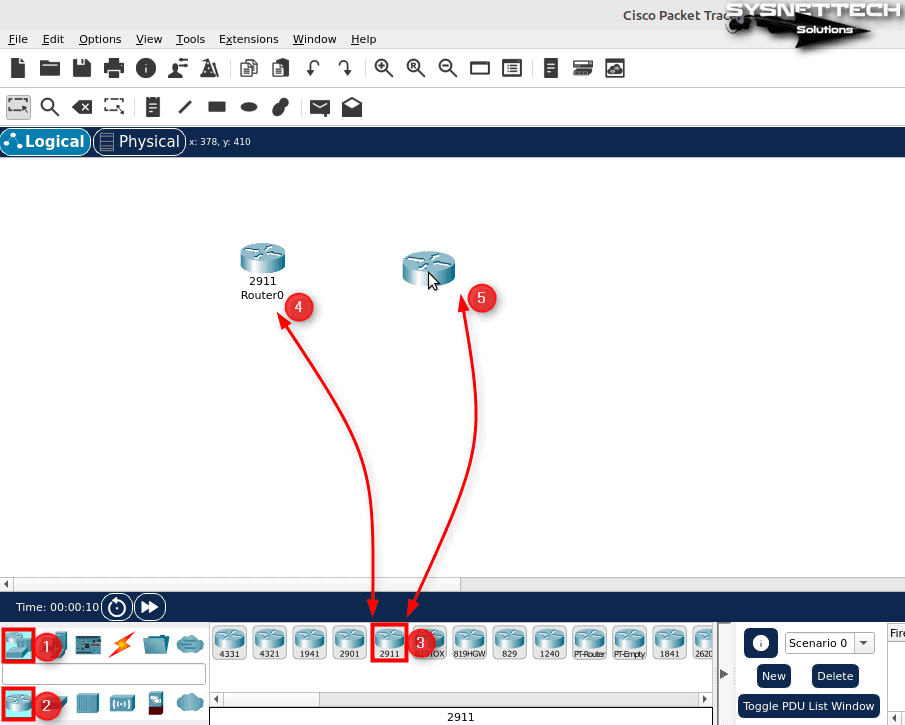
After clicking the Routers icon in the Network Devices category, add two 2911 model Routers to the workspace.
Step 2
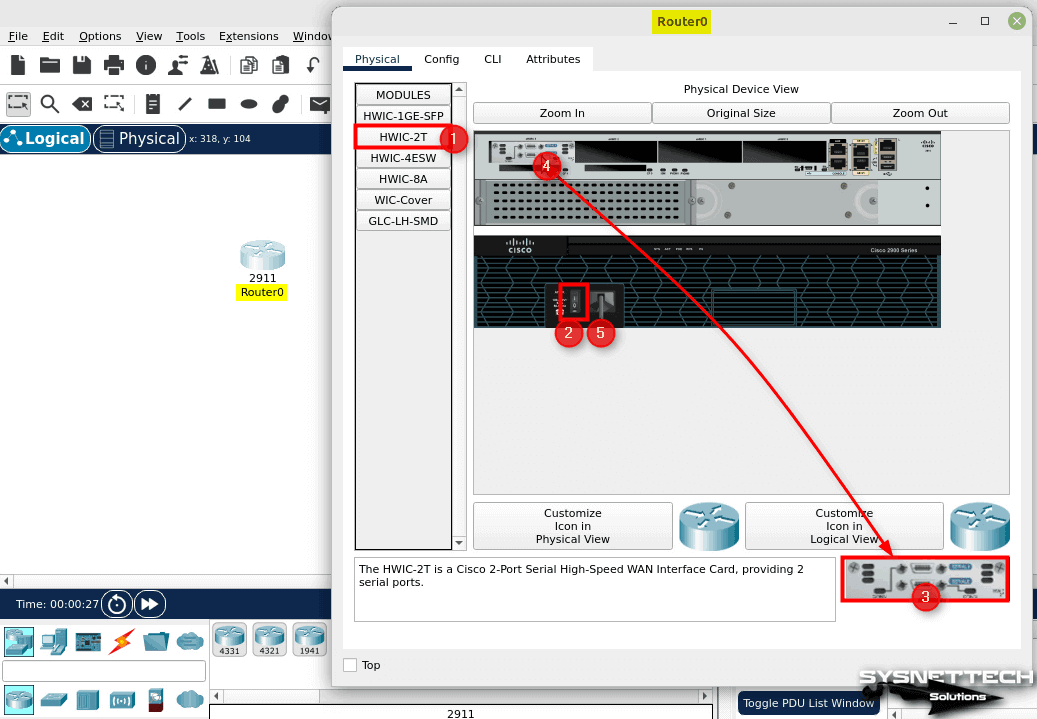
After double-clicking Router0, click HWIC-2T in the Physical tab in the window that opens, and add the serial interface displayed in the lower right corner to the Router. Ensure the router’s power is turned off before adding the Serial Interface.
Step 3
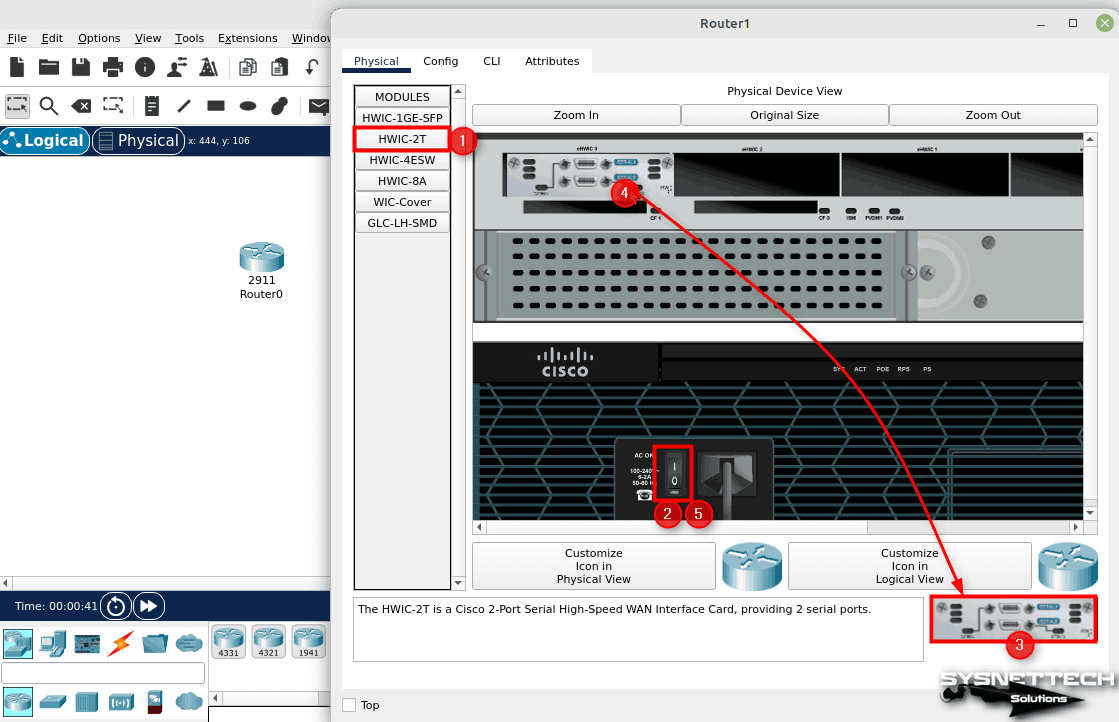
Add the HWIC-2T hardware to the Router1 device.
Step 4
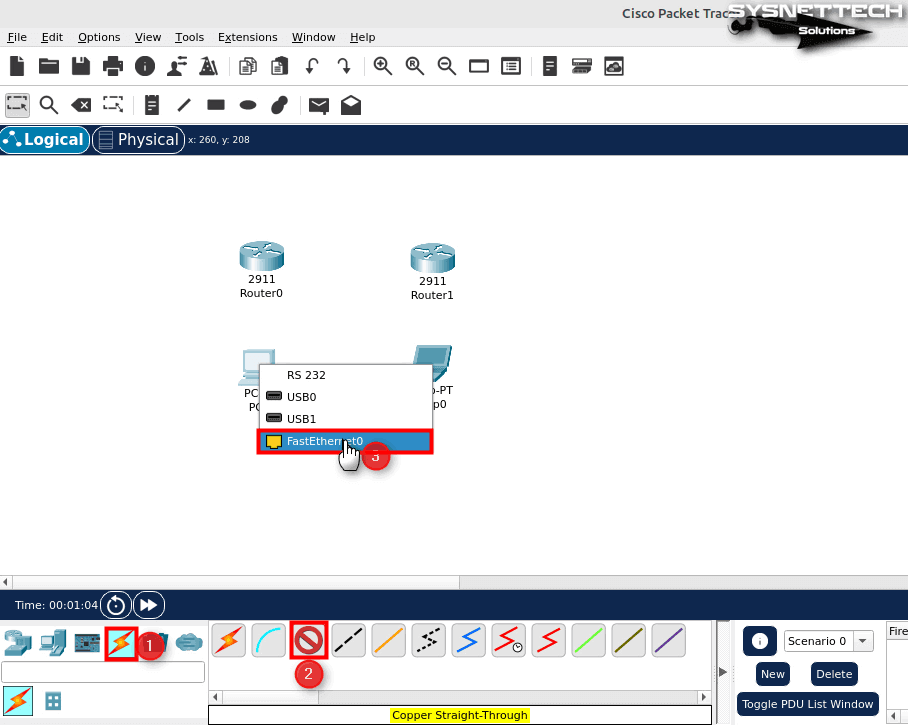
Add a desktop computer and a laptop to the workspace.

Step 5
After enabling the cabling option, select “Copper Straight-Through” and plug one end of the cable into the FastEthernet0 port of PC0.
Step 6
Plug the other end of the copper cable into Router0’s GigabitEthernet0/0 port.
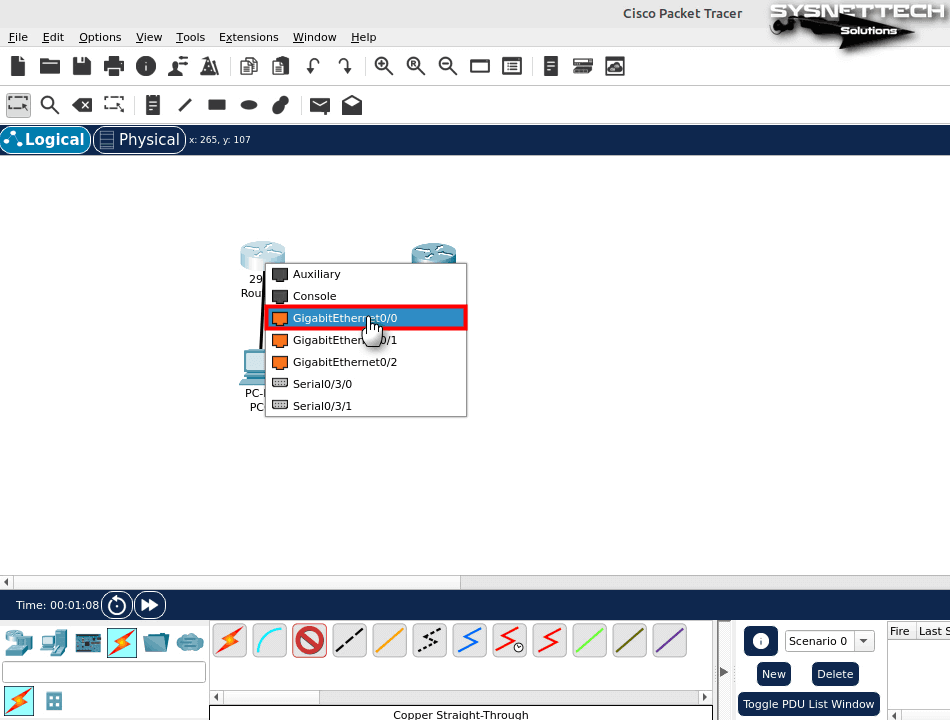
Step 7
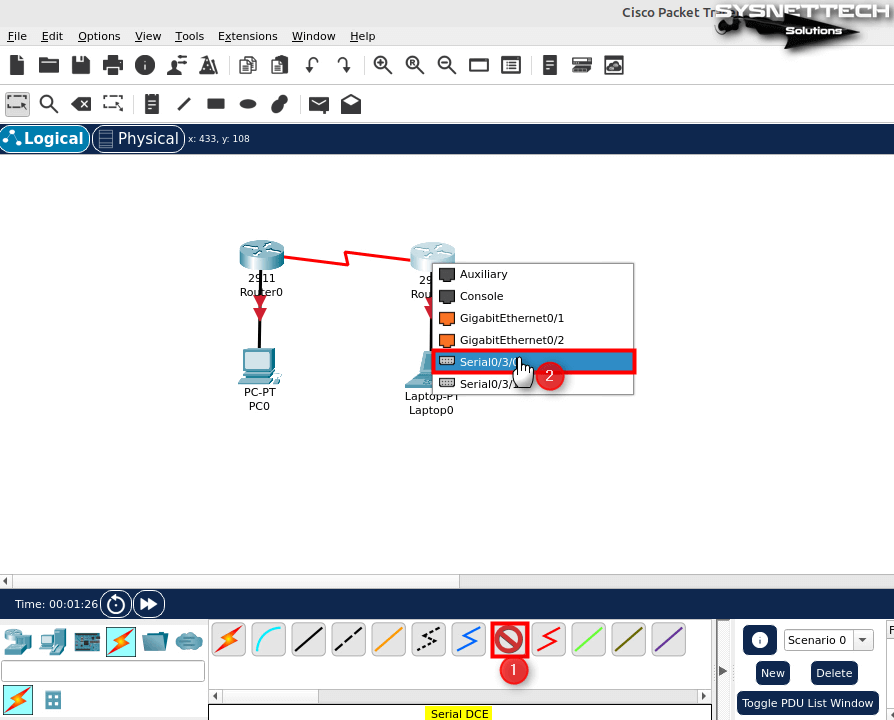
In the same way, after connecting Laptop0 and Router1, choose Serial DCE from the cabling types to join the Routers, and connect one end of the cable to the Serial0/3/0 port of R0 and the other end to the Serial0/3/0 port of R1.
Step 8
To assign a static IP address to PC0, open the Desktop/IP Configuration tool by double-clicking on it and type the IP address 192.168.1.10.
IPv4 Address: 192.168.1.10
Subnet Mask: 255.255.255.0
Default Gateway: 192.168.1.1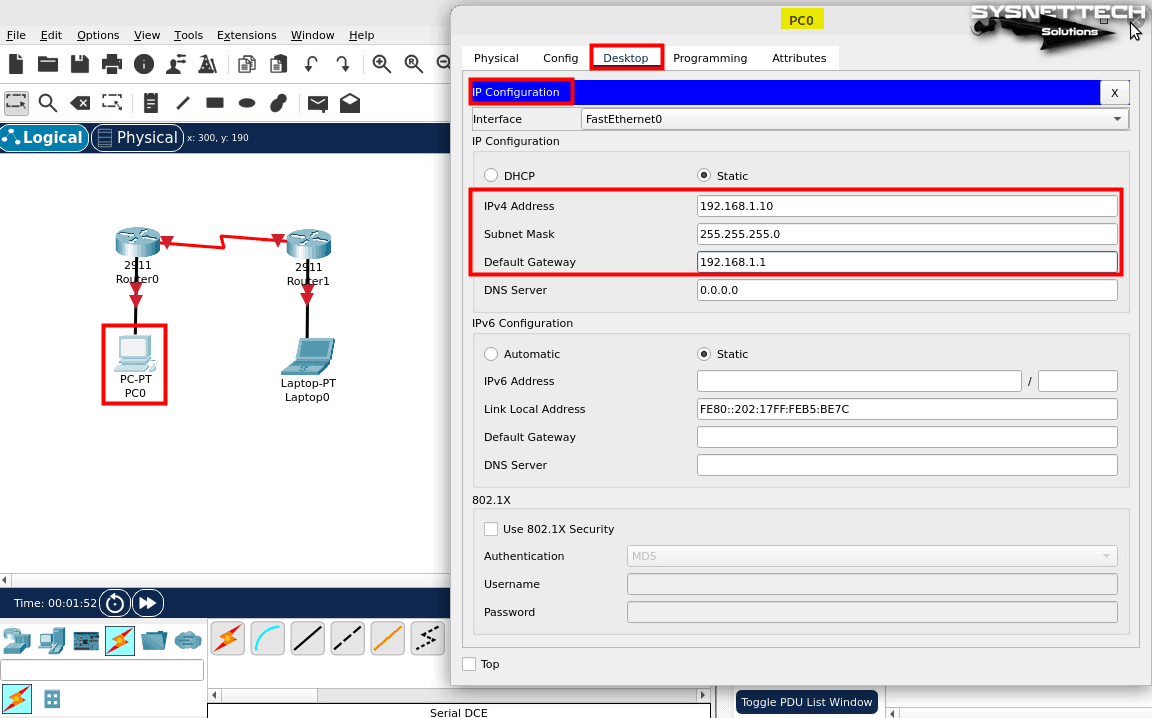
Step 9
Assign an IP address to laptop0 from block 192.168.3.0/24.
IPv4 Address: 192.168.3.10
Subnet Mask: 255.255.255.0
Default Gateway: 192.168.3.1
Step 10
After configuring the IP of end-user devices, assign IP addresses to Router0’s GigabitEthernet and Serial ports.
Router# conf t
Router(config)# interface gigabitethernet 0/0
Router(config-if)# ip address 192.168.1.1 255.255.255.0
Router(config-if)# no shutdown
Router(config-if)# exit
Router(config)# interface serial 0/3/0
Router(config-if)# 192.168.2.1 255.255.255.0
Router(config-if)# no shutdown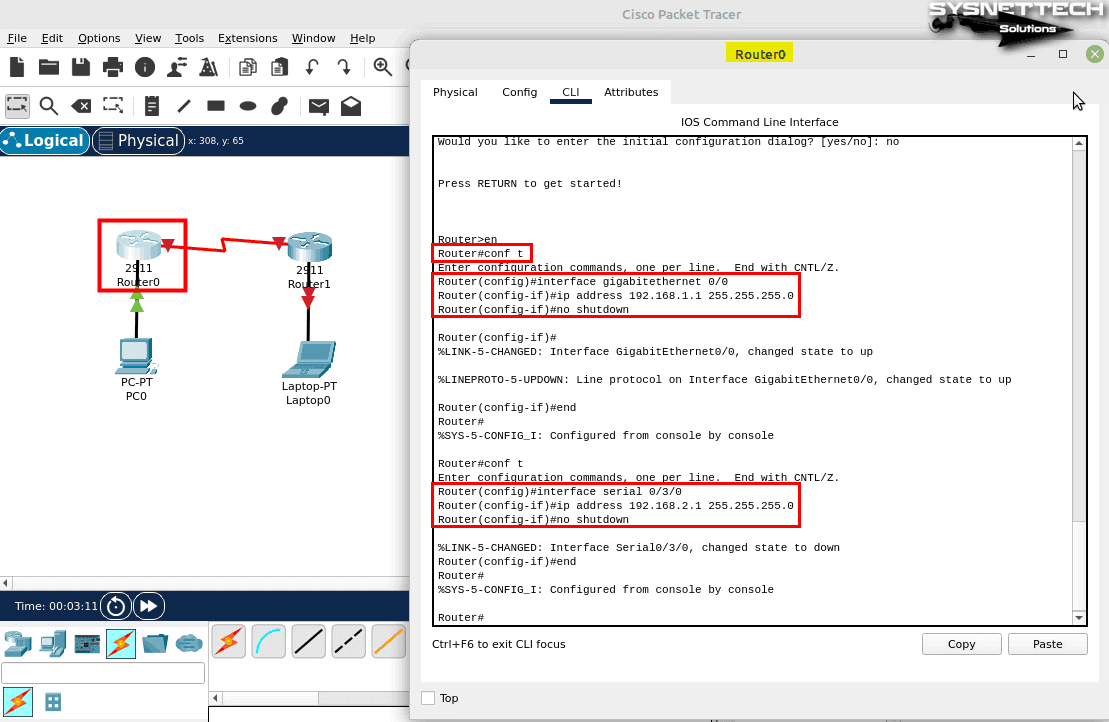
Step 11
Configure the GigabitEthernet and Serial interfaces of Router1 as well.
Router# conf t
Router(config)# interface gigabitethernet 0/0
Router(config-if)# ip address 192.168.3.1 255.255.255.0
Router(config-if)# no shutdown
Router(config-if)# exit
Router(config)# interface serial 0/3/0
Router(config-if)# 192.168.2.2 255.255.255.0
Router(config-if)# no shutdown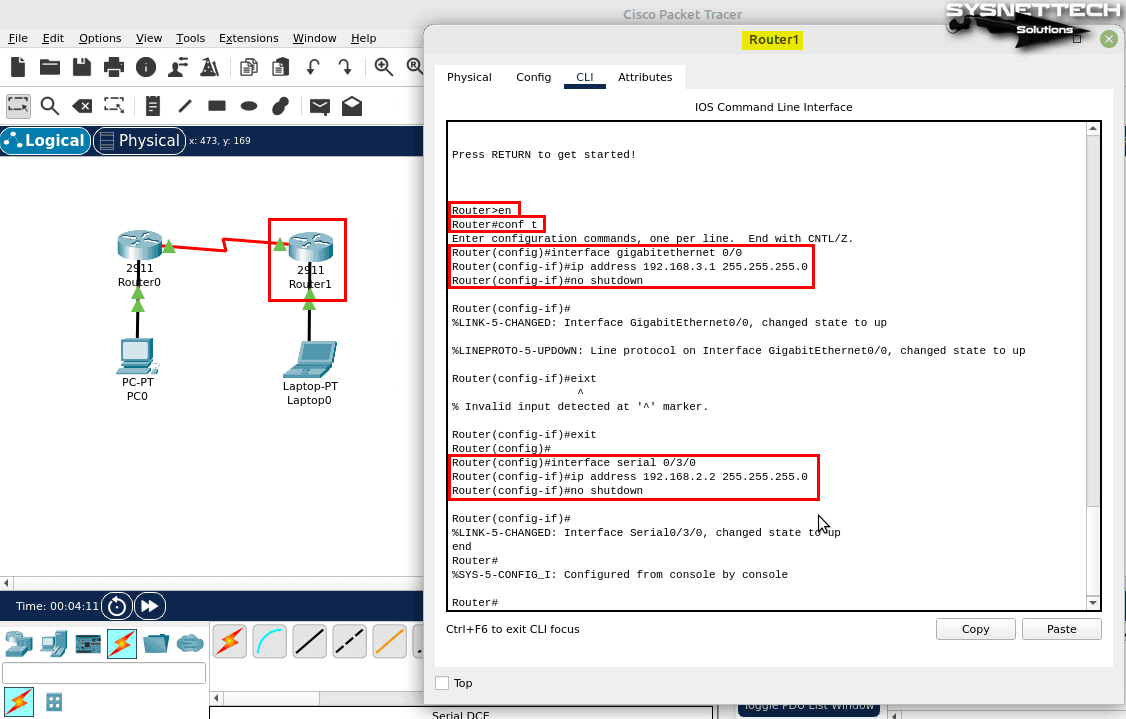
Step 12
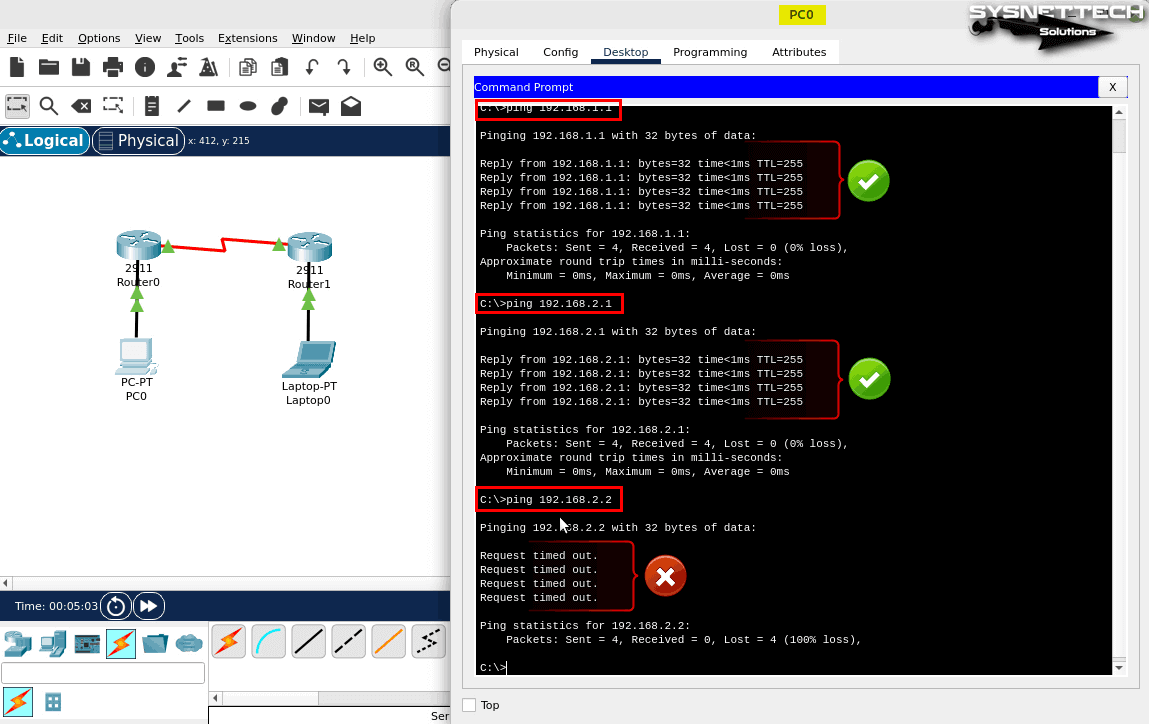
After configuring all devices in the network topology, test the network connection by pinging the ports of Router0 and the serial interface of Router1 from PC0.
As shown in the image below, PC0 cannot access the serial interface connected to Router1 because no routing protocol is configured.
Step 13
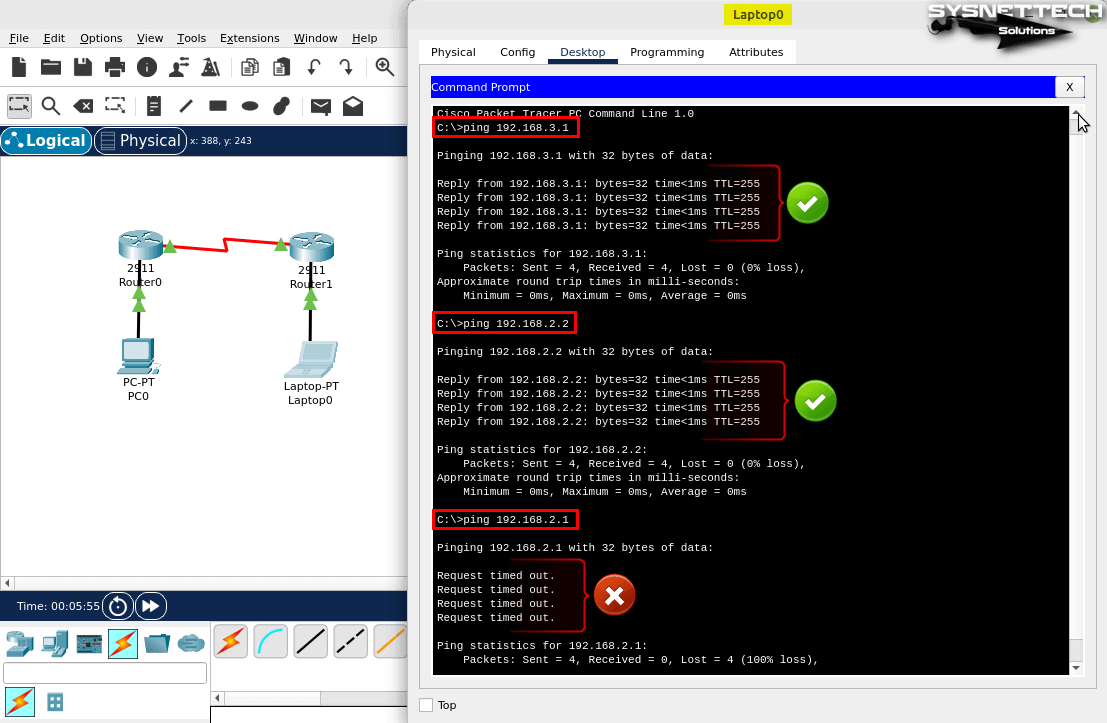
When you test the network connection on Laptop0, you can check that it cannot access the 192.168.1.0/24 network and Router0’s serial interface.
Step 14
You can use the ip route command in the CLI prompt to add static routing to the routers. To add a fixed route to Router0, execute the “ip route 192.168.2.0 255.255.255.0 192.168.2.2” command in config mode.
ip route 192.168.2.0 255.255.255.0 192.168.2.2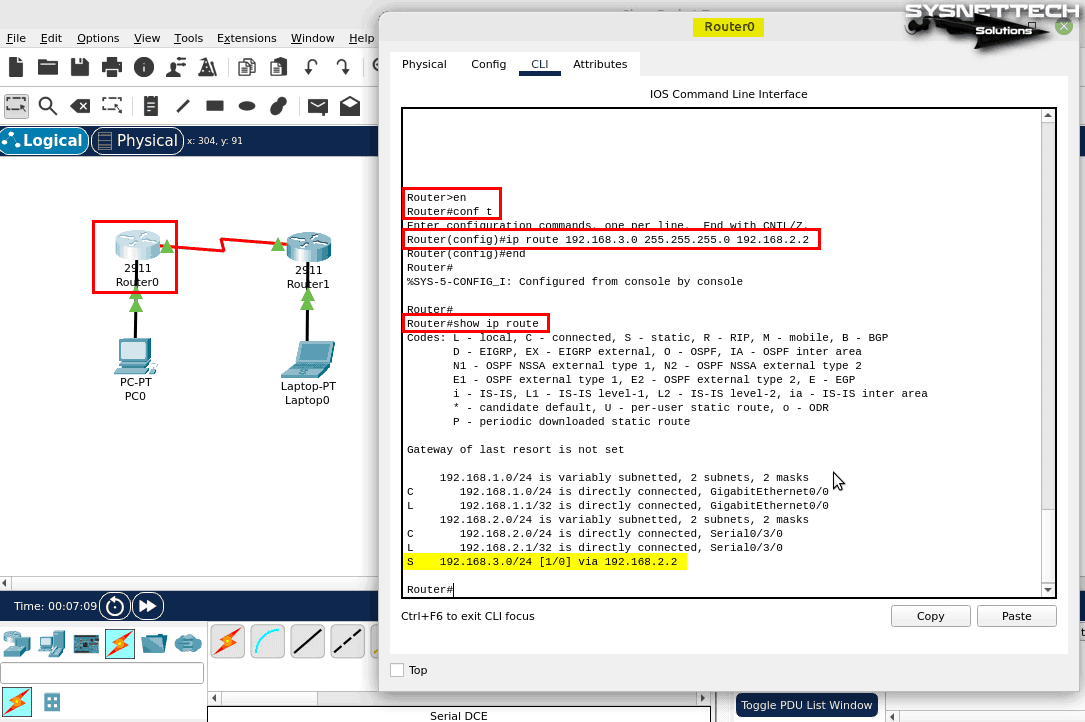
Step 15
To add a static route to Router1, execute the command “ip route 192.168.1.0 255.255.255.0 192.168.2.1” in config mode.
ip route 192.168.1.0 255.255.255.0 192.168.2.1
Step 16
After configuring static routing on routers, you can successfully ping Laptop0 from PC0.
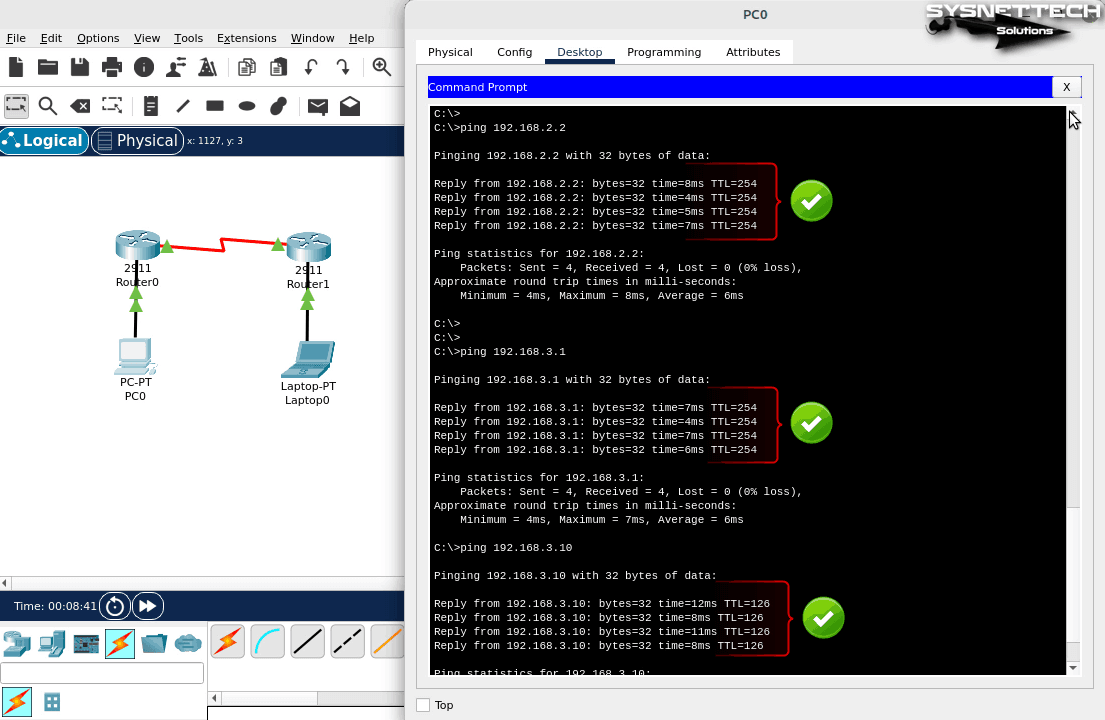
Step 17
Likewise, you can successfully ping PC0 on the 192.168.1.0/24 network from Laptop0 on the 192.168.3.0/24 network.
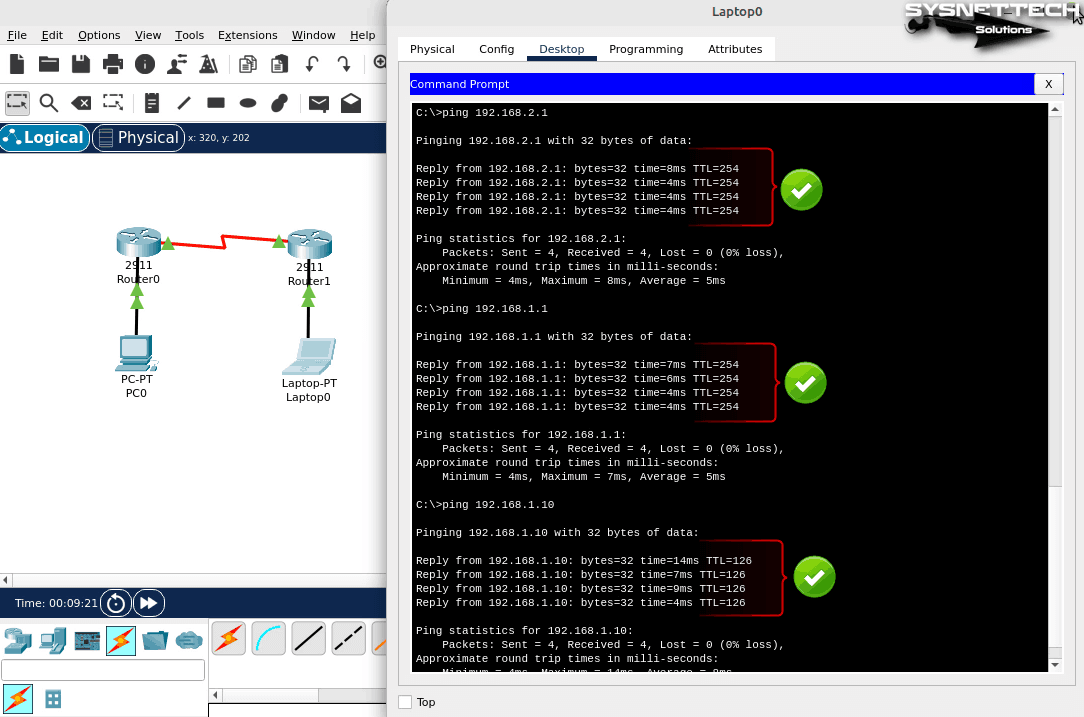
How to Uninstall Packet Tracer from Linux Mint
When you want to remove and delete Cisco Packet Tracer altogether from your Linux distribution, you can do this with a few commands from the terminal.
Step 1
Execute the “sudo apt remove packettracer” command to remove the Packet Tracer software from your system.
sudo apt remove packettracer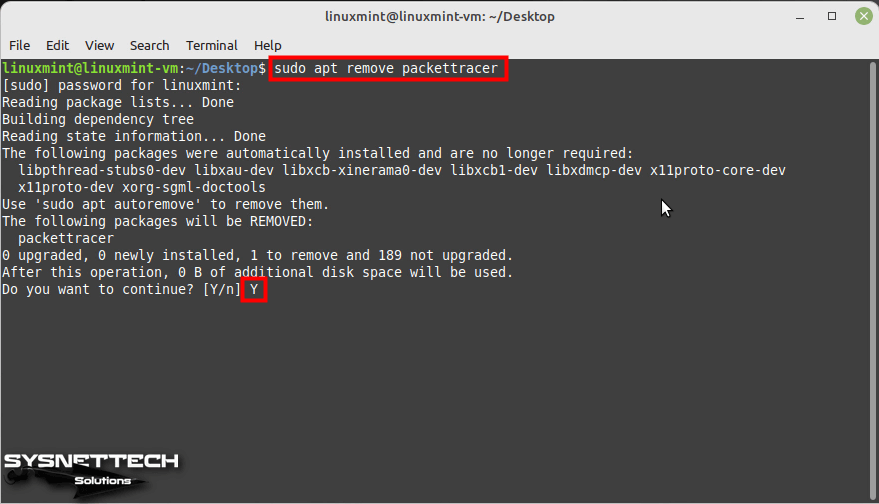
Step 2
Execute the “sudo apt autoremove && sudo apt autoclean” command to delete dependent packages and residual files while uninstalling Packet Tracer from your system.
sudo apt autoremove && sudo apt autoclean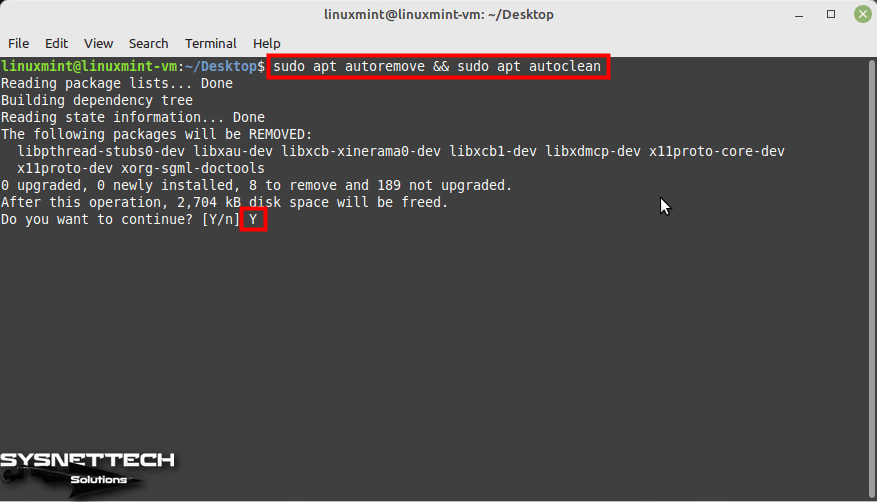
Step 3
At the same time, you can quickly delete the shortcut you created on the desktop from the terminal.
sudo rm -rf cisco-pt.desktop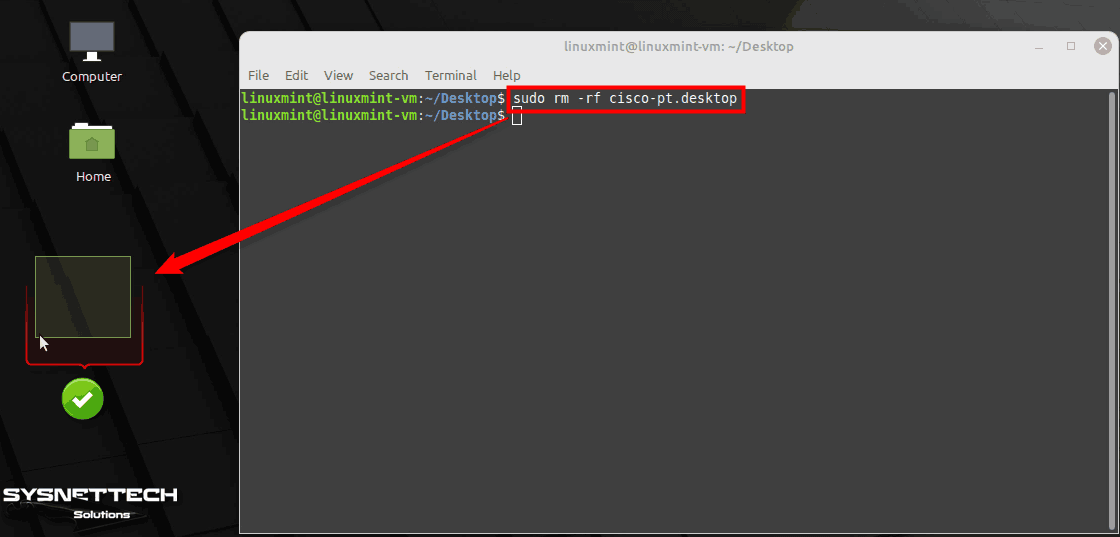
Video
Installing Old Versions
1) Packet Tracer 7.2.2
- Copy the .run extension installation file you downloaded to your computer and place it on your desktop. Then, open the terminal. Switch to root access in the terminal and run the following commands to initiate the installation.
chmod +x PacketTracer-7.2.2-ubuntu-setup.run./PacketTracer-7.2.2-ubuntu-setup.run
- Continue by clicking the Next button in the Packet Tracer Setup GUI window.
- Click Next without changing the installation folder.
- Check that I accept the license agreement for the program, and then click Next.
- In the Ready to Install window, click the Install button to start the installation process.
- After completing the installation, click Finish to exit the wizard.
- Now, run the “packettracer” command in the console. Then, when you try to open the simulator program, it will not open because you need to install dependent packages.
- You need to install the Libpng package for Packet Tracer. Otherwise, the program will not work on your system. To download and install libpng, run the commands below in the terminal.
wget https://ftp.us.debian.org/debian/pool/main/libp/libpng/libpng12-0_1.2.50-2+deb8u3_amd64.debdpkg -i libpng12-0_1.2.50-2+deb8u3_amd64.deb
- When you rerun CPT, the program will open successfully this time!
- To log into the program as a guest without logging in to Cisco, click the Guest Login button, and after waiting for 15 seconds, you can log in to the program by clicking Confirm Guest!
- You can verify that the Packet Tracer version is 7.2.2 in the Help > About section.
2.1) Packet Tracer 7.2.1
- First, edit the source.list of your Mint 19 system as follows.
deb https://packages.linuxmint.com tara main upstream import backport
deb https://archive.ubuntu.com/ubuntu bionic main restricted universe multiverse
deb https://archive.ubuntu.com/ubuntu bionic-updates main restricted universe multiverse
deb https://archive.ubuntu.com/ubuntu bionic-backports main restricted universe multiverse
deb https://security.ubuntu.com/ubuntu/ bionic-security main restricted universe multiverse
deb https://archive.canonical.com/ubuntu/ bionic partner
- Press Ctrl + X, Ctrl + Y, and Enter, respectively, to save your changes.
- To extract the CPT 7.2.1.tar.gz file to the folder, create a folder named CPT72 with the mkdir command. Next, execute the command “tar -xvzf Packet\ Tracer\ 7.2.1\ for\ Linux\ 64\ bit.tar.gz -C CPT72/” to extract the installation files to the folder.
mkdir CPT72tar -xvzf Packet\ Tracer\ 7.2.1\ for\ Linux\ 64\ bit.tar.gz -C CPT72/
- Navigate to the CPT72 folder and execute the “./install” command to initiate the installation.
- After installing the simulator software, execute the ./PacketTracer7 command in the terminal to start the program. If you encounter the libpng12-0 error, you need to install the libpng package.
- To install the libpng package, execute the following commands in the terminal.
wget https://ftp.debian.org/debian/pool/main/libp/libpng/libpng12-0_1.2.50-2+deb8u3_amd64.debsudo dpkg -i libpng12-0_1.2.50-2+deb8u3_amd64.deb
- After installing libpng, you can now run CPT 7.2.1 on your system!
- After fixing the libcrypto error, you will no longer see a warning in the terminal when you run the program. You can check the CPT version in Help / About.
2.2) Creating a Shortcut for Packet Tracer 7.2.1
Creating a start menu for a program on the Windows operating system is one of the easiest tasks. However, this may not be the case when creating desktops and setting up menu shortcuts for certain programs in Linux operating systems.
Shortcuts for some applications do not work on Linux platforms, and as a result, you have to create a new desktop shortcut manually.
After installing Packet Tracer 7.2.1, a program shortcut is not automatically created on the desktop or the Start menu. Therefore, you can fix the shortcut problem with a few commands. Follow the steps below to create a desktop and start a menu shortcut.
- Since the Packet Tracer software is installed in the /opt/pt/ location, you must copy the Cisco Packet Tracer.desktop file from this location to the desktop.
cp /opt/pt/bin/Cisco-PacketTracer.desktop ~/Desktop/chmod +x ~/Desktop/Cisco-PacketTracer.desktop
- To create a Start Menu Launcher, execute the following command.
cp ~/Desktop/Cisco-PacketTracer.desktop /usr/share/applications
- NOTE: If the shortcut still does not work, open the Cisco Packet Tracer.desktop file with the gedit program and replace the EXEC value with Exec=/opt/pt/bin/PacketTracer.
3.1) Packet Tracer 7.1.1
- Open Terminal and run the sudo su command to gain root access. Next, extract the .tar file to the PacketTracer711 folder.
tar -xvzf Packet-Tracer-7.1.1-for-Linux-64-bit.tar -C PacketTracer711/
- Go to the PacketTracer711 folder on the terminal and list the files in the folder using the ls command. Then, execute the’ ./install’ command to initiate the installation. To accept the license agreement, press Enter repeatedly.
- Press Space to quickly read the Cisco simulator 7.1.1 license agreement.
- To run the program after installation, first navigate to the cd /opt/pt/bin/directory and run the ./PacketTracer7 command.
- If you get the libQt5Multimedia.so.5 error when you try to start Packet Tracer, execute the following commands in the terminal one by one.
apt-get install qtmultimedia5-devapt-get install libqt5script5apt-get install libqt5scripttools5
- After installing the above packages, restart Packet Tracer. The program will then open without any issues.
- Click the Guest Login button to log in as a Packet Tracer 7.1.1 guest.
- After waiting for 15 seconds, click the Confirm Guest button to confirm the guest check-in and start the program.
3.2) Uninstalling Packet Tracer 7.1.1
You can use the Software Center to uninstall a program installed on Linux. Also, you can use Synaptic Package Manager.
However, if you cannot see or uninstall a program you have installed on Linux using the Synaptic Package Manager, you will need to use the terminal.
- After turning on your system, open the terminal on the desktop, execute the sudo su command to gain root access, and then type your password and press Enter. To delete Packet Tracer, run the rm -r /opt/pt/ command in the terminal.
rm -r /opt/pt/
- After uninstalling the program, you will see that Packet Tracer does not open when you double-click the shortcut.
- Follow the commands below to remove the Packet Tracer start menu shortcuts.
rm /usr/share/applications/pt7.desktoprm /usr/share/applications/Cisco-PacketTracer.desktop
- Verify that the program shortcut is located in the Start menu.
- To remove the Packet Tracer icon, follow the command below.
rm /usr/share/icons/hicolor/48x48/apps/pt7.png
- Execute the rm Cisco-Packet Tracer.desktop command to remove the desktop shortcut.
rm Cisco-PacketTracer.desktop

10 People Shared Their Experience
Hi there!
I manage to install and run PT 7.2 on Mint 19, BUT some IoT devices are not working.
If you try to add for instance a Garage Door or a Fan or a Push Button and click with ALT it wont work. I have the same instalation on Ubuntu and it is working. Weird don´t you think? Could you try in your setup?
Regards,
VC
perfect tutorial no problems install :}
Really useful. Also the instructions were really clear. thanks
You’re welcome! Thanks for your feedback!
hi i am new to linux.. and to packet tracer
After several trial and errors.. a lot of them
i made could finally install it.
thanks a lot
I’m glad to hear that. Thanks for your comment!
The libpng website is full of Vulnerability Warnings.
Is it possible to use PT with newer libpng?
You can try with newer libpng, but PT may not work. You need to try to see if this works.
Thank you. Very helpful tutorial
thank you very much