
Do you want to install and run Windows XP on a new virtual machine using VMware Workstation 17 Pro virtualization software on Windows 10 & 11 operating systems? In this article, I will walk you through the process of installing Windows XP Professional 64-bit SP1 on a virtual computer.
Before I forget, Microsoft has ended support for Windows XP. Despite this, there are still situations when it is necessary to run this legacy operating system, especially for managing automation machines or other tasks. I’ll show you how to create a new virtual machine for XP. Next, I will walk through the entire installation process, from configuring hardware compatibility to selecting the virtual disk type. As a result, you will have your virtual Windows XP running on your PC!
How to Set Up Windows XP Professional 64 Bit SP1 on Windows 10 using VMware Workstation 17
As you know, Windows XP was a popular operating system at the time. Microsoft ended its support for XP entirely in 2014. Therefore, it would be logical to use an up-to-date operating system such as Windows 10 on your host computer.
However, since automation machines used in some institutions or organizations were produced on an old date, they need Windows XP or an older operating system to be managed. In case of such need, it is recommended that systems such as XP run on desktop or laptop computers with old hardware.
Suppose you do not have an old computer, of course. In that case, you can use old operating systems on virtual machines by using virtualization software such as VMware on your current computer.
Or suppose you still want to use Windows XP even though it is an old system, as we mentioned, after installing a virtualization program such as VMware, VirtualBox, or Hyper-V on your Windows 10 computer. In that case, you can build this system on the virtual machine.
Host & VM Requirements for Windows XP
You must have some requirements to run Windows XP using VMware Workstation 17 Pro on your actual PC. In particular, these depend on the hardware capabilities of the host computer. However, you should know the specific needs of the virtual machine. However, for a perfect VM, here are the general rules you should consider:
Host Requirements:
- Processor: VMware Workstation 17 Pro requires a 64-bit x86 processor clocked at least 1.3 GHz. However, you would be better off using a modern multi-core processor with a higher clock speed.
- RAM: I recommend at least 4 GB RAM. However, allocating more RAM increases performance significantly.
- Storage: You need enough free disk space for VMware Workstation and virtual machines. You should also have extra space for VM files and XP files.
Virtual Machine Requirements:
- Processor: You can run your Windows XP system on a single-core processor. However, you can increase itPowerer by allocating more than one core.
- RAM: I recommend allocating at least 1 GB of RAM. You can also determine the RAM allocation yourself for better performance.
- Disk Space: Allocate enough virtual disk space for Windows XP according to the work you will do.
- Graphics: VMware Workstation 17 Pro supports 3D graphics acceleration. However, you need to adjust the graphics settings according to XP.
As a result, specific system requirements vary depending on the intended use. However, while you are running XP in a virtual environment, pay attention to the compatibility of your host PC’s hardware with VMware. Plus, I recommend sticking to the recommended settings for optimal performance.
How to Create a New Virtual Machine for Windows XP
Before proceeding with the installation steps, you need to install the VMware virtualization program on your computer. After installation, download the XP ISO file to your host computer by clicking the button below and create a new VM by following the steps below.
Windows XP Pro x86/x64 SP1 ISO + SP2 Installer
Step 1
After installing VMware Workstation 17 Pro on your computer, run the program and press Create a New Virtual Machine on the homepage to set up a new virtual machine. When the VM wizard opens, tick Custom (Advanced) and click the Next button.

Step 2
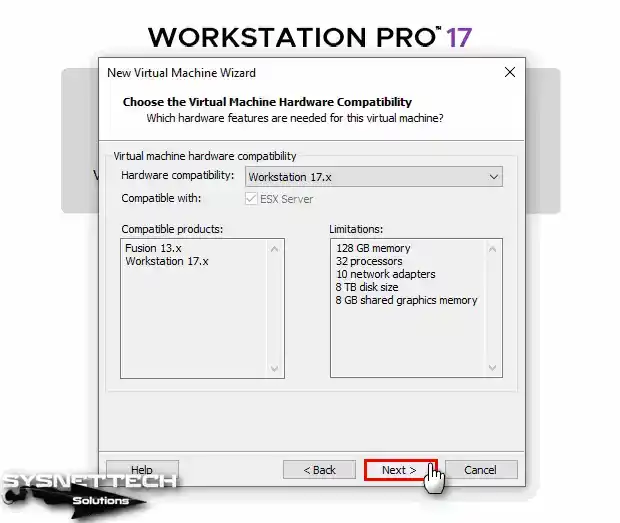
In the Choose the Hardware Compatibility window, select the latest version of the Workstation program you are using. In this window, you will see the version of Workstation Pro currently installed on your computer.
If you are installing on an older version, you will not be able to select 17.x, so update Workstation Pro. Next, choose Workstation 17.x for VMware virtual machine compatibility, and then hit the Next button.
Step 3
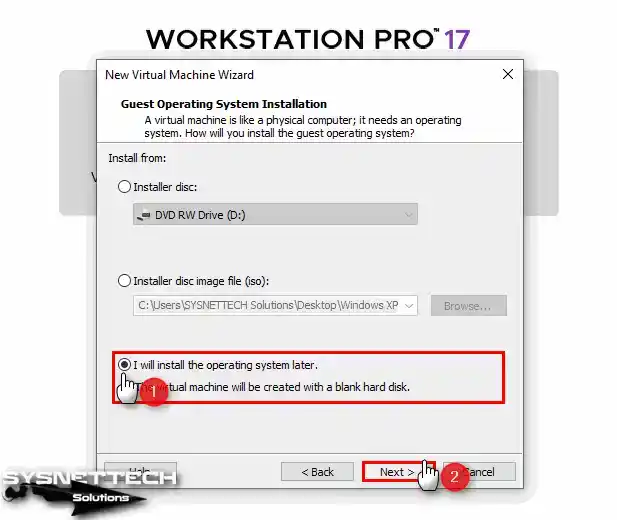
When installing a new virtual machine, I recommend choosing the “I will install the operating system later” option. This allows you to adjust advanced settings that better align with the intended operating system before installation. So, as soon as you make this selection, proceed by clicking the “Next” button.
Step 4
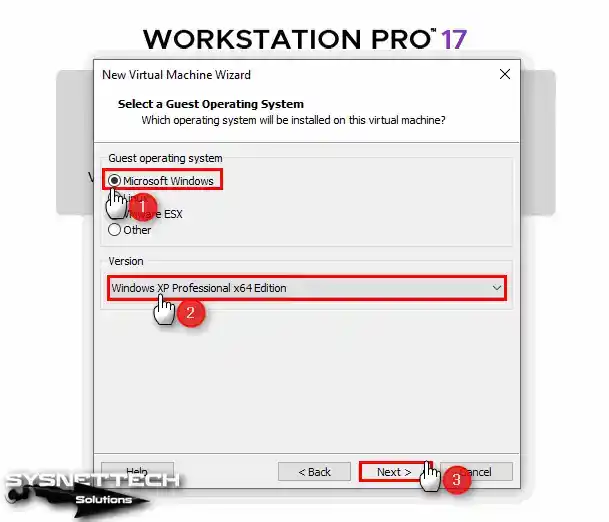
When installing XP on a virtual machine, start by selecting the “Microsoft Windows” option in the Select a Guest Operating System window. Then, select “Windows XP Professional” from the Version section.
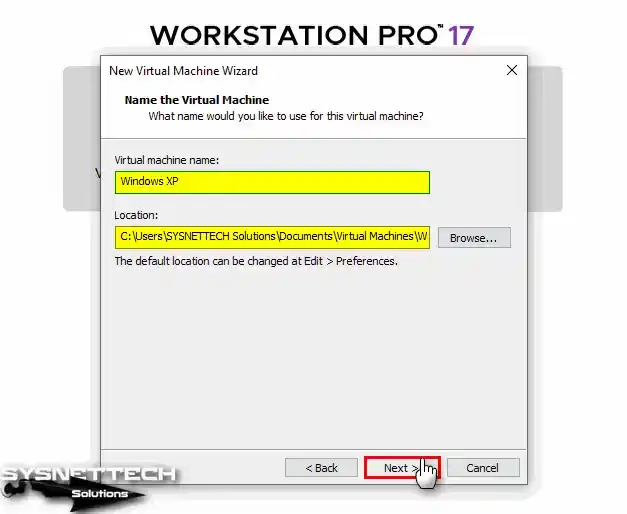
Step 5
In the “Name the Virtual Machine” section, type the name of the operating system you will install. In the Location section, if you want to store the virtual machine on a USB 3.0 or 3.1 external disk, configure the relevant location.
To change the installation location of the VM, press the Browse button in this window and select the relevant location in the window that opens.
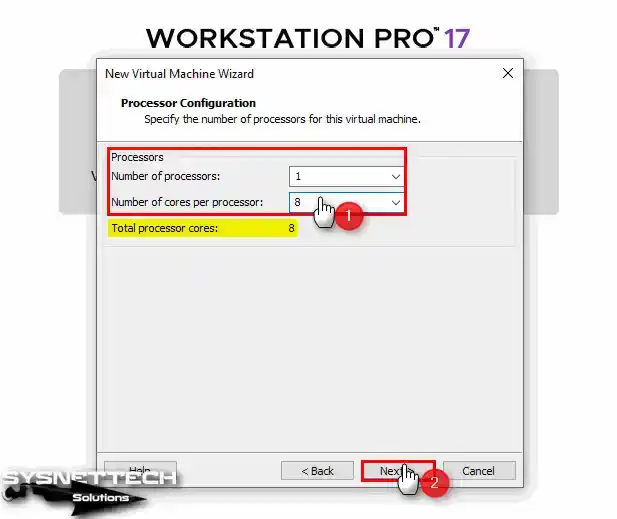
Step 6
In the Processor Configuration window, configure the number of processors and cores for XP depending on the hardware features of your computer.
If you have a fast PC and want to install it faster, you can configure 1 processor and 8 core values for the virtual machine.
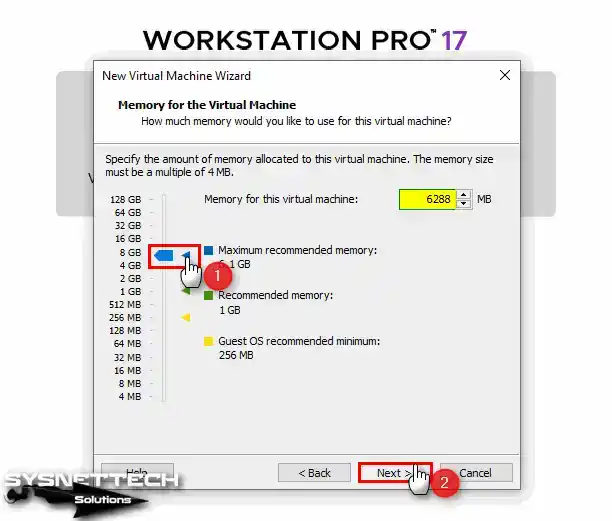
Step 7
Likewise, you can assign a 4 GB RAM size to the virtual computer or choose the maximum memory size according to the RAM capacity of your physical computer.
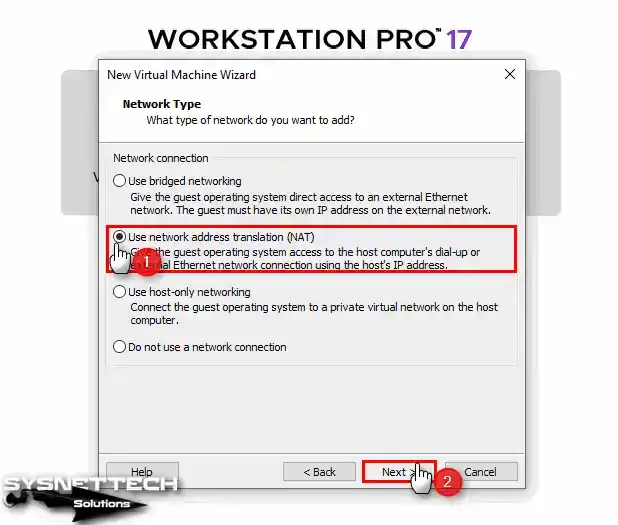
Step 8
If you want to connect to the Internet after installing the virtual operating system, select Bridged or NAT in the Network Type window.
Step 9
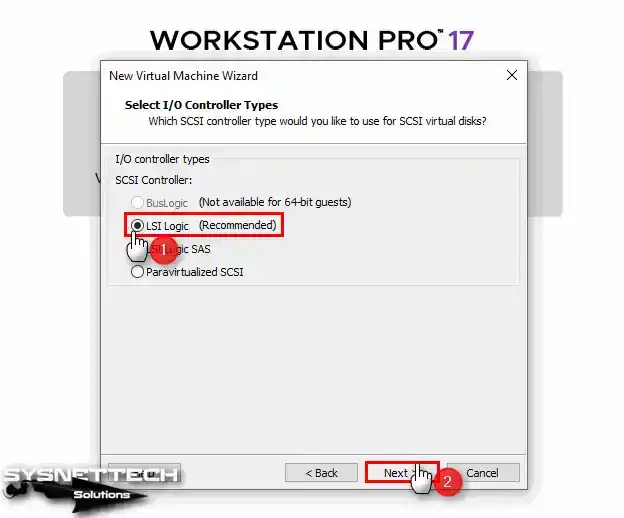
Once you’ve chosen the default LSI Logic option in the I/O Controller window, click Next to continue.
Step 10
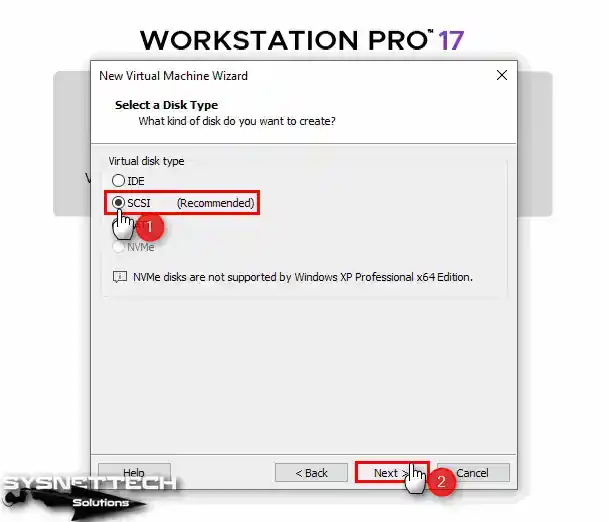
In the Select a Disk Type window, select which disk controller you want to install the virtual system with. Here, you need to select the SCSI disk type that is selected by default. Because Microsoft has ended its support for XP, the SATA disk structure is not supported. Still, some hosts provide SATA type and USB 3.0 support.
You may also see the warning that XP cannot be installed on the NVMe disk. NVMe is supported by current operating systems as it is a new disk controller.
Step 11
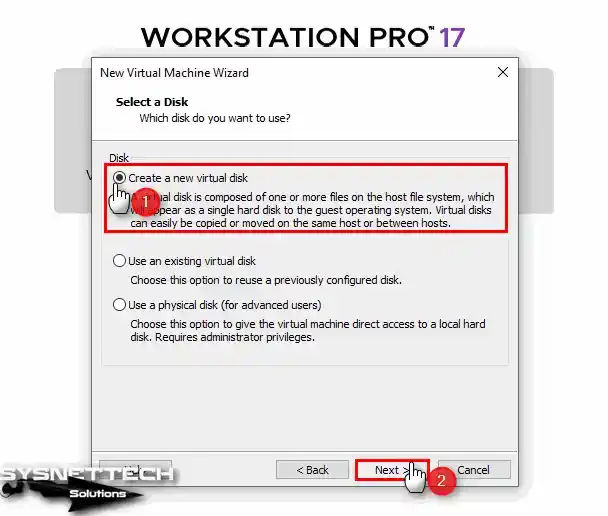
In the Select a Disk window, you can add the system disk you installed earlier or create a new virtual disk here. Additionally, you can use a physical disk in the VM.
For a clean system installation, select Create a new virtual disk and press Next.
Step 12
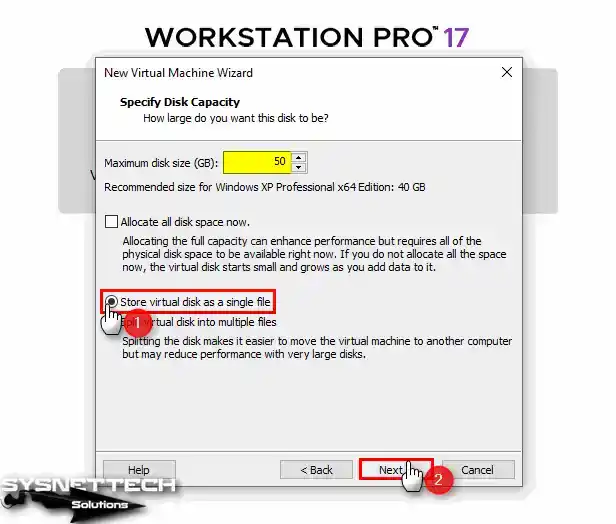
When setting up a virtual machine for Windows XP Professional, it is usually sufficient to allocate a virtual disk of 40 GB in size. However, virtual machines are different for basic tasks and professional work. Therefore, I recommend that you consider the disk size to be 20 GB or 50 GB for advanced tasks.
Make sure to back up the virtual machine disk file in a single file format. So, check that you have ticked the ‘Store virtual disk as single file’ option.
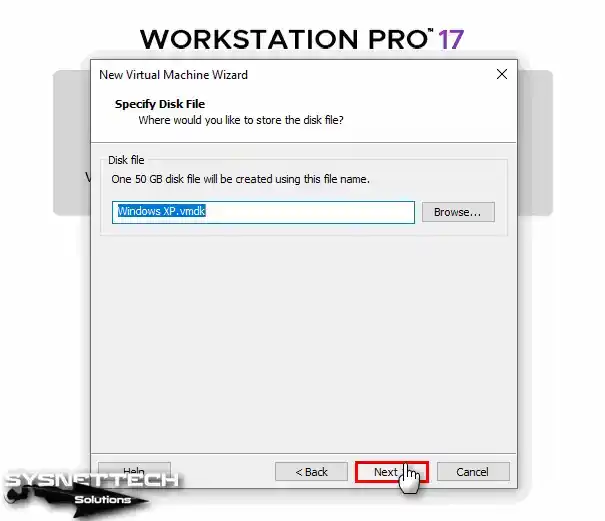
Step 13
You can change the name and location of the WinXP virtual machine disk file in the Specify Disk File window. However, since you will be installing it on an external disk, the disk name refers to the name that will be stored in the installation location.
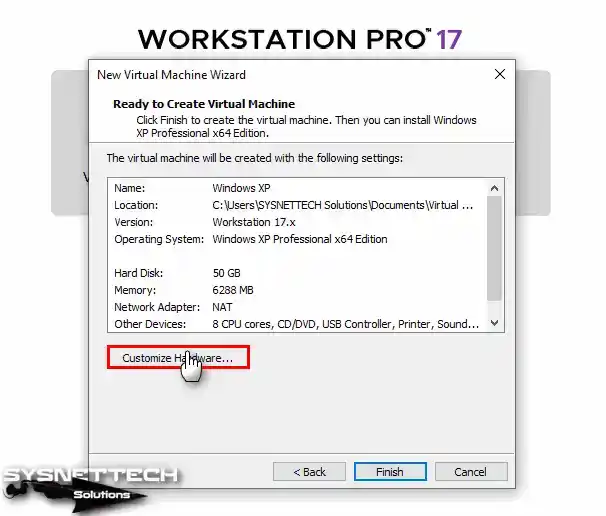
Step 14
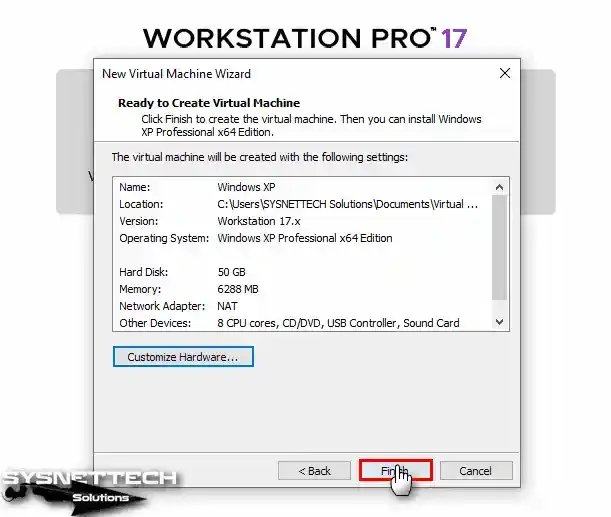
At the final stage of the virtual machine setup, hit the Customize Hardware button to add the ISO to the VM and enable virtualization.
Step 15
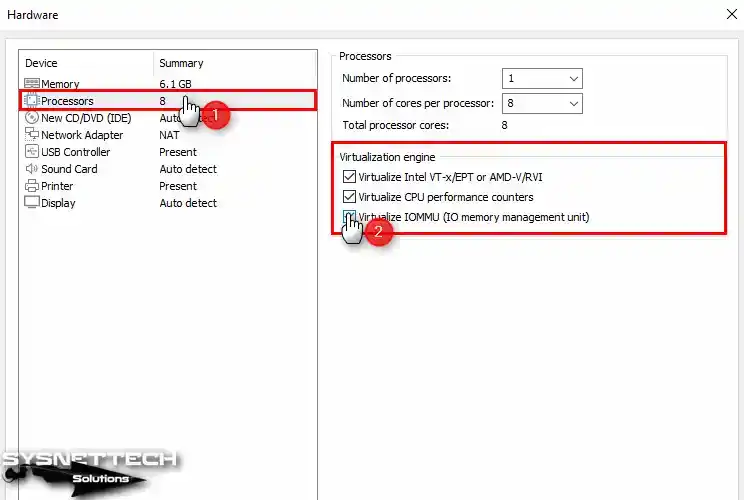
In the Hardware settings window, choose Processors and tick all the options in the Virtualization Engine section.
- Virtualize Intel VT-x/EPT or AMD-V/RVI
- Virtualize CPU Performance Counters
- Virtualize IOMMU (IO Memory Management Unit)
Step 16
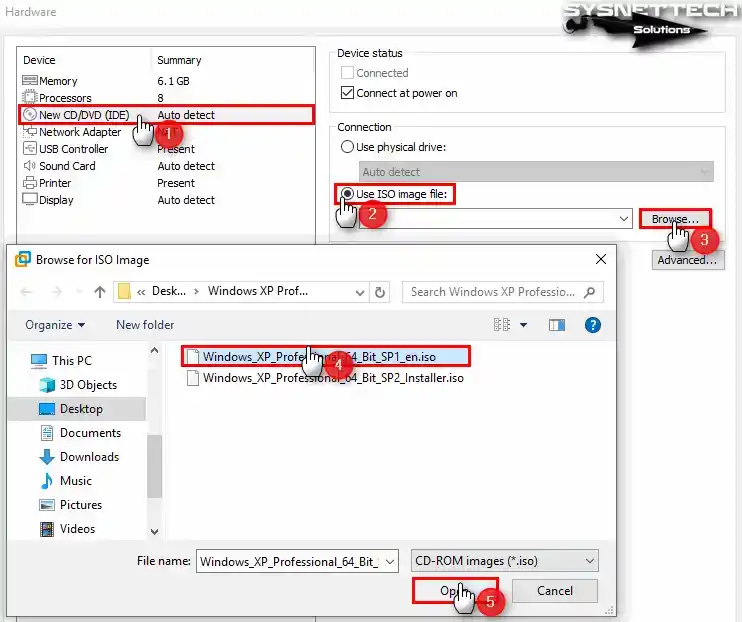
Choose the CD/DVD device to add the ISO file to the virtual computer, and then select the Use ISO image file option and click the Browse button.
Select the Windows XP SP1 ISO file you downloaded to your host computer and press the Open button.
Step 17
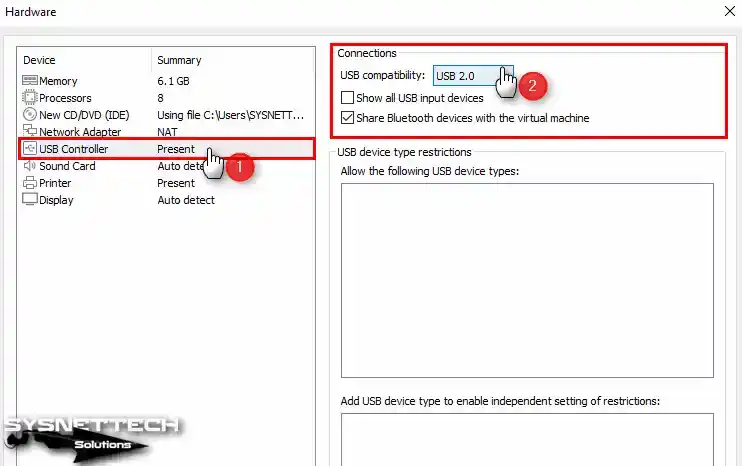
Select USB 2.0 compatibility from the USB Controller device settings.
Step 18
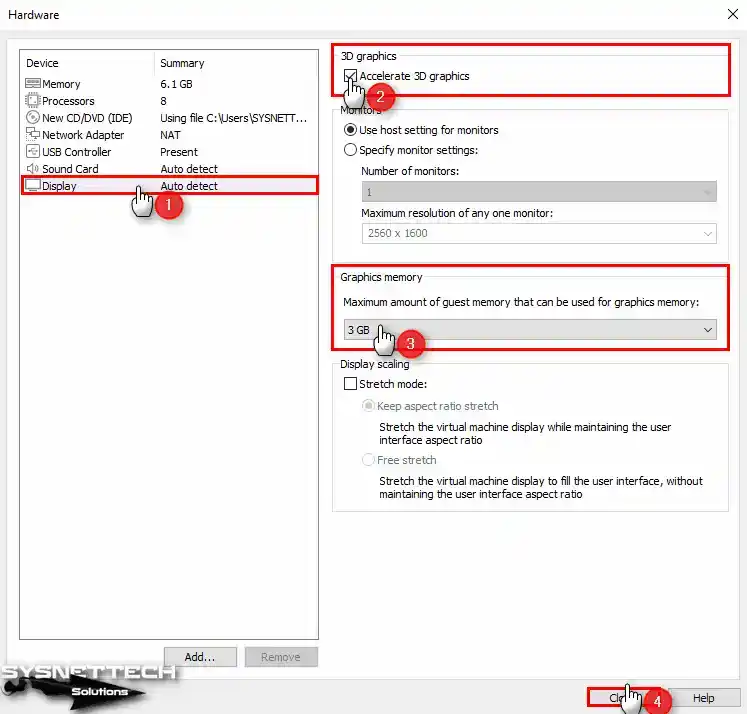
After clicking on the Display device, enable 3D graphics acceleration and configure the Graphics Memory size to a value that your host can support.
Step 19
After completing the necessary preparations, hit the Close button to close the hardware settings of the virtual computer.
Step 20
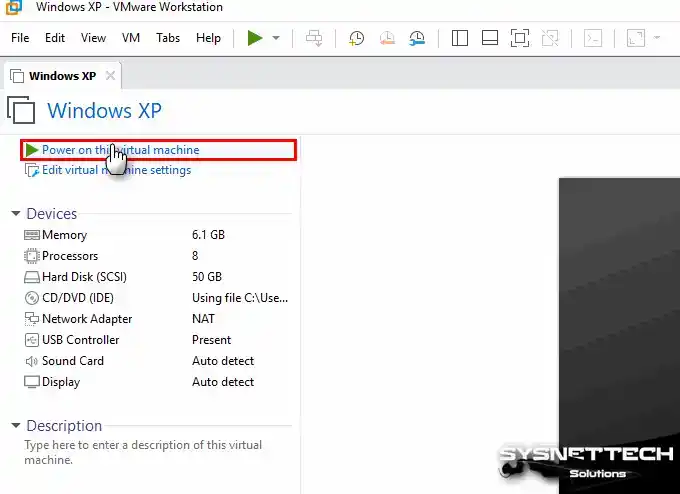
You can start installing the virtual XP system now by clicking the Power button on this virtual machine.
How to Install Windows XP on VMware
After you install and configure a new virtual machine (VM) for Windows XP, the setup wizard will start automatically when you start the VM. Alternatively, you can install XP on a physical computer by following the steps below.
Steps:
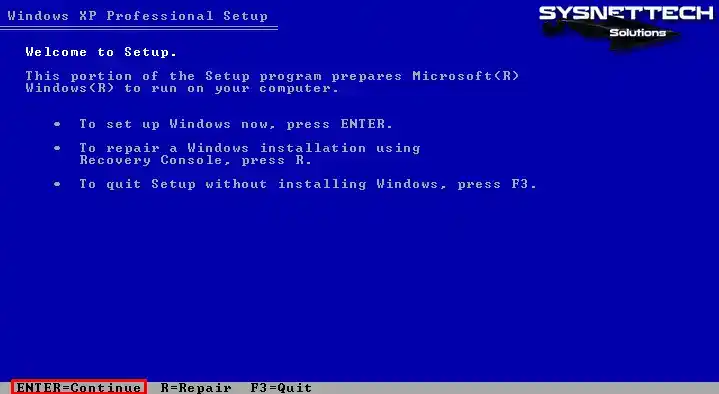
Step 1
Suppose you do not have an ISO file with SATA drivers integrated when the Windows Setup wizard opens. In that case, you can press the F6 key to install the relevant drivers in this step.
If you have a computer with Windows XP installed, you can Repair your system on this screen. Otherwise, press Enter to install from scratch.
Step 2
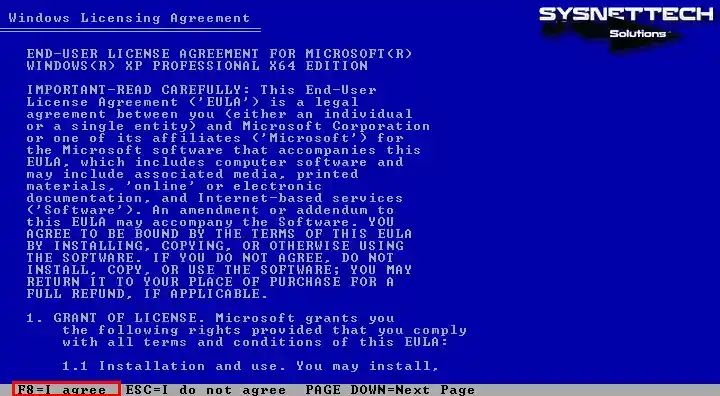
Please review the license agreement carefully before proceeding with the installation of the Windows XP Professional system. After reading the agreement, you can press F8 to indicate your acceptance.
Step 3
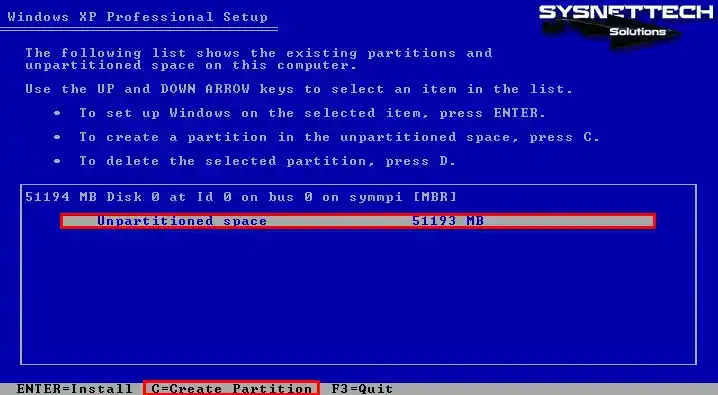
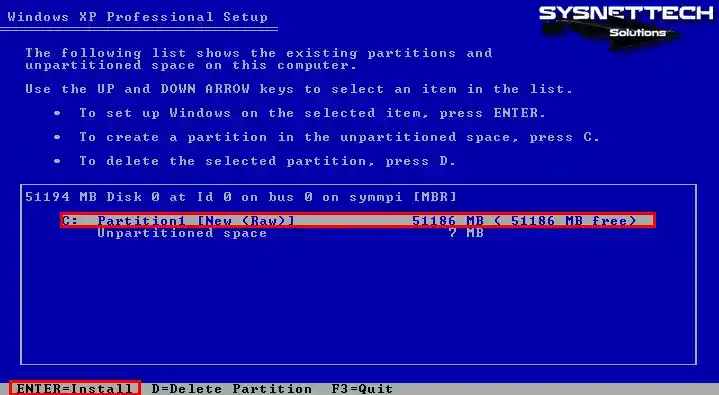
Now, press C to partition the XP virtual disk. If you want to start the installation immediately, press ENTER.
Step 4
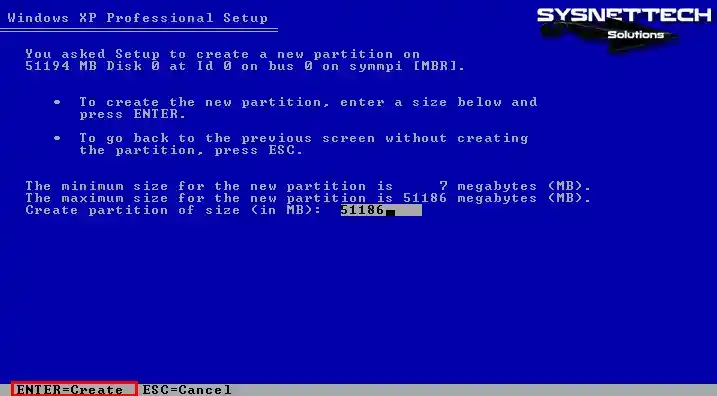
Press Enter to create the entire HDD size you have assigned for the Virtual PC.
Step 5
Press Enter to install XP on the C Partition you created.
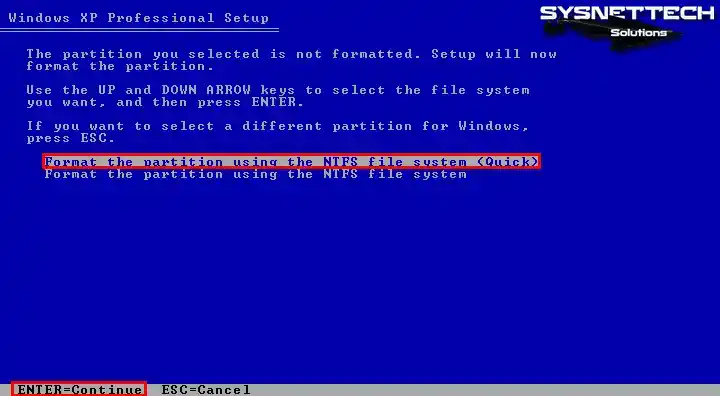
Step 6
Remember to use the NTFS format for your virtual disk. It’s essential for keeping your physical PC’s hard drive healthy and working well over time. Regular formatting can help your hard drive last longer and run better.
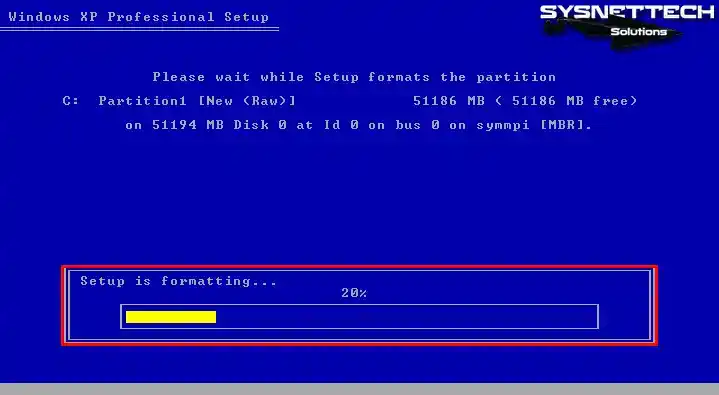
Step 7
Wait while the Setup formats the virtual disk.
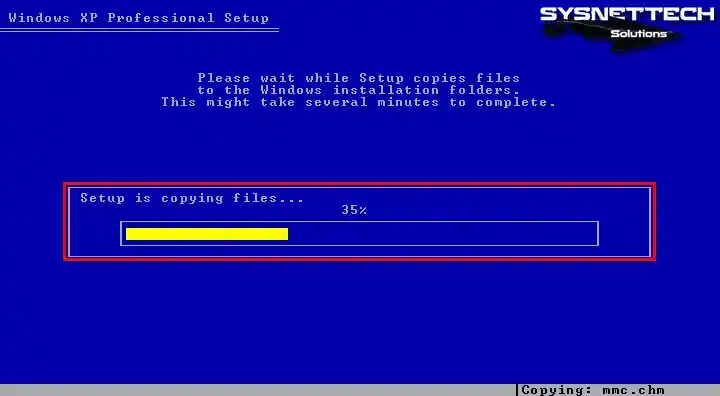
Step 8
Wait while Setup copies the necessary files for the XP system.
Step 9
After the first stage of the installation wizard is completed successfully, press Enter to restart the virtual system or wait for the timer to expire.
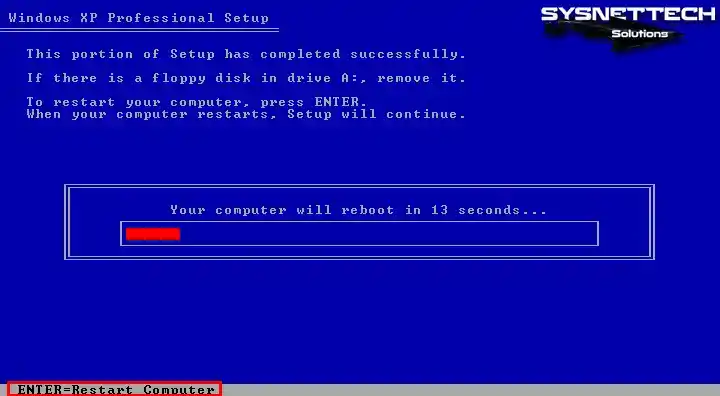
Step 10
Setup will continue when Windows XP restarts.

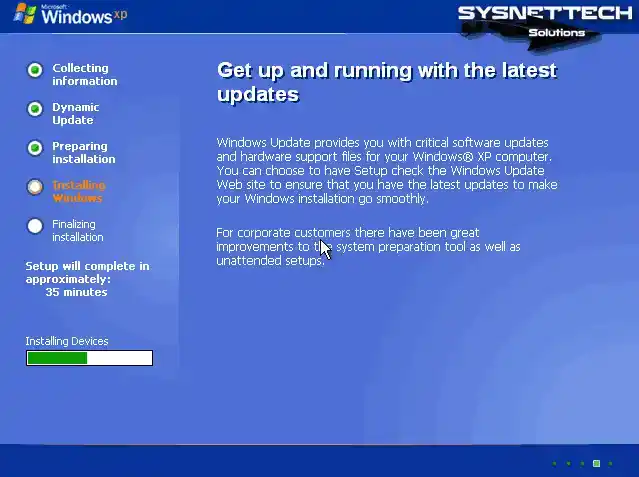
Step 11
Wait while Setup installs and prepares the necessary devices for installation.
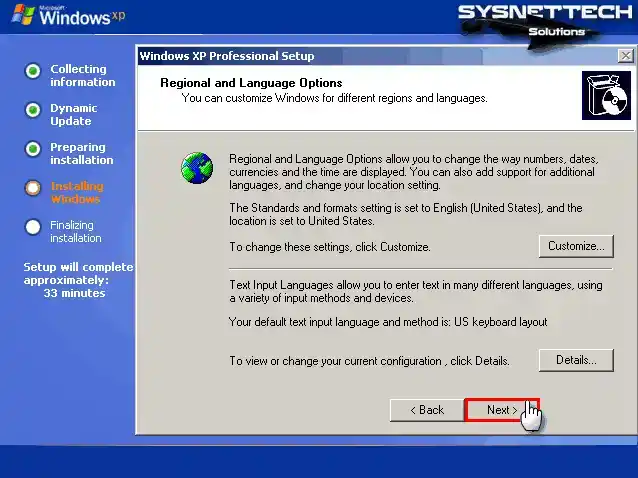
Step 12
When the window for Regional and Language Options opens, you can set your country and time zone by clicking Customize. Thus, to pick your keyboard layout, choose Details.
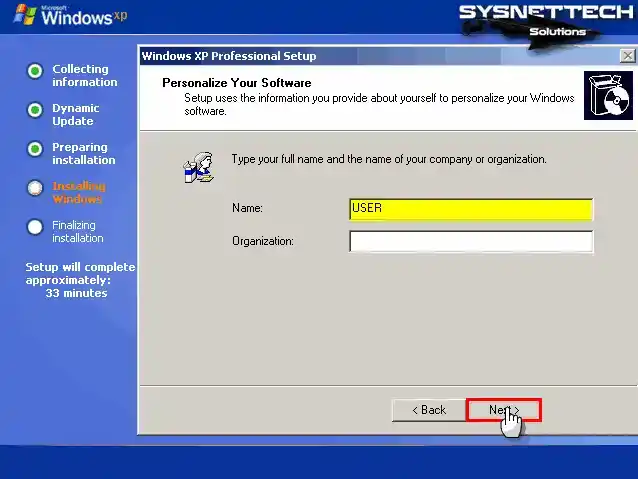
Step 13
In the Personalize Your Software screen, type a name for your user account. If you’re part of an organization, type its name too, then proceed with the Next button.
Step 14
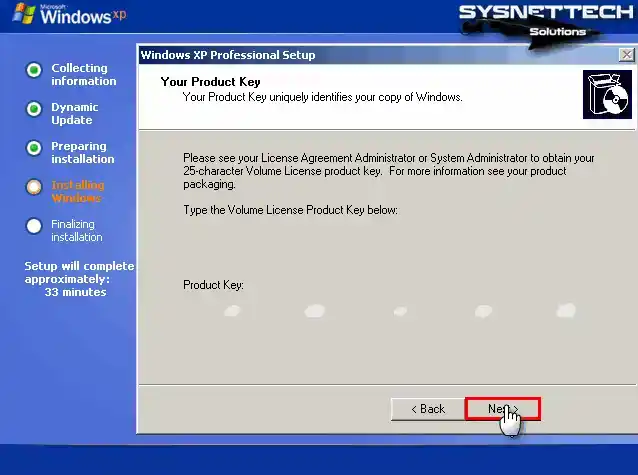
In the Your Product Key window, enter the installation key for Windows XP Pro 64 Bit Service Pack 1 and continue.
Step 15
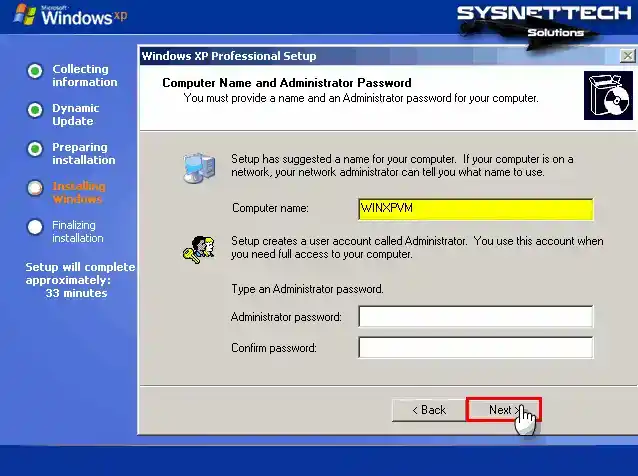
In the Computer Name and Administrator Password area, type a name for your virtual PC. If you want to set a password for the admin account, type it and press Next.
Step 16
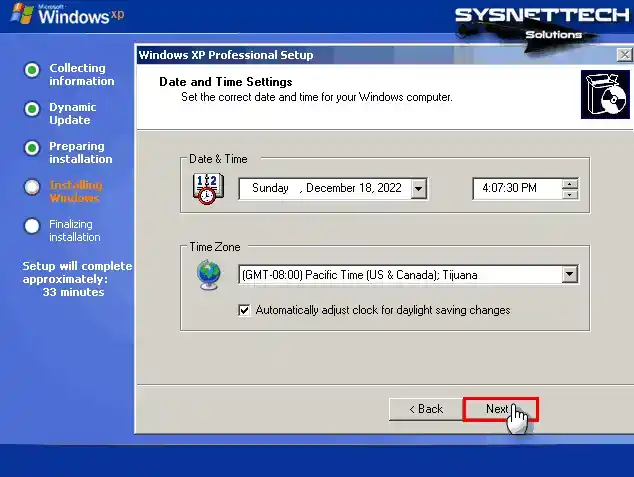
In the Date and Time Settings area, set your time zone and installation date to match your location, then hit Next.
Step 17
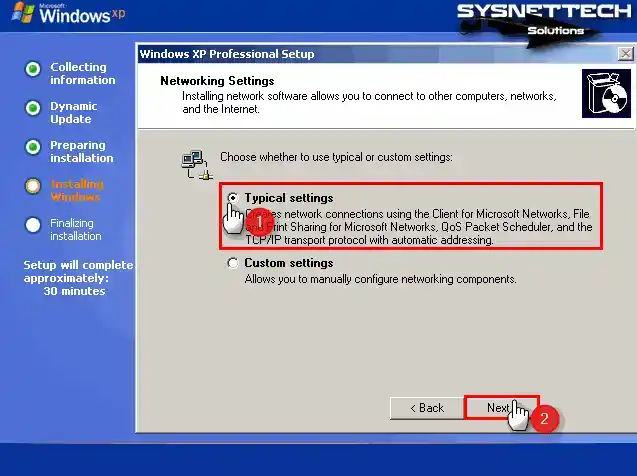
In the Networking Settings window, if you’re not using the VM in a domain, choose the default option “Typical Settings.”
Step 18
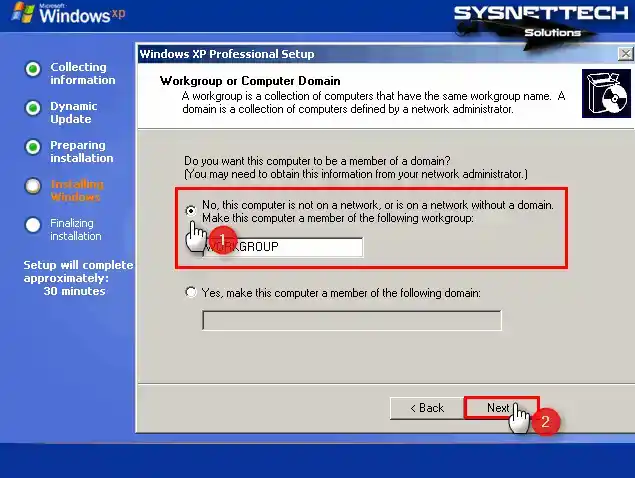
In the Workgroup or Computer Domain screen, if you’re not using the VM in a domain, choose “Workgroup.”
Step 19
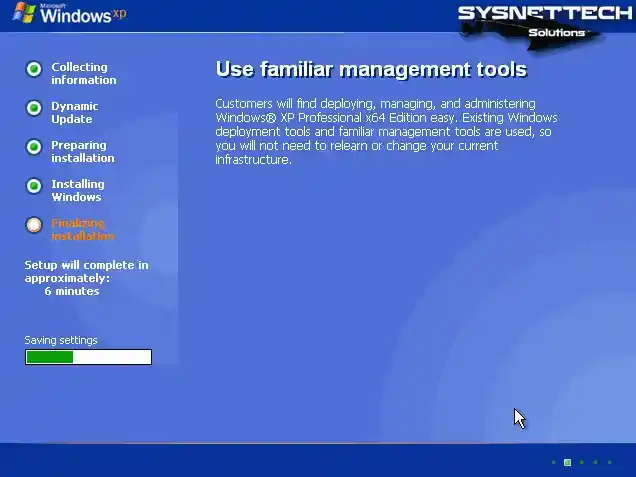
Wait while the setup wizard configures the remaining settings.
Step 20
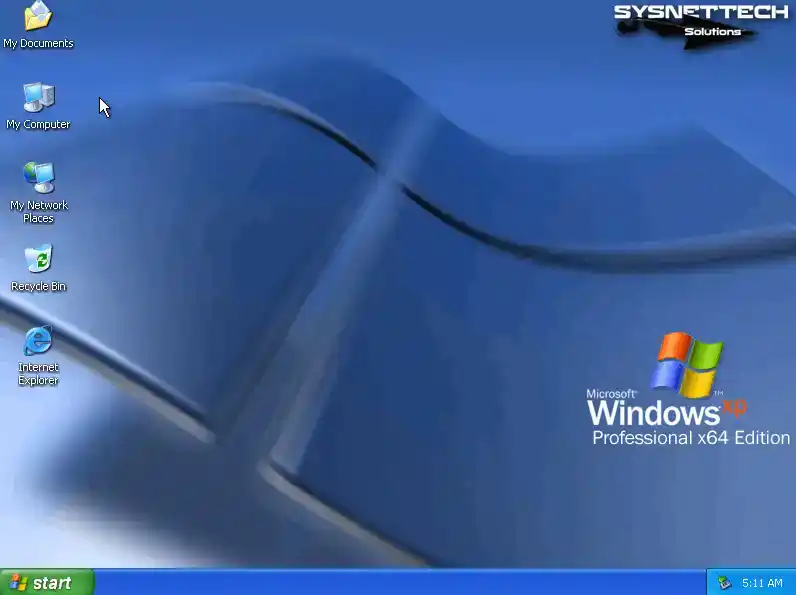
After the installation is complete, your Windows XP desktop screen will be ready.
How to Install VMware Tools
After installing Windows XP with VMware, you can build the drivers for devices that are not installed in your virtual system by installing VM Tools on the virtual machine. You can use the Shared Folder feature to transfer or send files between the host and the guest VM. Because of that, adjust the screen resolution to full screen for a better view.
Step 1
First, right-click on My Computer in the guest XP, then choose Manage. Next, hit Device Manager to see a list of drivers that may not be installed, as shown in the image below.

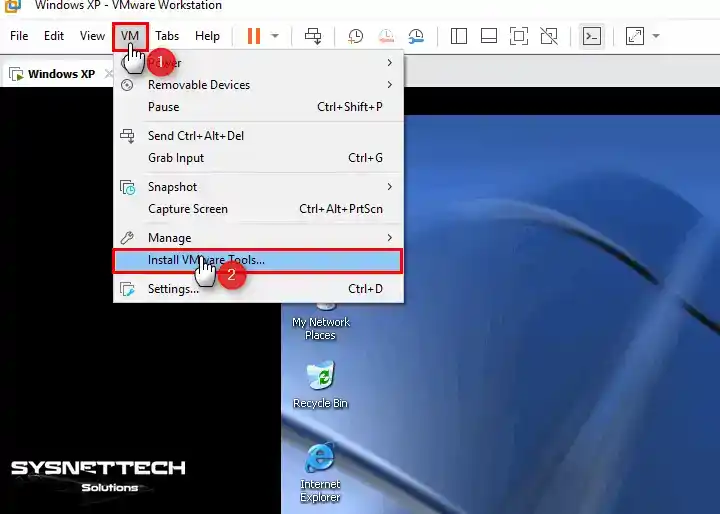
Step 2
Press VM / Install VMware Tools from the tool menu to install the drivers for the virtual PC.
Step 3
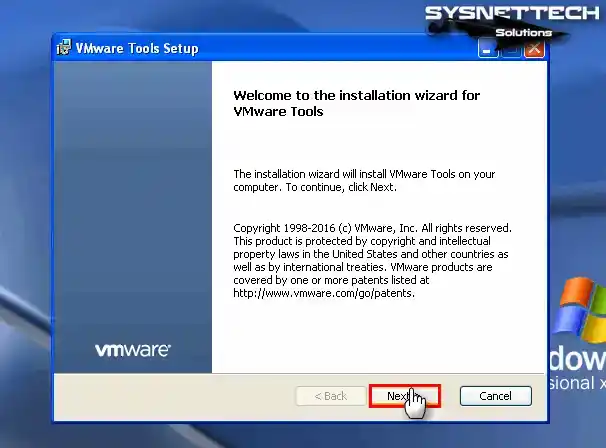
Wait while VMware Tools prepares for installation on the virtual PC. When the installation wizard opens, click Next to go to the next step.
Step 4
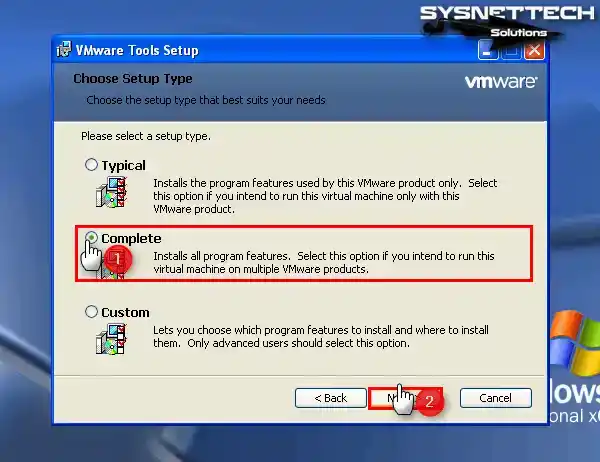
In the Choose Setup Type window, if you plan to use the virtual machine with other VMware products later on, choose Complete and click Next.
Step 5
Click the Install button to start installing all the features of the virtual machine utility.

Step 6
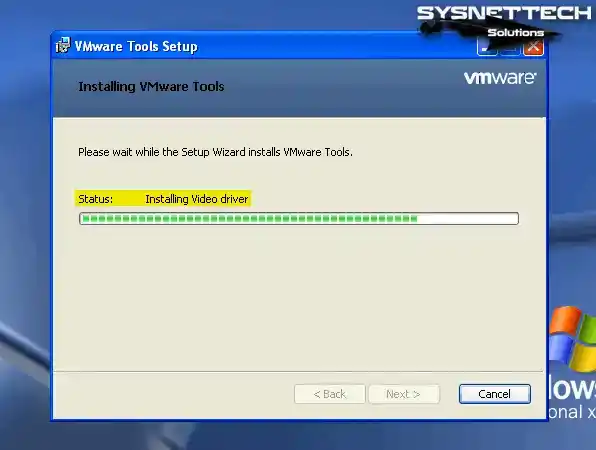
Wait while the video and other hardware drivers of your virtual system are installed.
Step 7
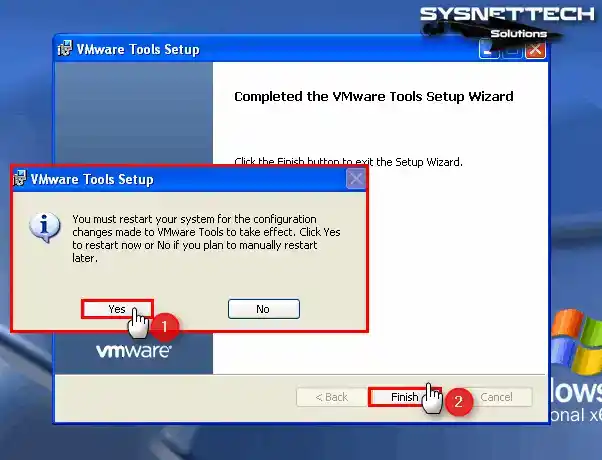
Click Yes to restart your virtual computer and check if the drivers are installed. When you view the Device Manager again, you can now see that drivers such as VMware SVGA II are installed in your virtual system.
Step 8
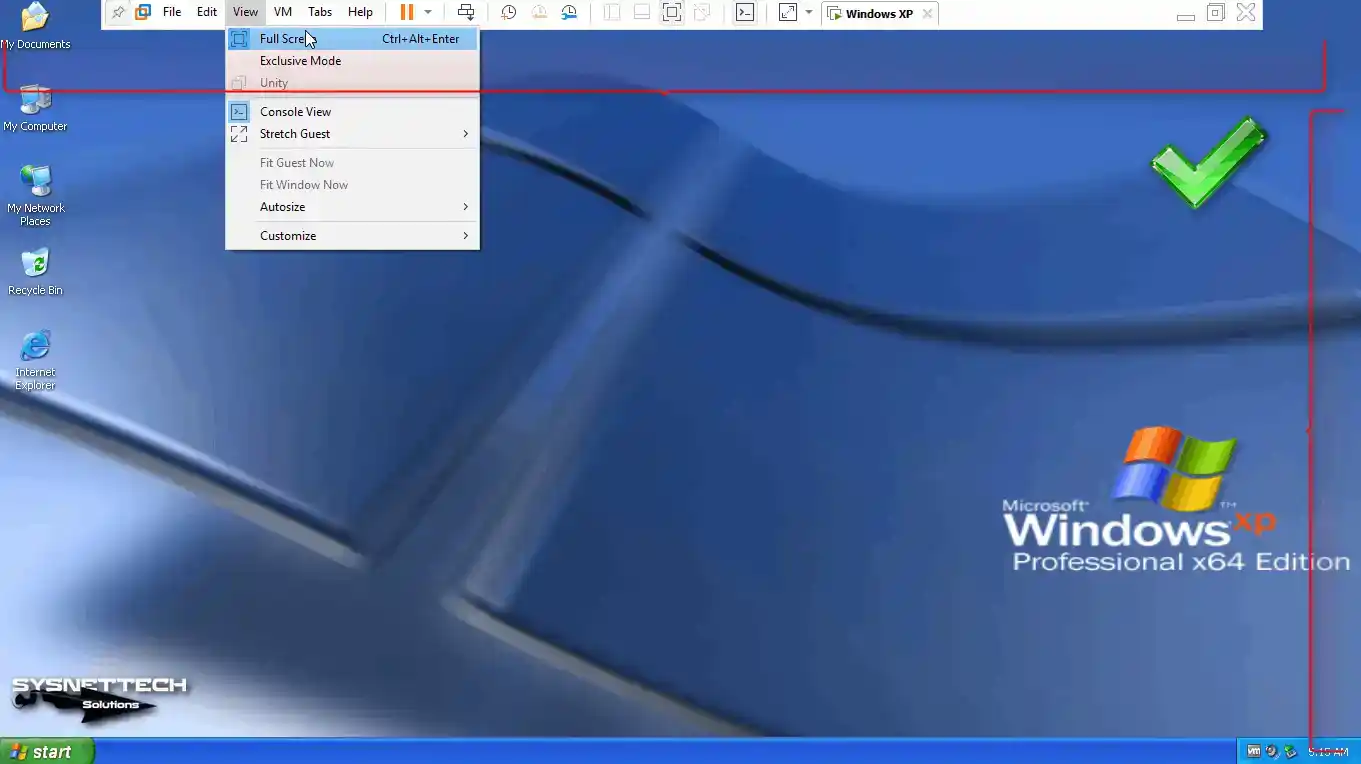
Click View / Full Screen from the Workstation tool menu and check that your virtual PC is adapted to full-screen mode.
Step 9
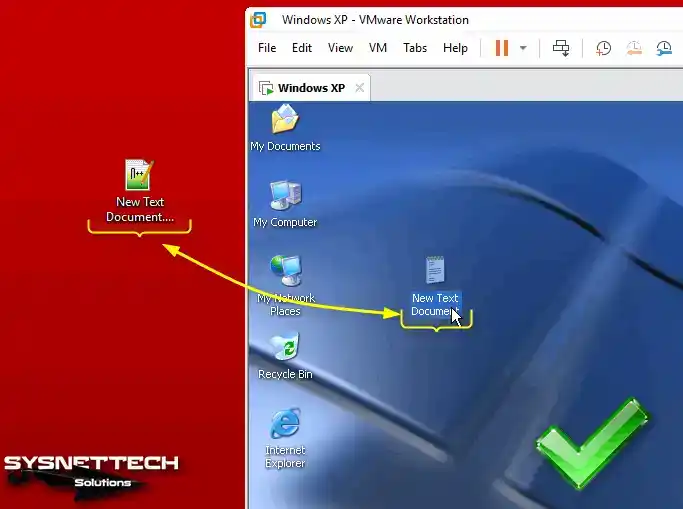
Make a new text document on your host OS. Then, try dragging and dropping it into the XP virtual OS. You’ll see that the file transfers over successfully.
Also, open the Internet Explorer browser and visit Google, and you can see that the Internet connection is working fine.
How to Configure Shared Folder
Creating a shared folder in virtual machines makes it easy to transfer files between the PC and the VM. When you drag and drop a file, it might take some time. However, using the Shared Folder feature makes the process faster, especially for files of the same size.
Click VM / Settings from the Workstation Pro menu to open the properties of the virtual machine you have installed.
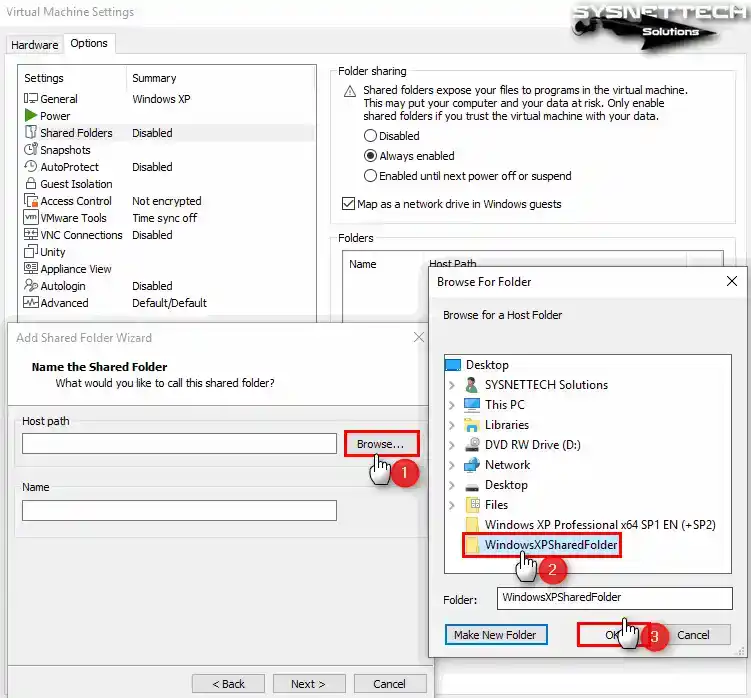
When the Virtual Machine Settings window opens, click the Options tab and then click Shared Folders. In the Folder Sharing section, check Always Enabled to enable this feature, and also select “Map as a network drive in Windows Guests” to configure it as a network drive, and then click the Add button.
When the Shared Folder Wizard opens, click Next directly.

In this window, select the folder you want to share, type a name, and click Next.
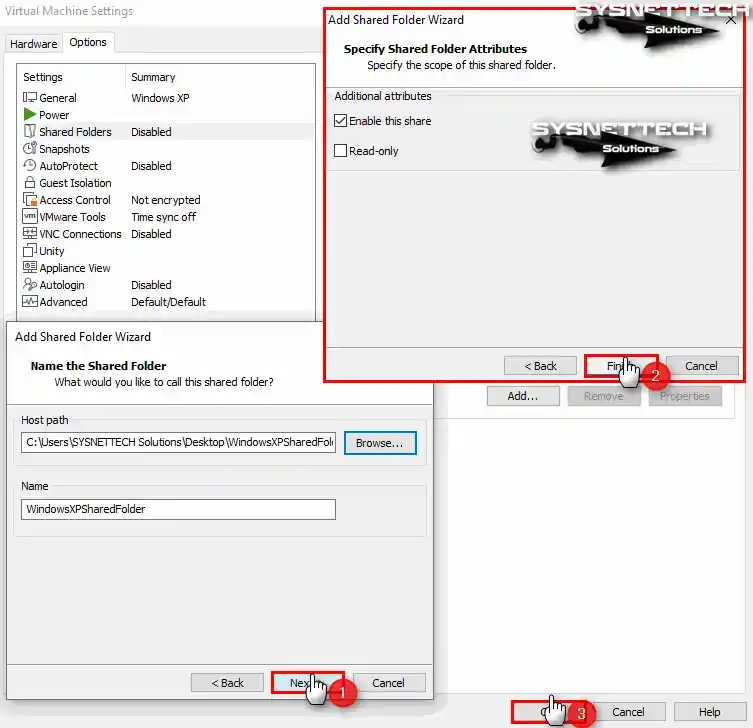
In order to make the folder you added available for sharing in the folder properties window, enable sharing by ticking “Enable this share” and click Finish.
After editing the path of the shared folder, close the VM settings.
When you look at the Shared Folder on my computer, check that it works in the Network Drives section.
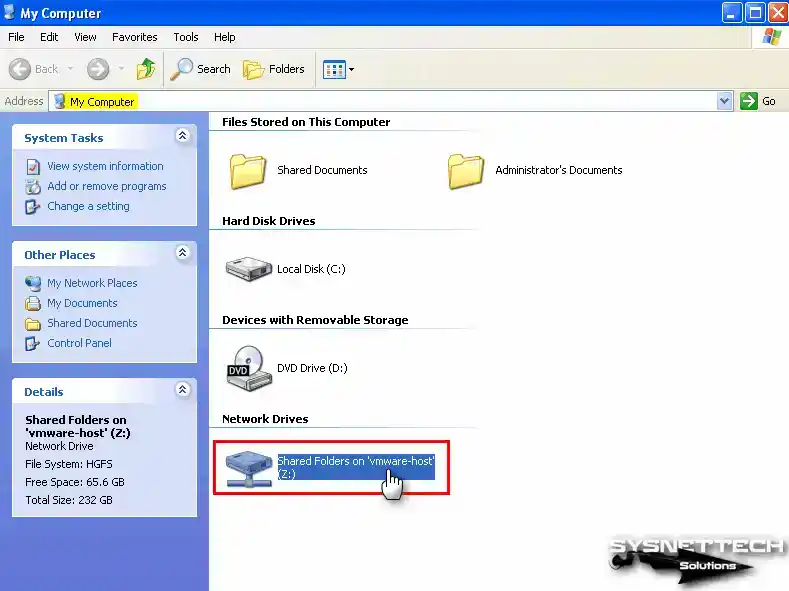
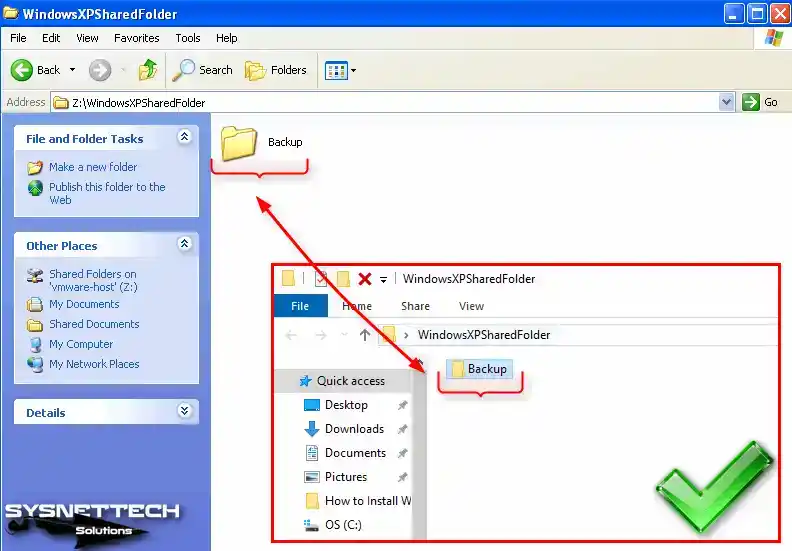
When you open the folder attached as a network drive, you can see that you can access the related files.
Additionally, click Add a Network Place from the options under Network Tasks to add the shared folder to My Network Places. Click Next when the add network location wizard opens.
Double-click on Choose another network location or click Next when the relevant option is selected. Open the vmware-host content by clicking the Browse button in the Internet or Network Address section, select Shared Folders, and click OK.
To access Shared Folders over the network, click Next after selecting the location. At this point, click Finish to close The Add Network Place Wizard.
Click My Network Places and check the location you added in the Local Network window. You can see that you can access the files when you view the Shared Folder content over the network.
How to Use USB Flash Memory
Instead of using the Shared Folder feature to transfer files, a faster solution is the use of USB flash memory.
Step 1
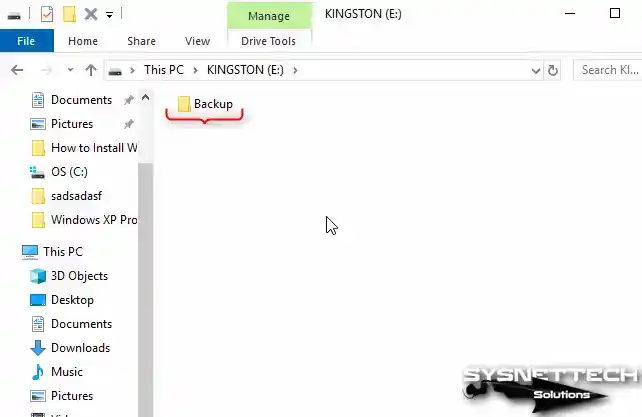
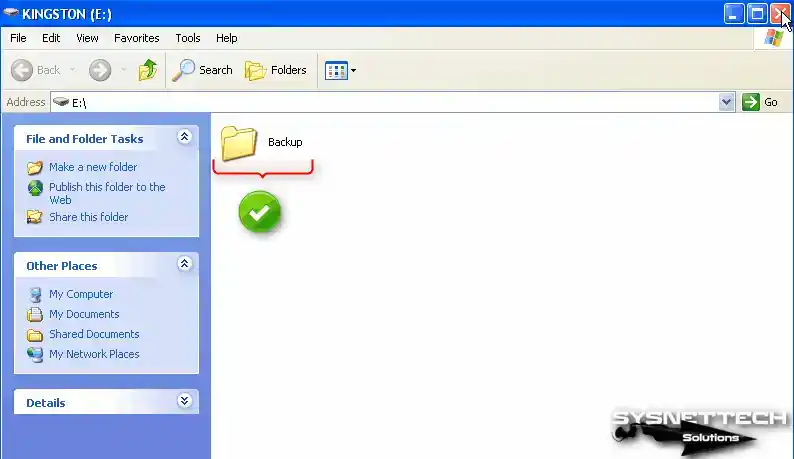
Insert a flash memory into one of the free USB ports of your host computer and create a folder named Backup, for example.
Step 2
To connect the USB disk to the virtual machine, click VM / Removable Devices / Name of your USB / Connect from the tool menu.
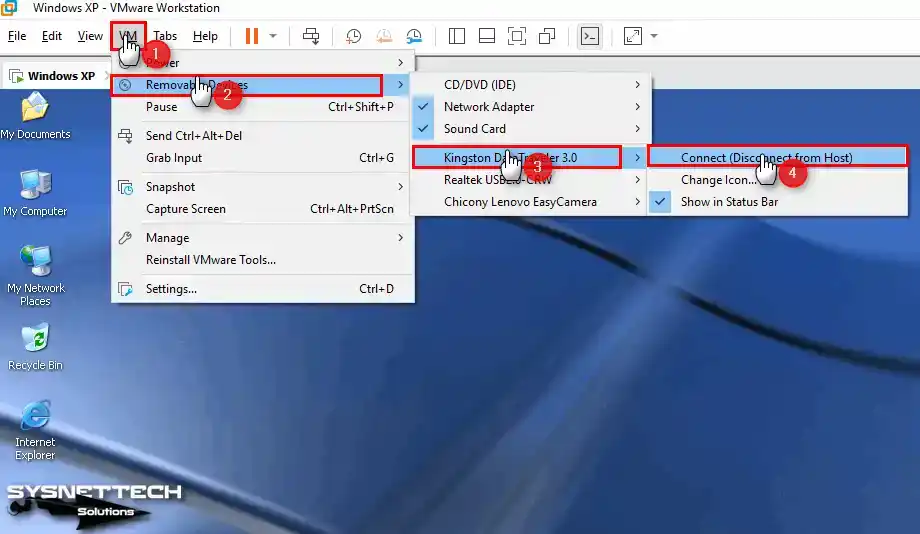
Step 3
When USB drivers are automatically installed in your virtual system, you can access your USB and see the folders and files you have created.
How to Install & Upgrade Windows XP SP2 Software Package from SP1 to SP2
To upgrade Windows XP 64-bit from SP1 to SP2, you can install an ISO file that includes SP2 files or install the SP2 software package from scratch.
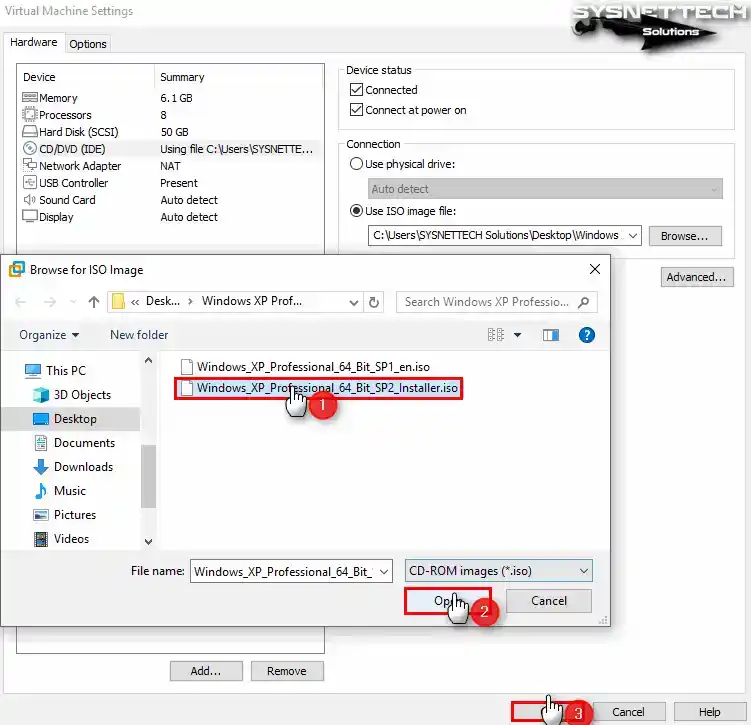
Step 1
To add the Microsoft Windows XP SP2 ISO image to the guest machine, right-click on the DVD drive and choose Settings. With the CD/DVD device selected, choose the Browse button to add the SP2 ISO location to the Use ISO Image File section.
Select the Windows XP SP2 Installer.iso file and hit the Open button. To enable the DVD device, check the Device Status option and press the OK button to close the window.
Step 2
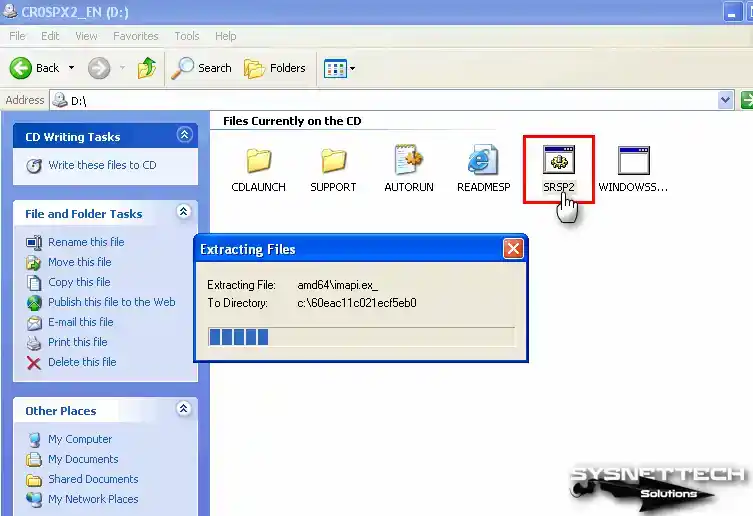
When the Service Pack 2 ISO image is automatically mounted to the system, you will automatically see the Readme page. Close the Readme.HTM webpage and open My Computer. To view the contents of the ISO image mounted in the Removable Storage section, press the right button and then choose Open.
Right-click / Open the SRSP2 file in the CD/DVD media to start the installation.
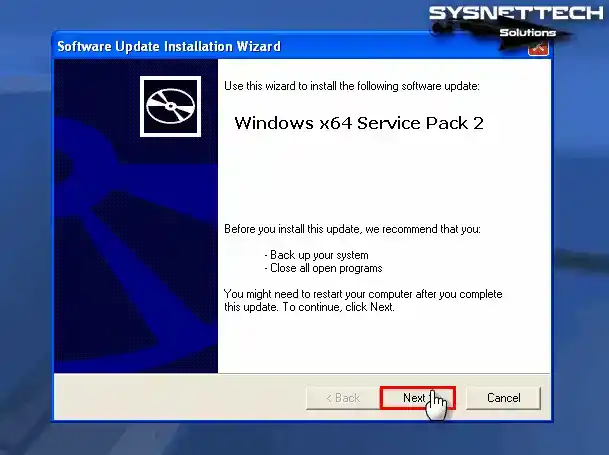
Step 3
Proceed by clicking on the Next button within the Windows x64 Service Pack 2 installation wizard.
Step 4
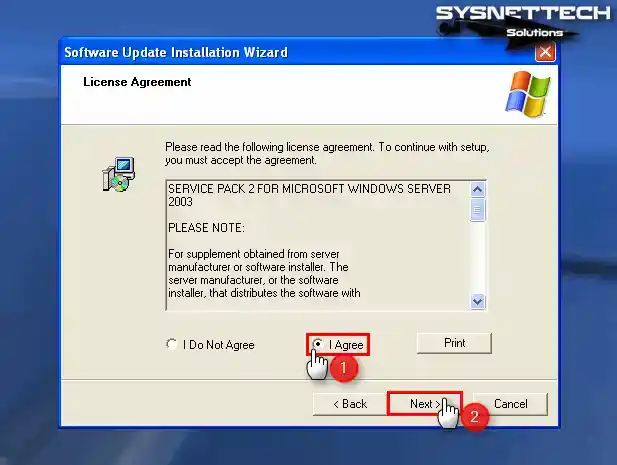
Check “I Agree” to accept the Service Pack 2 license agreement and press Next.
Step 5
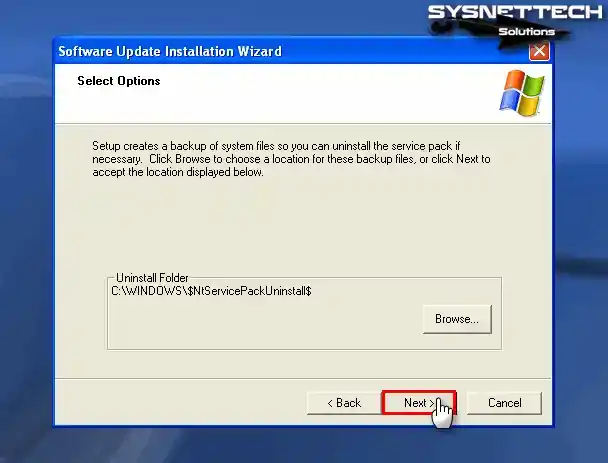
Proceed in the Select Options window without changing the Uninstall Folder location.
Step 6
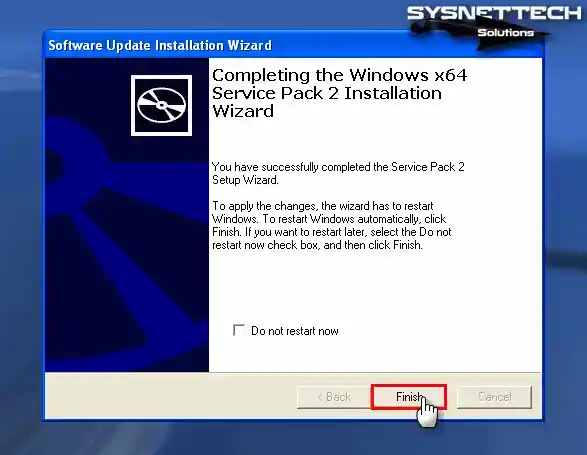
Wait while Windows XP Service Pack 2 is being installed. The system update period may take some time, so do not do anything on your system.
After installing Service Pack 2, restart your virtual system by clicking the Finish button.
Step 7
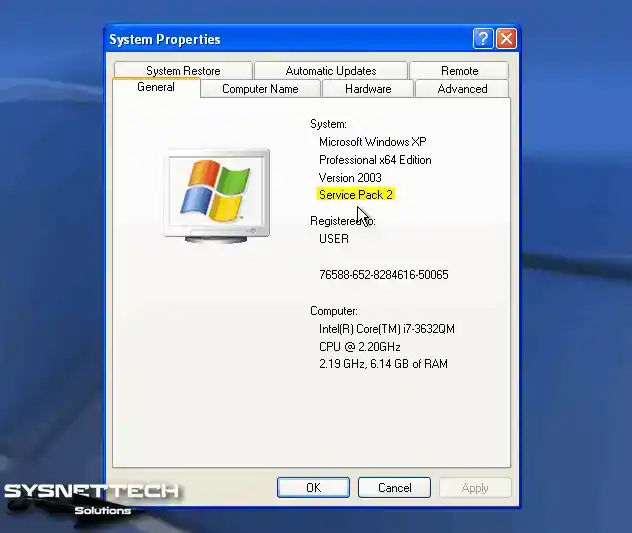
After right-clicking on my computer, press System Properties, and you can check the Service Pack version in the system section of the window that opens.
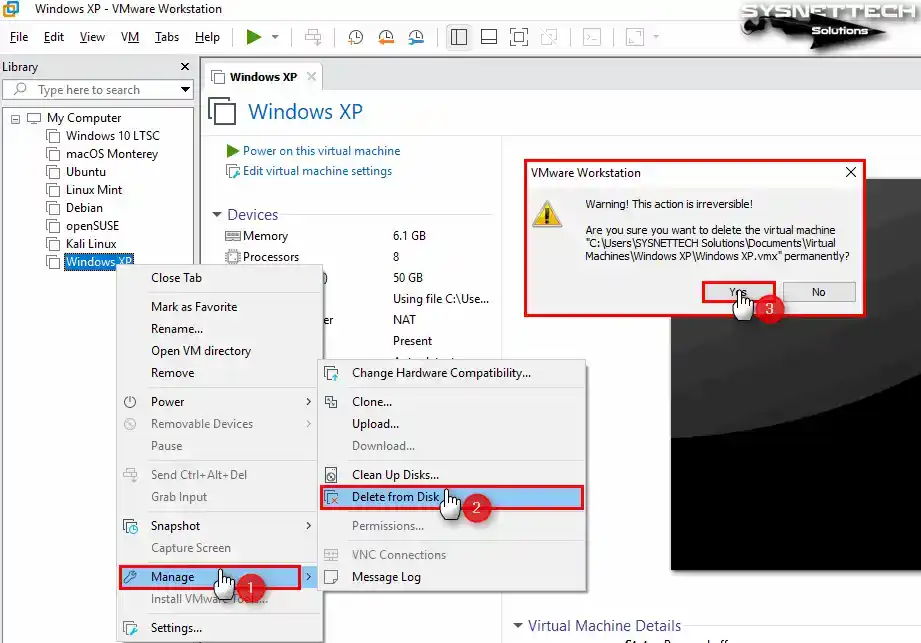
How to Delete the Windows XP Virtual Machine
Suppose you decide not to use the guest machines that you have prepared with VMware on your physical computer. In that case, we recommend that you completely delete the VM files from your host disk.
Right-click on your guest system from the left panel of Workstation Pro, then choose Manage / Delete From Disk. As soon as you select Yes in the warning window that opens, all VM files will be deleted entirely from your host disk.
Video
Installing Old Versions
You can easily install and use Windows XP operating system on 12, 14, 15, or 16 versions of Workstation Pro.
| Workstation Pro | YouTube Video | Slide |
|---|---|---|
| 12 Pro | Watch | – |
| 14 Pro | Watch | – |
| 15 Pro | Watch | View |
| 16 Pro | Watch | View |
| 17 Pro (New) | Watch | – |
Frequently Asked Questions (FAQ)
- Is Windows XP compatible with VMware Workstation?
- How do I install Windows XP on a virtual machine?
- Do I need to install VMware Tools for Windows XP?
- Are there any special settings I need to configure for the XP virtual machine?
Conclusion
As a result, you can set up a virtual machine that will run Windows XP on a modern computer. Thus, you get a practical and effective solution for managing legacy systems. With the detailed steps I provide, you can safely create a virtual environment that meets XP’s specific requirements.
With this approach, you ensure the continued availability of legacy software while retaining the advantages of the current operating system. Additionally, you can seamlessly bridge the gap between legacy and modern computing environments by leveraging virtualization technologies such as VMware Workstation 17 Pro.

13 People Shared Their Experience
please send me the adress to download xp iso.
You can download it from the button at the bottom of the article.
not able, it say: sorry you can’t view or download this file at this time……..
What do I do when the XP is installing on my VM and it asks for a license key?
The license key is included in the zipped file.
Thanks for helpme, Excelent guide! Saludos desde Perú
Are you sure, iso file doesn’t contain any viruses,,,?
Hello, there is absolutely no virus in the ISO file. By default, Google Drive warns of a virus scan for prevention. I am still using this image file and it is still backed up on my external drive.
This is a very detailed description of the installation however I am unable to locate the “button” for the download of the iso’s. Am I missing it somewhere?
Thanks for your feedback. I guess you didn’t see the download link of the ISO file in the content under the virtual machine creation title?
Anyway, I have updated the article and put the button instead of the ISO download link. Please check again.
help i press f8 where it says terms and conditions and nothing happens pls help
excellent solution
, with vmware 17.5 there is no vmware tools for win xp
u can install windows then open the guest in the my computer menu choose cd driver but prior to this choose cd driver to read from vmwaretool version 12.5 then easily click it and install vmware tool inside winxp
maybe u didnt mention this at this article but i found it through your proceeder
thanks bro
WoW! Really great content and description! For a complete novice like myself this was so easy to follow, and surprisingly it worked perfectly first time!! Many thanks to the author!