

When you buy a hard disk drive (HDD), you see capacity values. The box shows terms like 1 TB and 2 TB. However, when you install that disk in your PC and boot it for the first time, no one tells you anything. You cannot know how data is arranged on the magnetic platters. At this point, the structure we call NTFS steps in.
Every HDD you connect to the motherboard with a SATA cable needs an order. Likewise, every SSD you seat in an NVMe slot also needs this order. Also, every external disk you plug into a USB port wants the same order.
We call this order a file system. NTFS shows up on internal disks where the Windows operating system is installed. In addition, you also run into NTFS on portable drives you use for backup. This structure is the invisible architect of modern storage hardware.
Today, when you go to a computer store and buy any internal disk, you see NTFS even on the product box. Moreover, it comes ready by default. That is because Windows automatically formats the disk as NTFS during setup. All physical parameters, from sector size to cluster size, directly affect disk efficiency.
I will share the right NTFS settings for hard disk drives, SSDs, and NVMe modules. In addition, I will share the same settings for USB flash drives and external disks. Additionally, I will cover critical topics like data recovery, bad sector management, and disk health. My goal is to help you achieve maximum efficiency from the storage device in your hands.
NTFS Meaning and Historical Development (from NTFS 1.0 to NTFS 5.1)
The history of NTFS actually moves in parallel with the evolution of storage hardware. In the late 1980s, hard disk drives were growing in capacity.
However, the old FAT file system could not manage these growing disks efficiently. Therefore, Microsoft decided to build a completely new structure. It released the first version, NTFS 1.0, with Windows NT 3.1 in 1993. At that time, this version ran on server-class SCSI disks.
Here are the critical milestones of NTFS versions:
- NTFS 1.0 (1993): Microsoft designed it for server-class SCSI disks. Moreover, it included basic security and audit records.
- NTFS 1.1 (1994): Compression support arrived. This feature provided a significant advantage on limited disks.
- NTFS 1.2 (1995): It came with Windows NT 3.5. It strengthened compatibility with IDE and EIDE disks.
- NTFS 3.0 (1996): Microsoft introduced it with Windows NT 4.0. It improved performance and disk management.
- NTFS 3.1 (2000): Users still widely use this version that came with Windows 2000. It is also known as NTFS 5.0 or NTFS 5.1. In particular, disk quotas, EFS encryption, and reparse points came with this version.
During this evolution, each new version adapted to growing disk capacities. Additionally, it kept up with changing hardware standards.
Developers designed structures for 40 GB IDE disks in the early 2000s. Moreover, today these structures run without issue on 20 TB SAS drives. This proves how scalable NTFS is.
What Does NTFS Do? Its Role in Daily Use
What concrete benefits does NTFS provide in daily computer use? To understand this, let us first think about how a hard disk works. Magnetic platters spin, and the read/write head reads or writes data.
However, if this head does not know which sector to go to, the disk spins in vain. At this point, NTFS tells the head exactly where to go. As a result, data access time stays at the millisecond level.
Second, security comes into play. Imagine an office setting where everyone accesses the same file server. Only accountants should access the accounting folder.
NTFS lets you define separate permissions for each folder. Additionally, with EFS (Encrypting File System), you can encrypt sensitive files on your laptop. This way, even if you remove your NVMe SSD, no one can read your data.
The third key function is data recovery. An HDD’s magnetic head can suddenly stop due to a power outage. In this case, a half-finished write operation can leave the disk inconsistent.
NTFS’s journaling mechanism steps in and cleans up half-finished operations. As a result, your storage device quickly recovers after a system crash. In short, NTFS is both the organizer and the protector of your storage hardware.
What Are NTFS Features? Full List of Technical Capabilities
A set of technical features sets NTFS apart from other formats. These features make it essential for storage hardware. They also let it work efficiently in every setting, from magnetic platters to the NAND chips of NVMe SSDs. Let us examine NTFS features from a hardware perspective.
First, the most basic feature is the journaling mechanism. This system records all metadata changes on the disk to a separate log file.
When you unplug the SATA cable or cut power, the system reads this log when you reconnect the disk. This way, it detects which operations finished. Additionally, it understands which ones stopped halfway. This feature is vital, especially for SAS disks in RAID arrays.
The second group of NTFS features relates to security. With EFS, you can encrypt at the file level. Thanks to ACL (Access Control List), you define separate permissions for each user or group. These permissions cover read, write, and execute.
With disk quotas, you can limit each user’s maximum storage space. These features provide data security from external disks to USB flash drives.
The third group of NTFS features relates to performance and scalability. NTFS supports a theoretical file size up to 16 EB. It also offers a maximum volume size up to 256 TB.
In addition, it is compatible with all modern drives that have a 512-byte or 4096-byte sector size. It includes special optimizations for Advanced Format (4Kn and 512e) disks. All these capabilities make NTFS ideal for both HDDs and SSDs.
What Is NTFS Journaling and How Does It Work?
The NTFS journaling mechanism is actually a safety net. How does it work physically? Every metadata change made to the disk is first recorded to a special file called $LogFile. Then, after the system completes the operation written to the log, it writes the actual data to the disk.
If you unplug the SATA cable or cut power during this, the system restarts. Then, by reading this log, the system can detect operations that stopped halfway.
After this detection, the system completes or rolls back the half-finished operation. This way, NTFS always stays in a consistent state. This mechanism is essential, especially for database servers with heavy writes.
On SAS disks, journaling works together with the RAID controller. This provides two-layer protection. NTFS recovers quickly after an interruption.
The system automatically clears the log file when it reaches a certain size. Users do not notice this process. However, this mechanism running nonstop adds extra write load to the disk.
Especially on NVMe SSDs, this situation affects the TBW (Total Bytes Written) value to some degree. Still, when data integrity is at stake, we can accept this cost. As a result, NTFS journaling is one of the cornerstones of storage safety.
NTFS Security: EFS Encryption, ACL, and Disk Quotas
NTFS places your storage hardware under multi-layer protection. The first layer is EFS (Encrypting File System), i.e., file encryption.
You remove the laptop’s NVMe SSD and install it in another computer. Even so, no one can read your files encrypted with EFS. This feature is critical, especially for portable SSDs and external disks. The encryption process makes raw data on the disk meaningless.
The second layer is the ACL (Access Control List) structure. In NTFS, every file and folder has a security descriptor. This descriptor states who can access the file and with which rights.
For example, you let only a certain user write to a folder on an external disk. The system links permissions to unique identities called SIDs (Security Identifiers). When the user tries to access it, the system calculates effective permissions and decides.

The third layer is disk quotas. Thanks to this NTFS feature, you limit a user’s maximum space. Likewise, you set the space a group will use on a storage volume.
For example, you define a 50 GB quota for each user on a RAID array on a server. When the user exceeds this quota, NTFS gives a warning or stops the write. All these security features make NTFS an essential part of enterprise storage.
- EFS: File- and folder-level encryption. It prevents data leaks from a removed disk.
- ACL/DACL: Access permissions on a user and group basis.
- SACL: Security descriptor for audit records.
- SID: Identity that uniquely defines each user and group.
- Disk Quotas: Storage space limit per user.
NTFS Compression, Sparse Files, and Integrity Streams
NTFS not only stores data. It also helps you use storage capacity efficiently. The first of these is the compression feature. Thanks to this feature, you compress your files so they take up less space on the disk.
Text documents and source code files compress at a high rate. This way, you save significant space on an HDD or SSD. The compression process is integrated into NTFS and transparent to the user.
The second key feature is sparse file support. This feature is ideal for files that contain many zeros or empty space.
For example, a virtual machine disk image can be logically 100 GB. However, it can take up only 20 GB physically. NTFS does not write empty space to the disk. This way, you save a significant amount of space on your NVMe SSD. Backup and virtualization apps use this feature heavily.
Third, we need to mention the integrity streams feature. This feature ensures the integrity of files and metadata. It is especially common on enterprise SAS disks and RAID structures.
This mechanism detects and corrects data corruption. This strengthens NTFS’s self-healing ability. When these three features come together, we clearly understand how flexible NTFS is.
NTFS Alternate Data Streams (ADS) and Volume Shadow Copy (VSS)
NTFS has two little-known but equally powerful features. The first is ADS (Alternate Data Streams). Thanks to this feature, you link more than one data stream to a file.
For example, if you have a file named document.txt, you add an alternate stream named document.txt:notes. This way, you store extra metadata without creating a separate file. However, you access these streams only with programs or command-line tools.

The second feature is VSS (Volume Shadow Copy Service). Thanks to this feature, you create backups of your files even while they are in use.
For example, while a database runs, VSS steps in and takes a consistent snapshot. This feature is extremely useful, especially for System Restore and backup. Thanks to NTFS, VSS tracks changes on the disk. This way, you return to a past state whenever you want.

When these two features come together, you clearly see that NTFS is not just a storage format. It is also a full platform for advanced data management and recovery. Enterprise backup software in particular uses these two features heavily.
What Is NTFS MFT (Master File Table)? The Heart of NTFS
NTFS’s most critical component is undoubtedly the Master File Table (MFT). We can compare this structure to a library’s card catalog.
Just as every book in a library has a card, every file has an MFT record. This record contains information such as the file’s name, size, date, permissions, and physical location. In other words, MFT is the invisible brain of NTFS.
When you create a file, NTFS immediately adds a new record to the MFT. This record contains all properties of the file. It also keeps a map that shows which clusters its data is spread across.
When you delete the file, the system marks the related MFT record as empty. However, the system does not delete this record right away. This way, you have a chance to recover a file you deleted by mistake, as long as no new data is written over it. This MFT structure makes NTFS extremely strong for data recovery.
NTFS stores the MFT in a special area on the drive (MFT Zone). NTFS treats this area with priority. By default, it sets aside 12.5% of disk space for MFT growth. That is because MFT fragmentation seriously lowers performance.
Especially on magnetic platter HDDs, a fragmented MFT causes the read head to move continuously. For this reason, NTFS tries to keep the MFT as contiguous as possible.
MFT Structure: File Record, Segment Reference, and LCN/VCN Concepts
Understanding the inner structure of the MFT is important to grasp how NTFS works with your storage hardware. The MFT actually consists of a series of file records (MFT Records). Each file record is typically 1 KB in size.
It also holds all information about a file or folder. The system accesses each of these records with a unique number called an MFT segment reference.
This reference specifies the file’s position inside the MFT. For example, let us assume the file is the fifth record in the MFT. This reference lets the disk controller find the file quickly.
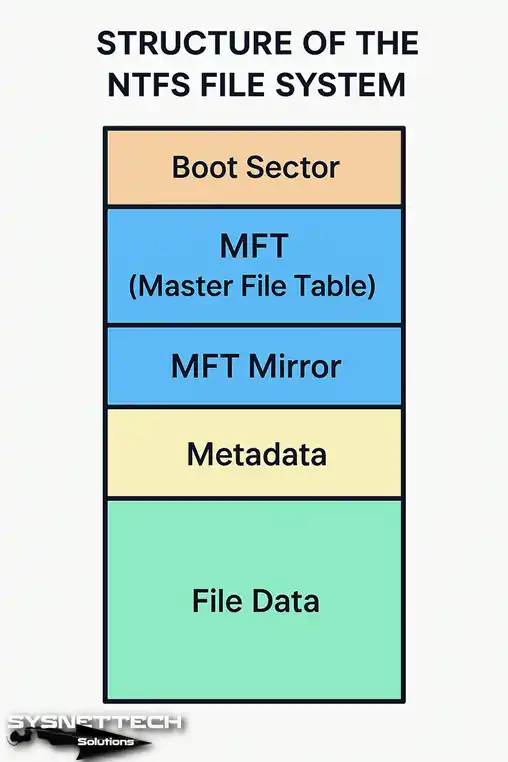
LCN, VCN Concepts and Cluster Mapping
Inside MFT records, there are two important concepts: LCN (Logical Cluster Number) and VCN (Virtual Cluster Number). These concepts show how a file’s data is spread across the disk. LCN specifies the physical cluster number on the disk. VCN is the logical cluster number inside the file itself.
For example, the first cluster of a 100 MB file is VCN 0. Its second cluster is VCN 1. The file’s physical location on the disk can be different numbers, such as LCN 5000.
This structure lets files be written to the disk in a scattered way (fragmentation). When a file grows and no contiguous space remains, NTFS splits the file into different clusters.
The MFT record keeps a map of these pieces and protects the file’s integrity. This is why the MFT is the most vital component of NTFS. This table summarizes the core components of the MFT structure:
| Component | Description |
|---|---|
| MFT Record | 1 KB structure that holds basic info for each file or folder. |
| MFT Segment Reference | Number that uniquely identifies each record in the MFT. |
| LCN (Logical Cluster Number) | Physical cluster number on the disk. |
| VCN (Virtual Cluster Number) | Logical cluster number inside the file. |
| Cluster Allocation Map | Map that shows which clusters are full and which are empty. |
NTFS Metadata Files: $MFT, $LogFile, $Bitmap, and Others
NTFS has a set of hidden metadata files that users do not see directly. These files are vital for storage hardware to work.
File names start with the ‘$’ sign. It also hides these files in the root directory. To see these files, you use the dir /a command in the command prompt. Here are the most important NTFS metadata files and their tasks:
| Metadata File | Task |
|---|---|
| $MFT | The Master File Table itself. It contains all file records. |
| $MFTMirr | Backup copy of the MFT. It is used for recovery when the MFT corrupts. |
| $LogFile | Transaction log. It is used for crash recovery. |
| $Volume | Contains the volume name, version, and other info. |
| $AttrDef | Contains attribute definitions. It specifies the type and rules of each attribute. |
| $Bitmap | Cluster allocation map. It shows which clusters are full. |
| $Boot | Contains the boot sector and BIOS parameter block. |
| $BadClus | Marks bad clusters on the disk. These clusters are not used. |
| $UpCase | Contains the uppercase/lowercase conversion table. It is used for Unicode characters. |
| $Extend | A directory that contains other metadata files (e.g., $Quota, $ObjId). |
These metadata files are vital for storage hardware to work properly. For example, the $Bitmap file determines which clusters are empty when a new file is created.
$LogFile, meanwhile, plays a critical role in recovery from system crashes. If any of these files corrupt, NTFS can suffer serious damage. You can also experience data loss. To protect the integrity of these structures, it helps to regularly check with tools like chkdsk.
NTFS vs FAT32 vs exFAT vs ReFS: Which Is Better?
There is more than one file system option on the market. It can be hard to decide which one is best for your storage hardware.
The four structures most often compared in the computer world are NTFS, FAT32, exFAT, and ReFS. Each has its own strengths and weaknesses. To make the right choice, you first need to understand the scenarios in which these structures stand out.
FAT32 is an old file system that has been in use for many years. Almost all devices support this structure. However, the 4 GB maximum file size limit is a serious disadvantage for today’s hardware.
Developers created exFAT to remove this FAT32 limitation. It is ideal, especially for USB flash drives and SD cards. Microsoft designed NTFS for SATA and NVMe disks. It is an advanced structure that stands out with security and recovery features.
ReFS, meanwhile, is a system Microsoft developed for servers and large-scale storage. It is also a next-generation structure focused on data integrity.
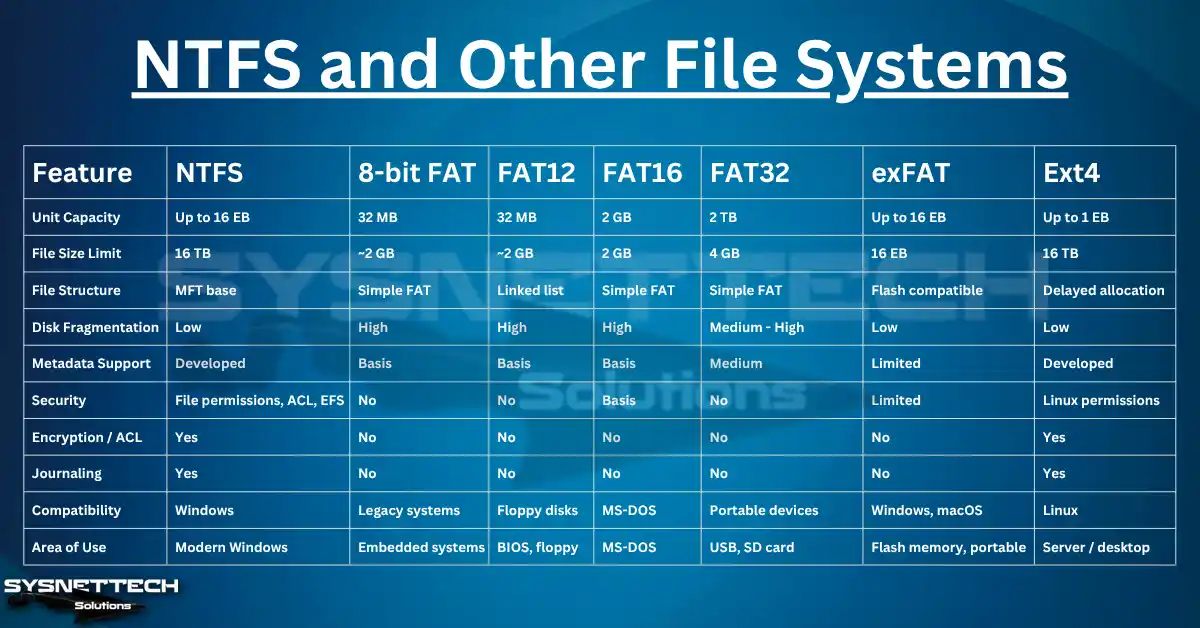
Comparison Table: NTFS vs FAT32 vs exFAT vs ReFS
The table below compares the core features of these four file systems. Pay close attention to drive type and compatibility. By reviewing this table, you can choose the structure that best fits your needs.
| Feature | NTFS | FAT32 | exFAT | ReFS |
|---|---|---|---|---|
| Maximum File Size | 16 EB | 4 GB | 16 EB | 16 EB |
| Maximum Volume Size | 256 TB | 2 TB | 128 PB | 35 PB |
| Journaling | Yes | No | No | Yes |
| Encryption (EFS) | Yes | No | No | No |
| Access Permissions (ACL) | Yes | No | No | Yes |
| Compression | Yes | No | No | No |
| Quota Support | Yes | No | No | Yes |
| NVMe SSD Support | Full | Limited | Full | Full |
| External HDD Support | Full | Full | Full | Partial |
| USB Flash Drive Support | Full | Full | Full | No |
| Bootable | Yes | Yes | Yes | Yes (2026) |
As you can see from the table, NTFS and ReFS are far ahead in security and advanced features. FAT32 and exFAT, meanwhile, stand out in portability and broad compatibility.
exFAT is especially ideal for USB flash drives and portable SSDs. The adoption of ReFS in NVMe RAID arrays as of 2026 is a major milestone in enterprise storage.
Scenario-Based Decision Guide: Which Format for Which Disk?
To decide which file system to choose, you must clarify your scenario and hardware type. Here is a step-by-step decision guide:
- System Disk (NVMe/SATA SSD): Definitely use NTFS. In fact, all security features are built on this structure.
- Internal Secondary Disk (HDD – Games/Archive): NTFS is the best option. It offers large file support and compression.
- External Portable HDD (Windows Only): Use NTFS. Moreover, you benefit from file permissions and encryption.
- External Portable SSD (Windows + Mac): Use exFAT. Both platforms offer full read/write support.
- USB Flash Drive (Small Files): Use FAT32 or exFAT. FAT32 offers broad compatibility. However, be aware of the 4 GB file limit.
- USB Flash Drive (Large Files): exFAT is the best option. You can also use NTFS. However, some car audio systems do not recognize it.
- Enterprise RAID Storage (SAS): Use ReFS or NTFS. ReFS is ideal for data integrity.
- Backup Drive (External HDD): Prefer NTFS. This way, you save disk space with compression.
By following this guide, you can choose the file system that best fits your needs. Remember, the wrong choice can lead to data loss or performance issues. For this reason, always back up your data before formatting.
NTFS Advantages and Disadvantages: A Realistic Review
Like every technology, NTFS has strengths and weaknesses. Before you decide to use NTFS, you should weigh its advantages and disadvantages. Here are the advantages and disadvantages of NTFS from the perspective of HDD and SSD hardware:
NTFS Strengths: Security, Recovery, and Scalability
Many features make NTFS popular and reliable. Here are the most important NTFS advantages from a hardware perspective:
- Advanced Security: It offers encryption with EFS and access permissions with ACL. In other words, it prevents data leaks from an NVMe SSD you remove.
- Data Recovery: Thanks to journaling, the risk of data loss during power outages drops. NTFS also repairs minor corruption on its own in the background.
- Scalability: It supports files up to 16 EB and volumes up to 256 TB. It is ideal for huge SAS arrays.
- Compression and Sparse Files: You compress files to save HDD space. You also create sparse files.
- Disk Quotas: It provides storage space management on multi-user systems.
- Broad Drive Support: It is compatible with all modern drives that use 512e and 4Kn sector layouts.
- Journaling: It protects storage volume consistency under all conditions.
These advantages make NTFS appealing to both home and enterprise users. Its solutions for data security and recovery in particular set it apart from rivals. It runs safely in every setting, from SAS disks in RAID arrays to the NAND chips of USB flash drives.
NTFS Limitations: Compatibility, Cluster Size, and Write Load
NTFS does have some disadvantages. Knowing these limits helps you manage your expectations correctly. The most important disadvantage is cross-platform compatibility.
For example, if you are a MacBook user, you cannot write to an NTFS-formatted external disk by default. To overcome this problem, you must use software like Paragon NTFS or Tuxera NTFS. Likewise, Linux systems provide NTFS support with the NTFS-3G or ntfs3 kernel driver.
The second limitation relates to cluster size. NTFS offers different options from 512 bytes to 64 KB. It uses a 4 KB cluster size by default. If you choose a 64 KB cluster size on very large volumes, compression is disabled.
Additionally, cluster sizes larger than 4 KB lead to disk waste for small files. Therefore, correct cluster size optimization matters.
The third limitation is the write load on SSDs. The NTFS journaling mechanism writes extra data on every write operation. This can shorten your NVMe SSD’s TBW life to some degree.
Moreover, wear leveling and TRIM technologies in modern SSDs greatly reduce this effect. Still, you should run regular disk health checks to extend the life of your storage hardware.
How Do You Format NTFS?
Formatting a hard disk drive or SSD in NTFS format is quite easy. However, remember that the format process deletes all data.
Therefore, back up your data to another device before you start. Here are three methods you can use for NTFS formatting:
NTFS Formatting with Disk Management (Step by Step)
Formatting a disk with a graphical interface is the easiest method. The Disk Management tool lets you manage all your internal and external drives. Here is what you need to do step by step:
- Type
diskmgmt.mscin the Start menu and press Enter to open Disk Management. - Find the drive you want to format as NTFS.
- Right-click the disk and select the ‘Format’ option.
- In the window that opens, select NTFS from the ‘File System’ menu.
- Leave ‘Allocation Unit Size’ at its default. 4 KB is ideal for NVMe SSDs.
- Type the name you want to give your disk in the ‘Volume Label’ field.
- Check the ‘Quick Format’ box. Leave the box empty for a full format.
- Click the ‘OK’ button and confirm the warning. The process completes in a few seconds.
This method is the fastest and most user-friendly option. However, if the disk has more than one partition, Disk Management offers more flexibility. For example, you can delete a partition and create a new NTFS partition.
NTFS Formatting Commands with CMD and Diskpart
If you prefer the command line, you can use the diskpart tool. If you cannot access the Disk Management interface, this tool is effective. Diskpart is a powerful tool used to manage all your storage devices. Here are the steps for NTFS formatting with diskpart:
- Type
cmdin the Start menu. Right-click and select ‘Run as administrator’. - Type
diskpartin the command prompt and press Enter. - List all drives with the
list diskcommand. Note the number of the disk you want to format. - Type
select disk N(N is the disk number). For example, for disk 1, typeselect disk 1. - Clean the disk by typing the
cleancommand. - Create a primary partition with the
create partition primarycommand. - Quickly format the partition as NTFS with the
format fs=ntfs quickcommand. Remove the wordquickfor a full format. - Assign a drive letter to the partition with the
assign letter=Gcommand. - Exit diskpart with the
exitcommand.
This method is especially useful in automated setup scenarios. It is also ideal when you want to quickly format multiple disks as NTFS.
You can also run Diskpart commands through PowerShell. This way, you follow a more programmatic approach with cmdlets like Get-Disk, Initialize-Disk, and Format-Volume.
Convert FAT32 to NTFS Without Data Loss (convert command)
You may have a USB flash drive or external disk formatted as FAT32. If you want to convert it to NTFS without data loss, use the convert command. This command converts the file system without deleting data on the disk. Here are the steps:
- Open the command prompt as administrator.
- Type the
convert G: /fs:ntfscommand (G is the drive letter). - When you press Enter, the system starts the NTFS conversion process.
- The process can take time based on disk size and how full it is.
- When conversion finishes, your disk is now formatted as NTFS.
This method is essential when you do not want to lose data on your USB flash drives. However, remember that the convert command may not always produce perfect results. If the disk has bad sectors in particular, conversion can fail. For this reason, taking a backup before the process is always the safest path.
NTFS Performance Optimization: Settings for SSD and HDD
NTFS offers good performance even with default settings. However, you can make some fine adjustments based on your hardware type. This way, you increase performance even more. Now we will cover the most effective optimizations for NVMe SSD, SATA SSD, and magnetic HDD.
First, you should follow different strategies based on disk type. For NVMe SSDs, the goal is to reduce write operations. You should also make sure the TRIM command is active.
For magnetic HDDs, the goal is to reduce disk fragmentation. You should also optimize the read head movements. MFT zone reservation is common to both disk types. Settings like 8.3 short file name creation are also common. Here is the detailed optimization guide:
MFT Zone Reservation and NtfsMftZoneReservation Setting
MFT zone reservation is an important NTFS setting that directly affects performance. By default, NTFS sets aside 12.5% of disk space for the MFT.
However, if your drive has many small files, this space becomes insufficient. As a result, the MFT starts to fragment. This situation causes the read head to move continuously, especially on HDDs. You increase this ratio with the NtfsMftZoneReservation registry setting. Here is what you need to do step by step:
- Type
regeditin the Start menu and press Enter to open the Registry Editor. - Follow the path
HKEY_LOCAL_MACHINE\\SYSTEM\\CurrentControlSet\\Control\\FileSystem. - Right-click the empty area on the right. Select ‘New’ > ‘DWORD (32-bit) Value’.
- Name the new value
NtfsMftZoneReservation. - Double-click the value. Enter a number from 1 to 4 in the ‘Value data’ field. (1 = 12.5%, 2 = 25%, 3 = 37.5%, 4 = 50%)
- Restart your computer. The setting takes effect after restart.
Set this NTFS setting to 2 or 3 if you store many small files on your drive. For example, a web server SAS disk benefits greatly from this setting.
Likewise, a developer’s NVMe SSD also benefits. However, remember that this setting increases the MFT area. It also reduces the space set aside for user data.
8.3 Short File Name Performance Impact and fsutil 8dot3name
NTFS gives every file a short name in 8.3 format for backward compatibility. For example, for the file LongFileName.docx, a short name like LONGFI~1.DOC is created. However, most modern apps now support long file names.
In fact, this feature has become an unnecessary performance load. Especially in folders with many files, these short names create a serious load. You disable this feature with the fsutil 8dot3name command. Here are the steps:
- Open the command prompt as administrator.
- Run the
fsutil 8dot3name query C:command to see the current setting. - Run the
fsutil 8dot3name set C: 1command to disable the feature. - Use the
fsutil 8dot3name strip /s C:command to delete existing short names.
This optimization provides a major performance boost, especially for developers. Users who work with many files also benefit from this setting. When you disable short name creation, file operations speed up. You see improvement in IOPS values, especially on NVMe SSDs.
TRIM Check for SSD and Its Link to Disk Defragmentation
The TRIM command is critical for solid-state drives in terms of performance and lifespan. TRIM lets the operating system tell the SSD which blocks are no longer in use.
This way, the SSD clears deleted blocks ahead of time. As a result, write operations speed up and wear leveling efficiency rises. Use the following command to check whether TRIM is active on NTFS:
fsutil behavior query DisableDeleteNotifyIf the result is DisableDeleteNotify = 0, TRIM is active. If the result is 1, TRIM is disabled. In this case, you activate it with the fsutil behavior set DisableDeleteNotify 0 command.
When TRIM is active, your NVMe SSD does not slow down over time and its life extends. Additionally, the automatic optimization task for SSDs in Windows runs weekly. It also clears missed blocks with a reTRIM operation.
You do not need to defragment SSDs. In fact, this process can shorten SSD life. Instead, you can run TRIM manually with the Optimize-Volume command.
NTFS Troubleshooting: RAW Error, MFT Corruption, and Data Recovery
Even though NTFS is a solid structure, you sometimes encounter various problems. The leading issues are RAW errors and MFT corruption. In this section, we will cover the causes and solutions for such problems. Remember, you should build a regular backup habit to avoid data loss.
NTFS Disk Became RAW: Causes and Solution Steps
A hard disk drive turning into RAW format means Windows cannot recognize the NTFS structure on that disk. This situation usually comes from MFT or boot sector corruption.
RAW disks appear as unformatted. You also cannot access the data inside them. Why does an NTFS RAW error happen? Here are the most common causes:
- A write operation stopping halfway during a sudden power outage.
- The read head hitting a bad sector on magnetic HDDs.
- Malicious software or viruses.
- Removing a USB flash drive or external disk without safe ejection.
- Corruption of the disk partition table (MBR/GPT).
- NVMe SSD firmware error.
Do not panic when you encounter a RAW NTFS disk. Here are the steps you can follow to recover your data:
- Use Data Recovery Software: Scan the RAW disk with EaseUS, Recuva, or TestDisk. This way, you recover your files.
- Try the chkdsk Command: Open the command prompt as administrator. Then run the
chkdsk G: /fcommand. - Format with Disk Management: If you recovered your data, format the RAW disk as NTFS.
- Check S.M.A.R.T. Data: Inspect disk health with tools like CrystalDiskInfo.
Remember, data recovery from an NTFS disk is more successful as long as no new data is written to the disk. Therefore, when you get a RAW error, stop using the disk. Start recovery right away.
Using the chkdsk Command: What Do /f, /r, /x Parameters Do?
chkdsk (Check Disk) is a built-in command-line tool used to scan for disk errors. It is extremely effective for NTFS disks. You perform different checks with its different parameters. Here are the most commonly used parameters and their tasks:
/f: Fixes errors on the disk. It repairs NTFS file system errors. However, you must lock the disk./r: Finds bad sectors and recovers readable info. It includes all functions of /f. It also scans for physical disk errors./x: Forces the disk to dismount if needed. It also includes the functions of /f. It is generally used for the system disk./v: Displays cleanup messages for NTFS./scan: Runs an online scan and repair. Moreover, it works without locking the disk./spotfix: Quickly fixes specific errors.
For example, you use the chkdsk C: /f /r command to both fix errors and scan for bad sectors on an HDD.
If the disk cannot lock, you force dismount it with the chkdsk C: /f /r /x command. Open the command prompt as administrator to run these commands. The chkdsk process can take a long time based on disk size and error count. Be patient and do not interrupt the process.
How Can I Find Out Which File System My Operating System Uses?
Knowing whether your storage hardware runs NTFS or another format is critical. That is because different file systems have different limits and features. For this reason, you must correctly identify your current structure.
Additionally, this information is essential for data management and performance optimization. For example, the security differences between NTFS and FAT32 are huge. Therefore, you should know your operating system well.
Luckily, Windows, macOS, and Linux make this check quite easy. Now let us look at the methods for each platform one by one.
1. For Windows Users
Windows users can check NTFS with two different methods. The first method is a simple click-through in File Explorer. The second method works through the command prompt.
Using File Explorer
Start by opening the This PC window. Right-click the drive you want to check. Select the Properties option from the menu that opens.
Look for the File System field on the General tab. Here you see NTFS, FAT32, or exFAT. This structure shows your drive’s format.

Using the Command Prompt
Press Win + R to open the Run box. Type cmd in the text field and press Enter. The command prompt screen appears.
In the CMD screen, type the wmic logicaldisk get name, filesystem command. When you press Enter, it lists NTFS drives and their formats. This method is especially fast when checking multiple disks.
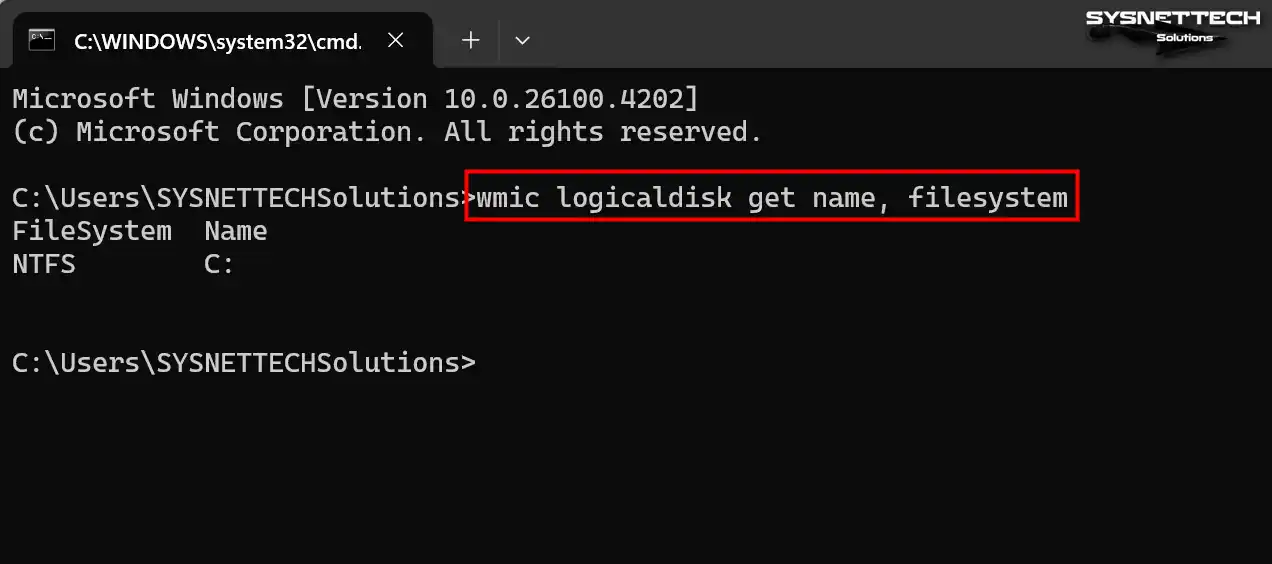
2. For macOS Users
macOS users can also check NTFS with two different methods. The first is the Disk Utility tool. The second works through Terminal.
Using Disk Utility
On your Mac, open Spotlight with Command + Space. Type Disk Utility in the search field and press Enter. This opens Disk Utility.

In Disk Utility, select the drive from the left sidebar. On this screen, you see your macOS system’s NTFS support in the Type section. For example, values like NTFS, APFS, and HFS+ may appear.

Using Terminal
First, open the Applications > Utilities directory. Run the Terminal app in this folder.

Find the Terminal app in the Utilities directory. Double-click to open the Terminal window.

Run the diskutil info / command in the console screen. Check the value labeled File System Personality in the output. If it says NTFS, your external disk is formatted as NTFS.

3. For Linux Users
Linux users can also check NTFS with two commands through Terminal. These are the df -T and lsblk -f commands.
Using the df -T Command
Find and open the terminal on your Linux OS. Type the df -T command in the command-line screen and press Enter. In the command output, look at the Type section of the drive you mounted. If it says NTFS, the drive is formatted as NTFS.

Using the lsblk Command
Likewise, type the lsblk -f command in the terminal screen. This command shows a list of block devices. In the FSTYPE column, you see whether each drive is NTFS.

Thanks to the methods on these three platforms, you easily learn the format of any storage device. This information matters especially when working with external disks. It lets you see compatibility problems ahead of time.
The Future of NTFS: ReFS and Next-Generation File Systems
Although NTFS has been a cornerstone of the Windows ecosystem for over 30 years, storage hardware keeps evolving. Microsoft developed a new file system called ReFS (Resilient File System).
Additionally, Microsoft planned for this system to replace NTFS in the future. So, what is ReFS and how is it different from NTFS? In this section, we will seek answers to these questions.
Microsoft first introduced ReFS with Windows Server 2012. Microsoft designed ReFS especially for large-scale storage systems, virtualization, and backup.
ReFS aims to remove some limits of NTFS. Additionally, ReFS aims to advance data integrity. The adoption of ReFS in NVMe RAID arrays in 2026 is seen as a major step.
What Is ReFS and How Is It Different from NTFS?
ReFS stands for ‘Resilient File System’. As the name suggests, its primary goal is data resilience. Its biggest difference from NTFS is that it has advanced data verification mechanisms.
These mechanisms are known as metadata checksum and integrity streams. This way, ReFS detects data corruption instantly. If a backup copy exists, it automatically repairs the corrupt data. For example, this feature works on disks mirrored with Storage Spaces.
The second key difference is scalability. ReFS supports volume sizes up to 35 PB. However, NTFS’s practical limit is 256 TB. This makes ReFS ideal for huge SAS arrays.
Additionally, ReFS works on a copy-on-write principle. This means that when a file changes, the original data is not overwritten. Instead, a new copy is formed. This way, you can return to old data if an error occurs.
| Feature | NTFS | ReFS |
|---|---|---|
| Maximum Volume Size | 256 TB | 35 PB |
| Data Integrity | Journaling | Metadata Checksums + Integrity Streams |
| Automatic Repair | Limited (Self-healing) | Advanced (Online repair) |
| NVMe RAID Support | Yes | Full |
| File Compression | Yes | No |
| EFS Encryption | Yes | No |
| Use Case | General purpose | Server, Virtualization, Backup |
As you can see, ReFS is superior to NTFS in many ways. However, it lacks some important features (compression, EFS). Therefore, it is not yet a full replacement for NTFS. Microsoft will probably add these missing features in the coming years. This way, it will slowly encourage the shift from NTFS to ReFS.
NTFS or ReFS? Decision by Use Cases
In which case should you prefer NTFS, and in which case ReFS? Here is a practical hardware-focused decision guide:
- Home Users and Gaming NVMe Drives: Keep using NTFS. You do not need ReFS’s advanced features.
- Small and Medium Businesses (SATA SSD/HDD): NTFS is still the best option. It is perfect for file servers.
- Large-Scale Data Centers (SAS Arrays): Consider ReFS. Moreover, it is ideal for virtualization and backup.
- NVMe RAID Servers: ReFS performs better for virtual machine disks and provides data integrity.
- Backup Drives: ReFS’s automatic repair and integrity features are ideal.
- USB Flash Drives and External Portable Disks: Use NTFS or exFAT. But remember that ReFS was not designed for portable media.
In summary, NTFS is still the most common and reliable structure today. ReFS, meanwhile, is slowly spreading as the technology of the future. We can predict that ReFS will replace NTFS in the next 5–10 years. However, NTFS remains the right choice for most users and hardware right now.
Advanced Reading Suggestions to Dive Deep into NTFS
The NTFS file system is the backbone of the Windows world. At the same time, the technical details of the topic can spark curiosity. In addition, the following resources aim to meet that need.
- Microsoft Learn – File System Overview: This comprehensive guide explains the reliability, security, and performance features of file systems in detail. It also covers advanced abilities like self-healing and journaling.
- Microsoft Learn – File Systems Comparison: This article compares different file systems with each other. It provides extensive information on their pros and cons. It also states which system suits which case.
- TechTarget – File System Review: This resource explains how a file system works and what features it offers. It also describes its role in current Windows versions. It includes practical information for users too.
FAQ About the NTFS File System
What does NTFS do?
What are NTFS features?
$LogFile file.What is the maximum file size and volume size?
What should the cluster size be?
NTFS or exFAT: Which is better for a flash drive?
How can I write to an NTFS disk on a Mac?
Should you defragment an SSD?
How do you fix a RAW disk?
chkdsk command. Open the command prompt as administrator. Type chkdsk X: /f. This command sometimes repairs basic corruption.Why is a file system required for internal disks?
Does NTFS compression affect performance, and on which files should you not use it?
Conclusion: Is NTFS Still the Right Choice?
Yes, NTFS is still the right choice today for all storage hardware in the Windows ecosystem. It has proven reliability for over 30 years.
It offers advanced security features and solid recovery mechanisms. So, it is unmatched with broad drive compatibility. NTFS is indispensable, especially for NVMe SSDs, SATA SSDs, SAS disks, and external HDDs.
In the future, it looks certain that ReFS will replace NTFS. However, this shift is not complete yet and ReFS has gaps. So for now, keep using NTFS.
Apply performance optimizations especially on SSD and NVMe drives. This way, you get maximum efficiency from NTFS. Remember, as with every technology, regular backup is your most important safety net.
Finally, always back up your data before formatting a hard disk drive. Then make the NTFS optimization settings that fit your drive type (NVMe SSD, SATA SSD, HDD). By applying the methods I mentioned, you get the best performance from your hardware. Stay well, and may your data always stay safe!

Be the first to share your comment