
In this helpful guide, we’ll explain step-by-step how to install and use VMware Workstation 17 Pro, a powerful virtualization software. With this fantastic tool, you can make virtual machines on the openSUSE Leap 15 Linux system, commonly used on server computers.
Plus, you can also make guest machines like Windows. If you want to dive into the world of virtual machines, this article is perfect for you.

How to Set Up and Use VMware Workstation 17 Pro to Create a Virtual Machine on openSUSE Leap 15
VMware Workstation Pro is paid software made by VMware. It lets you create virtual machines on Windows or Linux computers. Also, it works with processors that support virtualization for smooth use.
You can install VMware on Windows and Linux systems. It also works with openSUSE, a popular Linux version. This lets you run different systems on your computer.
The openSUSE system is reliable, stable, and supported by its users. It also works well, making it great for servers.
If you install openSUSE without a desktop GUI, it uses less power. This helps the hardware work better on servers. So, adding virtualization software makes your hardware perform at its best.
How to Download and Install VMware Workstation
Installing the Workstation & Player on SUSE may be harder than other ones. Thus, you might need various commands to obtain the required packages.
Steps:
Step 1
To download the VMware Workstation for openSUSE, visit the VMware webpage. Then, click the “Download” button under “Workstation 17 Pro for Linux.”
Then, in the opened window, select “Save the bundle extension setup file to your PC.”
Instead of downloading the setup file from VMware’s official website, you can use the terminal. You can also quickly get the Workstation software with the wget command.
Open the terminal and navigate to the location where you want to download the Workstation. If you want to download the file to Downloads, first execute the “cd ~/Downloads.” Then, use the wget command.
cd ~/Downloads
wget https://download3.vmware.com/software/WKST-1700-LX/VMware-Workstation-Full-17.0.0-20800274.x86_64.bundle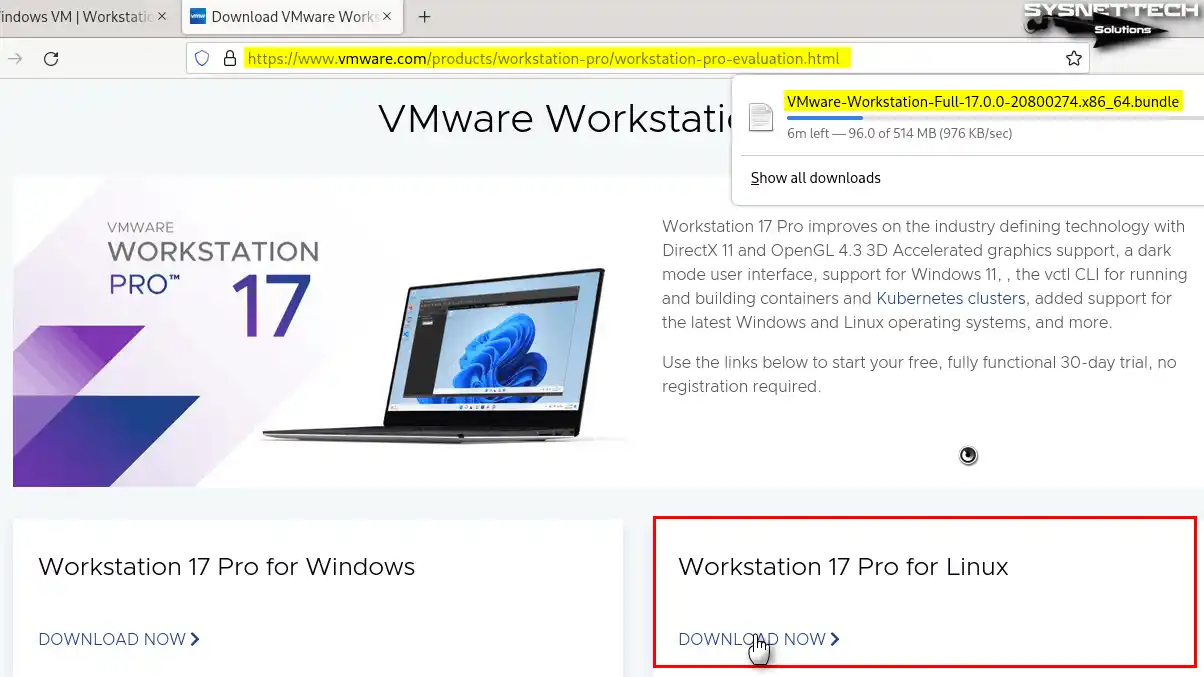
Step 2
After getting the bundle file, refresh the repository addresses in openSUSE. This will check for new package versions and update them. To do this, run the command “sudo zypper update” in the terminal. Then, press Y and Enter to confirm the installation of the needed packages.
sudo zypper updateBefore starting the setup, you need to install the required kernel packages for VMware on SUSE. Get and install the latest kernel and GCC packages. To do this, run the command “sudo zypper install kernel-source kernel-devel gcc” in the console. Then press Y and Enter to allow the installation of the packages.
sudo zypper install kernel-source kernel-devel gcc
Step 3
You have installed the kernel packages for VMware software on your openSUSE PC. Now, go to the location where you downloaded the setup file. Then, make the bundle file executable and start the installation.
sudo chmod +x VVMware-Workstation-Full-17.0.0-20800274.x86_64.bundle
sudo ./VMware-Workstation-Full-17.0.0-20800274.x86_64.bundle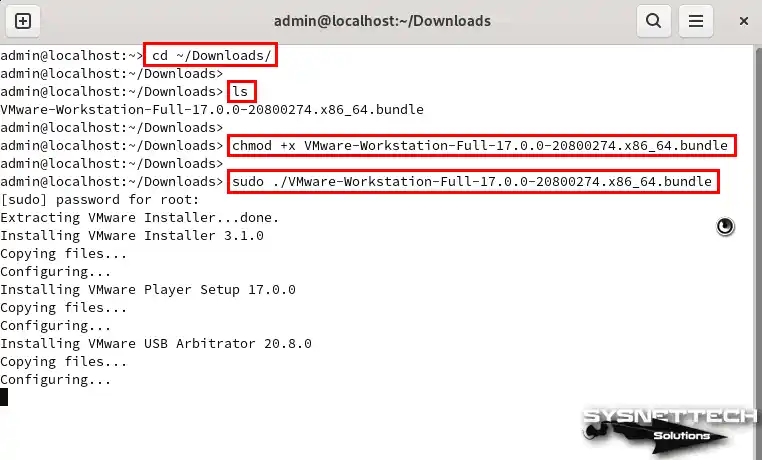
Step 4
You have installed Workstation / Player and Virtual Network Editor apps. Now, find the Workstation shortcut in the start menu and run it.

Step 5
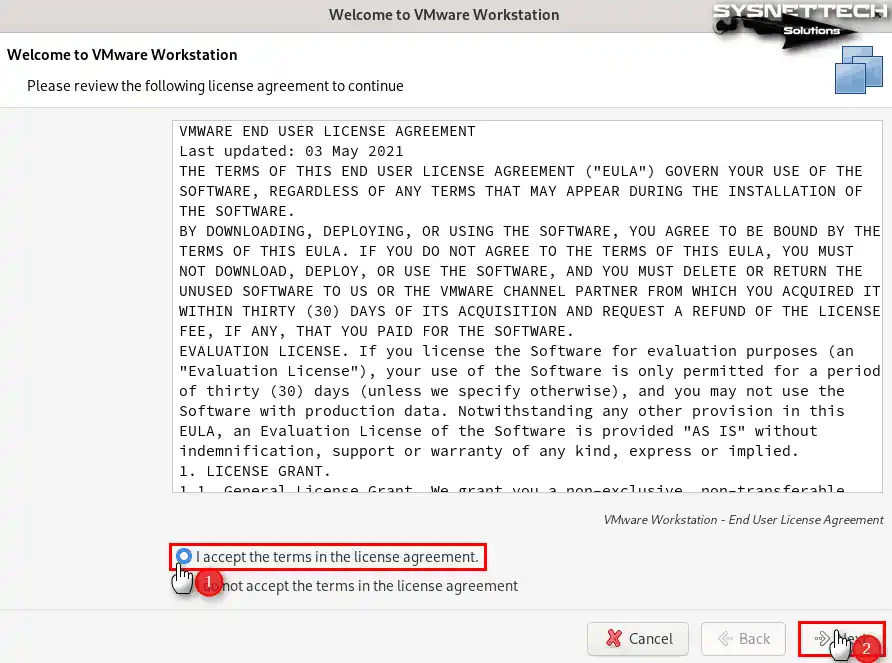
You will see the Workstation welcome window open. Here, review the end user license terms and accept them to proceed.
Step 6
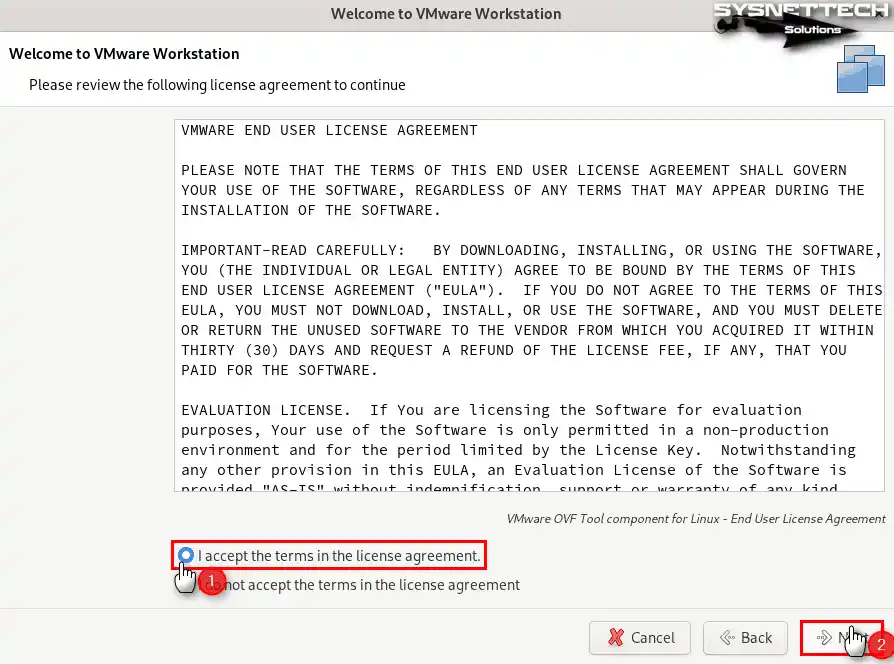
Accept the license agreement of the necessary OVF tool components for Linux platforms and continue.
Step 7
You can check for updates every time you run the virtualization software. So, if you want to check for new distributions at startup, check Yes in this window.

Step 8
You can help improve the software by joining the VMware customer experience program. You can choose to send reports about any system issues you find. If you don’t want to join CEIP now, select the No option. You can also change this setting later in the program’s settings.

Step 9
If you have purchased the Workstation software, I recommend that you enter your product key on the license screen. If you want to try it for free for 30 days, you can also choose the option below if you plan on purchasing it later.

Step 10
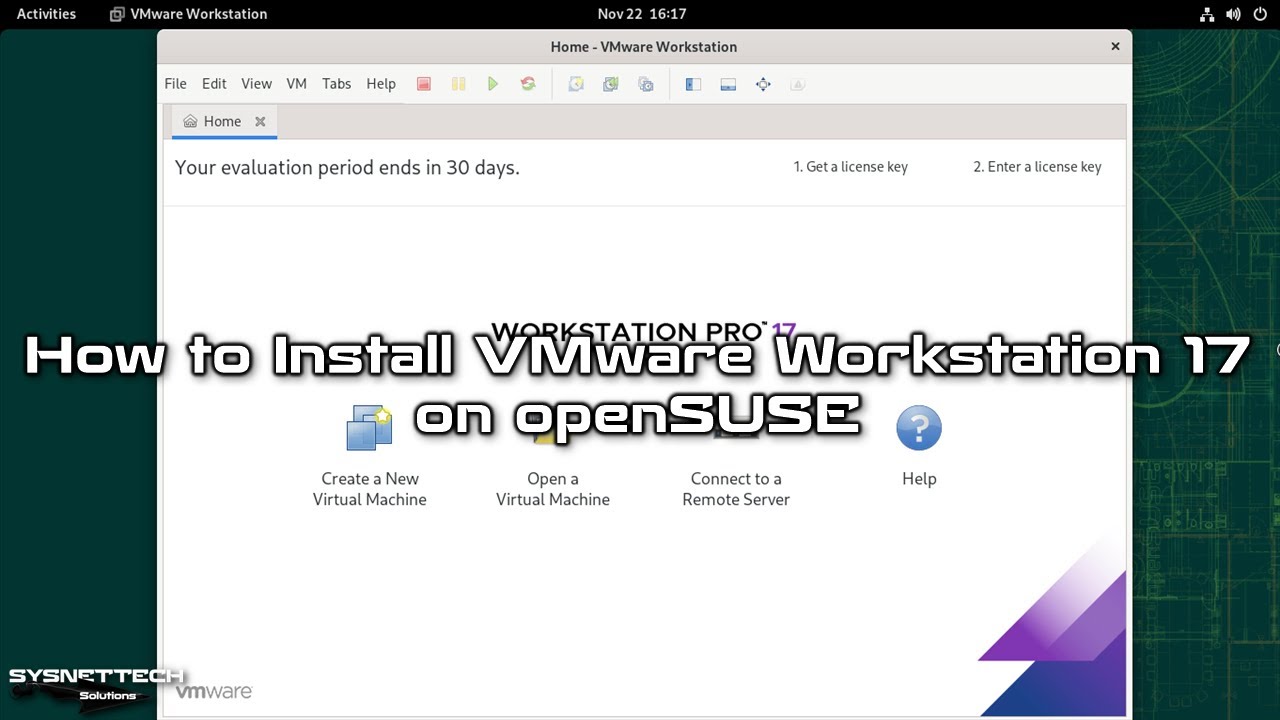
After installing VMware Pro software on your SUSE computer, open Help / About from the tool menu. You can also view the product info window. So you can check its version.

How to Create a New Virtual Machine on your openSUSE PC
After installing VMware Workstation on openSUSE, you can create new virtual machines. You can also run a system version from Windows, Linux, and macOS platforms. In this way, you can use different systems on your host PC.
Steps:
Step 1
When you run VMware Pro, click on Create a New Virtual Machine from the options on the main screen. Thus, you will be able to open the virtual machine wizard.

Step 2
There are two virtual machine setup options: Typical and Custom. If you choose Custom, you can set up a more advanced VM. But, with Typical, you can create a VM with more manageable steps.
Therefore, to prepare a more advanced VM, select the Custom (Advanced) type.

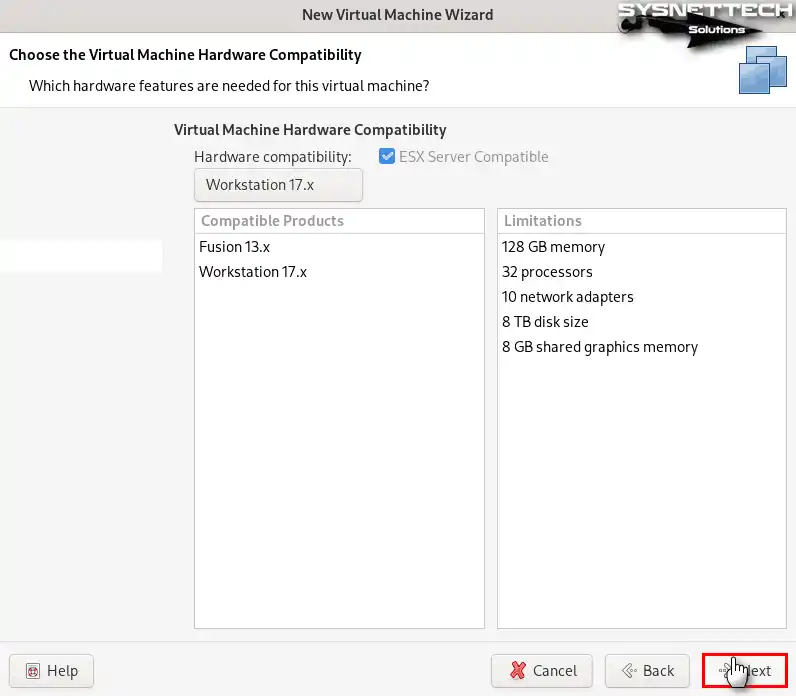
Step 3
Set the VM’s hardware to be compatible with the latest Workstation Pro version.
Step 4
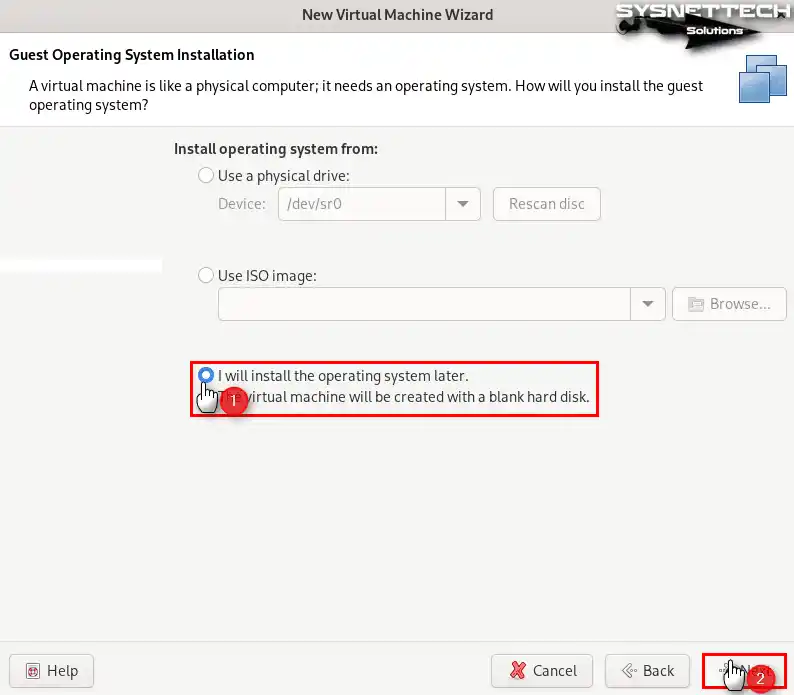
After selecting Custom, specify the device or media for the OS setup. If your host PC’s CD/DVD drive works, use it for installation—there is no need to download the ISO file.
Most computers today do not have a physical drive. Also, it is easier to get the ISO file. So here, please select I will install the operating system later.
Step 5
You will configure the system you will install in the Guest Operating System settings. For this reason, you must first select the platform and then the version. For example, you can choose Microsoft Windows as the platform and Windows 10 as the version.

Step 6
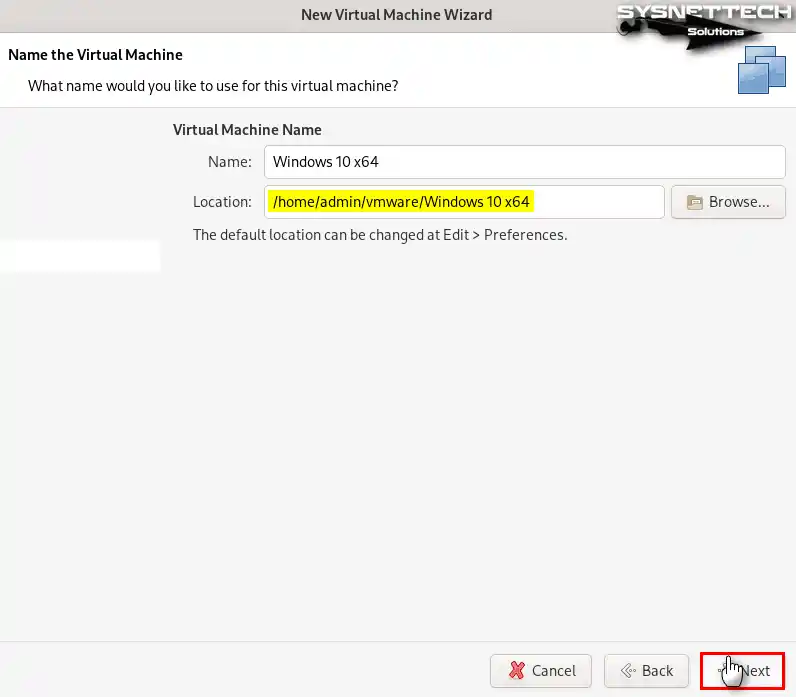
Depending on the type of guest system, descriptively edit the VM name. This way, you can avoid confusion as you will be installing more than one virtual OS.
Specify the relevant location where you want to install the Windows 10 virtual PC.
Step 7
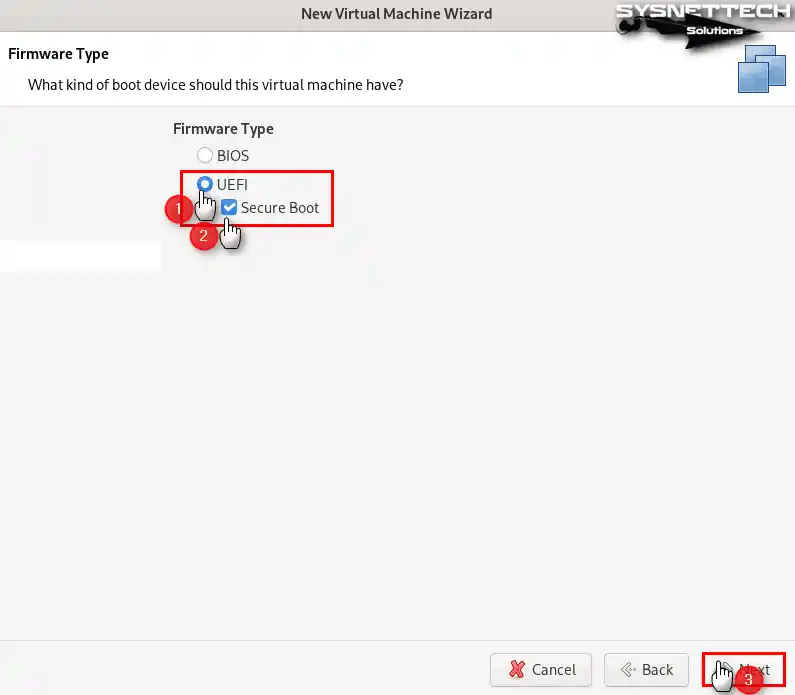
Select UEFI as the Firmware type of Windows 10 operating system. Then, enable the Secure Boot feature to provide a more secure boot.
Step 8
You should set your virtual computer according to the physical processor of your Linux PC. This setting is the number of virtual cores. Therefore, set a value that will not strain your host too much.
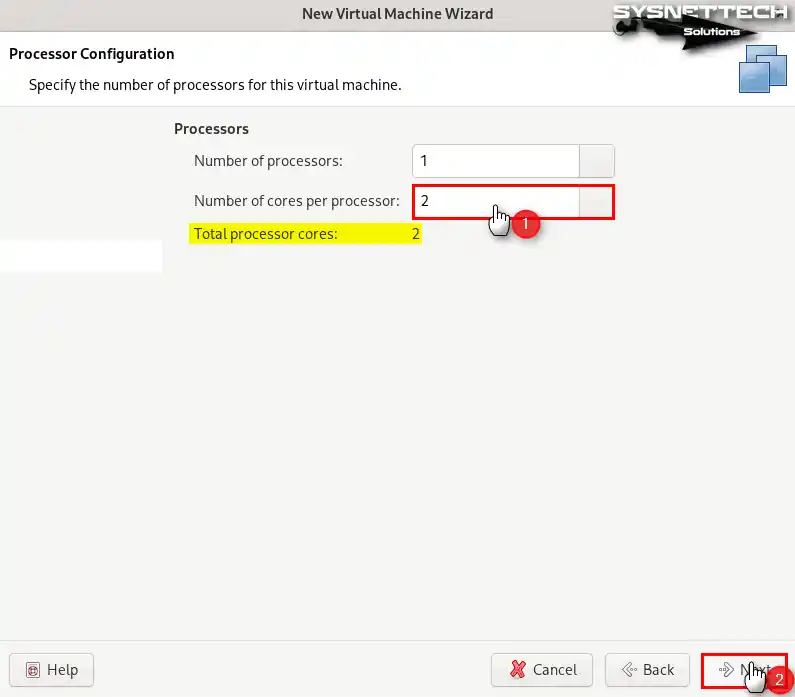
Step 9
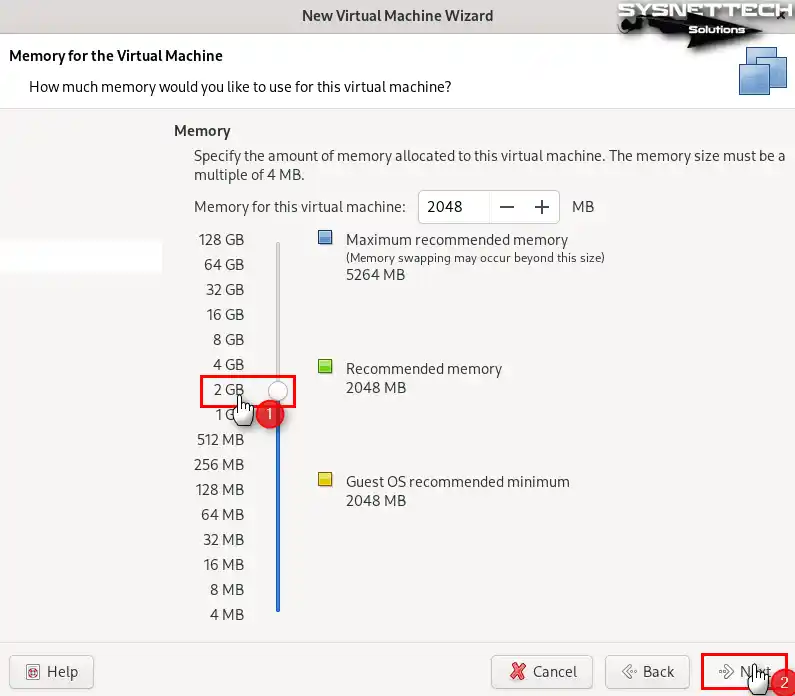
The memory size of the VM is critical. Thus, determine a suitable size according to the RAM size of your physical PC.
Step 10
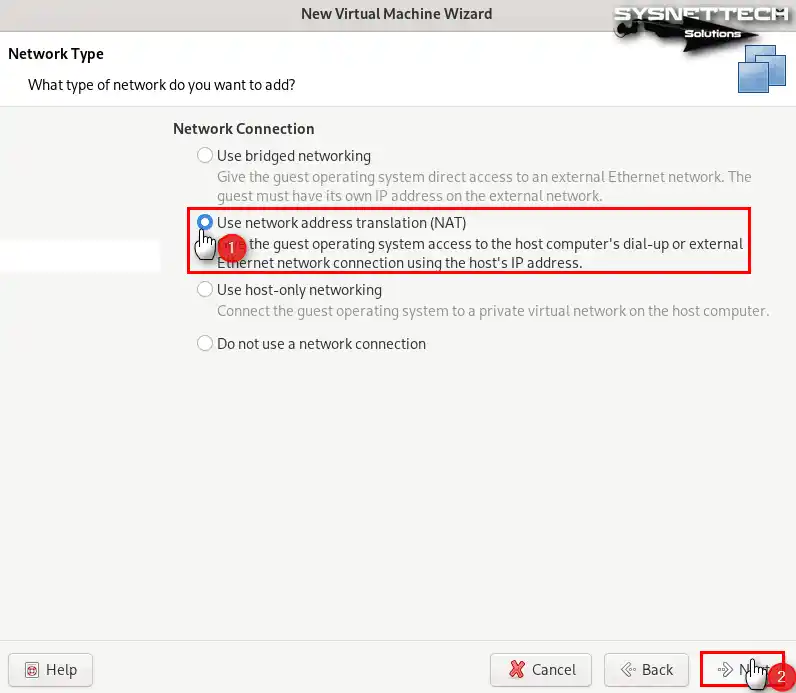
Select NAT to use a different IP block for your guest machines. This way, you will allow them to connect to the Internet and your local network. In addition, continue with the configuration in Workstation Pro software.
Step 11
For the virtual disk controller, choose LSI Logic SAS from the I/O Controller types and continue.

Step 12
Choose NVMe for faster data read and write on the virtual disk of your Windows 10 virtual PC.

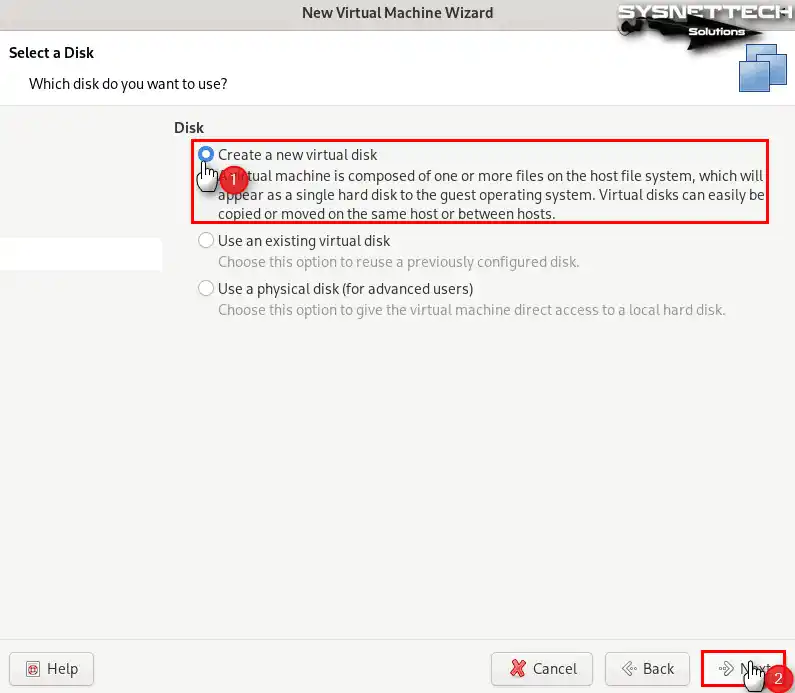
Step 13
Let’s say you are going to install an operating system on a new virtual machine for the first time. At this point, you need to continue using the Create a New Virtual Disk option.
Step 14
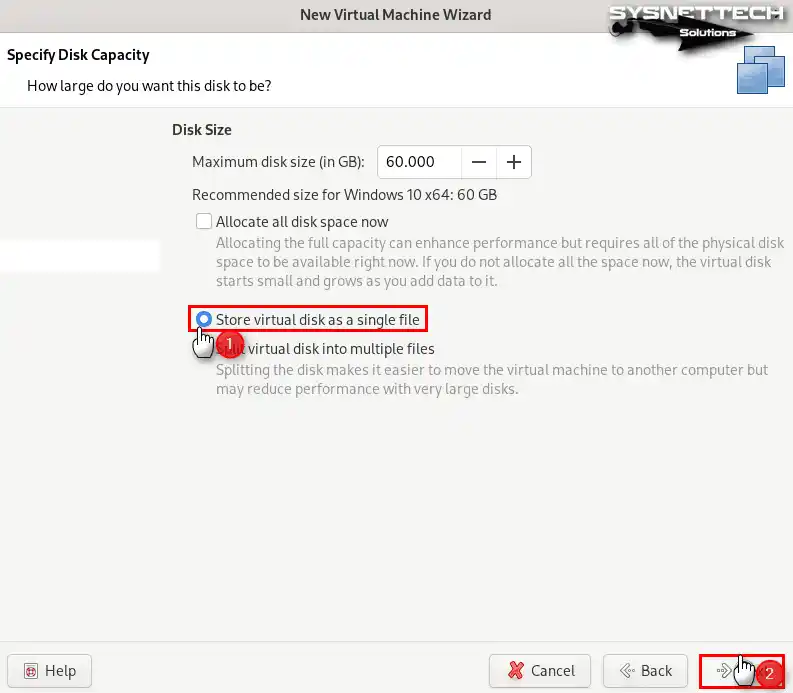
You can increase the capacity of your virtual disk for your Windows 10 system. You can change it from the Disk Size section to the size you want. Additionally, choose to backup the virtual disk file as a single file type.
Step 15
The location of the Windows 10 virtual disk file will be in the area where you will install it by default.

Step 16
You have prepared a new VM on your openSUSE PC. Now, you can see the settings you made in the hardware summary. Close the virtual machine wizard here. Then click Finish to make other settings.

Step 17
After preparing the virtual computer on your openSUSE, close the VMware Tools notification window.

Step 18
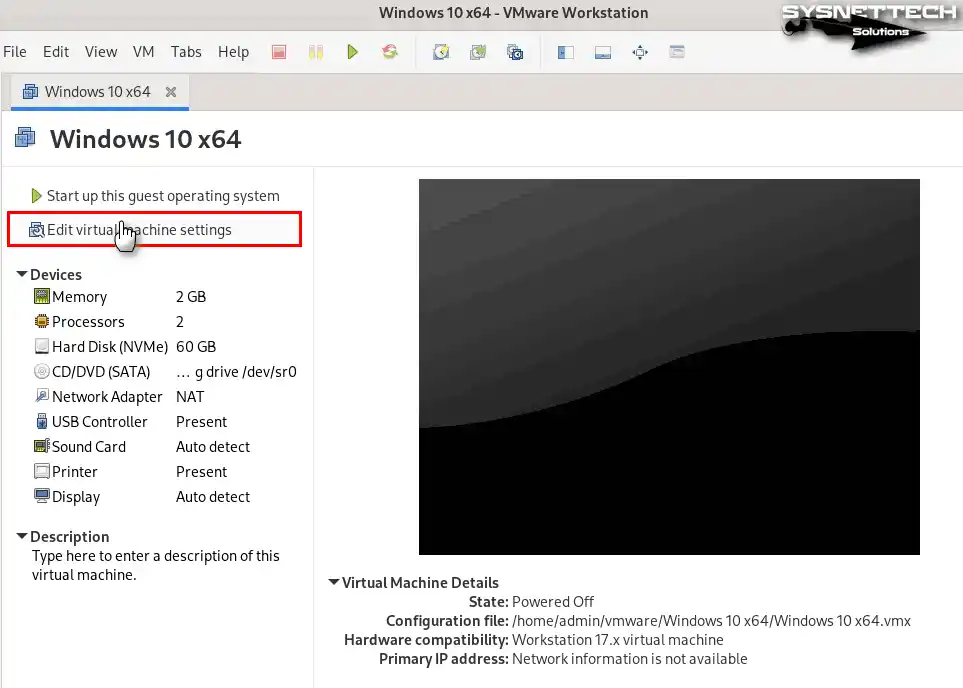
You should configure the settings of the Windows 10 x64 virtual machine better. For this reason, click on the Edit option.
Step 19
In the Processor settings, set one processor and two cores based on your host CPU’s power. Also, turn on all three features in the Virtualization Engine section.
- Virtualize Intel VT-x/EPT or AMD-V/RVI
- Virtualize CPU Performance Counters
- Virtualize IOMMU (IO Memory Management Unit)

Step 20
You must add the openSUSE Leap 15 ISO file to the VM you prepared. To do this, enable the Use ISO Image option in the CD/DVD device settings. Then select and open the image file via the Browse button.

Step 21
Change the USB compatibility to 3.1 so that you can use your USB 3.1 devices on your virtual computer.

Step 22
Finally, now turn on your virtual PC to begin the system setup. That is, click on the Start Up This Guest Operating System option.

Step 23
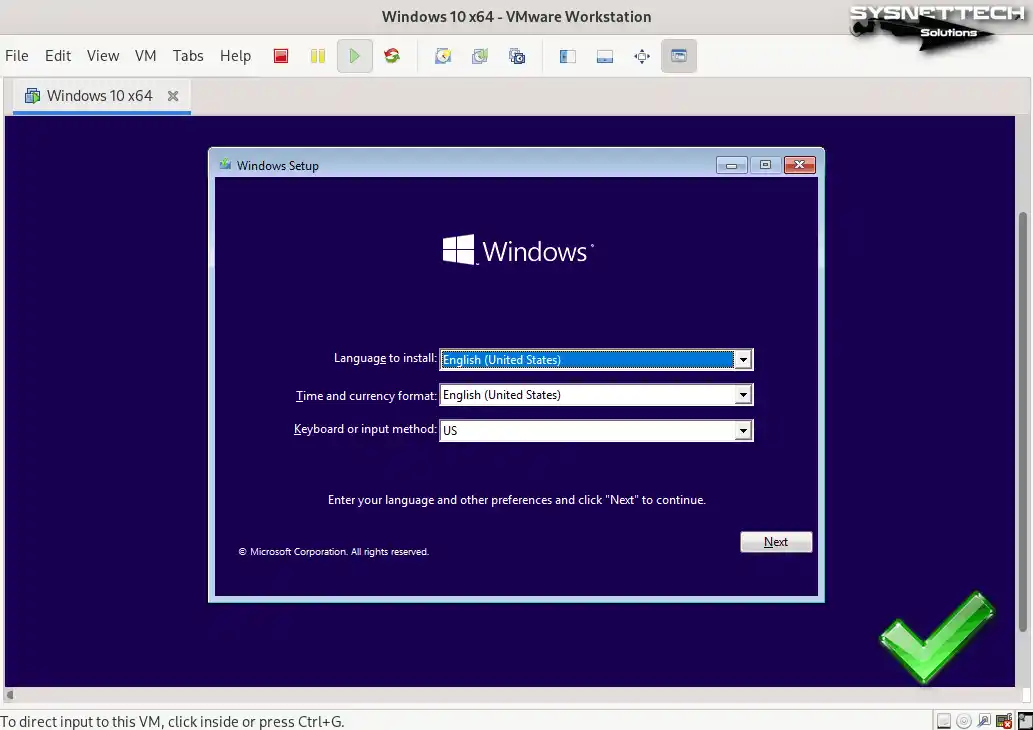
You have come to the Microsoft Windows 10 installation wizard. Now specify your system language, keyboard type, and time zone. Then, you can start installing the operating system.
How to Delete the Virtual Machine from openSUSE OS
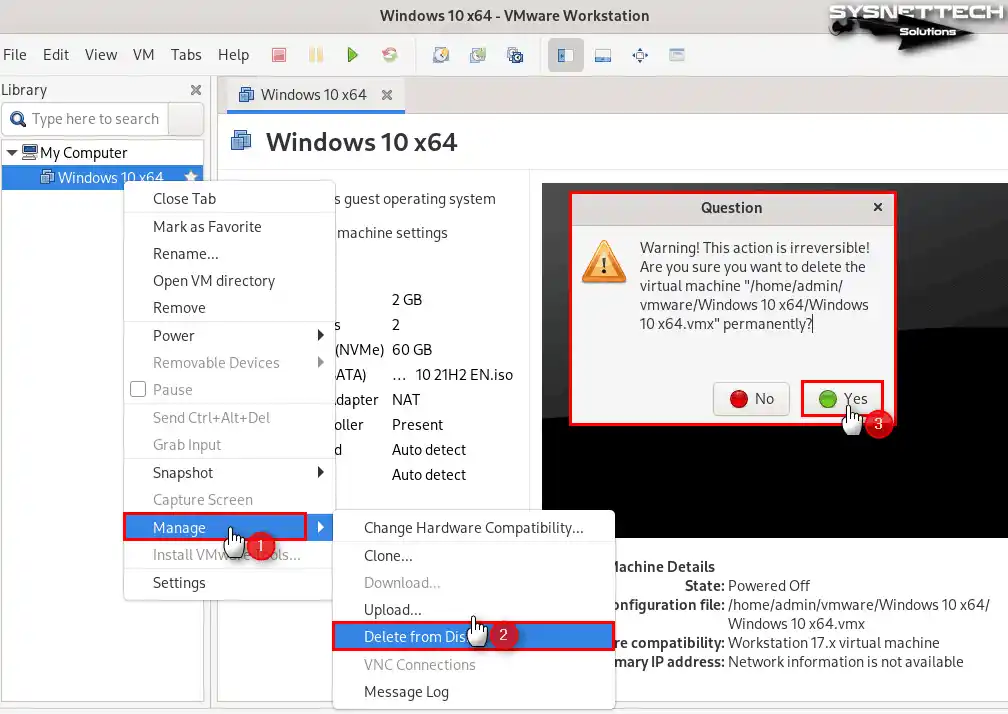
You can also delete your prepared VMs in openSUSE Leap or other Linux distributions. Obviously, you may want to remove them from your system entirely. If you’re going to do this, you can clean the VM in a few seconds.
Open the Workstation program and go to the Library section from the left panel. Right-click on the guest system you want to remove. Then click Manage / Delete From Disk. Finally, confirm the permanent removal from your system.
How to Uninstall VMware Workstation from openSUSE PC
If you no longer want to use the VMware virtualization application on your Linux computer, you can easily uninstall it.
Let’s say you want to delete VMware Workstation software from your openSUSE PC completely. First, open the console and check the installed version with the “vmware-installer –list-products” command.
Run the command “sudo vmware-installer -u vmware-workstation” to start the clean process. Then press Y and Enter to accept deleting the configuration files on your OS.
vmware-installer --list-products
sudo vmware-installer -u vmware-workstation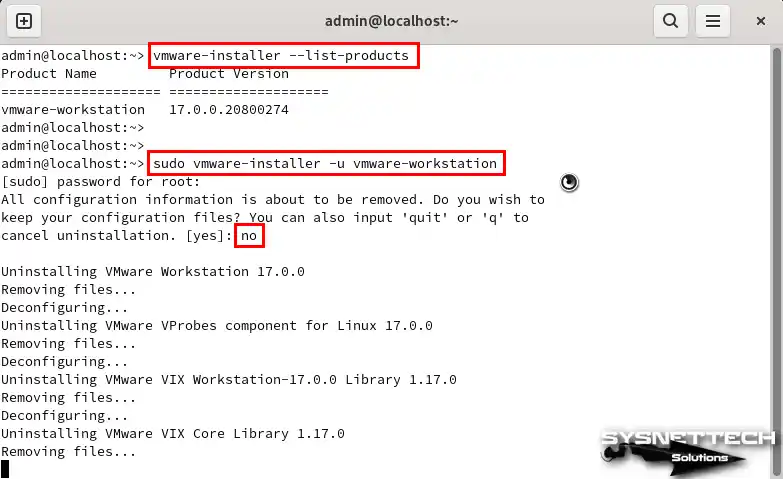
Video
Installing Old Versions
Frequently Asked Questions (FAQ)
- Is VMware Workstation free?
- Can I install VMware Workstation on openSUSE?
- How can I install VMware on openSUSE?
- What commands do I need to run in the terminal for installation?
- What is the importance of kernel packages when installing VMware?
- Can I create virtual machines for different operating systems?
Conclusion
In conclusion, VMware Workstation 17 Pro is excellent software for systems like openSUSE Leap 15. It lets you run different operating OSes on virtual PCs, making it a powerful VTx tool. By following the steps in this article, you can quickly build it on your PC.
Whether you are a developer or administrator, you can try different OSes on SUSE. With the easy-to-use Workstation Pro, you can manage your hardware well. This lets you run many VMs at the same time, not just one!
I want to mention something significant before I forget. You may be using another OS instead of SUSE on your host PC. For this reason, you can install openSUSE with VMware Workstation on the relevant system. This way, you can still experience using a different Linux distribution.

2 People Shared Their Experience
Tesekkür ederim Tolga,
this guide was really helpful for me.
Rica ederim, yardımcı olduğuma çok sevindim.