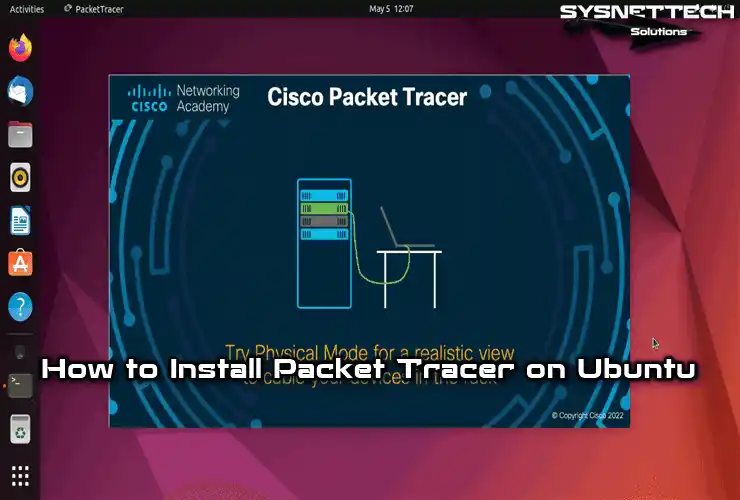
In this article, we will examine how to set up and use Cisco Packet Tracer 8.2 (8.2.0), which is released for free by Netacad, to prepare for Cisco Routing and Switching exams on a Debian 11 Bullseye Linux computer.
 on Debian 11")
How to Set Up Packet Tracer Version 8.2.0 on Debian 11 or 12 PC
Cisco Packet Tracer is a free downloadable network simulator software developed for Networking students. Using this software from Cisco, you can implement all network protocols in the exam curriculum in a virtual network environment.
Packet Tracer software is used not only to prepare for Cisco exams but also for entry-level users who want to improve themselves in computer networks.
The latest version of the Cisco network simulator program, which has added many new features by Networking Academy, is 8.2.0. To install 8.2.x on Windows, Linux, and macOS platforms, you can download it after registering on the Netacad website.
After downloading the setup package with the deb extension prepared for Linux platforms to your computer, you can easily install the Cisco network software on your Debian 11 computer, which is a rooted distribution among Linux distributions.
How to Download and Install Packet Tracer
After registering with Netacad, you can easily download Packet Tracer to your Windows, Linux, or macOS computers. If you want to download the program directly without registering, you can easily download one of the new and old versions in this article.
Step 1
Open the default web browser installed on your computer, type netacad.com in the URL address, and press Enter. After viewing the Netacad webpage, click login from the menu on the right.

Step 2
Type the email address and password you created while registering with Netacad and click the login button.

Step 3
Click on Resources / Download Packet Tracer from the menu on the Learning Portal webpage.

Step 4
You can check the Cisco software updates and system requirements on the download webpage. To download the installation package to your Debian PC, click the “64 Bit Download” link in the “Ubuntu Desktop Version 8.2.0 English” title, and save the deb package to your computer.

Step 5
After downloading the PacketTracer.deb setup file to your system, open the terminal and go to the Downloads location with the “cd ~/Downloads” command. You can use the “ls” command to view the directory contents.
When installing deb extension programs in Debian or other Linux distributions, the dpkg command is used from the terminal. So, to start the installation, execute the command “sudo dpkg -i CiscoPacketTracer_820_Ubuntu_64bit.deb” in the terminal, type your root password, and press Enter.
cd ~/Downloads
sudo dpkg -i CiscoPacketTracer_820_Ubuntu_64bit.deb
Step 6
When the Configuring Packet Tracer window opens, please read the license agreement of the software and press Enter at the OK option to accept it.

Step 7
Press Enter on Yes to also accept Packet Tracer’s EULA license agreement.

Step 8
During installation, you can see in the terminal that the dependent packages are not installed on your system. After installing these packages, you can use Packet Tracer without any problems.

Step 9
To download and configure dependent packages for Packet Tracer, execute the “sudo apt install -f” command in the terminal and press Y and Enter to confirm the newly installed packages.
sudo apt install -f
Step 10
After defining the additional packages to your system, execute the “packettracer” command in the terminal to run the program.
packettracer
Step 11
Click Yes if you confirm that the multi-user feature is started every time you start the program.

Step 12
When the Cisco Packet Tracer Login window opens, click Networking Academy to log in.

Step 13
Re-type your Netacad membership information and click the login button.

Step 14
When Cisco Packet Tracer opens, you can check its version by clicking Help / About from the tool menu.

How to Create a New Project
After installing Cisco Packet Tracer on your Debian system and logging in, you can now start preparing for your network exams.
Step 1
Add two 2911 model Cisco Routers to the Logical workspace of the Packet Tracer from the devices panel, as in the image below.

Step 2
From the Devices panel, click the Switch symbol this time to view the various Switch types. Add two L2 2960 model Cisco Switches to the workspace.

Step 3
Activate the Computers category and add a desktop computer and a laptop computer to the workspace, as in the image below.

Step 4
After you create a logical network topology, you must wire all the devices in the workspace. Activate the cabling option this time from the location of the Devices category, and click Copper Straight-Through.
Connect one end of the copper cable to the FastEthernet port of the PC and the other end to one of the free FastEthernet ports of the Switch in the network it is connected to.

Step 5
Since the network connection between the Cisco Router and Switch must be fast, connect one end of the flat cables to the GigabitEthernet ports of the Switches and the other end to the GigabitEthernet ports of the Routers.

Step 6
Since Copper Cross-Over must be used to connect two Cisco Routers, select the relevant cable type from the cabling option and connect the Routers from the GigabitEthernet ports.

Step 7
To configure the FastEthernet interface of the PC you have added to the workspace, click on it and assign a Static IP address as in the image below from the Desktop / IP Configuration panel in the window that opens.
IPv4 Address: 192.168.1.10
Subnet Mask: 255.255.255.0
Default Gateway: 192.168.1.1
Step 8
To assign an IP address to the FastEthernet port of the laptop in the subnet connected to Router1, configure the TCP/IP settings from the IP Configuration panel as in the image below.
IPv4 Address: 192.168.3.10
Subnet Mask: 255.255.255.0
Default Gateway: 192.168.3.1
Step 9
After assigning IP addresses to computers in the workspace, you must configure the Routers. Open Router0’s CLI prompt and configure GigabitEthernet ports.
Router> en
Router# conf t
Router(config)# interface gigabitethernet 0/1
Router(config-if)# ip address 192.168.1.1 255.255.255.0
Router(config-if)# no shutdown
Router(config-if)# exit
Router(config)# interface gigabitethernet 0/0
Router(config-if)# ip address 192.168.2.1 255.255.255.0
Router(config-if)# no shutdown
Step 10
Open the CLI command prompt of Router1 and configure the active GigabitEthernet ports in the same way.
Router> en
Router# conf t
Router(config)# interface gigabitethernet 0/1
Router(config-if)# ip address 192.168.3.1 255.255.255.0
Router(config-if)# no shutdown
Router(config-if)# exit
Router(config)# interface gigabitethernet 0/0
Router(config-if)# ip address 192.168.2.2 255.255.255.0
Router(config-if)# no shutdown
Step 11
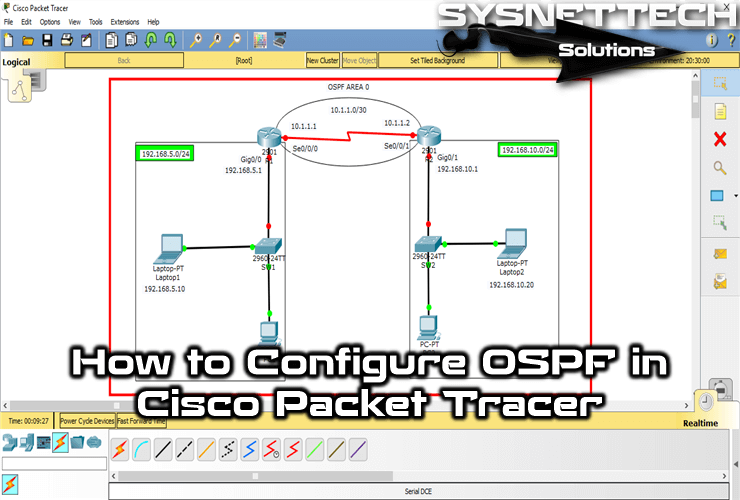
Ping the default gateway from PC0 and Router0’s Gig0/0 interface, and you will see that the connection is OK. However, if you ping Router1’s Gig0/0 interface, you will see that the process is incorrect. This is because no routing protocol is defined between the Routers.

Step 12
Likewise, when you try to ping 192.168.1.0/24 from Laptop0, you will see that the operation fails.

Step 13
You can choose one of the EIGRP, IGRP, RIPv1/v2, or OSPF routing protocols according to the sample network topology. Execute the commands below at Router0’s CLI prompt to configure the OSPF protocol for this topology.
Router>en
Router# conf t
Router(config)# router ospf 1
Router(config-router)# network 192.168.1.0 0.0.0.255 area 0
Router(config-router)# network 192.168.2.0 0.0.0.255 area 0
Step 14
Execute the commands below in the CLI to enable OSPF on Router1 as well.
Router>en
Router# conf t
Router(config)# router ospf 1
Router(config-router)# network 192.168.3.0 0.0.0.255 area 0
Router(config-router)# network 192.168.2.0 0.0.0.255 area 0
Step 15
After configuring OSPF, test the network connection by pinging the laptop from the PC.

Step 16
Likewise, when you ping the PC from the laptop, you can see that the network connection is OK.

How to Uninstall Packet Tracer from Debian
You may want to uninstall Packet Tracer from your Linux computer for any reason or when you plan to use a more advanced network simulator. Before you altogether remove the Cisco software from your system, do not forget to back up your projects.
Step 1
Open the terminal on your Linux system and execute the “sudo apt remove packettracer” command to uninstall Packet Tracer and press Y and Enter to confirm the packages to be deleted.
sudo apt remove packettracer
Step 2
Execute the “sudo apt autoclean && sudo apt autoremove” command to remove and delete unnecessary packages related to Cisco Packet Tracer and confirm the operation.
sudo apt autoclean && sudo apt autoremove
Video
Installing Old Versions
Packet Tracer 7.2.2 Installation
- Open Terminal and use the chmod command to change the permissions of the PacketTracer-7.2.2-ubuntu-setup.run file.
chmod +x PacketTracer-7.2.2-ubuntu-setup.run
- Next, run ./PacketTracer-7.2.2-ubuntu-setup.run to start the installation.
./PacketTracer-7.2.2-ubuntu-setup.run
- In old versions of CPT, the extension of the setup file was published as tar.gz. Now, Cisco has begun to use a .run file with a GUI setup interface for new versions of its software to enable Linux users to install it more easily. Now, click the Next button in the Packet Tracer GUI wizard.
- Proceed with the /opt/pt option configured by default in the Installation Folder window.
- Check I accept the license to accept the license agreement of the Cisco simulator, and then click Next.
- In the Ready to Install window, now click the Install button to install the CPT.
- In the Authorization Required window, type your password to confirm the installation to your sudo account, and then click OK.
- Wait while the Cisco simulator software is installed. Click Finish when the wizard reports that the installation is complete.
- When installing programs on Linux systems, you may sometimes need to install dependent packages. If you are getting a libpng error while running Packet Tracer, you need to download and install the libpng12-0_1.2.50.deb package.
wget https://ftp.us.debian.org/debian/pool/main/libp/libpng/libpng12-0_1.2.50-2+deb8u3_amd64.deb
- Run the command below in the terminal to install the libpng package you downloaded.
dpkg -i libpng12-0_1.2.50-2+deb8u3_amd64.deb
- If you encounter an error stating that the multiarch package must be installed, you will need to install that package as well. To install the multiarch package on Debian, run the command below.
sudo apt-get install multiarch-support
- After installing the multiarch-support package, try to install libpng again. If you encounter the error below this time, you need to copy the libpng12.so.0 file to the /opt/pt/bin/ folder.
(Reading database ... 157517 files and directories currently installed.) Preparing to unpack libpng12-0_1.2.50-2+deb8u3_amd64.deb ... Unpacking libpng12-0:amd64 (1.2.50-2+deb8u3) ... dpkg: error processing archive libpng12-0_1.2.50-2+deb8u3_amd64.deb (--install): unable to install new version of '/usr/lib/x86_64-linux-gnu/libpng12.so.0': No such file or directory Errors were encountered while processing: libpng12-0_1.2.50-2+deb8u3_amd64.deb
- To copy the file, you must first extract the .deb package to the folder. To extract the deb package and copy the libpng12.so.0 file, execute the commands below in the terminal and then run Packet Tracer.
mkdir cpt; dpkg -x libpng12-0_1.2.50-2+deb8u3_amd64.deb ./cptcp ./cpt/lib/x86_64-linux-gnu/libpng12.so.0 /opt/pt/bin/packettracer
- If Packet Tracer does not start and you get the error below, you need to install the libqt5webkit5 package. To do this, run the following command in the terminal.
Starting Packet Tracer 7.2.2 /usr/local/bin/packettracer: line 8: 2219 Aborted ./PacketTracer7 "$@" > /dev/null 2>&1sudo apt-get install libqt5webkit5
- After installing the libqt5webkit5 package, run the program using the packettracer command.
- In the Cisco login window, enter your account information and click User Login. If you want to continue without logging in, click the Guest Login button.
- After successfully installing Packet Tracer, you can check the version by clicking Help / About.
Creating a Desktop Shortcut
Creating shortcuts on Windows operating systems is relatively easy. However, creating a desktop shortcut on a Linux-based Debian or Ubuntu can be a bit complicated.
To create a desktop shortcut for a program on Debian, you must first edit the file with the extension programname.desktop. You can also configure this file with gedit.
Run the commands below to create a desktop shortcut for the Cisco Packet Tracer.
cp /opt/pt/bin/Cisco-PacketTracer.desktop /home/user/Desktop/chmod +x Cisco-PacketTracer.desktop
Making a Start Menu Shortcut
Shortcuts for some programs installed on Linux platforms are not automatically added to the start menu. Therefore, you can create a new desktop shortcut and add it to the Start Menu.
To create a start menu shortcut for Packet Tracer, you need to run the following command.
cp Cisco-PacketTracer.desktop /usr/share/applications
Packet Tracer 7.2 Installation
- First, open the terminal to edit the sources.list, and add the following addresses to the source list after executing the “sudo nano /etc/apt/sources.list” command. Press CTRL + X and then Y and Enter to save your changes to the Sources.list file.
deb https://ftp.us.debian.org/debian jessie maindeb https://ftp.us.debian.org/debian stretch maindeb https://deb.debian.org/debian unstable main
- After editing the Sources.list, update the package list using the sudo apt-get update command.
sudo apt-get update
- Create a new folder with the mkdir command and extract the PacketTracer72.tar.gz file into the folder you created.
mkdir CPT72tar -xvzf Packet\ Tracer\ 7.2.1\ for\ Linux\ 64\ bit.tar.gz -C CPT72/
- Go to the CPT72 folder and execute the ./install command to start the installation.
./install
- After installation, execute the packettracer command in the terminal. If not, go to cd /opt/pt/bin/ and run the ./PacketTracer7 command.
cd /opt/pt/bin/./PacketTracer7
- To fix this error, you need to install the libpng package. To do this, execute the sudo apt-get install libpng12-0 command.
sudo apt-get install libpng12-0
- If you try to open the program again and get the error ./libcrypto.so.1.0.0: no version information available (required by ./PacketTracer7) as in the image below, you need to install the libcrypto package. To install the Libcrypto package on Debian, execute “sudo apt-get install libssl1.0.0” in the terminal.
sudo apt-get install libssl1.0.0
- Now execute the command “cp -i /usr/lib/x86_64-linux-gnu/libcrypto.so.1.0.0 /opt/pt/bin/”. Then cp:overwrite ‘/opt/pt/bin/libcrypto.so.1.0.0’ to confirm overwriting existing file? Press the Y key.
cp -i /usr/lib/x86_64-linux-gnu/libcrypto.so.1.0.0 /opt/pt/bin/cp: overwrite '/opt/pt/bin/libcrypto.so.1.0.0'? Y
- Finally, execute the sudo apt-get install libqt5webkit5 command to install dependent packages for Packet Tracer 7.2.1.
sudo apt-get install libqt5webkit5
- Now you can see that the Packet Tracer software opens without any problems.
Packet Tracer 7.1 Installation
If you try to install an older version of Packet Tracer 7.1, you will get the error libQt5WebKitWidgets.so.5. To resolve this problem, install the following dependent packages on your system in order.
apt-get install qtmultimedia5-devapt-get install libqt5webkit5-dbgapt-get install libqt5script5apt-get install libqt5scripttools5
Finally, if you download libpng with the wget command and it does not match your system, you can download and install the relevant package from this address.
Installing Old Versions – Video
Related Articles
1) Building Packet Tracer on Kali
2) Building Packet Tracer on Linux Mint
3) Building Packet Tracer on openSUSE
4) Running Packet Tracer on Windows 10
5) Running Packet Tracer on Ubuntu

TolgaBagci
Hi, I'm Tolga, a computer expert with 20 years of experience. I help fix computer issues with things like hardware, systems, networks, virtualization, servers, and operating systems. Check out my website for helpful info, and feel free to ask me anything. Keep yourself in the loop about the newest technologies!
Thank you very much.
And fuck you packettracer, GNS3 is much better than packet fucking tracer do no load
Hi, thanks for this tutorial. Could you do a tutorial on how to install both packettracer 7.3 and gns3 on Debian 10 stable?