
In this article, I will explain how to get ready for Cisco tests on openSUSE. To do this, we will show you the Cisco Packet Tracer 8.2 setup process step by step.
You can efficiently run this strong network tool on openSUSE Leap 15. Because of that, this system gives better speed and trust than other Linux versions.
Also, system managers and home users often choose it. So, we can show its good uses more clearly.

How to Use Packet Tracer 8.2 (8.2.0) on openSUSE Leap 15 Linux System
As you know, Packet Tracer (PT) is a free network tool for Cisco Networking students. Also, the program has many Cisco and other web tools. Plus, it lets you make physical and logical network designs.
If you have openSUSE Leap or Tumbleweed on your computer, you can install Cisco software. This lets you easily set up your system and start studying well for your Cisco exams.
The main point is that it is often easier to install on Ubuntu and similar systems. So, the setup process may be challenging for some openSUSE users.
If you use RPM-based systems like Fedora or SUSE, you cannot install the DEB file directly. So, you must first change the file to the RPM type. This lets your system see and install the file correctly.
You cannot install DEB files directly on RPM-based Linux systems. So, first install the Alien program. Then, change the needed file to RPM format.
You can create an RPM-based setup file using Alien. But please know that in some cases, this may make applications stop working.
How to Download Packet Tracer and Convert DEB Package to RPM
When getting it from the Netacad website, you will only see Ubuntu. So, the setup file will have a DEB extension.
You have downloaded the DEB package for Cisco software. Therefore, you need to prepare a setup file for the SUSE system. Then, you must convert the package to the appropriate format.
Download Cisco Network Tool
Step 1
You can create a new account on Cisco NetAcad. Or, sign in with your current account. To do this, visit the NetAcad website. Then click Log In from the drop-down menu on the right.

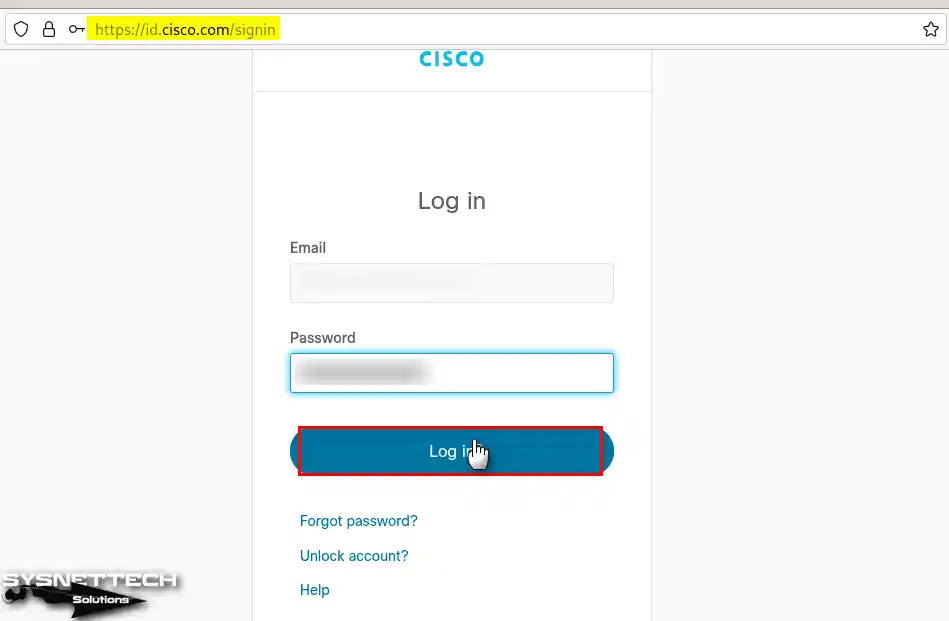
Step 2
Go to the login page and enter your information. First, enter the email address you used when registering. Then complete the process by entering your password.
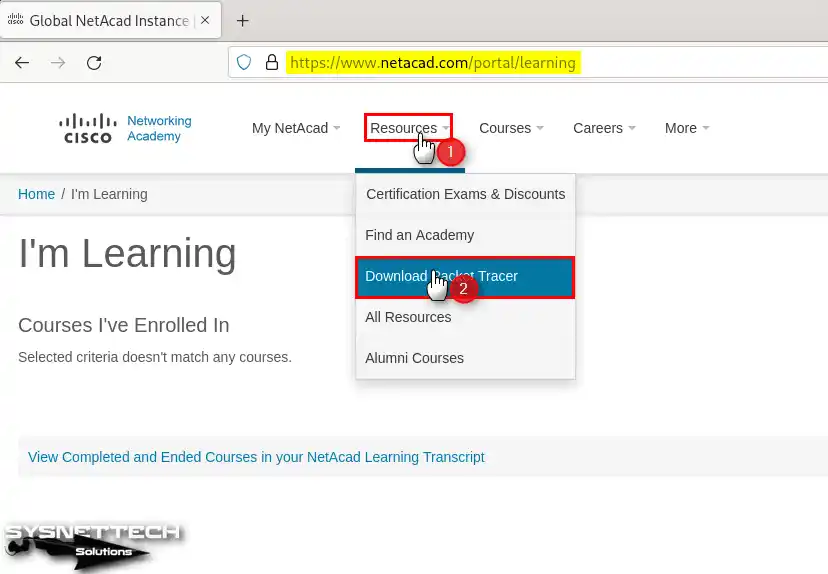
Step 3
After signing in to the Cisco Networking Academy, go to the menu. Then choose the Resources option and click “Download Packet Tracer.”
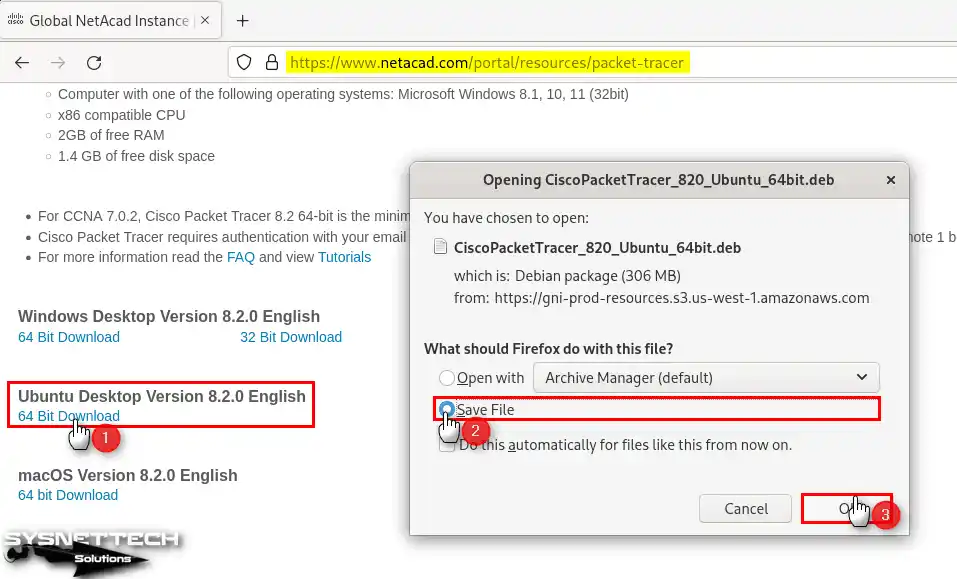
Step 4
Review the listed platforms for Windows, Linux, and macOS. Then click on the “Ubuntu Desktop Version 8.2.0 English” option. Next, use the 64 Bit Download link to save the DEB package.
You can also get the network simulator straight to your Linux computer. For this, check out our Packet Tracer Download guide.
Converting the Packet Tracer DEB Package to RPM
Step 1
Use the Alien application to convert the DEB package to RPM. Now, add Alien’s repo address to your system. Then run the following command in the terminal.
sudo zypper addrepo https://download.opensuse.org/repositories/home:txutxifel/15.4/home:txutxifel.repo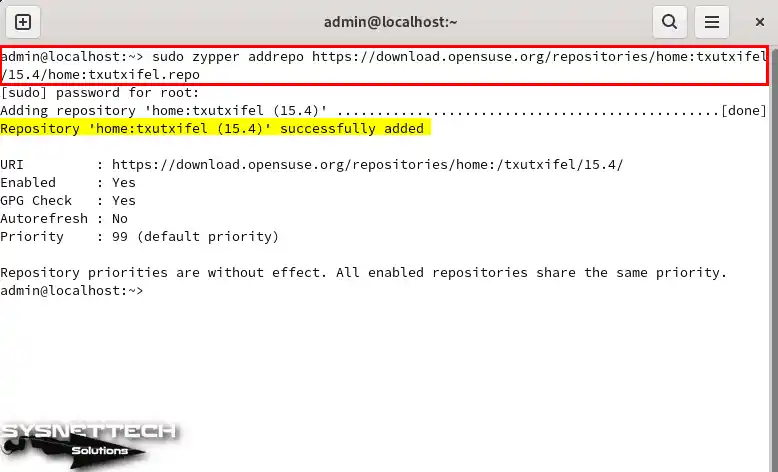
Step 2
Update the list of places your openSUSE system gets software from. Then, in the terminal, type the command “sudo zypper refresh”. Next, press the Y key and then press Enter to accept the new security key.
sudo zypper refresh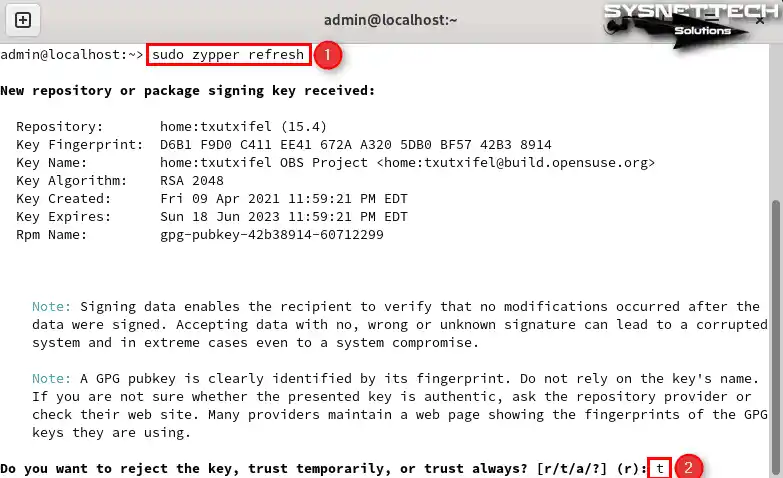
Step 3
You need to install the Alien software on your SUSE PC. To do this, run the command “sudo zypper install alien” in the terminal window. Then, press Y and Enter to see and agree to the packages for adding.
sudo zypper install alien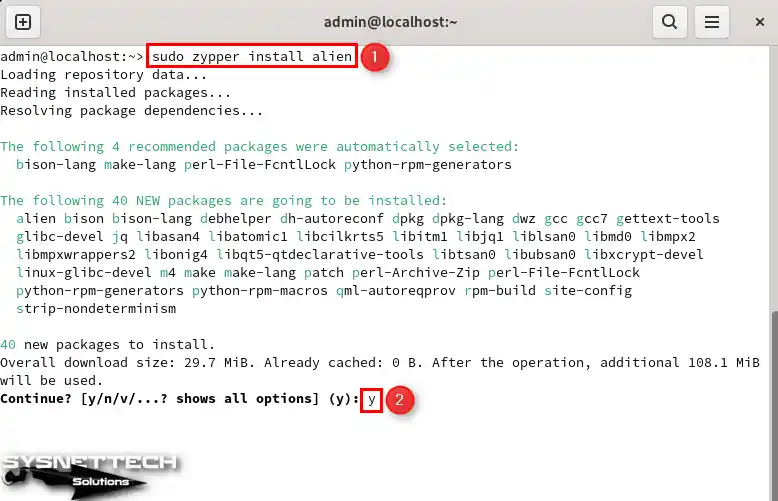
Step 4
To go to the downloads folder on your terminal, run the command “cd ~/Downloads”. This will allow you to access the simulator tool setup file easily.
Then use the terminal to convert the file to an RPM package. Run the command “sudo alien –to-rpm CiscoPacketTracer_820_Ubuntu_64bit.deb” and wait for it to finish.
cd ~/Downloads
sudo alien --to-rpm CiscoPacketTracer_820_Ubuntu_64bit.deb
Step 5
We need to prepare the PT RPM file. So, run the command “sudo zypper install PacketTracer-8.2-2.x86_64.rpm” in the terminal to install the Cisco software and confirm the packages.
You may see a “signature verification failed” error while installing. To skip this warning, press i and continue.
sudo zypper install PacketTracer-8.2-2.x86_64.rpm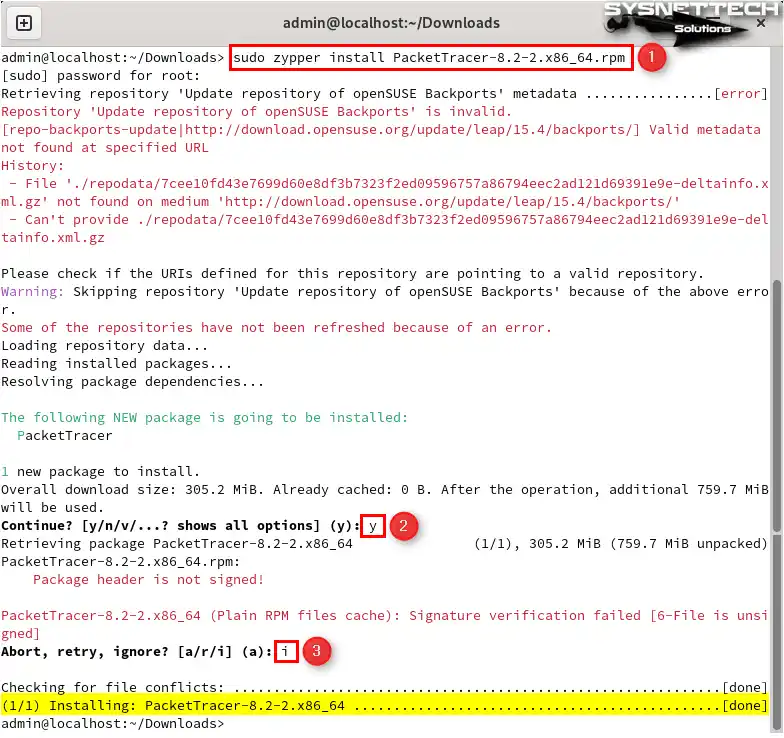
Starting Packet Tracer on SUSE OS
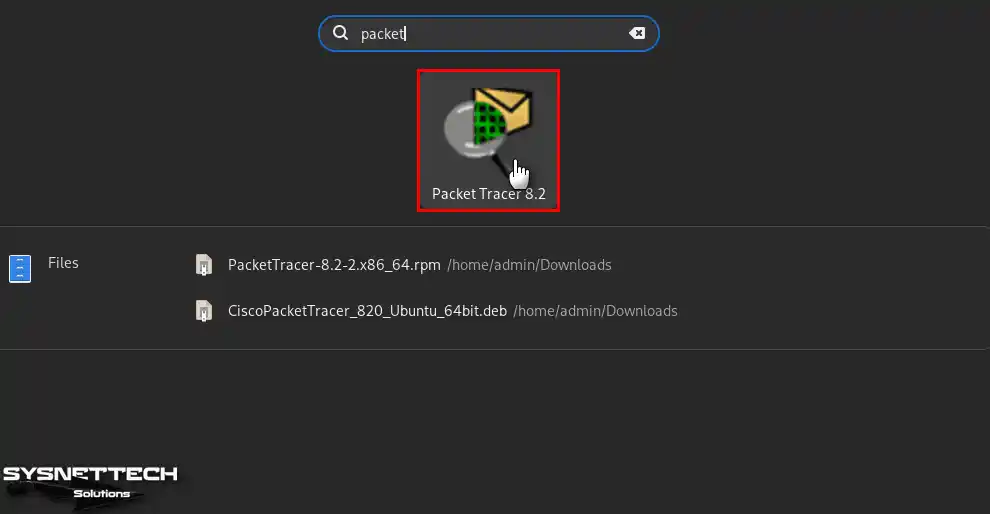
Step 1
After installing it, search for its shortcut in your SUSE system’s start menu and run it.
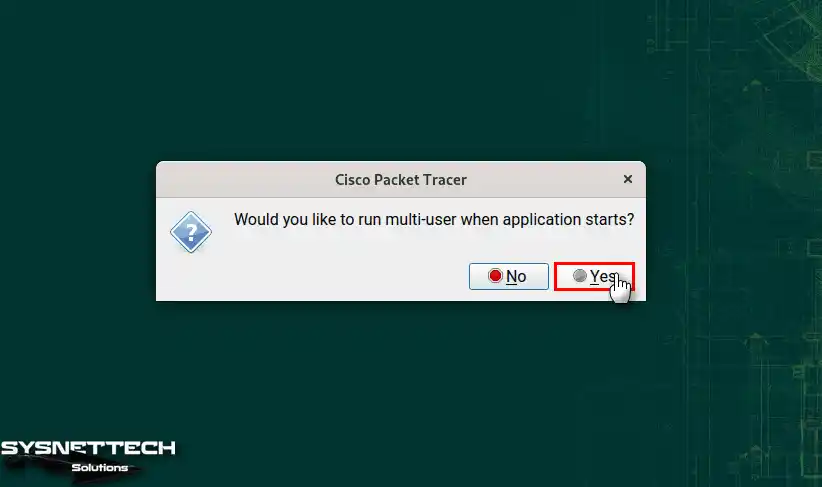
Step 2
The Cisco software will ask if you want to use the multi-user feature. You can then choose to turn this feature on or off, based on what you want to do.
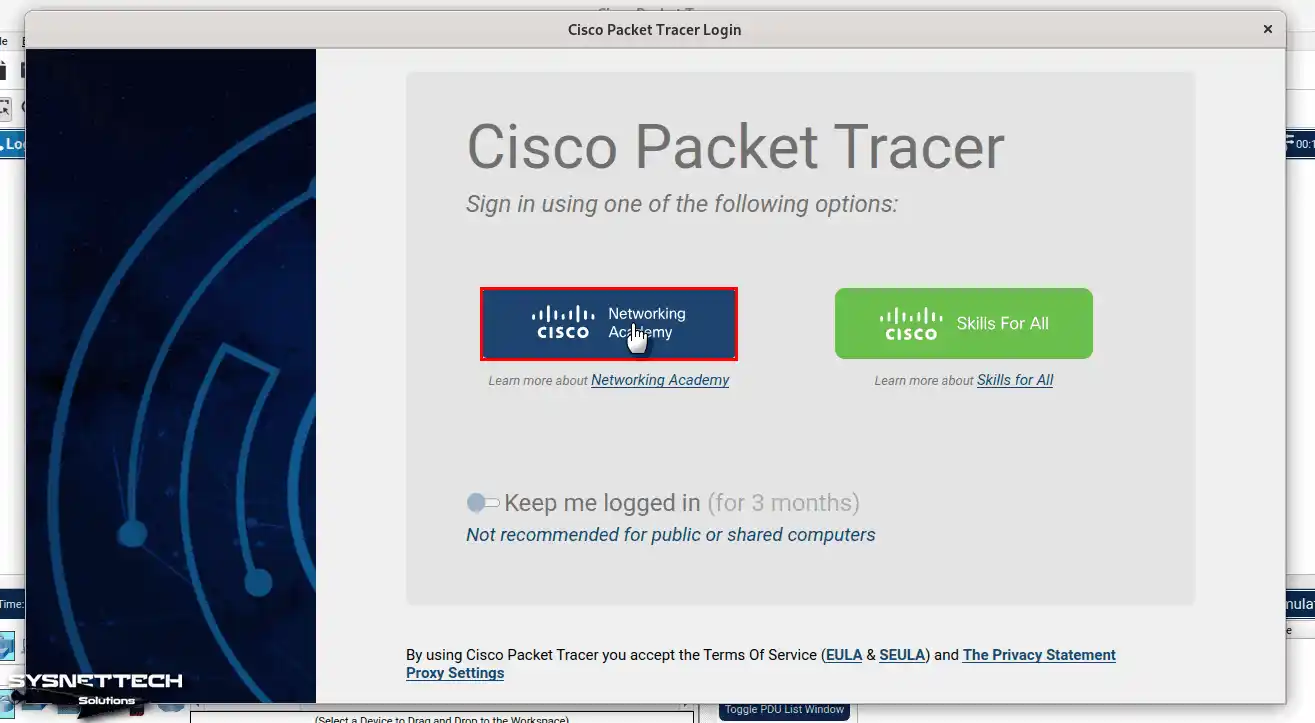
Step 3
When you open the Cisco login screen, use your Networking Academy account. Then, choose to log in to the program.
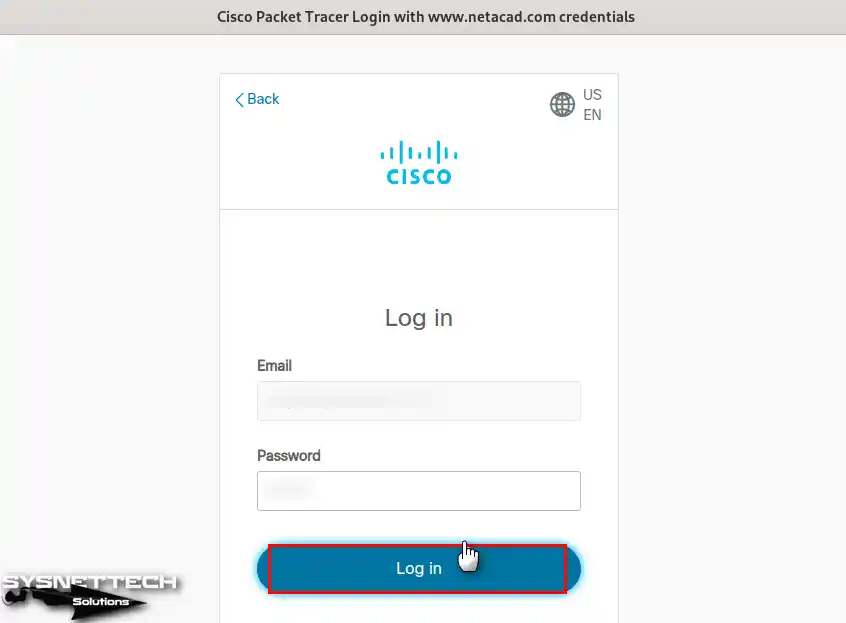
Step 4
Log in as soon as you enter your Cisco credentials again.
Step 5
After you log into the Cisco app, go to the menu that says “Tools”. Next, locate the Help / About option. Finally, you can check your software version here.

Step 6
Additionally, you can use the “packettracer” command from the terminal to open Cisco network software faster. However, this code may not work when you install it with the RPM package. So it would be best if you created a symlink for related software.
sudo ln -sf /opt/pt/packettracer /usr/local/bin/packettracer
How to Create a New Project for Cisco Exams on openSUSE
After adding Cisco Packet Tracer on openSUSE, first make a new project. Then, build the network designs given in your exam plan.
1. Add Network Devices to the Topology
Step 1
After opening PT, you can drag and drop devices into the work area. You can also pick and add the right devices to place many devices.
In this article, we will make a simple network setup to test Cisco software. Now, let’s add a Cisco Router model 2911 to the logical workspace.

Step 2
After adding the Router, the next step is to select the switching devices. Therefore, add a Switch to your workspace.

Step 3
After you open the “Computer” group, we will put the devices on the screen. First, put two desktops, then a laptop, and a Meraki Server.

2. Wire the Network Devices
Step 1
Now, turn on the cabling option from the group of network devices. Here, we will use Copper Straight-Through Cable to join the PCs & server in the network layout to the Switch.
After picking this cable, we need to link the devices. Place the FastEthernet ports of PC0, PC1, Laptop0, and Meraki Server into the empty ports on the Switch.

Step 2
If the Switch on the network does not have a Gigabit Ethernet interface, add one from the settings. Then connect all devices to the Switch. Finally, connect the Router to the Switch with the Gigabit Ethernet port.
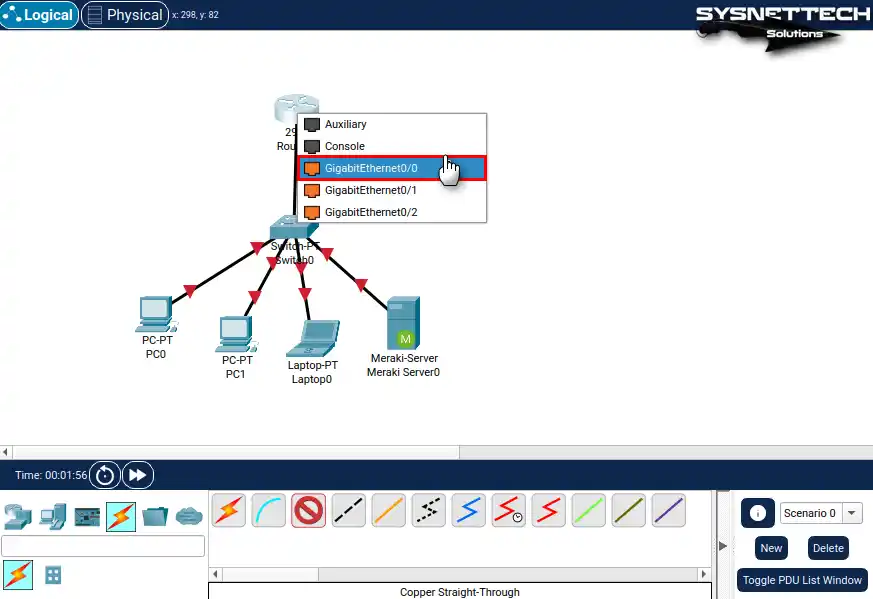
Step 3
After wiring the network devices, open the CLI of Router0. Then use the CLI commands I provided below.
So, this will allow you to assign an IP address to the GigabitEthernet 0/0 port of the Switch. Finally, enable this port.
Router> en
Router# conf t
Router(config)# interface gigabitethernet 0/0
Router(config-if)# ip address 192.168.1.1 255.255.255.0
Router(config-if)# no shutdown
3. Enable DHCP
Step 1
First, give an IP address to the GigabitEthernet port. Then, create a DHCP pool for end-user devices. You will let the IP settings on your network get their own numbers by themselves.
Now, use the following commands in the CLI prompt to configure DHCP on Router0.
Router(config)# ip dhcp pool LAN
Router(dhcp-config)# network 192.168.1.0 255.255.255.0
Router(dhcp-config)# default-router 192.168.1.1
Router(dhcp-config)# dns-server 192.168.1.1
Router(dhcp-config)# domain-name SNT
Router(dhcp-config)# exit
Router(config)# ip dhcp excluded-address 192.168.1.1
Step 2
Open Desktop / IP Configuration from the settings of PC0 or other devices.
First, find the IP settings for the FastEthernet ports. Change this setting from Static to DHCP. Then, be sure to verify this change.

Step 3
First, assign IP addresses using the DHCP server. Then, open Command Prompt from the Desktop menu. Next, you can test your connection by pinging devices on the same network from PC0.

Step 4
First, let’s check the network setup of our devices in the virtual topology. Then, enter the Router’s CLI command prompt and run the “show ip dhcp binding” command.
You can also get detailed information with the “show ip dhcp pool LAN”. In short, by doing this, you can access all information about DHCP.
show ip dhcp binding
show ip dhcp pool LAN
Video
How to Uninstall Packet Tracer from openSUSE
If you want to remove the Cisco simulator from openSUSE Leap 15, you can use the terminal. So, this way lets you do the removal very fast.
First, verify that your system has PT installed. Then, begin taking it off with the command “sudo rpm -e ProgramName”.
rpm -qa | grep -i PacketTracer
sudo rpm -e PacketTracer-8.2-2.x86_64
rpm -ql PacketTracer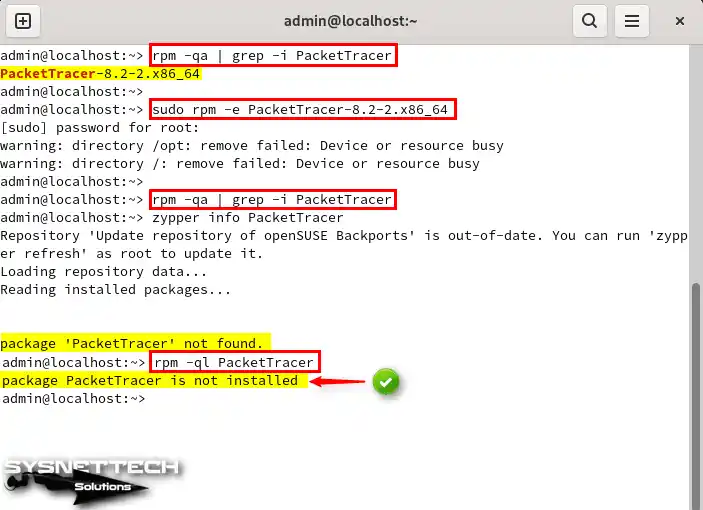
Installing Older Versions of the Cisco Simulator
Packet Tracer 7.2.2
- Double-click the PT file with the “.Run extension” to run the wizard.
- I suggest using the standard install spot. This will help you avoid possible problems later. So, go ahead now in the Install Folder window.
- Read and accept the Cisco simulator tool license agreement on your SUSE OS.
- Here, pick the Install button to add PT.
- To keep going, type your Root password and press OK. Once you check your password, the setup will finish shortly.
- More parts are needed to use the Cisco tool on Linux. For instance, you have to add Libpng on openSUSE. To add the key part, use the following line in the terminal.
wget https://ftp.us.debian.org/debian/pool/main/libp/libpng/libpng12-0_1.2.50-2+deb8u3_amd64.deb
- You got the libpng.deb file. But Debian files do not run on SUSE Linux. So, you need to add DPKG first.
sudo zypper install dpkg
- You have set up the DPKG package tool. Now you need to extract the Libpng package. To do this, copy the relevant file to the /opt/pt/bin/ location.
mkdir cpt; dpkg -x libpng12-0_1.2.50-2+deb8u3_amd64.deb ./cptsudo cp ./cpt/lib/x86_64-linux-gnu/libpng12.so.0 /opt/pt/bin/
- First, copy the “libpng12.so.0” file to the required folder. Then, execute the “packettracer” command in the terminal to start the program without trouble.
packettracer
Packet Tracer 7.2.2 Setup with WineHQ
Programs on Windows often end with .exe. But adding these files to Linux is not the same. Luckily, there are a few ways to do it.
Wine is one of the most commonly used solutions. You can add programs that work with this tool on Linux.
- First, install Wine on your SUSE PC.
- After you add Wine, right-click the PT.exe file. Then select the “Open with Wine” option.
- Say yes to the rules on the PT setup page. Then, keep the install spot as usual and press Next.
- Leave the Start Menu Folder setting at its default value. Here, you may want to create a desktop shortcut. To do so, check the “Create a desktop shortcut” option.
- Press Install to begin the setup, then wait for the tool to get the files ready.
- First, check the “Launch Cisco PT” option and click Finish.
- PT puts your network plans in a set place. You can view the right spot on this page.
- Press OK to shut the alert box. Lastly, wait as the Cisco Networking Academy tool starts.
Installing Old Versions – Video/Slide
| SUSE / PT Versiyon | YouTube Video | Slide |
|---|---|---|
| 15.0 / 7.2.2 | Watch | View |
| 15.4 / 8.2.0 (NEW) | Watch | – |
Frequently Asked Questions (FAQ)
- What are the system requirements for Packet Tracer for SUSE?
- Which add-ons do I need to install?
- What should I do if I encounter problems during installation?
- How can I uninstall Packet Tracer if I no longer need it?
Conclusion
As you see, we have added the Cisco Packet Tracer tool to the openSUSE system. This lets you use every part of this strong network tool on your Linux OS.
By doing all the steps I said, you can get the software and manage the related RPM job. Then, you can finish the change and setup steps.
Now, you and network managers can build tricky networks on your computer. I must add, you can better your Cisco learning with practice tests. So, you can get ready for the exam topics set by Cisco.
The openSUSE system gives great speed in the Linux world. If you pick this system, nothing stops you from getting better at networking!
If you want, our steps for adding the practice tool on Ubuntu are also on our site. The proper steps make it simpler to get the correct parts, letting you fit the app into your system better. So, please read our page on installing Packet Tracer on Ubuntu and do the steps to add the tool easily.

1 Reader Comment
Hello,
i follow the istructions on OpenSuse Leap 15.1 and 15.2 but with
this error
larrix@wrksuse15:~/Scaricati> packettracer
Starting Packet Tracer 7.2.2
/usr/local/bin/packettracer: riga 8: 27665 Eccezione in virgola mobile (core dump creato) ./PacketTracer7 “$@” > /dev/null 2>&1
In english Segmentation fault (core dumped)
Thanx