

The Windows operating system contains essential tools for network administrators. One of them is the Telnet client, a long-standing component. Unfortunately, Microsoft keeps this component disabled by default. Moreover, this is true for Windows 11, Windows 10, and Windows Server as well.
As a system administrator, you need this Windows feature for a specific task. For example, you may need to connect to an old UNIX server. Or you may run a port test to carry out network checks. In such cases, Telnet setup becomes essential.
This guide covers all modern builds of the Windows OS family. I tested it on Windows 11 build 23H2, 24H2, Windows 10 22H2, and Windows Server 2019/2022. I also cover the Home vs. Pro differences in Windows 11 and 10.
My goal is not just to list commands for you. I also want to explain how the OS core handles this component. After all, a true professional answers not just the “how” but the “why” as well.
You have three main paths: GUI (Settings and Control Panel), PowerShell, and DISM. In addition, I will share professional techniques such as GPO for enterprise settings. I will also cover offline image maintenance and PowerShell DSC topics. Finally, we will look at common errors and security risks.
Let me say this up front: this component joins the system as a Windows feature. Therefore, the setup requires you to understand how the OS handles its components. Let us take this journey together.
Why the Telnet Client Still Matters on Windows
Telnet is an old technology that lets you connect to a remote system through a command-line interface. It was built in 1969 for the ARPANET project. Today, it persists as an optional component inside the Windows OS.
So why does it still exist as a Windows feature? Because backward compatibility is a key priority for Microsoft. Many old devices and apps support only this protocol. Therefore, the OS has to meet that need.
Also, among Windows system tools, this component stands out as a fast port-testing tool. You learn in seconds whether a server listens on a specific port. This is an invaluable skill for network administrators especially.
I first used this tool in 2005 on a Windows XP machine. From that day on, I have needed to install this component on every Windows build. My experience shows that if you know the right method, the task is quite simple.
When you connect to old systems, other clients do the job too. In particular, SecureCRT client setup provides secure session management. You gather SSH and Telnet profiles in one screen.
Telnet Protocol: TCP Port 23, the NVT Standard, and Client-Server Design
The Telnet protocol rests on a client-server design that runs over TCP port 23. A client connects to a remote server. Then it exchanges data through the NVT (Network Virtual Terminal) standard.
The NVT standard solves the character-encoding gap between OS families. In other words, a Linux machine and a Windows system can communicate in the same language. However, this communication occurs in unencrypted form. As a result, a serious security vulnerability emerges.
The protocol uses a seven-bit ASCII character set. Each command starts with an IAC (Interpret As Command) byte. This design provides a simple but robust control scheme. Even so, it falls short of modern OS standards.
The Windows system provides this component as the telnet.exe file. It resides in the System32 directory. When you enable this Windows feature, you can connect through a command-line interface.
The OS places this file in the Win32 network services tier. Thus, it plays a key role in system maintenance. Yet Microsoft keeps this tool disabled by default due to security risks.
Why Telnet Is Disabled by Default on Windows
Microsoft chose to disable this component by default after Windows Vista. The main cause is security concerns. After all, the protocol sends all data as plain text.
Thus, an attacker who listens to network traffic can easily capture passwords. Also, it has no protection against MITM (Man-in-the-Middle) attacks. For this reason, Microsoft directs users to safer options such as SSH.
Yet backward compatibility with old systems still matters. Some legacy hardware supports only this protocol. That is why Microsoft ships the component as an optional feature rather than removing it.
This is why you see this tool in the Windows Features pane. Still, it remains unchecked by default. The OS will not load this component unless you enable it manually.
Today’s Uses for Telnet: Network Checks, Legacy System Maintenance, and the US Context
This tool remains valuable in a few key fields today. Above all, it is essential for network checks and port tests. Here are the most common use cases:
- Port test: You check whether a server listens on a specific port. For example, you test SMTP port 25 or HTTP port 80.
- Legacy system maintenance: Many US government sites still run old UNIX servers. You can use Telnet to reach these systems.
- Network hardware setup: In network hardware setup, first-time router and switch installation calls for console access. At its core, Telnet helps you in this task. TFTP server setup makes file transfer simple.
- Mail server checks: You perform banner grabbing to test the SMTP handshake. This way you learn whether the mail server sends a reply.
- Training and labs: Students who learn network protocols use this tool to observe plain-text communication.
Also, old CNC machines and medical devices run on this protocol alone. Therefore, system administrators must know this technology well. Yet they must not dismiss the security risks.
In the US, many banks and telecom firms still maintain legacy systems. Knowledge of this tool is essential for their maintenance. Still, new projects should adopt the SSH standard.
Telnet Setup on Windows 11: GUI, PowerShell, and DISM Methods
You have three main ways to use Telnet on Windows 11. These are GUI (Settings/Control Panel), PowerShell, and DISM. Each method offers its own advantages. Now let us look at each one individually.
First, you should know this: on Windows 11 build 23H2 and 24H2, this component is disabled by default. Also, build 24H2 introduces a significant structural change. Therefore, you must track the current steps.
Differences also exist between Windows 11 Home and Windows 11 Pro. In particular, there are significant disparities in Group Policy support.
How to Enable the Telnet Client on Windows 11 (Settings and Control Panel)
The easiest way is to use the Windows Features pane. To do so, follow these steps:
Step 1
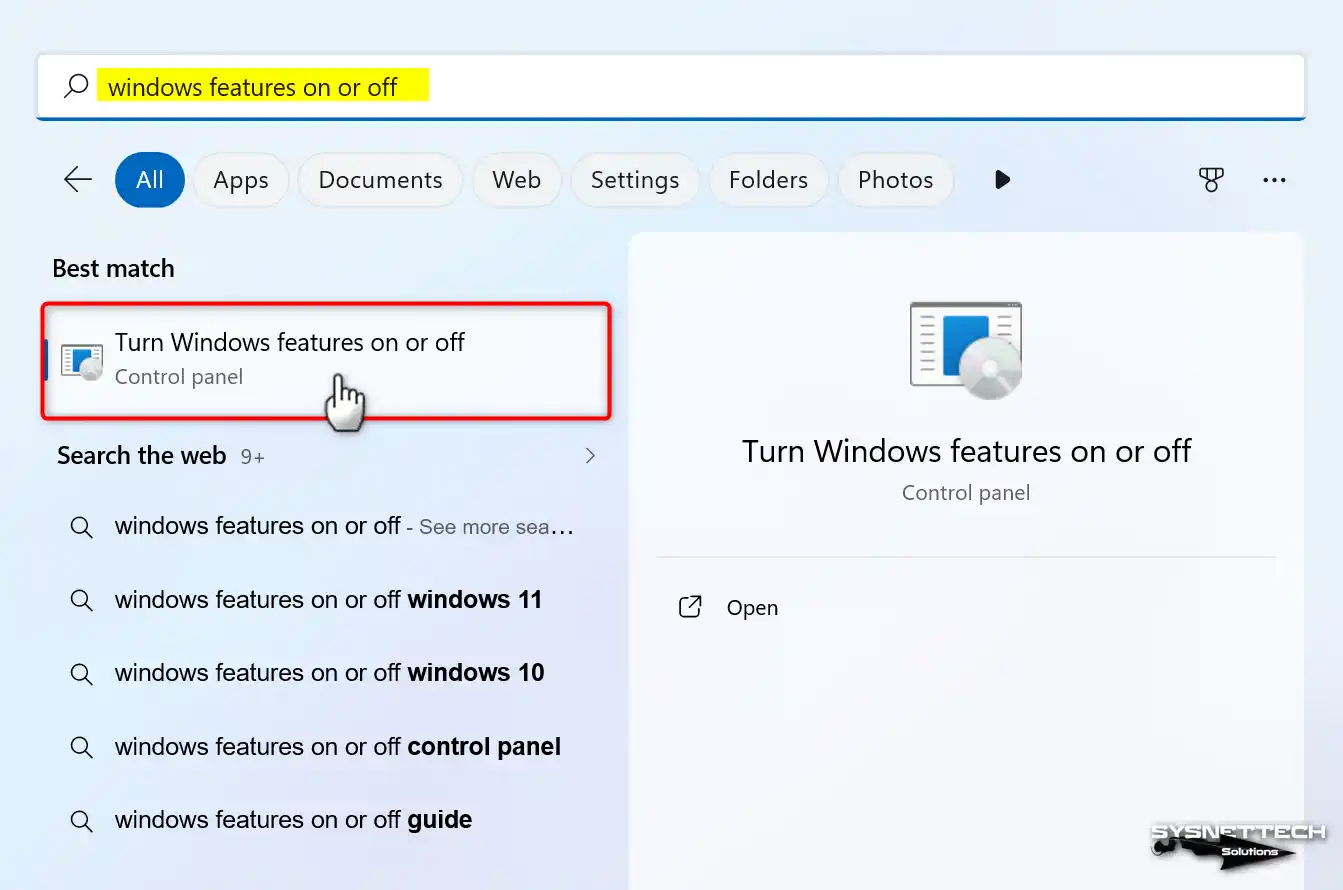
Click the Start menu and type “Turn Windows features on or off.” Click the result you see. The “Windows Features” pane then appears.
Step 2
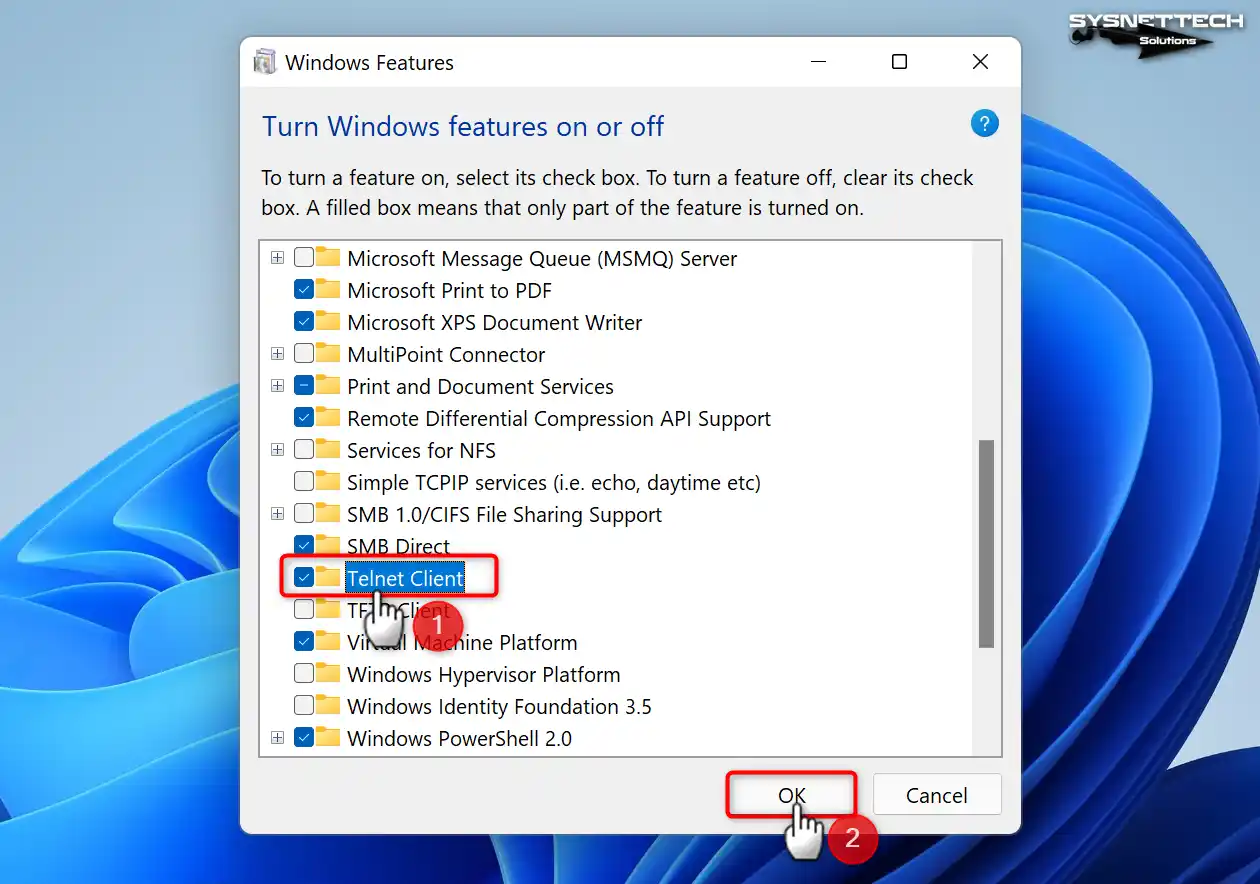
Find the “Telnet Client” option in the list and check the box next to it.
Step 3
When you click OK, the OS loads the files it needs.
Step 4
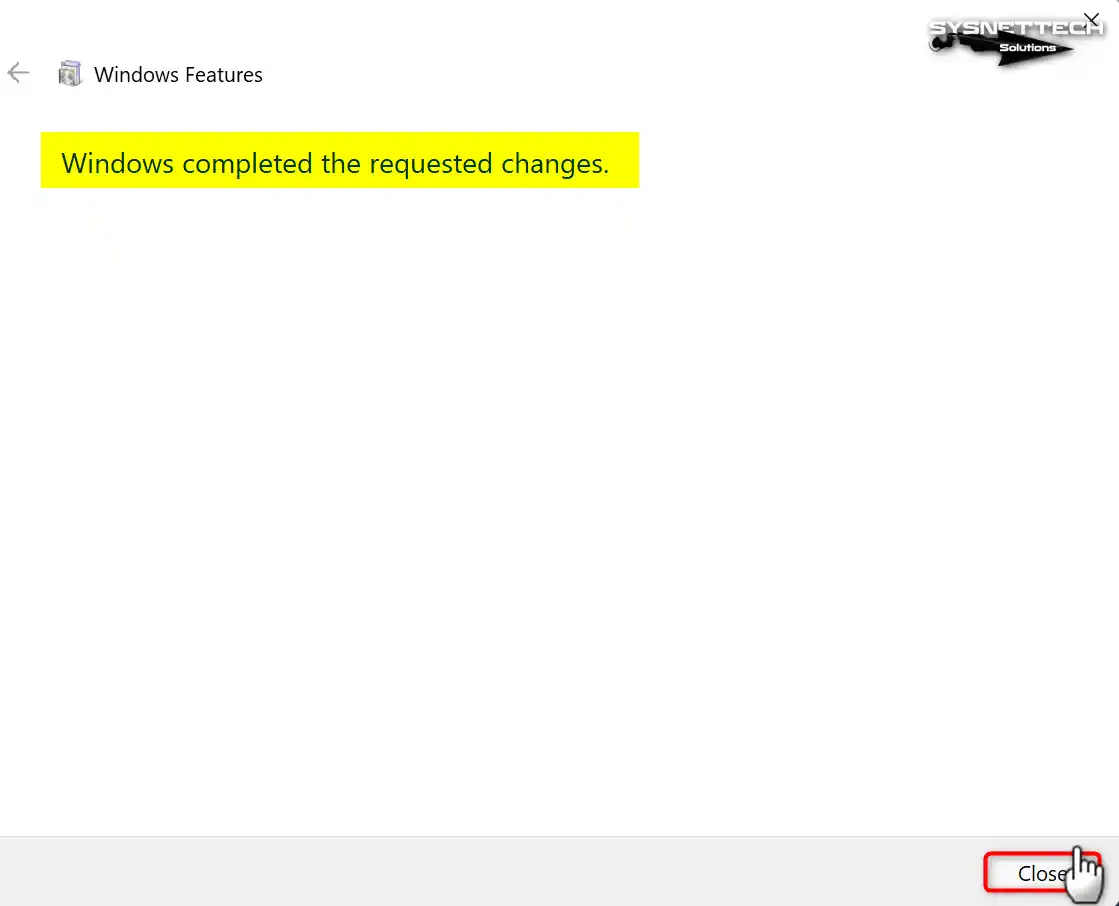
When the task ends, open Command Prompt and type telnet to test it.
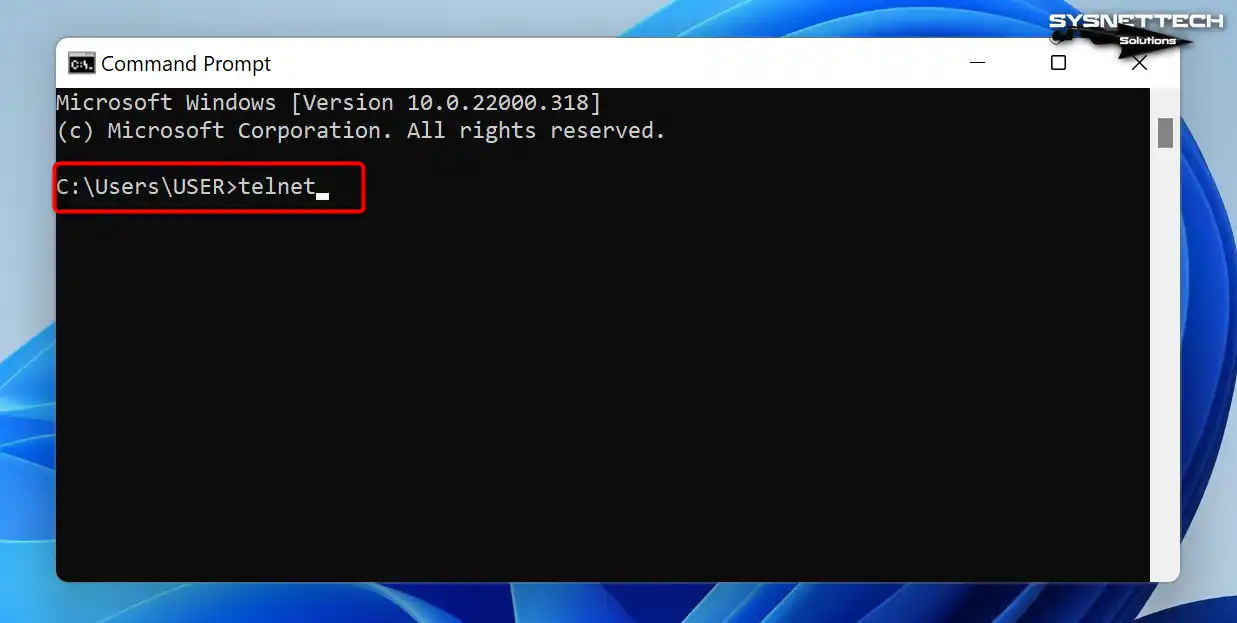
Step 5
If you see “Microsoft Telnet>” on the CMD screen when you connect, the task is complete.
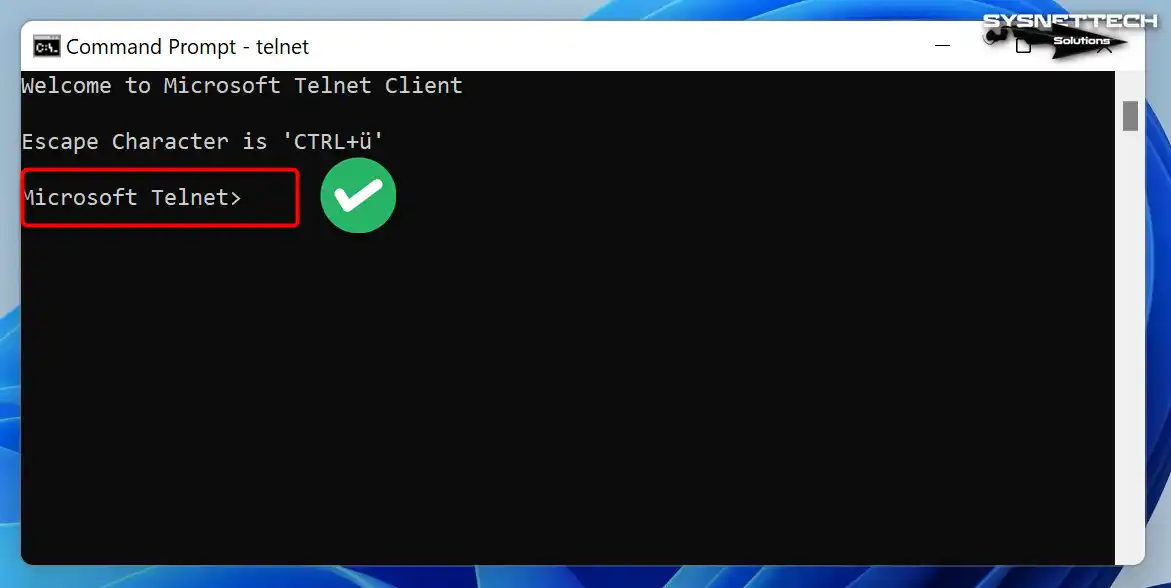
Step 6
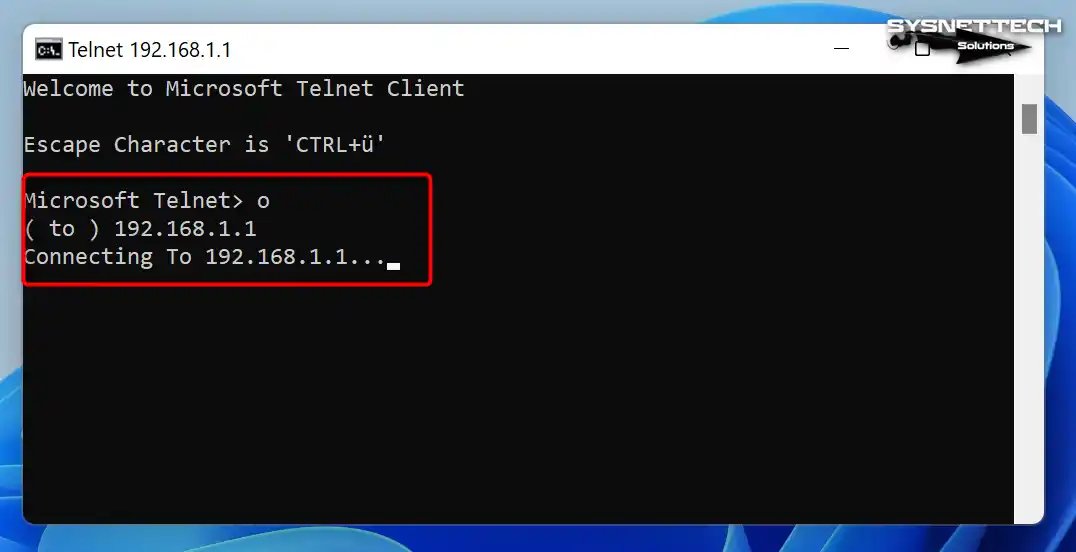
In the screenshot, you first enter the o (open) command and then type the 192.168.1.1 IP address. Yet the screen does not yet show a successful connection; you see only the “Connecting To…” text.
You can also perform this task through the Windows 11 Settings app. Follow this path: Settings > System > Optional features. Then click the “Add a feature” button. Select “Telnet Client” from the list and install it.
Yet in some cases this feature appears grayed out. In that case, you must log in with administrator rights. Also, Group Policy restrictions can block you.
Enable Windows 11 TelnetClient with PowerShell (Enable-WindowsOptionalFeature)
Step 1
PowerShell is the fastest and most reliable method on the Windows OS. In a PowerShell window that you run as administrator, type this command:
Enable-WindowsOptionalFeature -Online -FeatureName TelnetClient -All -NoRestart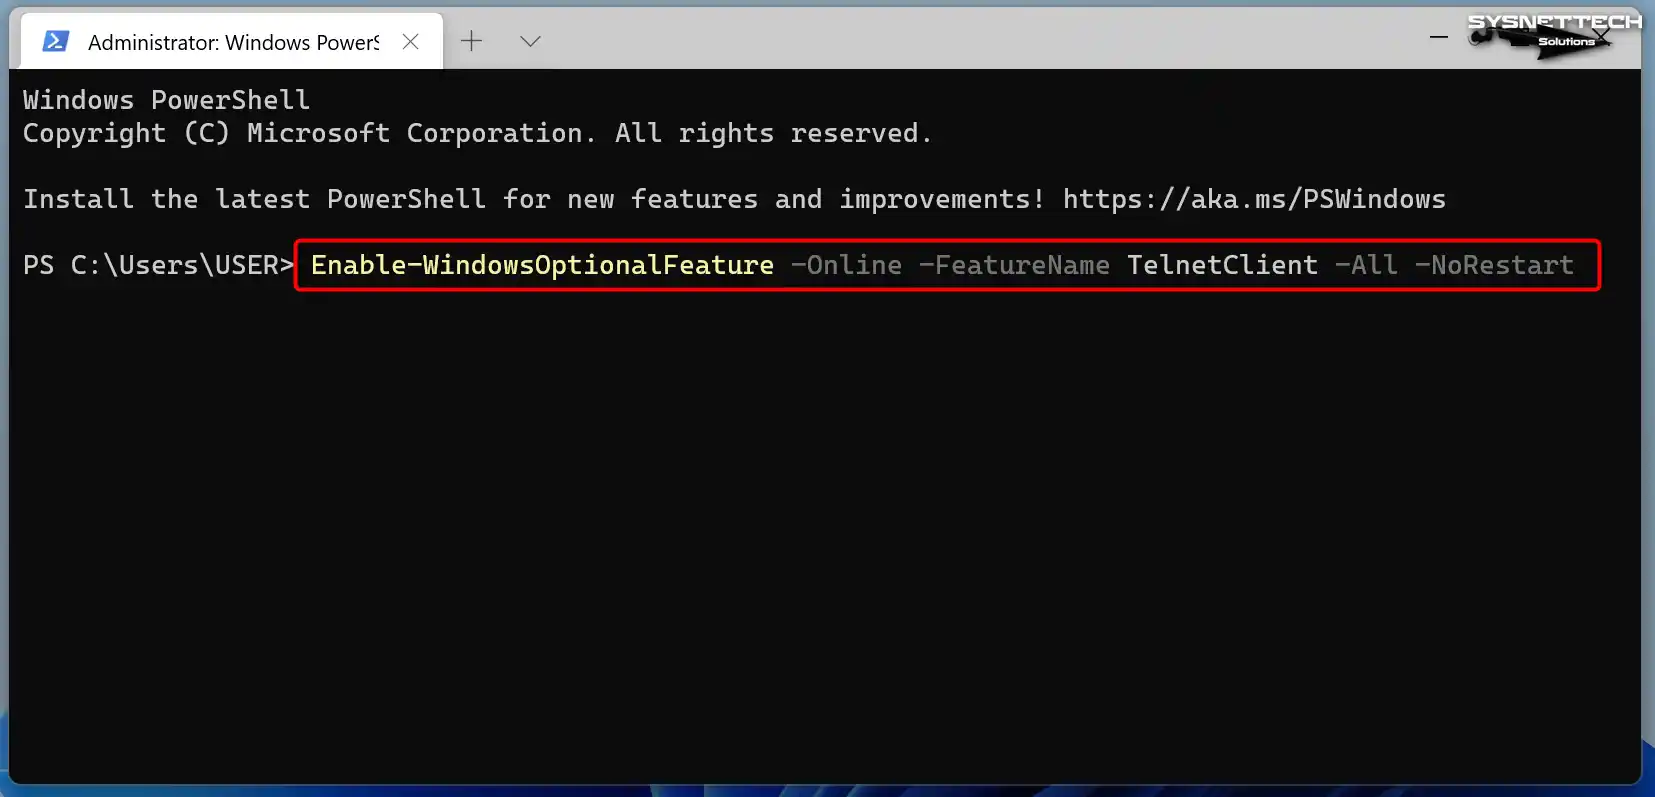
Step 2
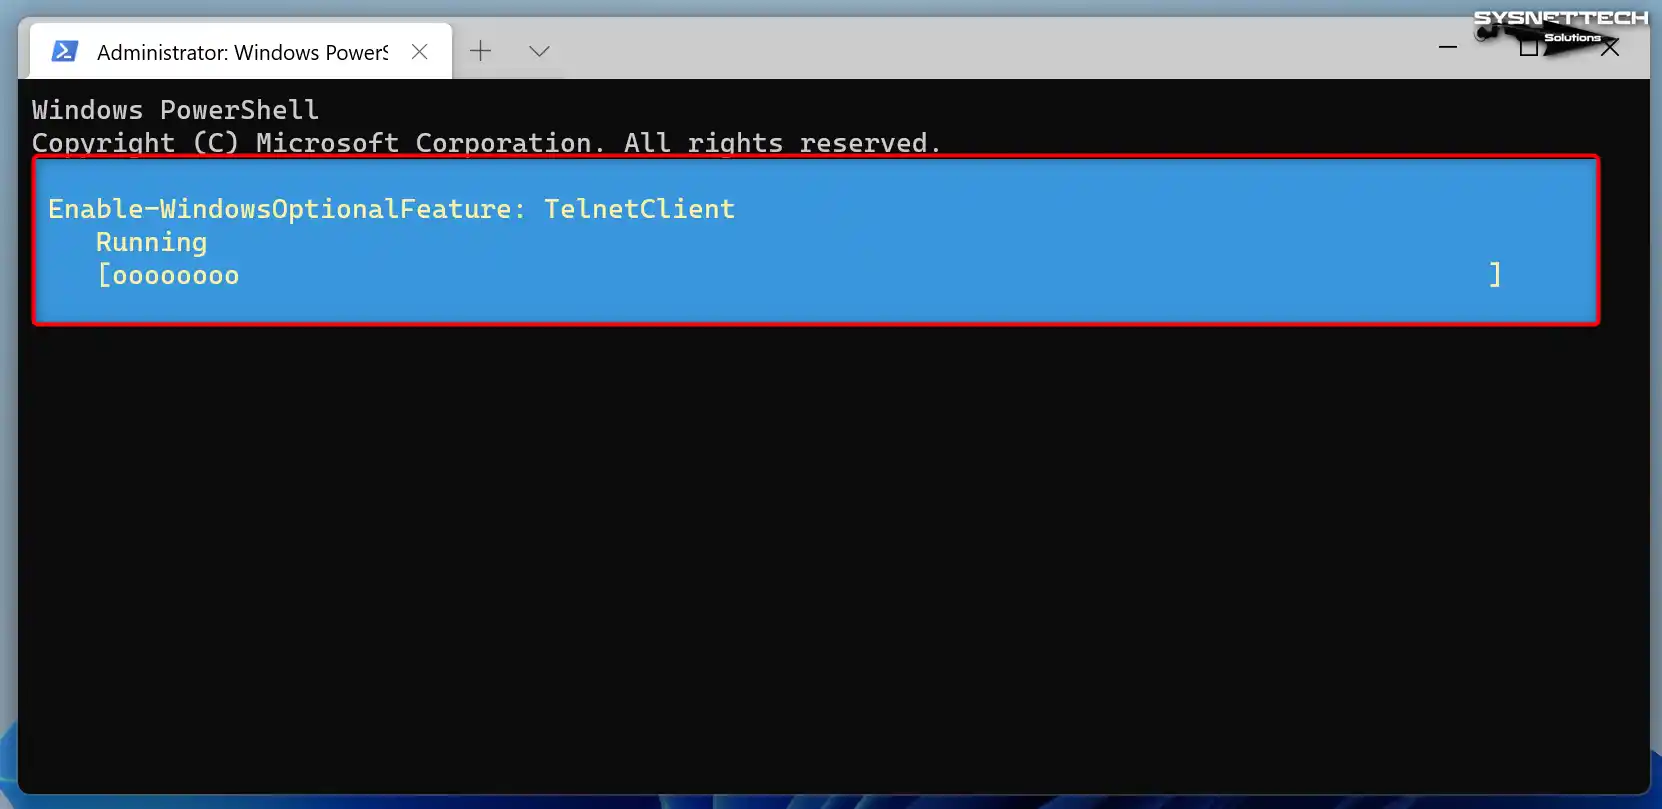
Wait while the enablement task runs in the blue area shown.
Step 3
This command enables the TelnetClient feature, while online. The -All flag loads all parent features as well. The -NoRestart flag prevents a system restart.
Step 4
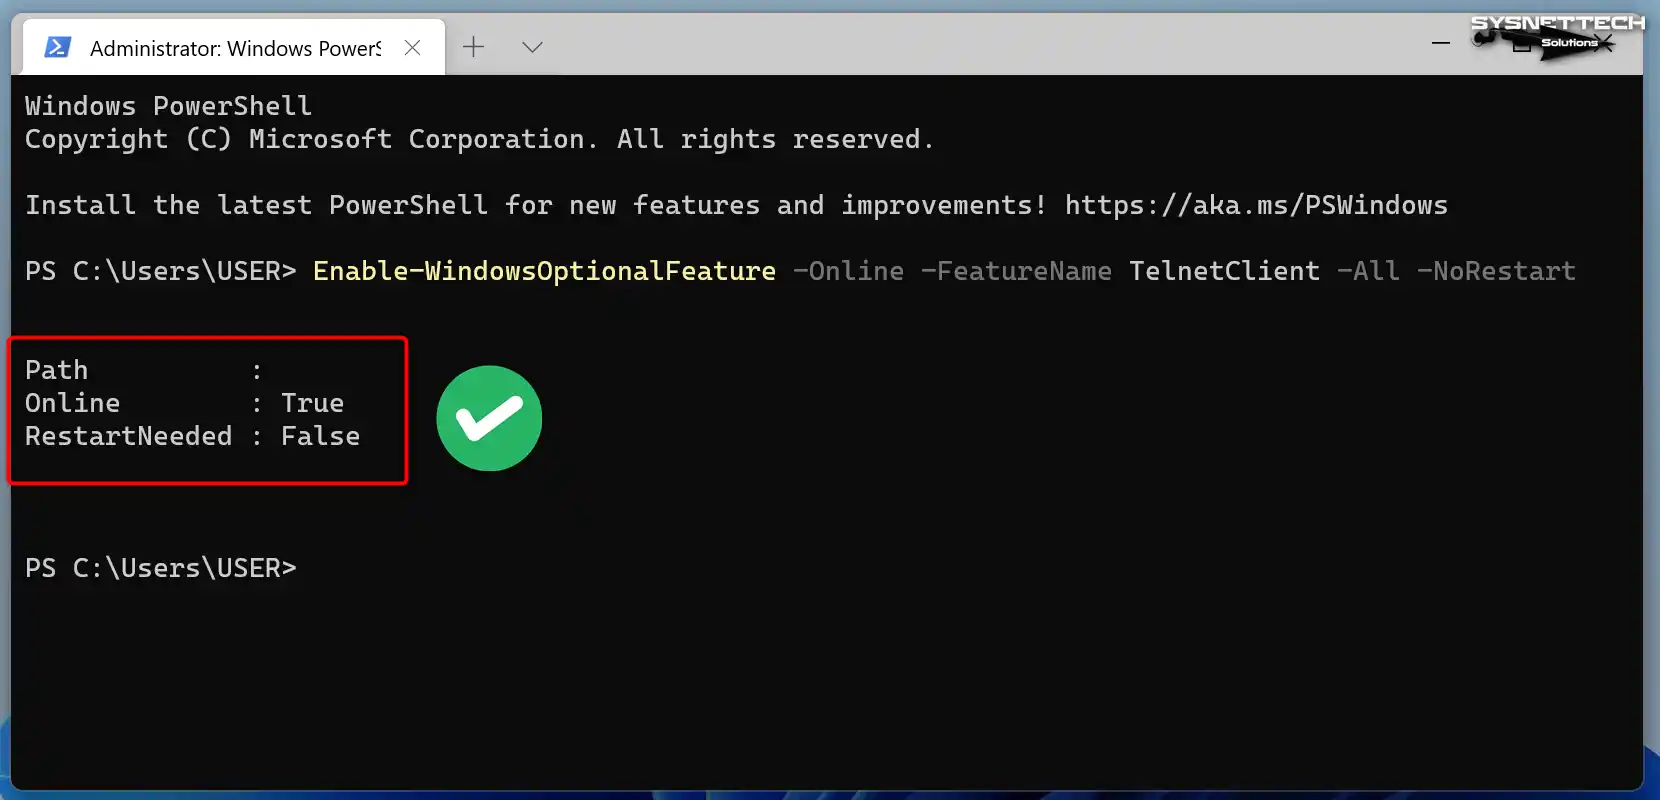
When the task ends, you see a “Success” message in the output. Then you can check the state with the Get-WindowsOptionalFeature -Online -FeatureName TelnetClient command.
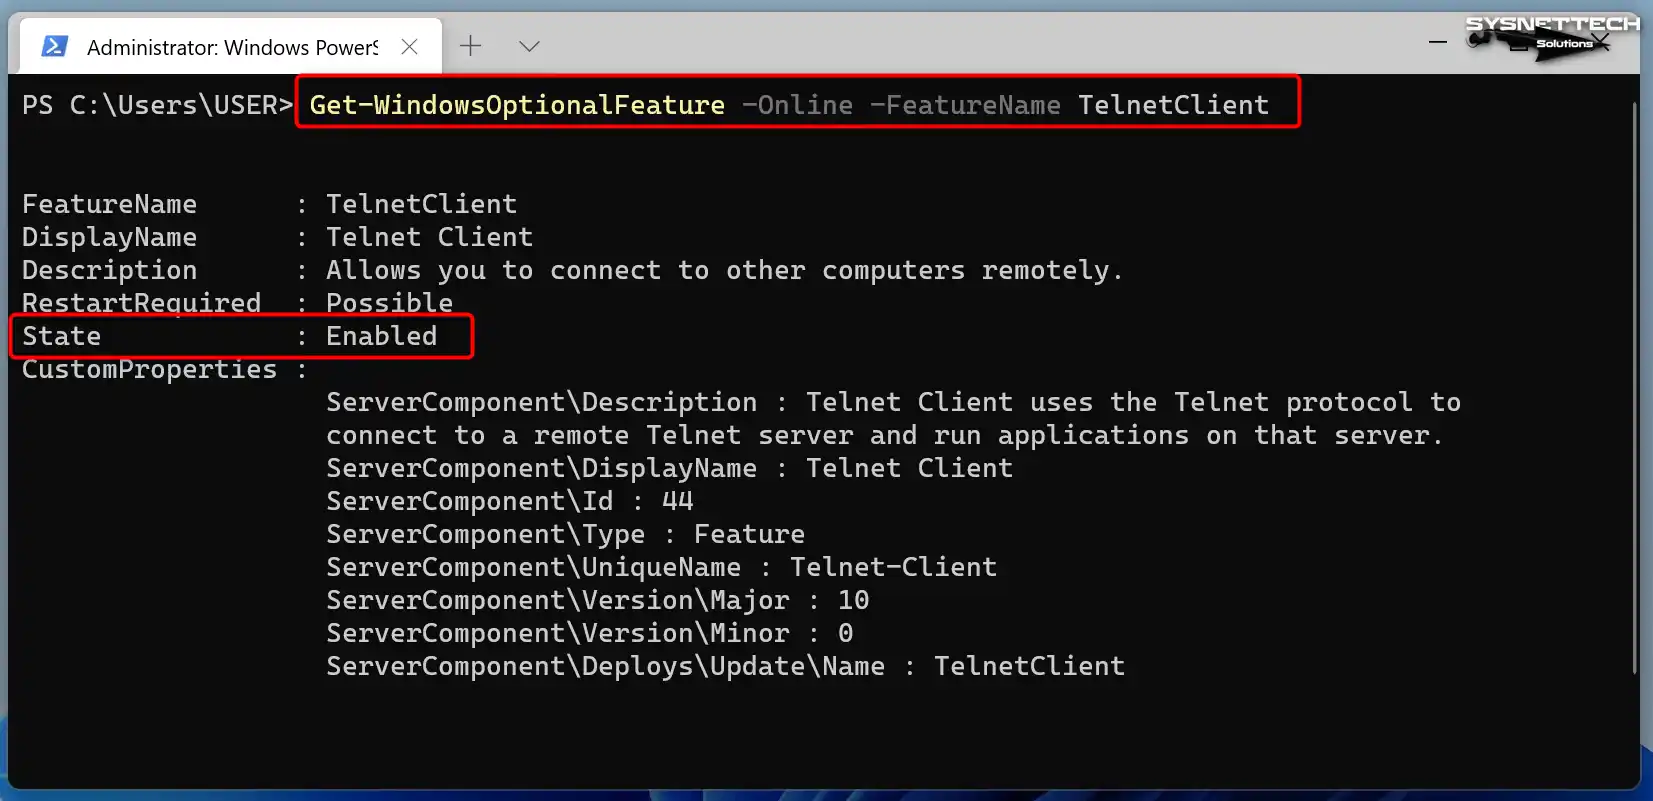
If this command returns an error, make sure you run PowerShell as administrator. Also, the Windows Update service must be running. After all, the system retrieves the files it needs through Windows Update.
The same command works on PowerShell 7 as well. Yet in some cases you may encounter a module conflict. In that case, I advise you to use Windows PowerShell 5.1.
There is no difference between Windows 11 build 23H2 and 24H2 for this command. The same cmdlet runs on both builds. Therefore, this method works on all modern Windows builds.
Telnet Client Setup with DISM: Online, Offline, and /Source Use
DISM (Deployment Image Servicing and Management) is a powerful tool for Windows component maintenance. Above all, it proves invaluable in offline setup cases. Here is the step-by-step procedure:
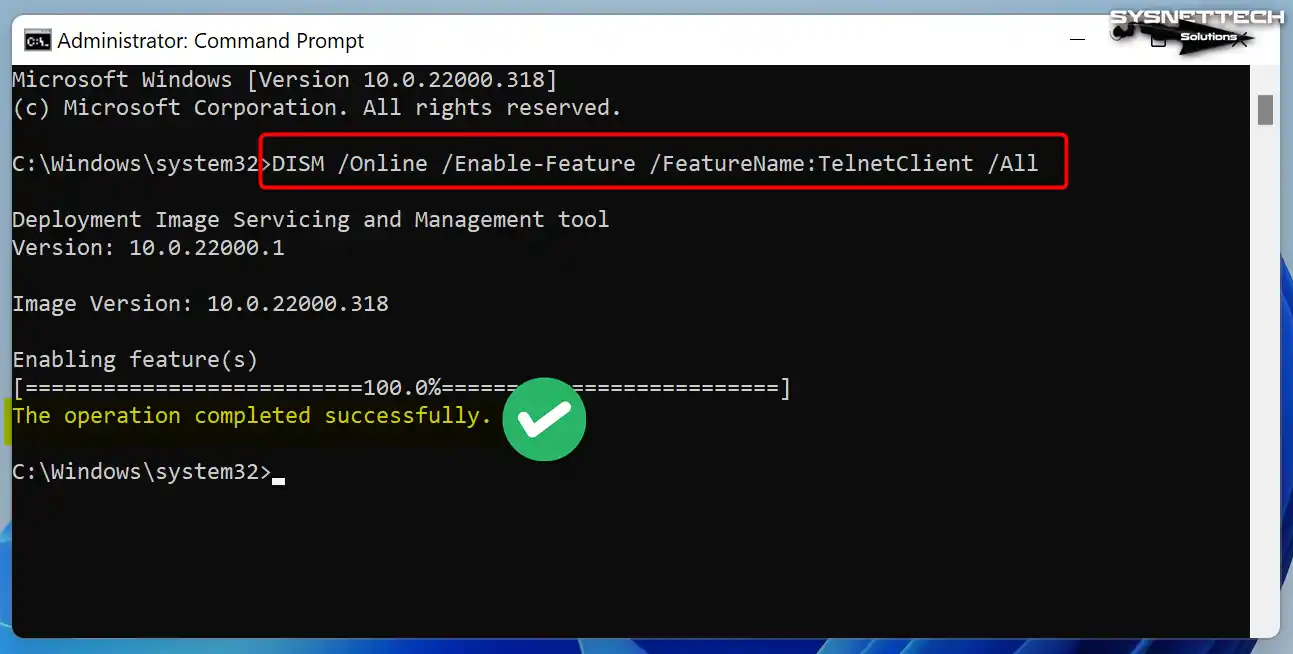
Open Command Prompt as administrator. For online setup, type this command: DISM /Online /Enable-Feature /FeatureName:TelnetClient /All. When the task ends, you see the “The operation completed successfully” message.
What if you have no network connection? Then you turn to the offline method. To do so, you must obtain the Windows 11 ISO file. Then you mount the ISO and locate the install.wim file.
You perform the offline setup with this command:
DISM /Online /Enable-Feature /FeatureName:TelnetClient /All /Source:D:\sources\sxs /LimitAccessThe /Source flag here points to the path of the files you need. The /LimitAccess flag blocks access to Windows Update. In this way, you set up with local files only.
Also, you can edit a WIM image directly. For example, if you want to add this component to an enterprise deployment image, you mount the image and run this command.
This method is essential for image-based deployment, above all in Windows Server setups. After all, you set up hundreds of machines with one image.
Telnet.Client Setup with Add-WindowsCapability: 24H2 Difference and Remove-WindowsCapability
In Windows 11 build 24H2, Microsoft now ships this component as a “Windows capability.” This changes the setup method. Here is the side-by-side table:
| Feature | WindowsOptionalFeature | WindowsCapability |
|---|---|---|
| Use | Windows 10, 11 (old build) | Windows 11 24H2 and later |
| PowerShell command | Enable-WindowsOptionalFeature | Add-WindowsCapability |
| Package name | TelnetClient | Telnet.Client~~~~0.0.1.0 |
| Uninstall | Disable-WindowsOptionalFeature | Remove-WindowsCapability |
On 24H2, you use this command for setup:
Add-WindowsCapability -Online -Name Telnet.Client~~~~0.0.1.0When you want to remove it, you run this command:
Remove-WindowsCapability -Online -Name Telnet.Client~~~~0.0.1.0It is worth knowing this difference. After all, the wrong command returns a “feature not found” error. Also, you must note this point when you switch between 23H2 and 24H2.
Telnet Setup on Windows 10: GUI, CMD, PowerShell, and Build Differences
On Windows 10, this tool’s setup differs slightly from Windows 11. In particular, build 22H2 introduces some changes. Fortunately, the main methods stay the same.
On the Windows 10 OS, you have three main paths: Control Panel, CMD, and PowerShell. Let us look at each one on its own. In this way, you select the best fit for your case.
Differences also exist between Windows 10 Home and Windows 10 Pro. In particular, there are significant disparities in enterprise deployment. I will cover this point in its own section.
Enabling TelnetClient on Windows 10 with Control Panel and optionalfeatures
Control Panel is the most well-known method. Above all, it is ideal for GUI users. Here is the step-by-step flow:
- Type “optionalfeatures” in the Start menu and press Enter.
- The “Windows Features” pane appears.
- Find “Telnet Client” in the list and check the box next to it.
- Click OK. The OS loads the components it needs.
- When the load ends, you may need to restart your PC.
Alternatively, you take the Control Panel > Programs > Programs and Features path. Then you click the “Turn Windows features on or off” link in the left menu.
This method works the same on Windows 10 Home and Pro. Yet on Home you may encounter some Group Policy restrictions.
Telnet Setup via CMD: pkgmgr and ocsetup Commands
You have old and new methods to install this component through Command Prompt. Here they are:
pkgmgr method (old):
pkgmgr /iu:"TelnetClient"This command was common on Windows 7 and older systems. Yet it still works on Windows 10. It may return an error only in some cases.
ocsetup method (old):
ocsetup TelnetClientThis command was also used on older systems. Although it works on Windows 10, Microsoft no longer supports it. After all, DISM is more reliable.
On modern Windows 10 builds, I advise you to use DISM. You perform the setup with this command:
DISM /Online /Enable-Feature /FeatureName:TelnetClient /AllThis command works on both CMD and PowerShell. In addition, it returns fewer errors.
Windows 10 Home vs. Pro: Telnet Setup and Deployment Differences
Some differences exist between Windows 10 Home and Windows 10 Pro for this tool’s setup. Here is the side-by-side comparison:
| Feature | Windows 10 Home | Windows 10 Pro |
|---|---|---|
| Telnet client | Available | Available |
| GUI setup | Yes | Yes |
| PowerShell setup | Yes | Yes |
| GPO deployment | No (limited) | Yes |
| Group Policy restrictions | More | More flexibility |
On Home, the Group Policy Editor is disabled by default. Therefore, you cannot deploy via GPO. Yet you can change some settings through the registry.
On Pro, you use the Group Policy Management Console. In this way, you deploy this component to more than one PC. For enterprise setups, this provides significant convenience.
Also, Windows 10 Pro has full PowerShell DSC (Desired State Configuration) support. On Home, this feature is limited.
Enabling TelnetClient on Windows 10 with PowerShell and State Checks
PowerShell is the most convenient method on the Windows 10 OS. In a window you open as administrator, run this command:
Enable-WindowsOptionalFeature -Online -FeatureName TelnetClient -All -NoRestartTo check the state once the task ends, use this command:
Get-WindowsOptionalFeature -Online -FeatureName TelnetClientThis command shows you the feature state. If it says “Enabled,” the setup succeeded. If it says “Disabled,” a problem exists.
Also, you get full information with the dism /online /get-featureinfo /featurename:TelnetClient command. This output shows the full name and state of the feature.
If you encounter an error during setup, check the Windows Update service. After all, this component retrieves the files it needs through Windows Update.
Telnet Server Setup on Windows Server and the tlntsvr Service
On a Windows Server setup, this tool’s installation has two stages: client and server. First, you install the client. Then you add the server role.
Yet a key note: Microsoft removed this server role in Windows Server 2019 and later. These roles no longer exist. Therefore, you use this role on old builds.
Still, in some cases you need this server. Above all, this may be essential for backward compatibility with old apps. Here is what you must do in that case.
On Windows Server 2016 and Windows Server 2012 R2, this role still exists. On Windows Server 2019, 2022, and 2025, it is gone. You must know this change in advance.
Telnet Client Setup on Windows Server: Server Manager and PowerShell
You have two methods to install this client on Windows Server. The first is Server Manager; the second is PowerShell.
Setup with Server Manager:
- Open Server Manager.
- Click the “Add roles and features” option.
- Go to the “Features” section.
- Check the “Telnet Client” option.
- Click Install and wait for the task to end.
Setup with PowerShell:
Install-WindowsFeature Telnet-ClientThis command loads the client on the server. Then you check the state with the Get-WindowsFeature Telnet-Client command.
When the setup ends, open Command Prompt and type telnet to test it. If you get a “command not found” error, check the PATH variable.
Also, you can install it with DISM:
dism /online /Enable-Feature /FeatureName:TelnetClientThis command works on Server Core builds as well. On servers with no GUI, this method is invaluable.
When I tested on Windows Server 2022, I found the PowerShell method gave the fastest result. Server Manager at times gives a slow response.
Telnet Server Role on Windows Server and Starting the tlntsvr Service
This server role was available in Windows Server 2016 and older. On Windows Server 2019 and later, this role is gone. Therefore, you install this role on old builds.
The setup steps are as follows:
- Open Server Manager.
- Start the “Add roles and features” wizard.
- Select the “Role-based or feature-based installation” option.
- Select the server and go to the “Features” section.
- Check the “Telnet Server” option and complete the setup.
To start the service after setup, run this command:
net start tlntsvrThen type this command to make the service start automatically:
sc config tlntsvr start= autoThis task makes the server run on each boot. Also, you must add the firewall rule.
You can also run this service from the Services screen. Run the services.msc command and find the “Telnet” service in the list. Then set the start type to “Automatic.”
Building a Telnet Firewall Rule on Windows Server
Once you install the server role, you must add a firewall rule. Otherwise, you cannot connect from the outside. Here is the step-by-step rule creation:
- Open the “Windows Defender Firewall” pane.
- Click the “Inbound Rules” section.
- Click the “New Rule” option.
- Select “Port” as the rule type.
- Type TCP port 23 and check the “Allow” option.
- Give the rule a name (for example, “Telnet Server Port 23”).
You can also add a rule with PowerShell:
New-NetFirewallRule -DisplayName "Telnet Server" -Direction Inbound -Protocol TCP -LocalPort 23 -Action AllowThis command allows connections from the outside. Yet for security you must also set a source IP restriction. For example, you allow connections from one subnet only.
New-NetFirewallRule -DisplayName "Telnet Server Restricted" -Direction Inbound -Protocol TCP -LocalPort 23 -RemoteAddress 192.168.1.0/24 -Action AllowThis rule allows connections from the 192.168.1.0/24 network only. Thus, it guards against external attacks.
On the Windows Server OS, firewall management is a key task. An incorrect rule will block access or create a security vulnerability.
Enterprise Telnet Deployment and Automation with GPO
In enterprise environments, you cannot install this component on hundreds of PCs one by one. Therefore, you use GPO (Group Policy Object). In this way, you deploy from one central point.
Also, methods such as offline setup, unattend.xml, and PowerShell DSC provide automation as well. Let us examine these methods in depth.
In Windows Server setups, these automation techniques maximize system maintenance efficiency. With the right plan, you set up thousands of machines in one operation.
TelnetClient Deployment in an Enterprise Setup with GPO
To deploy this client with GPO, follow these steps:
- Open the “Group Policy Management” console.
- Create a new GPO or edit an existing one.
- Take the “Computer Configuration” > “Policies” > “Administrative Templates” path.
- Go to the “System” > “Optional Features” folder.
- Find the “Enable Optional Features” policy and enable it.
- Type “TelnetClient” as the feature name.
- Link the GPO to the OU you want to use.
This method works on Windows 10 Pro and Enterprise builds. On Home, Group Policy support is limited. Therefore, you must use a PowerShell script for Home PCs.
For GPO to work, the PCs must join the domain. Also, you run the gpupdate /force command to refresh Group Policy.
In some cases, GPO settings may conflict. For example, a second policy may block optional features. In that case, you must check the precedence order.
I tested this policy on a domain controller on Windows Server 2022. I completed deployment to 500 clients in 15 minutes. This demonstrates the power of GPO with clear evidence.
Offline Telnet Setup: DISM /Source and ISO/WIM Use
To install this component in an environment with no network connection, you use the offline method. To do so, you need the Windows ISO file.
Here is the step-by-step offline setup:
- Obtain the Windows 11 or Windows 10 ISO file.
- Right-click the ISO file and select the “Mount” option.
- Note the drive letter that mounts (for example, D:).
- Open Command Prompt as administrator.
- Run this command:
DISM /Online /Enable-Feature /FeatureName:TelnetClient /All /Source:D:\sources\sxs /LimitAccessThis command takes the files it needs from the sxs folder on the ISO. The /LimitAccess flag blocks a call to Windows Update. In this way, you set up with a local source only.
Also, you can edit a WIM image directly. For example, to add this component to an enterprise deployment image, you mount the image and run this command:
DISM /Image:C:\Mount /Enable-Feature /FeatureName:TelnetClient /All /Source:D:\sources\sxsThis method provides significant convenience, above all in new PC installations. After all, you edit the image once, and it is ready for all deployments.
Windows image maintenance is one of the most critical tasks of enterprise IT teams. The right image reduces hours of work to minutes.
When you build an enterprise image, you cannot configure each machine one by one. In this case, Windows Sysprep use plays a key role at this point. You add the Telnet component to the image and deploy it to all systems. This approach saves hours across hundreds of installations.
Automated Telnet Setup with unattend.xml and PowerShell DSC
In large-scale deployments, automation is essential. Here are two powerful methods:
unattend.xml method:
To automatically install this component during Windows setup, you add this block to the unattend.xml file:
<component name="Microsoft-Windows-ServerManager-SvrMgrNc"><DoNotOpenServerManagerAtLogon>true</DoNotOpenServerManagerAtLogon></component><component name="Microsoft-Windows-Foundation-Package"><OptionalFeatures><Feature name="TelnetClient" state="Enabled"></Feature></OptionalFeatures></component>This setup enables the client automatically during setup. Also, you prevent Server Manager from starting at logon.
PowerShell DSC method:
PowerShell Desired State Configuration is a more modern automation tool. You use this setup:
Configuration EnableTelnet { Node "localhost" { WindowsOptionalFeature TelnetClient { Name = "TelnetClient" Ensure = "Enable" } } }When you run this script, DSC enables this feature on the target system automatically. Also, it checks for configuration drift continuously.
DSC provides significant convenience, above all in large-scale setups. After all, you run hundreds of servers from one center.
The Windows Server OS becomes a fully automated platform with DSC support. This is the foundation of the modern system maintenance approach.
Telnet Commands, Port Test, and Windows Terminal Integration
Once you install the client, you must know the basic commands. Also, you use these commands effectively to run a port test.
You can add this tool’s profile to Windows Terminal as well. In this way, you log in with one click. Here are all the details.
Telnet Command List: open, close, display, send, set, unset, status, quit
The basic commands you can use in a session are as follows:
| Command | What it does | Use case |
|---|---|---|
open | Opens a new connection | open 192.168.1.1 23 |
close | Closes the current connection | close |
display | Shows run flags | display |
send | Sends a custom command to the server | send hello |
set | Sets a session flag | set escape ^] |
unset | Resets the flag | unset escape |
status | Shows the connection state | status |
quit | Leaves the session | quit |
Learning these commands saves you significant time during network checks. Above all, the open and close commands are the ones you use most.
With the set command, you can change the escape character. The default escape character is Ctrl + ]. Yet you can swap it for a different character.
The quit command ends the session. If the session hangs, you first press Ctrl + ] and then type quit.
On the Windows system, telnet.exe in the System32 directory handles these commands. Therefore, they work the same on all Windows builds.
? or help. This command lists all available options.How to Run a Port Test with Telnet (SMTP Port 25, HTTP Port 80)
The most common use of this tool is the port test. You check quickly whether a server listens on a specific port. Here is the step-by-step port test:
- Open Command Prompt.
- Type this command:
telnet server_address port_number - For example, for an SMTP port 25 test:
telnet mail.server.com 25 - If the connection works, a banner message comes from the server.
- If the connection fails, you get a “Could not open connection” error.
For an HTTP port 80 test, you use this command:
telnet www.example.com 80Once you connect, you type GET / HTTP/1.1 and press Enter. Then you type Host: www.example.com. The server sends the HTTP response back to you.
This method is ideal for testing firewall rules as well. For example, when you add a new rule, you check this way whether the port is truly open.
If you do not want to install this component, you use the Test-NetConnection command in PowerShell. This command performs the same test but requires no extra setup.
Test-NetConnection -ComputerName mail.server.com -Port 25This command gives you more comprehensive information. You see details such as whether the TCP handshake succeeded and how long the ping time is.
Adding a Telnet Profile to Windows Terminal and Using Ctrl + ] to Quit
Windows Terminal is a modern console application. You get quick access by adding a profile to this app. Here are the steps:
- Open Windows Terminal.
- Go to the Settings menu (Ctrl + ,).
- Go to the “Profiles” section and click the “Add a new profile” option.
- Type “Telnet” as the profile name.
- Type
telnet.exein the command-line field. - Select an icon you like.
- Save and restart the terminal.
Now you see the tab in Windows Terminal. When you click this tab, the client opens immediately.
To leave the session, you press Ctrl + ] and type quit. This escape sequence closes the session cleanly. If this combination fails, you set a different escape character with the set escape command.
In some cases, the session stays on a black screen. In that case, you press Ctrl + ] and try the close command. If the problem persists, you must close the terminal pane and open it again.
The Windows 11 OS ships Windows Terminal as the default console. Therefore, this integration is part of the modern Windows experience.
Windows Telnet Security: Risks, Firewall, and the SSH Alternative
This tool is, by its very nature, an unsafe technology. It sends all data as plain text. Thus, someone can easily capture your sensitive data.
Yet you may still need to use this tool in some cases. In that case, you prioritize security measures. Here is what you must note.
The Windows system provides various security layers to reduce this risk. You protect against it with tools such as firewall and IPsec.
Why Telnet Is Not Secure: Plain-Text Communication, MITM, and Packet-Sniffing Risk
The main problem with this technology is that it sends data with no encryption. In other words, any device on the network can listen to the traffic. This practice is called packet sniffing.
When an attacker gains network access, they observe the entire session. They see everything, including the username and password. They use this data to gain unauthorized access to the system.
Also, MITM (Man-in-the-Middle) attacks are possible. The attacker steps in between the client and the server. Both sides think the other is legitimate, while the attacker controls the entire exchange.
Due to these risks, many security standards prohibit the use of this tool. For example, PCI DSS permanently bans this technology in payment systems. Similarly, you get a warning in ISO 27001 audits.
A security bulletin released in 2026 brought a key vulnerability to light. This flaw affects Windows systems with an open Telnet port. This vulnerability lets attackers access the system without a password.
Building a Telnet Outbound Rule in Windows Firewall
When you use the client, you want to allow outbound connections. To build an outbound rule in Windows Defender Firewall, follow these steps:
- Open “Windows Defender Firewall with Advanced Security”.
- Click the “Outbound Rules” section.
- Click the “New Rule” option.
- Select “Program” as the rule type.
- Type
C:\Windows\System32\telnet.exeas the program path. - Check the “Block this program” option.
- Name the rule “Block Telnet” and save it.
This rule blocks the client from connecting to the outside. Yet you can still allow connections to specific IPs for verified access.
To add an outbound rule with PowerShell, you use this command:
New-NetFirewallRule -DisplayName "Block Telnet Outbound" -Direction Outbound -Program "C:\Windows\System32\telnet.exe" -Action BlockThis rule blocks this client only. Other apps remain unaffected, and you boost security.
If you want to allow a specific server, you add an exception to the rule. For example, you allow a connection to the 192.168.1.100 address only.
The Windows system provides both GUI and PowerShell interfaces for firewall management. This flexibility is a major advantage for system administrators.
Telnet vs. SSH: Side-by-Side Table and Migration Plan
The main differences between Telnet and SSH are as follows:
| Feature | Telnet | SSH |
|---|---|---|
| Encryption | None (plain text) | Yes (AES, ChaCha20) |
| Default port | 23 | 22 |
| Authentication | Weak | Strong (key, 2FA) |
| MITM protection | None | Yes (host key check) |
| Data integrity | None | Yes (HMAC) |
| Current support | Limited | Wide |
SSH encrypts all communication. Thus, it guards against packet-sniffing attacks. Also, with key-based authentication, you prevent password theft.
The migration plan involves these steps:
- Install the SSH server (the OpenSSH Server feature on Windows).
- Open port 22 in the firewall.
- Encourage users to use an SSH key.
- Reduce Telnet connections gradually.
- Disable this tool permanently after a set time.
To install OpenSSH Server on the Windows OS, you run this command in PowerShell:
Add-WindowsCapability -Online -Name OpenSSH.Server~~~~0.0.1.0Then you start the SSH service:
Start-Service sshdIn this migration phase, you keep Telnet enabled for a while for backward compatibility with old systems. Yet on new systems, you use SSH only.
For more on SSH use in the OS, you can refer to my Windows 10/11 SSH Server Setup guide.
Common Telnet Errors and Fixes
You will encounter various errors when you install this tool. You can resolve most of these errors with simple fixes. Here are the most common issues and their fixes.
The Windows OS logs these errors in Event Viewer. Thus, this is the first place you look when you encounter a problem.
Telnet Not Recognized: ‘is not recognized as an internal or external command’ Fix
This error indicates the client is not installed. When you type telnet in Command Prompt, you get this message:
'telnet' is not recognized as an internal or external command, operable program or batch file.For the fix, first make sure you enabled this Windows feature. Use one of the GUI, PowerShell, or DISM methods I described.
If you performed the setup but still get the error, check the PATH environment variable. The System32 directory must be in PATH. If not, you add it manually.
Also, on 64-bit Windows systems, check telnet.exe in the SysWOW64 directory. In some cases, the file in the wrong directory does not work.
Try to run Command Prompt as administrator as well. At times, a permissions issue leads to this error. Also, in PowerShell, you view the current PATH variable with the $env:PATH command.
Finally, check Windows Update. Missing updates can prevent this component from loading correctly.
Windows Could Not Load This Feature: DISM Error Codes (0x800f0906, 0x800f081f, 0x800f0954, 0x800f0950, 0x800f0907)
You get various error codes when you set up with DISM. Here are their meanings and fixes:
| Error Code | Meaning | Fix |
|---|---|---|
| 0x800f0906 | Cannot connect to Windows Update | Check the network connection. Start the Windows Update service. |
| 0x800f081f | Source files not found | Set up from the ISO with the /Source flag. |
| 0x800f0954 | WSUS restriction | Remove the WSUS setting from Group Policy temporarily. |
| 0x800f0950 | Component store is corrupted | Run the DISM /RestoreHealth command. |
| 0x800f0907 | Source files are missing | Make sure you use the correct ISO build. |
The 0x800f0906 error is the most common issue. This error indicates a Windows Update access problem. For the fix, first check the Windows Update service.
You restart the Windows Update service with this command:
net stop wuauserv
net start wuauserv
Then run the DISM /Online /Cleanup-Image /RestoreHealth command. This command repairs corrupted system files.
For the 0x800f081f error, you must set up from the ISO file. Use the /Source flag I described in the previous section. Make sure you point to the correct sxs folder.
You see the 0x800f0954 error frequently in enterprise environments. If the WSUS server blocks optional features, this error appears. Disable the “Specify settings for optional component installation” policy in Group Policy.
The 0x800f0922 error is a common issue as well. This error appears when the system partition has too little space. Check the disk space and leave at least 500 MB free.
Telnet Feature Shows Gray, Cannot Be Checked, or the Windows Features Pane Will Not Open
This option may appear grayed out in the Windows Features pane. In that case, a few possible causes exist:
- No administrator rights: You must log in as administrator.
- Group Policy restriction: Your system administrator may have blocked this feature.
- Component store is corrupted: You must repair it with DISM.
- Windows Update service is disabled: You must start the service.
First, make sure you log in with administrator rights. If it still appears grayed out, check the Group Policy settings. Open Group Policy Editor with the gpedit.msc command.
Take the “Computer Configuration” > “Administrative Templates” > “Windows Components” > “Windows Update” path. Make sure the “Turn off the Windows Update” policy is disabled.
Also, if the Windows Features pane will not open at all, system files may be corrupted. Run the sfc /scannow command. Then repair with DISM.
In some cases, registry keys become corrupted. In that case, you check the keys with regedit. Yet you must be very careful when you edit the registry.
Windows Update Service Error, Low Disk Space, and Telnet Lost After an Update
The Windows Update service may return an error during this tool’s setup. In that case, make sure the service is running.
You check the service state with this command:
sc query wuauservIf the service stopped, start it with the net start wuauserv command. Also, check the BITS (Background Intelligent Transfer Service) service. After all, Windows Update retrieves files through BITS.
Low disk space blocks setup as well. This client takes up about 1-2 MB. Yet Windows Update requires more space for temporary files. I advise you to leave at least 500 MB free.
To check disk space, run the dfrgui command. Then you clear files you do not need. The Disk Cleanup tool (cleanmgr) helps here.
This tool may be lost after a Windows update. This state results from the update that resets optional features. For the fix, enable this Windows feature once more.
In PowerShell, check the state with the Get-WindowsOptionalFeature -Online -FeatureName TelnetClient command. If it says “Disabled,” run the Enable-WindowsOptionalFeature command again.
To prevent this issue, make a system restore point before the update. In this way, you can roll back when a problem appears.
After Telnet Setup: Uninstall, Disable, and Roll Back
Once you install this client, you must remove it if you no longer need it. For security, this matters. Here are the uninstall methods.
The Windows OS makes the component uninstall task quite straightforward. You perform this task through both GUI and command line.
How to Remove TelnetClient on Windows 11 (Disable-WindowsOptionalFeature)
To remove this client with PowerShell, run this command:
Disable-WindowsOptionalFeature -Online -FeatureName TelnetClient -NoRestartThis command disables the TelnetClient feature. When the task ends, the system may request a restart. The -NoRestart flag blocks this request.
Then check the state:
Get-WindowsOptionalFeature -Online -FeatureName TelnetClientIf the output says “Disabled,” the uninstall succeeded. Yet in some cases, a restart is needed. When the system restarts, you remove the feature permanently.
To remove it with GUI, open the “Turn Windows features on or off” pane. Uncheck the box next to Telnet Client and click OK.
To remove it with CMD, you use this command:
DISM /Online /Disable-Feature /FeatureName:TelnetClientThis command disables the feature through DISM. Above all, this method works on Server Core builds.
Delete the Telnet.Client Capability with Remove-WindowsCapability
In Windows 11 build 24H2, Microsoft ships this component as a Windows capability. In that case, the uninstall command is different:
Remove-WindowsCapability -Online -Name Telnet.Client~~~~0.0.1.0This command removes the Telnet.Client capability from the system. When the task ends, you see a “Success” message in the output.
When you run the telnet command after the uninstall, you get a “not recognized” error. This shows the client is gone permanently.
If you want to install the capability again, you run the Add-WindowsCapability command once more. This command retrieves the capability through Windows Update.
In some cases, you cannot remove this capability. For example, if a second component depends on this capability, you get an error. In that case, you check the dependencies.
To check the capability state, you use this command:
Get-WindowsCapability -Online -Name Telnet.Client*This command shows whether the capability is installed. If it says “State: Installed,” the capability is enabled.
Creating a System Restore Point and a Telnet Setup Rollback Plan
It is wise to create a restore point before any system change. Do not skip this step before this tool’s setup.
To create a restore point, follow these steps:
- Type “System Restore” in the Start menu and open it.
- Click the “Create” button.
- Type a description (for example, “before Telnet setup”).
- Click “Create” and wait for the task to end.
You can also create a restore point with PowerShell. Yet first you must enable System Protection. You enable protection with this command:
Enable-ComputerRestore -Drive "C:\"Then you create a restore point:
Checkpoint-Computer -Description "Before Telnet setup" -RestorePointType "MODIFY_SETTINGS"This command saves the current system state. If you encounter a problem after setup, you can roll back to this point.
For the rollback task, you open the “System Restore” tool and use the “Recommended restore” option. Alternatively, you select a different point.
If System Restore fails, try it in Safe Mode. In Safe Mode, system files have fewer locks. In this way, the rollback succeeds more often.
The OS provides a strong recovery plan with the System Restore feature. Keeping this feature enabled saves you time in the long run.
Telnet Setup and Enable: Further Reading for Windows 11, 10, and Server
Enabling the Telnet client makes it easy to check network issues. Yet this feature is disabled by default on most Windows builds. Still, the sources below guide you through the setup and configuration process.
- Microsoft Learn – Client Setup and Use: This Turkish guide walks through client setup via Server Manager and PowerShell, step by step. Also, it provides hands-on tips on basic commands and connection management.
- Microsoft Learn – Windows Commands: Network Tool: This page provides the syntax and flags of the command-line tool. It gives comprehensive information on different terminal types and session management options.
- Microsoft Learn – Windows Server: Role and Feature Install: This guide explains how to set up roles and features through the Server Manager tool. It contains the steps you must take to select the client feature.
FAQ About Telnet Use on Windows
Does Telnet setup need admin rights?
Can I set up Telnet on Windows 11 Home?
Does Telnet setup need a network connection?
Telnet was lost after a Windows update; what should I do?
How do I use SSH in place of Telnet?
Can I use a port other than Telnet port 23?
A Telnet connection gives a “Could not open connection” error; what is the fix?
How do I leave the Telnet command?
Can I set up Telnet Server on Windows Server 2022?
I get a “Windows could not load this feature” error; what should I do?
Conclusion: A Clear Choice on Telnet Setup on Windows
This tool is a Windows feature that remains valuable in specific cases today. Yet when you weigh the security risks, you must keep its use to a minimum.
Telnet Enable: Summary and Checklist
Here is a summary of what I have described throughout this article and a step-by-step checklist:
- ✅ Enable the client with GUI, PowerShell, or DISM.
- ✅ For Windows 11 24H2, use the Add-WindowsCapability command.
- ✅ On Windows 10, choose the Enable-WindowsOptionalFeature command.
- ✅ On Windows Server, note that the Telnet Server role is gone.
- ✅ Deploy in an enterprise environment with GPO.
- ✅ For offline setup, use the /Source flag.
- ✅ For a port test, run the telnet server port command.
- ✅ Set up the firewall rule.
- ✅ Draft a migration plan to SSH.
- ✅ If a problem occurs, try the DISM /RestoreHealth command.
By following this checklist, you achieve a smooth setup in your own environment. Also, you remain prepared for possible errors.
Telnet or SSH? A Decision Tree
In which case should you use Telnet, and in which case SSH? Here is a simple decision tree:
| Case | Best Protocol | Why? |
|---|---|---|
| Modern server maintenance | SSH | Encryption and strong authentication |
| Port test (one-time) | Telnet or Test-NetConnection | Fast and convenient |
| Old UNIX system access | Telnet (short-term) | Backward compatibility |
| File transfer | SFTP/SCP | Secure file transfer |
| Enterprise bulk maintenance | SSH + PowerShell Remoting | Automation and security |
| Network hardware setup | SSH (if available) or Telnet (console) | Depends on hardware support |
If you still use this technology, start your migration plan right now. First, install the SSH server. Then steer users to SSH gradually. At the last stage, disable this tool permanently.
Keep in mind: this technology is an approach from 1969. In 2026, Windows system security standards are much higher. Therefore, adopting modern protocols such as SSH is essential for your security and your organization’s.

Be the first to share your comment