How to Convert DMG Files to ISO Files on Windows 11 & 10
Quick Insight
You change a DMG file to ISO on Windows by using the UltraISO program with admin rights. You open the Tools menu and click Convert to launch the built-in wizard. Next you browse to your Mac disk image file and pick it from its folder. You then set the output type to standard ISO and start the process. The tool keeps the source data safe while it builds the new file. So you get a cross-platform image that mounts and runs on any Windows PC with ease.
In our fast-changing world of technology, we see different computer systems. For example, Windows and Mac have their own file kinds that sometimes do not work together. DMG, common on Apple platforms, is one example.
If you use Windows and have trouble with these files, I will help you with this guide. This means I will show you how to open them in Windows 11 and 10, or how to change them to ISO form with UltraISO.
Understanding DMG Files
A DMG file is an Apple Mac computer disk type. We use image files for Windows computer setups, but we can also use materials like this on Mac systems.
We use these to add programs to Apple Mac computers. To put it simply, we only use files like this on macOS computers.
You will need other software to open your items like this on Windows computers. For example, you can use the programs listed below;
Making an ISO with this package is quite simple and easy. You can convert within minutes with a 3rd party program. Now, let’s convert a file to an ISO using the UltraISO program.
1. Locate DMG & Open with UltraISO
Step 1
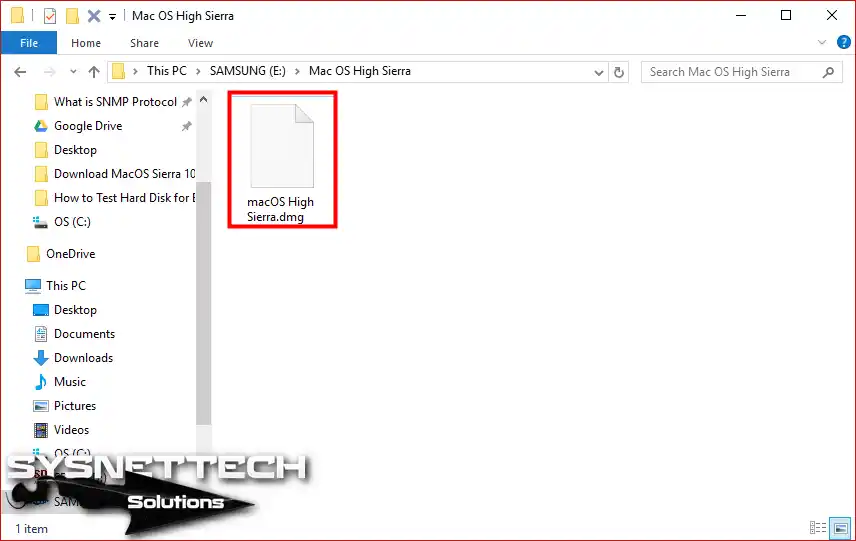
To convert a DMG archive, first find the file you want. Start by browsing your device’s storage.
Check your desktop, downloads folder, or specific directories. Simply find the macOS disk image you want to convert.
Step 2
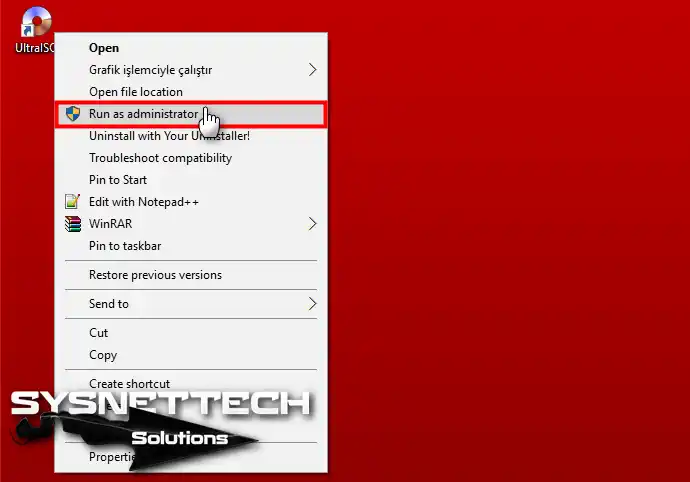
After you run UltraISO on your computer, find the program. You can see it in your Start menu or on your desktop. For the best use, right-click the program icon.
Then, choose “Run as administrator” from the list that appears. This step lets you use every UltraISO part so that you can handle your files without trouble.
Step 3
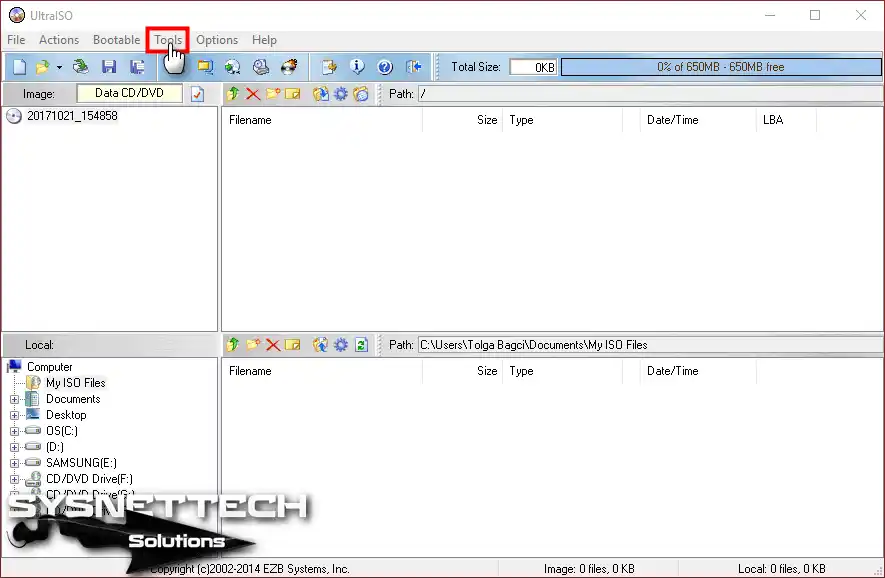
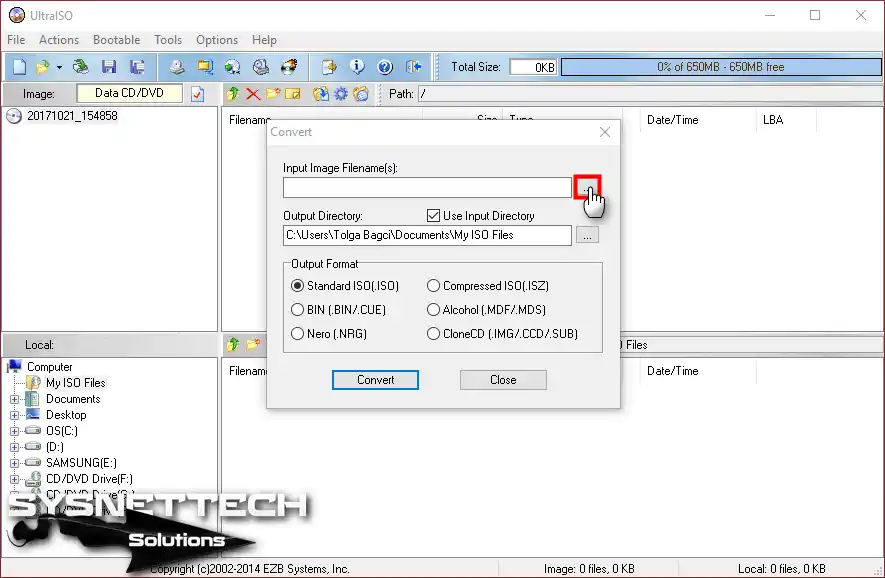
First, press the Tools tab in the UltraISO menu. Here, you will see many choices you can utilize to handle your images better.
Step 4
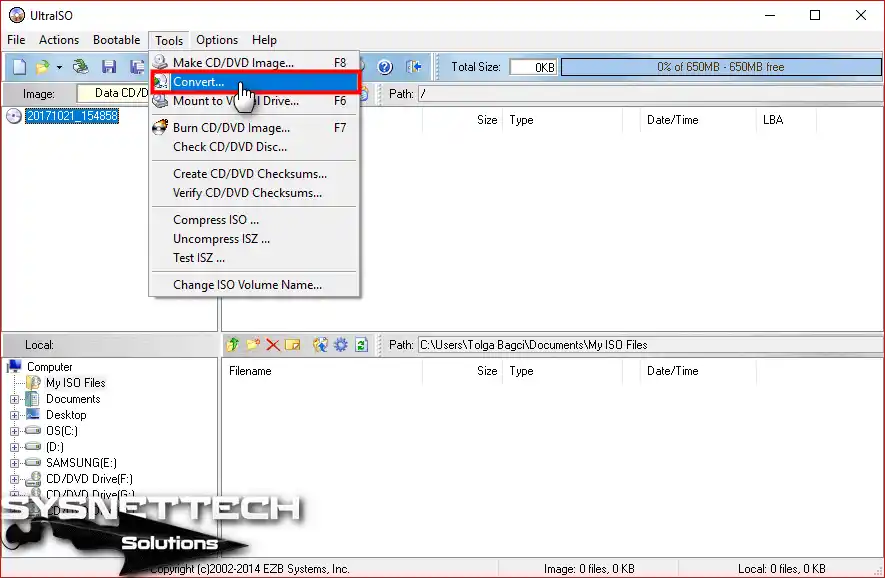
From the Tools choices drop-down list, pick Convert. This tool lets you change your data or information. After you check the settings, change the conversion to fit what you need.
Step 5
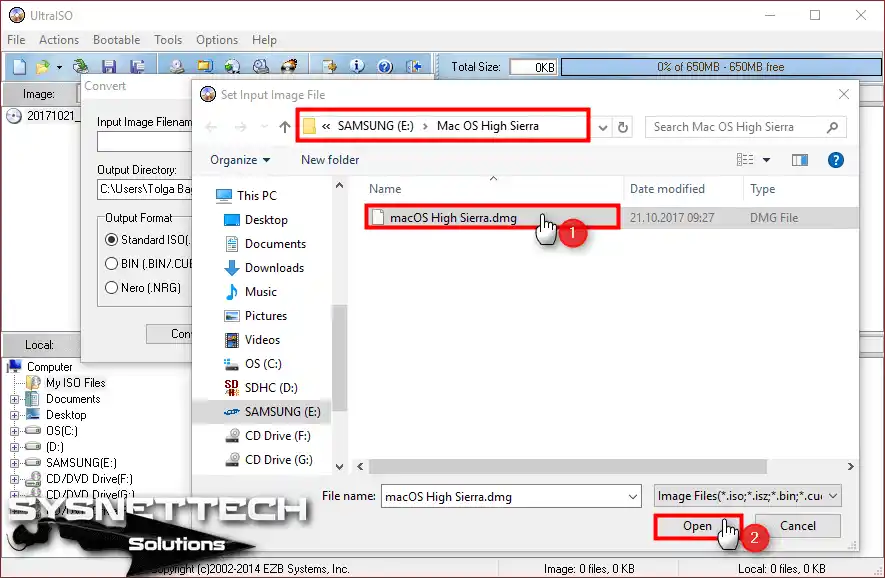
Please choose the folder or document place that holds the DMG (Disk Image) you wish to change. Be sure you have the proper access to open this place before you go on.
Step 6
For example, you can pick the HighSierra.dmg, like I did in the picture below. This file is not needed; pick any correct thing and press Open.
2. Change DMG to ISO
Step 1
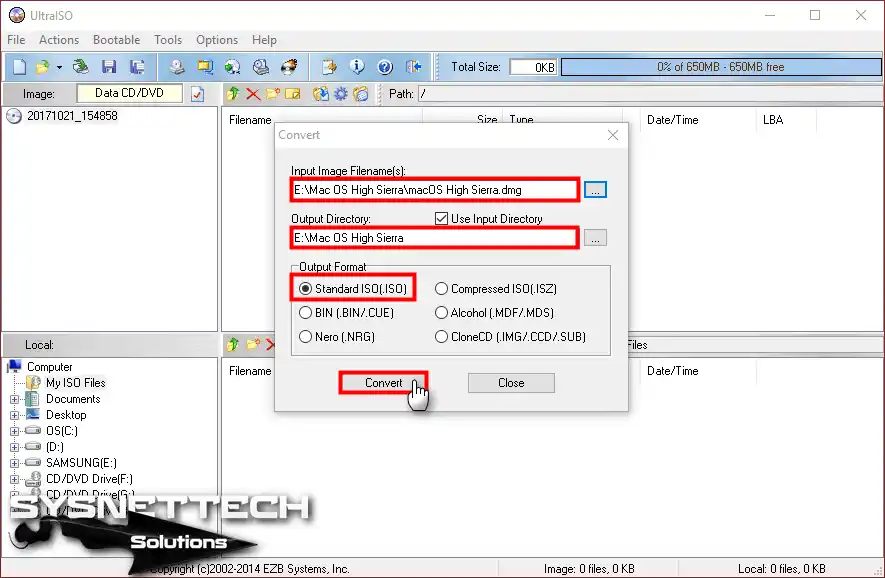
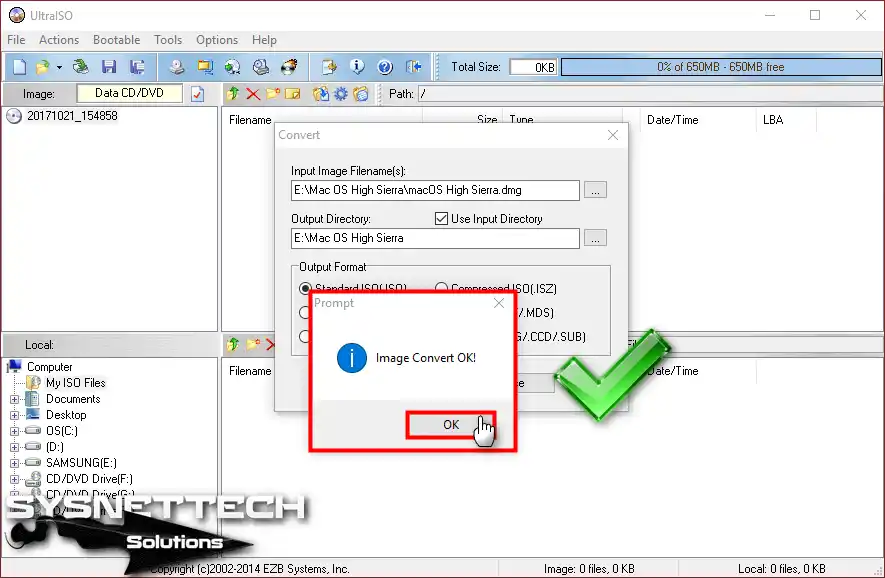
In the Convert window, select the type to be converted in the Output Format section and start the process.
Step 2
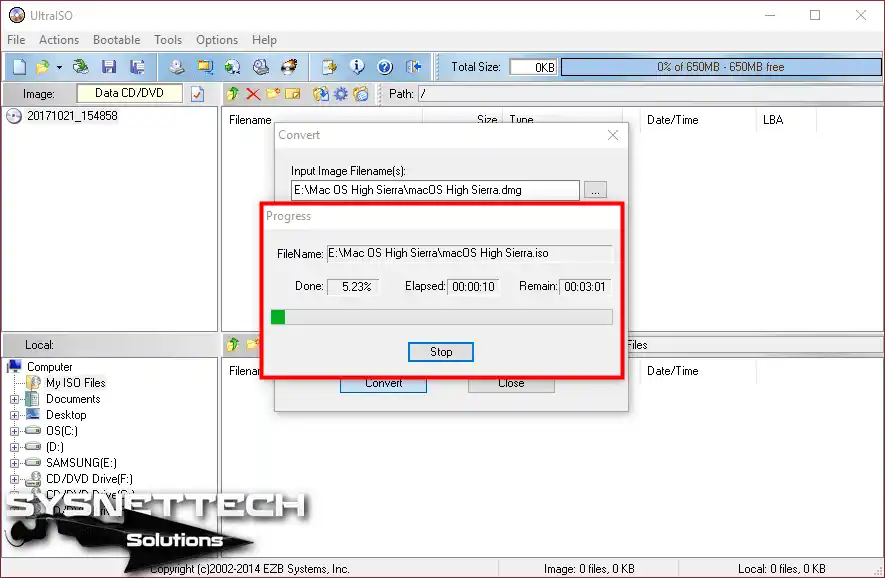
Wait while the UltraISO app converts your selected macOS disk image to ISO.
Step 3
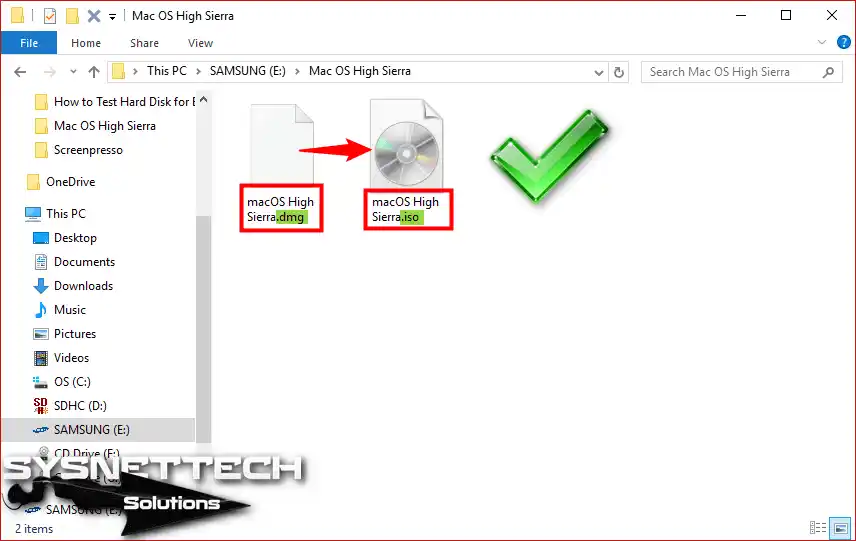
When the job is OK, you will see something extraordinary. The Mac computer format you picked is now an ISO file!
Best of all, the change kept the first file safe and whole. Because of this, all the parts and uses are still there. This good change lets you do new things for setup and sharing.
Step 4
To be sure the job worked, please look at the picture below. I have given a clear SS of the results we got.
ISO Conversion Guide: FAQ
What is the easiest way to convert a DMG file to ISO?
The easiest way is to pick a native tool for your OS. On Windows, UltraISO or AnyBurn works in minutes. Meanwhile, Terminal commands on Mac do the same job.
First, find the source file. In UltraISO, open the Tools menu and click Convert. Then set the source and target paths.
Next, start the conversion. When it ends, mount the result on a virtual drive and check the contents. In fact, I always prefer native tools.
Of course, big files need patience. Write the result to an NTFS disk. If you get errors, run the program as admin. UltraISO costs money, but AnyBurn is free. That free tool is ideal for starters.
Can I convert this file on Windows without opening it?
Actually, you can convert it on Windows without opening the contents. dmg2img or AnyBurn reads the raw image and writes directly to the target container. They do not try to parse the file system.
For encrypted files, you need a password. In that case, dmg2img throws an error. So you must remove the password first.
Also, you do not need to extract contents with 7-Zip. The converter copies sector by sector in the background. It keeps the install image structure intact.
Test the result right away. If it does not open, re-download the source. Bad downloads happen a lot. Also check your disk space during the conversion.
How do I use the dmg2img command?
You can run the dmg2img command on Windows, Linux, and macOS with ease. First, download the tool. Then open Terminal or the command prompt.
The basic command is: dmg2img source.dmg target.iso. Note that you see the progress percentage on screen.
Best of all, the -s flag gives you silent mode and produces clean output in the background. Write the output to the same folder and test it right away.
Besides, for split files, you must merge them first because the command expects one part. It does not work on encrypted files. If you get errors, avoid special characters in the file path.
What are the conversion steps with AnyBurn?
To be clear, converting with AnyBurn is really simple. Just open the program and click ‘Convert image file’ on the main screen.
Consequently, point to the source file and pick ISO as the target format. After you set the output folder, hit the Convert button. When it ends, a report screen pops up on its own. Mounting the result on a virtual drive gives you peace of mind.
The free version runs fast on small files. However, it uses a lot of RAM on very large files. Keep that in mind. Do not shut down your PC during conversion. A sudden power cut will ruin the file.
Can encrypted DMG files convert to ISO?
You cannot convert an encrypted file directly. First of all, you must decrypt it. Tools like 7-Zip or DMG Extractor work well for this.
After you enter the password, extract the contents to a folder. Plus, build a new image from that folder. UltraISO or AnyBurn works fine at this point.
Some converters skip encrypted files silently. The result then looks empty. Therefore, check the lock status before you start.
Surprisingly, some tools will not open an encrypted file at all. They just throw an error. In that case, try a different extractor. Patience is the key here.
Does Disk Utility on Mac do the same job?
Disk Utility on Mac does not do the same job directly. You need to take a slightly different path. Start by mounting the disk. Moreover, go to the File menu and pick New Image.
Pick DVD/CD master as the format. This setting makes a file with a .cdr extension. Finally, just rename the extension to .iso.
Of course, Terminal gives you much faster results. Just use the hdiutil convert command and write the source and target paths. One line does the job.
This method is not an official conversion. Still, most burners accept .cdr files. Even so, the Terminal command always gives cleaner results.
Why won’t the converted ISO open?
Actually, the file you converted may not open for several reasons. Your source may be encrypted. Or it may have gotten damaged during download. Both are common issues.
The most common cause I see is the file system. When the inner structure is HFS+, Windows cannot read it natively. As a result, the contents look empty on a virtual drive.
First of all, check the source and convert again with a solid tool. If needed, try a different virtual drive. Of course, the drive itself can be the problem.
Interestingly, some files use the UDF format. Windows reads that format without issue. I always test the result in a virtual machine. That is the most reliable test.
Are online converters safe?
In fact, online converters are not safe. You upload your file to a server you do not know. That server can store your data or share it with third parties.
What’s more, large files time out and uploads can take hours. You end up with a corrupt file. The wasted time is just the cherry on top.
Besides, some services set size limits and add ads and trackers on top. Even if you find a free site, the risk does not go away.
Needless to say, I recommend you stick with native tools. Privacy comes first. Never upload private data to these sites at all.
Do very large files cause problems?
To be clear, very large files can cause issues. You need to accept that from the start. FAT32 disks cannot hold files over 4 GB. Format the target disk as NTFS or exFAT.
Note that during conversion, you need almost twice the disk space. If RAM is low, the program freezes. For files over 8 GB, at least 16 GB of RAM is good.
Similarly, merge split files first. Closing other heavy programs during the process speeds things up a lot.
Do not shut down your PC during conversion. A power outage will damage the file. Therefore, using a backup power supply is a good idea.
Can I convert ISO back to DMG?
Believe it or not, you can convert it back. On Mac, the hdiutil convert command works well for this. Just pick UDZO as the format.
Similarly, on Windows, UltraISO or AnyBurn does the same job. Open the source and pick DMG as the target format. The rest follows on its own.
Some metadata can vanish in this process. macOS boot info can change too. Consequently, keep your backups safe.
Finally, after conversion, test the result on Mac. Going back and forth between two formats raises the risk of data loss. Back up at every step and work with patience.
Conclusion
In short, changing DMG files to ISO form is simple, as you can see. You can do this on a Windows 10 computer with UltraISO.
This job creates new ways to run Apple-based programs. If you want to run Mac computer apps or send files, this way is constructive.
It helps you handle and use your disk files well. Follow the steps I shared above for a simple change.
Your first files stay safe and ready to use. Now you know about cross-system file handling. Have fun with your change!
Since you have read our guide, I know you work with ISO files. So, checking any ISO file makes sure it is good. Therefore, I also say you should read our article, Verifying an ISO in Windows.
They'll Thank You for Discovering This Guide!
Ready to do your loved ones a huge favor with just one click? Knowledge grows as it is shared.
Hi, I'm Tolga, a computer expert with 20 years of experience. I help fix computer issues with things like hardware, systems, networks, virtualization, servers, and operating systems. Check out my website for helpful info, and feel free to ask me anything. Keep yourself in the loop about the newest technologies!




Be the first to share your comment