

You want to run remote management on your Windows machine. Maybe you will manage a server from the command line. Perhaps you will open a secure channel for your CI/CD pipelines. At this point, SSH Server setup comes into play.
Traditionally, we used RDP. However, RDP is a heavy protocol. Plus, it comes with security flaws. SSH, by contrast, offers a light, encrypted remote access protocol that fits automation well.
In this guide, you will set up OpenSSH Server on Windows 10 and Windows 11 from scratch. Also, you will learn about Server 2022 and Server 2025. After that, you will master key pair creation, firewall rules, SFTP, and port forwarding.
I have done this setup dozens of times. In fact, I have tested it both in my own lab and in live production settings. My goal is to tell you not just what the docs say, but what works in the field.
If you are ready, grab your coffee and settle into your chair. This guide will let you dive fully into the world of Secure Shell on Windows!
What Is SSH Server Setup and Why Should You Use OpenSSH on Windows?
Let me put it briefly: SSH Server setup is the process of turning a Windows machine into a server. This server runs remote commands and transfers files. For this task, Microsoft offers a built-in OpenSSH package.
So why don’t we opt for older protocols, such as Telnet setups, or graphical solutions like RDP? Why do we use SSH instead? Because SSH runs on a client-server architecture. Also, it encrypts all traffic end to end. In other words, no one can read the data in between.
SSH is a must in cloud settings and DevOps work. GitHub Actions, Ansible, and similar tools connect to Windows servers over SSH. This is because SSH is much lighter and more universal than WinRM.
When you set up SSH Server, you gain these abilities:
- Remote command line and full shell access
- Secure file transfer (SFTP and SCP)
- Port forwarding and tunnel creation
- Smooth integration with automation tools
- Key-based authentication for passwordless login
Personally, I keep RDP on Windows machines for emergencies. I always run my daily management and automation tasks over SSH. The reason is that SSH sessions use far fewer resources. On top of that, you can easily automate these processes.
SSH Protocol and OpenSSH Package: Key Concepts
SSH is short for “Secure Shell.” In Turkish, we can translate it as guvenli kabuk. Tatu Ylonen developed this protocol in 1995. The developer designed this protocol to encrypt communication over a network.
OpenSSH is the most common open-source implementation of the SSH protocol. Developers build this tool under the OpenBSD project. On top of that, it comes by default on almost every Linux distro. Microsoft also adapted this project to Windows under the name Win32-OpenSSH.
Microsoft offers OpenSSH on Windows as both a client and a server component. On the client side, ssh.exe does the work. As for the server side, it consists of the sshd.exe service and the sftp-server.exe subsystem.
Now let us clarify the core components in a table:
| Component | Role | Default Location |
|---|---|---|
| ssh.exe | Client side; connects to a remote server | C:\Windows\System32\OpenSSH\ |
| sshd.exe | Server service; listens for incoming connections | C:\Windows\System32\OpenSSH\ |
| sftp-server.exe | Secure file transfer subsystem | C:\Windows\System32\OpenSSH\ |
| ssh-keygen.exe | Key pair creation tool | C:\Windows\System32\OpenSSH\ |
| ssh-agent.exe | Authentication agent | C:\Windows\System32\OpenSSH\ |
| sshd_config | Server configuration file | C:\ProgramData\ssh\ |
Notice that the config file is not under System32. The C:\ProgramData\ssh\sshd_config path is a shared spot for both 32-bit and 64-bit processes. If you miss this detail during your first setup, you can lose hours.
I mixed up this path in my early setups. Then I realized that Windows moves the config to ProgramData when it installs OpenSSH. So you should always make your edits on this file.
Copy-Item "C:\ProgramData\ssh\sshd_config" "C:\ProgramData\ssh\sshd_config.bak" command will save you if something goes wrong.OpenSSH vs RDP on Windows: Which One and When?
In the Windows world, RDP is the first thing that comes to mind for remote access. However, OpenSSH and RDP serve completely different needs. To decide which one to pick, you must first clarify your goal.
The table below puts the two solutions side by side. I use this comparison often when I train my teams:
| Factor | OpenSSH | RDP |
|---|---|---|
| Purpose | Command line, automation, file transfer | Graphical interface, desktop access |
| Resource Use | Very low (CPU, memory, bandwidth) | High (graphics processing, session management) |
| Security | End-to-end encryption, key-based identity | NLA, TLS; but a wider attack surface |
| Automation | Excellent (PowerShell, CI/CD, Ansible) | Weak (requires GUI interaction) |
| Port | 22 (TCP) | 3389 (TCP/UDP) |
| Scriptability | Full (scp, sftp, rsync over SSH) | None |
| Concurrent Sessions | Unlimited (depends on config) | 1 on Windows 10/11, 2+ on Server |
So which one should you use and when? Here is the rule I follow in the field:
- For server management and automation, always pick SSH. Ansible, Terraform, and GitHub Actions manage Windows over SSH.
- When you need a graphical interface, use RDP. If you manage Active Directory or a GUI-based app, for instance, RDP is a must.
- For file transfer, use SFTP. Copying files over RDP is slow and risky.
- As for emergency access, keep both ready. If SSH goes down, you can connect over RDP and take action.
Restart-Service TermService command. If SSH had not been installed, physical access to the server would have been required. That is why I keep SSH on every Windows server.How to Install OpenSSH Server on Windows 10 and 11 (PowerShell and GUI Methods)
There is more than one way to install OpenSSH Server on Windows 10 and 11. Microsoft offers this component under Windows Features on Demand. So you do not need to download an extra installer for setup.
Also, Windows offers optional features through the Features on Demand package. On top of that, Media Feature Pack is part of this system.
I usually prefer the PowerShell method. It finishes the job with a single command and gives output that fits automation. However, a wizard-based setup is also available for GUI fans.
Below, I will show both methods step by step. Also, I will cover the Server Manager path for Windows Server 2025 and the manual setup scenario.
OpenSSH Server Setup with PowerShell: The Add-WindowsCapability Command
The PowerShell method is the fastest and cleanest option for SSH Server setup. In a PowerShell window opened as admin, you can handle the job with a single command.
First, let us check the current install state. That way, you avoid doing needless work:
Get-WindowsCapability -Online -Name OpenSSH.Server*This command gives you a State : Installed or State : NotPresent output. If you see NotPresent, you can move to setup. Now run the actual install command:
Add-WindowsCapability -Online -Name OpenSSH.Server~~~~0.0.1.0This command downloads Microsoft’s official OpenSSH package and integrates it into the system. The process usually takes between 30 seconds and 2 minutes. When setup finishes, you get a State : Installed output.
After that, you must start the service. Setup does not start the service on its own:
Start-Service sshdNow let us set the service to start on its own. That way, the SSH service comes up by itself on every reboot:
Set-Service -Name sshd -StartupType AutomaticFinally, you must add the firewall rule. Luckily, Windows creates this rule on its own during OpenSSH setup. Even so, it is worth a check:
Get-NetFirewallRule -Name *OpenSSH*If the rule is missing, we will add it by hand. But first, let us look at the different approach in Windows Server 2025.
Add-WindowsCapability command sometimes gives a 0x800F0954 error. I will cover the fix for this error in detail in later sections. For now, let us assume setup succeeded.Enabling SSH with Server Manager on Windows Server 2025
Windows Server 2025 brings a very important change to OpenSSH. Now, the sshd.exe service and OpenSSH components come installed by default.
So you do not need to put in extra effort for SSH Server setup. However, you must start and configure the service by hand. Microsoft stops the service by default for security reasons.
To enable SSH through Server Manager, follow these steps:
- Open Server Manager and go to the Local Server tab.
- Click the Remote SSH Access link on the right side.
- In the window that opens, check the Enable SSH option.
- Press the Apply button. After that, Windows starts the service and adds the firewall rule.
This single-step process removes the complex setup from earlier versions. For those who dealt with Windows Server 2022 OpenSSH setup, it is a big relief.
Also, Server 2025 brings a new local group called OpenSSH Users. By adding users to this group, you can easily control SSH access. Users not in the group cannot connect over SSH.
I use this group on almost every server. When you pair it with the AllowGroups directive in the sshd_config file, it gives you excellent access control. I will detail this configuration in later sections.
Manual Setup: Win32-OpenSSH ZIP and MSI Update
In some cases, Windows Update or optional features do not work. For example, if you are on an air-gapped network or use WSUS, Add-WindowsCapability can fail. That is when manual setup comes in.
Microsoft publishes Win32-OpenSSH releases on GitHub. From there, you can download the ZIP archive and install it by hand. Also, an MSI package exists; this package is ideal for enterprise deployment.
The manual setup steps are as follows:
Step 1
Download the latest release from the PowerShell/Win32-OpenSSH repo on GitHub. As of 2026, the current version is OpenSSH 10.4.
Step 2
Extract the ZIP archive to a folder like C:\Program Files\OpenSSH. First, create a folder named OpenSSH under C:\Program Files\.
Step 3
In an admin PowerShell window, run this command:
powershell.exe -ExecutionPolicy Bypass -File Install-sshd.ps1Step 4
This script copies the needed files under System32 and registers the service. After that, start the service and set it to start on its own.
Step 5
If you install with the MSI package, you can use the msiexec /i OpenSSH-Win64.msi command. MSI is ideal for deployment through Group Policy. Also, it supports silent setup parameters.
I especially prefer the MSI package for server fleets. You can install it on hundreds of servers at once through SCCM or Intune. The ZIP method, by contrast, suits one-time setups or test settings better.
Optional features on Windows sometimes cause trouble. .NET Framework 3.5 setup also brings similar headaches. Because of this, you should prepare in advance.
Install-sshd.ps1 script. Copying files alone is not enough. The script creates the service entry and the needed registry keys. If you skip this step, the Start-Service sshd command gives a “service not found” error.GUI Setup: Step-by-Step OpenSSH Server Setup with the setupssh.exe Wizard
For those who shy away from the command line, wizard-based setup is a great alternative. I especially recommend this method to beginners. You get visual feedback at every step.
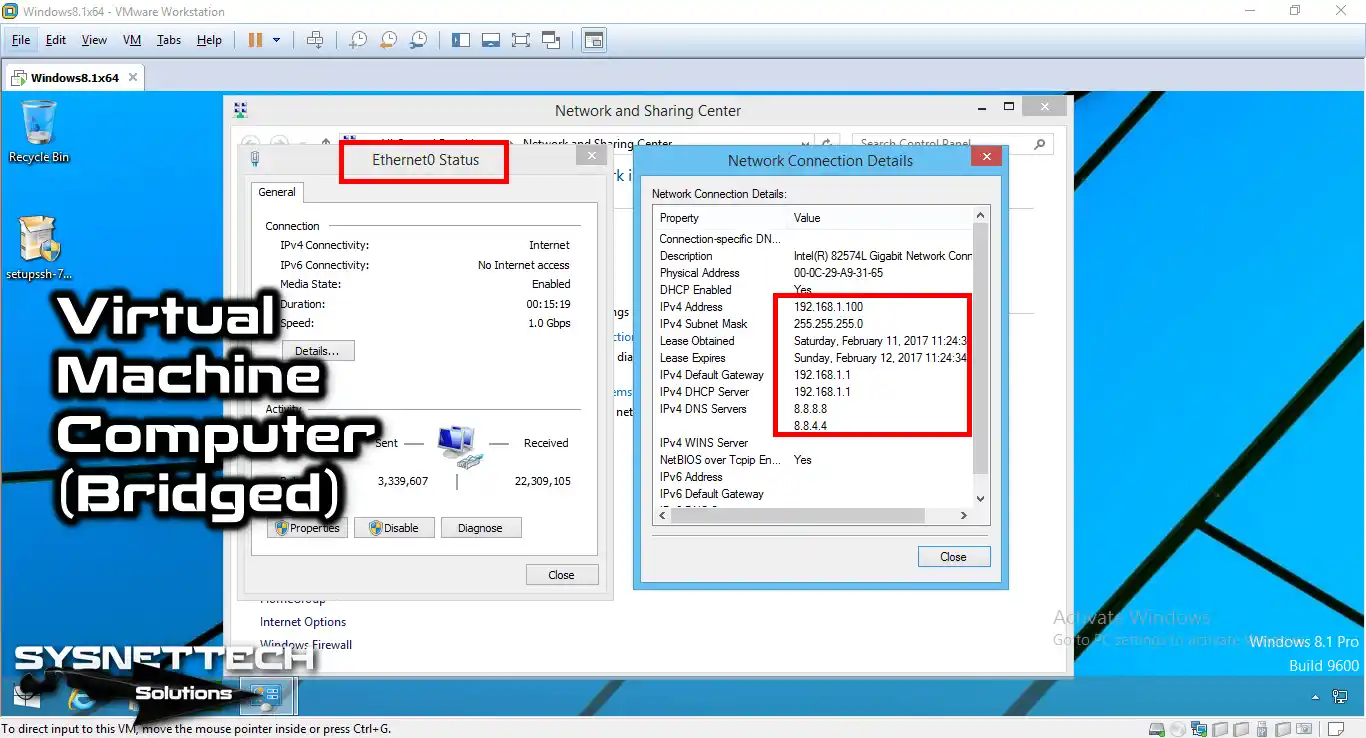
First, verify the network configuration on the virtual machine or physical machine. Check the network adapter IP address of your host machine.
Step 1
Look at the network adapter details of your host machine. Here, note the IP address, subnet mask, and gateway.

Step 2
Configure the guest machine’s network setting as VMnet4 or Bridged. Then look at the IP address the machine got from the DHCP server.
Step 3
Now we must set the VM’s network adapter setting. So check this setting through the Virtual Network Editor.

Step 4
In the VMware Virtual Network Editor program, you can create VMnet4 or a new VMnet. Check that you set the VMnet4 adapter as Bridged.

Step 5
Copy the OpenSSH program you downloaded to your computer over to the virtual machine. Then run the setupssh.exe file as admin to start setup.

Step 6
Pick the language for the program to install. Then click the OK button to move on.

Step 7
The wizard prepares the OpenSSH program setup. At this stage, you must wait a few seconds.

Step 8
In the OpenSSH setup window, move on with the Next button.

Step 9
Accept the OpenSSH license agreement and continue the process.

OpenSSH Server Configuration and Completing Setup
Step 1
In the Components window, check the Server option. The Client option is for the client side.

Step 2
In the setup location window, move on without changing the default location.

Step 3
In the Start Menu folder pick window, continue with Next.

Step 4
In the Run as LOCAL_SYSTEM window, pick this setting. This option gives the highest rights.

Step 5
SSH connections use port number 22 by default. In this window, leave the value at 22 and move on.

Step 6
When you create a key for a secure link, accept the default value. 2048 bits is enough.

Step 7
In the user settings window, check the Local Users option. A different option exists for domain users.

Step 8
Wait while OpenSSH installs on your Windows 10 or Windows 11 system.

Step 9
After OpenSSH setup finishes, press the Finish button. Then you must start the service by hand.

Get-Service sshd command. Setup sometimes skips starting the service. You can start it by hand with Start-Service sshd.Starting the sshd Service, Auto-Start, and the Windows Firewall Rule
After OpenSSH Server setup finishes, the time comes to configure the service. This step is the most critical part of the setup process. Installing is not enough; the service must run and be reachable from the network.
Now we will cover three core topics: starting the service and setting auto-start, adding a firewall rule, and verifying the connection. I will show each one step by step.
Starting the sshd Service and Setting Auto-Start
After setup, the sshd service usually stays stopped. To start the service, run this command with admin rights:
Step 1
Start-Service sshdStep 2
Use the Get-Service sshd command to check the service state. You should see a Status : Running output. If you see Stopped, you must look at the event log to find the cause.
Step 3
Now let us make the service start on its own at every boot:
Set-Service -Name sshd -StartupType AutomaticThis setting makes the SSH service come up by itself when the server reboots. On production servers, this setting is vital. Otherwise, you need manual action after every reboot.
Step 4
It also pays to check service dependencies. For example, the ssh-agent service is needed for key-based authentication. Set it to auto-start as well:
Set-Service -Name ssh-agent -StartupType AutomaticI usually configure the sshd and ssh-agent services together. That way, both the server side and the client side are ready. In CI/CD pipelines especially, this pair is a must.
sc.exe failure sshd reset= 86400 actions= restart/5000/restart/10000/restart/20000 command restarts the service on its own when it crashes. This setting is critical for nonstop remote access.Windows Firewall SSH Rule: Allowing Port 22
Even if the service runs, Windows Firewall can block connections. Luckily, OpenSSH setup creates an inbound rule called OpenSSH-Server-In-TCP on its own.
Check whether the rule exists with this command:
Step 1
Get-NetFirewallRule -Name *OpenSSH* | Format-Table Name, Enabled, Direction, ActionStep 2
If the rule is missing or disabled, add it by hand:
New-NetFirewallRule -Name "OpenSSH-Server-In-TCP" -DisplayName "OpenSSH Server (sshd)" -Enabled True -Direction Inbound -Protocol TCP -Action Allow -LocalPort 22Step 3
This command allows all connections coming in on TCP port 22. However, for security, I suggest you restrict the source IP address. For example, you can allow only connections from the management network:
New-NetFirewallRule -Name "OpenSSH-Server-In-TCP" -DisplayName "OpenSSH Server (sshd)" -Enabled True -Direction Inbound -Protocol TCP -Action Allow -LocalPort 22 -RemoteAddress 192.168.1.0/24Here, the -RemoteAddress parameter is vital. In production settings, opening the SSH port to the whole internet is very risky. Attackers try to connect to port 22 thousands of times per second. So source IP restriction is a must.
Also, you can tie the rule to certain user groups using the advanced settings of Windows Firewall. For example, only members of the admin user group can make SSH connections.
Test-NetConnection -ComputerName localhost -Port 22 command. If the local connection works, the issue is not in the firewall but in the network setup.NOTE: To diagnose connection issues, use the ping command. You can run detailed tests with different parameters. To fix network problems, you may find the ping parameters guide helpful.
Connection Test: Verification with ssh -V and netstat -ano
Now that the service and firewall are ready, we can test the connection. First, let us check the OpenSSH version:
Step 1
ssh -VStep 2
This command gives you an output like OpenSSH_for_Windows_10.4. The version number matters for knowing which security features are available. As of 2026, the current version is 10.4.
After that, let us check whether the service really listens on port 22:
Step 3
netstat -ano | findstr :22Step 4
This command shows the process that listens on port 22. You should see a line in LISTENING state. If you cannot see one, the service may not run or may use a different port.
Now let us test a connection from a remote machine:
Step 5
ssh user@server-ip-addressStep 6
On the first connection, it shows you the server’s host key fingerprint and asks for approval. Type yes and press Enter. Then it will ask you to enter the user password.
If the connection is refused, you can get a detailed log with the ssh -vvv user@server-ip command. This output clearly shows at which stage the problem occurs. You will understand whether it is authentication, a network link, or a key issue.
I always run an ssh -vvv test on every new setup. This command reveals most config errors before a connection is even made.
SSH Key Authentication on Windows 11: ssh-keygen, authorized_keys, and icacls Permission Management
SSH connection with a password works but is not secure. It is defenseless against brute-force attacks. That is why you should use key-based authentication.
With this method, you create a key pair: the private key stays with you. Also, you place the public key on the server. If the server sees the mathematical match of your private key, it lets you in.
In this section, you will learn to make keys with ssh-keygen, set up the authorized_keys file, and fix file permissions with icacls.
Creating an ED25519 Key Pair with ssh-keygen
We will use the ssh-keygen command to make keys. I always prefer the ED25519 algorithm. It is shorter, faster, and safer than RSA.
Open PowerShell on your client machine and run this command:
Step 1
ssh-keygen -t ed25519 -C "windows-ssh-2026"Step 2
This command will ask you three questions. The first question is the file location. By default, it suggests C:\Users\user\.ssh\id_ed25519. Press Enter to accept the default.
Step 3
The second question is for a passphrase. You can leave it blank, but for security, I suggest you enter a passphrase. This passphrase encrypts your private key.
Step 4
In the third question, enter the same passphrase again. When the process finishes, two files appear: id_ed25519 (private key) and id_ed25519.pub (public key).
To view the contents of the public key:
Get-Content $env:USERPROFILE\.ssh\id_ed25519.pubWe will copy this output and move it to the server. But first, let us look at the setup on the server side.
If you must use an RSA key (for compatibility with old systems), you can use the ssh-keygen -t rsa -b 4096 command.
However, as of 2026, the ssh-rsa algorithm is off by default. I will cover this topic in detail in the troubleshooting section.
id_ed25519 file is your identity. If you send this file by email or carry it on a USB drive, you commit a major security breach. Moreover, uploading the file to cloud storage also creates a serious security gap. Only share the public key with the .pub extension.Configuring authorized_keys and administrators_authorized_keys
On the server side, two different authorization files exist. For normal users, you use authorized_keys; for admin users, you use administrators_authorized_keys.
The file path for normal users is:
C:\Users\user\.ssh\authorized_keysThe file path for admin users is:
C:\ProgramData\ssh\administrators_authorized_keysI usually create both files. Sometimes a user may want to connect with both normal and admin rights. Also, you can customize this behavior with the Match block in the sshd_config file.
To add your public key to the file, use this command:
Add-Content -Path "C:\ProgramData\ssh\administrators_authorized_keys" -Value (Get-Content $env:USERPROFILE\.ssh\id_ed25519.pub)This command adds the public key from your client machine to the authorization file on the server. If you connect from a remote machine, you must first copy the public key to the server. You can use scp for this:
scp $env:USERPROFILE\.ssh\id_ed25519.pub user@server:C:\Users\user\.ssh\authorized_keysHowever, this method does not set file permissions on its own. So in the next step, we will fix permissions with icacls.
authorized_keys file must be in UTF-8 encoding. Files you create with Notepad sometimes get saved by the system in UTF-16 format. In this case, the SSH server cannot read the key. Make sure you create the file with Set-Content -Encoding UTF8.Breaking Permission Inheritance and Setting Correct ACLs with icacls
On Windows, file permissions are where SSH gets stuck most often. In Linux, chmod 600 fixes it with a single command, but on Windows, access control list (ACL) management is needed.
OpenSSH wants the authorized_keys file to be writable only by its owner and SYSTEM. Otherwise, it gives a Permission denied (publickey) error.
To fix permissions, we must first break inheritance. By default, the file inherits permissions from its parent folder:
Step 1
icacls "C:\ProgramData\ssh\administrators_authorized_keys" /inheritance:rStep 2
Then let us give full rights only to the Administrators and SYSTEM groups:
icacls "C:\ProgramData\ssh\administrators_authorized_keys" /grant "Administrators:F" /grant "SYSTEM:F"Step 3
These two commands bring the file into the format SSH expects. You should do the same for the normal user file:
icacls "C:\Users\user\.ssh\authorized_keys" /inheritance:r /grant "user:F" /grant "SYSTEM:F"Step 4
Now restart the service and test the key-based connection:
Restart-Service sshdThe connection should log in directly without asking for a password. If it still asks for a password, check the ssh -vvv output. Usually, the file permissions or the PubkeyAuthentication line in sshd_config is the problem.
I turned these permission settings into a PowerShell script. I run it on its own every time I add a new user. That way, I removed manual errors completely.
Creating and Authorizing a User Account
For security, create a separate user for each client. That way, you can easily manage access control.
Open the Computer Management console. Go to the Local Users and Groups section.

Right-click the Users folder. Then pick the New User option.

When the user creation window opens, click the New User option.

Fill in the user name, password, and description fields. Check the “Password never expires” option.

Press the Create button to create the user. Then close the window with Close.

Double-click the SSHUser account to make it a member of the Administrators group.

Switch to the Member Of tab. Then click the Add button below to continue.

In the Select Group window, click the Advanced button below.

Then click the Find Now button to search for groups on the operating system.

After you pick the Administrator account, press OK.

Finally, press OK again.

After you make the user a member of the Administrators group, press OK to save.

AllowGroups directive in the sshd_config file.sshd_config Windows Settings: Port Change, Security Hardening, and Advanced Configuration
The sshd_config file is the brain of the SSH server. Every change you make in this file directly affects the server’s behavior. In this section, we will cover port changes, basic hardening, and advanced topics like post-quantum cryptography.
On Windows, the config file is at C:\ProgramData\ssh\sshd_config. Always back it up before you edit it.
I run this command before every change:
Copy-Item "C:\ProgramData\ssh\sshd_config" "C:\ProgramData\ssh\sshd_config.bak"This backup habit has saved me from big trouble many times. On production servers especially, a config error can cut off all access.
Changing the SSH Port on Windows (from 22 to 2222) and Updating the Firewall
The whole world knows the default port 22. So it is the first target for attackers. Changing the port is an important security step. Of course, it is not enough on its own, but it narrows the attack surface.
Step 1
To change the port, open the sshd_config file and find the Port 22 line.
Step 2
Change this line to Port 2222.
Port 2222Step 3
Then you must update the Windows Firewall rule. Disable the old rule and add a new one:
New-NetFirewallRule -Name "OpenSSH-Server-In-TCP-2222" -DisplayName "OpenSSH Server (sshd) 2222" -Enabled True -Direction Inbound -Protocol TCP -Action Allow -LocalPort 2222Step 4
Now restart the service:
Restart-Service sshdStep 5
For a connection test, use the ssh user@server -p 2222 command. The -p parameter sets the port number. Remember, you can no longer connect over port 22.
I usually close port 22 completely. I leave only a high port like 2222 open. Also, I add source IP restriction with the -RemoteAddress parameter. This pair makes the SSH server largely invisible.
Basic Hardening: PermitRootLogin, MaxAuthTries, and GSSAPIAuthentication
To make the SSH server secure, you must apply a few basic settings. These settings cut the attack surface to a minimum. The table below shows the standard hardening settings I apply on every server:
| Setting | Suggested Value | Description |
|---|---|---|
| PermitRootLogin | no | Blocks direct login by the root user |
| MaxAuthTries | 3 | Cuts the connection after 3 failed tries |
| PasswordAuthentication | no | Turns off password login completely |
| PubkeyAuthentication | yes | Allows only key-based login |
| PermitEmptyPasswords | no | Rejects accounts with empty passwords |
| GSSAPIAuthentication | no | Turns off needless GSSAPI authentication |
| X11Forwarding | no | Turns off X11 forwarding (not needed on Windows) |
Add these settings to the end of the sshd_config file. Then restart the service. Before you set PasswordAuthentication no, make sure key-based login works. Otherwise, you can lose access to the server completely.
The MaxAuthTries setting is especially important. Its default value is 6. Dropping it to 3 slows brute-force attacks. If an attacker fails in 3 tries, the connection drops and they must reconnect.
The GSSAPIAuthentication no setting is usually needless on Windows. If you do not use Kerberos-based authentication, turning this setting off prevents needless delay on every connection.
PasswordAuthentication no, always verify that you can log in with a key using the ssh -i private_key user@server command. Otherwise, you get locked out of the server completely and physical access is needed.Advanced: Post-Quantum Cryptography and ssh-rsa Algorithm Compatibility
Quantum computers have the potential to break current encryption algorithms. So post-quantum cryptography work has gained speed. OpenSSH is also taking important steps in this area.
OpenSSH 10.4, released in July 2026, brought experimental post-quantum signature support. This release offers a composite signature scheme made of a mix of ML-DSA 44 and Ed25519.
To test post-quantum algorithms, you can add these lines to the sshd_config file:
HostKeyAlgorithms mlkem768x25519-sha256,ssh-ed25519
KexAlgorithms sntrup761x25519-sha512@openssh.com,mlkem768x25519-sha256
However, these algorithms are at an experimental stage. You must run broad tests before you use them in production. I have not yet enabled these algorithms on live systems. But I am testing them in a lab setting.
For compatibility with old systems, you may need the ssh-rsa algorithm. OpenSSH 8.8 and later turn this algorithm off by default. To enable it again, add these lines to the sshd_config file:
PubkeyAcceptedAlgorithms +ssh-rsa
HostKeyAlgorithms +ssh-rsa
These lines turn the ssh-rsa algorithm back on for old clients. However, for security, use this algorithm only when you must. Switch to ED25519 as soon as you can.
I have used ED25519 for years. It is both faster and safer. Unless I must work with an old system, I do not add backward compatibility for ssh-rsa.
Creating Windows SSH Tunnels: Real-World Scenarios with -L, -R, and SOCKS Proxy
SSH tunneling is one of the most powerful features. With it, you can set up encrypted channels even on unsafe networks. In this section, I will explain three tunnel types with real scenarios.
I use tunneling especially for database management and remote desktop access. Database servers open straight to the internet carry big risk. An SSH tunnel removes this risk.
Local Port Forwarding (-L): Remote Desktop and Database Tunnel
Local port forwarding links a port on your own machine to a port on a remote server. You use it with the -L parameter. I use it most for database tunnels.
Say you want to reach a MySQL database running on a remote server. However, the database port is closed to the outside world. You can open a secure tunnel with this command:
ssh -L 3306:localhost:3306 user@remote-serverThis command links port 3306 on your own machine to port 3306 on the remote server. Now every client that connects to localhost:3306 actually reaches the database on the remote server.
Similarly, for a remote desktop SSH tunnel, you can use this command:
ssh -L 13389:localhost:3389 user@remote-serverThen you connect to localhost:13389 in your RDP client. This method gives you secure remote desktop access without opening the RDP port to the internet.
I use this method especially when I connect to client servers. Instead of opening RDP straight, I pass it through an SSH tunnel. That way, all traffic stays encrypted.
Remote Port Forwarding (-R) and Dynamic SOCKS Proxy (-D)
Remote port forwarding opens a service on your local machine to the remote server. You use it with the -R parameter. Developers often call this a reverse SSH tunnel.
For example, you want to open a web server at home to the outside world. However, you cannot do port forwarding on your modem. You can set up a reverse tunnel with this command:
ssh -R 8080:localhost:80 user@remote-serverThis command links port 8080 on the remote server to port 80 on your machine. Now anyone who connects to the remote server’s IP address on port 8080 reaches your home server.
Dynamic port forwarding, by contrast, uses the -D parameter. This creates a SOCKS proxy server. It is ideal for passing all your browser traffic over SSH:
ssh -D 1080 user@remote-serverThen you set localhost:1080 as a SOCKS5 proxy in your browser’s proxy settings. All your internet traffic flows encrypted through the remote server.
I use this method on public Wi-Fi networks. Especially at airports or hotels, I pass all my traffic through my own server. That way, bad actors on the local network cannot read my data.
ssh -L 5432:localhost:5432 user@db-server command. This method is both secure and auditable.Setting Up an SFTP Server on Windows and Restricting Users with ChrootDirectory
SFTP gives you secure file transfer over SSH. Unlike FTP, all traffic is encrypted. When you install OpenSSH on Windows, the SFTP subsystem comes on its own.
However, to make SFTP secure, you must lock users into a certain directory. This process is called a chroot jail. Now, I will show the SFTP setup and the chroot setting.
You use SFTP for file transfer over SSH. In some cases, simple protocols like TFTP also work. Let me add this too: TFTP is common in network device config. Setting up a TFTP server on Windows is also quite easy.
Subsystem sftp Configuration and the sftp-server.exe Path
For the SFTP subsystem to work, the sshd_config file must have this line:
Subsystem sftp sftp-server.exeThis line tells the SSH server to route SFTP requests to the sftp-server.exe program. On Windows, this file is under C:\Windows\System32\OpenSSH\.
If the line is missing or commented out, SFTP connections fail. I check this line on every setup. Sometimes this line can vanish during config file updates.
To enable SFTP logging, you can add these lines:
SyslogFacility LOCAL0
LogLevel DEBUG3
These settings log all actions in SFTP sessions. Log files appear under C:\ProgramData\ssh\logs. During debugging, these logs are priceless.
To test the SFTP connection, you can use the sftp user@server command. On a successful connection, you see the sftp> prompt. You can do file tasks with commands like ls, put, and get.
User Isolation with ChrootDirectory and the Match Block
By default, SFTP users can reach the whole file system. This is a big security risk. To lock users into a certain folder, you must use the ChrootDirectory directive.
Step 1
First, create a separate user group for SFTP. Then add a Match block to the end of the sshd_config file:
Match Group sftp-users
    ChrootDirectory C:\SFTP\%u
    ForceCommand internal-sftp
    AllowTcpForwarding no
    PermitTunnel no
Step 2
This config locks every user in the sftp-users group into their own home directory. The %u variable stands for the user name. So the user ahmet gets locked into the C:\SFTP\ahmet directory.
Step 3
However, applying chroot on Windows is not as simple as on Linux. There is a complex interplay between NTFS permissions and the OpenSSH chroot mechanism. The chroot directory must be owned by SYSTEM and users must not have write permission.
Here is the correct permission setup:
icacls "C:\SFTP\ahmet" /inheritance:r /grant "SYSTEM:F" /grant "Administrators:F"Step 4
For the user to upload files, create a separate subfolder and give write permission there:
mkdir "C:\SFTP\ahmet\upload"
icacls "C:\SFTP\ahmet\upload" /grant "ahmet:M"
Step 5
This config lets the user upload files only to the upload folder. They cannot write to the chroot directory itself. This is a critical step for user isolation.
I wrote a PowerShell script that creates this structure on its own for every SFTP user. The script creates the user, adds them to the group, sets up the directories, and sets permissions. That way, I can prepare hundreds of users in seconds.
cd .. command. If you get a “Couldn’t canonicalize: No such file or directory” error, it means chroot works. The user cannot go up to parent directories.OpenSSH Troubleshooting on Windows 11: 0x800F0954 and Connection Refused Scenarios
Not every setup goes smoothly. In enterprise settings especially, knowledge of Windows OpenSSH troubleshooting saves the day. I have run into these errors dozens of times. I know the fixes by heart. After you read this section, you will have the same ease.
0x800F0954 and 0x800F0950: Setup Errors from WSUS and Group Policy
The Add-WindowsCapability command sometimes gives a 0x800F0954 error. This error means Windows cannot find the optional feature package. It usually comes from WSUS or Group Policy.
The root of the problem is this: WSUS does not send the .cab files needed for optional features to servers. So Windows cannot download the OpenSSH package. The same problem appears with 0x800F0950 and 0x8024402C errors.
To fix it, follow these steps:
Step 1
Open the Registry Editor. Then go to this key: HKEY_LOCAL_MACHINE\SOFTWARE\Policies\Microsoft\Windows\WindowsUpdate\AU
Step 2
Find the UseWUServer DWORD value. If the value is 1, set it to 0.
Step 3
Restart the Windows Update service: Restart-Service wuauserv
Step 4
Now run the Add-WindowsCapability command again.
This method requires you to turn off WSUS. However, doing it on a temporary basis is enough. After setup finishes, you can set the UseWUServer value back to 1.
As an alternative, you can install OpenSSH with the manual ZIP package. This method fixes the problem without touching WSUS at all. In air-gapped networks especially, it is the only option.
Fixing Permission denied (publickey) and ssh-rsa Algorithm Mismatch
The Permission denied (publickey) error is a nightmare for SSH users. This error means key-based login was refused. It can have more than one cause.
Step 1
The first thing you must check is file permissions. The authorized_keys file must be writable only by its owner and SYSTEM. To fix permissions, use the icacls command:
icacls "C:\ProgramData\ssh\administrators_authorized_keys" /inheritance:r /grant "Administrators:F" /grant "SYSTEM:F"Step 2
The second possible cause is that the ssh-rsa algorithm is off. Since OpenSSH 8.8, this algorithm is off by default. If you use an old client, the connection fails.
To fix it, add these lines to the sshd_config file:
PubkeyAcceptedAlgorithms +ssh-rsa
HostKeyAlgorithms +ssh-rsa
Step 3
Then restart the service. This change turns the ssh-rsa algorithm back on. However, for security, use this algorithm only when you must.
Step 4
The third possible cause is that the PubkeyAuthentication line in sshd_config is set to no. Set this line to yes. Also, make sure the AuthorizedKeysFile line points to the right path.
I run these three checks in order on every Permission denied error. In 90% of cases, the problem is one of these three causes. The other 10% usually comes from a corrupt key file or a key that belongs to the wrong user.
Finally, always check the ssh -vvv output. This output shows exactly at which stage you get stuck.
For example, if you get an error after the “Offering public key” line, the problem is on the server side. If you get an error after the “Authentications that can continue” line, there is a problem on the client side.
Windows SSH Server Security Settings and Compliance Audit
Installing the SSH server is not enough. To keep it secure, you must audit it nonstop. I apply these settings on every production server. Also, I run a monthly security audit. That way, I spot possible flaws early.
Access Control with AllowUsers, DenyUsers, and the Match Block
Controlling who can connect to the SSH server is vital. By default, all local users can connect. This is usually an unwanted state.
With the AllowUsers directive, you can allow only certain users:
AllowUsers admin backupThis setting lets only the admin and backup users make SSH connections. The system rejects all other users.
The DenyUsers directive, by contrast, blocks certain users. It is usually used to block built-in accounts like Administrator:
DenyUsers Administrator GuestWith the Match block, you can do more granular control. For example, you can apply different settings to a certain user group:
Match Group sftp-users
    ChrootDirectory C:\SFTP\%u
    ForceCommand internal-sftp
    PermitTunnel no
This config lets users in the sftp-users group use only SFTP. It turns off SSH shell access completely.
I use at least one Match block on every server. Different user groups have different needs. Admins get full access, while automation accounts can run only certain commands.
AllowUsers or DenyUsers, do not forget to add your own user name. Otherwise, you get locked out of the server completely. After you make the change, test a new connection without closing your current session.Auditing with Event Viewer and SSH Posture Control
Watching SSH events is the best way to spot security breaches early. On Windows, OpenSSH logs events through Event Viewer.
The event log location is: Applications and Services Logs > OpenSSH > Operational. The system keeps connection attempts, auth successes, and errors in this log.
I check this log regularly. Failed connection attempts especially can signal a possible attack. In Event Viewer, Event ID 4 shows failed authentication, while Event ID 2 shows a successful connection.
Also, Windows Server 2025 brings a new feature called SSH Posture Control. This feature audits, applies, and fixes SSH config with a mix of Azure Policy and PowerShell.
The audits SSH Posture Control provides are:
- Checks whether the SSH service runs
- Spots weak crypto algorithms
- Verifies firewall rules
- Reports unauthorized config changes
- Sends compliance scan results to Azure
This feature is a big help for those who manage large Windows server fleets. I have not yet enabled it on all my servers. But I got very good results in pilot tests.
SSH Tools on Windows 10 and 11: Windows Terminal, PowerShell, WinSCP, and VS Code
After you set up the SSH server, you need tools to use it. The Windows ecosystem has many options. In this section, I will present the tools I use most.
These tools speed up your daily workflow. Windows Terminal and VS Code especially are must-haves in the modern developer experience.
SSH Connection with Windows Terminal and PowerShell
Windows Terminal is Microsoft’s modern terminal emulator. It stands out with its tabbed layout, customizable themes, and fast render engine.
To make an SSH connection from Windows Terminal, open a new tab and type this command:
ssh user@server-ipIn Windows Terminal, I create profiles for the servers I use often. That way, I can connect with one click. To create a profile, add this block to the settings.json file:
{
    "name": "Production Server",
    "commandline": "ssh user@10.0.1.50",
    "icon": "ms-appx:///ProfileIcons/{9acb9455-ca41-5af7-950f-6bca1bc9722f}.png",
    "hidden": false
}
SSH connection through PowerShell is just as easy. In fact, with PowerShell 7.7, you can open a remote PowerShell session over SSH. The PowerShell Remoting over SSH feature is growing in popularity as an alternative to WinRM.
To use this feature, a few settings are needed on the client and server sides. First, add this line to the sshd_config file on the server:
Subsystem powershell pwsh.exe -sshs -NoLogoThen on the client, you can open a remote session with the New-PSSession -HostName server -UserName user command. This method is ideal for those who do not want to open the WinRM port, especially in cloud settings.
I use PowerShell Remoting over SSH in my CI/CD pipelines. It is lighter and safer than WinRM. Also, it works without issues from Linux-based build agents.
Connecting to a Windows SSH Server with PuTTY
PuTTY is the most classic SSH client in the Windows world. It still keeps its popularity with its light build and rich features.
Besides PuTTY, alternative SSH clients like SecureCRT also exist. Enterprise teams use this tool often for security. It offers advanced session management and strong encryption support.
Step 1
First, open the program by double-clicking the putty.exe file. It needs no setup; it is a portable tool.

Step 2
After you open the PuTTY program, type the IP address of the VM (OpenSSH Server) and press OK.

Step 3
You can see from the image below that you made a connection to the OpenSSH Server.

Step 4
Type the SSHUser name you created on the virtual machine.

Step 5
Type the SSHUser password and press Enter.

Step 6
You successfully connected to the SSH Server using PuTTY!

Step 7
Run the “hostname” command to learn the computer name of the server.

Step 8
Also, you can check the Hostname value through the OpenSSH Server.

Step 9
To create a new folder on the server, run the “md FolderName” command.

Step 10
Go to the virtual machine. Then check the C: drive to verify that you created the new folder.

ssh.exe client in Windows. However, PuTTY offers extra features like saved sessions and port forwarding profiles.VS Code Remote-SSH, WinSCP, and Git Integration
Visual Studio Code lets you edit files on remote servers straight with the Remote-SSH extension. This extension connects over SSH and shows the remote file system as if it were local.
To use Remote-SSH:
- Open VS Code and install the
Remote - SSHextension from the Extensions tab. - Press
F1and run theRemote-SSH: Connect to Hostcommand. - Enter the address of the server you want to connect to.
- VS Code sets up the SSH connection and opens the remote file system.
WinSCP, by contrast, is the most popular graphical interface for secure file transfer. It supports SFTP and SCP protocols. Also, it offers file sync and scripting features.
To connect to your Windows SFTP server with WinSCP:
- Open WinSCP and switch to the New Session tab.
- Pick SFTP as the protocol.
- Specify the server address, port number, user name, and your key file.
- Press the Login button.
For Git integration, platforms like GitHub, GitLab, and Bitbucket support SSH keys. By adding the public key you made with ssh-keygen to your GitHub account, you can do passwordless git actions.
I use these three tools together in my daily workflow. I write code with VS Code and transfer files with WinSCP. Also, I handle version control with Git. All of them work over the same SSH key.
Further Reading Resources on SSH Connection
If you want to dive deeper into what I covered in this guide, be sure to check the sources below. These sources are the most trusted official and academic references on the topic.
- Microsoft Learn — OpenSSH for Windows Overview: Microsoft’s official OpenSSH documentation. It holds the most current info on setup, config, and troubleshooting.
- OpenSSH Official Release Notes: OpenSSH’s official release notes. Follow them to get first-hand info on post-quantum cryptography and security fixes.
- GitHub — PowerShell/Win32-OpenSSH: The official GitHub repo for OpenSSH on Windows. You can find the latest releases, MSI packages, and community talks here.
OpenSSH Server FAQ on Windows
Is SSH installed by default on Windows Server 2025?
How do I change the SSH port on Windows?
How do I fix the Permission denied (publickey) error?
How do I fix the 0x800F0954 error in a WSUS setting?
How do I create and use an SSH key on Windows?
How do I make the Windows SSH server start on its own?
How do I set up an SFTP server on Windows?
How do I update OpenSSH?
Conclusion: A Secure and Automation-Ready SSH Infrastructure on Windows 10, 11, and Server
That is it. We covered the SSH Server setup process on Windows from start to finish. Now you can set up a secure SSH infrastructure on your Windows 10, 11, and Server 2022/2025 systems.
Remember: SSH is not just a setup task. It needs ongoing care and security updates. You should track new developments like post-quantum cryptography especially.
I have used SSH in Windows environments for years. It is much lighter, safer, and more automation-friendly than RDP. In DevOps processes especially, SSH is a must.
You can also set up your own secure SSH infrastructure by following the steps in this guide. If you get stuck at any step, do not hesitate to check the ssh -vvv output. This output will show the source of the problem.
Now it is your turn. Set up SSH Server on your own server and enjoy secure remote management. Good luck!

Be the first to share your comment