

In today’s rapidly developing digital world, the media feature pack on our PCs is an indispensable part. For example, apart from our daily work, we watch movies or listen to our favorite music.
However, I suppose you are using Microsoft’s Windows 10 & 11 N or KN editions. In that case, we cannot do some of these because this pack is not available in N and KN versions. So, we can’t use Media Player or Skype.
If we encounter such situations or our version does not support it, no problem! Microsoft has an additional package for these versions. The name of this package is Feature Pack.
Thanks to this, we can continue to use our multimedia files without switching to another Windows version. In this article, we explained all the details on how to download and install the necessary package.

What is the Media Feature Pack?
It’s an extra package for N and KN versions made by Microsoft to follow the law. This package gives you all the usual media stuff for your computer system.
Of course, some digital solutions, like Windows Media Player, are required by law. But there are other choices beyond what’s legally required. These alternatives have different features and might be better for your needs. In particular, we see these in Microsoft’s systems labeled N and KN.
Basically, the digital package helps you play, record, or stream media on your computer. So, you can tune in to music, watch videos, and do other things like that.
It also works with the Media Center, which helps us make a central system. But it’s not included in the versions I talked about. So, we have two options: download it from Microsoft or switch to Pro versions.
What Software Does the Media Package Support?
| Feature | Explanation |
|---|---|
| Windows Media Player | It lets you do things with files, like playing music CDs or organizing files in your collection. You can also make playlists, add details about your multimedia, and make music CDs. |
| Media Player Runtime | It lets you access videos and music files from a website or another PC far away. |
| Media Format | It has a particular type of file called Advanced Systems Format (ASF) and tools for playing audio and video files. |
| Windows Media DRM | It helps us play protected content safely on our computers. |
| Media Sharing & Play To | We can share our music, pictures, and video content on other PCs on the same network. |
| Media Foundation | It helps protect content and ensures good quality for audio and video. |
| Windows Portable Devices Engine | It talks to devices using something called Media Transfer Protocol, which is MTP. |
| WMA, AAC, MPEG, FLAC, ALAC, AMR & Dolby Digital audio codecs | It plays MP3, WMA, MPEG-2 audio, AAC audio, FLAC, ALAC and AC-3 audio files. |
| MPEG-4 & H.264, VC-1, H.265 & H.263 codecs | We play our digital files with this feature, which we also know as “standard-based codecs.” |
| Movies & TV | It’s the program we use to watch digital videos. |
| Voice Recorder | As you can understand from the name, we use it only for recording sound. |
| Skype | It’s the excellent program we use for messaging and talking to others. |
What Exactly Does It Do?
In usual Microsoft Windows 10 or 11 versions, like Pro, media programs are already installed. So this makes it easy to use multimedia stuff. However, the N and KN versions may lack these features. Alternatively, you might need to add them manually.
You can use the software from the support package list I talked about earlier. In short, this ensures compatibility with Windows 10 and 11. But you’ll have to add the Feature Pack without switching your system version. Then, you’ll have all the multimedia programs you need.
To use any video recorder program, you need to update this pack. That means you need to install it. Let me tell you about an actual situation I faced. When I had an older Windows version, I had trouble installing Camtasia Studio. It happened while I was installing the update pack.
What are the N and KN Versions?
We call the N or KN versions of Windows 10 Microsoft’s unique operating systems. Basically, these versions came out because of some issues with Microsoft and the European Union.
Actually, it’s pretty much the same as the regular version, but it doesn’t have Windows Player. So, people need to add something extra to play music and videos.
Also, I want to tell you that these don’t work with DRM & Center or play DVDs.
Let’s talk about KN. It’s a lot like the N version. However, the only difference is the apps it has and the versions made for specific countries. Basically, Microsoft made this decision because of decisions made in South Korea.
Of course, it doesn’t include Skype, Windows Store, or some messaging apps.
As a result, users cannot play their content due to restrictions. Of course, there is a solution! In short, it is installing a 3rd party software. Or, they need to install the Media Feature Pack that Microsoft releases for its special editions.
How to Simply Download and Install Media Feature Pack in Windows 10
First of all, let me state that if you receive an error after installing the package on your PC, you should download another version. Thus, check the Version number of your OS and obtain the multimedia package from the Internet again. For example, I am using Windows 10 version 1903.
Follow these steps to download and install the relevant package on your PC:
Step 1: Check System Version
Before you update, make sure you know what version of your operating system you have. Go to Settings, then click on System, and then About. You can also type “winver” into the Run tool and press enter.
On the screen that appears, you will see the terms N or KN for your Windows 10 platform. Here, find out your version and version no.

Step 2: Download Feature Pack
Now, click on this link to download this package from the Microsoft website. As soon as you access the relevant resource, you will see a web page like the one below. From here, when you expand the options in the “Select Edition” section, you will see the following:
- Version 1903 (May 2019)
- Version 1809 (Oct 2018)
- Version 1803 (Apr 2018)
- Version 1709 (Oct 2017)
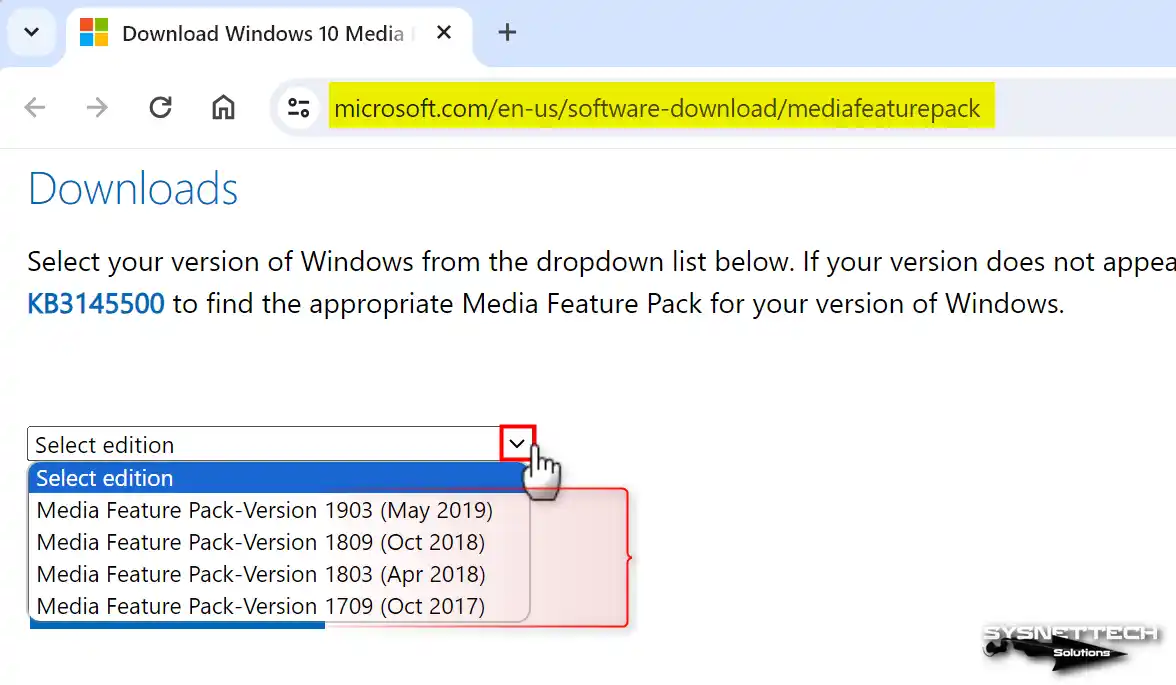
Download the 1903, 1809, 1803, or 1709 versions that suit you.
NOTE: Your machine may have a newer Windows number. However, you also need to find the relevant version from Microsoft and download the package.
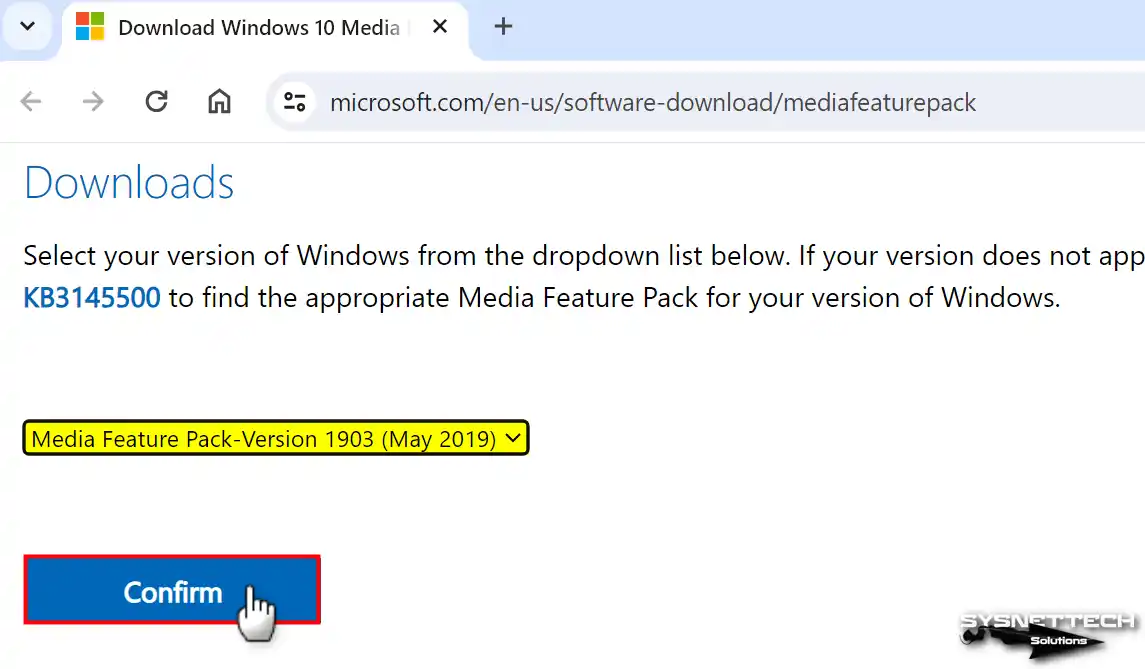
Finally, select whether your system is 32-bit or 64-bit to complete the download.
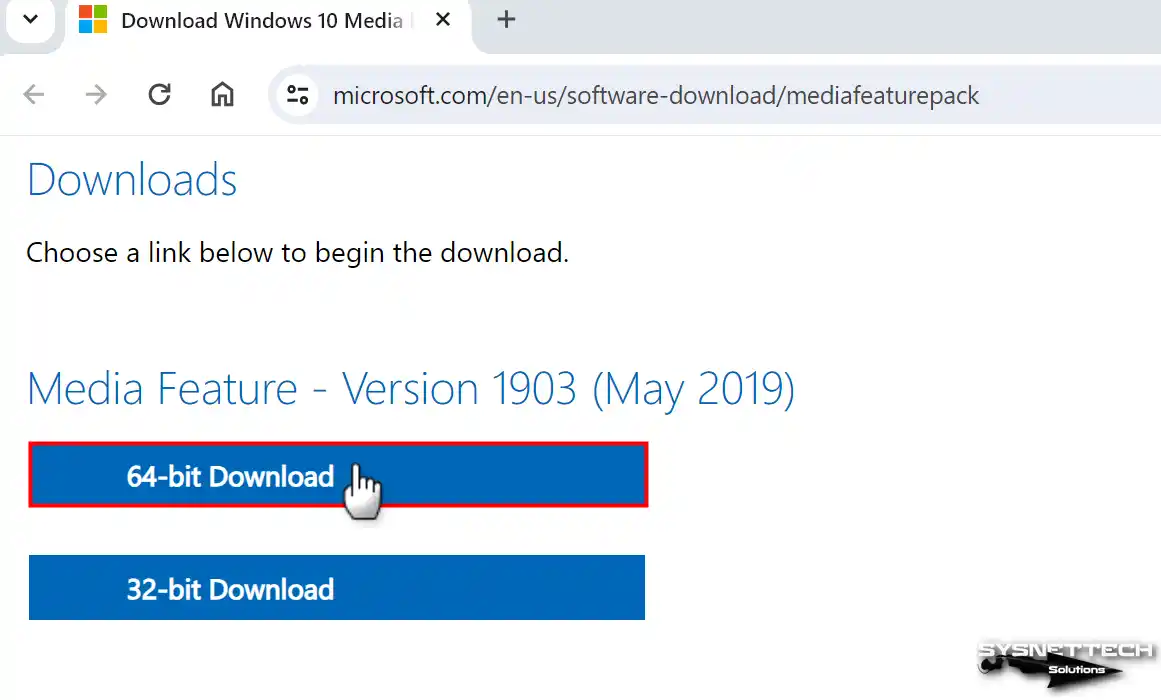
Step 3: Install the Package
Once you’ve downloaded the Feature Pack file, double-click on it to start installing.
Follow the easy stages on the screen to finish installing. Then, restart your device so the changes can happen on your PC.
Step 4: Test Multimedia Programs
Once you’ve installed the Feature Pack, give Skype a try! You can also test out other multimedia apps, not just Skype.
If you still receive errors, reinstall this package.
How to Install Media Feature Pack in Windows 11 N & KN Edition
Of course, more recent versions of Windows include many things, like this pack. However, 11, one of today’s latest systems, also has these versions.
In this system, unlike Windows 10, Microsoft provides extra feature software to its users from outside.
Step 1: Installing via GUI
So, let’s say you followed the steps above but couldn’t find a package for 11 on the download page. In this case, you will need to download the relevant package via Windows Update.
To add all media-related features to your Windows 11 PC:
- In the Windows 11 GUI interface, go to Settings, then click on Applications, and finally, choose Optional Features.
- Go to the search screen by clicking Add with an Additional Feature on the relevant screen.
- Now type “Media Pack” in the search box, find it, and select it. Once you have chosen the relevant digital content software package, continue with Next and then install.
NOTE: Optional features sometimes do not appear in the list. The steps for installing offline .NET Framework 3.5 on Windows follow a similar logic. Preparing system files in advance speeds up the installation.
Step 2: Installing with PowerShell
If you have a regular version of Windows 11, you cannot install this pack with PowerShell. Even if you look at the supported features, you will see that this is not the case.
But if you want to install faster on N & KN operating systems:
- To start, find “PowerShell” on your Windows 11 PC. When you see it, open it with administrative privileges. It’s essential to run it with administrator rights because this boosts the system’s abilities. In short, this makes sure that extra features get added to your system.
- In the PowerShell command tool, type in the command below and press Enter. This starts the process of activating the feature pack.
DISM /Online /Add-Capability /CapabilityName:Media.MediaFeaturePack~~~~0.0.1.0
That’s it! With this setup, it’s easy to access and play your content on your PC. So, this simple process makes your multimedia experience better.
NOTE: Also, the installation method I mentioned here works for newer Windows 10 versions.
FAQ About the Media Feature Pack
What is the Media Feature Pack and what does it do?
How do you install it on Windows 10 N?
Why does the Media Feature Pack not show up on Windows 11?
What do you do if the install fails?
Why is the Media Feature Pack needed for Discord?
Does the Media Feature Pack arrive on its own through Windows Update?
How do you turn on Media Player after installing?
Is the Media Feature Pack different on N and KN editions?
How do you remove it with DISM?
Does it affect system performance?
Conclusion
To summarize, we need this in the Microsoft Windows 10 N or KN versions. This way, you can troubleshoot media-related issues on your PC. As I said, you can use Windows Media Player or other 3rd party software.
Basically, when you add the Media Feature Pack, you get access to all multimedia programs. This is especially true for N or KN versions. Thus, check your Windows release info and download the relevant package. Finally, run the update as an administrator. We hope this article helped you!

Be the first to share your comment