
In this article, I’ll walk you through why DHCP is so necessary in GNS3 network setups. I will also show you step by step how to configure it on a Cisco Router.
In today’s linked world, running a network well is very important. This lets us do more work by making sure talking is smooth. A key part of this is this system.
DHCP lets us automatically give IP addresses to devices on our LAN. In short, this removes the need to set them up by hand.
Even if you have never used the GNS3 tool, you can make different plans in a virtual network space. So, let’s get ready to give out IPs on fake Routers by itself!

The Importance of DHCP in Network Setup
The setup for DHCP is vital for running a network. It automatically gives out IP addresses. This helps devices on a LAN link up simply.
So, people who run networks do not have to give out IP addresses by hand. Doing it by hand can take a lot of time. Also, it can easily lead to mistakes.
When a device joins a LAN, DHCP gives it an IP address. This address is picked from a set list, called the scope. Along with IP addresses, it can also give out other key details.
These details include the primary Router, the subnet mask, and the DNS server numbers. This smooth method makes the network work better.
Also, it makes handling devices easier. Because of this, talking between devices on the network works more smoothly.
Key Considerations for Successful DHCP Implementation
After you set up DHCP on Cisco Routers, key network details are sent out on their own. This covers the IP Address, Subnet Mask, DNS Address, Default Gateway, and Domain Name. This automatic work makes IP address handling easier and cuts down on setup mistakes.
Also, for this to work well, every device must be set up the right way. Every device should get its TCP/IP details by itself. This usually means picking “Get an IP address on its own” and “Get a DNS server address on its own” in the device’s LAN settings.
To learn more about it, test tools can be invaluable. For example, using GNS3 and VMware virtual machines lets you see networks. You can build a real-looking setup to watch how devices talk.
They will ask for IP details and see how addresses are given out. In all, this hands-on practice improves both your learning and your fixing skills for real network problems.
How to Enable the DHCP Service on a Cisco Router with GNS3
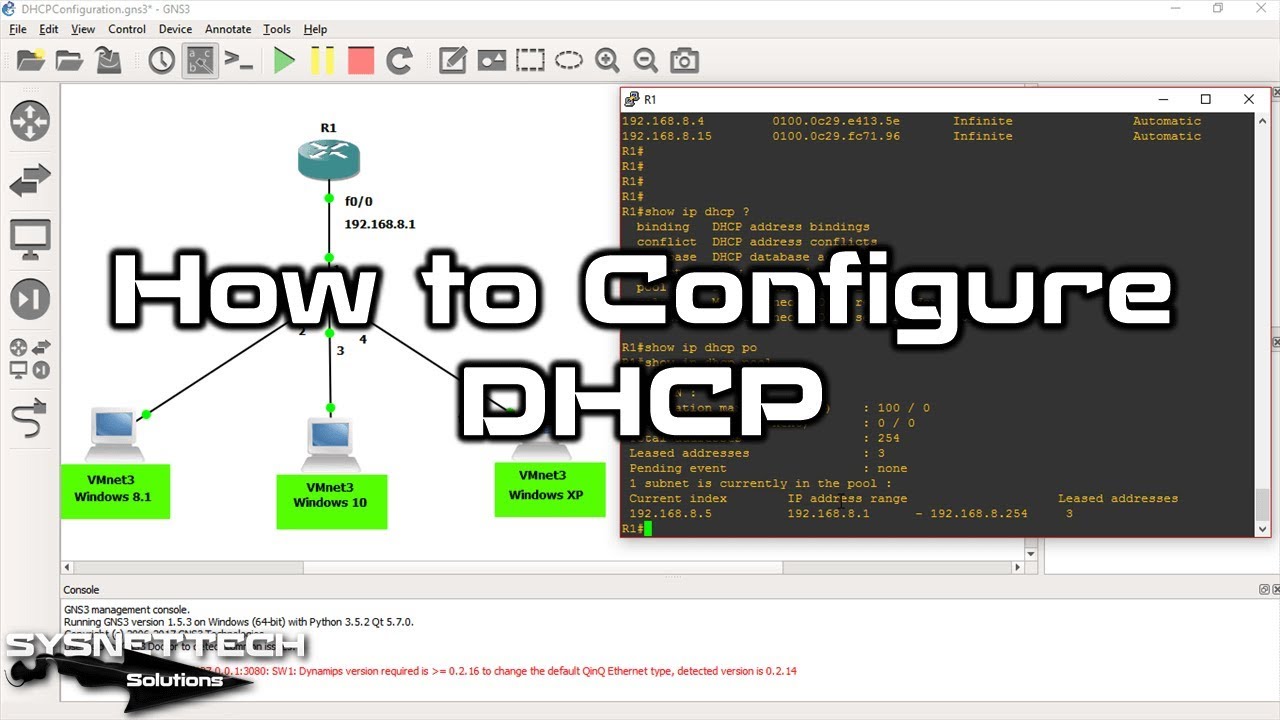
1. Create a Topology for IP Distribution Using DHCP
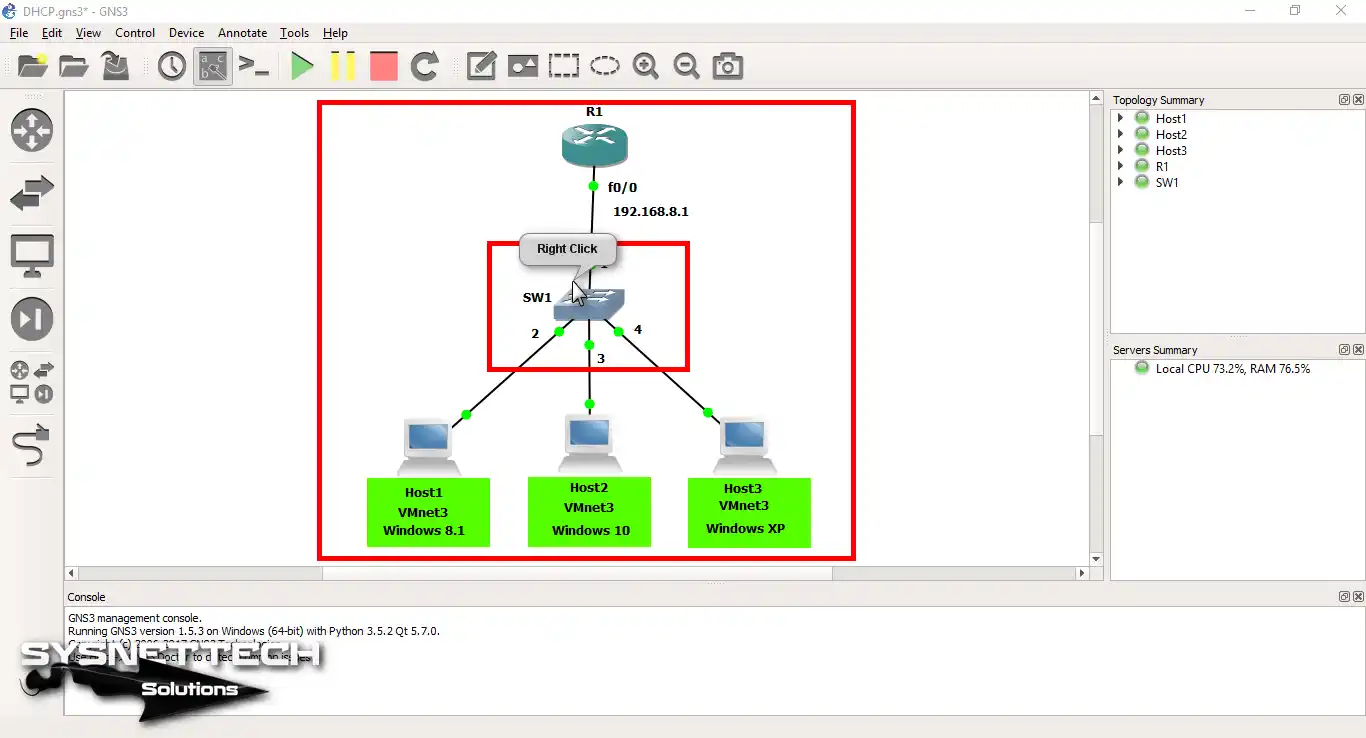
Step 1
To begin, launch the GNS3 application on your computer. When you open it, you should design a network layout similar to the one I created.
Therefore, try to replicate the layout shown in the attached image. Add a Cisco Router, Switch, and three virtual machines (VMs).
After you put these parts in your work area, we will set up the adapter. We will make sure each virtual computer is linked through VMnet by setting it up.
In fact, getting DHCP to work right is a basic configuration of a Cisco Router. If you make the correct basic settings, it will be easier to proceed step by step in your project. This way, you can prepare your network device more efficiently.
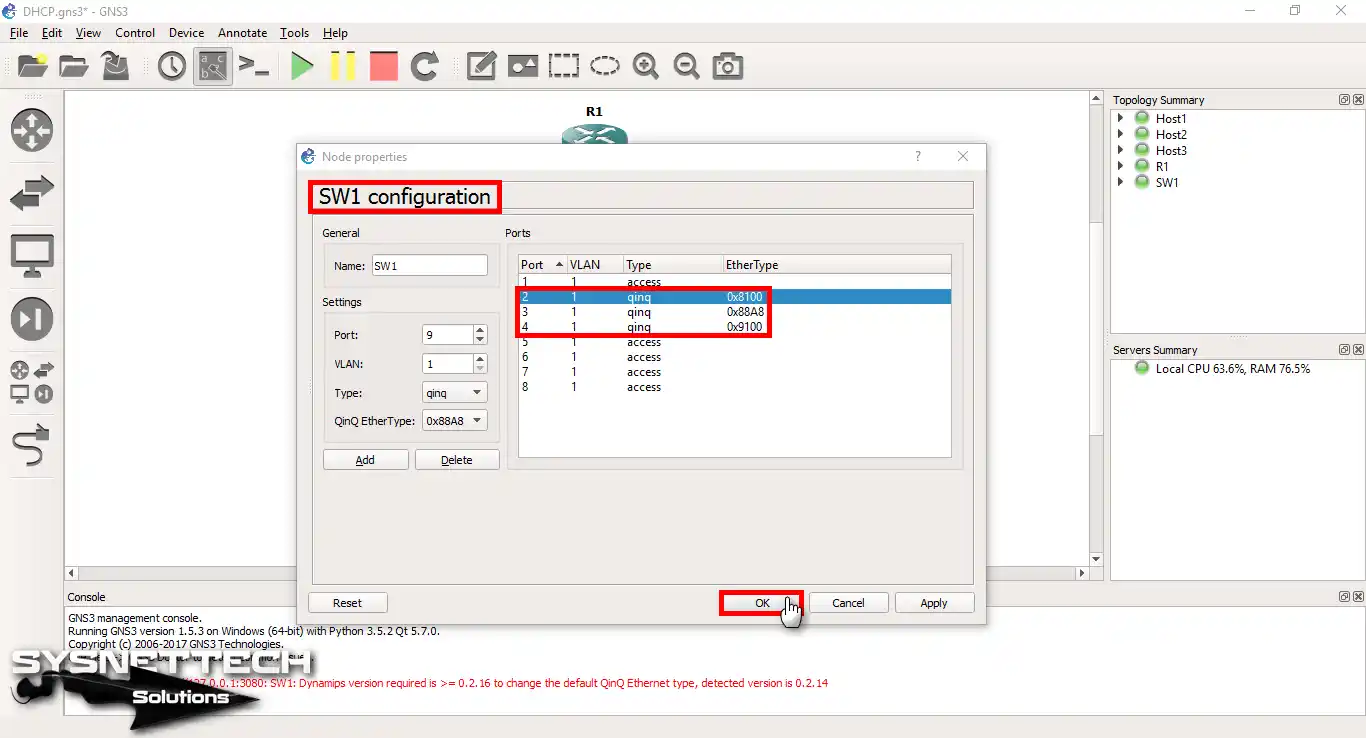
Step 2
You must configure the Cisco Switch (SW1) device correctly in GNS3. This makes sure that your LAN PCs and your Router can talk to each other without any problems.
To start setting up SW1, click the Switch picture two times. Thus, you will open the Node Properties window.
Next, go to the section for configuring the key ports. Find the ports connected to the computers. Change their types to “qinq” (also known as Q-in-Q).
This setup lets you wrap VLAN tag encapsulation. It makes handling many VLANs easier. This is needed to keep the network orderly and fast.
Finally, after you make the needed changes, be sure to save your setup.
2. Configure DHCP on the Cisco Router
First, you need to access the Router’s Command Line Interface (CLI). You can do this by double-clicking on the Router icon in GNS3.
As soon as the CLI opens, you should configure the DHCP function, as I did. However, to set up DHCP, you must first go to the configuration mode.
Here, first type “configure terminal” and give an IP address to the Router’s FastEthernet0/0 port. Then, you must create a DHCP pool. You can do this with the command “ip dhcp pool <pool name>”.
However, I recommend that you write the pool name here in a descriptive manner. Next, define the network address & subnet mask for the 192.168.8.0/24 network. You can do this with “network <network address><subnet mask>”. For example, use “network 192.168.8.0 255.255.255.0”.
Also, set the default gateway for the devices. Use the order “default-router <gateway-ip>”, like “default-router 192.168.8.1”. If you need to put a DNS server for devices, just run “dns-server 8.8.8.8”.
After putting in all the needed settings, save them and leave. By doing these steps, you will hand out host addresses from your GNS3 Router to your other devices by itself.
2. 1. Commands I Use in the Router CLI
R1# conf t
R1(config)# interface fastethernet 0/0
R1(config-if)# ip address 192.168.8.1 255.255.255.0
R1(config-if)# no shutdown
R1(config-if)# exit
R1(config)# ip dhcp pool LAN
R1(dhcp-config)# network 192.168.8.0 255.255.255.0
R1(dhcp-config)# default-router 192.168.8.1
R1(dhcp-config)# dns-server 192.168.8.1
R1(dhcp-config)# domain-name sysnettechsolutions.com
R1(dhcp-config)# ip dhcp excluded-address 192.168.8.1
R1(dhcp-config)# lease infinite
R1(dhcp-config)# end
R1# copy running-config startup-config
Destination filename [startup-config]?
Building configuration...
[OK]
R1#
Let me explain the DHCP commands I use on the Cisco Router:
- ip dhcp pool LAN: Gives a name to the IP group you are making.
- network 192.168.8.0 255.255.255.0: Sets the LAN that will get the IP address.
- default-router 192.168.8.1: Sets the device that is the main gateway on the network.
- dns-server 192.168.8.1: Sets the DNS server number on the computers.
- domain-name sysnettechsolutions.com: Gives the domain name to the PCs.
- ip dhcp excluded-address 192.168.8.1: Picks the IP number/numbers to leave out.
- lease infinite: Sets how long the details given to the network PCs will last.
After running the needed orders, turn on your fake computers in VMware. When starting, your TCP/IPv4 settings should get an IP address on their own. Of course, keep in mind that you will get these settings through DHCP.
In short, the GNS3 DHCP router will send all network information to the VMs. This data includes the IP address, subnet mask, default gateway, and DNS server addresses.
3. Check that the VMs are Getting IP Addresses Automatically
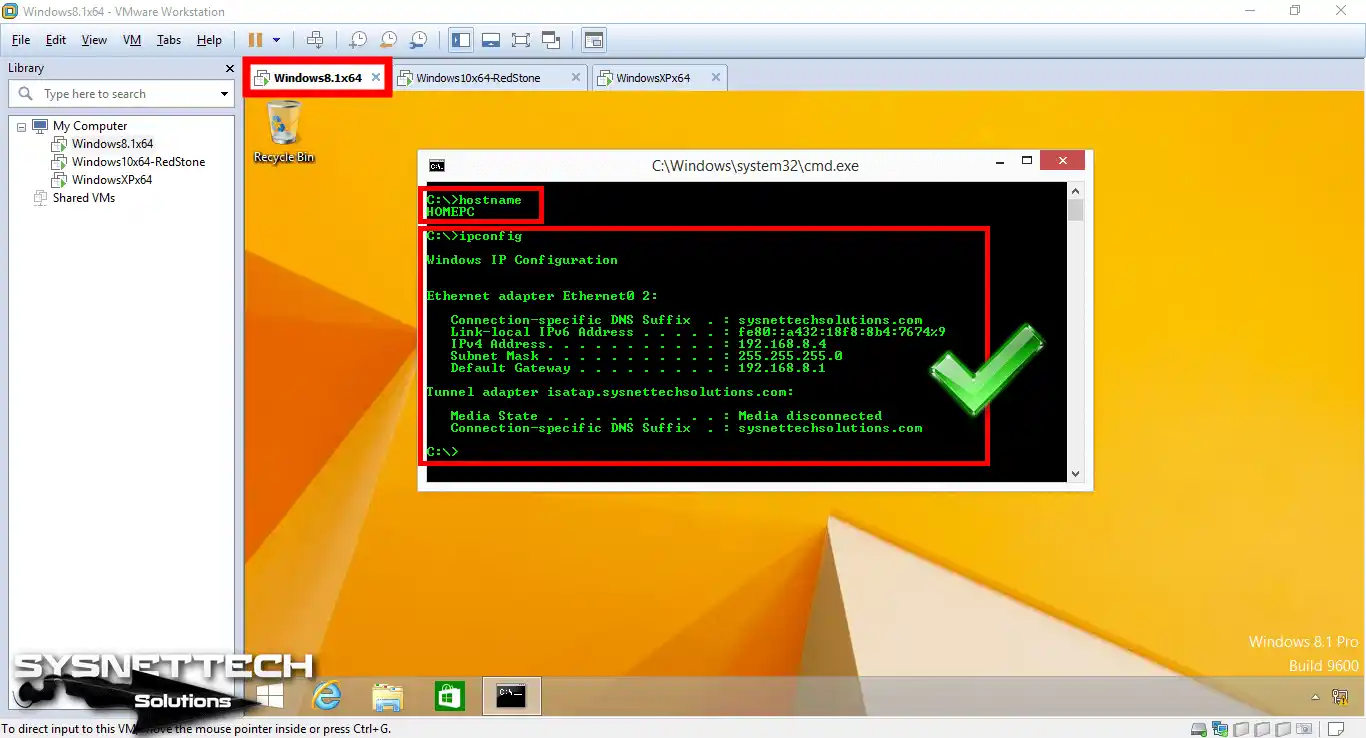
Step 1
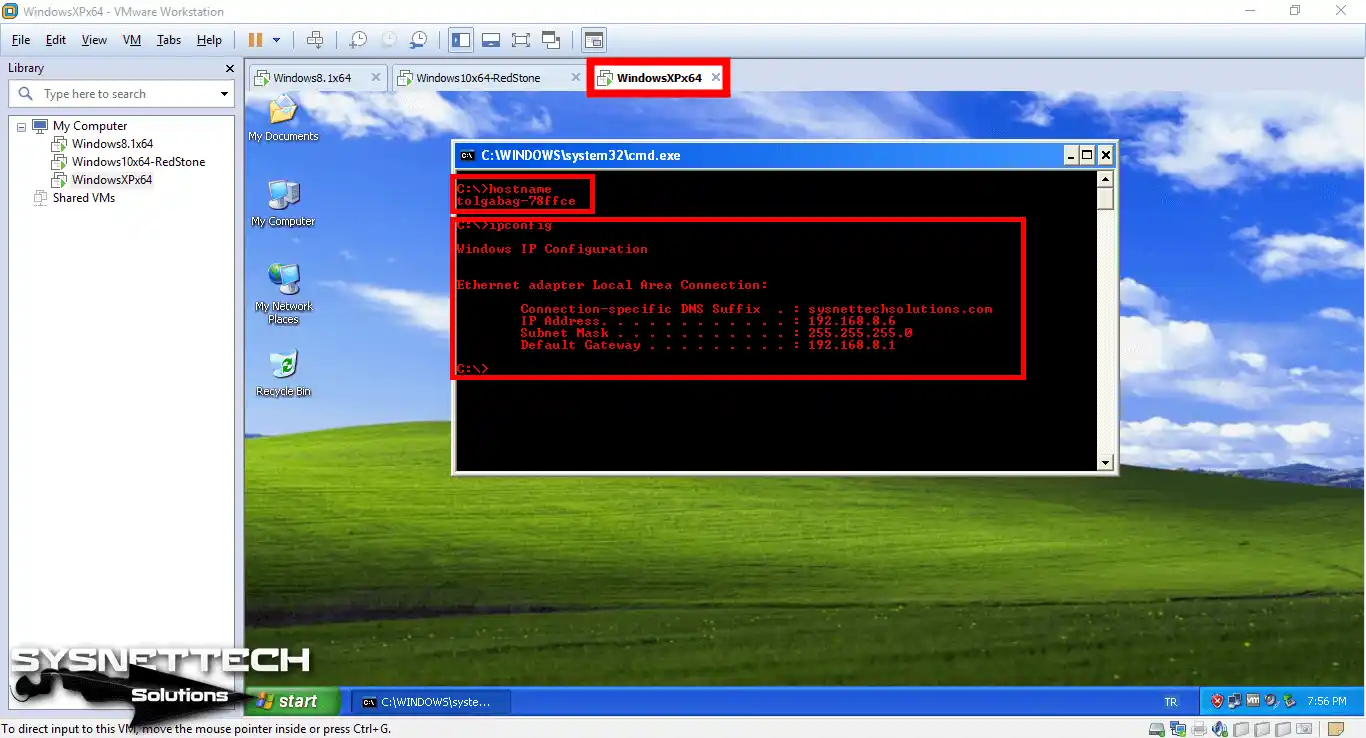
Now, let’s look at the TCP/IP details that the computers in our setup get from the Router!
To do this, I first open CMD on my own Windows 8.1 virtual PC. Here, I simply type “ipconfig” and press Enter.
This command will show us more detailed LAN settings. That is, you will see details about your present network connections. If you look closely at the output, you will find your host address, subnet mask, and default gateway.
Also, check your DNS servers. These facts are essential in a network setup. In the end, look at the numbers shown in the picture given. These numbers will show you how your fake computer works with the LAN.
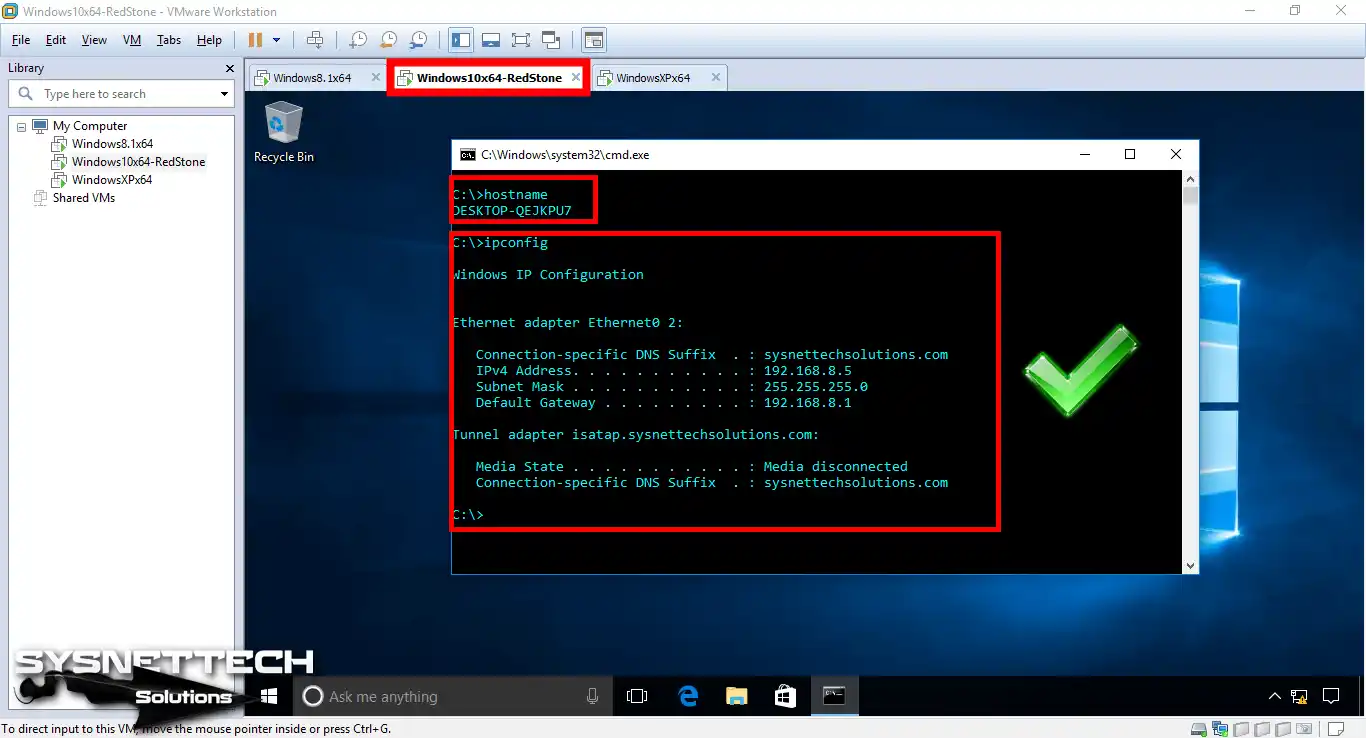
Step 2
Now, let’s look more closely at the TCP/IP setup of our second virtual computer. First, look carefully at the IP address, since we gave it a different IP number than the first PC.
But, you can see that the subnet mask, main gateway, and DNS number are the same. So, you have made sure the link and work are right for your setup. All PCs you put on your network will also get the exact numbers from this data.
Step 3
Finally, let’s check the Windows XP guest PC, the last one we put in our DHCP setup. In the same way, the Cisco Router also gave IP numbers to this VM.
In short, I had configured the 192.168.8.0 IP block for DHCP. So, the server sent TCP/IP numbers to all VMs or real computers on the LAN without any problems!
Using Show Commands to Control the DHCP Protocol
- R1 Running Config
- DHCP Commands
- DHCP Bindings
- DHCP Pools
- DHCP Statistics
R1#show running-config
Building configuration...
Current configuration : 1157 bytes
!
version 12.4
service timestamps debug datetime msec
service timestamps log datetime msec
no service password-encryption
!
hostname R1
!
boot-start-marker
boot-end-marker
!
no aaa new-model
memory-size iomem 5
no ip icmp rate-limit unreachable
ip cef
!
no ip dhcp use vrf connected
ip dhcp excluded-address 192.168.8.1
!
ip dhcp pool LAN
 network 192.168.8.0 255.255.255.0
 dns-server 192.168.8.1
 default-router 192.168.8.1
 domain-name sysnettechsolutions.com
 lease infinite
!
no ip domain lookup
ip auth-proxy max-nodata-conns 3
ip admission max-nodata-conns 3
!
ip tcp synwait-time 5
!
interface FastEthernet0/0
 ip address 192.168.8.1 255.255.255.0
 duplex auto
 speed auto
!
interface FastEthernet0/1
 no ip address
 shutdown
 duplex auto
 speed auto
!
ip forward-protocol nd
!
no ip http server
no ip http secure-server
!
no cdp log mismatch duplex
!
control-plane
!
gatekeeper
 shutdown
!
line con 0
 exec-timeout 0 0
 privilege level 15
 logging synchronous
line aux 0
 exec-timeout 0 0
 privilege level 15
 logging synchronous
line vty 0 4
 login
!
end
R1#
R1#show ip dhcp ?
binding DHCP address bindings
conflict DHCP address conflicts
database DHCP database agents
import Show Imported Parameters
pool DHCP pools information
relay Miscellaneous DHCP relay information
server Miscellaneous DHCP server informationR1#show ip dhcp binding
Bindings from all pools not associated with VRF:
IP address Client-ID/Hardware address Lease expiration Type
192.168.8.3 0100.5056.3a87.3f Infinite AutomaticR1#show ip dhcp pool
Pool LAN :
Utilization mark (high/low) : 100 / 0
Subnet size (first/next) : 0 / 0
Total addresses : 254
Leased addresses : 1
Pending event : none
1 subnet is currently in the pool :
Current index IP address range Leased addresses
192.168.8.1 192.168.8.1 - 192.168.8.254 1R1#show ip dhcp server statistics
Memory usage 23999
Address pools 1
Database agents 0
Automatic bindings 1
Manual bindings 0
Expired bindings 0
Malformed messages 0
Secure arp entries 0
Message Received
BOOTREQUEST 0
DHCPDISCOVER 104
DHCPREQUEST 7338
DHCPDECLINE 0
DHCPRELEASE 0
DHCPINFORM 0
Message Sent
BOOTREPLY 0
DHCPOFFER 104
DHCPACK 4408
DHCPNAK 0
R1#YouTube Tutorial Video on Cisco Router Automatic IP Configuration
I also made a YouTube how-to video using the same steps I shared in the article. So, feel free to watch this tutorial to learn how to configure DHCP on your Cisco Router.
This informative video will show you the steps for DHCP with GNS3 step by step. This will make it a lot easier for you to get the hang of optimizing your network.
And of course, if you find our content useful, please consider subscribing to our YouTube channel. This way, you can support us and follow our latest tutorials & tips!
Frequently Asked Questions (FAQ) About Router DHCP
- Why do I need DHCP on a Cisco Router?
- Can I exclude specific IP addresses from the DHCP pool?
- How do I verify that DHCP is working correctly?
- Can I assign IP addresses to the VPCs in my network?
Conclusion
In short, DHCP is a must-have on a Cisco Router. Thus, it lets us enjoy the ease of handling IP sharing in our work.
Also, we can easily make our network work better. By giving out networking details automatically, we cut down on mistakes from DHCP. This automatic work makes running our local LAN easier.
Moreover, making virtual networks with GNS3 improves our learning by doing. In other words, it prepares you for real-world network issues.
So, when you set up the automatic host configuration correctly, your tech skills will get better. By making a smooth local network, you can also see how devices talk to each other.
As you move forward, you should keep testing other scenarios in GNS3. Doing this will for sure move you a step ahead in getting ready for Cisco exams.
I should also mention this: You set up DHCP directly on the Router. Actually, I would say this is a standard task in our LAN setup. However, you should also check out our DHCP Relay Agent Configuration guide in GNS3. This setup is a perfect way to give this service to other smaller networks. In other words, you can assign IP addresses to PCs on one subnet from a server on another subnet.

Be the first to share your comment