
Dynamic NAT helps devices on your network get online. It uses the public IPs you have been given. Here, we will set up the Dynamic IP distribution on a Cisco router. This follows our past talks on PAT and Static NAT.
Knowing this standard is key for network fans. It makes IP use better and helps your network connect. To set it up, we use tools like GNS3 and VMware. We will walk you through each part.
By doing this, your virtual machines can reach the web with ease. Let’s see how to use Dynamic NAT and grow your network skills!

Dynamic NAT Operation on Cisco Routers
Dynamic NAT on the Router lets clients get online. It links local IPs to ones bought from the ISP. This enables devices on the network to connect without trouble. So, clients can use the web with no problems. In all, using this makes web access easy for everyone nearby.
To set up a Dynamic IP, first make an access list. Start by reaching the LAN IP block with this list. Then, you must create an IP pool. Use the “ip nat pool” command to do this. Next, put in the addresses given by your ISP. This makes sure your NAT setup is right for your network.
To learn this NAT method, make a network plan. Use VMware for your virtual machines. Then, use the GNS3 emulator for the Router test. This mix will help you learn well. Also, doing it yourself enables you to understand more. In all, this way makes complex ideas easier and more transparent.
You can use the Virtual Network Editor to make a VMnet. First, put in the IP block for your virtual machines. Then, set up the virtual machines in VMware. This matches the network plan you made. Doing these steps makes sure your virtual network runs well.
To get on the web, use your computer’s Ethernet port. The GNS3 app has trouble with WiFi. So, always pick a wired link for the best speed. This helps your setup work without a hitch. Also, it cuts down on possible link problems. Keep in mind, a steady link is key for GNS3.
How to Enable Dynamic NAT on a Router in GNS3
Follow the steps below to configure Dynamic NAT on the simulator software.
Steps:
Step 1
Open the graphical network simulator program, type the project name, and click OK.

Step 2
Add a Cisco Router, Switch, and Cloud to the workspace to create a network topology, as shown in the image below.
In addition, VMware virtual machines can be added to the workspace.

Step 3
Select and add your computer’s Ethernet in the Cloud configuration. If you select the WiFi network adapter, you cannot take virtual machines to the Internet.

Step 4
After running the Cisco Router, open the CLI command console and perform the following commands in sequence.
R1# conf t
R1(config)# interface fastethernet0/0
R1(config-if)# ip address 192.168.8.1 255.255.255.0
R1(config-if)# ip nat inside
R1(config-if)# no shutdown
R1(config-if)# exit
R1(config)#interface fastethernet0/1
R1(config-if)# ip address dhcp
R1(config-if)# ip nat outside
R1(config-if)# no shutdown
R1(config-if)# exit
R1(config)# access-list 1 permit 192.168.8.0 0.0.0.255
R1(config)# ip nat pool DYNAMICNAT 192.168.1.20 192.168.1.25 netmask 255.255.255.0
R1(config)# ip nat inside source list 1 pool DYNAMICNAT
R1(config)# exit
R1# copy running-config startup-config
With the access list, allow the network to access the Internet and configure the IP address range allocated by your ISP with the ip nat pool.
Computers on the LAN will access the Internet with the IP addresses created in this pool.
Dynamic NAT differs from Static NAT in that it controls multiple IP addresses in a single repository.

Step 5
After setting up Dynamic NAT, ping the Router’s FastEthetnet0/0 interface from the Windows 8.1 virtual machine.

Step 6
Check the network connection from the Windows 10 virtual machine by pinging the Router’s FastEthetnet0/0 interface.

Step 7
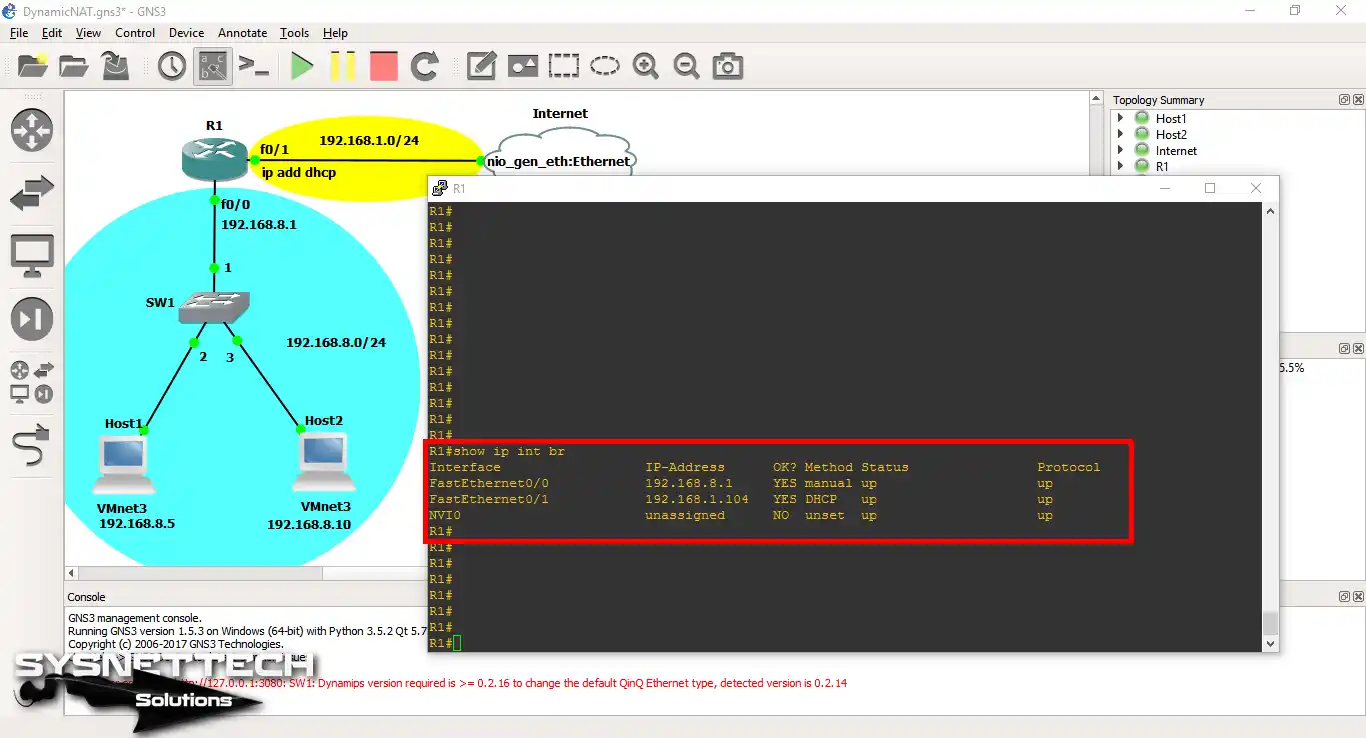
Use the show ip interface brief command to check whether the interfaces of the Cisco router are open.
The local network’s DHCP server assigns the IP address of the FastEthernet0/1 interface.
Step 8
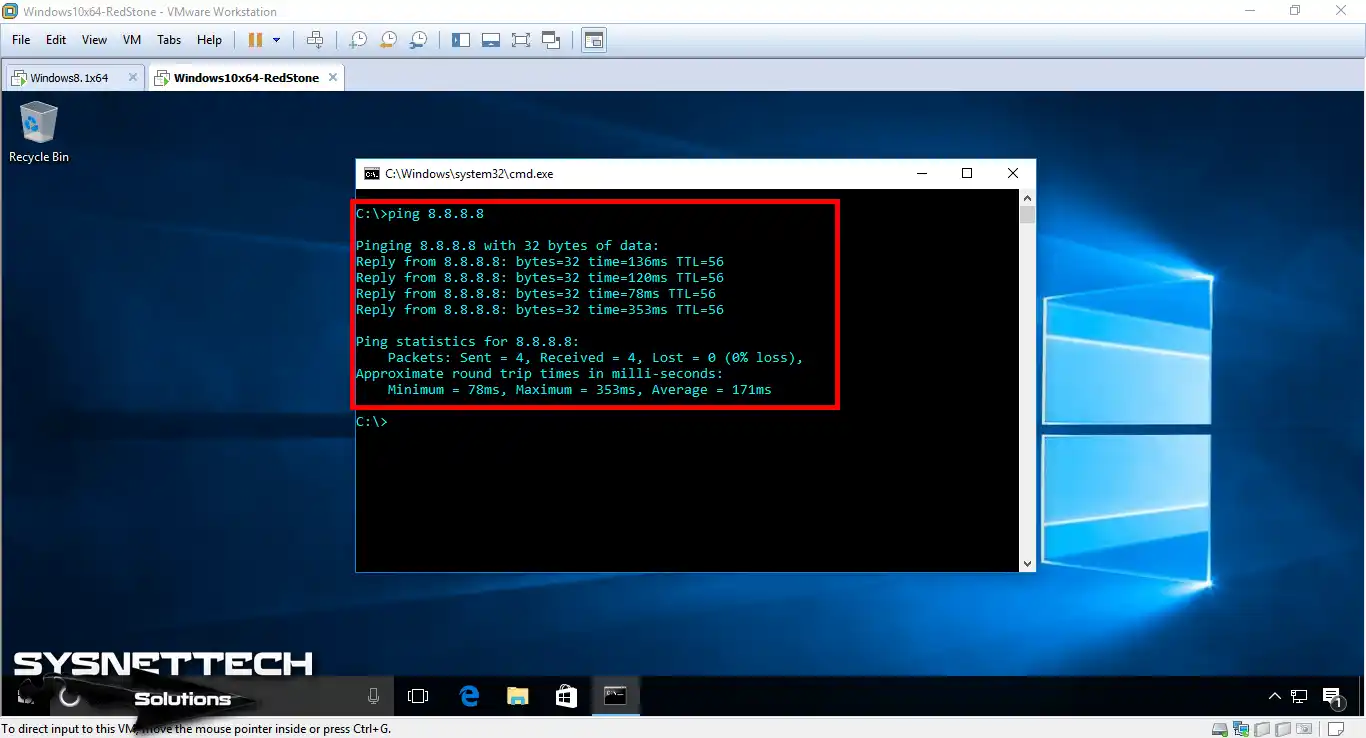
When you ping the Google DNS servers from the Cisco router, you can see that this process was successful.

Step 9
The ping from the Windows 8.1 machine to the Google DNS servers will also succeed.

Step 10
As you can see, pinging from the Windows 10 machine to the Google DNS servers will be successful.
Step 11
When you apply the show ip nat translation command in the Router’s CLI console, you can see that the 192.168.8.5 and 192.168.8.10 IP addresses are converted to Global IP addresses through Dynamic NAT.
Virtual machines used idle 192.168.1.20 and 192.168.1.21 IP addresses in the IP NAT pool.

Step 12
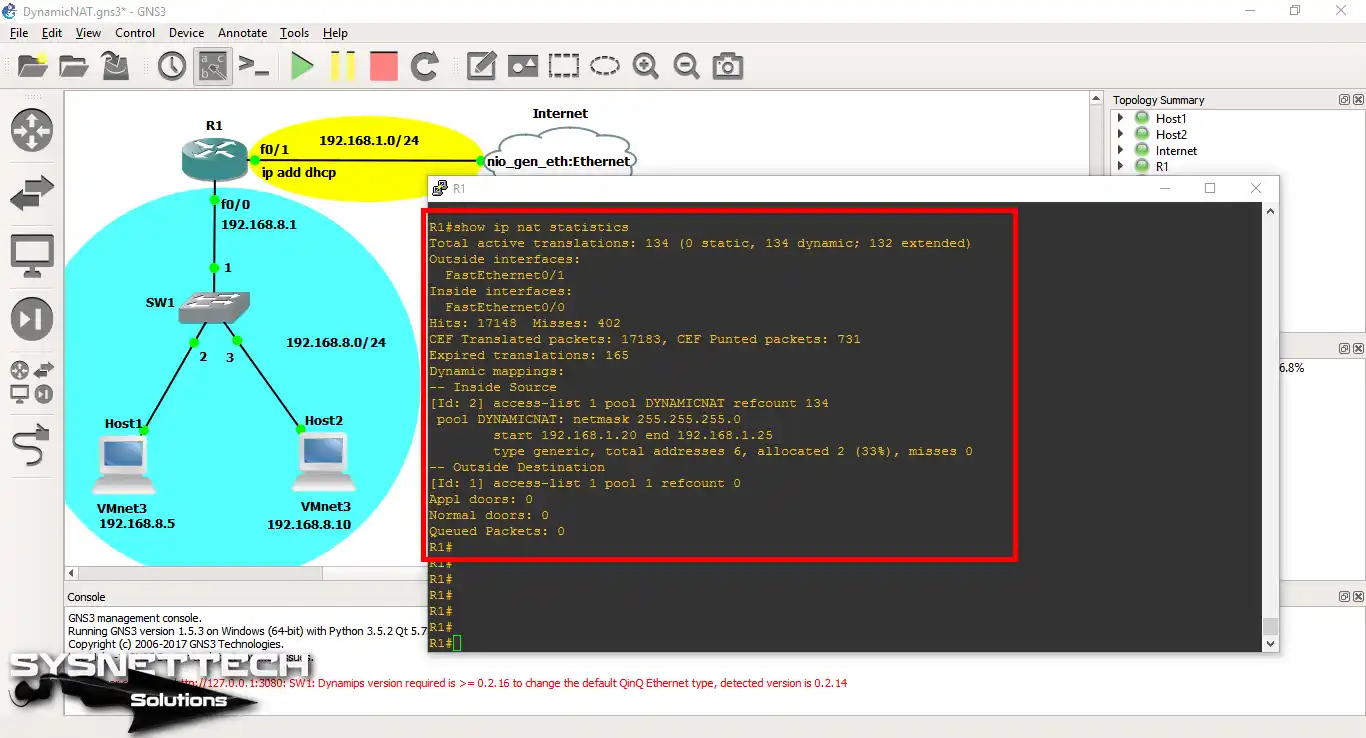
When you apply the show ip nat statistics command, you can see NAT statistics in the Cisco router’s CLI console.
Dynamic NAT CLI Show Commands
- show running-config
- show ip nat statistics
- show ip nat translations
R1#show running-config
Building configuration...

Current configuration : 1175 bytes
!
version 12.4
service timestamps debug datetime msec
service timestamps log datetime msec
no service password-encryption
!
hostname R1
!
boot-start-marker
boot-end-marker
!
no aaa new-model
memory-size iomem 5
no ip icmp rate-limit unreachable
ip cef
!
no ip domain lookup
ip auth-proxy max-nodata-conns 3
ip admission max-nodata-conns 3
!
ip tcp synwait-time 5
!
interface FastEthernet0/0
ip address 192.168.8.1 255.255.255.0
ip nat inside
ip virtual-reassembly
duplex auto
speed auto
!
interface FastEthernet0/1
ip address dhcp
ip nat outside
ip virtual-reassembly
duplex auto
speed auto
!
ip forward-protocol nd
!
no ip http server
no ip http secure-server
ip nat pool DYNAMICNAT 192.168.1.20 192.168.1.25 netmask 255.255.255.0
ip nat inside source list 1 pool DYNAMICNAT
!
access-list 1 permit 192.168.8.0 0.0.0.255
no cdp log mismatch duplex
!
control-plane
!
gatekeeper
shutdown
!
line con 0
exec-timeout 0 0
privilege level 15
logging synchronous
line aux 0
exec-timeout 0 0
privilege level 15
logging synchronous
line vty 0 4
login
!
end
R1#
R1#show ip nat statistics
Total active translations: 134 (0 static, 134 dynamic; 132 extended)
Outside interfaces:
FastEthernet0/1
Inside interfaces:
FastEthernet0/0
Hits: 17148 Misses: 402
CEF Translated packets: 17183, CEF Punted packets: 731
Expired translations: 165
Dynamic mappings:
-- Inside Source
[Id: 2] access-list 1 pool DYNAMICNAT refcount 134
pool DYNAMICNAT: netmask 255.255.255.0
start 192.168.1.20 end 192.168.1.25
type generic, total addresses 6, allocated 2 (33%), misses 0
-- Outside Destination
[Id: 1] access-list 1 pool 1 refcount 0
Appl doors: 0
Normal doors: 0
Queued Packets: 0
R1#
R1#show ip nat translations
Pro Inside global Inside local Outside local Outside global
icmp 192.168.1.21:1 192.168.8.5:1 8.8.8.8:1 8.8.8.8:1
tcp 192.168.1.21:49159 192.168.8.5:49159 2.17.229.218:80 2.17.229.218:80
tcp 192.168.1.21:49161 192.168.8.5:49161 195.175.116.65:80 195.175.116.65:80
Pro Inside global Inside local Outside local Outside global
tcp 192.168.1.21:49274 192.168.8.5:49274 54.247.73.98:443 54.247.73.98:443
tcp 192.168.1.21:49275 192.168.8.5:49275 104.86.225.240:80 104.86.225.240:80
tcp 192.168.1.21:49276 192.168.8.5:49276 93.184.221.200:443 93.184.221.200:443
tcp 192.168.1.21:49277 192.168.8.5:49277 93.184.221.200:443 93.184.221.200:443
icmp 192.168.1.20:1 192.168.8.10:1 8.8.8.8:1 8.8.8.8:1
tcp 192.168.1.20:49712 192.168.8.10:49712 204.79.197.203:443 204.79.197.203:443
tcp 192.168.1.20:49713 192.168.8.10:49713 204.79.197.203:443 204.79.197.203:443
tcp 192.168.1.20:49742 192.168.8.10:49742 31.13.93.36:443 31.13.93.36:443
tcp 192.168.1.20:49743 192.168.8.10:49743 31.13.92.2:443 31.13.92.2:443
tcp 192.168.1.20:49745 192.168.8.10:49745 31.13.92.14:443 31.13.92.14:443
tcp 192.168.1.20:49746 192.168.8.10:49746 31.13.92.14:443 31.13.92.14:443
tcp 192.168.1.20:49753 192.168.8.10:49753 40.77.226.250:443 40.77.226.250:443
--- 192.168.1.20 192.168.8.10 --- ---
How to Setup Dynamic NAT ⇒ Video
You can watch the video below to enable Dynamic NAT with GNS3 and also subscribe to our YouTube channel to support us!
Conclusion
Dynamic NAT is configured only with the pool system according to Static NAT. You can test this process more specifically with GNS3 and VMware programs. Thanks for following us!

Be the first to share your comment