
In the field of network engineering, setting up Telnet on a Cisco Router is crucial. This is something everyone in IT and network roles should be familiar with. Thanks to Telnet, a network protocol, we can easily connect to network devices from a distance. These devices could include a modem, Router, Switch, and firewall, for instance.
GNS3 is a tool that lots of network engineers and beginners use. It helps us set up real network situations in a virtual space. One thing we can practice with is the Telnet protocol. So, in this article, we’ll guide you on how to set up Telnet on a Cisco Router using GNS3.
Why Do We Use Telnet on Cisco Routers or Switch Devices?
We use Telnet on Cisco network devices mainly to access them from a distance. With Telnet, we can connect to these devices even if we’re not right next to them. This way, we can control and manage them just like we would if we were there in person.
Telnet is handy for handling network devices from one central spot, especially when you have various branches. It makes things a lot easier when it comes to handling tasks.
However, we like using Telnet in places where network security isn’t a big concern. That’s because running Telnet on Cisco Routers or Switches doesn’t need a lot of resources. Since it’s a lightweight protocol, it works faster than some other options.
The safer option, SSH, needs more resources. That’s why we like using it on more robust and more advanced network devices. But, we use a lightweight solution for remote management, especially if we are using an old device. So, in this case, Telnet comes into play.
In short, it makes sense to use Telnet on older Cisco devices and SSH on newer ones. For example, if you are preparing for your exams, you will enable remote connection on an old IOS device. In this case, choose the connection type that will both efficiently use your PC’s performance and suit your purpose.
Getting Ready for Telnet Connection
First of all, our advice to you is to have basic network knowledge. Well, if you know GNS3, we can understand that your network level is in good condition.
Making Telnet work on Routers or Switches in GNS3 is super easy. You have to set up the arrangement of devices the right way.
To connect to Cisco using Telnet, you’ll need the following on your PC.
- GNS3 (Graphical Network Simulator 3)
- One of the Pro or Player Versions of VMware Workstation
- A Windows Guest OS
- Putty: The Tool We Most Commonly Use for Telnet Works
You can configure Telnet on a network device using real network topologies. In this case, you must first connect your physical Router to your computer via the Console. You can then enable Telnet as soon as you gain access.
You can link up your Cisco Router or Switch to the LAN or WAN by setting up remote access. This way, you can handle the rest of the tasks by connecting to your device from a distance.
So, How Do We Configure Telnet on a Cisco Router with GNS3?
Once you’ve set up the simulator software and everything else you need, create a new virtual machine in VMware. After that, follow the steps below to turn on Cisco Telnet using GNS3.
Steps:
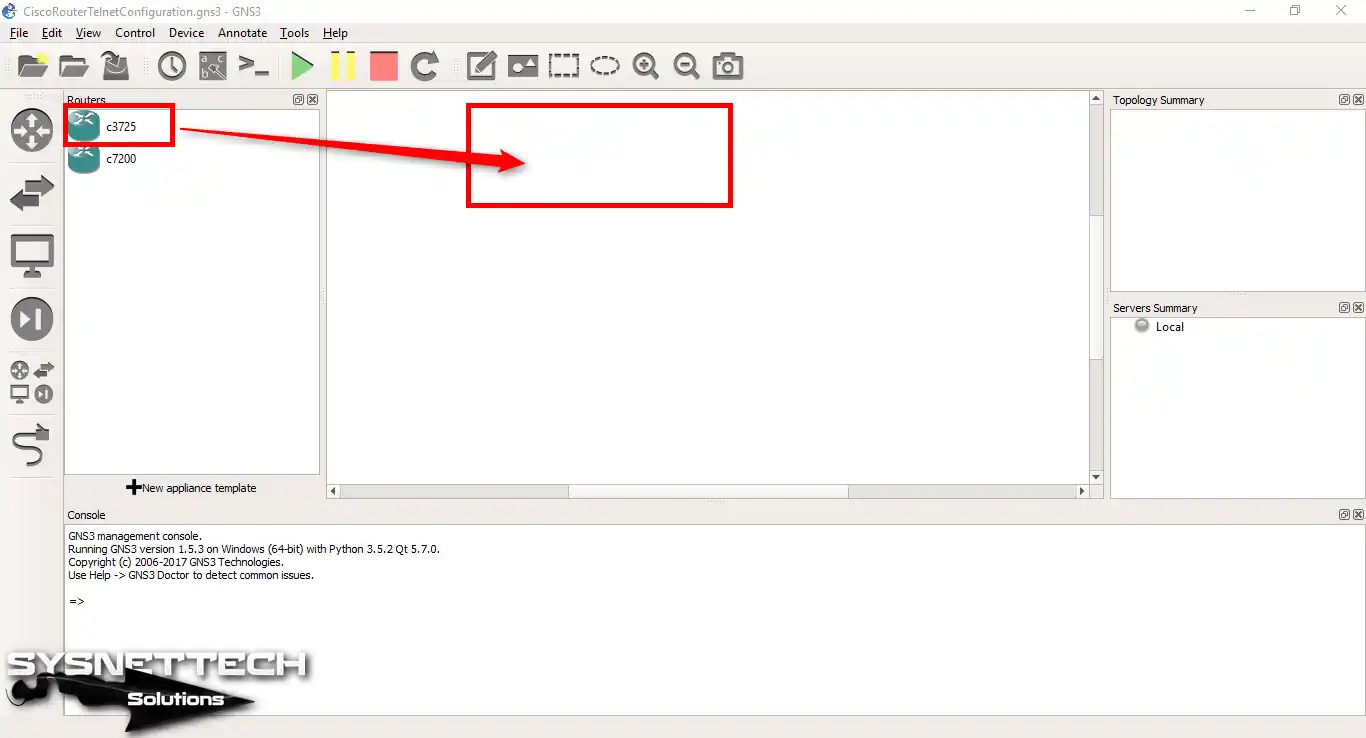
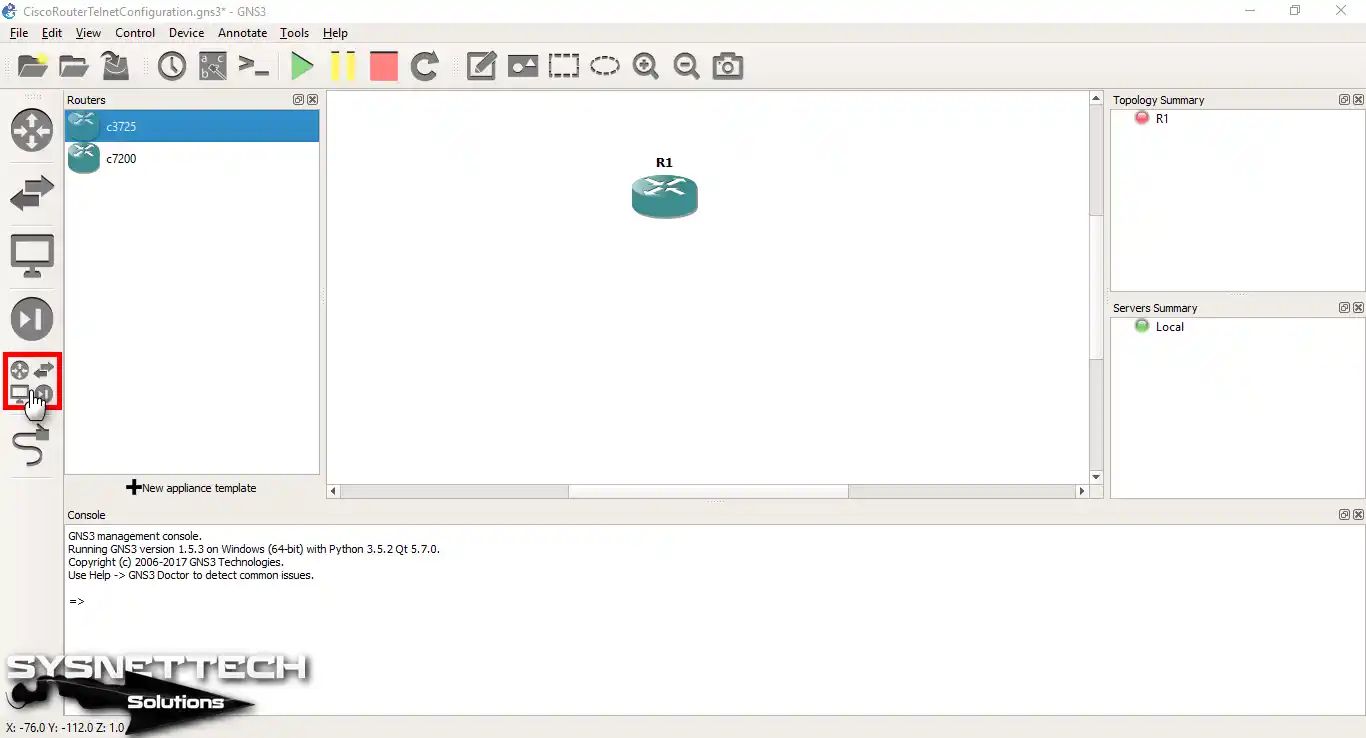
Step 1
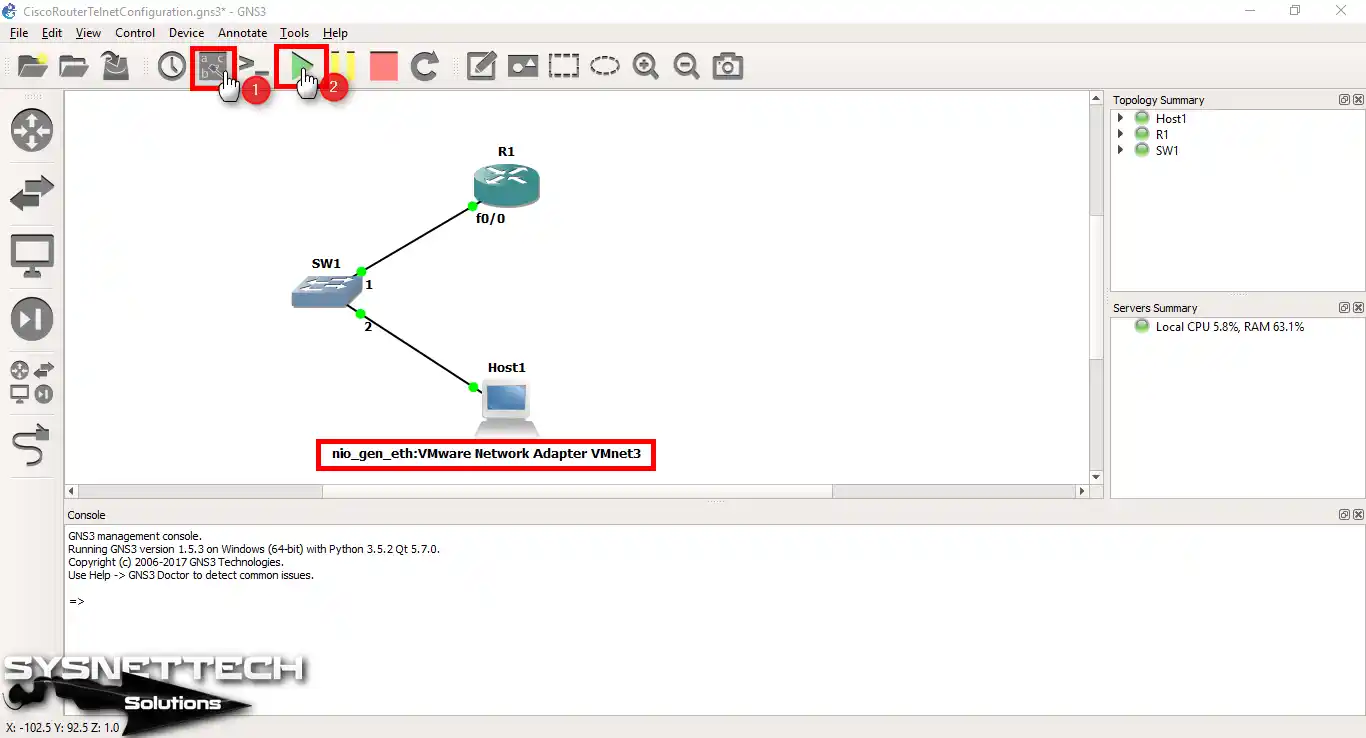
To add the Router to your GNS3 workspace, click on the symbol below.
Step 2
In the window that opens, pick a Cisco Router from the ones you added to GNS3. Then, drag and drop it into the topology workspace.
Step 3
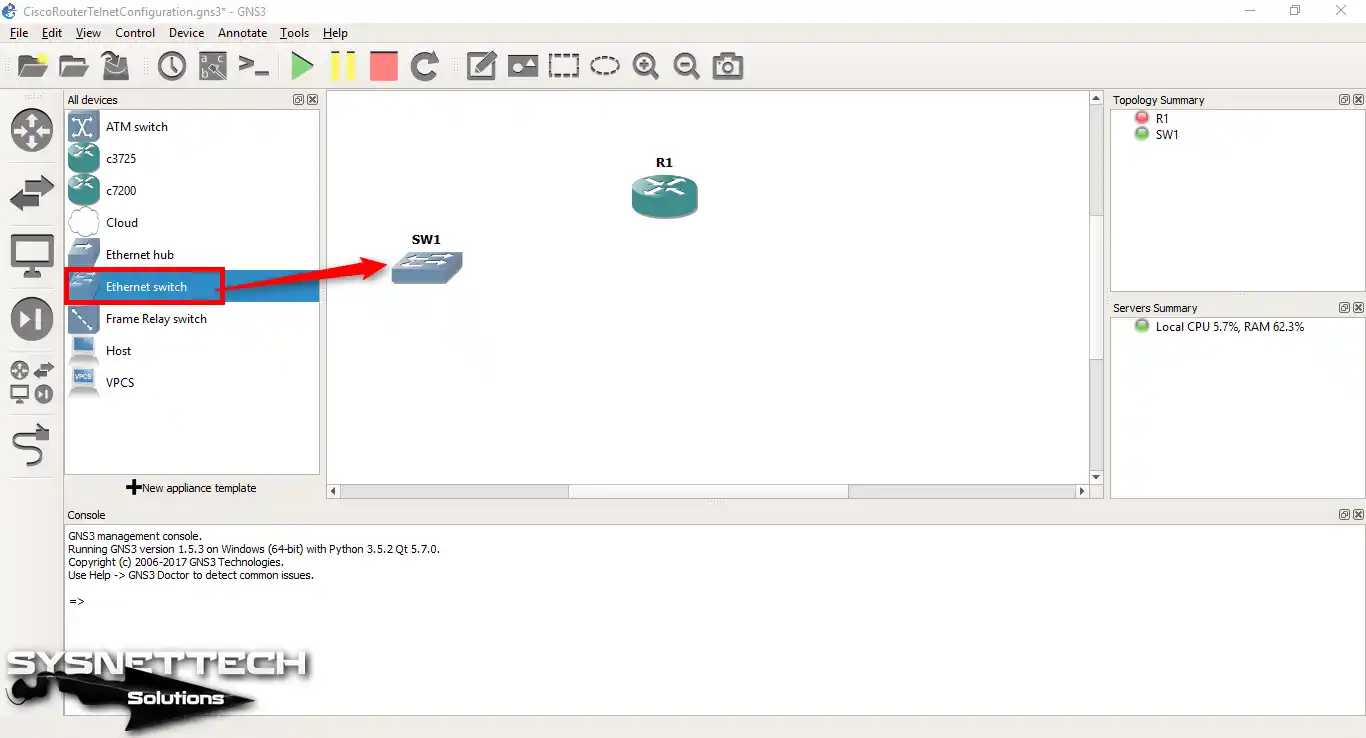
Now, Click All Devices to add Cisco Switch and PC.
Step 4
Find the Cisco Switch from the list you see and drag and drop it to the workspace.
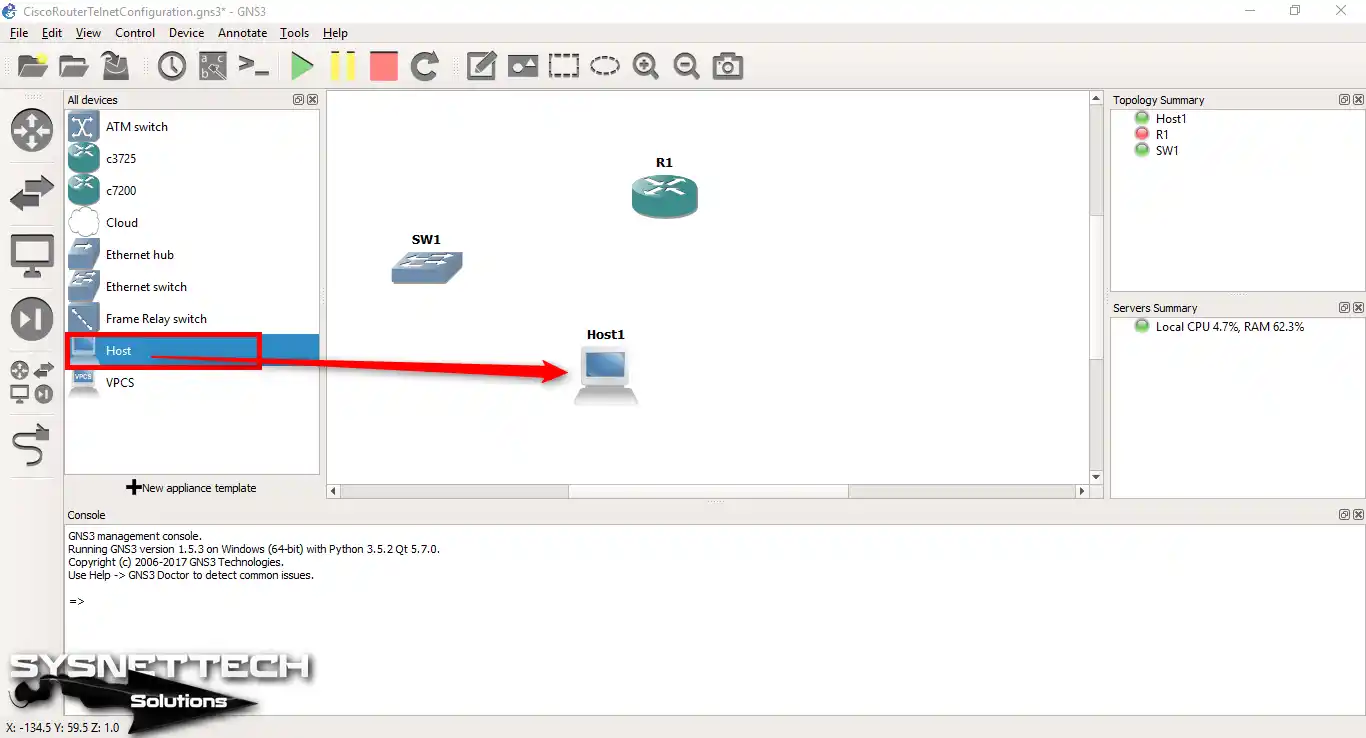
Step 5
You must add any virtual machine in VMware Workstation to the network topology. Now, add the Host to include it in the network.
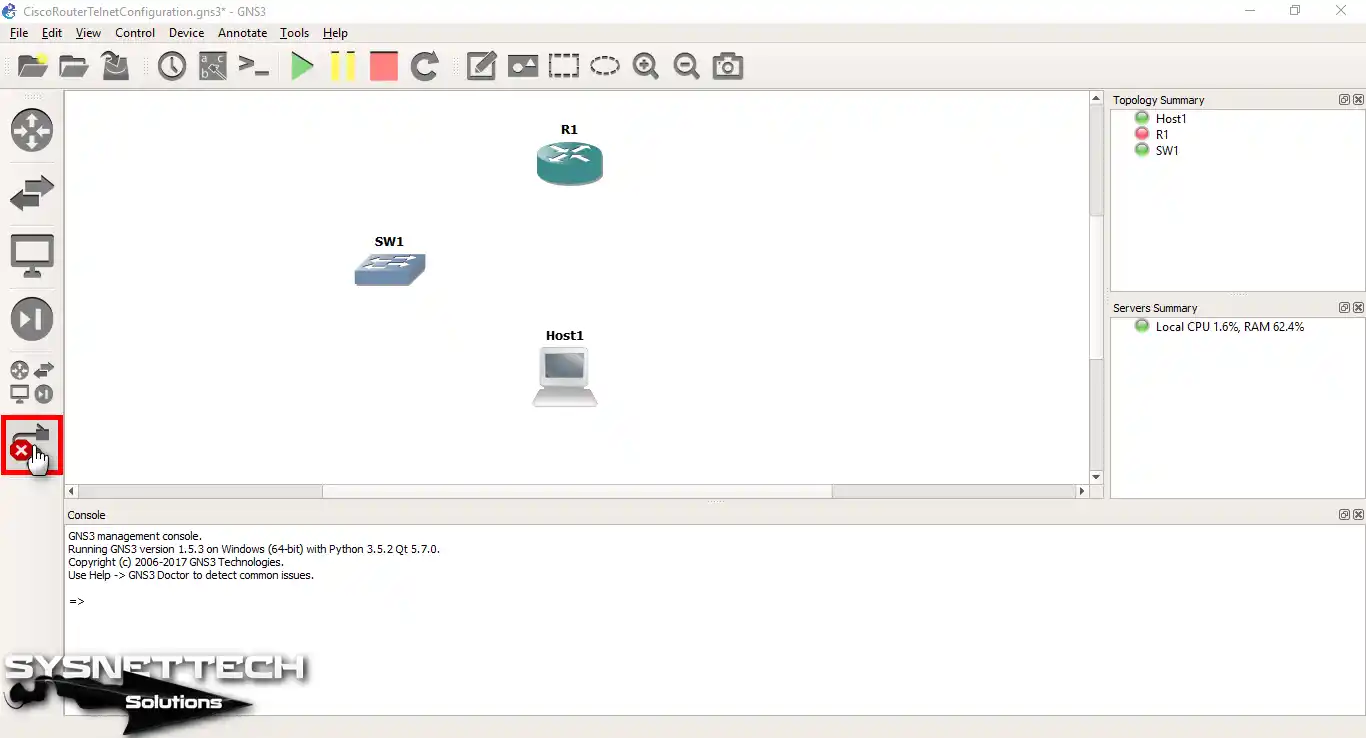
Step 6
In the host settings, the critical choice is Ethernet NIO. Here, you have to pick a custom segment in VMware’s virtual network editor within the NIO settings. In short, this avoids confusion and helps you create better projects.
Now, select a VMnet you created yourself from the Host’s NIO settings. We used VMnet3 as an example in this article.
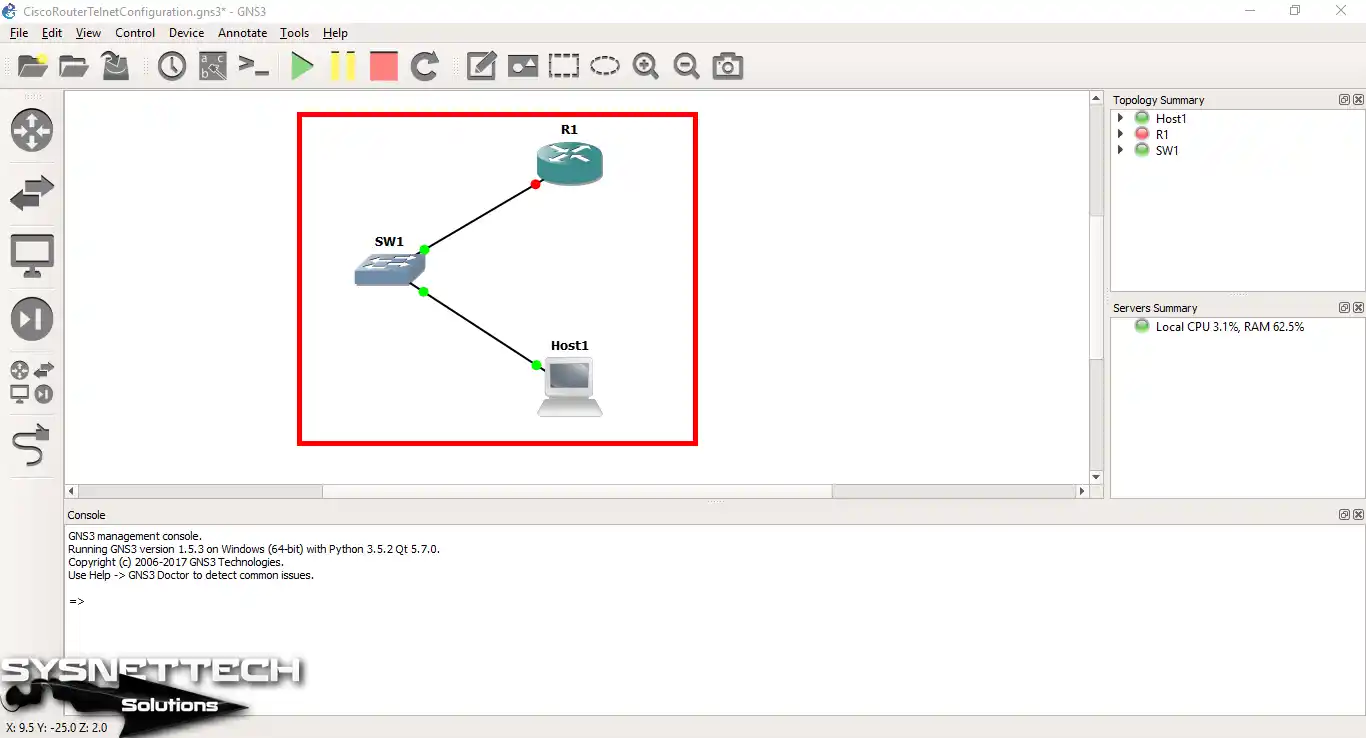
Step 7
You will see a green icon on the Switch and PC when you connect the network devices. Here, if there is a red icon, you can understand that the Router is not working correctly.
Step 8
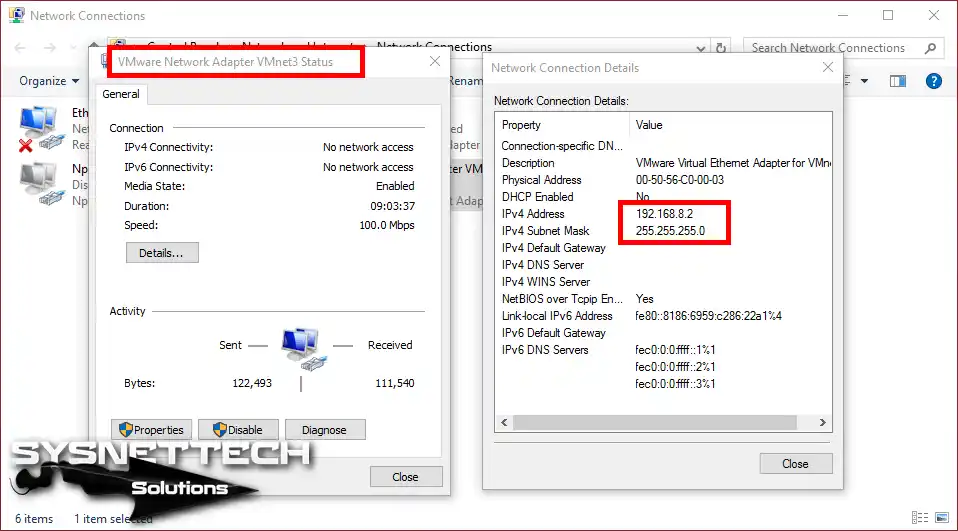
Now, open Network and Internet Settings on your physical PC and find VMnet3. After that, configure the IP settings of the adapter you selected according to your work.
The IP address set for the new VMnet on the Host is 192.168.8.1.
In network designs, we typically give Routers IP addresses ending in .1. So, in this case as well, keeping this value unchanged will prevent any issues.
Step 9
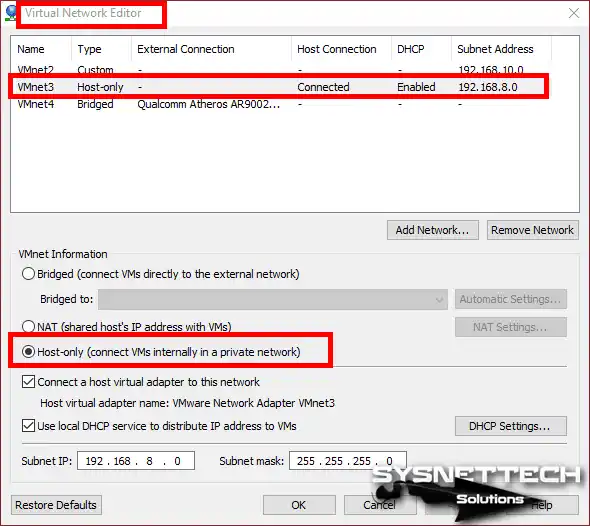
Open the Virtual Network Editor program and look at VMnet3’s settings. Now, configure its type as Host-Only and the IP block as 192.168.8.0/24.
Step 10
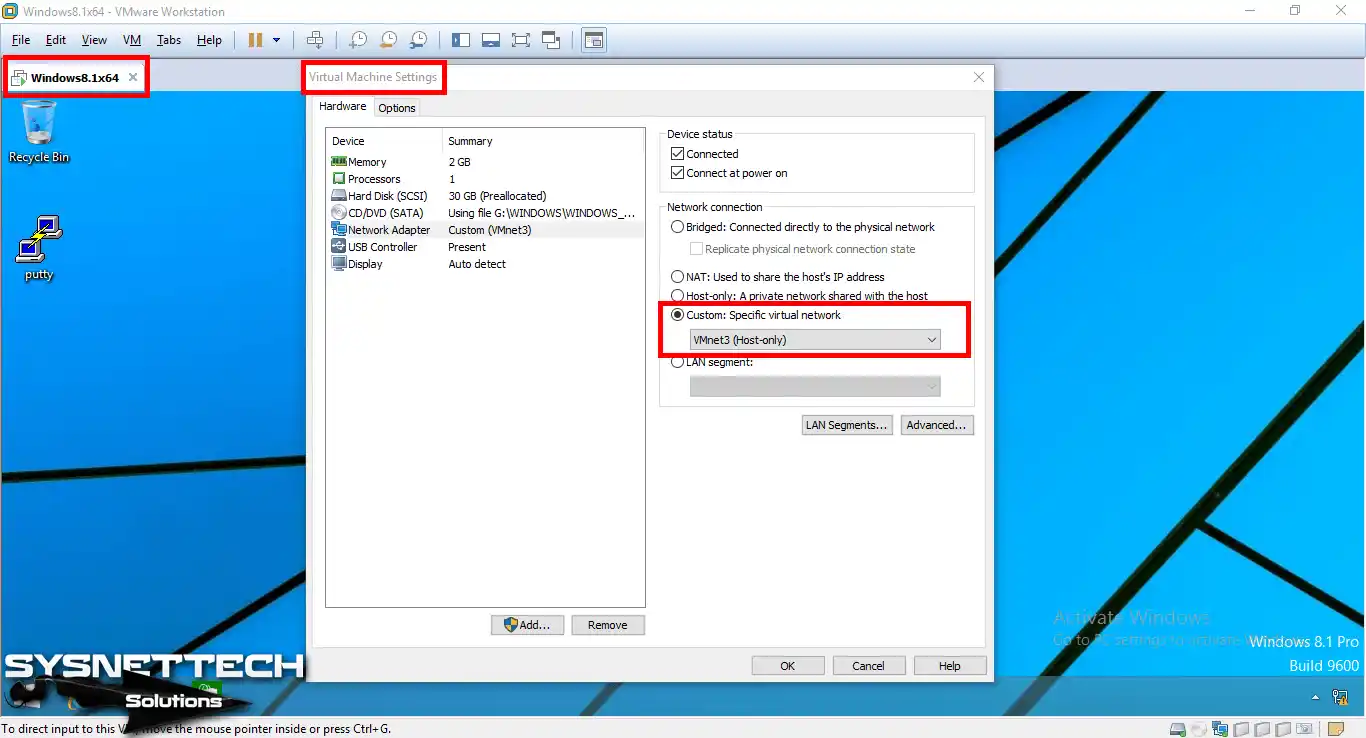
Now, you need to set up your Guest OS running on VMware. To do this, for example, open the adapter settings of the Win8 VM. Then, select Network Adapter and set Custom / VMnet3 on the right.
Making and Testing a Telnet Connection to a GNS3 Router
Step 1
Once you’re OK with getting ready for the Telnet connection, go ahead and start the Router.
Step 2
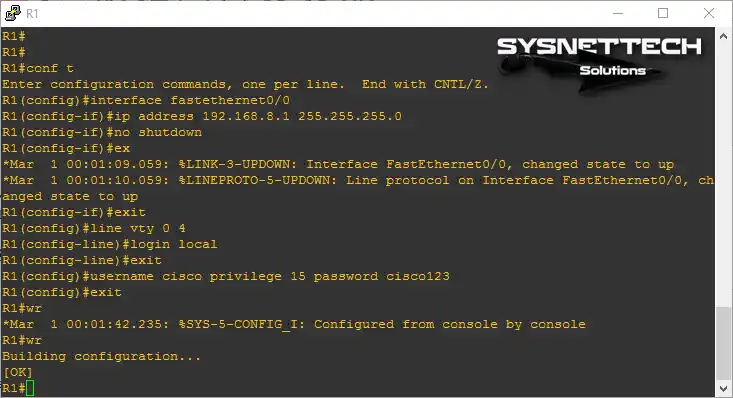
Double-click on the Router to open the command prompt. Then, type in the commands below to enable Telnet.
R1# conf t
R1(config)# interface fastethernet0/0
R1(config-if)# ip address 192.168.8.1 255.255.255.0
R1(config-if)# no shutdown
R1(config-if)# exit
R1(config)# line vty 0 4
R1(config-line)# login local
R1(config-line)# exit
R1(config)# username cisco privilege 15 password cisco123
R1(config)# exit
R1# wr
Step 3
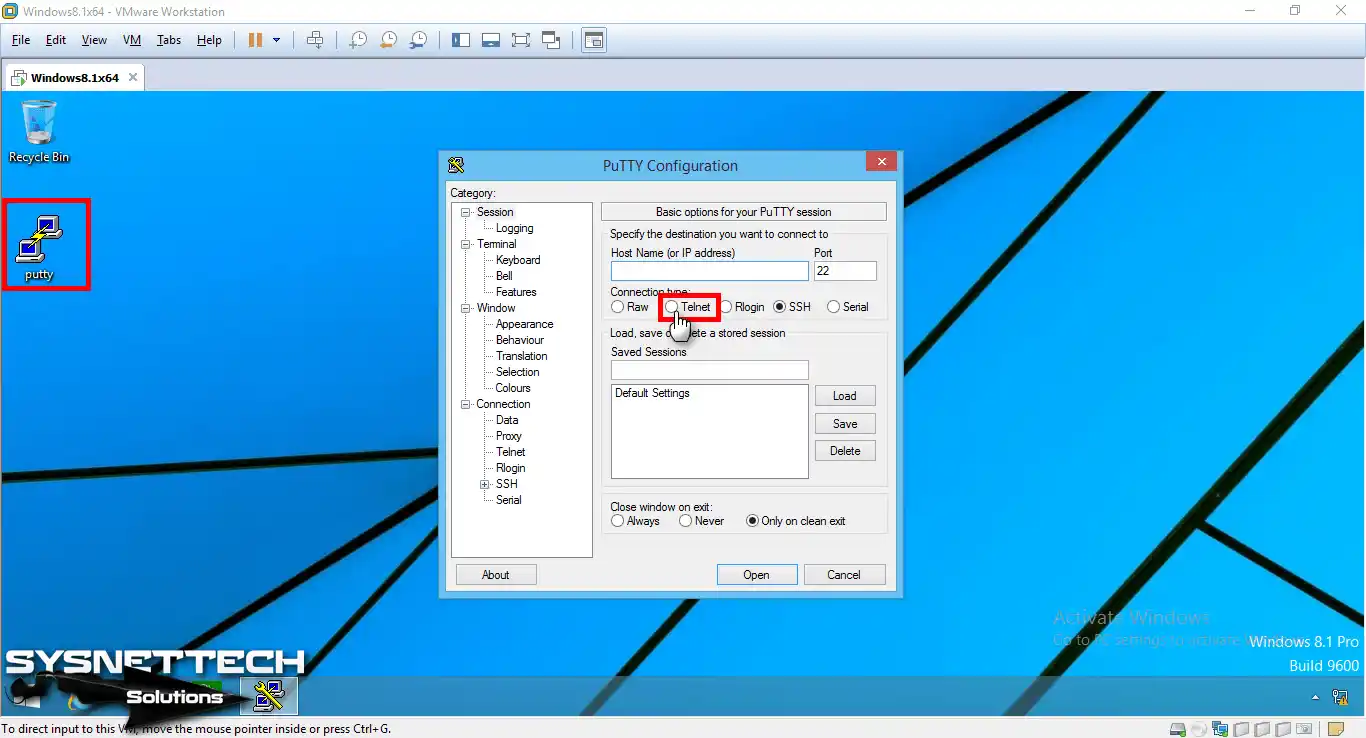
Run PuTTY on your virtual computer. Then select Telnet as in the image below.
Step 4
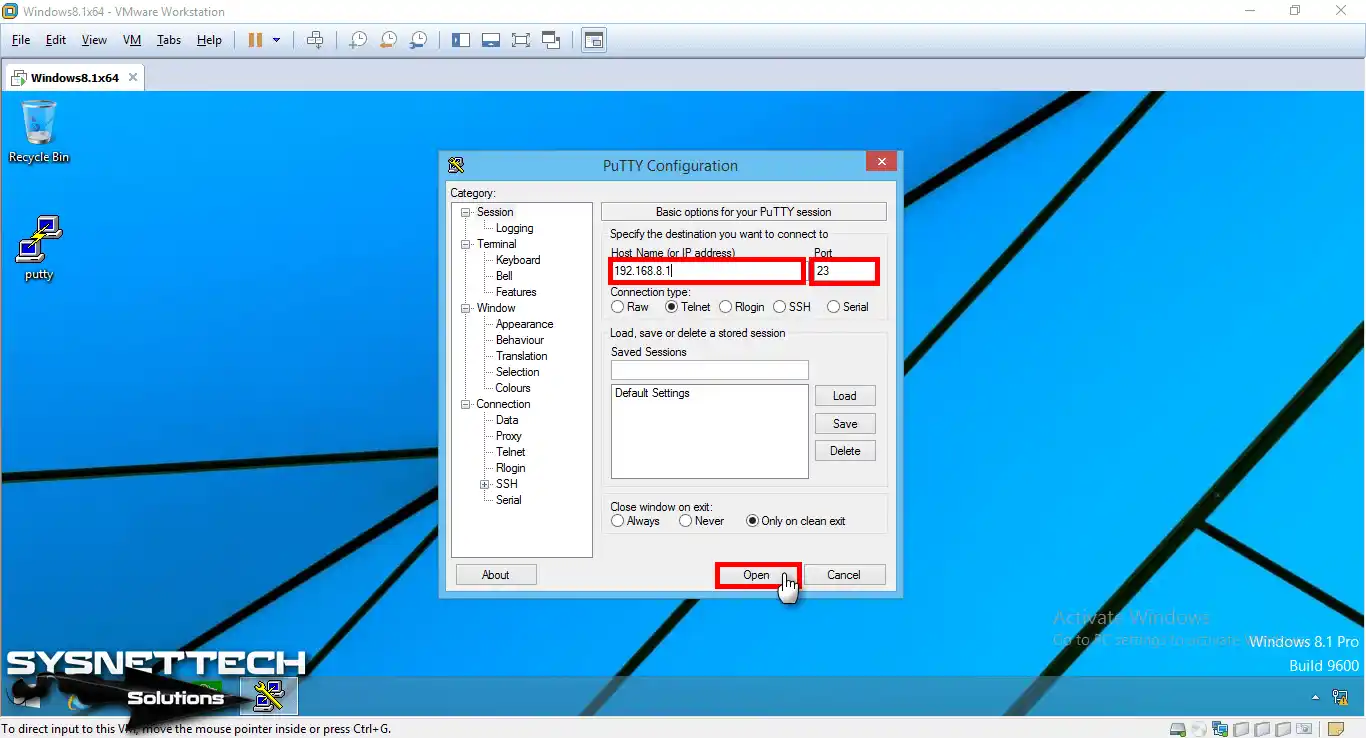
Enter the FastEthernet 0/0 IP address of the Router, type 23 in the port number, and click the Open button.
Step 5
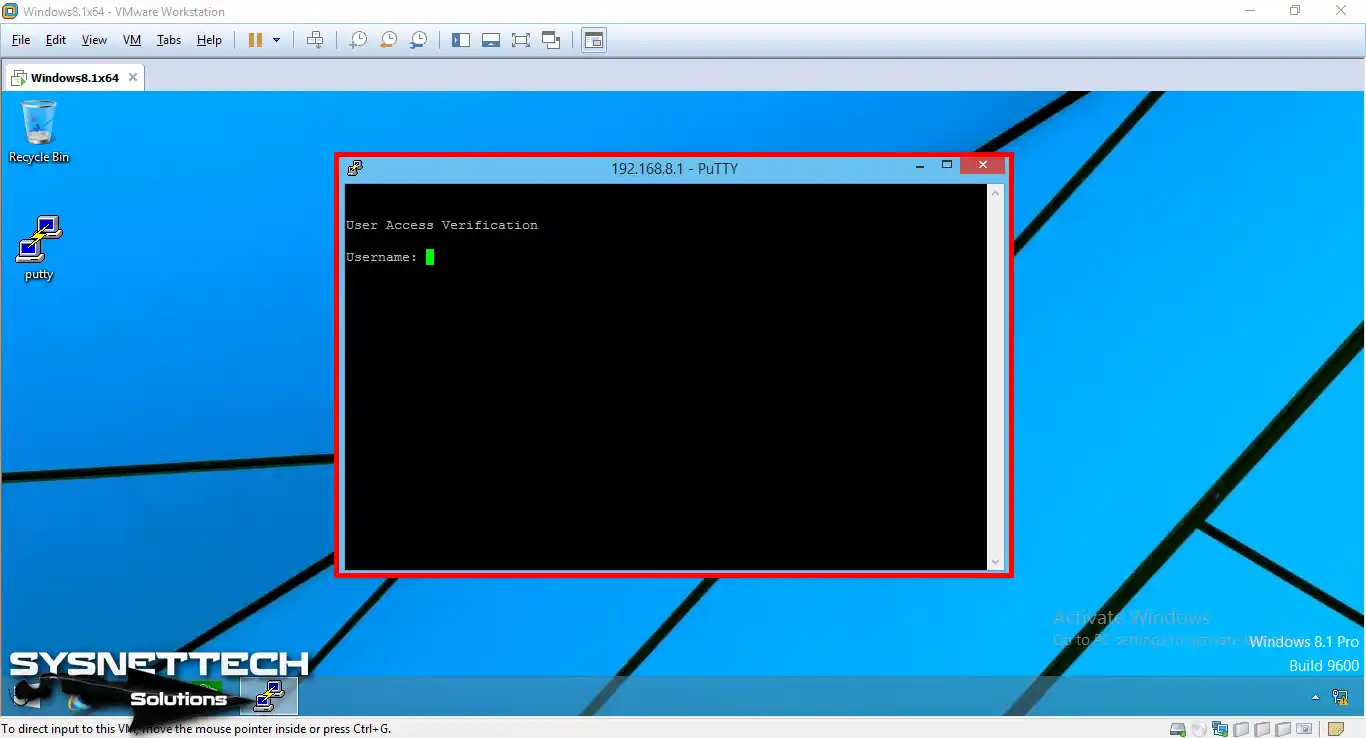
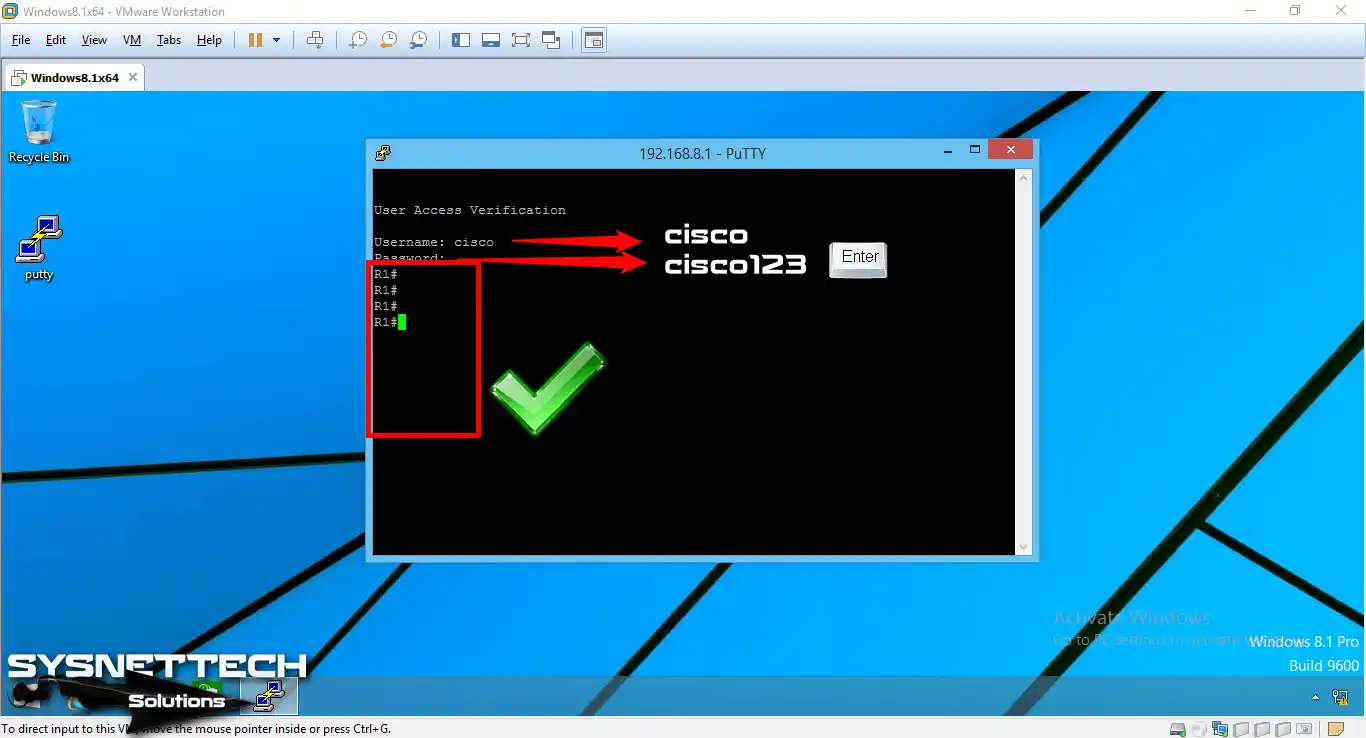
Once you’ve connected to the Cisco Router successfully, enter the username and password you made!
Step 6
As you can see in the image below, you can now set up the Router with Telnet.
Step 8
Last but not least, see the open Telnet sessions on the Router through the virtual machine. Just type in the “show line” command and check the results.
show line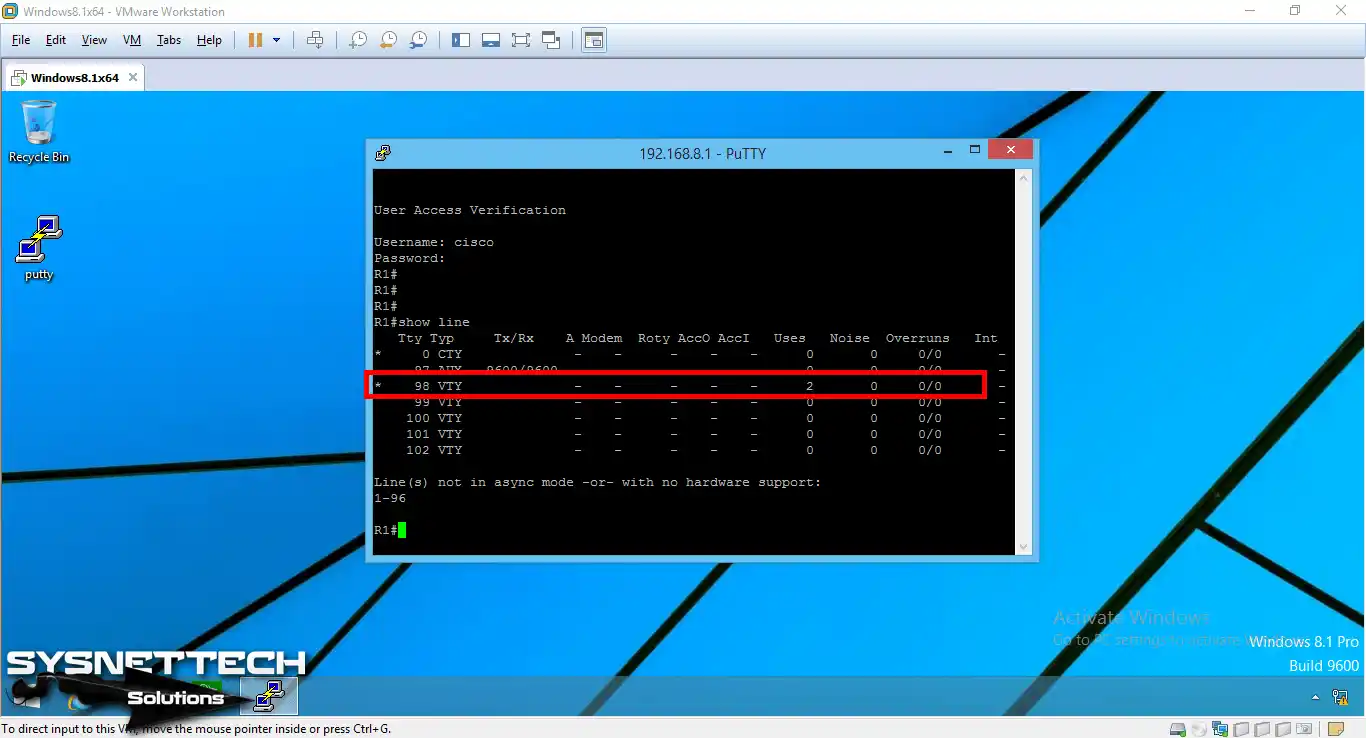
Video
Disabling Telnet from Cisco Router in GNS3
With GNS3, you can connect to your devices from VMs in your projects via Telnet. But, we said that this is an unsafe method. However, you can still use it for fast operations on older devices.
But you can disable Telnet on a Cisco Router or Switch. If so, it would be better to do this from the emulator program interface.
Here’s how you can disable Telnet on GNS3:
Step 1
First, open GNS3 and right-click on the Router you have configured. Then, open the CLI by selecting Console.
Step 2
Switch to the Privileged Exec mode by typing “enable” in the Router’s command prompt. After that, use the “configure terminal” command to go to the next level.
Step 3
Now, type in “transport input ssh” to turn off Telnet. But keep in mind that this will only partially shut down Telnet on IOS devices. It will switch to SSH instead of Telnet.
R1(config)# line vty 0 4
R1(config-line)# transport input ssh
Note: You can use “no service telnet” to turn off Telnet completely on NX-OS devices.
Step 4
Last step, type “write memory” or “wr” in the CLI to save these settings. This keeps your configuration in the Router’s non-volatile RAM (NVRAM). So, even if you restart the Router, your settings will stay in place.
write memoryFrequently Asked Questions (FAQ) About Cisco Telnet
- How do I check the Telnet session on the Cisco Router?
- How do I know if the session is active?
- How can I make sure Telnet is working?
- How Do I Make a Telnet Connection from One Router to Another Router?
Conclusion
To sum up, we learned how to set up the Telnet protocol using GNS3 and a virtual machine. We also connected to the Router or Switch from a distance. This way, you can configure devices on your local or remote network without having to move around.
You can create a Telnet session with a device by following the steps in this article. Plus, you can handle different setup tasks from a distance. This is super handy for network administrators who have to control many devices spread out in other places.
In general, lots of people like using the Telnet protocol. However, folks who are worried about security tend to go for alternative methods like SSH.

Be the first to share your comment