
In this article, we will examine how to set up and run Microsoft Windows 95 on a new virtual machine using VMware Workstation 17 Pro virtualization software on a Windows 11 PC.
How to Set Up Windows 95 using VMware Workstation 17 Pro on Windows 11 Operating System with Intel 12th Gen 12700H (Alder Lake) CPU
After the Windows 3.1 DOS system, Microsoft released Windows 95, the first 32-bit operating system with an advanced user interface, on August 24, 1995, for its users.
One of the most fundamental innovations of Windows 95 is that it has a user interface instead of DOS. It also includes protocols such as TCP/IP that assist in establishing network connections and support 32-bit applications.
With this system, the Plug and Play feature was developed so that users could integrate peripheral devices into computers more easily. The start menu and taskbar were presented to users for the first time with this version and are features of Windows 10, which are still widely used today.
With the development of the Internet in the 1990s, Windows 95 was the first operating system to use large networks. Also, the Internet Explorer web browser was the most popular during that period.
Also, Direct X and Direct 3D were introduced for MS-DOS to run some programs and items, and to be able to run more demanding games.
Although Windows 95 is an old system, some users want to install it and try it. In addition, some machines or devices with old hardware can be updated with old operating systems and firmware.
If you have an old computer, it may make more sense to install Windows 95 on a physical PC, but if you do not have an old PC, you can install this system with a virtual machine on your computer with up-to-date hardware and system.
How to Create a New Virtual Machine for Windows 95
In order to run one of the Windows or Linux distributions on the virtual machine, you need to use software such as VMware Workstation Pro. You can run old Windows systems on your physical/host computer by using one of the Player and Workstation Pro software developed by VMware.
To install Windows 95 with VMware, you must first create and prepare a suitable virtual computer for this system.
First of all, install VMware Pro on your Windows 11 system and follow the steps below in order.
Step 1
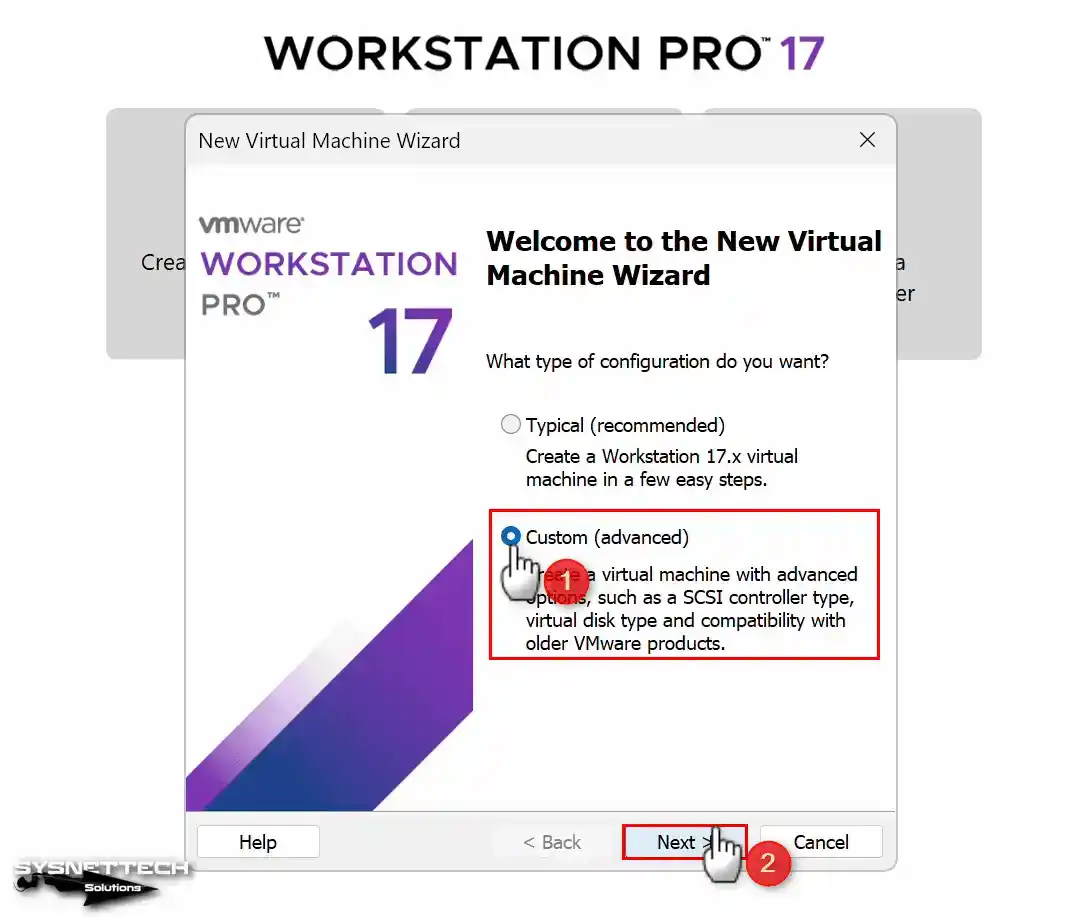
After installing VMware 17 Pro, run it and click Create a New Virtual Machine on the main page of the program, then select Custom (Advanced) in the VM wizard that opens, and click the Next button.
Step 2
Workstation 17.x is selected in the virtual machine hardware compatibility window because it refers to the latest version of the virtualization software you have installed on your system.
In order to better adjust the virtual hardware settings of Microsoft Windows 95, select the compatibility type as 5.x on this screen and continue.

Step 3
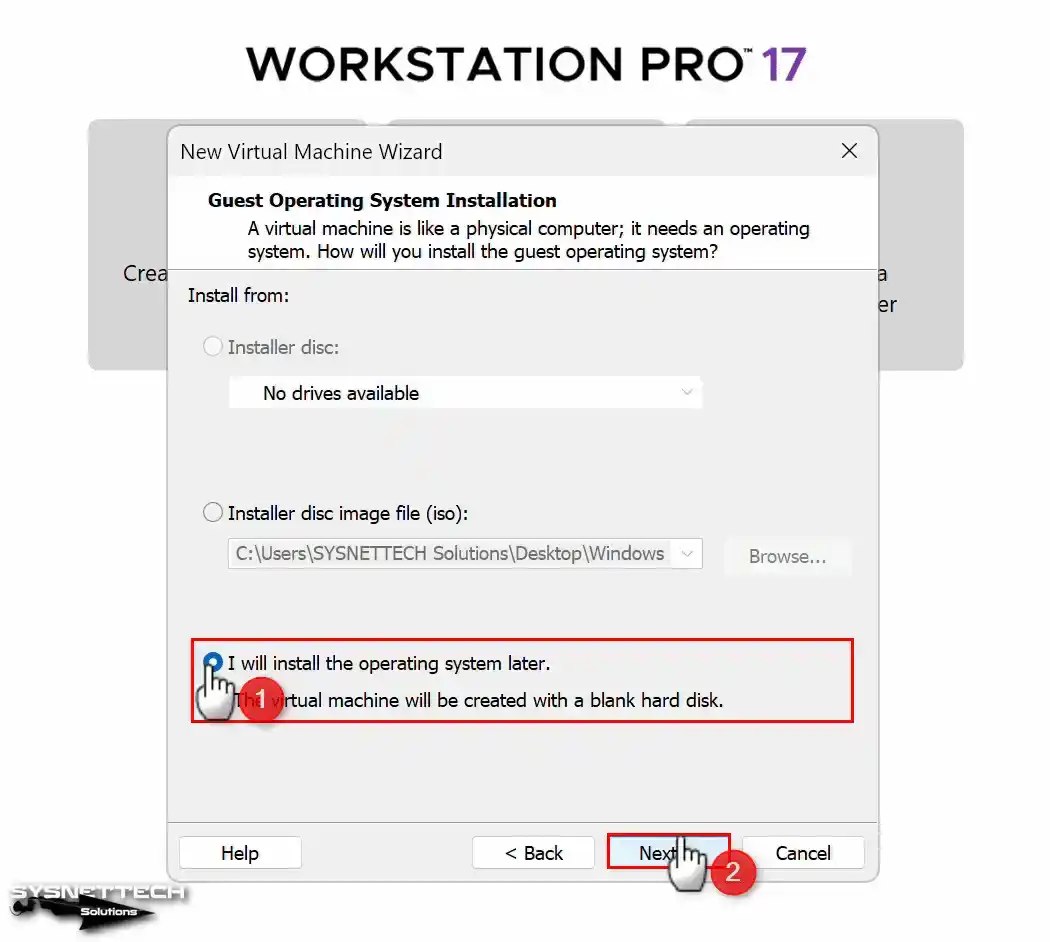
To prepare the virtual system first and then to install it, select I willinstall the operating system later and click Next.
Step 4
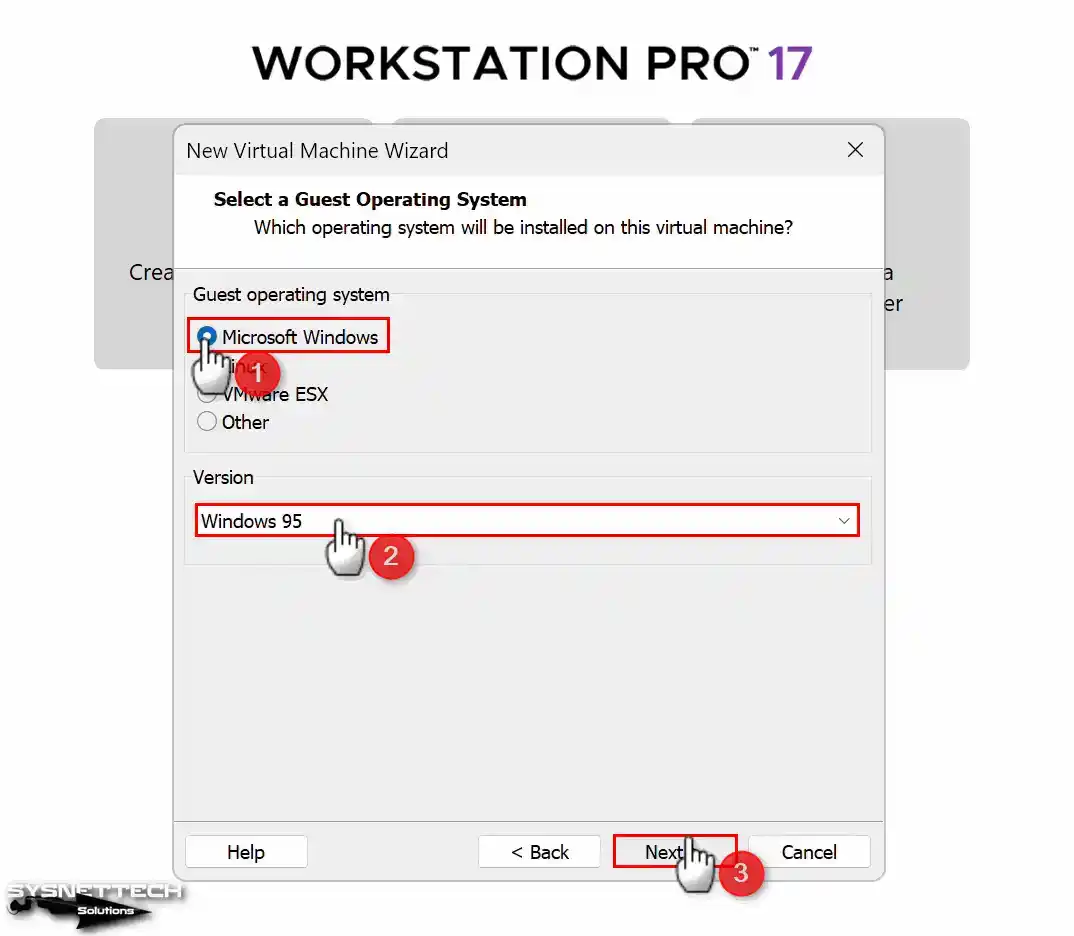
In the Guest operating system selection step, first, select the platform of the system (Microsoft Windows), and in the version section, choose the system you will install and click Next.
Step 5
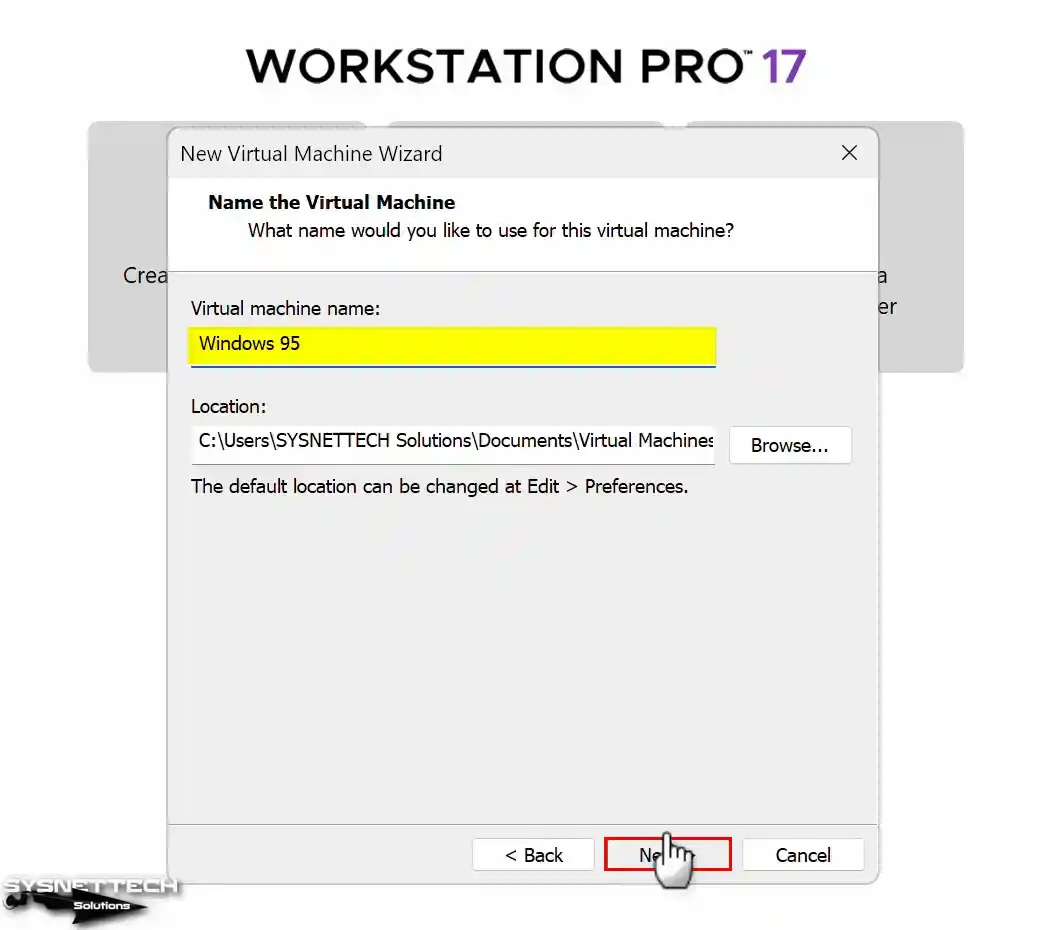
You can change the name of the virtual computer you have prepared from the Name section. Also, since storing the VM on an external HDD is essential for performance, you can change the installation location by clicking the Browse button.
If the disk of your physical computer is SSD or NVMe, you can continue without changing the installation location, as you will run the virtual machines faster.
Step 6
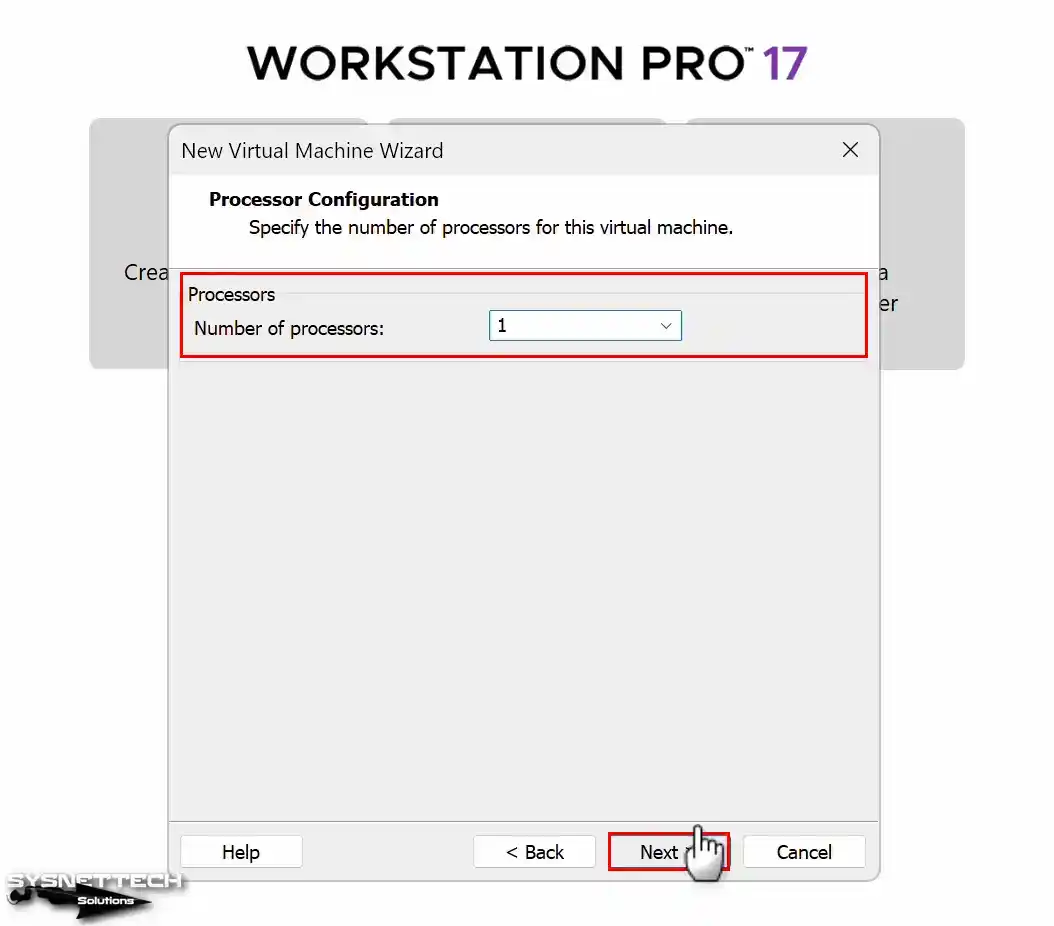
Assign 1 processor to the Windows 95 guest machine and click Next.
Step 7
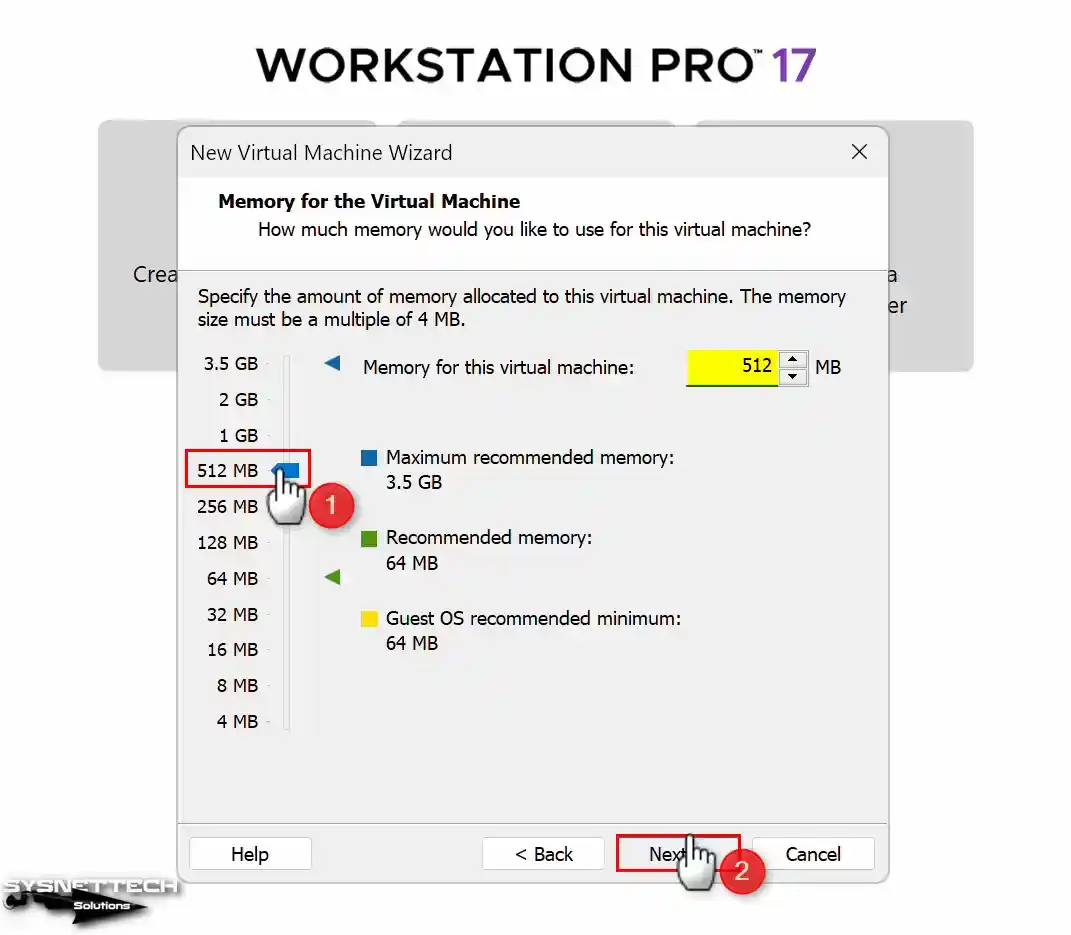
For Windows 95, you must set the RAM size to a maximum of 512 MB. If you configure a larger RAM size, your virtual PC will not boot and will restart constantly.
Step 8
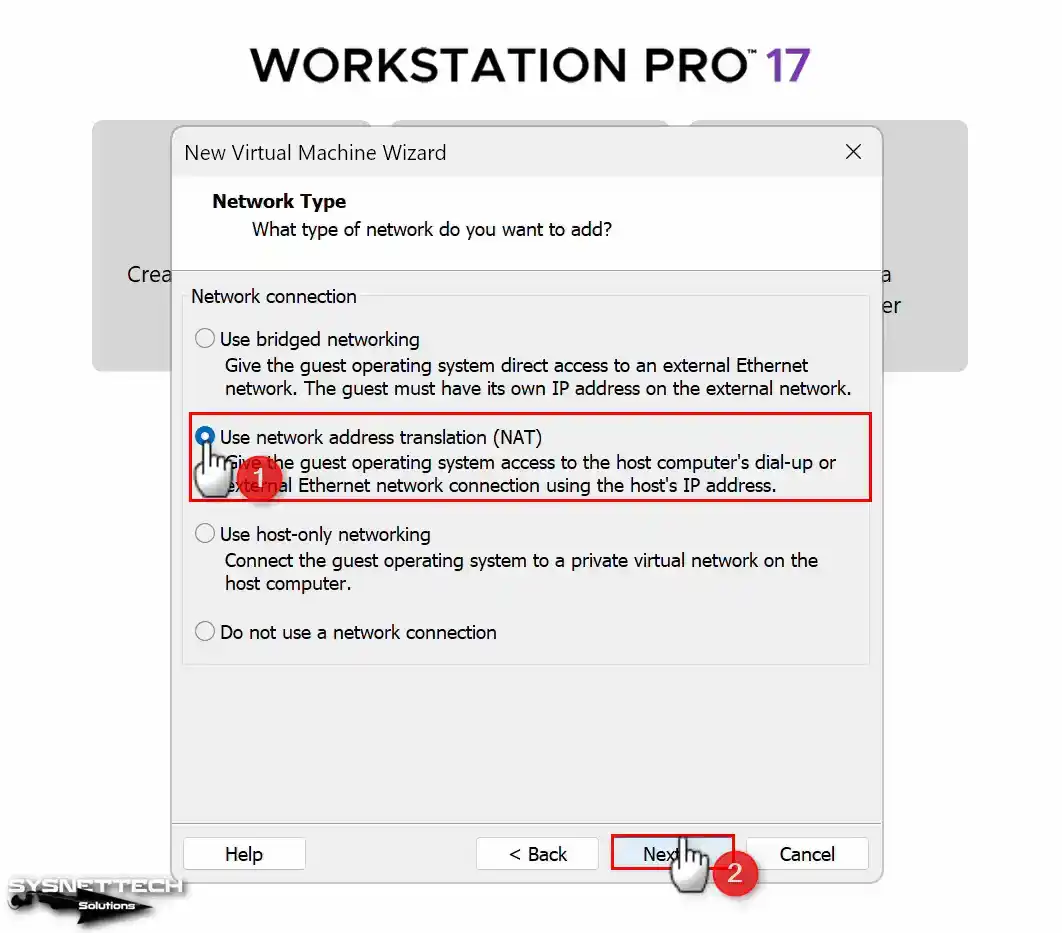
To connect your virtual machine to the network, select the NAT network type and click Next.
Step 9
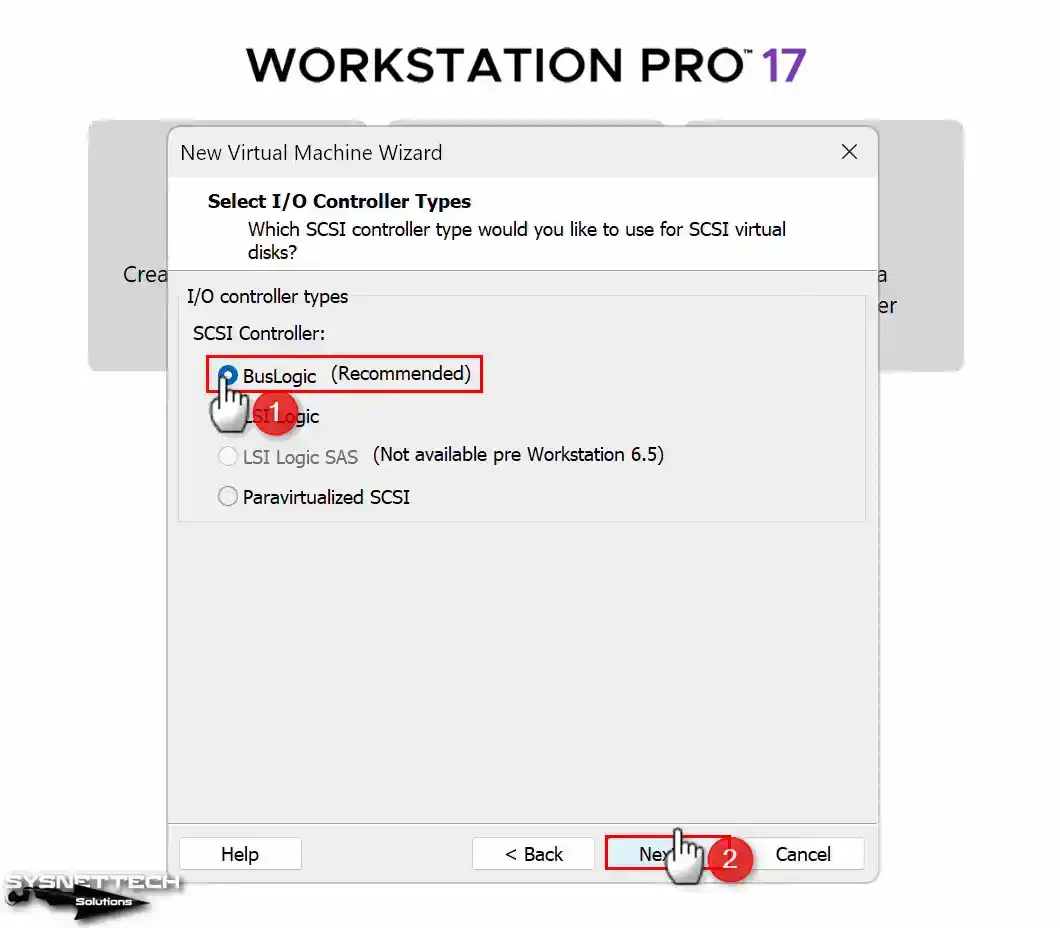
Select BusLogic as the I/O disk controller and click Next.
Step 10
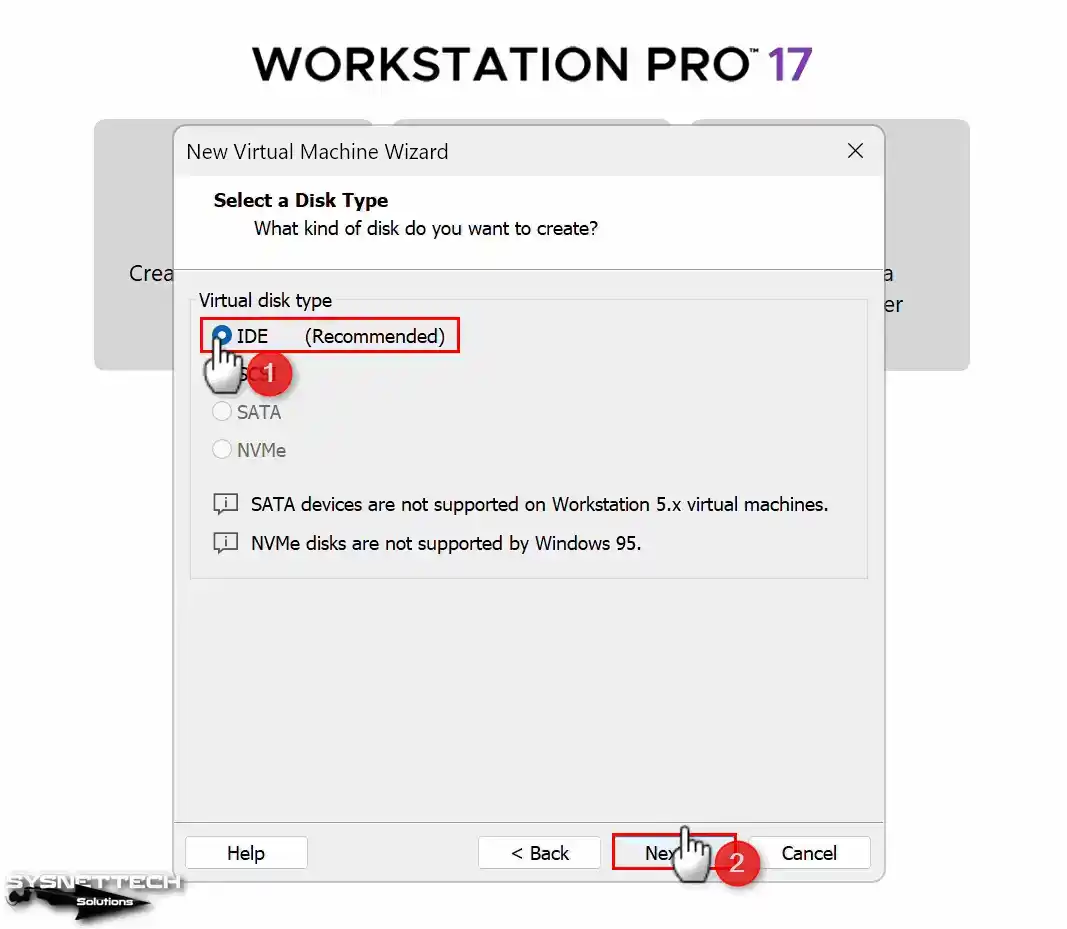
In this step, you need to choose an IDE for the virtual disk type because the SATA disk structure creates problems during the installation of drivers. You will understand the difference between disk structures better in the driver installation section.
Step 11
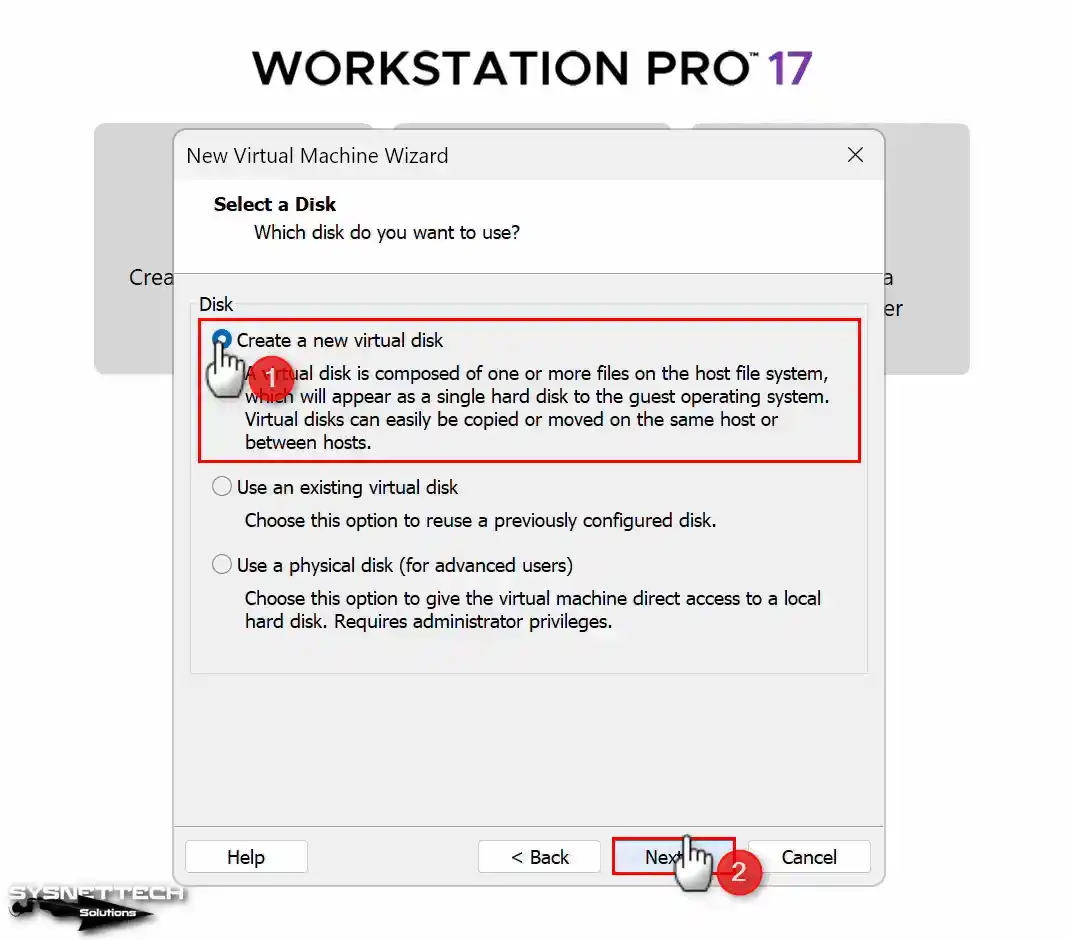
To install a clean operating system, you need to use a new disk, so select Create a New Virtual Disk and click Next.
Step 12
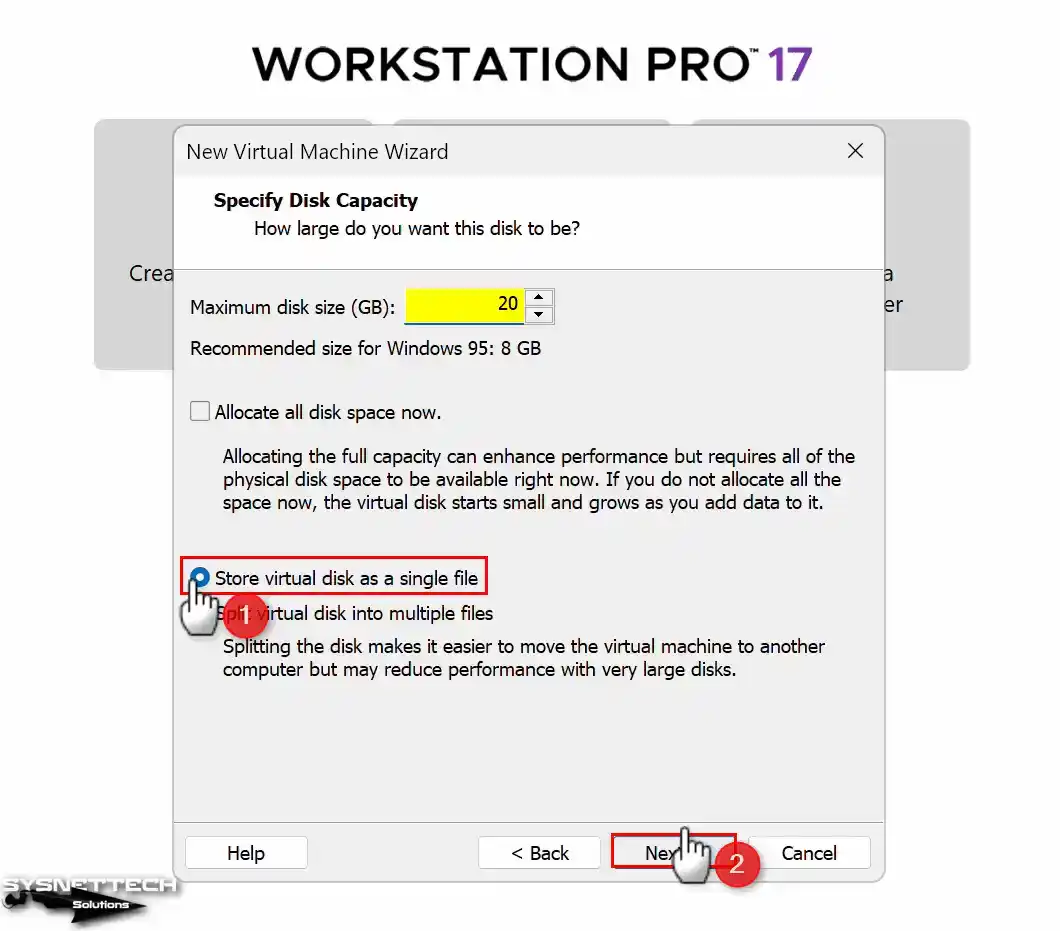
Use the recommended amount specified by VMware Pro for the size of the virtual disk, and also check the Store virtual disk as a single file option to store this disk as a single file on your host, and click Next.
Step 13
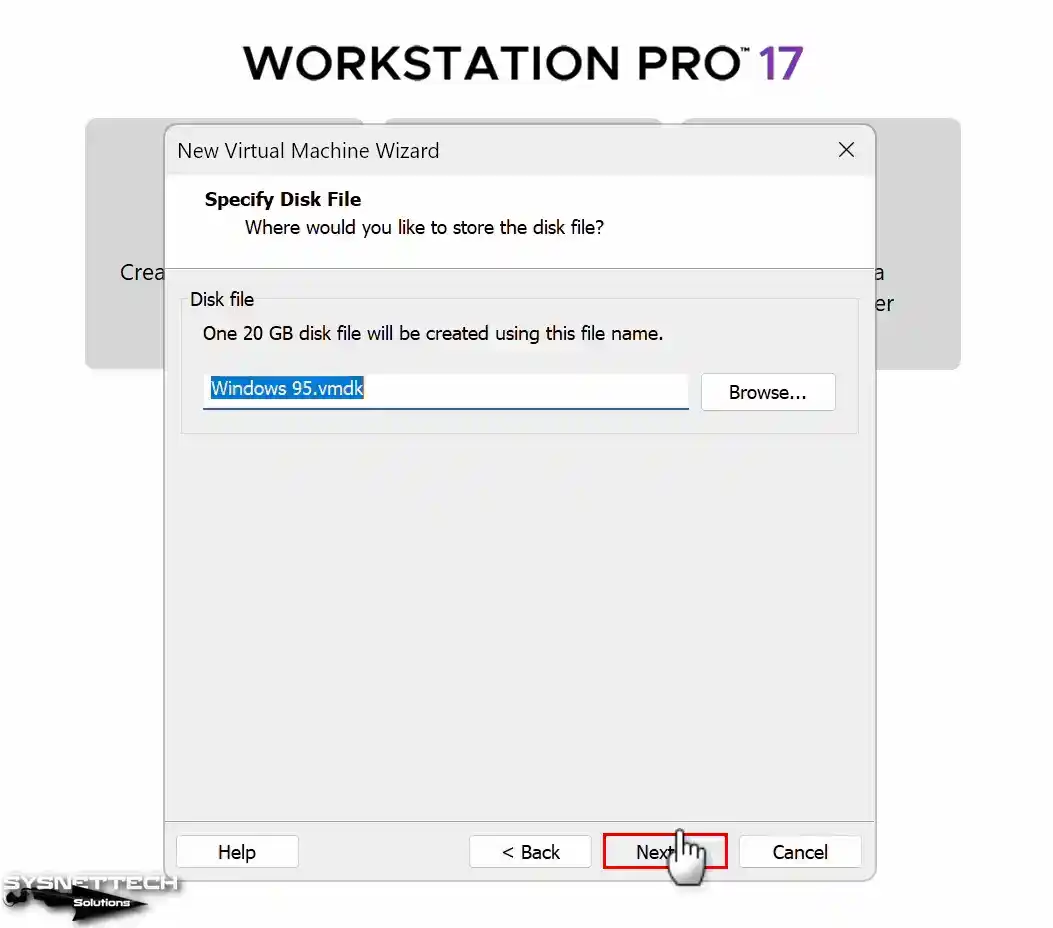
In the Specify Disk File window, you can change the name of the virtual disk you created or change the location where you want to store it. If you leave the location of the virtual disk in the default location, the virtual disk will be stored where you will install the VM.
Step 14
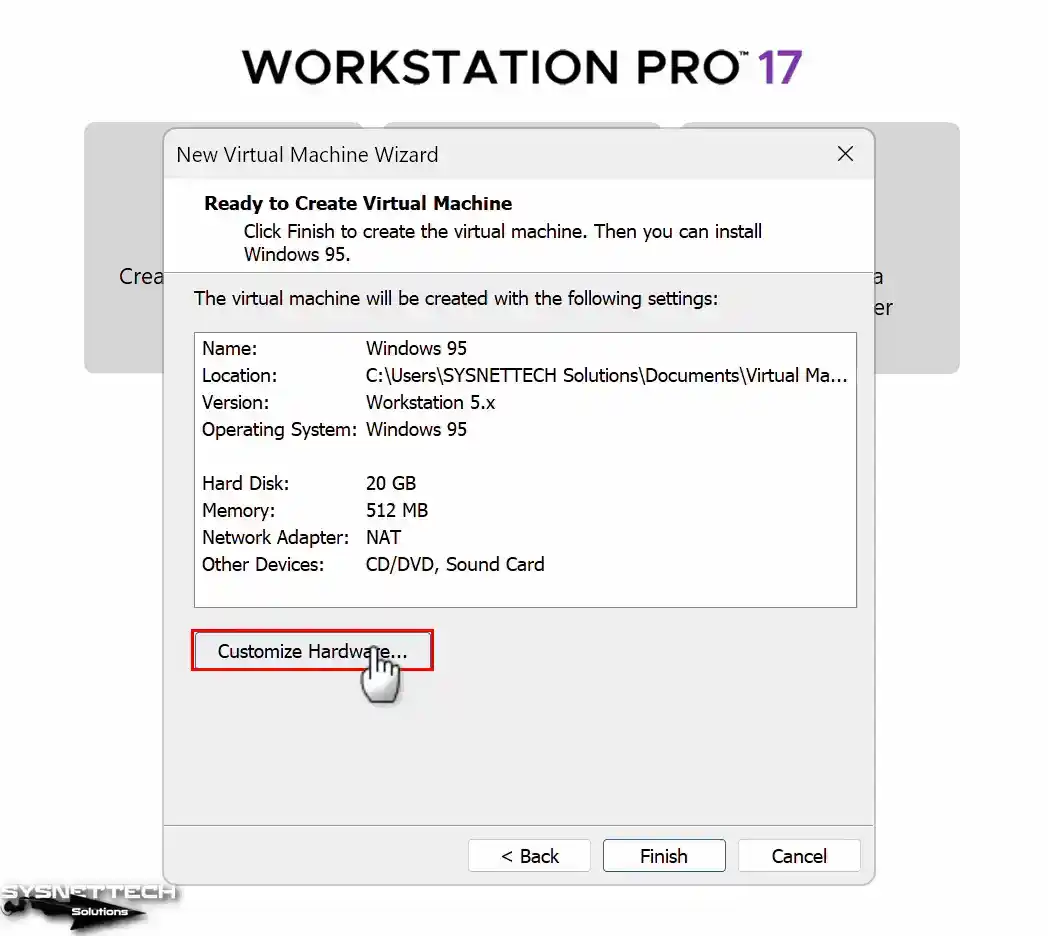
In the summary window, click the Customize Hardware button to add the Windows 95 ISO file to the virtual machine or to increase the graphics memory.
Step 15
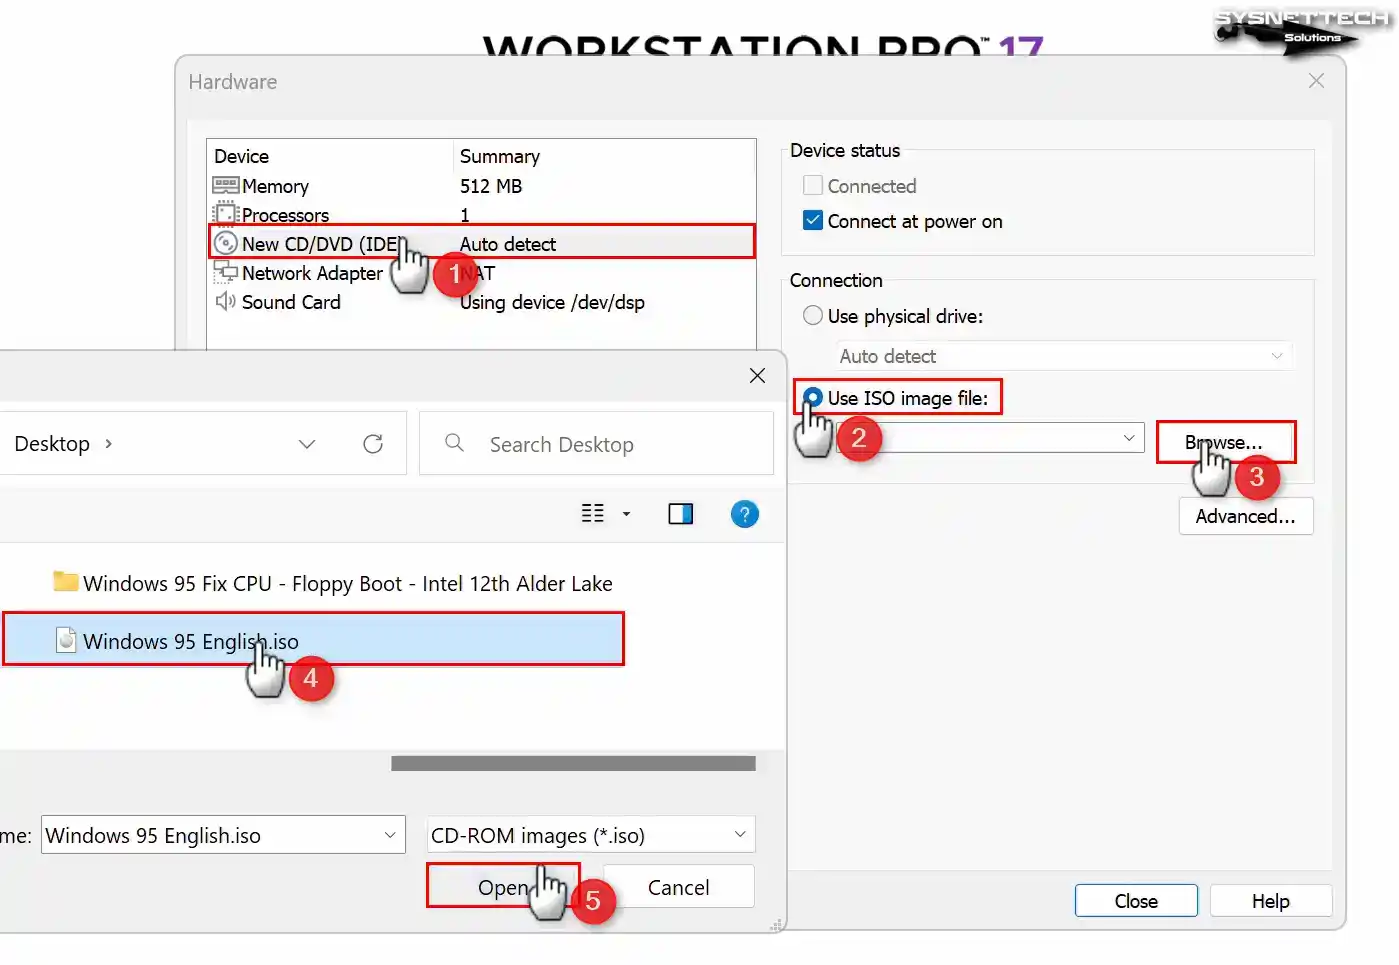
First, click to download the ISO file to your computer, and then click the CD/DVD device to add the Windows 95 ISO image to theVM. ThenM, enable the Use ISO Image File option and click the Browse button.
Select the Windows 95 ISO file you downloaded to your computer and click the Open button.
Step 16
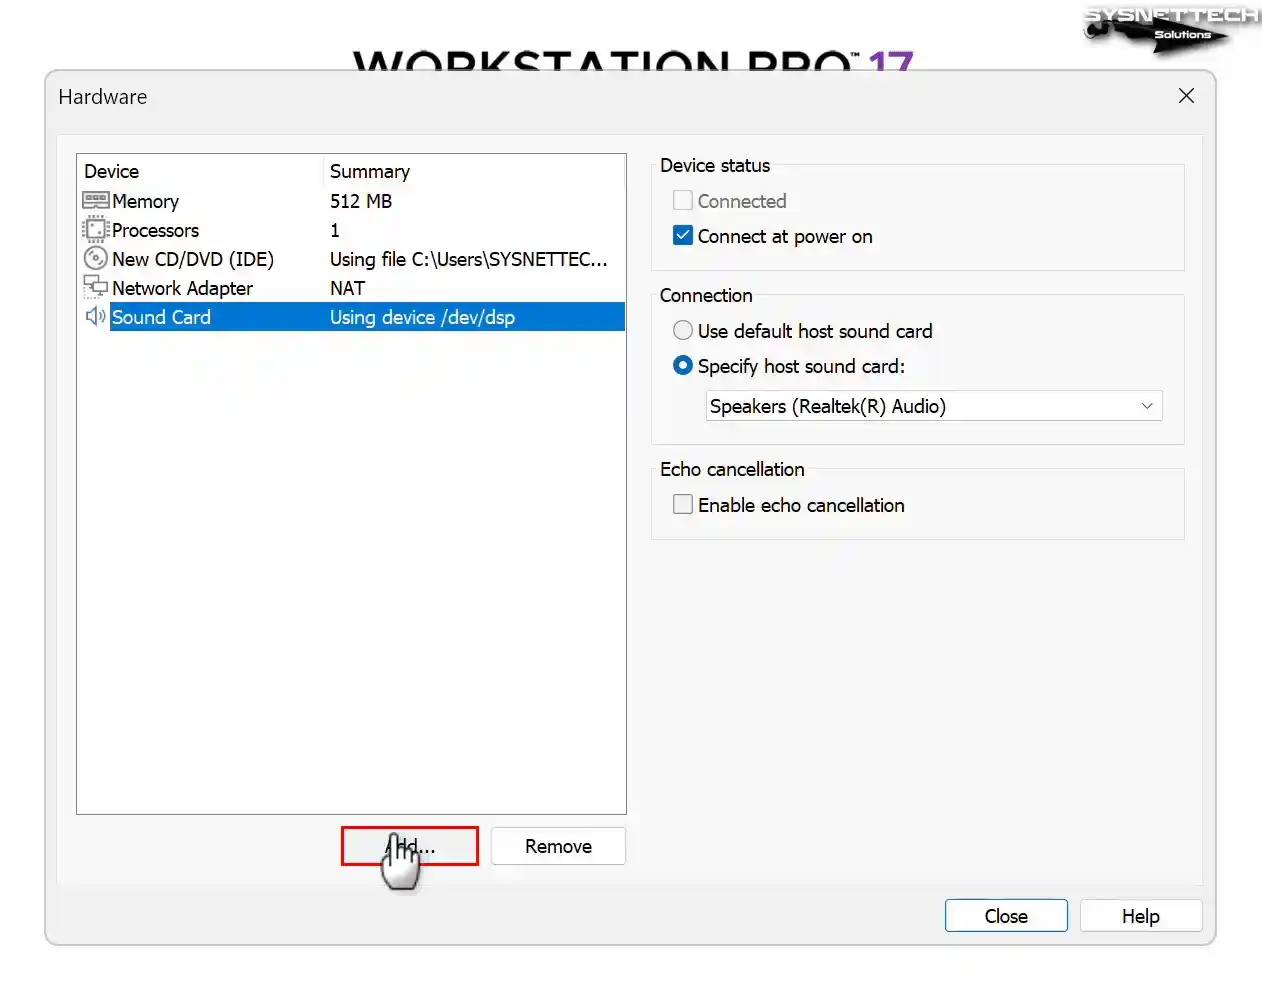
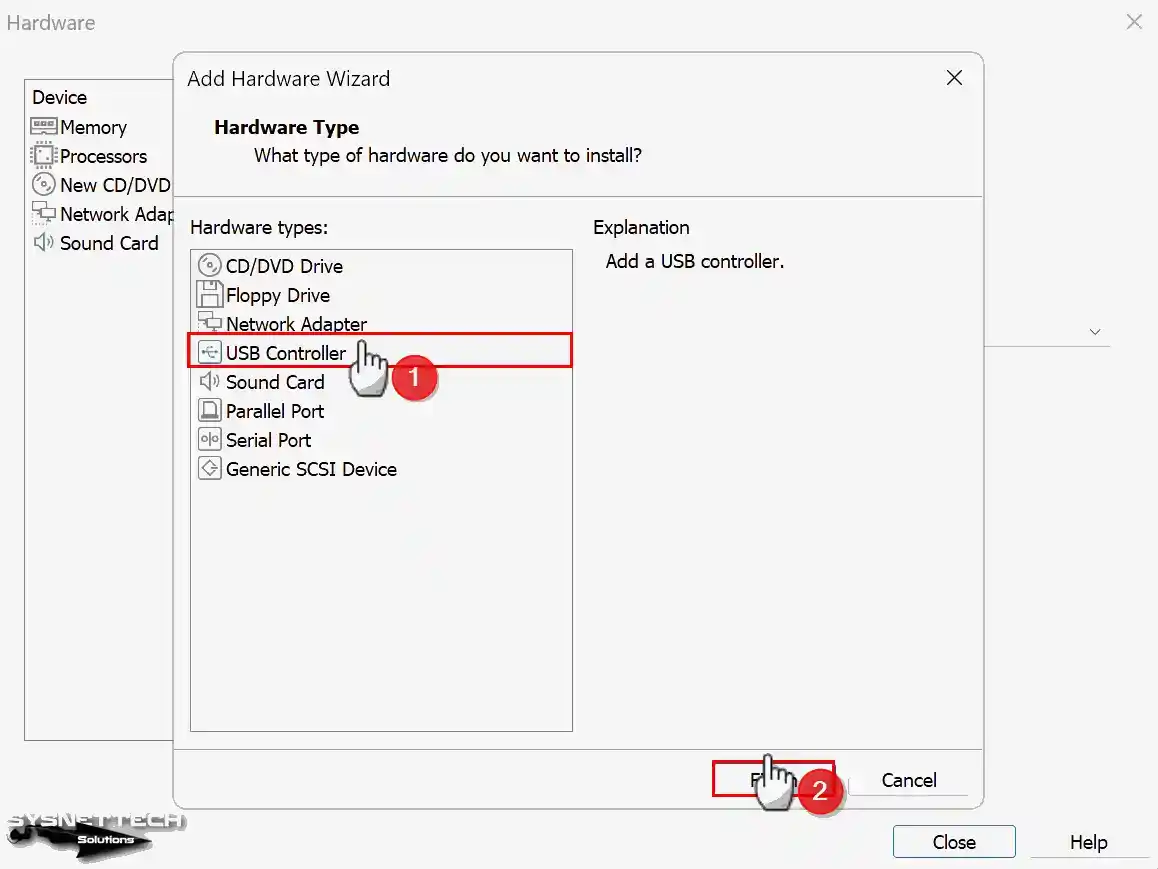
In addition, in order to add a USB controller to use your USB devices in your virtual computer, click the Add button on the Hardware screen and open the wizard.
Step 17
Select the USB Controller in the Hardware Type window and click Finish.
Step 18
After preparing the Windows 95 machine, close the hardware window.

Step 19
When the VM is ready, it opens automatically on the program homepage. Run it and proceed to the installation steps.

How to Install Windows 95
After preparing and running your virtual computer, when your system’s boot screen opens, you must first edit the virtual disk you created using the fdisk command.
Before installing the Windows 95 operating system, you need to format the disk and create an active partition. If you have the original installation media, you will need a Floppy drive. After adding the Floppy device to the virtual machine, you need to open it with the img extension boot file, first prepare the disk, and then copy the system files.
Step 1
The first screen you will encounter after booting your system is as follows. You do not need a floppy device as fdisk is integrated into the content of the ISO file you add to the VM.
Execute the “fdisk” command in the A:\> command line to edit the virtual disk.
fdisk
Step 2
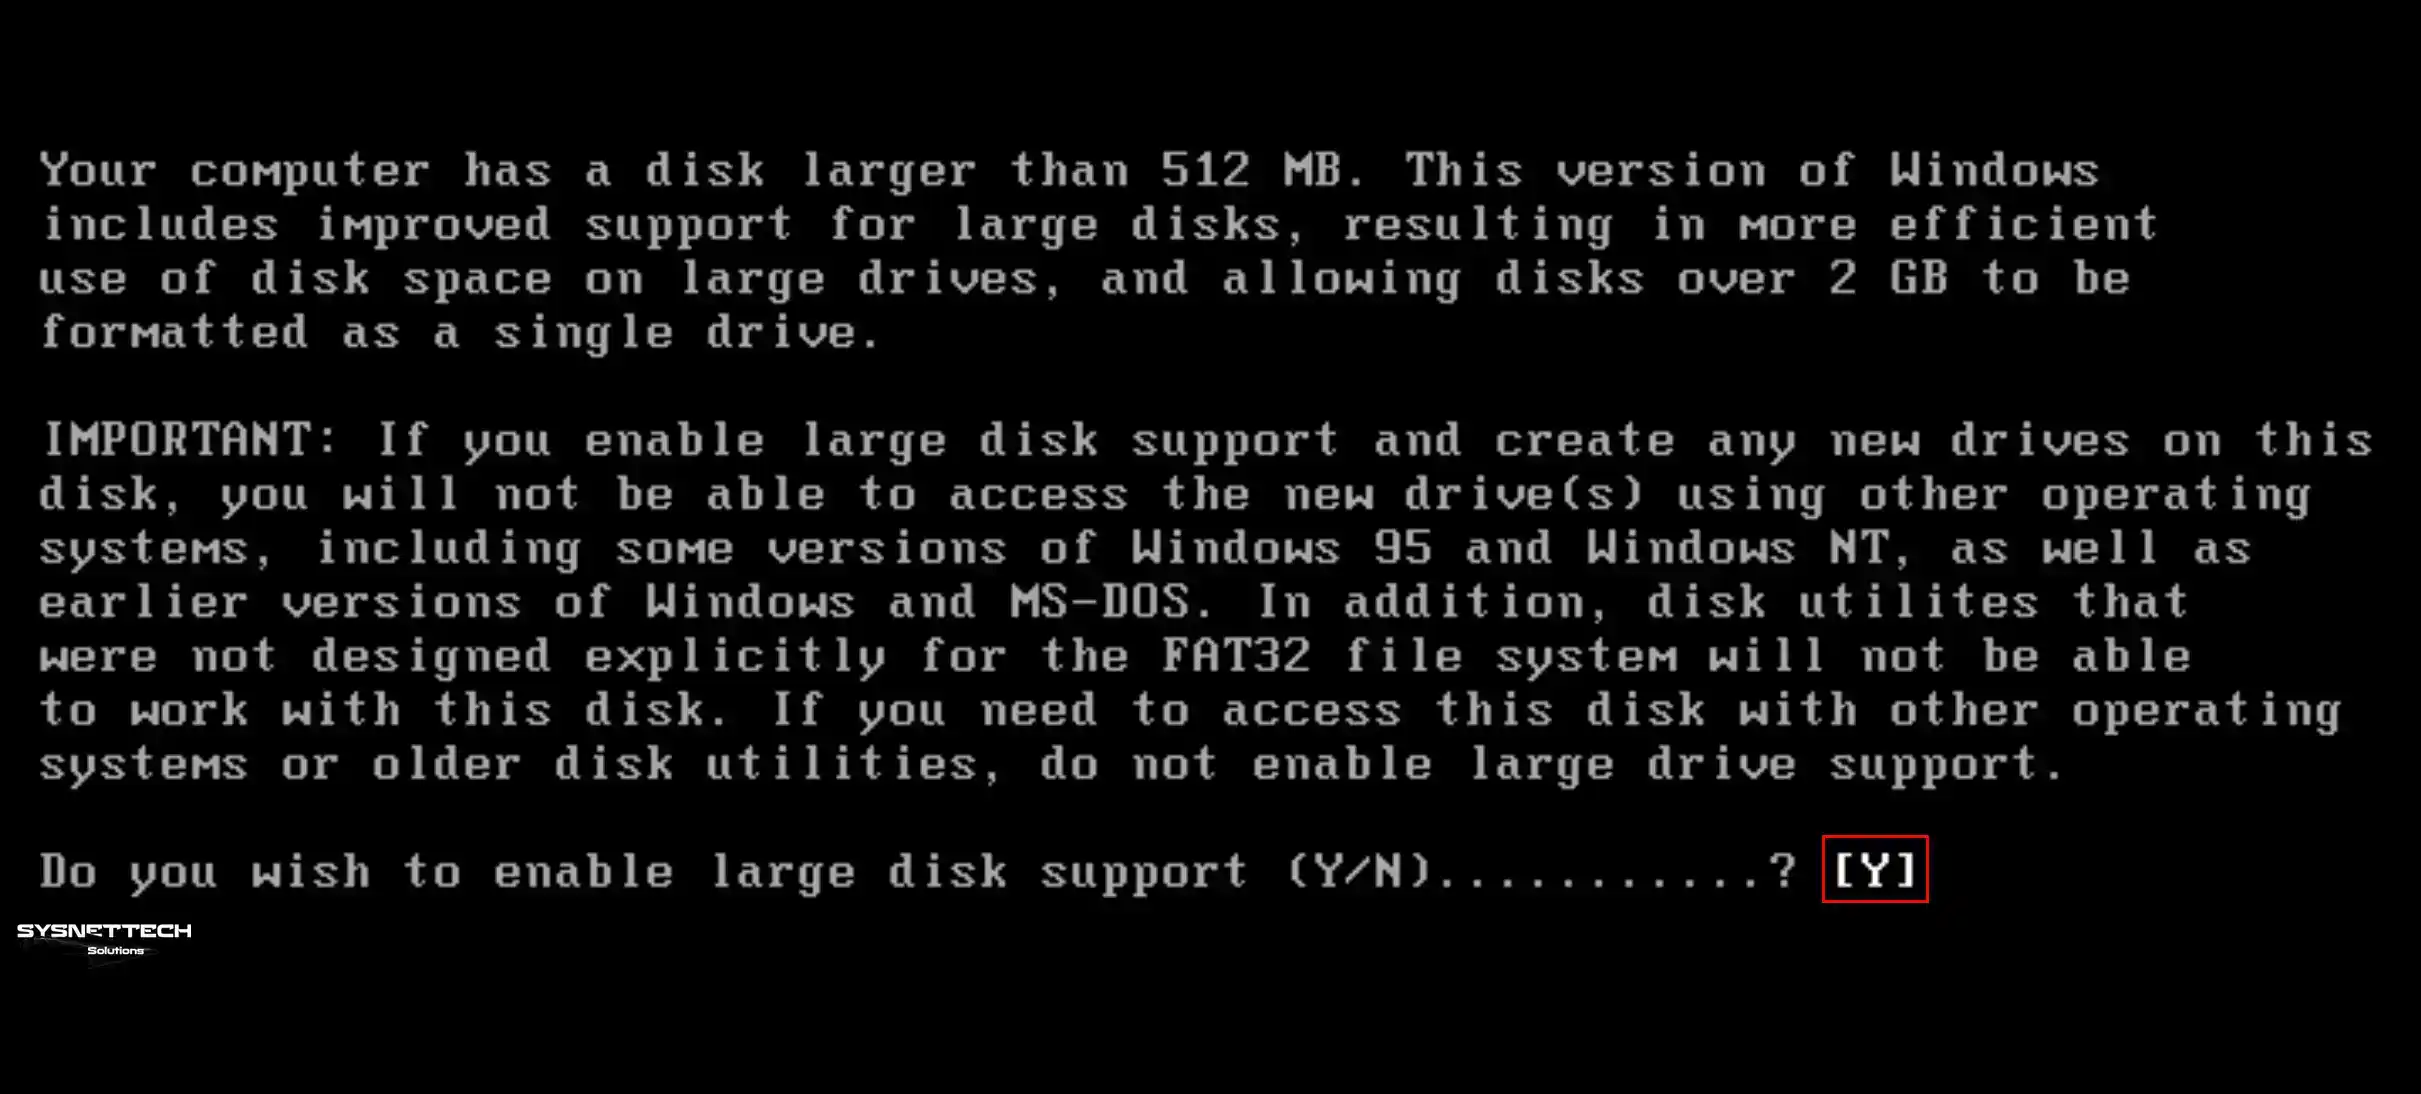
If your system has a disk size larger than 512MB, press Y followed by Enter to enable extensive disk usage.
Step 3
In the Microsoft Windows 95 FDISK options screen, press Enter on the Create DOS Partition or Logical DOS Drive option.
Create DOS Partition or Logical DOS Drive
Step 4
Press Enter on the Create Primary DOS Partition option to create a primary partition on the disk.
Create Primary DOS Partition
Step 5
Press the Y key and then Enter to confirm the maximum disk size usage for the Primary Partition you created.

Step 6
It would be best if you restarted your computer so the changes would take effect. To do this, click the down arrow next to the Suspend button and click Restart Guest.

Step 7
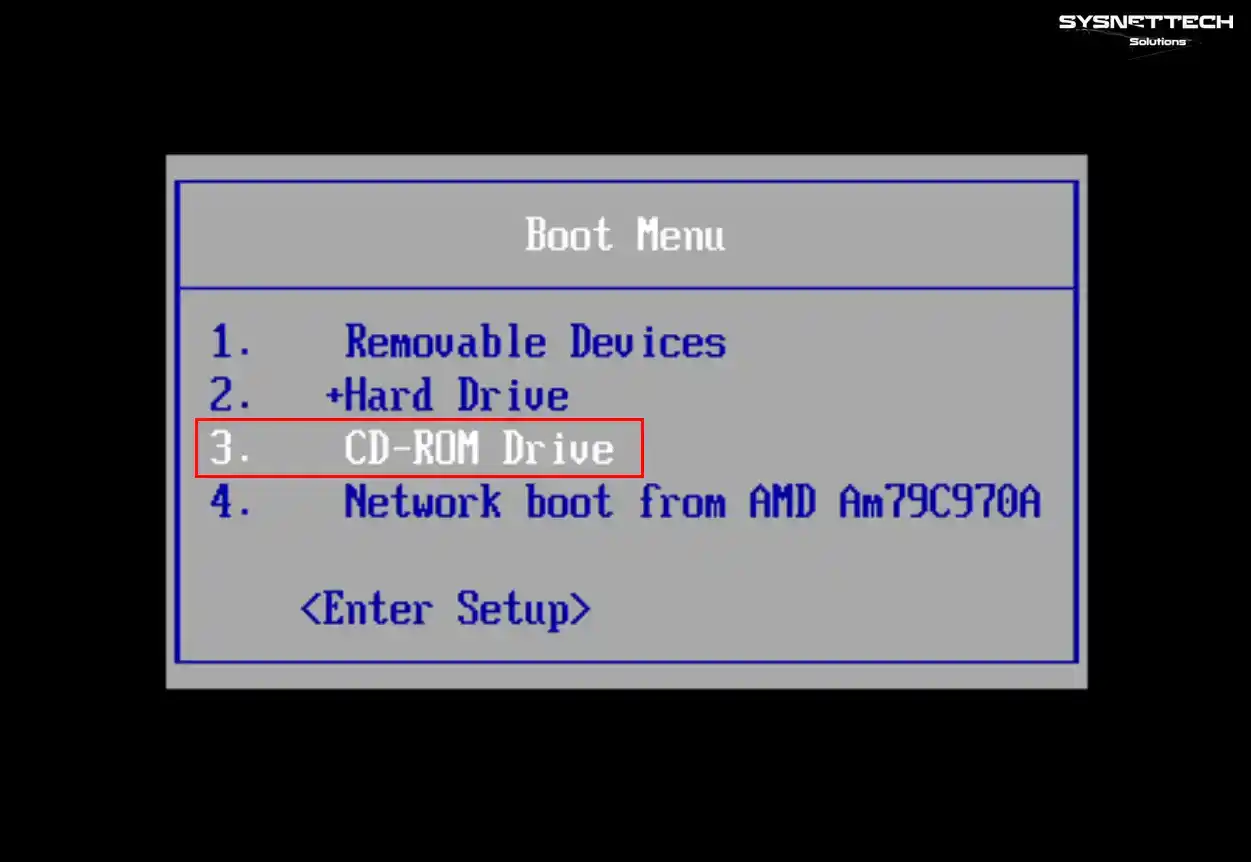
After restarting your virtual system, you may get the operating system lost error because you are not booting from the CD-ROM.
To open the Boot Menu on VMware, press the ESC key while restarting your system. Press Enter on the CD-ROM Drive on the Boot Menu screen and continue.
Step 8
You need to format the disk on which you created the primary partition, execute the format C: command on the command line, and then press Y to confirm that all files on the C drive will be deleted. Press Enter to configure the volume label character count as a default.
format C:
Step 9
After formatting the C drive, you need to create a new folder to copy the Windows 95 system files. To make a folder named WIN95 on C, first, go to the C drive with the C: command and execute the “mkdir WIN95” command.
A:\> C:
C:\> mkdir WIN95
Step 10
To view the contents of the CD-ROM device, switch to the relevant driver with the R: command and view and control the contents of the drive with the dir command.
Execute the command below on the command line to copy the Windows 95 installation files to the WIN95 folder you created on the C drive.
copy R:\WIN95\*.* C:\WIN95
Step 11
After copying the system files, execute the setup command in the C:\WIN95 folder to start the Windows 95 installation, and then press Enter to continue.
C:\WIN95> setup
Step 12
When Microsoft ScanDisk opens, wait while your system’s file integrity, disk size, and directory structure are checked.

Step 13
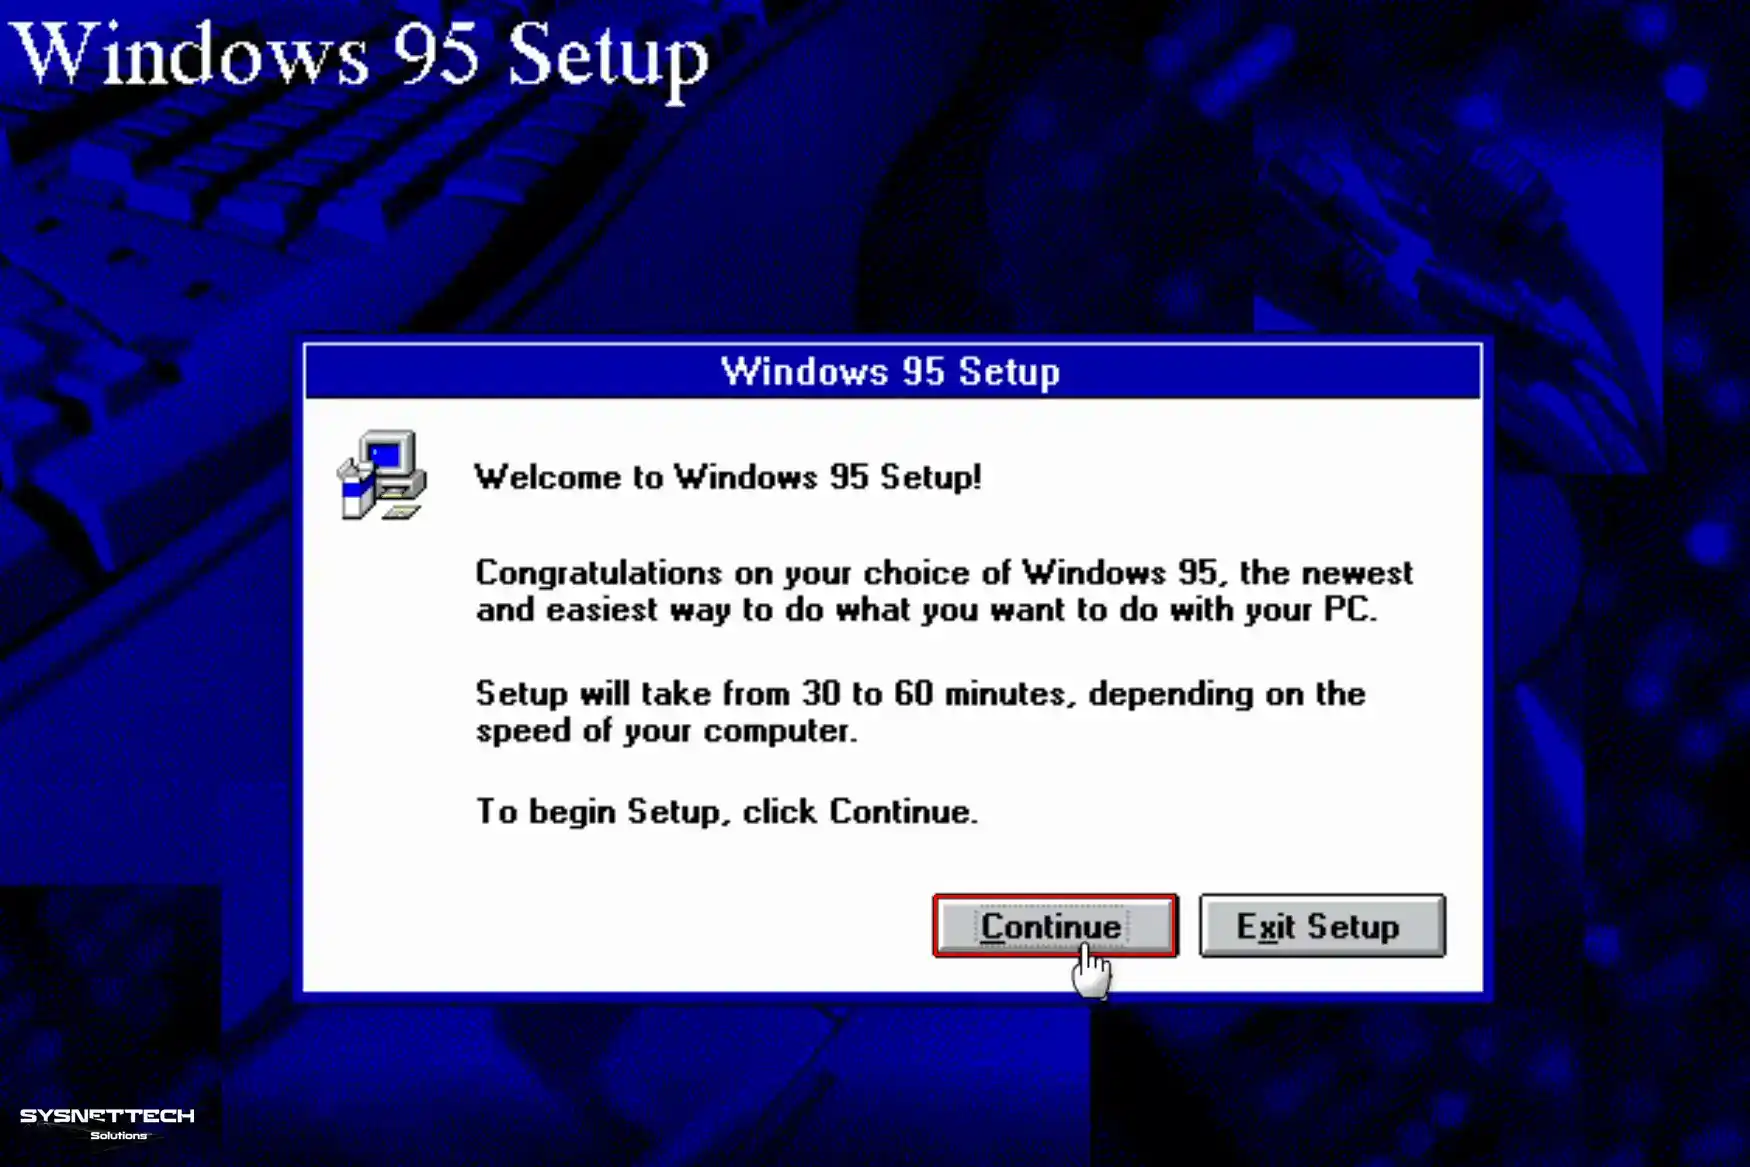
When the Windows 95 Setup screen opens, the wizard informs you that the installation will be completed in 30 to 60 minutes. Click the Continue button in the welcome window to start the installation.
Step 14
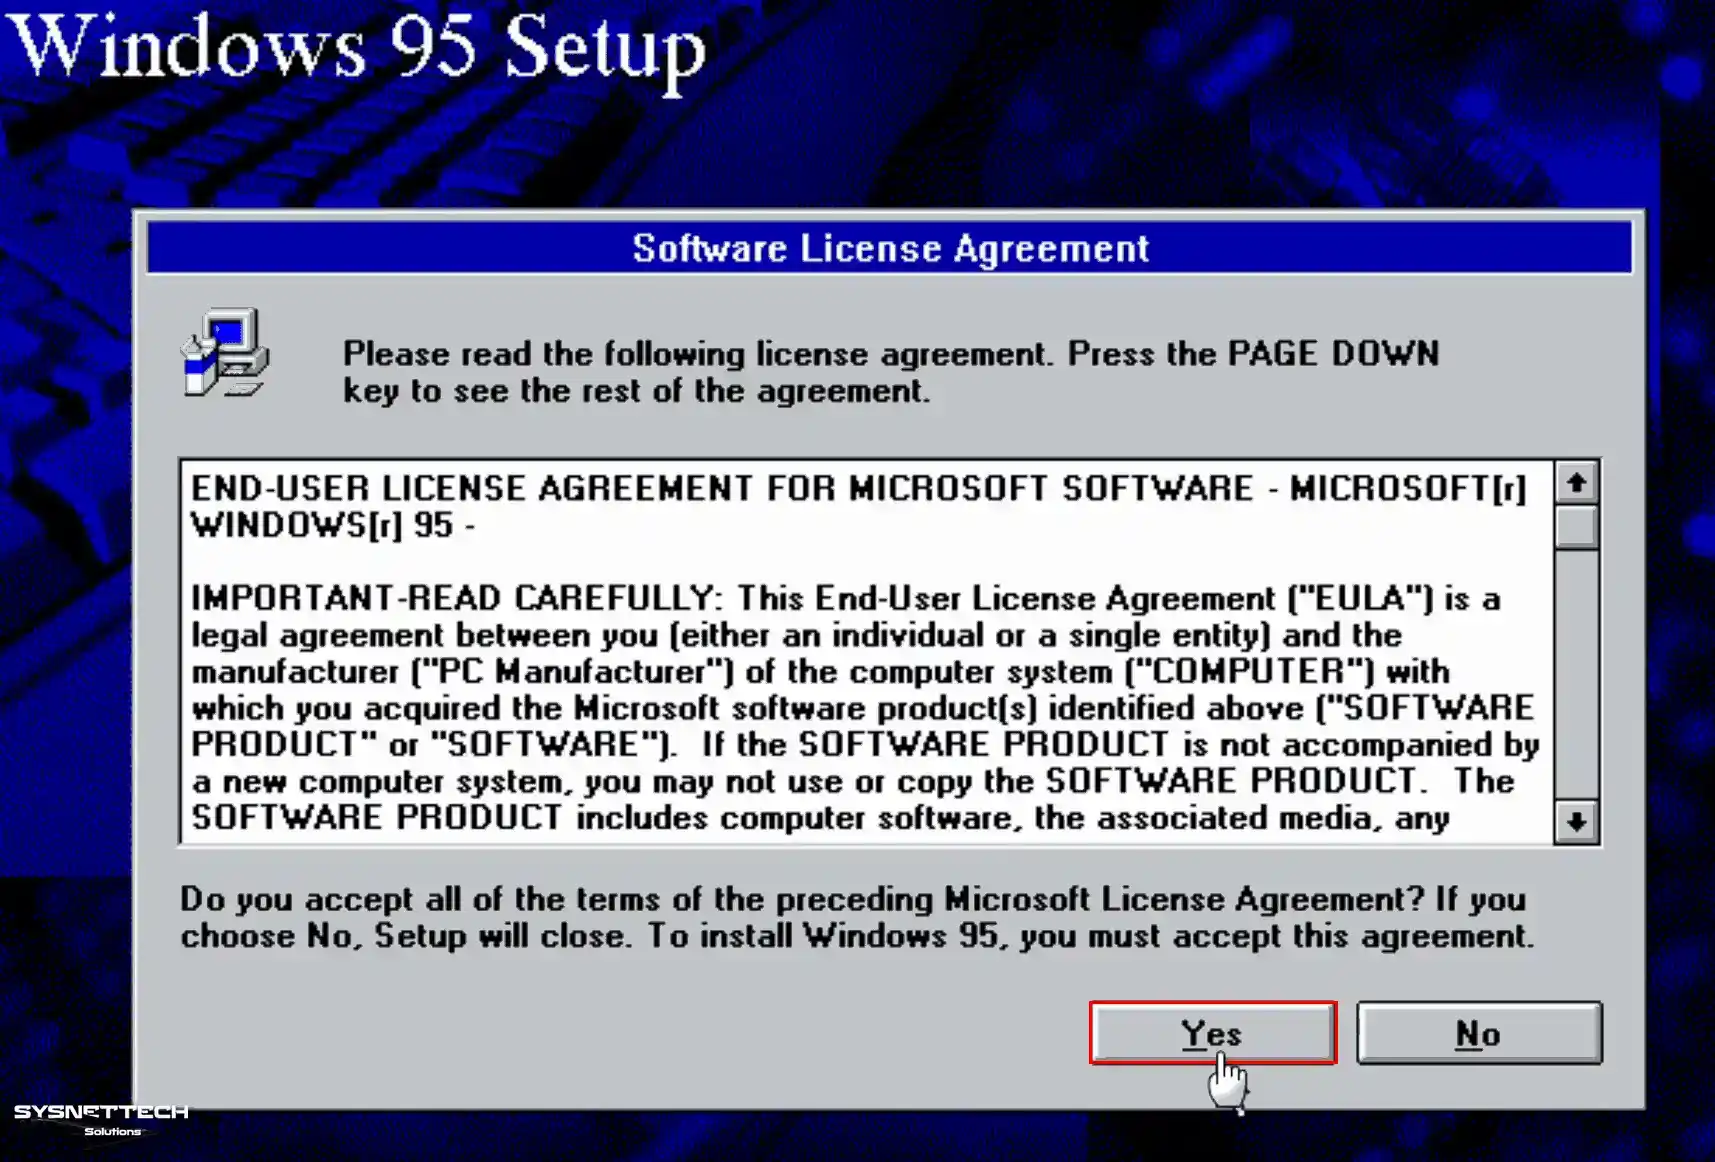
Press Page Down to read the Windows 95 license agreement and then click Yes to accept it.
Step 15
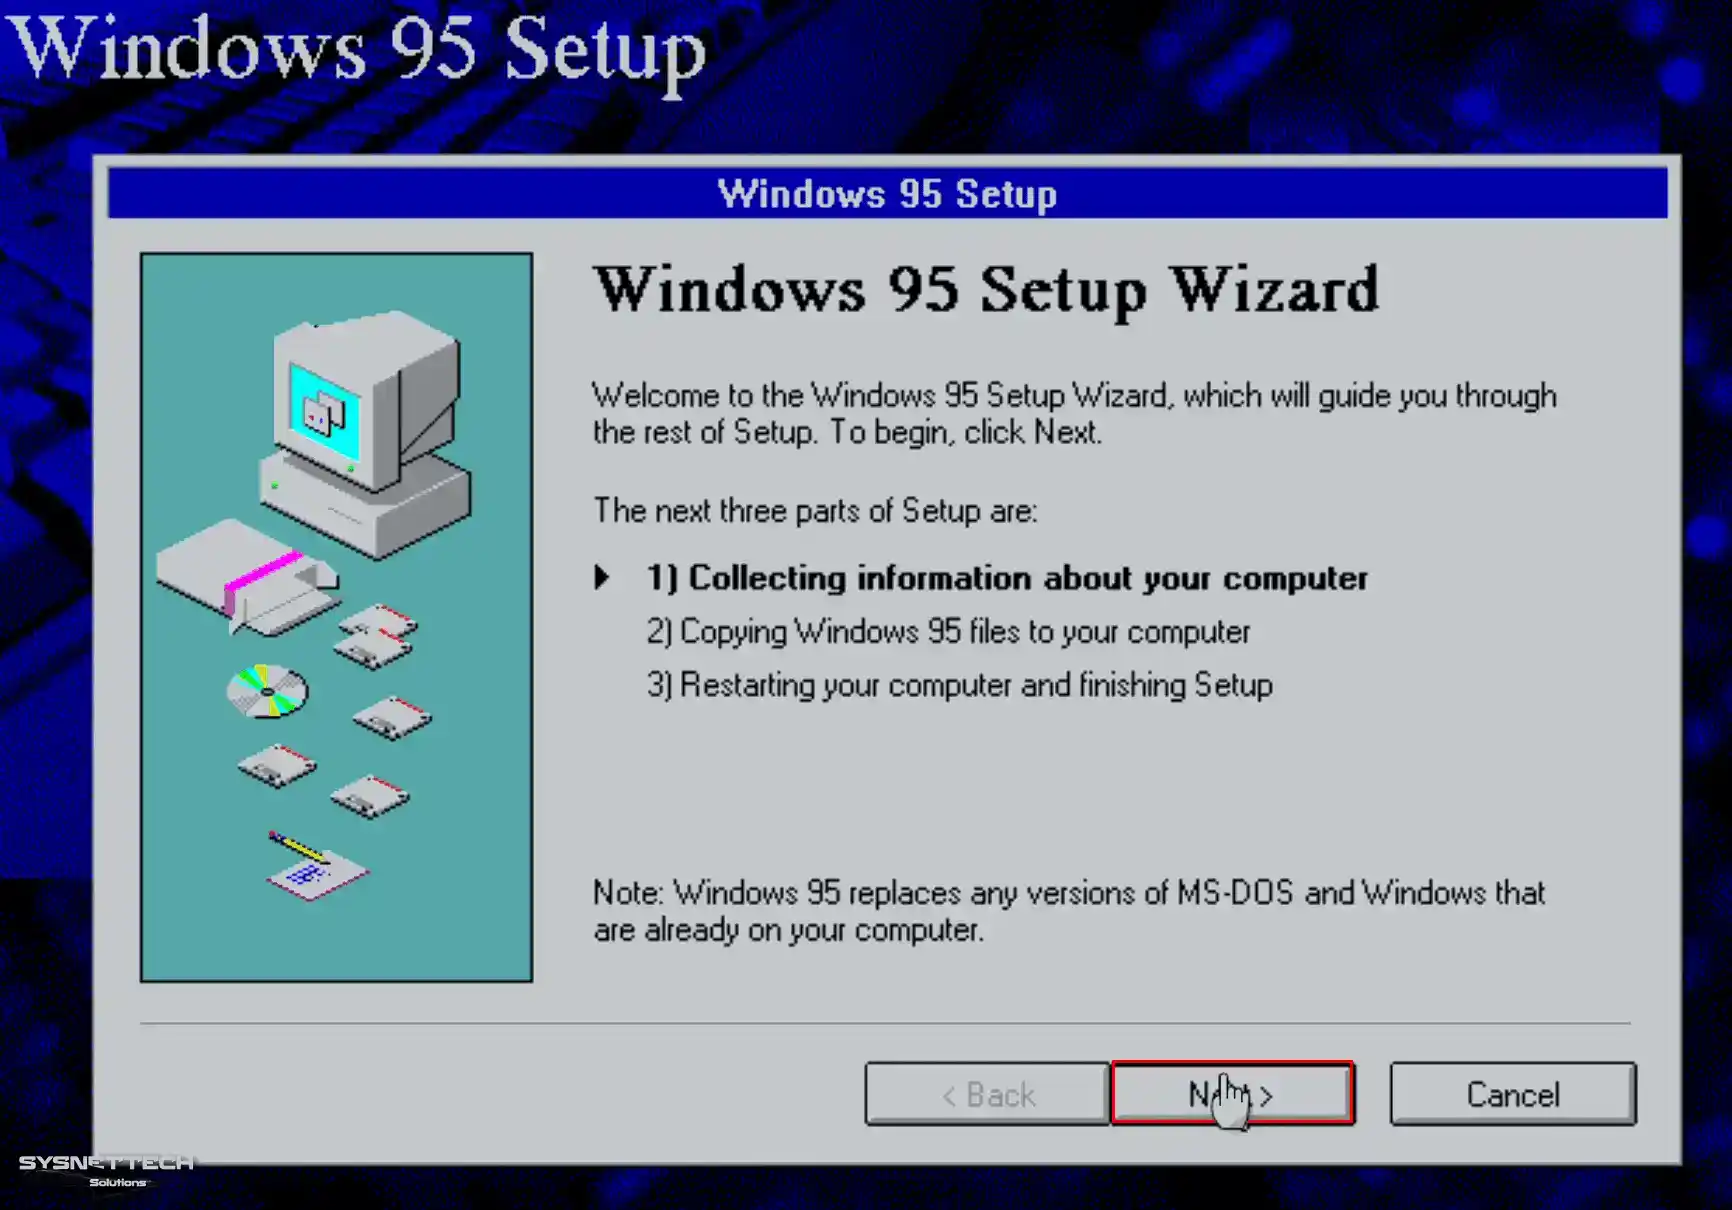
Click Next for the setup wizard to collect information about your computer and copy the system files.
Step 16
In the Choose Directory window, select the default C:\WINDOWS location where you will install your virtual system and click Next.

Step 17
In the Setup Options window, select the installation type, Typical by default, and continue. If you want to make changes to your system, you can continue with the Custom option.

Step 18
In the Certificate of Authenticity window, type your Windows 95 product key and click Next.

Step 19
In the User Information window, type the user account name and company information for your system and click Next.

Step 20
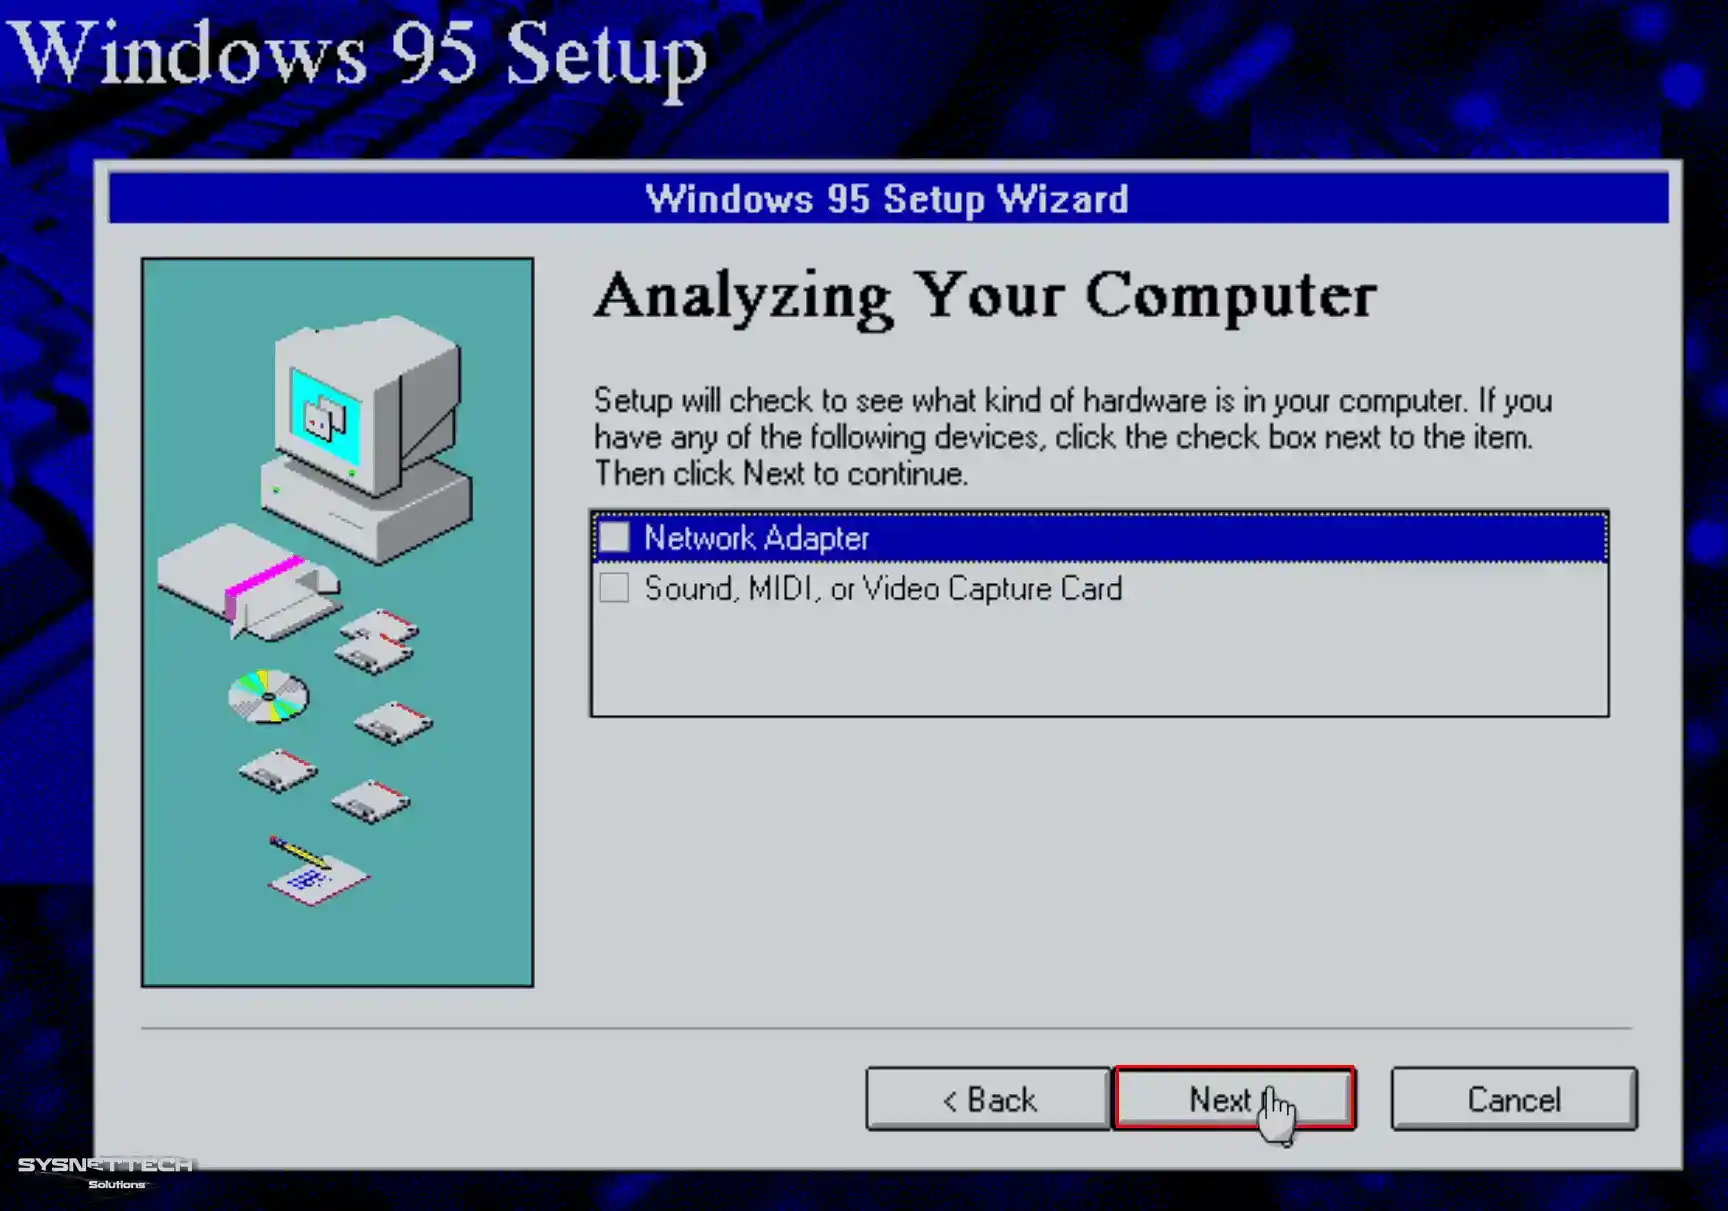
Click Next for the setup wizard to analyze the hardware components of your virtual system.
Step 21
Wait while the hardware of your virtual computer is being scanned.

Step 22
In the Windows Components window, select Install the most common components to install the most commonly used services and continue.

Step 23
If you want to create a Startup Disk, select Yes, but select No, as it is not required in the virtual machine, and click Next.

Step 24
Click Next to start copying Windows system files and continue.

Step 25
Wait while the Windows 95 system files are copied and installed.

Step 26
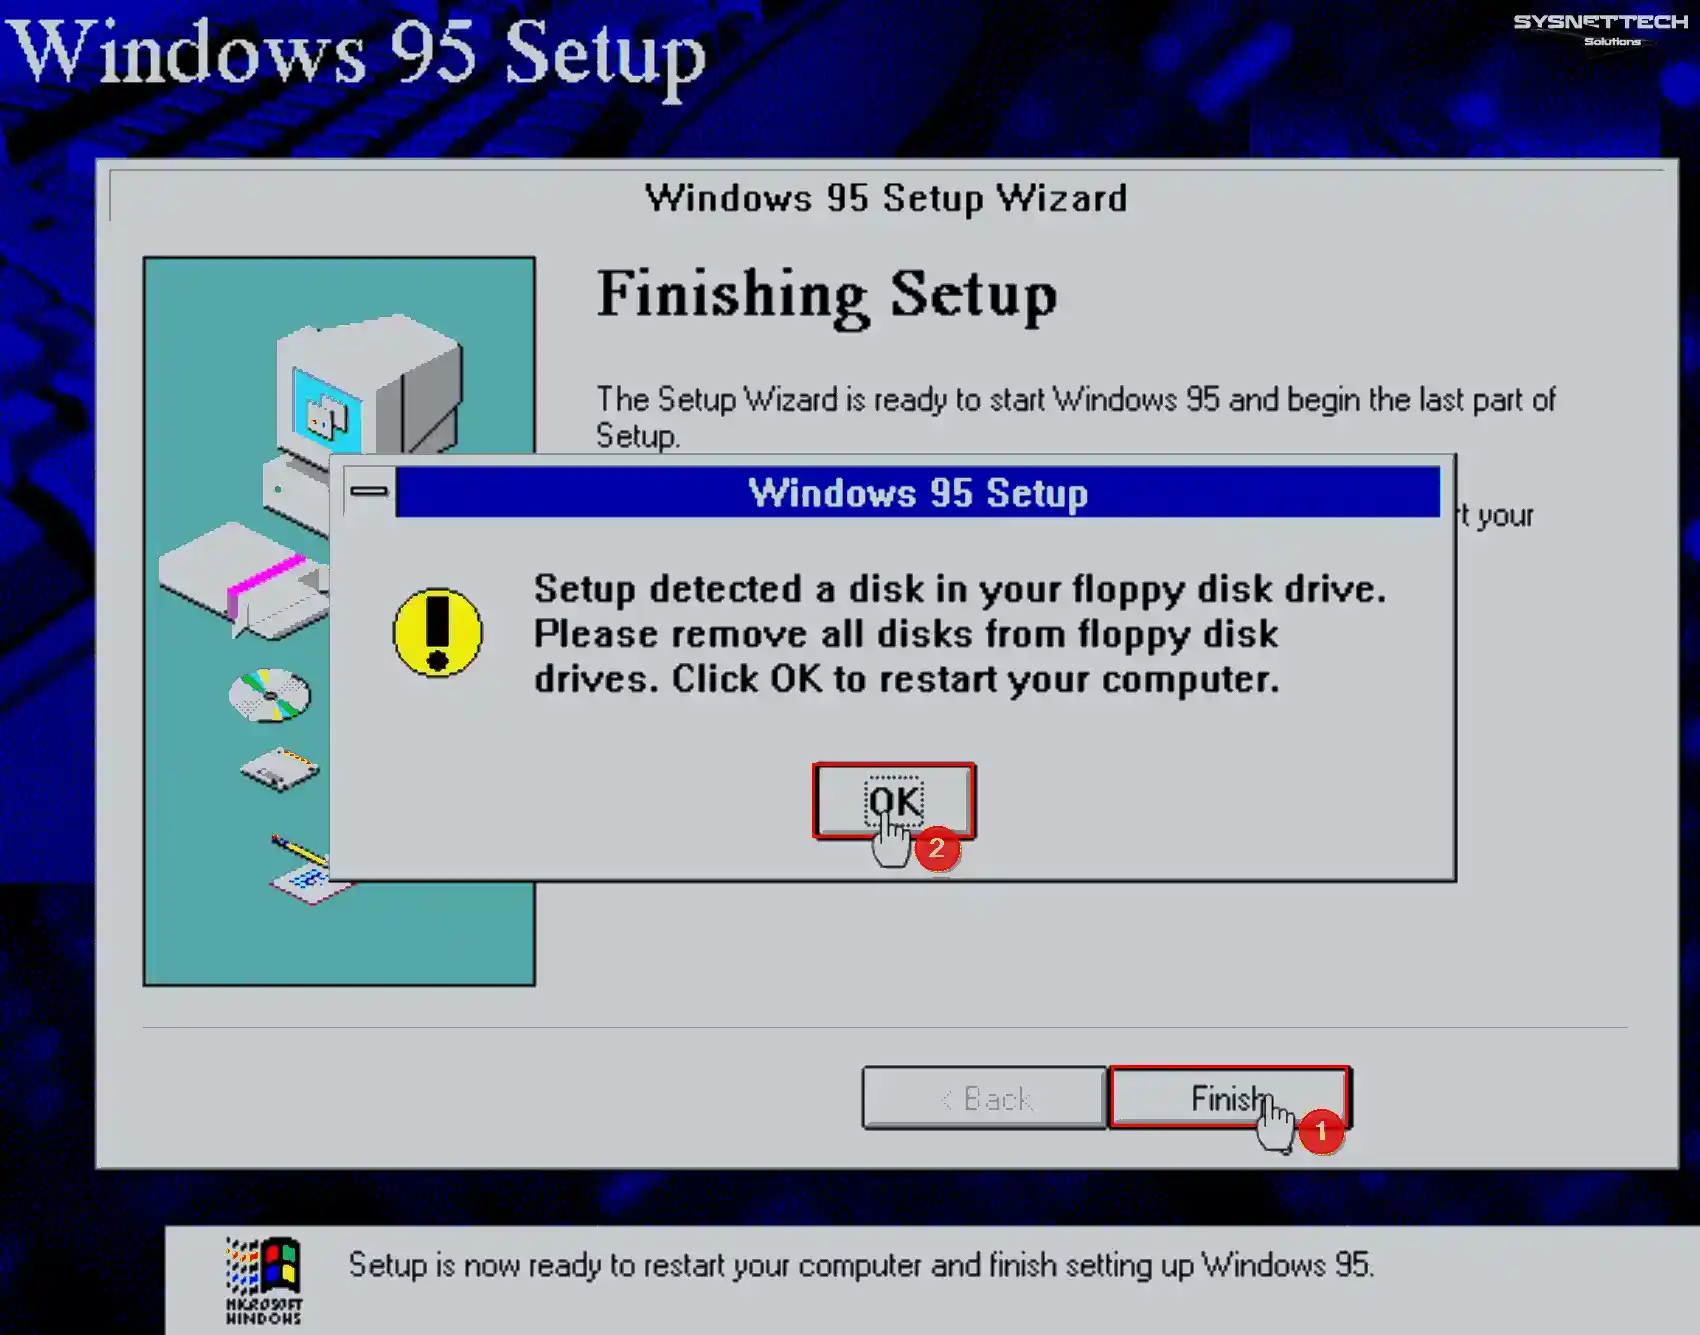
When the installation wizard identifies the floppy disk drive on your system, disconnect it and click the OK button.
Step 27
At this stage, you will receive a Windows Protection Error while installing on your new-generation computer. In order to run your Windows 95 guest machine properly, you need to patch it. Now, shut down your virtual machine and proceed to the next step.

Step 28
Click Edit Virtual Machine Settings, as you need to add a Floppy device to the virtual machine to patch your virtual system.
After opening the settings of the virtual machine, click the Add button, select Floppy Drive as the hardware type, and click Finish.

Step 29
Click the button below to download the patch ISO file for Windows 95 to your computer and to add the ima file to the Floppy drive, select Use Floppy Image File, click Browse and select the Patcher.ima file.
You can also download Patcher9x-0.7.45-boot.ima from the Vogons.org website article or GitHub page.

Step 30
When you boot your virtual system from the Floppy drive, execute the “patch9x” command on the DOS screen and then press Enter to confirm the WINDOWS/SYSTEM location.
To patch Win95 for the latest CPUs, select the default option, i.e., 2, and press Y and Enter to apply the changes.

Step 31
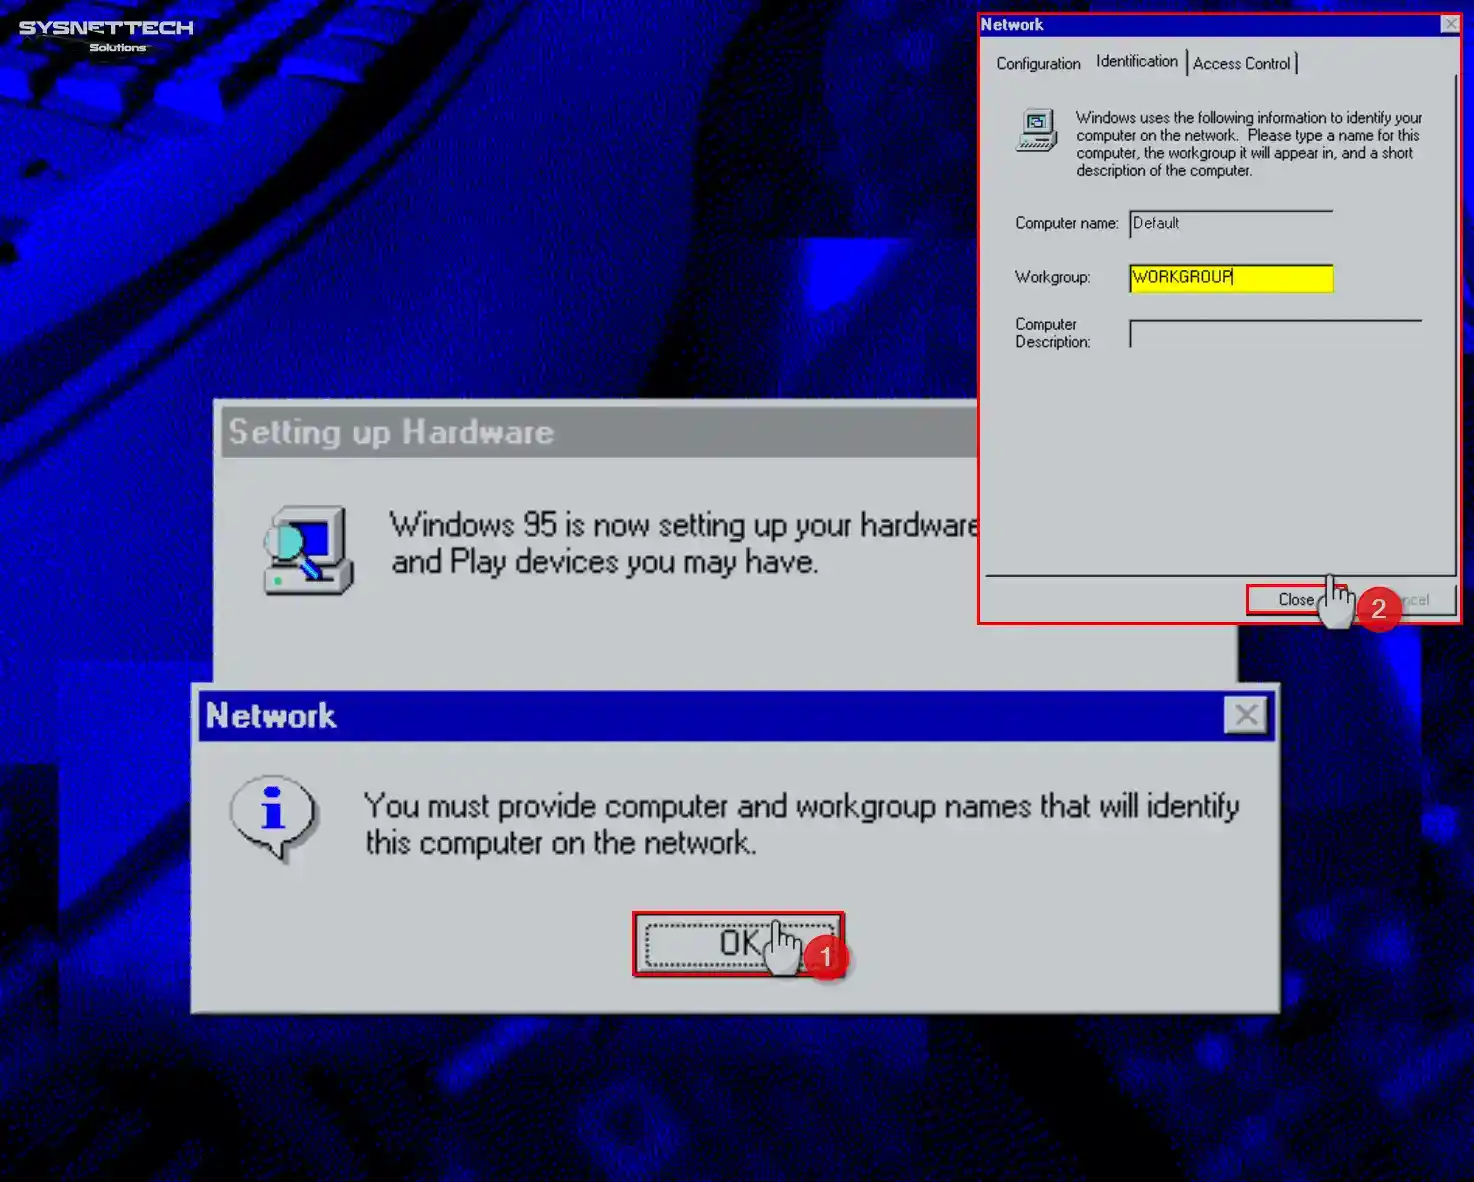
Wait while Windows 95 sets up plug-and-play devices. Also, click OK when Windows prompts you to type a computer name and workgroup name at this stage.
When the network window opens, type a computer name for your virtual system, type Workgroup for the Workgroup, and click the Close button.
Step 32
Configure your date and time settings depending on the country you live in, and click the Close button. When the Add Printer Wizard opens, click the Cancel button to configure this step later or close the wizard if you don’t have a printer.

Step 33
After the setup wizard completes the Win95 installation, click OK to restart your virtual system.

Step 34
Wait while the Microsoft Windows 95 operating system boots up.

Step 35
Type the username you created for the user account and click OK. In the Set Windows Password window, set a new password to make your system password accessible and click OK. If you don’t want to create any password here, leave the fields in New Password blank and click OK.

Step 36
After your virtual system restarts, right-click on My Computer, click Properties from the options that appear, and check the version of your system.

How to Install VMware Tools
After installing the Windows 95 system, you must also install the VMware Tools software. With this software, you can use your virtual PC in full-screen mode by installing the video card driver. In addition, you can use your host’s devices, such as USB, Webcam, and mouse, on the virtual PC.
Step 1
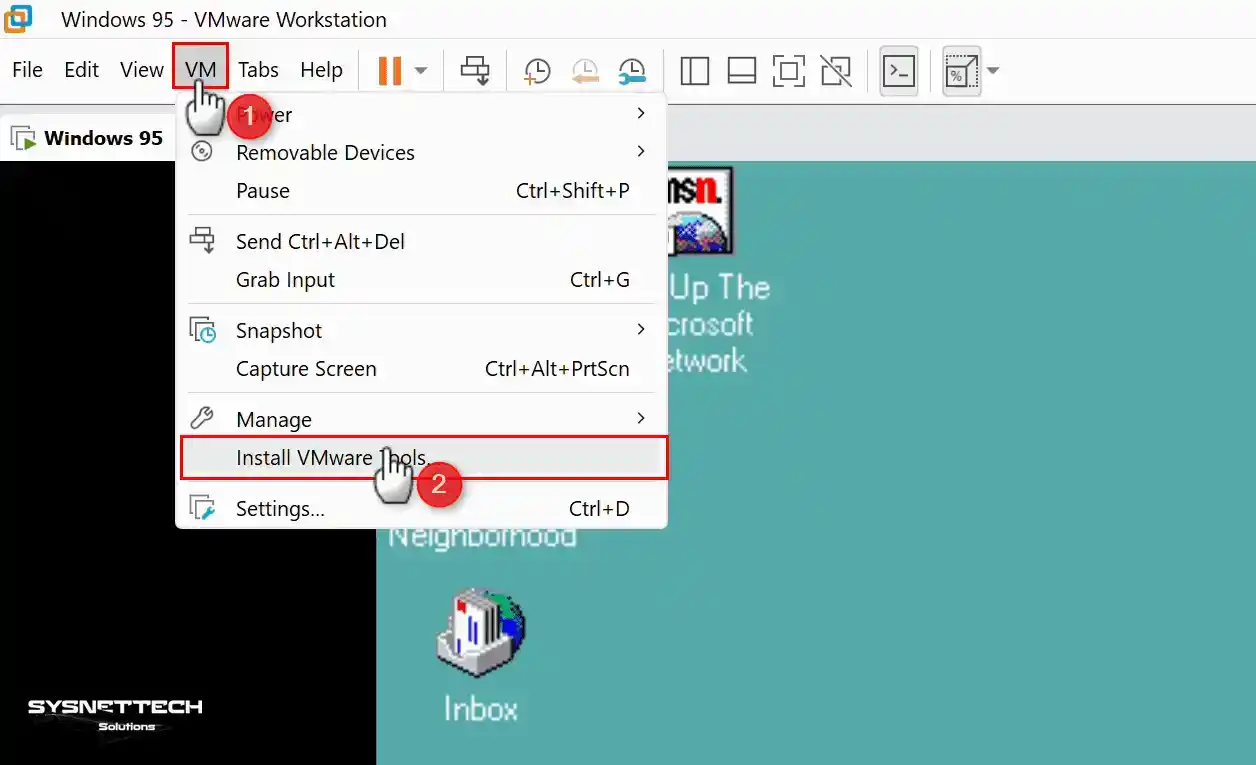
To install VMware Tools on the virtual machine, click VM / Install VMware Tools from the Workstation Pro tool menu.
Step 2
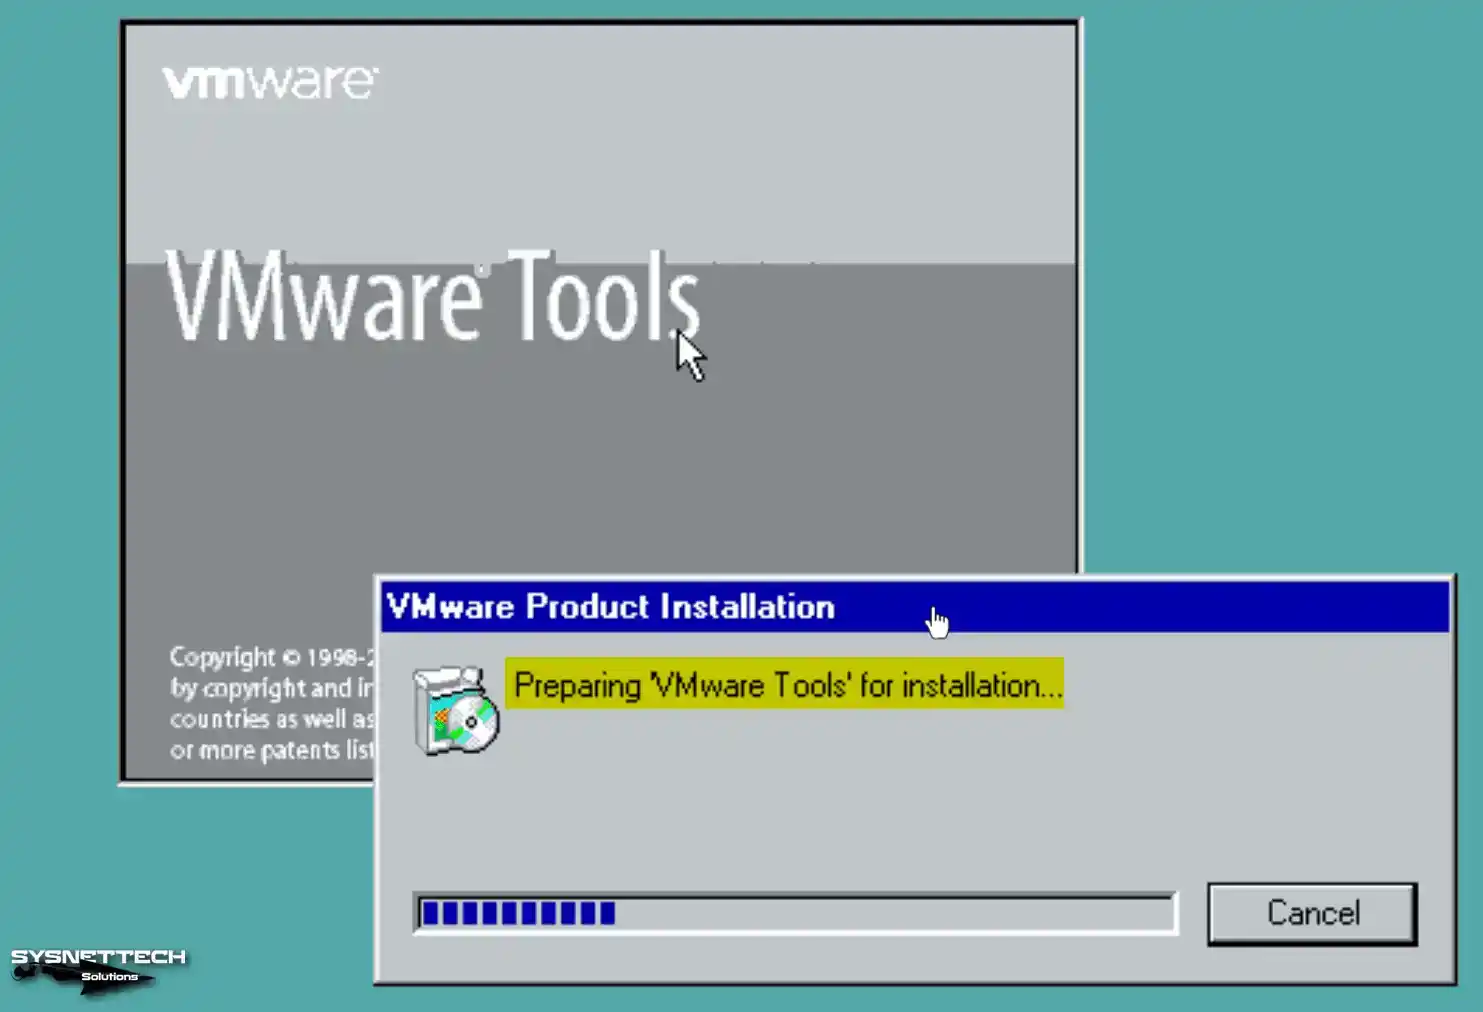
Wait while VMware Tools prepares for installation on the VM.
Step 3
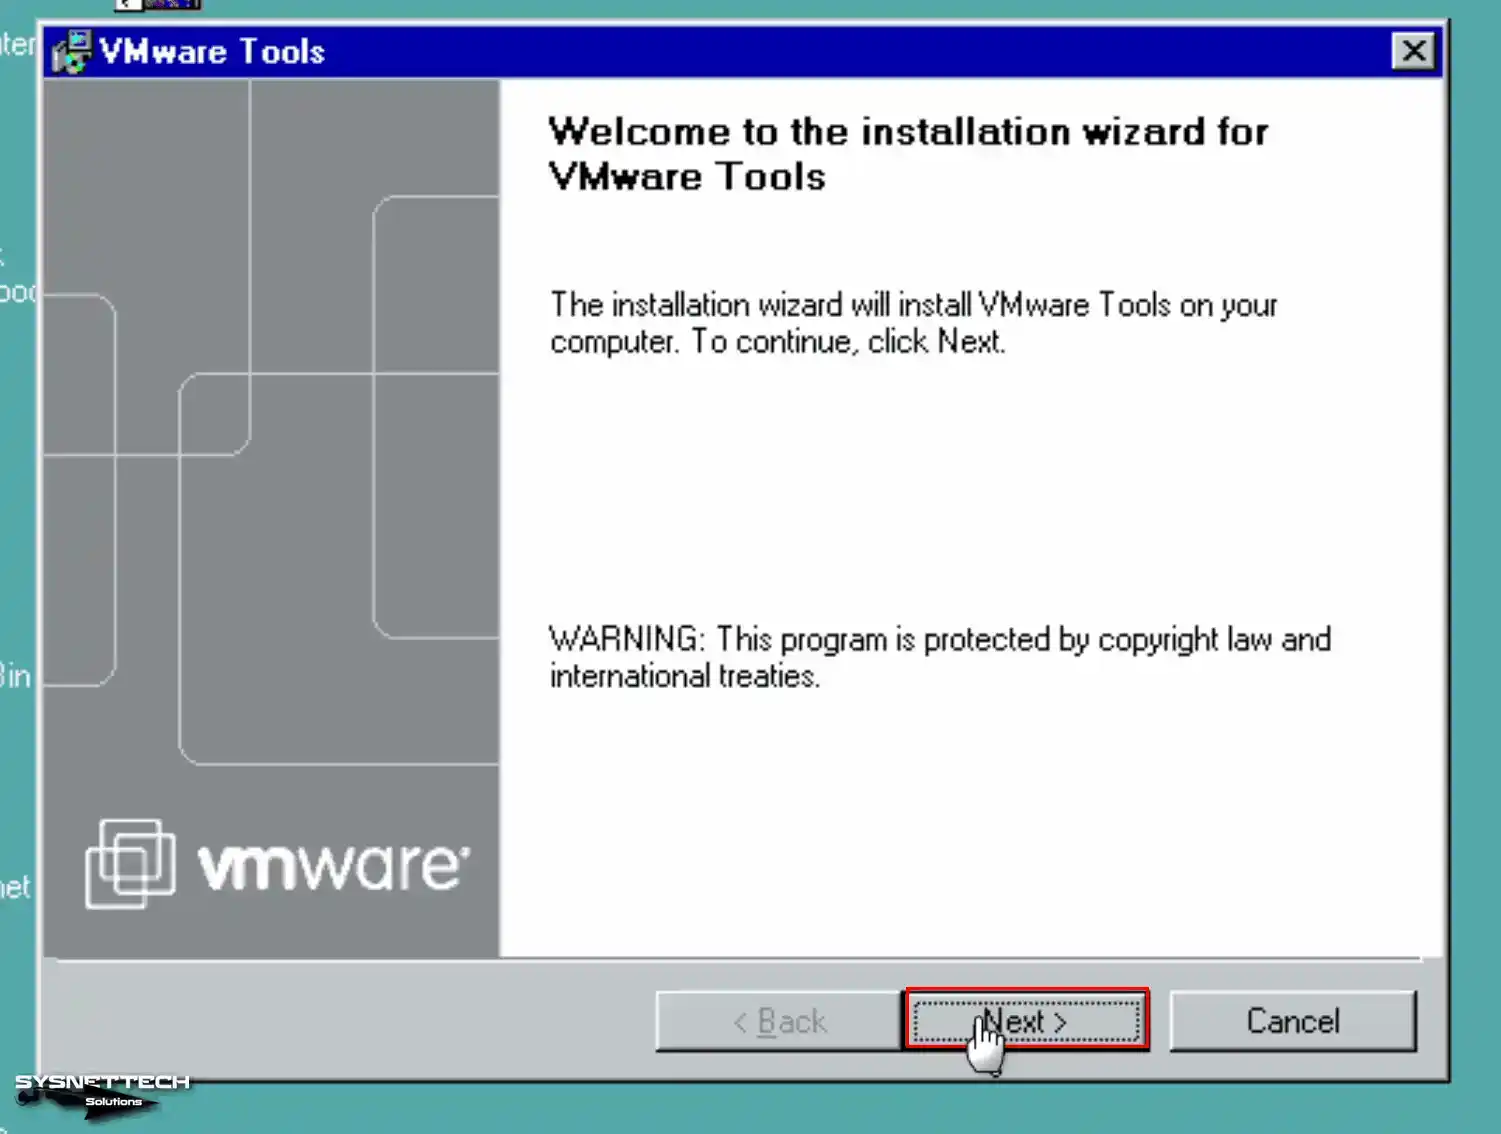
When the setup wizard opens, click Next to start installing the virtual machine tools.
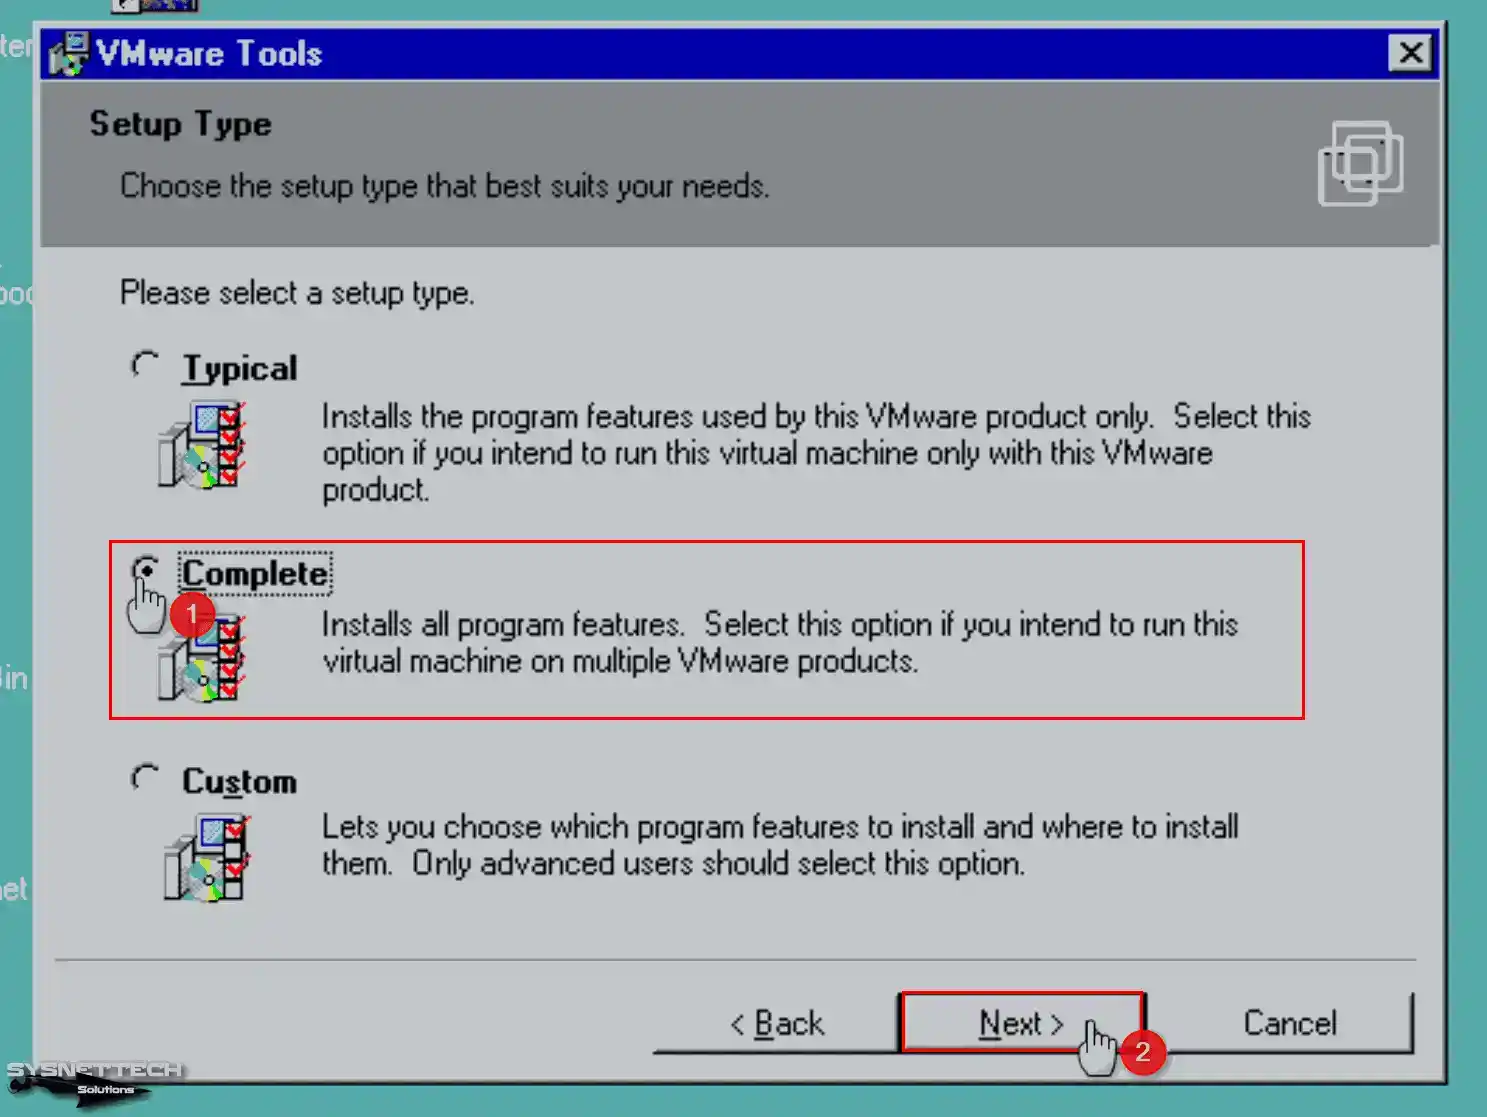
Step 4
If you are going to use your virtual machine with other VMware Pro products, select Complete as the installation type and click Next.
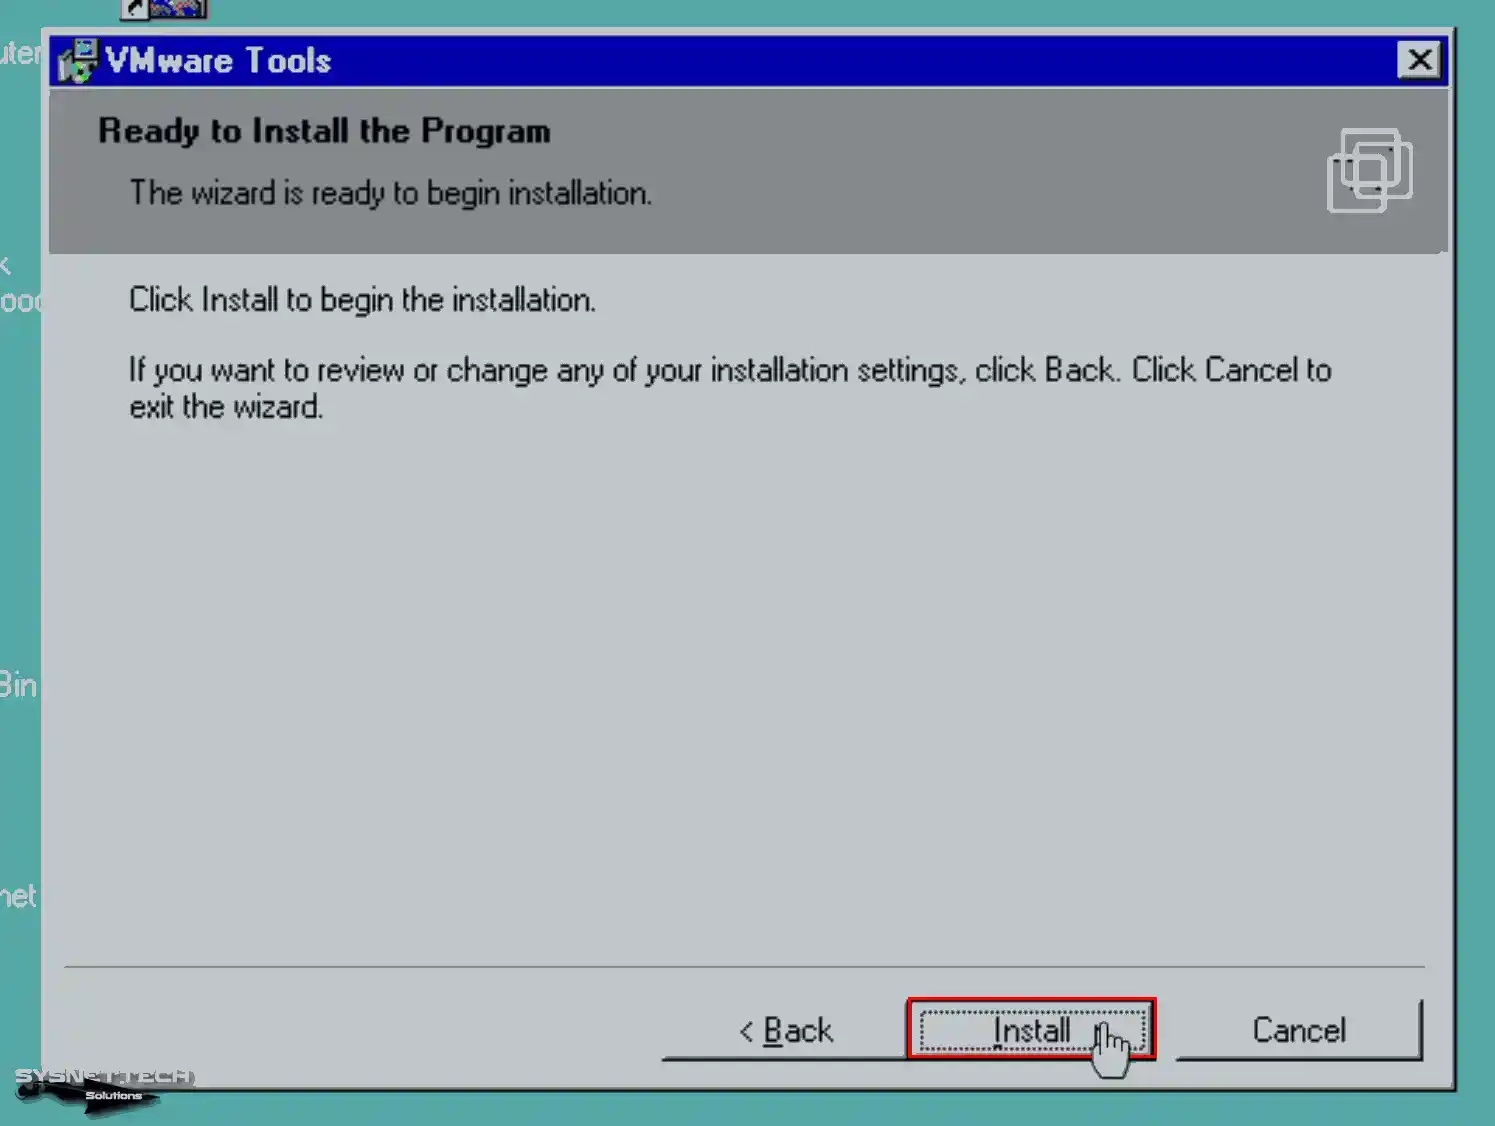
Step 5
When the virtual machine tools are ready to be installed, click the Install button.
Step 6
When you receive Warning 25010 (Microsoft HTML Help Engine) during the VM Tools installation phase, click the Yes button. Click OK in the HTML Help 1.31 Update window and continue.

Step 7
This time, when you get Warning 25009, click OK. Then, if the SVGA driver cannot be installed in the VMware Tools installation, you must do this manually later.
Setup failed to install the SVGA driver automatically. This driver will have to be
installed manually. Instructions for how to do this will appear at the end of installation.
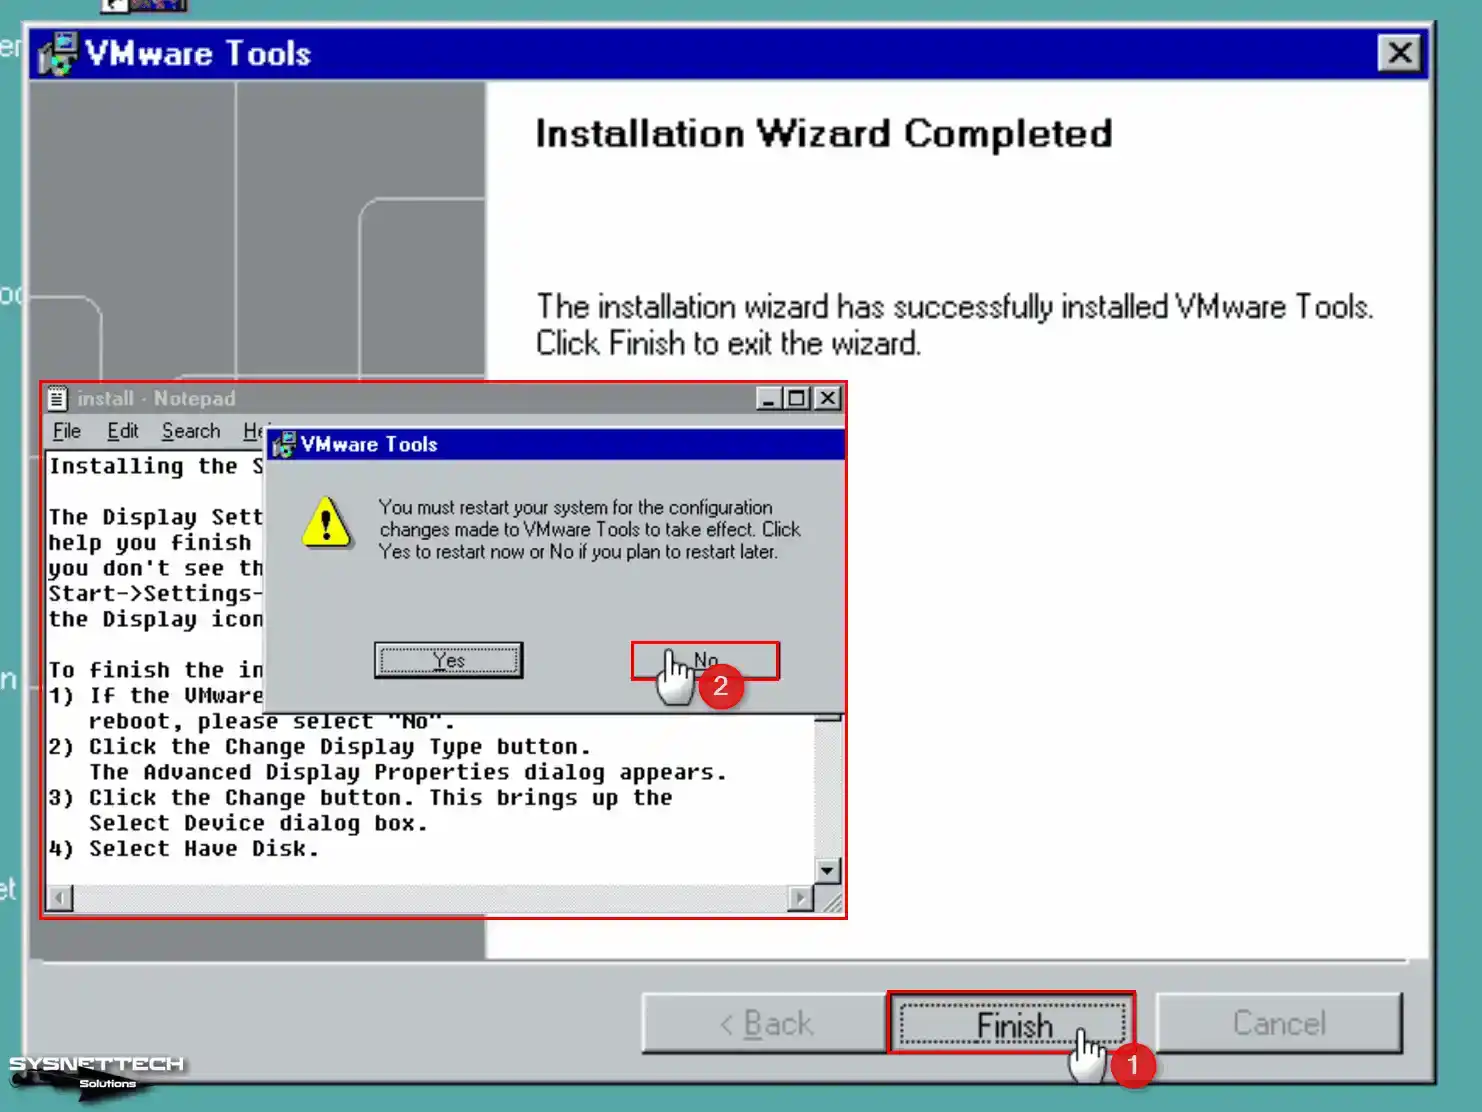
Step 8
Click Finish to close the VM Tools wizard. Click the No button in the warning window asking you to restart your system. To install the SVGA driver manually, the text document will open automatically, but you will need to restart your system.
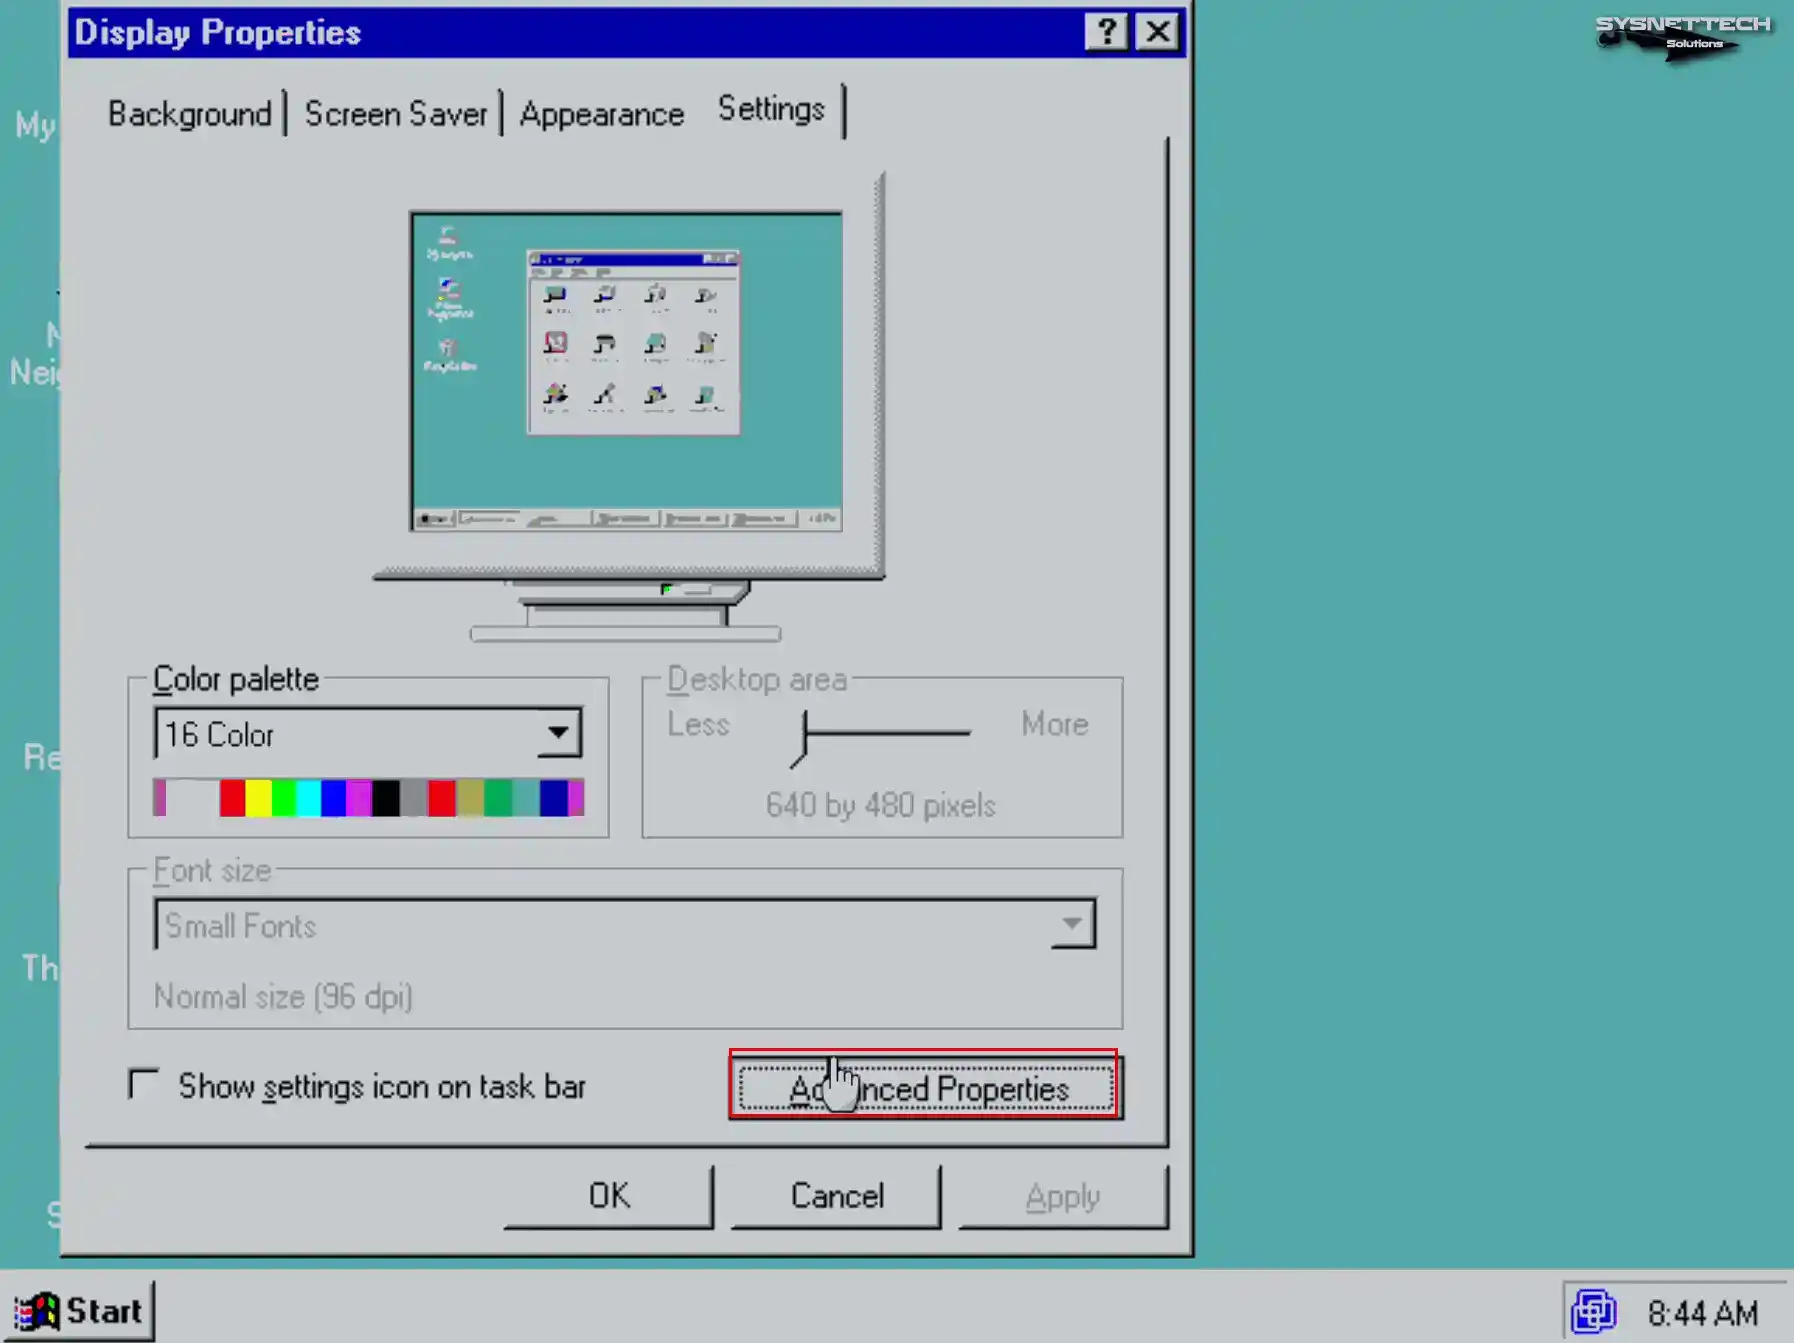
Step 9
Right-click on the desktop, open the Display Properties window, and click the Advanced Properties button.
Step 10
In the Advanced display properties window, click the Change button on the Adapter tab, and then click the Have Disk button on the Standard PCI Graphics Adapter (SVGA).
When the Install from Disk window opens, paste the location you copied in the previous step into From: and click the Browse button. Select the VMX_SVGA.inf file in the opened location and click OK.

Step 11
Select the VMware SVGA II device in the Select Device window and click OK. Then click the Apply button to confirm the settings of the VMware SVGA II device.

Step 12
Configure the screen resolution to 1024 x 768 and click OK to confirm the resolution. If the resolution of the VM is not working correctly, you can revert to the original settings after waiting 15 seconds. Click the Yes button if you want to set a monitor; otherwise, click the No button.
If the resolution of the virtual machine is working correctly, click Yes to use the resolution you set.

Step 13
Click View / Fit Guest Now or View / Full Screen to fit Windows 95 resolution to full screen.

Step 14
You can also drag and drop a file from your host computer’s desktop location or another location to the virtual machine to see that the file has been successfully copied.

How to Install TCP/IP Protocol for Internet and Network Connection
After fully configuring Windows 95, you need to install the TCP/IP protocol to be able to access the Internet through your VM.
Step 1
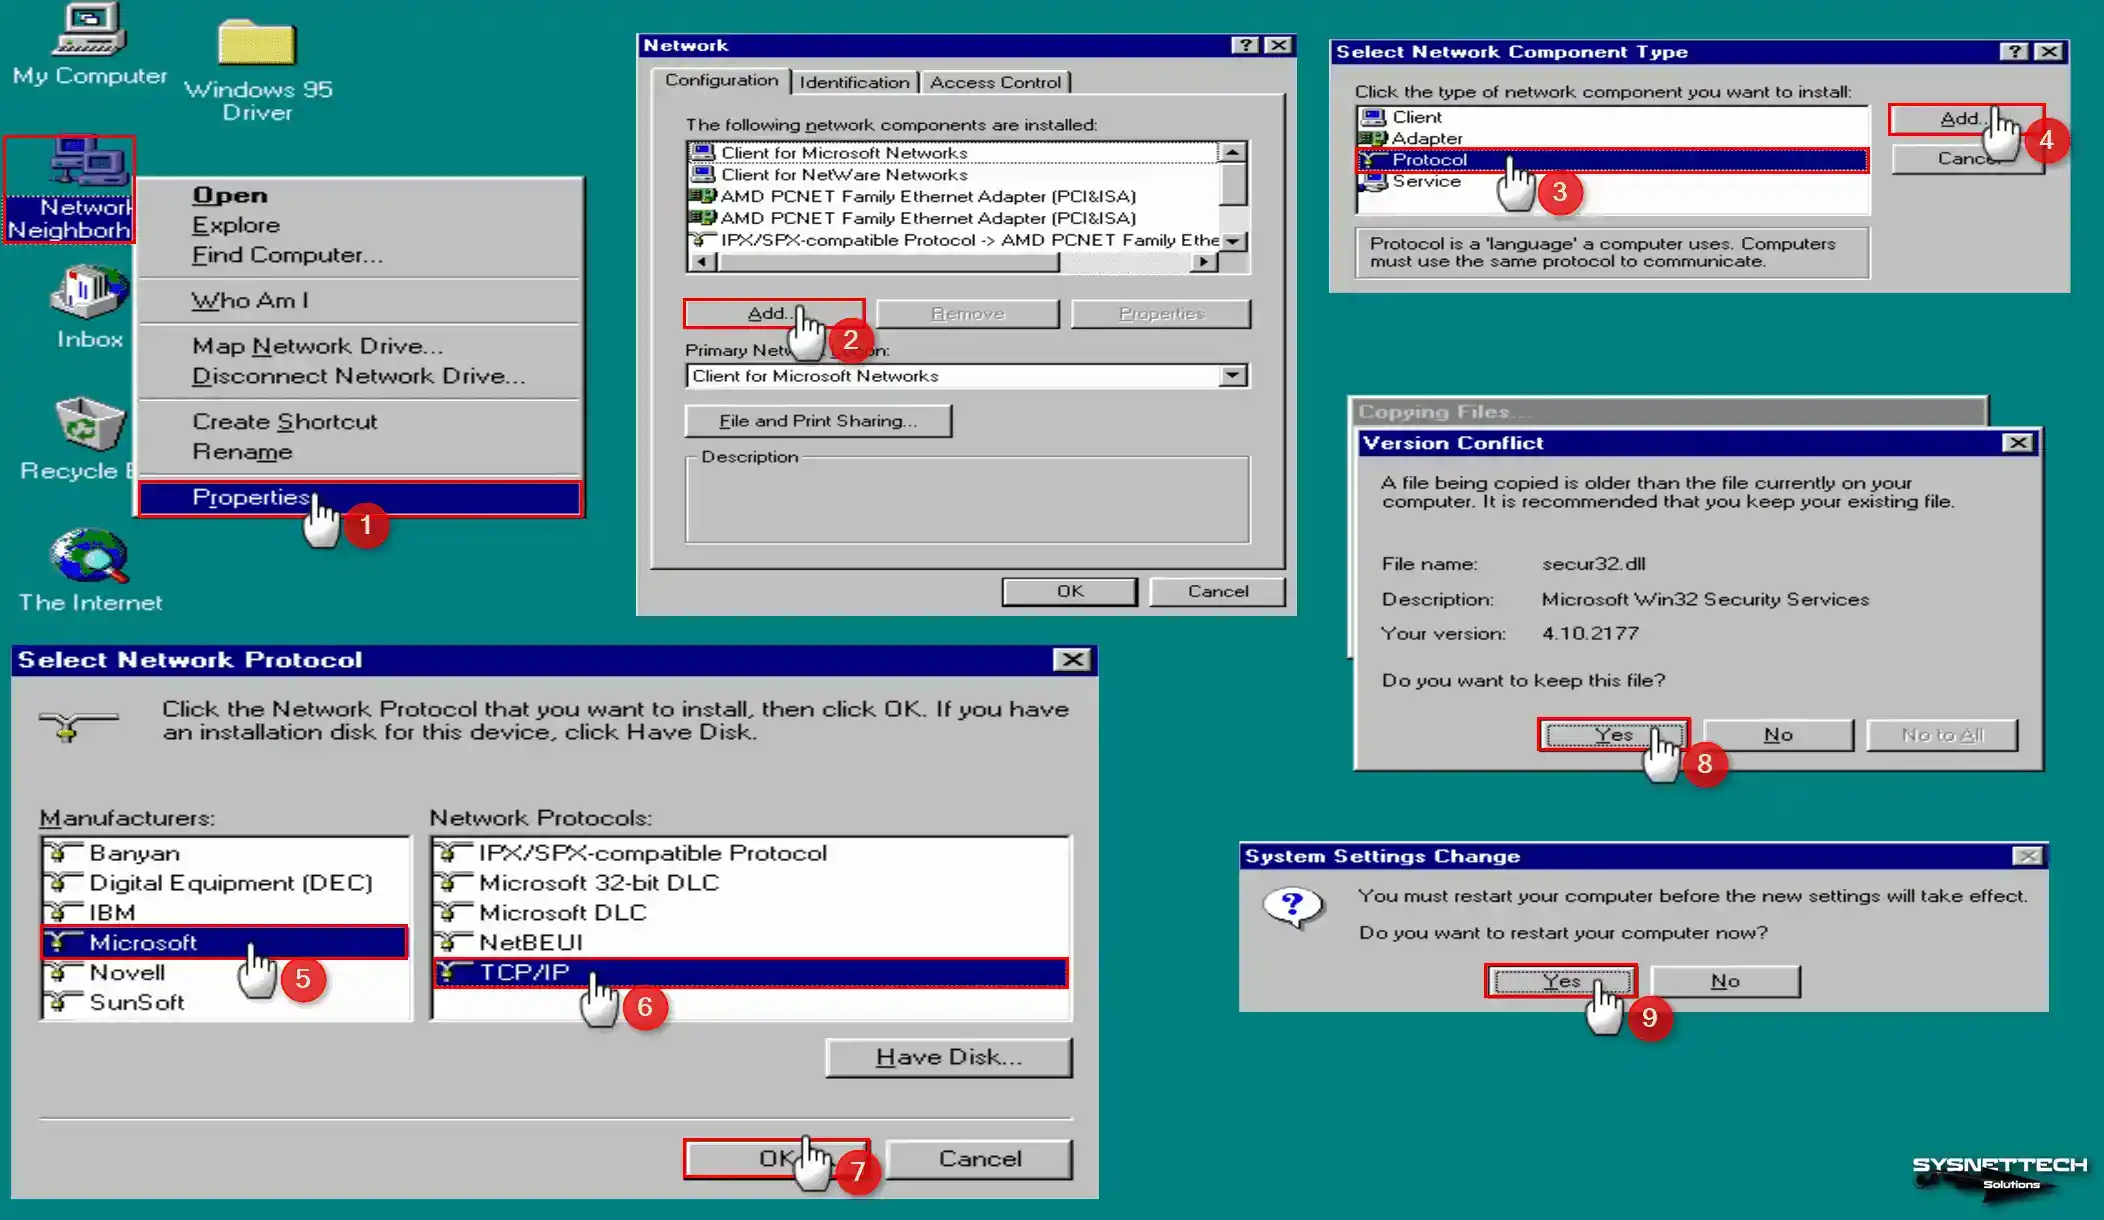
Right-click on the Network Neighborhood you see on the desktop and click Properties from the options that appear.
When the Network window opens, click the Add button and open the Component Type window. In this window, check Protocol and click the Add button again.
In the Select Network Protocol window, select Microsoft first, then TCP/IP, and click OK.
In the Version Conflict window, you can see the conflicting files in the File name:. Click Yes to confirm overwriting these files.
Step 2
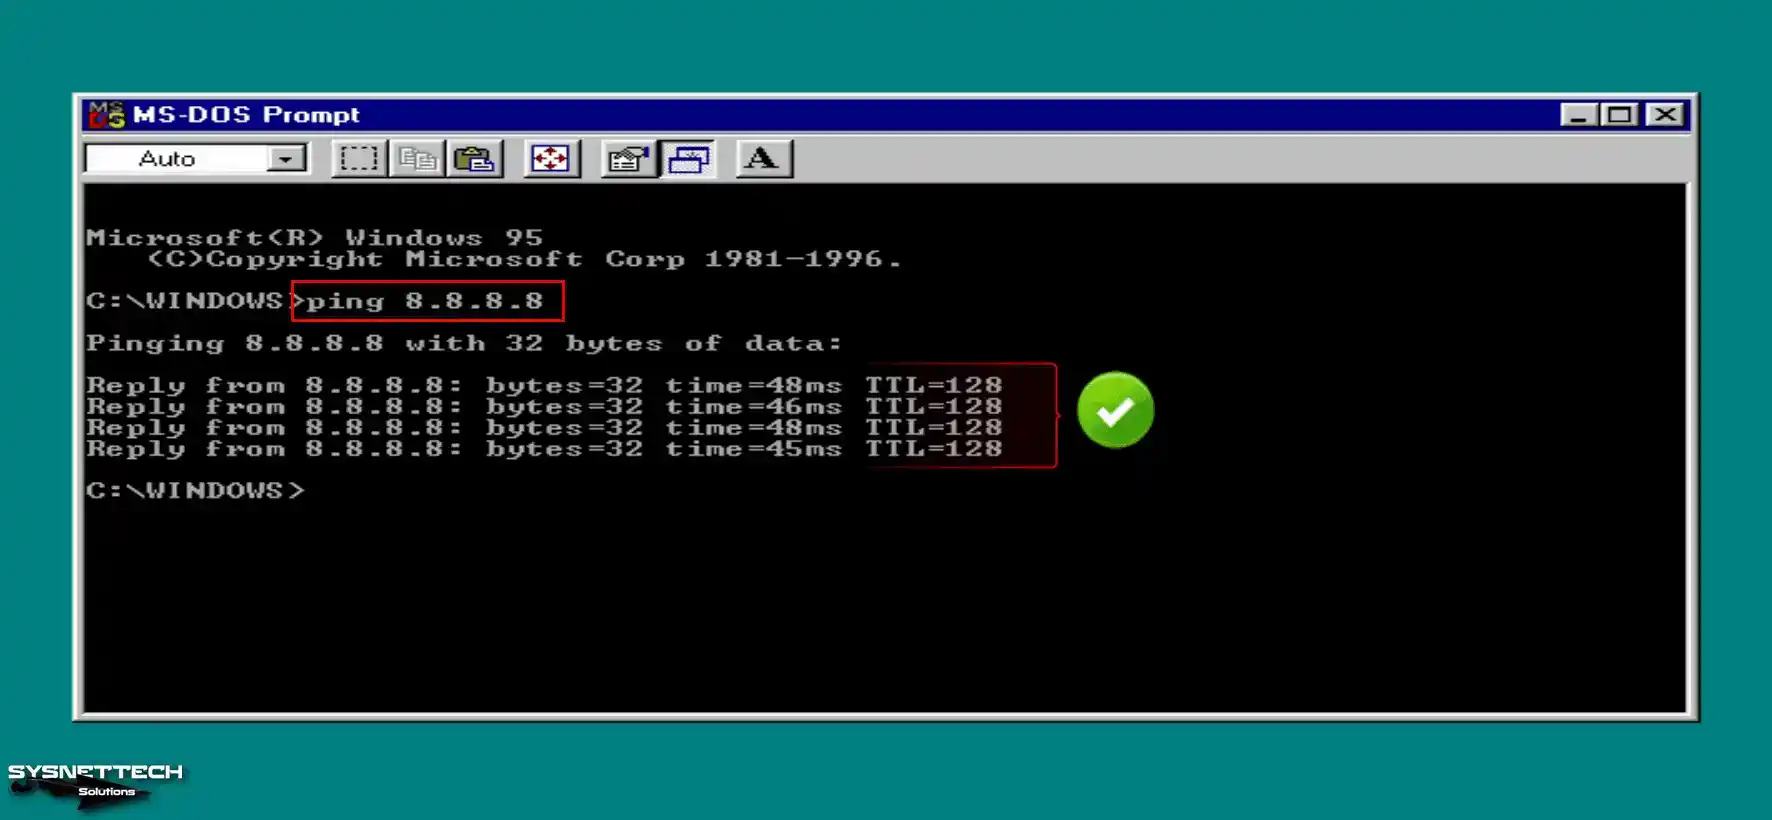
Open MS-DOS Prompt and ping the Google search engine by executing the ping 8.8.8.8 command, and you can see that your Internet connection is OK.
If you ping without installing the protocol, you will see that the command is not recognized.
Step 3
When you open the Internet, the Connection Wizard will open. You need to configure your Internet connection with this wizard, so click Next directly.
Select Current to configure your current connection from the Internet connection setup options and click Next.

Step 4
When Microsoft Internet Explorer opens automatically, you can see that your connection is working smoothly when you visit the Google website.

How to Install Chipset Driver
After installing up-to-date operating systems with VMware, VM Tools usually automatically install any drivers that are not installed on the system.
But when you install old and outdated systems, you have to search for and find the drivers for the system and install them manually. You can achieve greater availability and efficiency by installing drivers that are not installed in the Windows 95 virtual computer.
Step 1
First, open the properties of your Win95 system and click the Device Manager tab, then check the drivers that VM Tools could not install.
- PCI Bridge
- PCI Multimedia Audio Device
- PCI System Peripheral
- PCI Universal Serial Bus

Step 2
Before you can install drivers for older systems, you need to lower the hardware compatibility of the VM on the VMware Workstation software. In the virtual machine configuration phase, we determined the hardware compatibility as 5.x and configured the virtual hardware settings according to the compatibility version. However, in order to install system drivers, you need to change the hardware version again after installing VMware Tools.
When the hardware compatibility is 17.x, when you try to install the drivers, you will get many errors from the system, or the drivers will not be installed. Also, the system may give a Windows Protection Error.
Now, turn off your Win95 machine and click VM / Manage / Change Hardware Compatibility from the menu.

Step 3
When the hardware compatibility change wizard opens, click Next to continue. In the Hardware Compatibility section, select Workstation 5.x and click Next.
NOTE: If you select the disk type of your virtual system as SATA, your disk will fail when you downgrade the hardware version. Because it is stated in the Limitations section that SATA devices will not be supported.

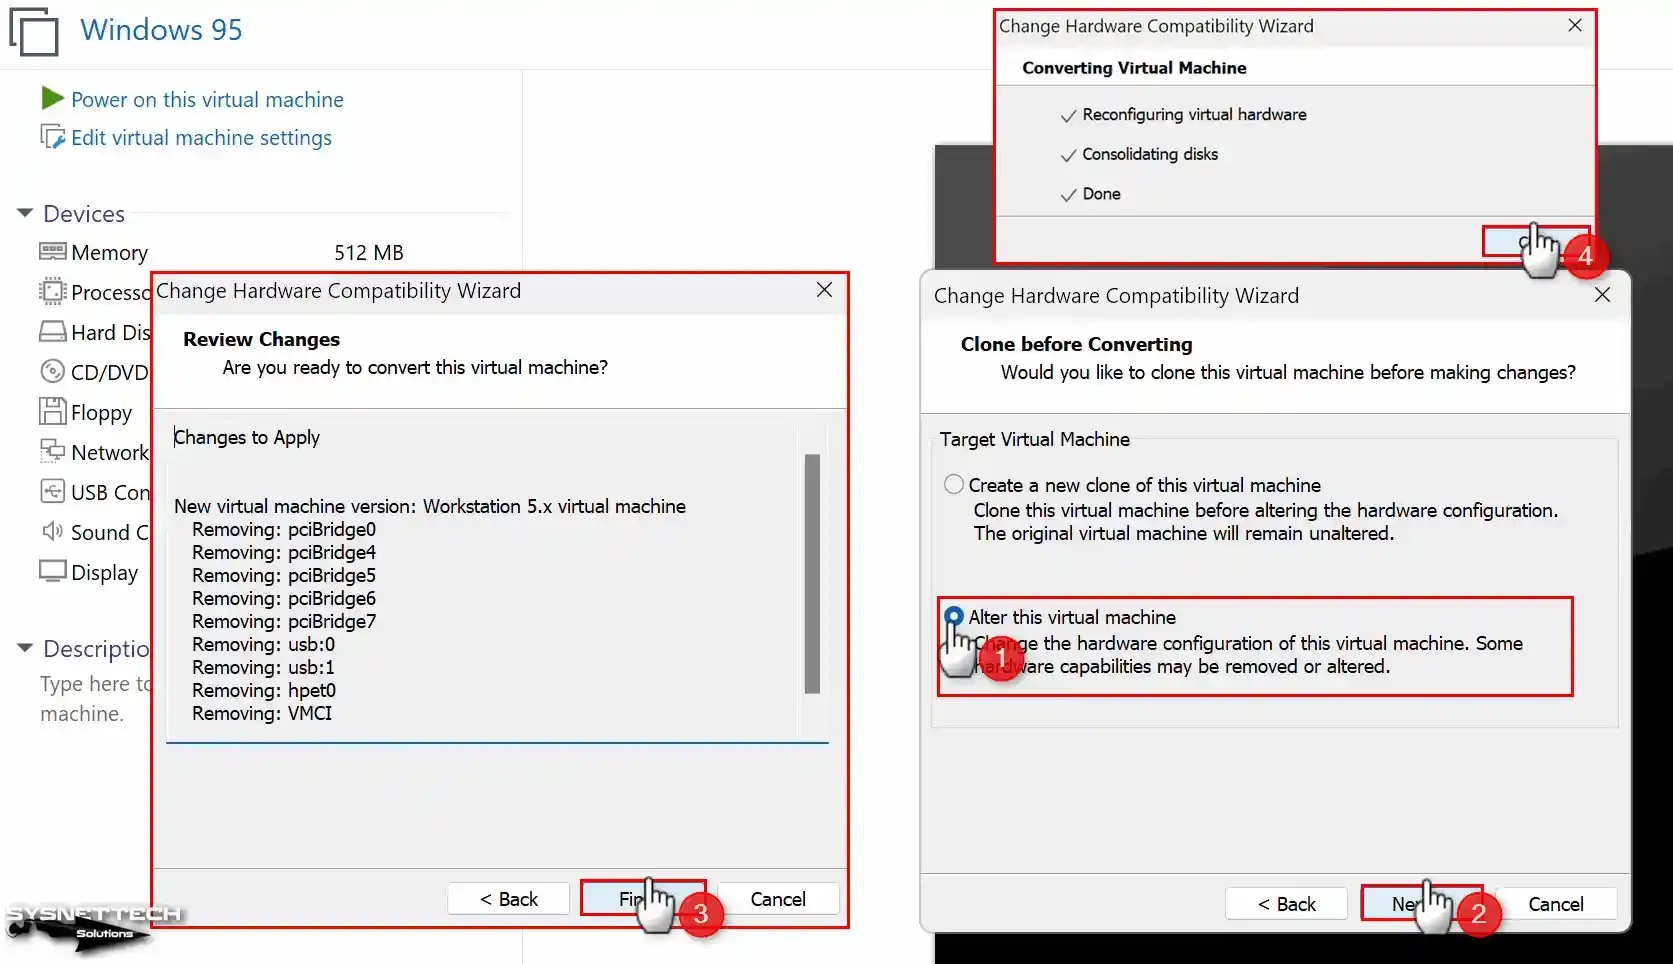
Step 4
After configuring the hardware version, select Alter this virtual machine and click Next. You can see the settings to be removed from the virtual machine in the Review Changes window.
After changing the hardware version, start the Win95 PC.
Step 5
In this step, you will see that new hardware is automatically found while your virtual system is booting. If you receive a version conflict warning, as in the image below, confirm the operation by clicking the Yes button.
The system also found the Windows 95 audio device automatically, but the driver was not installed, so click the Cancel button in this window.

Step 6
When you open Device Manager again, you will see that the driver for the PCI Bridge device could not be installed.

Step 7
After downloading the driver software of the Windows 95 virtual machine to your computer from the list at the bottom of the article, open the Chipset Driver folder and run the Setup file as in the image below.

Step 8
When the Intel Chipset Software Installation Utility V2.80.008 wizard opens, click Next. Click Yes to accept the license agreement of the chipset driver software. After checking the Intel Chipset list supported by the software tool, click Next and complete the installation.
Restart your virtual system after the Windows 95 Chipset driver installation.

Step 9
When you restart your system, you can see that the drivers for Intel(r) 82371AB/EB/MB PCI Bus Master IDE Controller and PCI to ISA Bridge (ISA Mode) devices are found automatically.
When you recheck the Device Manager, you can see that the Primary and Secondary IDE controllers in the Hard Disk Controllers have been successfully updated.
- Intel 82371AB/EB/MB PCI Bus Master IDE Controller
- Primary IDE Controller (dual fifo)
- Secondary IDE Controller (dual fifo)
NOTE: At this stage, if you are getting the Standard Floppy Disk Controller error, shut down your virtual computer to install or enable its driver, and then click Power On to Firmware to enter the BIOS settings of your VM. On the PhoenixBIOS Setup Utility screen of the virtual machine, configure the Legacy Diskette A: as 2.88 MB in the Main section, press F10, and save the settings. After turning on your system, open Device Manager again and check that the yellow exclamation mark has been removed from the Standard Floppy Disk Controller device.

How to Install Sound Blaster PCI128 Driver
To install the Audio driver on a Windows 95 VM, download the Sound Blaster PCI128 driver software from the table at the bottom of the article and copy it to the VM.
Step 1
After copying the sound driver to your virtual computer, double-click Sound Blaster PCI128 and click Yes to accept the software license agreement. Click Next to install the Creative Sound Blaster sound driver.
Once the Creative Sound Blaster PCI128 hardware is found, wait while it installs the drivers.

Step 2
After restarting your system, open Device Manager and, this time, select Properties / Drive / Update Driver / Gameport Joystick (8-24-1996) to solve the driver problem of the Creative Gameport Joystick device and click Finish.

How to Install USB (Xusbsupp) Driver
In order to use USB devices on a Windows 95 VM, you must add, install, and configure a USB Controller from the hardware wizard. You can find the USB Driver in the table at the bottom of the article.
Step 1
After running your virtual system, open Device Manager and check that the drivers for the PCI Universal Serial Bus device are not installed automatically.
After downloading and copying the USB driver to the VM, double-click Xusbsupp in the driver folder and click Yes to confirm the installation of the USB driver in the pop-up window. Click Yes to accept the license agreement for the Xusbsupp software.
After the Extended USB Supplement installation is complete, click OK and restart your virtual computer.

Step 2
When you check the driver for the USB devices, you can see that the PCI Universal Serial Bus device has a yellow exclamation point.
Select the PCI device and click the Remove button, then click OK. Then click Refresh so that your system can load the USB drivers correctly.

Step 3
After refreshing the list of available devices, your virtual system will find and install the USB Universal Host Controller device.
When you check the USB Controller device, you can see that the drivers have been installed successfully.
- Intel 82371AB/EB/MB PCI to USB Universal Host Controller
- USB Root Hub

How to Use USB Flash Memory
If you want to transfer files from your host system to your virtual system faster, you can use your USB flash drives or USB external storage devices.
Step 1
Now, insert a Flash Memory formatted with a FAT32 file system into your host machine, and when the New USB Device Detected window opens, check the Connect to a virtual machine option, select Windows 95, and then click OK.

Step 2
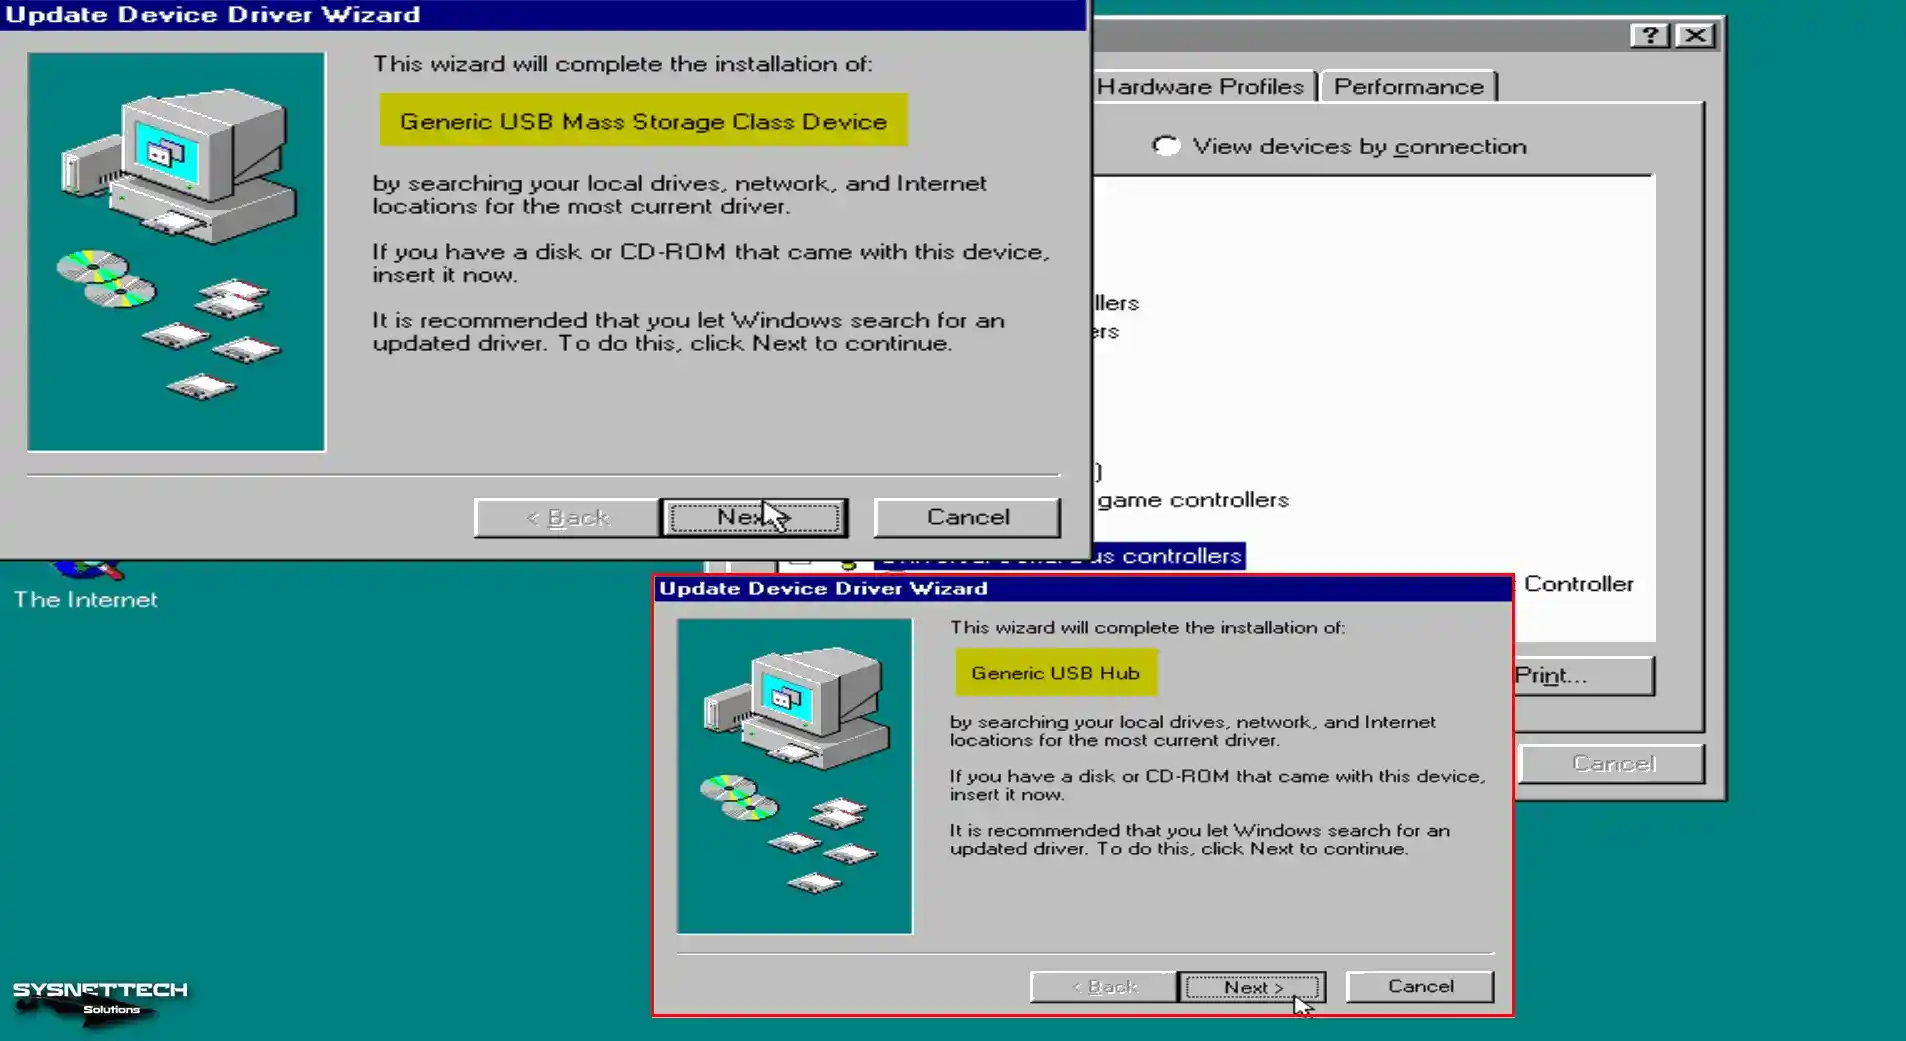
After inserting the flash memory into your virtual machine, click Next to install the Generic USB Mass Storage Class Device driver when the Driver Wizard automatically opens. Click Finish after Windows has updated the USB mass storage device.
Click Next to install another required Generic USB Hub driver as well. After Windows has updated the Generic USB Hub device, click Finish.
Step 3
When you open My Computer, you can now use your Flash Memory on the Windows 95 VM without any problems. When you check the driver of your USB stick in Device Manager, you can see KINGSTON DataTraveler 3.0 in Disk Drives.
NOTE: Use the USB 2.0 port of your host device to insert flash memory into the VM. If you plug your flash memory into your host’s USB 3.0 sockets, your virtual computer will fail.

Step 4
Create a folder in your USB in your virtual system and plug your USB memory back into your host. That is, disconnect it. When your device switches to your host, you can see the folder you created.

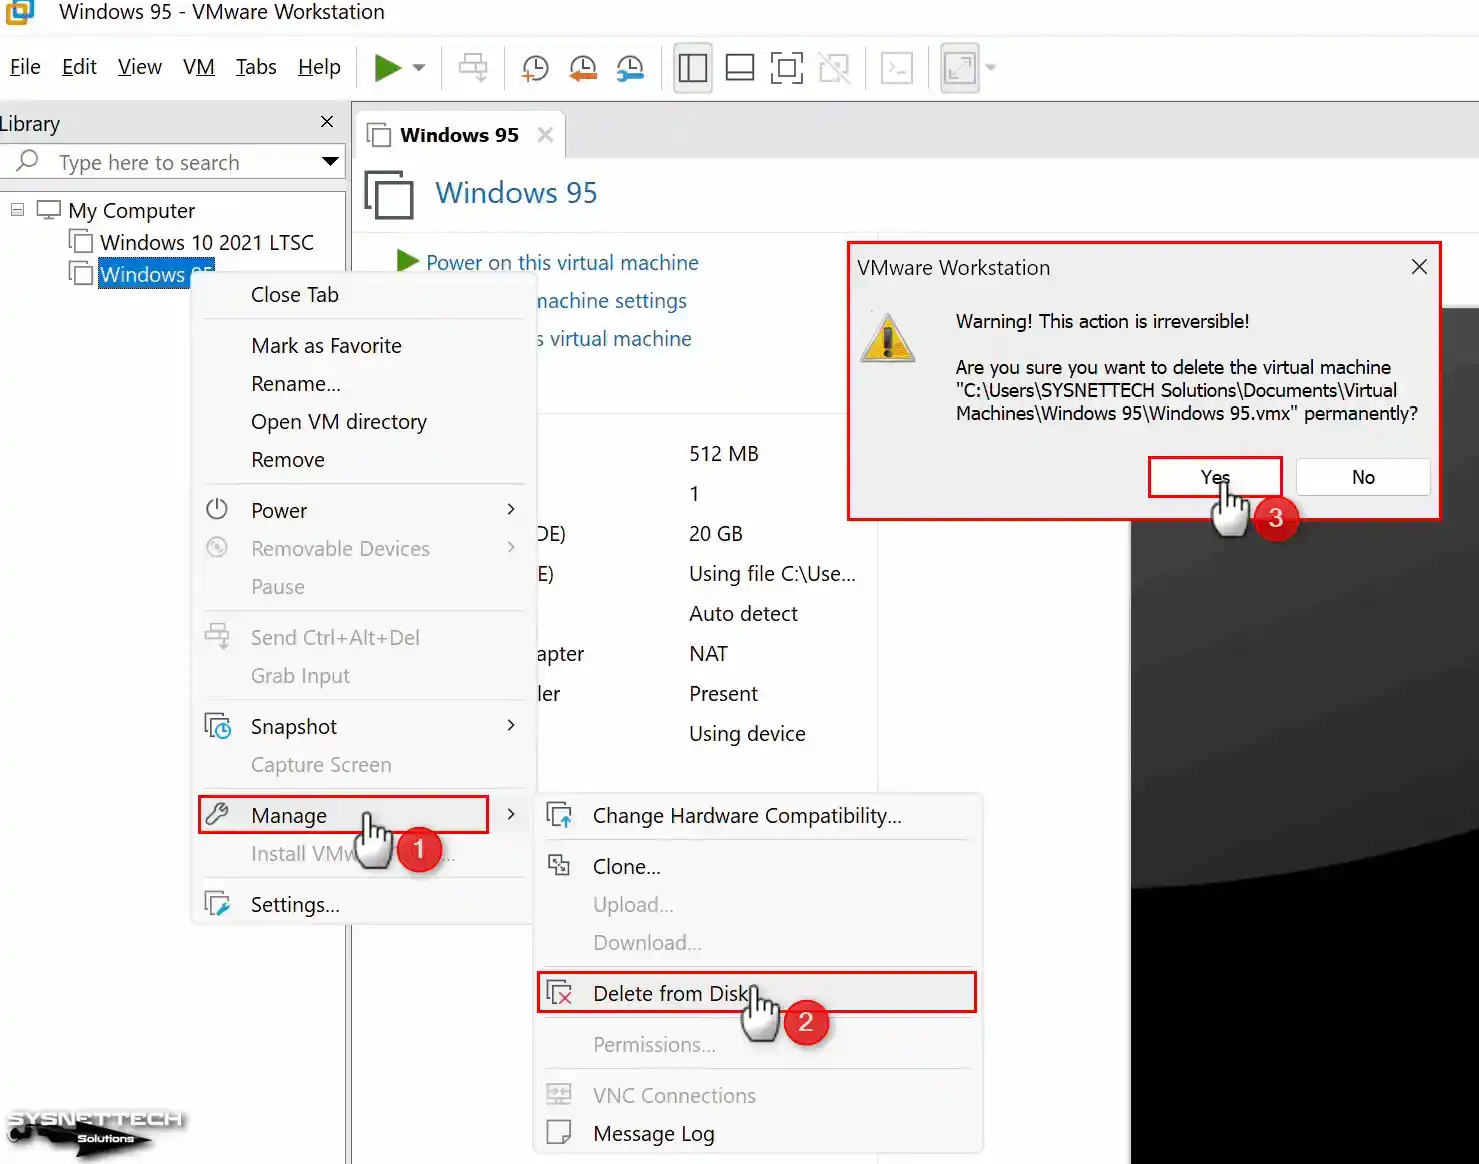
How to Delete the Virtual Machine
If you no longer want to use your Microsoft Windows 95 guest machine, we recommend that you delete it entirely so as not to overfill the capacity of your host disk.
To delete or clean all files related to your Windows 95 VM, right-click on your system, click Manage / Delete From Disk, and confirm the operation by clicking Yes in the window that opens.
Video
Windows 95 Driver Download
| File | Links |
|---|---|
| Windows 95 ISO | Download |
| Chipset Driver (infinst_280_win32) | Download |
| Creative Sound Blaster PCI128 Driver | Download |
| USB Driver (XUSBSUPP) | Download |
| All Drivers | Download |
Installing Old Versions
| Workstation Version | YouTube Video | Slide |
|---|---|---|
| 14 Pro | Watch | – |
| 16 Pro | Watch | View |
| 17 Pro (NEW) | Watch | – |
Conclusion
As a result, it is possible to install and run Windows 95 on a virtual machine using VMware Workstation 17 Pro on a modern Windows 11 PC. This is a way to explore the history of operating systems. It’s also fascinating to experience computing nostalgia.
For learning or to remember the past, it is vital to follow each step carefully. However, you also need to pay attention to the key points given. In this way, you can set up a working Windows 95 virtual machine.
We should enjoy new technology but also respect old systems. This can also be a fun and valuable experience for tech fans and history lovers.
If you want to try another well-known old system, be sure to check our guide on how to install Windows 98 with VMware. In this article, I show each step of the setup and explain the hardware settings. This way, you can use Windows 98 on your computer along with your Windows 95 virtual system.

23 People Shared Their Experience
Excellent work!!! Thank you so much.
You’re welcome!
I am running the latest Vmware Pro and when I restart and hit escape it still says missing operating system. I followed your directions to the T.
Brian
also I am running Windows 11
@Brian Proulx
You need to download a Windows 95 boot floppy and mount that in Vmware. Google found it pretty fast for me.
@Tolga Bagci
Excellent written guide! Everything worked like a charm here.
Thanks a lot for your valuable comment!
1 question. Has anyone tried or can confirm if this works in regular Vmware Workstation player? Not the Pro version.
Thanks for the tutorial !
Just one question for the USB Driver : How do you copy it to the Guest once downloaded on the host ? Maybe a dummy question but I can’t figure out how to do that ^^
Thanks for your comment. Prepare an ISO file containing the USB drive and add it to the CD/DVD drive. That’s it 🙂
He encontrado esta pagina de casualidad, pero la verdad me a ayudado mogollon, quisiera darte un millon de gracias porque gracias a la informacion que has expuesto aqui he conseguido algo que llevaba mucho tiempo intentando conseguir.
Empece en la informatica en el año 1984 y tengo mogollon de programas retro en DVD y queria meterlos todos en un disco HDD o extraible, pero para eso necesitaba que me funcionaran bien en una maquina virtual como si funcionara en un pc de aquella epoca.
Siguiendo los pasos que has expuesto aqui la maquina virtual fluye de maravilla, incluso con programas de 3D de aquella epoca.
El sonido siguiendo tus pasos necesitaba conectar un altavoz externo, al final he conseguido que me funcione sin conectar nada pero cambiando la configuracion que tu proponias, al final es probar diferentes configuraciones, actualmente el sonido lo obtengo de un monitor, pero le he dicho que me lo coja de mi host, y al instalar el audio me lo a cojido genial.
El archivo de la cpu que tu proponias no me funcionaba yo he usado otro que tenia por ahi, pero al final el resultado a sido genial, el truco creo que es la compatibilidad y que no disponia de los drivers y los he conseguido gracias a esta pagina, muchas gracias estoy muy contento con el resultado.
Estoy muy feliz de ayudarte. Gracias por tus comentarios. Si usó un archivo de CPU diferente, estaría muy agradecido si pudiera ayudar a otras personas escribiendo el nombre del archivo como comentario. Gracias.
Where did you get the ISO?
You can get the ISO file from the table at the bottom of the article.
There’s no URL.
At the end of the article, there are links to drivers, but not ISO files.
The first entry of the table has the ISO file. You can download the rar file from Yandex disk and extract it to the folder.
The cell of the “Windows 95 ISO” row is blank.
No, there is no problem. Maybe you can look again in the incognito tab.
Apparently I had to open developer tools to see the elements
Wow, thank you for such an explicit and well-made step-by-step tutorial !
It is not often one can find an article of that quality, about that subject in particular.
Hey, the link in the “Windows 95 ISO” row is only visible in the page source! Right-click the cell next to “Windows 95 ISO” and click “Inspect” or whatever and expand the second
error : VMware Tools is no longer shipped with VMware Workstation for legacy guest operating systems.
Hey, even after installing the patches, i’m still getting a windows protection error after installing a driver. It completly keeps me from booting the machine normally. Is there a fix to this? Thanks.