
In this guide, I will show you how to add a new NVMe drive to a Windows 7 x64 Ultimate SP1 virtual machine. I will do this specifically for a VM running on a VMware Workstation Pro virtualization program.
In short, I will clone a SATA disk to an NVMe disk. This will give you a better understanding of how to run a virtual machine on an NVMe.
How to Use Windows 7 on NVMe Disk on Virtualization Software
Let’s say you have a Windows 7 VM that you set up with VMware Workstation or other virtualization software. When you add an NVMe SSD disk to this system, the system will not be able to install its drivers automatically.
Therefore, you can find the ID of the relevant hardware by Google and install it. You can also install it with Windows updates.
NVMe is a newer technology than the SATA structure. And it also works better than SATA. With the latest version of VMware Pro, we can now use this disk type. However, if you want to use it on an old system like Windows 7, we need to install some Hotfixes from Microsoft Windows.
Microsoft stopped supporting Windows 7 on January 14, 2020. This means they will not support new disk types like NVMe on VMs or real PCs. They also won’t release updates for new tech on an OS they no longer support. So, you might face setup or compatibility problems.
For example, you created a new virtual machine to run Windows 10 with VMware Pro. If you select NVMe in the Select Disk Type window, you will not have any problems during the installation phase. In other words, the operating system will automatically recognize this disk type. The reason for this is that Windows 10 adapts to new technologies. Because Microsoft still supports this OS.
In short, you can use the NVMe disk type with a genuine and updated Windows 10. Also, you will work smoothly with many other new technologies like this.
There is a most straightforward way to run and use Windows 7 on NVMe. Here, I will explain it to you: Make a clean installation using the SATA disk type. Then, add a second NVMe disk and clone the SATA for the device you added. You can also do this by adding the hotfix into the ISO without doing it separately.
How to Add NVMe Hard Disk to Windows 7 on VMware
With VMware, you can configure the VM in detail as soon as you install an operating system. You can also add a second piece of hardware to your virtual computer, such as an HDD or network card. For example, if you are going to install an older OS like Windows 95, you will need to add a Floppy Drive.
Steps:
Step 1
Let’s add an extra HDD to the Windows 7 VM installed on the SATA disk. To do this, click on any device in the Devices area while the virtual machine is off. Then, click the Add button in the window that displays the hardware.

Step 2
In the Select a Disk Type window, you need to select NVMe. Also, remember that you can choose SATA instead of it here.

Step 3
Let’s add a disk to a virtual computer, just as in physical environments. Therefore, you need to create a new virtual disk in VMware Pro.
In the Select a Disk window, select the “Create a new virtual disk” option. Thus, you will be able to create a new disk for your VM.

Step 4
In the Specify Disk Capacity window, you can specify a disk size. For example, the size of the SATA disk is 30 GB, but you can set more for NVMe. In this case, you will not encounter any problems in the disk cloning process.
After configuring the virtual disk size, select the “Store virtual disk as a single file” option. Also, this option allows you to store the disk as a single file.

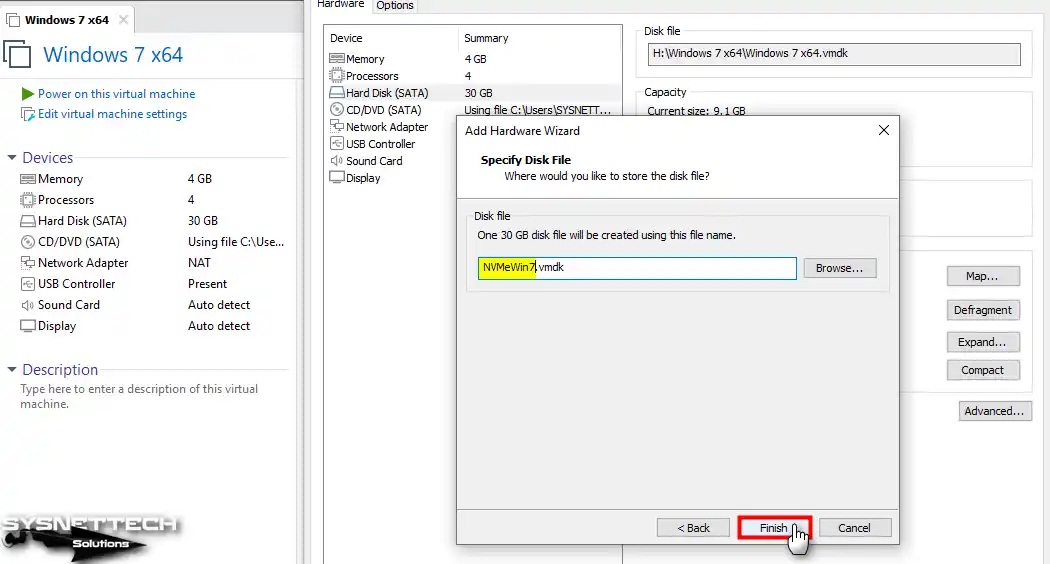
Step 5
In the “Specify Disk File” window, type NVMeWin7 for the virtual disk name. Plus, you can also type your name if you want to specify a different thing.
Step 6
After adding a new storage unit to the virtual machine, click the OK button. This also allows you to close the hardware window. As a result, you have completed the VM settings.

Step 7
After everything, run the Windows 7 x64 PC.

Step 8
Right-click the My Computer icon and select Manage. When the Computer Management screen opens, click Device Manager.
However, in the Other Devices section, you will see the PCI Device with a yellow exclamation mark. This indicates that the driver for the hardware you added has not been installed.
Furthermore, click on PCI Device and then open the Details tab. Select the Hardware IDS option from the Property section. As a result, you can see the driver’s hardware address in the Value section.
PCI\VEN_15AD&DEV_07F0&SUBSYS_07F015AD&REV_00
Step 9
Download the driver that you added to the Windows 7 VM and save it to your computer. Also, don’t forget to copy the downloaded file to the VM.

Step 10
Now, double-click on the PCI Device to open hardware properties. Then, click on the Update Driver button.

Step 11
We will install the NVMe driver manually. To do this, click on Browse my computer for driver software.

Step 12
Finally, extract the downloaded Driver file and put it in a folder. Then, select the driver folder and click OK.

Step 13
Specify the location that contains the drivers. After this process, press Next to start the installation.

Step 14
This time, you may encounter an unsigned driver warning from Windows, as in the image below. So, click on the Install this driver software anyway option.

Step 15
After installing the Standard NVMe Express Controller driver, check the PCI hardware properties. At this stage, you may find that Windows cannot start the driver you installed. This error indicates that the hardware you added can work on your computer or virtual machine. On the other hand, it means that Windows does not recognize this driver.
Windows cannot initialize the device driver for this hardware. (Code 37)
Step 16
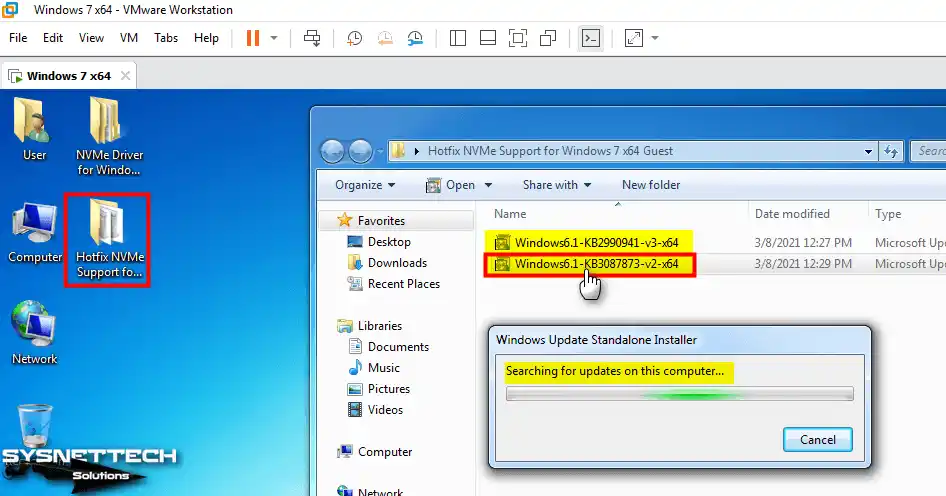
Enable NVMe support in Windows 7 64-bit SP1 operating system. To do this, first download Windows KB2990941 and KB3087873 Hotfixes. Then, copy these files to your computer and VM. In short, these steps will help you to fix the Code 37 error.
After downloading the Windows 7 Hotfix files, you need to install both hotfixes. First, double-click the Windows6.1-KB3087873 file. Then, you can complete the process by starting the installation.
Download Windows KB2990941 ve KB3087873 Hotfix
Step 17
In the Windows Update Standalone Installer window, you need to install the KB3087873 hotfix. To do this, click the Yes button to start the installation process.

Step 18
Wait while hotfix installs for Windows 7.

Step 19
Similarly, install Windows 6.1-KB2990941 by double-clicking on it. Then click the Restart Now button for the updates to take effect.

Step 20
Wait while Windows is configuring updates, and do not turn off your virtual computer.

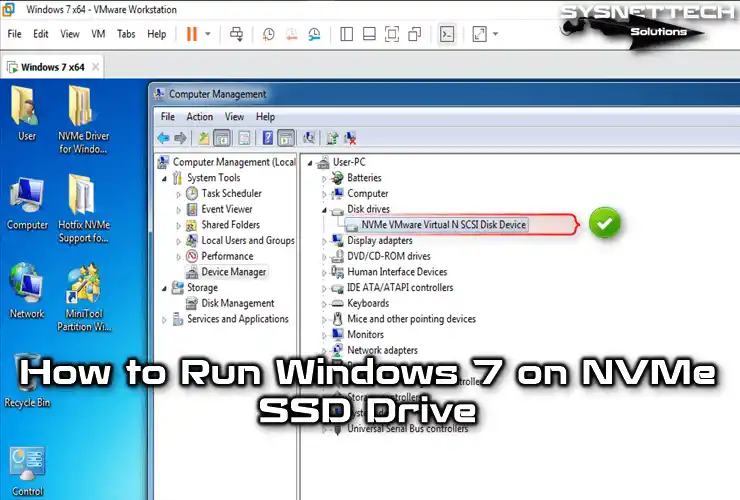
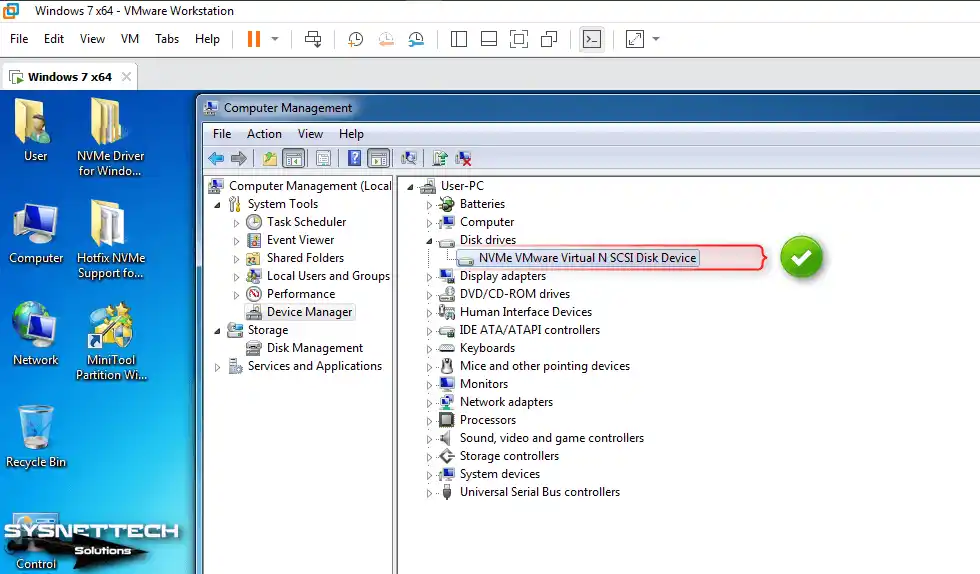
Step 21
After your virtual OS has restarted, check the Device Manager. Now you can see that the Standard NVMe Express Controller driver is active and working fine.

Step 22
So far, you have successfully connected Windows 7 to your NVMe disk. Now, just open Disk Management to set up your new disk. Finally, create a partition and assign it a drive letter.
As soon as you click on Disk Management, the Initialize Disk window opens, and click OK while selecting MBR.

Step 23
To edit your new HDD, right-click on it. Then, click New Simple Volume.

Step 24
When the New Simple Volume Wizard opens, you will see a window where you should note that simple volumes can only be created on a single disk.

Step 25
In the Specify Volume Size window, we will use the entire disk size. Leave the default value unchanged and click the Next button.

Step 26
In the Assign Drive Letter or Path window, activate the new volume. Then, click the Next button to assign a letter.

Step 27
In the Format Partition window, type the name of your disk in the Volume Label field. Here, please type the name that will appear on My Computer. Then, to quickly format the disk, select the Perform a quick format option and press Next.

Step 28
Once you have completed creating the simple volume on your new disk, click the Finish button.

Step 29
When you view My Computer, you can see that the NVMe SSD Drive hardware is OK. So, it is ready to use!

How to Copy / Clone SATA Disk to NVMe Disk Using MiniTool Partition
Now, you can clone the Windows 7 operating system on the SATA disk. For this, you can use the Clone method. In this way, you can transfer your information to the newly added NVMe disk.
For disk copying/cloning, we will use MiniTool Partition Wizard Server 9.0 software. Although this program’s version is old, it is still stable today.
Step 1
Install MiniTool Partition software on your virtual computer and then run it. On the program’s main screen, you will see two disks defined in your system: SATA and NVMe.
Right-click on the SATA disk and click Copy.

Step 2
In the Select Target Disk window, select the target disk to copy all data on the source disk. Here, select the NVMe disk you just added.

Step 3
Click Yes in the window to tell yourself that all data on the target disk will be deleted.

Step 4
In the “Review the Changes” window, go to Copy Options.
However, we need to copy all the data from the source disk to the target one. To copy in the same way, select the Fit Partitions to Entire Disk option.

Step 5
After the cloning process is complete, you can start your virtual PC from the target disk. To do this, define the new disk in the default boot order and Finish.

Step 6
Review all the settings you have made and click the Apply button to make the changes.

Step 7
At this stage, close all applications running in the background on your virtual PC and click Yes.

Step 8
Wait while all data on the source disk is copied to the target disk.

Step 9
Since C drive is in use, the wizard will perform MiniTool Partition cloning after booting. If you are copying data disk to another PC, there is no need to reboot your system. Also, if you are operating on the host, there is no need to reboot.
The C drive usually has the Windows system files. So, the information window says it will copy essential files after starting.
You do this when the program begins. Also, restart your Windows 7 guest PC and finish copying the rest of the disk.

Step 10
At this step, do not press any key to start the MiniTool Partition program!

Step 11
In the Partition Wizard – Boot Mode window, you can see that the disk copying process is in progress. This process will take some time, so wait and do not turn off your computer.

Step 12
You have successfully cloned the SATA virtual drive to the NVMe. Now, wait while the wizard makes the final settings for your system to boot.

Step 13
At this point, your virtual computer will restart. If it doesn’t start in 60 seconds, restart it yourself.

Step 14
When you open your Windows 7 VM, click on My Computer and check the drives. In this step, you will see that you have opened your virtual system via the SATA disk. In this case, the other disk is idle. So, you need to delete the SATA disk from the VM.

Step 15
Expand the disk drives from Device Manager. Then, check if both disk types are active. The primary purpose is to remove the SATA disk and shut down the VM.

Step 16
Open the Virtual Machine Settings window. Next, choose Hard Disk (SATA). Then, click the Remove button.

Step 17
Check that the virtual disk is removed and only the disk is active.

Step 18
Start your virtual computer to check if it will boot from NVMe.

Step 19
You can see that your VM now boots from the NVMe SSD drive.

Step 20
To check if your system only has an NVMe storage device. F, open Device Manager first, then check the drivers.
Step 21
Finally, you can repair VMware Tools on the virtual machine. Before doing so, restart your PC to ensure that everything works well.

Video
Frequently Asked Questions (FAQ)
- Can I use NVMe drives with Windows 7 in a virtual machine?
- What are the prerequisites for adding an NVMe drive?
- Why is there an exclamation mark next to PCI Device in Device Manager?
- Can I clone a SATA disk to an NVMe disk?
- What should I do if Windows 7 VM does not recognize the drive?
- Is it necessary to install Microsoft hotfixes for NVMe support?
Conclusion
As a result, you can run Windows 7 on NVMe drives in VMware Workstation Pro. In this way, you increase the advantages of advanced storage technology in the old operating system.
In fact, you may see the processes as complicated. Since Microsoft does not support Windows 7, you should install a manual driver. But, with a systematic method, you can make the transition easier.
Of course, first, use a SATA drive. Then, you can increase performance by copying this drive to an NVMe disk. With this guide, you can improve the write and read speeds of old OSes with the proper steps.
In short, you can benefit from the speed and reliability of NVMe drives. Thanks to this disk technology, you stay compatible. Thus, you optimize your VMs for modern workloads.

3 People Shared Their Experience
Is there a way to set the installation destination to NVMe when installing the OS?
Yes, there is. I’ll update this topic as “Method 2” later.
Method 2 i.e. directly integrate hotfixes into Windows 7 ISO and use it in VMware does not work. It might work on real hardware however. VMware nvme controller and microsoft hotfixes are not compatible.