

This guide shows you how to install VMware Workstation 17 Pro on Windows 11. You will also install and run Microsoft Windows 98 on a new virtual machine.
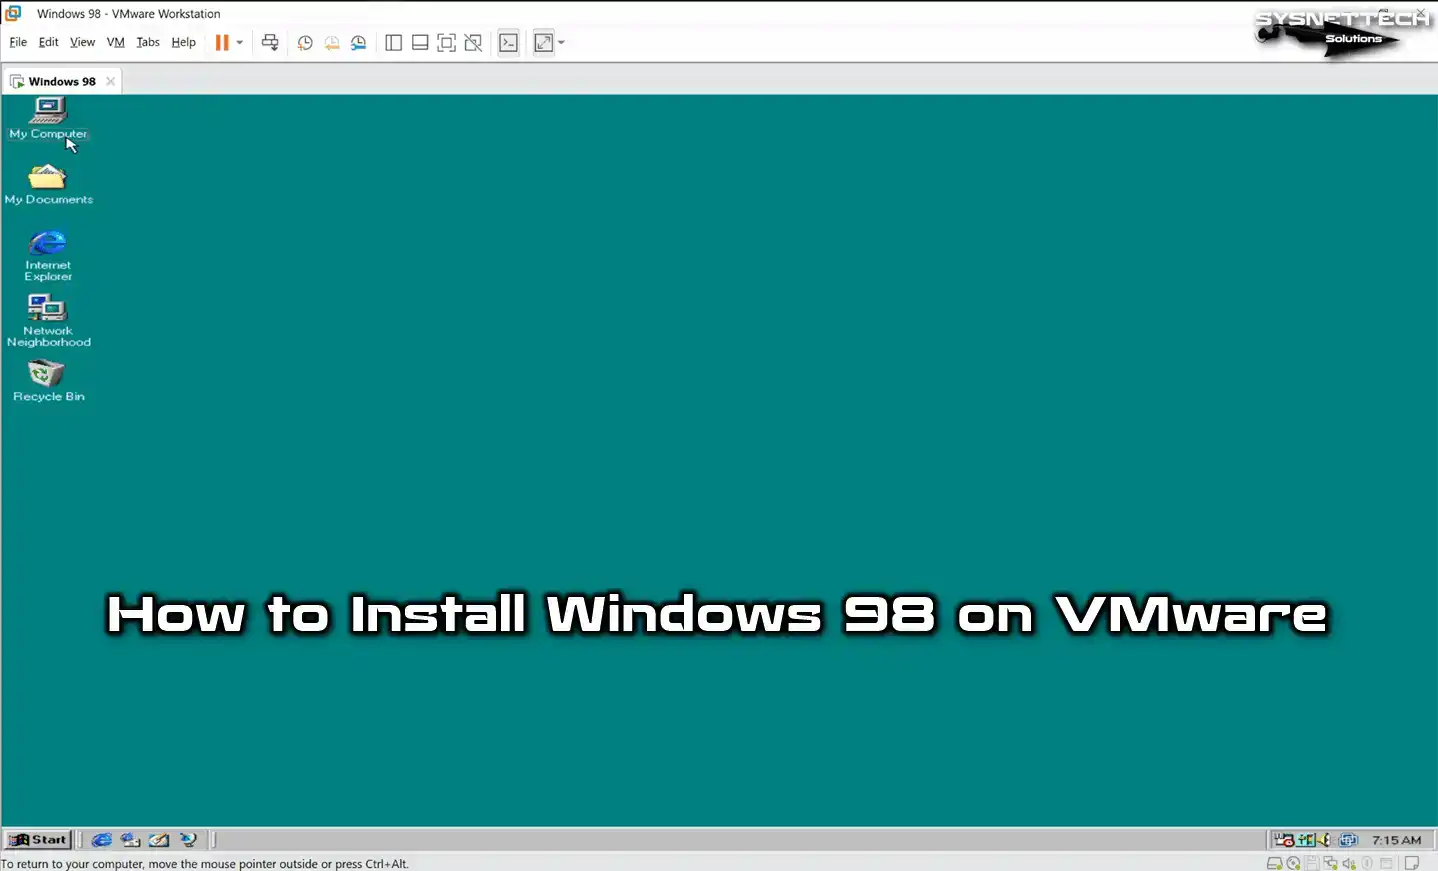
How to Install Windows 98 on Windows 11 Using VMware Workstation 17 Pro
Microsoft built Windows 98 to fix flaws and security issues in Windows 95. The company also released this system, code-named Memphis, on June 25, 1998.
When home users first started using computers, MS-DOS was the standard operating system. Over time, developers designed Windows 98. They used the MS-DOS and Windows 95 foundations.
Developers gave users a better graphical interface on this system. They also aimed for multitasking and easy network setup.
With Win98, users no longer need DOS at all. Still, you can run some apps from DOS without installing them on the system.
You may want to update firmware on some hardware. You can still use an old operating system for this task today.
For such jobs, you may need to install the OS your device supports. You may need an old computer or a virtual machine.
You may use a current operating system like Windows 11. In that case, use VMware Workstation virtualization software. It helps you install and run old systems on your computer.
Creating a New Virtual Machine for Windows 98
If you lack a physical computer with old hardware, use a virtual PC. It lets you run old systems on your host. Before you start, install Workstation on your Windows 11 computer. Then restart your PC.
First, download the Windows 98 ISO file for VMware to your computer. Next, create a new virtual machine with the steps below.
Step 1
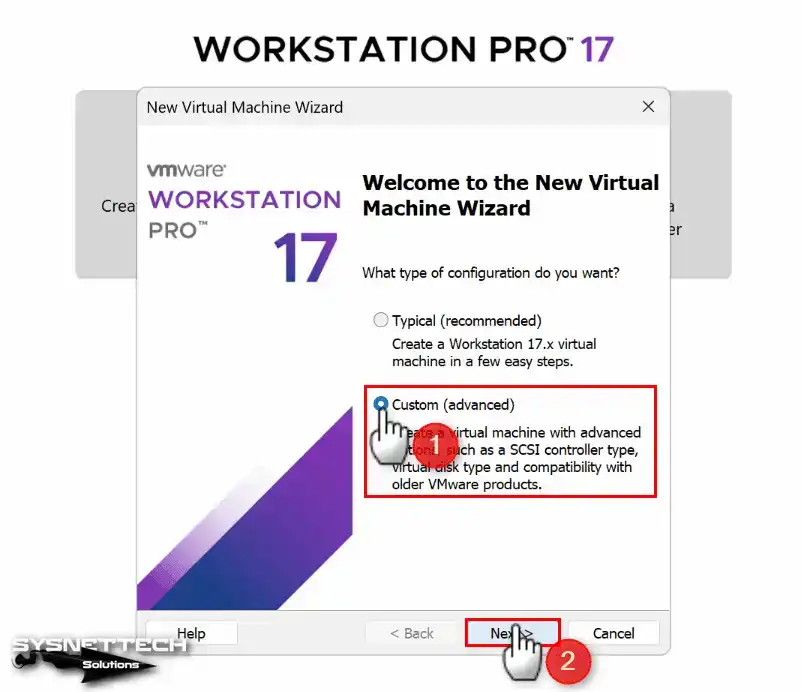
First, run VMware 17 Pro. Then click Create a New Virtual Machine on the main screen.
The virtual machine creation wizard opens. You see Custom (Advanced) selected by default. You configure the virtual PC hardware better with this option. Then click Next in the window.
Step 2
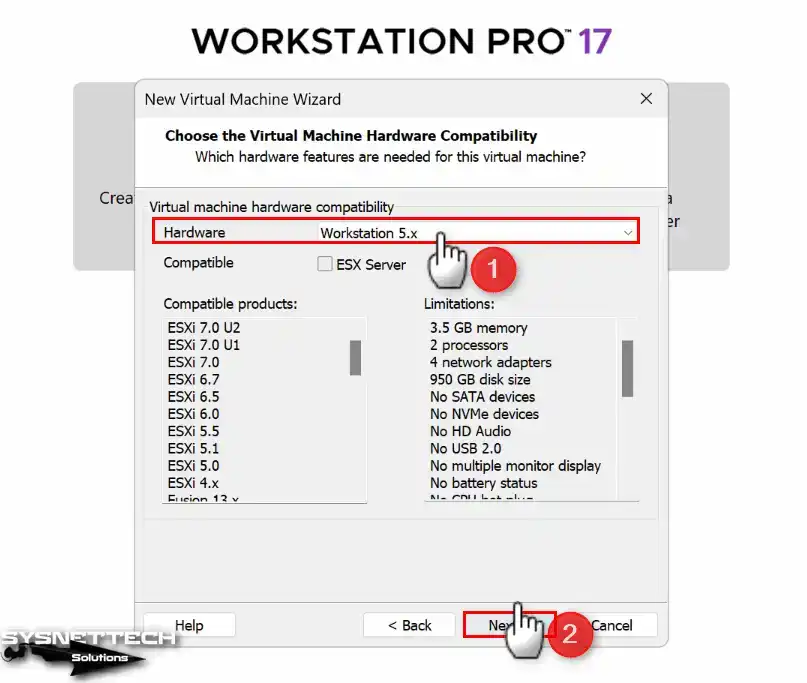
Next, choose an old hardware version for Win98 in the hardware compatibility window. This helps you set current hardware more easily.
Actually, continue with version 5.x. Later, the hardware version shows as 17.x when you finish the virtual PC.
You cannot change the hardware version without installing VMware Tools. However, choose 5.x compatibility now for a more stable guest machine. Then continue.
Step 3
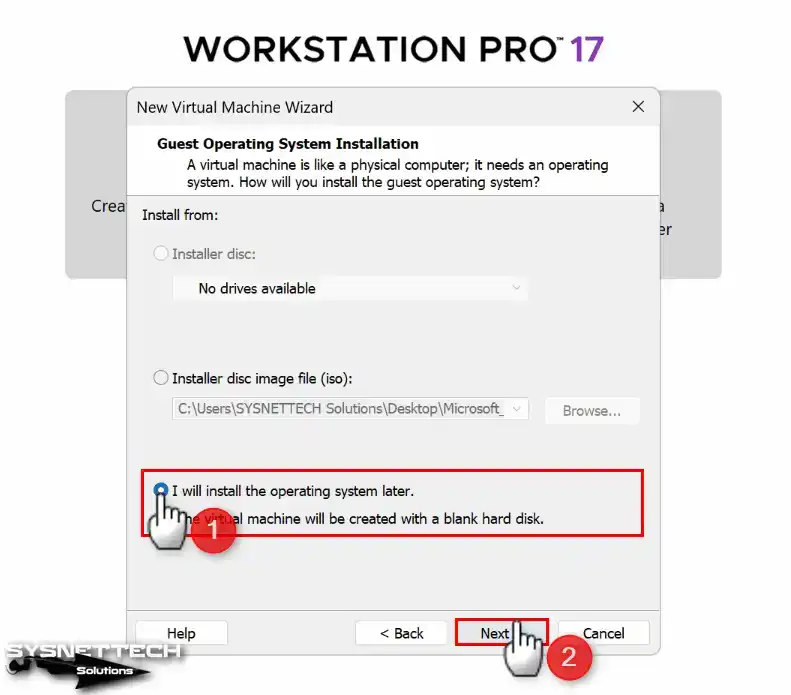
Next, pick how you want to install the guest operating system in this window. You can choose a Windows or Linux installation method. You can also use physical media or an ISO image.
For a more accurate virtual machine, install the operating system later. Select that option and click Next.
Operating System Selection and Storage Settings
Step 1
First, pick the platform to choose the guest operating system. Then select the OS distribution from the Version section. In this window, choose Microsoft Windows and then Windows 98.
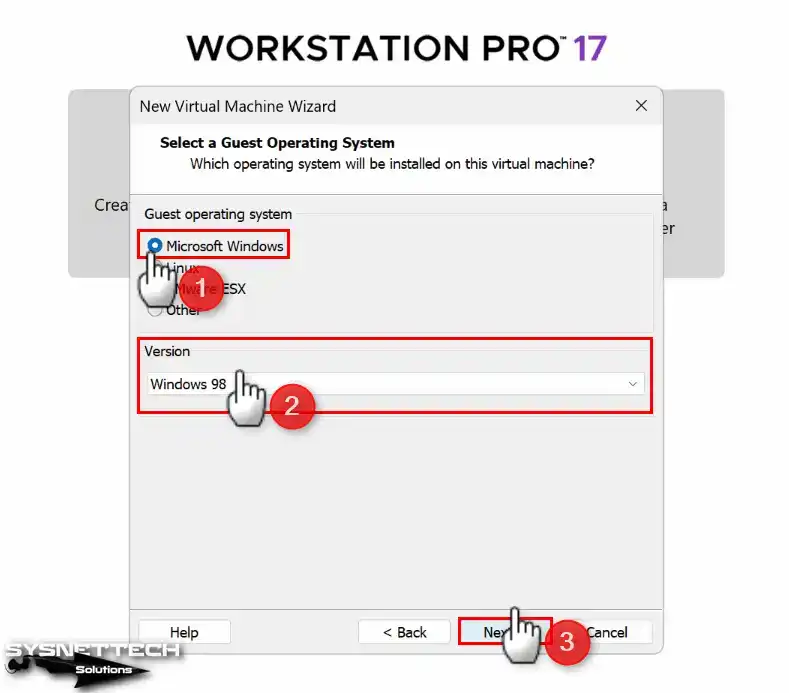
Step 2
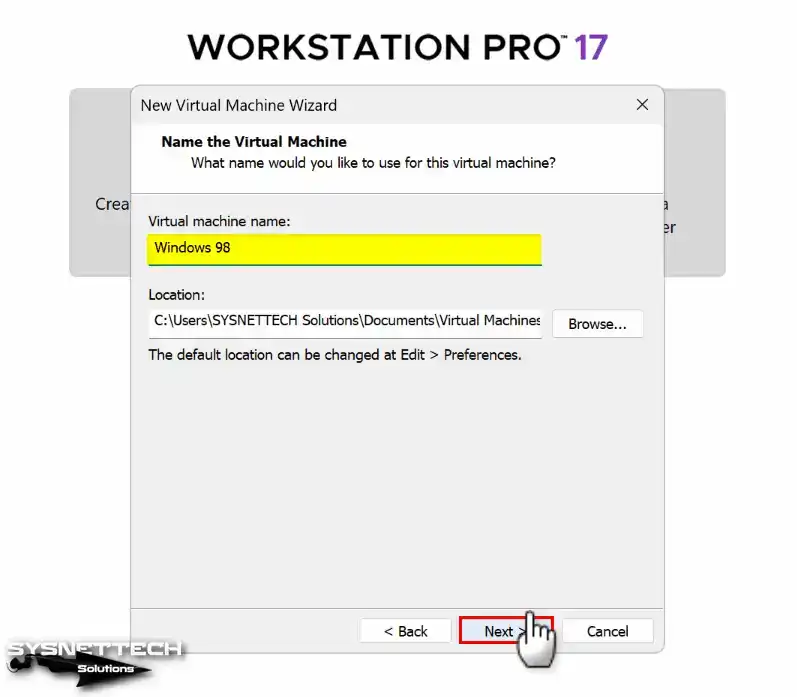
Next, change the virtual machine name that will appear in the VMware Pro library. To do this, type a new name in the Name field. Alternatively, use the default name the program sets.
This step matters greatly when you prepare a VM. You must set the storage location for the VM here.
If your host hard disk has enough space, keep the VM on the C drive. To use the VM more efficiently, create a folder on an external disk and install it there.
Hardware Configuration and Disk Settings
Step 1
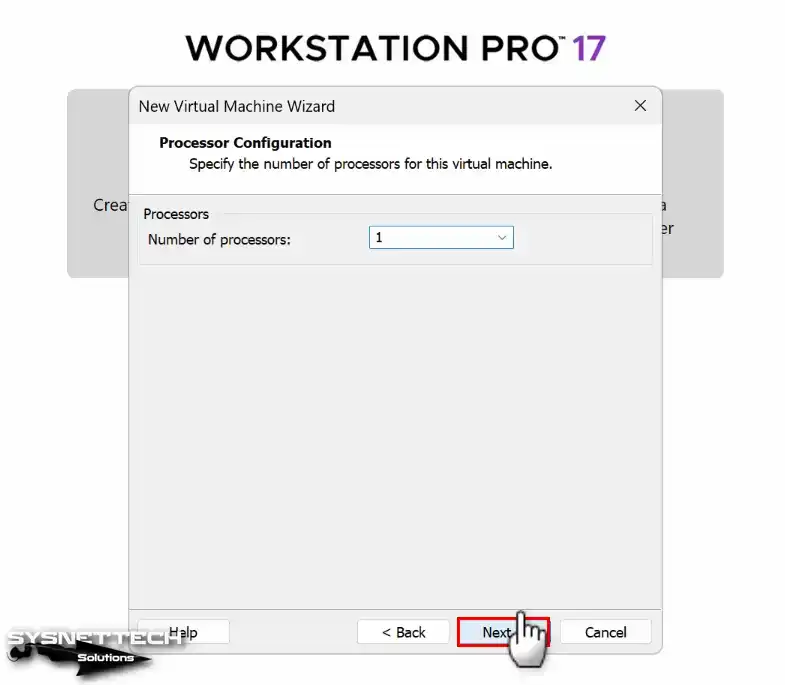
First, set one processor for the VMware Windows 98 virtual machine. Even if you set more processors, the system uses only one core.
Step 2
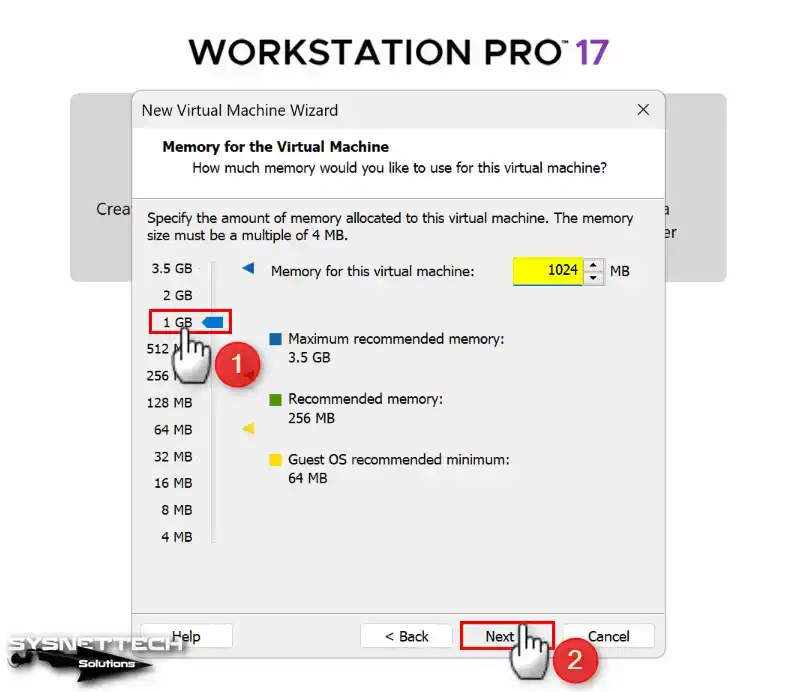
Next, set the RAM size correctly for the Win98 VM. This system supports a maximum RAM size of 1 GB.
Set the Win98 virtual PC RAM size to 2 GB or 4 GB. If you do not, the system restarts constantly and enters a loop.
Step 3
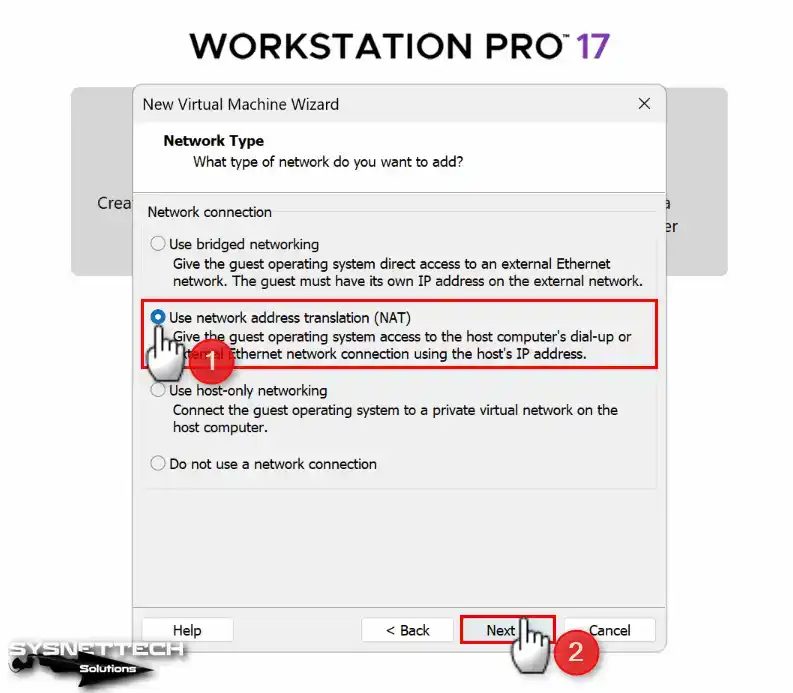
Next, choose NAT (Network Address Translation) for the network type and continue.
If you pick NAT for the VM network connection, you get a different IP. It differs from the host. However, if you want the same IP block, choose Bridged.
Step 4
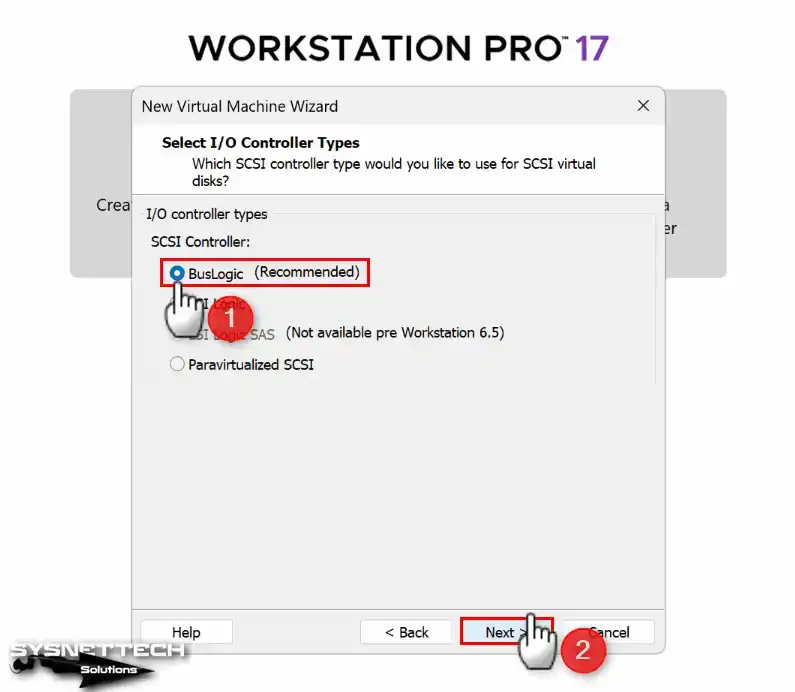
Next, choose BusLogic in the I/O Controller window. This gives your virtual disk compatible, efficient, and high-performance operation.
Disk Settings and Summary
Step 1
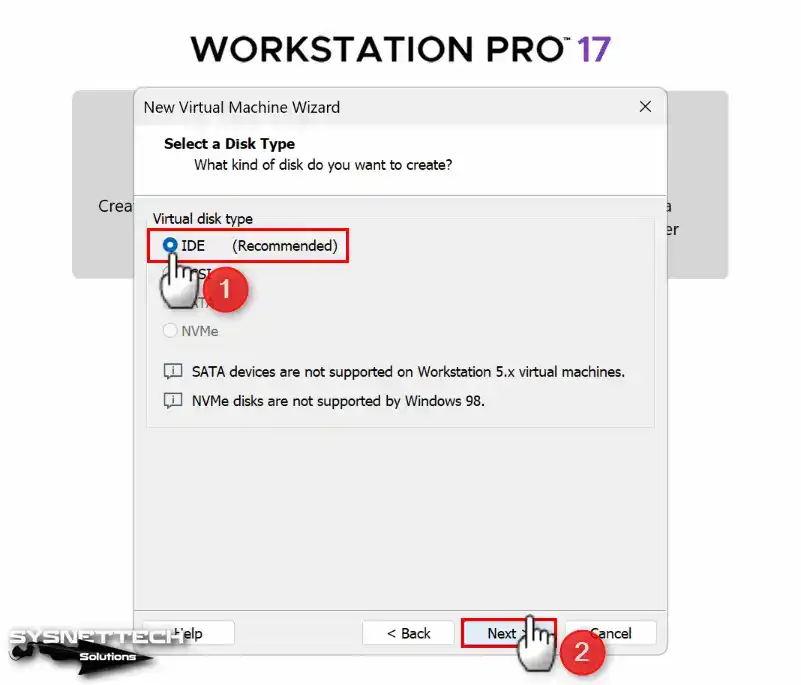
First, set the disk type to IDE for the VM and continue. NVMe disk type is inactive in this window. Win98 does not support this disk structure.
Note: If you install hardware drivers on your virtual PC, do not select SATA here. If you choose SATA, you cannot adjust VMware hardware compatibility. Your virtual disk will report an error.
Step 2
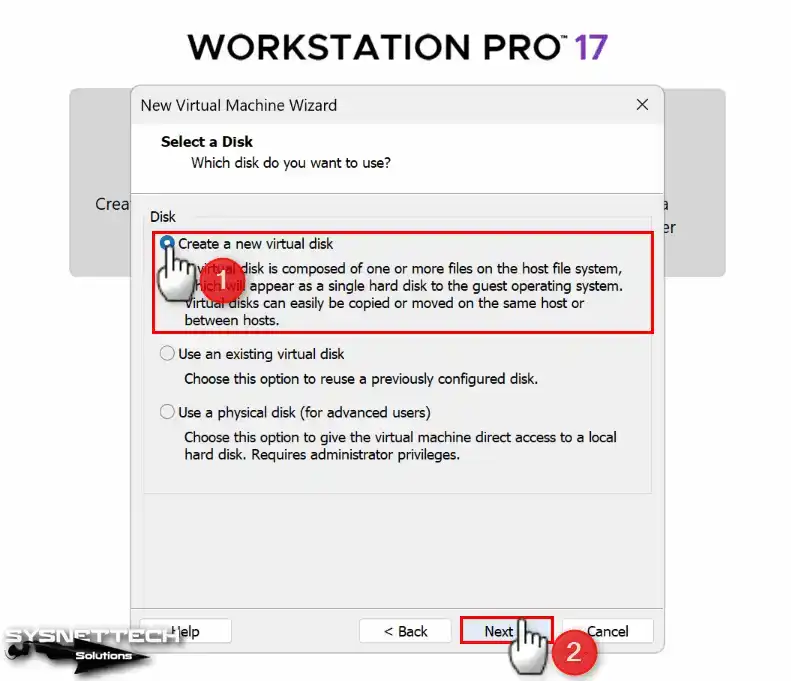
First, you are installing a clean operating system. Select Create a New Virtual Disk in the Select a Disk window. Then press Next.
You may have installed Win98 with an older version of VMware. To open this disk in the new version, choose Use an existing virtual disk.
Step 3
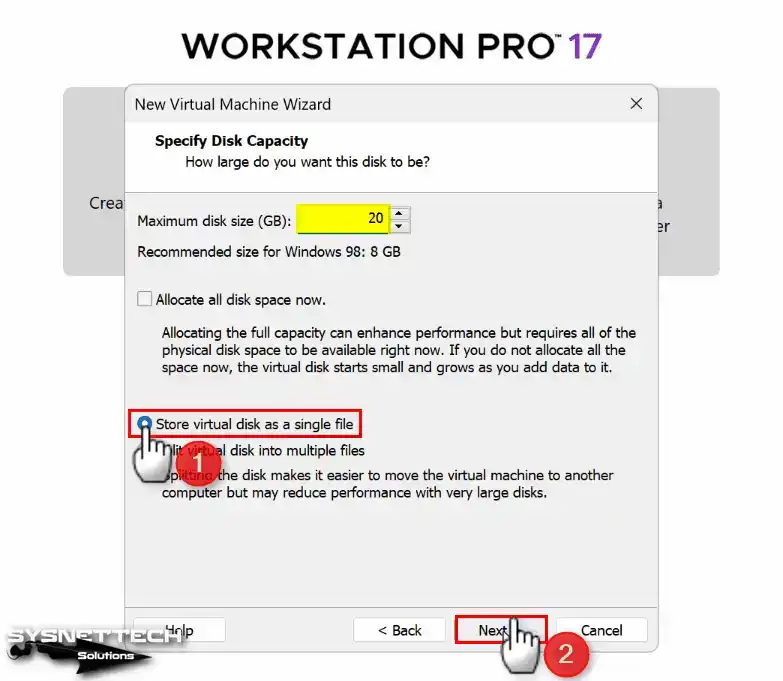
First, determine the disk size of the virtual PC. Then I recommend storing the virtual disk as a single file. Select Store virtual disk as a single file.
Step 4
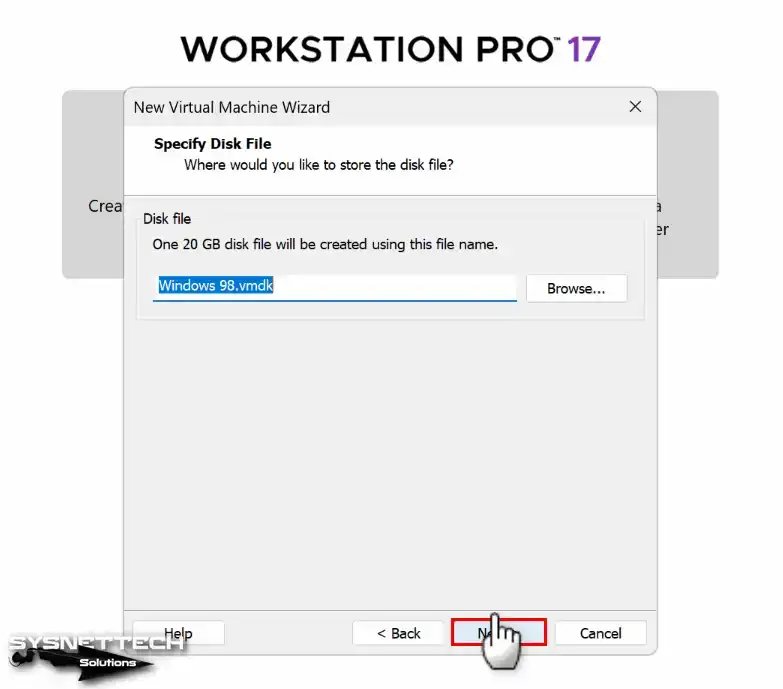
Next, change the disk file name in this window. You can also save it somewhere other than the VM install location. Use Browse to change the virtual disk save location.
Step 5
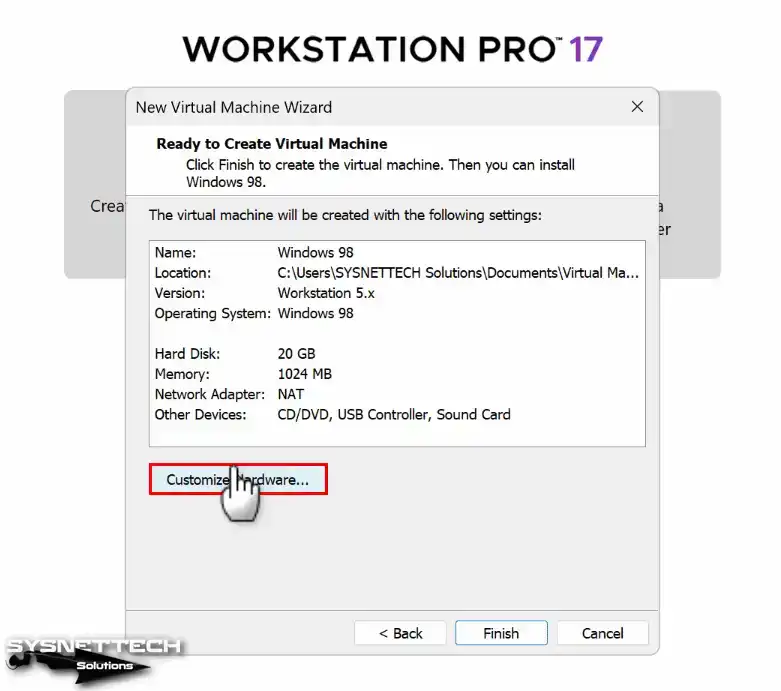
Next, see the hardware settings you configured in the virtual machine summary window. Now press Customize Hardware to add the Win98 ISO file to the VM.
ISO and USB Configuration
Step 1
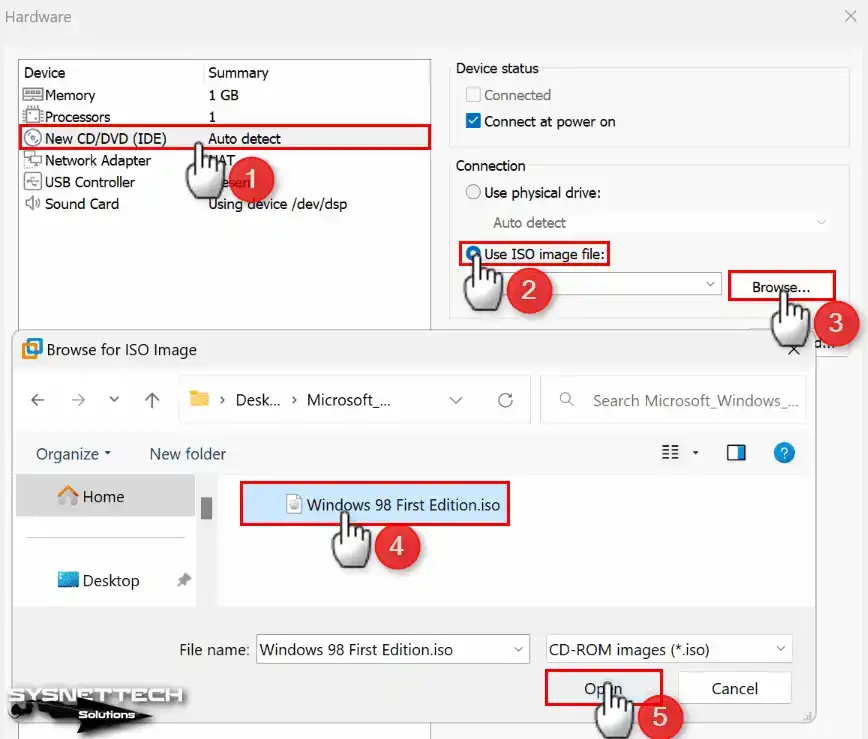
Finally, add the ISO image file to the virtual PC. First click the CD/DVD device. Then enable Use ISO image file. After that, press Browse and select the ISO file you downloaded.
Step 2
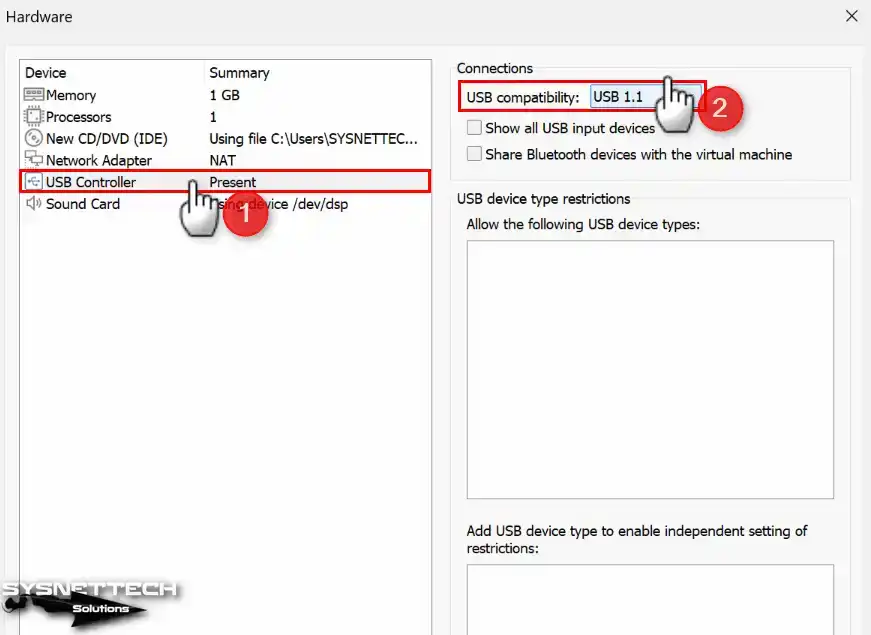
Next, set the USB type to 1.1 in Workstation Pro for Win98. Then close the VM wizard.
Step 3
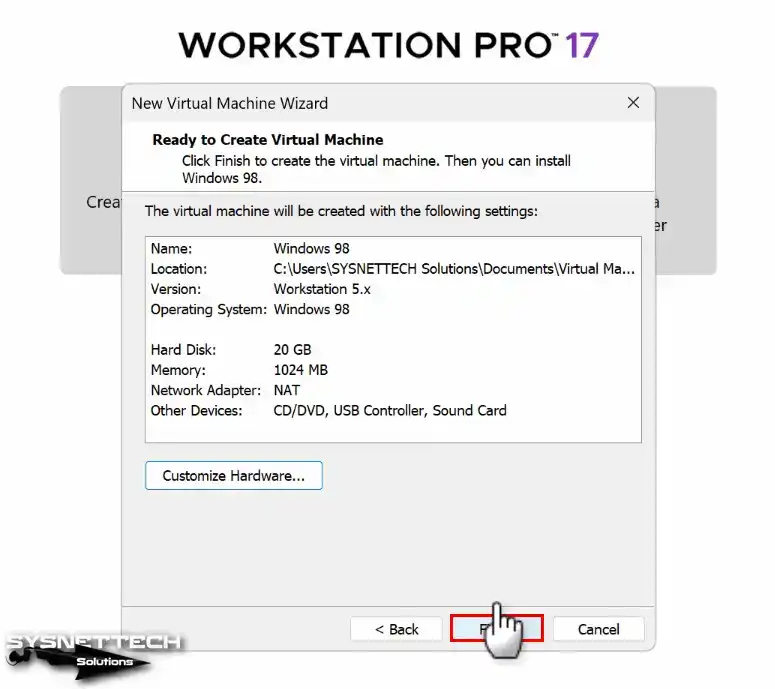
Finally, press Finish to close the virtual PC hardware summary window.
Step 4
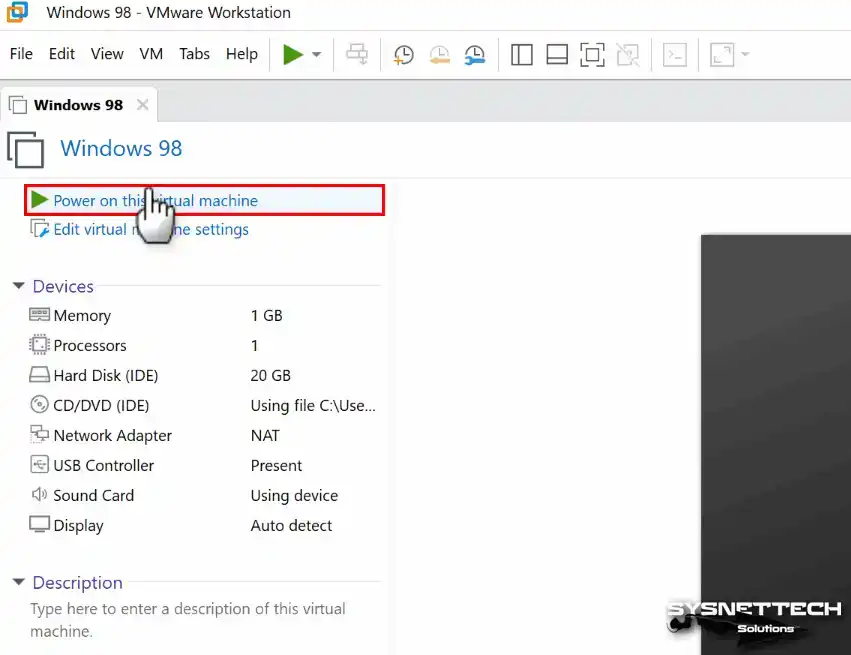
Next, start the installation after preparing the Microsoft Win98 virtual PC. Click Power on this virtual machine to run the system.
Windows 98 Installation
First, create a new virtual machine with VMware Workstation on Windows 11. Old operating systems have certain minimum system requirements.
Next, run the Microsoft Win98 virtual machine. Then continue as if you are installing on a physical computer.
Step 1
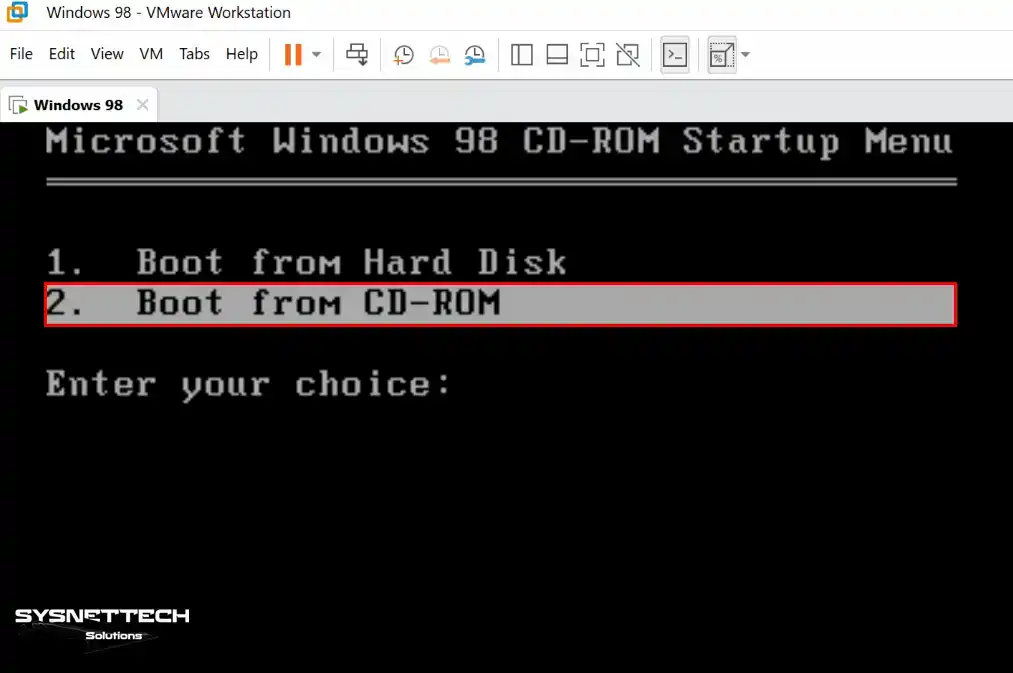
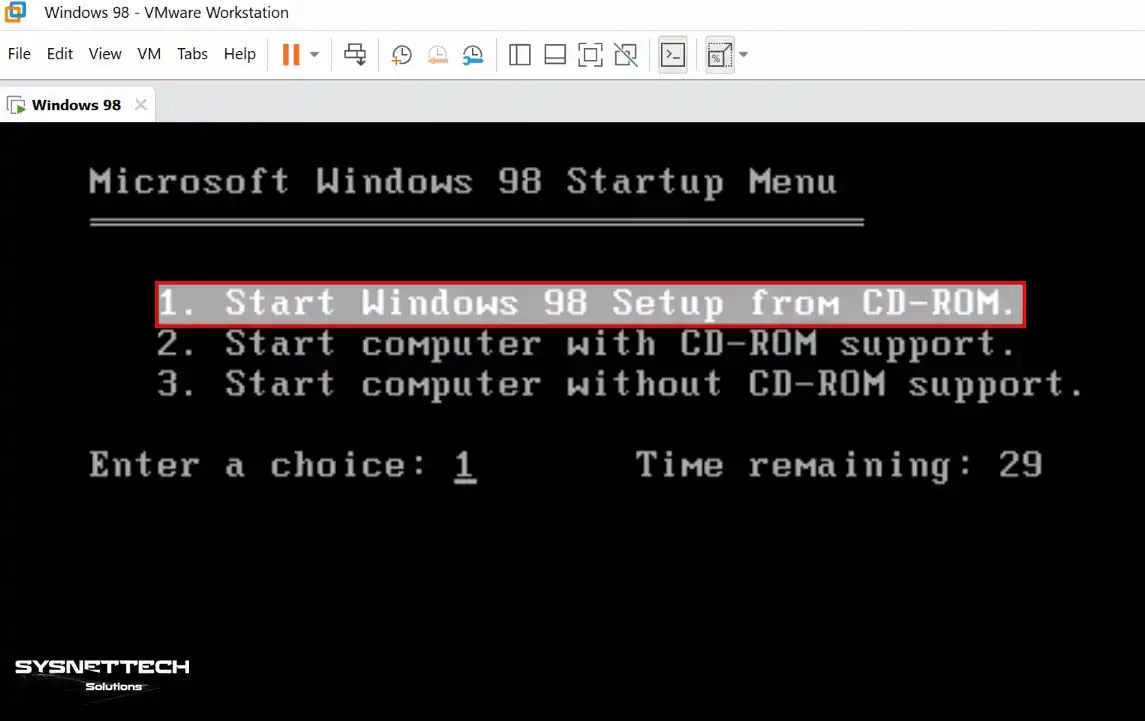
After you power on the virtual PC, the Microsoft Windows 98 CD-ROM Startup Menu opens. In the boot menu, you see two install methods using a hard disk or CD-ROM.
On the boot screen, press Enter on Boot from CD-ROM to continue the installation.
Step 2
Similarly, press Enter on Start Windows 98 Setup from CD-ROM.
Step 3
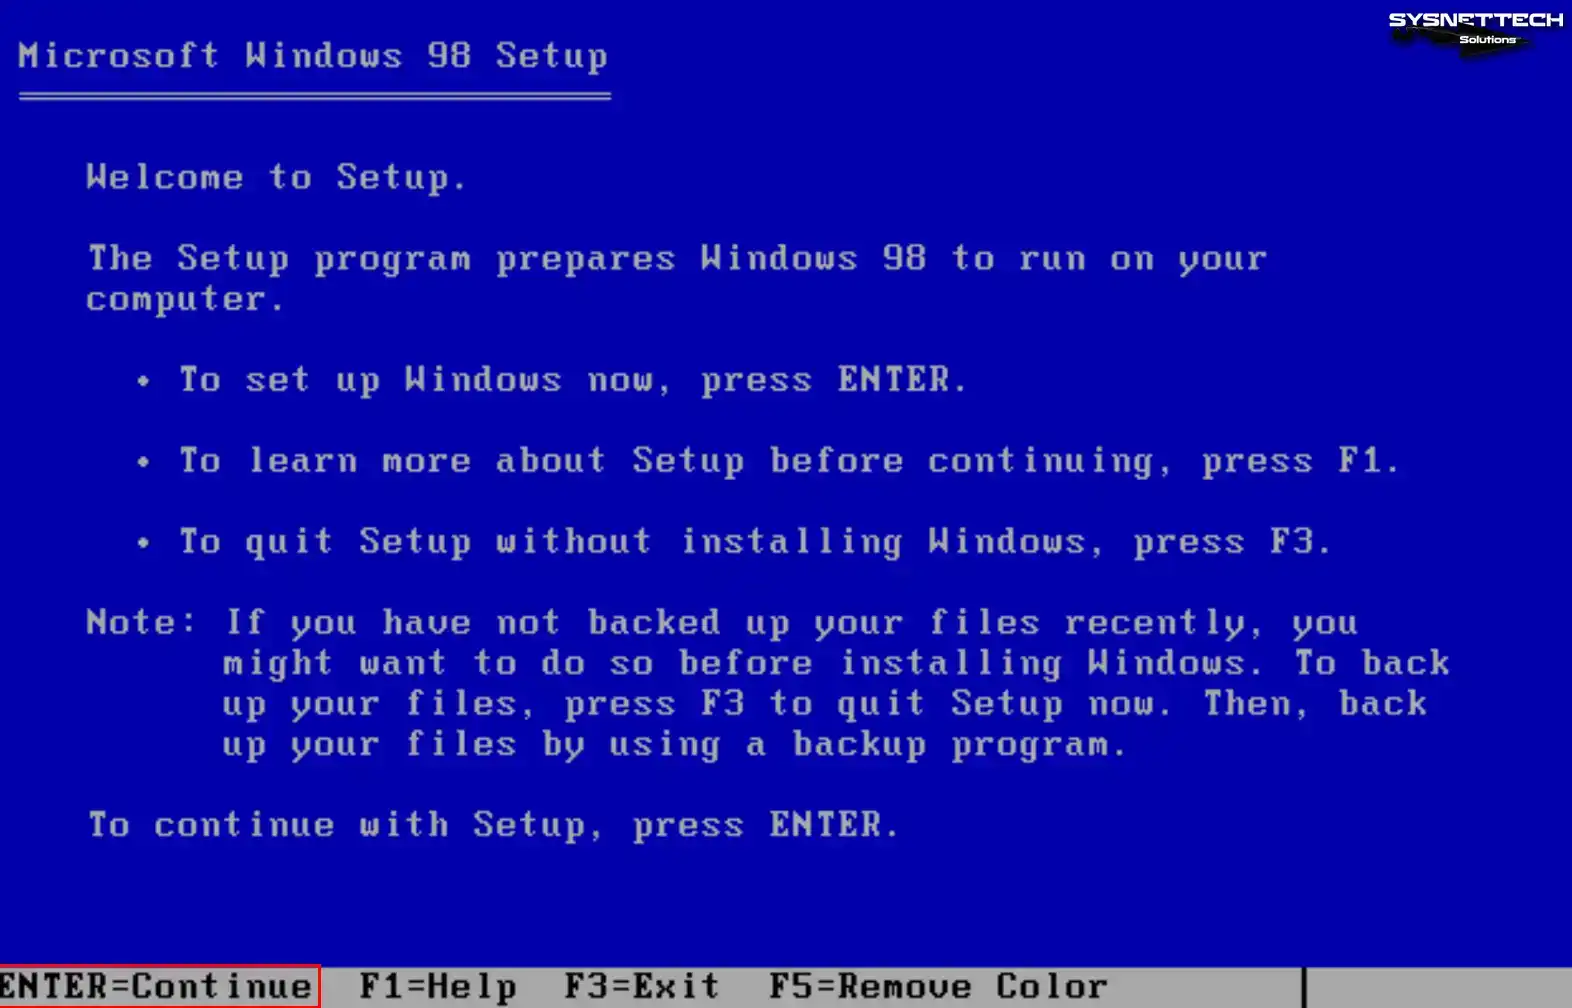
First, press Enter on the Microsoft Windows 98 Setup screen to begin the installation. You can also press F1 for detailed setup information. Press F3 to exit the wizard.
Step 4
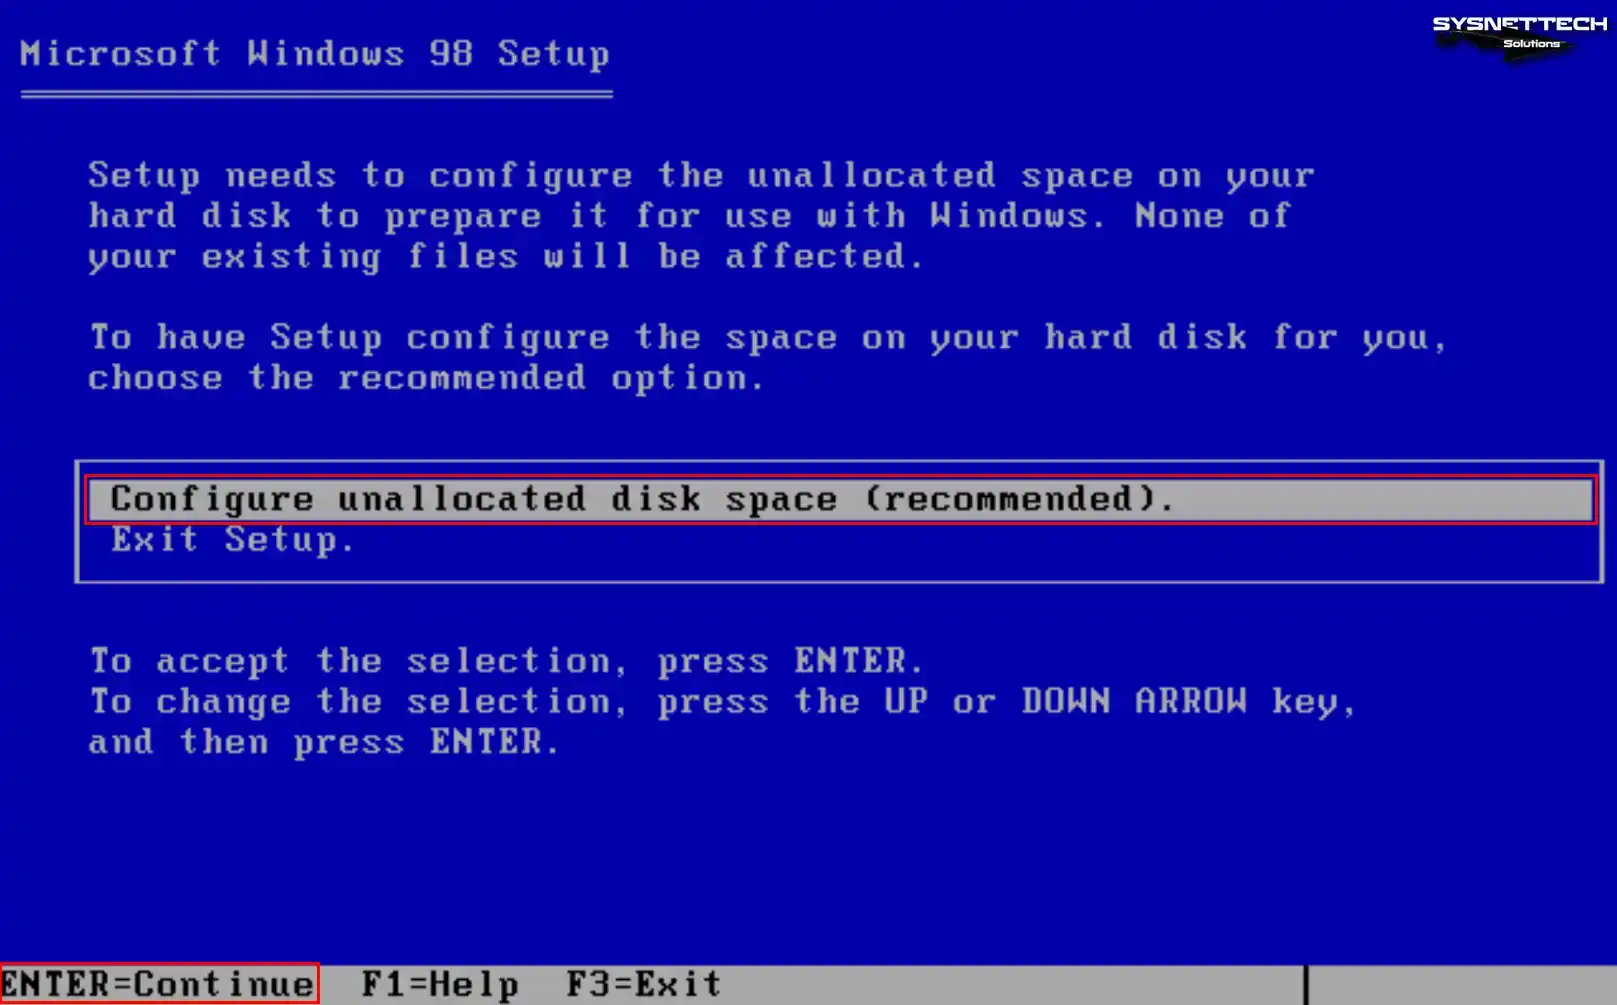
After you start the installation, configure unallocated disk space on the disk setup screen. Press Enter on Configure unallocated disk space and continue.
Step 5
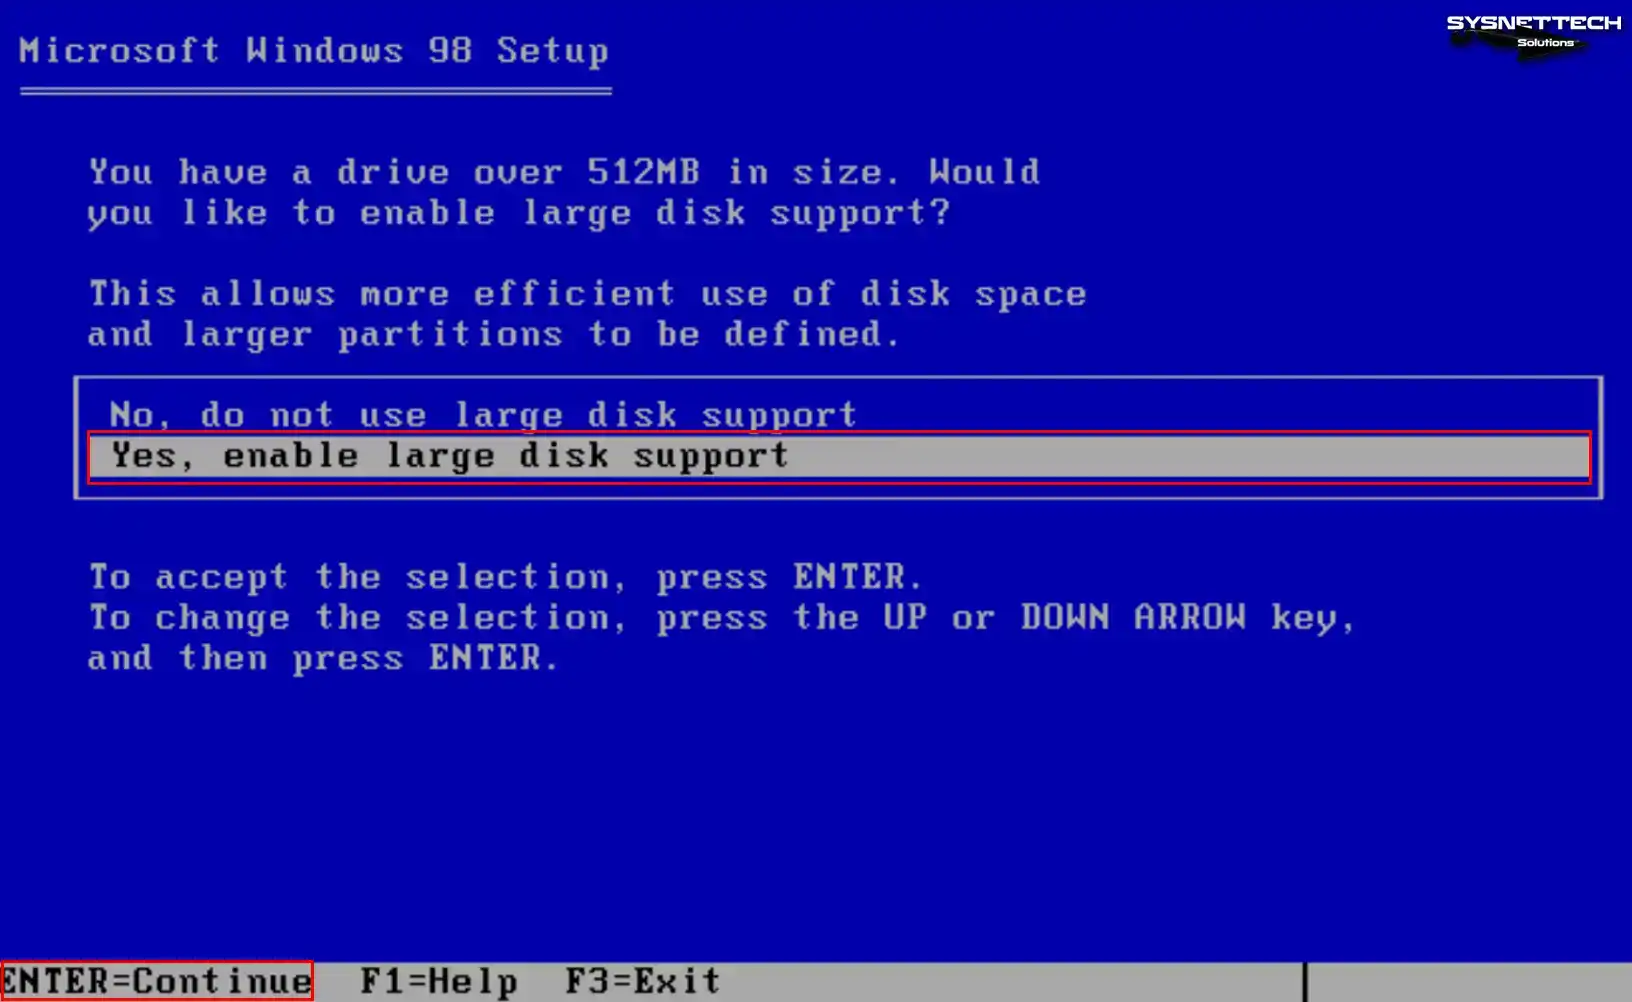
On Windows 9x systems, you see a large disk prompt for disk sizes over 512 MB. You may want to use the full 8 GB disk space assigned to the virtual machine. Select Yes, enable large disk support and press Enter.
Step 6
First, press Enter to let the setup wizard restart your system. Your system restarts after this step. Then follow the same steps up to step 4 when the boot screen appears.
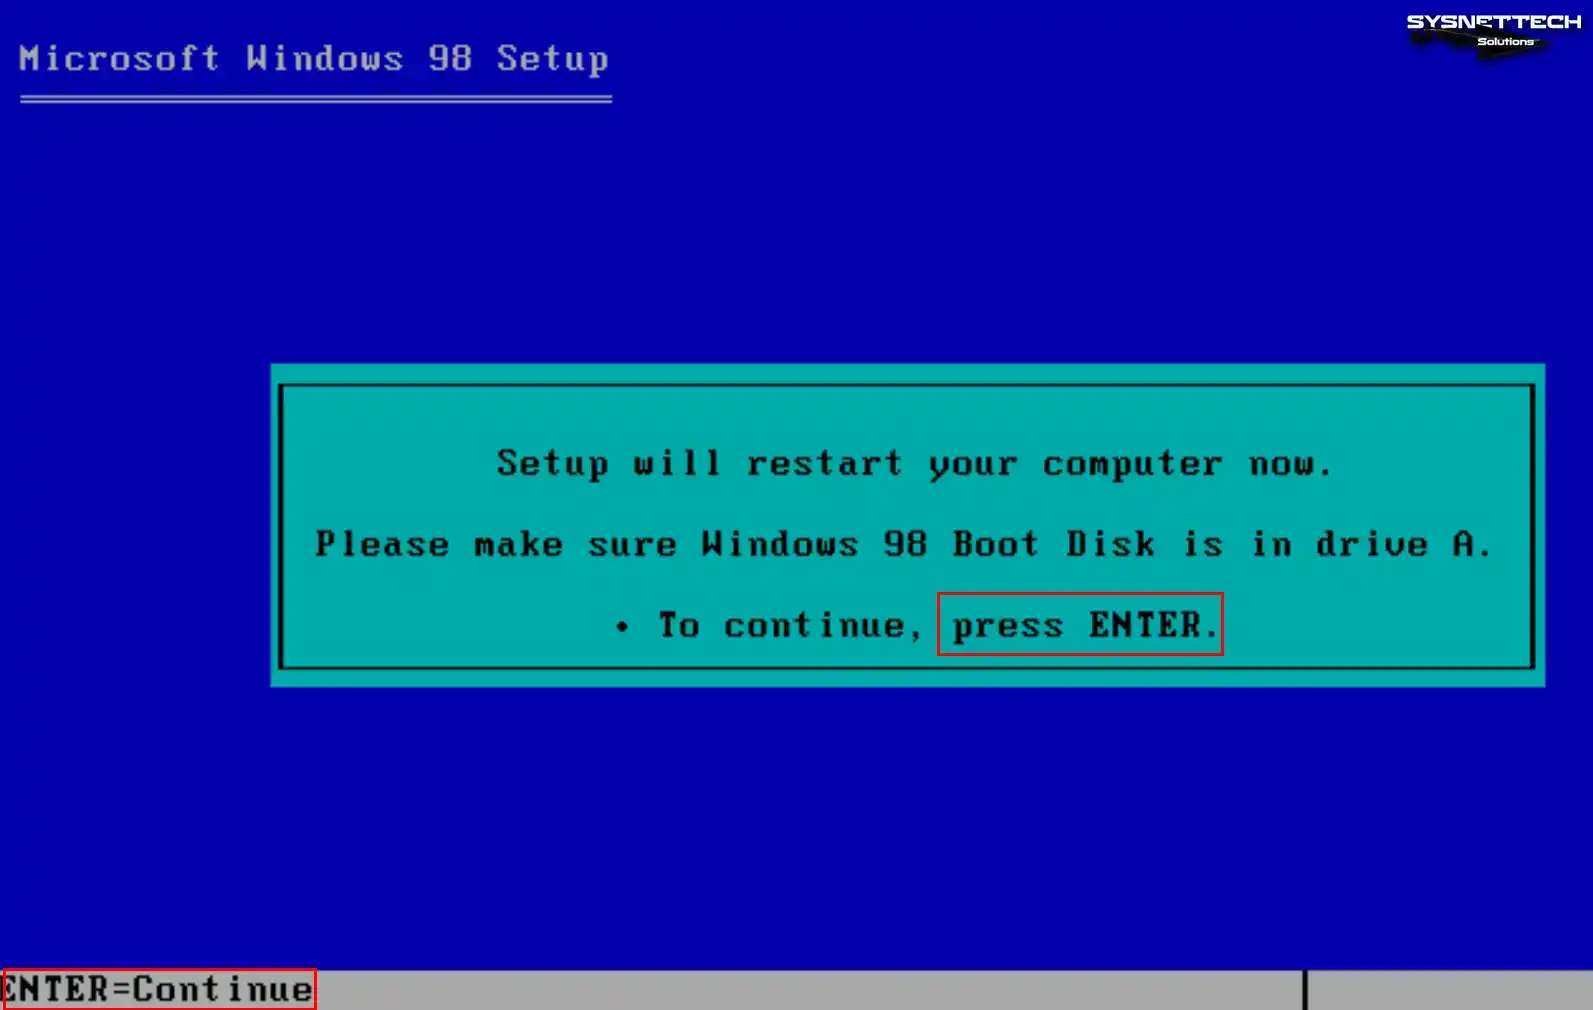
Step 7
After you configure large disk space use, the process continues. Then the wizard automatically formats the C drive.
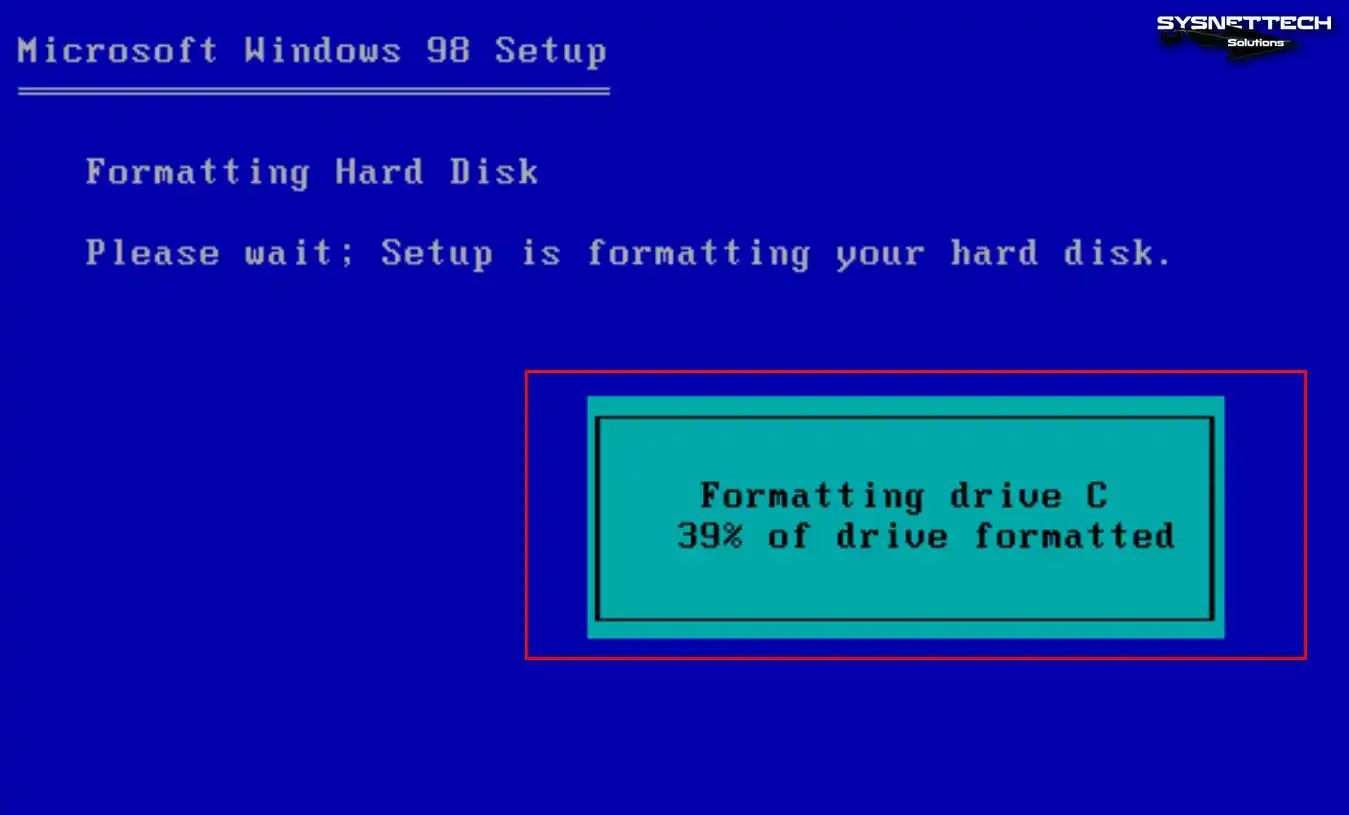
Step 8
After the setup wizard formats your virtual disk, press Enter to continue.
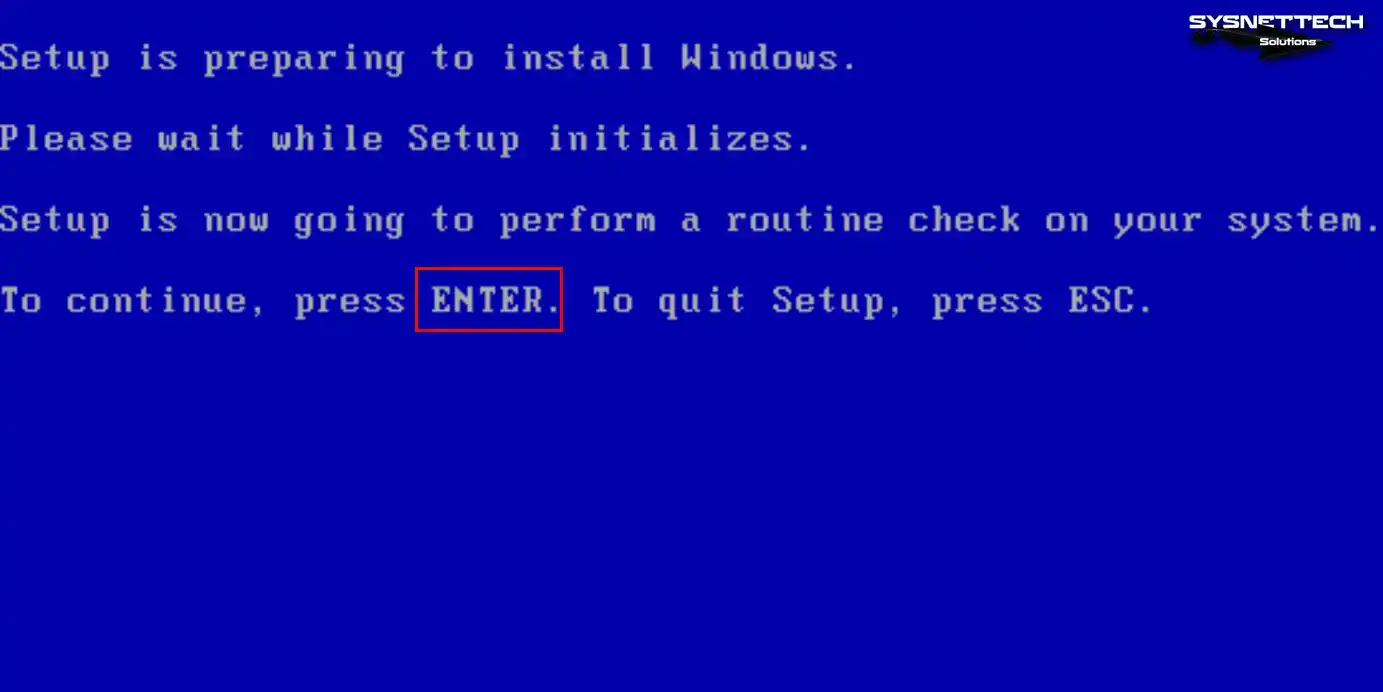
Step 9
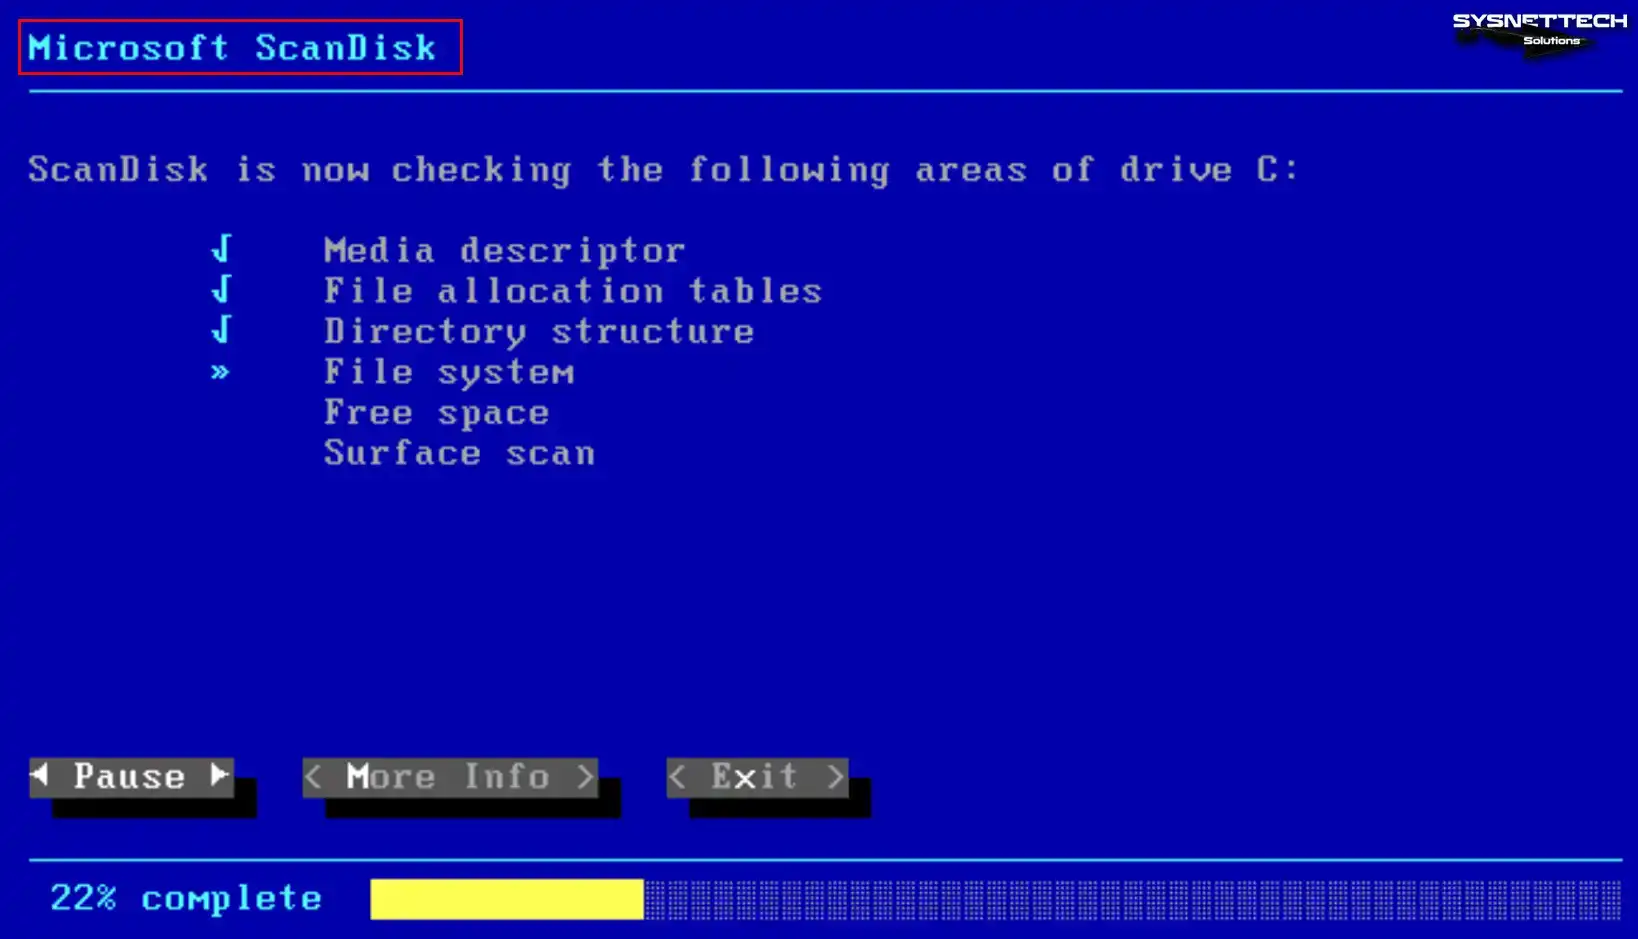
In this step, Microsoft ScanDisk opens. Then it scans and checks key details like file integrity on your system.
Continuing Setup and Copying System Files
Step 1
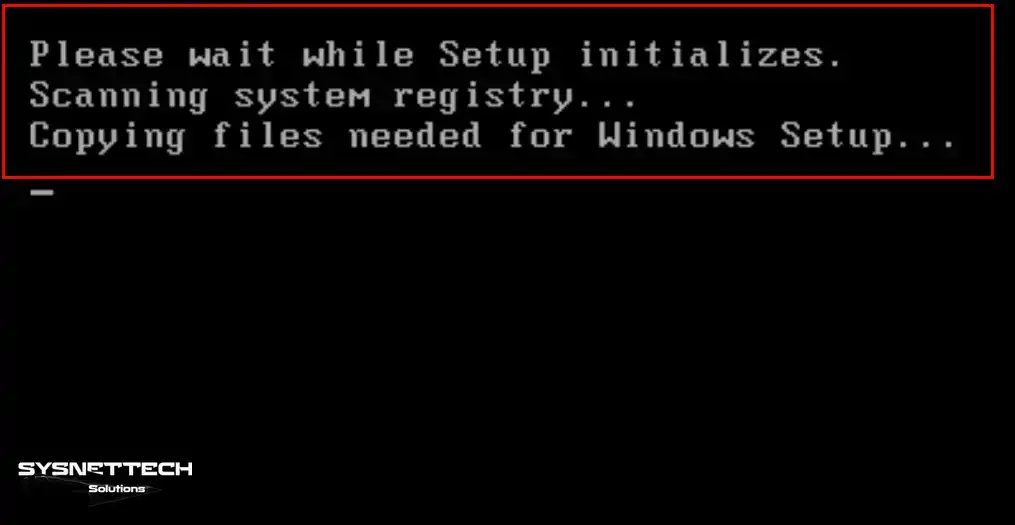
First, Microsoft ScanDisk verifies the setup media and system file integrity. Your system then restarts and copies files needed for setup.
Step 2
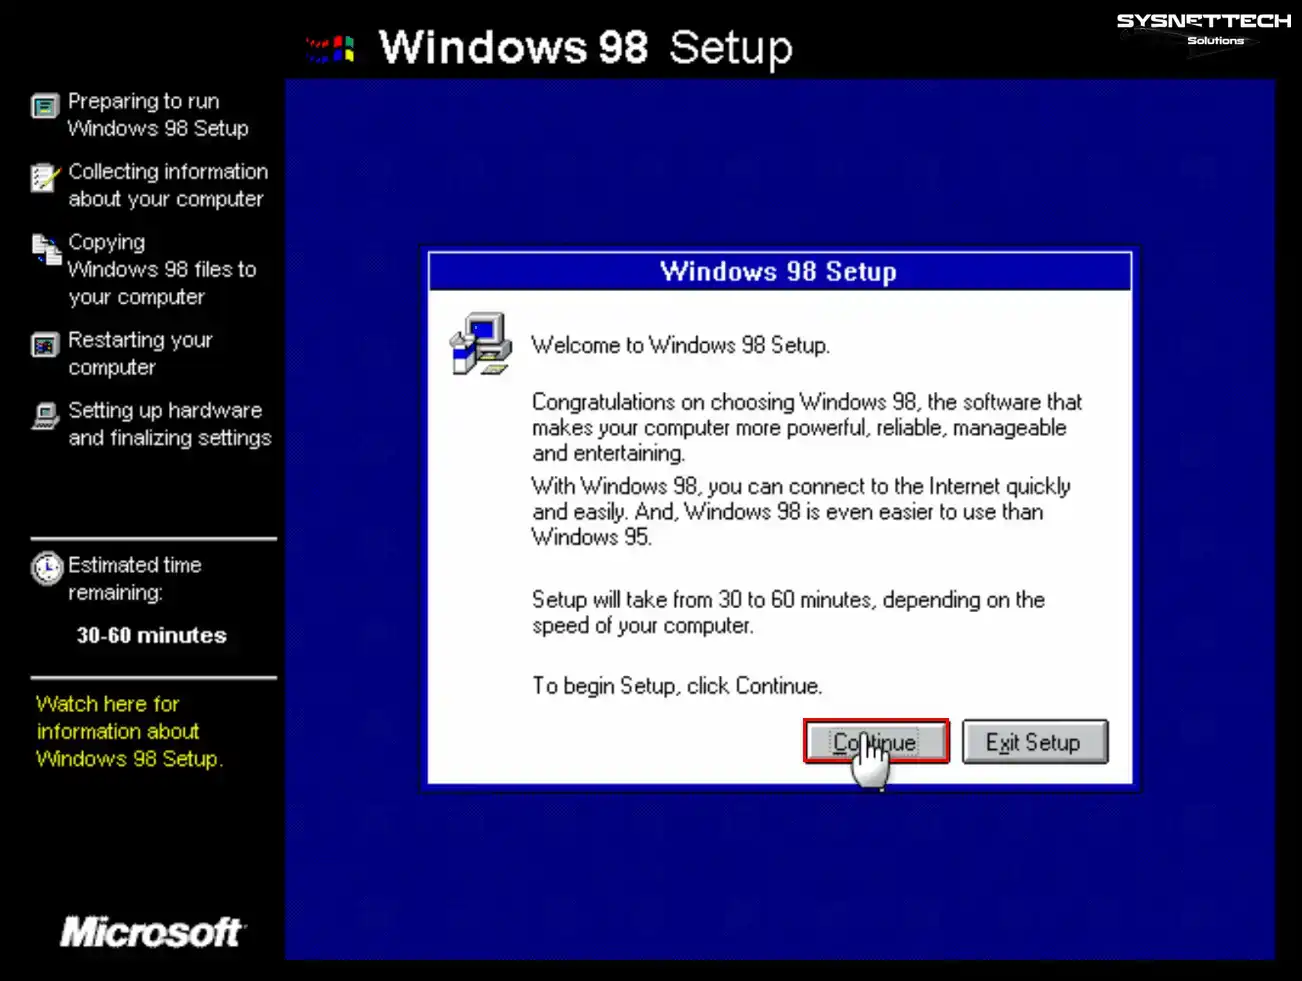
When the Setup screen opens, you see a notice. This process can take 30 to 60 minutes depending on your computer speed. Then press Continue to move on.
Step 3
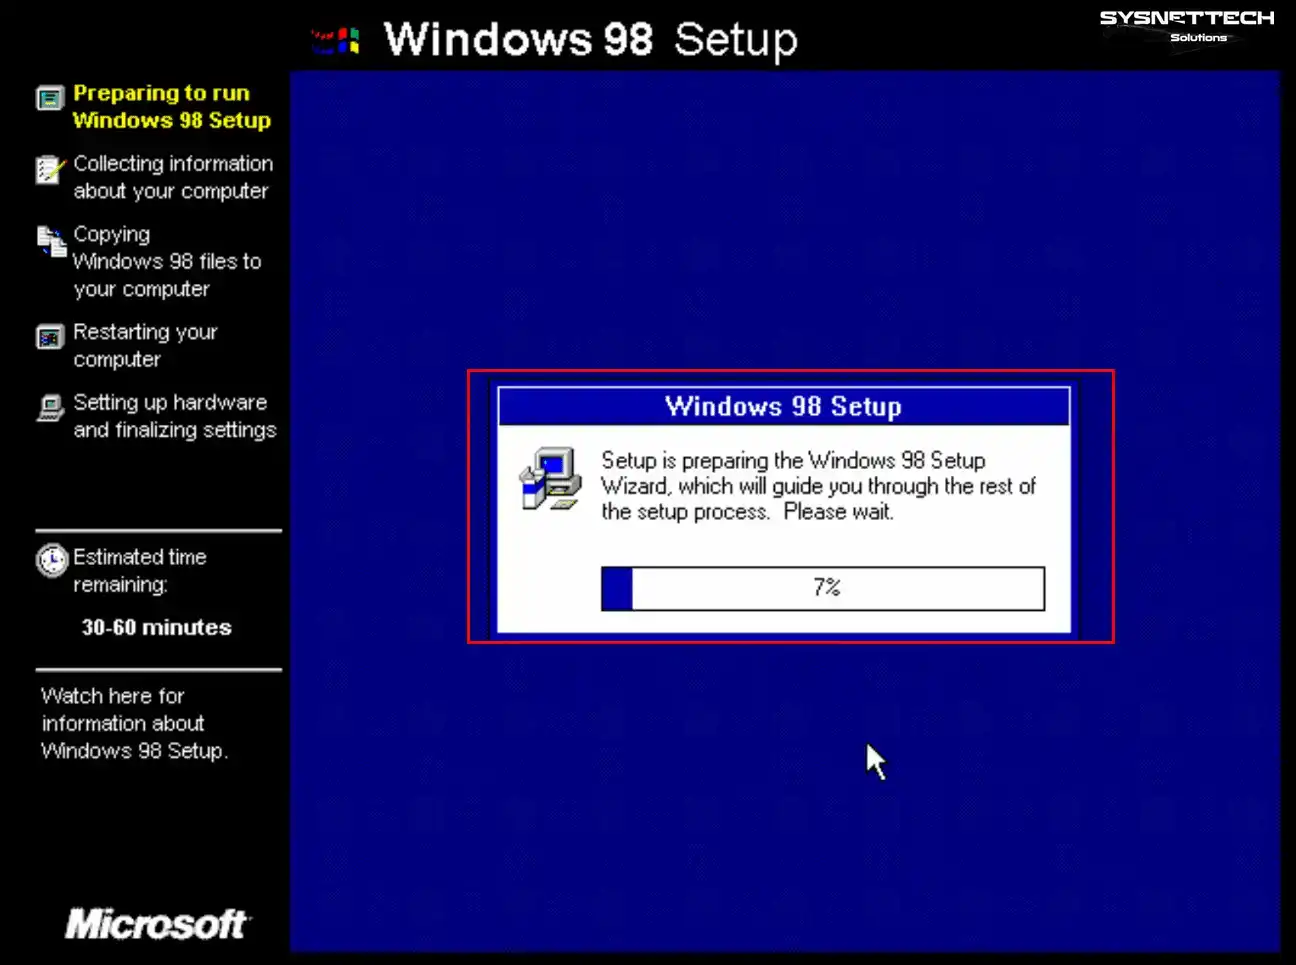
Next, wait while the wizard prepares to complete the remaining install steps.
Step 4
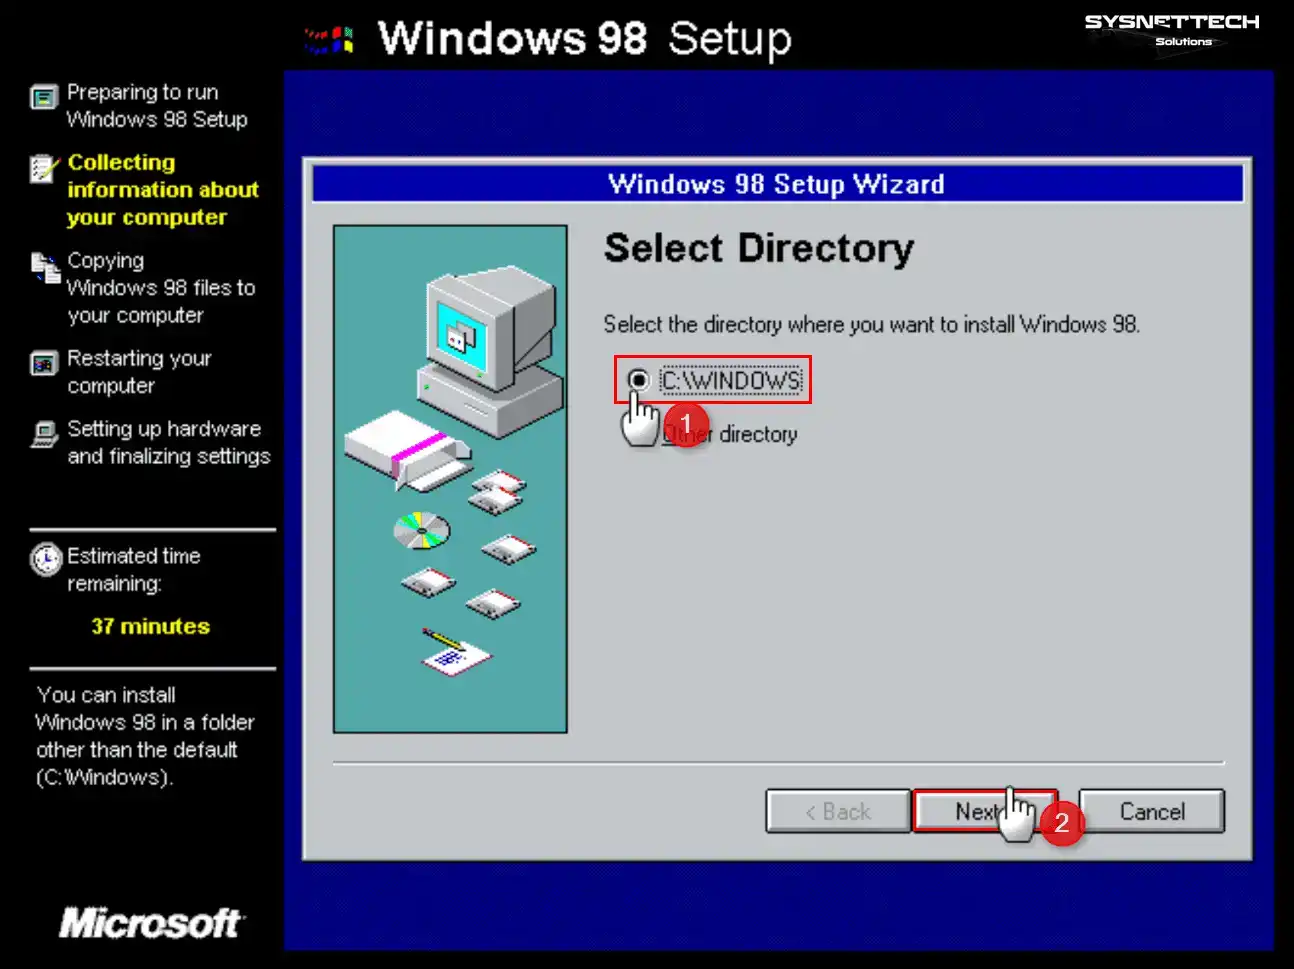
In the Select Directory window, you can change the folder where Win98 installs. Still, choose the default C:\WINDOWS folder and click Next.
Step 5
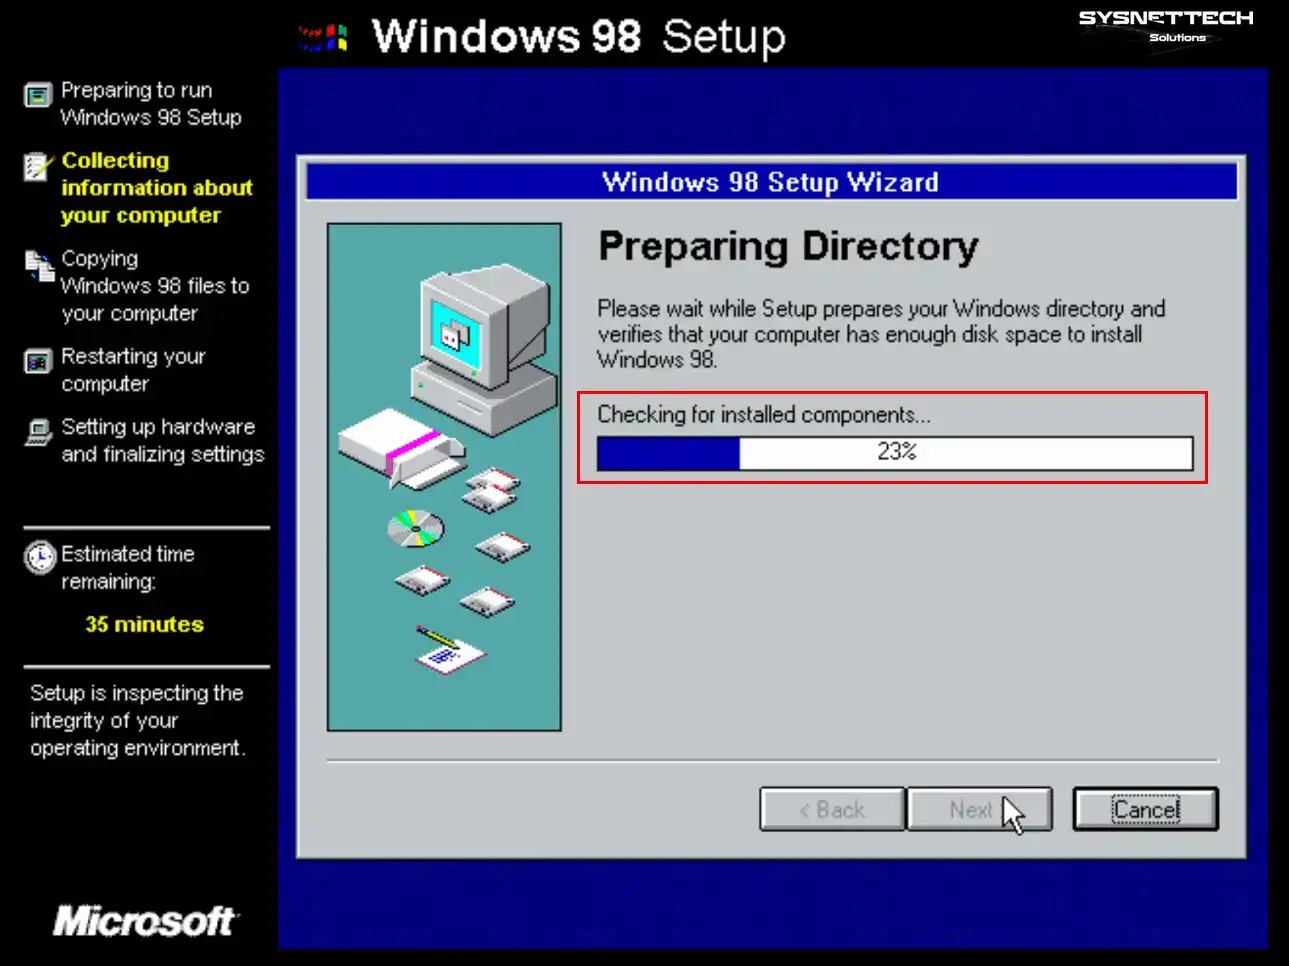
Wait while the wizard checks the Windows install directory and installed components.
Step 6
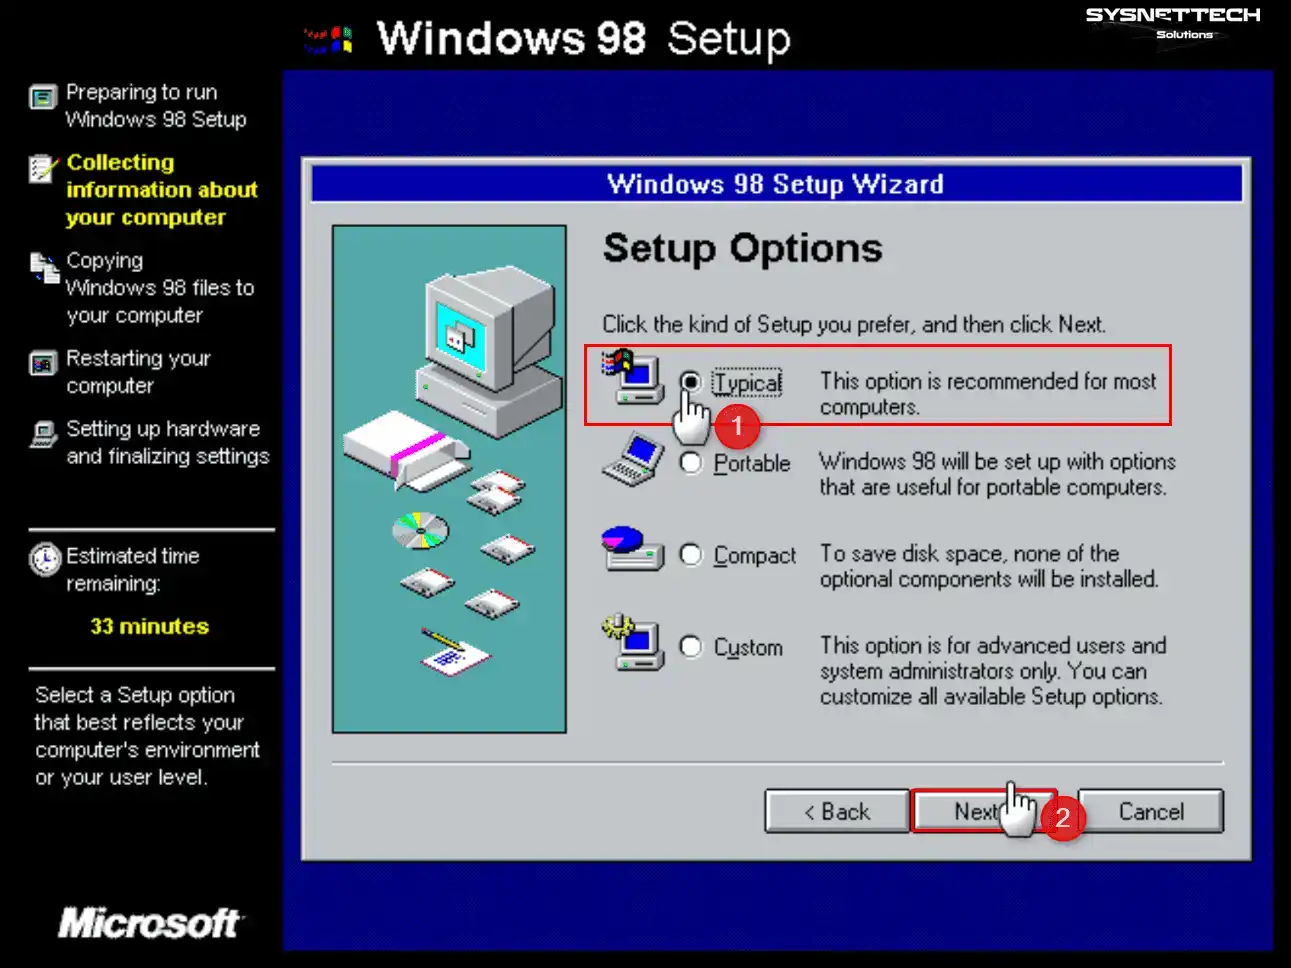
In the Setup Options window, Typical appears by default. Naturally, you can continue by choosing this ready-made setup type.
If you want to configure all available options like components to install, choose Custom.
Step 7
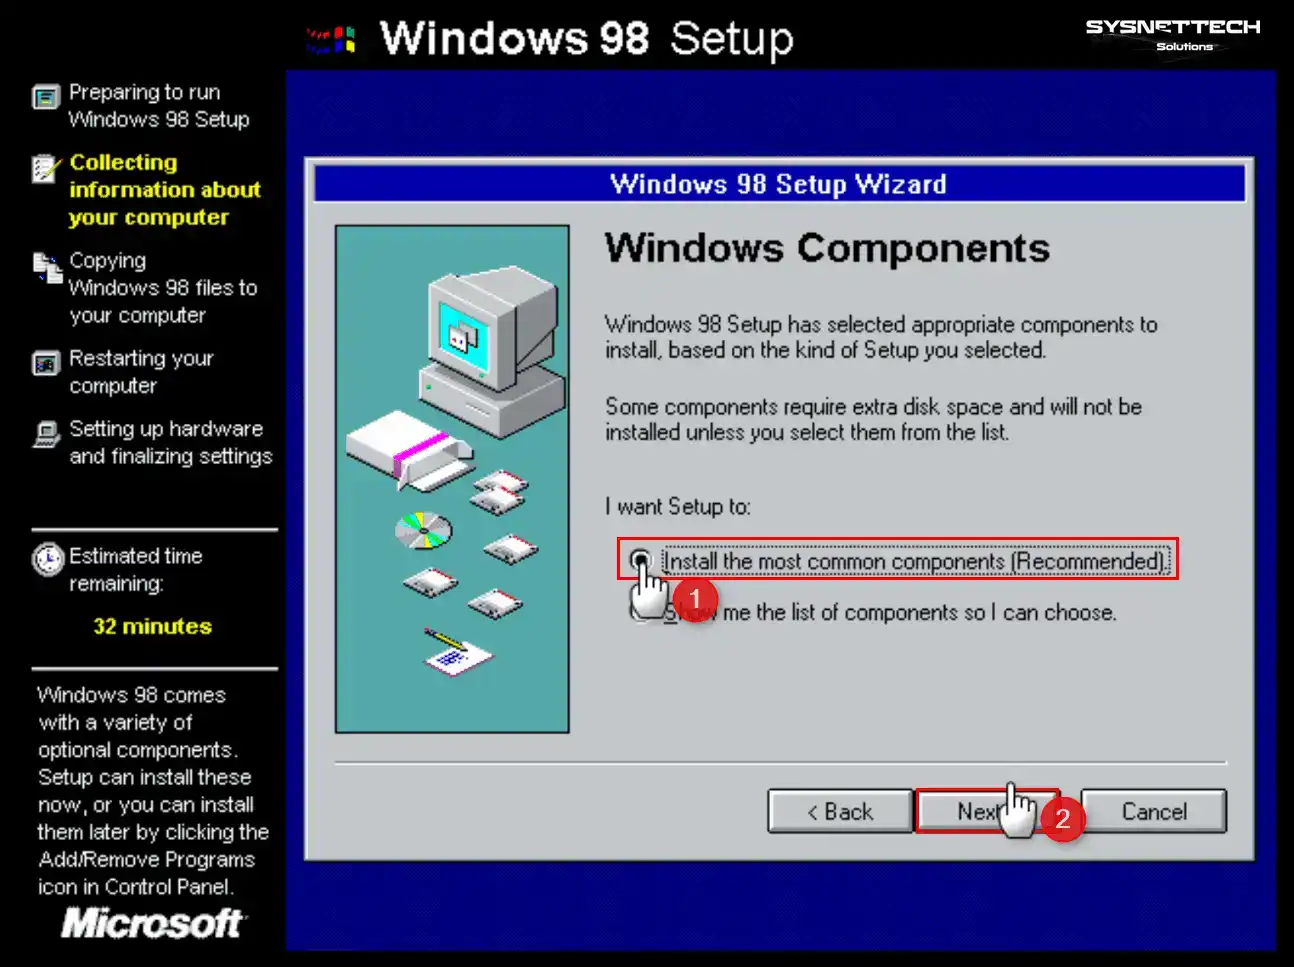
On the Windows Components screen, you can edit system tools and apps. Choose the option below to continue. We recommend installing the most common system components at this step.
Step 8
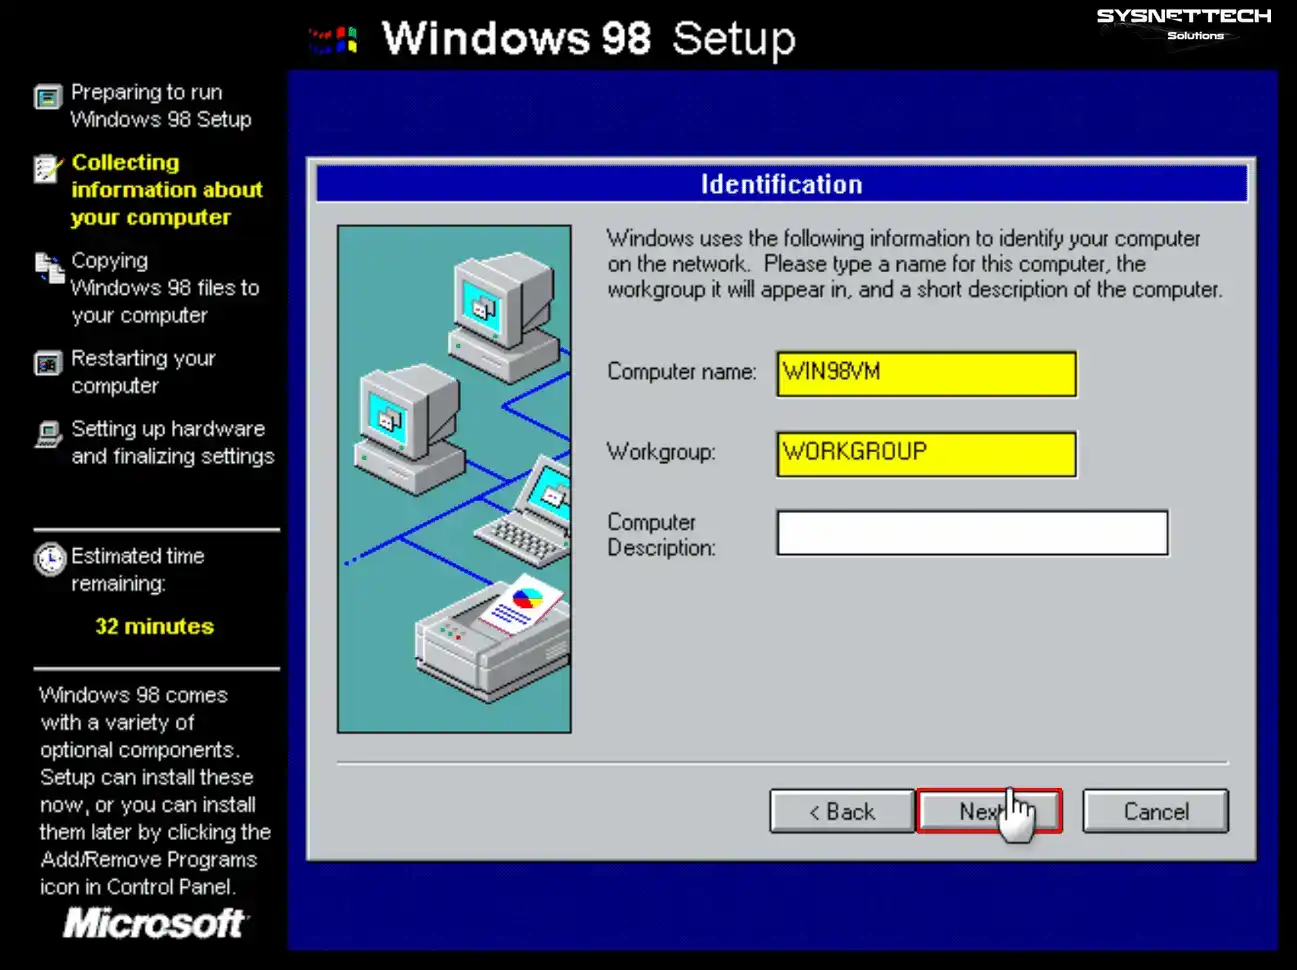
In the Identification window, enter a new name for your virtual PC. Also follow the steps without changing the workgroup. You can fill the Description field to write a note for your virtual PC.
Step 9
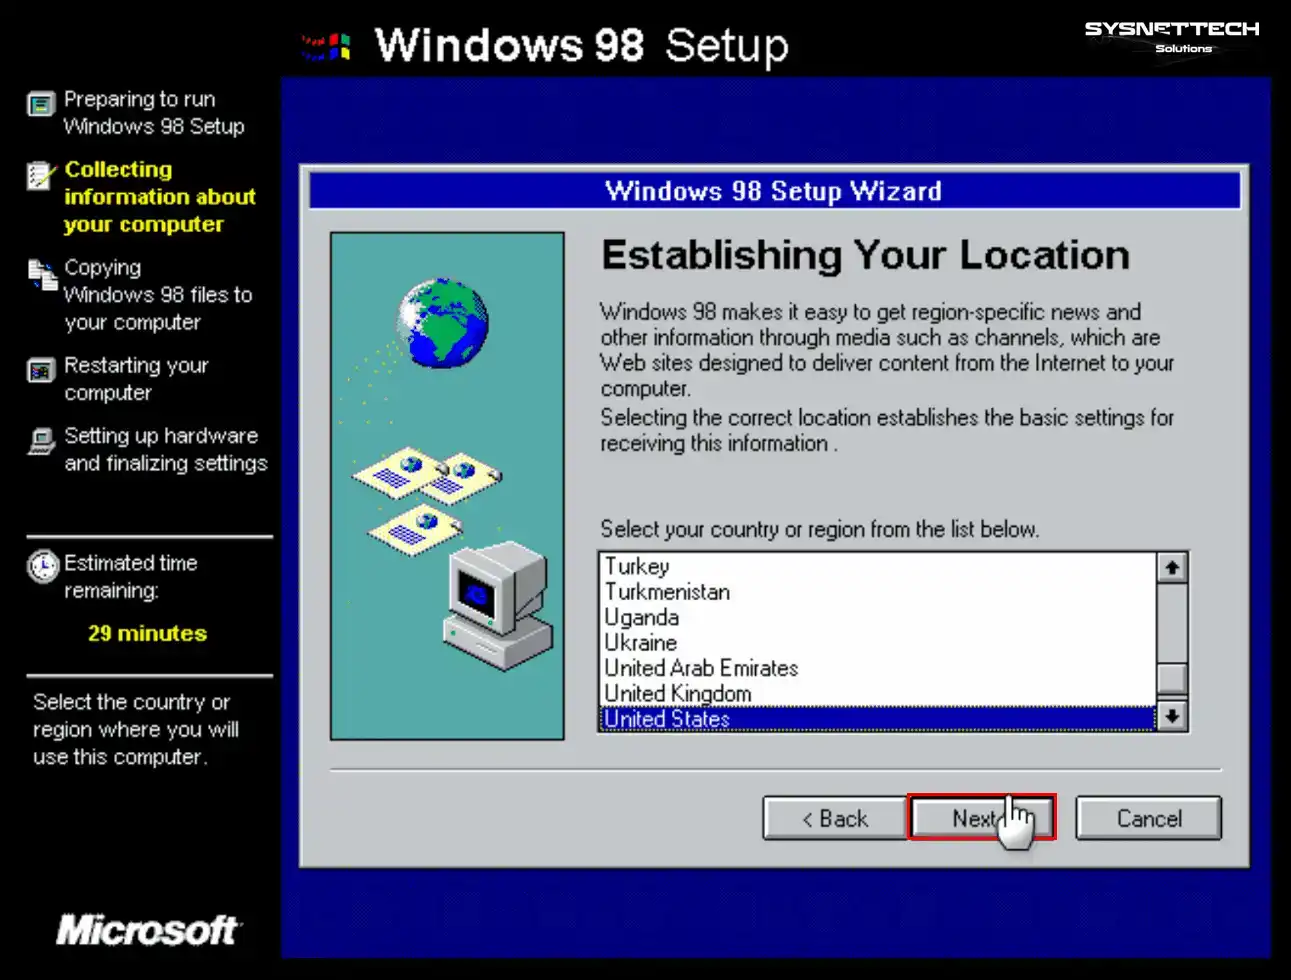
Next, select your country from the list during location configuration.
Step 10
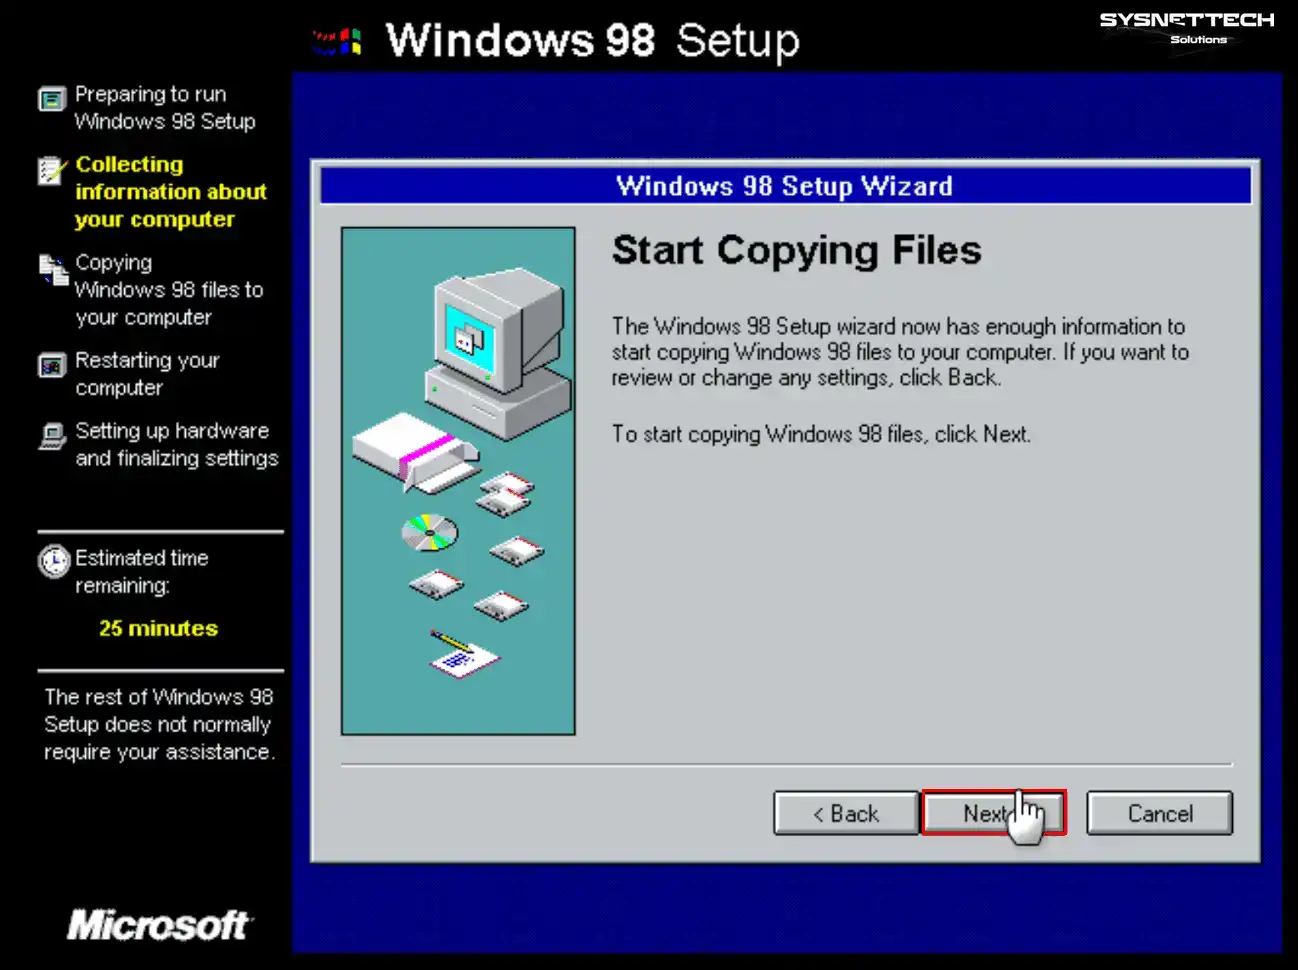
Finally, click Next to start copying Win98 system files.
Step 11
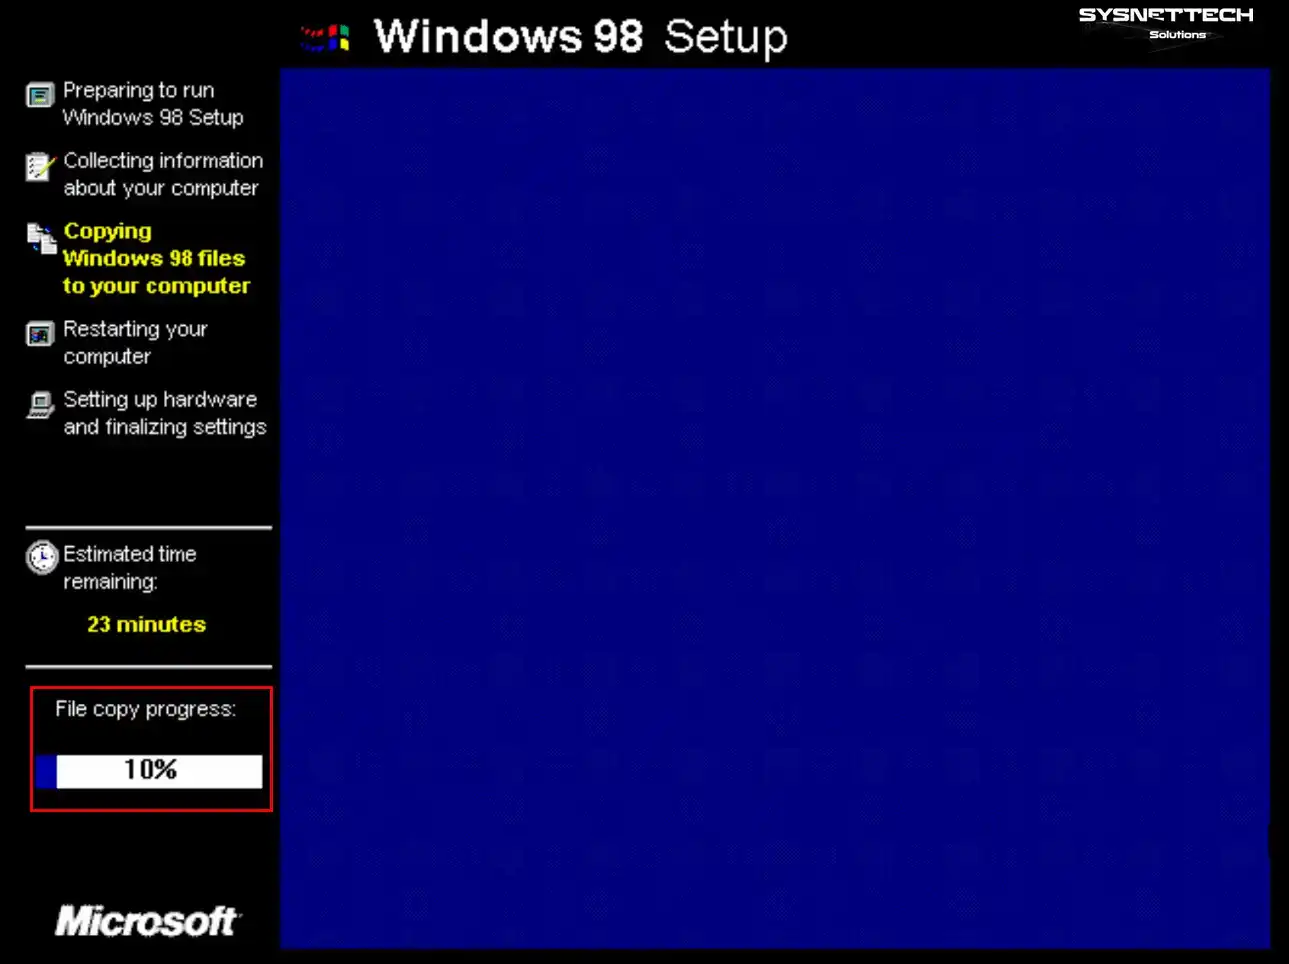
When your virtual PC restarts, Win98 system files begin to copy. This copy process takes time based on your system speed.
License and User Information
Step 1
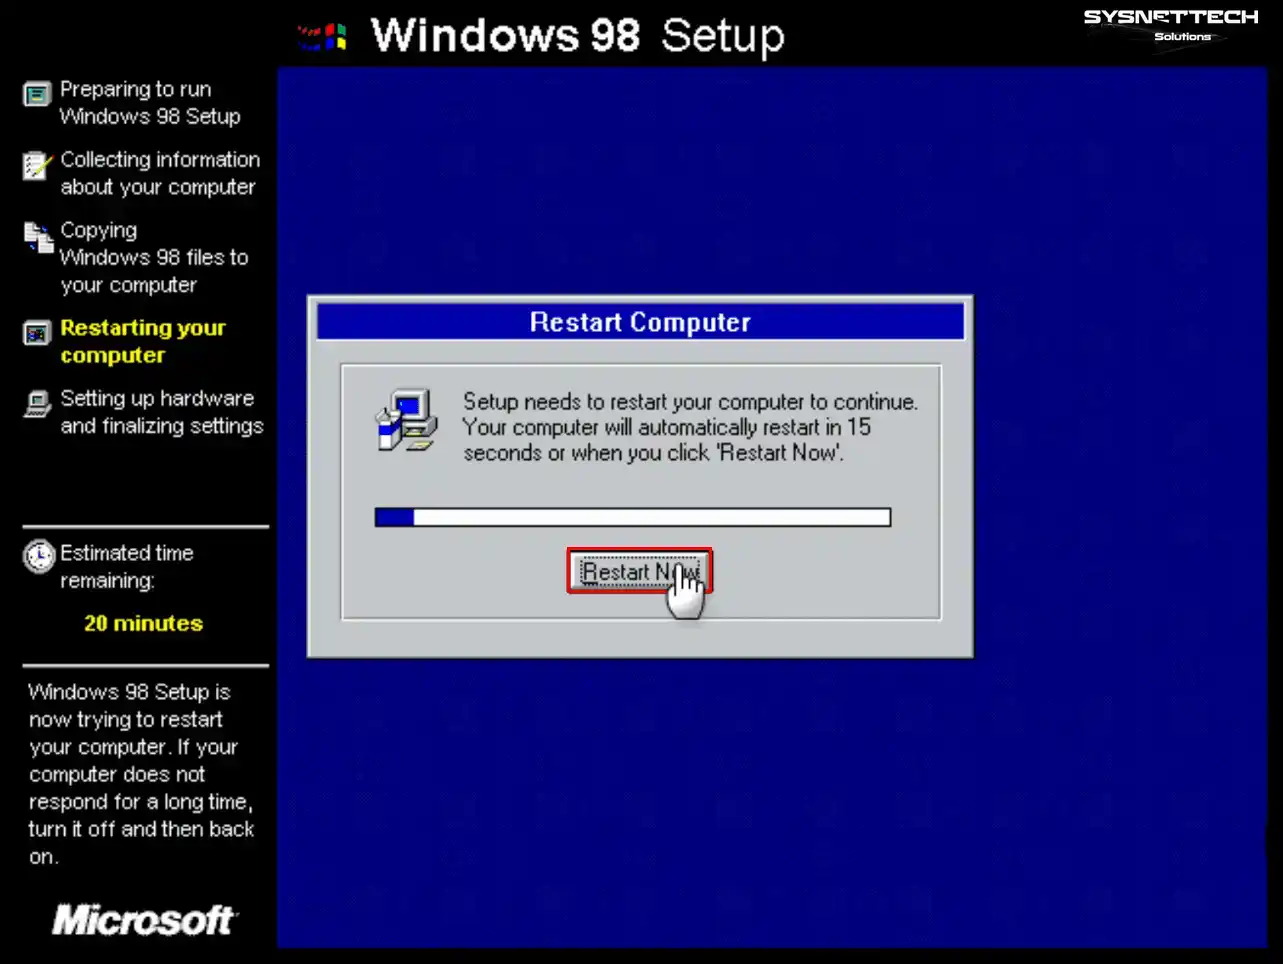
After the operating system files finish copying, restart your VM.
Step 2
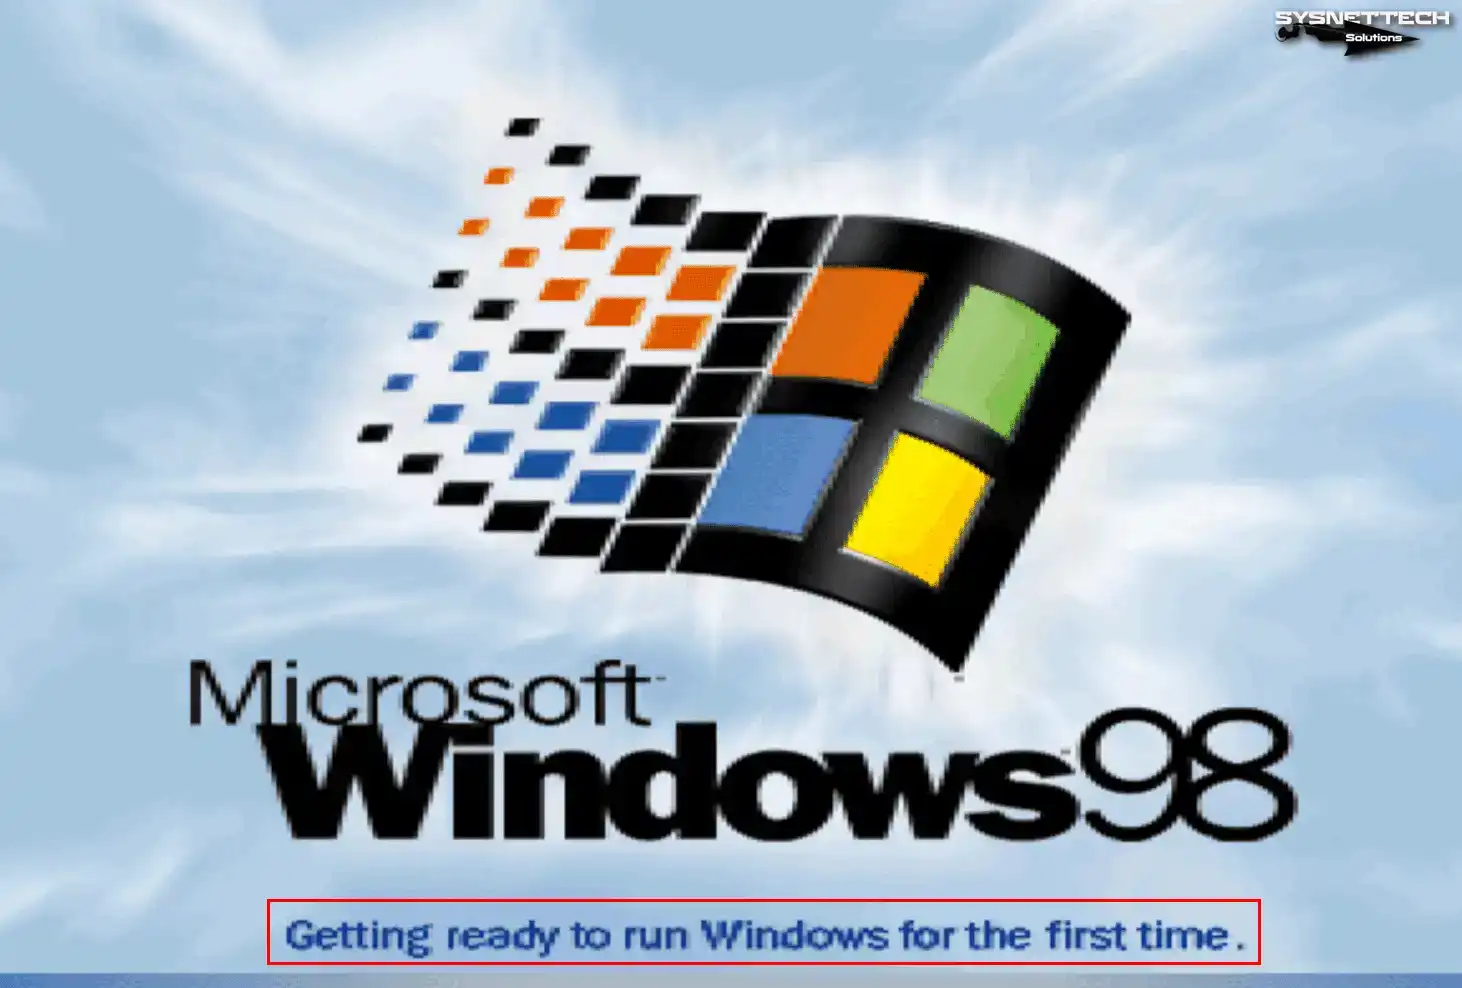
Wait while Microsoft Windows 98 starts.
Step 3
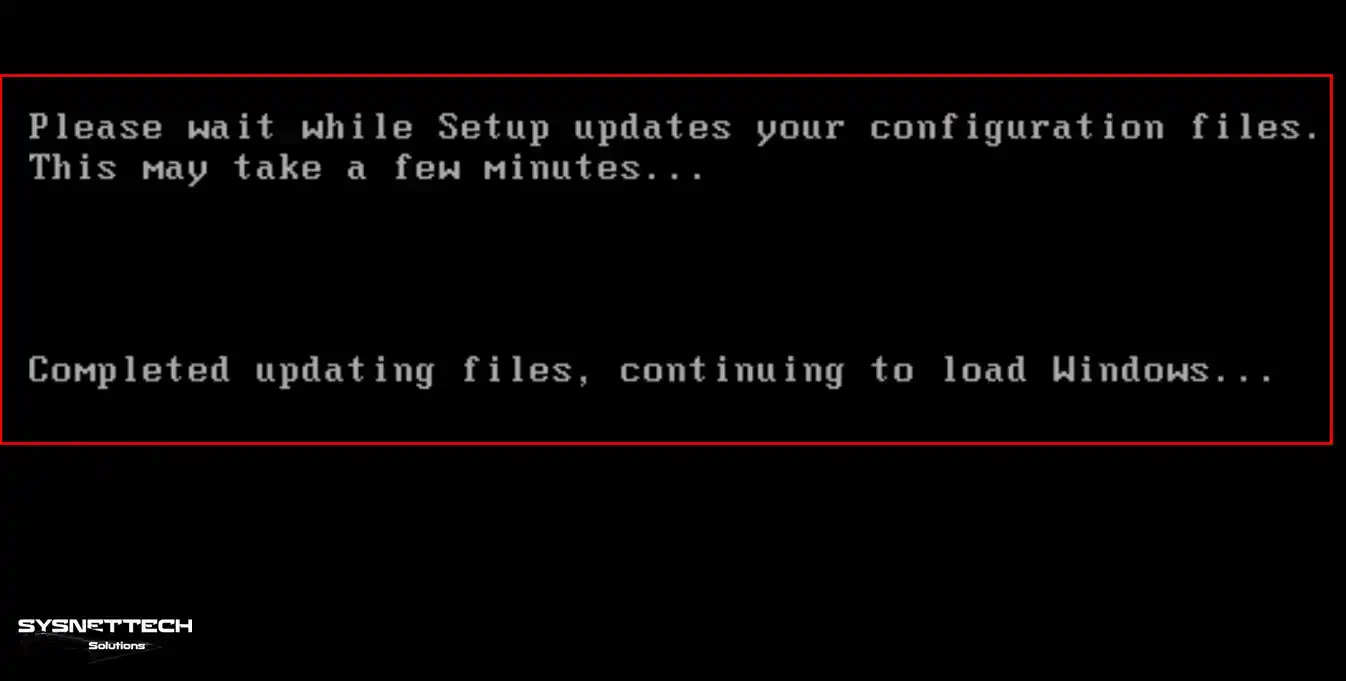
Wait while the setup wizard updates configuration files.
Step 4
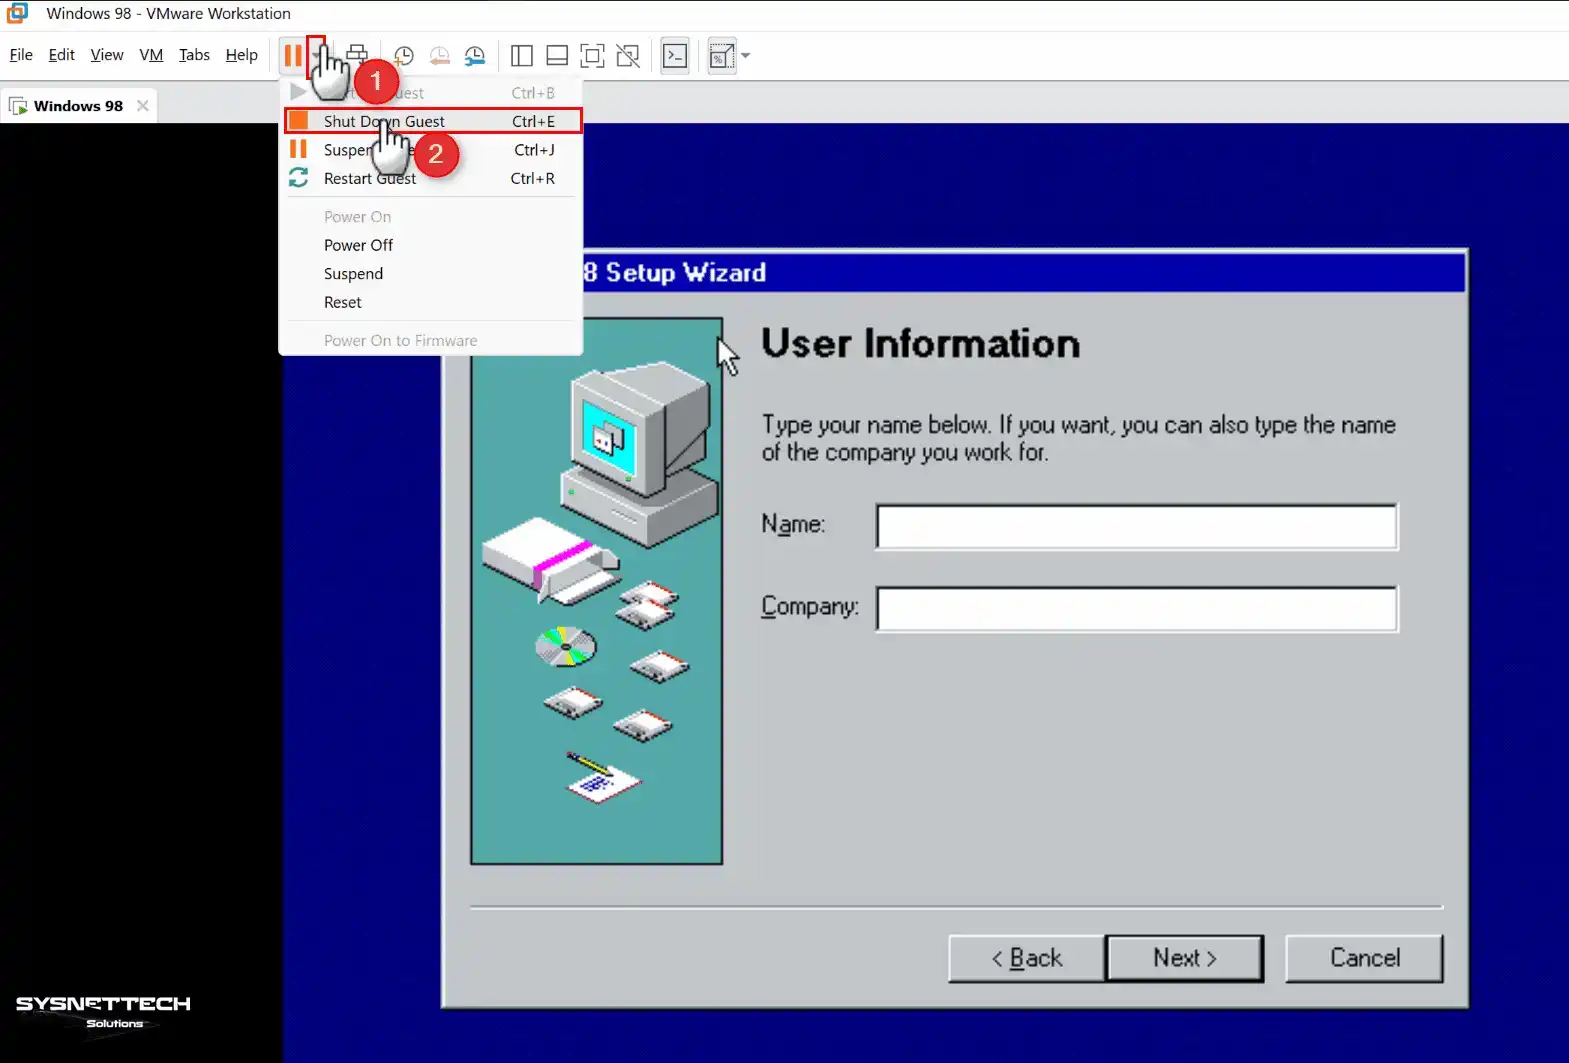
If you have an Intel 12th Gen processor, you may fail to install Win98. Shut down your VM during the second phase of the operating system.
Step 5
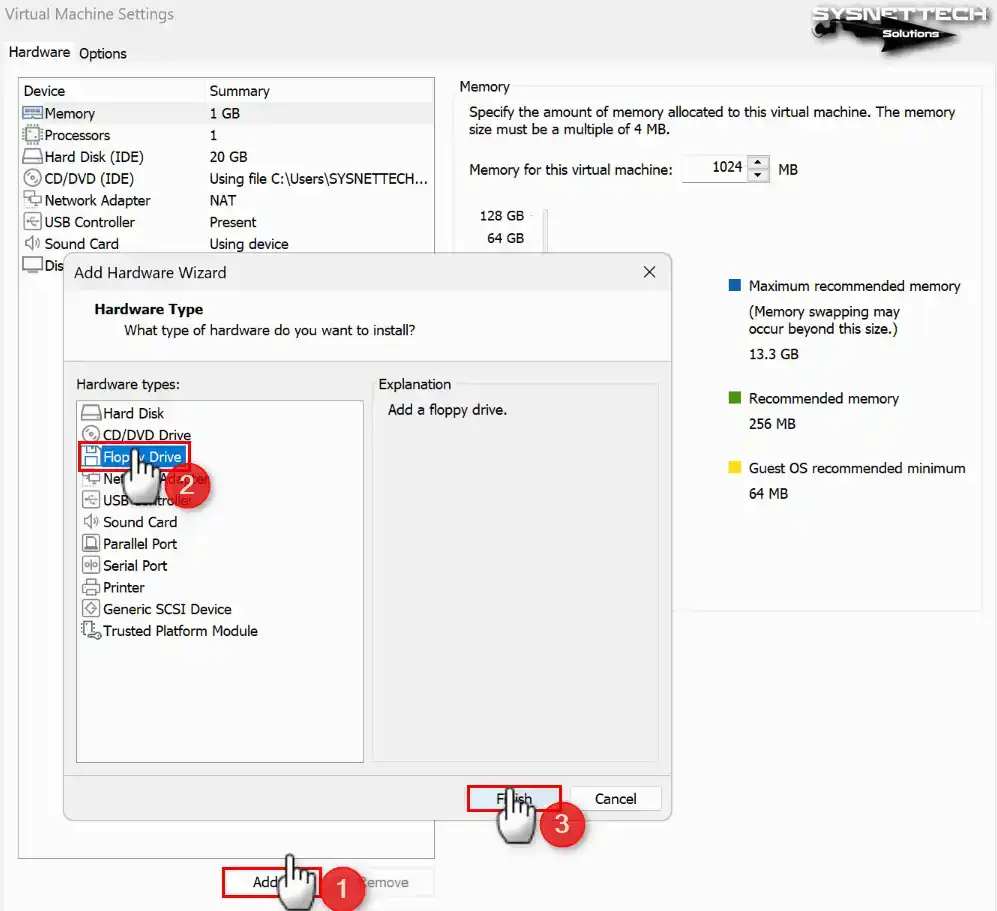
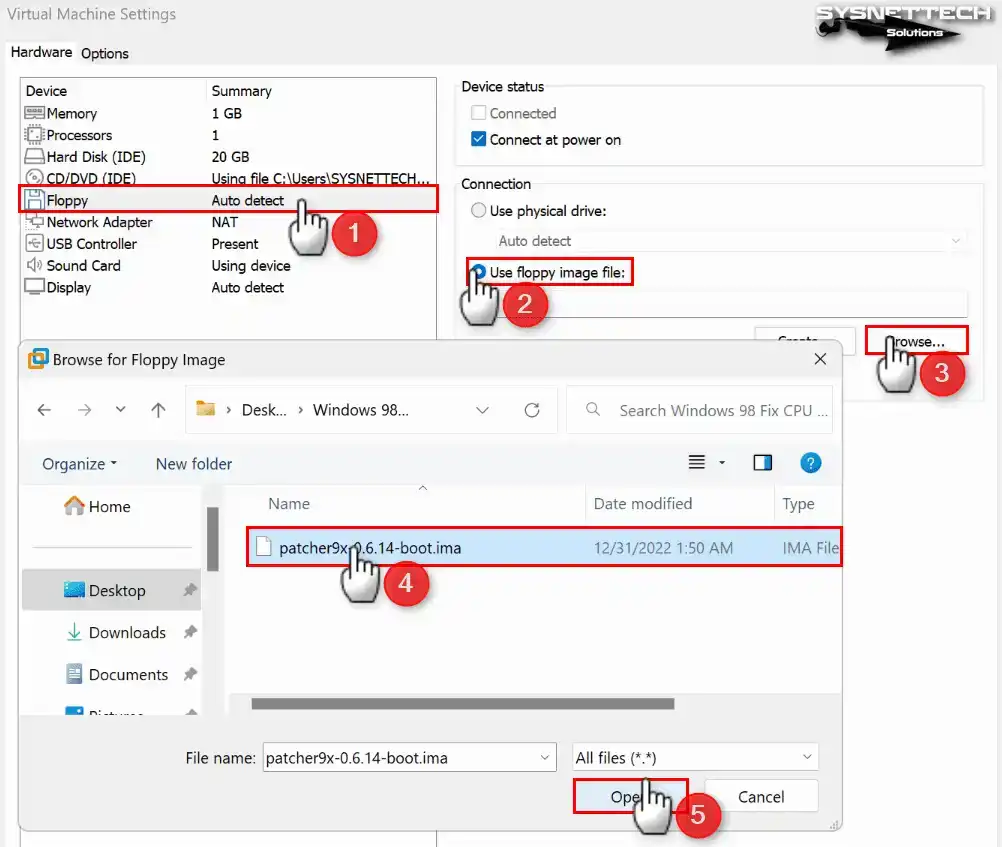
First, open virtual machine settings and click Add to add a new device. Then select Floppy Drive on the Hardware Type screen. Finally, press Finish.
Step 6
Next, open Use Floppy Image File to load a bootable image file. It goes on the floppy drive. Then press Browse and select the Patch.ima file you downloaded.
On newer CPUs, we use patcher9x-0.6.14-boot.ima to run Windows 9x versions. Download it from the article on the Vogons website or the GitHub link.
Step 7
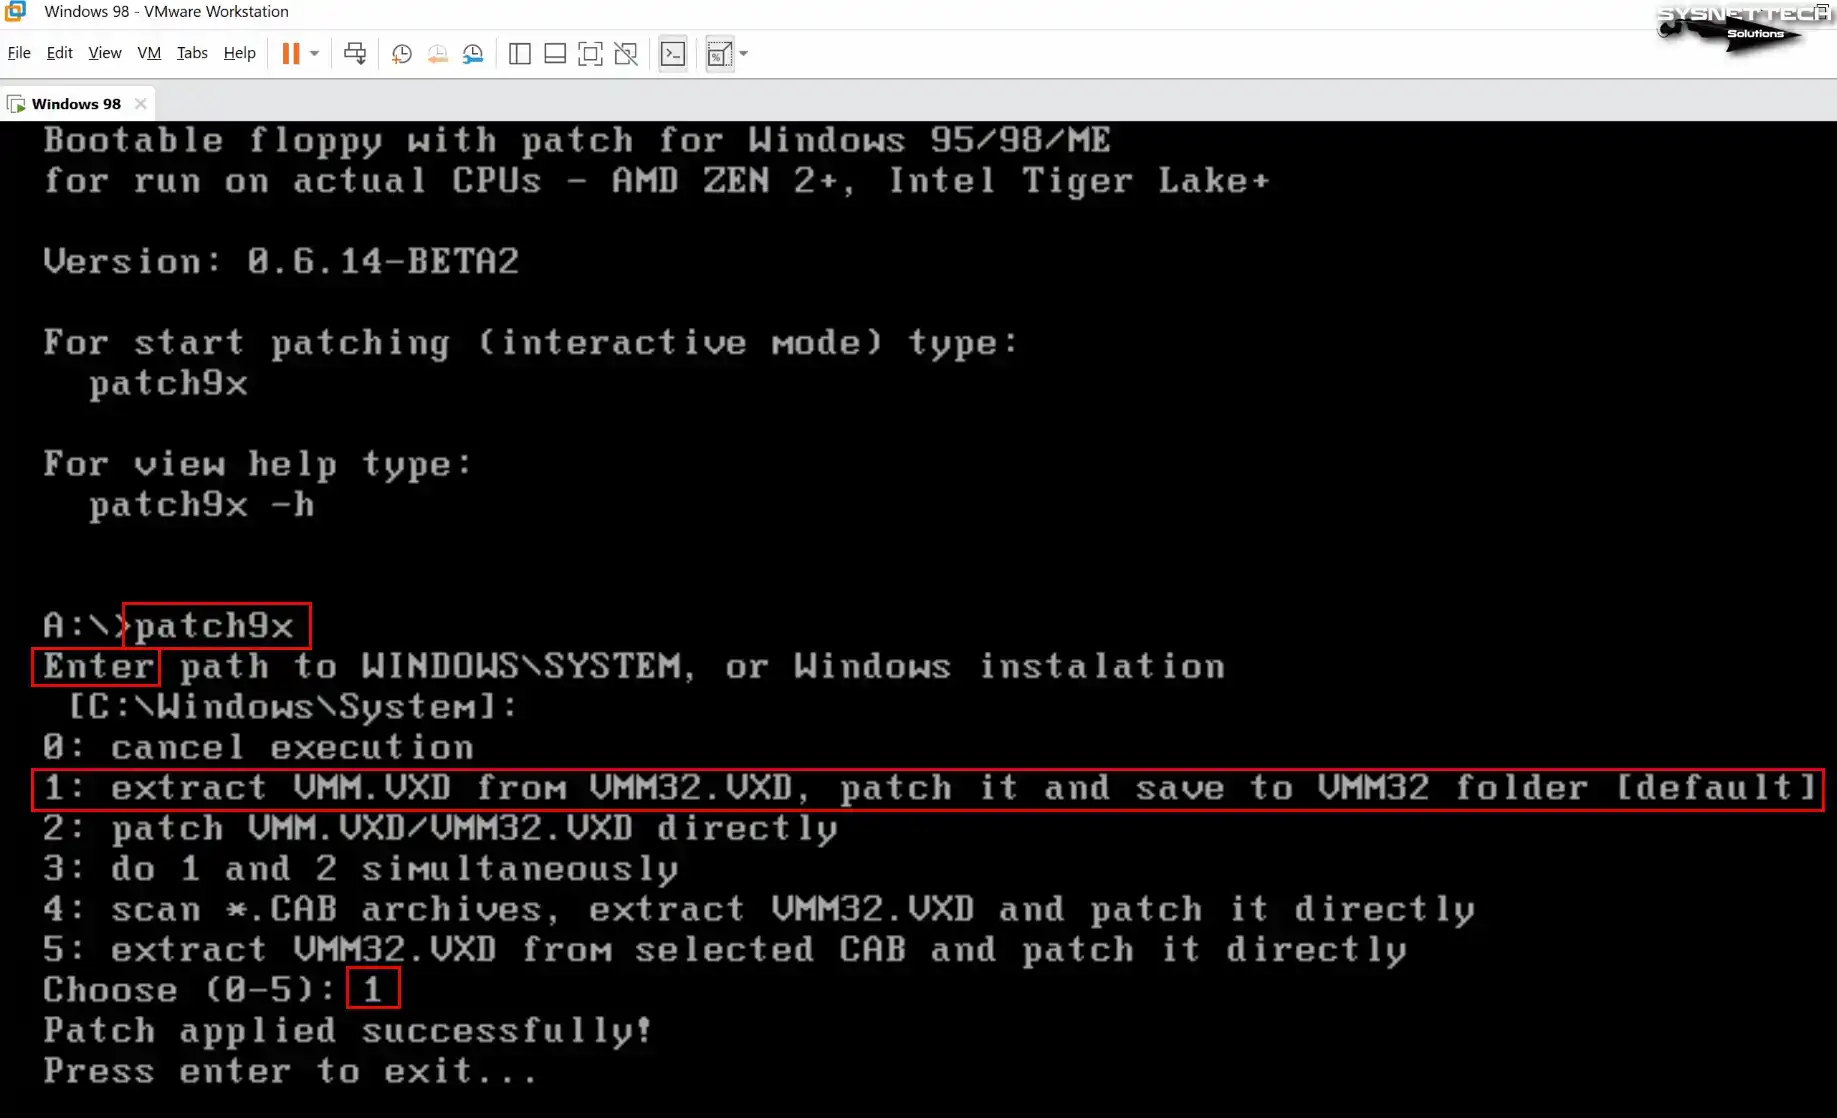
When your Win98 virtual system boots, type patch9x at the A:\> prompt and press Enter. In the next step, press Enter and choose 1 to apply the process.
The patch edits the relevant files. This lets your virtual operating system run on your current computer. Then shut down and restart your system.
Step 8
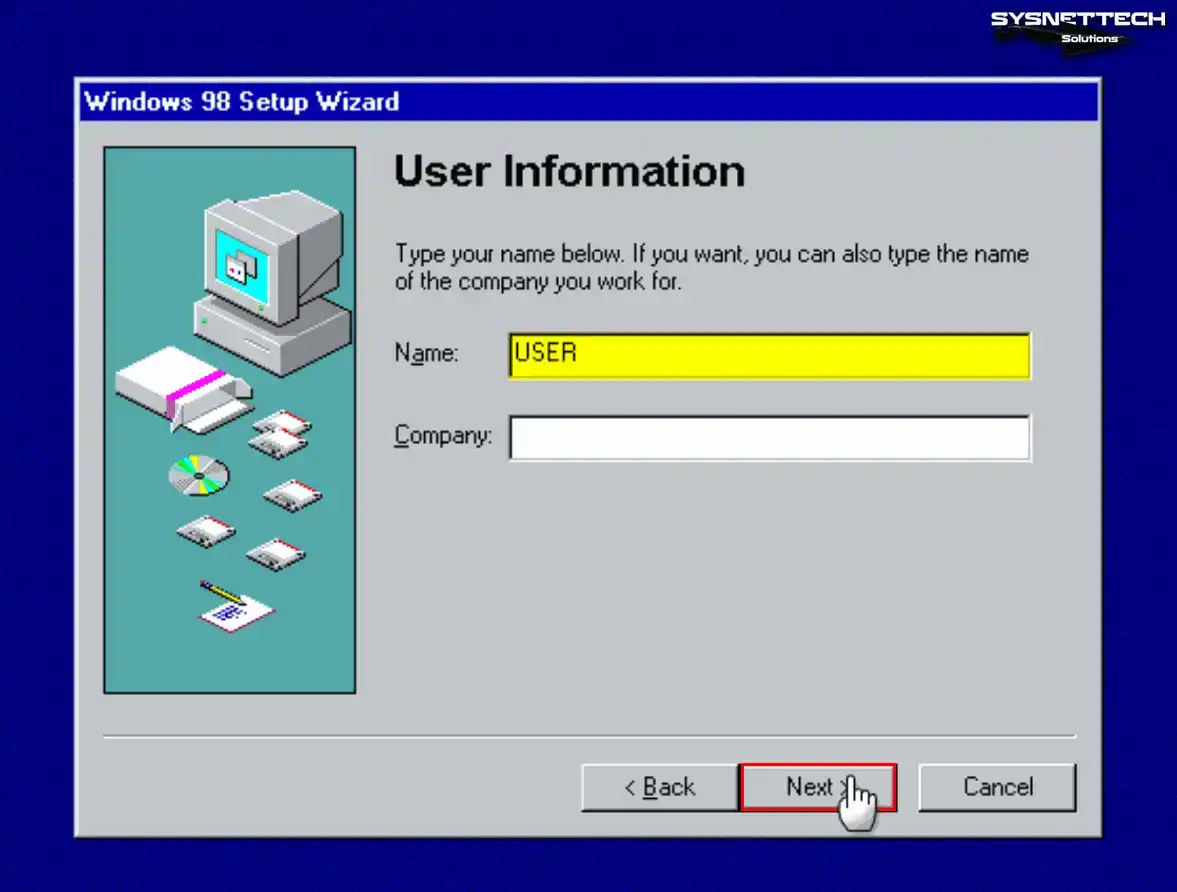
After the required configuration files are ready, the User Information window opens. In this window, type a name for the user account of your Win98 system. If you use your VM in a corporate environment, you can also type company information.
Step 9
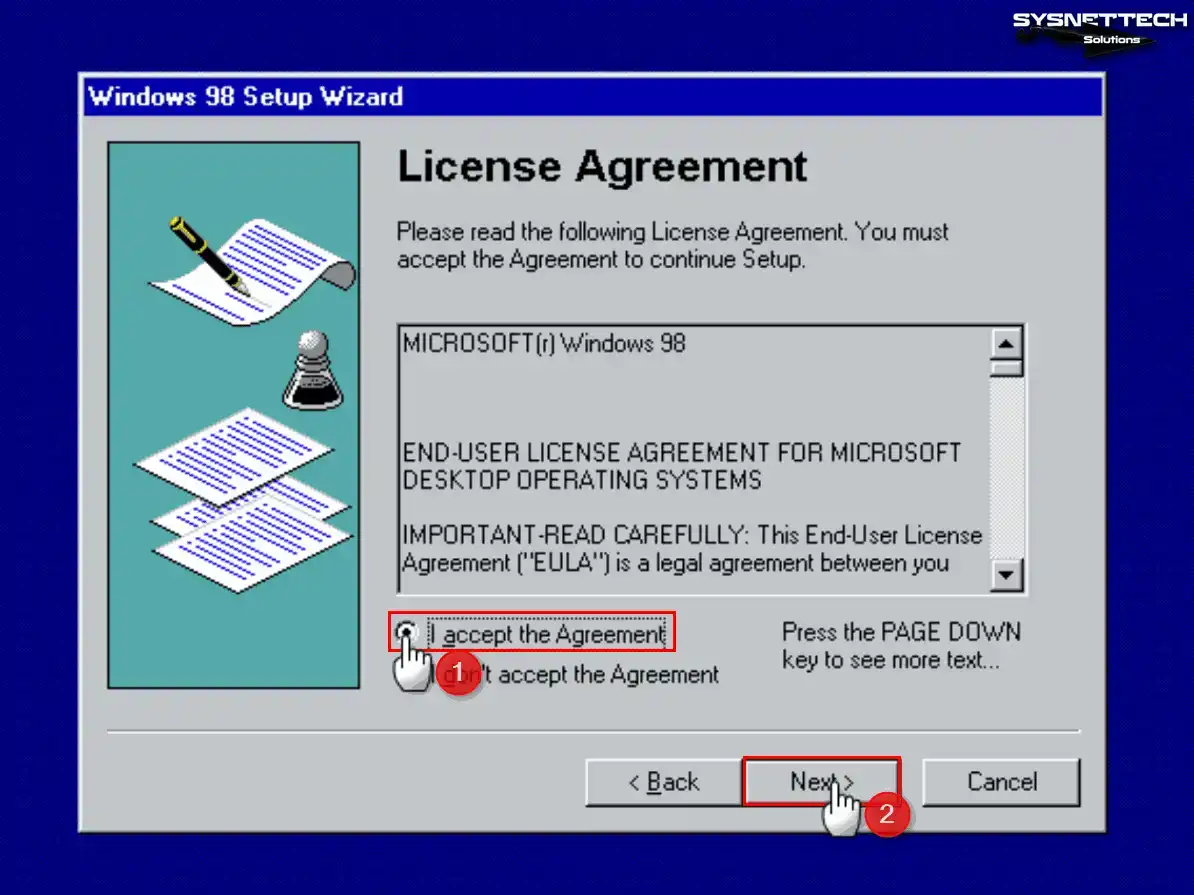
First, check I accept the agreement to approve the Win98 license terms. Then press Next to move past this step.
Step 10
Next, enter your Windows 98 license key in the Product Key box. Then click Next to move to the next stage.
Final Configuration and Desktop
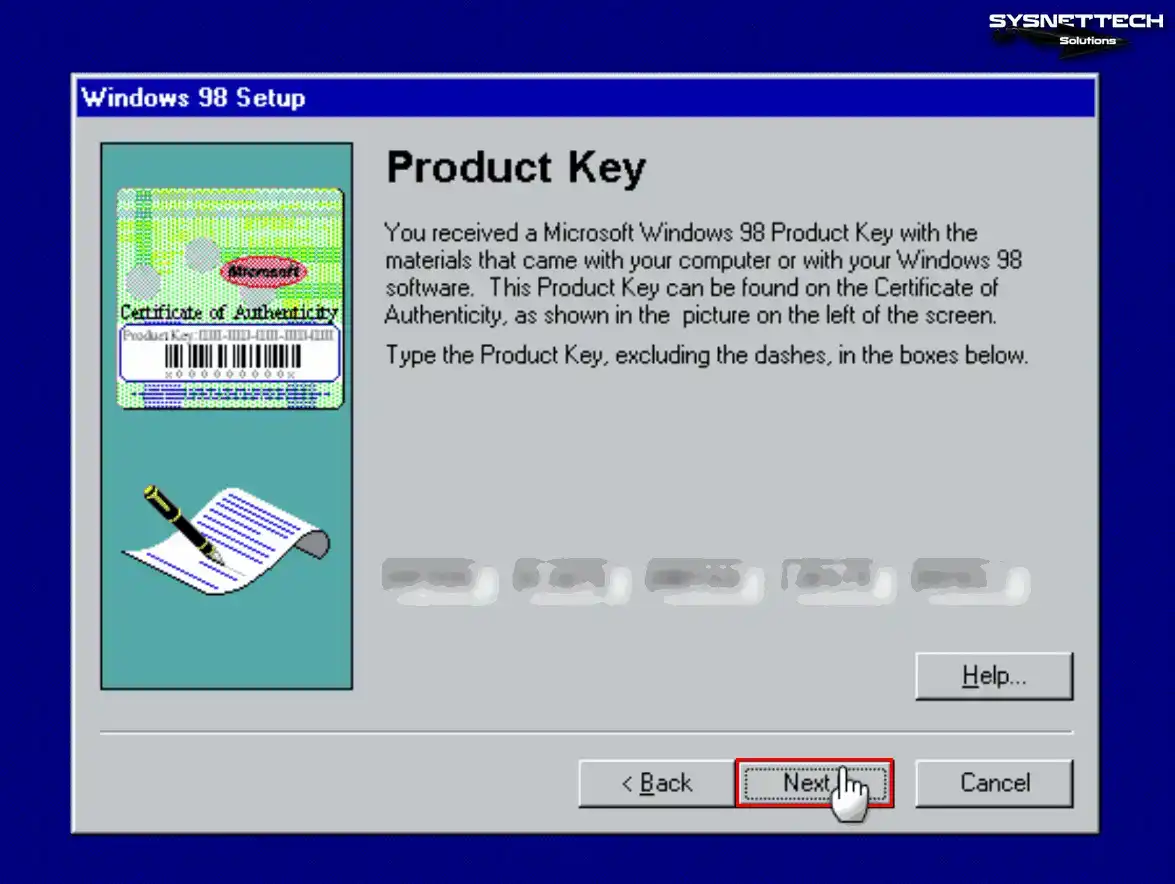
Step 1
After you finish all operating system settings, click Finish to start the system.
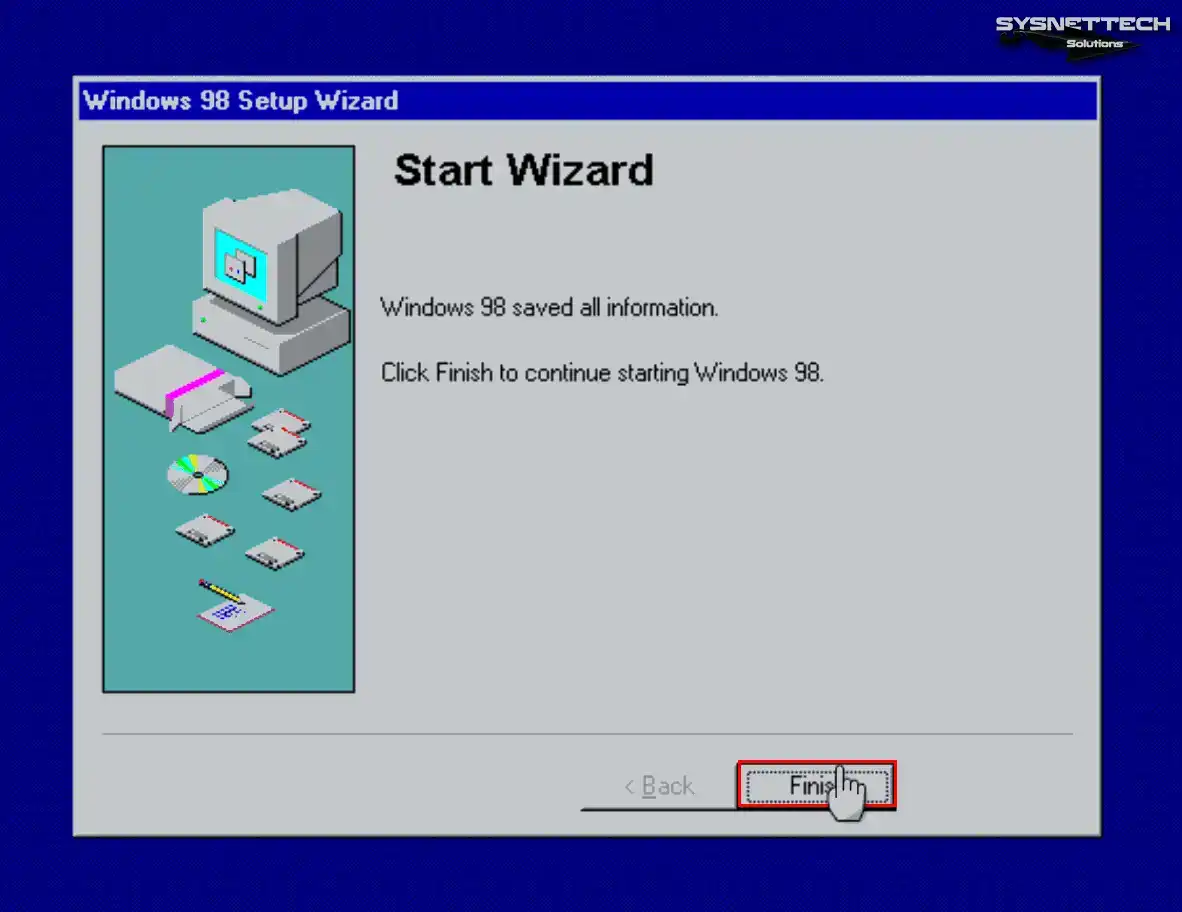
Step 2
When your VM restarts, the setup wizard scans hardware. It looks for plug and play devices. Do not restart your computer until the hardware scan completes.
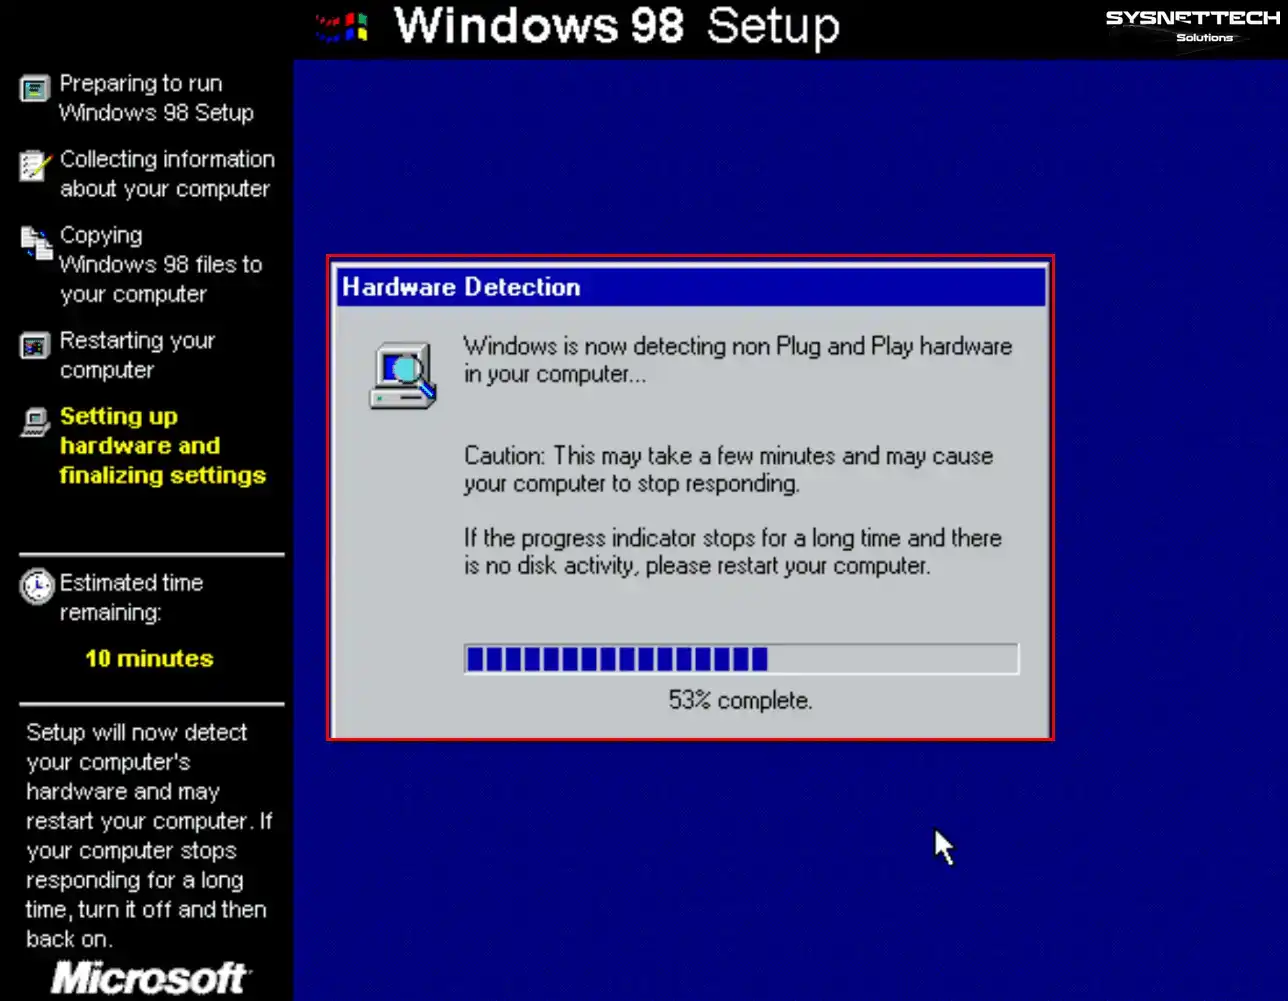
Step 3
Wait while the wizard configures your virtual PC hardware and Plug and Play devices.
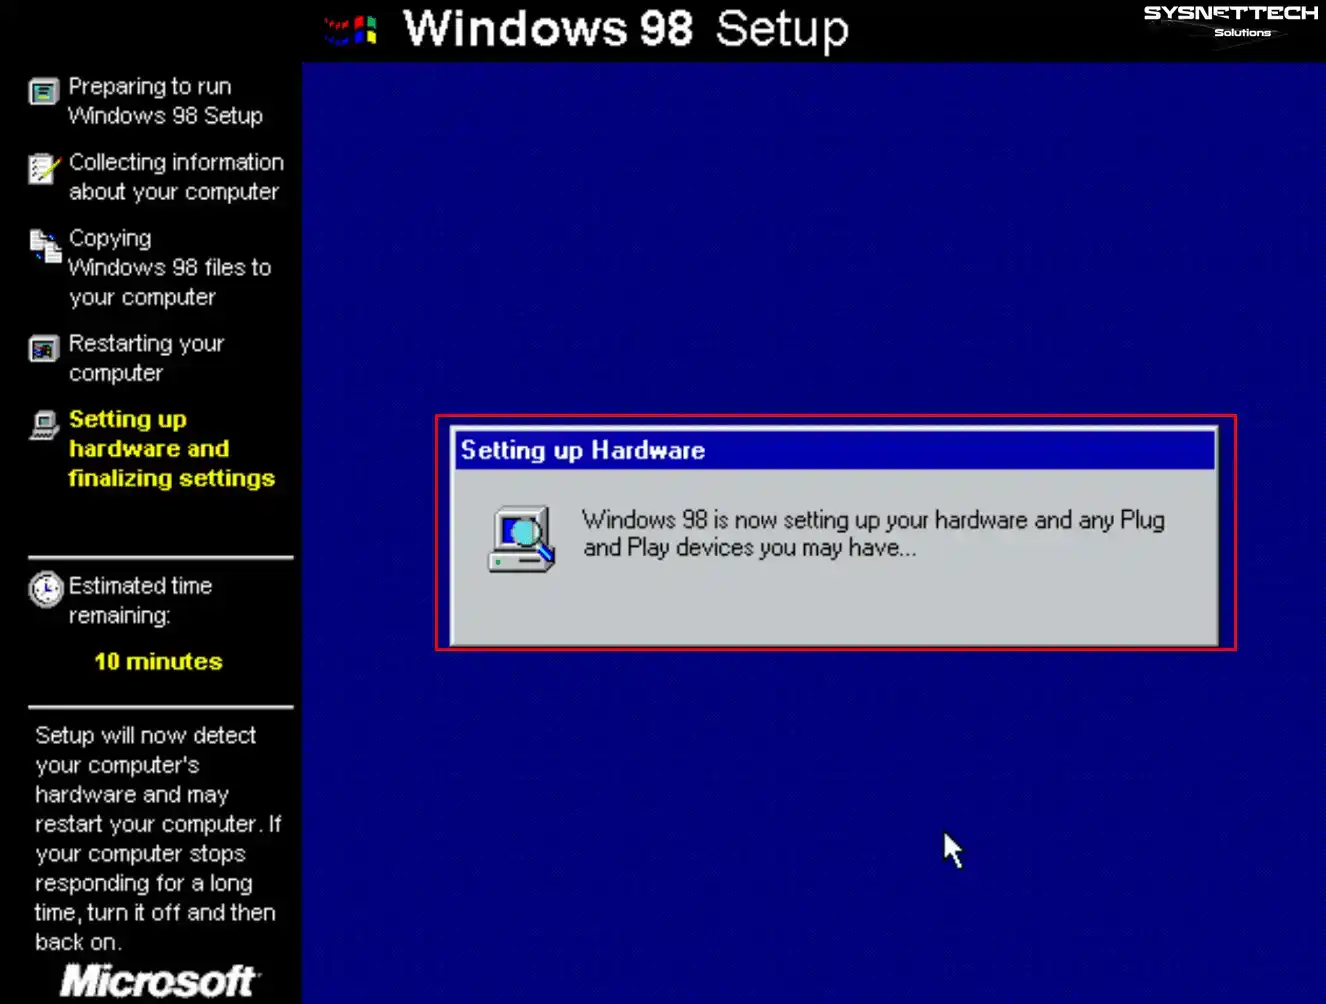
Step 4
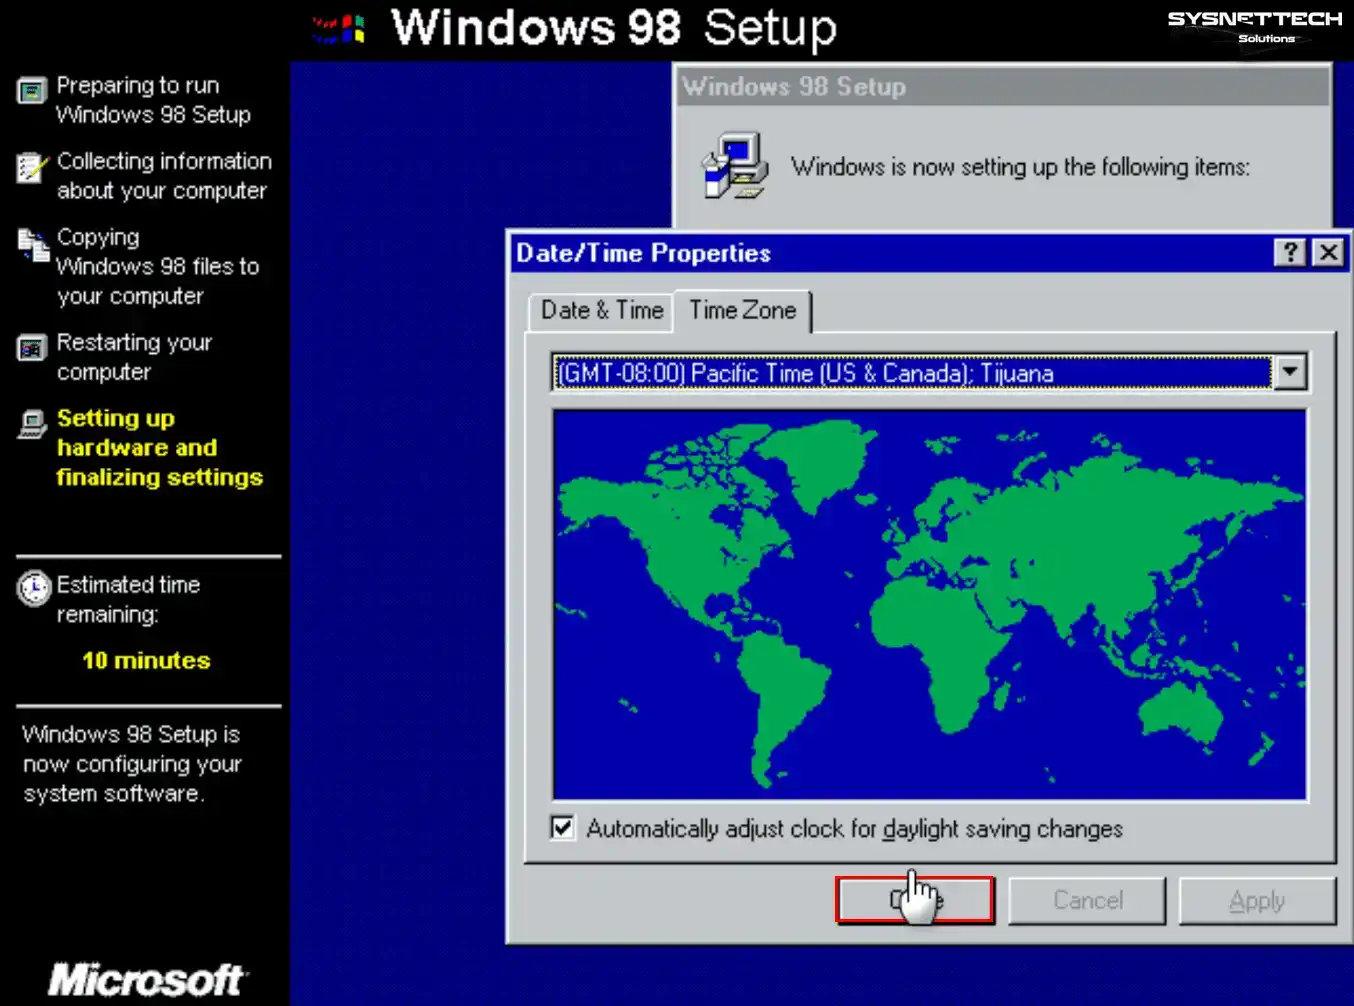
In this step, adjust the date and time settings to your location again. Then close the window.
Step 5
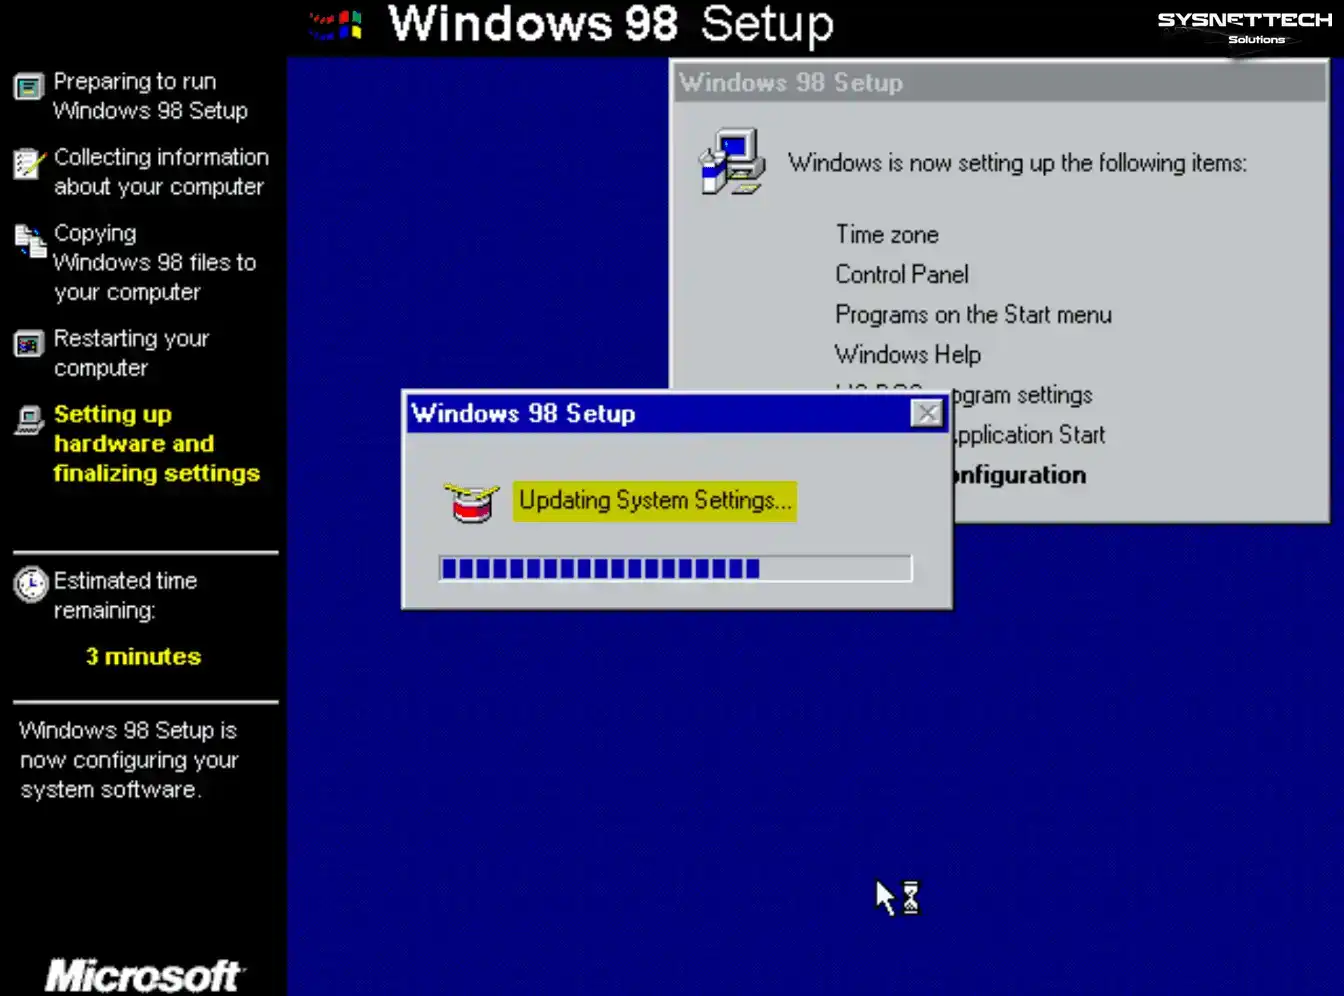
Wait while the setup wizard updates system settings.
Step 6
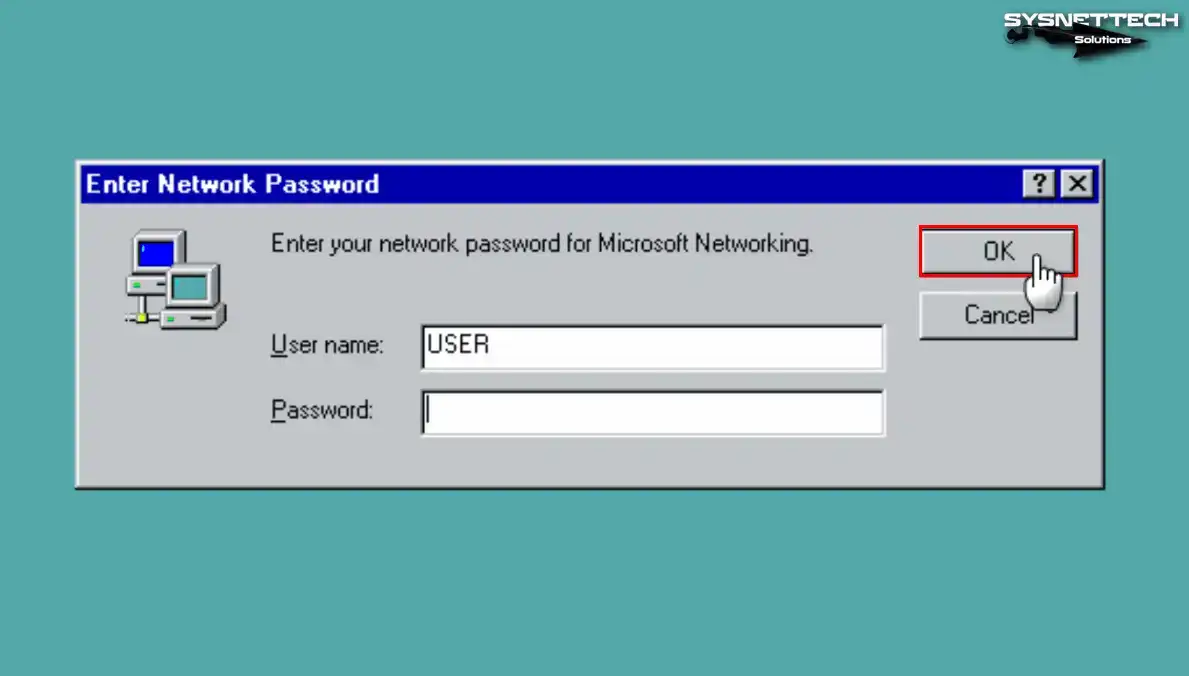
When the Enter Network Password screen appears, type your user name. Then click OK to open your session.
Step 7
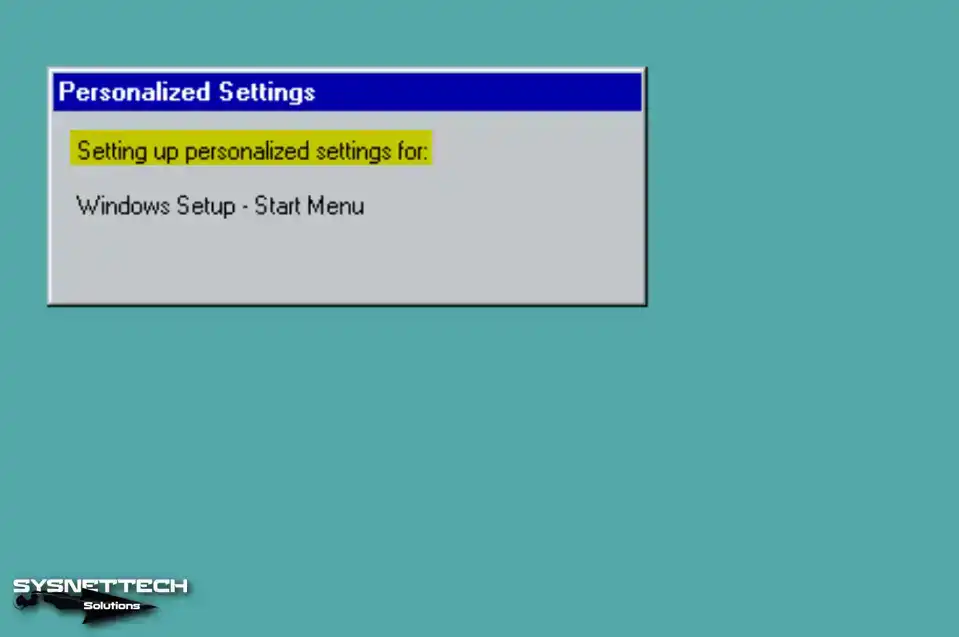
Wait while the system configures personalized settings.
Step 8
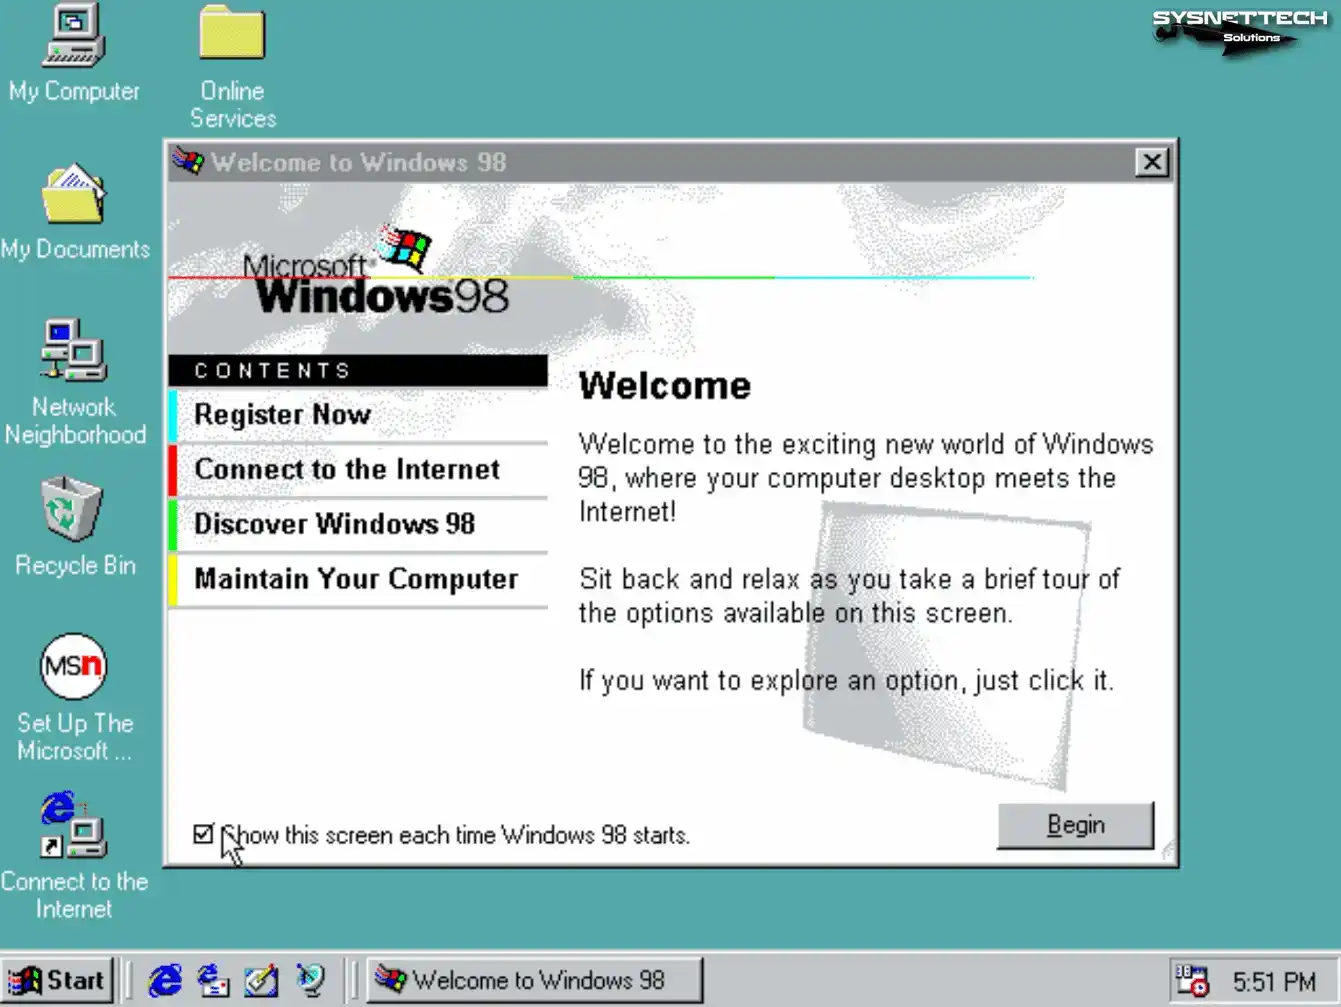
After you type your user name, you see the Microsoft Win98 desktop screen.
Step 9
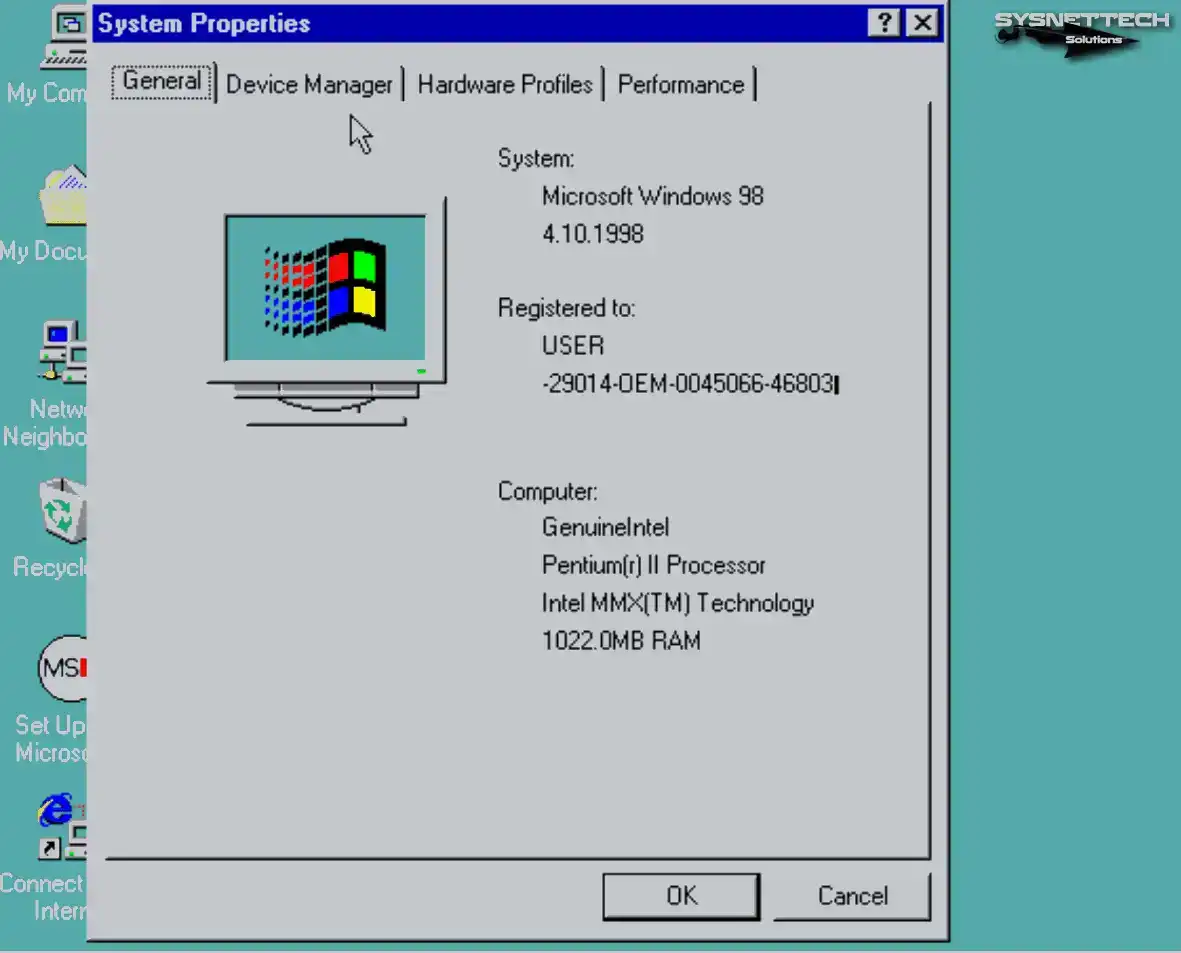
Right-click My Computer and open Properties. Then you can view your system information.
Installing VMware Tools
After you install an operating system on virtual machines, install VMware Tools first. This software adds missing system drivers to VMs.
Thus you can use the VM at full screen resolution. You can also use your host’s USB and webcam devices.
Step 1
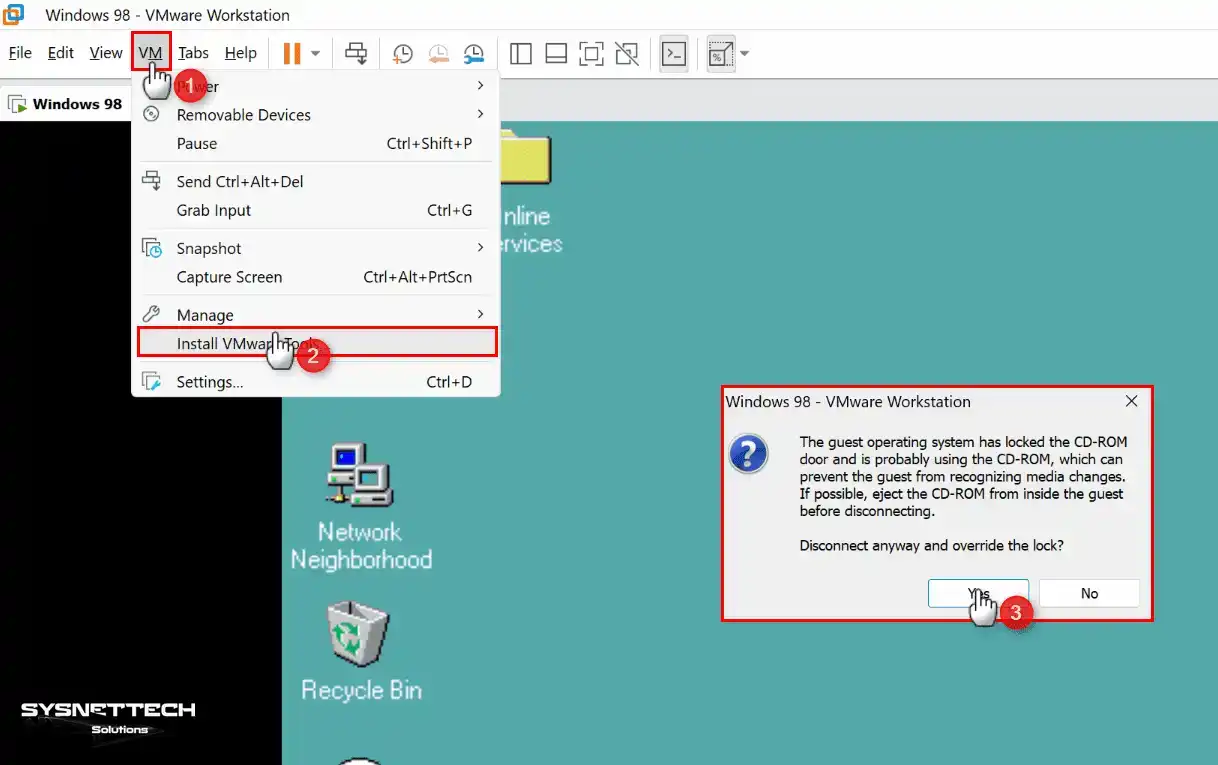
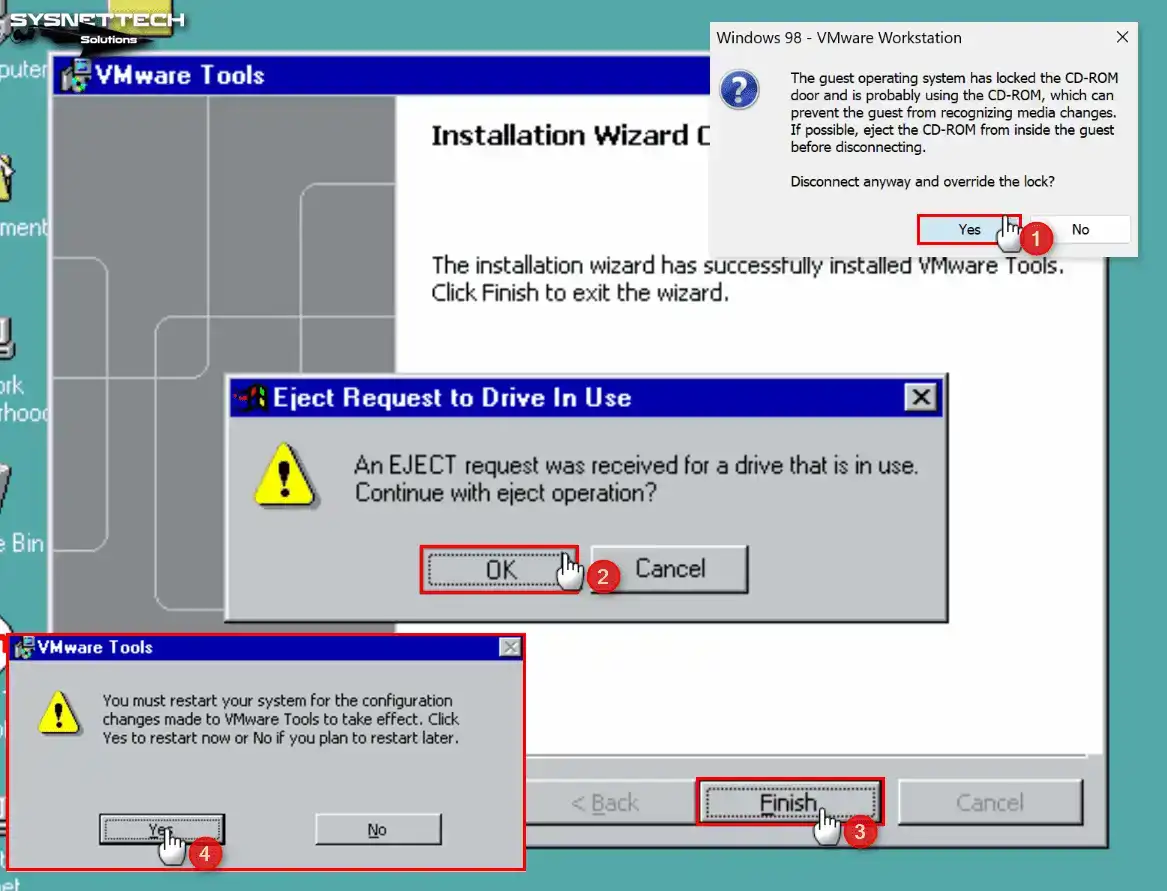
First, you must transfer the VMware Tools package to the Win98 virtual system. Click Install from the VM menu. When the guest OS reports that the CD-ROM is locked, click Yes to continue.
Step 2
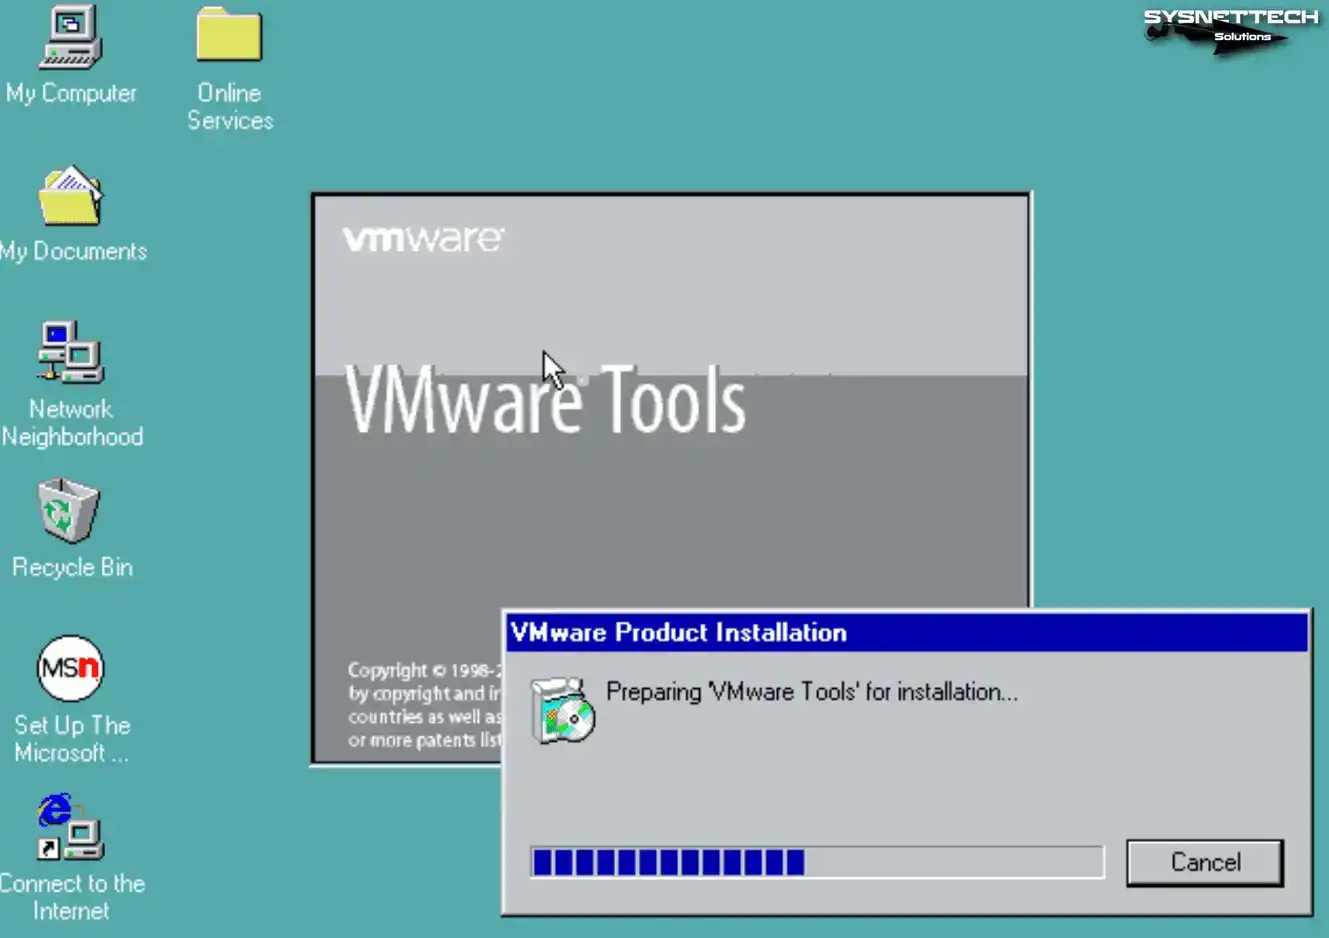
The virtual system starts the VM Tools package immediately. Then follow the on-screen directions to finish the installation.
Step 3
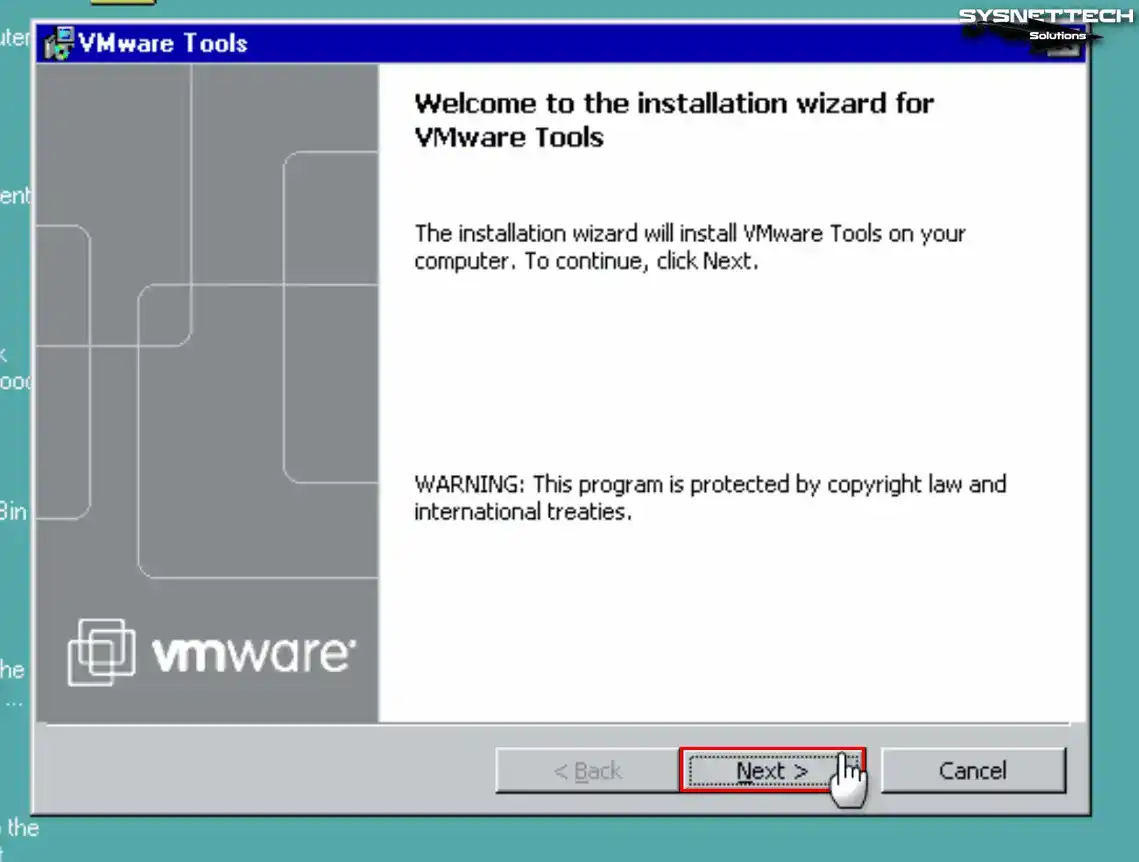
The virtual system tools setup wizard appears on your screen. Then click Next to move to the next stage.
Step 4
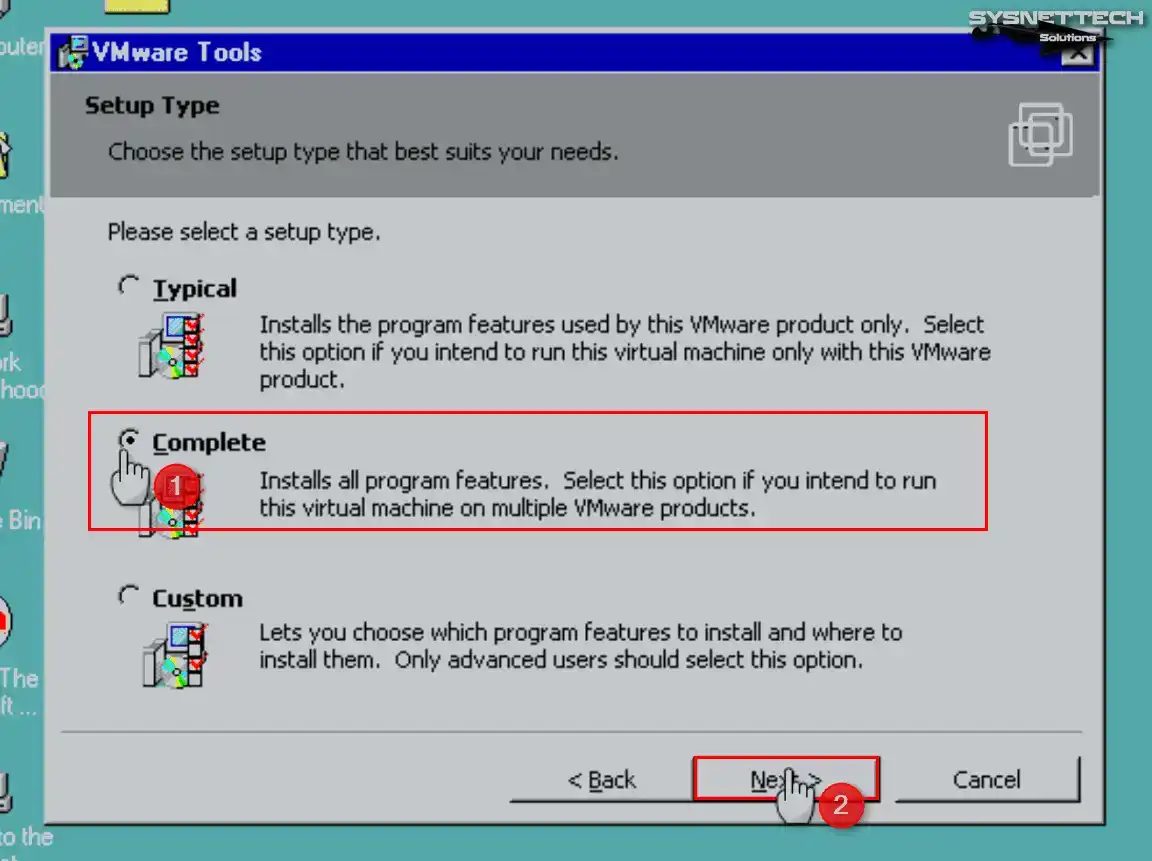
Set the VM Tools installation type to Complete. Then continue the installation steps with Next.
Step 5
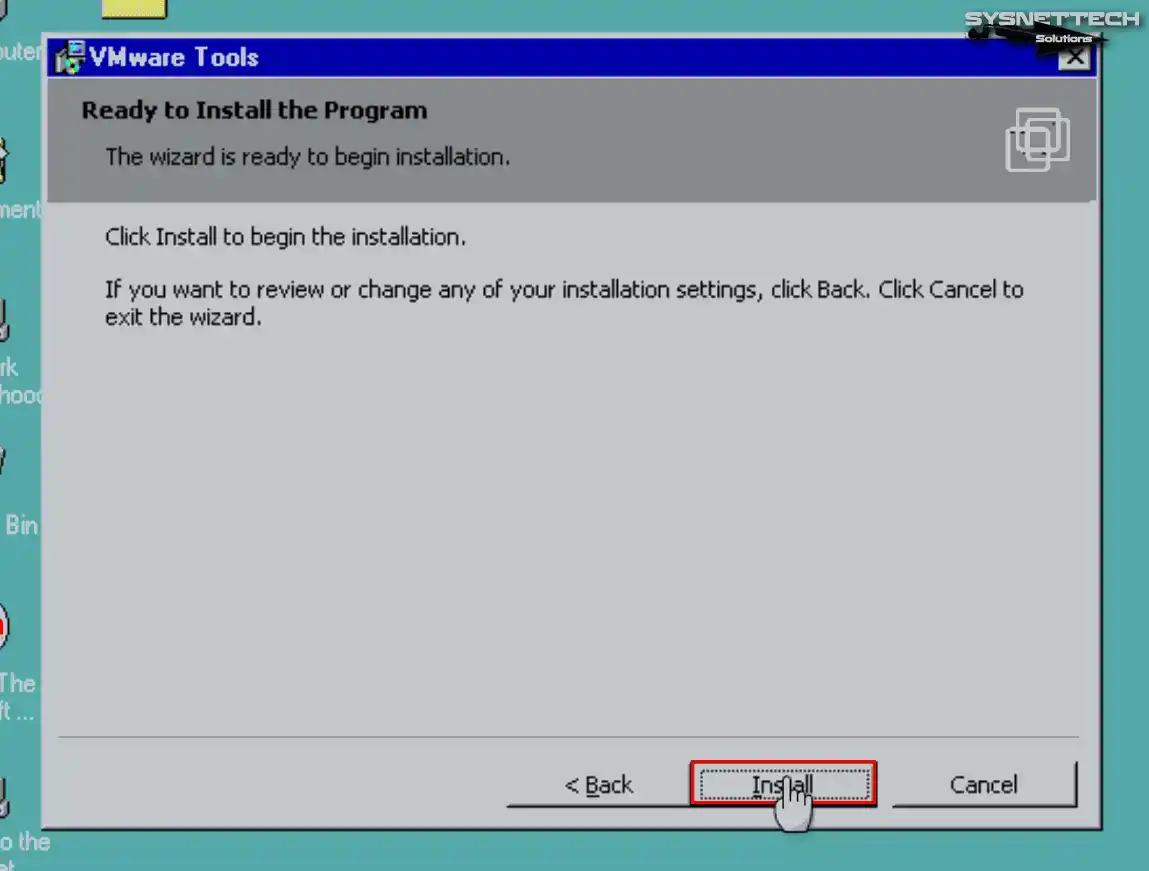
Finally, select Install to start installing the virtual PC tools.
Completing the Installation, Settings, and Testing
Step 1
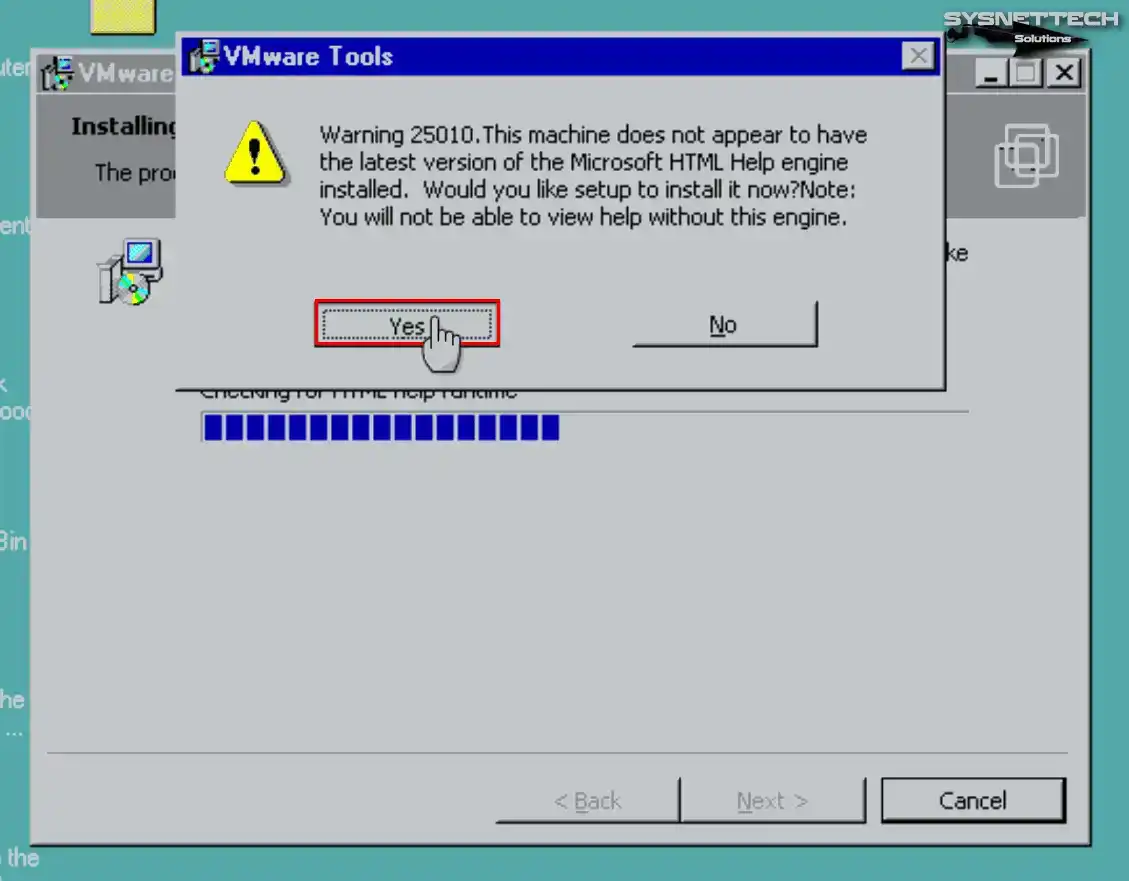
During installation, you may see warning 25010 in the HTML Help Runtime check. In that case, click Yes to install the HTML Help engine.
Step 2
When VMware Tools installation finishes, the system shows an Eject notification. At this stage, click OK and then Finish to close the wizard.
Step 3
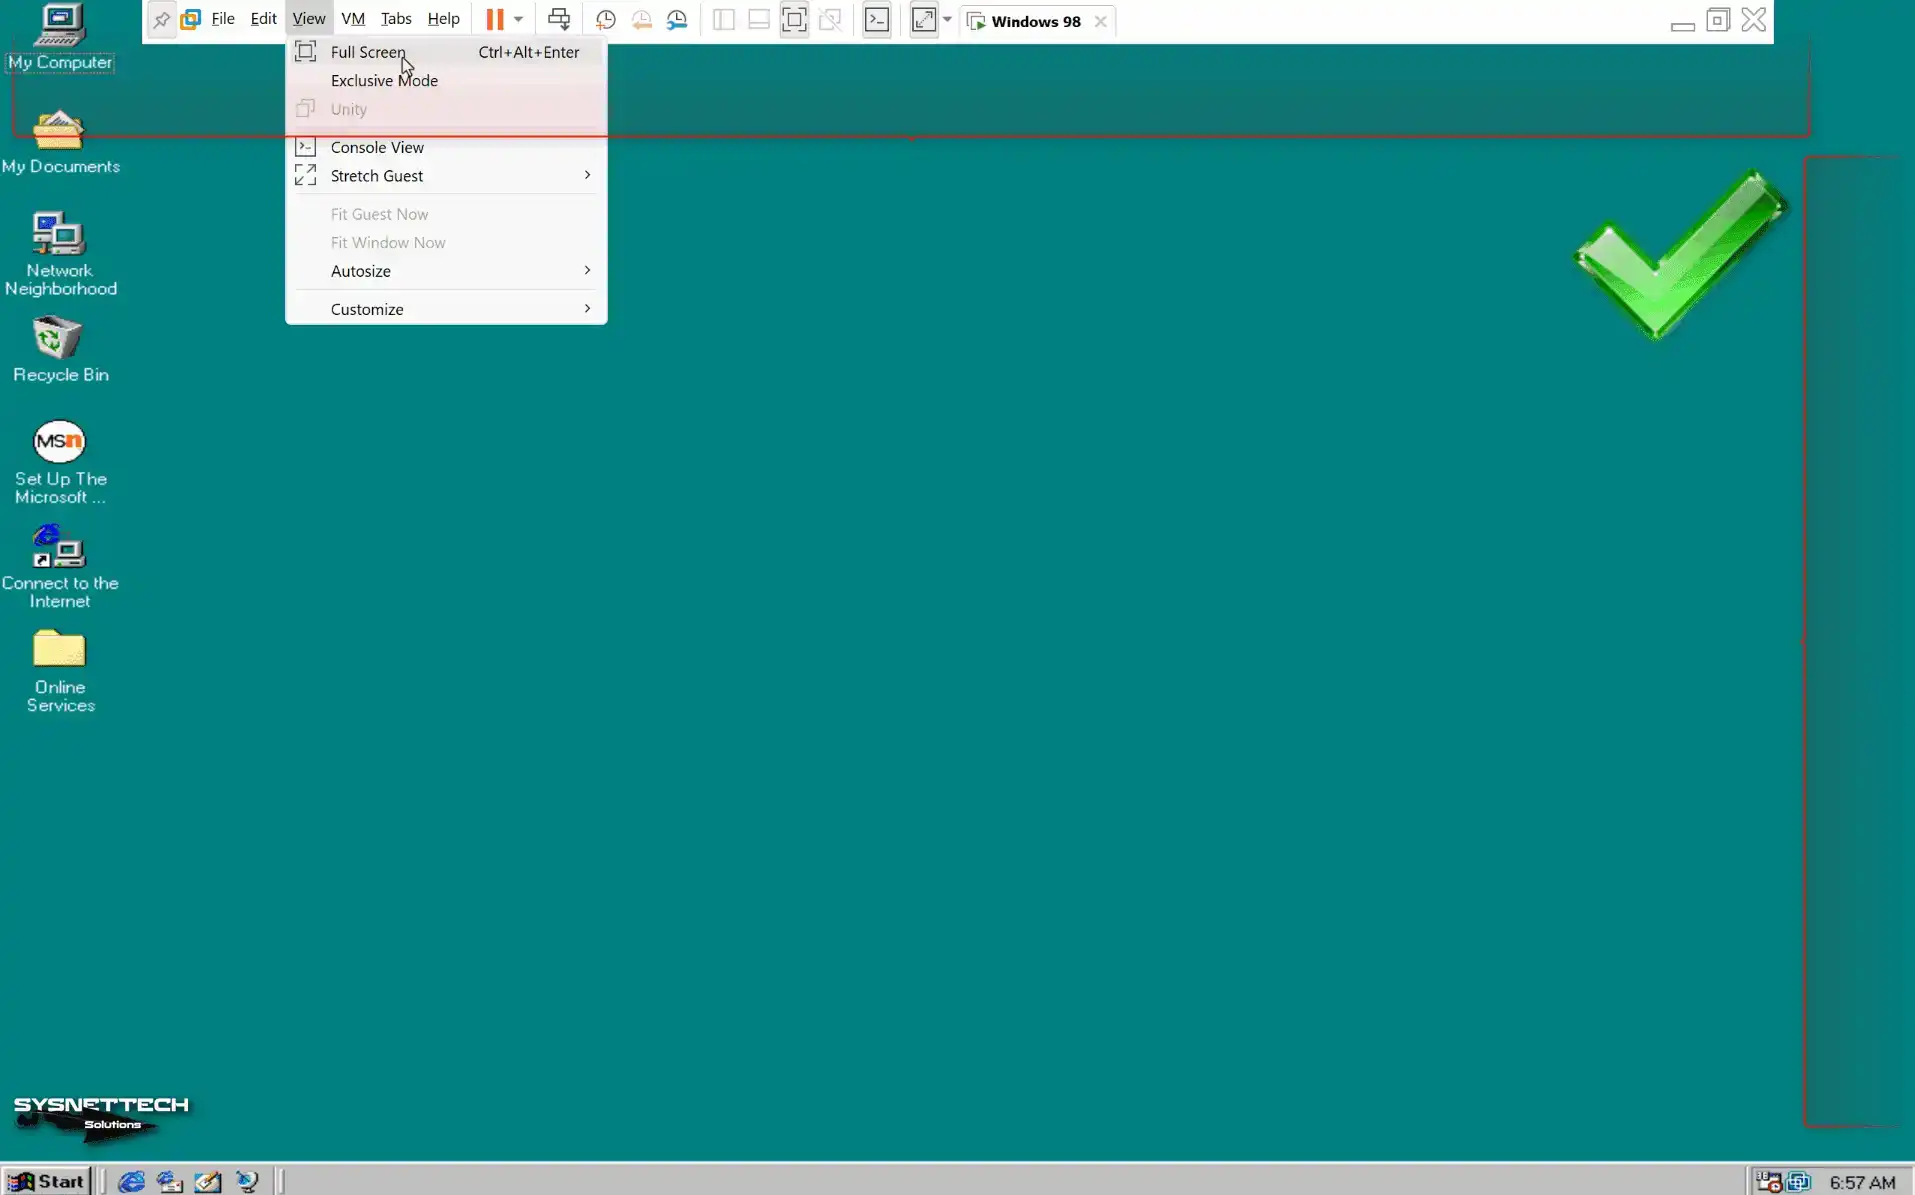
You can now use your virtual PC at full screen resolution supported by your host. If your VM does not adapt to full screen resolution, open Display Properties.
Then set the screen resolution to 1024×768 or higher. Finally, save the settings. Then choose View / Fit Guest Now and check.
Step 4
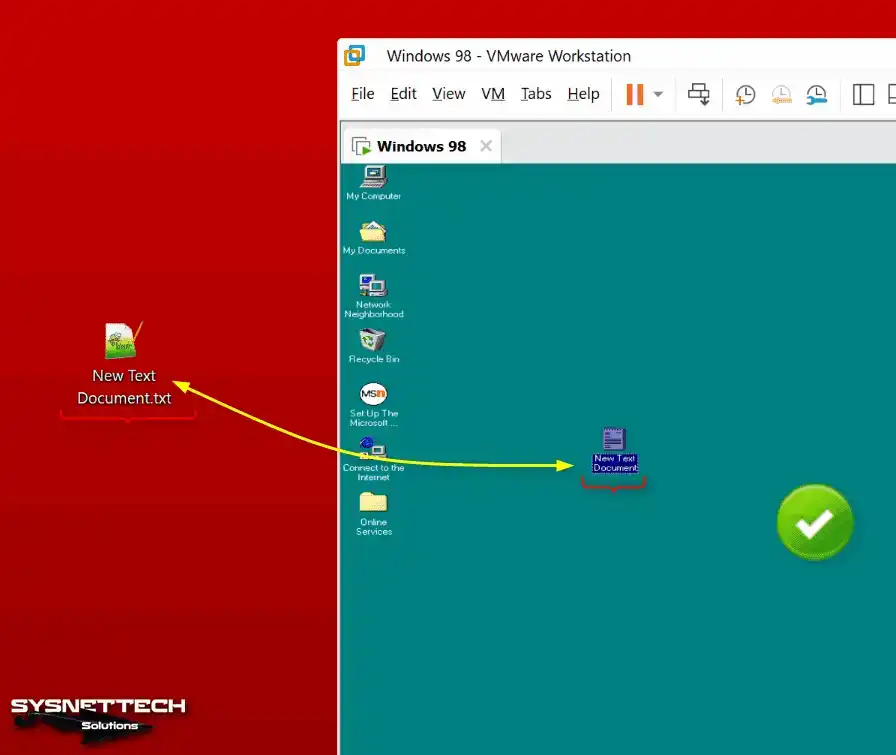
Moreover, VM Tools offers significant convenience. You can drag and drop files between the host and the virtual system. This moves them quickly.
Create a new text document on your host machine. Then drag and drop the file into the VM environment. You will see the successful transfer right away.
Configuring Internet Connection
After you install the guest system, check the Internet connection first.
Step 1
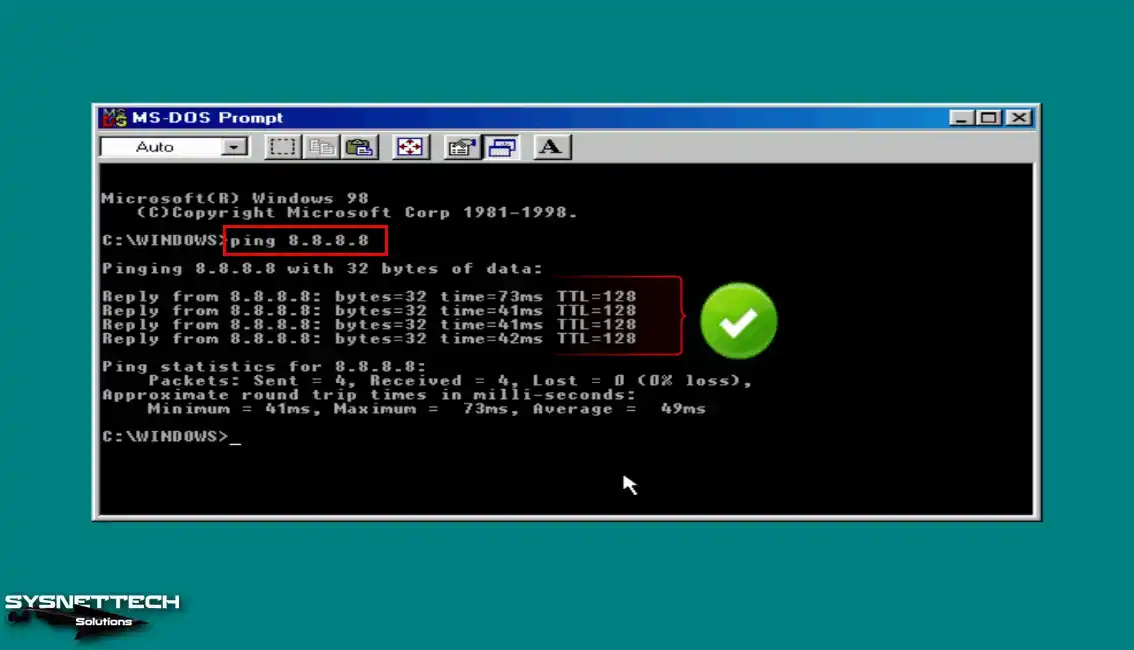
First, test your internet connection on the virtual system. Open the MS-DOS Prompt screen and type ping 8.8.8.8. This reaches Google servers to check the network status right away.
Step 2
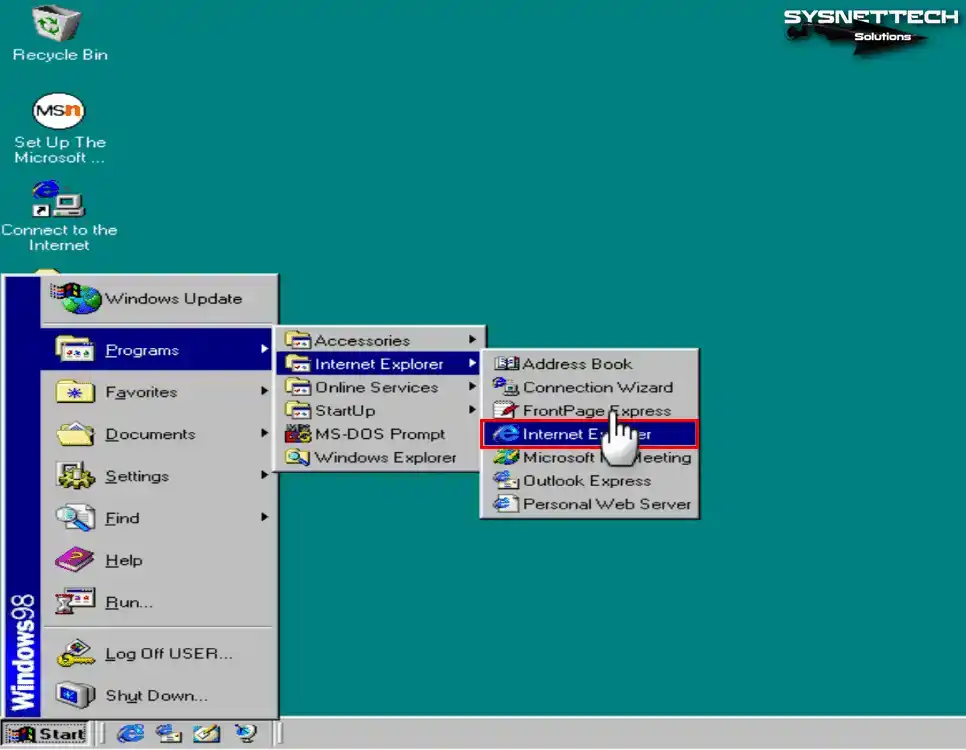
Next, go to Start / Programs / Internet Explorer and open Internet Explorer.
Step 3
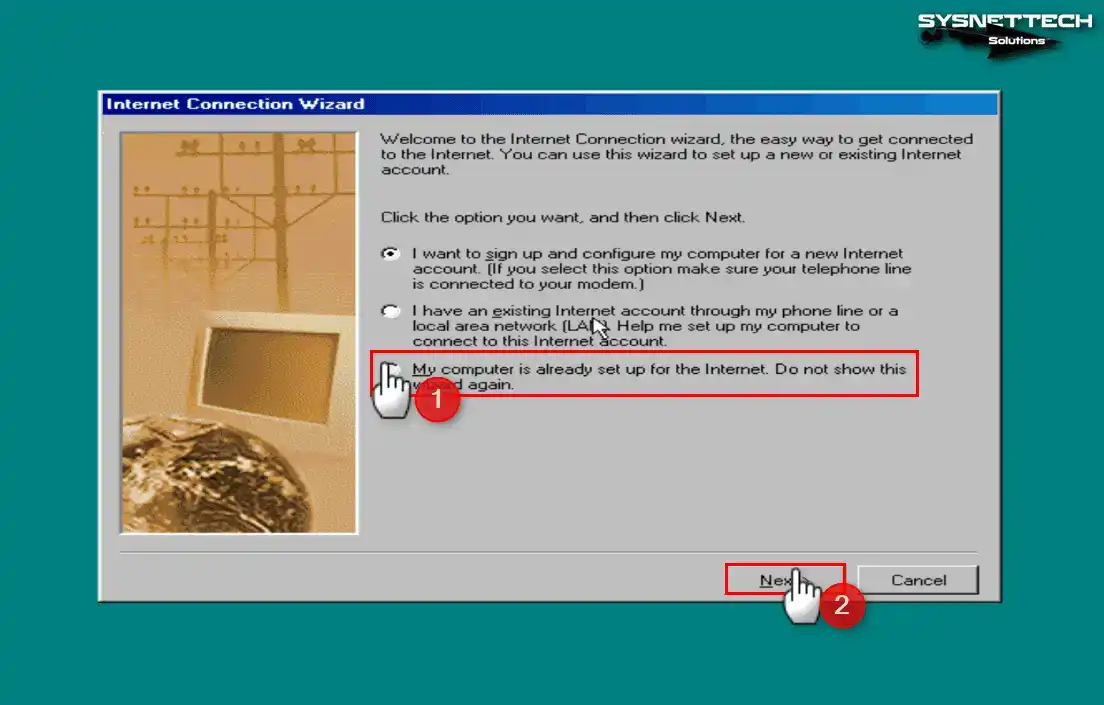
When the Internet Connection Wizard screen opens, your network connection is ready. Select the third option and click Next.
Step 4
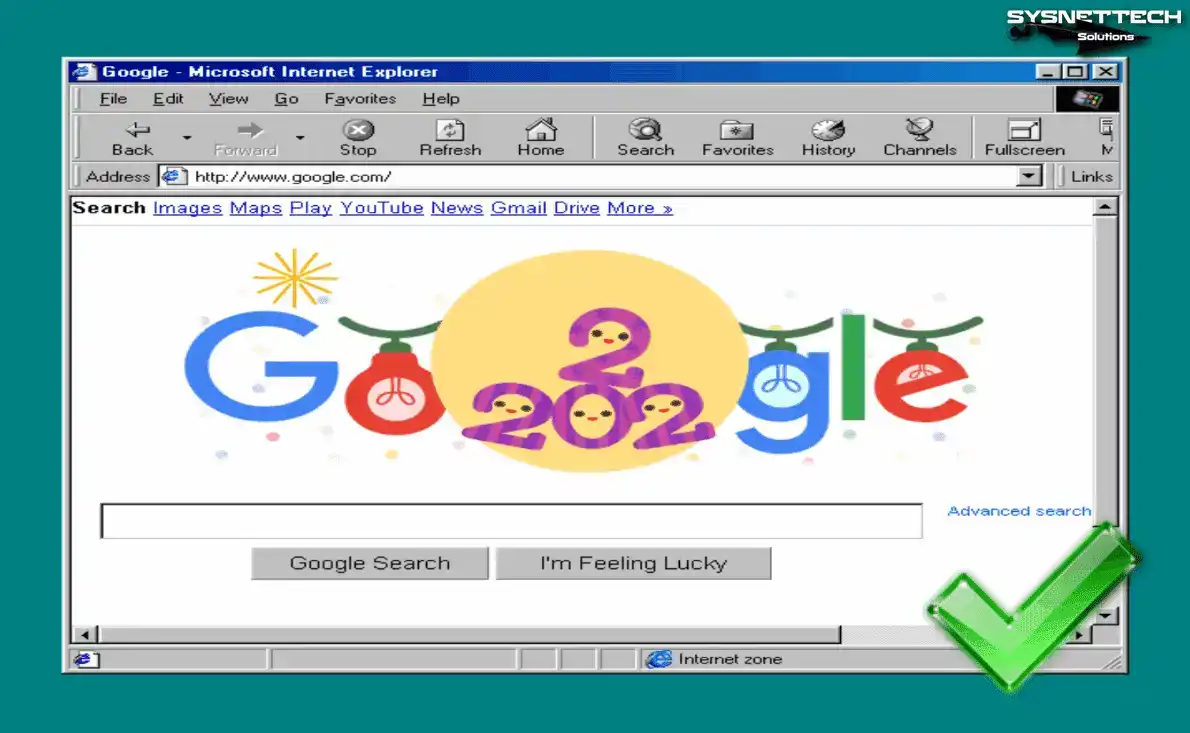
Try to connect to the Google page with Internet Explorer. Then you instantly notice that your internet access works without any issues.
Driver Installation
After you install Windows 98 FE, you can use it for testing. Configure network connections first. You can install drivers for devices like sound and USB. This lets you experience the system more professionally.
Download the Win98 USB and sound drivers from the table below.
Step 1
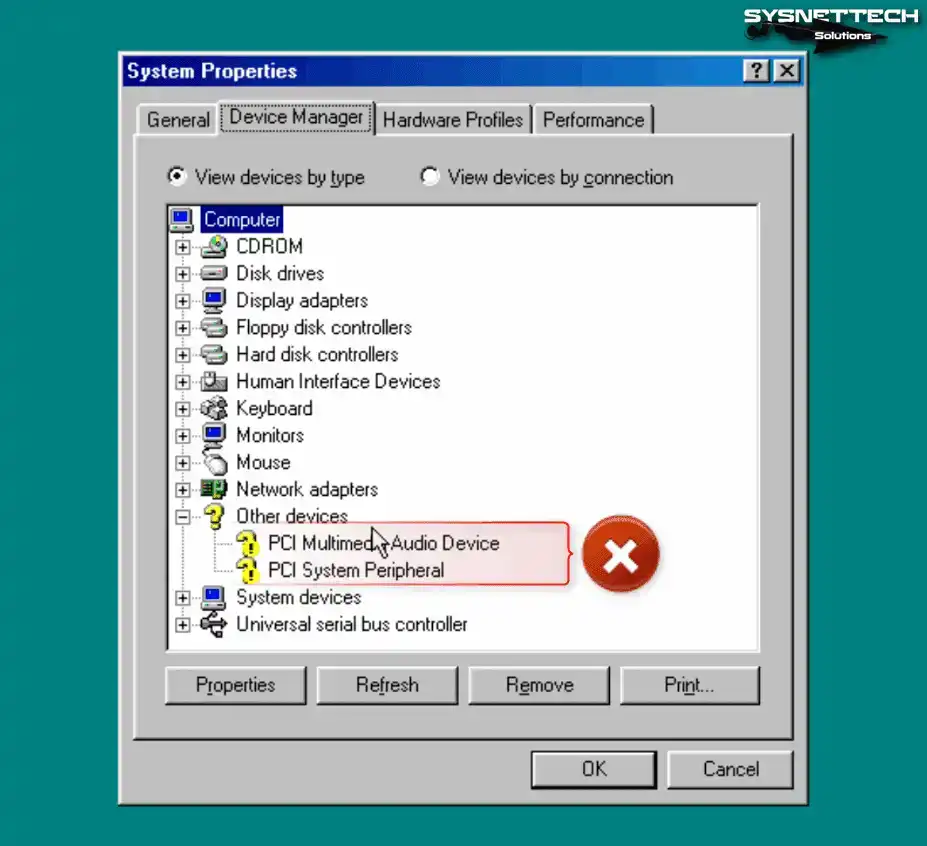
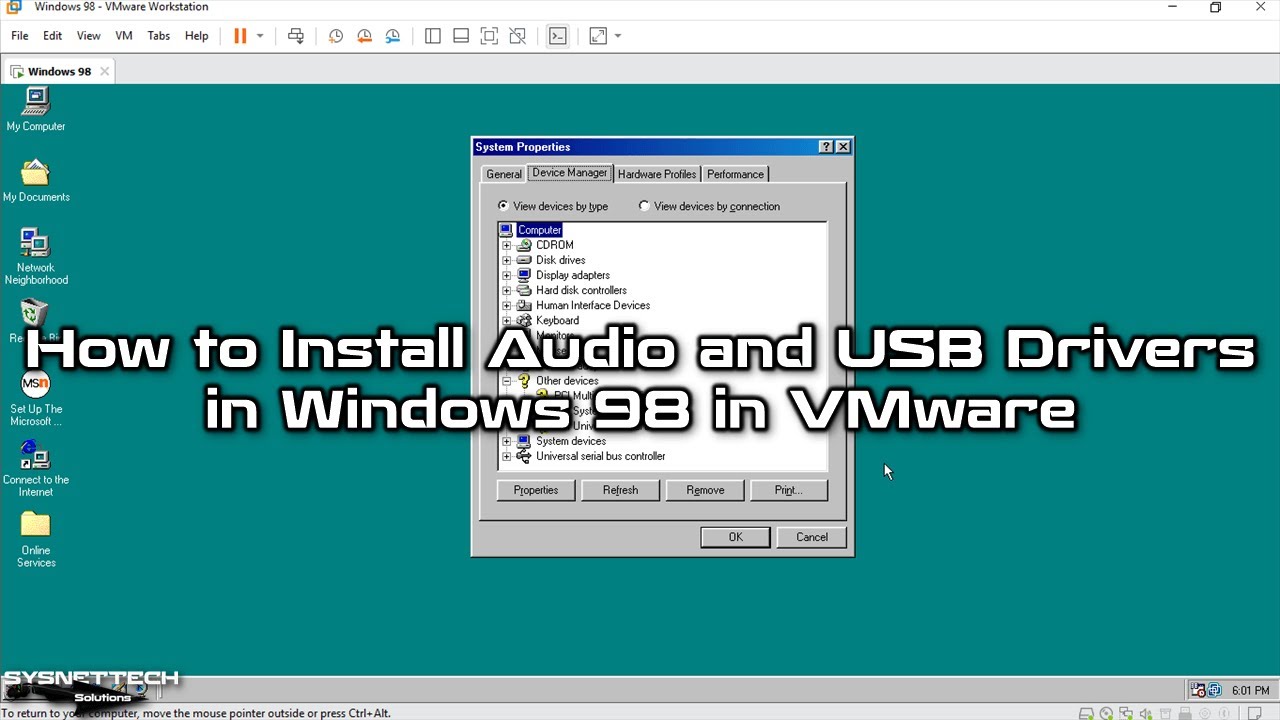
First, right-click My Computer. Then click Properties from the options. Go to the System Properties window. Open the Device Manager tab and check all missing drivers on your system right away.
Below is the list of drivers that VMware Tools could not install.
- PCI Multimedia Audio Device
- PCI System Peripheral
Step 2
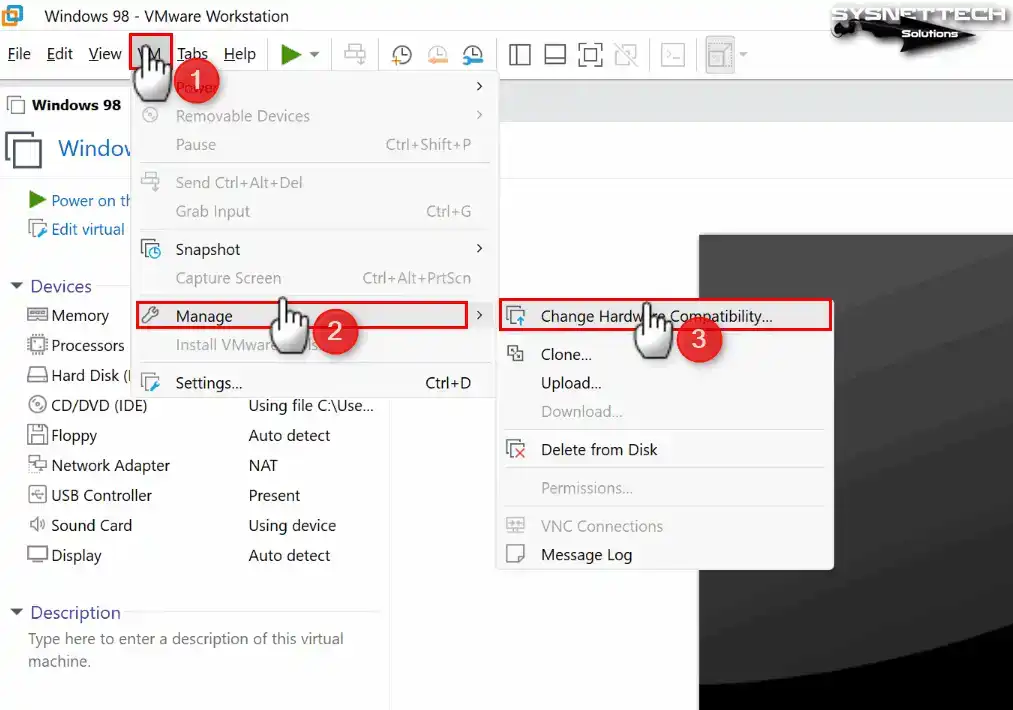
After checking missing drivers, shut down your virtual PC. Then follow VM, Manage, and Change Hardware Compatibility in the menu. This helps the system detect hardware correctly.
Step 3
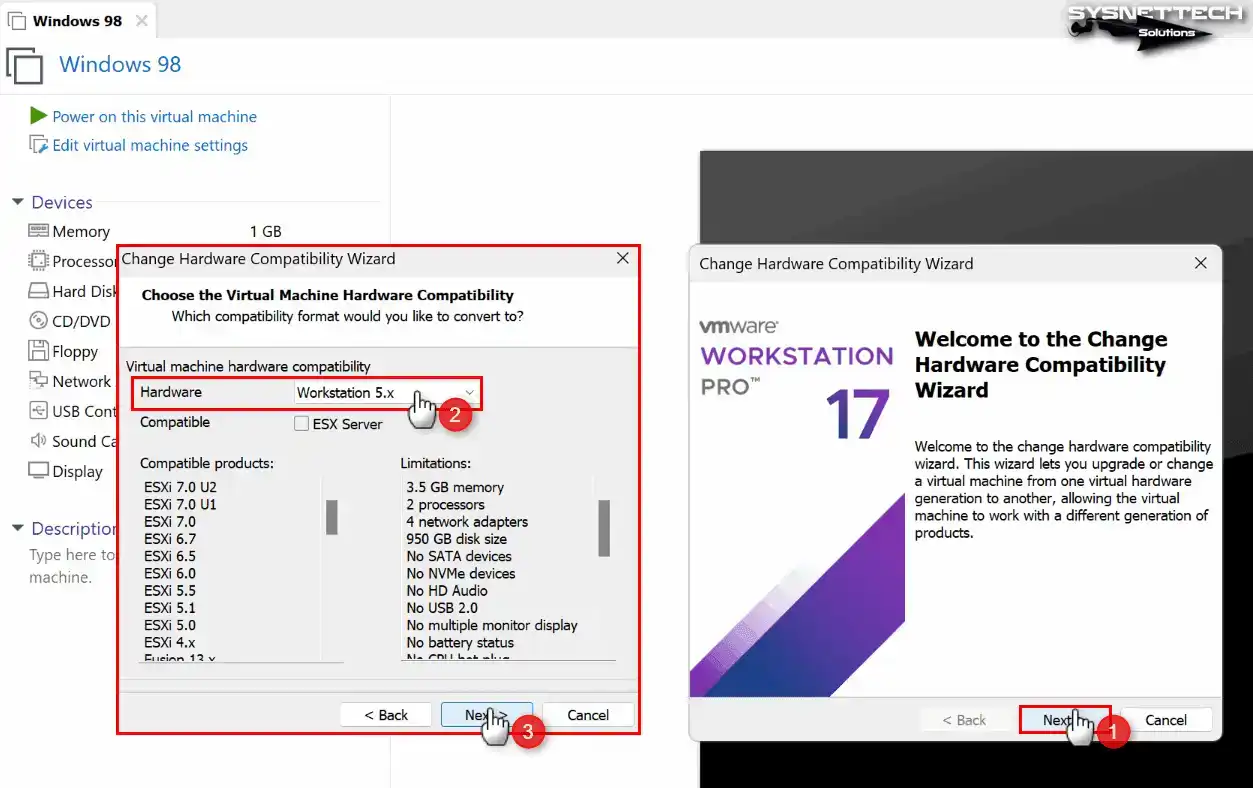
Start the VMware hardware version wizard. Then set Hardware Compatibility to Workstation 5.x for proper driver operation. Click Next again.
Step 4
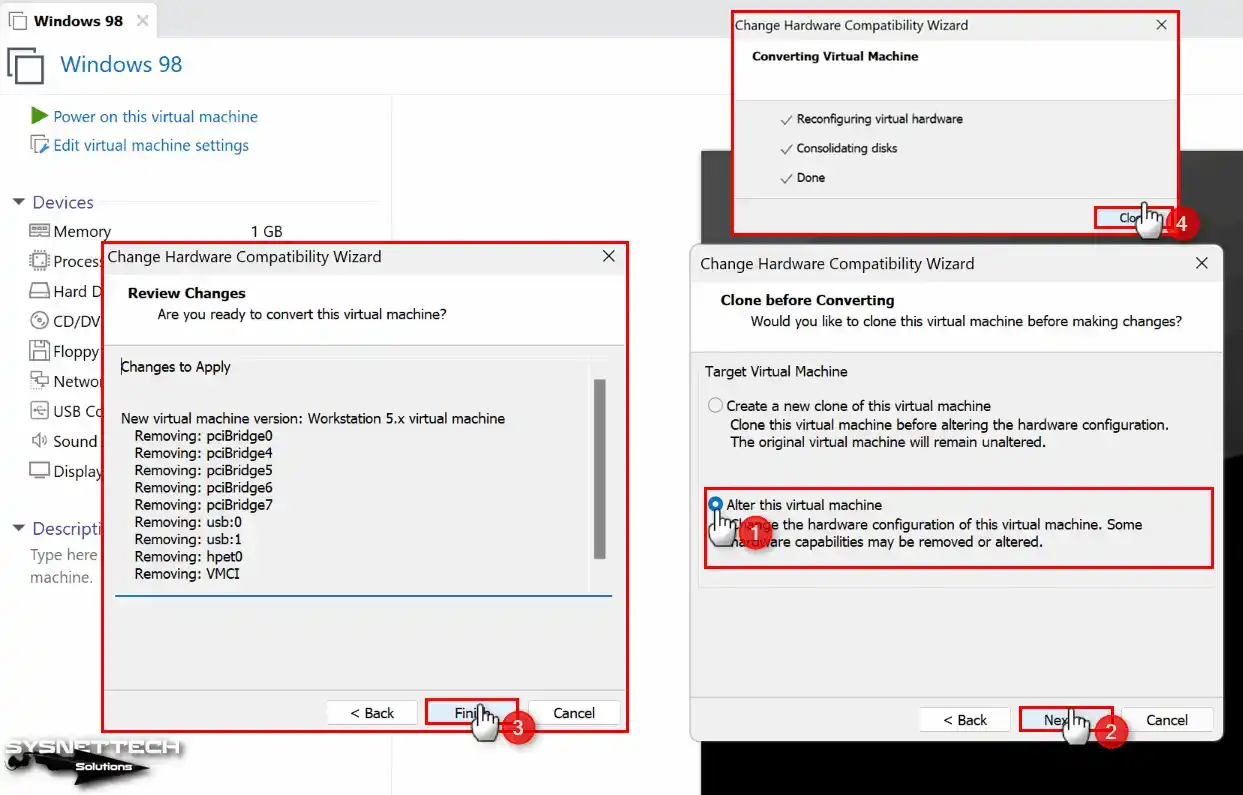
You changed the hardware compatibility to Workstation 5.x. Now select Alter this virtual machine. Finally, close the window after converting the VM to 5.x.
Step 5
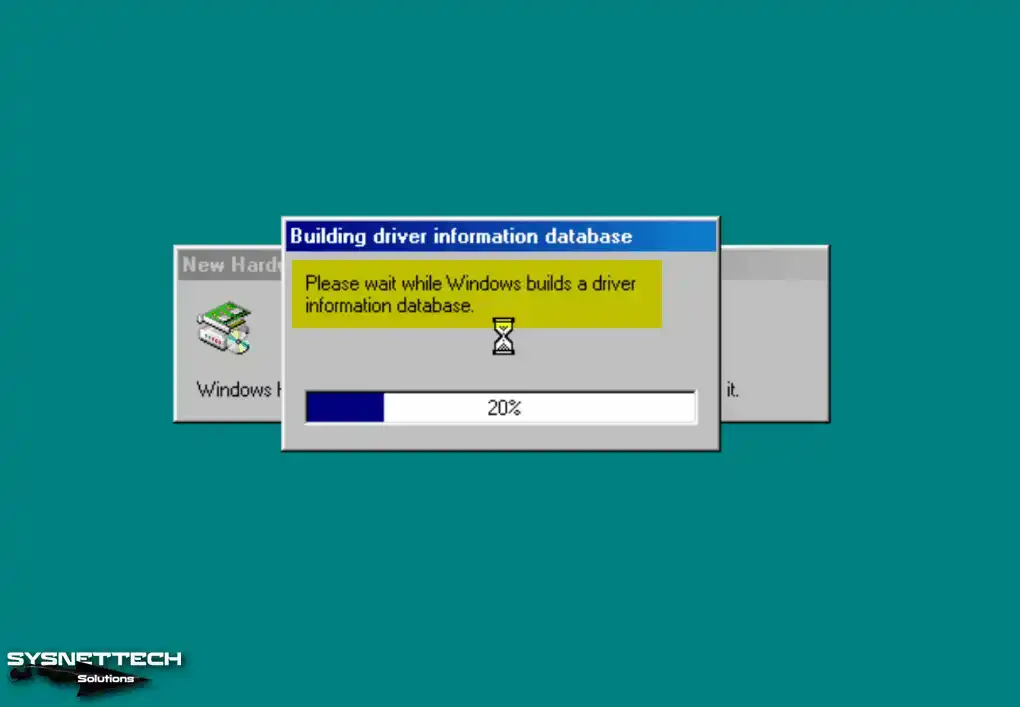
Run your virtual system. Thus you instantly see new devices like Standard Floppy Disk Controller appear on the screen.
Step 6
Some drivers update automatically, but you must install drivers for devices like USB manually.
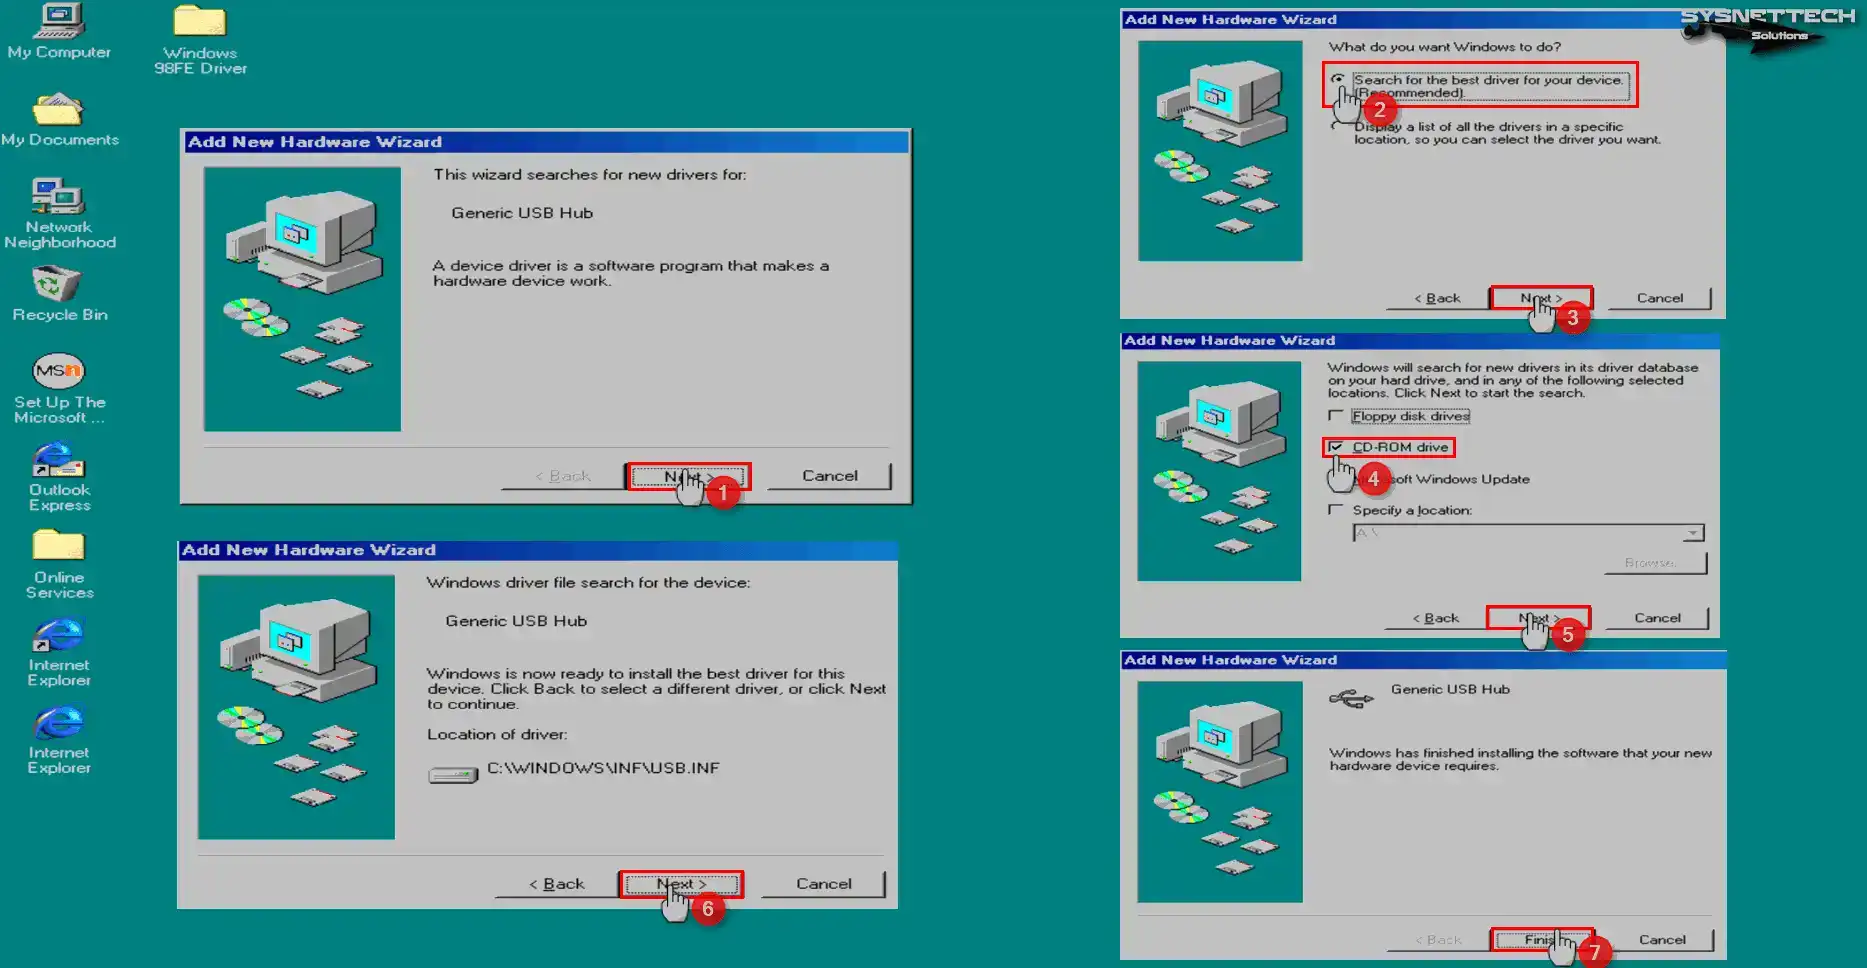
When you see the Intel 82371AB/EB PCI to USB Universal Host Controller device, click Next. Then proceed to the next step. In the Add New Hardware wizard, continue to let Windows install the best drivers.
To install the USB driver, check CD-ROM Drive. At this step, make sure the Win98 ISO file is connected to the VM.
Sound Driver and Additional Devices
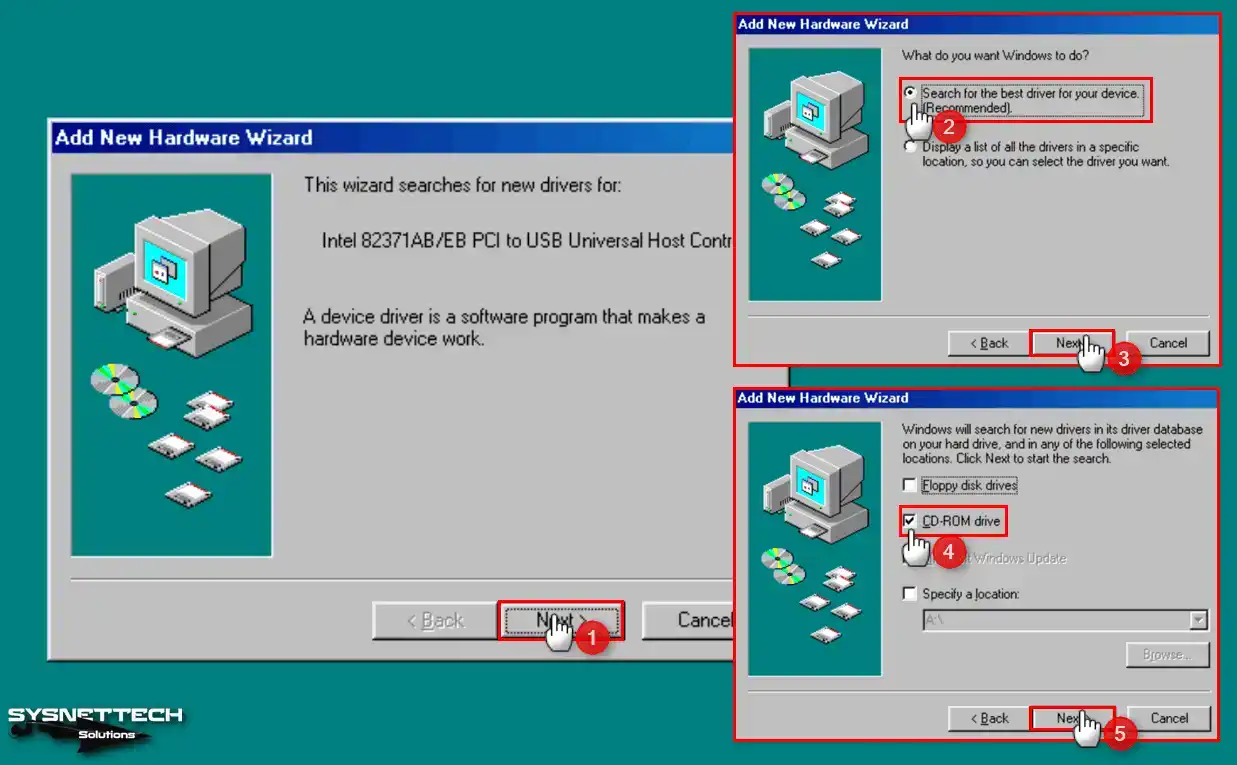
Step 1
Choose The Updated Driver because Windows found a newer driver version for USB. Windows will install the USB Controller driver to C:\WINDOWS\INF\USB.INF.
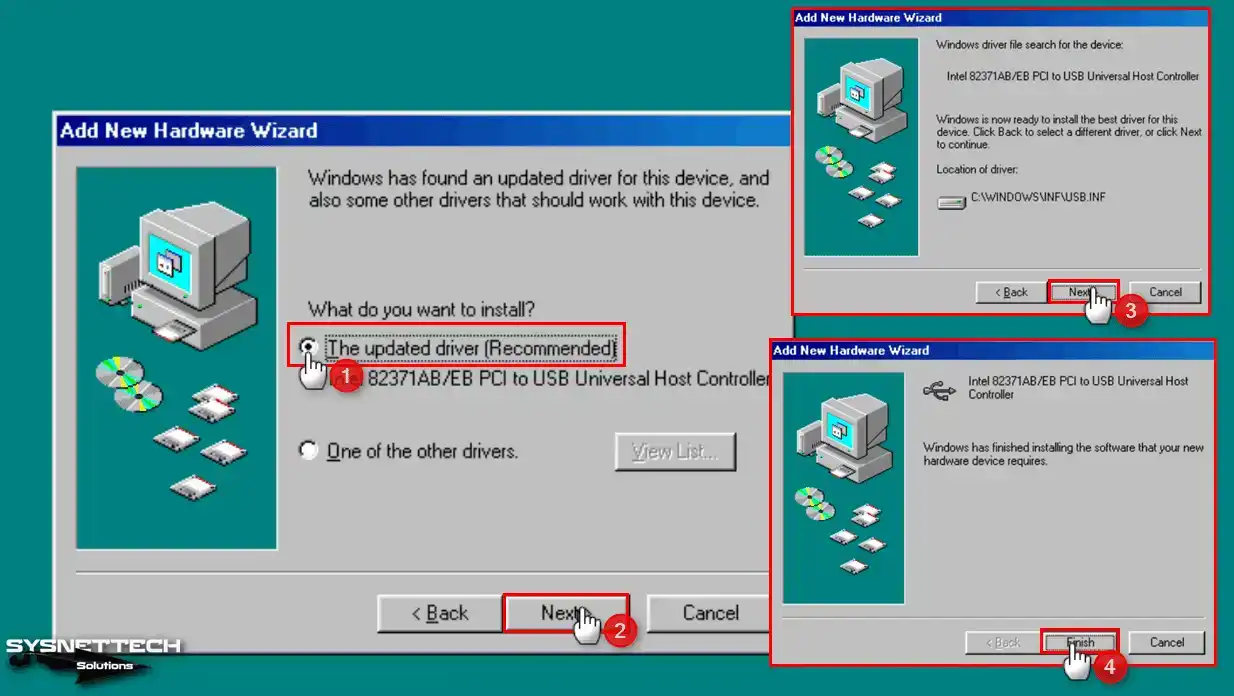
Step 2
Also install the AMD PCNET Family Ethernet Adapter (PCI-ISA) drivers the system found. Follow the same steps in order for this process.
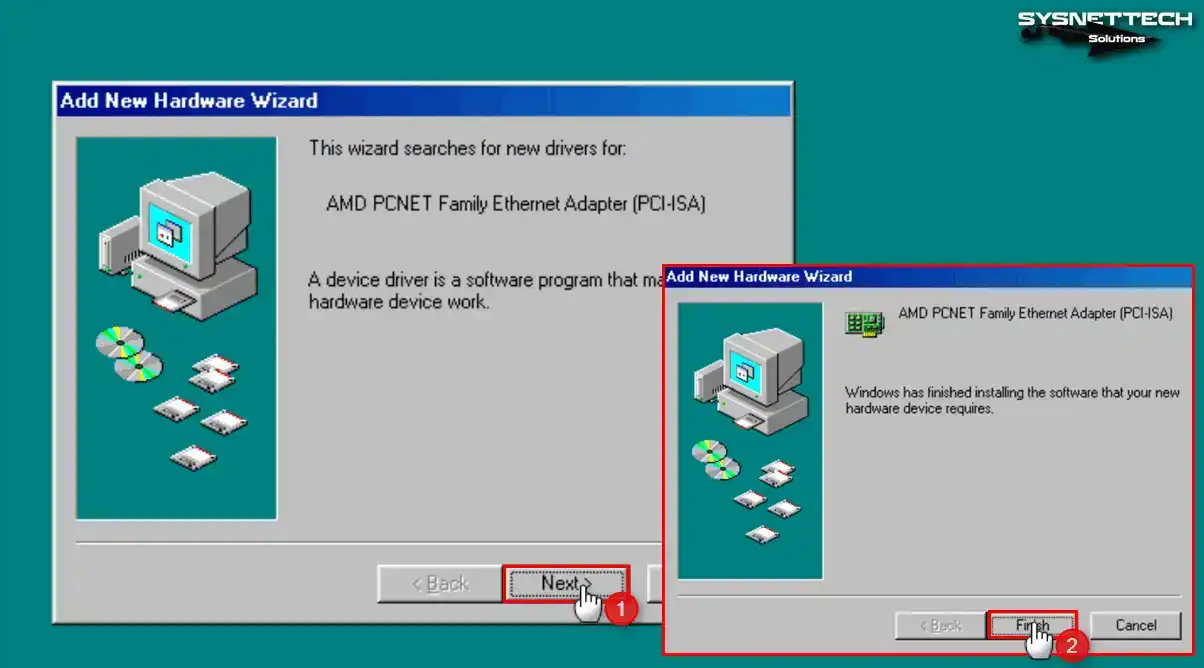
Step 3
One of the biggest problems with Win98 VM use is the sound driver. After you change the hardware version, the system finds the sound device automatically.
There is an important rule here. If you install the sound driver on Workstation 16.x or 17.x, you get an error. It is a Windows Protection Error. Change the virtual machine hardware version.
When the system finds the PCI Multimedia Audio Device, click Cancel.
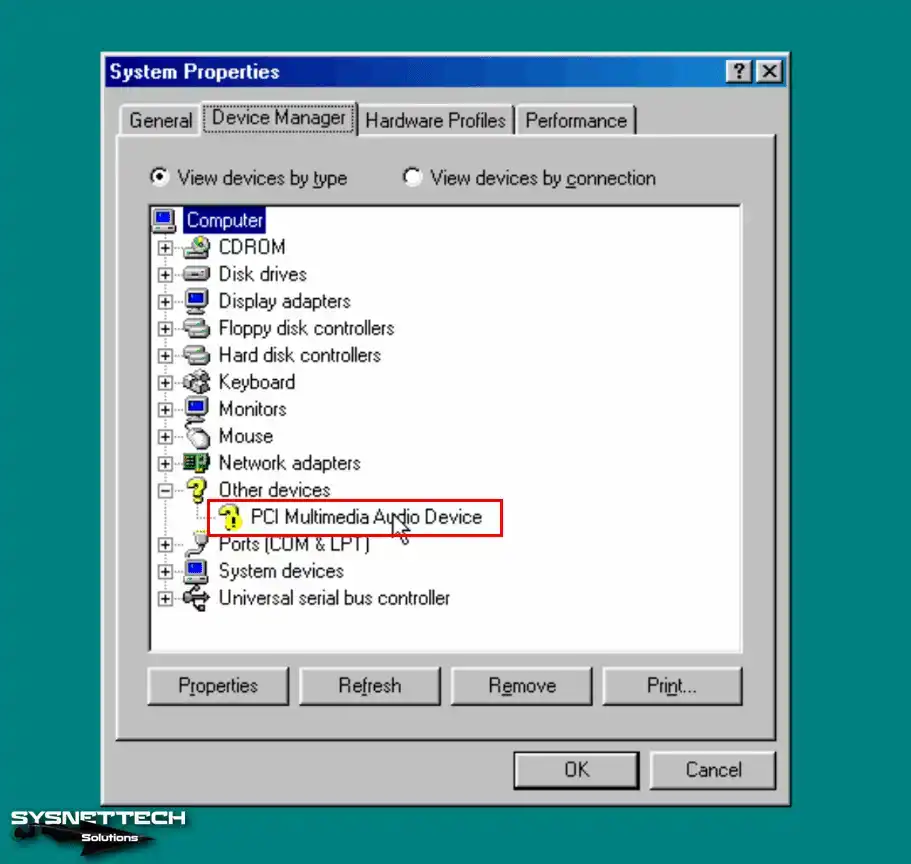
Step 4
You must install the sound device driver manually. The CD-ROM cannot install this device’s drivers automatically.
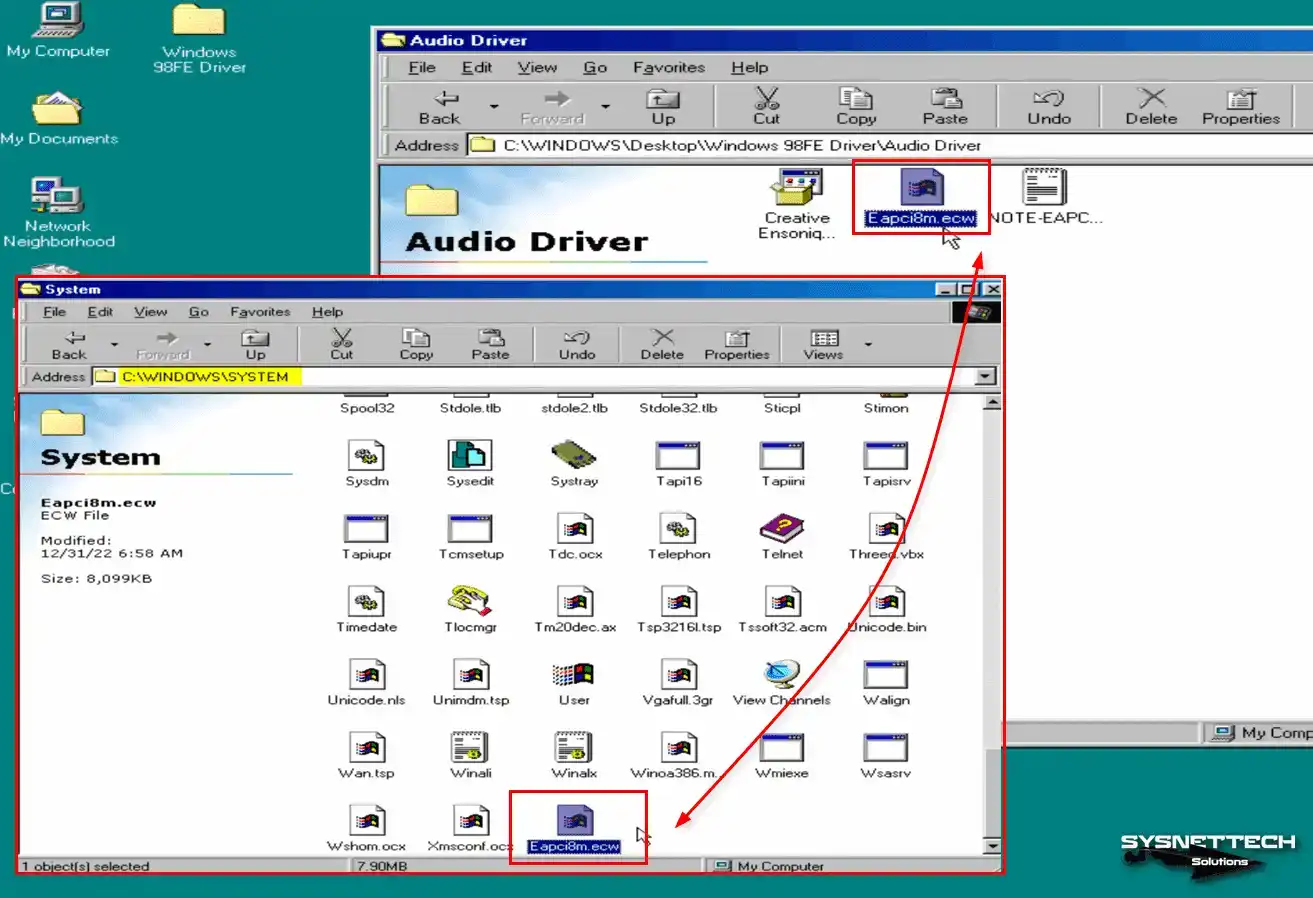
Copy the EAPCI8M.ECW file from the Audio Driver you downloaded to C:\WINDOWS\SYSTEM. You can find the Audio Driver in the table at the bottom.
Step 5
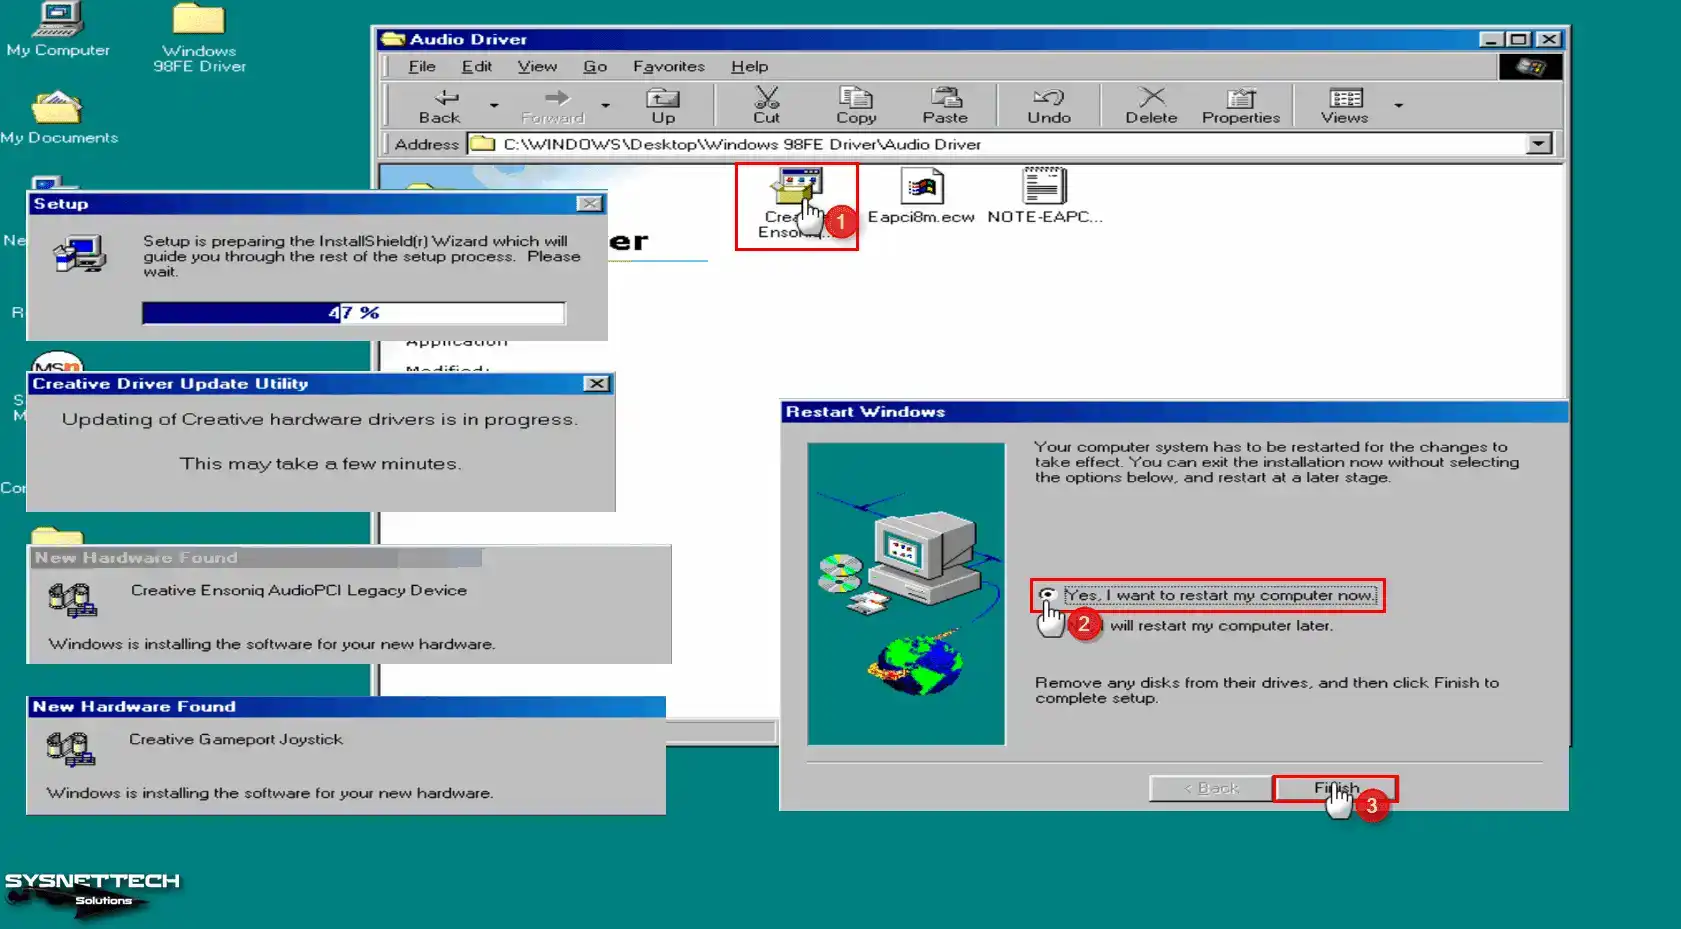
Now copy the Creative Ensoniq AudioPCI Driver (epw9xup) file to the VM and run it. When you run the setup file, the system rescans the audio device automatically. Then it installs the drivers.
Step 6
You copied the EAPCI8M.ECW file to the right location. Now open Device Manager and view the Creative Ensoniq AudioPCI device settings.
Here, set the MIDI Synthesizer Waveset setting to 8 MB GM/GS Waveset ver 5.
After you install Creative Ensoniq AudioPCI Driver, you see an error like below. You must configure the MIDI settings on the system.
The Creative Ensoniq AudioPCI driver cannot load MIDI waveset. MIDI playback
has been disabled.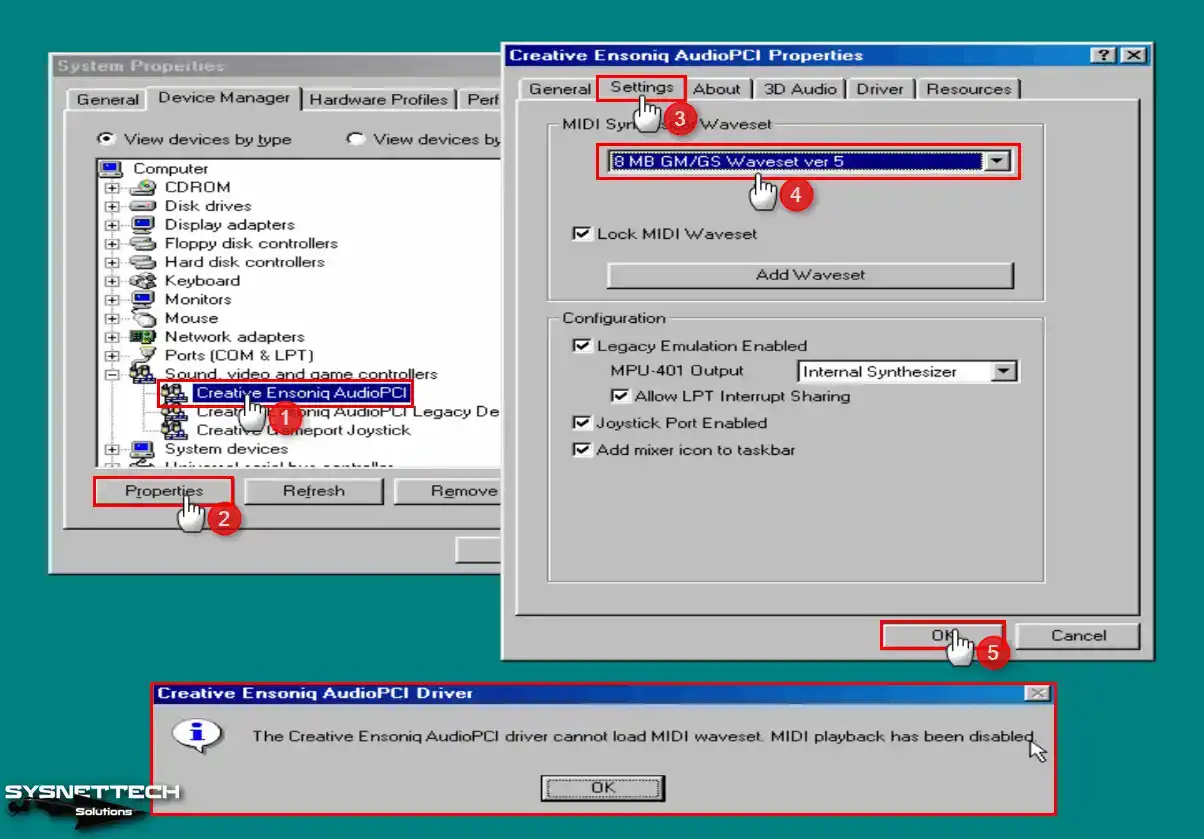
Step 7
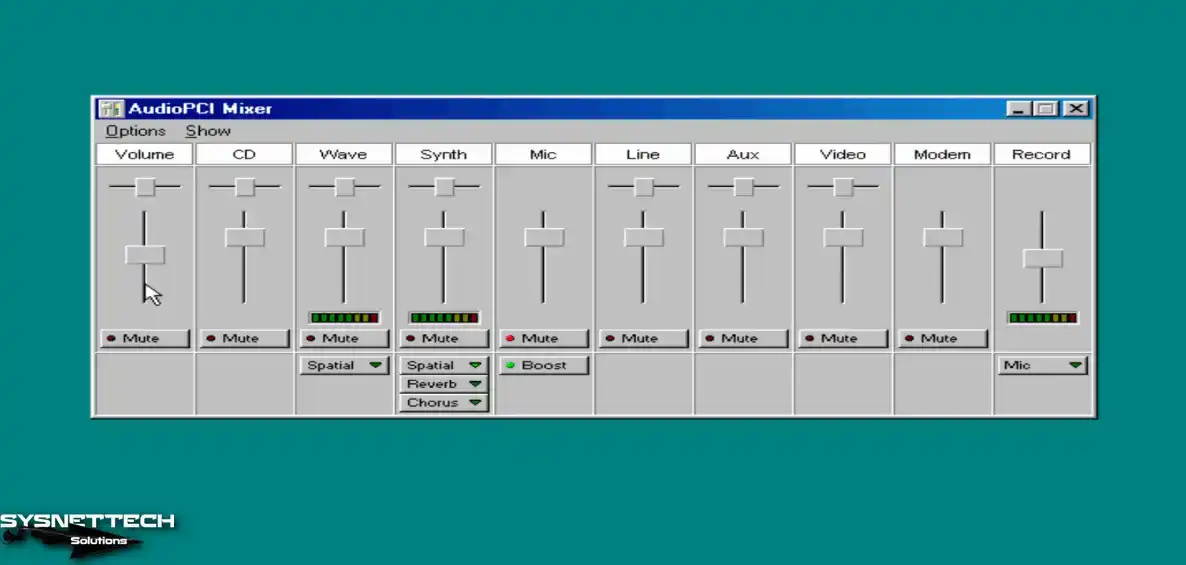
When you restart your system, you will no longer see the MIDI warning. Also, you may see the AudioPCI Mixer app start in the taskbar.
Using USB Flash Drive
We recommend a USB flash drive for copying large files to the virtual machine quickly.
Step 1
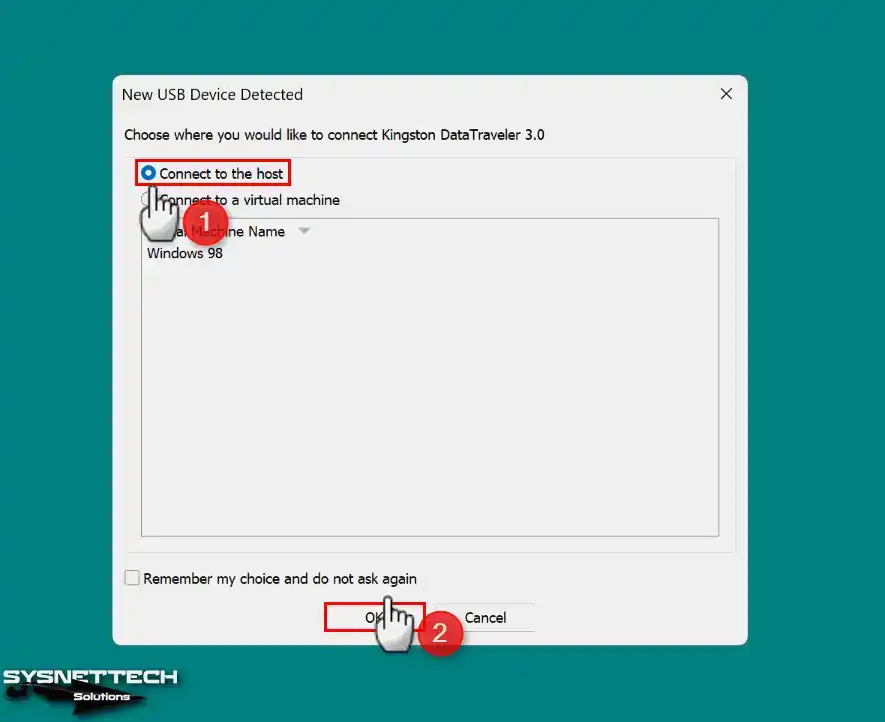
Now plug a USB flash drive into your host PC. VMware automatically opens the New USB Device Detected window. Then check Connect to the host and click OK.
Step 2
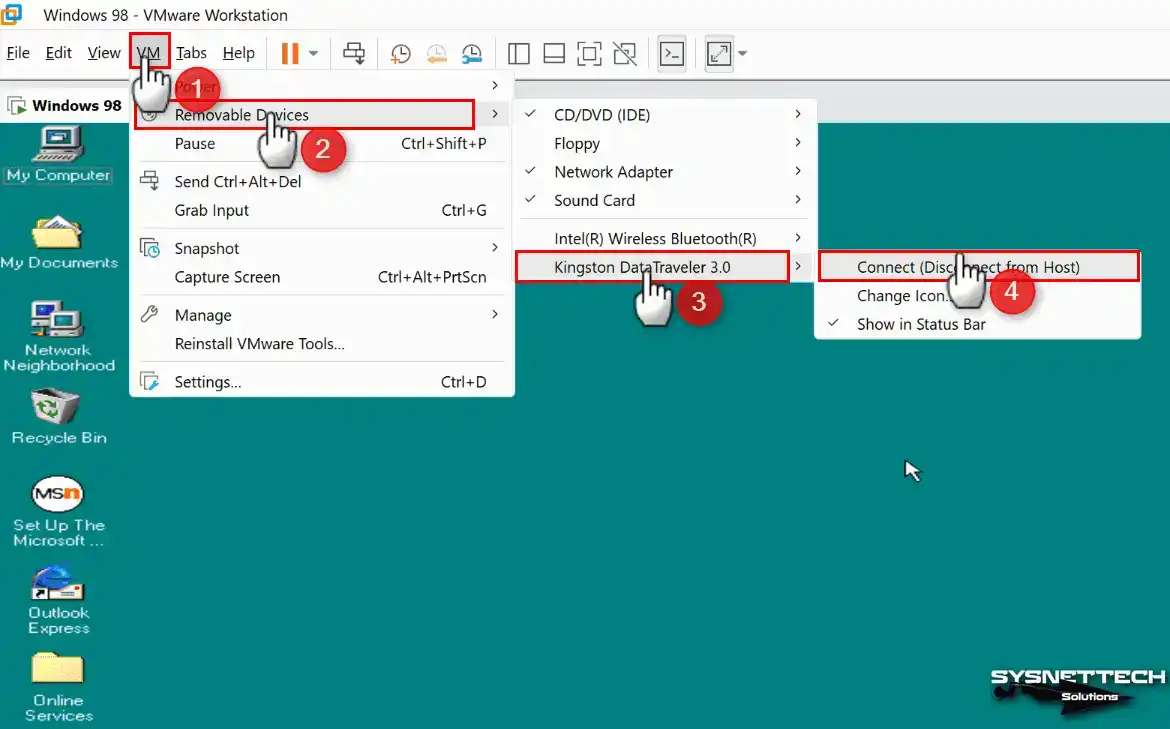
On the host machine, add a new folder or document to the USB disk. Then open the Workstation Pro menu to transfer the file to the VM. Click VM, Removable Devices, your USB name, and Connect in order.
Step 3
To use flash drives in the VM, install the USB Mass Storage Controller driver manually. First, install the Generic USB Hub driver from the Windows ISO file.
Step 4
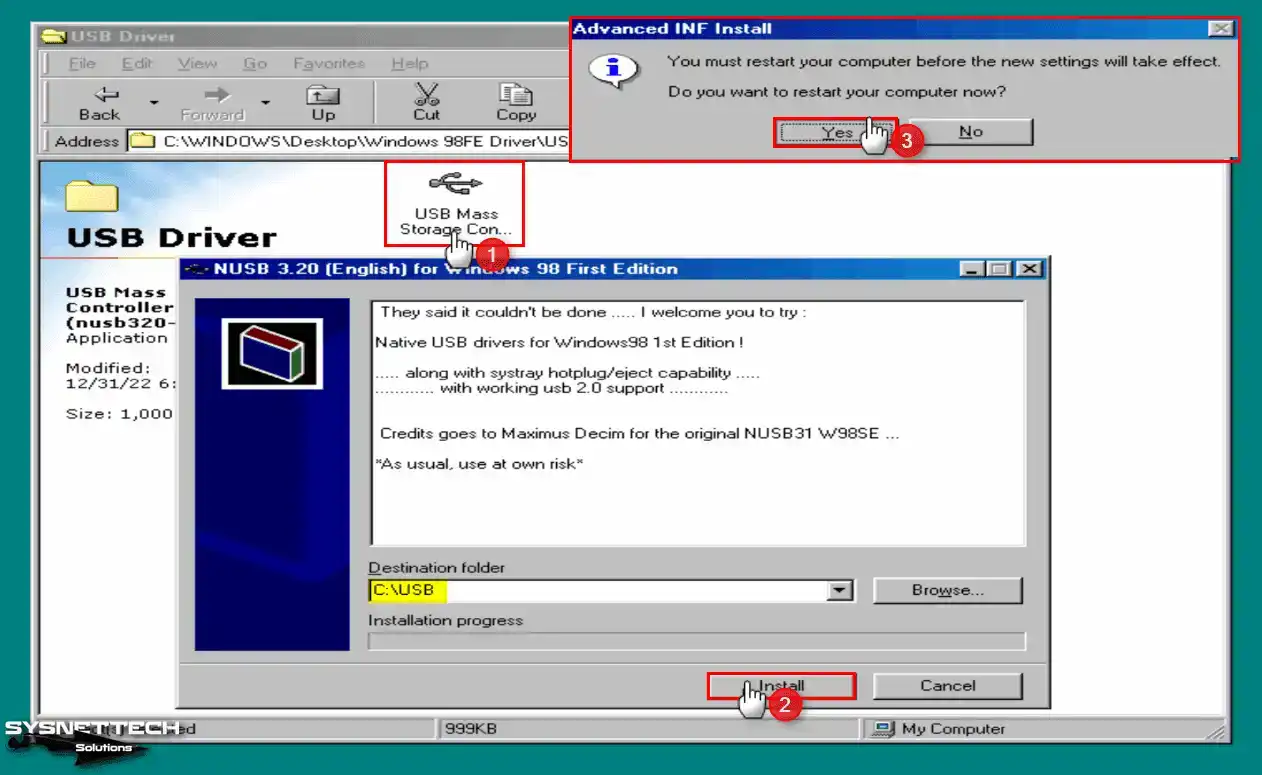
Also, install the USB Mass Storage Controller driver manually. This enables flash drives in the VM.
Also download the USB Mass Storage Controller Driver (nusb320-Eng-98FE) file to your computer. Then double-click the file to start the installation. When the Native USB Driver window opens, extract the archive contents to C:\USB.
Step 5
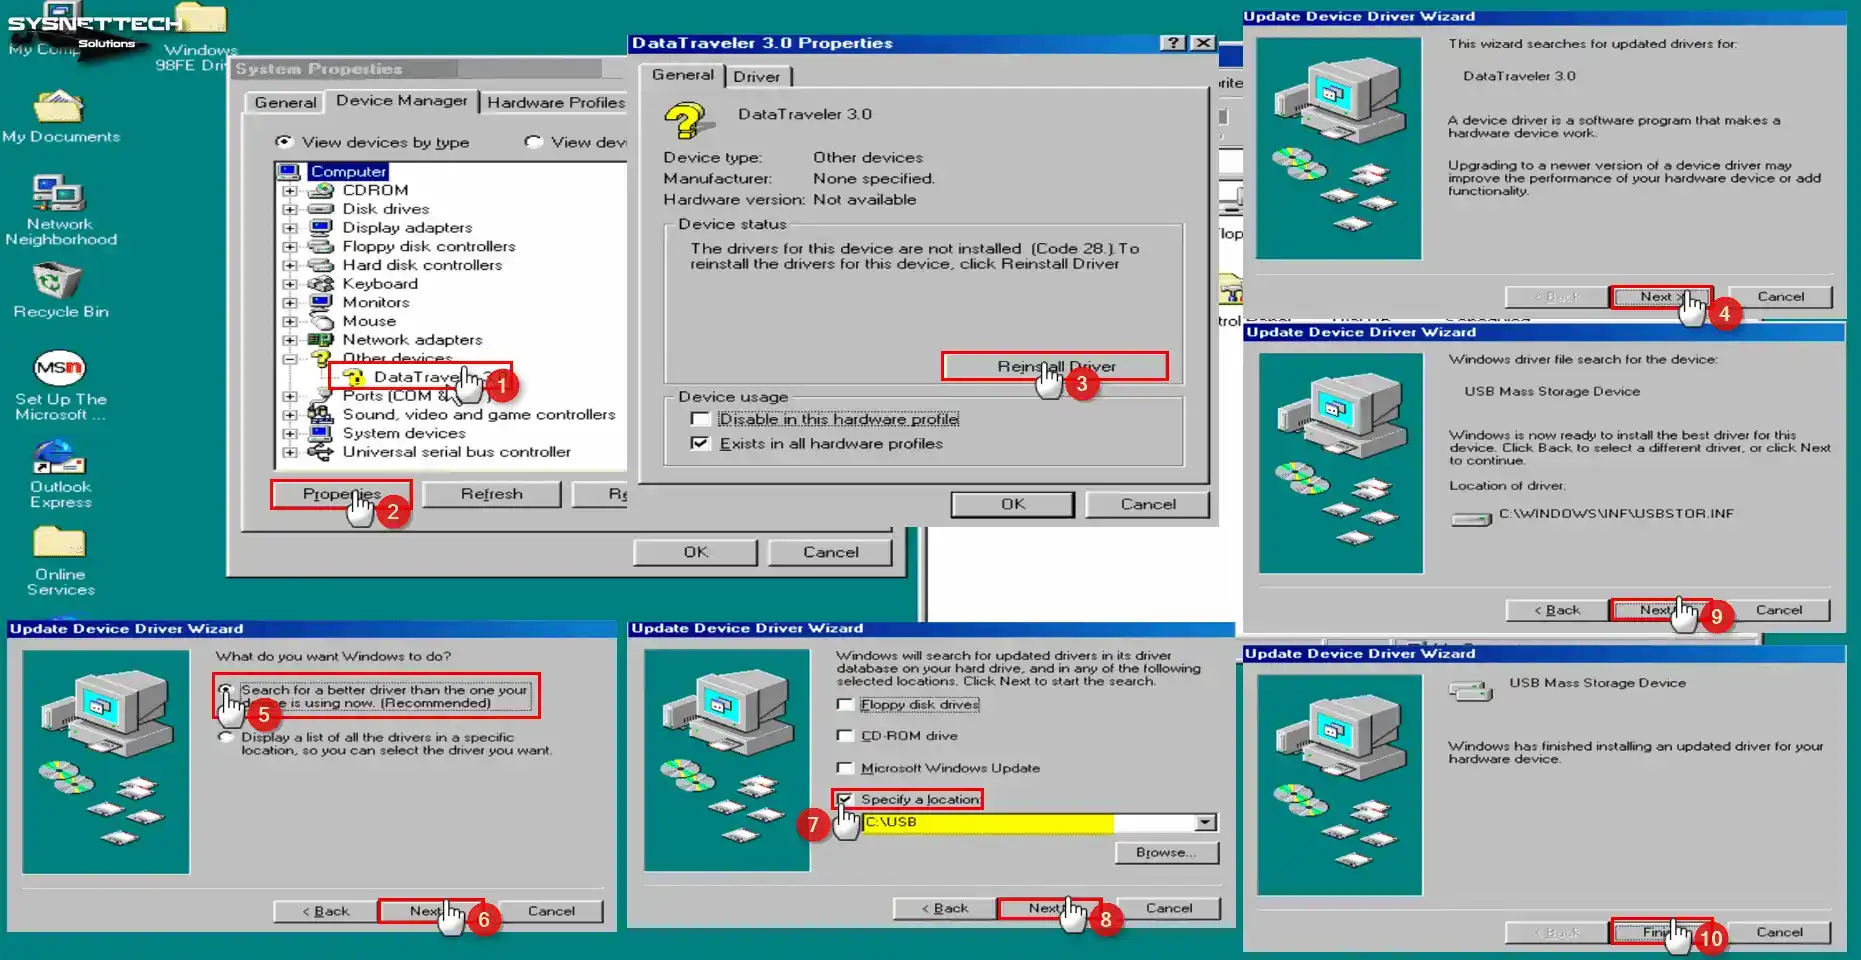
In Device Manager, click Refresh and scan the hardware again. This time, install the Generic USB Hub driver manually.
For Generic USB Hub, check Search for the best driver for your device. Choose the folder you extracted to C:\USB for the USB Hub Driver. Then click OK.
Install the DataTraveler 3.0 device driver. If the system cannot find the USBNTMAP.SYS file, look for this driver in C:\USB.
Step 6
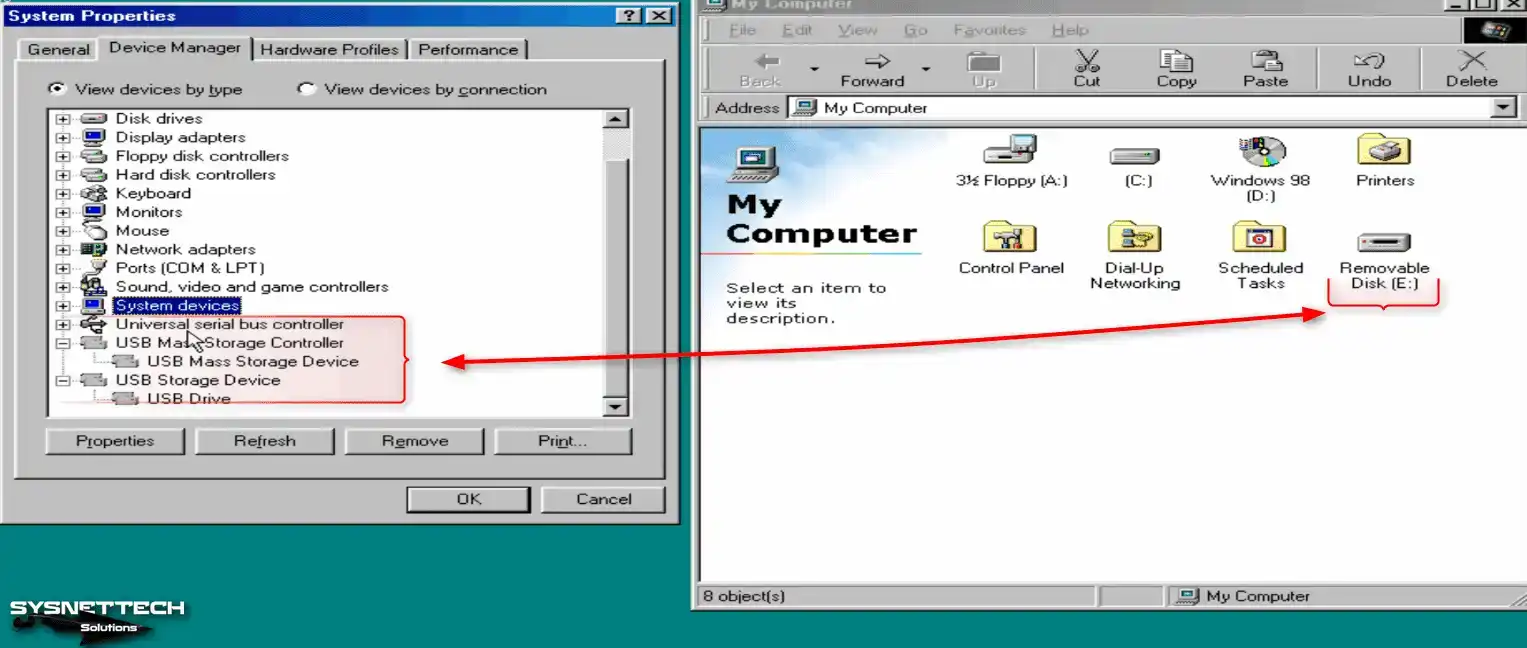
Finally, the USB 3.0 flash drive now works without issues. Check Disk Drives in Device Manager; you will see the KINGSTON DataTraveler 3.0 device.
Deleting the Virtual Machine
You may no longer want to use the Win98 virtual machine. You can delete it completely from your host disk.
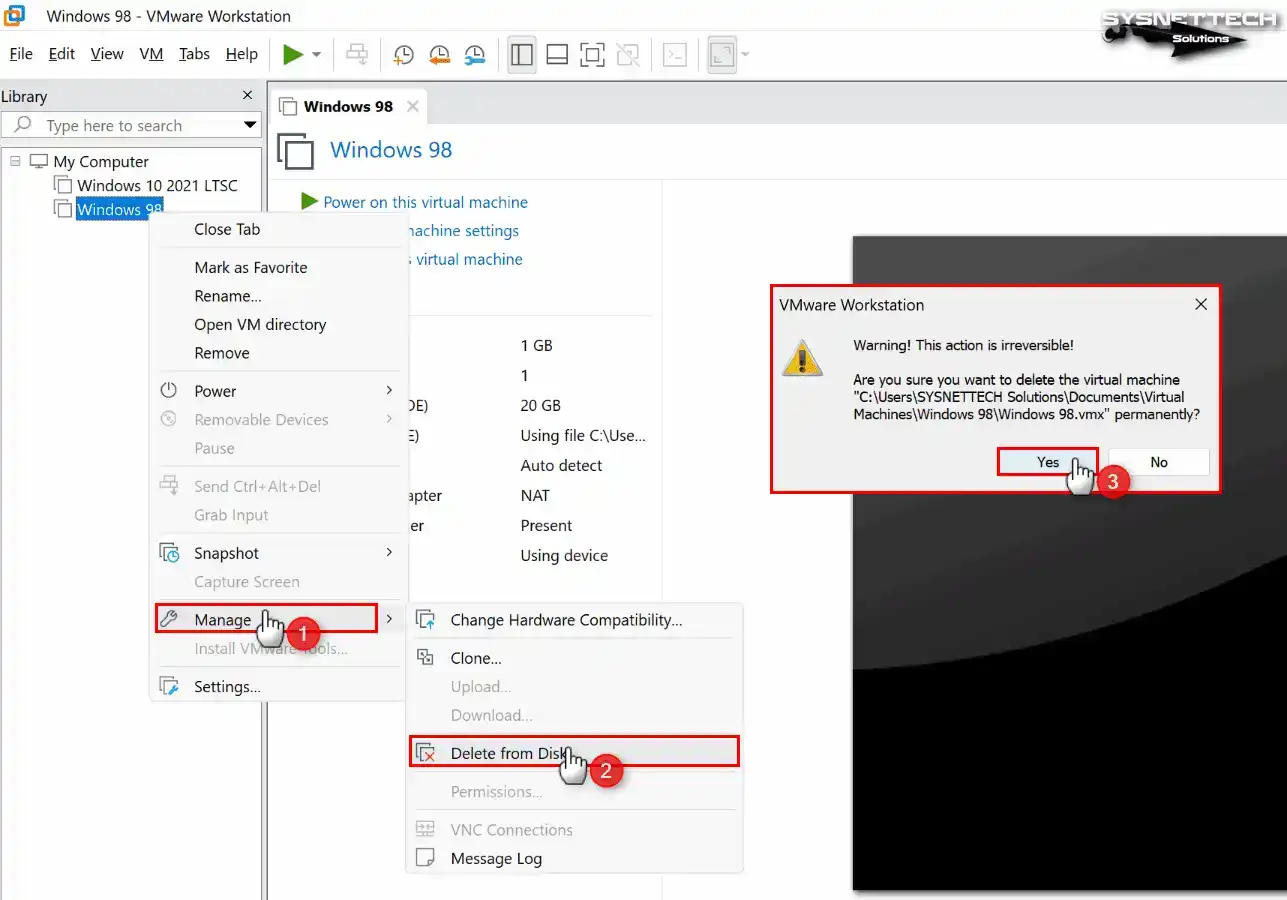
Right-click the VM you want to delete in the Workstation Pro left panel. Then select Manage and Delete From Disk. Confirm the action.
1. Video
2. Video
3. Video
Download Windows 98 FE (First Edition) Drivers and ISO
| File | Download Link |
|---|---|
| Windows 98 FE (First Edition) ISO | Download |
| Audio Driver (Creative Ensoniq AudioPCI) | Download |
| USB Driver (USB Mass Storage Controller) | Download |
| All Drivers | Download |
Download Windows 98 SE (Second Edition) Drivers and ISO
| File | Download Link |
|---|---|
| Windows 98 SE (Second Edition) ISO | Download |
| Sound Driver (Creative SB PCI (WDM)) | Download |
| USB Driver (nusb36e-2694) | Download |
| All Drivers | Download |
Installing Older Versions
| Workstation Version | YouTube Video | Slide |
|---|---|---|
| 14 Pro | Watch | – |
| 16 Pro | Watch | View |
| 17 Pro (NEW) | Watch | – |
FAQ About Windows 98 Virtualization
Can I create a virtual disk over 64 GB for Windows 98?
Should I prefer the FE or SE version?
How do I move Windows 98 from VMware to VirtualBox?
Can I get 3D acceleration or DirectX support?
How do I set Windows 98 to full-screen resolution?
Where can I find a reliable installation ISO?
What is the license status of Windows 98 virtualization?
How do I fix keyboard and mouse lag?
Do old classic games run without problems?
What fine-tuning should I do for Windows 98 performance?
Conclusion
In conclusion, run Microsoft Windows 98 on your computer with VMware Workstation 17 Pro. Even on an Intel 12th/13th/14th Gen Windows 11 PC, a virtual machine runs it.
Follow the steps in this detailed article to use this old operating system. You can also create a stable and efficient virtual environment. Whether for nostalgia or old software access, VMware Workstation brings the past to today.
In short, we must embrace and learn developments in virtualization technology. Knowing such old systems in computing will make us aware of future innovations.
Also, if you are interested in an older version of Windows, I recommend our Windows 95 installation with VMware article. In that guide, I explain all processes step by step, just like here.

51 People Shared Their Experience
Left my remarks on the YouTube page with this video. I have reached my level of disgust with all the videos about VMWare being used to install Windows OS’s. Not a one works the way you would expect the results . The only obvious conclusion an experienced pioneer could arrive at – is that Virtualization is a big fat joke. Until some one can definitively demonstrate with a video that the VM tricks work “AFTER” all the supposed installs by firing VM up again with the OS appearing as it would on a “REAL” machine install – then I’ll be convinced the whole thing is a sham. Sorry to be so negative – but see no opportunity to arrive at a more positive conclusion. Its the old story – proof is in the pudding.
Calm down 🙂
I do not understand exactly what you want.
You can use many operating systems on virtual machines such as VMware and VirtualBox. VMware runs on the OS. If you want to use virtualization directly on the hardware, you can buy a server and install VMware ESXi on it.
My apologies – I guess I did not make myself clear enough for you. Please re-read the sentence starting with word “Until”. That should make abundantly clear what I would appreciate seeing (as well as many other silent viewers). Your level of expertise is unquestionably beyond us mere mortals – so please be patient and bear with us. There is no criticism intended/directed toward you or others who promote this paradigm. If VMWare runs on the host OS – whats the point when the OS installed within the VM cant be installed on the host machine. Sounds like a rabbit chasing his tale here. Your last “If” sentence is actually the root cause of the VM strategy failure. Thanks again for the courtesy of your reply. I have calmed down – just washed my hands of all this ridiculous absurdity to move on to more esoteric endeavors (in the REAL world). If I could sit at a keyboard with you and watch you prove my point – you would be the first person I would take out to the restaurant of your choice. Best wishes in your future challenges..
How about an actual article and not a video? This is not an article.
Thank you for the feedback. I could not write the article because I’m too busy. But I will consider your opinion and I will fix it.
I can attest to the fact that Vmware Workstation Pro 16.1.2 can run Windows 3.11 – 10, macOS 11.3 Big Sur, and Linux Distros.
I testify that the guides and YouTube videos made by tolqabaqci were a big help for setting up and running my virtual machines.
Please continue to produce these guides and videos. How about Windows 1.0 and 2.0 to complete the Microsoft OS family. God bless and more power.
Many thanks for your feedback. Your comment made me very happy. Thanks again for your motivation.
exelente ahora descargo los drive me falta eso
Gracias por tus comentarios.
I agree this how to with VMWare workstation executes without flaw until one minor place, where the Windows SE version is slightly different with audio and the eqsonic driver. Thos steps do not seem to be necessary as my midi did not error out and test midi files play without incident. Thanks for the help as I have struggled with this for a while and clearly I was headed down an incorrect path and you showed me option to undetand why. Good on you!
I’m glad you fixed your problem. Also, many thanks for your comment.
Hi, please share how to share folders from WM WS pro 16 to windows 98?
Windows 98 (FE and SE) is not a guest operating system that permits sharing folders. on the vmware website they have a list of guest operating systems that do permit shared folders.
How to enable 3d Acceleration in vmware workstation 16 pro, instaled windows 98se.
The vmware says “3d acceleration is not supported in this guest operating system”.
Using VMwre Workstation 16 pro in Windows 11 envirronment
I consistently get a “This program has performed an illegal operation error and will be shut down If problem persists contact program vendor”
Closing that box, I see
“The SHELL32.DLL is linked to export SHLWAPI.DLL:FileAttributesA, ”
Closing that box the install process hangs
Interestingly enough I get the same error when I try to install through Oracle VirtualBox!
This is the second time my comment was deleted. This is very unprofessional. ANSWER QUESTIONS!
Not sure why my original comment was DELETED, especially considering I was allowed to write a reply, so I’ll post my comment again. I’m having trouble connecting to the internet on Windows 98. I’m using Windows 98 on VMWare Workstation 15 Pro. I followed the above guide up until it says to download the audio driver for PCI device. I cannot connect to the internet, and I followed all the steps of the Internet Connection Wizard. I typed in ping 8.8.8.8 in the MSDOS prompt and it shows to be working. However Internet Explorer will only allow me to connect to msn.com and google.com, and I can’t click on most other links on the msn page; a separate page pops up saying “cannot find server, page cannot be displayed.” Also, when I pull up ipconfig in the command prompt, there is no DNS listing at all. Please advise.
Your comment may have been detected as spam. I am seeing your message for the first time. If you experience such a problem again, I suggest you look at the contact section of their website.
Since Windows 98 is an older operating system, you may not be able to view some websites with the default Internet browser. This is because websites are designed according to current technologies and some protocols are updated.
My suggestion to you is that you download old version programs from the Internet for old Windows systems. If you search a little more, you can find suitable programs for retro systems.
It looks like you need the Internet to download the audio driver. If you are already using Win98 on a virtual machine, you do not need to connect to the Internet and download the driver.
You can download the audio driver on your host PC and create the driver as an ISO using software like UltraISO and then add the image to the VM and install the driver.
I am trying to install windows 98 se on the vmware client free version. I get many dll errors.
do I need the pro version?
Try disabling the core isolation on your windows host under windows security.
Hi, I have this problem
Upgrade the virtual machine to enable high-speed USB 2.0 support for the device ‘SanDisk Ultra’. An attempt will be made to connect this device to the best available host controller. This might result in undefined behavior for this device.
Windows 98SE
Usb 16, 32 64gb Kingston
Thank you
Hi there,
Just a quick note to say THANK YOU!! These notes/guide/howto clearly took quite a bit of time to compile and it really did help. Thank you for putting so much effort – it was REALLY helpful and I REALLY appriciated it
I’m glad I helped. Your nice comment motivated me. Thank you so much.
I downloded the iso from the link provided, but it doesn’t look like it came with the product key?? Do you know where I can find it? Or should I go find a different iso????
So got windows 7, windows 2012 r2, and windows Xp all running in VM’s thanks to your fantastic video tutors. Thank you for this generous work.
Had an issue with using NAT for networking but was able to use thje “Virtual Network Editor” to solve the issue by simply clicking on the “restore defaults’ button.
Bridging worked every time but was having a tough time trying to get NAT working. Found a webblog that said to just restore defaults and worked like a charm.
Thanks for explaining the difference between using NAT vs Bridging in step 8 of this article by the way. Simple and easy to understand.
I’m so glad you fixed your problem. Your nice and motivating comment made me very happy. Thank you so much.
This consistently fails for me after installing the Ensoniq AudioPCI drivers, Windows 98 hangs after reboot and applying the CPU patch does not fix things at this point. Generally the same approach is working Ok for other 9x operating systems, but not Windows 98.
Did you download and run “SBPCI_WebDrvsV5_12_01” and “epw9xup” driver downloads from the Creative Audio website? That fixed my Ensoniq AudioPCI errors when booting my Win98SE VMWare player machine
Hallo Herr Bagci,
versuche wiederholt die Patch-Datei “patcher9x0.6.14 boot.ima” zu installieren. Leider
wird die Installation nach Patch9x … 1 abgebrochen. Die Fehlermeldung: “Error: Path (1) must
lead to direktory or File”. Ich nutze VMware Workstation Pro 17.0.1 unter Windows 11 und als VM: Windows 98 Zweite Ausgabe 4.10.2222A.
Viele Grüße und vielen Dank im Voraus
Gerhard Poppen
Hallo, manchmal kann die Installation abhängig von der Prozessorgeschwindigkeit des verwendeten Computers nicht durchgeführt werden. Sie sollten also versuchen, neuere oder ältere Patcher zu verwenden, die der Entwickler auf GitHub veröffentlicht hat. Hier ist der Link: https://github.com/JHRobotics/patcher9x/releases/
Hallo Herr Bagci,
danke für die schnelle Antwort. ..6.23-win32, ..7.45-win32, ..6.27-boot, ..7.45-boot habe ich alle probiert, leider ohne Erfolg. Kann es evtl. auch mit den Datei-Zugriffsrechen zusammenhängen? Ich benutze ein Laptop von XMG, Prozessor Intel(R) i7-10875H CPU mit 2,30 GHz.
Herzliche Grüße und noch ein schönes Wochenende
Gerhard Poppen
Es tut mir leid, dass ich nicht antworten konnte. Dann müssen Sie eine Lösung finden, indem Sie die Einstellungen der virtuellen Maschine ändern. Ich empfehle beispielsweise, einfach bei den standardmäßigen 2 GB zu bleiben, anstatt große Festplatten zu verwenden. In einigen Fällen vermeidet die Installation mit einer solchen Konfiguration Probleme.
Hallo Herr Bagci,
danke für die Antwort. Meine VM-Hard Disk (IDE) auf 4 GB eingestellt. Ist es denn möglich,
die Größe im Nachhinein noch zu ändern?
Mein Problem: Die Anwendungen in der VM Win98 frieren immer kurzfristig ein. Ein Wechsel der Anwendungen hebt die Blockade dann wieder auf und ich kann weiter arbeiten.
Herzliche Grüße
Gerhard Poppen
Also windows 98, has beautiful
It works !!!
Intel-13th CPU 13600K
WORKSTATION PRO 17
That floppy disk trick do solve the WIN98 install eroor!!
Thanks for your feedback!
The Google Drive links for Win 98SE (not sure about Win 98FE) are giving me “Too many people have downloaded this file recently” errors.
This error happens when I try to download the files.
This happens on Google servers. You have to wait 24 hours. I will update the download links soon.
Hello! With the tutorials on this page, I was able to install Windows 95 and Windows 98 in Portuguese; However, the links to the Windows 98 drivers aren’t working… Is it possible to correct them? Thank you very much in advance and congratulations on the tutorials!
Hello. I updated all the driver links yesterday. Still, check it out. If there is a cache problem, try opening the page in an incognito tab.
These new links have worked, thank you very much! And once again, many congratulations on the tutorials, which, although they don’t cover installing Windows in languages other than English, are very enlightening. Wendrill
I’m so glad to hear that. Also, thank you very much for your motivational comment.
Only many thanks.
Followed your guide and it seem to work I get a lot of crashes with “Explorer” with “This program has performed an illegal operation error and will be shut down If problem persists contact program vendor” . If I hit details it shows “EXPLORER caused an invalid page fault in
module BROWSEUI.DLL at 0167:7f34745c.” The PATCH9X fix seemed to fix a couple of 98 SE vm’s I’ve had around since Workstation 6 that were working but they too get the Explore crash. Luckily I have 2 DOS/95/98/ME PC’s that I’ve has since 2002 that work still but I liked having something I could just click and run. OH well as I said at least you got the VM’s working again. Thank for your work!
Hello, I see you have instructions on using the vm pro version; however, do you have the vm workstation player? I am using the player 17 version for my vms. Thank you.
WIN98SE doesn’t have entertainment pack.
patch9x fixed my only problem
Thanks. That’s quite detailed. Thanks many. ありがとう,多謝.
Thank you very much for your motivating comment and feedback 🙂
Why is there no download?!?! Disappeared?? Please back and thank you
Audio Driver (Creative Ensoniq AudioPCI)
USB Driver (USB Mass Storage Controller)
All Drivers…
Thanks very much for the tutorials and great details. I was successful installing a vm of win98se using vmware pro ($9 for the license and well worth it). I’m using a FoxPro application that needs to print to accomplish output. Is there any printer driver available for generating pdfs that would work with this arrangement? Thanks in advance. I’ve tried Cutepdf and pdfcreator without success.
I have tried to follow these steps exactly, however, no matter which version of Windows 98 I try, or which ISO of the OS I use, it first refuses to allow connection to the internet; Google won’t load in Internet Explorer like it should, despite follwing the instructions, and also when I check the Device Manager, under Other Devices, all that is shown is PCI Multimedia Audio Device; the other option simply doesn’t exist for some reason. I haven’t even tried to install any of the drivers because of this, so what the hell is going on with this, and why am I having such issues with this when it seems no one else is?