
Of course, virtualization is a must in the modern computing age. Frankly, we can run multiple systems on a single physical machine. Because of that, we can use Windows XP, especially with VMware Workstation Pro or Player. However, to get full performance on the guest machine, we need to install VMware Tools.
We must do this not only on XP but on all other Microsoft or Linux-based systems. In this article, we will increase both the performance and functionality of it. To do this, we will install the VM drivers I mentioned.
How to Set Up VMware Tools on the Windows XP VM
We must get full performance from a VM that you install on the VMware Workstation. To do this, we need to install the virtual hardware drivers of the VM.
To give an example, let’s say you installed a new system on your real physical PC. As soon as you make the necessary settings, you install the drivers for some hardware, such as the video card.
At this point, such a method also exists for virtual machines. So, in short, you also need to install the drivers for the virtual system. Thus, we can experience one or more systems at the same time by taking advantage of the hardware power of our host device. You should also install this if you install a Linux operating system with VMware.
Frankly, the reasons why we build VM addons on a guest operating system, that is, a VM, are:
- We provide better mouse mobility between the VM and the host.
- We install the guest machine drivers.
- We can use the VM in full-screen mode.
- We can exchange files between the host and the VM.
- We can use the guest machine more efficiently.
For example, you can also build VM Tools on Windows 7. This process has no system differences, but you need to find an extra driver package for very old OSes.
How to Set Up Guest Tools in Windows XP
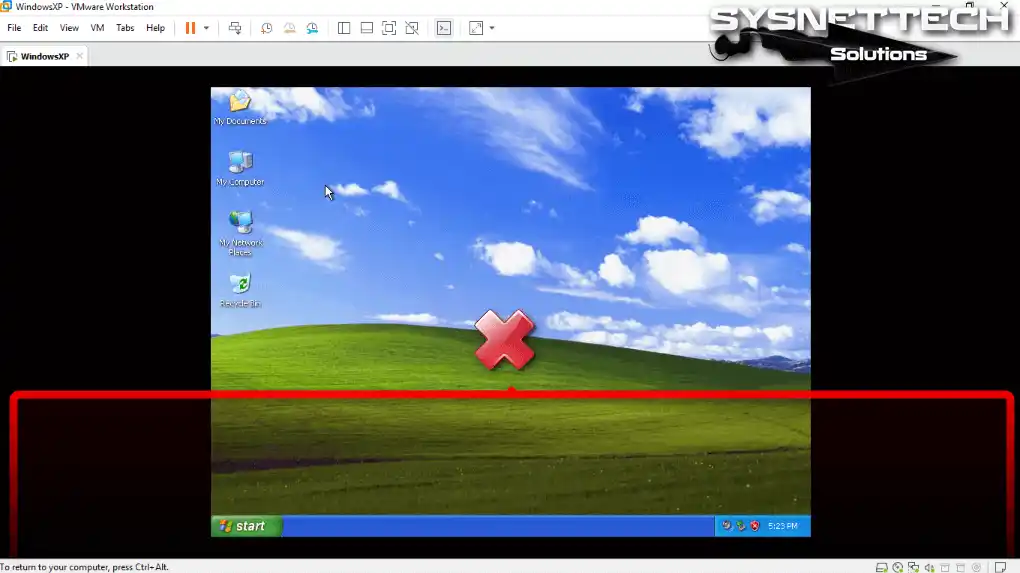
Let’s say you have previously installed Windows XP with VMware. When you run your virtual system, you will see the screen as in Step 1. This is because you have not installed the system’s graphics card driver.
Now, you can easily set up VMware Tools on your Windows XP virtual system by following the steps below.
You will see the whole screen status of the virtual machine before installation.
1. Start the VMware Tools Wizard
Step 1
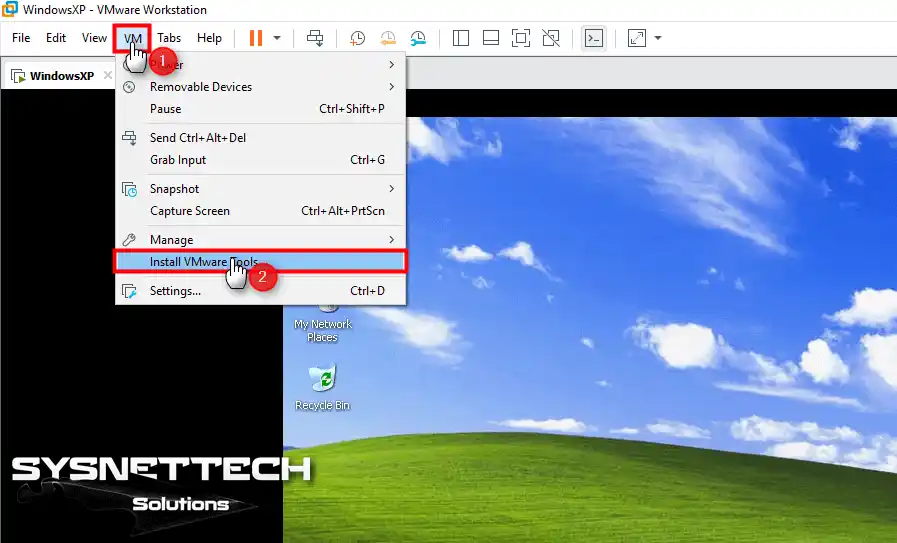
You now need to add the driver package to use the virtual machine in full-screen mode.
Click on VM / Install VMware Tools to install the necessary tools on your Windows XP system.
Step 2
As soon as you start the VMware wizard, you will be ready for installation.

2. Select Complete as the Installation Type
Step 1
Now, on this screen, select the Complete option that I recommend. Then click Next to proceed to the Choose Setup Type screen.

Step 2
Now, all you have to do is click the Install button. Thus, you will start installing the necessary drivers for the Windows VM.

Step 3
As you can see in the installation wizard, you are installing video drivers. After this stage, you will develop all the guest machine’s capabilities.

Step 4
Finally, after completing the installation, end the wizard with Finish.

Step 5
Now click Yes to confirm the reboot for the changes to take effect on your Windows XP system.

3. Make Your Windows XP VM Full Screen
Step 1
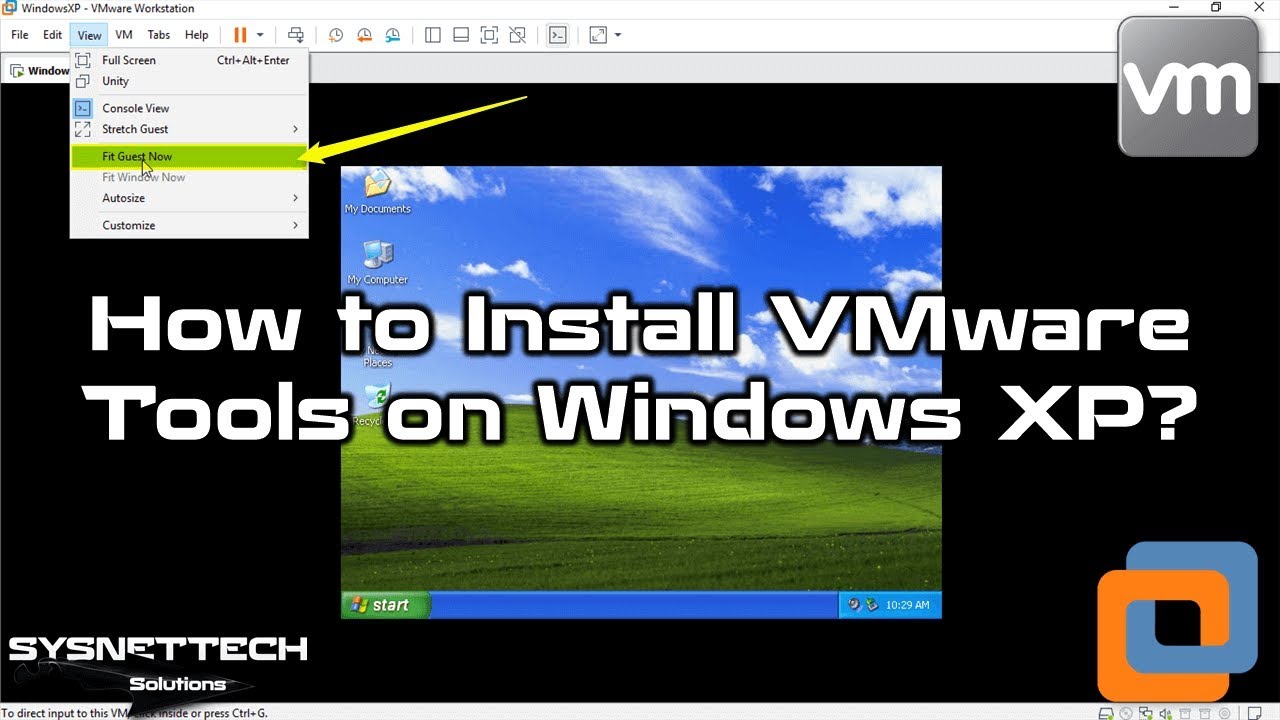
I restarted your virtual OS, but it didn’t go to full screen.
Then, go to the VMware Workstation tool menu. From there, click View / Fit Guest Now, as in the image below, and verify the result.

Step 2
You will now see your XP running in full-screen mode. In fact, check out the screenshot I added to verify this process.

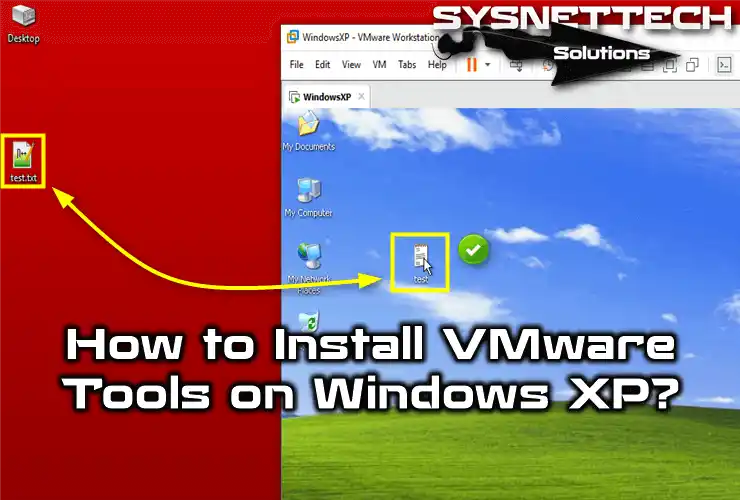
4. Transfer Files with Drag and Drop
You can also copy and paste anything from your host system to your virtual PC.
Additionally, you can, of course, use the drag-and-drop method to speed up this process.

Installing Addons in the XP Virtual PC ⇒ Video
I have published a video tutorial to make it easier for you to follow all the steps I shared with you above. So, I recommend you watch the video below to boost your virtual XP and dive into nostalgia. If you find it useful, I invite you to subscribe to our YouTube channel!
Frequently Asked Questions (FAQ) About Windows XP Tools
- Why should I set up VM Tools on a Windows XP virtual machine?
- Can I run XP without installing VM Tools?
- How do I update XP Tools?
Conclusion
In the end, VMware virtualization is the best choice for many systems. It costs money, but you can take advantage of the trial period. Before I forget, you can also choose the VMware Player version. It’s suitable for essential work, and you can run modern or legacy systems on your PC.
In short, no matter which option you choose, I recommend installing VMware Tools. By doing this, you increase the performance of your system, such as XP. Not only that, but you can also use functionalities such as file sharing. For example, you can enable the Shared Folder feature or use USB sticks.
Also, this article explains how to install VM Tools for Windows 8. So, follow the steps given to do it quickly. No matter which version your system is, the steps are the same. It doesn’t matter if it’s new or old; the methods are always exact.

3 People Shared Their Experience
Help! The “Install VMWare Tools” option is disabled, what can I do about it?
Can you repair VMware Workstation using Apps and Features (Programs and Features)?
I’ve been trying to install VMWare Tools on my Win XP Home edition Virtual machine since yesterday.
HISTORY. I have VMWARE Player 16.2, and everything worked so far. I was advised to delete the CD-ROM
in Settings then re-install it to “Ungrey” the Tools option. That is where it stands right now. I can’t get to “Run” in the Guest BECAUSE Tools isn’t installed. This all used to be OK in earlier versions of VMWare. The Host is Win 10 Home Edition, and has been for over 2 years. Downloaded versions of XP were refuted, even putting in the enclosed [.txt] Authenticity code. “Virtualization” has never been off the pc.
Be grateful for any advice.