
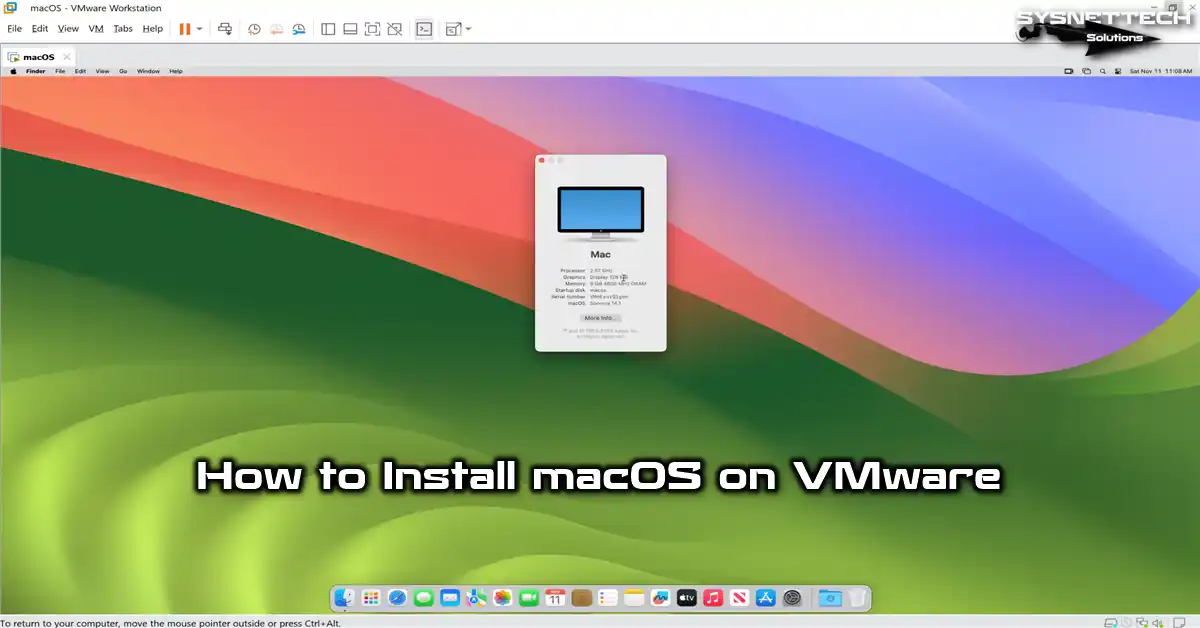
This article will examine how to install and configure macOS Sonoma 14 on a new virtual machine using VMware Workstation 17 (17.5) Pro on the Windows 11 operating system.
How to Run macOS Sonoma 14 in a Virtual Machine on Windows 10 or Windows 11 using VMware
Apple released macOS Sonoma, the next most current operating system for Macintosh computers, after macOS Catalina on September 26, 2023, after announcing it at WWDC on June 5, 2023.
Apple’s addition of a name to each macOS version is a popular approach for the sake of being memorable. The 13 versions determined the name Sonoma from a region in California, as with the old versions.
Apple has improved the rounded corners icons and windows in the user interface for Sonoma, giving it a more transparent and smoother look. It also supports GIF or video content to increase user interaction in the messages application.
With the release of Sonoma, Apple now fully supports ARM processors, with silicon chips developed for its operating system instead of the x86/64 instruction set. Recently, the M1/M2 processors it has produced have achieved longer charging times and system performance than Intel and AMD’s processors.
Users with iMac, MacBook, or MacBook Pro computers can download the Sonoma 14 update from the Apple Store and easily update their system. You can look at this article to learn how to update using the Apple Store.
Suppose you do not have a Mac computer. In that case, you can install macOS 14 on a host computer with Windows 10 or Windows 11 with the VMware Workstation Pro virtualization program and experience Apple’s new system.
Usually, you cannot install an Apple operating system on VMware Workstation because the program does not support Apple OS systems. However, you can enable this support and unlock macOS using VMware Unlocker.
Additionally, you can unlock Apple Mac OS X using Unlocker software on Windows and vSphere ESXi.
How to Create a New Virtual Machine for macOS Sonoma
After installing VMware on your Windows 11 host computer, you need to use the Unlocker tool to install a guest macOS operating system, as we mentioned, and set the VM’s settings correctly.
Step 1
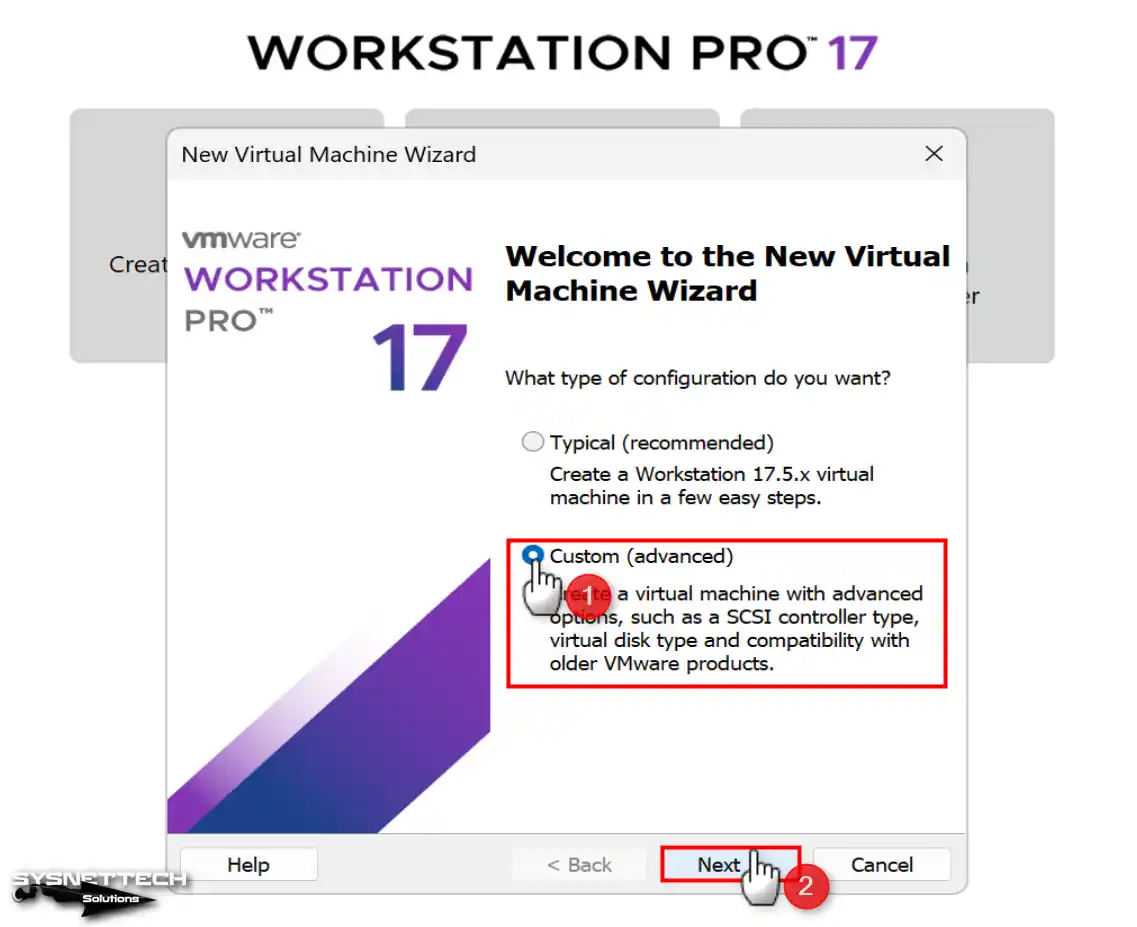
After opening VMware Workstation 17 Pro, open the wizard by clicking the Create a Virtual Machine option on the main screen. After opening the New Virtual Machine Wizard, select Custom (Advanced) to configure the virtual machine’s settings better and click Next.
Step 2
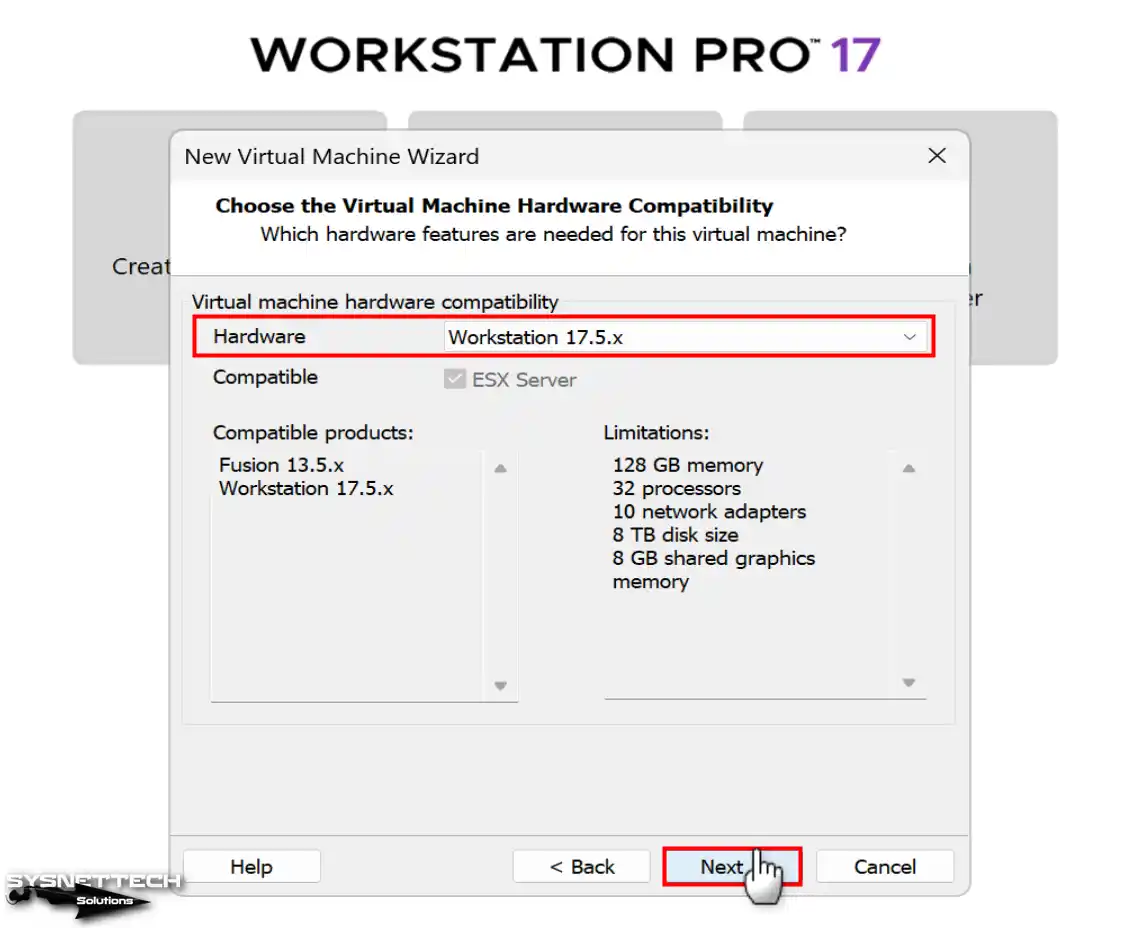
In the Choose the Virtual Machine Hardware Compatibility window, select the latest version of VMware Pro installed on your computer. Suppose you try to install an older system version and get an error. In that case, you can downgrade the Workstation version from the compatibility section.
Step 3
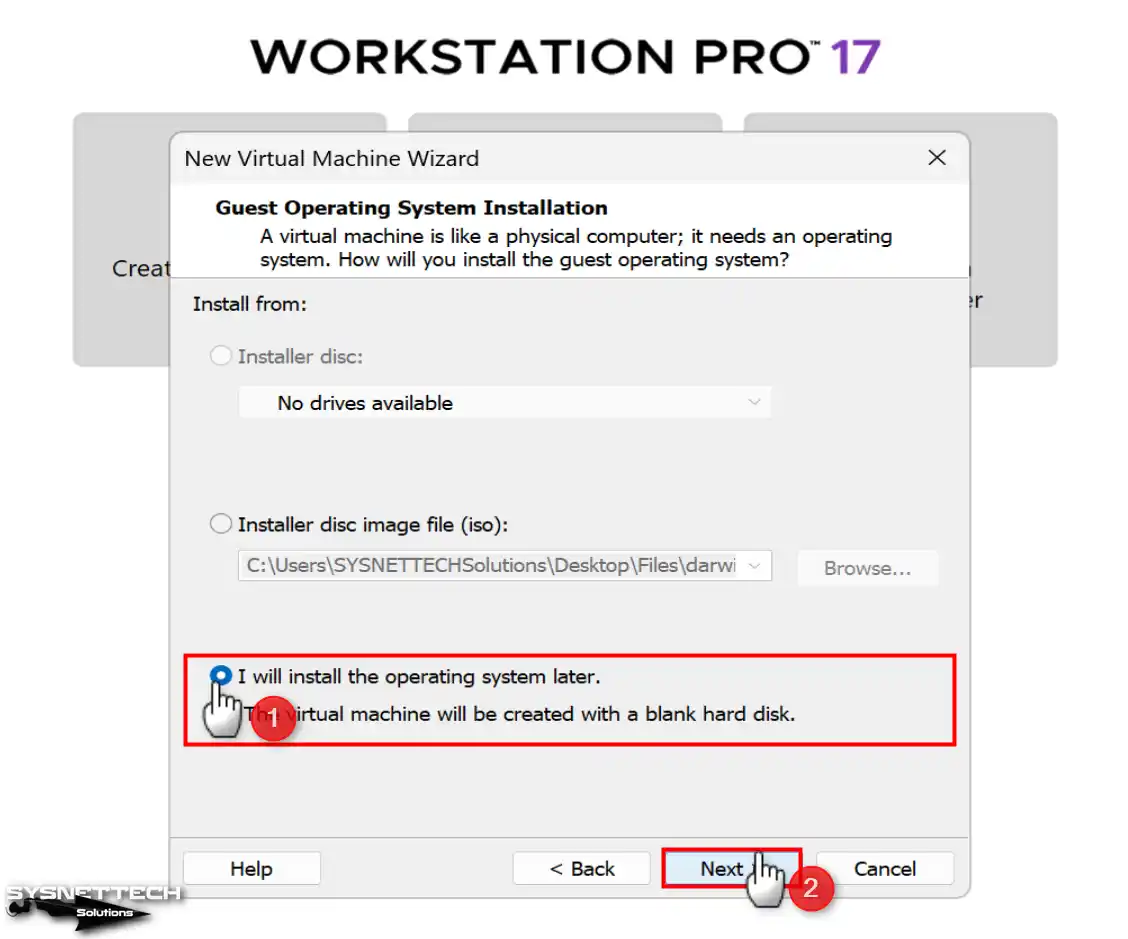
In the Guest Operating System Installation window, you can select the type of media you will use for system installation. To install with your host’s physical DVD drive, choose your installation media from the Installer Disc section or add the ISO image you downloaded to your computer from the Installer Disc Image section to the virtual machine.
At this stage, adding the ISO file to the virtual machine automatically determines the type and settings of the macOS virtual machine based on the added image. This process may not be suitable for installation, so select I will install the operating system later and continue configuring the settings manually.
Step 4
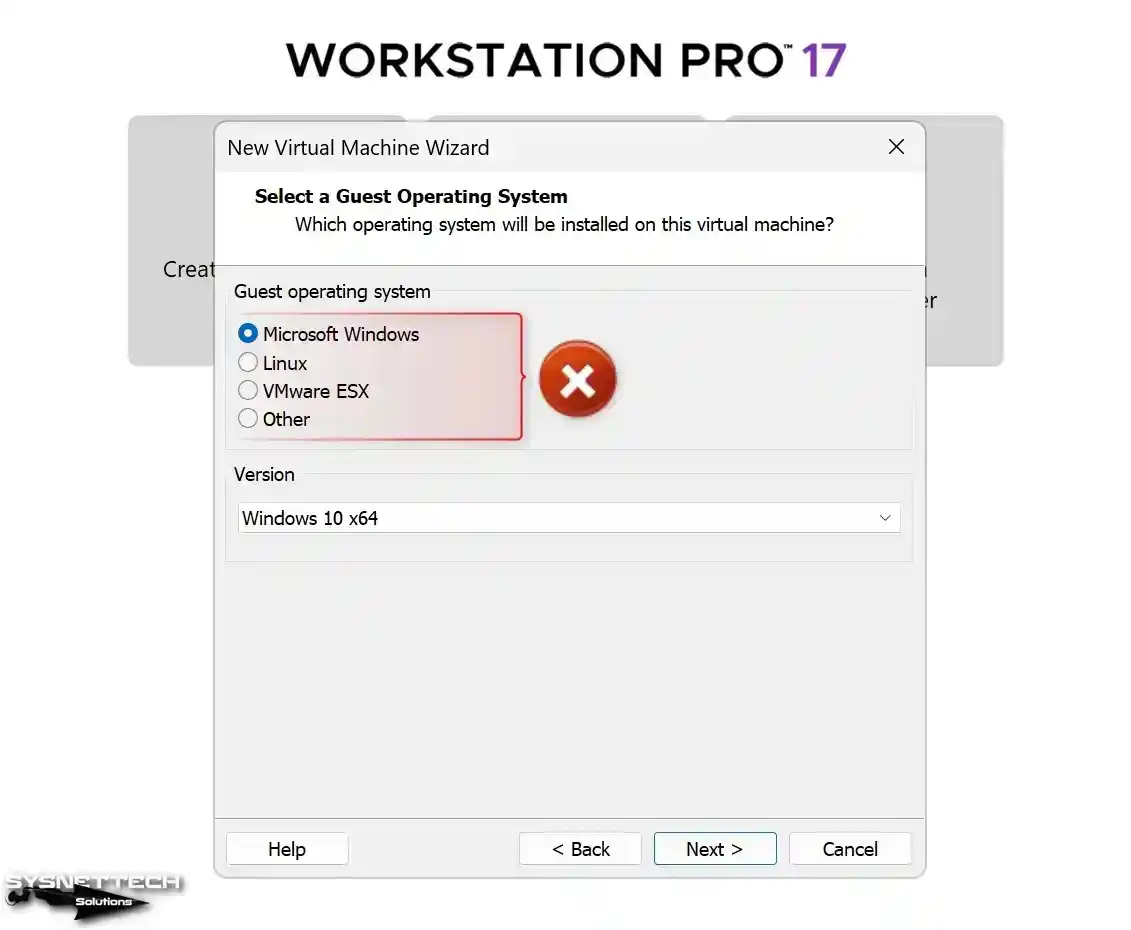
In the Select a Guest Operating System window, you can select the operating systems of Microsoft Windows, Linux, ESX, or other platforms. Still, you will see no Apple Mac OS X here.
When you try to install macOS on the virtual machine, you will see no support for Apple Mac OS X systems. So you need to enable macOS support with Unlocker.
In this window, click the Cancel button to close the virtual machine creation wizard and close your VMware Workstation program completely.
Step 5
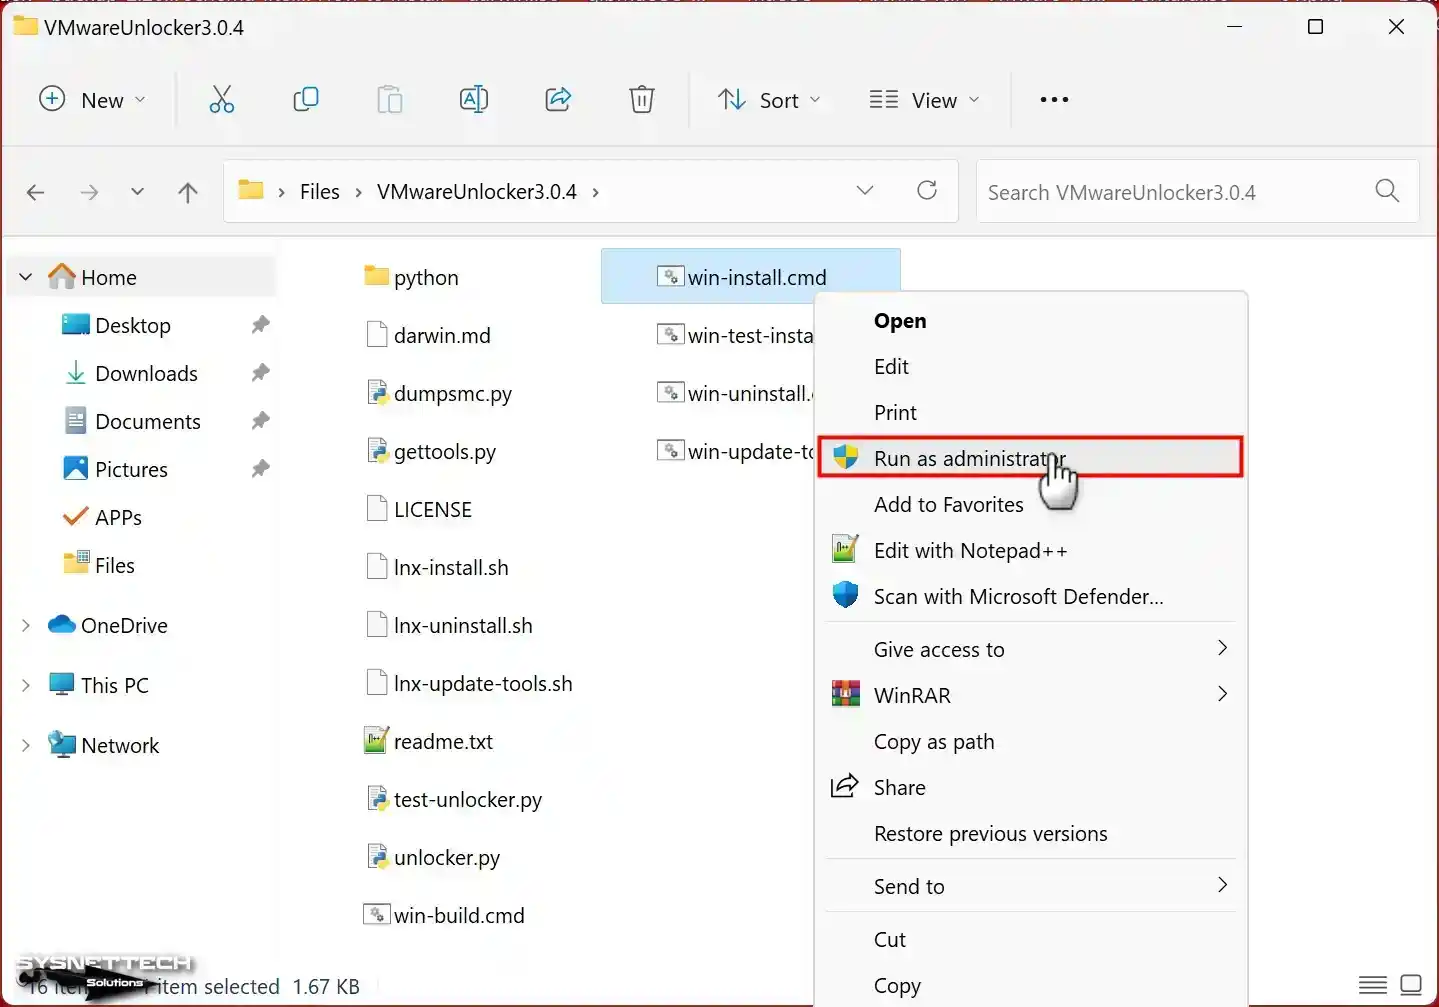
Download VMware Unlocker to your computer, and then extract the zip file to the folder and run the win-install.cmd file in the folder as an administrator.
Step 6
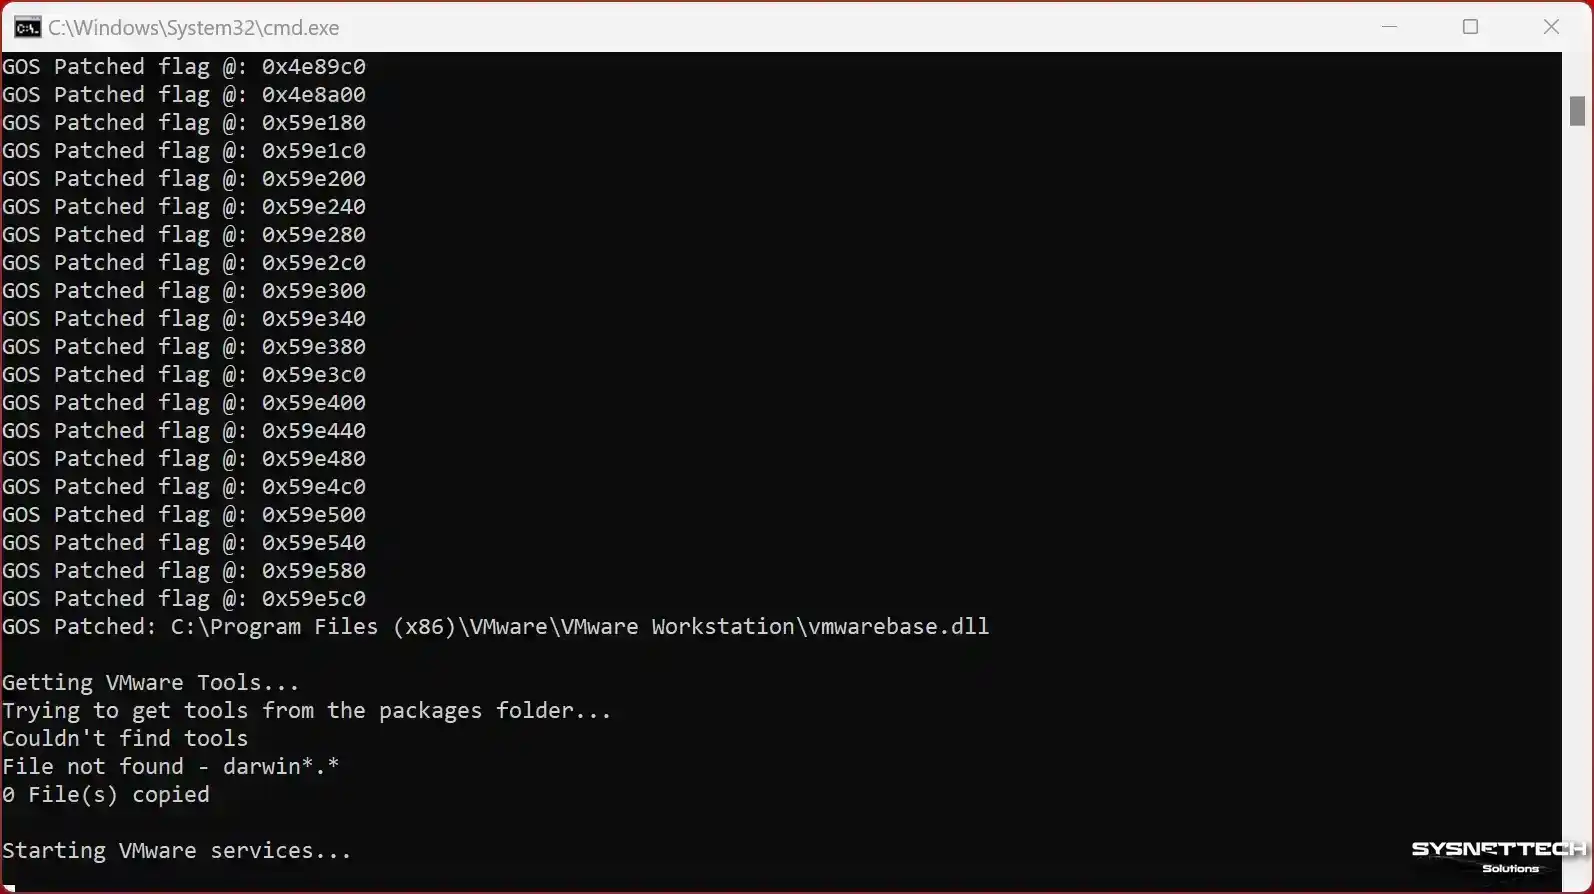
After running the Unlocker tool, some files of the VMware program will be automatically organized and backed up. In addition, VMware Tools (Darwin.iso) will start to download, allowing you to use the Apple operating system more efficiently on your host.
NOTE: If you are having trouble getting VMware Tools, you can find safe download links and fix steps in this article.
Step 7
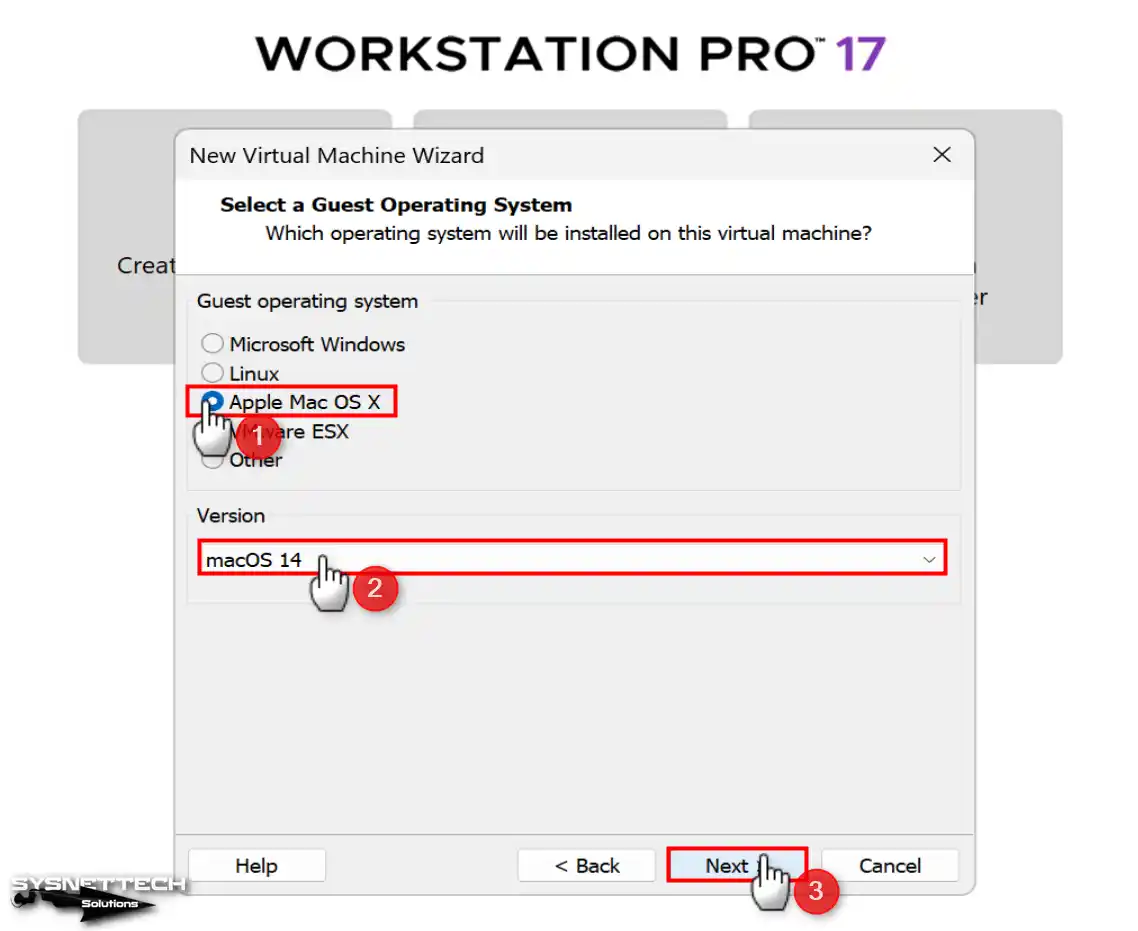
After unlocking macOS, you can see that Apple Mac OS X support is enabled, this time in the guest operating system selection window.
After selecting the Apple Mac OS X platform, select macOS 14 from the Version section and click Next.
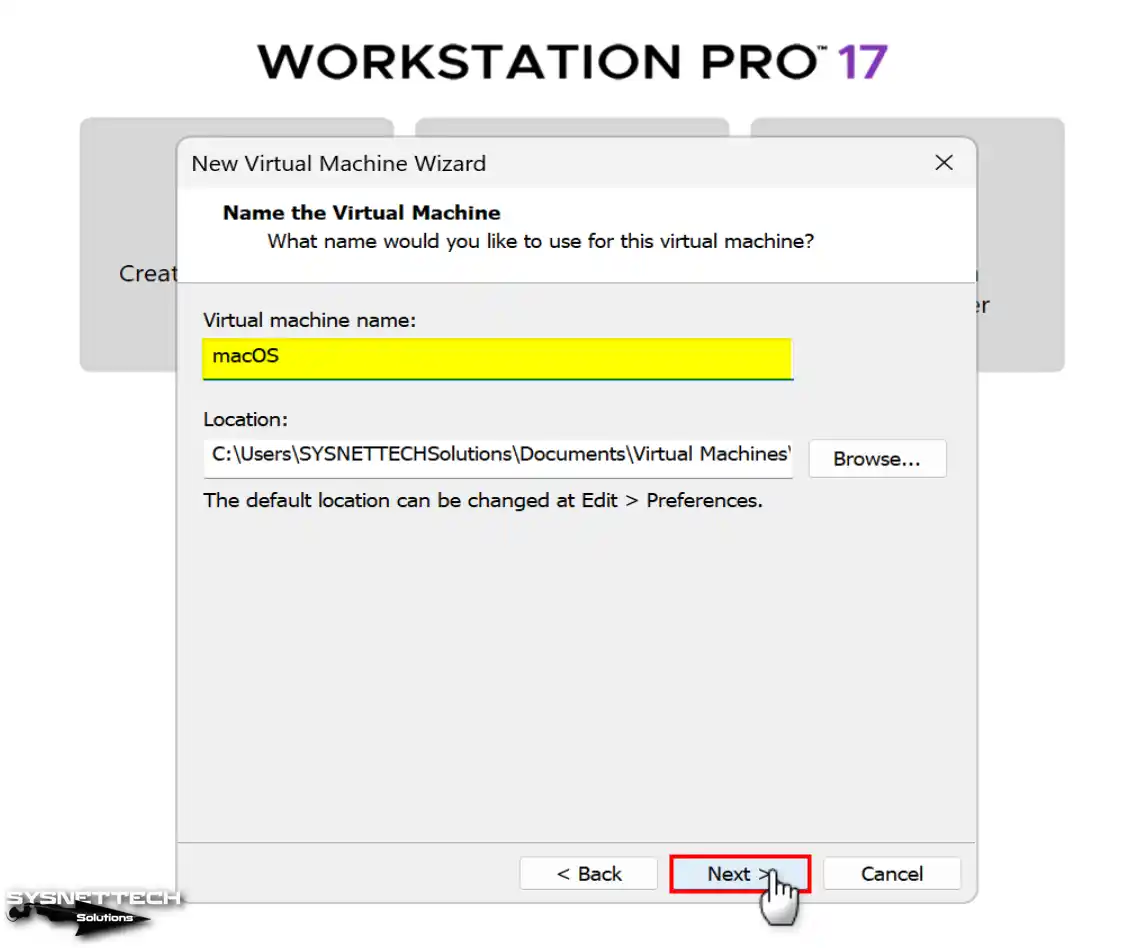
Step 8
Type the name of the system you will install on the virtual machine. Suppose you want to change the installation location. In that case, you can specify the site on an external disk via the Browse button.
Suppose the type of your host disk is SSD or NVMe. In that case, you can continue without changing the installation location to match the performance of the guest machine.
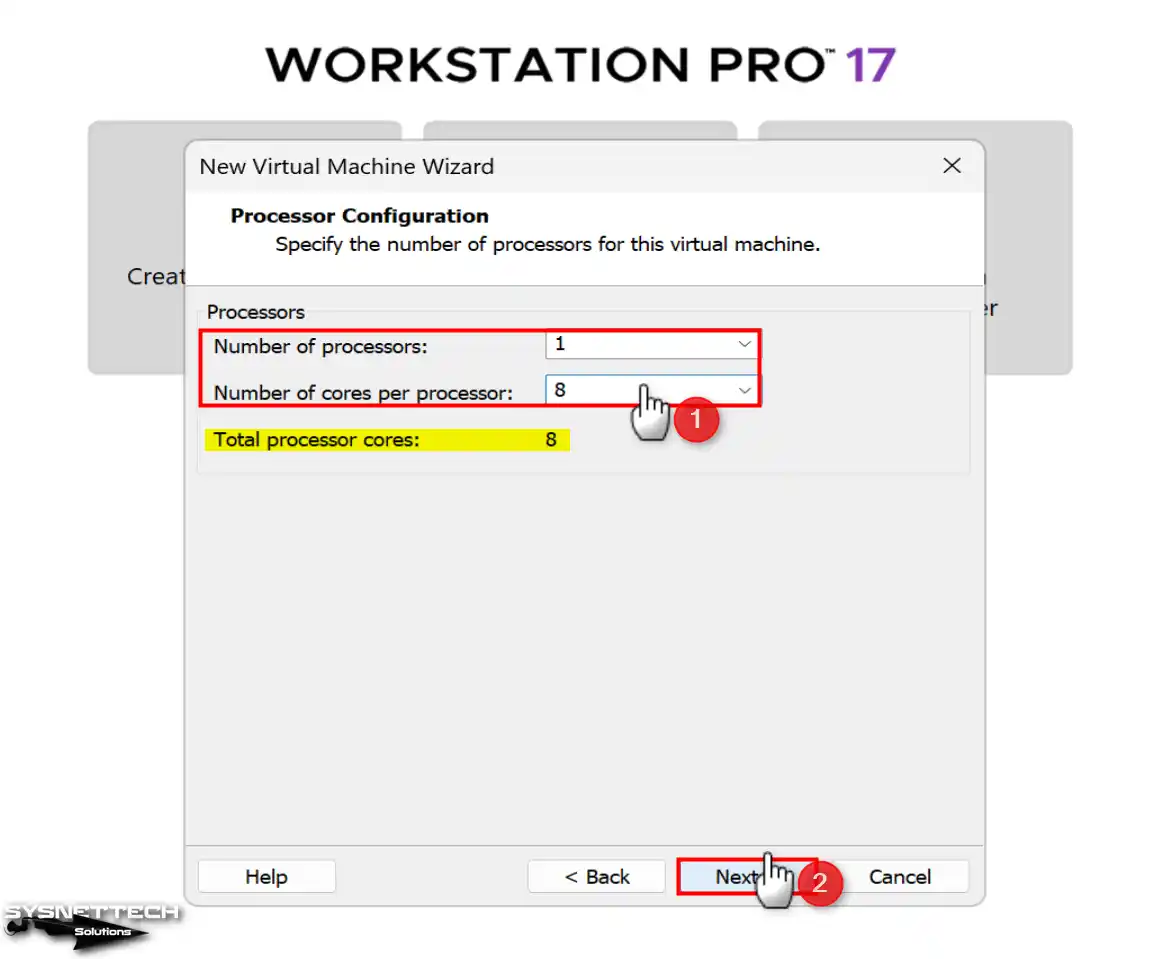
Step 9
In the Processor Configuration window, you can increase the number of virtual processor cores by the hardware performance of your host computer. Increasing the number of processors can cause the virtual system not to work stable, so you need to find the most suitable value for the macOS guest operating system.
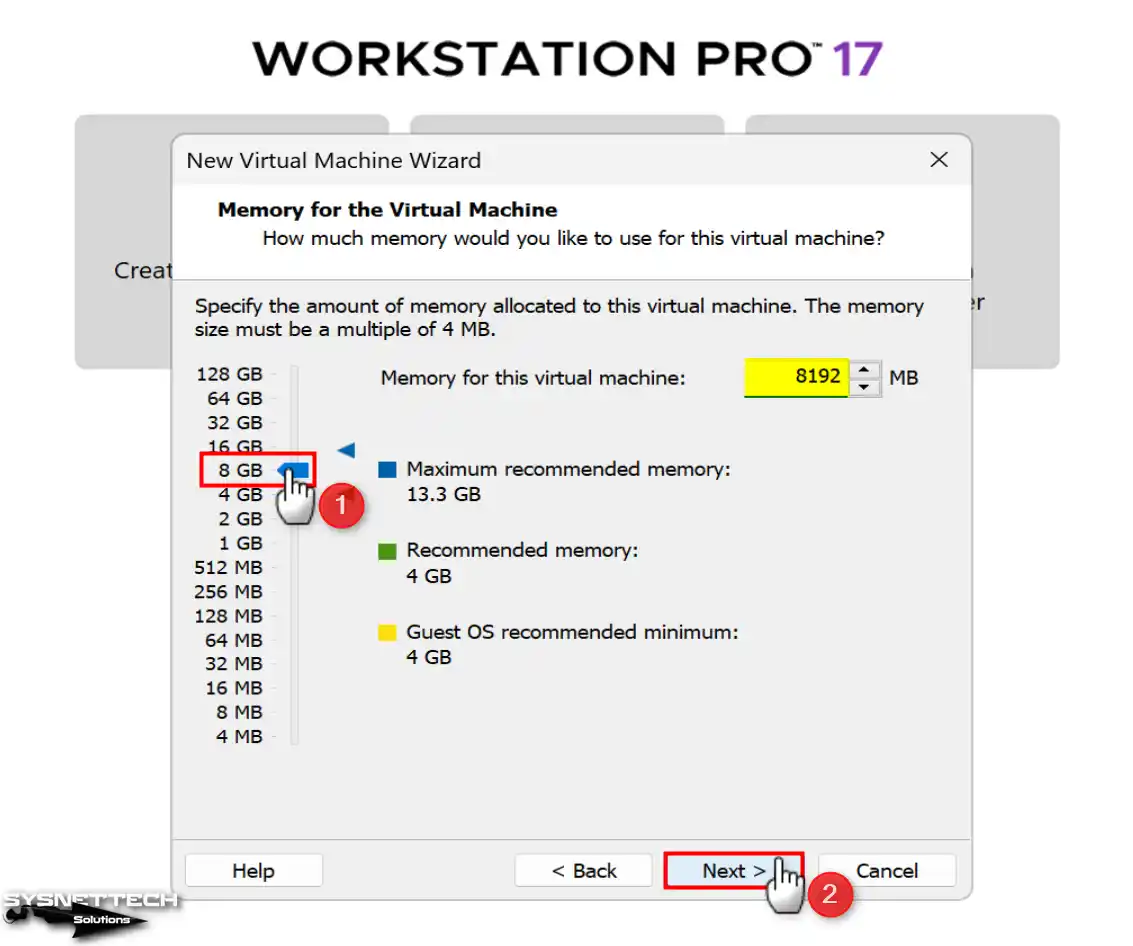
Step 10
Likewise, configure a suitable memory value for the macOS VM depending on the RAM capacity of your host computer. If your system has 16GB of RAM, you can allocate 8GB of memory to the VM.
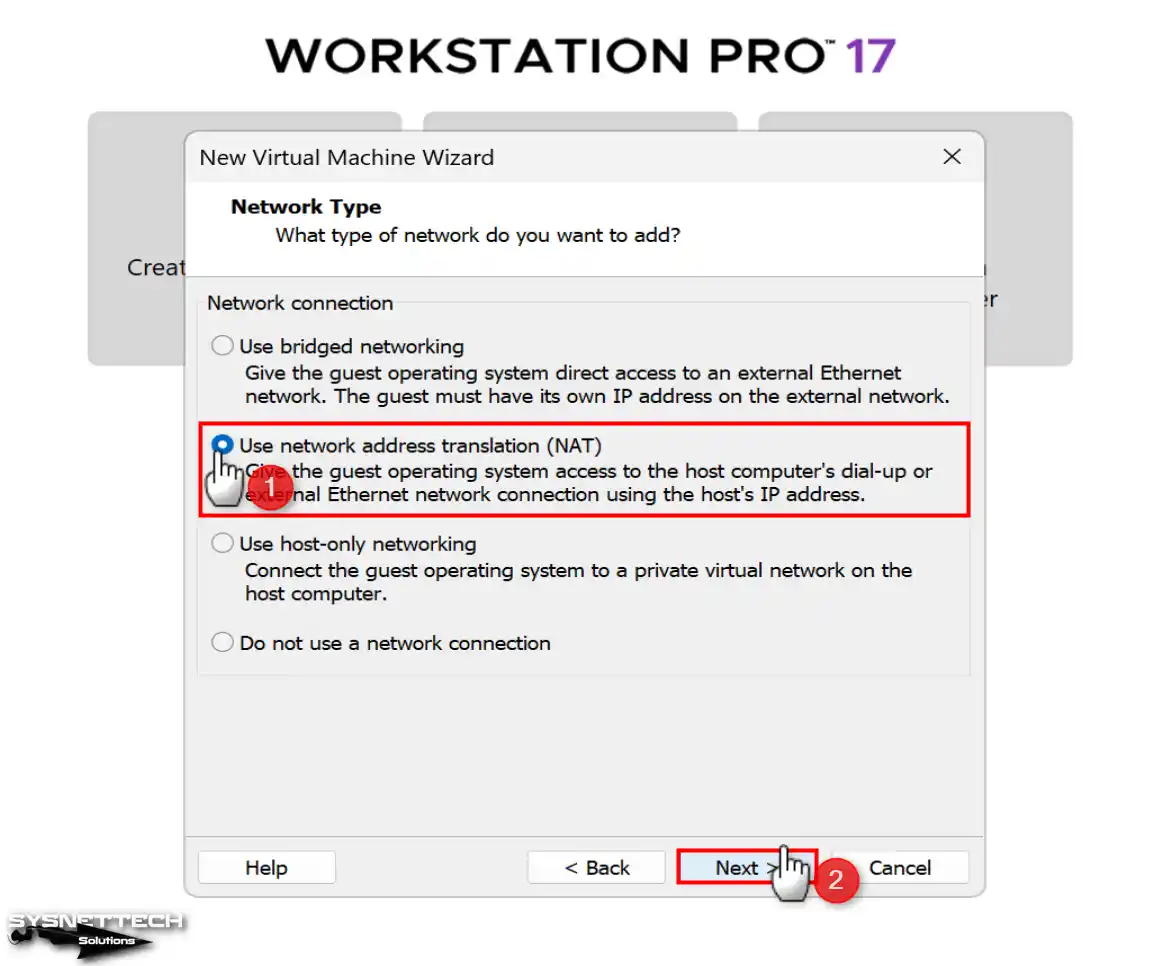
Step 11
Use NAT to connect the virtual computer to your local network in Network Type settings. If you don’t need an Internet connection in the VM, you can choose Host-Only or choose not to use any network adapters.
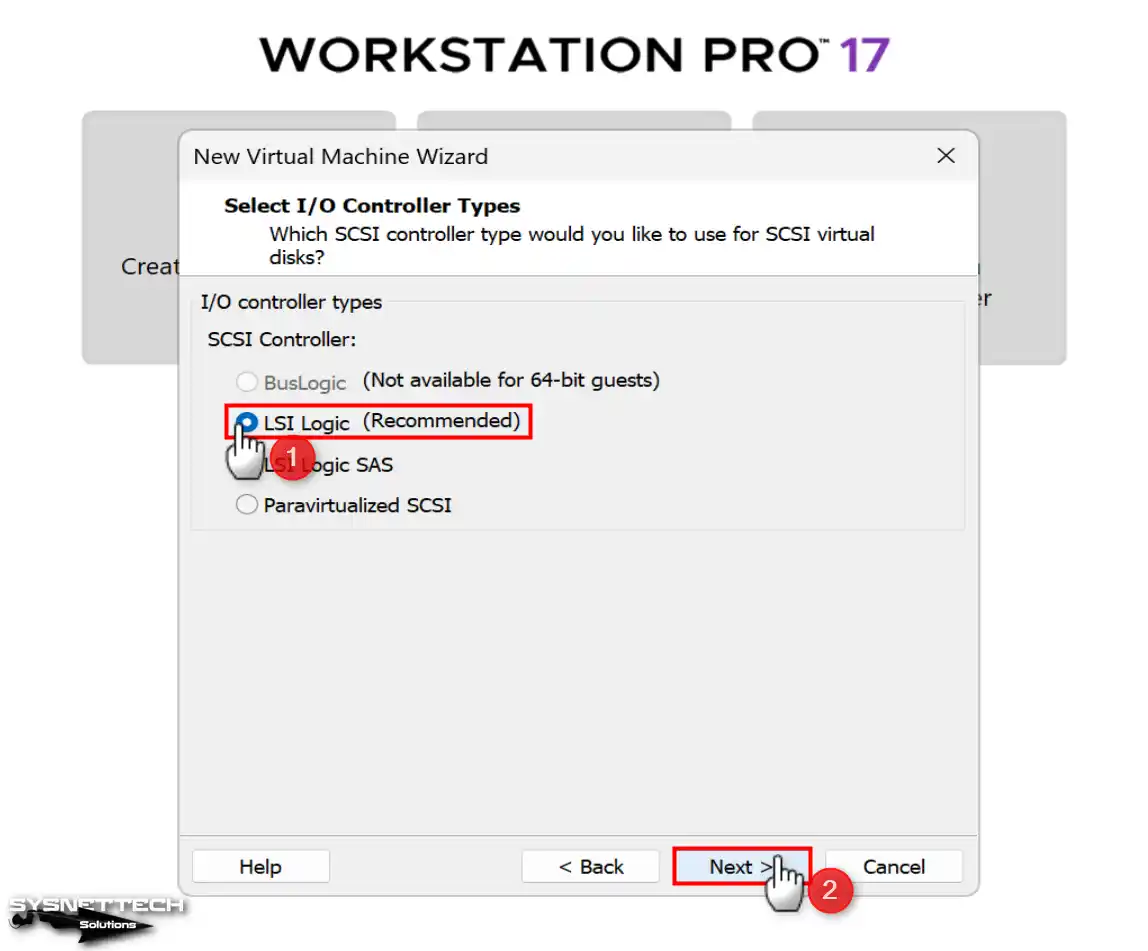
Step 12
Proceed with LSI Logic, which is recommended and selected by default in the I/O Controller types window.
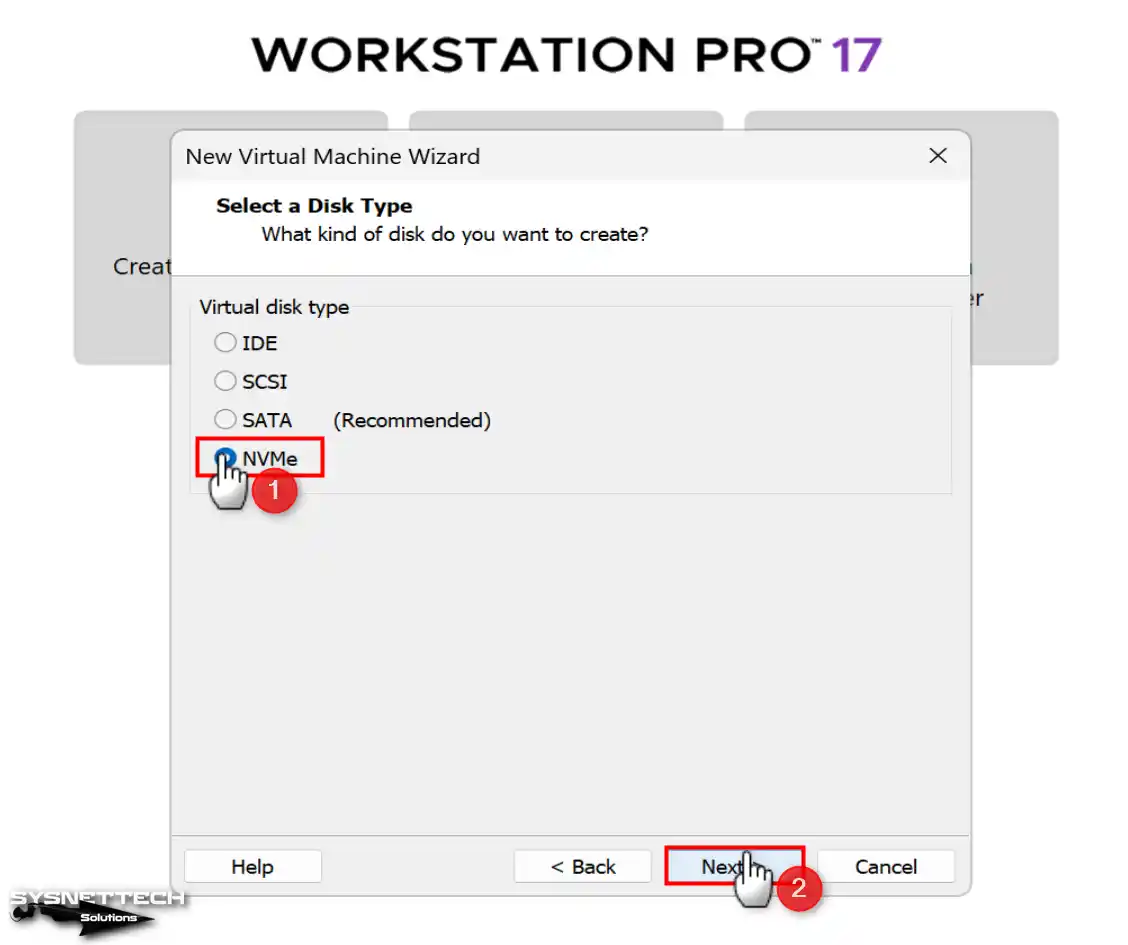
Step 13
In the Disk Types window, you can select the virtual PC’s disk as IDE, SCSI, SATA, or NVMe, but you need to find out if the system you will install has support.
Since macOS Sonoma is an up-to-date operating system and supports new technologies, you can significantly increase the virtual machine’s performance by choosing the NVMe disk type.
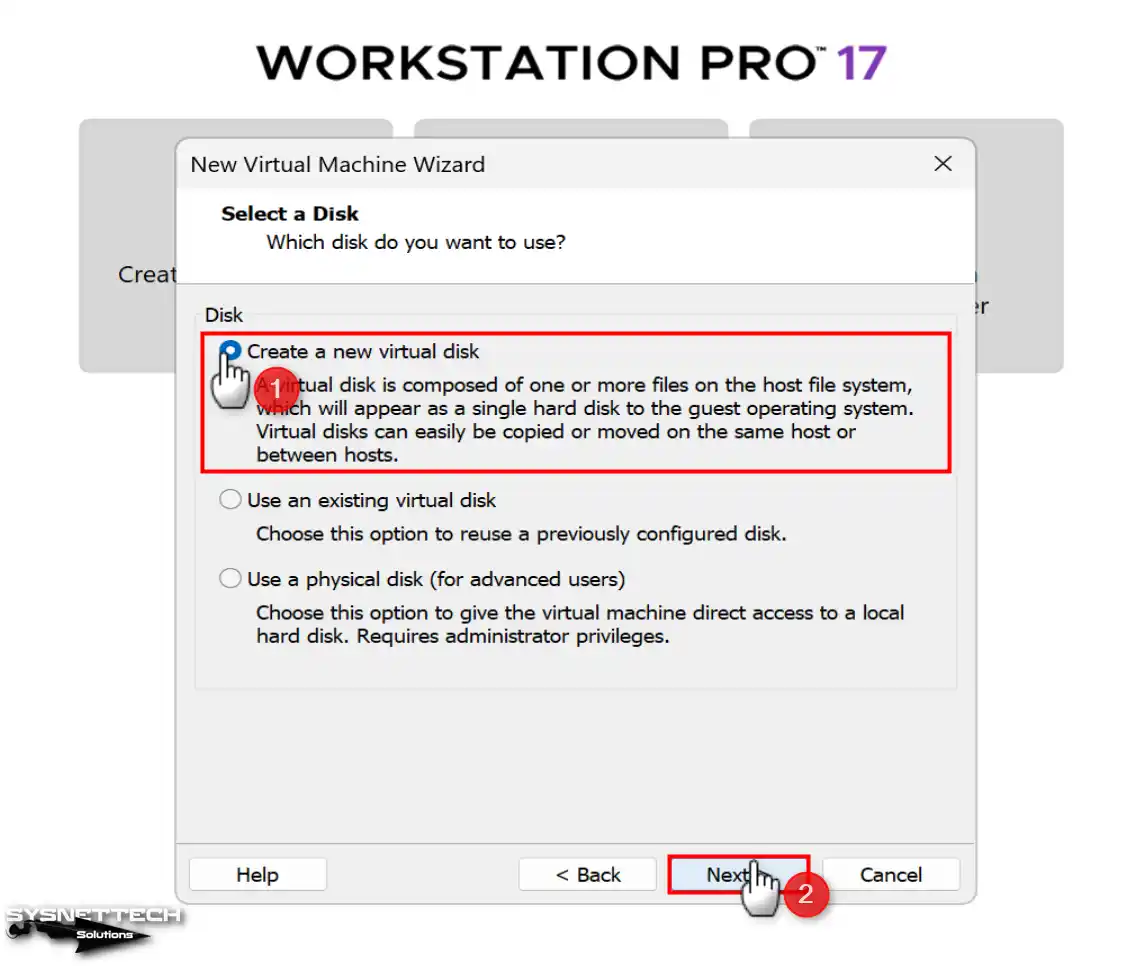
Step 14
In the Select a Disk window, you can create a new virtual HDD for the virtual computer, add an existing disk file, or mount your physical disk directly to the VM.
Select Create a new virtual disk for a clean macOS installation and click Next.
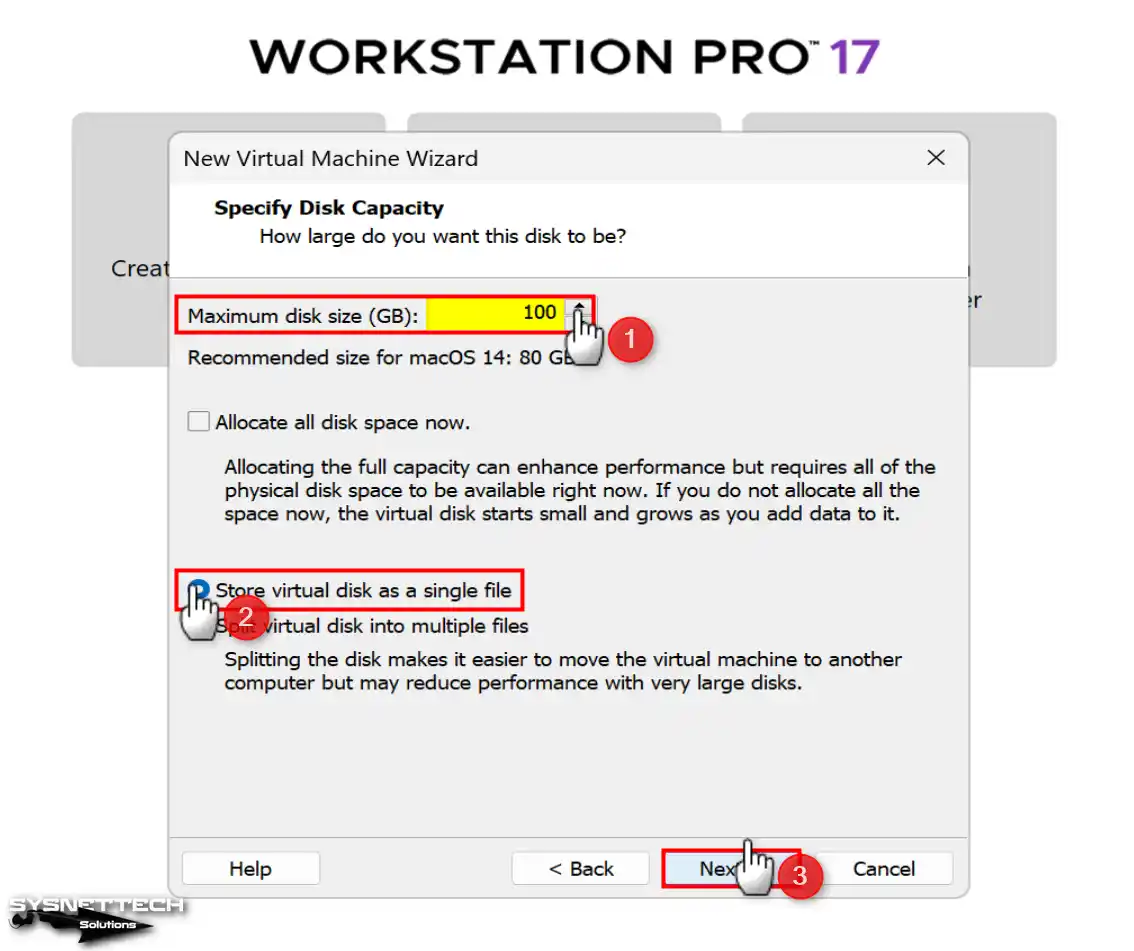
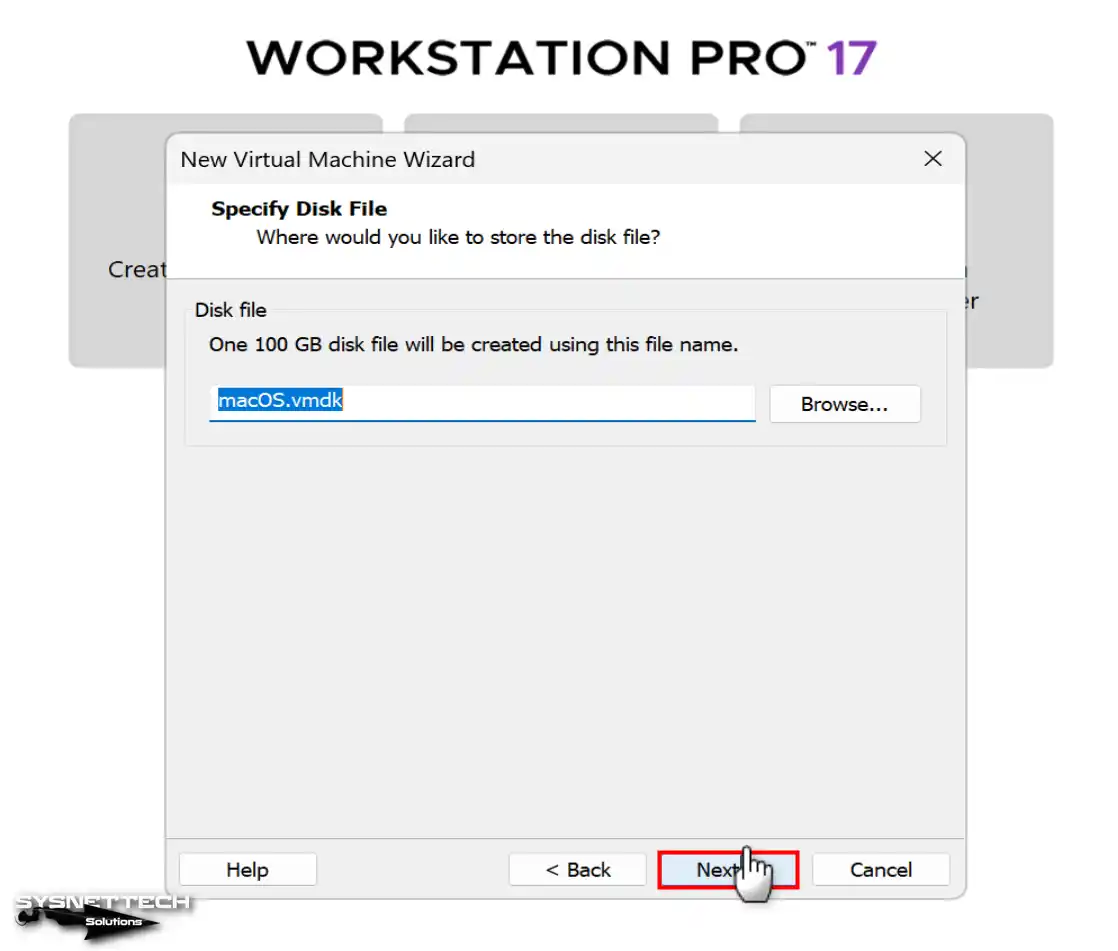
Step 15
In the Specify Disk Capacity window, modify the virtual disk size for Sonoma to 100 GB and select to back up the virtual disk as a single file on your host.
If you use an old mechanical disk type on your computer, you can allocate 100 GB of disk space for the VM from your host disk with the Allocate all disk space now option. If you continue without selecting this option, the required length will be automatically allocated from your host disk if the virtual machine needs disk space.
Step 16
Suppose you want to back up the virtual disk file to a location other than the virtual machine configuration files. In that case, you can select the relevant location in this window. When you install more than one virtual machine on your computer, do not change the location of the disk file, as virtual disk files in different areas may confuse you.
Step 17
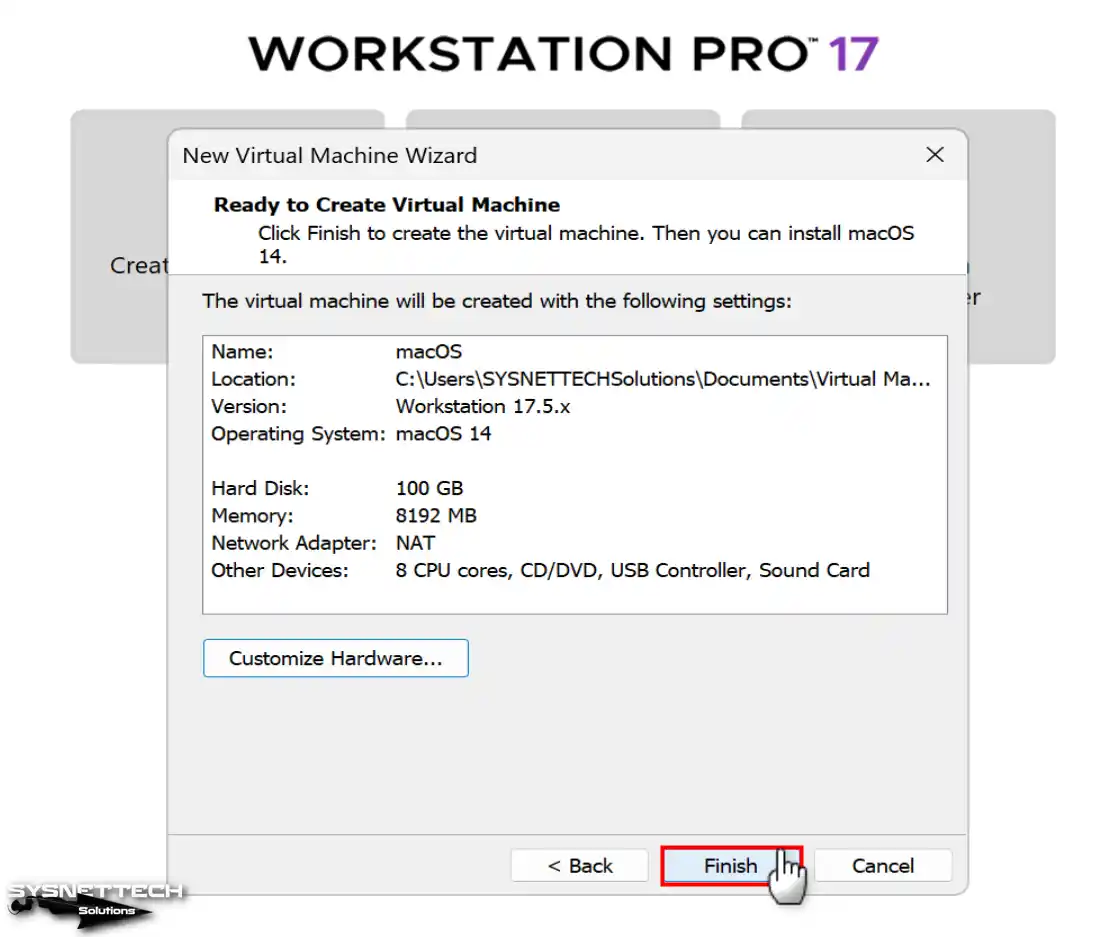
When the system is ready to create the virtual computer, you will see a summary window like the one below. After checking all the settings you have made for the VM in the summary window, click the Customize Hardware button.
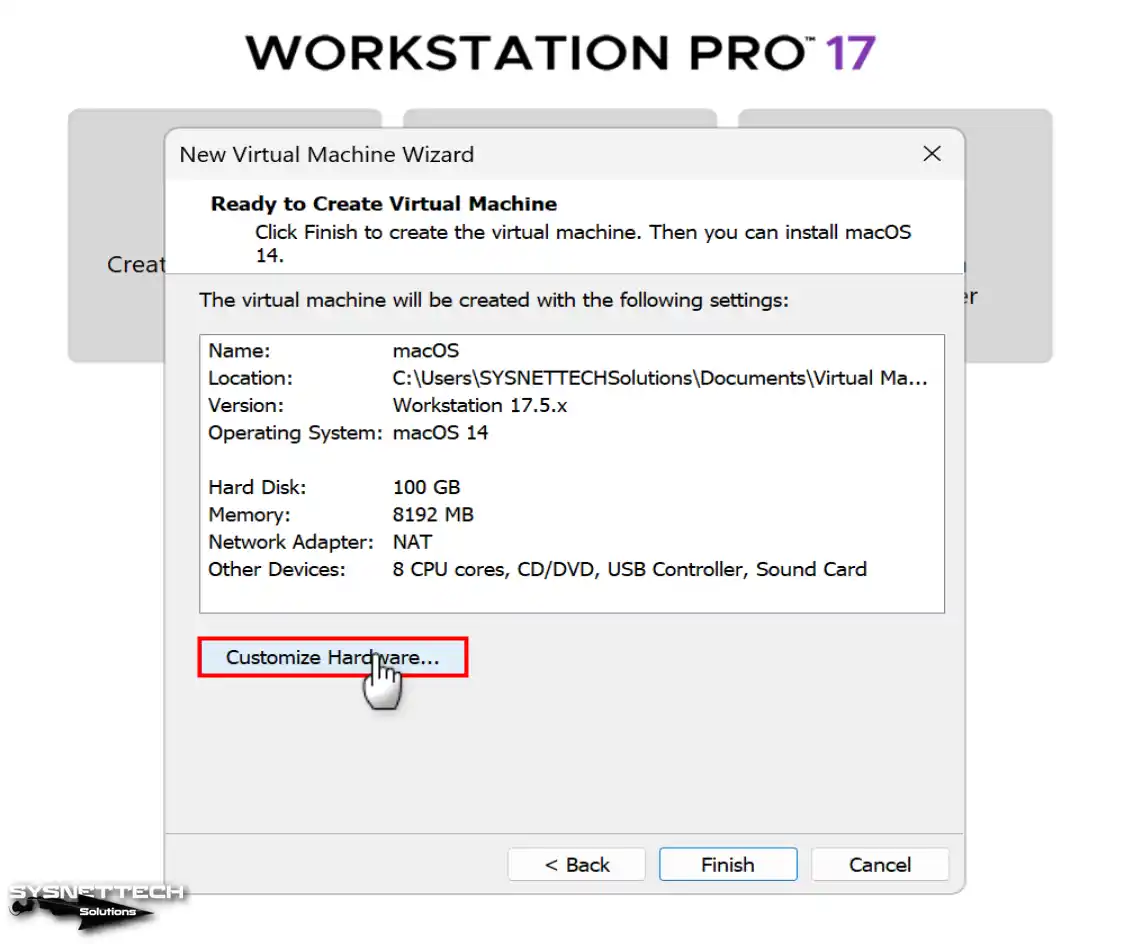
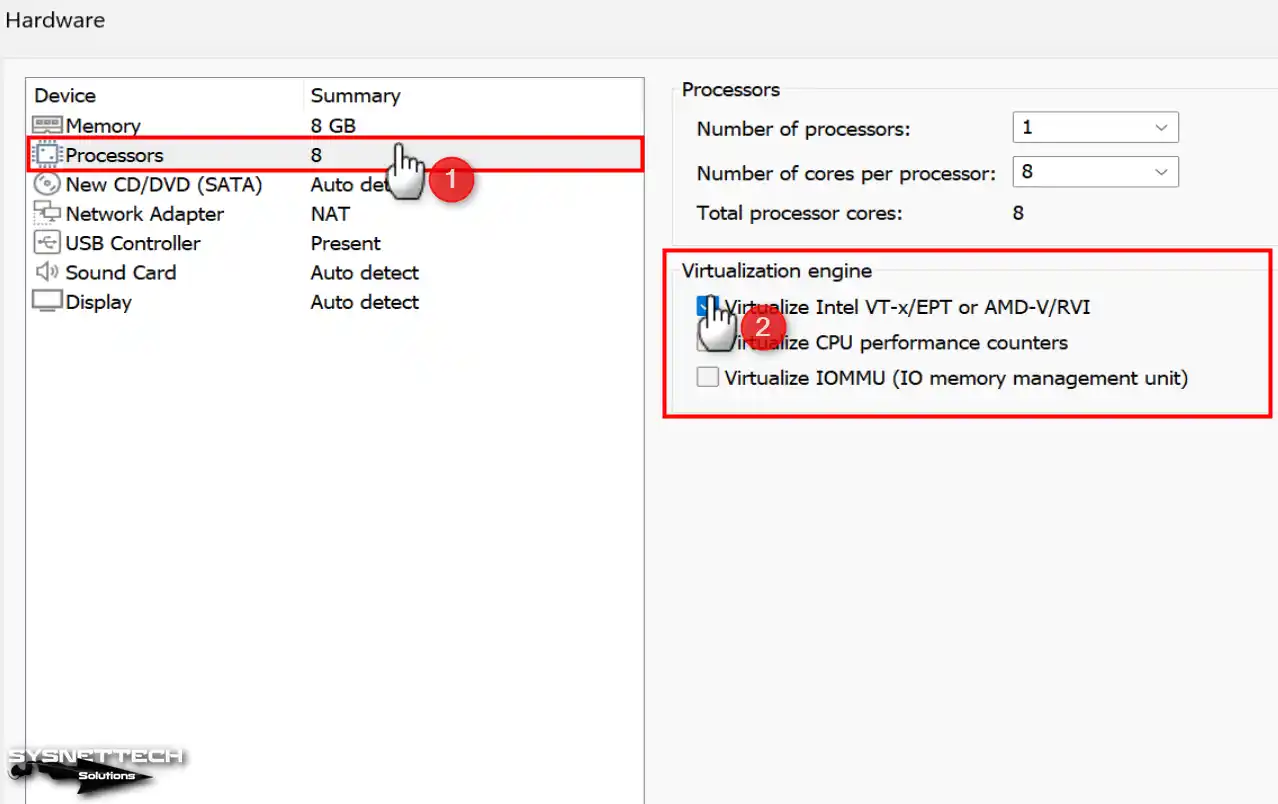
Step 18
View the processor settings of your macOS virtual system and enable the “Virtualize Intel VT-x or AMD-V/RVI” option from the Virtualization Engine section.
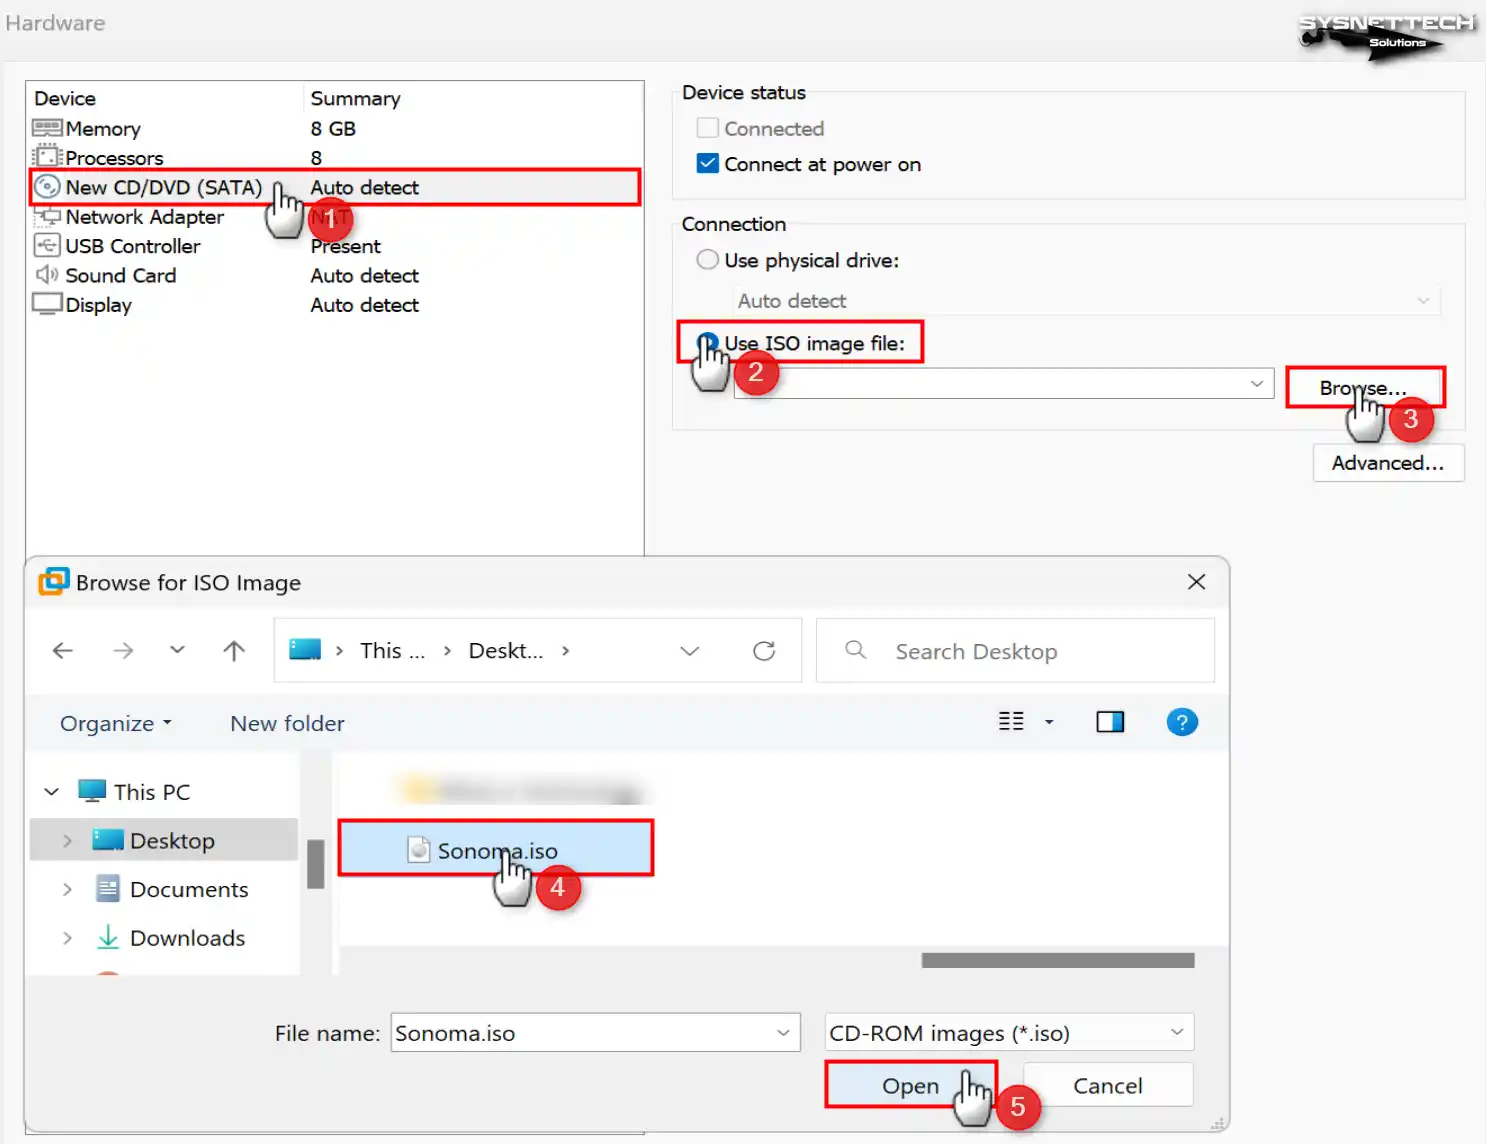
Step 19
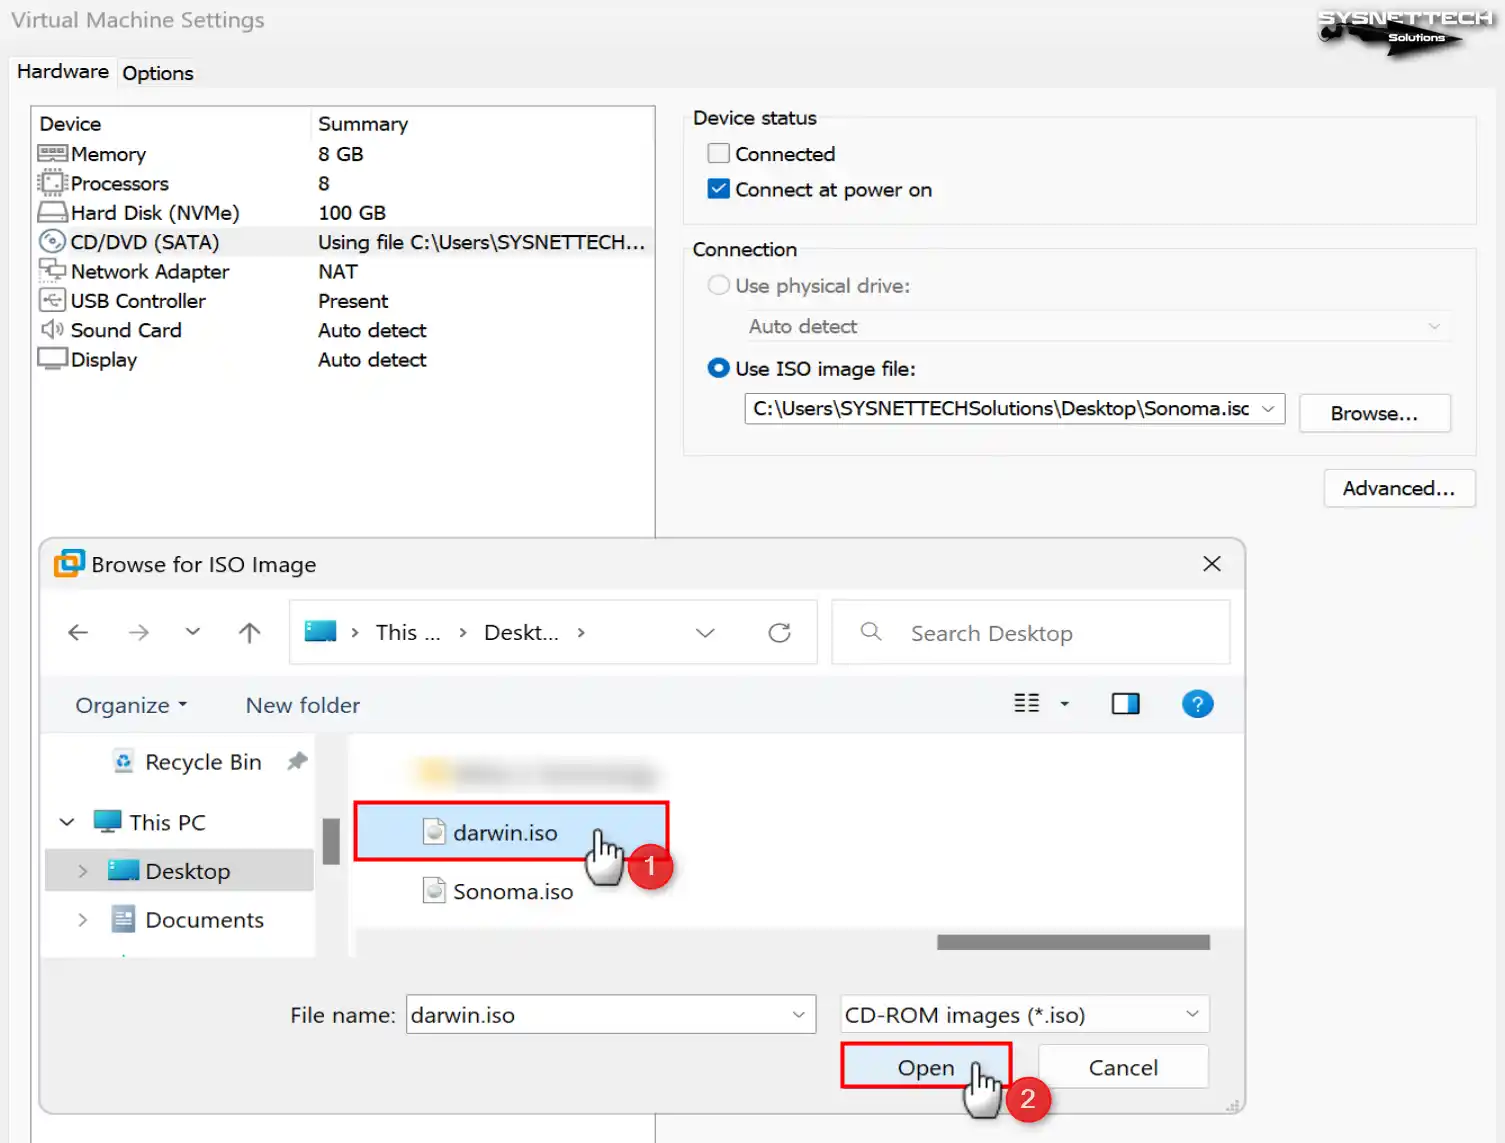
To add the macOS Sonoma ISO file to the guest system you created, select the Use ISO Image File option in the hardware settings window on the CD/DVD (SATA) device and click Browse.
Select the macOS 14 ISO file you downloaded to your computer and click Open.
Step 20
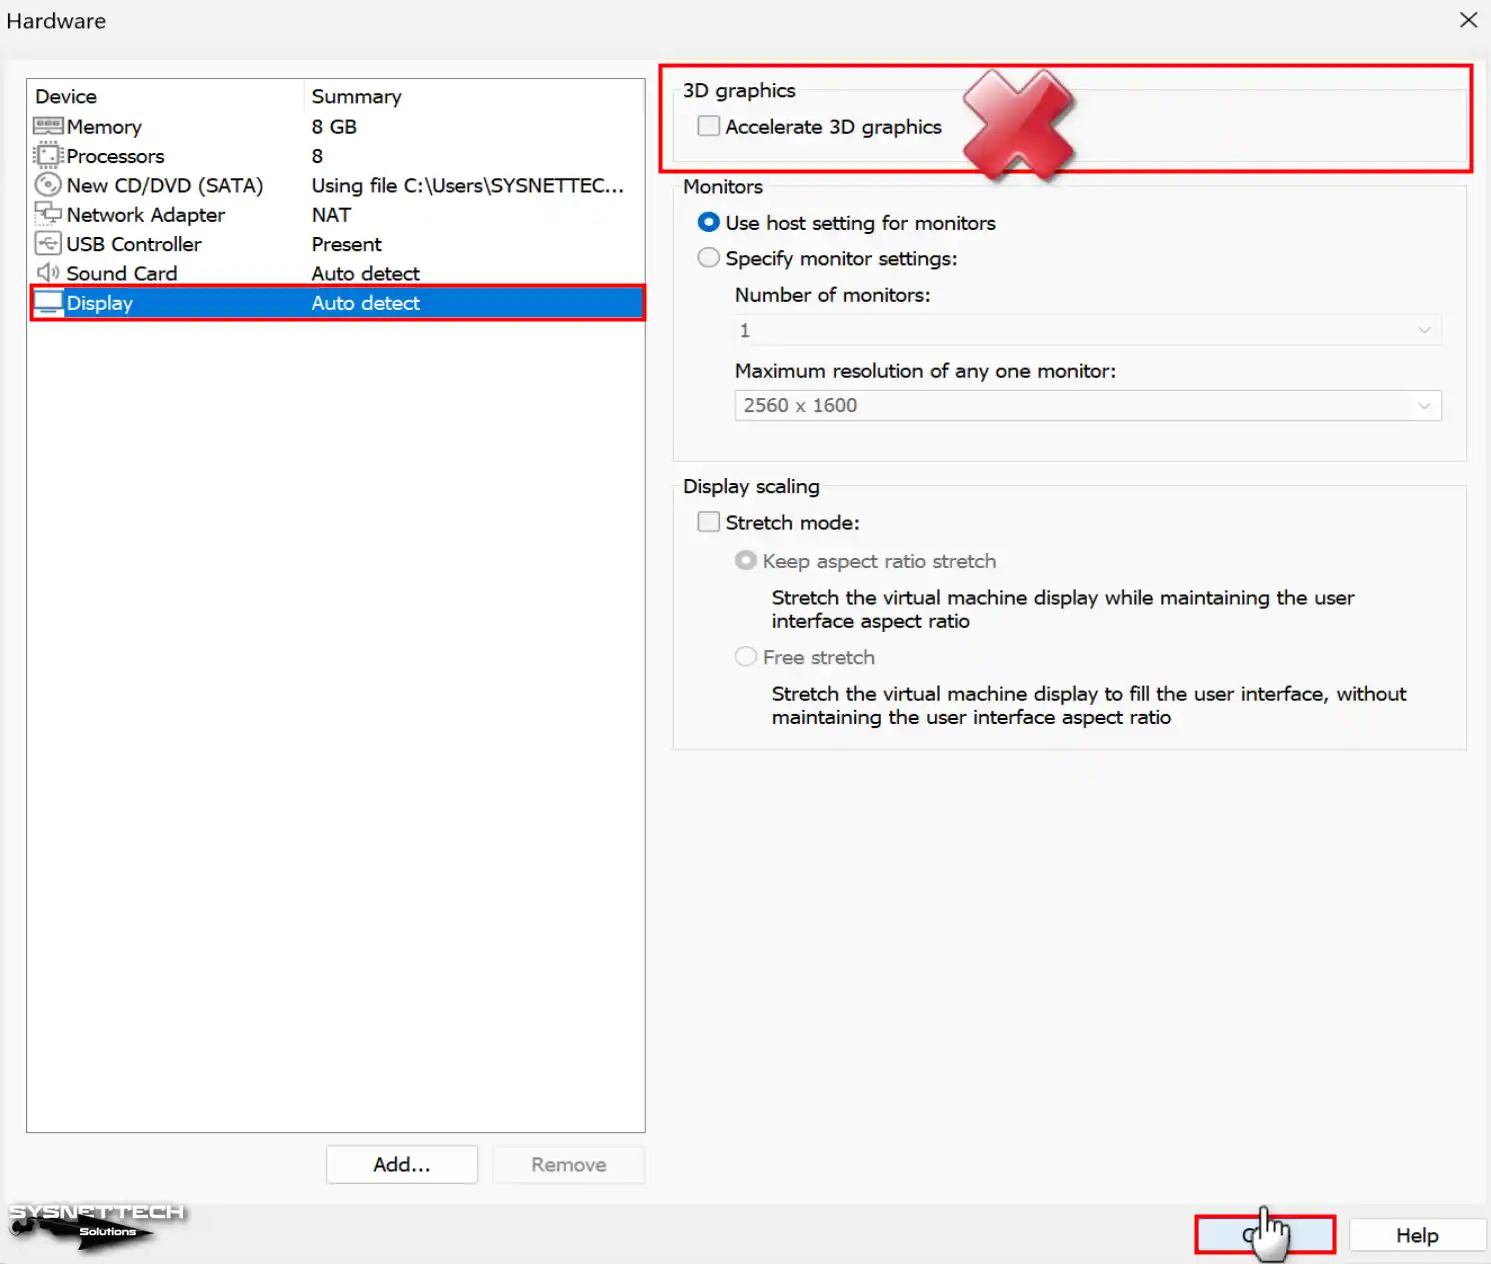
After adding the macOS image file to the guest machine, turn off the “Accelerate 3D Graphics” feature in the Display settings and close the window.
Step 21
Close the summary window of the Guest virtual PC and continue.
Step 22
Before running the Sonoma virtual machine and installing it, you need to add codes to its VMX file. Right-click on the VM you created from the Library section of Workstation Pro, and then click Open VM Directory.
Open the macOS.vmx file with Notepad and save the file after adding the following codes.
smbios.reflectHost = "TRUE"
hw.model = "MacBookPro14,3"
board-id = "Mac-551B86E5744E2388"
smc.version = "0"
If you have an AMD processor host, add the bottom codes to the VMX file and save it.
smc.version = "0"
cpuid.0.eax = "0000:0000:0000:0000:0000:0000:0000:1011"
cpuid.0.ebx = "0111:0101:0110:1110:0110:0101:0100:0111"
cpuid.0.ecx = "0110:1100:0110:0101:0111:0100:0110:1110"
cpuid.0.edx = "0100:1001:0110:0101:0110:1110:0110:1001"
cpuid.1.eax = "0000:0000:0000:0001:0000:0110:0111:0001"
cpuid.1.ebx = "0000:0010:0000:0001:0000:1000:0000:0000"
cpuid.1.ecx = "1000:0010:1001:1000:0010:0010:0000:0011"
cpuid.1.edx = "0000:0111:1000:1011:1111:1011:1111:1111"
smbios.reflectHost = "TRUE"
hw.model = "MacBookPro14,3"
board-id = "Mac-551B86E5744E2388"
Step 23
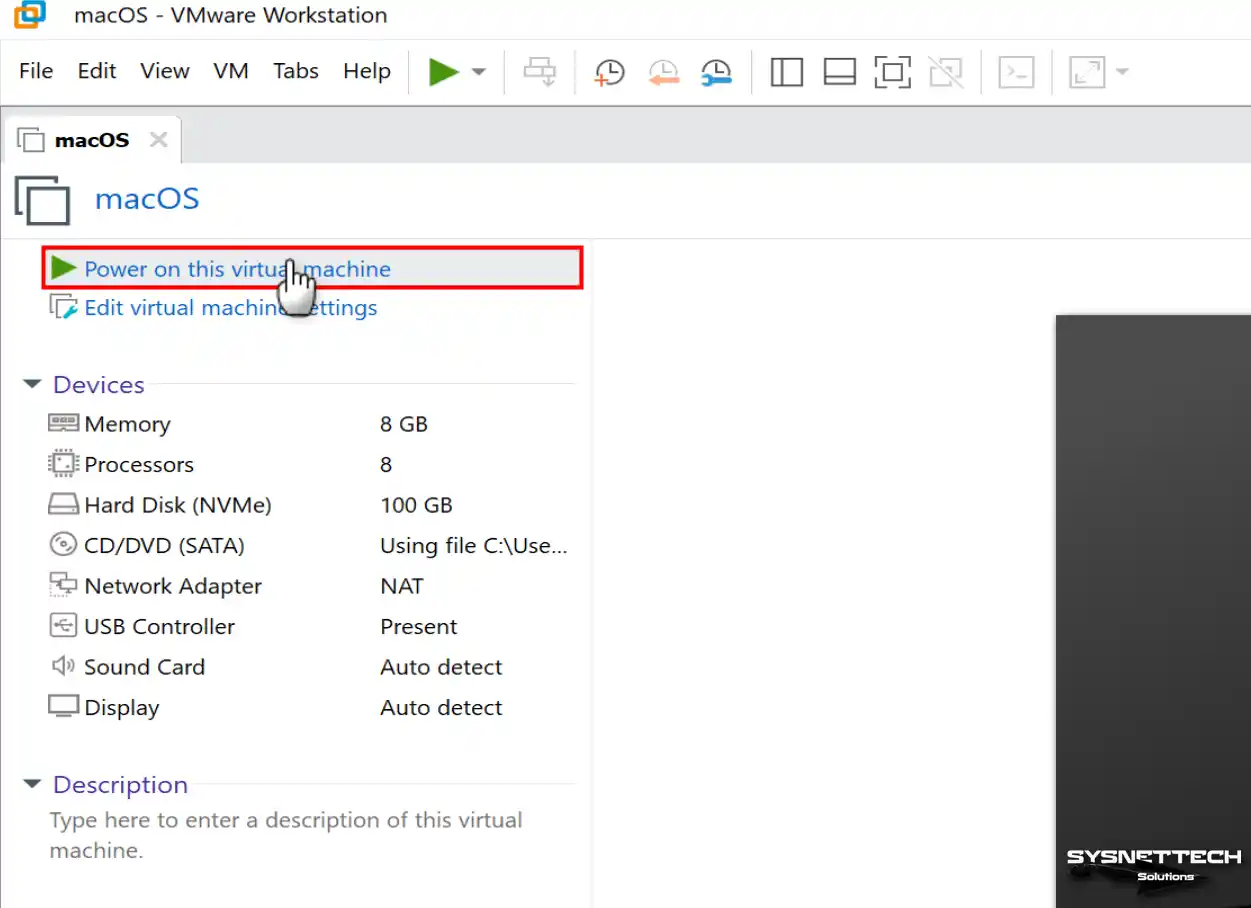
After adding the necessary codes to the macOS.vmx file, save the file and run the virtual computer.
How to Install macOS Sonoma using VMware
After creating a new virtual machine for macOS with VMware up to this stage, you can start the system setup.
Step 1
After running the macOS virtual computer, wait for the system to boot when you see the Apple logo.

Step 2
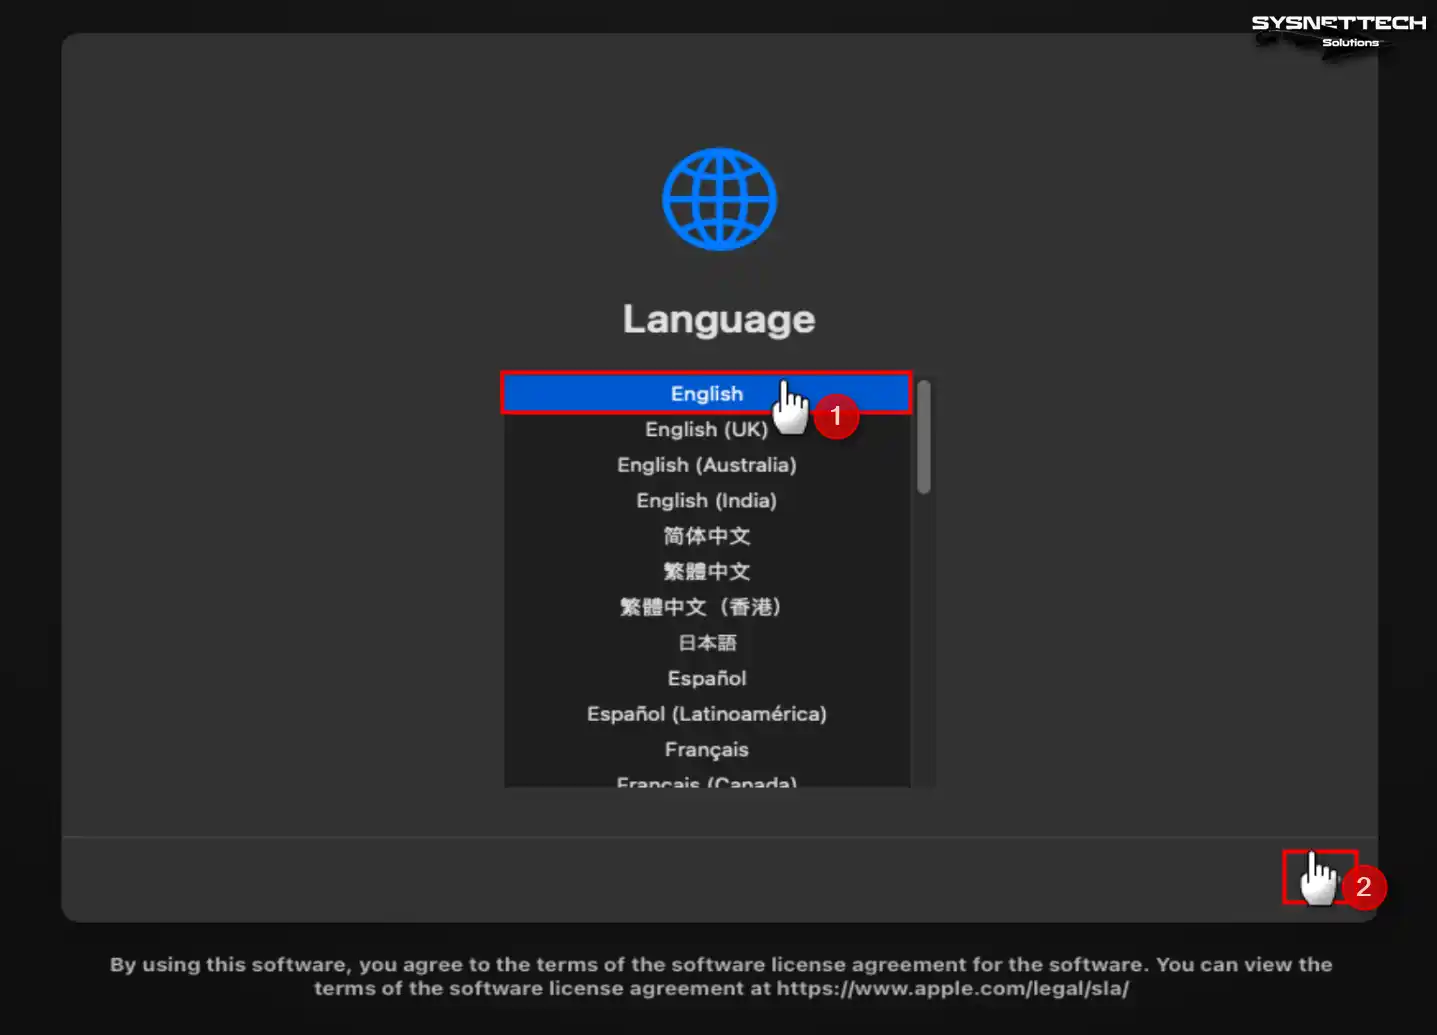
Choose which system display language you will use the macOS operating system with and continue.
Step 3
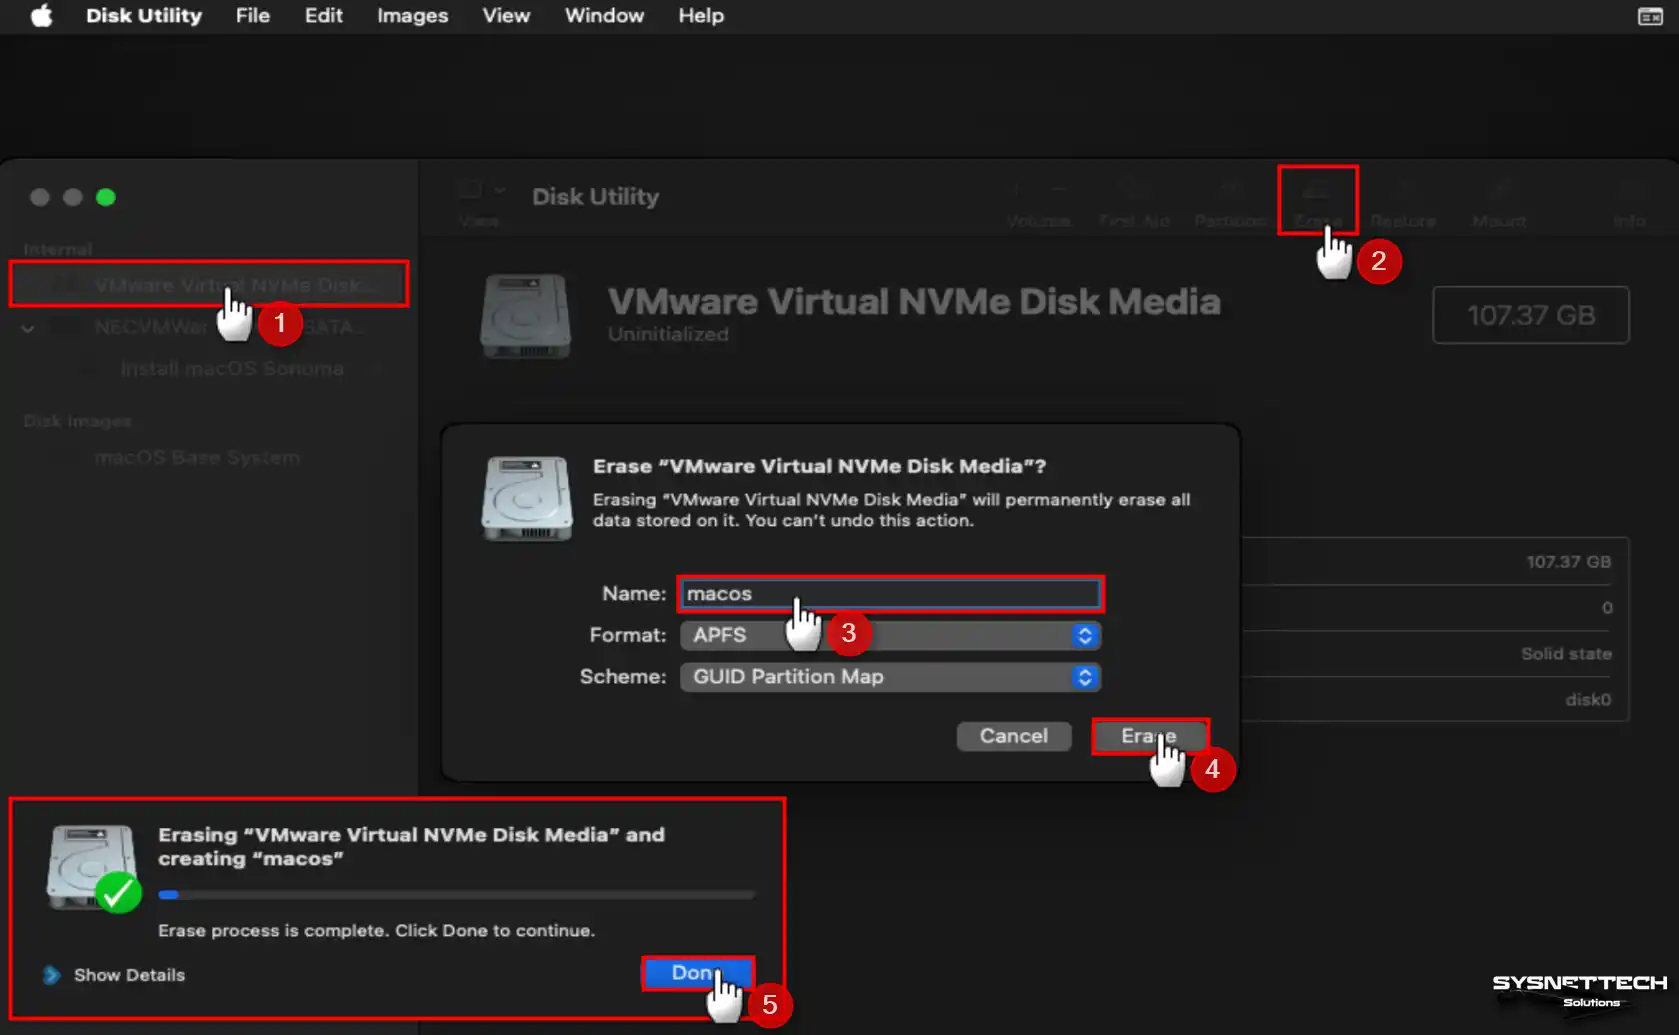
When the Recovery screen appears, open Disk Utility, as you need to format the virtual disk before installation.
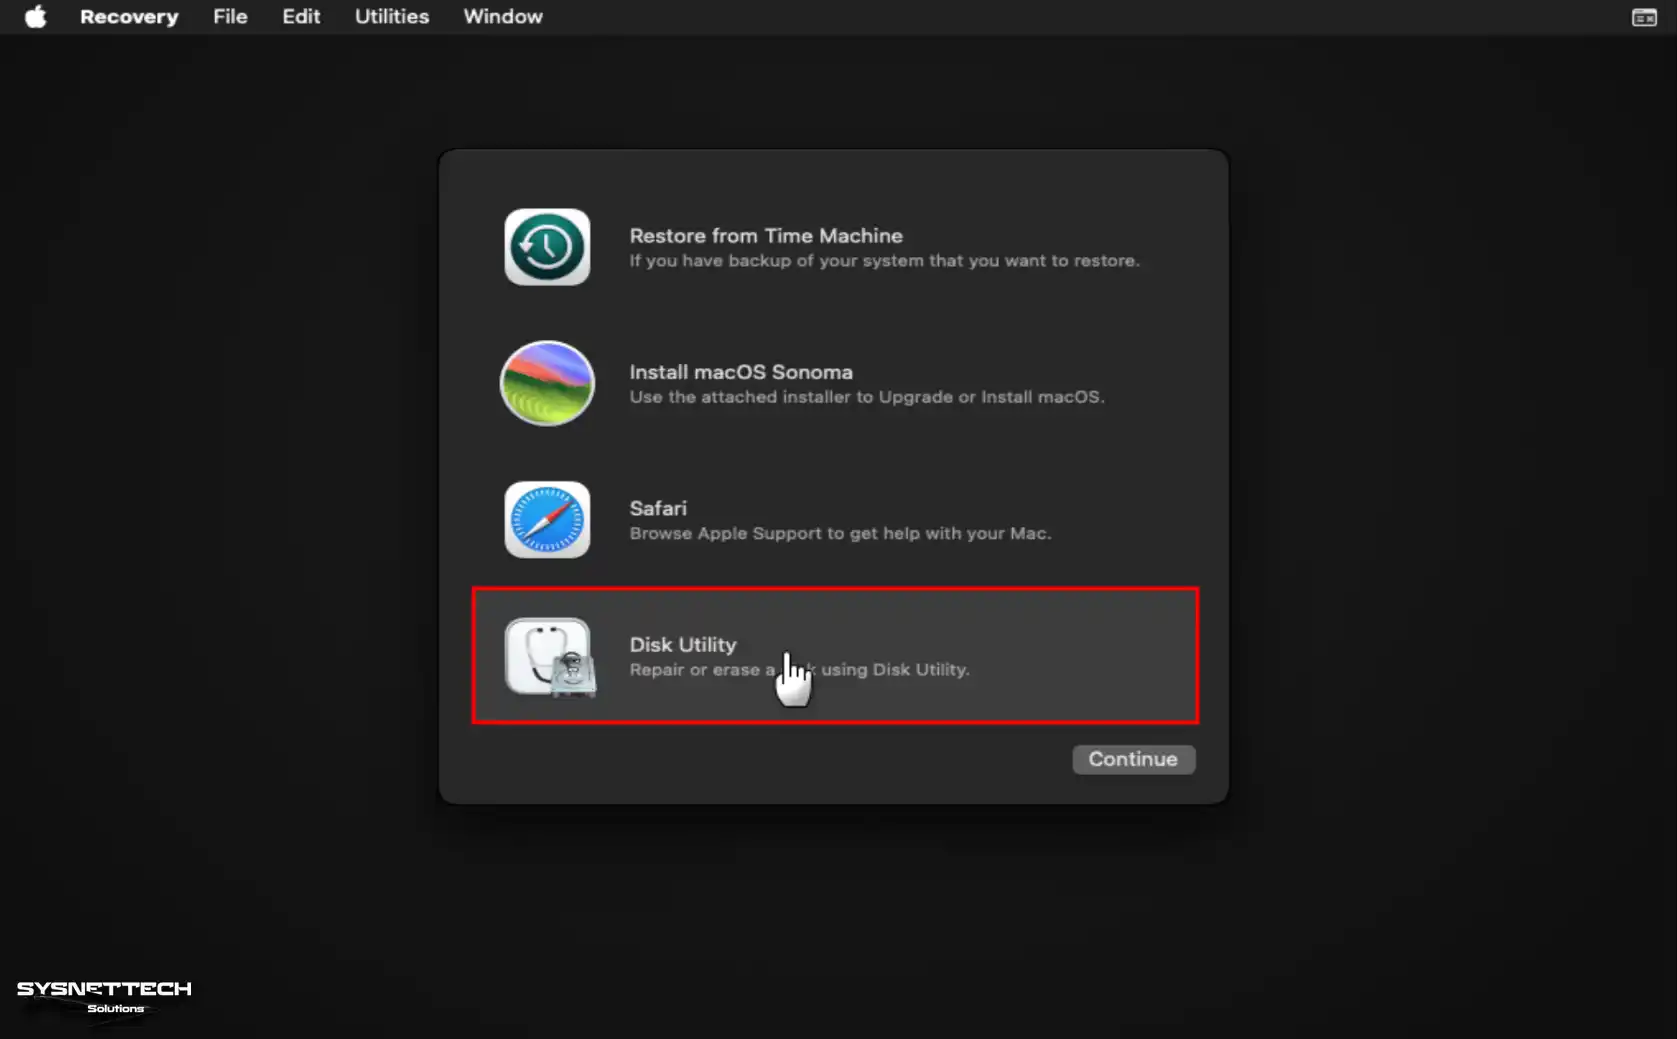
Step 4
Select VMware Virtual NVMe Disk Media on Disk Utility and click the Erase button. To format the selected disk, type any disk name in the Name field in the open window, select the APFS format, click the Erase button again, and wait for the process to complete.
- Name: macOS
- Format: APFS
- Scheme: GUID Partition Map
Step 5
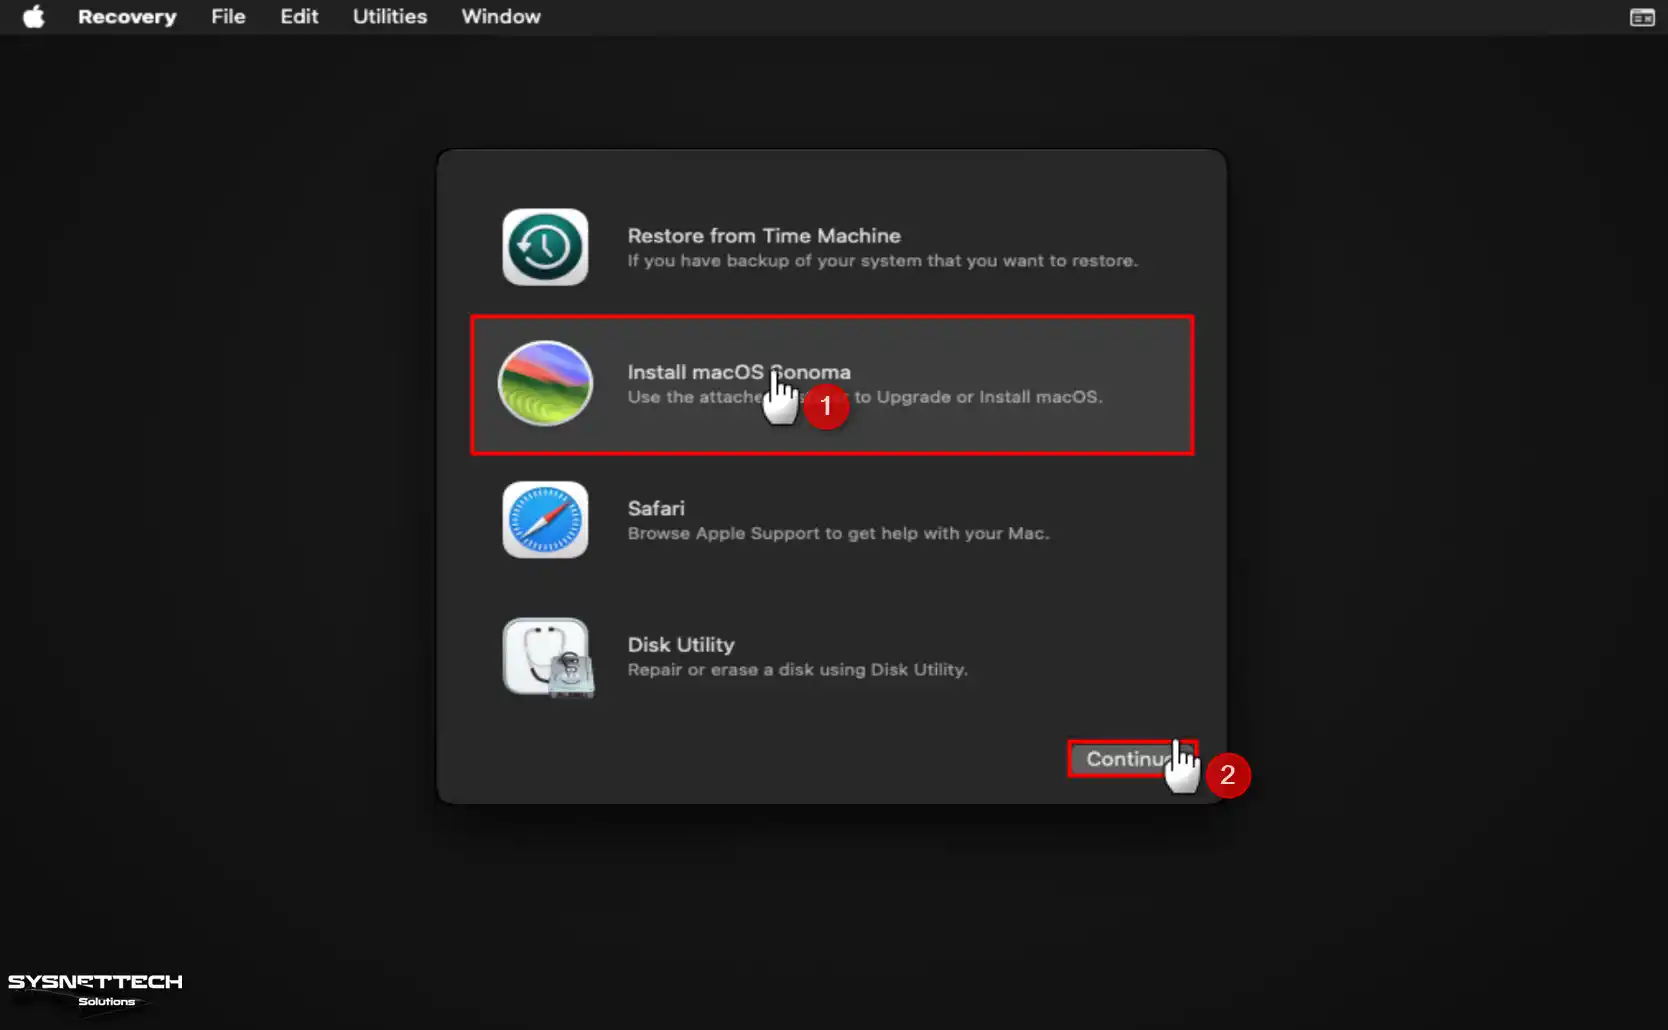
After formatting the virtual disk, select Install macOS Sonoma and click Continue to install the system.
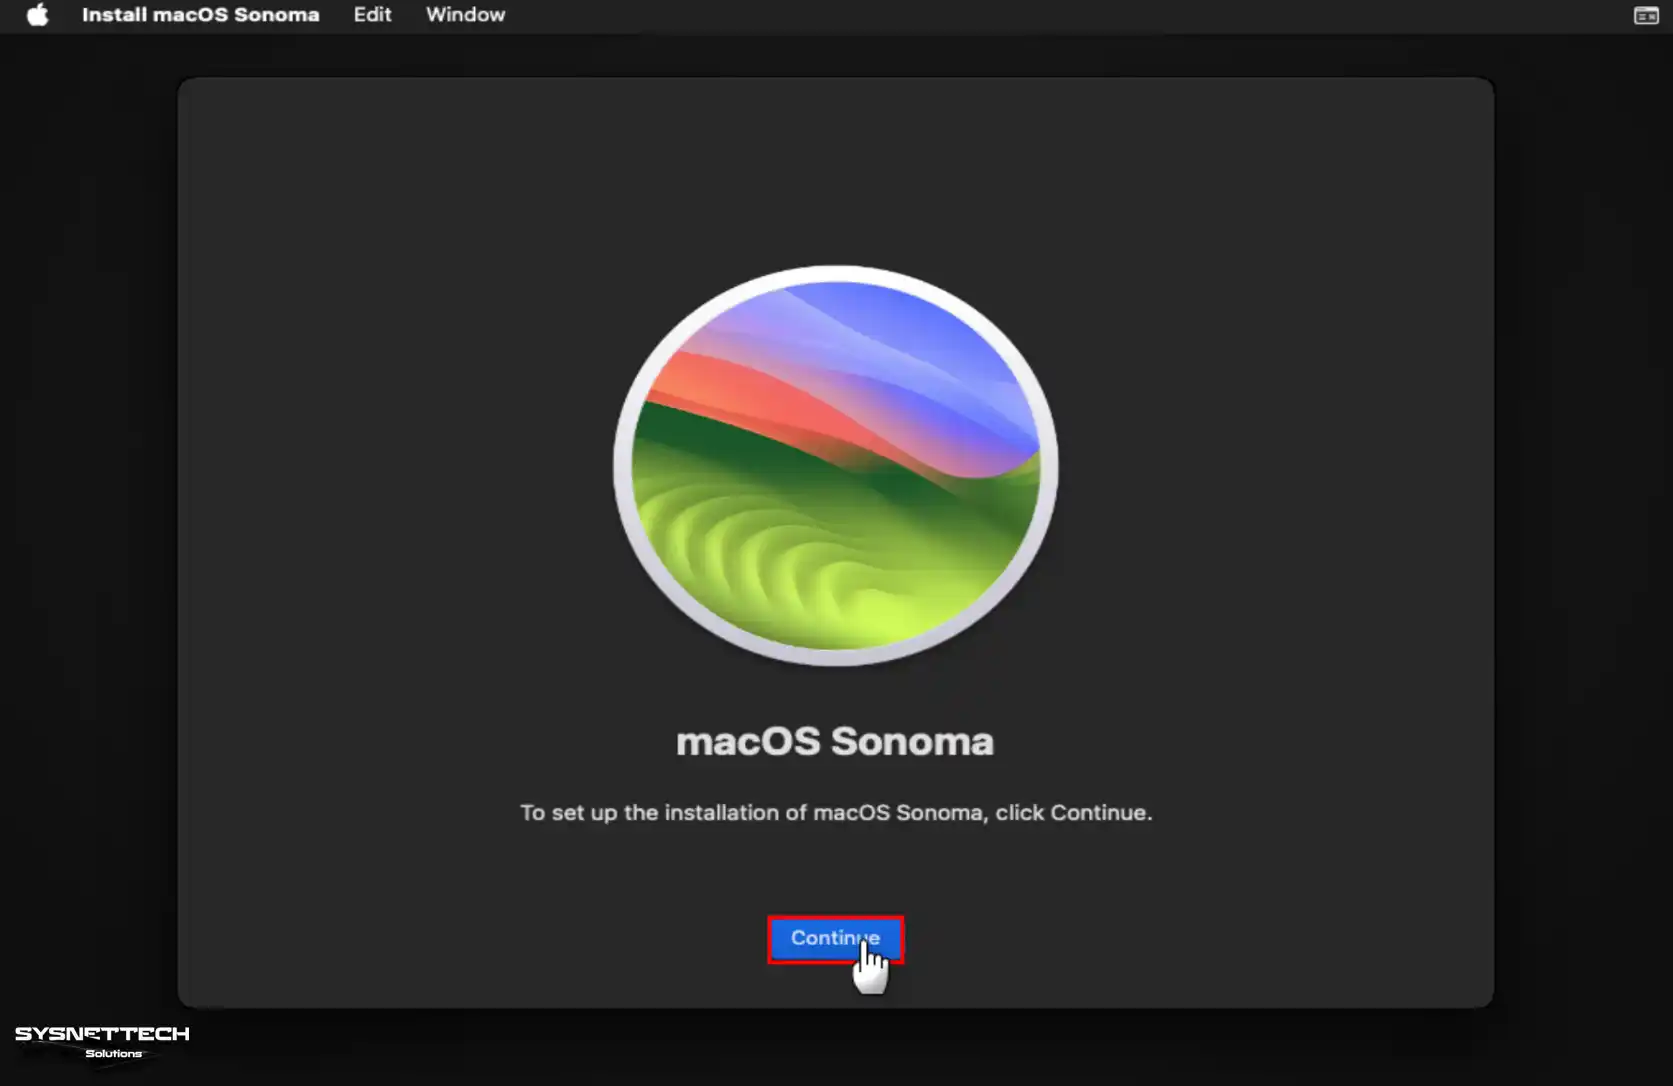
Step 6
Click Continue again to start the macOS installation.
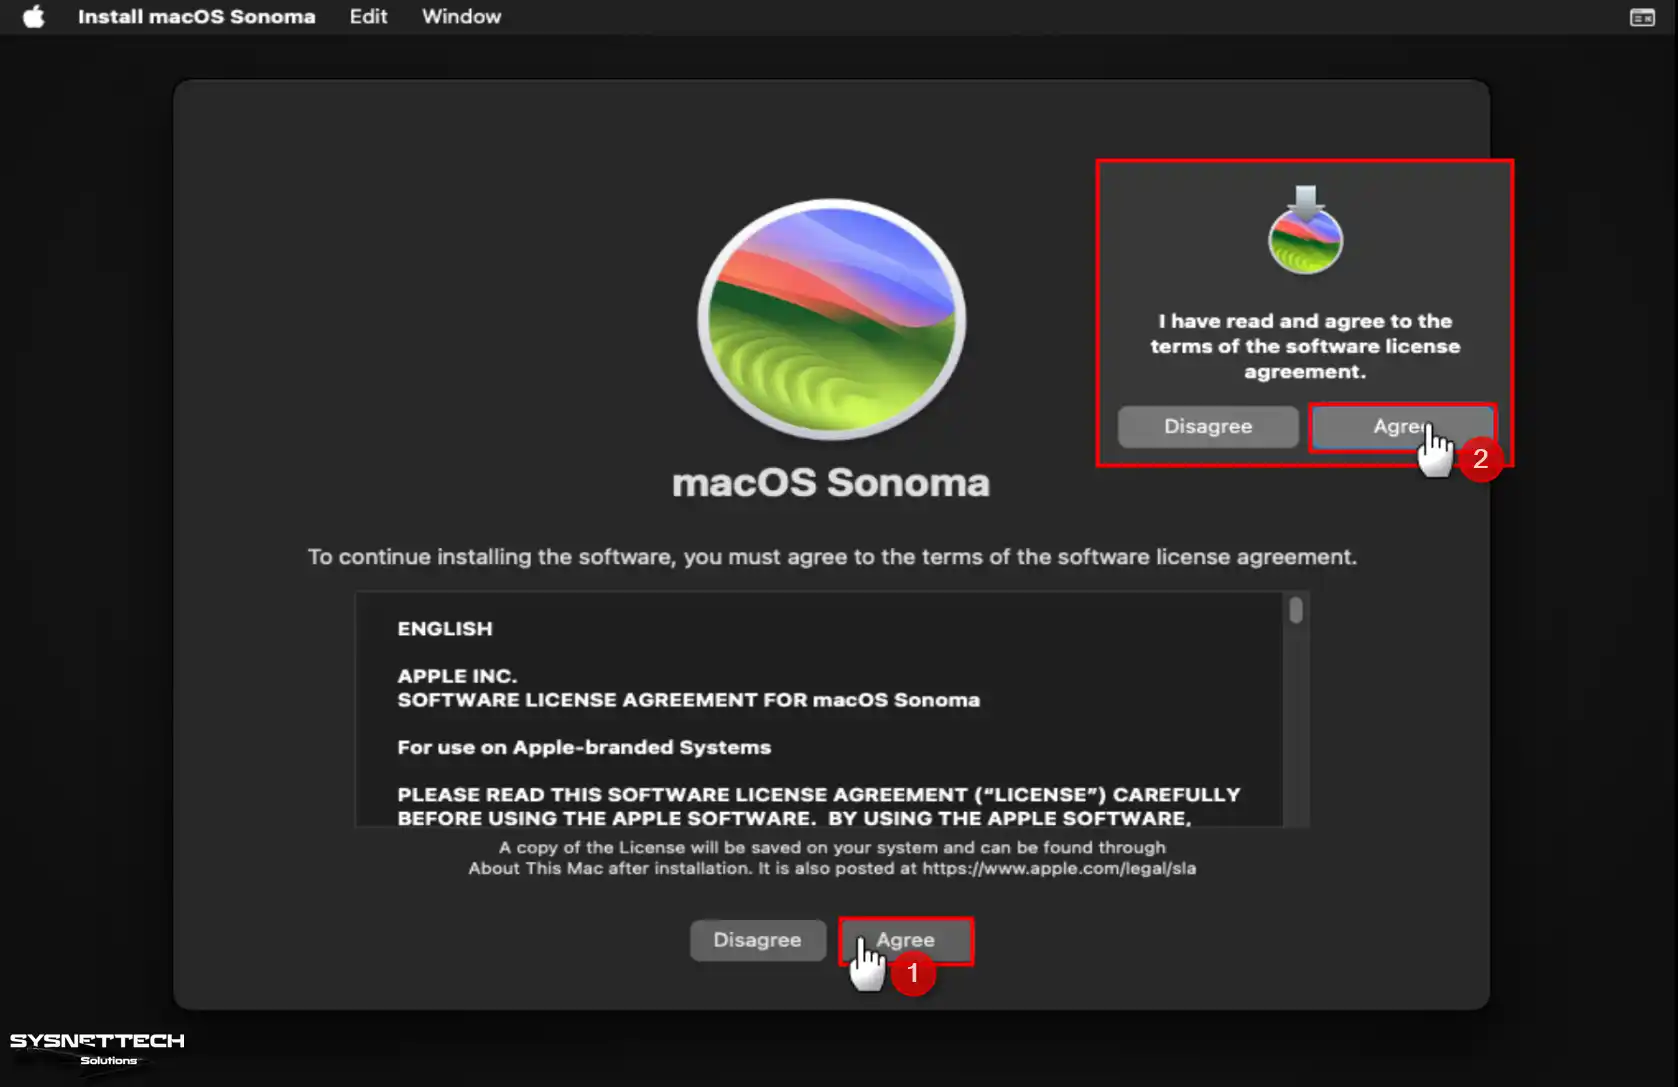
Step 7
Accept the license agreement to continue installing the macOS software.
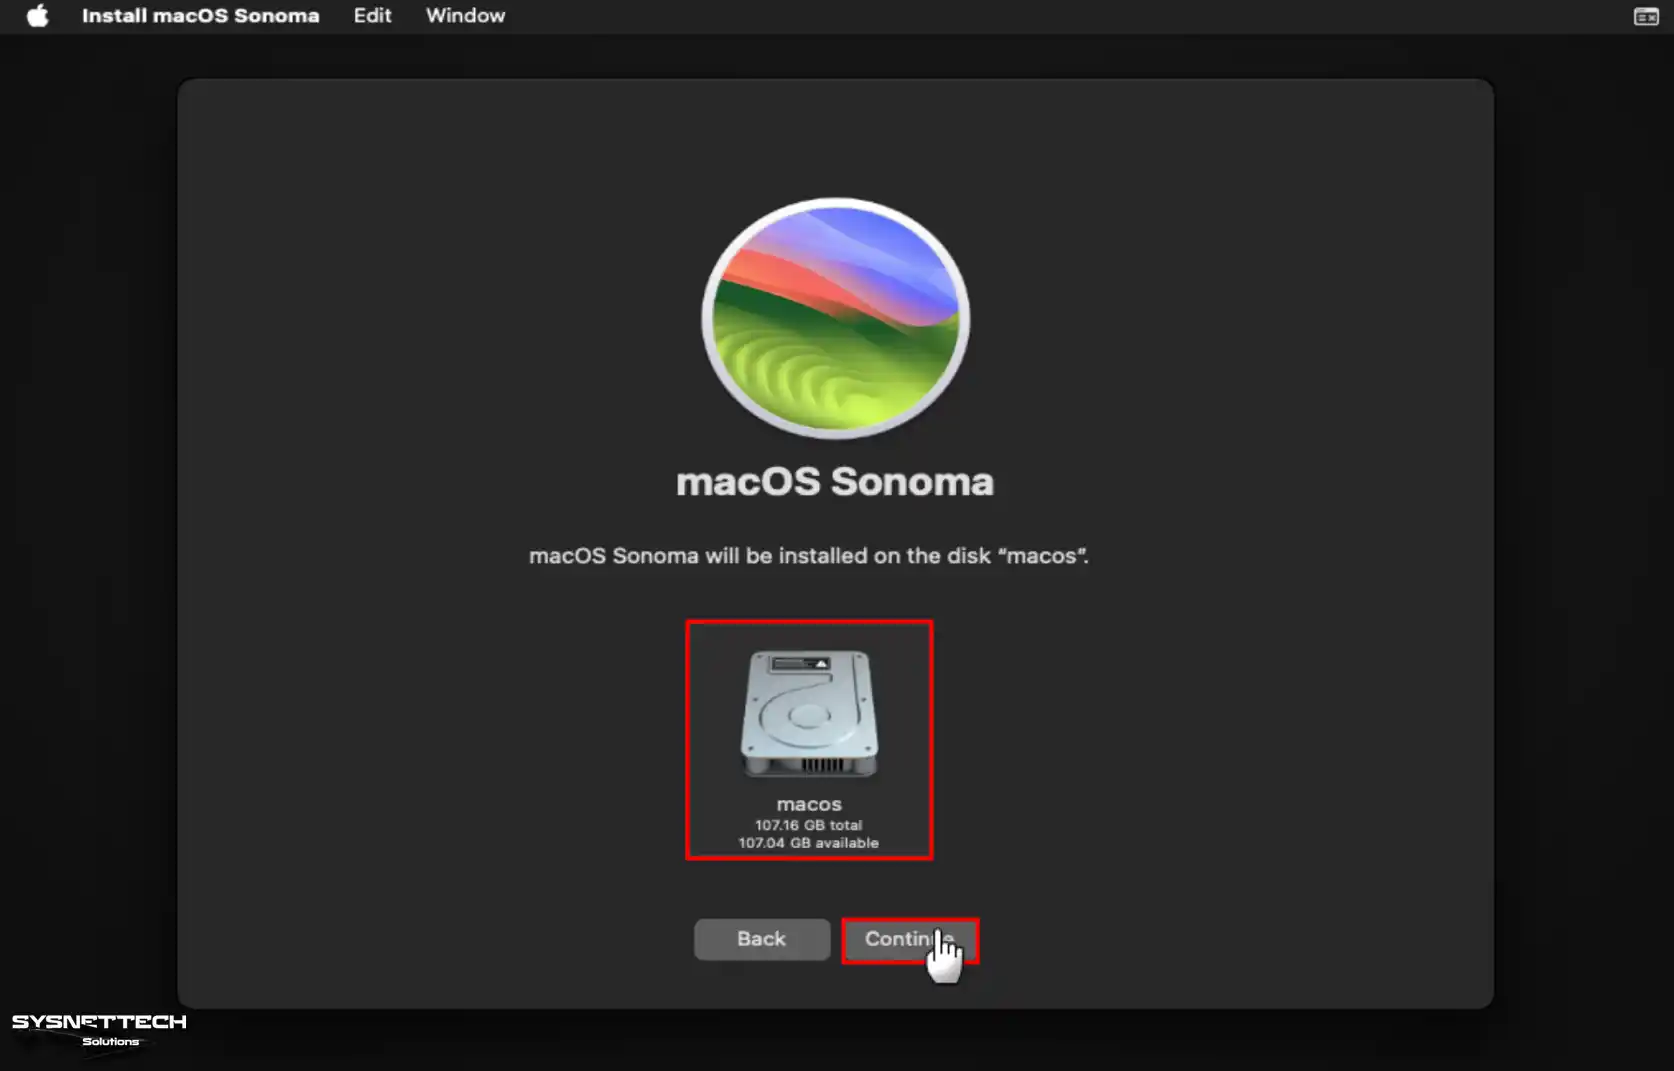
Step 8
Select the virtual disk you formatted and click Continue.
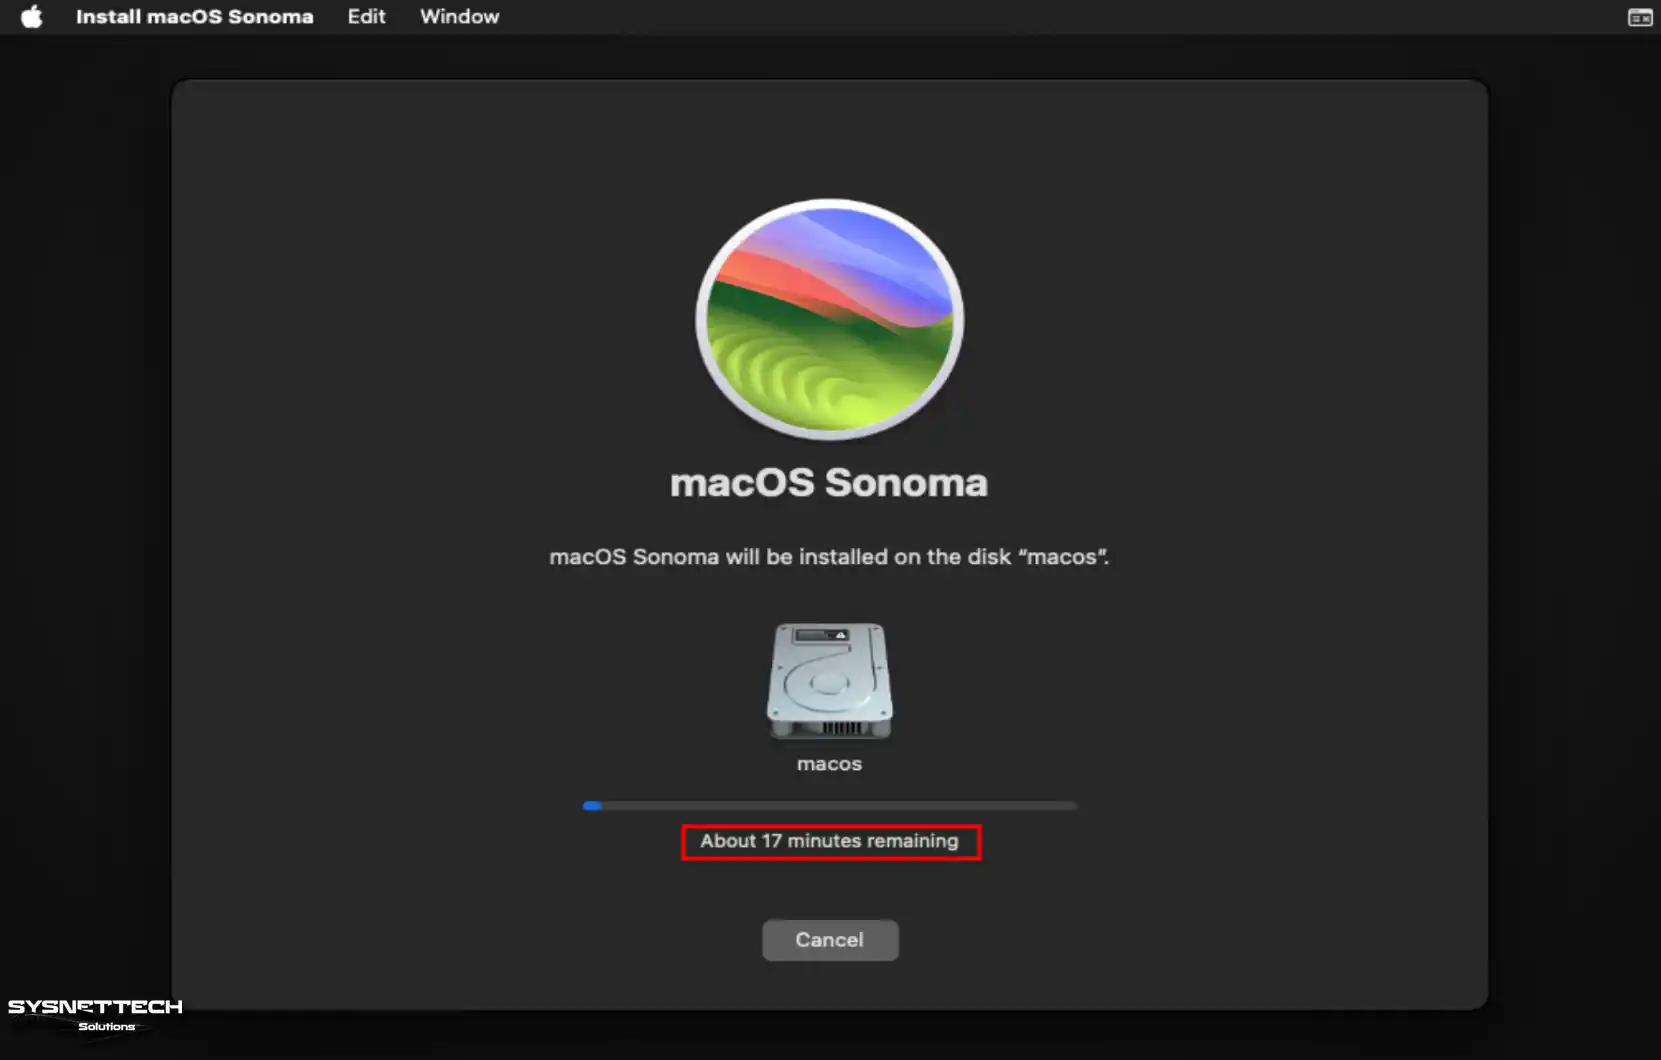
Step 9
Wait while the setup wizard copies the system files to the macOS disk. The progress bar says approximately how long it will take, but this may take less time, depending on the performance of your host computer.
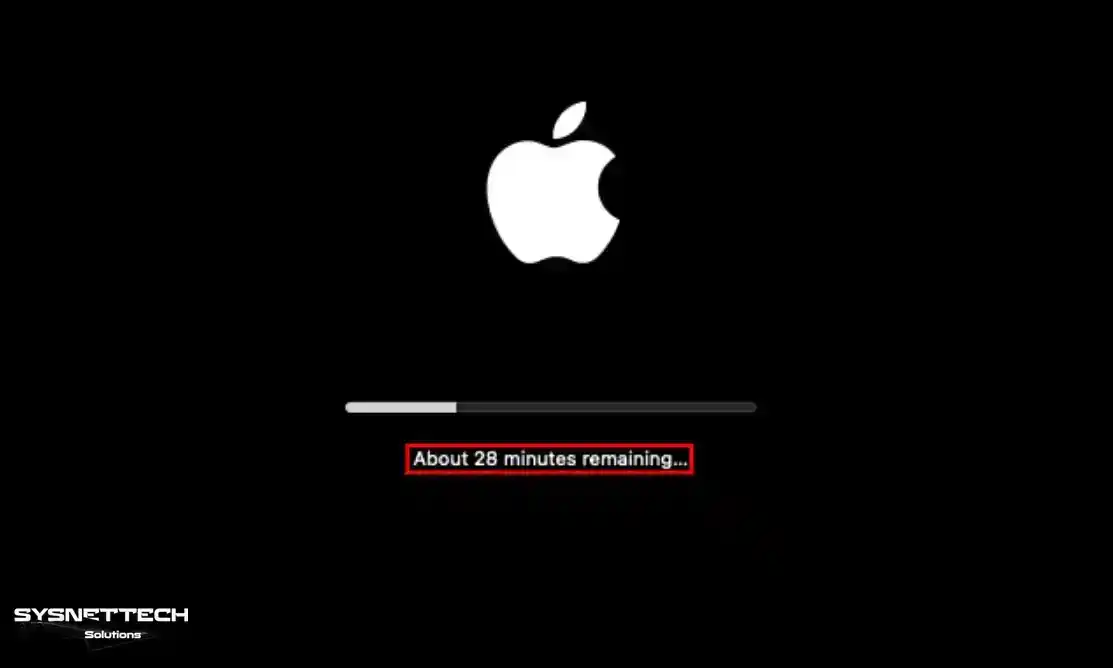
Step 10
After copying the system files, the guest virtual system will restart and operate with the Apple logo.
Step 11
After copying the necessary files, choose your country and click Continue when the Select Your Country or Region screen appears.

Step 12
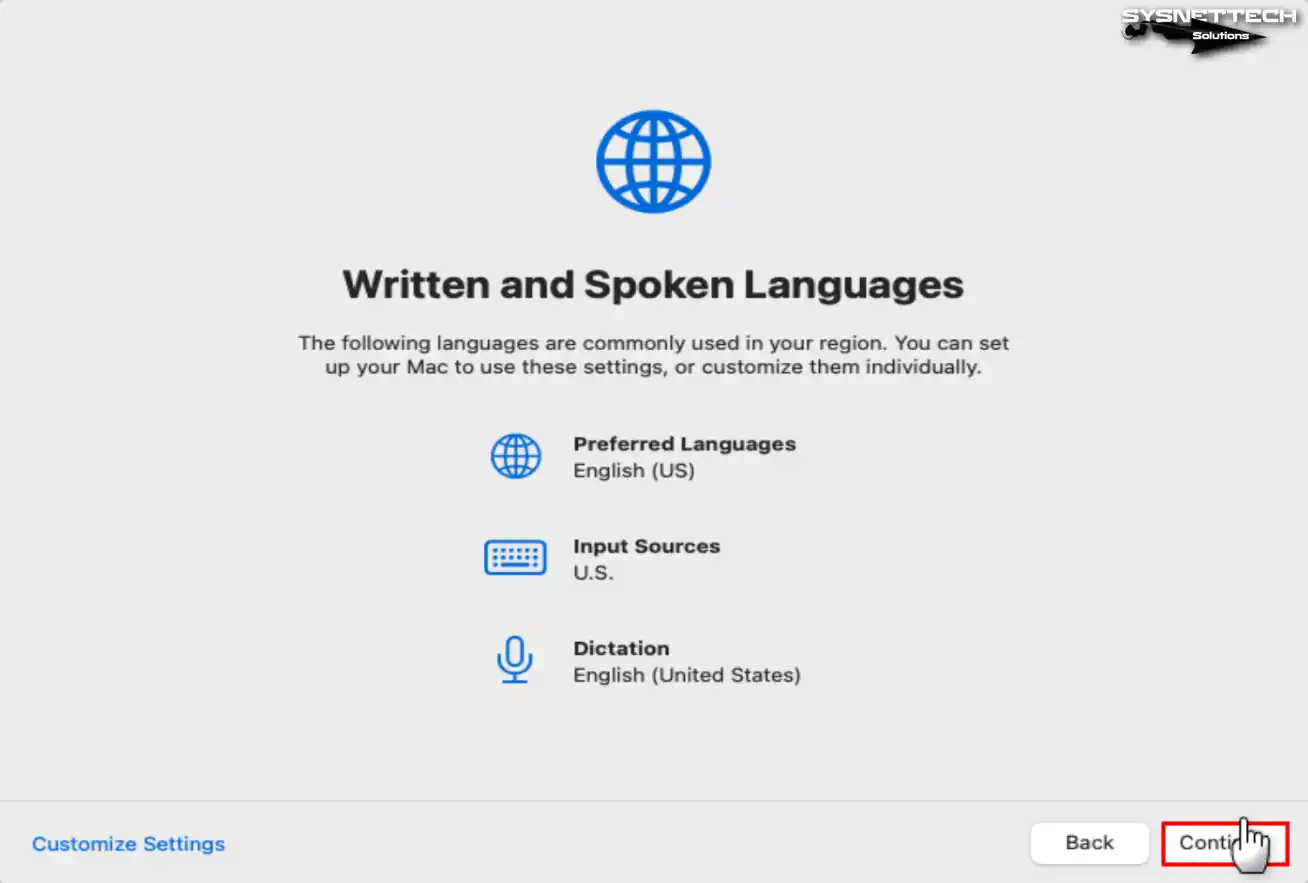
On the Written and Spoken Languages screen, you can change the system language, keyboard layout, and system robot voice you want to use in your system.
Step 13
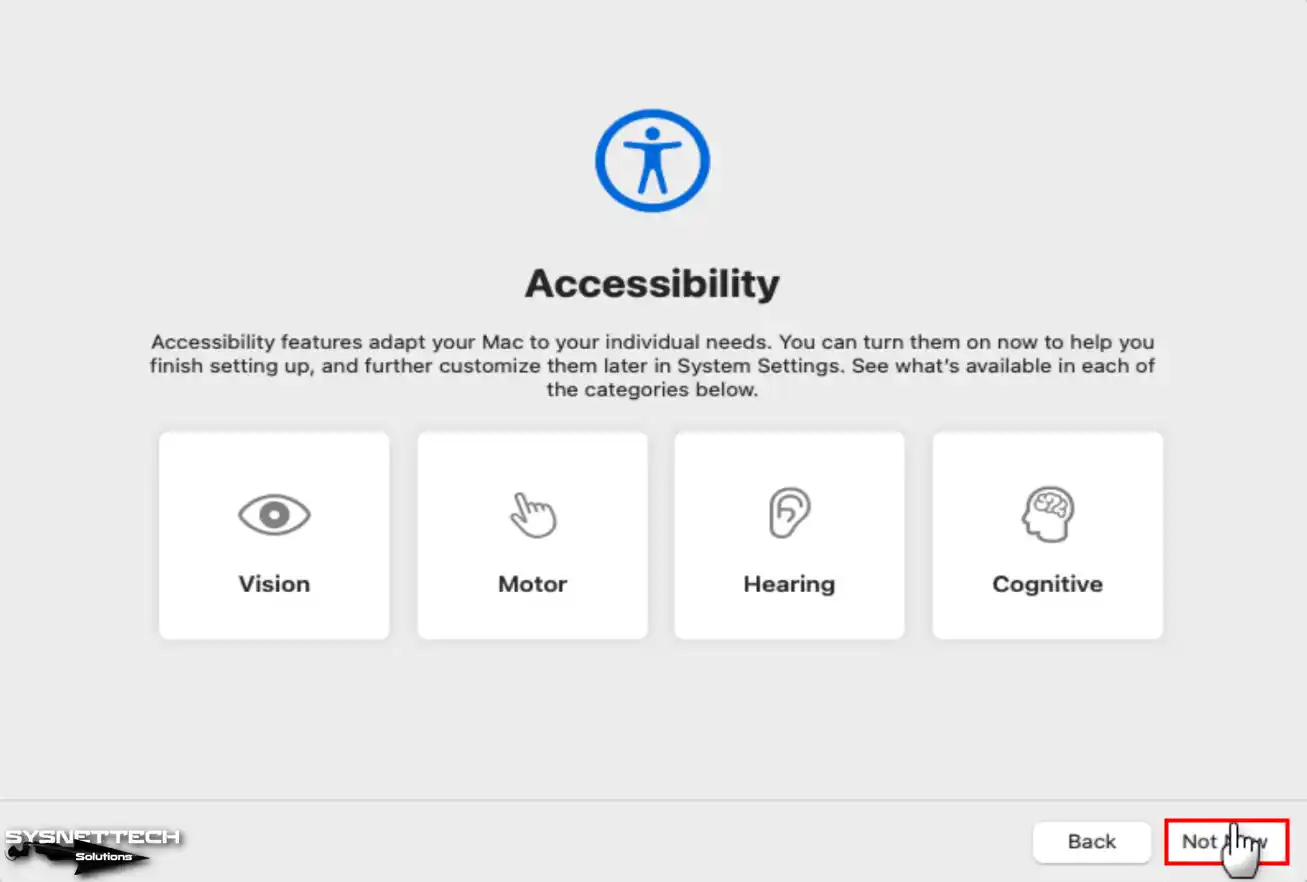
You can customize your system according to your personal needs in the Accessibility settings. For example, you can use the VoiceOver screen reader to speak text in files or web pages or to appear on the screen.
Step 14
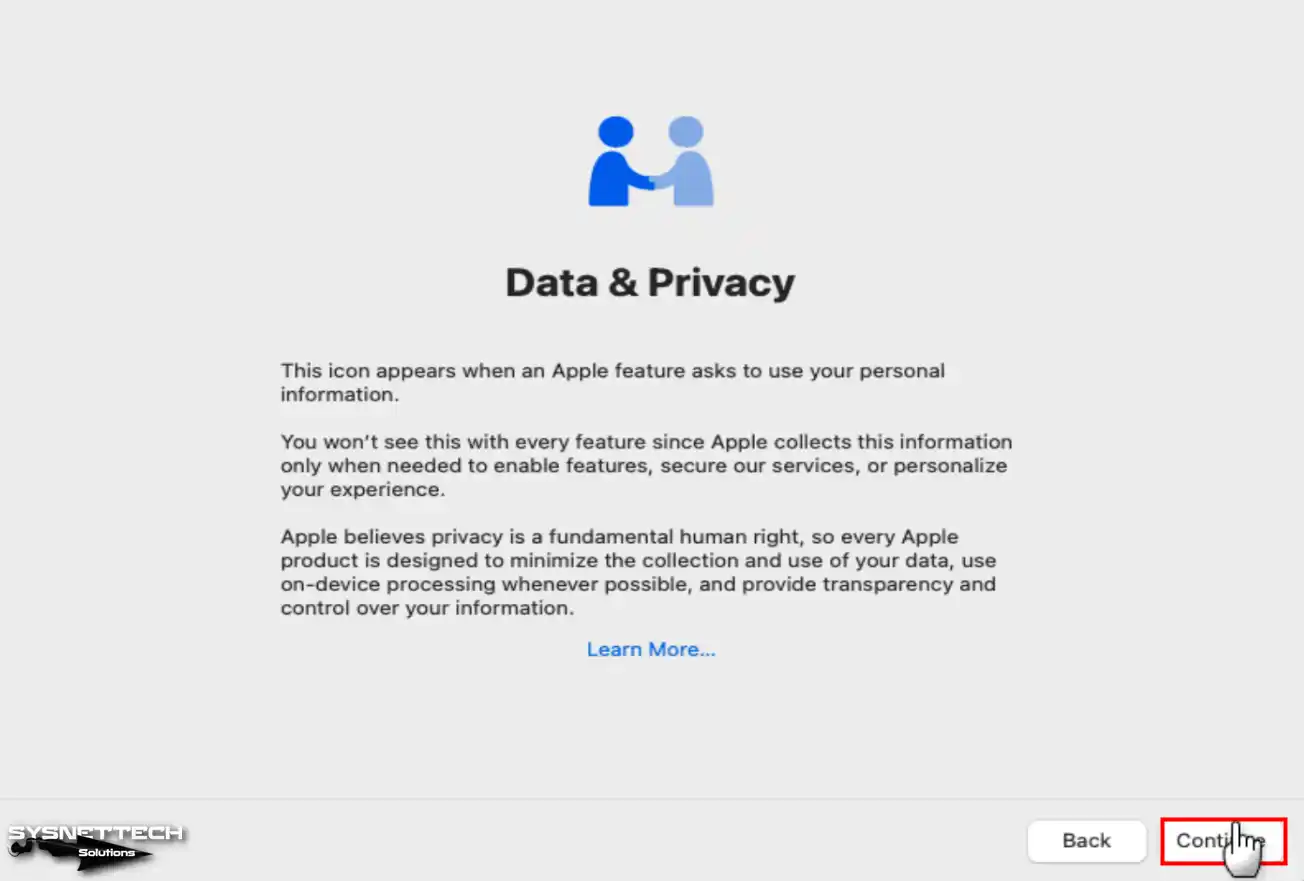
On the Data & Privacy screen, Apple clearly states that it uses minimum personal information of users and respects human rights. Collecting your data aims to improve Apple services and enhance the user experience.
Step 15
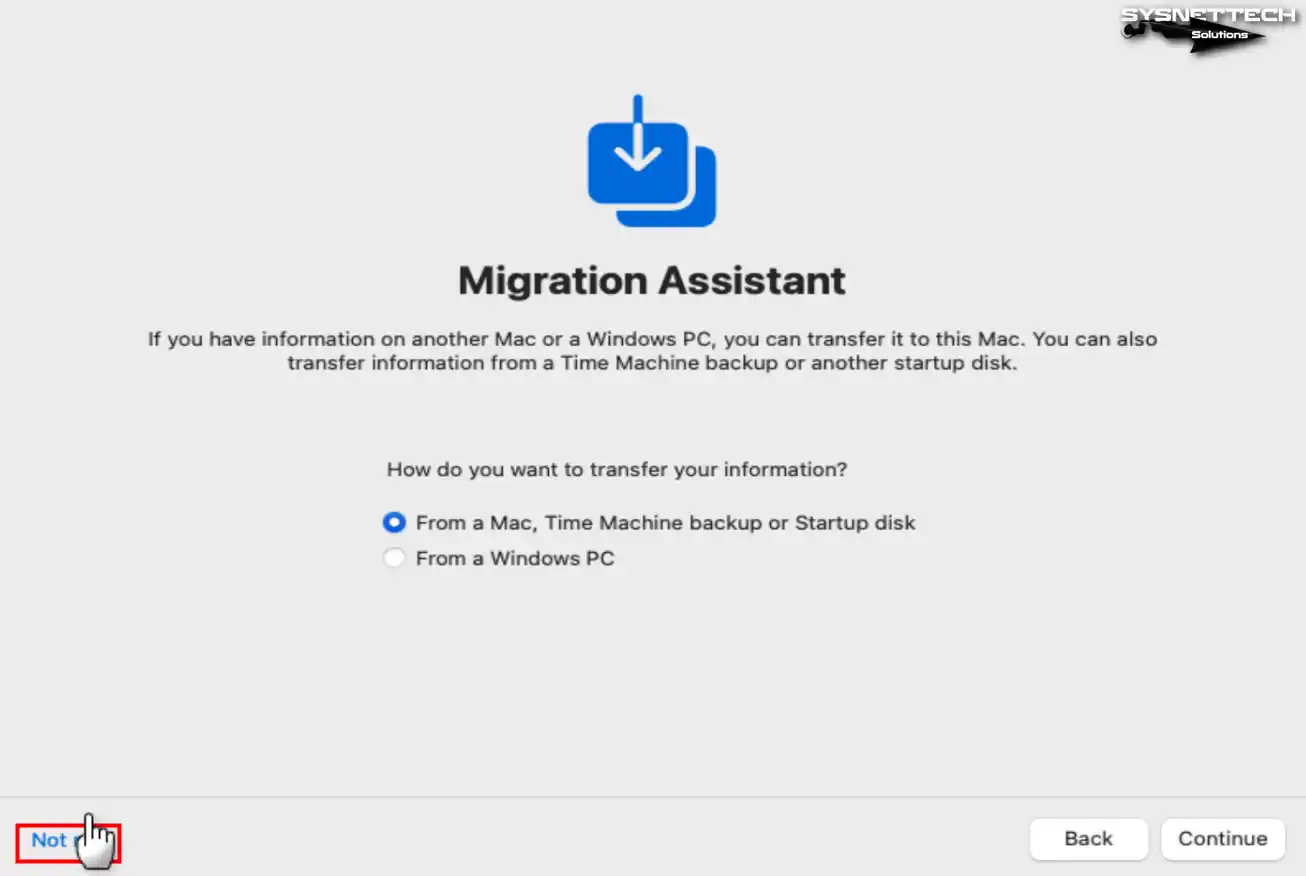
You can transmit your files and documents to the guest machine from another Mac or Windows computer. You can transfer data later to get a system experience from scratch.
Step 16
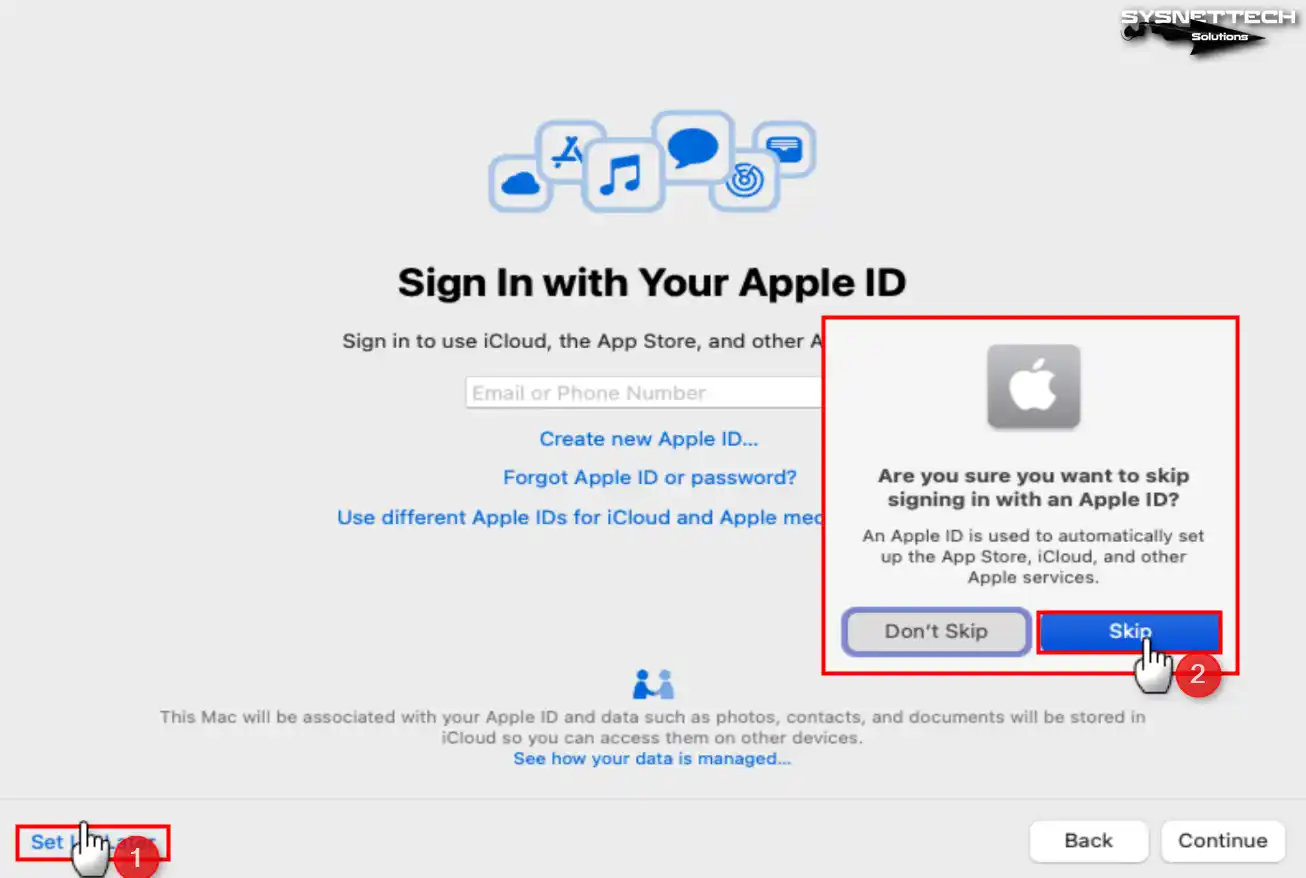
You can log in to use iCloud, App Store, and other Apple services on the Sign In with Your Apple ID screen. So, you can start a new Apple account on this screen if you do not have one.
Step 17
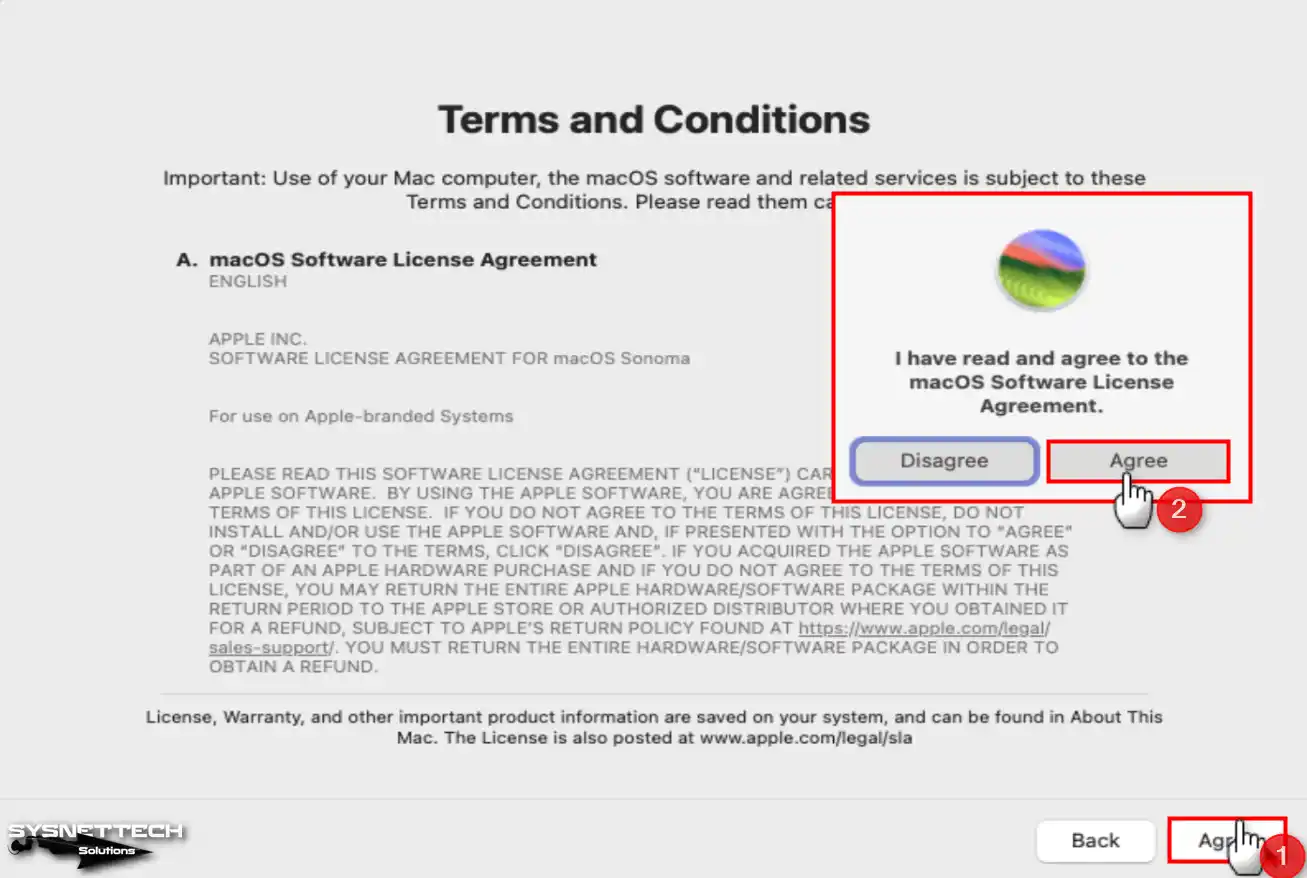
After reading the macOS software license agreement on the Terms and Conditions screen, accept it.
Step 18
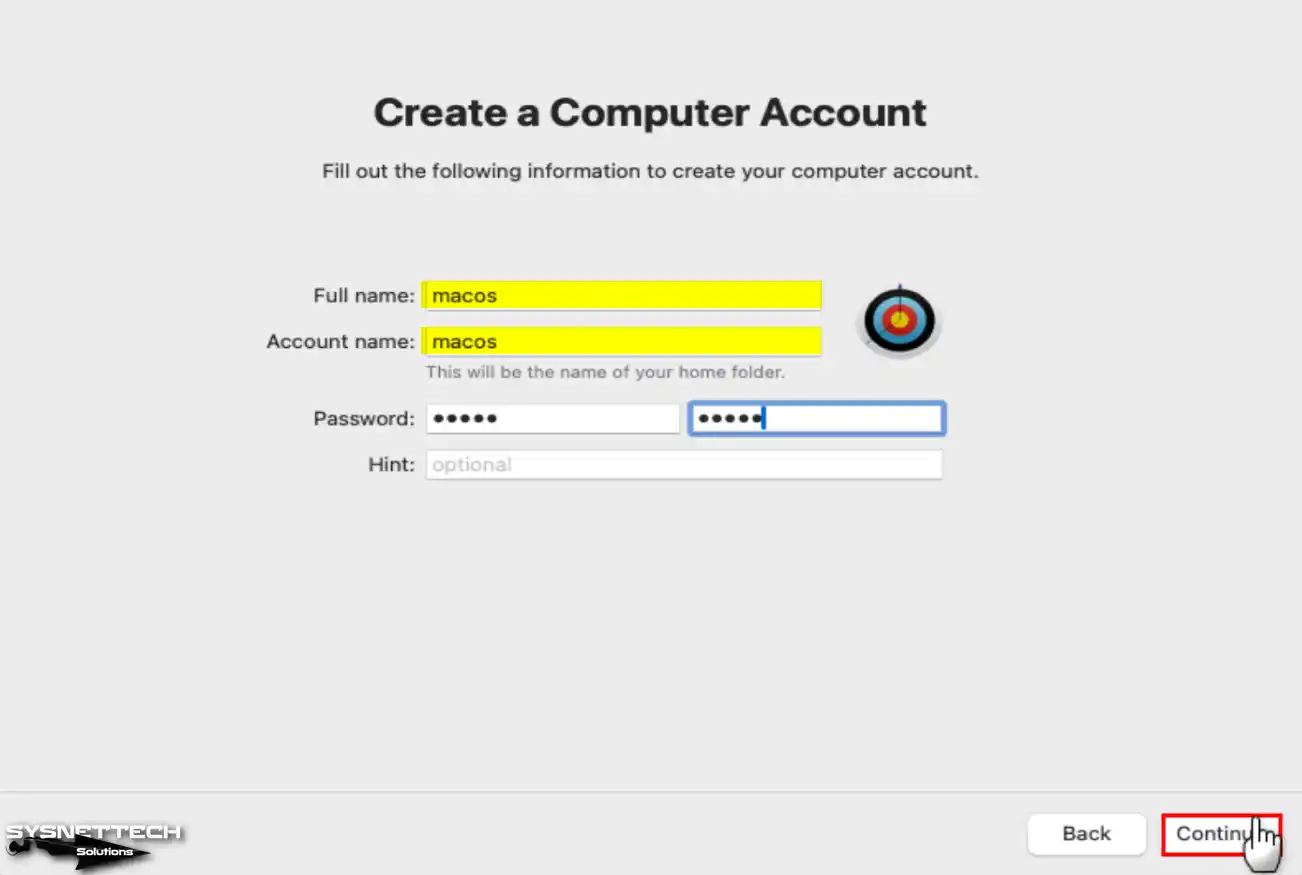
Create a new computer account for your virtual system and select your profile picture.
Step 19
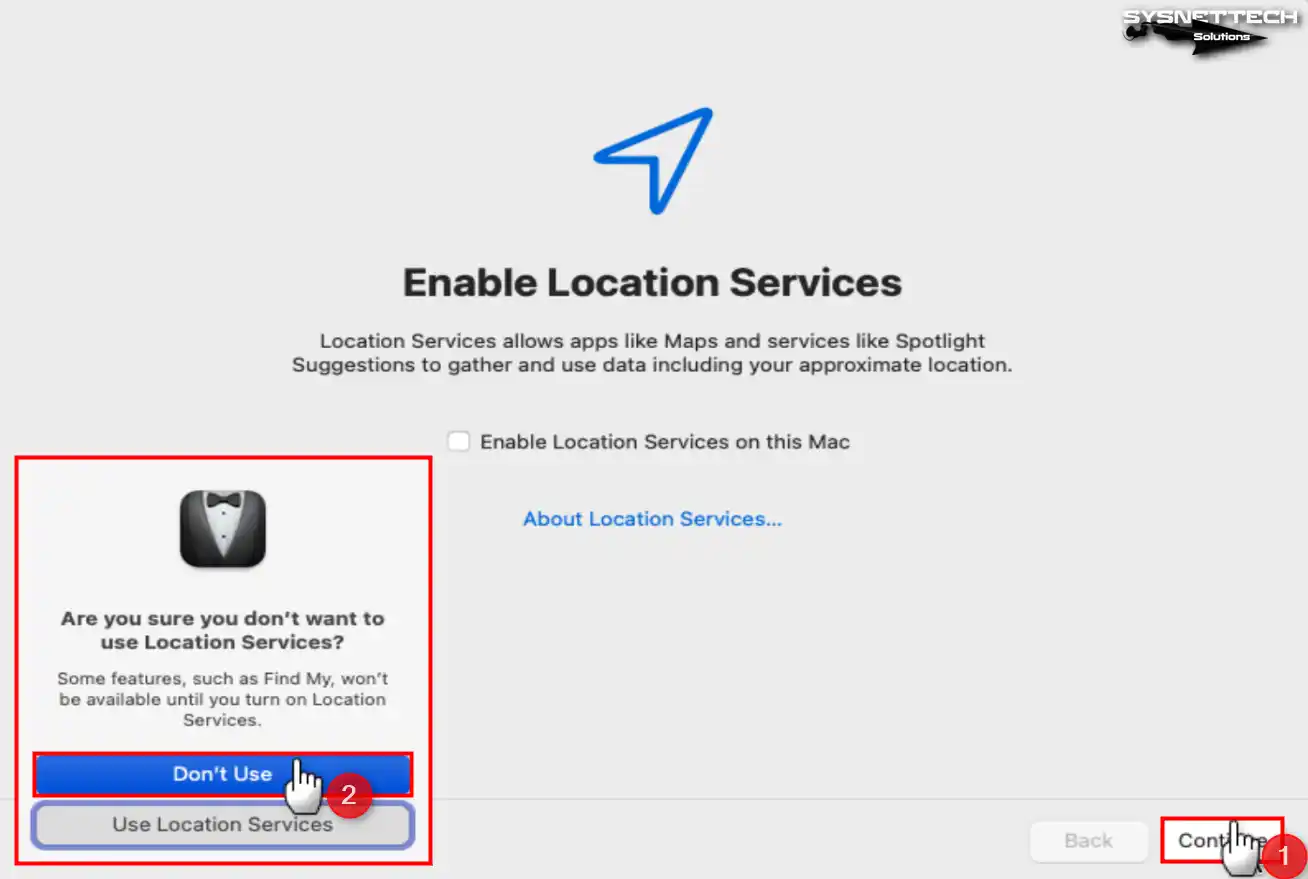
You can allow and disallow data usage to enhance the personalized user experience for Apple Maps and other services. This decision is entirely personal, but you can share your data and location information with Apple to help further improve macOS.
Step 20
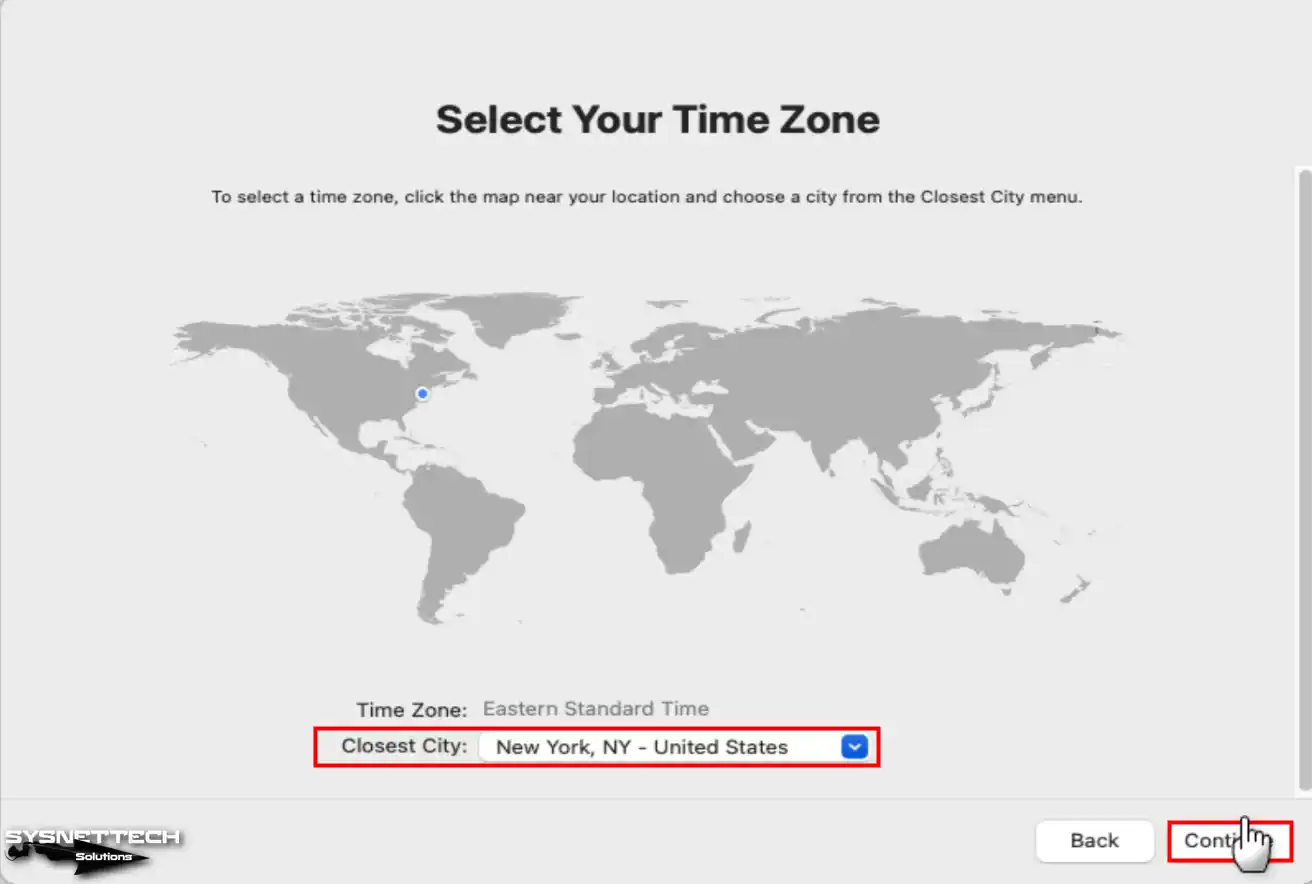
On the Time Zone screen, select the zone where you live or closest to you and continue.
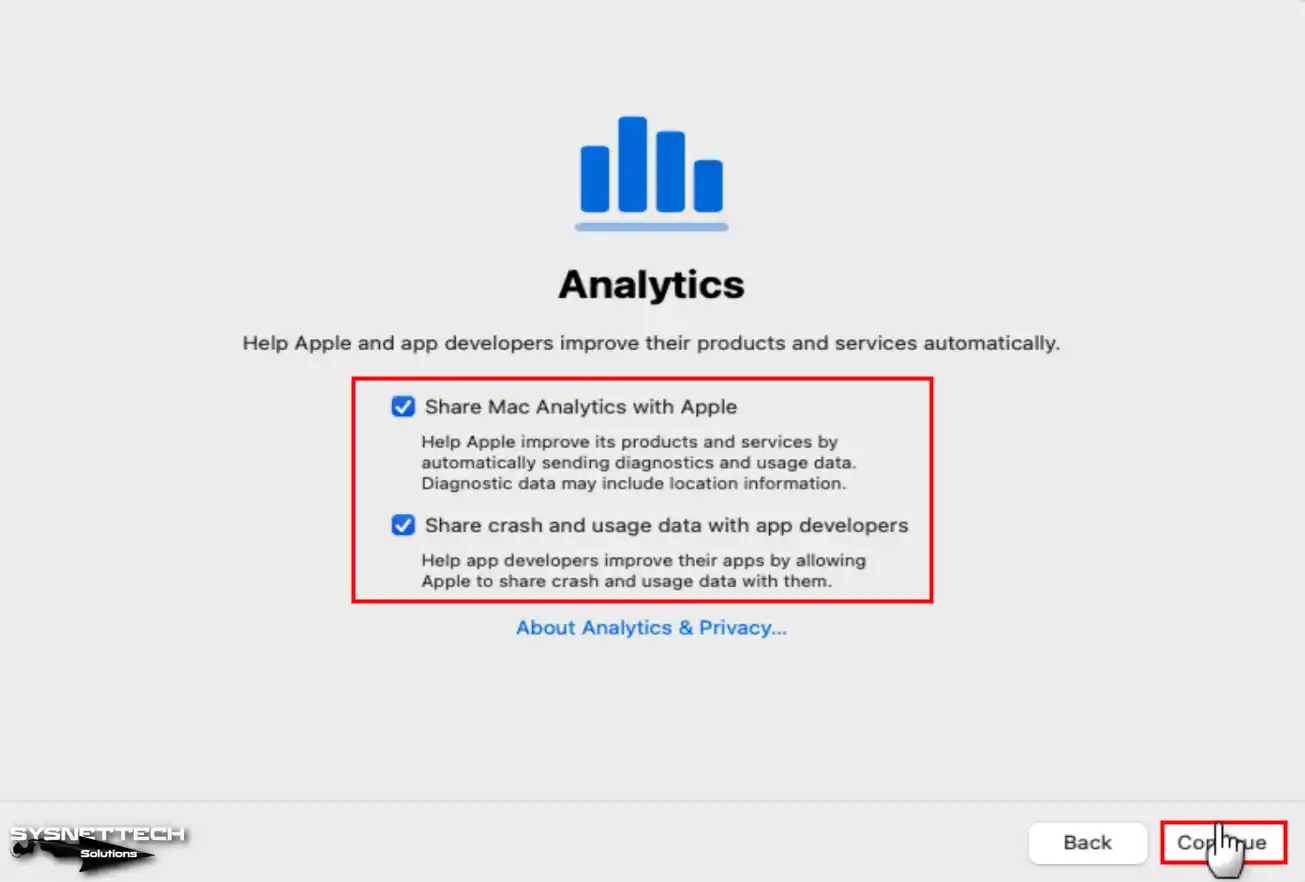
Step 21
Likewise, by sharing the crash and usage data you encounter in the applications you use with the developers, you can help them develop their applications more for users.
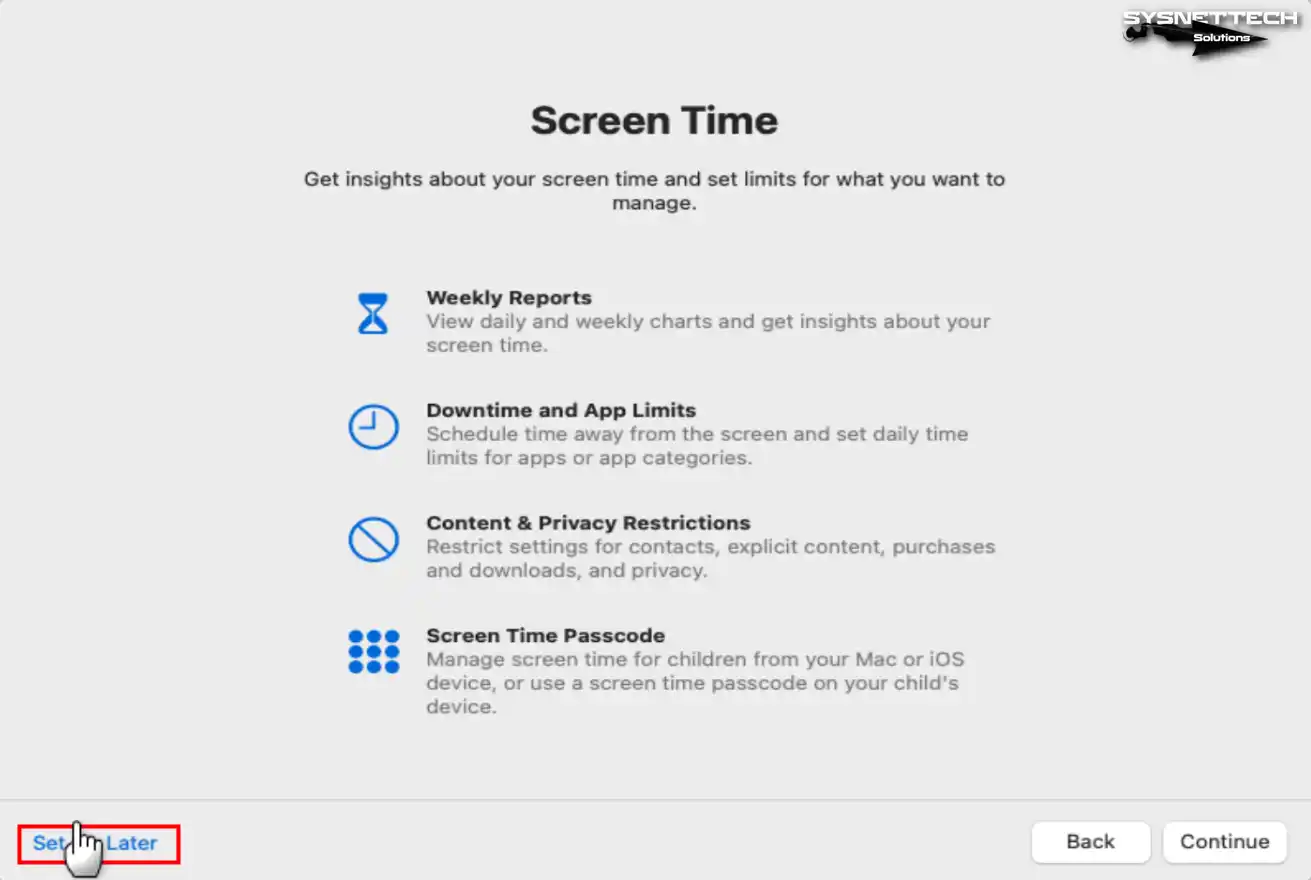
Step 22
Screen Time allows parents to have more control of the system over their children of all ages. It also allows to review the time spent on apps and web pages. To configure these settings in detail later, click Set Up Later and continue.
Step 23
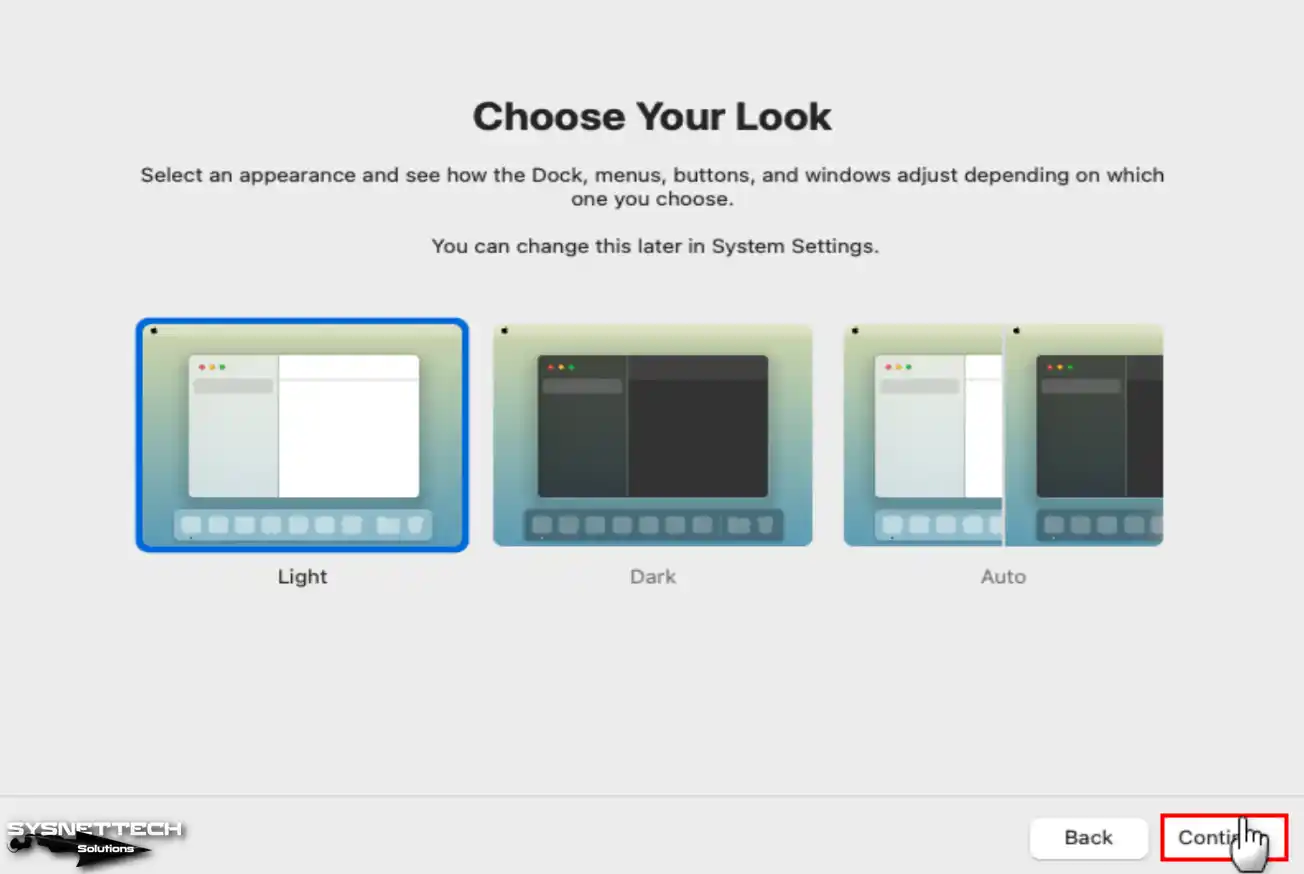
You can select the theme you want to use on your Sonoma system on the Choose Your Look screen. Apple has offered users three theme skins: Light, Dark, and Auto.
If you choose to use the Auto view, your system’s view will automatically turn light or dark depending on the time zone of the country you live in.
Step 24
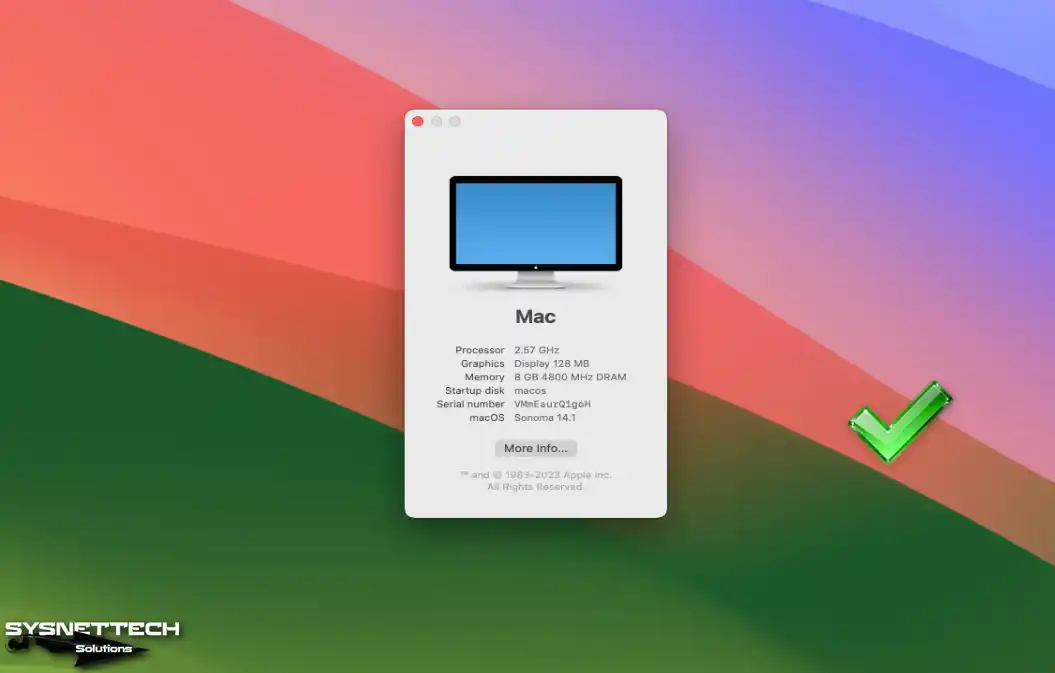
After adjusting the system settings and clicking the Apple logo, you can find your macOS version via About This Mac.
How to Install VMware Tools on macOS
After installing macOS Sonoma with VMware, you must install VM Tools to use your guest virtual system in full-screen resolution and more performance.
You do not need to download the VM Tools ISO file from anywhere for macOS guest machines. Using the Unlocker tool will download the VM Tools (Darwin.iso) file to your computer.
Step 1
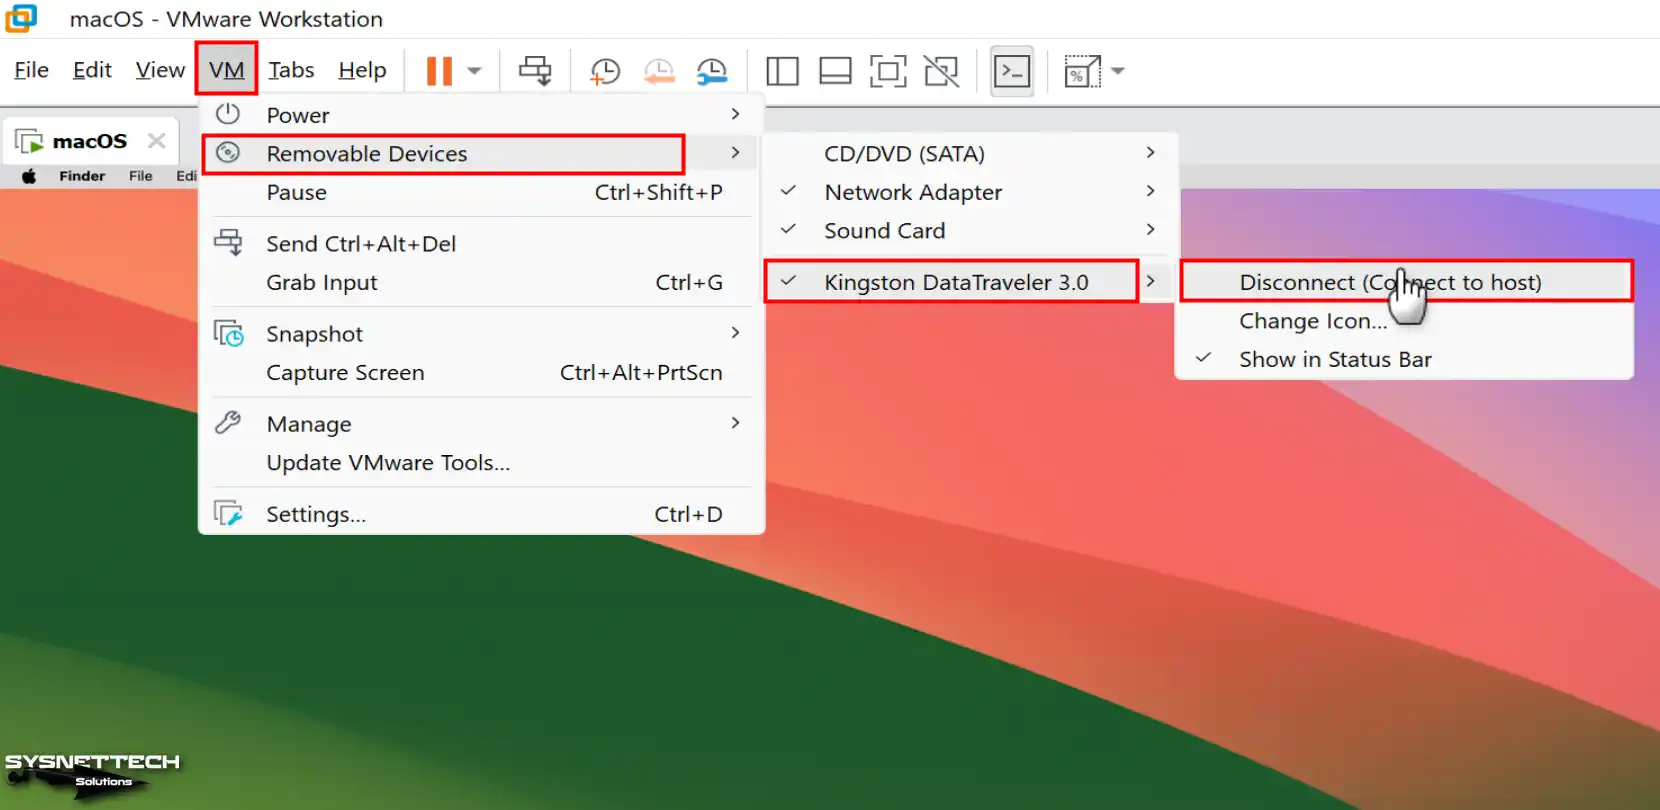
In macOS virtual PC, go to VM / Removable Devices / CD/DVD (SATA) in the tool menu and click Settings.
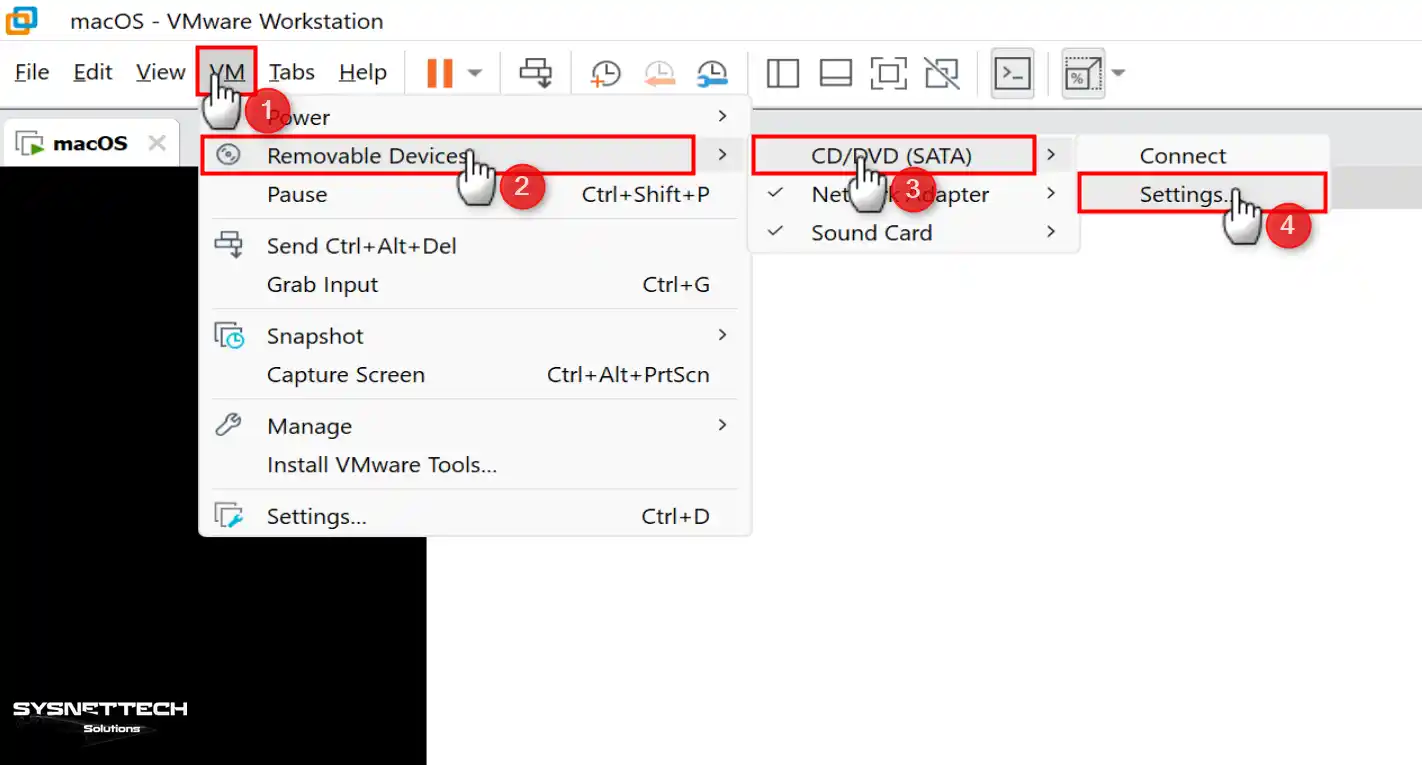
Step 2
After changing the status of the CD/DVD device to Connected, add the Darwin.iso file in the Unlocker/Tools folder to the VM.
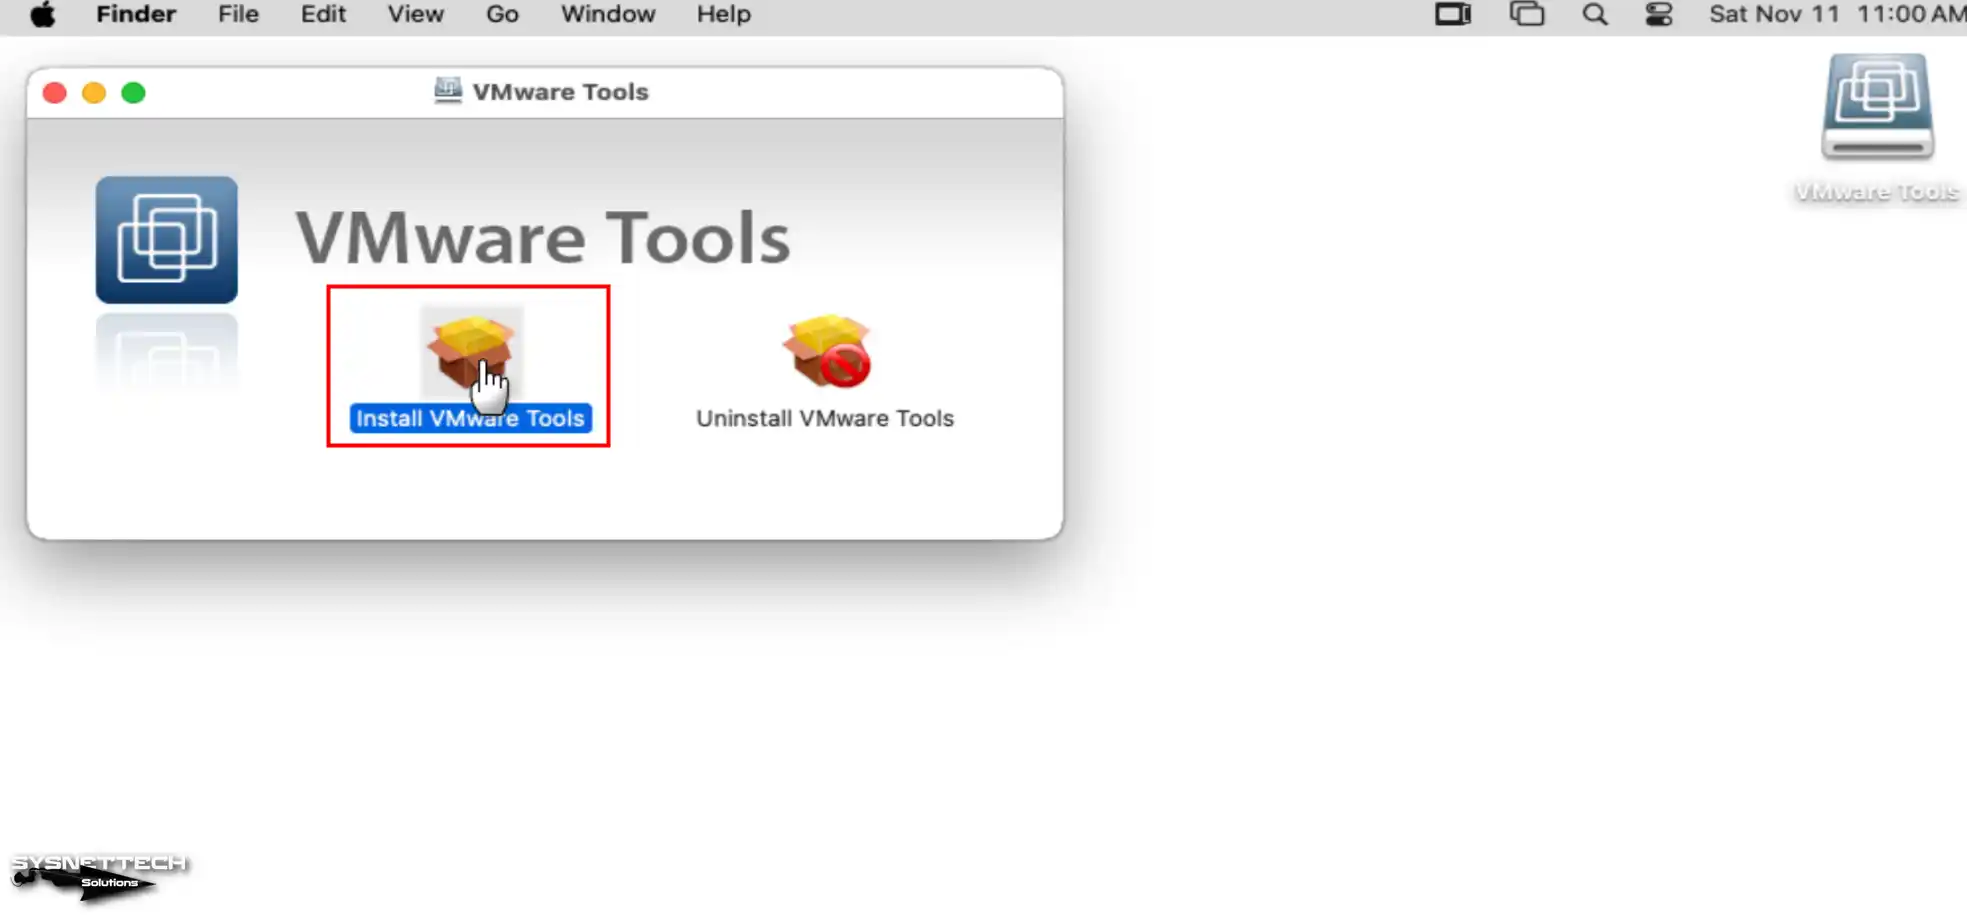
Step 3
After mounting the ISO image on the VM, double-click on Install VMware Tools and initiate the installation.
Step 4
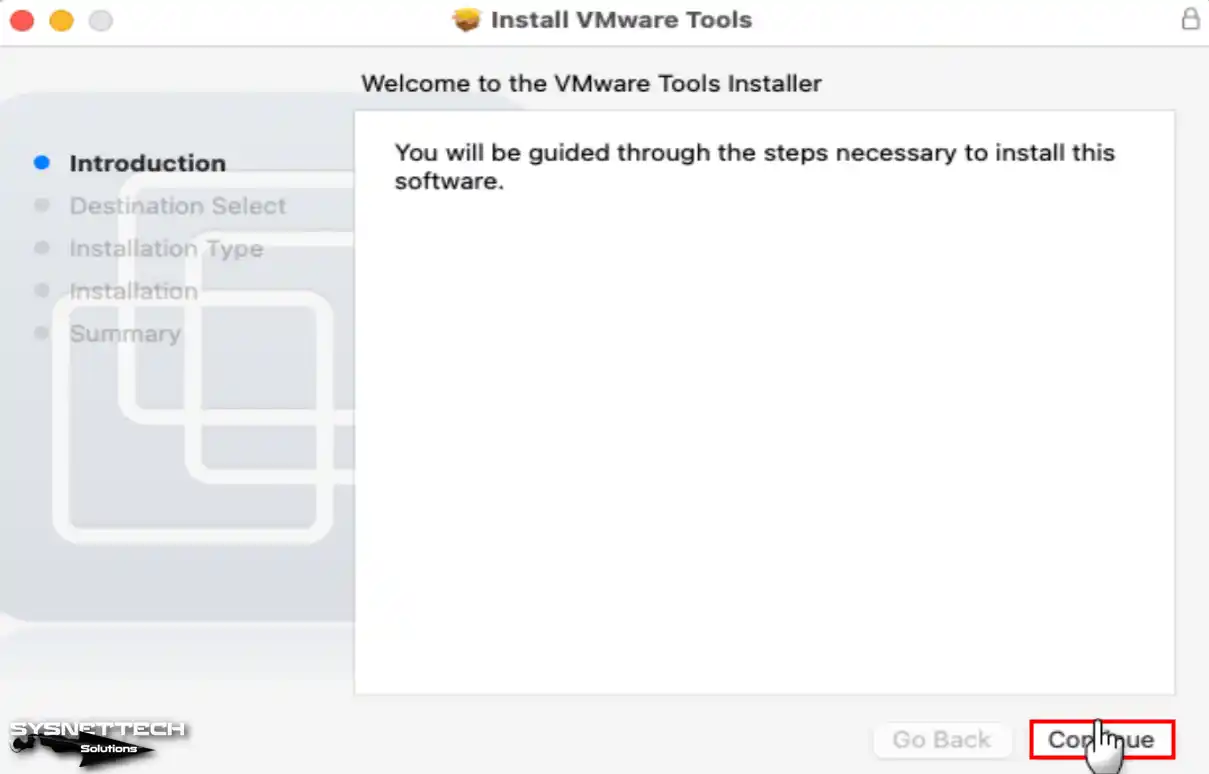
In the VMware Tools Installer window, click Continue to continue the installation.
Step 5
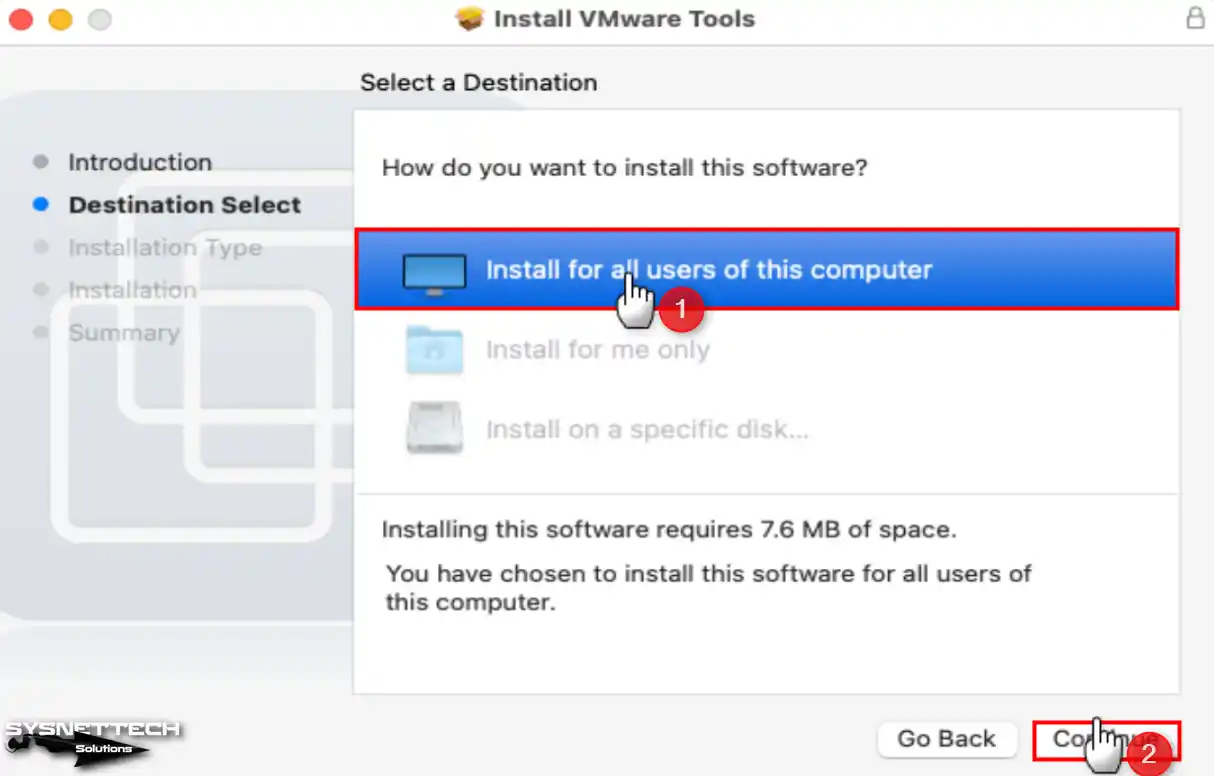
Since you need to select the target location for installation, select “Install for all users of this computer” and click Continue again.
Step 6
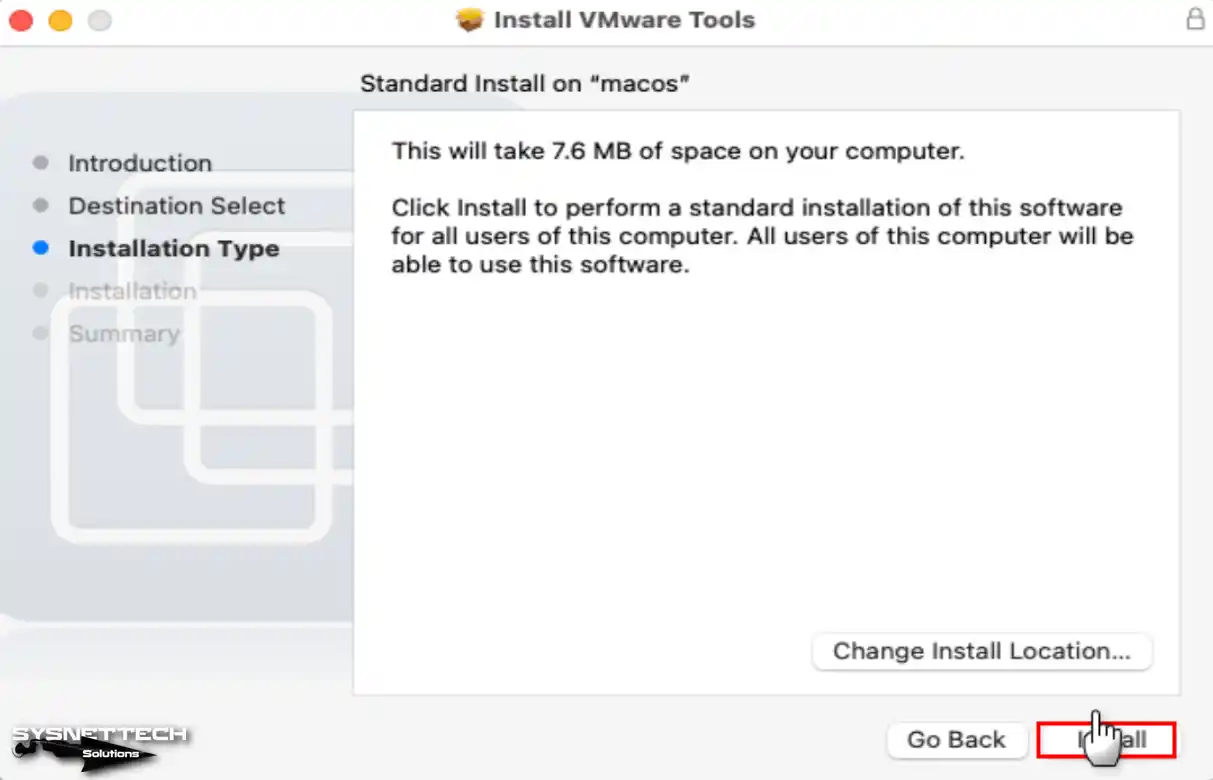
VMware Tools will use 7.6 MB of disk space on your virtual disk. Do not change the installation location; click the Install button directly for standard installation.
Step 7
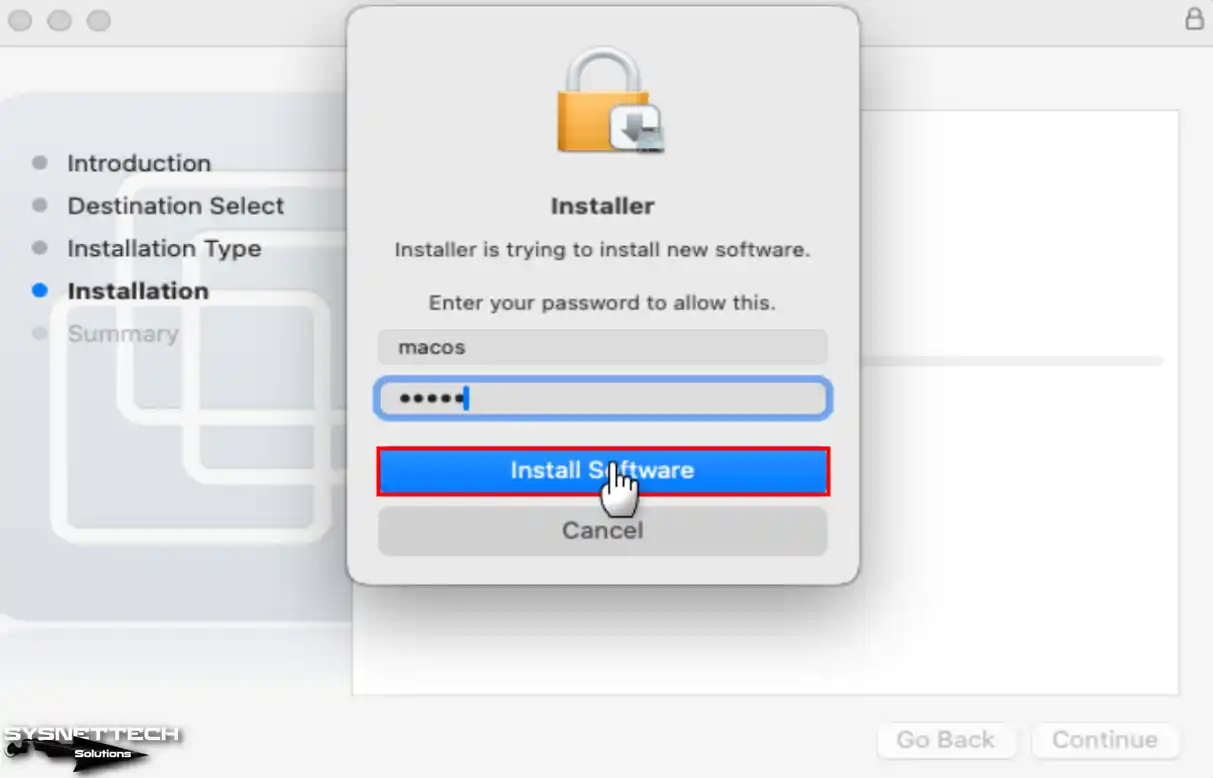
When the installation starts, type your user account password to authorize the wizard and click the Install Software button.
Step 8
When you encounter the System Extension Blocked warning this time, click Open Security Preferences.
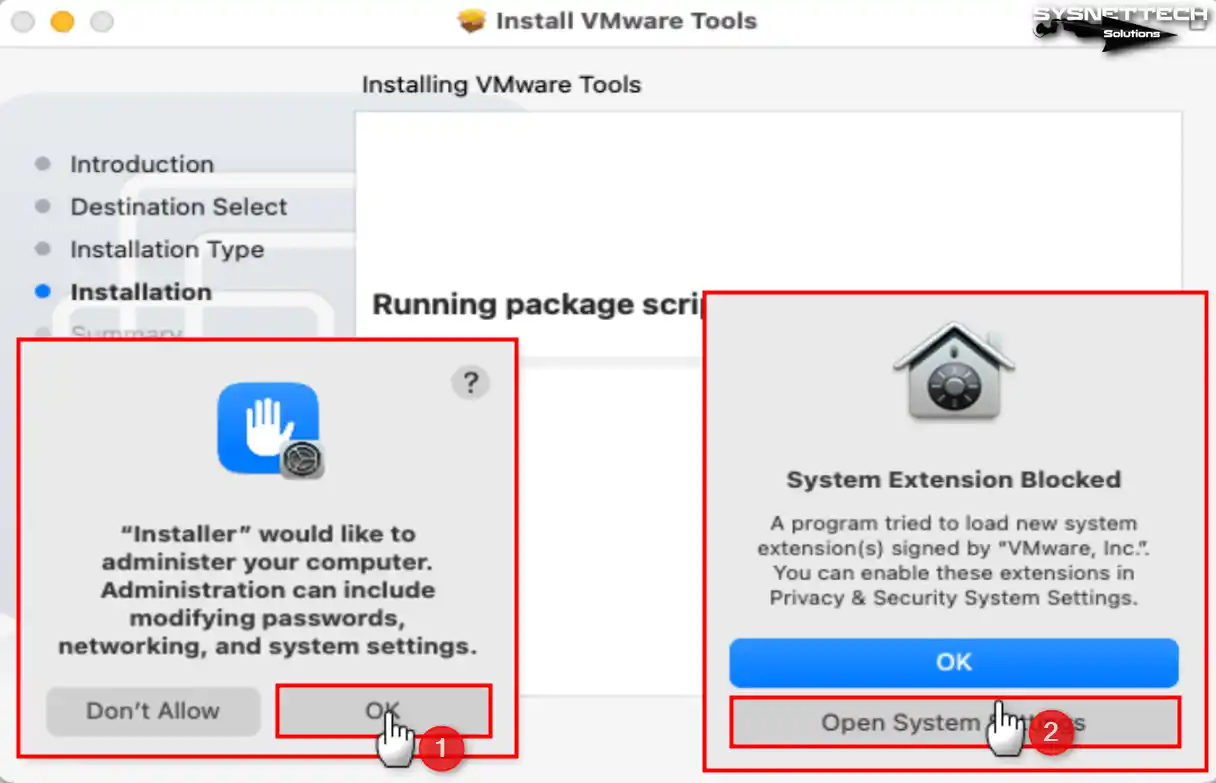
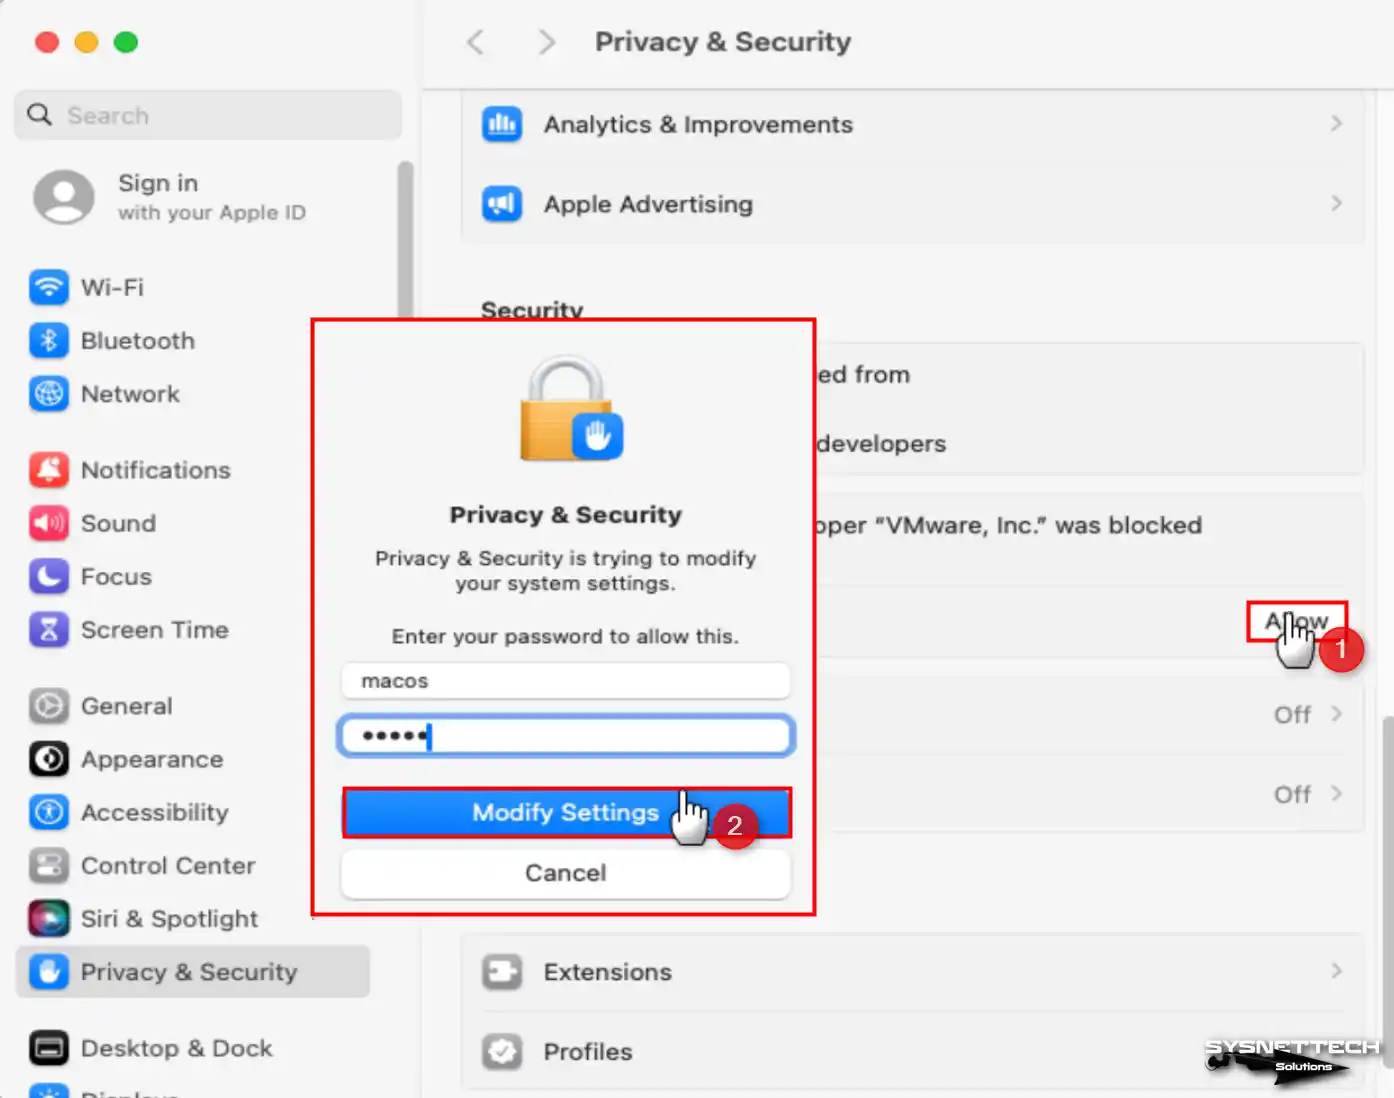
Step 9
Click the Allow button next to the “System software from developer VMware, Inc. was blocked from loading” warning.
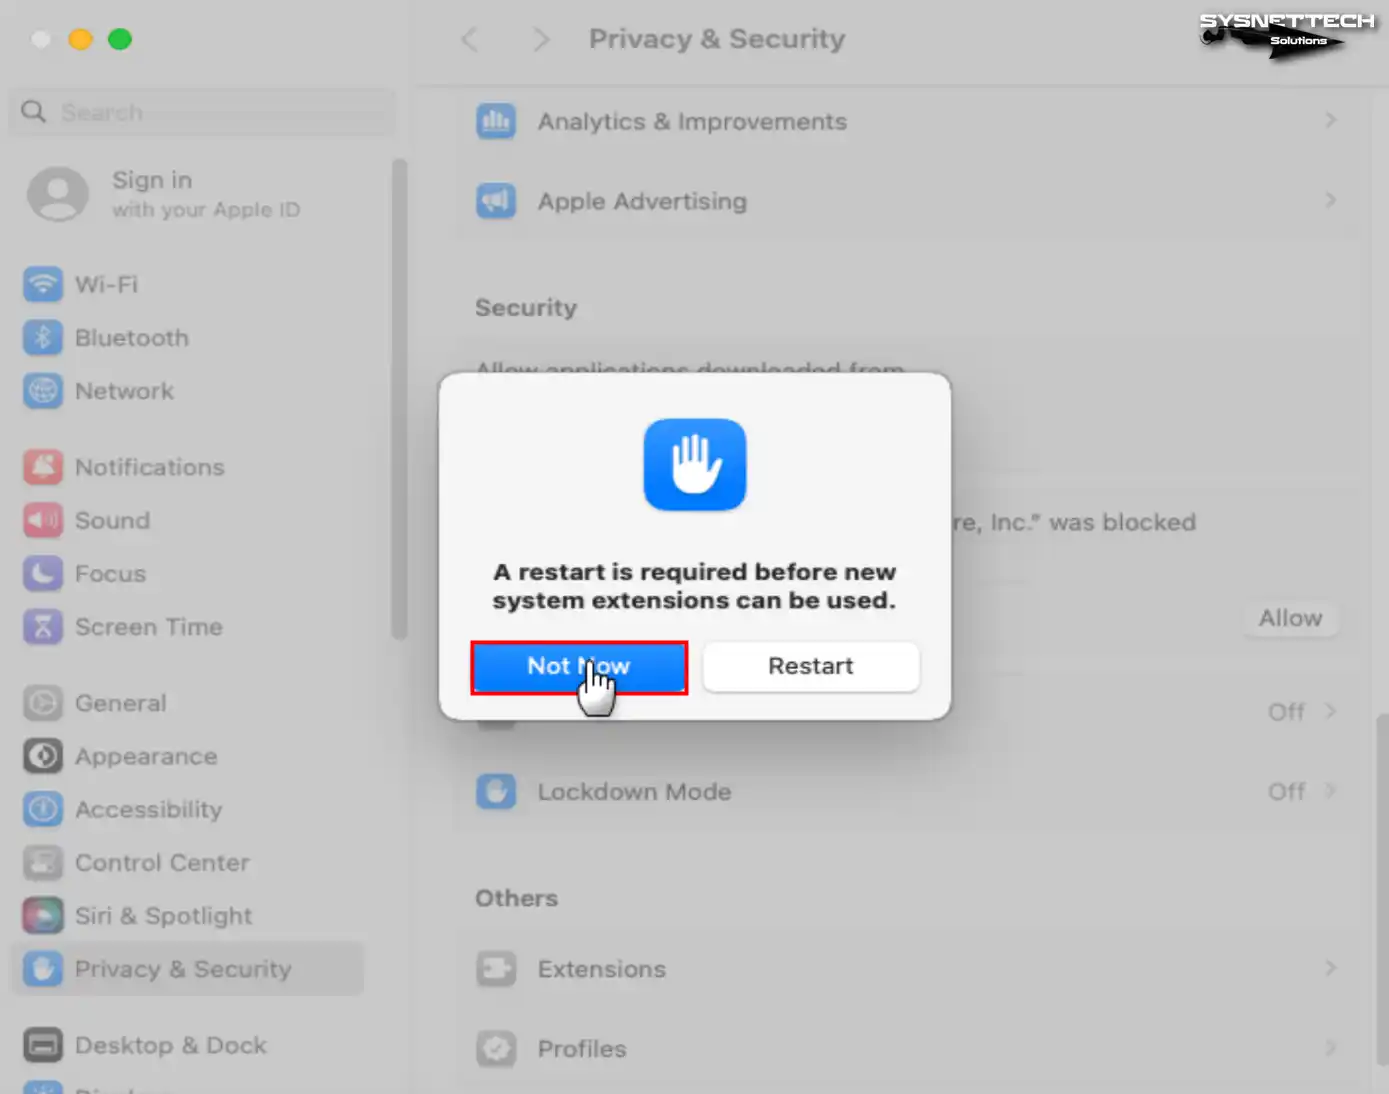
Step 10
Click Not Now in the window informing you that you need to restart your system for the new system components to take effect.
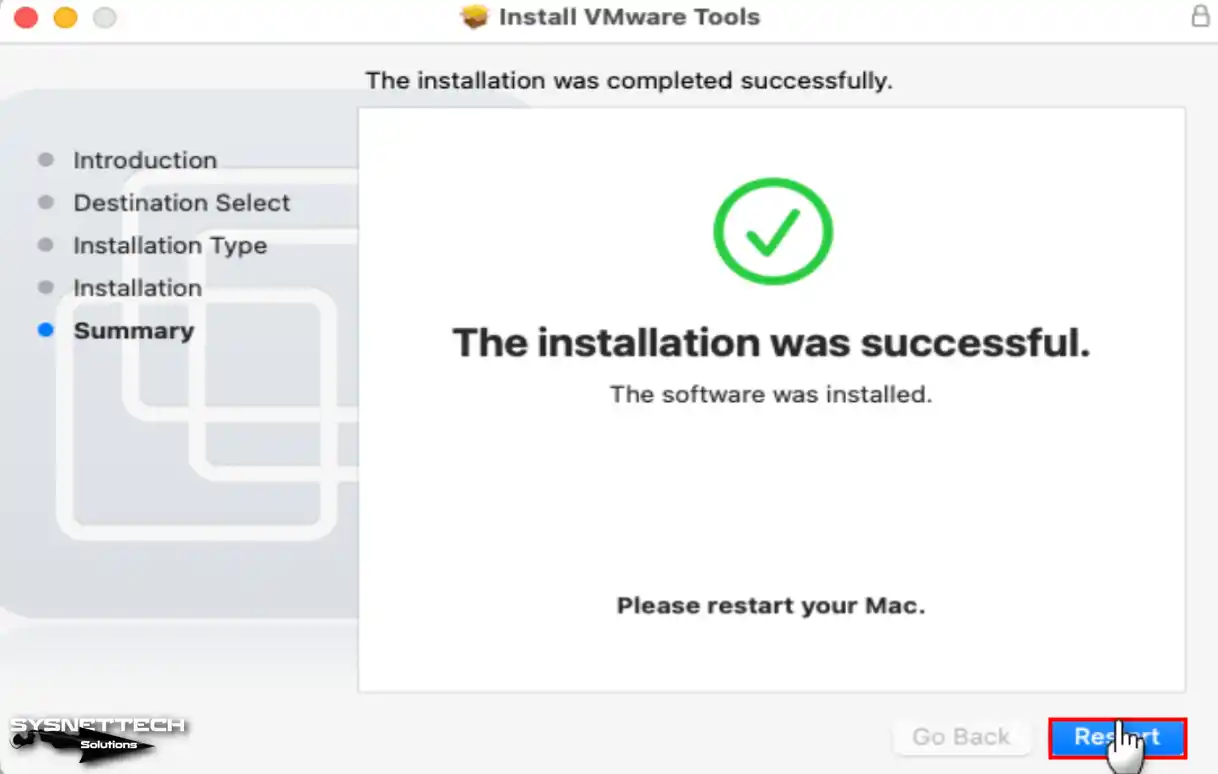
Step 11
After completing the installation of VM Tools on macOS, restart your system.
Step 12
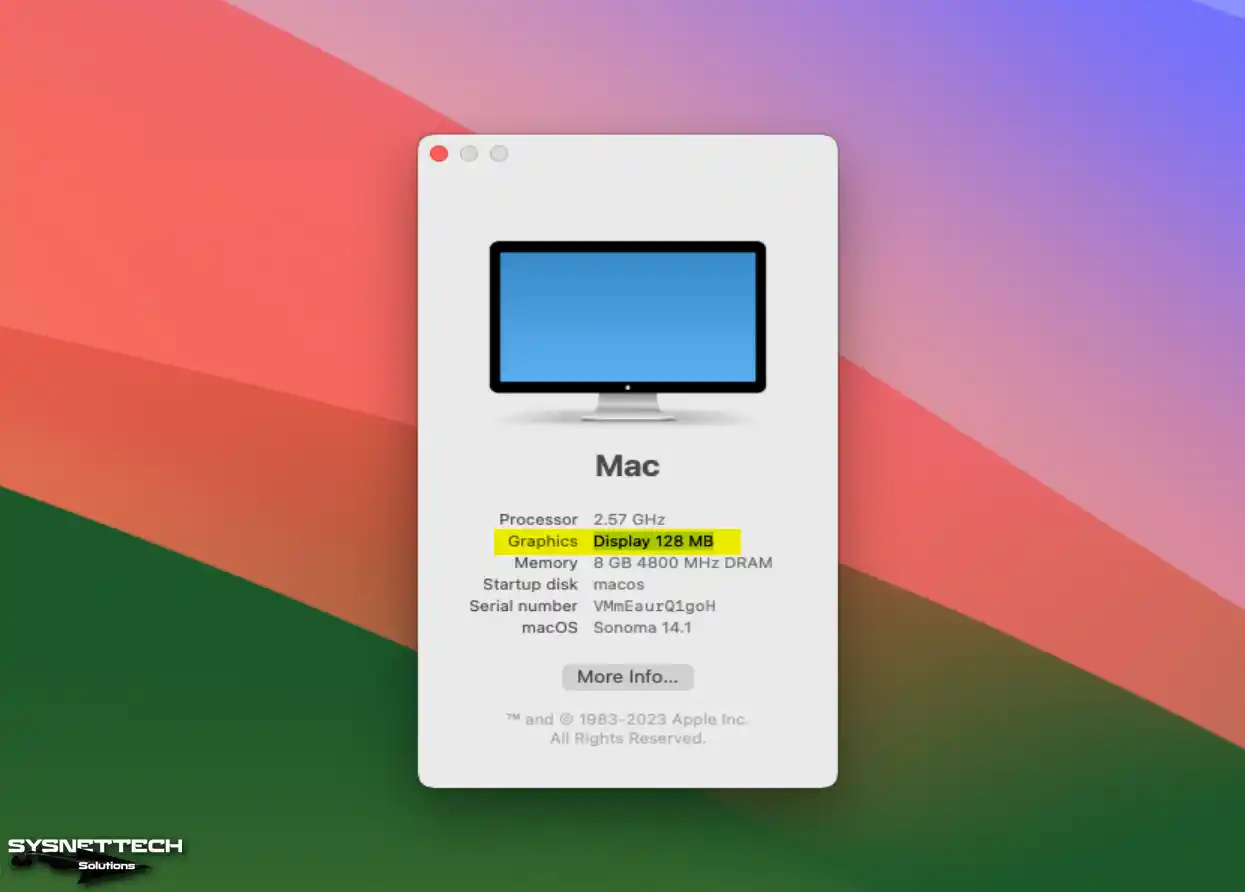
Check that your guest system is available in full-screen resolution on VMware and that the graphics memory is 128 MB instead of 3 MB.
Step 13
To use your guest machine in full-screen resolution, depending on the screen of your host, click View / Full Screen from the Workstation tool menu.

Step 14
When you try to transfer a file by dragging and dropping a file from the Windows 10 host machine to the macOS guest machine, you will get the VMware-tools-daemon error. Click Open System Preferences to resolve this error.
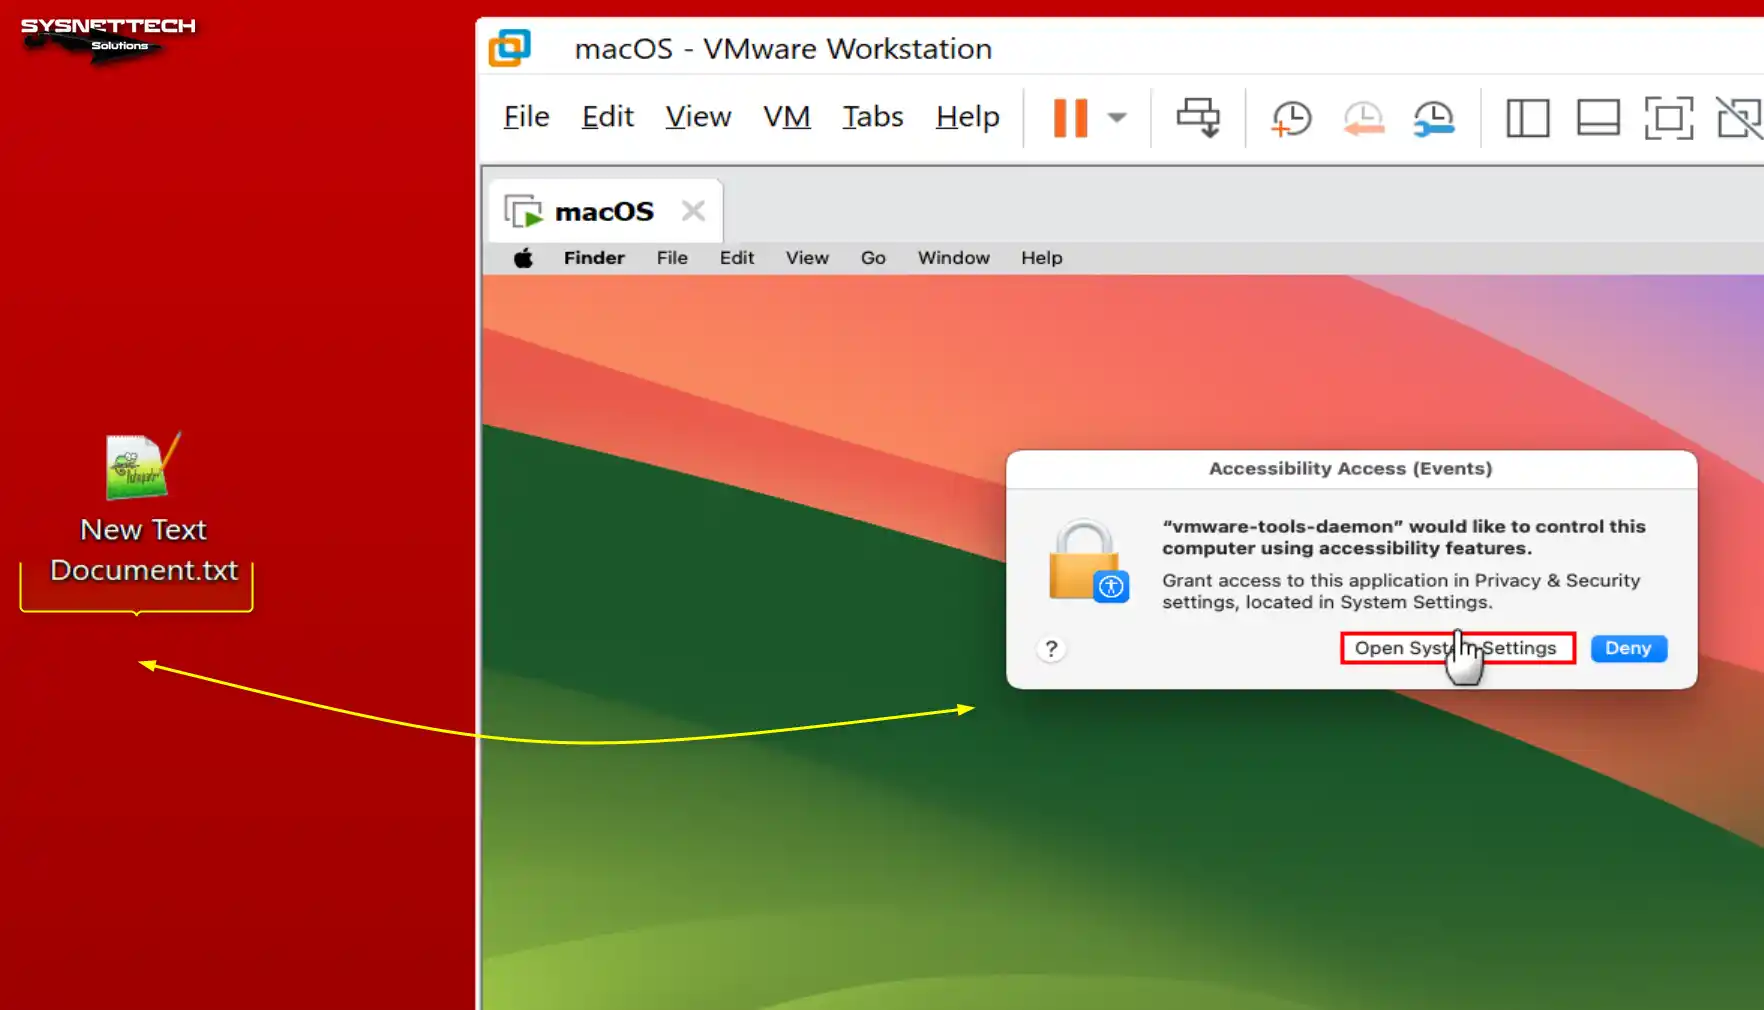
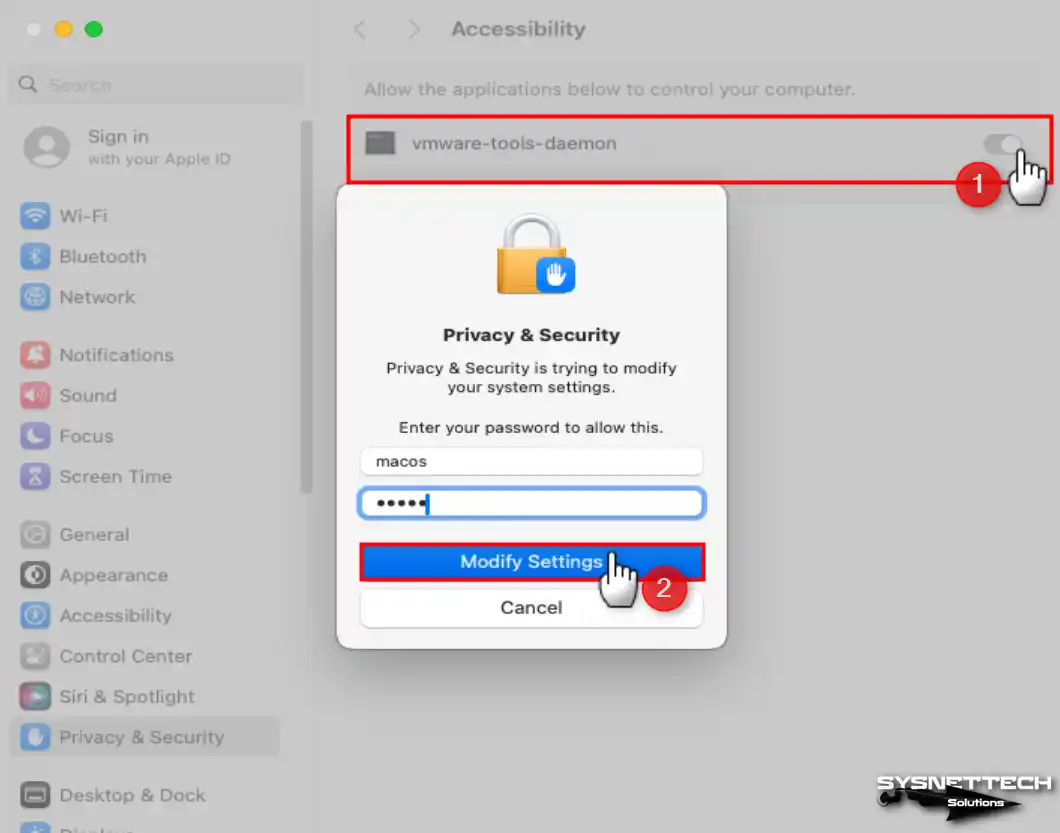
Step 15
To change the security and privacy settings, unlock the system again and enable the VMware-tools-daemon component in the Accessibility section.
Step 16
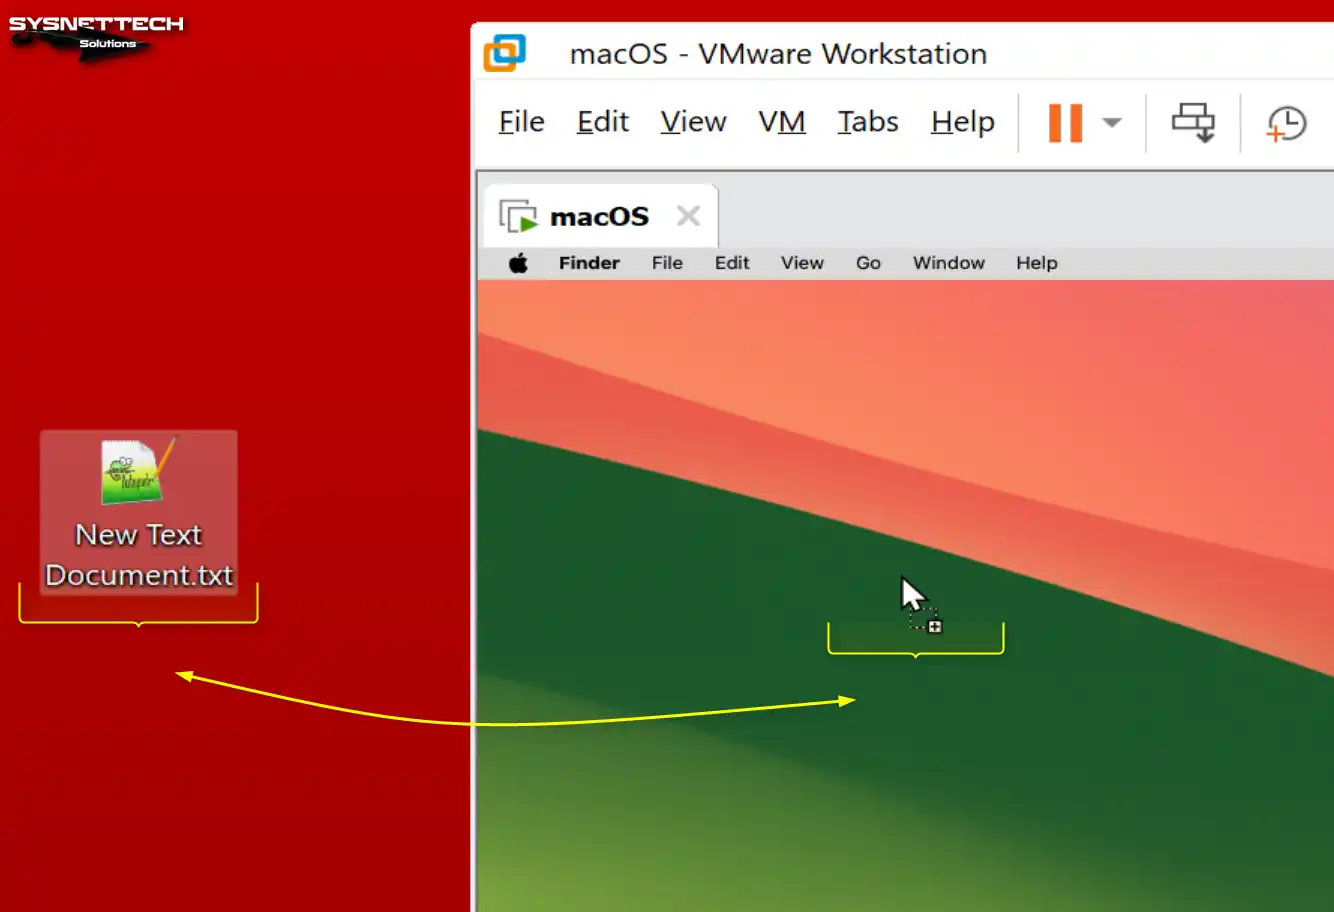
When you try to transfer a file from your host to the VM again after allowing the VMware-tools-daemon component, you can see that the operation will be successful, as in the image below.
How to Check Internet Connection
After setting all the settings on your guest’s macOS computer, it is helpful to test the internet connection. Otherwise, you will be unable to install new updates on your system or the applications you want to use.
Step 1
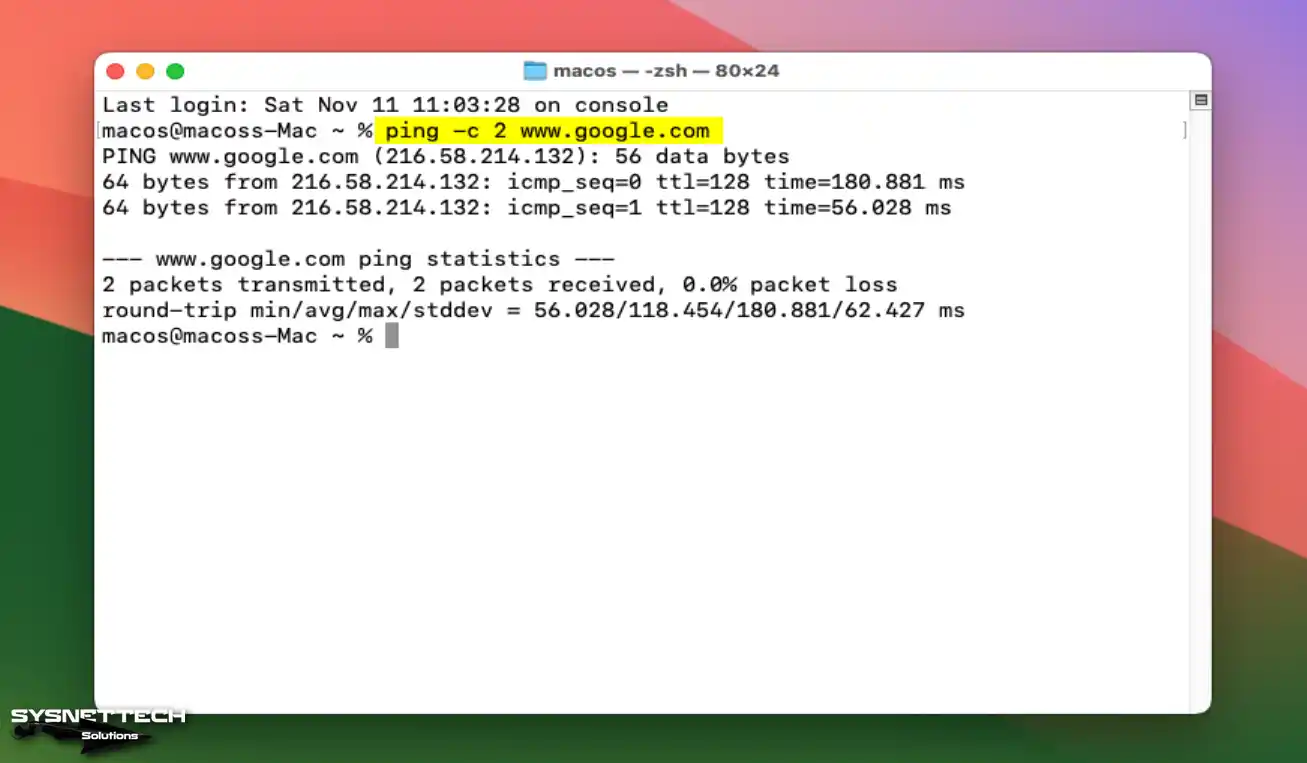
To run the terminal, press Windows Key + Space together, type terminal in the open search bar, and run it.
To ping on macOS, execute the command ping -c 2 www.google.com in the terminal. If you see the TTL=128 value in the ping output, you can access the Internet.
Step 2
When the ping is successful, open the Safari web browser on your Mac virtual computer and test your connection by visiting the Google homepage.

How to Use USB Flash Memory
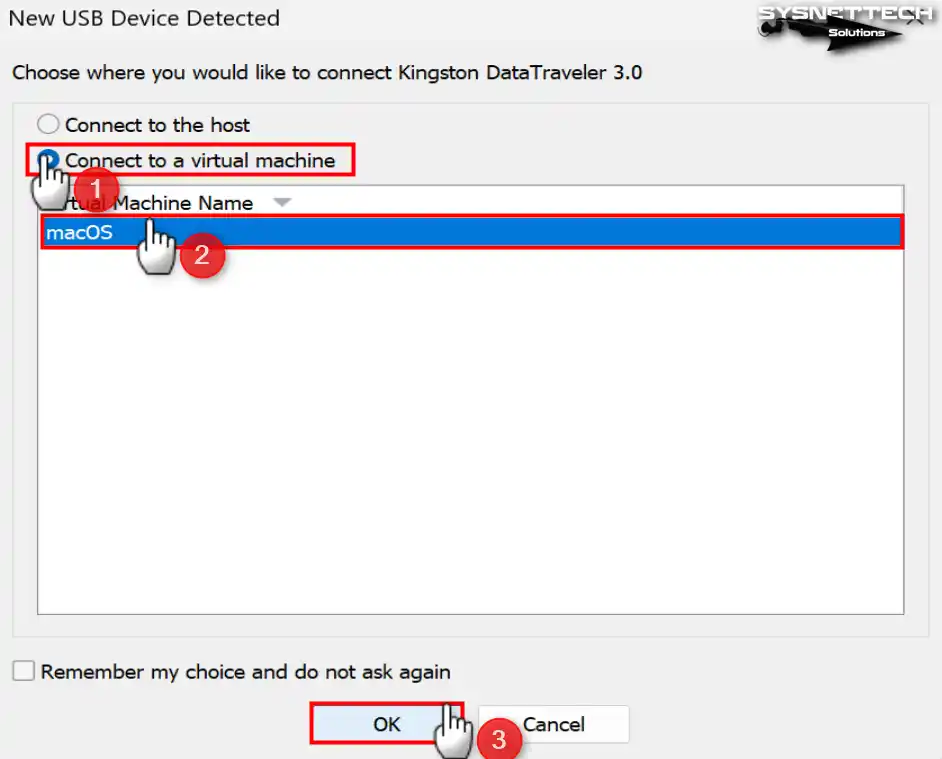
You can use your USB flash drives in a virtual machine set up in VMware Workstation 17 Pro software. As soon as the host inserts a USB disk into your computer, the new device is detected by the program window, and you can easily plug your device into the VM or the host.
Step 1
Insert a USB flash disk into your Windows 10 host computer. When the New USB Device Detected window opens, select the Connect to a virtual machine option, choose your virtual machine, and click OK.
Step 2
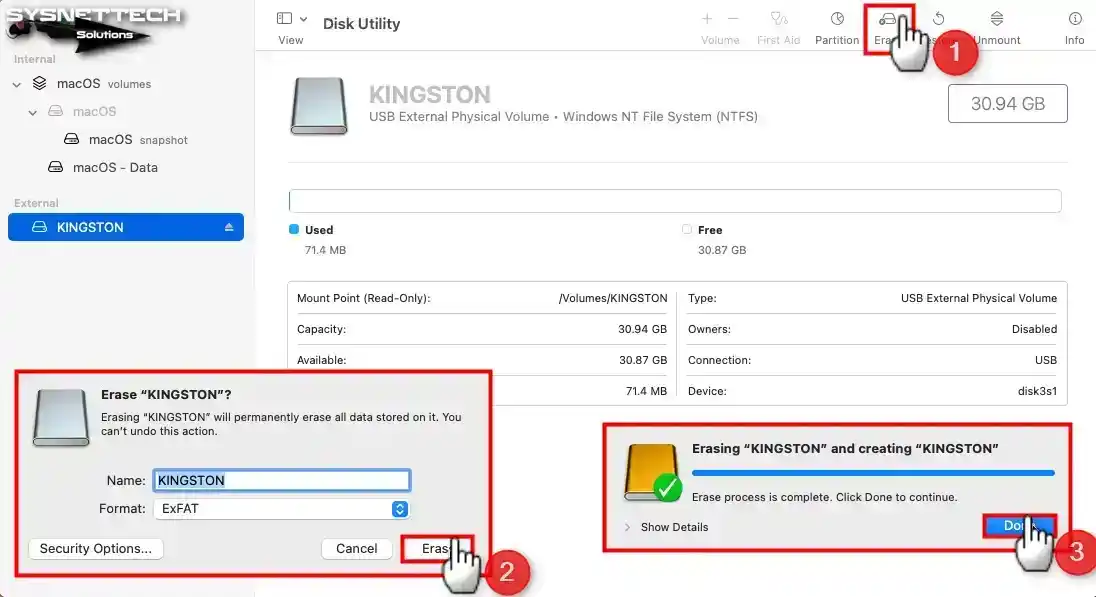
You cannot use an NTFS-formatted flash drive on macOS. So, it would help if you formatted your USB stick as ExFAT. After opening Disk Utility, right-click on your flash disk from the External section and click Erase.
In the disk formatting window, type any name in the Name field, select ExFAT from the Format field, and click the Erase button again.
Step 3
After formatting your flash disk as ExFAT, you can transfer your data.
Step 4
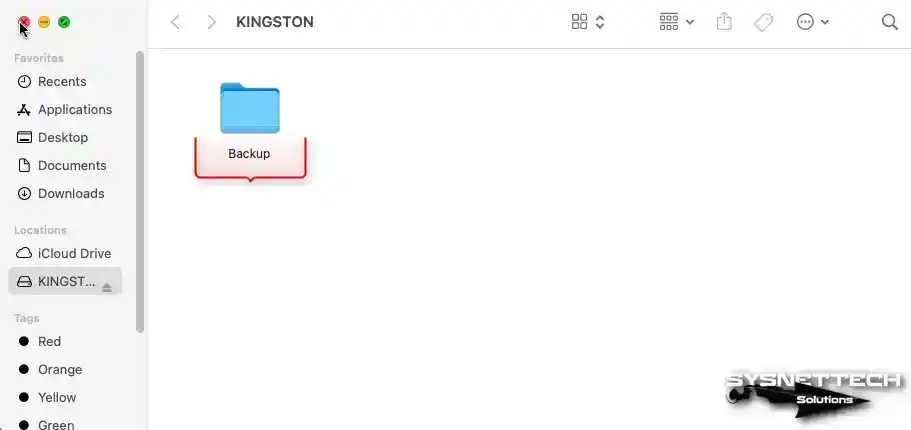
Disconnect your flash disk attached to the macOS VM and connect it to the host this time. This aims to test whether Windows can view the data transferred to the flash drive on macOS.
Step 5
When you view the contents of your flash memory through My Computer on your Windows 10 host, you can see the folder named Backup created in the VM.

How to Improve the Performance of a macOS Guest Machine
Unfortunately, even if you run the macOS operating system virtually, you cannot use some of your applications or games because it does not support 3D graphics. This is because there is no 3D graphics support for macOS by the virtualization software used.
You can increase the graphics memory from 3 MB to 128 MB by installing VMware Tools on the guest machine. However, this will not work even if you have a new computer.
At the very least, it may be ideal for software developers or people who want to experience Apple systems. For example, you will experience performance issues when using the latest macOS version with a VM, even on Intel’s 12th or 13th-generation processors.
Changing the visual effects of your system, adjusting the menu transition effects, or lowering the screen resolution may affect the system’s performance a little.
You can quickly change system settings using the codes listed below. Remember to back up your system with the snapshot beforehand!
- Quick Access to the Dock
sudo defaults write com.apple.dock autohide-time-modifier -float 0.15- Turning Off Visual Effects
sudo defaults write com.apple.finder DisableAllAnimations -bool truesudo defaults write com.apple.finder InitialSpringBoardDelay -float 0- Disabling Spotlight Search
sudo mdutil -a -i off- Shorten Delay in Visual Effects
sudo defaults write -g com.apple.mouse.scaling -float 5.0sudo defaults write -g com.apple.trackpad.scaling -float 5.0sudo defaults write -g InitialKeyRepeat -int 15sudo defaults write -g KeyRepeat -int 2- Window Sensitivity Settings
sudo defaults write com.apple.driver.AppleBluetoothMultitouch.trackpad TrackpadThreeFingerDrag -bool truesudo defaults write com.apple.driver.AppleBluetoothMultitouch.trackpad TrackpadThreeFingerHorizSwipeGesture -int 0sudo defaults write com.apple.driver.AppleBluetoothMultitouch.trackpad TrackpadThreeFingerVertSwipeGesture -int 0- Increasing Drag Speed
sudo defaults write -g com.apple.trackpad.scaling 2.5sudo defaults write NSGlobalDomain NSWindowResizeTime -float 0.001- Lowering the Resolution
sudo /Library/Application\ Support/VMware\ Tools/vmware-resolutionSet 1920 1080- Turning Off Visual Effects to Reduce CPU Load
sudo defaults write com.apple.universalaccess reduceMotion -bool true- Turning Off Visual Effects in Safari
sudo defaults write com.apple.Safari WebKitInitialTimedLayoutDelay 0.25- Disabling Bluetooth
sudo defaults write /Library/Preferences/com.apple.Bluetooth.plist ControllerPowerState 0- Turning Off Menu Transition Effects
sudo defaults write NSGlobalDomain NSAutomaticWindowAnimationsEnabled -bool falseInstalling Old Versions
| Versiyon | Slide |
|---|---|
| macOS Sierra 10.12 | View |
| macOS High Sierra 10.13 | View |
| macOS Mojave 10.14 | View |
| macOS Big Sur 11 | View |
| macOS Ventura 13 | View |
macOS on Virtual Machines: What You Wonder and Life-Saving Tips
Do I have to own a real Mac computer to run macOS?
Why can’t I see the Apple Mac OS X option in VMware Workstation?
Can I run a macOS virtual machine on a computer with an AMD processor?
The VM stays on a black screen or freezes after installation. What should I do?
How much RAM and CPU cores should I give to the virtual machine for macOS?
How do I install VMware Tools on macOS and why is it needed?
Conclusion
As a result, by following the steps in this article, you can install macOS Sonoma 14 with VMware Workstation 17 Pro on Windows 11. Additionally, with support from VMware Unlocker, users can now experience macOS on non-Apple hardware.
However, this method allows you to test macOS Sonoma without requiring a Mac computer. In addition, this installation has become more accessible and convenient for many users. As a result, macOS offers new possibilities for exploring and testing Sonoma.

46 People Shared Their Experience
Hello,
Unable to get pass Step 30. When it boots, the Apple indicator goes half way, then it reboots itself repeatingly. I followed all the steps according to instructions but unable to get to Step 31 as the boot looping might be a debugger called: . Take a look at the following screenshot I shared via link.
I tried same steps without success.
When apple gauge is near 40%, the VM reboots.
There’s a bit difference with me, because my PC is Linux (xenial) and NOT has VM acceleration on BIOS.
Had the same issues listed above … To get it installed and working, I turned the CPU Virtualization options Off for the initial install, than Virtualization On for the Install and finally Virtualization Off once it was installed… Not ideal … But got it to work …
Wonderful guide.. it all worked like charm …
big thumbs up (Y)
Thank you Speedtangent!
Totally junk !!! I spent two days installed it successfully. But next morning it can’t boot up.
I will remove it entirely and go to VirtualBox.
It went very well
Tks for your great work
You’re welcome! Thank you for your comment!
Wonderful detailed guide! Got it working on the first try, THANK YOU!
Dear
As per your instructions for install macos Sierra on vmware successfully install . I am following your instructions step by step then installation successfully macos. Thank you brothers you are great.
Getting this error “The CPU has been disabled by the guest operating system. Power off or reset the virtual machine.” when i am starting the VM
Check that the VT-x (Virtualization) feature is enabled in the host computer’s BIOS settings. If VT-x is enabled, disable it completely if you’ve used Hyper-V before and try again.
This is a wonderful guide. However I can’t get it to work. I’m using Windows 10 with VMware Player 16. My computer has an Intel Core i7 CPU with 16 GB of RAM. Everything works fine until the install itself (I can boot up and partition the hard drive). I keep getting an error message saying that the macOS Mojave installer is corrupt and can not continue. I tried the High Sierra install too and got the same problem. Am I doing something wrong?
1. On the macOS Utilities screen, open Utilities / Terminal from the tool menu.
2. Execute the date command in Terminal and check the current date. To solve this error, you need to set the date back 3 or 5 years.
3. Disconnect the VM from the Internet and execute the command “date 102523382016” in the terminal. After applying this command, click Install macOS again and start the installation.
Hello,
Thank you for the article. I am currently receiving an error message when trying to boot up the virtual machine. It says VMware Workstation unrecoverable error: (vcpu-0)
Exception 0xc0000005 (access violation) has occurred.
I am running vmware 16 latest release
I have an i9 12900 cpu
I had to uncheck the virtualization engine checkboxes or else I get “VMware Workstation does not support virtualized performance counters on this host.”
Thank you for your time
HI,
Thanks so much to the tips to install MacOS. I have problem I cannot hear or hear sound from Mac OS from VMWare. I have tried all tips from VMWare but still no success. I am running my PC with GTX 1050 Ti Display anc sound through HDMI to my Samsung Monitor C27F591.
Any help would be great.
thanks again
Hello great tips for macos in vmware but when i launch the vm from ISO to install i get the cpu has been disbled havent used hyper-v what do i do?
i cant get it to erase the nvme disk to reinstall macOS. im stumped and cant figure it out
Works Good
tentei instalar no meu pc porem apesar de seguir todos os passos na hora que clico para instalar o mac, aparece tela preta com uma maçã e não si disso
I got it to work using VENTURA on WIN 11 and VMware 17. A couple of tweaks here and there, like the Darwin, had to be downloaded manually. But it works very fine
Also if you encounter issues with internet, follow this steps
1. Check if your computer has internet connection
2. Make sure NAT is selected under Network Connection (Network Adapter) in Virtual Machine Settings
2. Open .vmx file of your macOS 13 Ventura Virtual Machine
3. Edit ethernet0.virtualDev = “vmxnet3”
Worked for me
Exactly this method works.
My environment > Windows 10(Latest) + AMD® Ryzen 9 5900hx CPU + VMWare 17 Pro
It will stuck when install finish and boot loop.
Do you have any suggestions?
Same problem with Ventura on simiral equpment (Ryzen 7 Pro 6850U + W10 22H2 + VMw WS17 Pro). I tried VT-x on/off. Catalina running fine with VT-x off, with VT-x on running too but i have problem with resuming from suspend. 3D acceleration i have on, i checked windows task manager and when i playing video or moving window 3D section has higher utilisation.
Great guide! I’m having a problem when trying to find the darwin.iso from within the settings. I had to download the iso but getting this error when opening the file “This operation cannot proceed because your Mac OS guest is using the CD/DVD. Dismiss this message, eject the disc from inside the guest, and retry this operation.” And then “Connection control operation failed for disk ‘sata0:1′”
Thanks a lot for your comment. However, you can ignore the CD/DVD error you encounter. The Workstation program only warns you. You can choose to download VMware Tools from this link. Thanks again.
Hi there,
I followed the directions exactly. I am able to get past the disk format stage. but then it chokes during the install stage. It looks like it gets very close to complete, but then it starts cycling through reboots, each time displaying, ‘Your computer restarted because of a problem. Press any key or wait a few seconds to continue starting up.’
I’m using an AMD Ryzen 9 5950x processor. I think I may have read in the past that virtualization of Apple systems is problematic with AMD processors. Is that true? Any idea what my problem is?
Thanks.
Not working on my Ryzen 7 / Windows 10 / VMPlayer 17. Same probelm as David above, installation starts but at some point it just restarts and goes into a boot loop. Any clues on how to fix this?
Did you find a solution? Having the exact same problem.. Any help would be apreciated!
Hi all! I have the same problem with boot loop in the final of installing way (Ryzen 7 5800h)
First of all, HUGE thankyou Tolga for this complete and excellent tutorial. I’m in the same boat as all the others with Ryzen CPUs, it just goes into a continuous reboot loop but I found this :
To install macOS on Ryzen laptop, you need to:
Create a macOS bootable USB disk using Windows, macOS or Linux.
Download and install a virtual machine software such as VMWare Player or VirtualBox.
Torrent a macOS image file compatible with AMD Ryzen, such as Sierra, Catalina or Monterey.
Modify the VMware VMX file or the OpenCore boot loader for the macOS image.
Configure the EFI BIOS setting of your laptop to boot from the USB disk.
Install macOS on your laptop and perform post installation steps.
I’m goingto try Monterey and will report on how I go.
Success! The Monterey iso works on AMD Ryzen 7 5800X3D following all the steps in this tutorial exactly. Thanks again Tolga.
I’m so glad I helped. Also, thanks for your feedback.
Step 23, I can’t get past that. I turn it on, only a blue “boot manager” box appears, with a few choices, none of which works (except “shut down the system”). Conclusion: Failed installing macOS on VMWare, I tried twice from the beginning. Maybe it’s a bad ISO? I had to download it from another place because the Mega link here doesn’t work (requires a payment).
There may be corruption when downloading the ISO file from another platform. However, still, ensure you have configured your VM’s settings properly. Also, find a set suitable for your host by playing with the number of CPUs and vCore value. This installation process may vary from device to device in some cases. Thanks for your feedback.
Same problem with an AMD CPU (AMD Ryzen 7 5700G 8x 3.80GHz).
I have a Catalina VM with VMware 17.5 on Windows 11 and this works without problems. So I copied it and tried to update to macOS 14 Sonoma Beta, in the System Updater by Download, took a while, its 12 GB or so.
Then after first installation before any macOS 14 GUI, it hangs in a boot loop, in the very beginning of boot it stops and I read that error: “Your computer restarted because of a problem…”
I have the vmx changed as I read differently, the Unlocker 3.0.5 is active and as I say, the 10.15.7 is running flawlessly.
Must be the combinatin AMD and macOS 14, have tried 13 too, not working neither, also boot loop.
Wayne McDermott wrote, that Monterey can play in Ryzen, so next thing I will try is Monterey ISO…
Any hints to play Sonoma are highly welcome 🙂
Thanks.frank
I can’t get past Step 10 of the MacOS Sonoma install. I’m running Windows 10 Pro 22H2 and a fully licensed VMware Workstation Pro 17.5. I get the “Your computer restarted because of a problem. Press any key or wait a few seconds to continue starting up.”
My computer hardware is an AMD Ryzen 9 7800X, 64 GB DDR5 RAM, with a three NVMEe GEN5 SSDs. Any help you could provide me will definitely be appreciated. I really want to run the MacOS on this computer. Thanks!
I saw “Your computer restarted because of a problem. Press any key or whait a few seconds to continue sratiing up.”
How to solve it?
Hello, nice to meet you.
I installed macOS Sonoma 14 on VMware Workstation 17 with HP ENVY I can’t proceed.
What should I do in this case?
I would appreciate any advice.
Thank you.
Please excuse me.
Hi Tolga, w have an AMD 5600 I am using Workstation Pro 17 . I followed your tutorial and managed to get Sonoma to get to the recovery screen where you can select disk utility and format it. Is goes through different stages but just before the end setup stage it reboots then I get this Your computer restarted because of a problem. Press any key or wait a few seconds to continue starting up.” hope you can help solve the issue thanks. Regards Chris.
If your CPU is intel, check if it supports AVX2. If it doesn’t then there’s simply no way to boot macOS 13 or higher.
Same for me on AMD Ryzen
“Your computer restarted because of a problem. Press any key or wait a few seconds to continue starting up.”
No solution ?
Amazing guide, can someone please help me with the performance issues, the given ones are not working.
Amazing guide! I get it to work using both Sequoia and Sonoma, but cannot add a USB device. Using right click on the VM name -> Removable devices -> choose device -> Connect (disconnect from host) I get the message that the device is going to be unplugged from the host and connected to the virtual machine. Then I get a USB device error and all the device icons in the bottom bar disappear except for the drive, disk, network and sound. Very shortly after they all re-appear.
I have tried putting:
usb.quirks.device0 = “05ac:12ab skip-refresh”
usb.quirks.device0 = “05ac:12ab skip-setconfig”
usb.quirks.device0 = “05ac:12ab skip-reset, skip-refresh, skip-setconfig”
in the vmx (vid:05ac pid:12ab)
I have tried using usb2 (under settings -> USB controller) but then my keyboard and mouse are not recognised at bootup.
VMWare Tools are installed and the Daemon is running.
Another strange thing is that the background stays white – I have changed it and it is visible in the login screen, but in the finder / desktop it does not change.
Any hints are welcome!
Thank you for the clear feedback and for testing on both Sequoia and Sonoma — that is very helpful. The USB issue you described usually points to a controller problem or a host conflict rather than a quirk setting issue.
Please delete all lines in the .vmx file that begin with usb.quirks.device0. These lines are often unnecessary and can interfere with USB startup. Then, add the following lines to enable the xHCI controller and allow HID devices to function through it:
usb.present = "TRUE"ehci.present = "FALSE"
xhci.present = "TRUE"
usb.generic.allowHID = "TRUE"
usb.autoConnect.device0 = "0x05ac:0x12ab"
Shut down the virtual machine completely (do not just pause it), then restart it. If the issue persists, check for potential problems on the host machine. Avoid using USB hubs, try connecting the device to a different USB port, and in Windows Device Manager, disable “Allow the computer to turn off this device to save power” for each USB Root Hub.
If your device is manufactured by Apple (Vendor ID 05ac), Windows may claim it before VMware can assign it to the virtual machine. As a last-resort advanced fix, you can also add the following lines to the .vmx file to prevent device conflicts and apply less restrictive USB rules:
pciPassthru0.present = "FALSE"usb.restrictions.defaultAllow = "TRUE"
After applying these changes, reboot the host machine completely before testing again.
If the issue continues, please let me know your VMware version and host operating system, and I’ll help you investigate further.