
In today’s online world, we must know network setups like Cisco. This is true for both eager and skilled IT workers. Of the many tools you can use, SDM (Security Device Manager) is a top choice. It gives us an easy-to-use screen, letting us make challenging jobs simple on our older devices.
In fact, Cisco SDM is for users who do not know the command line. So, it gives a visual way to manage the network. In the end, it makes LAN & WAN management much easier without using the CLI.
In this guide, we will configure NAT on a Cisco Router using SDM. I want to make Basic NAT easier for you by sticking to the basic ideas.
No matter if you are building a small office LAN or getting ready for what’s next, I think learning NAT with SDM will help you. Really, this is a key step in your networking journey. You will get the needed tools to move up in the Cisco network world.
Understanding SDM Software
SDM (Security Device Manager) is a web-based software we use to configure Cisco Routers. We can install this software either on the network device’s memory or on our PC. This allows us to configure the device on our LAN from a screen with a visual interface.
Actually, the SDM tool is more geared toward users who are not proficient with CLI commands. If you are new to Cisco network designs, you are probably just getting used to the CLI. Therefore, SDM comes into play here, saving you from the complexity of commands.
Even now, Cisco still helps its older tools, but newer ones have taken their place. Therefore, if you are developing your skills in the field of networking, I recommend that you know this as well.
NAT Configuration with SDM
As I said, you can configure a Cisco Router with the CLI at both a basic and advanced level. However, you must have advanced CLI knowledge.
Still, if you’re going to configure NAT with SDM, for example, I recommend doing so to grasp the basic concept. If you become more proficient with the CLI, you’ll gain valuable skills. Additionally, this will also help you learn how to set up Cisco devices more easily.
NAT (Network Address Translation) is essential for a network. Through this protocol, we convert our private IP addresses to public IP addresses.
By private, we mean these are only the numbers we assign to our LAN. When accessing the Internet, all our PCs use the IP address provided by our ISP. This lets us keep our inside addresses safe but still get into the online system.
As the RFC 1918 rules say, private IP addresses use these number groups:
- 10.0.0.0 to 10.255.255.255
- 172.16.0.0 to 172.31.255.255
- 192.168.0.0 to 192.168.255.255
We only use the above addresses on our devices within the LAN. Because of this, our office computers cannot talk to outside networks. But, as I said before, we use NAT to convert our local traffic. So, we can communicate with the online world.
Now, first install Cisco SDM, and then let’s move on to the basic IP conversion settings.
How to Configure NAT on a Cisco Router in the SDM Software
We will use VMware Workstation to set up Network Address Translation with SDM. First, set up a virtual machine in VMware and configure the VMnet setting to Host-Only.
Just remember to set the VMnet IP block to 192.168.8.0/24, as in step 1.
With this setting, your VM will only be able to communicate with VMnets in the same group. On the other hand, you will not be able to access the network where your host PC is located.
That’s why we will create a great LAN topology and bring a VM out to our local network using IP translation.
1. Create a Topology for Basic NAT
Step 1
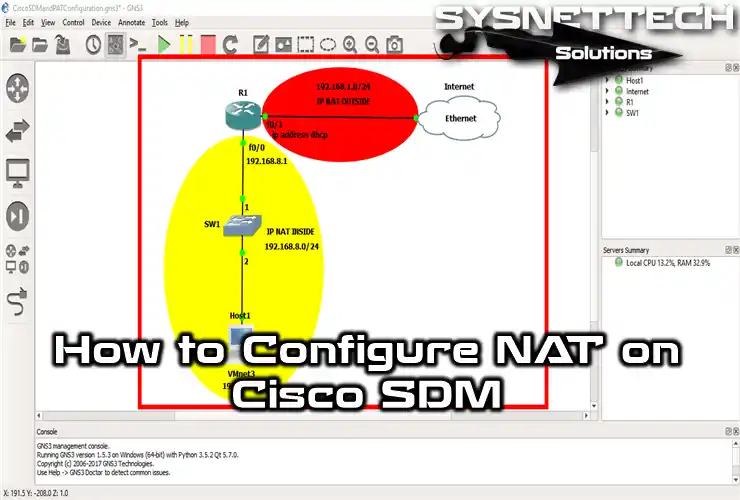
Open the GNS3 network topology tool and make a simple network setup like the image shows. This topology I have prepared for you is for the basic one.
So, add a Cisco Router, Switch, PC, and Cloud. Make sure your Router has ports for both networks. This is because you will set up the NAT rules to match.
In the topology, I designated the Fa0/0 port on the Router as the inside network and Fa0/1 as the outside network. That is, I connected a VM I created in VMware to the Fa0/0 interface. I defined a private network with VMnet3 and added it to the layout using the Cloud PC in GNS3.
Therefore, I assigned the IP address 192.168.8.5 to the device connected to VMnet3. In short, I will connect my VM to the Internet by routing it from the GNS3 Router to my local network. For this, I will use the SDM tool developed by Cisco for its older devices.

Step 2
If the topology is OK, start the SDM program from inside the virtual machine. Or, if you want to reach the Router’s web page, type its IP address in your browser. In our case, we can get to SDM by typing 192.168.8.1 and trying to connect.
After you get into SDM, click Configure at the top menu. Here, you will see many different things you can set up on the Router. For example, you can set up VPN, ACL Routing, or Security Audit settings.
With the SDM tool, you can do all the setups shown in the picture below. In other words, you can easily handle and change your network device settings.

2. Select the NAT Type
Step 1
We opened the current settings by clicking the Configure tab in the SDM interface. Now, let’s proceed by clicking NAT in the Tasks area on the left side.

Step 2
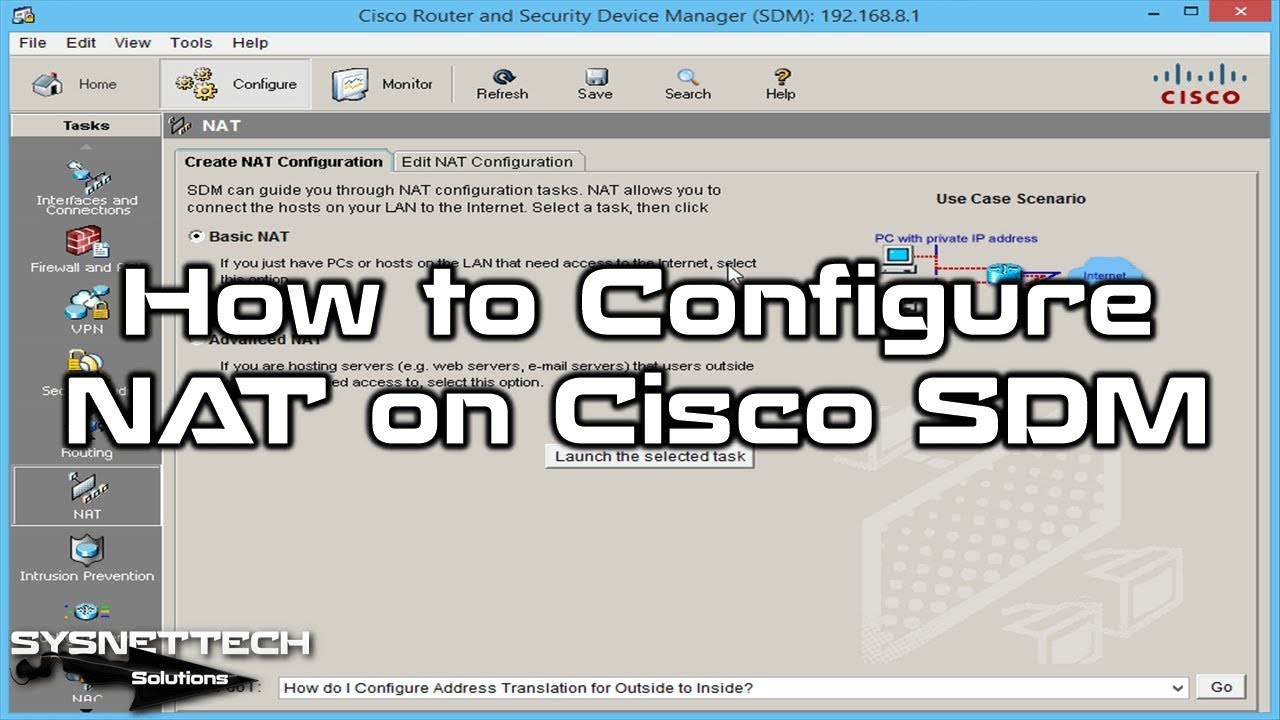
The screen in the SDM config section shows you which choice to pick. Here, you can make a new NAT setup or change an existing one.
Here you have two choices for a new setup:
- Basic NAT: If your local network only has computers, pick this choice. This lets you easily link your devices that need the web to the online world.
- Advanced NAT: You might need some users on your outside network to reach a web or email server. In this case, you can pick this choice to do a more complex IP translation setup.
I suggest you select the Basic one, since we are following our topology. After that, click “Launch the selected task” to proceed to your port selection.

3. Configure Basic NAT in the SDM Tool
Step 1
Actually, the Basic NAT wizard tells you what to do here. That is, it asks you to select the port on your Cisco Router that is connected to your ISP.
On the other hand, it suggests that you choose the port through which you will connect your local devices to the Internet.

Step 2
Here, you should pick your port linked to the Internet Service Provider, which is FastEthernet0/1. In our topology, our port to the outside network is Fa0/1, so we choose this one.

Step 3
Right after we pick FastEthernet0/1, we will see the ready network just below. In fact, the SDM helper leads us without any errors.

Step 4
I selected the Fa0/1 interface for the Router Outside NAT. Now, I specify the network range listed by the wizard, which is 192.168.8.0 – 192.168.8.255.

Step 5
We defined the Inside & Outside ports on the Router with SDM. Since we have now completed Basic NAT, proceed by clicking Next.

Step 6
We click Finish to send the basic IP mapping settings to our Router.

Step 7
SDM successfully sent the commands to the Router!

4. Verify Basic NAT Settings
Step 1
You can check the summary of the address translation setup on the SDM. If you want, you can also change the setup for a different network here.

Step 2
Let’s test IP mapping on our sample VM. Open the CMD tool and ping Google servers with the command “ping 8.8.8.8”!
Here, our VM reached our local network via the Router. Since the packet request was from the external network, it went to our local modem. Therefore, our ping test was successful in the NAT test.

Step 3
Another check we do is to see if the address changes on the R1 Router. To do this, click on it in the GNS3 program to open the CLI and run “show ip nat translations”.
Look closely at the IP translations in the CLI console. There, you can see that the Router converts the IP address 192.168.8.5 to 192.168.1.101.

Step 4
Now let’s try connecting to Google from the browser on our virtual PC. Right after that, let’s check the Router IP logs to see what happened!

Step 5
Run “show ip nat translations” again on the Router and check the output. Here, you will now see the current IP addresses of the Google search engine!

Step 6
Finally, run “show ip nat statistics” on the Router doing the Basic NAT job. In the results that show up, you will see the count of actions your device has taken for your VM.

Show Commands for Basic NAT
- R1#show running-config
- R1#show ip nat statistics
- R1#show ip nat translations
R1#show running-config
Building configuration...
Current configuration : 1449 bytes
!
version 12.4
service timestamps debug datetime msec
service timestamps log datetime msec
no service password-encryption
!
hostname R1
!
boot-start-marker
boot-end-marker
!
no aaa new-model
memory-size iomem 5
no ip icmp rate-limit unreachable
ip cef
!
no ip domain lookup
ip auth-proxy max-nodata-conns 3
ip admission max-nodata-conns 3
!
crypto pki trustpoint TP-self-signed-4279256517
enrollment selfsigned
subject-name cn=IOS-Self-Signed-Certificate-4279256517
revocation-check none
rsakeypair TP-self-signed-4279256517
!
username ciscosdm privilege 15 secret 5 $1$P8AQ$58kw7DHT7YUj3far7KDoM.
!
ip tcp synwait-time 5
!
interface FastEthernet0/0
ip address 192.168.8.1 255.255.255.0
ip nat inside
ip virtual-reassembly
duplex auto
speed auto
!
interface FastEthernet0/1
ip address dhcp
ip nat outside
ip virtual-reassembly
duplex auto
speed auto
!
ip forward-protocol nd
!
ip http server
ip http authentication local
ip http secure-server
ip nat inside source list 1 interface FastEthernet0/1 overload
!
access-list 1 remark SDM_ACL Category=2
access-list 1 permit 192.168.8.0 0.0.0.255
no cdp log mismatch duplex
!
control-plane
!
gatekeeper
shutdown
!
line con 0
exec-timeout 0 0
privilege level 15
logging synchronous
line aux 0
exec-timeout 0 0
privilege level 15
logging synchronous
line vty 0 4
login local
transport input telnet
!
end
R1#
R1#show ip nat statistics
Total active translations: 85 (0 static, 85 dynamic; 85 extended)
Outside interfaces:
FastEthernet0/1
Inside interfaces:
FastEthernet0/0
Hits: 2977 Misses: 94
CEF Translated packets: 2921, CEF Punted packets: 297
Expired translations: 62
Dynamic mappings:
-- Inside Source
[Id: 1] access-list 1 interface FastEthernet0/1 refcount 85
Appl doors: 0
Normal doors: 0
Queued Packets: 0
R1#
R1#show ip nat translations
Pro Inside global Inside local Outside local Outside global
udp 192.168.1.101:49225 192.168.8.5:49225 192.168.1.1:53 192.168.1.1:53
udp 192.168.1.101:49701 192.168.8.5:49701 192.168.1.1:53 192.168.1.1:53
tcp 192.168.1.101:49750 192.168.8.5:49750 23.198.21.99:80 23.198.21.99:80
tcp 192.168.1.101:49751 192.168.8.5:49751 204.79.197.203:80 204.79.197.203:80
tcp 192.168.1.101:49753 192.168.8.5:49753 204.79.197.203:80 204.79.197.203:80
tcp 192.168.1.101:49754 192.168.8.5:49754 151.101.193.108:80 151.101.193.108:80
tcp 192.168.1.101:49755 192.168.8.5:49755 13.107.5.80:80 13.107.5.80:80
tcp 192.168.1.101:49756 192.168.8.5:49756 13.107.5.80:80 13.107.5.80:80
tcp 192.168.1.101:49757 192.168.8.5:49757 195.175.112.105:80 195.175.112.105:80
tcp 192.168.1.101:49758 192.168.8.5:49758 195.175.112.105:80 195.175.112.105:80
tcp 192.168.1.101:49759 192.168.8.5:49759 195.175.112.105:80 195.175.112.105:80
tcp 192.168.1.101:49760 192.168.8.5:49760 195.175.112.105:80 195.175.112.105:80
tcp 192.168.1.101:49761 192.168.8.5:49761 2.18.213.33:80 2.18.213.33:80
tcp 192.168.1.101:49762 192.168.8.5:49762 2.18.213.33:80 2.18.213.33:80
tcp 192.168.1.101:49763 192.168.8.5:49763 2.18.213.33:80 2.18.213.33:80
tcp 192.168.1.101:49764 192.168.8.5:49764 2.18.213.33:80 2.18.213.33:80
tcp 192.168.1.101:49765 192.168.8.5:49765 2.17.23.122:80 2.17.23.122:80
How to Enable NAT with SDM ⇒ Video
To learn about the NAT (Network Address Translation) feature using Cisco SDM, watch our YouTube video. In this video tutorial, I walk you through each step just like in our guide.
Rest assured that you will understand each step clearly. Plus, we would be delighted if you subscribed to our YouTube channel. By joining us, you can see more helpful guides and access our useful resources!
Frequently Asked Questions (FAQ) About SDM NAT
- What do you need to have ready before setting up NAT in SDM?
- How can I resolve the IP translation issues in SDM?
- Can I configure PAT (Port Address Translation) with SDM?
Conclusion
In short, setting up SDM and NAT is very simple. First, you make your network tasks much easier. Also, you build a strong base for your work in the Cisco world.
Because SDM’s screen is simple, you can set up your device even if you are new to networks. For example, you can see the key job of IP address mapping, as shown in our guide. You can also see why it matters for safe and sound network talk.
As you keep building your skills, you can move from SDM to CLI. I am sure this change will significantly improve your know-how.
Also, it will give you the smarts to fix more challenging LAN problems. So, be sure to use this good network learning chance. This way, you will grow as a skilled network pro in the Cisco tech world.
Also, I suggest a few guides you can try using the CLI, not SDM. You can also check out our Cisco Router Static NAT Configuration guide with GNS3. Here, you will learn that you can only convert using a fixed IP, not a changing one.
I assume you want to implement this protocol with a more flexible approach, like the one shown here. If so, you can also look at the Cisco Router Dynamic NAT Setup with GNS3. You can do more changing network address swaps instead of fixed ones. Also, you will learn this setup all through the CLI!

Be the first to share your comment