
In a changing online world, we must keep our devices safe. So, we need to protect the settings of our network equipment, like routers and switches.
But one of the best ways to do this is to back up our IOS images often. This way, we can keep our devices safe and be ready for possible problems.
By using a TFTP Server, we can quickly capture these IOS images on the network. This keeps things safe if the system fails or has problems.
In this article, I’ll show you how to back up the IOS images of devices like routers running GNS3. Plus, I’ll walk you through the restoration process step by step!

How to Back Up and Restore Cisco Router IOS
You can easily save the IOS images of devices like routers and switches in your network to a TFTP server. Then, you can quickly bring back these images when needed.
In our last article, I showed how to back up Cisco Router and Switch configuration files. I also showed how to move these files to a Simple File Transfer Protocol (TFTP) server.
In this section, we’ll take it a step further. I’ll show you how to copy the system files of different network devices to a TFTP server.
Let’s do this backup in a safe environment to make a very real network scenario. I’ll use GNS3 and VMware virtual machines for this.
This way, you can learn the backup steps one by one without needing real hardware. I’m also sure this method will really help you get a complete understanding of the process.
Preparation Step: Set Up TFTP Server
To begin, first install a reliable TFTP server on your host machine. For example, you can choose popular apps such as SolarWinds TFTP Server & Tftpd32.
These programs have easy-to-use interfaces and are simple to use. Then, set the VMnet settings in VMware to match your planned network layout. Finally, make sure all virtual machines are correctly connected.
Once your file server is ready, set the firewall correctly. You should specifically allow TFTP traffic using UDP port 69.
Then, add the TFTP server to your GNS3 layout and link it to the virtual network. This lets devices talk to the server in the simulated environment. So, this connection is vital for backup tasks.
Once the setup is done, back up the system files from the network devices to the server. This way, you can safely save important Router & Switch settings or IOS images.
You can also easily bring back your IOS if possible errors happen on your devices. In short, this is the most crucial step to stop data loss and keep network management safe.
How to Save the Router’s IOS Image to TFTP
For Cisco IOS backup, follow the steps below.
Steps:
Step 1
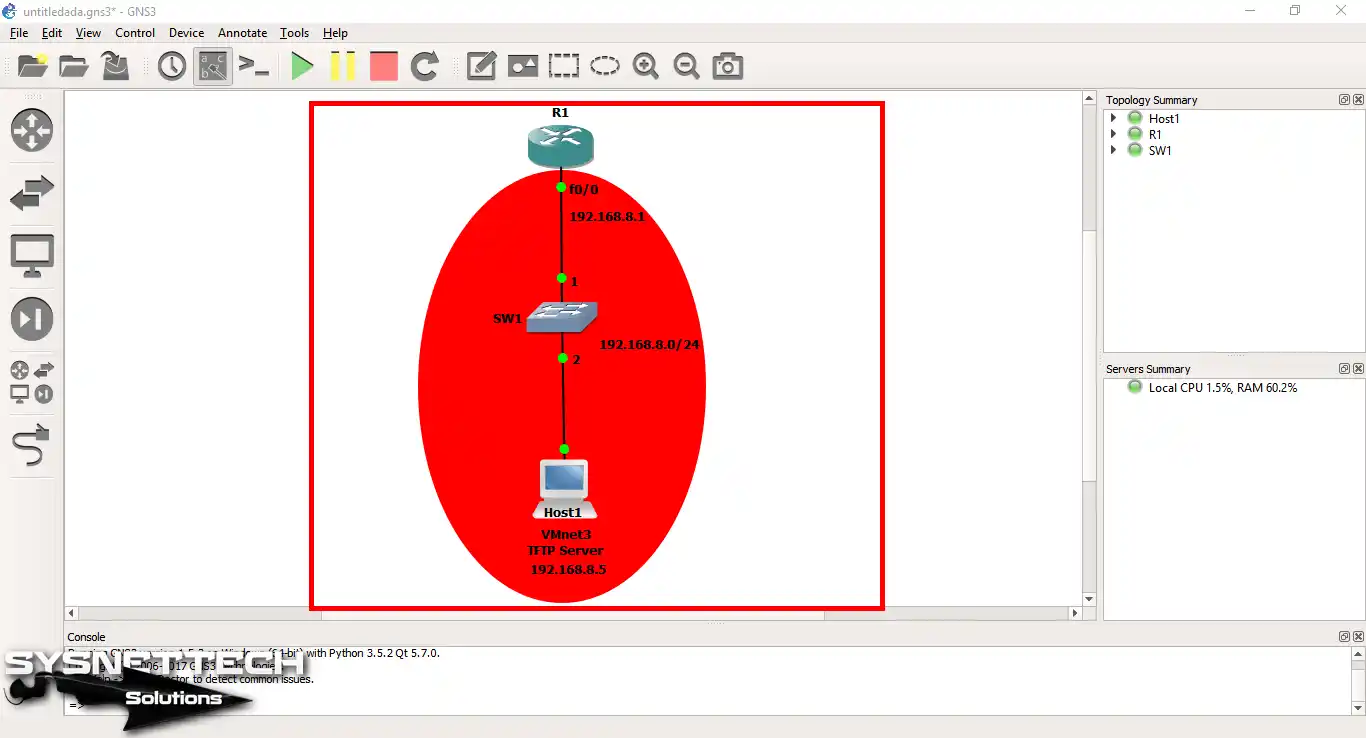
First, open GNS3 and create a new project. Then, start by setting up a network topology like the one shown in the image below!
Step 2
Start your file transfer server and open the SolarWinds app. Then, check that the service is running.

Step 3
Now open the C:\TFTP-Root folder on the server. Then, of course, verify that this directory is empty.

Step 4
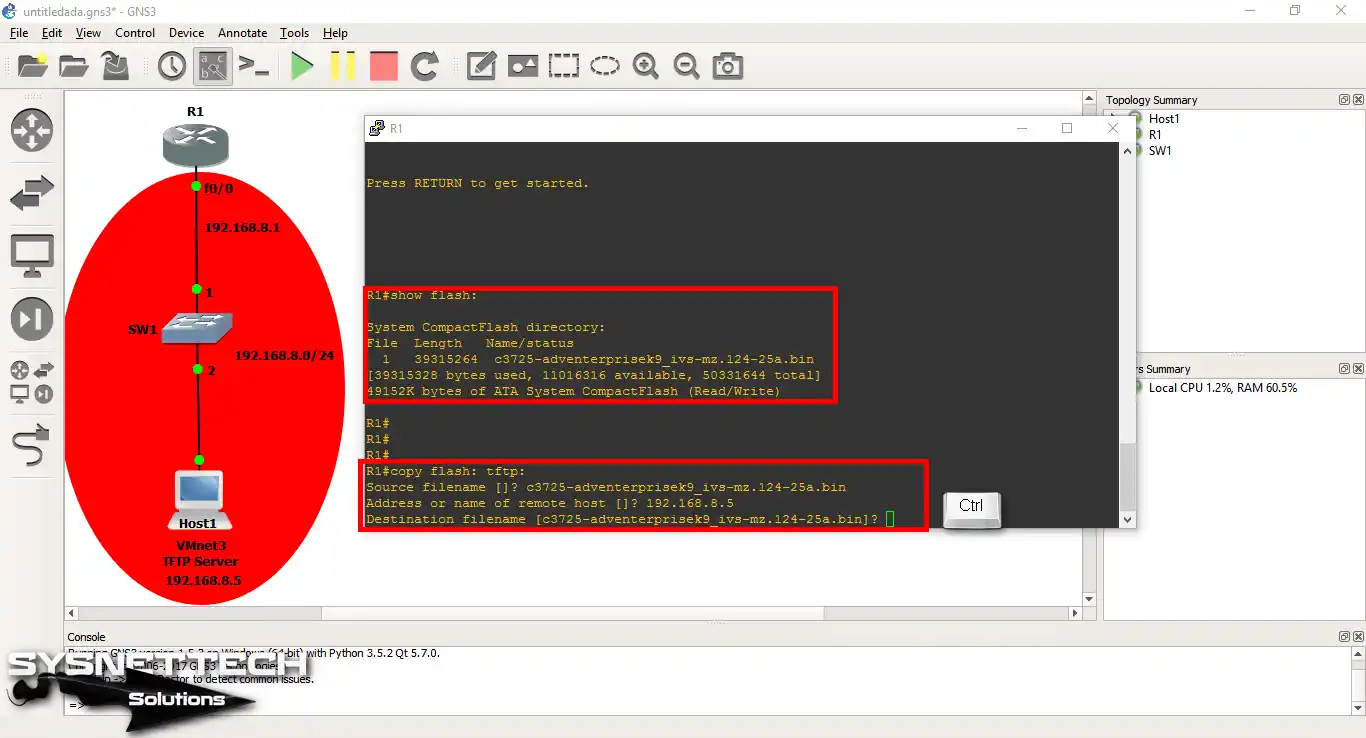
First, access your Cisco Router. Then, run the “show flash:” command. Carefully check the results. So, you will be able to verify if an image is present easily.
First, you can quickly see if the file is there. To do this, you’ll need to obtain an IOS image from a server. Then, you can use the “copy tftp:flash:” command. This will allow you to copy this image to the router easily.
R1# copy flash: tftp:
Source filename []? c3725-adventerprisek9_ivs-mz.124-25a.bin
Address or name of remote host []? 192.168.8.5
Destination filename [c3725-adventerprisek9_ivs-mz.124-25a.bin]?
!!!!!!!!!!!!!!!!!!!!!!!!!!!!!!!!!!!!!!!!!!!!!!!!!!!!!!!!!!!!
39315264 bytes copied in 771.024 secs (50991 bytes/sec)
R1#- Source Filename ⇒ The name of the IOS image on the Cisco Router.
- Address or Name of Remote Host ⇒ The name or IP address of the remote computer.
- Destination Filename ⇒ Leave blank by default. It will be saved with the file name specified in [].
Step 5
After moving the IOS image to the server, quickly go to the router. Then, you can carefully check the logs made there.
!!!!!!!!!!!!!!!!!!!!!!!!!!!!!!!!!!!!!!!!!!!!!!!!!!!!!!!!!!!!!!!!!!!!!!!!
39315264 bytes copied in 771.024 secs (50991 bytes/sec)
Step 6
Finally, check the file server’s root folder. Then, confirm that the system saved the image correctly. You can easily see this process in the image below.

Step 7
Examine the CLI screen of Router1. This will quickly show you that you have copied the IOS image successfully.

Show Command Outputs for IOS Backup
- Running Config
- Flash Directory
- Flash → TFTP Copy
- Flash Detailed
- Flash Summary
R1#show running-config
Building configuration...

Current configuration : 920 bytes
!
version 12.4
service timestamps debug datetime msec
service timestamps log datetime msec
no service password-encryption
!
hostname R1
!
boot-start-marker
boot-end-marker
!
no aaa new-model
memory-size iomem 5
no ip icmp rate-limit unreachable
ip cef
!
no ip domain lookup
ip auth-proxy max-nodata-conns 3
ip admission max-nodata-conns 3
!
ip tcp synwait-time 5
!
interface FastEthernet0/0
 ip address 192.168.8.1 255.255.255.0
 duplex auto
 speed auto
!
interface FastEthernet0/1
 no ip address
 shutdown
 duplex auto
 speed auto
!
ip forward-protocol nd
!
no ip http server
no ip http secure-server
!
no cdp log mismatch duplex
!
control-plane
!
gatekeeper
 shutdown
!
line con 0
 exec-timeout 0 0
 privilege level 15
 logging synchronous
line aux 0
 exec-timeout 0 0
 privilege level 15
 logging synchronous
line vty 0 4
 login
!
end
R1#
R1#show flash:
System CompactFlash directory:
File Length Name/status
1 39315264 c3725-adventerprisek9_ivs-mz.124-25a.bin
[39315328 bytes used, 11016316 available, 50331644 total]
49152K bytes of ATA System CompactFlash (Read/Write)R1#copy flash: tftp:
Source filename []? c3725-adventerprisek9_ivs-mz.124-25a.bin
Address or name of remote host []? 192.168.8.5
Destination filename [c3725-adventerprisek9_ivs-mz.124-25a.bin]?
!!!!!!!!!!!!!!!!!!!!!!!!!!!!!!!!!!!!!!!!!!!!!!!!!!!!!!!!!!!!!!!!!!!!!!!!!!!!!!!!!!!!!
!!!!!!!!!!!!!!!!!!!!!!!!!!!!!!!!!!!!!!!!!!!!!!!!!!!!!!!!!!!!!!!!!!!!!!!
39315264 bytes copied in 771.024 secs (50991 bytes/sec)
R1#R1#show flash: detailed
System CompactFlash directory:
File Length Name/status
addr fcksum ccksum
1 39315264 c3725-adventerprisek9_ivs-mz.124-25a.bin
0x40 0xA7A1 0xA7A1
[39315328 bytes used, 11016316 available, 50331644 total]
49152K bytes of ATA System CompactFlash (Read/Write)R1#show flash: summary
Partition Size Used Free Bank-Size State Copy Mode
1 49151K 38393K 10758K 0K Read/Write Direct
49152K bytes of ATA System CompactFlash (Read/Write)IOS Backup and Restore ⇒ Video
Learn how to back up your router’s system file with our video tutorial. Also, learn how to bring it back. Watch the helpful video below.
After that, don’t forget to join our YouTube channel to support us and see future tutorials.
Frequently Asked Questions (FAQ)
- Do I need to set up a TFTP server?
- What are the steps to backing up an IOS image to a server?
- How can I verify that the backup was successful?
- What should I do if the backup fails?
Conclusion
So, you should back up your network devices with IOS images. This will help keep them safe. This is also an essential step in today’s fast online world.
First, you can use a TFTP service. This will create a secure storage space for your router. You can also save your key images there. This will prepare you for potential system failures.
This article will guide you step-by-step. First, it will teach you how to perform backups. It will also help you bring back system function. As a result, you’ll always stay prepared.
I also suggest being careful as you go deeper into networking. Also, don’t forget to do regular backups. This will help you follow reasonable management steps. In short, you’ll make a strong network setup. So, this is an essential plan.
You can also use these methods right away, which makes your network safer.

1 Reader Comment
I want to install ASA. Which version of ASA & Gns3 is suitabl.