

In this article, we’ll examine step by step how to configure the Virtual Network connection. Specifically, this is one of the VMware Workstation network settings.
How to Configure a Specific Virtual Network in VMware Workstation/Player
When you install the VMware virtualization program, it creates VMnet connections. For example, these connections support Bridged, NAT, and Host-Only modes on the Virtual Network Editor.
Once you create a new virtual machine on VMware, check the Virtual Network Editor first. After that, select Bridged, NAT, or Host-Only from the network adapter’s settings. You can find these options for your virtual machine.
This VMware virtual network configuration is the same as other VMnet network settings. Still, in some cases, you can configure Custom Networking. This helps you add a virtual machine to a 3rd party program. Moreover, it helps you avoid complexity.
For example, you created a new VMnet5 on the Network Editor. Then you configured it as Bridged. Therefore, you should configure the virtual machine network configuration as VMnet5.
How to Use Custom-Specific Networking on VMware Workstation 12/14/15
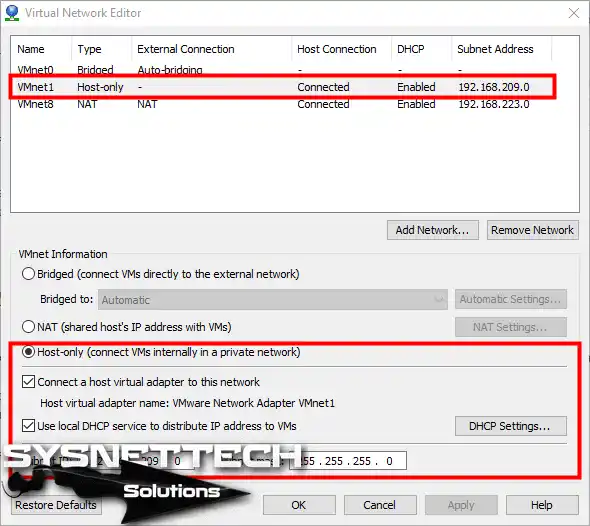
The first default configuration on the Network Editor is as follows. VMware Workstation automatically configures VMnet0, VMnet1, and VMnet8.
In this window, VMware Workstation configures VMnet1 as Host-Only.
Follow the steps below to configure the custom-specific network on VMware Workstation.
Step 1
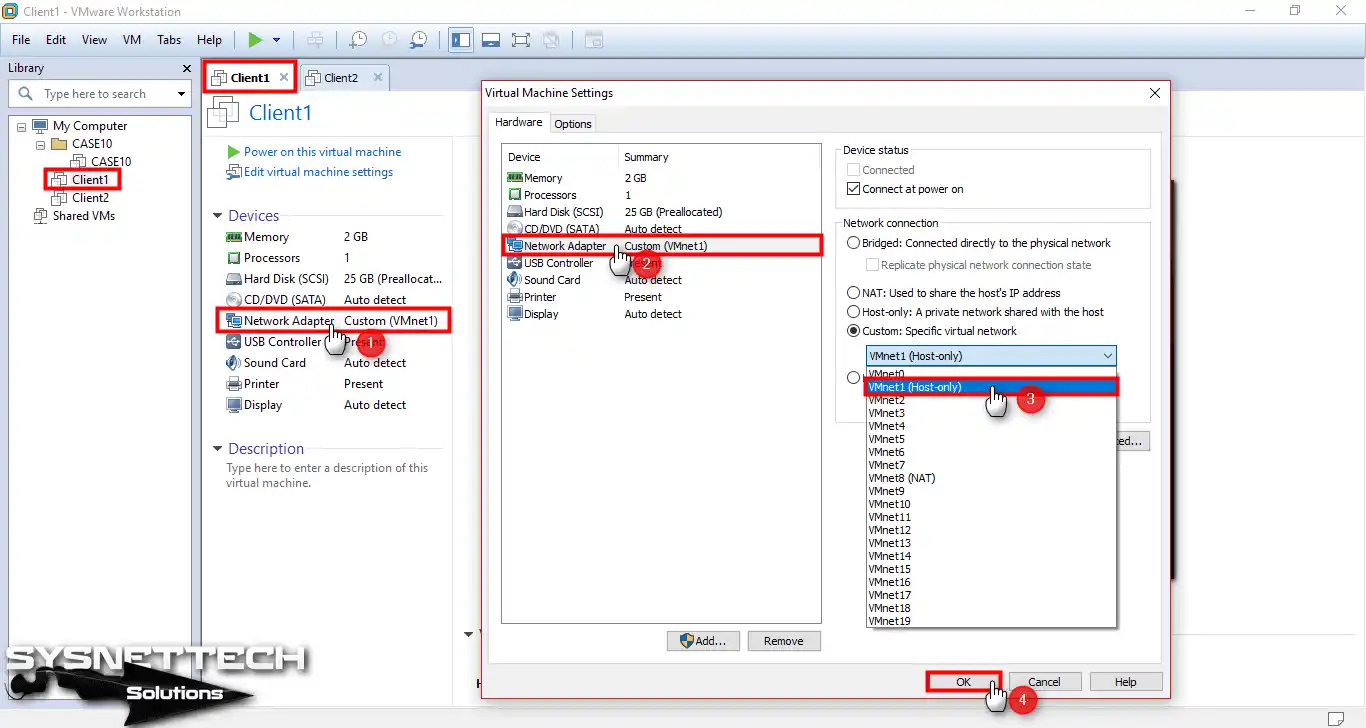
Name the two machines you installed on VMware: Client1 and Client2. Then click Network Adapter. This lets you configure the Client1 machine’s network card configuration.
When you select the Custom Specific Network option, you will see the VMnets you created. Specifically, these appear as shown below. Select VMnet1 for the Client1 machine.
Step 2
Select VMnet1 for the Client2 machine.

Step 3
After configuring the Custom Specific Network, test the network connection. Then ping Client2 from the Client1 machine.
If Ping fails, disable Windows Firewall on both VMs.

Step 4
Likewise, check the network connection by pinging Client1 from the Client2 machine.

Step 5
Since you configured Client1 and Client2 on the same VMnet1, both virtual machines communicate. Moreover, they can connect with each other. However, if you configured the Client2 VM on another VMnet6/Host-Only, the VMs would not connect.
You can think of the VMnet/Host-Only setting you created. This setting acts as a Switch on the Virtual Network Editor. Therefore, you can create advanced network topologies by configuring a Custom Network on VMware. For example, in GNS3, you can connect virtual machines on two different networks. Use a Cisco Router for this.
VMware Network Mastery: 6 Questions About Custom Virtual Networks
Why should I use a custom network when VMware already has standard modes like Bridged, NAT, and Host-Only?
How do I create a new network other than VMnet0, VMnet1, and VMnet8 in the Virtual Network Editor?
I connected two virtual machines to the same custom network, but they can’t ping each other. What should I do?
What is the difference between a custom network and Host-Only? Aren’t they the same thing?
How do virtual machines on different VMnets communicate with each other?
Can I automate custom network configuration from the command line?
Conclusion
In this article, we discussed step-by-step instructions. Specifically, these instructions show how to use Specific Network on VMware. With VMware Specific Networking, you can assign IP addresses. For example, you can assign them from different IP blocks to virtual machines.

Be the first to share your comment