

You notice your computer has a strange delay at startup. Maybe you see a “read error” message when opening a file. Or worse, that valuable photo archive of yours suddenly vanishes. At these moments, most users do not know what to do. They panic and run to the repair shop. However, the fix is actually very simple: Run a regular disk health test.
So what is an HDD, SSD, and NVMe health test? In short, you read and interpret signals from sensors inside your storage unit. Then you catch the failure before it even occurs. In this guide, you will find the most current methods as of 2026. We will cover everything from Backblaze’s latest failure data to AI-powered predictive maintenance.
On the other hand, using the wrong tool leads you into a false sense of security. So we will review both built-in Windows tools and third-party software. You will also learn how to read SMART parameters from raw data, because the text “SMART PASSED” does not always tell the truth.
Finally, we will plan step by step what you should do when the drive sounds the alarm. We will cover backup strategies, cloning tools, and data recovery methods. Remember: Take 10 minutes today and test it. This small step can prevent a big disaster tomorrow!
What Is a Hard Disk Health Test and Why Is It Vitally Important?
One morning you turned on your computer and heard an unfamiliar clicking sound. Then your files stopped opening. At that moment you understood that your storage unit was preparing to bid you farewell.
At this point, you should run health tests for your HDD, SSD, and NVMe drives. In fact, this is the only way to prevent this nightmare scenario. So what do these tests actually do? In short, we read and interpret the data produced by the sensors inside your storage unit.
Thanks to this data, you learn the health status of your drive. You also take action in advance in case of a possible failure. First of all, you should know this: Regular checks are your strongest shield against data loss.
Disk Health Test Definition and Scope
A disk health test collects data from sensors inside your storage unit. It analyzes this data and reveals your drive’s current state and future risks. This test does not just answer the question “Is it broken or healthy?”
At the same time, it also shows how much life your drive has left. For example, an SSD’s TBW value indicates the total amount of data that unit can write over its lifetime. Also, the reallocated sector count on HDDs is a sign of bad areas on the surface.
In terms of scope, we divide these tests into three main categories. First, we read and interpret SMART data. Second, we run a surface scan (error scan) and detect bad sectors. Finally, we measure read and write speed and test overall performance.
When you evaluate these three stages together, you get the true health indicator for your drive. Remember, a single metric is not enough. A holistic approach gives you the most accurate result.
Backblaze 2026 Data: How Often Do HDDs Fail?
Backblaze sheds light on the storage world with reports it publishes every quarter. The 2026 first quarter data shows big differences by brand and model. In the table below, you will find the most current AFR (Annualized Failure Rate) values.
| Manufacturer | Model | Capacity (TB) | Disk Count | AFR (%) |
|---|---|---|---|---|
| HGST | HUH728080ALE600 | 8 | 1,026 | 0 |
| HGST | HUH721212ALE600 | 12 | 2,608 | 1.25 |
| Seagate | ST8000DM002 | 8 | 8,910 | 1.43 |
| Seagate | ST12000NM0008 | 12 | 18,650 | 1.30 |
| Toshiba | MG08ACA16TEY | 16 | 10,315 | 0.82 |
As you can see from the table, HGST models have the lowest failure rate. Along with this, Toshiba’s 16 TB model also delivers impressive performance. Seagate, meanwhile, achieves a consistent failure rate in high-volume use.
In light of this data, you can get an idea about your drive’s brand and model. However, remember that statistics are a pool average. Your unit may behave in a completely different way.
Especially with high-capacity drives, the low AFR values are welcome news because data centers now prefer larger units. As a result, the failure cost per unit of storage also goes down.
SMART Technology: A Guide to Reading Your Drive’s Silent Scream Correctly
SMART technology lets storage units monitor themselves. Sensors inside your drive constantly measure various parameters. When you read this data correctly, you get word of a failure weeks in advance.
Unfortunately, most users ignore SMART data. Or they misinterpret it and panic for no reason. In this section, we will go through critical parameters and alarm values one by one.
This way, you too can analyze your drive like an expert. Remember, in HDD, SSD, and NVMe health tests, reviewing SMART data is the most critical stage. Reading this data is the only way to see a failure in advance.
Critical SMART Parameters and Alarm Values (ID 05, C5, C6, 09)
Every SMART parameter has a threshold value. When the normalized value drops below this threshold, the drive enters a pre-failure state. Here is a detailed analysis of the four most critical parameters:
| SMART ID | Parameter Name | What Does It Mean? | Warning Threshold | Critical Threshold |
|---|---|---|---|---|
| 05 | Reallocated Sector Count | Number of reallocated sectors. It shows that bad sectors have been replaced from the spare pool. | 1-10 | > 10 |
| C5 | Current Pending Sector Count | Pending sectors. These are sectors that give read errors but have not yet been reallocated. | 1-5 | > 5 |
| C6 | Uncorrectable Sector Count | Uncorrectable sectors. These are sectors that are physically damaged and cannot be recovered. | 1 | > 1 |
| 09 | Power-On Hours | Total operating hours of the drive. It is a reference point for life assessment. | — | — |
The values in the table are based on large-scale failure studies from Google and Backblaze. When reallocated sector count goes above 10, the annual failure probability jumps from 2.5% to 30%. When current pending sector count goes above 5, this rate ranges between 3.5% and 25%.
So where will you read these values? A tool like CrystalDiskInfo shows all these parameters with color codes. Blue means “good,” yellow means “caution,” and red means “bad.”
If you see a yellow or red warning, you should act right away. Especially after HDD, SSD, and NVMe tests, you should always save these values. Trend analysis is always more valuable than a one-time measurement.
SMART Indicators Unique to SSD and NVMe: TBW, Media Wearout Indicator, Available Spare
SSD and NVMe drives have a completely different architecture from HDDs. They use NAND flash chips instead of mechanical parts. As a result, their health indicators are also different.
Here are three critical parameters you need to watch: TBW (Total Bytes Written) shows the total amount of data your drive can write over its lifetime. The maker sets this value under warranty.
For example, as of 2026, some new models have hit the market. Especially with PCIe Gen 5 NVMe options like Lexar Thor Ultra, we see different TBW values. In particular, 350 TBW for 512 GB, 750 TBW for 1 TB, 1,500 TBW for 2 TB, and 3,000 TBW for 4 TB stand out.
Samsung’s new 990 QLC model offers 400 TBW in its 1 TB version. On top of that, the 2 TB version reaches 800 TBW.
Media Wearout Indicator shows how worn the NAND chips are. This value starts at 100 and drops over time. When the value falls below 10, the drive is seriously worn.
Available Spare shows the percentage of spare area reserved to replace bad blocks. This value starts at 100 and drops. When the value falls below the maker’s threshold, the unit fails. In this case, the system puts it into read-only mode.
Tracking these three parameters on a regular basis removes the risk of sudden data loss on your SSD and NVMe drives. Also, save these values for comparison when you run a test.
Can SMART Data Be Reset? What to Watch Out for When Buying a Used Disk
The biggest fear when buying a used disk is running into fake SMART data. Unfortunately, some sellers reset operating hours and error counters. On top of that, these people make the product look completely new. So is this possible?
Technically yes, but it is a hard and risky process. The drive stores SMART data in its firmware. Resetting this data requires special software and hardware. Also, most modern units have protection mechanisms that can detect such tampering.
Steps and Precautions for Buying a Used Disk
Follow these steps when you buy a used disk:
- Check SMART data with CrystalDiskInfo before you buy the drive.
- A very low Power-On Hours value is suspicious. Even a brand-new unit can have a few hours of operating time.
- Look at the Reallocated Sector and Pending Sector values. A value other than zero shows the drive had problems in the past.
- After you test the unit, run a surface scan. In this case, do not buy it if there are bad sectors.
- If possible, run the drive for a while and watch its temperature. Abnormal heating can be a sign of a serious failure.
Also, even if SMART data has been reset, the physical wear on the unit continues. That is, no matter how much you clean the drive, you cannot bring back its mechanical life. So when you buy a used unit, be suspicious if the price is far below market value.
In particular, do not buy a used product without running a test. This step protects both your money and your data, and it is the simplest way to do so.
Quick Disk Health Check with Built-in Windows Tools (Without Downloading a Program)
You do not always need third-party software. Windows 10 and 11 give you several powerful tools to check disk health. These tools are very useful, especially when you want to do a quick first check.
They also let you learn hard disk health without downloading a program. In this section, we will cover three basic tools that run from the command line. All of them are completely free and ready inside Windows.
All you need to do is open the command prompt as an administrator. For a disk health test, your first step should be these commands, because they give fast results and use few system resources.
Query Disk Health in 10 Seconds with the wmic diskdrive get status Command
This command is the fastest way to query your drive’s overall health. With a one-line command, you get a result in seconds. Here is how to use it step by step:
- Click the Start menu and type “cmd.”
- Right-click Command Prompt and select “Run as administrator.”
- In the black window that opens, type this command:
wmic diskdrive get status - Press Enter and wait for the result.
If the output says “OK,” it means your drives passed the basic health check. If you see a result like “Pred Fail” (Failure Prediction), “Error,” or “Degraded,” you need to act right away.
However, remember that this command offers a limited check. It only shows the overall SMART status, not detailed parameters. For more detailed info, you can use this command: wmic diskdrive get model,status,size,serialnumber
This command also lists your drives’ model, serial number, and capacity. This way, you can more easily identify which unit has a problem.
In particular, remember that Microsoft removed WMIC in supported versions of Windows 11 and recommends PowerShell alternatives. So you should prefer PowerShell commands on modern systems.
chkdsk C: /f /r Command: When Should I Use It, and How Long Does It Take?
chkdsk is Windows’ oldest repair tool. It fixes file system errors and detects bad sectors. However, when you use it the wrong way, it takes hours. So you should know well when and how to use it.
The chkdsk command has different parameters. The most common ones are these:
chkdsk C:— Runs in read-only mode only, gives an error report, and does not repair.chkdsk C: /f— Finds and repairs file system errors.chkdsk C: /r— Finds bad sectors and recovers readable info. It also includes the /f parameter.chkdsk C: /scan— Runs an online scan and works without locking the drive.
How long does chkdsk take? There is no clear answer to this question, because the time varies by drive capacity, fill rate, and health status. According to 2026 data, scan time varies. For example, a 500 GB HDD takes 2-3 hours, a 1 TB takes 4-6 hours, and a 2 TB takes 8-12 hours. SSDs scan 3-5 times faster.
So before you run the chkdsk command, keep your computer plugged in and do not interrupt the process. Also, do not use the computer during the scan, because disk access is heavy and the system slows down.
Professional Monitoring with PowerShell Get-PhysicalDisk and Get-StorageReliabilityCounter
PowerShell is one of Windows’ most powerful tools. It gives you huge flexibility when querying disk health. The Get-PhysicalDisk command shows your drive’s overall status. Get-StorageReliabilityCounter offers much more detailed data.
Here is how to use it step by step:
- Open PowerShell as an administrator.
- Run this command:
Get-PhysicalDisk | Format-Table FriendlyName, MediaType, HealthStatus, OperationalStatus - This command lists all your physical drives. If the HealthStatus column says “Healthy,” your unit is healthy.
- For more detailed info, use this command:
Get-PhysicalDisk | Get-StorageReliabilityCounter | Format-List
The Get-StorageReliabilityCounter command gives you these critical data points:
- Temperature — Current drive temperature (Celsius)
- ReadErrorsTotal — Total read error count
- WriteErrorsTotal — Total write error count
- PowerOnHours — Total operating hours
- StartStopCycleCount — Start/stop cycle count
You can save this data regularly and run trend analysis. For example, if the read error count keeps rising, the drive may fail soon. Also, you can turn these commands into a PowerShell script and run it automatically with Task Scheduler.
In particular, watch the ReadErrors, WriteErrors, and MediaErrors values. If any of these values is greater than zero, the drive has a physical problem. In this case, I recommend you make a full backup within 72 hours.
Professional Disk Analysis with Vendor and Third-Party Software
Windows tools are enough for a quick check. However, you should use professional software for deep analysis. This software reads SMART data in more detail, runs surface scans, and offers benchmark tests. There are dozens of different tools on the market. So which one should you choose?
In this section, we will compare the most popular and reliable disk health test programs. Also, we will cover the advantages of vendor software and open-source alternatives.
CrystalDiskInfo vs HD Tune Pro: Which One Should You Use in Which Case?
CrystalDiskInfo and HD Tune Pro are the first two programs that come to mind for disk health testing. Both have free versions, but they have different strengths. Here is a detailed comparison:
| Feature | CrystalDiskInfo | HD Tune Pro |
|---|---|---|
| Price | Free (open source) | Free version + paid Pro |
| SMART Reading | Excellent — all parameters color-coded | Good — basic parameters |
| Surface Scan | No | Yes (Error Scan) |
| Speed Test (Benchmark) | No | Yes (Read/Write/IOPS) |
| Health Status | Instant and detailed | Instant |
| Ease of Use | Very simple — one screen | Medium — tabbed layout |
| SSD/NVMe Support | Full support | Full support |
| Portable Version | Yes | Yes |
As you can see, CrystalDiskInfo is ideal for a quick health check. It shows all critical SMART parameters on one screen. HD Tune Pro, meanwhile, offers a more comprehensive analysis. With surface scans and benchmark tests, you can measure your drive’s performance.
How many hours does an HD Tune error scan take? For a 1 TB HDD, this time usually ranges from 40-60 minutes to 2-3 hours. For 2 TB and larger drives, it can exceed 4 hours. On SSDs, you complete the process much faster.
My advice is this: Do the first check with CrystalDiskInfo. If you see a problem, move on to detailed analysis with HD Tune Pro. Using both programs together gives you the most accurate result.
Old USB sticks and SD cards usually use the FAT format. The FAT file system structure is still common on these devices. Maybe you have noticed that file size limits are different from those of NTFS. You should know this difference when you interpret surface scan results. On small devices, error detection behaves differently.
Doing a Hard Disk Health and Bad Sector Test with HDD Tune
Now let’s get to the heart of the matter. We will use the HD Tune Pro program for the test. This software is really very successful. Also, you clearly examine your drive’s overall status and Bad Sector map. You also see read and write speeds in the same interface.
Before you move on to the HDD health test, download the program from its official page. Then extract the zipped file to a folder. After that, follow the steps below in order for the test.
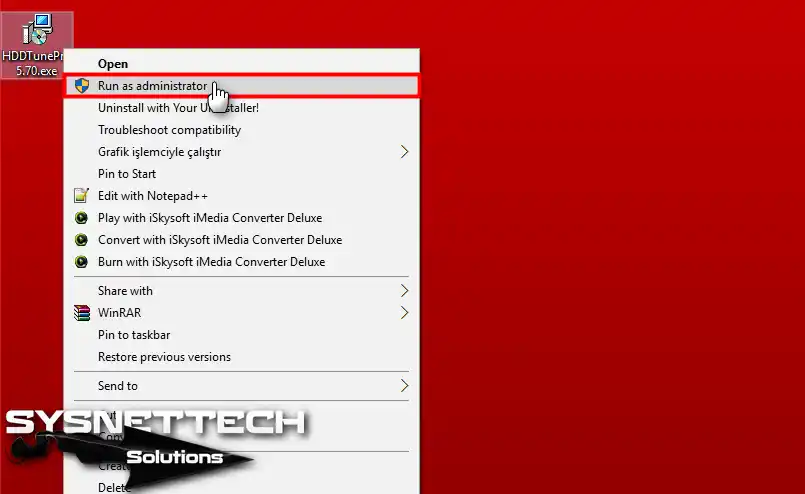
Step 1
To install HD Tune software on your computer, run the setup file as an administrator.
Step 2
In the HD Tune Wizard window, continue with the Next button.

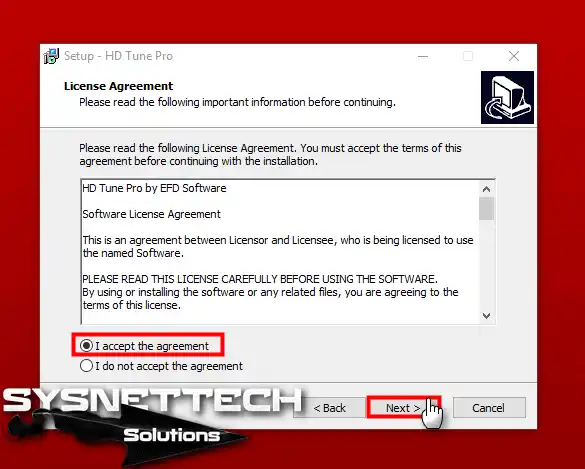
Step 3
Along with that, accept the software license agreement and press Next.
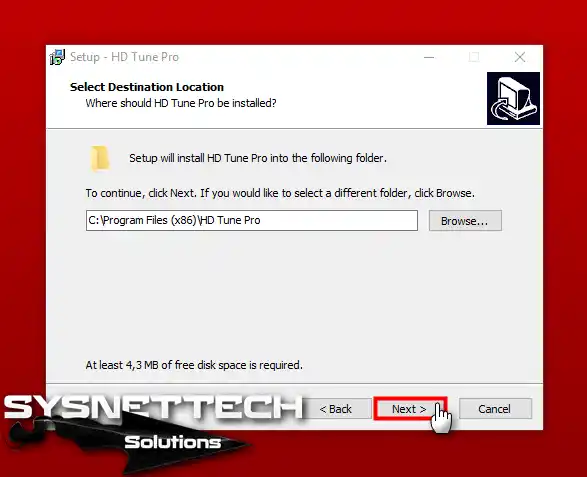
Step 4
Do not change the install directory for the HDD Tune program. Then press Next to continue the process.
Step 5
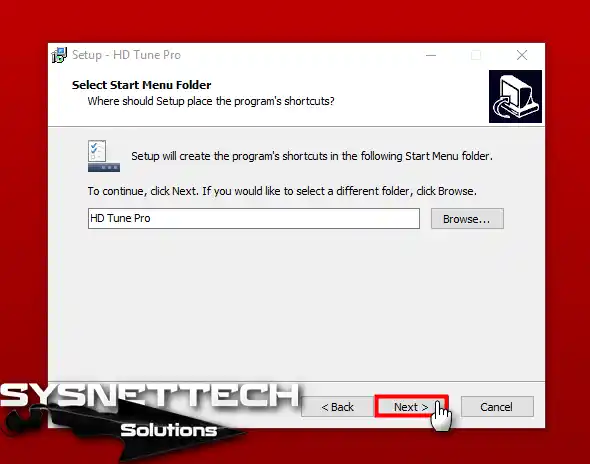
In the Select Start Menu Folder window, click Next to move on.
Step 6
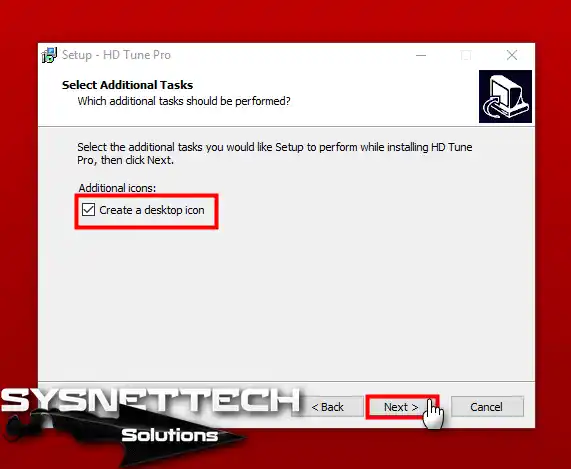
To create a desktop shortcut, check the Create a desktop icon option.
Step 7
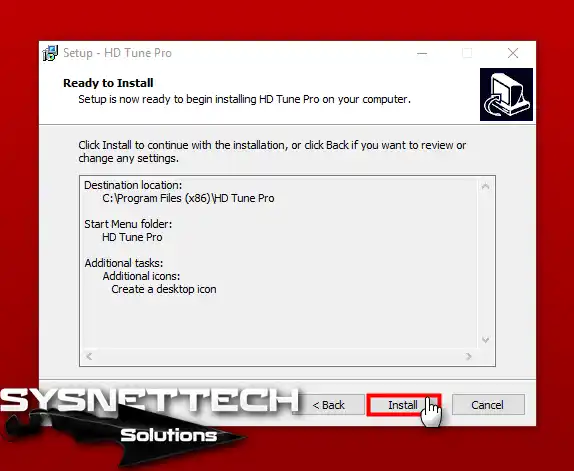
You will now complete the HDD Tune setup. So click Install to start the process.
Step 8
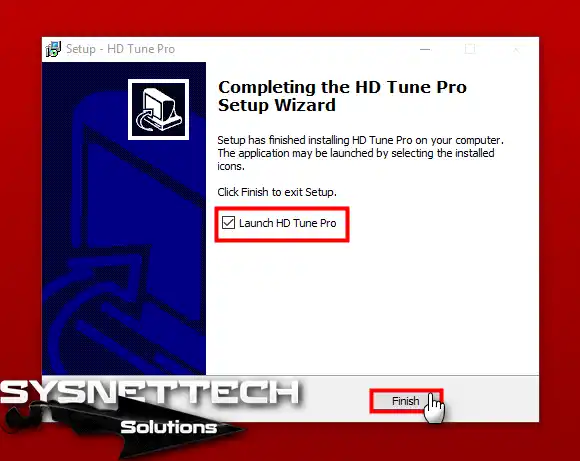
To start the software right after install, check the Launch HD Tune Pro option and click Finish.
Step 9
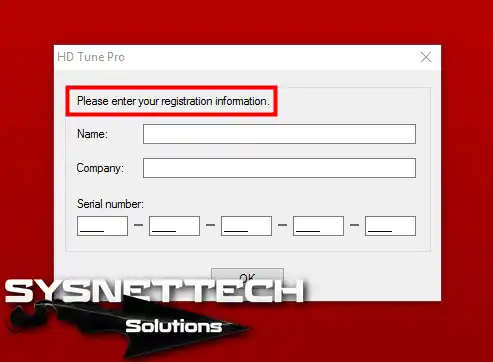
If you have an HDD Tune license, enter the info and click OK.
Drive Scan and Health Check with HDD Tune Pro
Setup is done. Now let’s move on to the real test. The steps below cover scanning and health checking.
Step 1
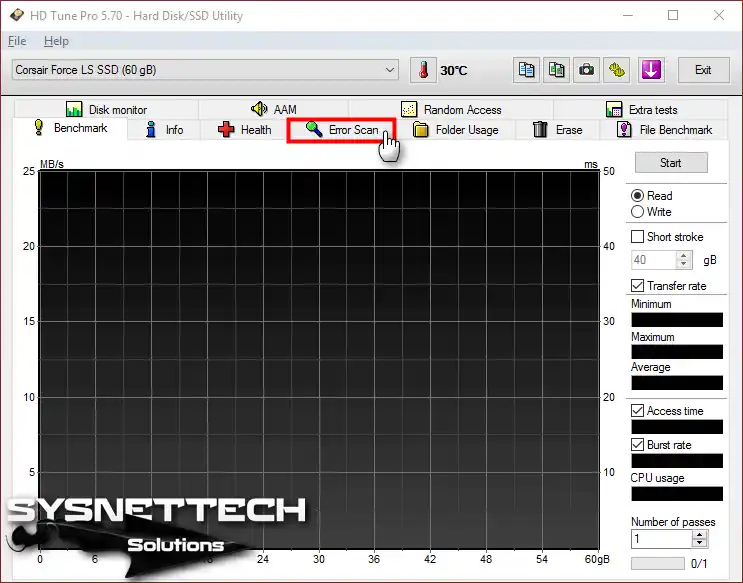
The HD Tune Pro first screen is in front of you. On the Benchmark tab, you test write and read speeds.
For a health test or bad sector test, click the Error Scan tab.
Step 2
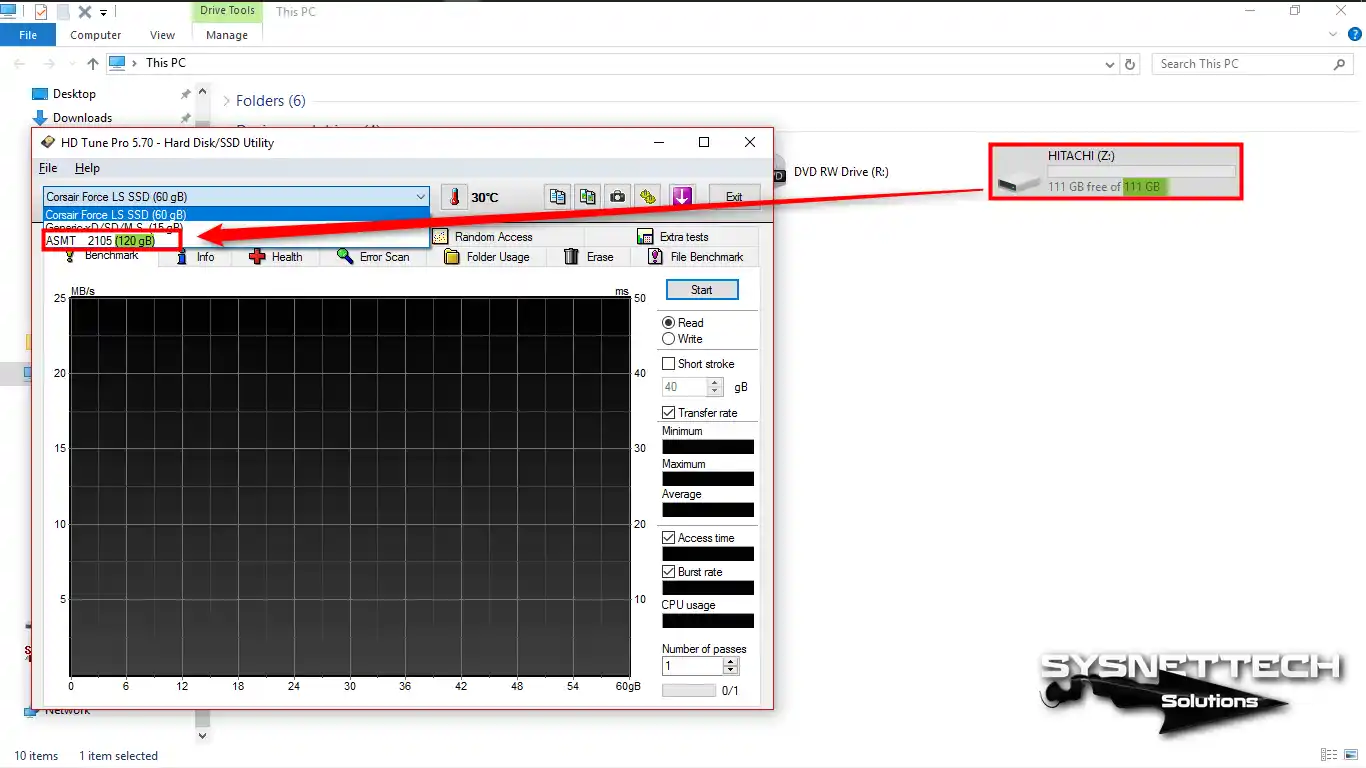
Select the unit for the Bad Sector scan. If you will test a drive in an external HDD enclosure, its name may not appear. So choose your device by looking at the size.
Step 3
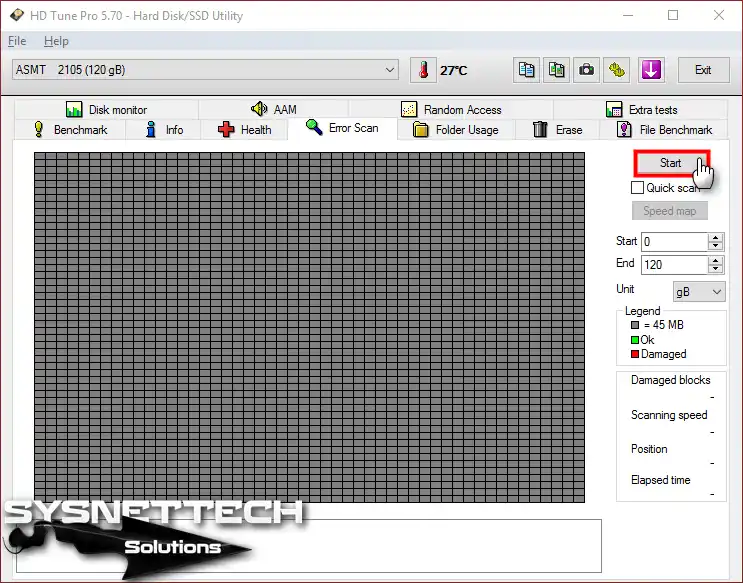
After you select the unit for the Bad Sector review, click the Start button.
Step 4
The HDD Bad Sector scan has started! The time this process takes to complete varies by your HDD size.
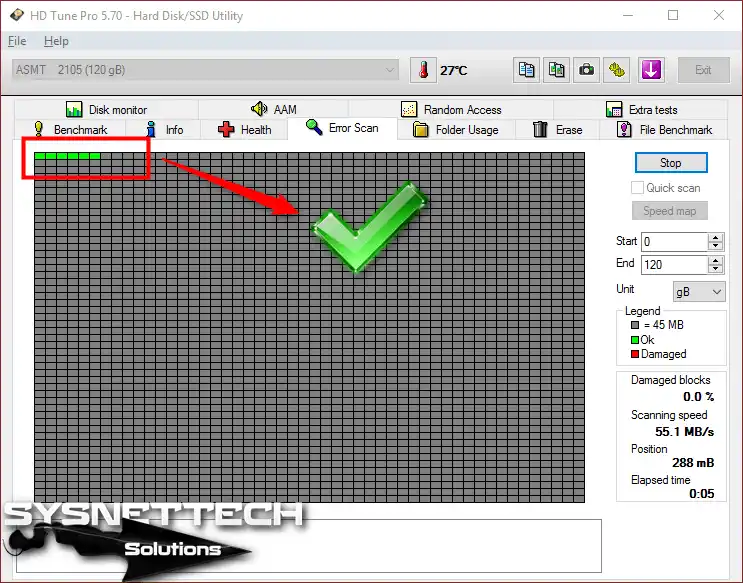
Reviewing the Analysis Result
Step 1
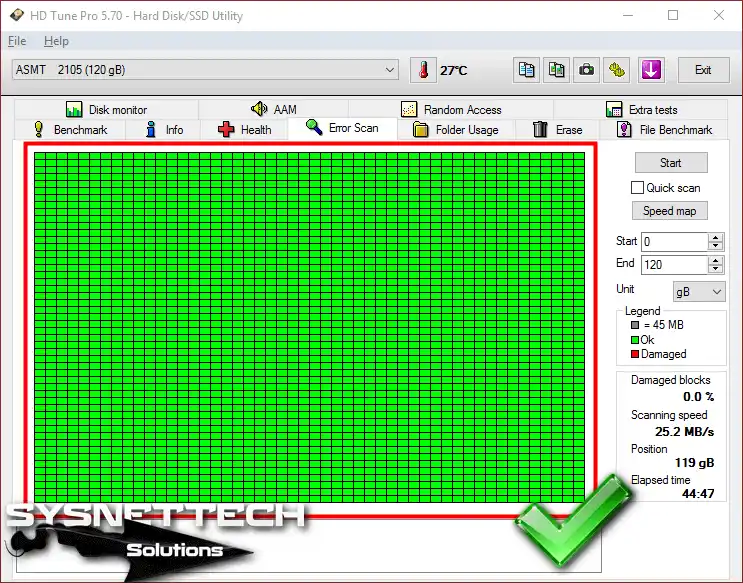
We have successfully completed the test. If you see a mostly green map like the one below, your device is healthy.
If the program finds a bad unit on your HDD, then it shows the error in red.
Step 2
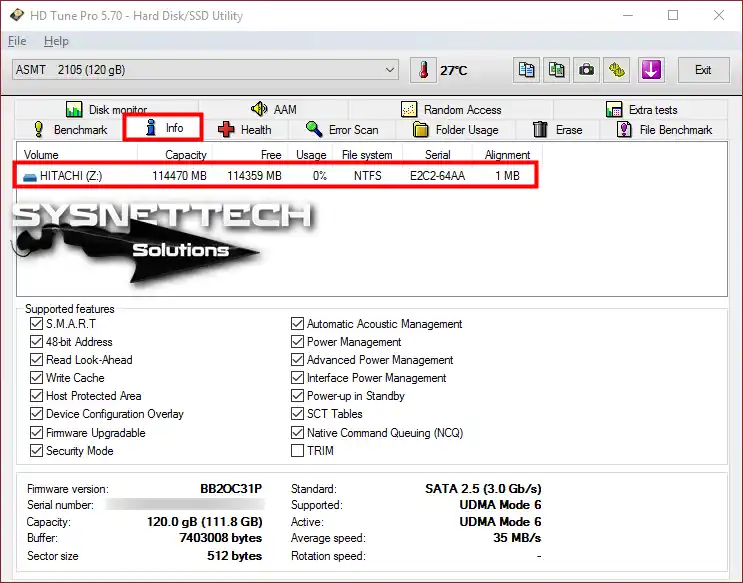
Also, you can reach detailed info about your HDD by clicking the Info tab. Here you can see the firmware version, serial number, and supported features.
Even if your test comes back clean, heavy read-write wears down your HDD. Temporary files and browser cache in particular speed up this wear.
Let me give you a small tip. For apps I use often, I rely on creating a RAMDisk to speed up the system. This method extends drive life. Also, programs open instantly. Based on my experience, this method works well if you have 16 GB of RAM.
Vendor Software: SeaTools, WD Data Lifeguard, Samsung Magician Usage Guide
Every drive maker offers special software for its own hardware. This software usually performs deeper analysis than third-party tools, because the maker has direct access to the firmware of its own units. Here are the three most common vendor tools and their usage steps:
SeaTools (Seagate): It is a comprehensive diagnostic tool designed for Seagate drives. It offers options like Short Drive Self Test, Long Drive Self Test, and surface scan. How do you use SeaTools? After you download and install the program, select your unit. Then start the test you want from the “Basic Tests” menu. The short test takes a few minutes, while the long test can take hours depending on capacity.
WD Data Lifeguard Diagnostics (Western Digital): It is a tool developed for WD drives. It offers two main tests: Quick Test and Extended Test. It also displays SMART data. Using WD Data Lifeguard Diagnostics is quite simple. You just select the unit and start the test. The Extended Test can take a long time because it scans the entire surface.
Samsung Magician (Samsung SSD): It is software developed specifically for Samsung SSDs. The program does not just run tests. Moreover, it offers firmware updates, TRIM optimization, and performance profile settings. For a Samsung Magician health check, go to the “Drive Health” tab. Here you can see critical data like TBW, temperature, and total data written.
Open-Source and Free Alternatives: GSmartControl, smartmontools, HDDScan
Even if vendor software is powerful, it is not always enough. Especially when you want to test units of different brands, you need open-source tools. Here are three strong alternatives:
GSmartControl is a graphical interface for smartmontools. It brings the smartctl command commonly used on Linux to Windows. Its use is quite simple: You can select your unit and start a short or long test from the “Perform Tests” tab. It also displays SMART data in detail.
smartmontools is a command-line based tool. It runs on Linux and Windows. With the smartctl -a /dev/sda command, you can view all SMART data for your drive. With the smartctl -t long /dev/sda command, you can start a long test. Linux smartctl has become an industry standard for health checks.
HDDScan is a free tool designed especially for HDDs. It reads SMART data, runs surface scans, and offers benchmark tests. HDDScan shows SMART values with color codes, similar to CrystalDiskInfo. It also offers advanced tests like the “Butterfly Read Test.”
Interpreting Test Results Correctly and AI-Powered Predictive Maintenance
Running a test is one thing; interpreting the results correctly is something else entirely. Most users relax when they see the words “SMART PASSED.” However, the truth is not like that at all. Now, we will cover critical points that go unnoticed and next-generation AI-powered solutions.
Traditional SMART monitoring relies on specific threshold values. As long as a parameter does not cross its threshold, the drive appears “healthy.” However, this approach falls short when predicting sudden failures. At this exact point, AI comes into play.
SMART PASSED Lies: Why Does Your Drive Suddenly Die While It Looks Fine?
SMART technology has been in use since the 1990s. Since that day, drive architectures have gone through a huge evolution. However, the SMART standard has struggled to keep up with this change. Especially on SSD and NVMe drives, traditional SMART parameters fall short.
So why does a unit suddenly die without any warning? There are several reasons. First, some failures happen instantly. For example, a voltage spike or physical shock can disable the drive at once. SMART cannot predict such events in advance.
Second, SMART data may not always be read correctly. Some drive makers keep SMART thresholds very low in their firmware. This way, the unit looks healthier than it really is. Third, software errors and firmware bugs can lead to misinterpretation of SMART data.
Also, users often ask, “Does CrystalDiskInfo show wrong values?” The answer: Yes, sometimes it can. Especially with newly released drive models, SMART parameters may not yet be defined correctly. So instead of trusting one tool, you should cross-check with more than one tool.
Drive Failure Prediction with Machine Learning: Decision Tree Models and Accuracy Rates
AI is breaking new ground in drive failure prediction. Traditional SMART monitoring methods wait for a single parameter to cross its threshold. However, machine learning models analyze many parameters at the same time. This way, they catch patterns the human eye cannot see.
AI tools like ULINK DA Drive Analyzer use models trained on millions of drive data points. These models can predict failures a median of 12 days in advance.
With traditional SMART monitoring, this period is only 3 days. Also, the AI model detects 13.7 times more failing units than SMART thresholds can catch on their own.
So how do these models work? We usually use decision tree or deep learning algorithms.
We train these models with past failure data. Then we compare them with new data and flag risky units. Some models reach accuracy rates above 92%.
Today, these technologies have become accessible not only in enterprise data centers but also for individual users. Tools like ULINK DA SmartQuest run the AI model directly on your computer. This way, you can continuously monitor drive health and get early warnings.
Disk Health Looks Good but Bad Sectors Exist: Solving the Contradiction
Question: My SMART data looks clean, but bad sectors show up in a surface scan. How is this possible?
Answer: This situation is actually quite common. SMART reports data from sensors inside the unit. However, SMART may not have detected some bad sectors yet. In particular, “pending sectors” are areas that cannot be read but have not yet been reallocated. A surface scan brings such problems to light.
Question: What should I do if bad sectors show up?
Answer: The first step is to back up your data right away. Then fully format the drive and test it again. If the bad sectors do not go away, it means the time has come to replace the unit. If the number of bad sectors is growing, the drive may fail completely soon.
Do not panic if you detect bad sectors. Your first step should be to copy all data to another disk; you must follow the correct steps for the NTFS conversion.
Question: Can bad sectors be repaired?
Answer: You can repair logical bad sectors (software errors) with some tools. However, you cannot repair physical bad sectors (damage on the magnetic surface). The unit replaces these sectors from the spare pool. However, when the spare pool runs out, the drive fails completely.
Question: Disk health looks good, but the computer is slow. What could be the cause?
Answer: Even if drive health is good, you can have performance problems. The most common cause is fragmentation. Especially on HDDs, as the fragmentation rate rises, read/write speed drops. Also, unnecessary background services can slow down access. Defrag and optimization can solve this problem.
Question: Is a clicking sound from an HDD a drive failure?
Answer: Yes, a repeated clicking sound from an HDD usually signals a mechanical failure. The read head may be touching the platter, or the motor may not run right. In this case, back up your data right away and replace the unit. A clicking sound shows the drive will fail completely soon.
Authoritative Sources for Disk Health Testing: Vendor Tools and Official Guides
Monitoring drive health with the right methods prevents data loss. Along with that, vendor tools differ for each drive type. Also, official sources offer the most reliable results.
- Seagate – Hard drive tests: It explains step by step how to run S.M.A.R.T. checks, short and long drive tests with SeaTools for Windows. It also covers Windows CHKDSK and macOS Disk Utility alternatives.
- Western Digital – How to install and use WD Drive Utilities software: It shows how to check drive status, run a quick test, and perform a full sector scan with WD Drive Utilities. It also gives info about S.M.A.R.T. failure prediction.
- Intel – Intel Memory and Storage Tool usage examples: It shows how to get SMART logs from NVMe and SATA SSDs with command-line examples for the Intel MAS tool. It also includes product info and firmware update steps.
- Microsoft – chkdsk command: It explains the syntax, parameters, and how to scan and repair file system errors for Windows’ built-in chkdsk tool with official docs. It details the functions of options like /f, /r, and /scan.
- HP – Hard disk failure and testing on HP computers: It shows how to run quick and comprehensive hard disk tests with HP PC Hardware Diagnostics. It explains how to interpret SMART checks, short DST, and long DST results.
When Disk Health Sounds the Alarm: Data Recovery, Cloning, and Backup Strategies
Do not panic when HDD health shows “Warning” or “Bad.” However, do not wait too long to act. In this section, we will build your emergency plan step by step. Also, we will cover cloning and backup strategies.
Remember: Everything you do after data loss is harder and more expensive than the preparation you do before. Be proactive.
First 3 Steps When Disk Health Shows ‘Warning’ or ‘Bad’
If you see a yellow or red warning in a test, apply these three steps right away:
- Back up your data right away. Copy all important files on the unit to an external drive or cloud storage. Do not delay this step. Recovering data from a bad unit is much harder than backing up from a healthy one.
- Get a new disk. Has the time come to replace the unit? The answer is almost always “yes.” A unit at warning level can fail completely in a short time. Buy a new one and move your data there.
- Clone the drive. Instead of manually copying your data, use cloning software. This way, you move your operating system and all your programs to the new unit. Macrium Reflect, Clonezilla, and AOMEI Backupper are ideal for this job.
Preventing Data Loss with Disk Cloning: Macrium Reflect, Clonezilla, AOMEI Backupper
Disk cloning is the process of creating an exact copy of your current drive on a new one. This method lets you move your operating system and all your data in one go. Here are the three most popular cloning tools and their usage steps:
Macrium Reflect Free: It is one of the most popular free cloning tools for Windows. Its use is quite simple. Open the program, select the source and target drives. Then click the “Clone this disk” option. The cloning process can take from 30 minutes to a few hours depending on size.
Clonezilla: It is an open-source and free cloning tool. It runs from a bootable USB. This way, you can clone drives independently of the operating system. Clonezilla is especially common among Linux users. However, its interface is a bit complex, so you should follow the steps carefully.
AOMEI Backupper: It is a backup and cloning tool with both free and paid versions. Besides cloning, it also offers features like system imaging, file backup, and sync. AOMEI Backupper has a user-friendly interface for backup. You can complete the cloning process in a few clicks.
The 3-2-1 Backup Rule: Ultimate Protection Against Disk Failure
The most effective defense against drive failure is the 3-2-1 backup rule. This rule recommends you keep your data in three different copies. You should keep them on two different media, with one copy in a physically different location.
So how do I apply this rule in practice? For example, suppose you have an e-commerce site. You can store your product database in three places: First, on the SSD in the server. Second, on a NAS device in your office. Third, in a cloud backup service. This way, if the drive in the server fails, you can restore from the copy on the NAS. If a fire breaks out in your office, the cloud copy comes into play.
The biggest advantage of the 3-2-1 rule is that you do not depend on a single point of failure. When your drive fails, you continue your work without interruption thanks to your backups. To apply this rule to your life, follow these steps:
- Identify your important data. Instead of backing up everything, focus on critical files.
- Use automatic backup software. Manual backup is open to being forgotten and neglected.
- Test your backups regularly. Do not count a backup you cannot restore as a backup.
- Encrypt your backups. Pay attention to data privacy, especially with cloud backups.
Top 10 Most Asked Questions About Disk Health: Clear Answers in a Friendly Chat
How long does a hard disk health test take?
Can I use the computer during a disk test?
Is a clicking sound from an HDD a drive failure?
How much TBW does an SSD have, and when should I replace it?
Can they reset SMART data? What should I watch out for when buying a used disk?
Does CrystalDiskInfo show wrong values?
Disk health looks good, but the computer is slow. Why?
Which disk health test program is better?
If someone resets SMART data, does the unit look brand new?
According to Backblaze data, which HDD brand is most reliable?
Conclusion: Check Your Disk Health Today, Do Not Lose Data Tomorrow
Disk health is a topic most users see as unimportant, yet it is vital. A 10-minute disk test you run today can prevent hours of data recovery effort tomorrow. It can also head off money losses.
In this article, we covered practical test methods and disk health checks for all disk types. Moreover, we reviewed a wide range from Windows tools to AI-based maintenance. As a result, you can now evaluate your disk health like an expert.
Remember: What matters is not running a test, but interpreting the results correctly and taking the right action on time. Check your disk health on a regular basis. Do not neglect your backups. Be proactive.
Disk Health Test Checklist: Which Step in Which Case?
The checklist below sums up which step you should take based on your drive’s condition:
- Case: Everything normal (SMART: OK) → Run a SMART check every 3 months. Also, run a surface scan once a year.
- Case: Yellow warning (Caution) → Back up your data right away. Make a disk cloning plan. Get a new unit within 1 week.
- Case: Red warning (Bad) → Rescue your data urgently. Remove the drive from the system. Then install a new unit and restore the data.
- Case: Bad sectors detected → Decide based on the bad sector scan result. If the unit has a small number of bad sectors, you can keep using it.
- Case: Drive makes a clicking sound → Back up your data immediately. Do not run the unit any further. You may need a professional data recovery service.
- Case: Drive slowed down → Run defrag and optimization. If the problem continues, run a surface scan.
- Case: SSD TBW value passed 80% → Review your backup plan. Start researching a new SSD.
Proactive Disk Maintenance: Monthly and Yearly Test Schedule
Create a regular maintenance schedule to protect drive health. Here is the schedule I recommend:
- Weekly: Run a quick SMART check with CrystalDiskInfo. Track temperature values.
- Monthly: Check health from Windows Storage Settings. Delete unnecessary files with Disk Cleanup and Storage Sense.
- Quarterly: Run a surface scan (HD Tune Error Scan). Check for bad sectors.
- Every six months: Run a benchmark test. Compare read and write speed test results. If there is a performance drop, investigate the cause.
- Yearly: Clone the drive or take a system image. Review your backup strategy. If you plan to buy a new unit, review Backblaze reports.
Heavy read and write operations shorten HDD life. To reduce this, RAM disk solutions come into play. The ImDisk virtual disk tool is quite practical for this job.
By following this schedule, you are always one step ahead of drive failure. Remember, instead of feeling regret after data loss, it is always better to take action in advance.
Healthy drives mean happy tomorrows. Now go and check your disk!

Be the first to share your comment