

In this article, we will cover how to install Windows 7 Ultimate 64-bit on VMware Workstation 17 Pro. Of course, we will use Windows 11 and Windows 10 64-bit systems for this task. Additionally, our guide will walk you through each step of the setup process.
Furthermore, you can run Windows 7 without issues by using VMware. By doing so, you can run legacy Windows applications and create a test environment for software development.
As a result, you can run Microsoft’s popular operating system from that era on a virtual machine. Let’s begin our virtualization journey with Workstation Pro or Player!
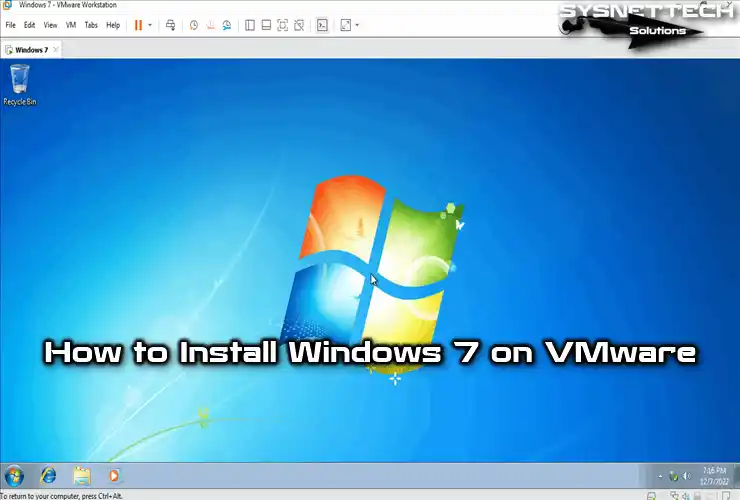
How to Install Windows 7 on a Virtual Machine Using VMware Workstation 17 Pro
VMware Workstation lets you run multiple systems on one physical PC. For example, it allows you to create, manage, and run multiple virtual machines. It is one of the most powerful virtualization programs on the market.
However, Workstation Pro is no longer paid software. On the other hand, the Player version has a simpler interface and is free. Both provide superior performance and stability compared to other virtualization solutions.
If you prefer VMware Workstation Pro, you get more effective virtualization. In particular, you can simulate older versions of Windows operating systems on your PC. You can also do these tasks with the Player version, but you will not have access to advanced features.
Sometimes VMware releases new versions of the software. In some cases, this process leads to compatibility issues and can cause difficulties for some systems. In such cases, you can try using an older operating system version.
Optimizing Windows 7 Virtual Machine Performance on VMware
VMware Workstation 17 Pro is currently the latest version. You may want to run a Windows 7 virtual PC using this virtualization software. However, you must pay attention to certain system requirements for smooth performance.
For example, you should look at your host computer’s CPU, that is, the processor hardware. The main source of virtualization is the processor. If it supports virtualization, the next factor to consider is your physical RAM amount.
The RAM amount is very important for running your VM effectively. You must allocate enough memory, at least the minimum requirement, to your virtual system. This provides both compatibility and maximum performance. Therefore, allocating enough RAM to the virtual machine is a critical task.
Additionally, you need to configure the virtual processor and core settings for your VM. These settings vary according to the processor hardware type of your host PC. However, if you want a more efficient VM, you should configure the virtual CPU and core count.
In addition to RAM and processor settings, disk space is also important for your VM. Not only disk space but also the disk technology type plays an important role. For example, a 50 GB virtual disk for Windows 7 is a good size.
Moreover, if you use an old mechanical hard disk, your performance will be low. Instead, if you use newer disk types such as NVMe or SSD, your VM will run very fast.
The final point about system performance and requirements is as follows. First, you must enable the VT-x feature from your host computer’s BIOS or UEFI settings. This feature varies from PC to PC. However, you will see this feature as Intel VT-x/EPT or AMD-V/RVI in the settings.
Creating a New Virtual Machine for Windows 7
You may not be able to run Windows 7-compatible software on your Windows 10 computer. Therefore, you can install a compatible operating system for the program you want to run by using virtualization software. You do not need to install Windows 7 from scratch on your PC.
If you prefer a newer system than Windows 7, installing Windows 10 in a virtual machine is almost the same. The steps are the same, and there is no big difference between the two.
Step 1
Now, run VMware Workstation 17 Pro or Player on your PC. As soon as you open the program, you need to create a new VM. Click the Create a New Virtual Machine option on the screen.
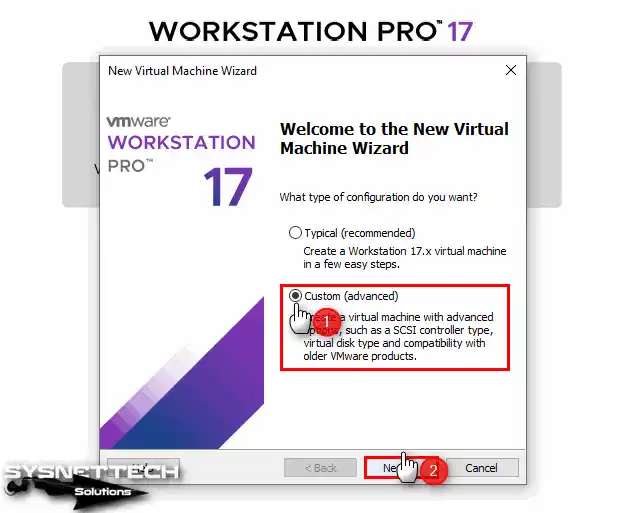
Then, the New VM Wizard opens. In this window, you should prefer advanced settings for a more stable configuration. To do so, select the Custom (Advanced) option.
Step 2
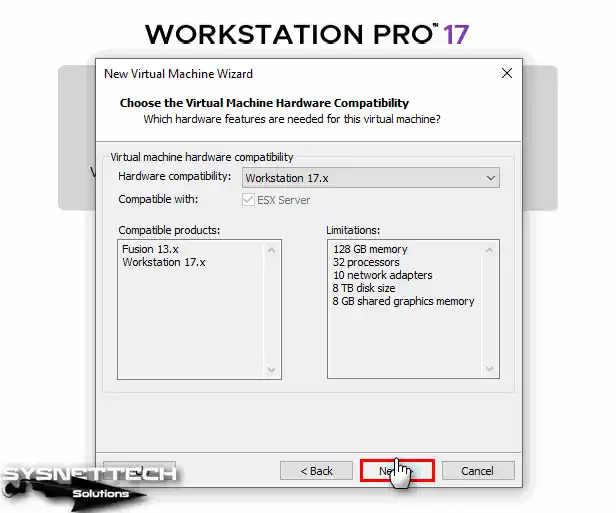
In the next stage, you will see the VMware Hardware Compatibility window. Here, select the latest version (Workstation 17.x).
Step 3
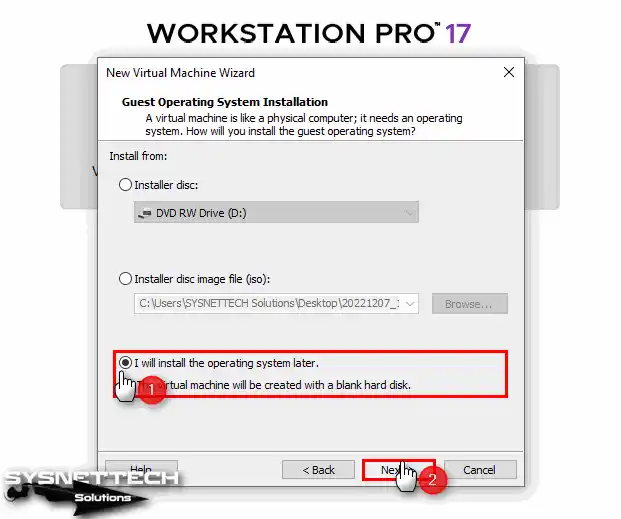
If you add the Windows 7 ISO file to the virtual machine in this step, your virtualization program will automatically determine the other settings. Additionally, it will ask you for information such as a license key or username.
In this guide, I will examine advanced settings. Therefore, I prefer to add the ISO file to the VM later and perform the installation later. At this point, I select ‘I will install the operating system later’ and continue.
Step 4
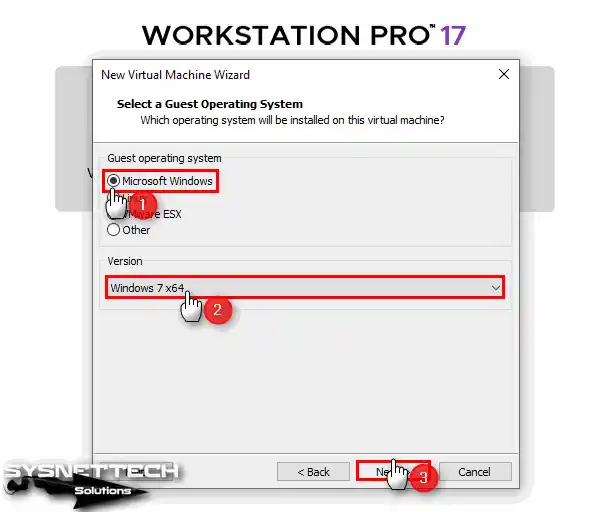
In the guest operating system selection window, first select Microsoft Windows. Then, select Windows 7 x64 from the Version section.
Configuring Virtual Machine Hardware
Step 1
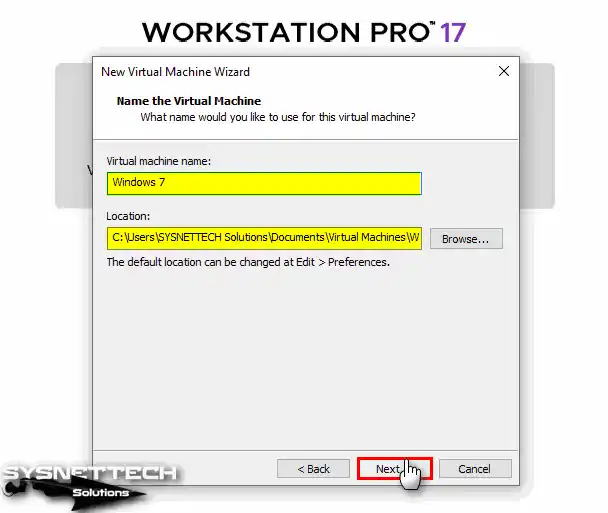
In the Virtual Machine Name window, set a name for your Windows 7 machine. In the Location section, select where you want to store it.
Now, at this step, you can also save the VM files to an external HDD. However, if your host computer has an NVMe or SSD disk, you should install the VM on the existing hardware.
Step 2
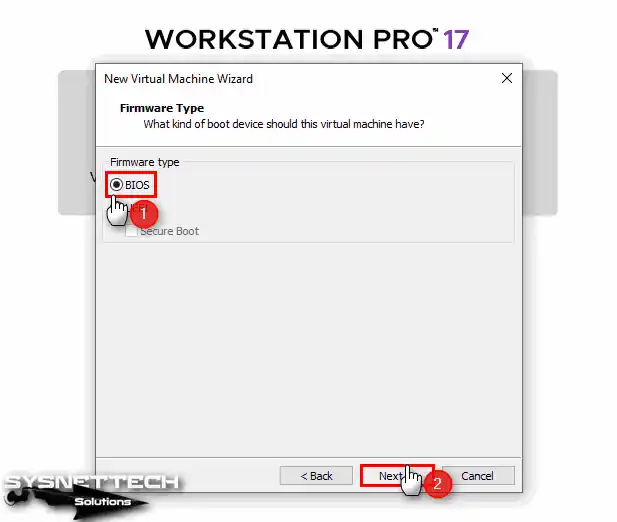
You are familiar with the options in the Firmware Type window. Therefore, because Windows 7 is an older system, select BIOS..
Step 3
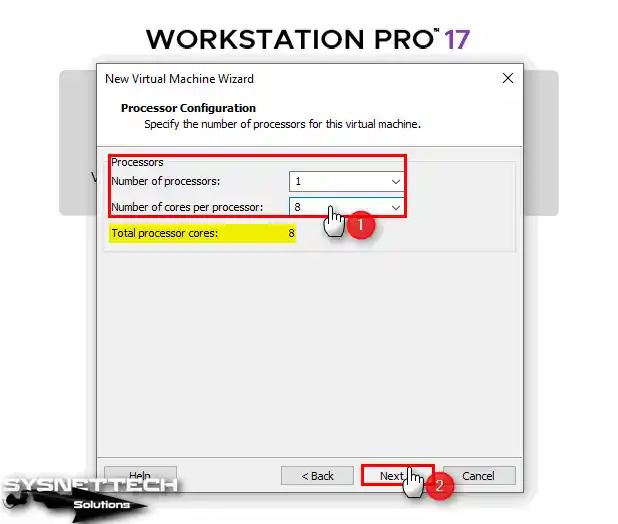
As we said at the beginning, you should adjust the settings based on your host’s processor hardware type and performance. Here, in the CPU configuration window, you can adjust the processor or core count.
For example, for a VMware Windows 7 guest machine, a configuration with 1 processor and 8 cores per processor is ideal.
Step 4
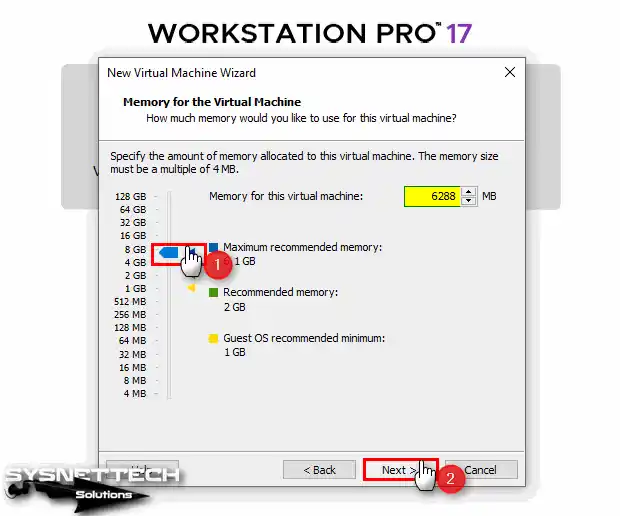
Configure the recommended or maximum memory size for your Windows 7 virtual PC. Here, you can also specify half of the installed RAM on your host.
Step 5
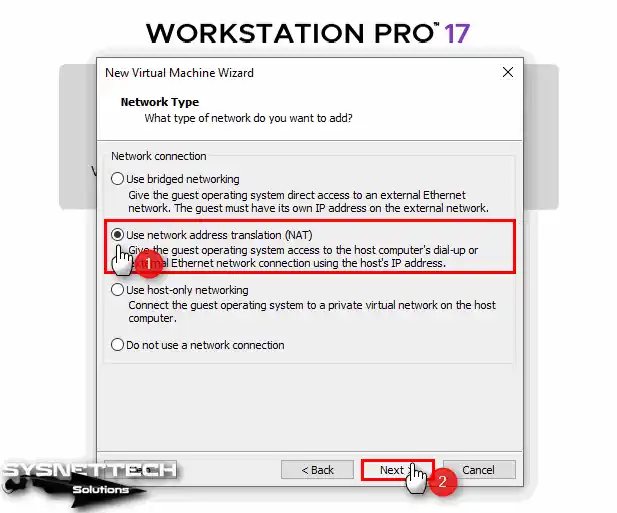
In the Network Type window, there are various connection options. However, continue by selecting NAT, which is selected by default.
Step 6
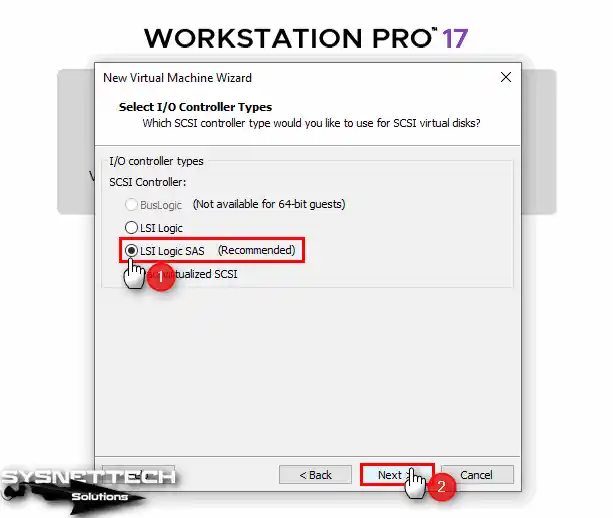
Even if you are a beginner, default settings are usually adequate. For example, you can continue with LSI Logic SAS (Recommended) in the I/O Controller Types window.
Virtual Disk and Advanced Hardware Settings
Step 1
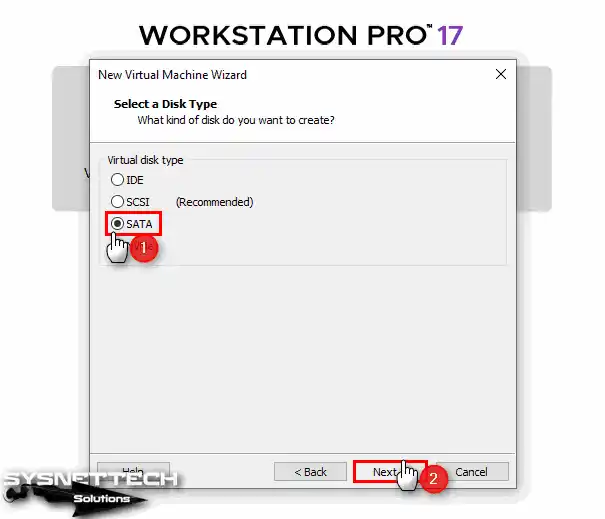
Select SATA as the disk type for Windows 7.
Step 2
A virtual PC needs a new virtual disk. Therefore, continue with the ‘Create a new virtual disk’ option.
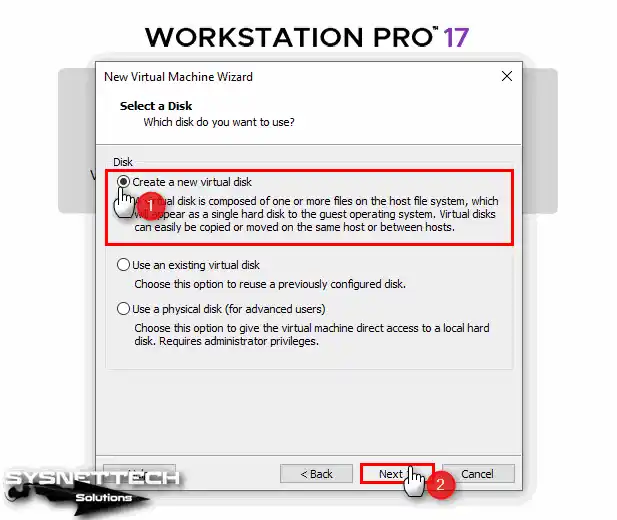
Step 3
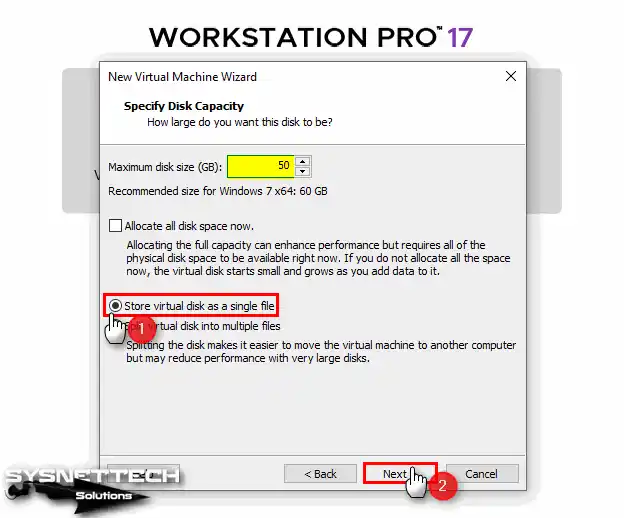
As mentioned, a 50 GB disk is enough for a Windows 7 VM. However, determine the disk size yourself based on your workload.
Moreover, do not forget to select ‘Store virtual disk as a single file’. This option will create a single virtual disk file. Thus, it will allow you to create backups more easily in the future.
Step 4
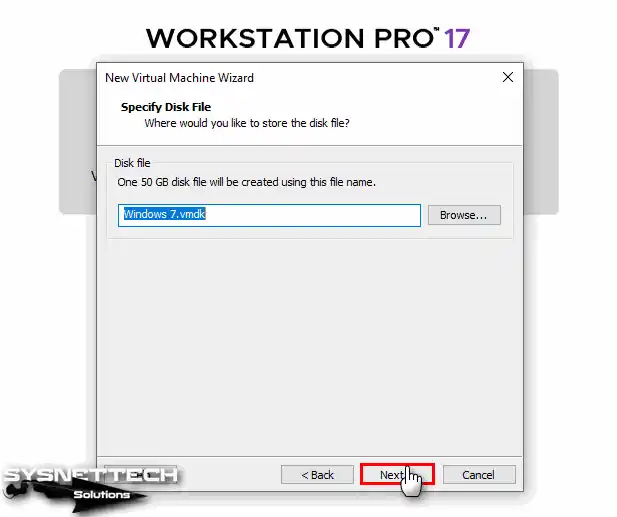
Of course, you can change the location where you want to store the virtual disk file. However, leave it in the default location. Also, do not change its name to avoid confusion in the future.
Step 5
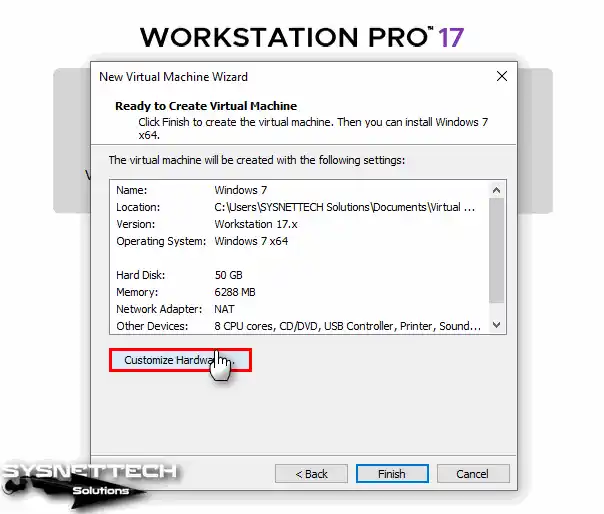
The process of creating a VM has a final stage. You will see the Customize Hardware option. In this summary window, you can review the settings you have made up to this stage.
However, click Customize Hardware for more advanced settings on the guest machine.
Running the Virtual Machine
Step 1
Click the processor hardware option in the VM settings. Select all options in the Virtualization Engine section on the right side.
- Virtualize Intel VT-x/EPT or AMD-V/RVI
- Virtualize CPU Performance Counters
- Virtualize IOMMU (IO Memory Management Unit)
NOTE: Sometimes, when your VM does not boot, you can try disabling the second or third option. Especially on newer processors and systems, these options can cause problems.

Step 2
First, download the Windows 7 ISO file used in this article from this link. When you click the link, you will go to Google Drive. On the relevant web page, you will see that the file name is “windows_7_ultimate_with_sp1_x64”.
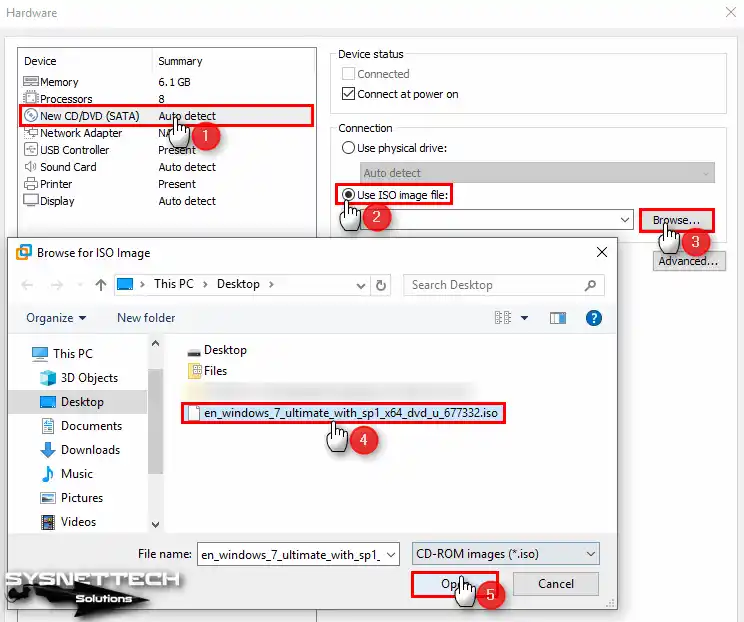
After configuring the CPU settings, click the CD/DVD device. Since you will use an ISO file to install Windows 7, enable the ‘Use ISO Image File’ option. Then, click Browse to add the image file to the VM.
Step 3
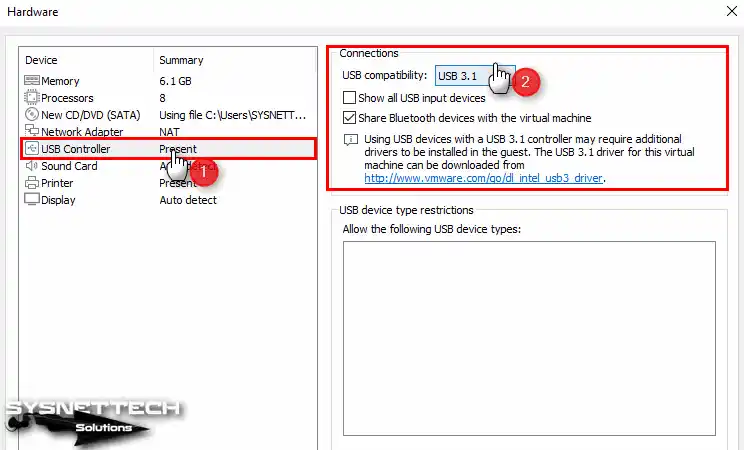
Click the USB Controller device and set the compatibility setting to 3.1.
Also, enable the following USB features:
- Show all USB input devices
- Share Bluetooth devices with the guest machine
Step 4
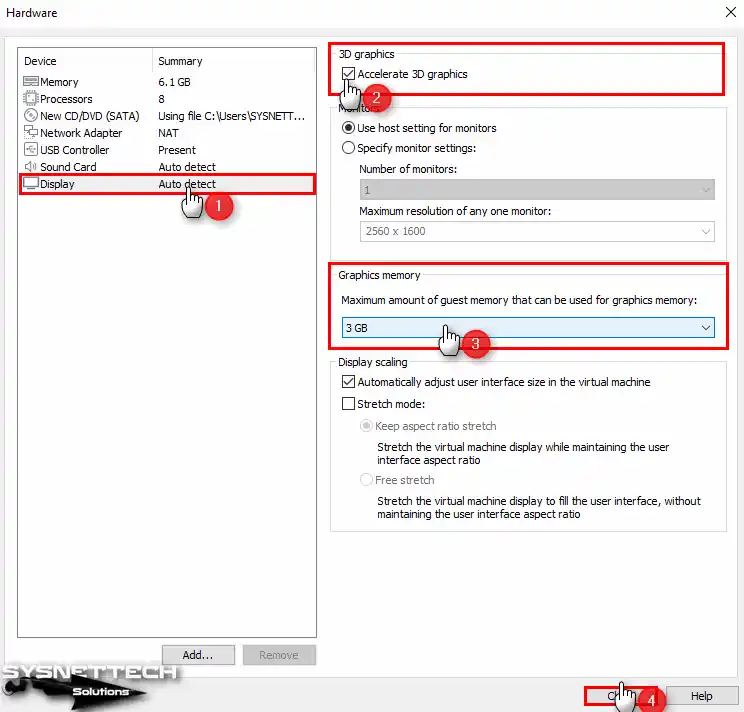
After clicking the Display device, enable 3D graphics acceleration from the options listed on the right side. Then, set the Graphics Memory value to half of the RAM amount you allocated to the virtual OS.
Step 5
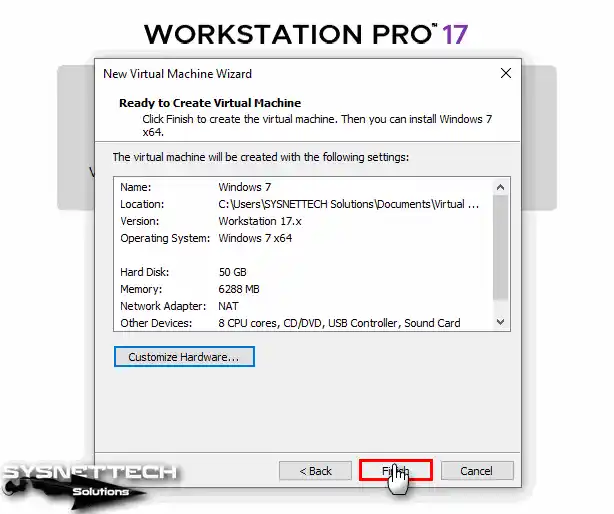
After creating the new virtual PC for Windows 7 on VMware, click the Finish button to close the guest machine’s hardware properties window.
Step 6
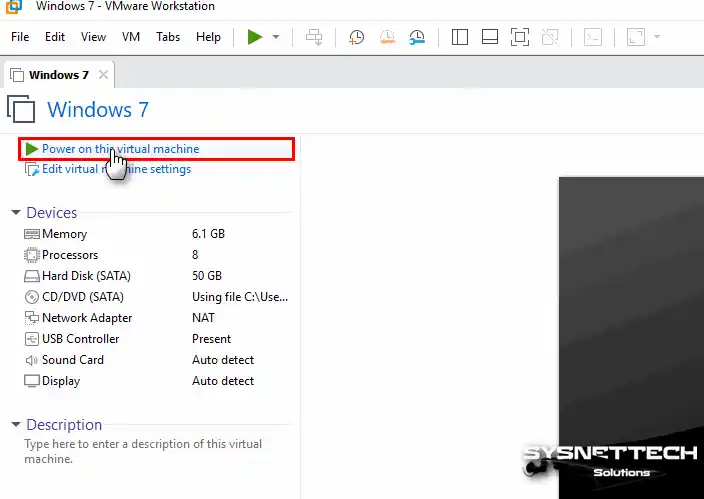
Click the ‘Power on this virtual machine’ button to start the Windows 7 operating system installation.
Windows 7 Installation on Our Prepared Virtual PC
After preparing and running the Windows 7 VM, you will see the first installation screen. If there are no problems, you can follow the steps below for installation.
Step 1
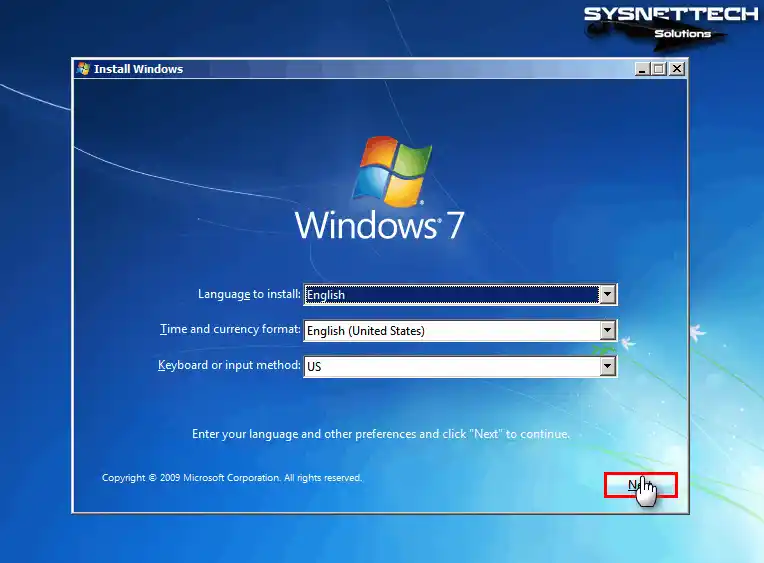
Configure the display language, time zone, and keyboard layout for your Windows 7 operating system.
Step 2
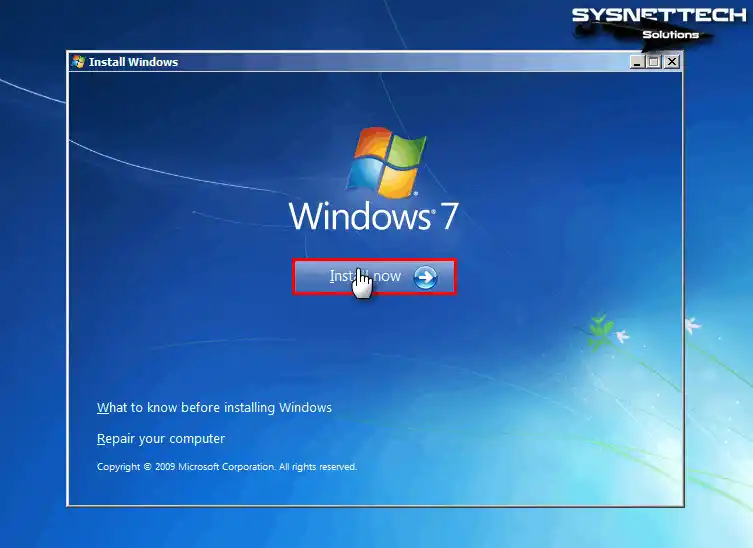
As soon as you configure the basic settings for Windows 7, click the Install Now button.
Step 3
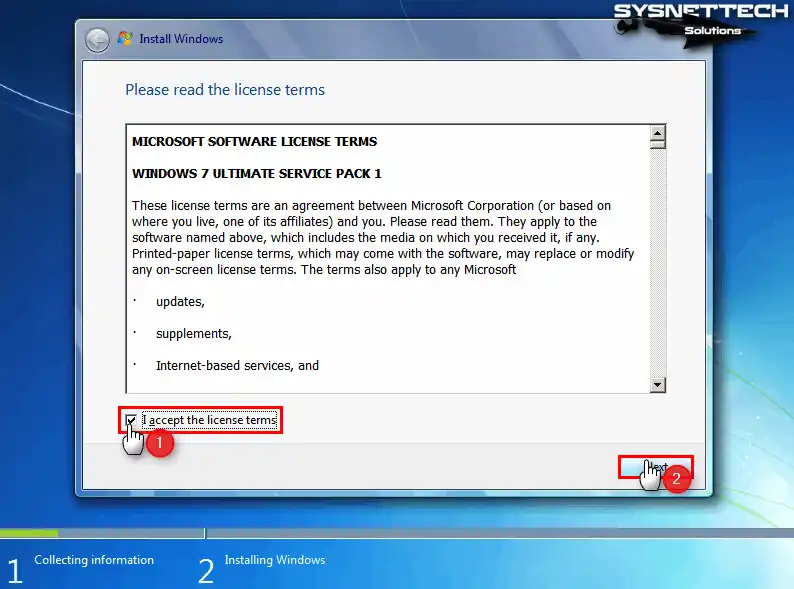
Accept the Windows 7 Ultimate Service Pack 1 license agreement.
Step 4
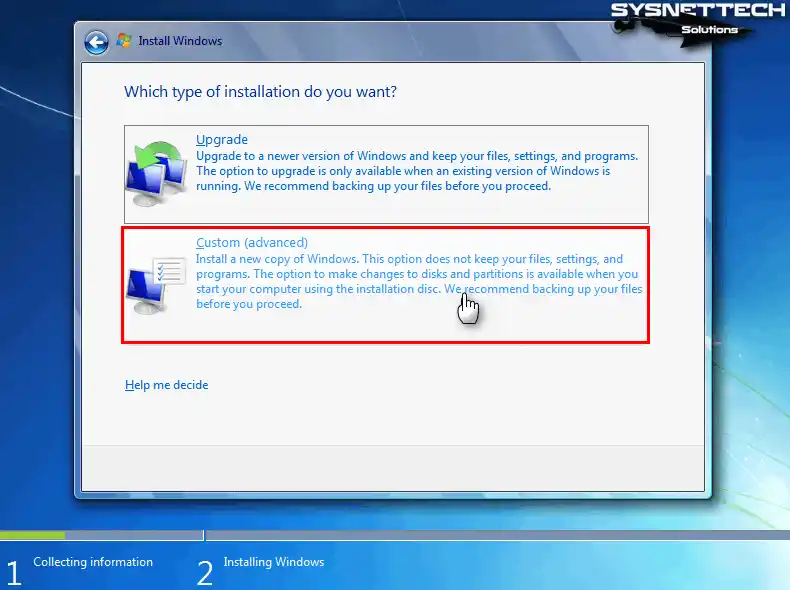
You need to select Custom (Advanced) to perform a clean installation of Windows 7 on the virtual computer.
If you want to upgrade a previously prepared system to a different version, you need to select the Upgrade option.
Step 5
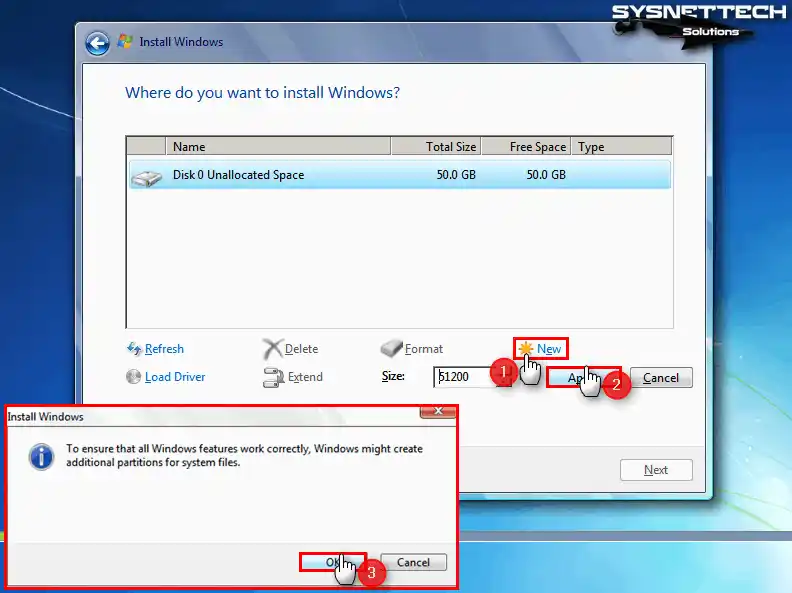
In the disk configuration window, click Drive Options. To create a new partition on the virtual disk, select New. To use the entire 50 GB disk, click Apply.
The wizard will create additional partitions for Windows to run its features properly. Therefore, click OK in the information window that appears.
Step 6
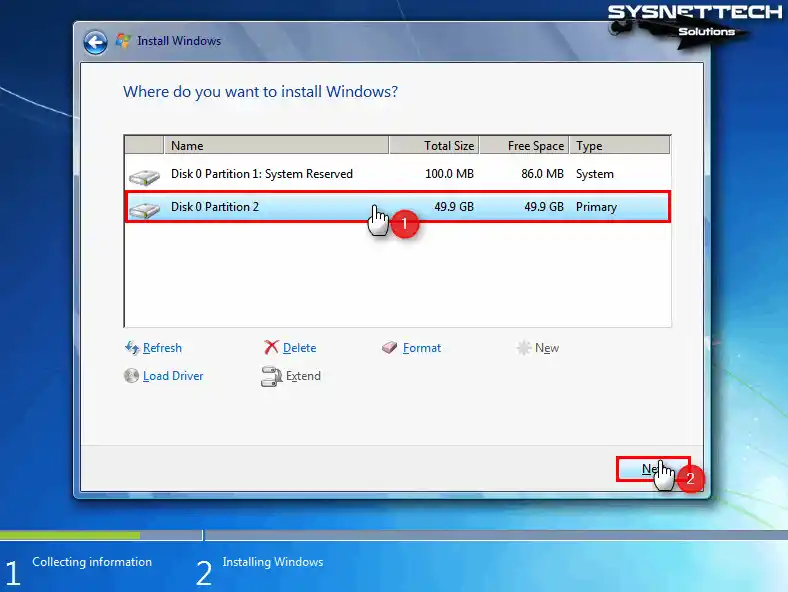
To install Windows 7, select Disk 0 Partition 2 and continue.
Step 7
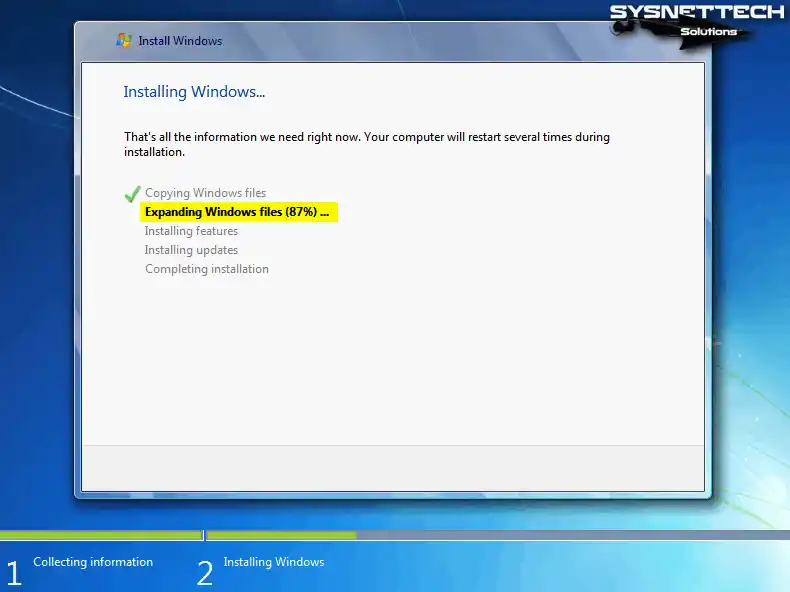
In this stage, the wizard will extract the Windows installation files.
Step 8
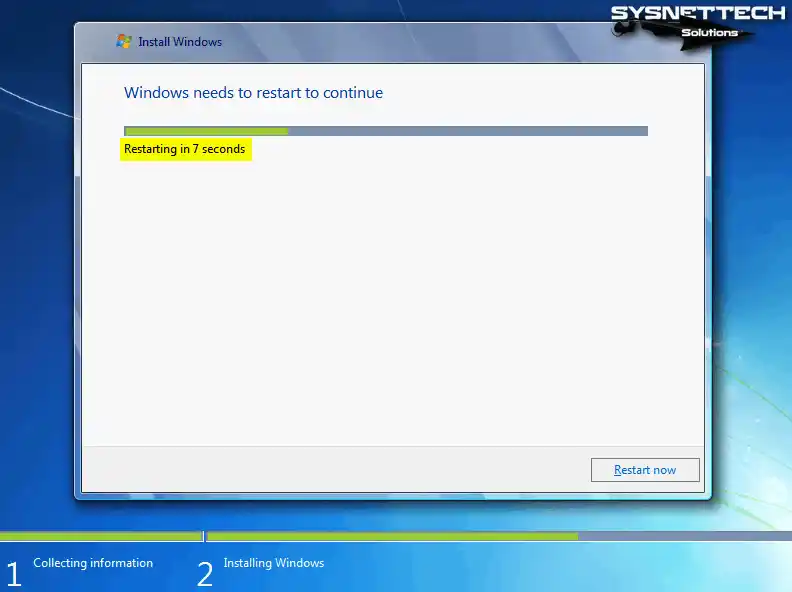
When the wizard copies the system files, your guest machine will restart within 10 seconds. If you prefer not to wait, click Restart Now.
Completing Windows 7 Installation
Step 1
While your virtual system restarts, wait for Windows to update the registry and other settings.
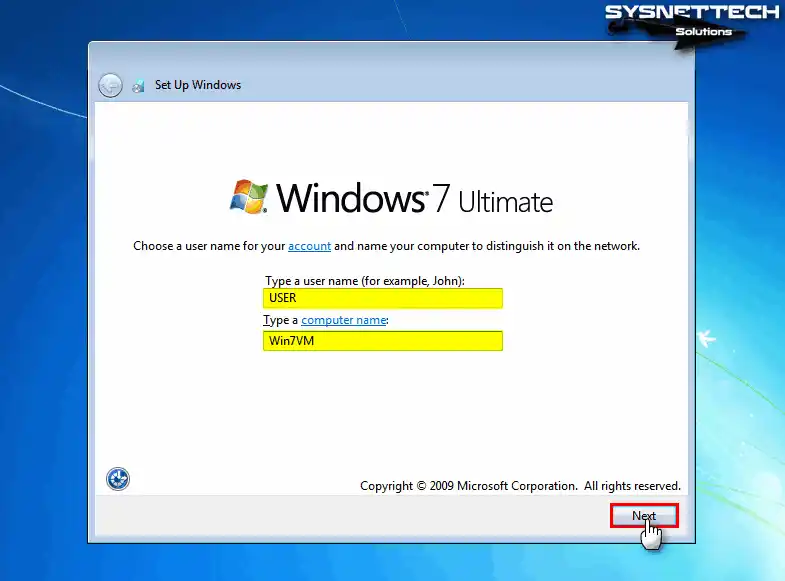
When your computer’s registry settings are updated, you will see the user account creation window. Here, complete the required fields to assign a new username and computer name to your Windows 7 system.
Step 2
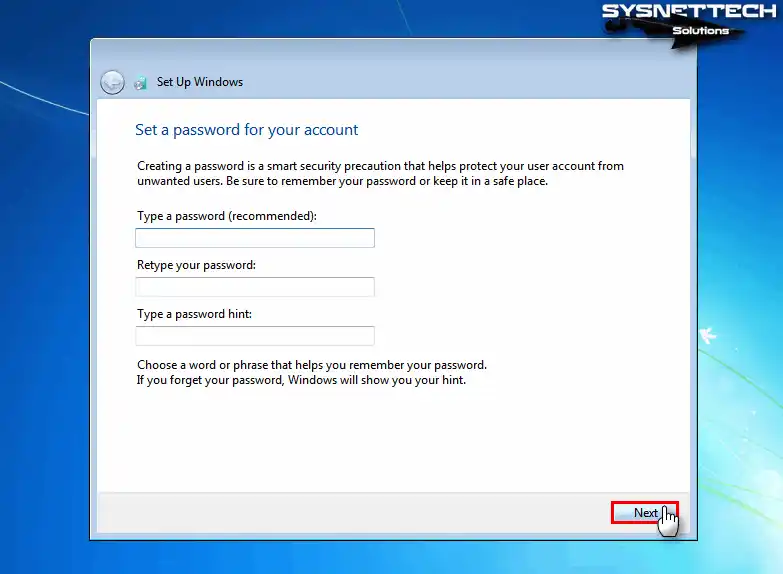
You may want to set a strong Windows password for your user account. If so, enter the password you chose in both boxes.
If you plan to create multiple user accounts on your system, you should set a hint.
Step 3
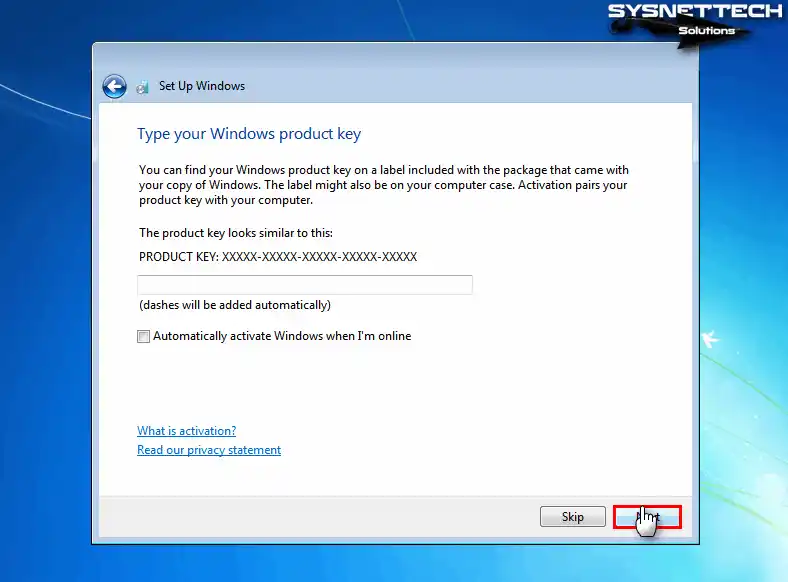
If you have a license key for Windows 7, you can enter it in this window. If not, you can simply continue with Next.
Step 4
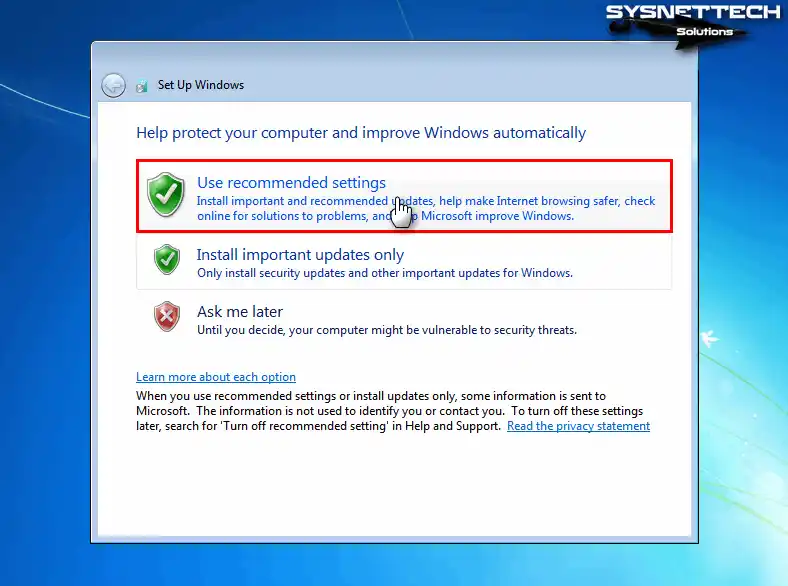
You can configure the Windows firewall in detail for the software you will use later. To do so, select the ‘Ask me later’ option from the available options.
Additionally, you can accept the settings recommended by Windows. To do so, select Use Recommended Settings.
Step 5
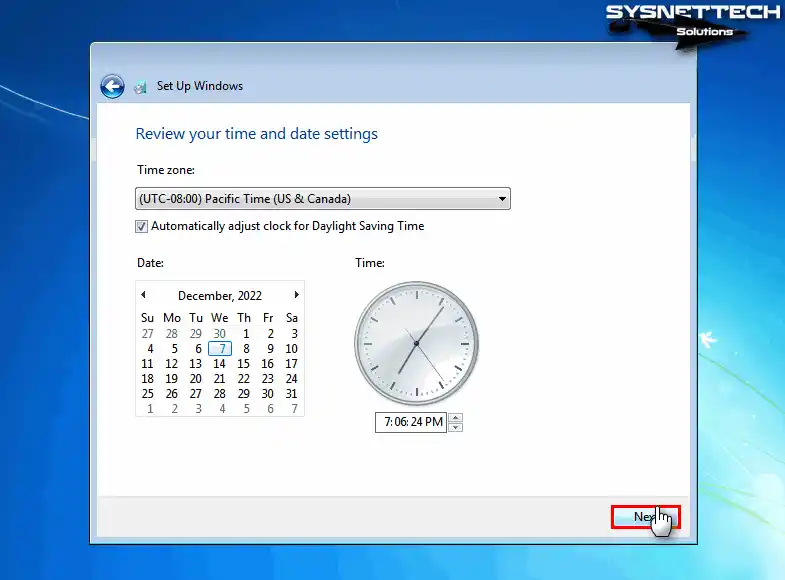
Select your time zone and current time for the country you live in.
Step 6
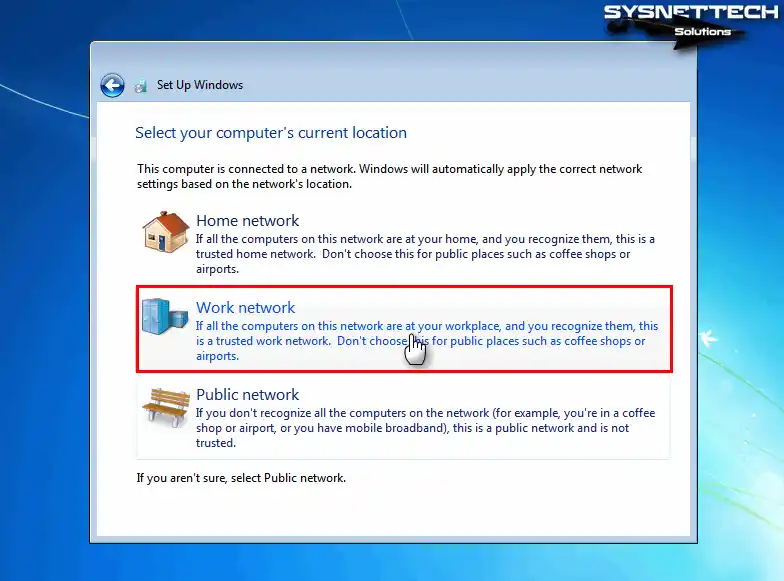
Configure your network according to your purpose. For example, you can choose one of the Home, Work, and Public options.
Step 7
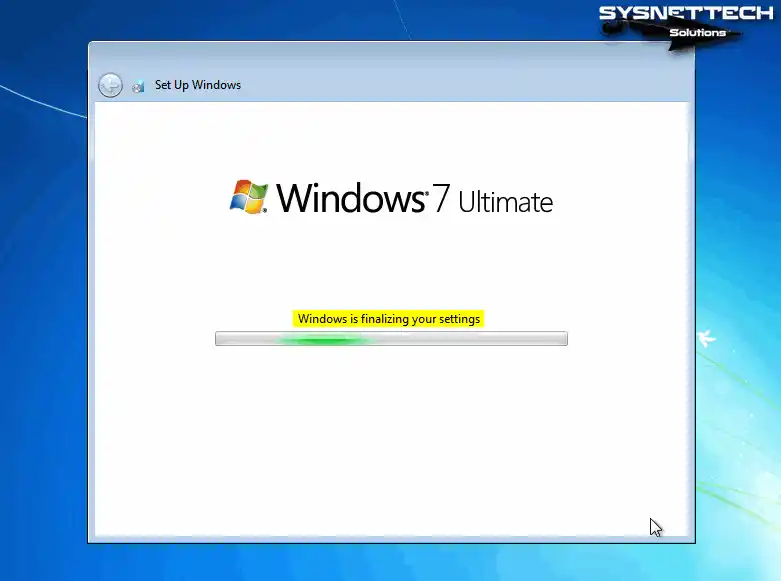
Wait while the Windows 7 Ultimate wizard applies the final settings to your system.
Step 8
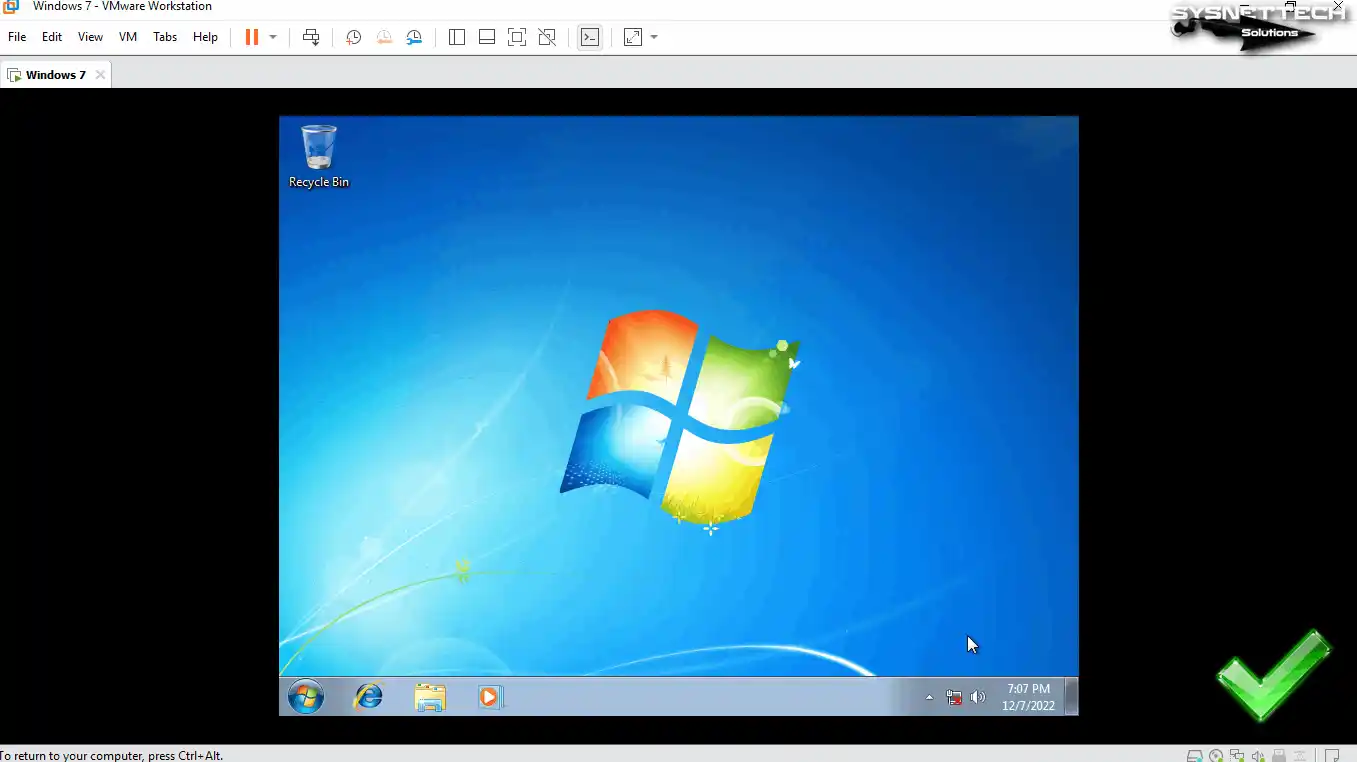
At this stage, you will see the Windows 7 welcome window. When your desktop is ready, you will see the default background wallpaper.
Installing VMware Tools on Windows 7 Virtual Machine
We used to install the VMware Tools package for Microsoft Windows 7 VMs without issues in older VMware versions. However, in new versions, we encounter various errors.
VMware Tools is necessary software for your guest machine to use your host’s hardware more efficiently. With this tool, you can transfer files between the host and the guest.
Also, you can benefit from host hardware such as a webcam. Moreover, thanks to the Shared Folder structure, you can share a folder across the network.
Steps:
Step 1
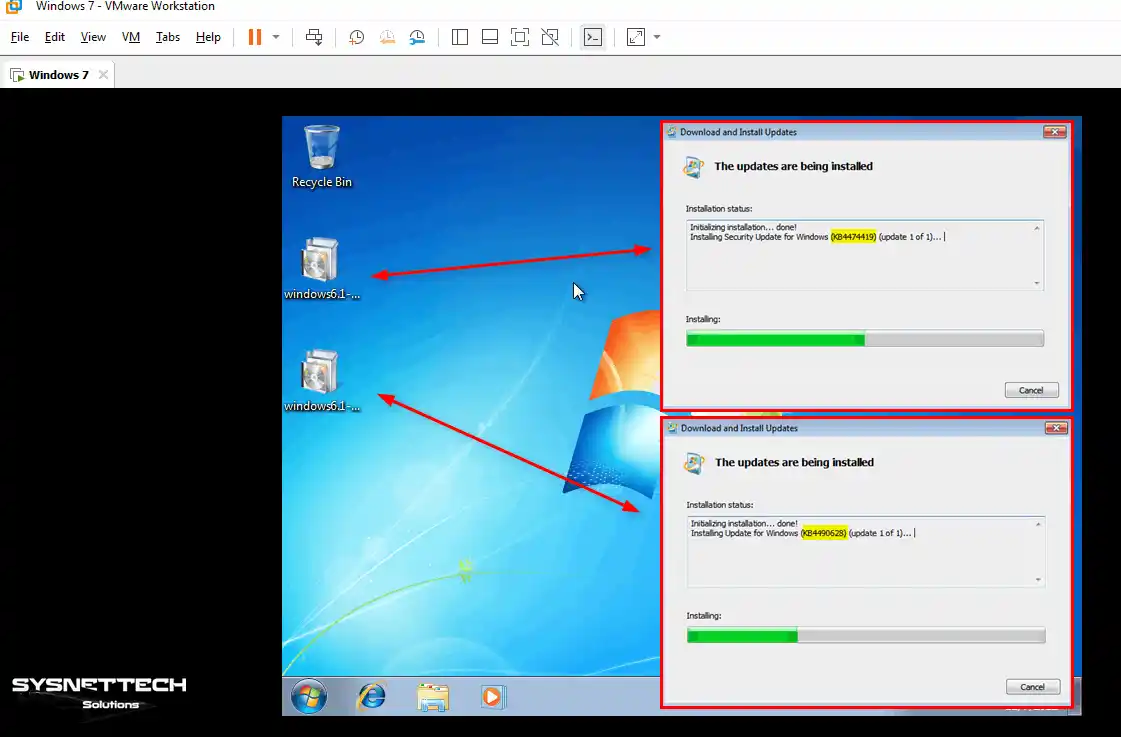
Before installing VMware Tools on your Windows 7 x64 guest machine, you need to install the KB4474419 and KB4490628 update packages on your system.
If you did not install these Windows update packages on your system, you will receive the errors below during installation.
Setup failed to install the VSock Virtual Machine Communication Interface Sockets driver automatically. This driver will have to be installed manually.Setup failed to install the Host Guest Shared Folders driver automatically. This driver will have to be installed manually.To download the update packages for Windows 7 x64 to your host system, click the button below. The name and extension of the downloaded file will be “Windows 7 x64 kb4474419 kb4490628.iso”. Add this file to your guest machine, install the update packages, and restart your system.
Step 2
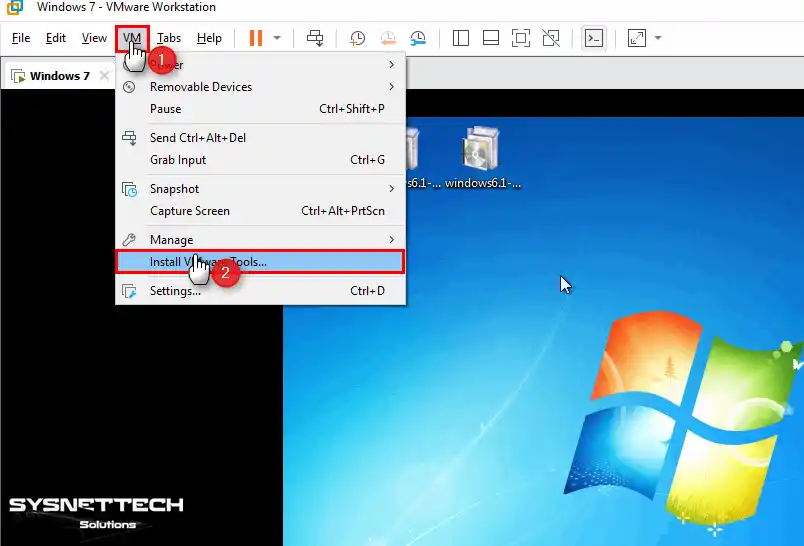
Now, to install virtual machine tools, go to VM > Tools from the menu. Then, click the Install VMware Tools option to start the process.
Step 3
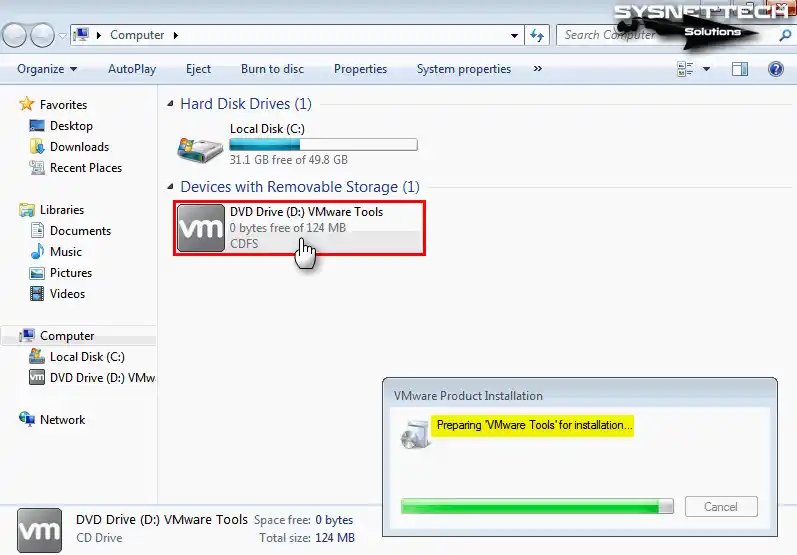
If the VMware Tools installation wizard does not start automatically and takes too long, it is not a problem. Simply open My Computer and double-click the DVD device as shown in the image below.
Step 4
You have started the VMware Tools installation wizard. After briefly reading the information on the screen.
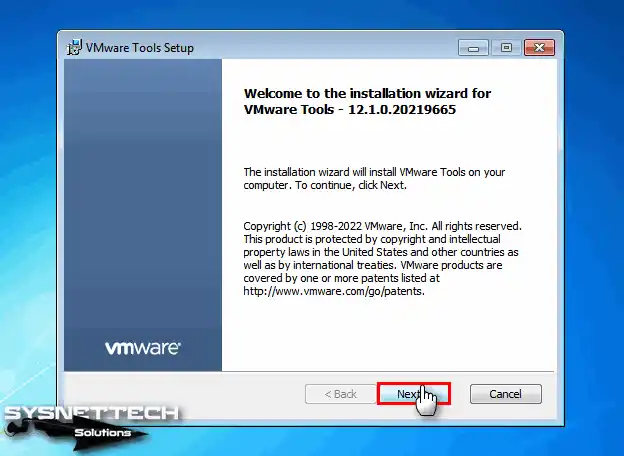
Step 5
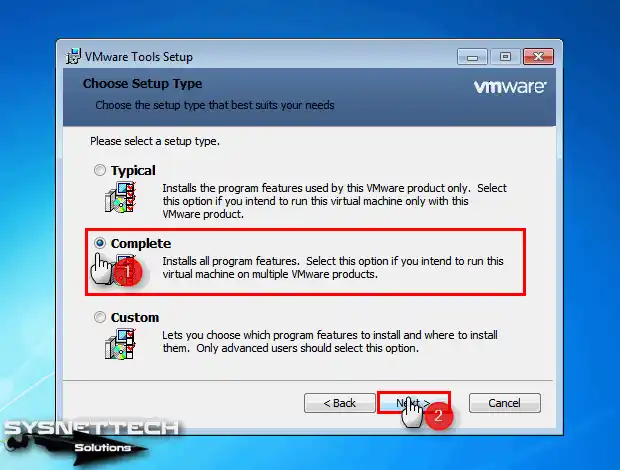
In the Choose Setup Type window, select the Complete option. If you want to make a change, click the Back button.
Continuing VMware Tools Installation
Step 1
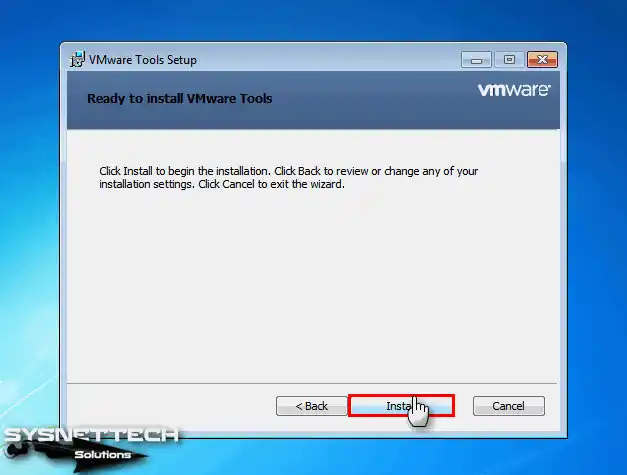
To start installing the drivers of the Windows 7 virtual machine, click Install.
Step 2
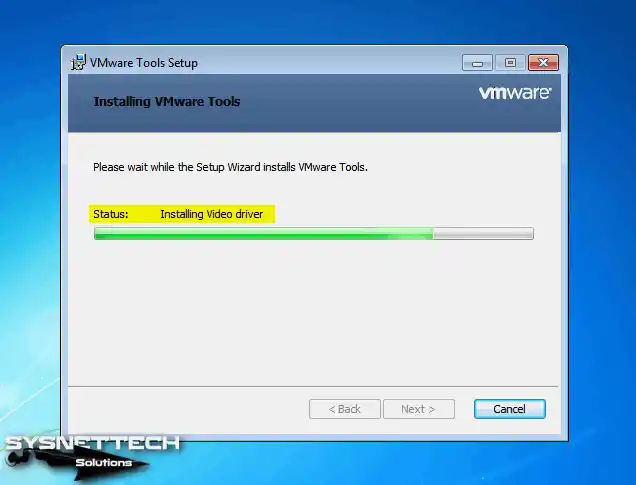
Wait while the wizard installs other drivers of your virtual operating system, such as the graphics or display card driver.
Step 3
You have installed your guest system’s drivers. Now, restart your system to apply the changes.
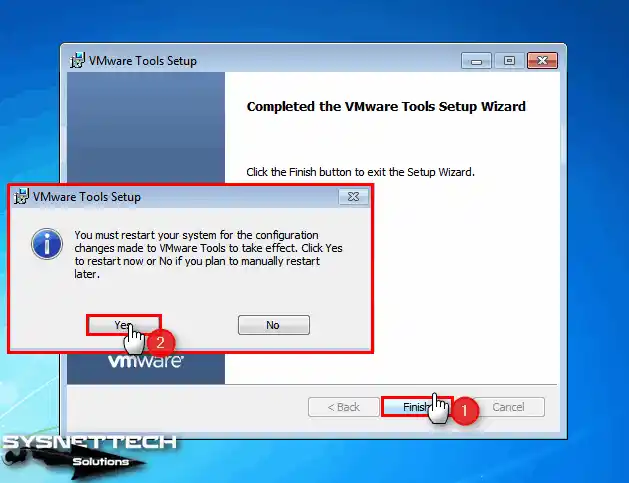
Step 4
When you restart your system, you can see that the screen resolution adjusts to full screen. However, USB 3.x drivers will not install automatically.
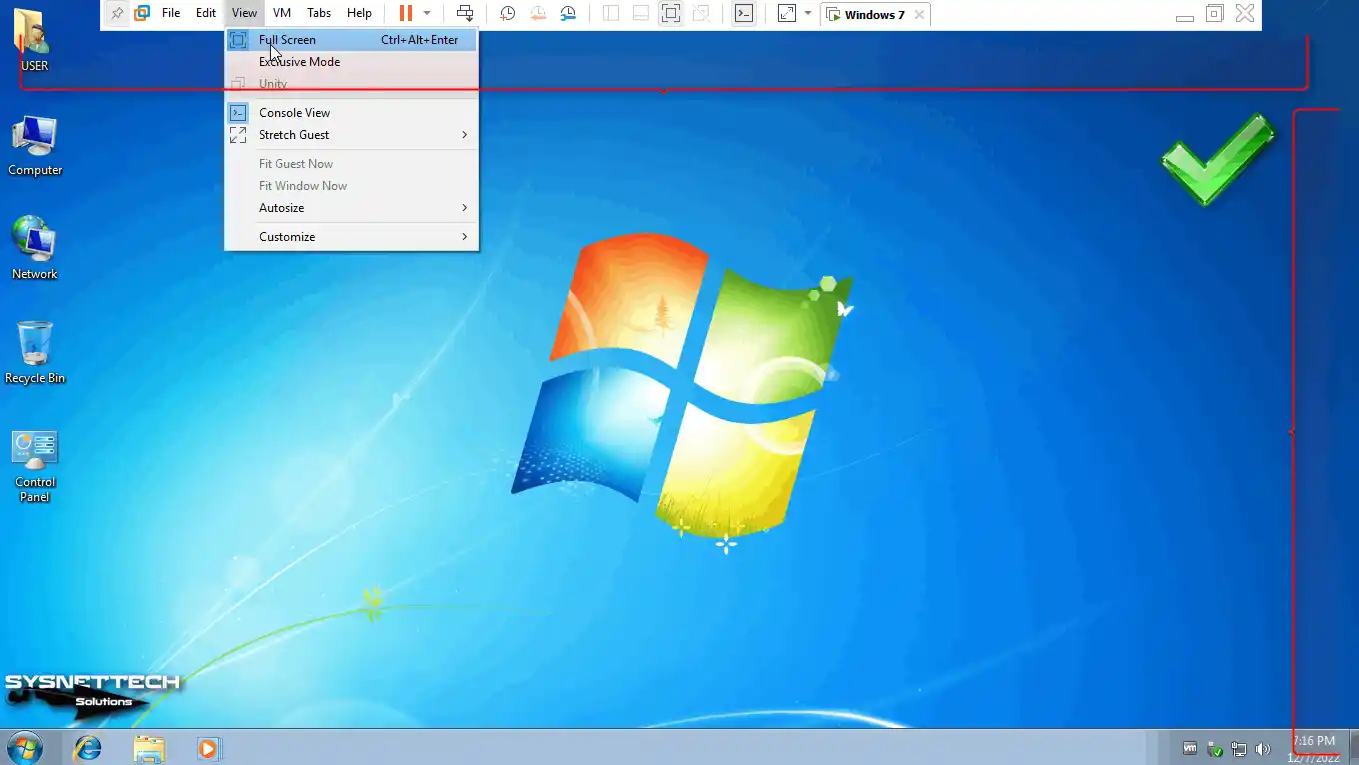
Step 5
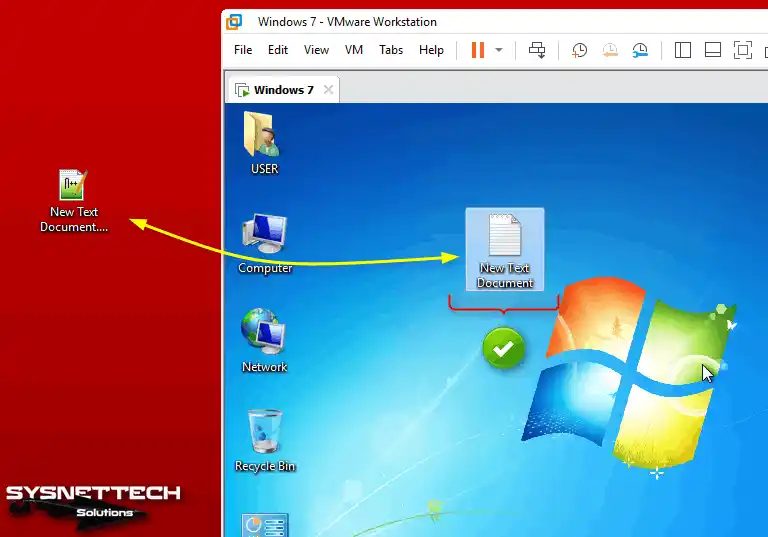
Create a text document on your host system’s desktop or another location. Then, try to transfer files by dragging and dropping them to your VM.
You will see that you have copied the files without issues as shown in the screenshot below.
Shared Folder Configuration
Suppose you installed a Windows or Linux operating system with VMware. This section covers a useful feature called Shared Folder.
With this feature, you specify a common folder on your host device. Then, you can share files more easily between your host PC and the VM.
Shared Folder works like a shared folder structure on the network. You can access the shared folder you created through both Network and My Computer.
To create a new Shared Folder on the machine you created, click VM > Settings. Then, click Options in the VM settings window.
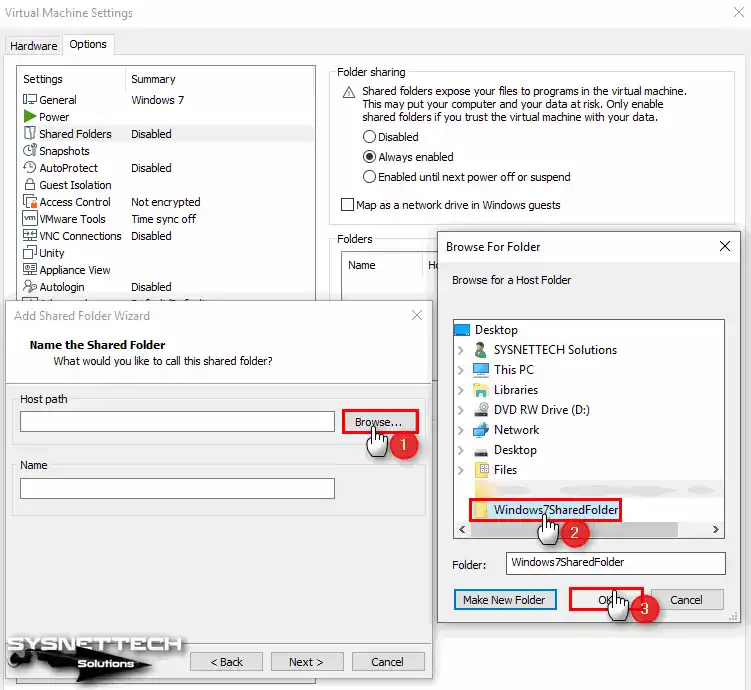
Now, click Shared Folders as shown on the screen. In the Folder Sharing tab, select Always Enabled. Finally, click Add to select and add a folder on your host.
At this stage, you will open the Shared Folder wizard. As mentioned, hit Next to continue adding the shared folder.
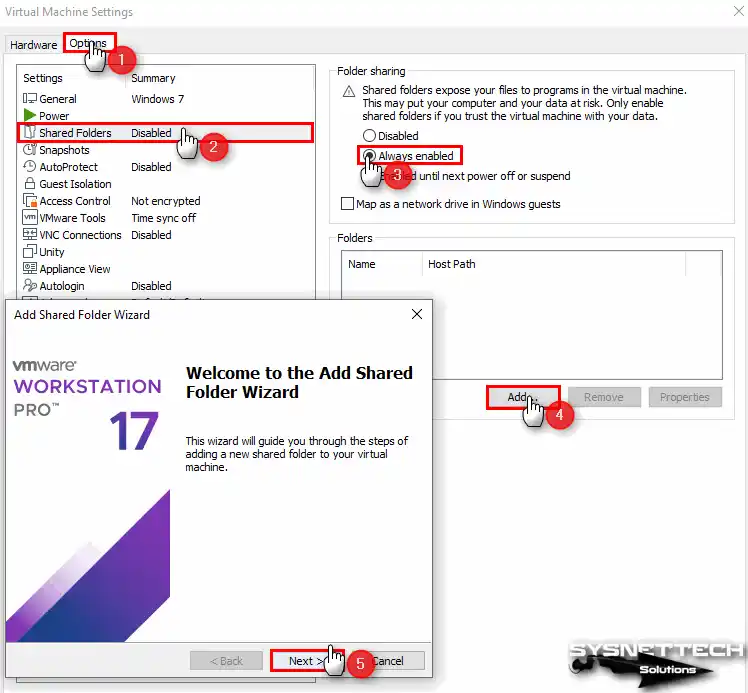
Click Browse to configure the Host Path setting. Then, create and select a shared folder in any location on your host computer.
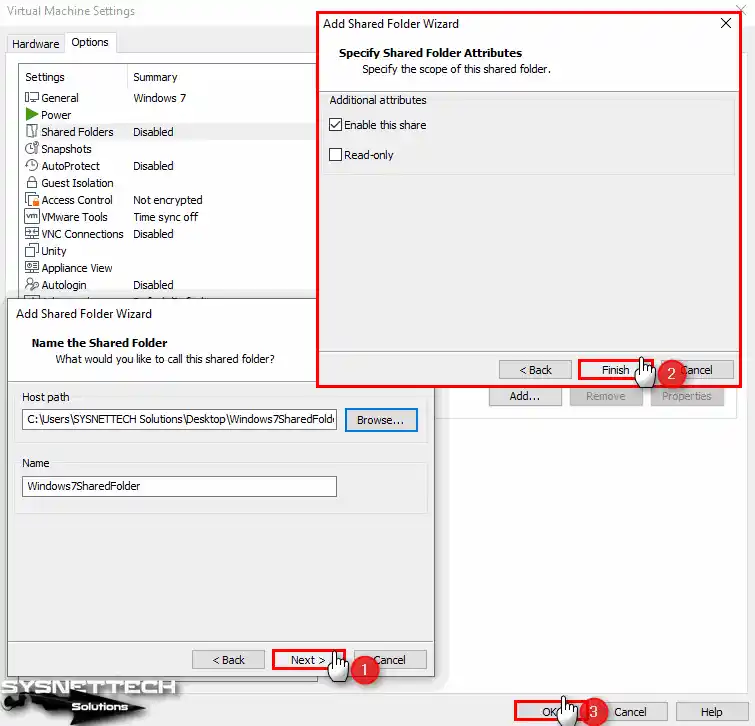
In the Additional Attributes window, you can enable or disable folder sharing.
Additionally, if you select Read-Only, you will not be able to make any changes to the shared folder. However, you will only be able to view the folder’s contents and open the relevant files.
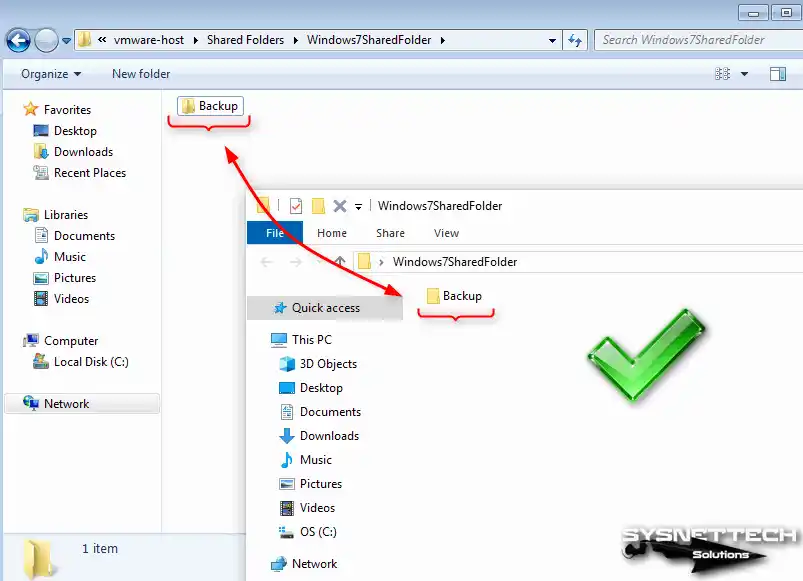
Open Network and check whether the Shared Folder feature works. You can see the shared folder created between the host and the VM.
Finally, enable the ‘Map as a network drive in Windows guests’ option.
Using USB Flash Drive on Windows 7 VM
After installing VMware Tools, USB 3.0 drivers will not install automatically. These drivers are not included in the installation media of older operating systems.
However, if you install a newer operating system such as Windows 10, these drivers will install automatically, because newer operating systems support this hardware. If they do not, you may need to install the driver manually.
Step 1
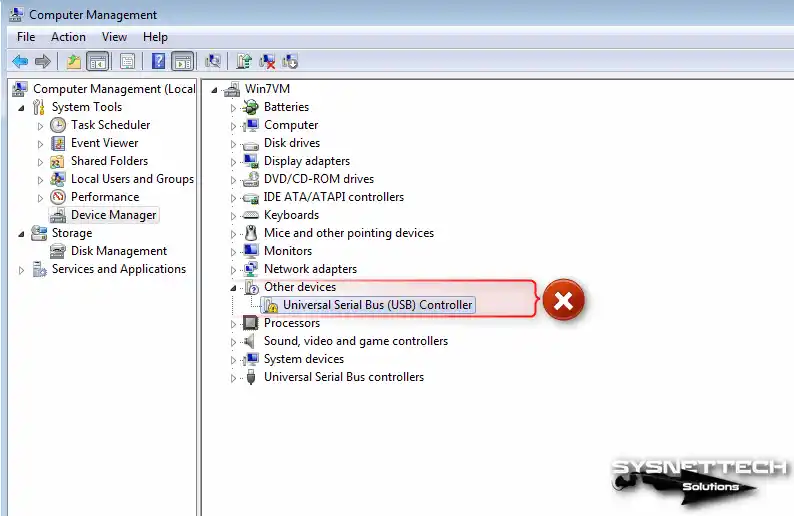
Open Device Manager in Windows 7 and look under Other Devices. Here, when you check the Universal Serial Bus (USB) Controller device, you will see that the drivers are not installed.
To install USB drivers manually:
- To install the relevant driver manually, double-click the Universal Serial Bus (USB) Controller device.
- In the Universal Serial Bus (USB) Controller Properties window, click the Update Driver button.
- Click the Browse my computer for driver software option.
- Select Intel’s USB driver folder and click OK.
- After selecting the driver folder, press Next to start the installation.
- After the manual installation, you will see that the Intel (R) USB 3.0 eXtensible Host Controller device has been installed successfully.
- When you check Device Manager again, you will see Unknown Device. You have successfully installed the USB Controller driver, but you have not installed the Root Hub driver. The reason is that the driver provided by Intel is not fully compatible.
- Download the Intel (R) USB 3.0 Root Hub driver to your computer and try to install the unknown driver manually in the same way.
- To install the unknown driver, specify the location of the folder you downloaded to your computer and click OK.
- You can see that the Intel (R) USB 3.0 Root Hub driver has been installed successfully.
Installing USB Drivers and Connecting USB Drive
Step 1
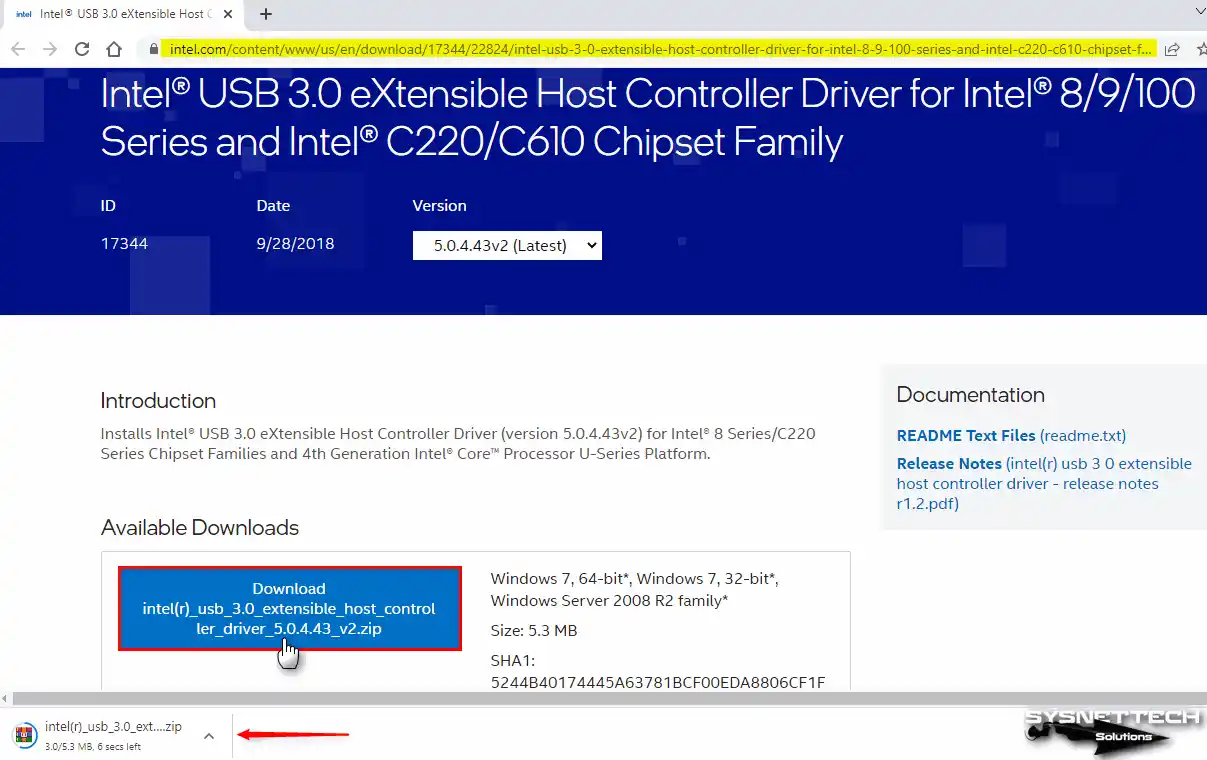
To use USB 3.0/3.1 devices on the virtual machine, you must download the necessary drivers. To do so, download the driver from my GitHub page.
On the Intel download web page, download the intel(r)_usb_3.0_extensible_host_controller_driver_5.0.4.43_v2.zip file to your computer and copy it to your VM.
Step 2
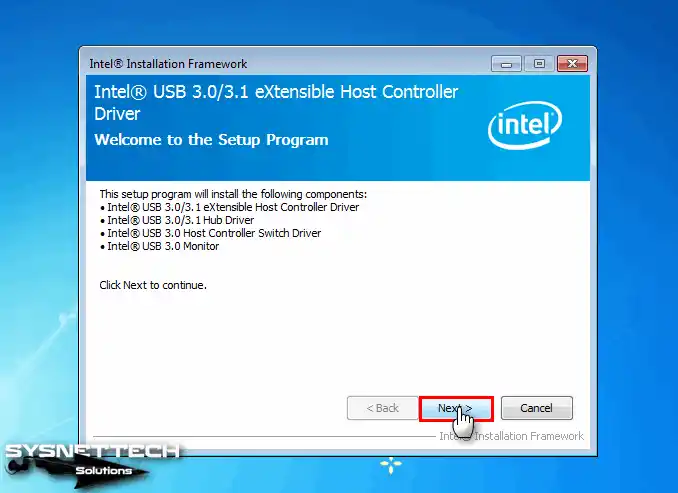
Extract the zipped file for Intel USB 3.0/3.1 eXtensible Host Controller Driver to a folder. Then, double-click the setup file to open the wizard.
In the USB driver wizard, select the components to be installed and continue.
Step 3
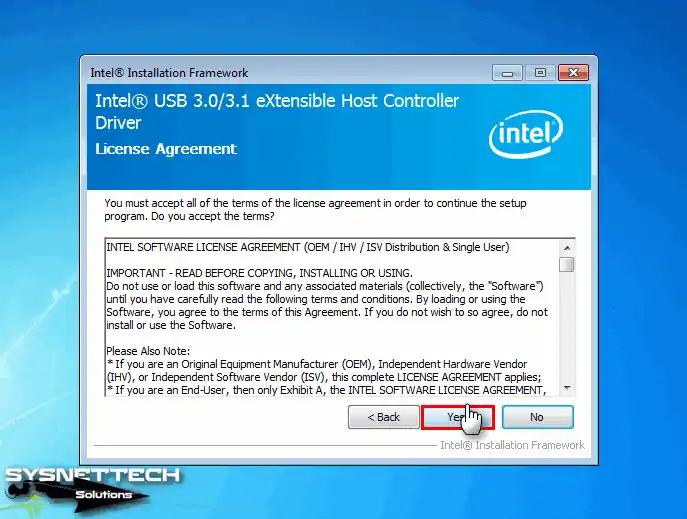
Accept the license agreement of the Intel USB driver software.
Step 4
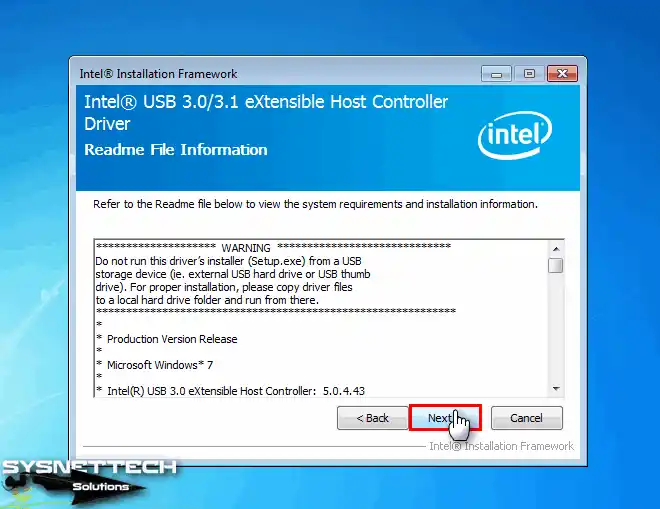
During installation, make sure that external USB devices are not plugged into your computer. Also, click the “Next” button in the window that displays this warning. After that, the installation will continue without issues, and you can complete the process successfully.
Step 5
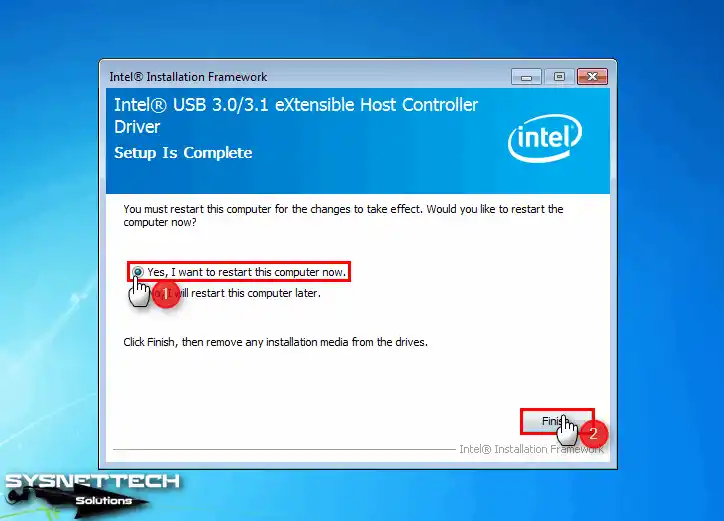
After installing USB 3.0/3.1 drivers on Windows 7, restart your system.
Step 6
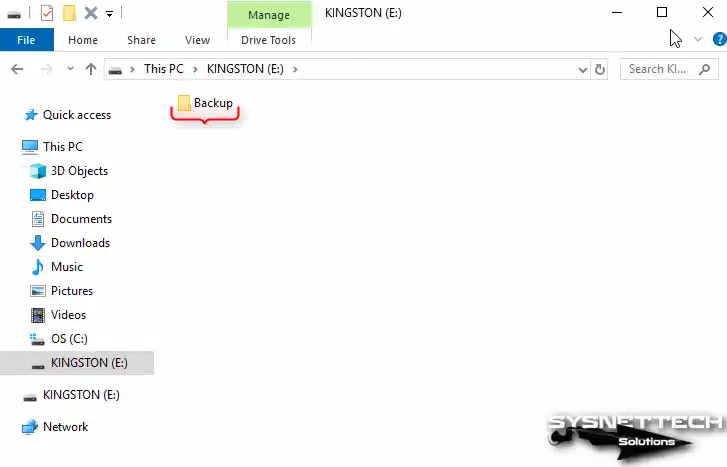
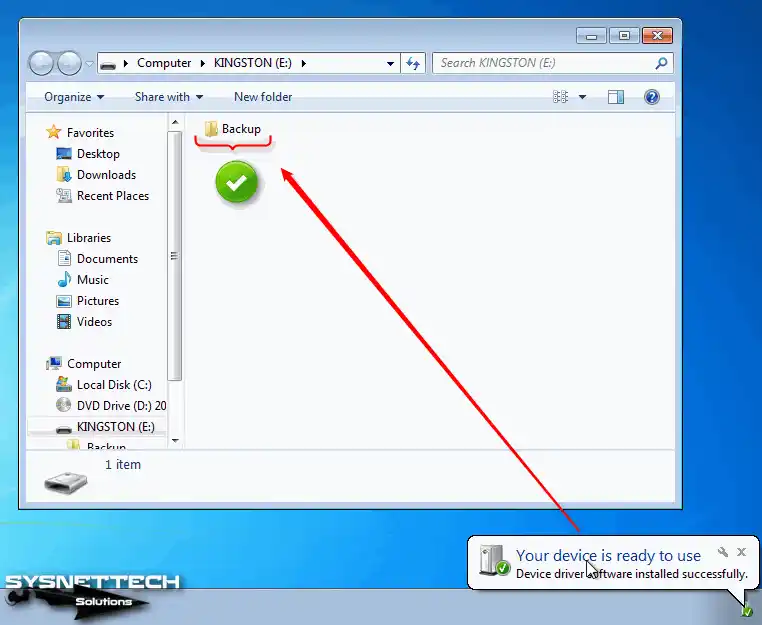
Plug a USB 3.x-compatible flash drive into your host. Also, create a folder named Backup on it as an example.
Step 7
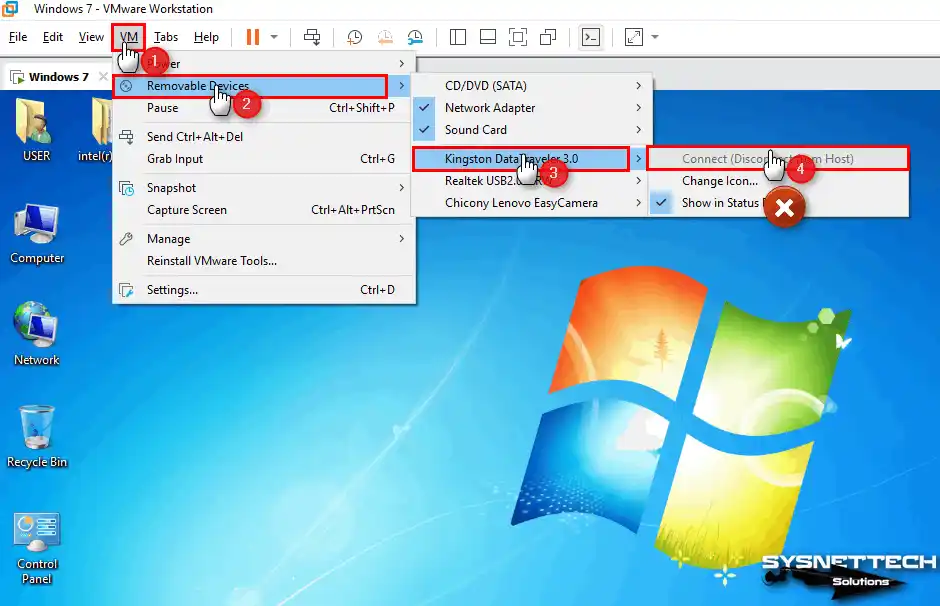
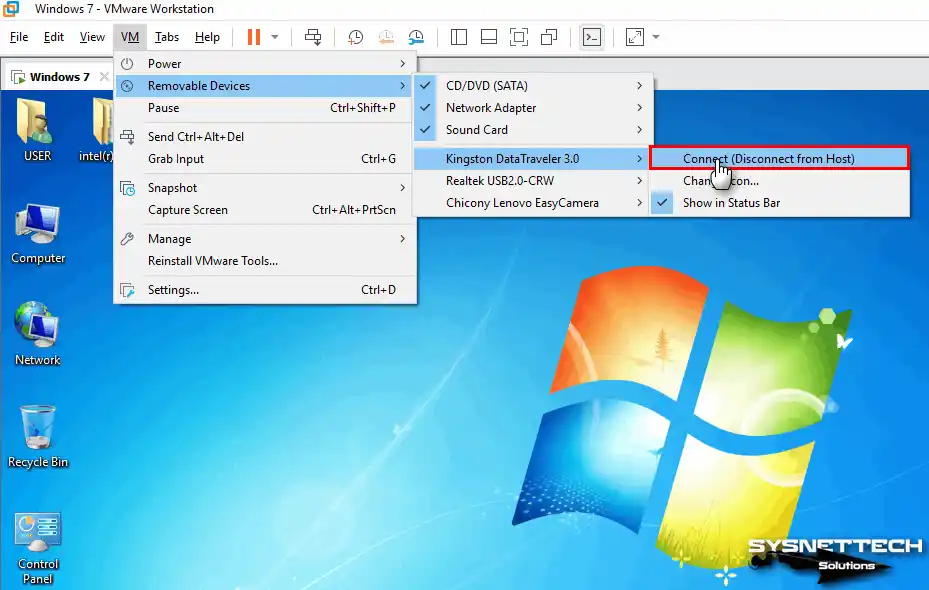
You need to connect your USB drive to the virtual machine. To do so, click VM > Removable Devices > [your USB device] > Connect from the Workstation menu. Your USB drive will then connect to the VM, and you can access your data from it.
If the Connect option is not active or is grayed out, shut down your guest machine. Then, try the connection again when it is off. The Connect option will then be enabled.
Editing the .vmx File in Windows 7
Step 1
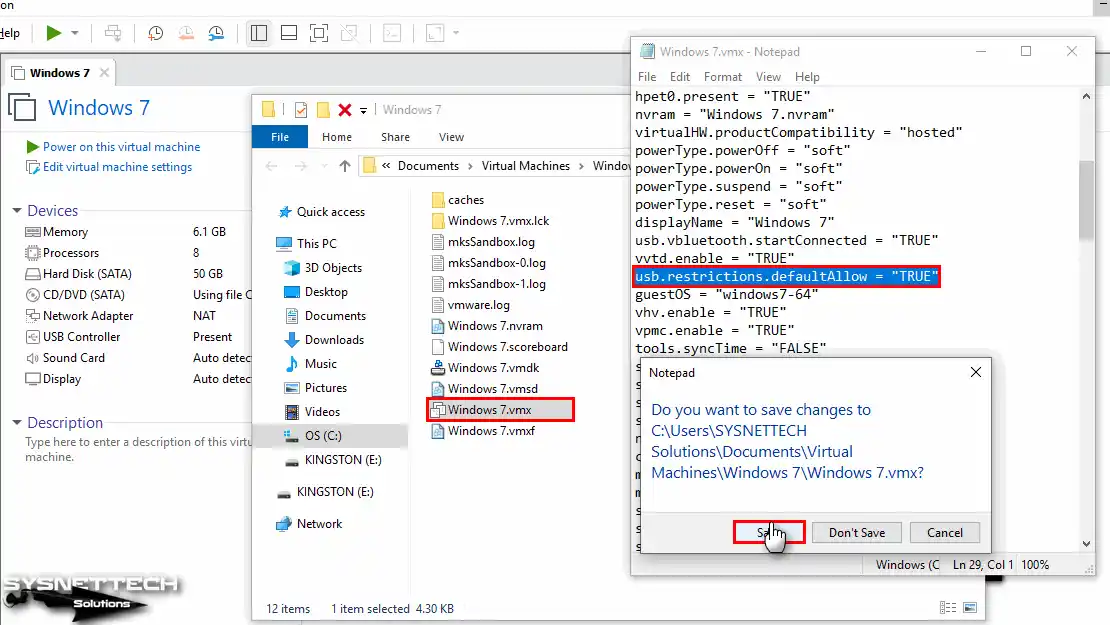
Open the Windows 7.vmx file. Change the usb.restrictions.defaultAllow=”FALSE” value to “TRUE” and save the file.
Step 2
Try to add your USB disk to your VM again. As shown below, you will see that the Connect option is now active.
Step 3
When you plug your flash drive into your VM, you can now see the Backup folder you created on it.
Deleting Windows 7 Virtual Machine from VMware Workstation
You can quickly delete a Windows 7 virtual OS you prepared with VMware Workstation Pro. By doing so, you can completely remove not only this system but also other platforms from your computer. This will also remove all unnecessary files, freeing up more space on your computer.
Right-click the guest machine you want to delete from the list in Workstation Pro’s left panel. Then, click the ‘Manage / Delete From Disk’ option. Click ‘Yes’ to confirm the operation in the ‘This operation is irreversible’ window. You will permanently delete the selected virtual PC.

Video
Installing Older Versions
| Workstation Pro | YouTube Video | Slide |
|---|---|---|
| 12 Pro | Watch | – |
| 14 Pro | Watch | – |
| 15 Pro | Watch | View |
| 16 Pro | Watch | View |
| 17 Pro (NEW) | Watch | – |
FAQ About Using Windows 7 with VMware
Windows 7 gives an ACPI error during installation on VMware. What is the solution?
VMware Tools installation gets stuck on Windows 7. How do I proceed?
Windows 7 ISO won’t boot on the virtual machine. What is the reason?
Should you choose IDE or SCSI for Windows 7?
Windows 7 sound driver does not work in VMware Workstation 16. How do I fix it?
Why does the ‘Disk partition not found’ error occur during installation?
Does updating virtual machine hardware break an old system?
Guest operating system recognizes keyboard and mouse late. What is the setting?
After installation, the network adapter shows a yellow exclamation mark. How do I install the driver manually?
Shared folder connection keeps dropping. Is there a permanent solution?
Conclusion
To summarize, you can use a VM with VMware Workstation 17 Pro or Player. Thus, you can have a Windows 7 system running on a VM. Also, using VMware provides extra benefits. For example, besides running legacy applications, you can create isolated test environments.
By following the steps in this guide, you can install Windows 7 without issues. These steps will also make the installation process easier and help you solve problems you may encounter in advance. As a result, you can install Windows 7 quickly and efficiently.
If you want to run Windows Vista on VMware after your experience with Windows 7, the process won’t feel difficult at all. And if you want to try a more up-to-date system, I can say that the logic for installing Windows 8 in a virtual environment is the same.
In summary, you can benefit from the advantages of virtualization technology. Additionally, if you are a software developer, you can perform application compatibility testing. For these reasons, it is safe to run older operating systems on a modern system.

16 People Shared Their Experience
Your article displays the VMware Tools error message, “Setup failed to install the Host Guest Shared Folders driver”. Then you give instructions on how to set up shared folders. But since shared folders are busted the instructions don’t really help.
First of all, thank you for your comment. If you install Windows 7 Hotfixes before VM Tools installation, you won’t get any errors. The reason I installed the Hotfixes during the Shared Folder configuration phase is to show what caused the error in the VM Tools installation phase.
Really loved the detailed tutorial. Please keep it up
Thank you so much for this nice comment!
When installing Tools, I got a bunch of other warnings and things that didnt install and in the end Tools would not install. I am not sure what to do now
Before installing VMware Tools, download KB4490628 and KB4474419 updates, install them and then try to install VMTools again.
You may get errors during VMware Tools installation without hotfixes installed. That’s why I have shown the relevant errors in the steps in the article.
Thanks a lot for your tutorials regarding VMware Workstation and Win7.
I did not install an operation system for a long time but your tutorials cover everything to get it working even if I work with VMware the first time.
Thanks a lot,
Harald
Many thanks for your valuable comment.
Thank you for your great effort and step-by-step explanations.I am able to install windows 7 with a share folder on my VMWare workstation pro. Greatly appreciated .
Thank you very much for your feedback and comment.
thanks for the brief content. it has been joy following along.
You’re welcome, thanks for your comment.
perfeeeectrtttttttttttttttttttttttt
Tried to install a valid copy of Win7-64. Did not accept my valid product key stating:
“The product key does not match current Windows SKU”
u sre best
windows 7 home premium