
In this article, we will examine how to set up and configure Microsoft Windows 10 on a new virtual machine using VMware Workstation 17 Pro on a computer with a virtualization feature.
How to Install Windows 10 22H2 on a Virtual Machine with VMware Workstation 17 Pro on a PC / Laptop
Suppose you are going to create a network environment or a test environment using VMware Workstation. In that case, you may need to run one of the Windows 10, 7, 8, or 8.1 operating systems or one of the Linux distributions on your computer.
You can install and run various operating systems on your physical (host) computer using virtualization programs. In addition, you can use one or more of the Hyper-V, Oracle VM VirtualBox programs to create a virtual computer on your computer, other than the VMware Pro software.
Although the VMware Workstation virtualization program is not free, it is more widely used than the free VirtualBox program. We recommend purchasing VMware Pro after trying it for free for 30 days.
How to Create a New Virtual Machine for Windows 10
After creating the virtual machine (VM) with the latest version of the Workstation Pro program, we will create a virtual computer and then install Windows 10 22H2, and finally install VMware Tools so that the guest machine can work more efficiently.
Before proceeding with the steps of installing the Windows operating system on the virtual computer, visit this article and download the latest version of Windows 10 to your computer.
Step 1
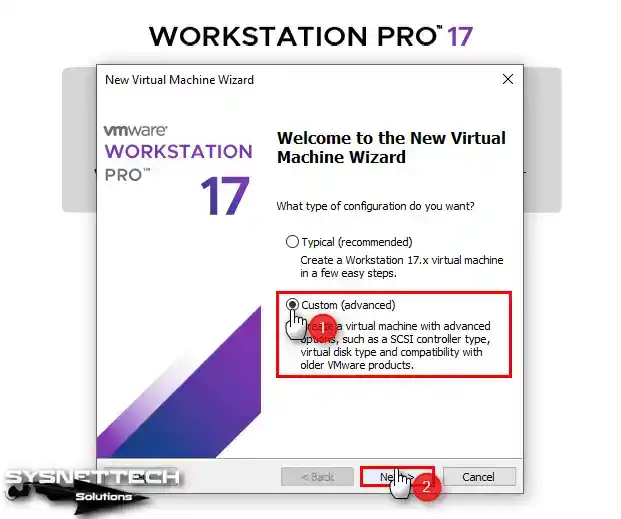
Now, open the VMware 17 Pro software, click Create a New Virtual Machine, and open the virtual machine wizard.
Then, select Custom (Advanced) to prepare an advanced VM in the virtual machine creation wizard and continue.
Step 2
In the hardware compatibility window, select Workstation 17.x or newer and click Next.

Step 3
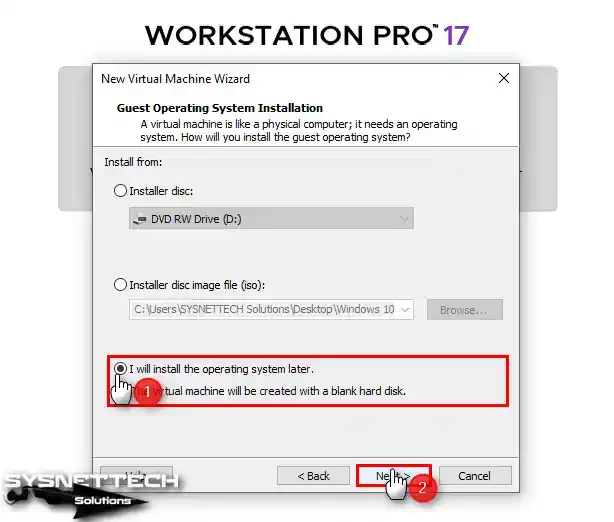
To add the ISO image file to the virtual machine later in the guest machine installation, check the “I will install the operating system later” option and click Next.
Step 4
In the Guest operating system selection window, you must configure the system type and version you will install. In this step, select Microsoft Windows operating system and Windows 10 x64 in Version.

Step 5
When you want to install a Windows, Linux, or macOS operating system with VMware, configuring the virtual machine installation location on another hard disk is very beneficial in terms of performance. You can even improve your performance by installing a virtual machine on an SSD or NVMe disk.

Step 6
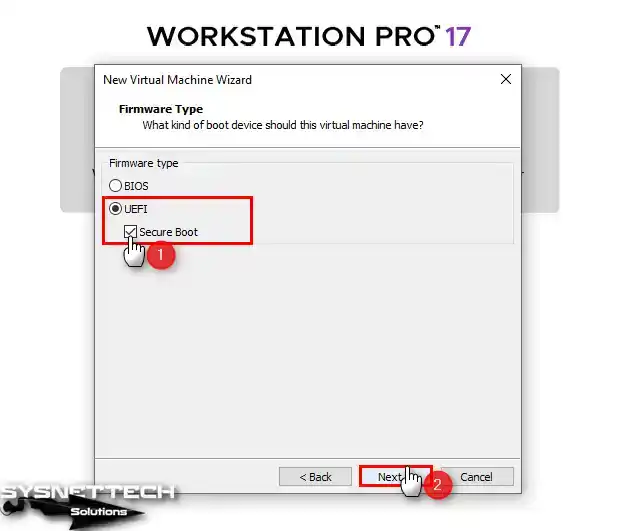
Continue with UEFI, which is selected by default in the Firmware Type window. In this step, you can enable Secure Boot, or you can do this later in the VM’s settings.
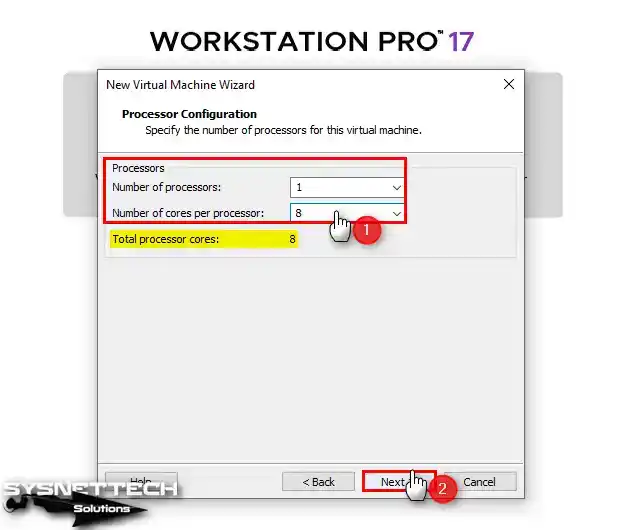
Step 7
In the Processor Configuration window, configure the amount of CPU you want to add to the virtual machine and the Core value per processor.
Step 8
You can assign a minimum or maximum value to the virtual machine, depending on the capacity of your computer. If your host has 32 GB of RAM, it will be beneficial for performance to set a RAM size of 8 GB or 16 GB here.

Step 9
In the Network Type window, select the NAT option to use an IP block separate from your host’s IP address range and click Next.

Step 10
In the Select I/O Controller Types window, continue the installation with the LSI Logic SAS disk type selected by default, supported by Windows 10.
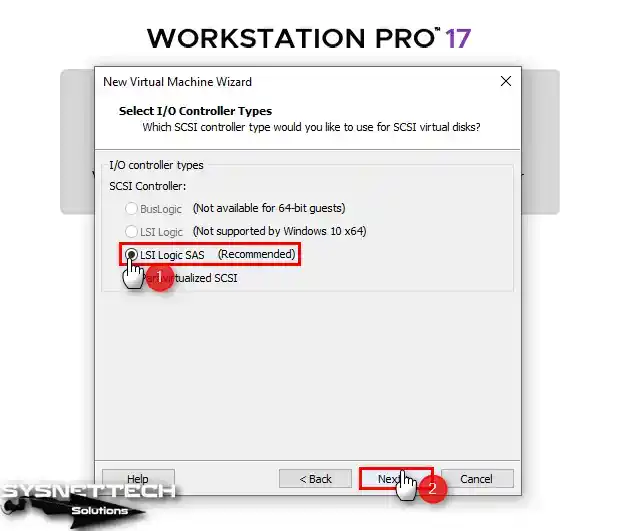
Step 11
One of the new features of VMware Workstation Pro is the NVMe disk type. You will get a lot of performance when you install with NVMe disk type.
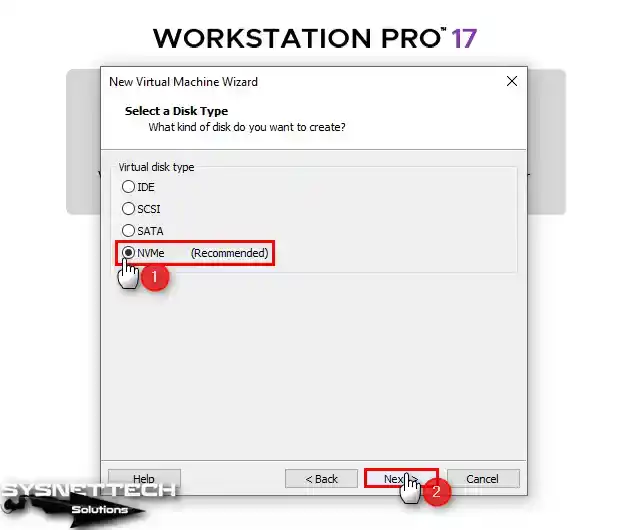
Step 12
In the Select a Disk window, you need to create a new virtual disk for Windows 10 or add a virtual disk you have already installed. For a clean Windows installation, select “Create a new virtual disk” and click Next.
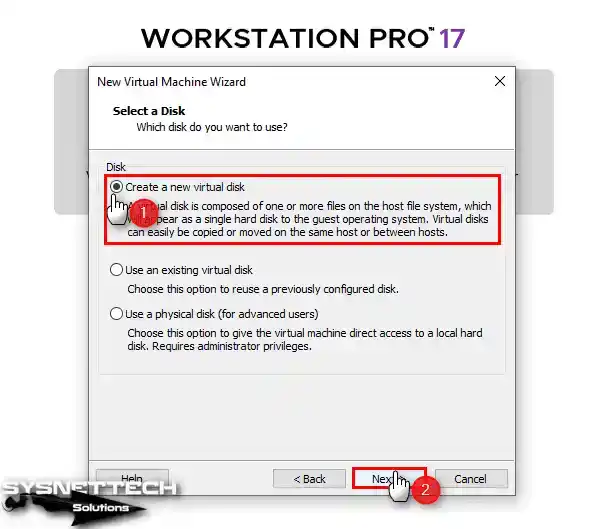
Step 13
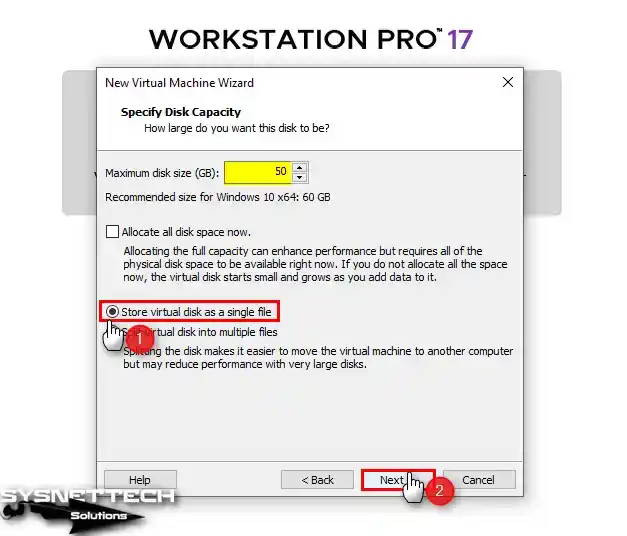
In the Specify Disk Capacity window, the Workstation program recommends 60 GB for Windows 10. Keeping this value to the maximum can be helpful sometimes, but it can take up a lot of space on your host’s disk.
Therefore, if you are installing Windows 10 on the virtual machine with VMware just for testing, configure a disk space of 50 GB and store the disk as a single file.
Step 14
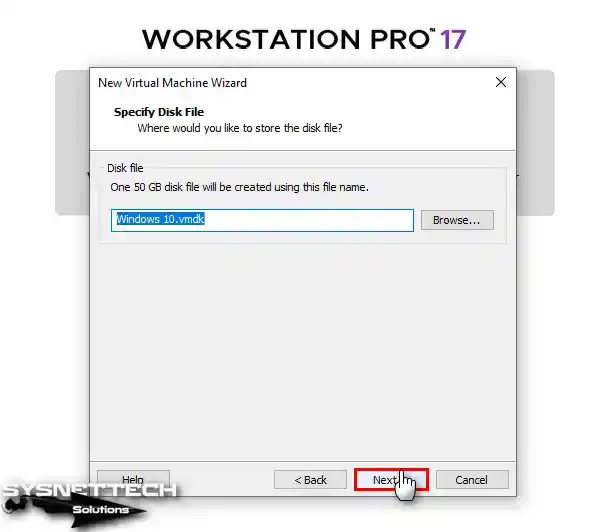
In the Specify Disk File window, you can change the location to back up the VMDK extension virtual disk to a different location. If you change the value here, you may have trouble locating the virtual machines later. Therefore, to ensure that the disk file is stored in the location where the VM will be installed, leave the default value here and click Next.
Step 15
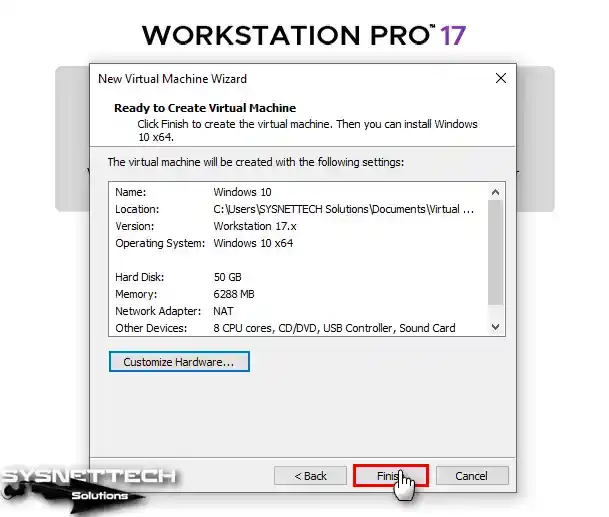
Click the Customize Hardware button to configure the hardware settings of the virtual machine.

Step 16
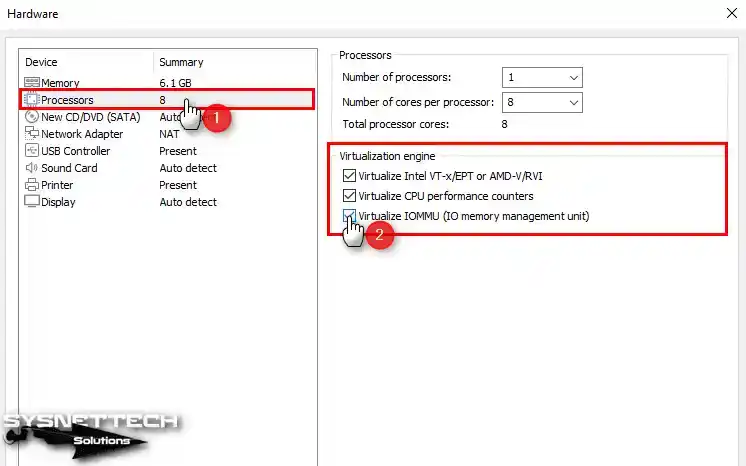
In the hardware settings of the Windows 10 VM, click on the Processors component and tick all the options in the Virtualization Engine section on the right.
- Virtualize Intel VT-x/EPT or AMD-V/RVI
- Virtualize CPU Performance Counters
- Virtualize IOMMU (IO Memory Management Unit)
Step 17
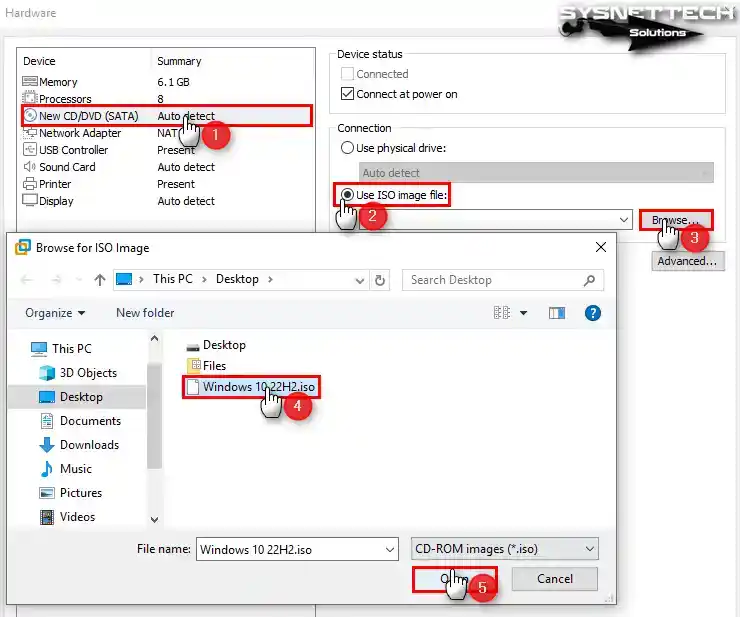
In the hardware settings of the virtual pc, check the Use ISO image file option in the New CD/DVD (SATA) tab, and then click the Browse button to go to the location of the Windows ISO file. In the window that opens, select the image file of the Windows 10 operating system you downloaded to your PC and click Open.
Step 18
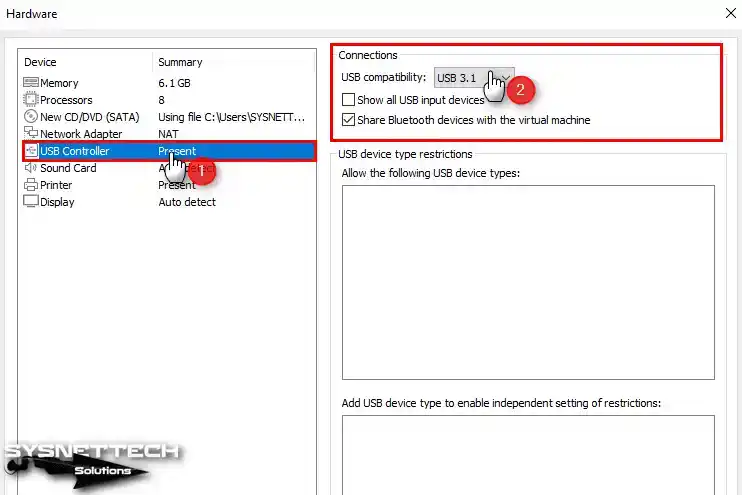
In order to quickly copy large files from your host system to your virtual computer using your flash memory, set the compatibility mode to 3.1 in the USB device settings.
Step 19
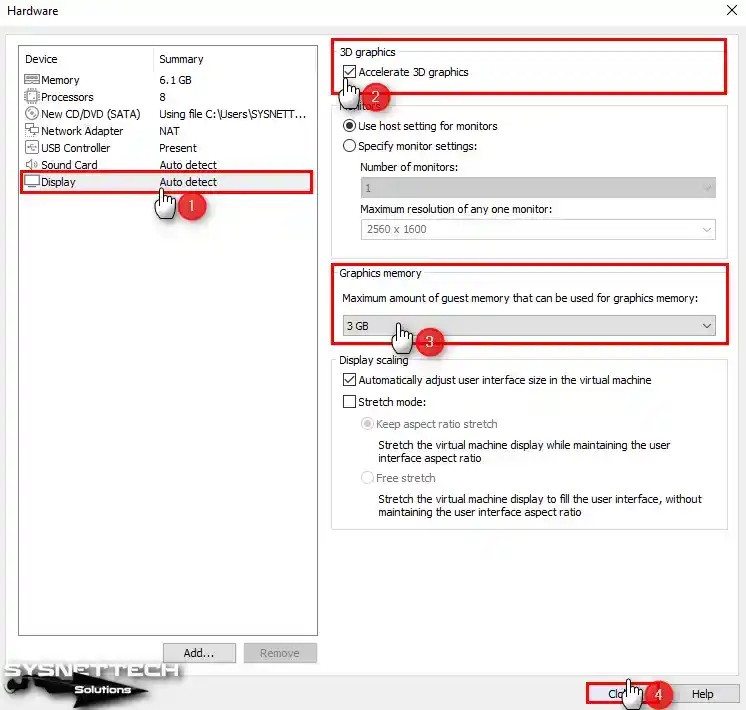
In the Display tab, enable 3D Graphics / Accelerate 3D Graphics and configure the amount of Graphic Memory your computer can support or assign a minimum of 3 GB video memory.
Step 20
After configuring the necessary settings, click the Finish button to close the hardware customization window.
Step 21
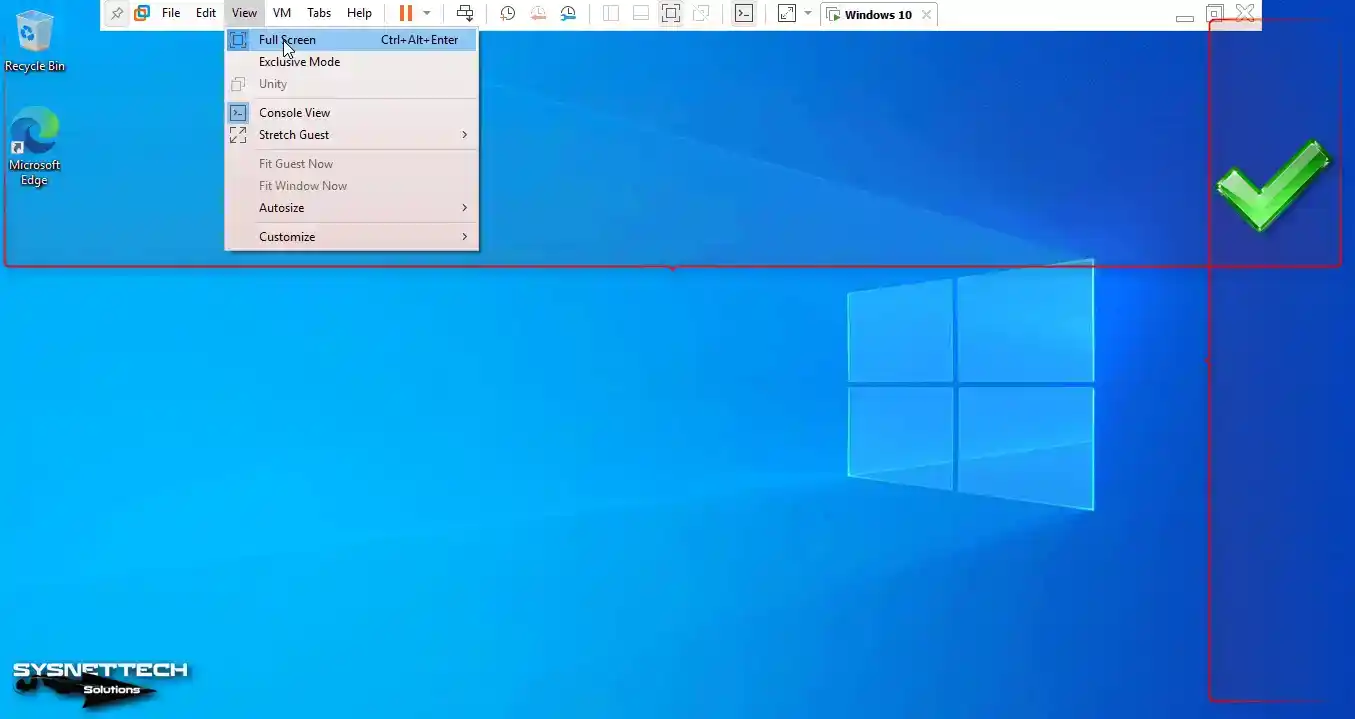
Run the virtual machine by clicking Power on this virtual machine or the green start button. In this step, you can enable Secure Boot for UEFI boot for the Windows 10 operating system from Firmware Type settings in Options / Advanced.

How to Install Windows 10
While installing Windows systems is easy, you may encounter some problems installing them on top of other virtualization software such as VMware. Therefore, it will be helpful to follow the Windows installation steps below.
Step 1
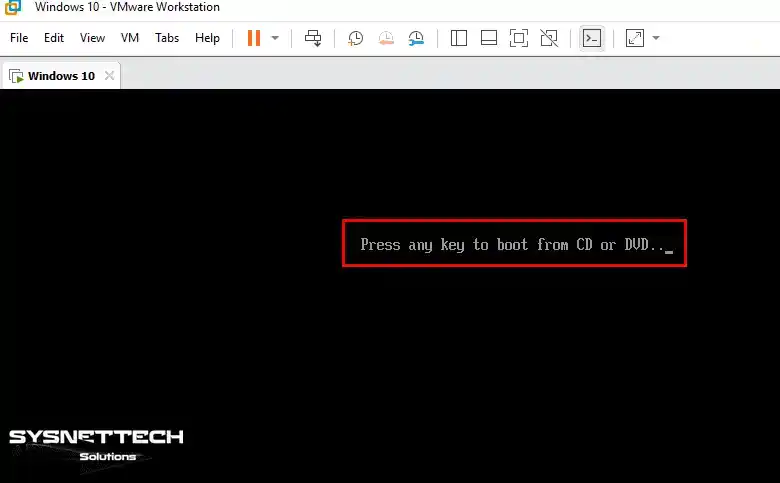
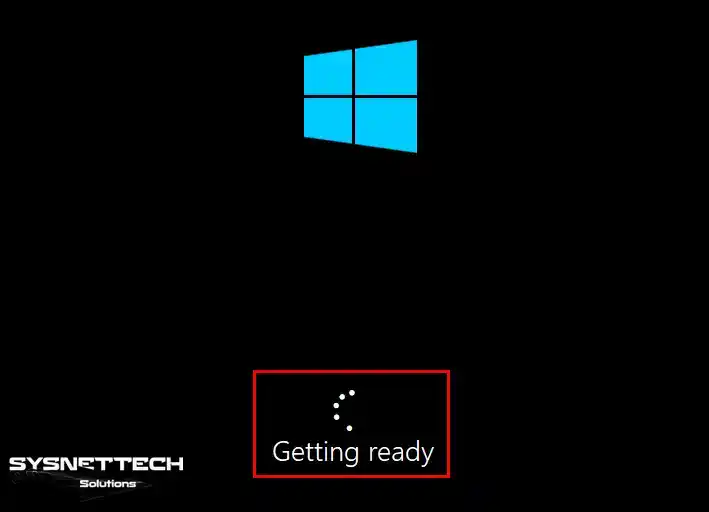
After preparing the Windows 10 machine for installation, run the VM and press any key on your keyboard when you see the message “Press any key to boot from CD or DVD.”
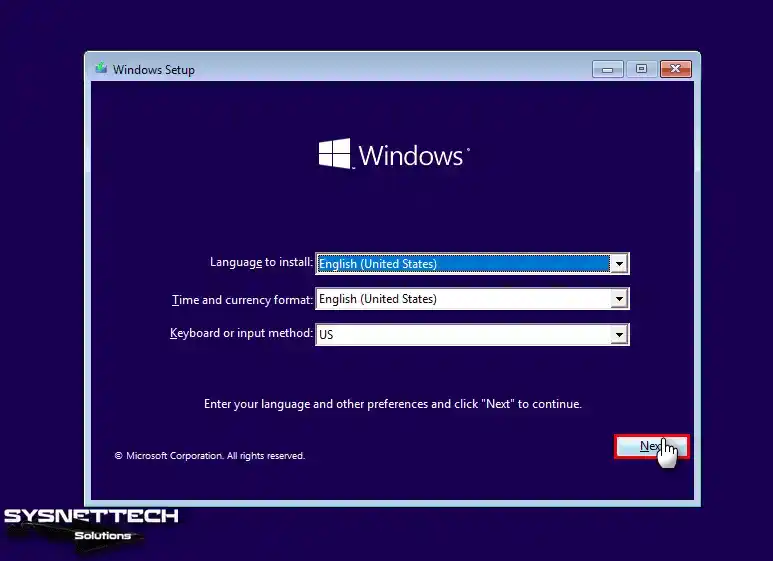
Step 2
Configure the system language, keyboard layout, and time zone you want to use for the Windows operating system and click the Next button.
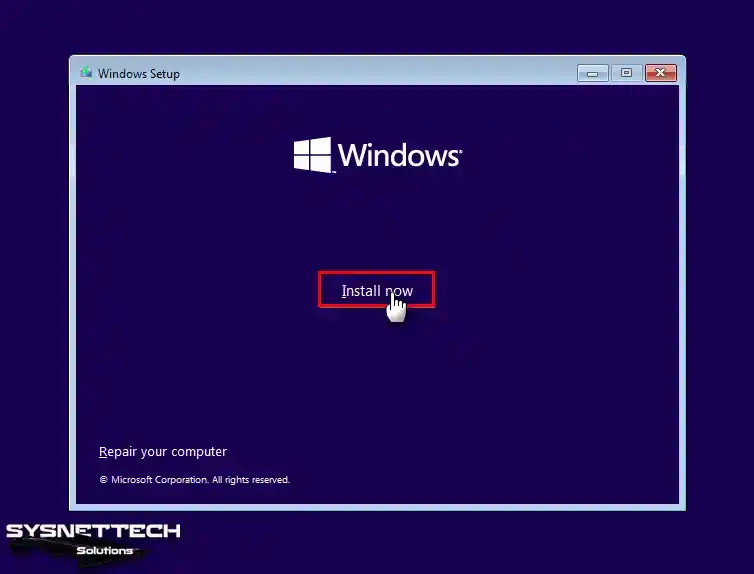
Step 3
Click the Install Now button to start the installation process.
Step 4
To use a genuine Windows 10 license in the virtual machine, type your key in the relevant section. Click the “I don’t have a product key” option, as there is no need for a license key in test virtual operating system installations.

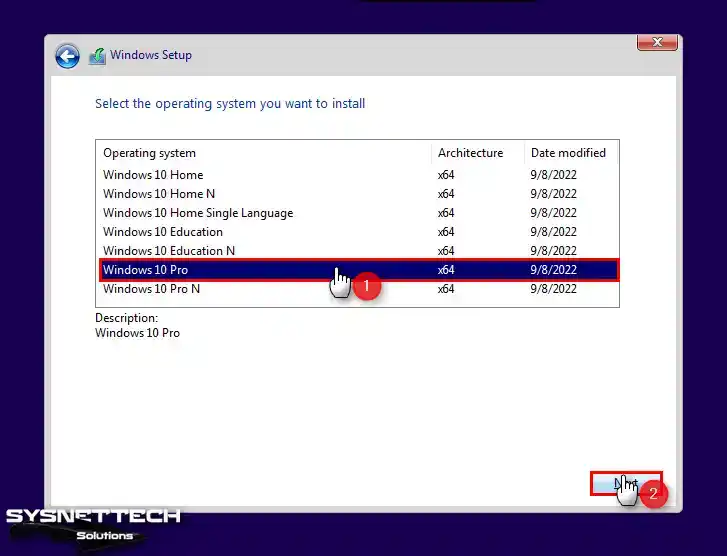
Step 5
Select the Windows version (Pro) you want to install and click Next.
Step 6
To accept the Windows 10 license agreement, select “I accept the license terms” and click Next.
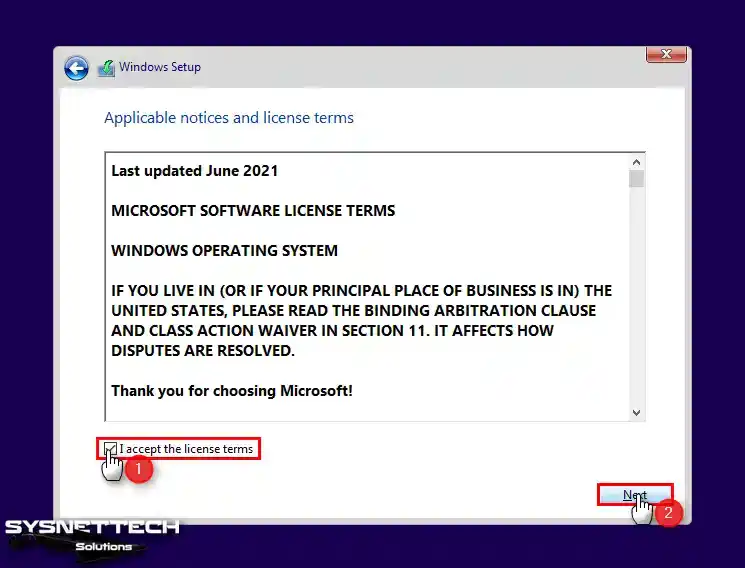
Step 7
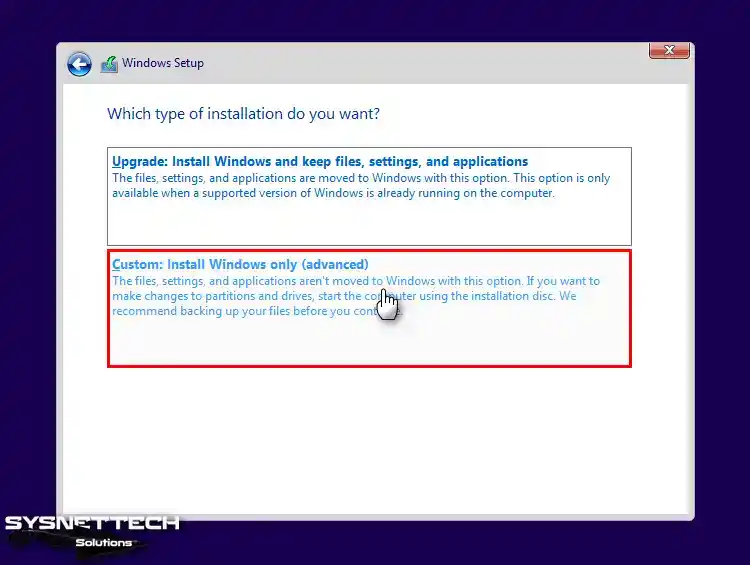
Click Custom: Install Windows only (Advanced) to install a clean Microsoft Windows 10.
Step 8
Click New to configure the VMware virtual disk. To use the entire disk, leave the Size at the default value and click the Apply button.
Click the OK button in the information window, which will create additional partitions on the Windows disk.

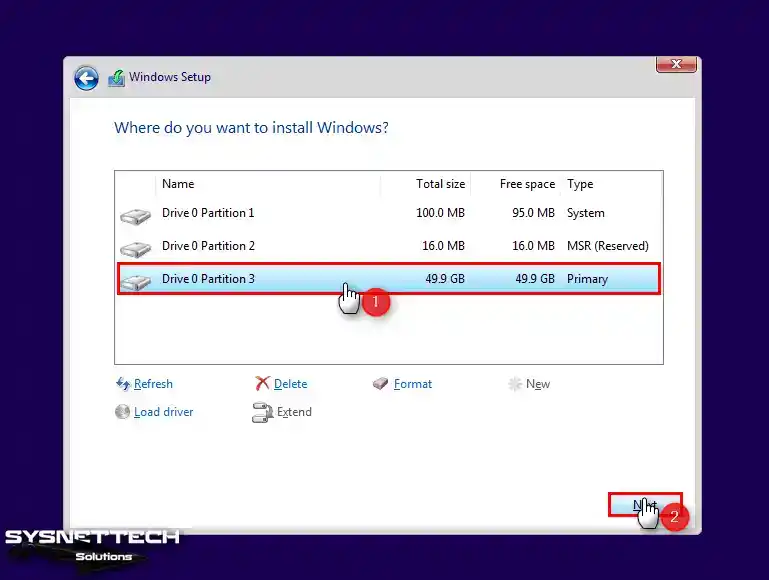
Step 9
Select Driver 0 Partition 3 and click the Next button to continue the installation.
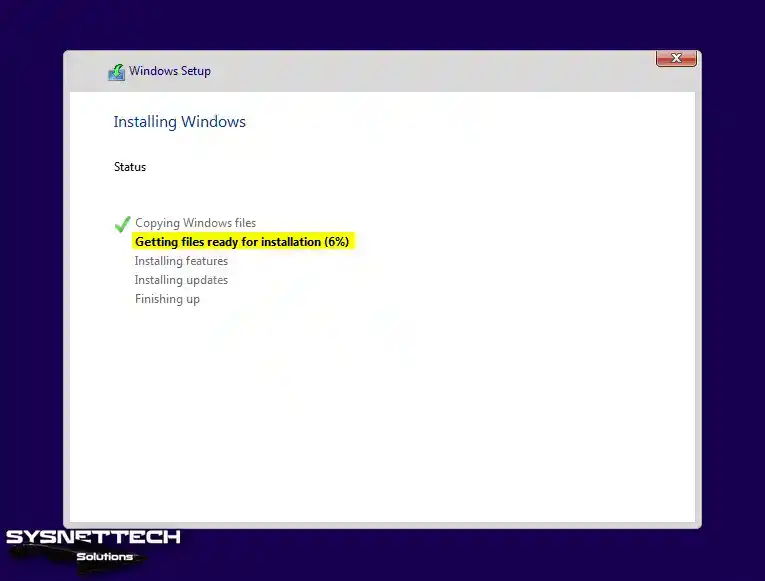
Step 10
Wait while the files are being prepared for installation. This process may take some time, depending on your computer’s performance and virtual machine hardware settings.
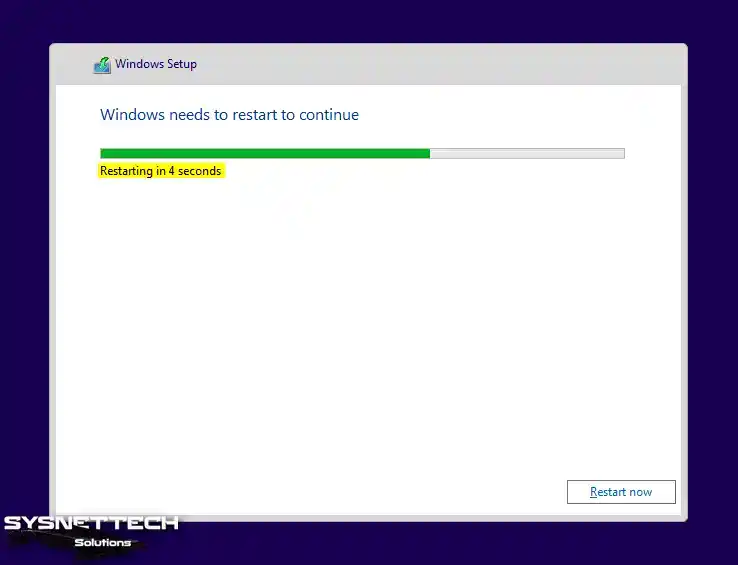
Step 11
After the installation copies the necessary files, the virtual machine will restart automatically.
Step 12
Wait while the necessary settings are being made and the devices are being prepared.
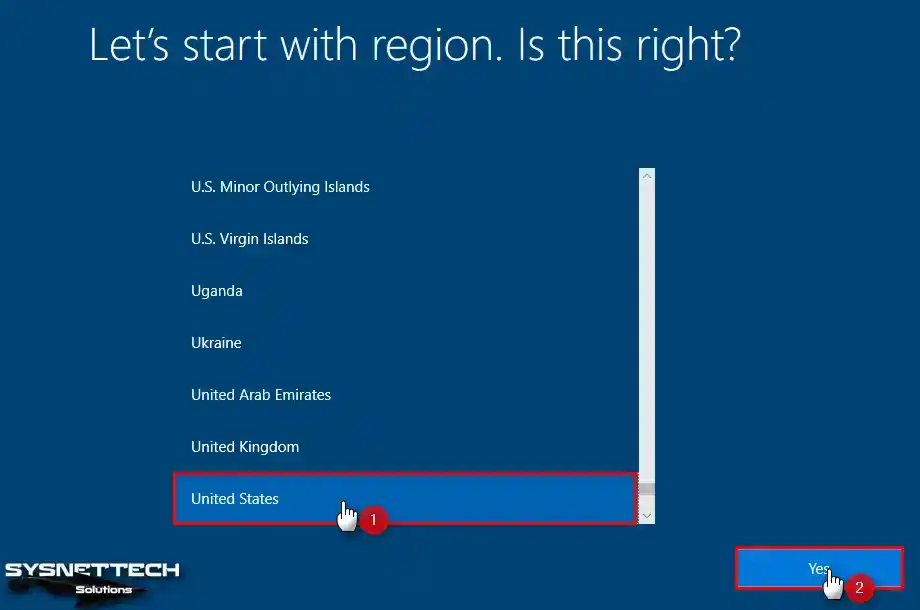
Step 13
When your computer restarts, select your region, that is, the country you live in, and click the Yes button.
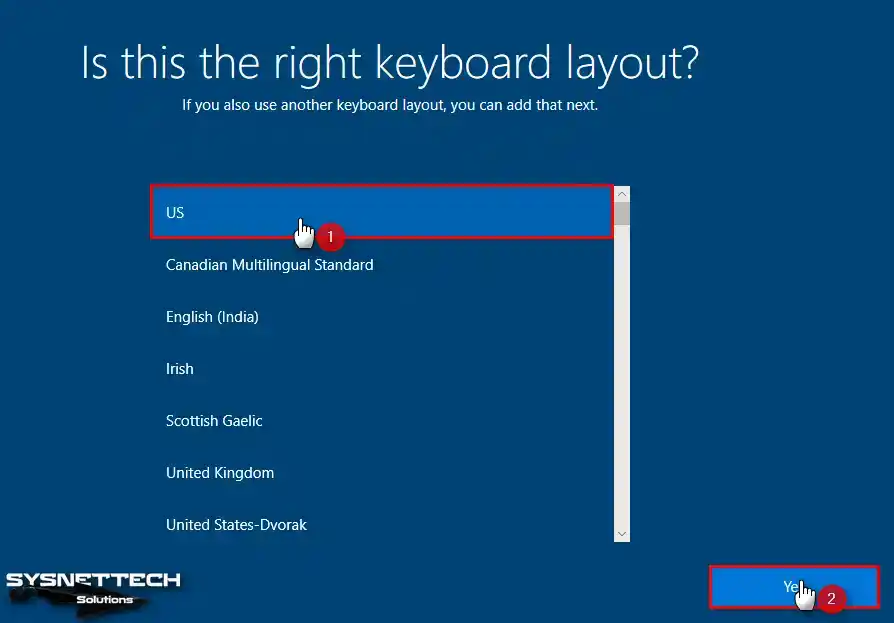
Step 14
Select the keyboard layout you want to use in your Windows 10 virtual system and click Yes.
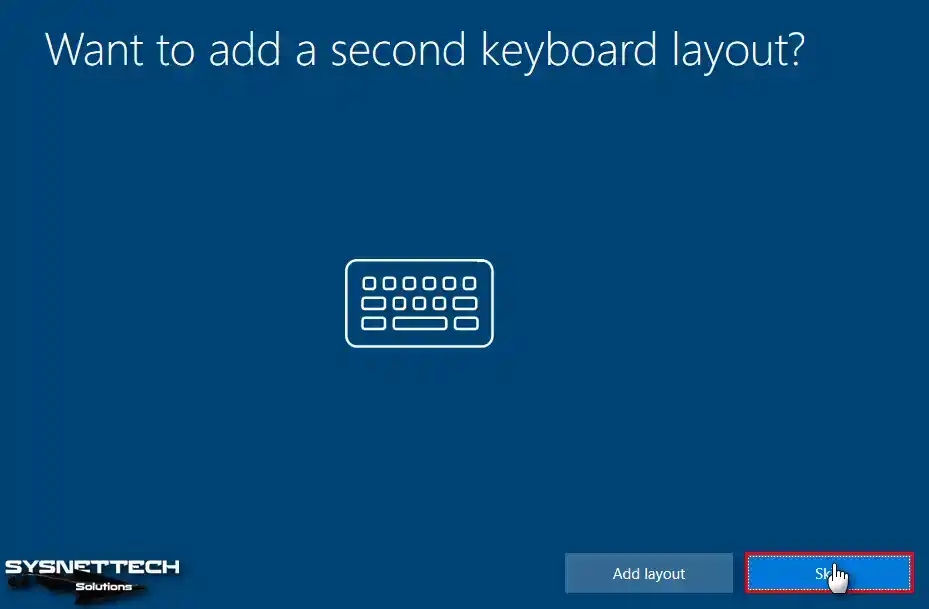
Step 15
If you want to use a second additional keyboard layout, you can click the Add Layout button. You can also add a second keyboard layout after the system setup. For now, click the Skip button and continue.
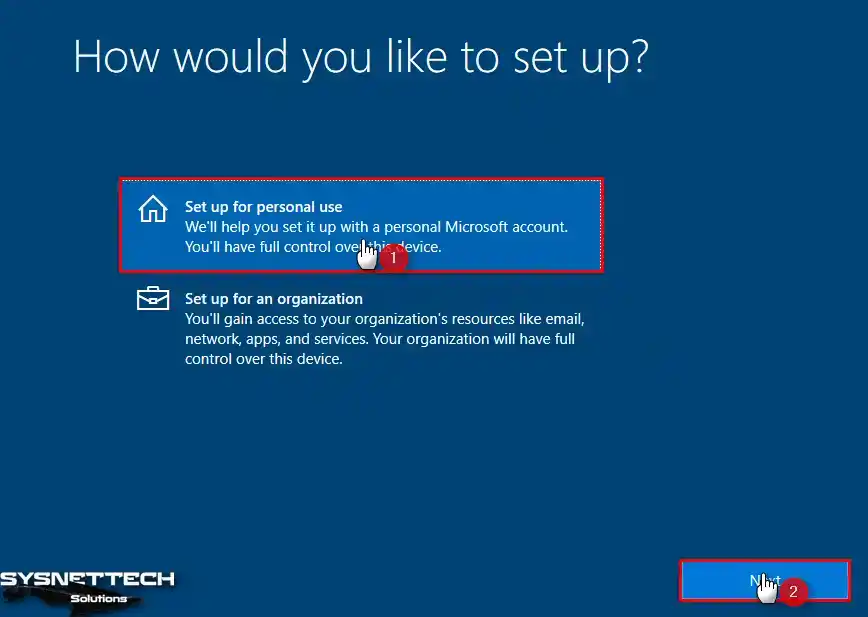
Step 16
It would be best if you chose the purpose for which you will use Windows on this screen. As you can see in the image below, a screen was added for users to select a new installation type in the latest version of Windows. Here, you can configure your computer for personal or organizational use.
Select Set up for personal use and click Next.
Step 17
On this screen, you can sign in to your computer with your Microsoft account. If you do not have a Microsoft account, click Offline Account.
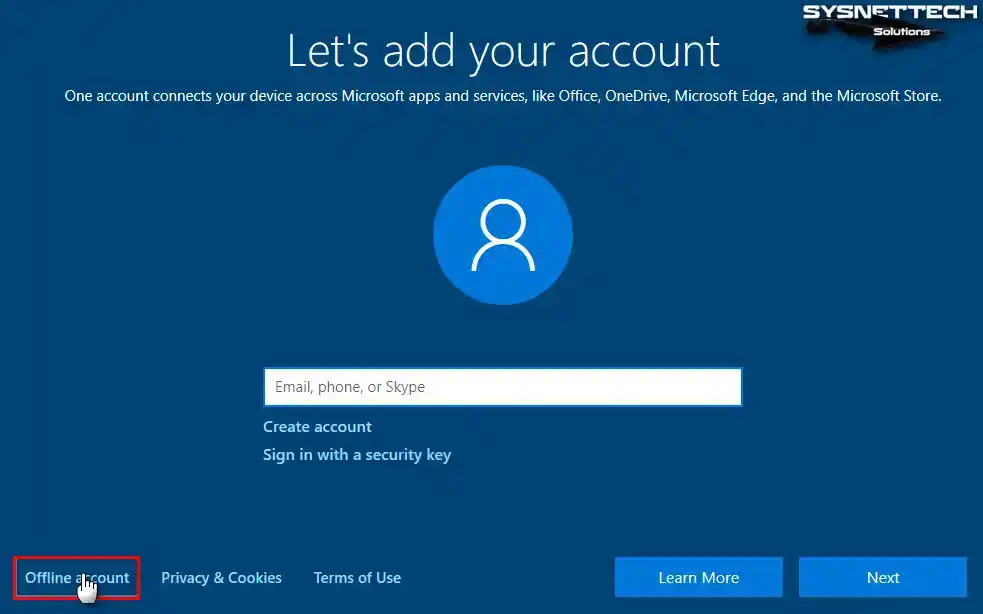
Step 18
On this screen, if you decide to sign in with a Microsoft account, you can click Next. In this step, click Limited Experience to create an offline or local user account.

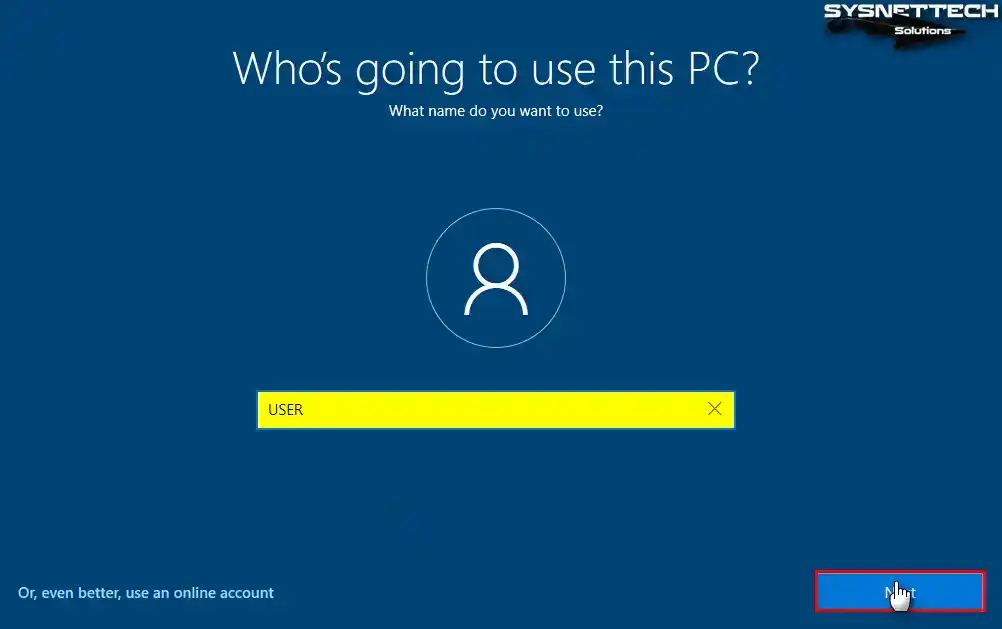
Step 19
Type the user account name on the “Who’s going to use this PC?” screen and continue with Next.
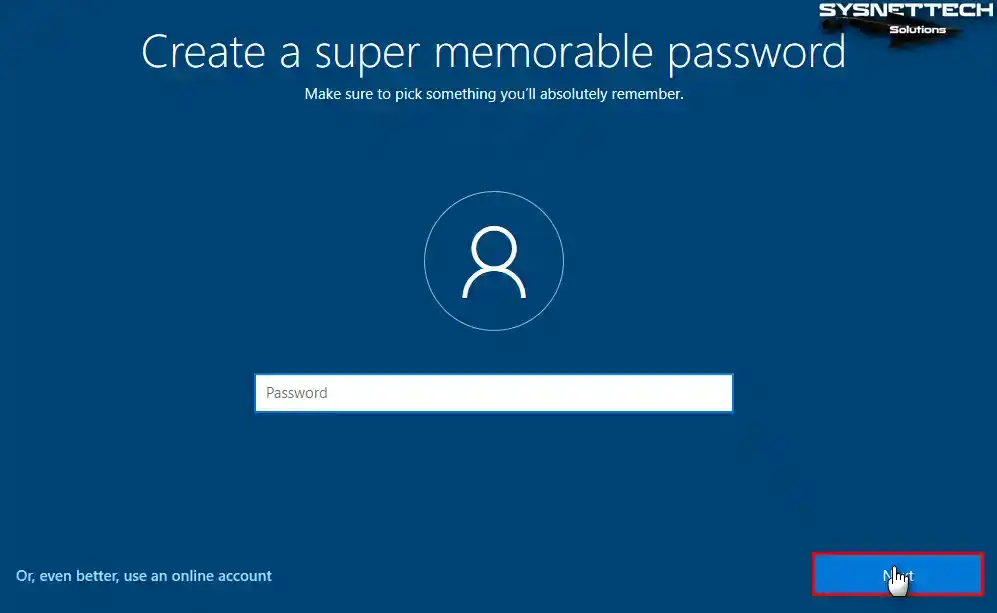
Step 20
If you do not want unauthorized people to use your computer, you can create a password.
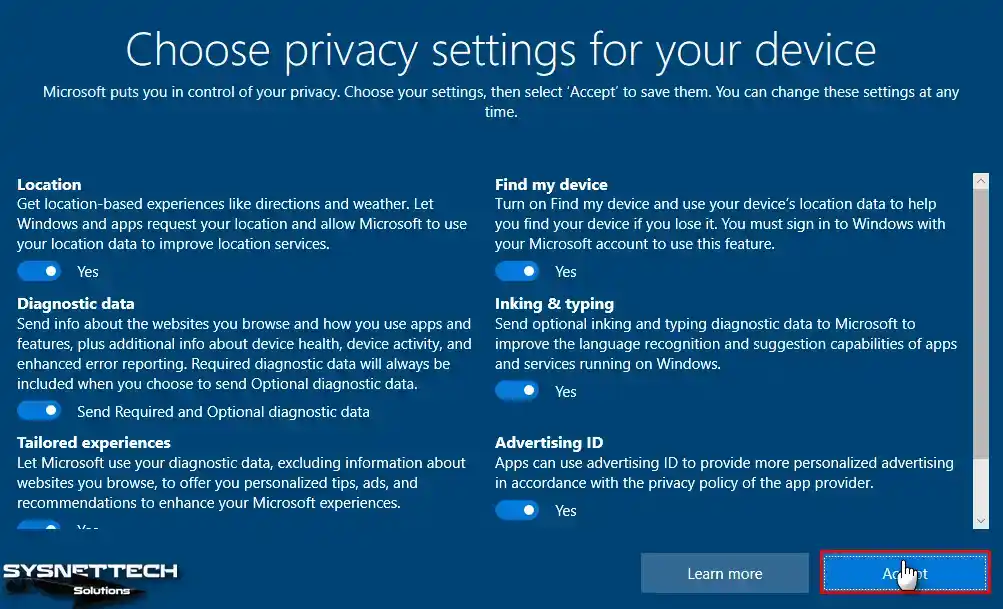
Step 21
Set and accept the privacy settings of your device according to your personal opinion.
Step 22
In the new installation wizard of Windows 10, you can choose what you will primarily use your PC for, depending on your personal experience. You can select or bypass one or more of the Entertainment, Creativity, Gaming, Business, School, or Family categories specified by Microsoft.

Step 23
Using Cortana is an option for users. If you want to activate it, click the Accept button or click the Not Now button to activate and use it later.

Step 24
In this step, your computer will now be ready, so do not turn off your computer.

Step 25
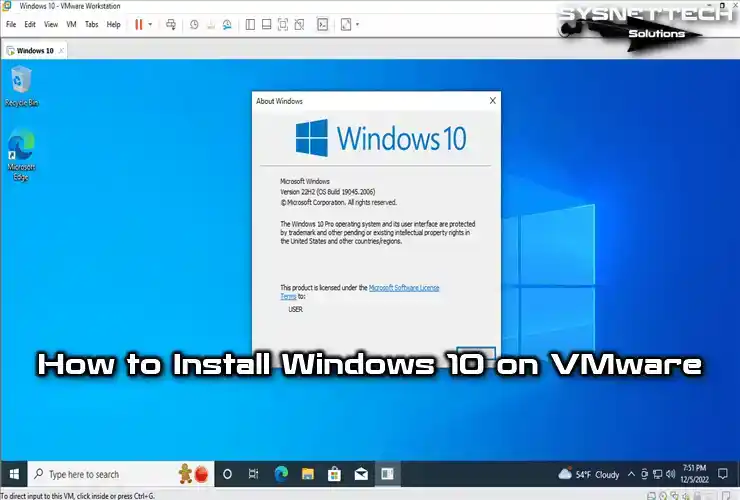
To check the Windows operating system version, press Windows Key + R and execute the winver command in the Run window.
winver
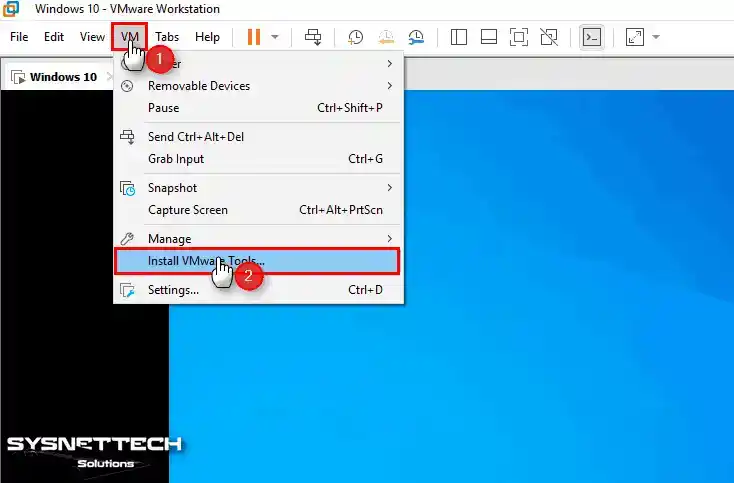
How to Install VMware Tools
After installing Windows 10, you also need to install VM Tools. If you do not install it, you will not be able to use the virtual machine in full-screen mode or full resolution.
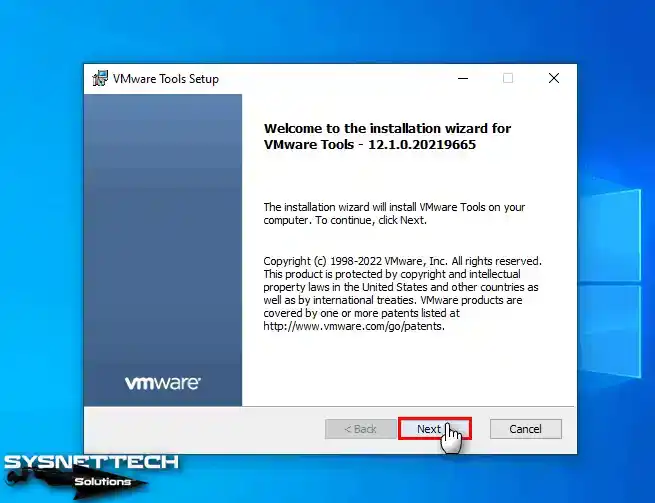
Step 1
Click VM / Install VMware Tools from the menu to install the drivers on the guest machine.
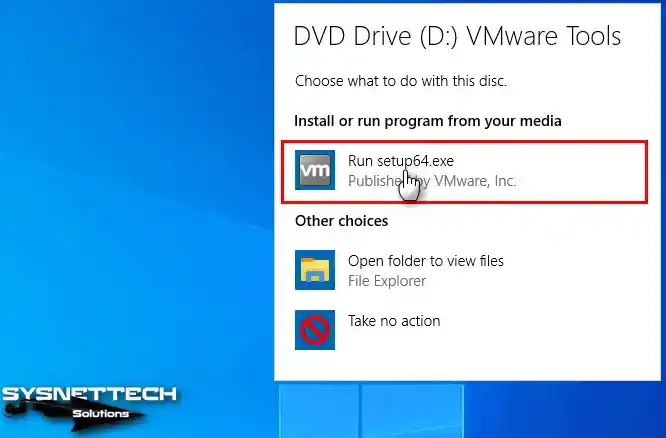
Step 2
If the VMware Tools image file does not open automatically on your system, open this PC and double-click on the DVD drive, as shown below.
Step 3
Click Next to continue using the VM Tools wizard.
Step 4
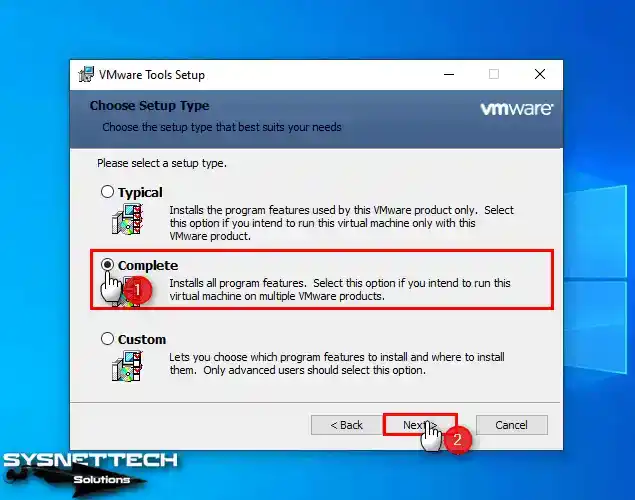
If you choose Complete as the installation type, you can use this virtual computer by importing it on other VMware platforms.
Step 5
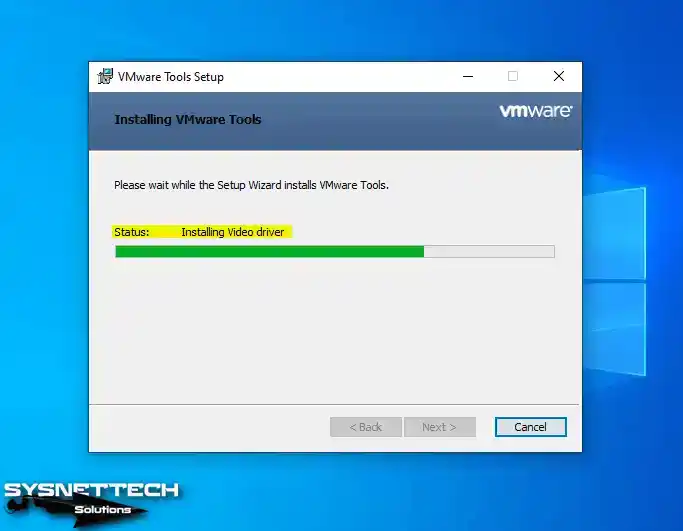
Click the Install button to start the installation of the virtual PC tools.

Step 6
As you can see in the image below, the Video driver and other device drivers are being installed.
Step 7
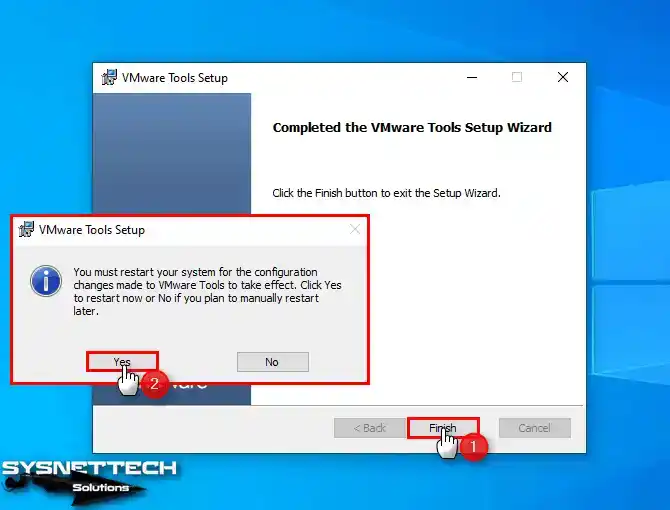
The screen resolution of the virtual machine will change as the installation completes. When the installation is complete, restart your system so the changes take effect on your guest machine.
Step 8
When your VM is turned on, check that you can use your Windows 10 virtual system in full-screen resolution.
Step 9
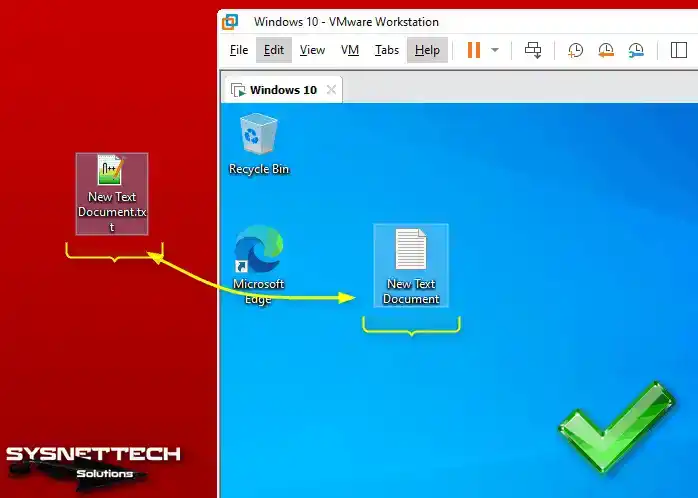
Restart the VM and check if the file can be copied between the host and the guest machine by drag and drop.
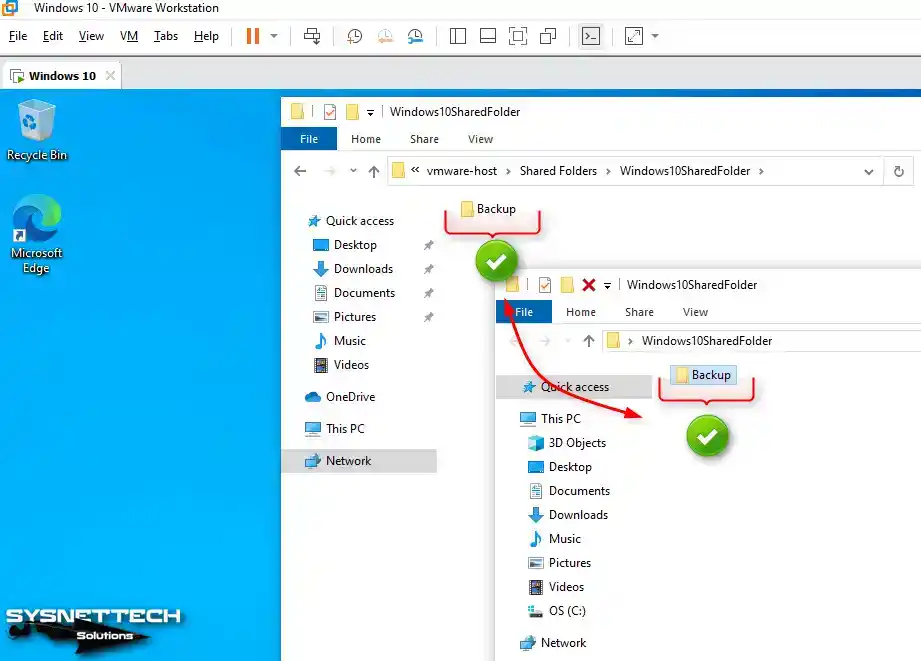
How to Configure Shared Folder
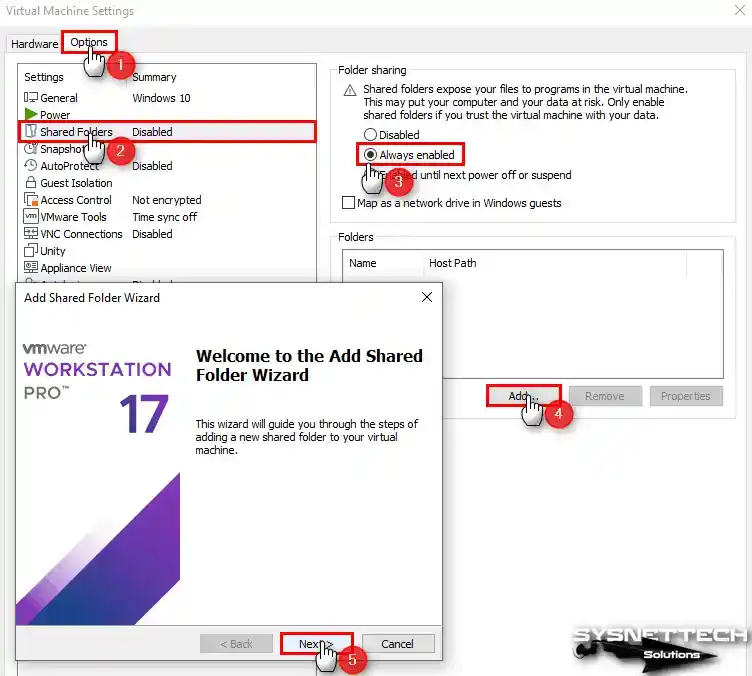
We recommend that you activate and use the Shared Folder structure so that you can quickly copy your large files to Windows 10 or other virtual systems that you have prepared with Workstation Pro.
To enable Shared Folder on your Windows 10 virtual computer, open the VM’s settings, select Shared Folders in the Options tab, and then tick Always Enabled from the Sharing settings.
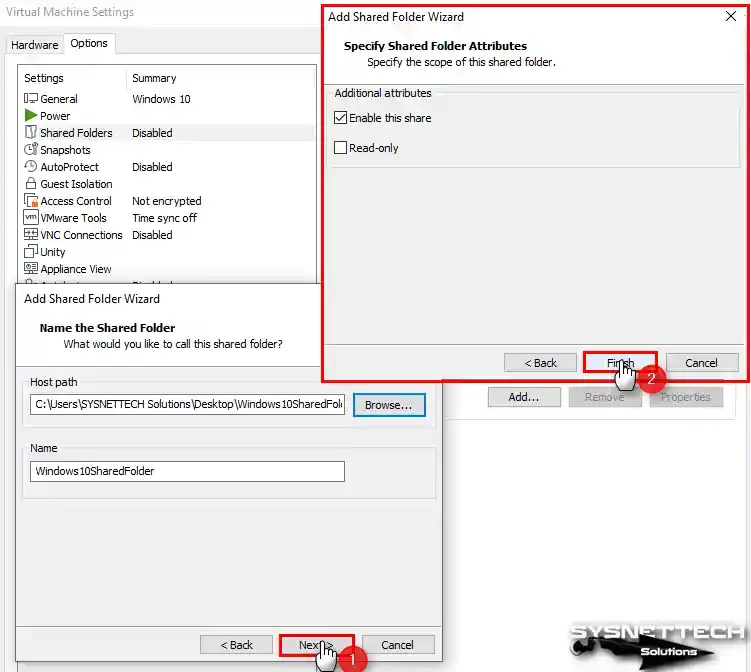
Then click Add to open the wizard to create a shared folder in a location of your host system.
After clicking Browse in the Name of the Shared Folder window, create and select a shared folder on your host system in the window that opens.

Activate the folder you created for sharing and close the wizard.
After opening Network connections on your virtual machine and enabling file sharing for other computers on the network, you can see the shared folder in “vmware-host / Shared Folders / Windows10SharedFolder”.
You can check the process by creating a folder named Backup in the Windows10SharedFolder folder and opening and viewing the folder on your host system.
How to Use USB Flash Memory
You can also use your USB flash drives or storage devices that you use on your physical computer in your virtual system.
Step 1
First of all, insert a flash memory into one of the free USB 3.x ports of your physical computer and create a folder called Backup in it.
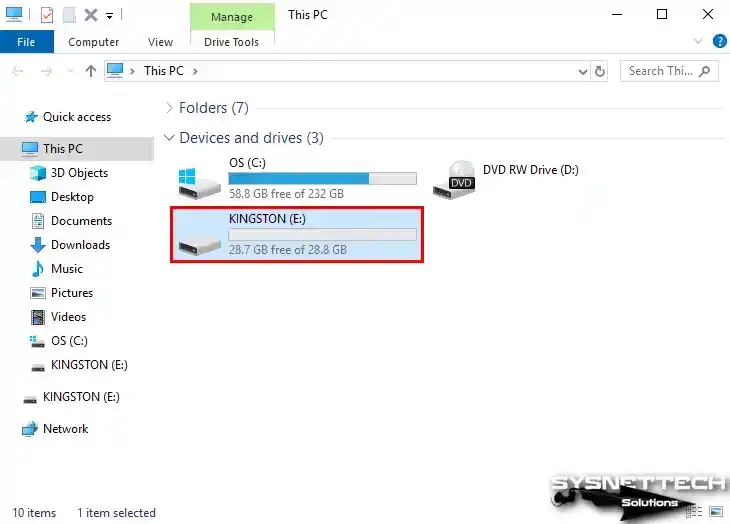
Step 2
To connect your USB stick to the VM, click VM / Removable Devices / Name of your USB / Connect from the VMware tool menu.

Step 3
Open This PC in your Windows VM, and you can check the contents of your USB or start copying your files.

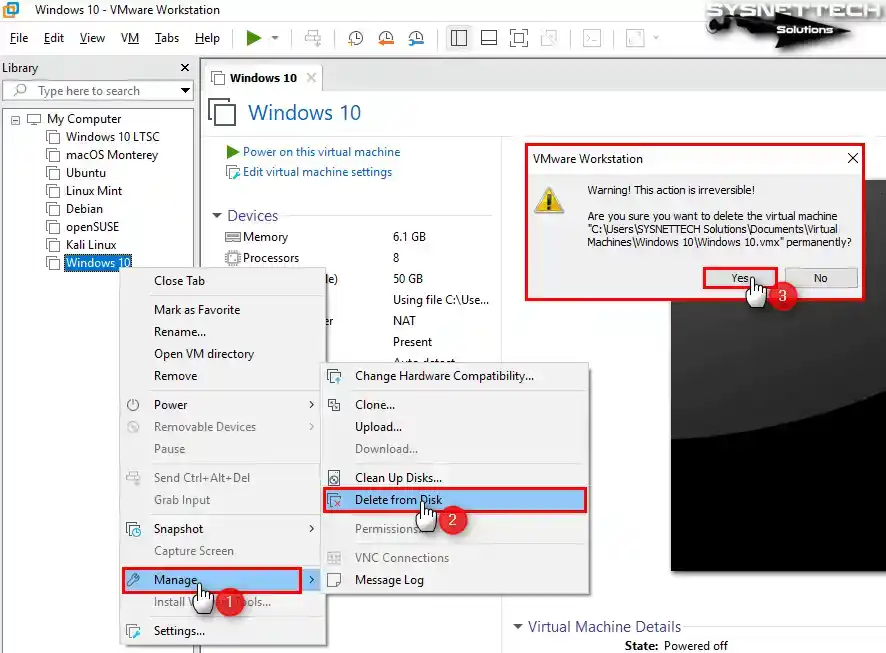
How to Delete the Virtual Machine
Suppose you decide to use no longer the guest operating systems that you created on your PC using the VMware Workstation virtualization software. In that case, you can completely delete the VM you have determined from the disk in order not to fill your host disk unnecessarily.
Right-click on the virtual machine you want to delete from the Workstation library, then click Manage / Delete From Disk and click Yes to confirm the complete deletion from your disk in the window that opens.
Video
Installing Windows with Legacy Versions
If you’re using one of the older versions of VMware Pro software, or if the version you previously purchased doesn’t provide a free upgrade, you don’t have to install a Windows with the new version. You can take a look at the installation processes with old versions from the table below.
| Workstation Pro | YouTube Video | Slide |
|---|---|---|
| 12 Pro | Watch | View |
| 14 Pro | Watch | – |
| 15 Pro | Watch | View |
| 16 Pro | Watch | View |
| 17 Pro (NEW) | Watch | – |
The 6 Most Asked Questions When Installing Windows 10 on a Virtual Machine
What is the most critical setting for performance when installing Windows 10 on a virtual machine?
Is VMware Tools really needed? What does it do?
What is the fastest way to share files with the host computer?
Should I choose NVMe or SCSI as the virtual disk?
I chose NAT as the network type. What does this mean? Is it right?
How do I completely delete the virtual machine I installed from the disk?
Conclusion
In conclusion, as you can see, installing Windows 10 with VMware Workstation 17 Pro is relatively easy. Moreover, it also allows you to create test environments. With all the steps I have mentioned, you can maximize your VM performance.
In addition, you can make your virtual machine work smoothly with fine-tuning because we are one step ahead in terms of flexibility, security, and isolation offered by VMware. Plus, you can master different system setups, as it also allows for advanced testing and development.

2 People Shared Their Experience
Thank you so much, everything in this article is perfectly clear and well explained, very appreciated, keep up the good work <3
thanks