
This article explores installing Oracle VM VirtualBox, a virtualization software that enables virtual execution of Windows, Linux, or macOS operating systems on a Kali Linux 2024 computer. We aim to supply a complete guide on creating a new VM, demonstrating clear and detailed step-by-step instructions.

How to Set Up Oracle VM VirtualBox to Create a Virtual Machine on Kali Linux 2024
Kali Linux is a Debian-based Linux distribution developed by Offensive Security that includes multiple free tools for systems and networking. You can perform system audits and test your network security through free programs using this distribution.
Oracle VM VirtualBox is a cost-free virtualization application featuring Intel and AMD processors that can be effortlessly installed on computers. By using this software, you can actively run multiple examples of Windows, Linux, Solaris, or macOS operating systems virtually on your physical computer, eliminating the need for dual-boot configurations.
You can easily set up a new virtual machine on your Kali Linux PC by using the no-cost Oracle software. To use devices such as a USB and webcam on your host computer, you need to install the Extension Pack after installing the program.
How to Download and Install VirtualBox
The installation process for programs on Windows systems typically involves straightforward steps, requiring no additional actions on your part. However, for a program to work correctly in Linux distributions, you must install dependent packages during installation.
Step 1
To download Oracle VM VirtualBox to your Linux system, visit the official website and hit the Download VirtualBox 6.1 image on the homepage.

Step 2
Click Linux Distributions under the VirtualBox 6.1.38 Platform Packages heading to download the Oracle software to your Linux computer.

Step 3
The opened webpage shows multiple Linux distribution versions under the VirtualBox 6.1.38 for Linux title. You need to select the relevant distribution from whichever system’s code structure the Linux distribution installed on your computer is derived from.
Since the Kali distro is derived from the Debian code structure, click on the latest version, Debian 11, and then in the window that opens, choose the Save File option to save the deb package to your computer and click OK.

Step 4
Before installing the VirtualBox.deb package on your system, executing the “sudo apt update” command in the terminal is recommended. This will update the index of packages installed on your Linux system.
sudo apt update
Step 5
Additional packages must be installed to ensure the proper functioning of VirtualBox. You can complete this by running the “sudo apt install build-essential dkms” command in the terminal console.
sudo apt install build-essential dkms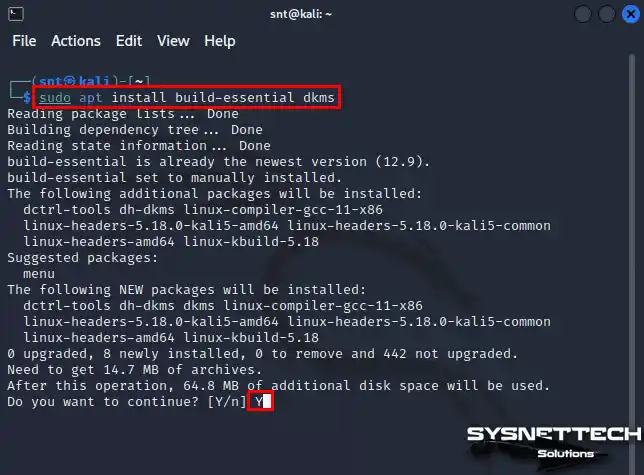
Step 6
Open the console and navigate to where you downloaded the deb package to install VirtualBox on Linux. “cd ~/Downloads” makes this easy. Use “ls” to check for the deb package in the correct directory. After verifying availability, use “sudo dpkg -i FileName.deb” to install it.
sudo dpkg -i virtualbox-6.1_6.1.38-153438\~Debian\~bullseye_amd64.debWhile installing VirtualBox, you may find that the dependent packages libqt5opengl5, libsdl1.2debian, and libvpx6 are not installed on your system. You must add the Debian Repository address to your system to install these packages.
dpkg: dependency problems prevent configuration of virtualbox-6.1:
virtualbox-6.1 depends on libqt5opengl5 (>= 5.0.2); however:
Package libqt5opengl5 is not installed.
virtualbox-6.1 depends on libsdl1.2debian (>= 1.2.11); however:
Package libsdl1.2debian is not installed.
virtualbox-6.1 depends on libvpx6 (>= 1.6.0); however:
Package libvpx6 is not installed.
Step 7
Add the Debian Bullseye repo address by executing the command below in the “sources.list configuration file” so that your Kali system can access the resources where the software packages and applications are located. Then update the package list again with the command “sudo apt update.”
echo "deb http://ftp.us.debian.org/debian bullseye main" | sudo tee -a /etc/apt/sources.list
sudo apt update
Step 8
Execute the “sudo apt install -f” command to force the installation of required dependencies packages for VirtualBox.deb.
sudo apt install -fNOTE: At this stage, after downloading and installing additional packages, you may get the linux-headers-5.18.0-kali5-amd64 kernel error for VirtualBox this time. To fix this problem, execute the below commands in the terminal to install this and its dependent packages.
wget http://http.kali.org/pool/main/l/linux/linux-headers-5.18.0-kali5-amd64_5.18.5-1kali6_amd64.deb | wget http://http.kali.org/pool/main/l/linux/linux-headers-5.18.0-kali5-common_5.18.5-1kali6_all.deb | wget http://http.kali.org/pool/main/l/linux/linux-kbuild-5.18_5.18.5-1kali6_amd64.deb | wget http://http.kali.org/pool/main/l/linux/linux-compiler-gcc-11-x86_5.18.5-1kali6_amd64.deb
sudo dpkg -i *.deb
Step 9
With the dependent packages for VirtualBox successfully downloaded and installed, you can now launch the virtualization software on your Linux computer. When you open the program, you can check the new version from the Help / About section of the tool menu.

How to Install Extension Pack
After installing VirtualBox on Kali Linux, you must install the Extension Pack software to use your host computer’s hardware in virtual machines, such as USB 3.0 and webcam.
Step 1
After running the Oracle VM VirtualBox Manager, click File / Preferences from the tool menu and click Extensions from the left panel of the open window to check for an existing Extension Pack.

Step 2
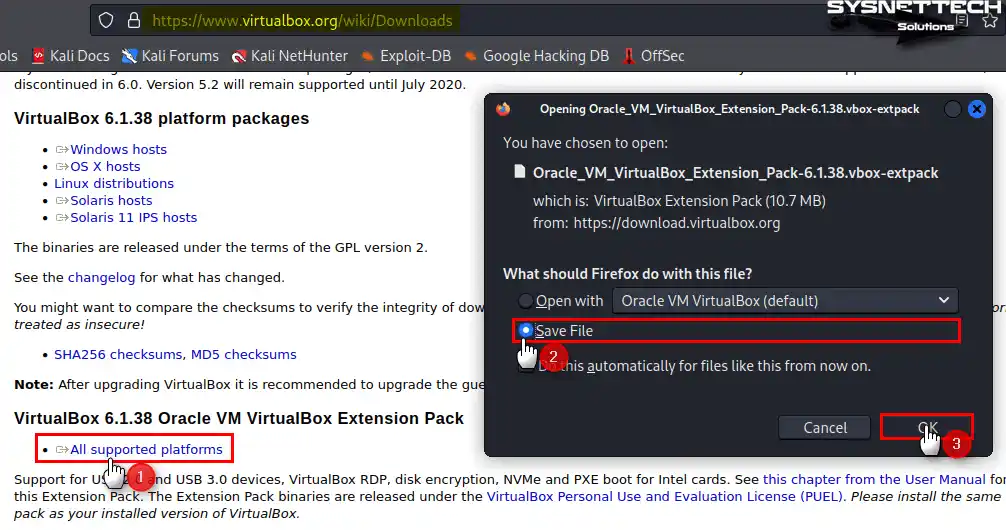
If the extension package is not installed in your program, revisit the Oracle website and download the vbox-extpack package to your computer by clicking All Supported Platforms.
Step 3
Open the Downloads folder and double-click the “Oracle_VM_VirtualBox_Extension_Pack-6.1.38.vbox-extpack” package to start the installation.

Step 4
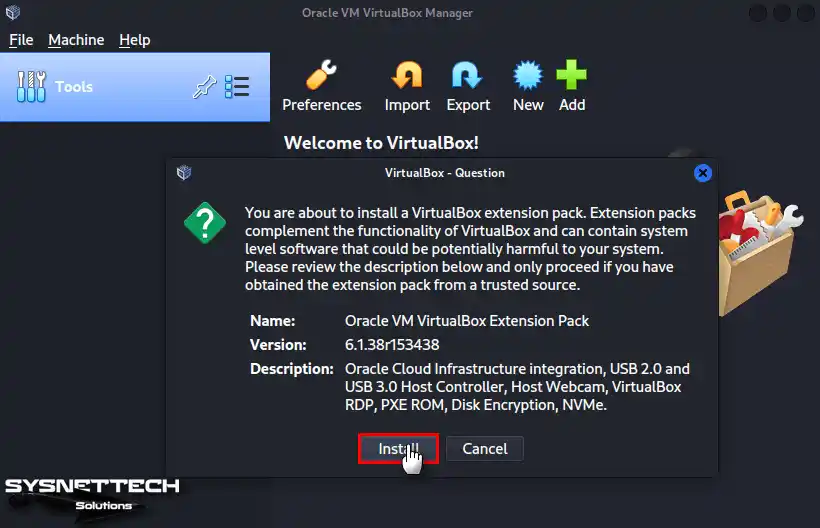
Click Install in the window that states the Extension Pack description.
Step 5
To read the full text of the extension package’s license agreement, scroll down the page and click I Agree.

Step 6
After successfully installing the Extension Package on your Kali system, click OK to close the information window.

Step 7
When you check the Extensions section from Preferences again, you can see that the extension package is installed.

How to Create a New Virtual Machine
After successfully installing Oracle virtualization software on your Kali Linux PC, you can now install Windows 10 or one of the other systems to use Windows software on your physical computer.
Step 1
After opening the Oracle VM VirtualBox software, click the New button from the large icons section to start the virtual machine wizard.
After the wizard is opened, type the name of the guest system to be installed in the Name field, and then check that the Microsoft platform and operating system version is correct in the Type and Version settings and click Next.

Step 2
Configure the virtual memory size of the Windows 10 guest operating system according to the capacity of your host computer.

Step 3
Tick Create a Virtual Hard Disk Now to install a clean system and click Next.

Step 4
If you are not going to use the disk of your virtual machine with other virtualization software, select the VDI (VirtualBox Disk Image) disk type and click Next.

Step 5
To ensure that the virtual disk of your Windows 10 virtual computer grows as much as the area used and not to fill your host disk unnecessarily, select the Dynamically Allocated storage type and click Next.

Step 6
Don’t change the File Location if you agree to back up the virtual disk file to the default location determined by the Oracle software. In this window, select an appropriate virtual disk size based on the size of the programs you will install on your Windows 10 VM and click Next.

Step 7
After preparing your Windows 10 virtual system, click Settings to view more advanced hardware settings.

Step 8
In the General / Advanced settings of the virtual machine, first, change the relevant properties to Bidirectional, as in the illustration below, so that you can transfer files between your host system and your VM using drag-drop and copy-paste features.

Step 9
Since the floppy device is old, delete it from the Boot Order devices in the System / Motherboard settings.

Step 10
Configure the number of virtual processor cores to be two or higher according to the power of your host CPU so that your virtual PC can work more efficiently and do your work more comfortably.

Step 11
If you will use applications that require high GPU power, such as Photoshop in your Windows 10 virtual operating system, enable the 3D Acceleration feature in the Display settings and configure the Video Memory size to 256 or higher.

Step 12
You can speed up your VM more by enabling the Host I/O Cache feature for the SATA controller of the virtual disk from the Storage device settings.

Step 13
Likewise, change the working principle of the Windows 10.vdi virtual disk file to a Solid-State Drive (SSD).

Step 14
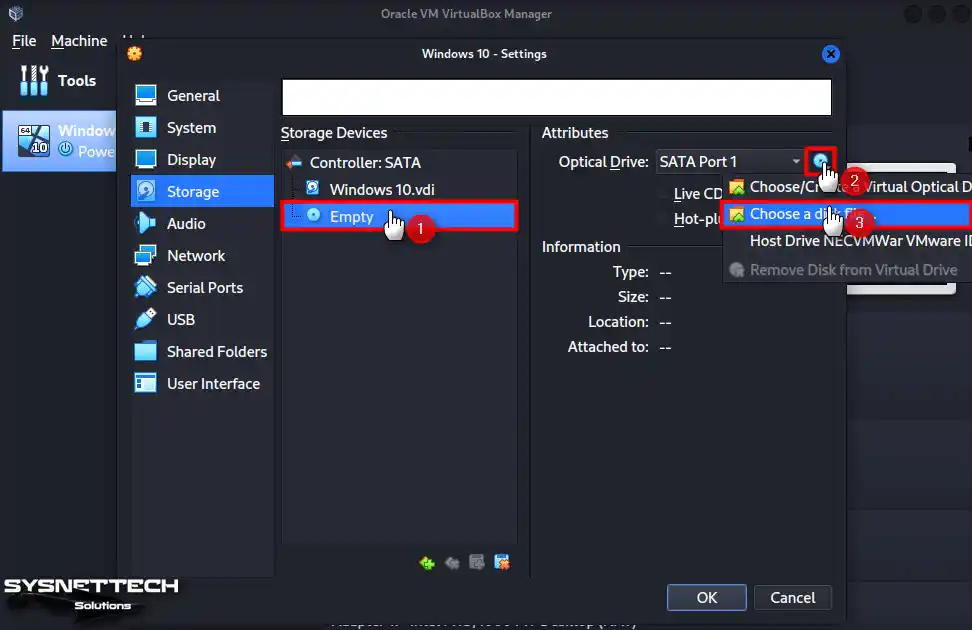
To add the installation media of Windows 10 or another operating system to the VM you have prepared, select the Empty optical drive, click the CD/DVD icon, then click Choose a disk file.
Step 15
When the ” Choose a Virtual Optical Disk File ” window opens, select the Windows 10 ISO file from your host computer and click Open.

Step 16
To transfer large files from your Kali computer to your virtual machine faster, enable the USB 3.x (xHCI) Controller in the USB hardware settings.

Step 17
After correctly making all your Windows 10 guest machine settings, click Start and run it.

Step 18
Press any key when your virtual computer is turned on and start the Windows 10 setup wizard.

How to Delete the Virtual Machine
You can quickly delete the Windows or other guest operating systems that you created using Oracle VM VirtualBox.
Step 1
If you want to delete a virtual computer on Oracle VM VirtualBox, follow these actions: locate it on the left panel, right-click, and choose “Remove” from the open options. Afterward, hit the “Delete All Files” button in the following window to confirm the deletion of all files from your physical PC’s disk.

Step 2
After completely deleting the virtual machine from your system, go to the VirtualBox VM location and check for any folders or files.

How to Uninstall VirtualBox from Kali Linux
If you want to remove the Oracle virtualization software from your Kali PC, use the terminal.
Step 1
To remove VirtualBox from your system, access the console and input the command “sudo apt remove –purge VirtualBox.” After finishing the task, you’ll be asked to enter the password for the user details. Type your password and press Enter to initiate the uninstallation process.
sudo apt remove --purge *VirtualBox*
Step 2
After this process, press Y and Enter to confirm the packages to be removed from your system.

Step 3
After removing all applications related to Oracle VM VirtualBox from your system, execute the commands below in the terminal and delete the residual files.
sudo rm -rf ~/"VirtualBox VMs"
sudo rm -rf ~/.config/VirtualBox/
sudo rm -rf /usr/lib/"VirtualBox"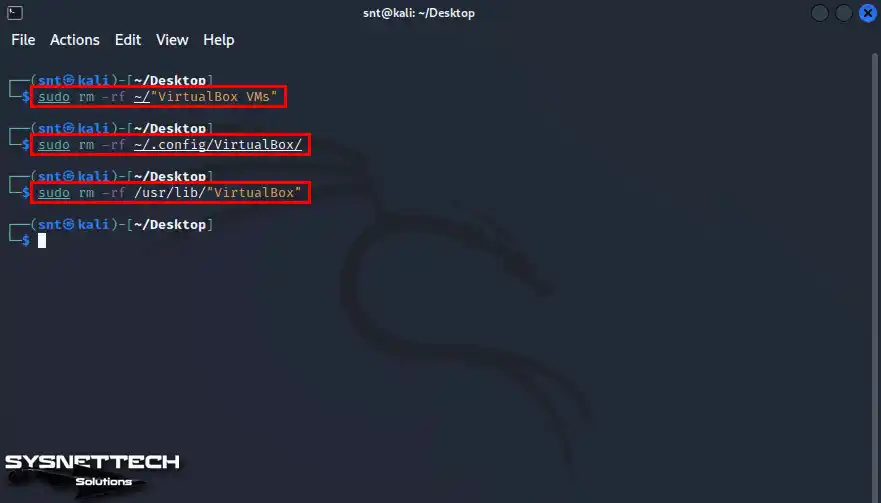
Step 4
To remove any additional packages installed alongside VirtualBox or any other program on your system, you can utilize the “sudo apt autoremove && sudo apt autoclean” command. This command will help delete unnecessary packages, ensuring a cleaner system after removal.
sudo apt autoremove && sudo apt autoclean
Step 5
Finally, delete the VBox group added to your Linux system during the Oracle program installation.
cat /etc/group | grep vbox
sudo groupdel vboxusers
Video
How to Install VirtualBox via Oracle Repository
When you manually set up the VirtualBox app on your computer, it is essential to note that ensuing updates will require manual installation. Suppose the latest version of the program is terminated.
To keep your Linux machine current, you can use the following commands: “sudo apt update” to refresh the package lists and “sudo apt upgrade” to have available updates.
- To update your Linux system’s installed packages, execute the following command in the terminal.
sudo apt update
- Execute the declaration below in the terminal to download and compile the necessary kernels for Oracle software.
sudo apt install build-essential dkms
- To make it easier to install other dependent packages for VirtualBox, edit your repository address using the command below.
sudo echo "deb http://ftp.us.debian.org/debian bullseye main" | sudo tee -a /etc/apt/sources.list
- Execute the declaration below in the terminal to add the Oracle repository address.
sudo echo "deb https://download.virtualbox.org/virtualbox/debian bullseye contrib" | sudo tee -a /etc/apt/sources.list
- Execute the declaration below in the terminal to download and add the Oracle public key to your system.
wget -q https://www.virtualbox.org/download/oracle_vbox_2016.asc -O- | sudo apt-key add -
- Update your system’s package list again.
sudo apt update
- To install VirtualBox, execute the command below in the terminal.
sudo apt install virtualbox-6.1
- If you see that the dependent packages are not downloaded during the installation phase, go to Downloads in the terminal and download the relevant packages using the following commands.
cd ~/Downloads
- Execute the command below in the terminal to download the necessary Linux kernel and additional packages for VirtualBox.
wget http://http.kali.org/pool/main/l/linux/linux-headers-5.18.0-kali5-amd64_5.18.5-1kali6_amd64.deb | wget http://http.kali.org/pool/main/l/linux/linux-headers-5.18.0-kali5-common_5.18.5-1kali6_all.deb | wget http://http.kali.org/pool/main/l/linux/linux-kbuild-5.18_5.18.5-1kali6_amd64.deb | wget http://http.kali.org/pool/main/l/linux/linux-compiler-gcc-11-x86_5.18.5-1kali6_amd64.deb
- Execute the command below in the terminal to install the three deb packages you downloaded to the Downloads location at the same time.
sudo dpkg -i *.deb
- Run Oracle VM VirtualBox using the “virtualbox” command in the terminal.
virtualbox
- When you see that the Linux kernels are not installed in the terminal again, execute the command below in the terminal to compile the kernels.
sudo /sbin/vboxconfig
- When you rerun your virtual machine software from the terminal, you will not get any errors this time.
- Finally, execute the below command in the terminal to install the Extension Pack on your Kali system.
sudo apt install virtualbox-ext-pack
- When removing the extension package, you can utilize the following command.
sudo apt purge virtualbox-ext-pack
Installing Old Versions
| VBox / Kali Version | YouTube Video | Slide |
|---|---|---|
| 5.2 / 2018 | Watch | View |
| 6.1 / 2020 | Watch | View |
| 6.1.3x / 2022 | Watch | View |
| 6.1.3x / 2022.3 (NEW) | Watch | – |
Conclusion
As a result, there are many methods to create a virtual machine on Kali Linux 2024. However, the best and free of these is Oracle VM VirtualBox. Thus, with Oracle, you can use multiple operating systems on a single physical device.
This gives you a powerful and cost-free solution on your Kali PC. Frankly, if you follow all the steps I have explained, you can successfully install VirtualBox software on your Kali Linux PC. Afterward, you can quickly install a new virtual machine.
You must install the Extension Pack so that you can simulate the hardware of your host computer in a virtual environment. In summary, thanks to VirtualBox, you do not need dual boot configurations on your Kali system.

8 People Shared Their Experience
Thnx, very clear! Even for a beginner in lynux
You’re welcome! Thanks for your feedback!
bash: virtualbox: command not found
I got this error after typing virtualbox into my terminal
Great Article.. helped me alot after long search. Thanks.
You’re welcome! Thanks for your comment!
Hi, I’m at Step: 4
Error when trying to download libsdl1.2debian and libvpx5 packages,
Error request sent, awaiting response … 404 Not Found
I executed the wget and that’s when the error occur, any advice is appreciated
Thanks this really helped me.
Thank you sir you have done great job and it helped me a lot but another time allow people to copy paste