

Microsoft updates Windows to give users a modern, speedy, safe, and steady operating system. Users use Microsoft updates to keep their systems secure. But sometimes, an update can mess up the system. So, users try to determine the issue source. Specifically, they check the Windows installation date.
In short, they find the system installation date. Then, they check the updated patches that Microsoft released since that date.
So, it helps them pinpoint and fix issues. A particular update may mess up the system. Alternatively, they might want to know the Windows installation date.
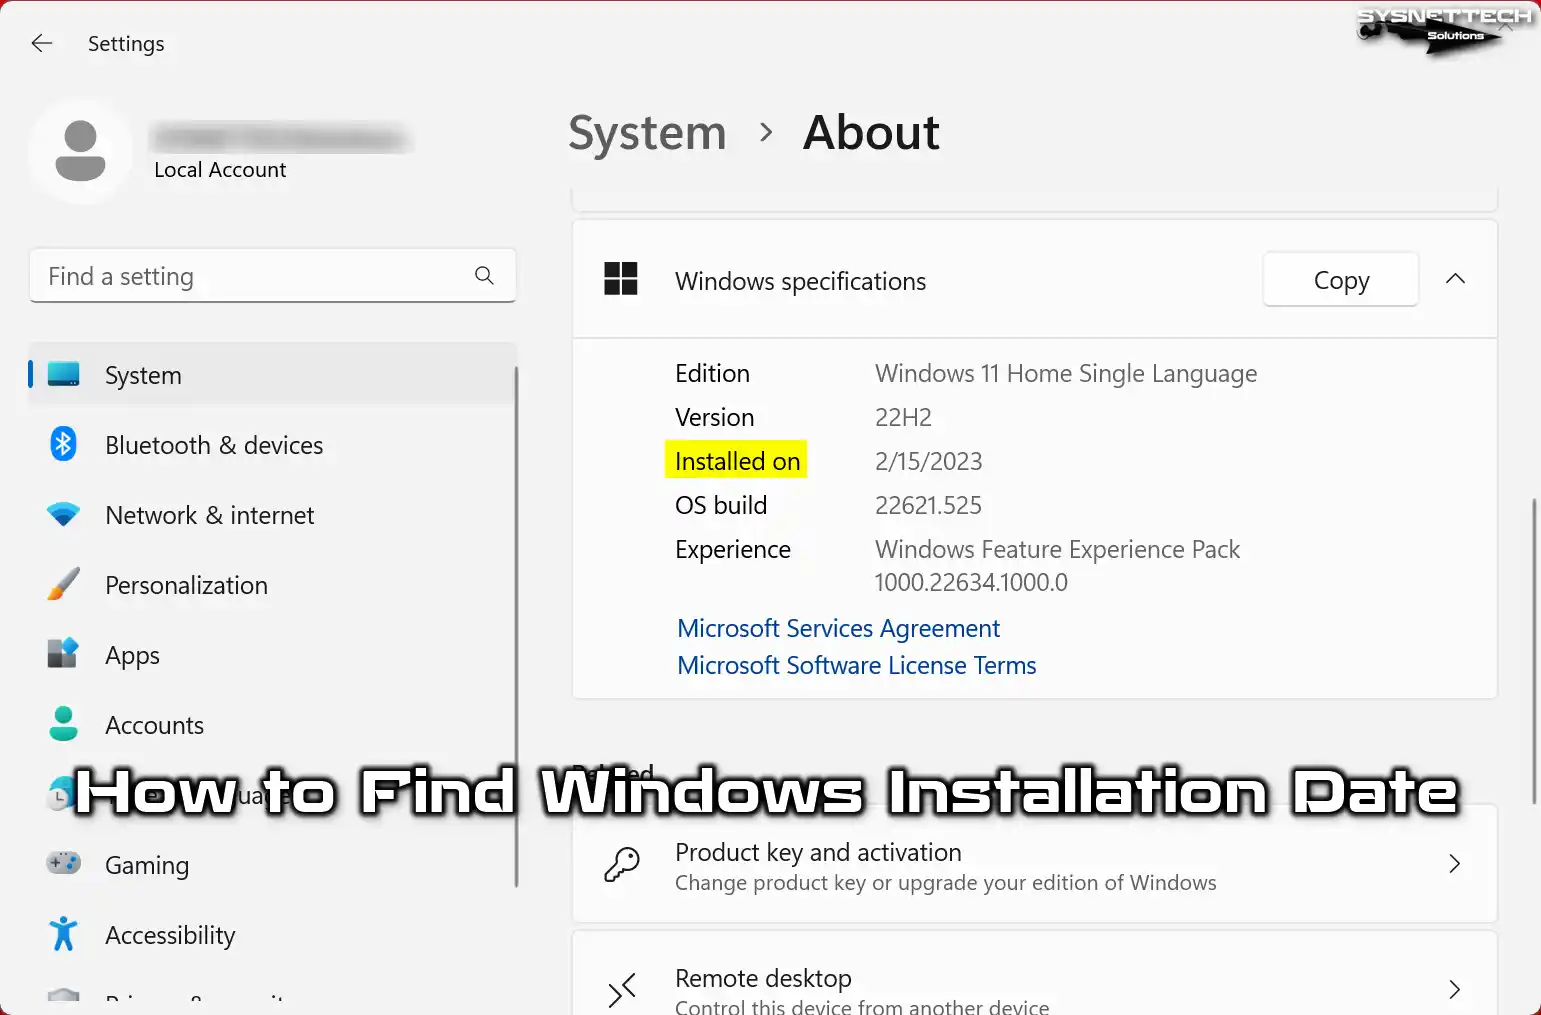
Why is It Important to Find the First System Installation Date?
When fixing problems with Windows systems, users often depend on the installation date. They use this to track the patches they install on the operating system. Additionally, they follow up to resolve any system issues they encounter. With this information, they understand the problems that occur in their computers. Consequently, they see it as a solution method.
Knowing your PC’s first setup is essential for how well it works and stays stable. It also helps to figure out and fix problems, improving the overall experience. Here’s why:
1. Troubleshooting and Resolving System Errors
Knowing the original date is crucial for fixing critical system errors. Knowing when you installed the OS can help you troubleshoot problems. So, you can start dealing with a problem based on a particular time frame. This way, you can figure out when the issues initially showed up.
2. Tracking System and Hardware Changes
Let’s say you added new hardware to your computer, such as a graphics card. You can note the original date of your system for reference. This helps with accurate documentation and makes troubleshooting easier. By doing so, you monitor issues effectively. Be it on your PC or a client’s device, tracking becomes seamless.
When checking your computer for hardware upgrades, do not forget storage disks. If you added a new disk, check it. Also, if your old disk works slower, take action.
Checking the health of your disk is smart at this early stage. It stops you from losing files later. This may sound familiar, but even a simple SMART error can signal big problems.
3. Update Tracking
You can check the installation date to determine which Windows version is on your PC. For example, you can define the start date and pinpoint the Windows version. Therefore, you can accurately identify the version that Microsoft released.
4. System Security Monitoring
You regularly install Windows 11 or 10 updates to keep your system safe. This way, the installation date lets you gauge how long your system has remained secure. If you have not updated since first install, its security remains protected. This lasts until that time.
Also, people who set up computers know an important detail. The time to install the system matters a lot. Now, to get straight to the point: when you install Windows on many computers, you need to understand how the system preparation tool works.
This tool lets you create your own custom installations. From my own experience, I can tell you this. Write down the master image date. It makes fixing problems much easier.
Finding the First OS Installation Date in Windows 11, 10, 8x, or 7
You can find the installation date on all versions of Microsoft Windows operating systems. If you use an older OS, you cannot use PowerShell. Examples include Windows 95, 98, or 2000. However, you can use CMD on older systems.
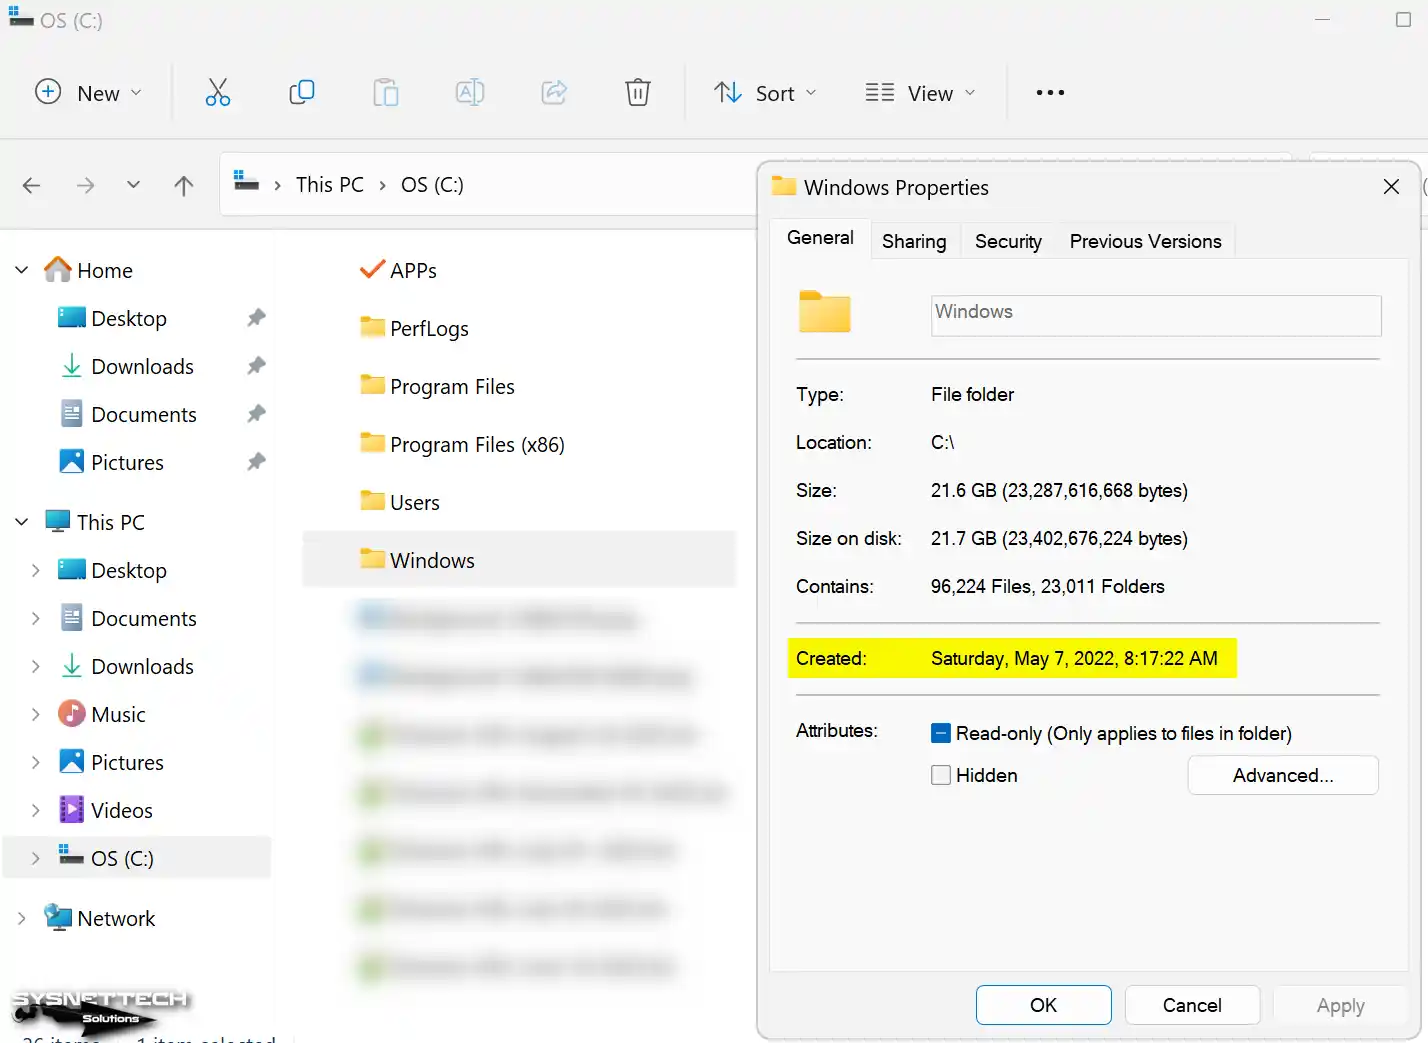
To quickly determine the install date, check the Windows folder. It is on your C:\ drive. Right-click the folder, go to properties, and see the creation date. As a result, that date indicates the installation time.
For instance, in the screenshot below, you can check the first install date of Windows 11. However, remember that the date of this Windows folder may only sometimes be entirely accurate.
Microsoft sometimes releases an all-in-one feature pack as a cumulative update for the previous version. When you install this package, your system’s build number changes. Accordingly, the system updates the creation date of the Windows folder on the C drive.
Now, let’s find the install date of Windows 11 on a PC using five different methods.
Step 1: Finding the First Setup Date from Settings
You can find the installation date in its simplest form from the operating system settings. To access this information:
- Click Start in Windows 11, then type “Settings” in search.
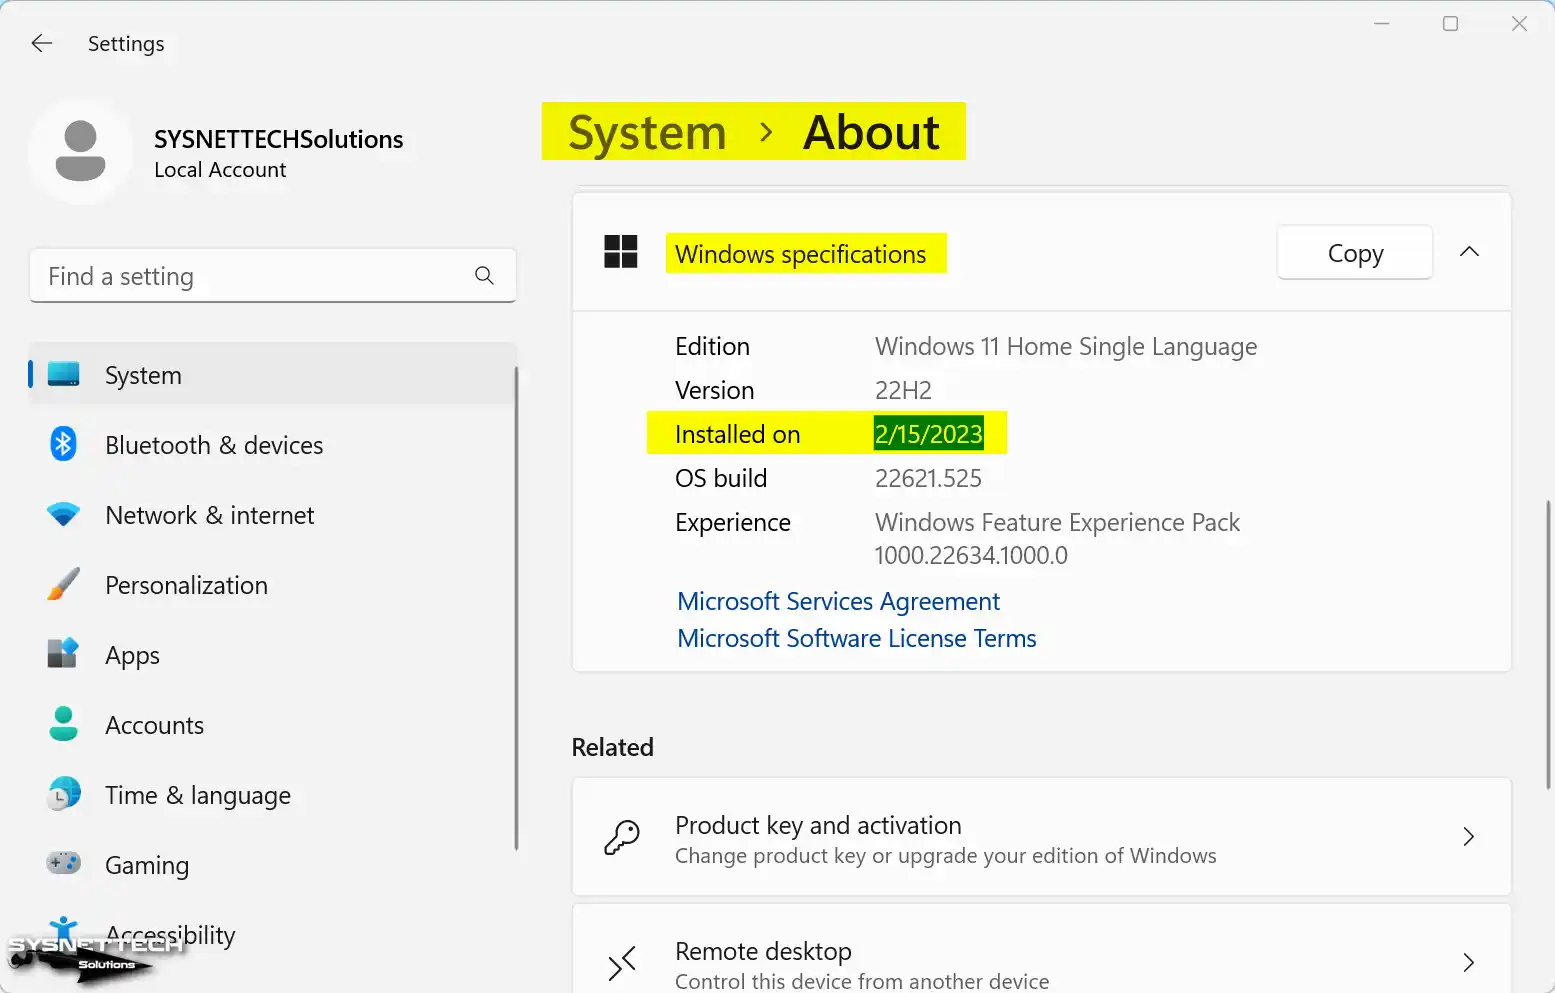
- Open the Settings app. Scroll down System, then click About.
- In the System > About screen, find Windows Specifications. It lists details below:
- Edition
- Version
- Installed On
- OS Build
- Experience
The “Installed On” option displays the date you installed Windows on your computer.
Step 2: Finding Windows Original Date using CMD
Another simple way to find out when you installed Windows is to use CMD.
Microsoft includes the CMD command prompt on almost all its platforms. With this tool, you can adjust many system settings or gather information. In this article, let’s find the install date using this tool.
- Press Windows key + R to open CMD. Or type cmd in Start.
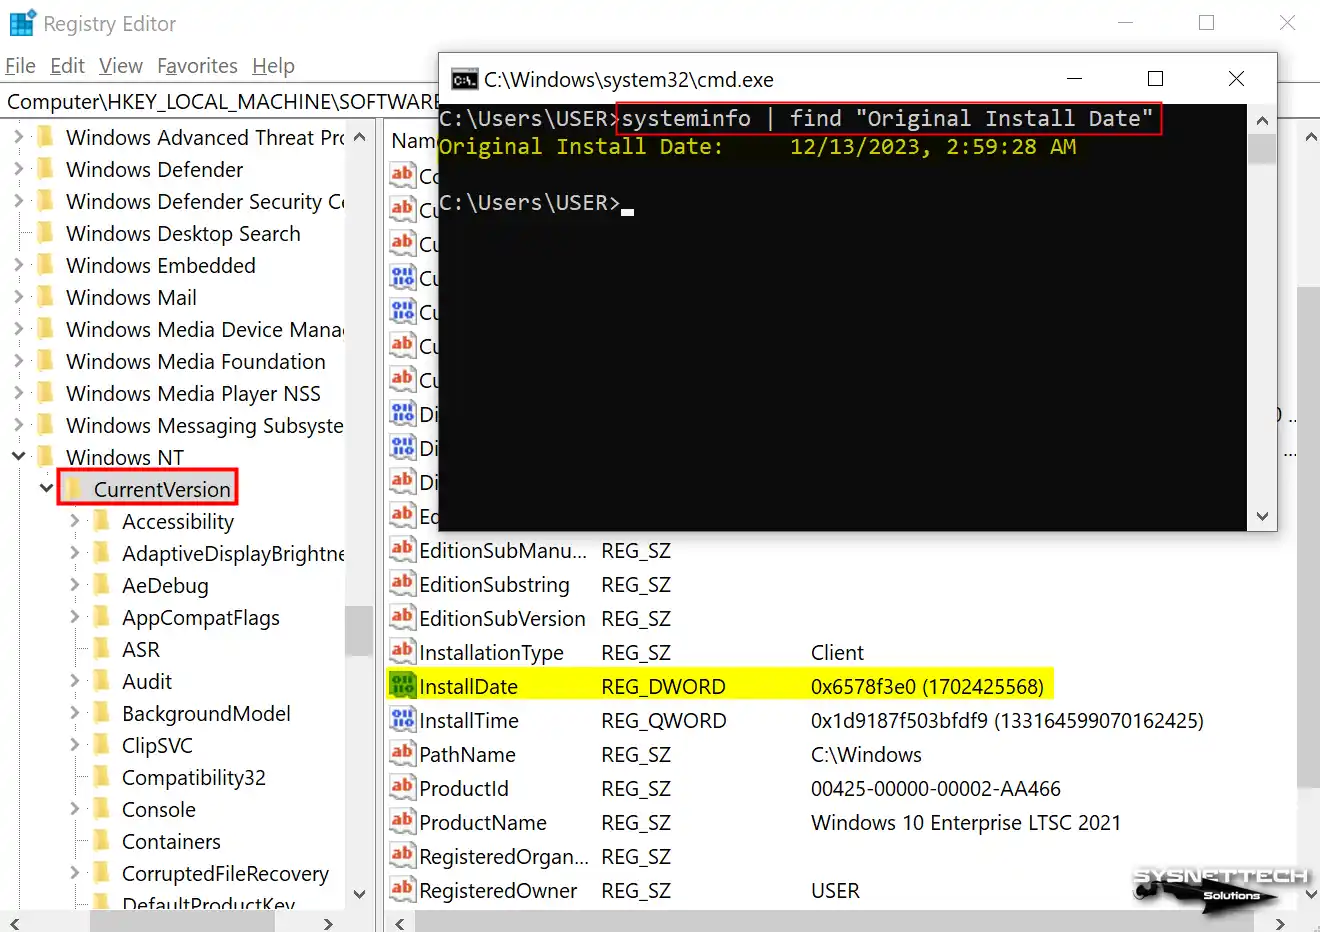
- Open CMD. You see C:\Users\YourUsername>. Type systeminfo. Check “Original Install Date”. It shows your initial install date.
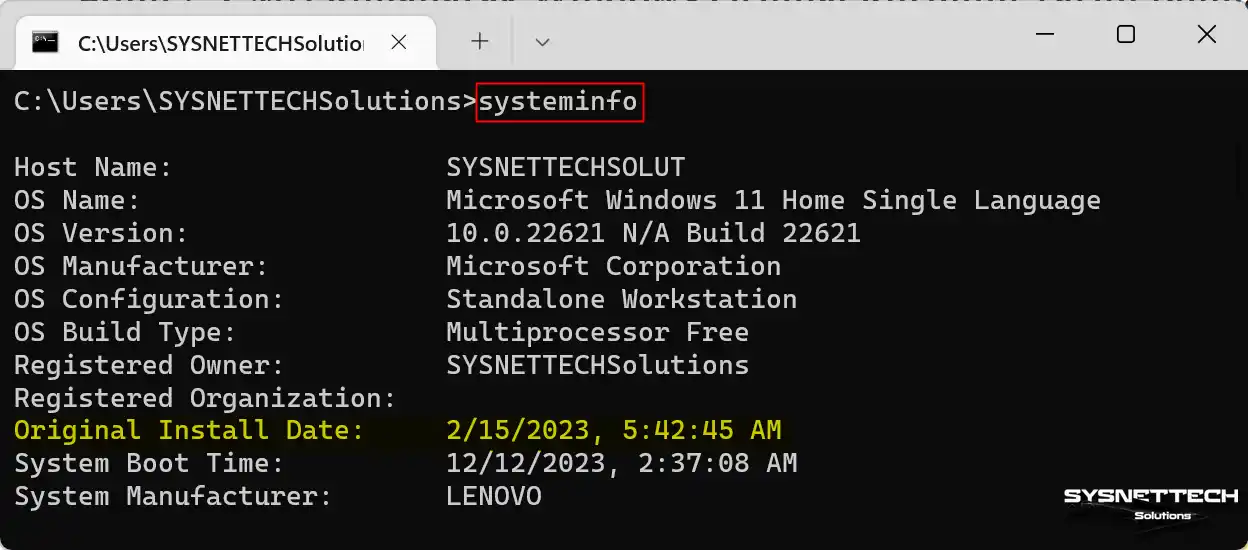
- For faster results, use this command: systeminfo | find “Original Install Date”.
systeminfo | find "Original Install Date"There are commands you can type to get information from your computer. Using these commands makes it much easier to manage a computer. One useful command is systeminfo. But there are also other strong tools. For example, there are various network diagnostic commands. These help you find and fix internet connection problems. I use these small tricks all the time.

Step 3: Checking Installation Date Using WMIC
In CMD, you can also find your initial Windows 11 install date. Use the WMIC command. With WMIC, you can obtain all your system information and access detailed insights.
Additionally, you can use WMIC commands with both CMD and PowerShell tools.
For example, let’s use WMIC to determine the install date of a PC’s operating system.
- Open CMD from Start or Run.
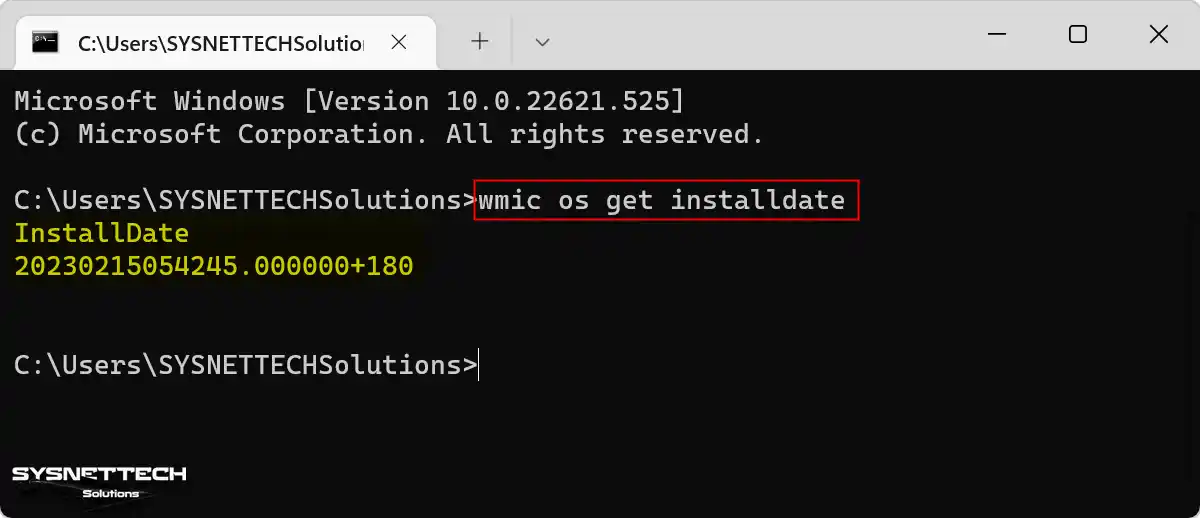
- Type wmic os get installdate. Press Enter.
wmic os get installdate- You see a different date format. It shows year, month, day, and time. Example: 20230215054245.000000+180 means 2023-02-15 05:42:45.
Step 4: Checking Installation Date Using PowerShell
Another way to find the Windows Original Date is by using PowerShell. So, you can use PowerShell on all Windows XP to 11 versions. Therefore, it gives you a professional approach. You can access the desired system information.
Let’s follow these steps to learn the installation time with PowerShell.
- Open Start. Type powershell in search. Run the best PowerShell app.
- Open PowerShell. Type the command below. Press Enter. The output shows your system date.
([WMI]'').ConvertToDateTime((Get-WmiObject Win32_OperatingSystem).InstallDate)![([WMI]'').ConvertToDateTime((Get-WmiObject Win32_OperatingSystem).InstallDate)](https://img.sysnettechsolutions.com/Windows-Install-Date-06.webp)
- If the command above seems too long, use this shorter version.
gcim Win32_OperatingSystem | select InstallDate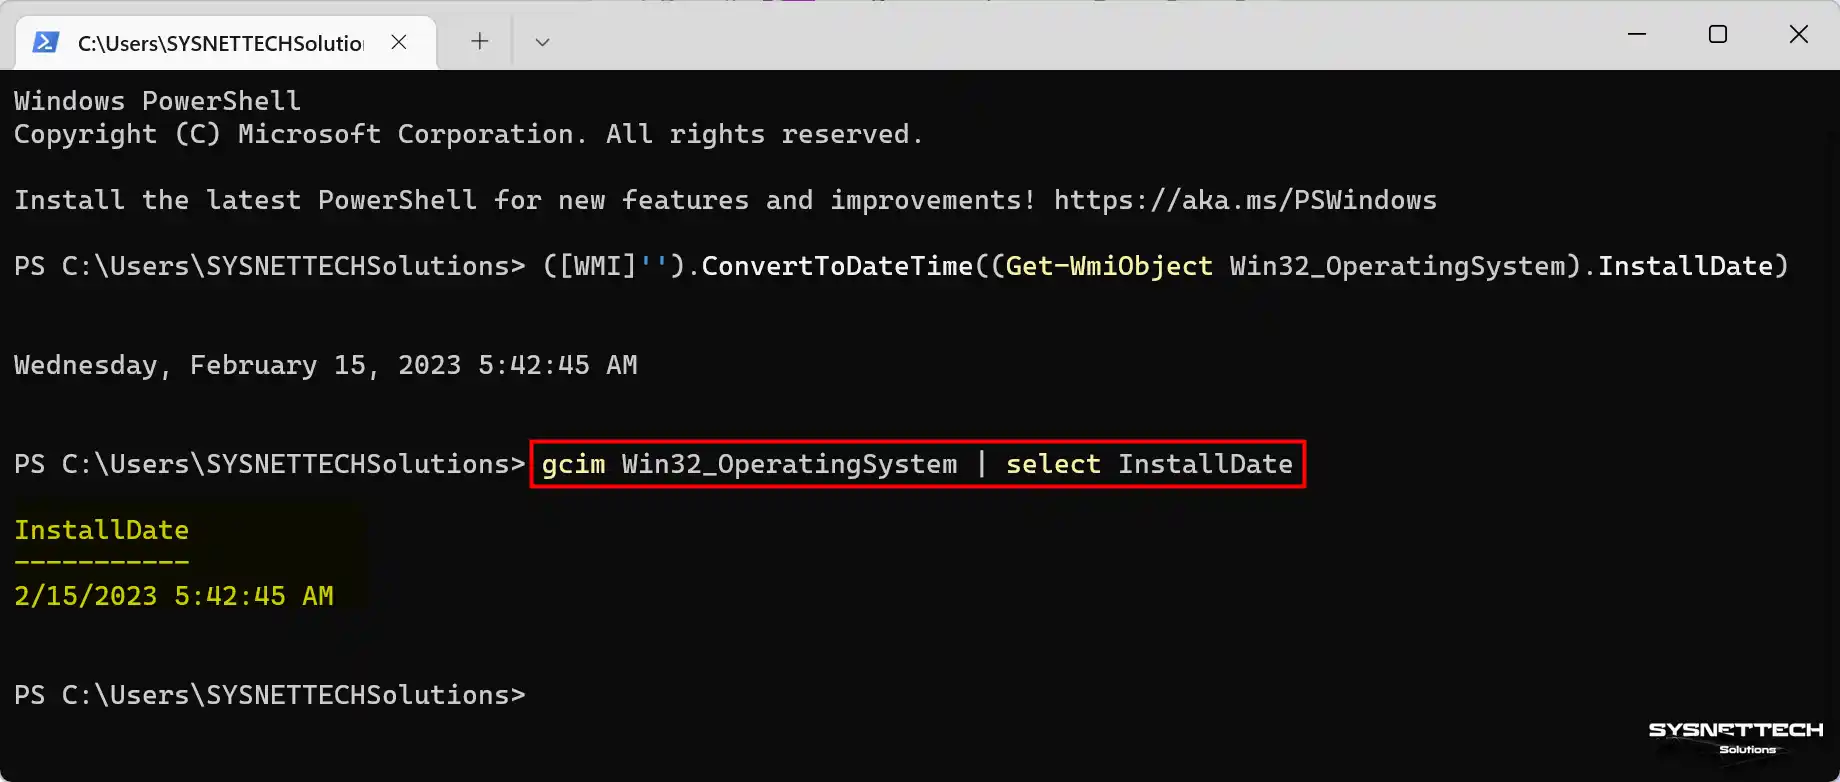
PowerShell is not only for finding information on your own computer. It is also great for controlling other computers from far away. If you need to send commands to another machine, look at remote connection tools. These tools are already built into PowerShell.
Step 5: Checking the Installation Date using Regedit (Registry Editor)
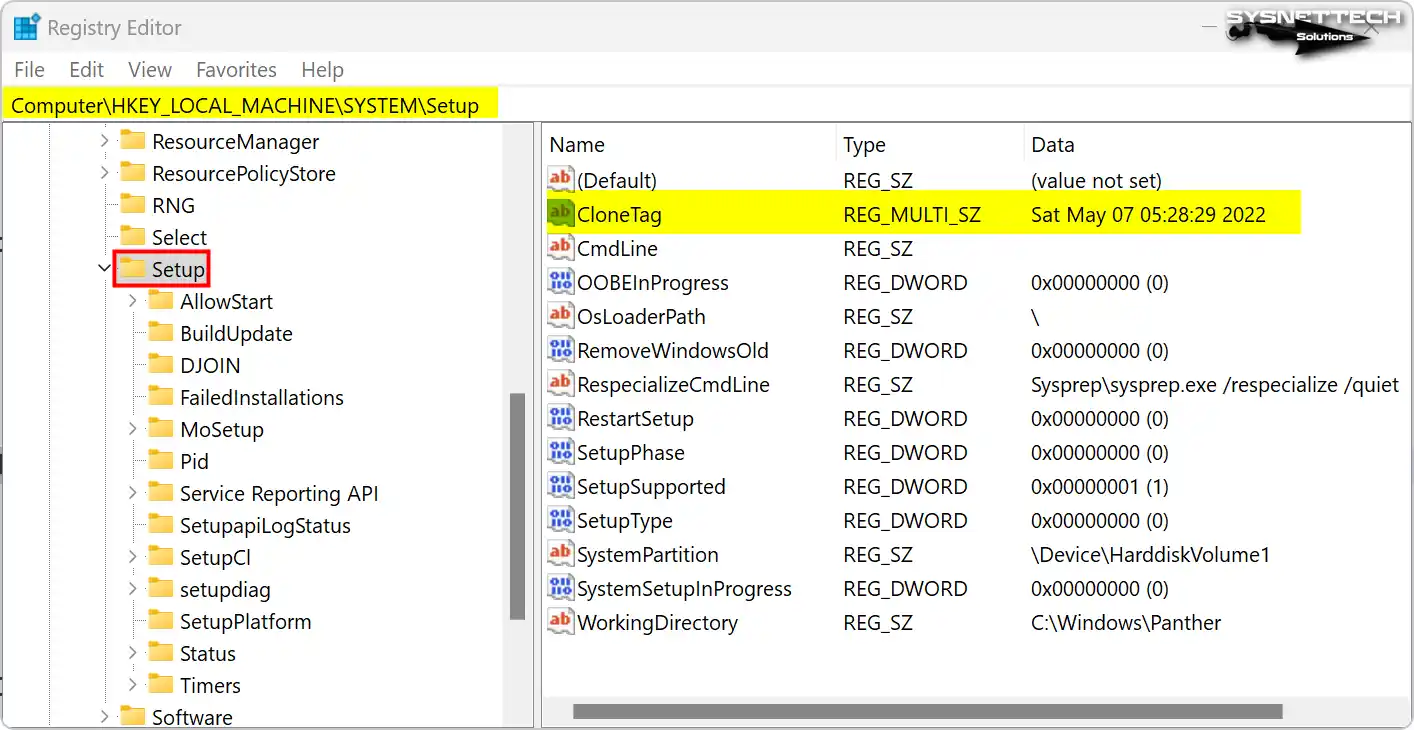
Another option to figure out when you installed Windows is to use regedit. However, like the method in step 1, this depends on the Windows folder’s creation date. Similarly, this value might change if you install a complete feature pack update. As a result, this method helps you get information.
- Press Windows + R. Type regedit. Click OK.
- Go to the location below. Check CloneTag on the right.
HKEY_LOCAL_MACHINE > SYSTEM > Setup- CloneTag shows the system installation time. See previous steps.
How to Change Windows 11/10/8 Original Install Date via Regedit
You can change the original date value in Windows 11 and earlier systems. In some cases, you may want to modify the installed system date.
Before changing the system date, back up the whole Registry. This is a good idea. This helps avoid possible mistakes. Editing Registry values or entries can be risky. So, be careful and think about your PC’s stability before doing this.
- Use regedit from Start or Run to open the editor.
- Open Registry Editor. Find the location below.
Patch: HKEY_LOCAL_MACHINE > SOFTWARE > Microsoft > Windows NT > CurrentVersion
- Choose CurrentVersion. Find InstallDate on the right. Double-click it.
- A window pops up. It lets you change InstallDate. You see Hexadecimal and Decimal sections.
- Enter the Epoch time in Decimal field. To add one day, add 86400 to current decimal. Enter the result.
- Recheck with CMD or PowerShell. You see +1 day added.
- Visit this website to add a specific date. It gives Epoch time for current time. You can also edit the date to get a Timestamp.
Frequently Asked Questions About Windows System Date (FAQ)
How do I check the Windows 10 or 11 installation date?
Can I know when I installed Windows?
Where is the Windows installation date in the registry?
Can I change the first installation date of Windows?
Conclusion
You can easily find your Windows installation date. Follow any of the above steps. This information helps with troubleshooting. It also tracks your OS age.
However, before examining the registry or changing a record, make a backup first.

Be the first to share your comment