
Setting up a Cisco Router for the first time with Packet Tracer may feel hard. But with the right help, you can make your work simpler. So, whether you are a new network worker or studying for tests. Most of all, it is key to get good at setting up network devices.
In this guide, I will help you link to a Cisco Router CLI with a console cable. By making this link, you can set up your network devices more simply.
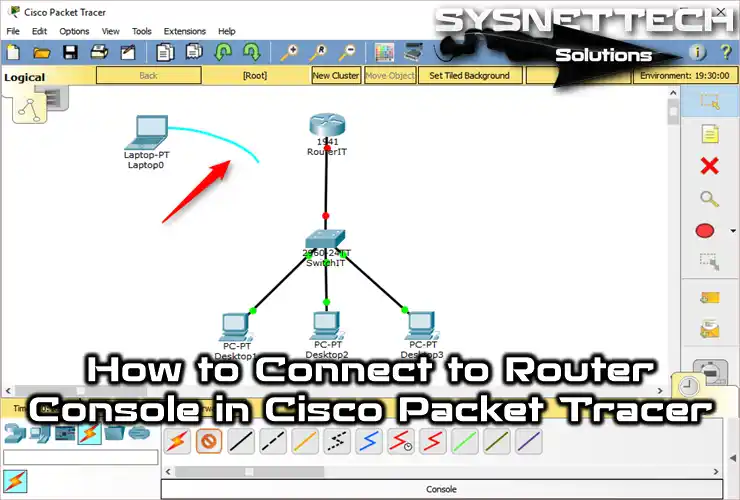
How to Set Up a Cisco Router using a Rollover Console Cable
In a real situation, you might need to do the first setup on a Cisco Router. That’s why configuring a switch is the same. Therefore, you first need to connect to the device via the Console port.
If you are getting ready for Cisco tests with Packet Tracer, you do not need to link to a Router with a wire. But you should still learn how to do it through the console.
To start a console connection to the Router, you need a rollover cable. One end of this cable is RS-232. The other end is RJ-45.
You plug the RJ-45 end into the Router’s console port. Then, you connect the other end, the RS-232 end, to your computer.
A USB cable also lets you establish the console connection. For example, a cable with one end being USB and the other end being RJ-45 will work. Thus, we call this a Cisco Console Interface cable.
What is a Rollover Cable?
A Cisco console cable is a rollover wire. It mainly links a computer’s serial port to a Router. We can also join it to the console port of a switch.
This is a special kind of serial wire. The link lets you talk to the device’s command line. So, it is a key part of CLI setup and control.
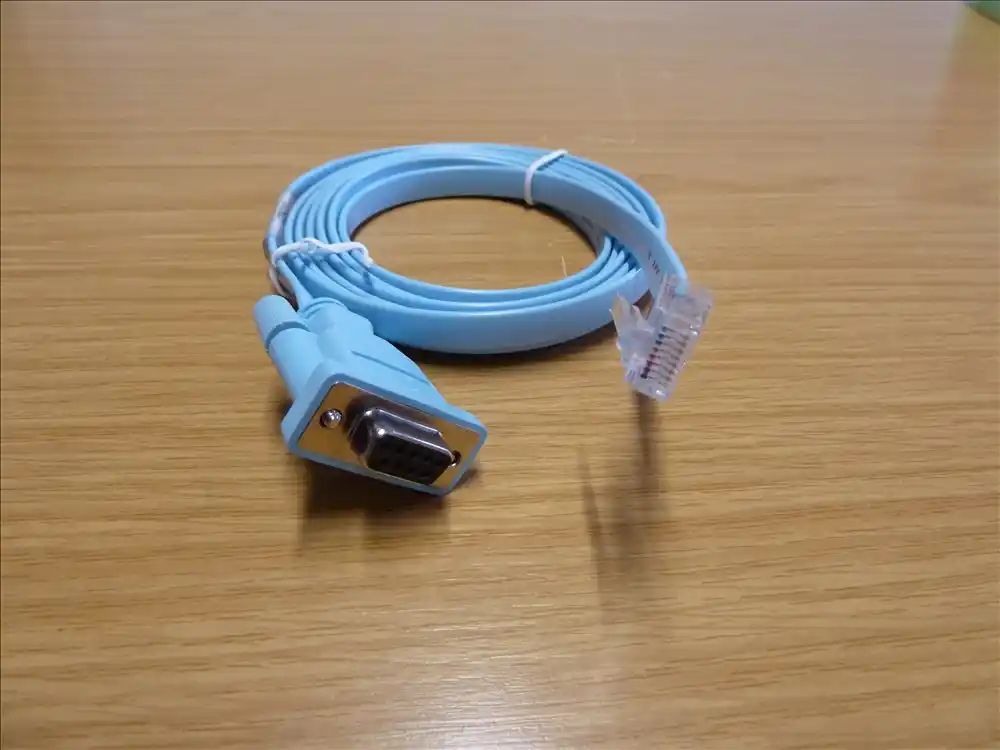
A rollover cable is special because it uniquely sets its wires. Standard Ethernet cables are straight or crossed. But the pins on a rollover cable are flipped.
For example, pin 1 on one end is pin 8 on the other end. Also, pin 2 is pin 7. In short, we call it “rollover” because of its reversed connection.
Typically, one end of the rollover cable has an RJ-45 connector. We plug this into the device’s console port. The other end has a DB-9 or DB-25 connector.
We plug this end into the computer’s serial port. But new computers often do not have a serial port. So, we can frequently solve this by using a USB-to-serial adapter.
Rollover cables are a must for network workers. We use them most in places that need device setup and fixing.
That’s why users can link to the device through the console port. This lets them quickly reach key setup choices. Put simply, they can run tests and make network updates. In short, I would say that knowing how to use a rollover cable is a fundamental skill.
Understanding Serial Communication Parameters
We often use serial links to move data between devices. So, we must know its setup choices well. This is the base for making good talk rules.
Now, let’s see the main settings in a standard serial link setup by reading the parts below!
1. Bits Per Second (9600)
We measure Baud rate in bits per second (bps). This speed is the basis of data moving between devices. For example, 9600 bps is a common choice. This setting means we transmit 9600 bits per second.
Also, this speed mixes high power with trustworthiness. Therefore, we use a lot of home devices to factory machines. As a result, picking the correct baud rate also changes how well the talk works.
2. Data Bits (8)
The number of data bits determines how much information each byte holds. For example, 8 data bits stand for ASCII letters. This provides a wide range of values between 0 and 255.
Plus, it supports standard character sets. So, it is key to smooth talking between devices. In other words, this choice is sufficient for most applications. Furthermore, the pick of data bits changes how well and how complex things work.
3. Parity (None)
Parity is an error control mechanism that keeps data correct. It makes communication simpler because it uses no extra bits in the “None” setting.
But it also turns off error detection. So, the Parity setting is suitable for safe, simple uses. In contrast, key systems can better handle mistakes by using parity.
4. Stop Bits (1)
Stop bits identify the end of a data byte. This means the receiving device knows the data is complete. For example, a one-stop bit sends a signal after each byte.
This signal keeps devices in sync and ensures they handle data correctly. The pick of stop bits is key to communication trust. In short, even a small change can cause a wrong reading of data.
5. Flow Control (None)
Flow control manages the data sending speed. This method stops data loss and overflow. The “None” setting indicates that there is no flow check.
This gives a simple setup but has downsides. It is not suitable for devices with different speeds or lots of data. In the end, using flow control makes contact better and stronger.
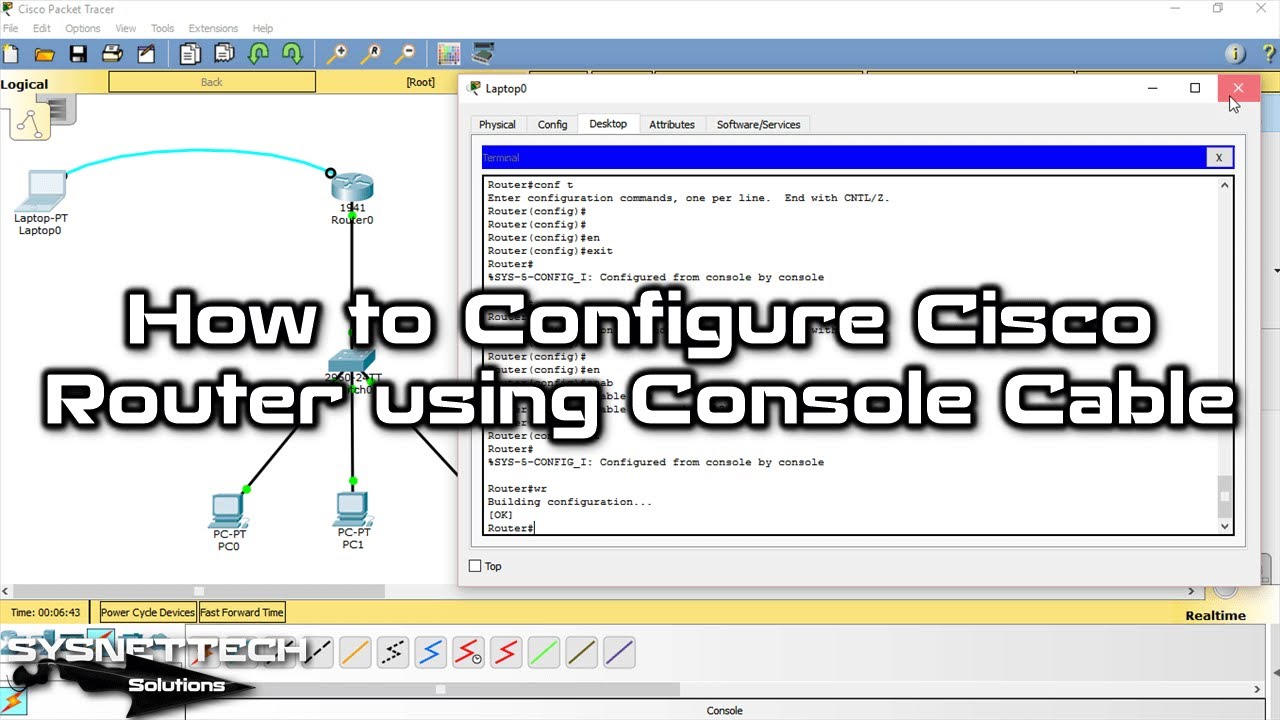
Cisco Router Installation with Console Cable
To set up a Router through the console in Cisco Packet Tracer, do the steps below. First, set the simple options. After that, you will make sure your device works right, and then you can test your network link.
1. Editing Network Topology & Rollover Cable Connection
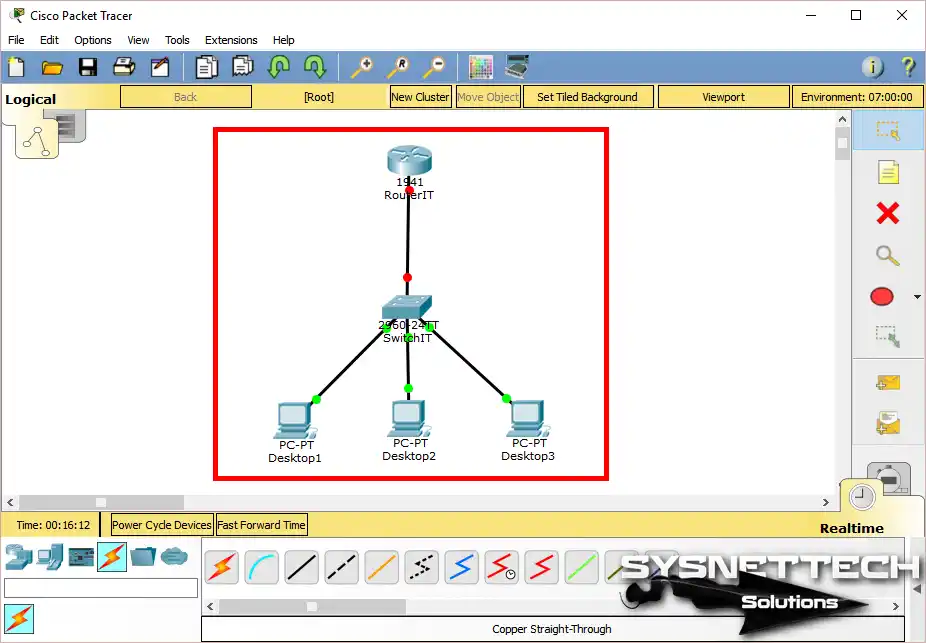
Step 1
First, put one Switch & Router in the Cisco simulator’s work area. Then, add three PCs to finish the layout. After this, you will have made a network setup like the picture shows.
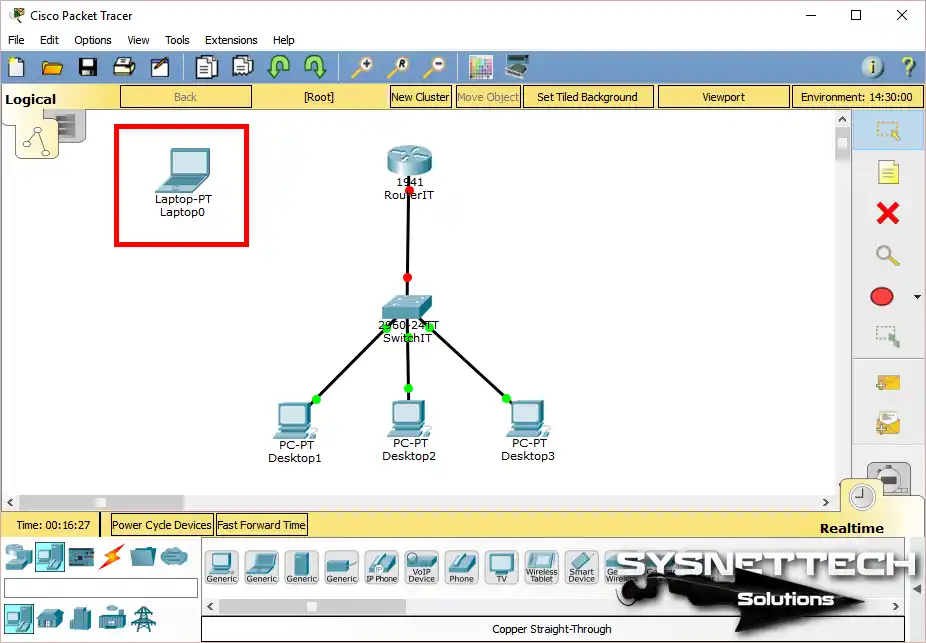
Step 2
First, pick the laptop from the device list. Then, put it in the simulation environment. You will have placed the device as its own item in the Packet Tracer workspace.
Step 3
First, open the Packet Tracer wire choices. Next, find the Console wire. Last, click on this wire to finish your pick.

Step 4
First, click on the laptop device. From the new window that opens, select the RS-232 option.
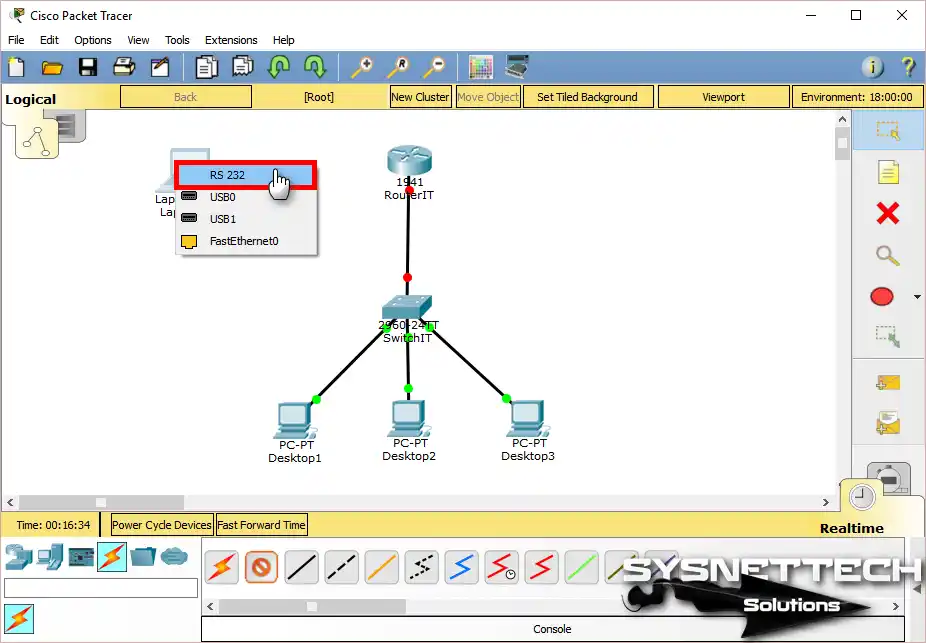
Step 5
Plug one end of the console cable into the laptop. Then, connect the other end of the cable to the Router. To do this, click on the Router device once.
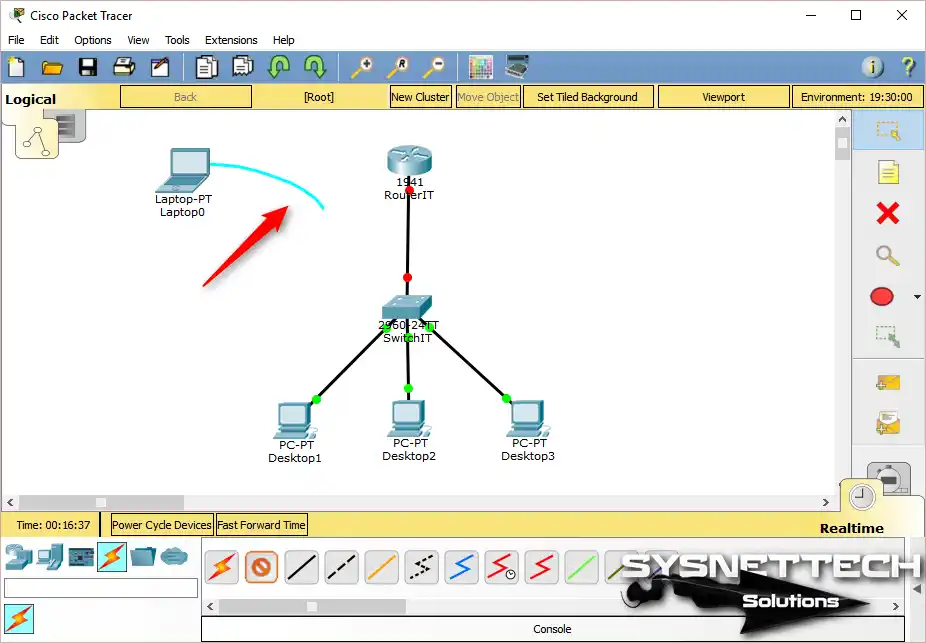
Step 6
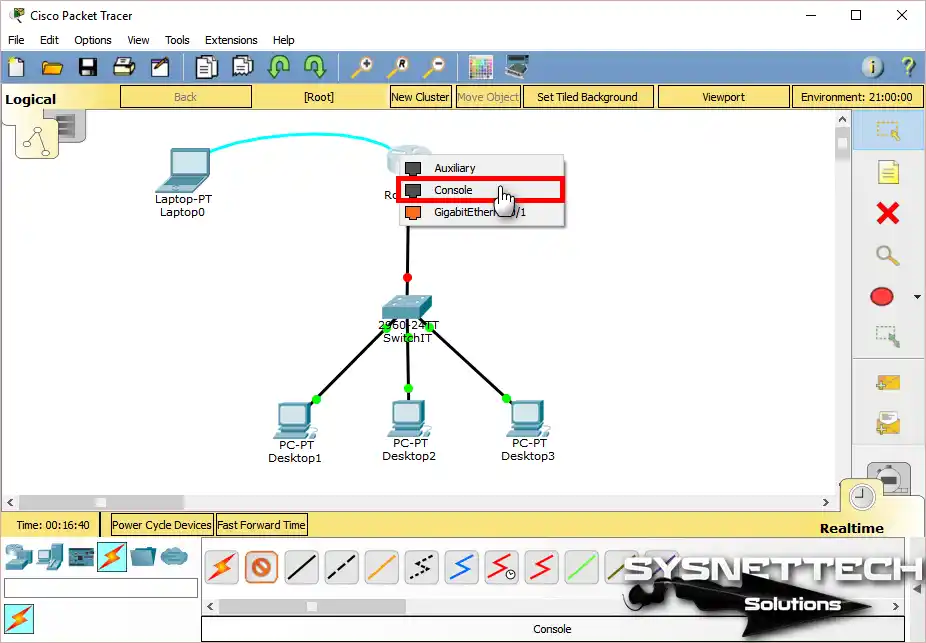
As soon as you open the Router’s setup window, pick the Console port from the list here. That is, you will finish the console link setup.
2. Accessing the Cisco Router Interface with Terminal
Step 1
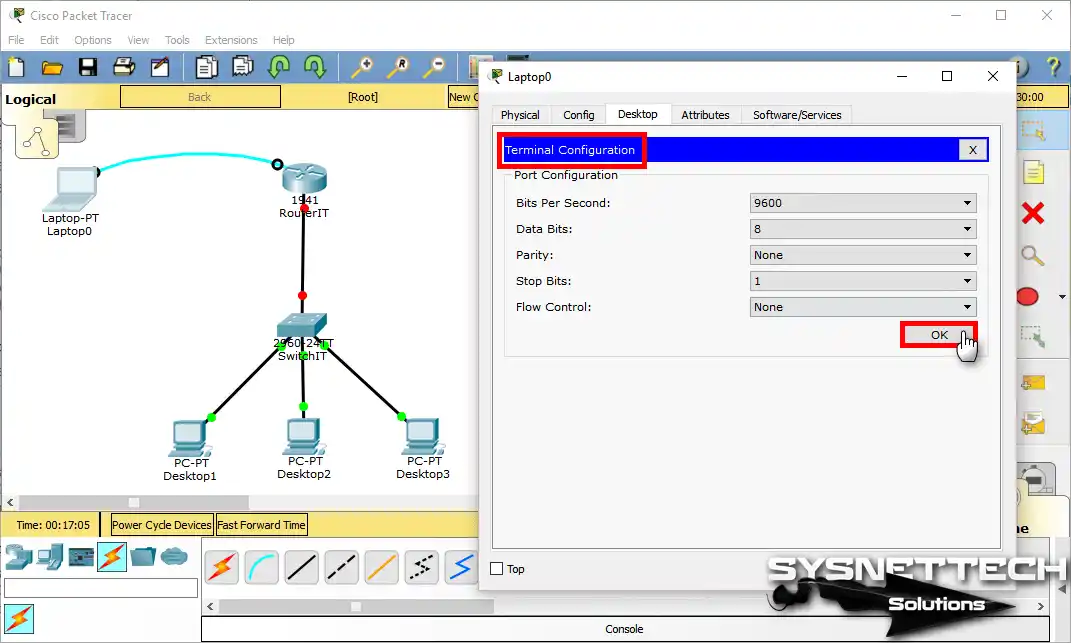
After you plug the console cable into the Router, click on the laptop. Open the setup console by picking the Terminal choice from the menu that appears.

Step 2
In the Terminal Setup window, you will see Bits Per Second, Data Bits, Parity, Stop Bits, and Flow Control. Here, keep the related settings as they are and press OK to finish.
- Bits Per Second: 9600
- Data Bits: 8
- Parity: None
- Stop Bits: 1
- Flow Control: None
Step 3
You have made a console link between the laptop and the Router. Now, when you open the CLI command box, you will see the first setup question. Answer this question with “no” to start simple jobs.
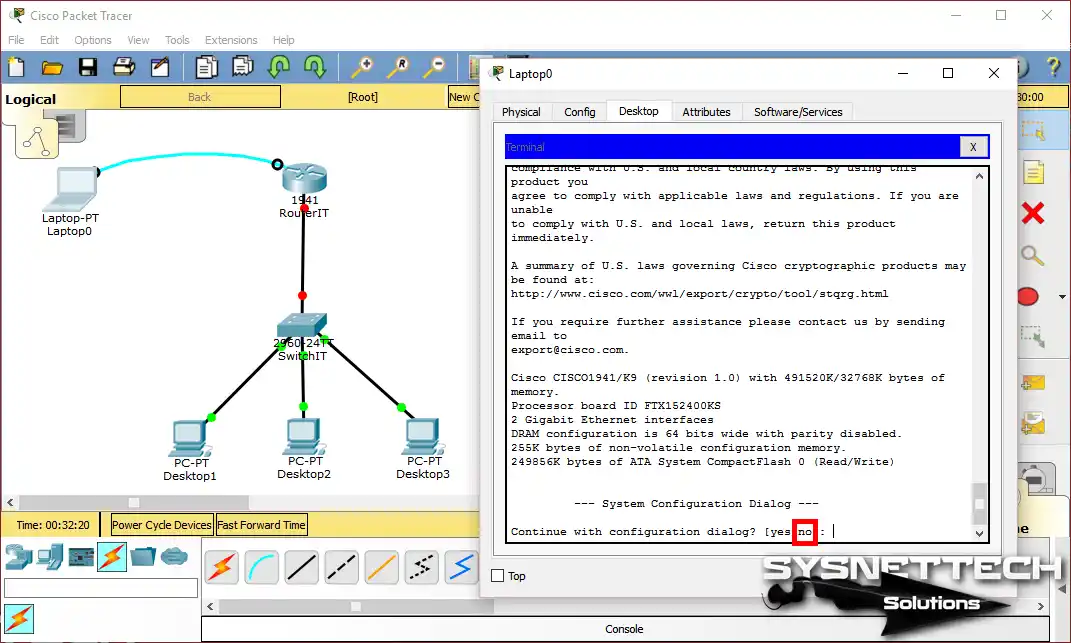
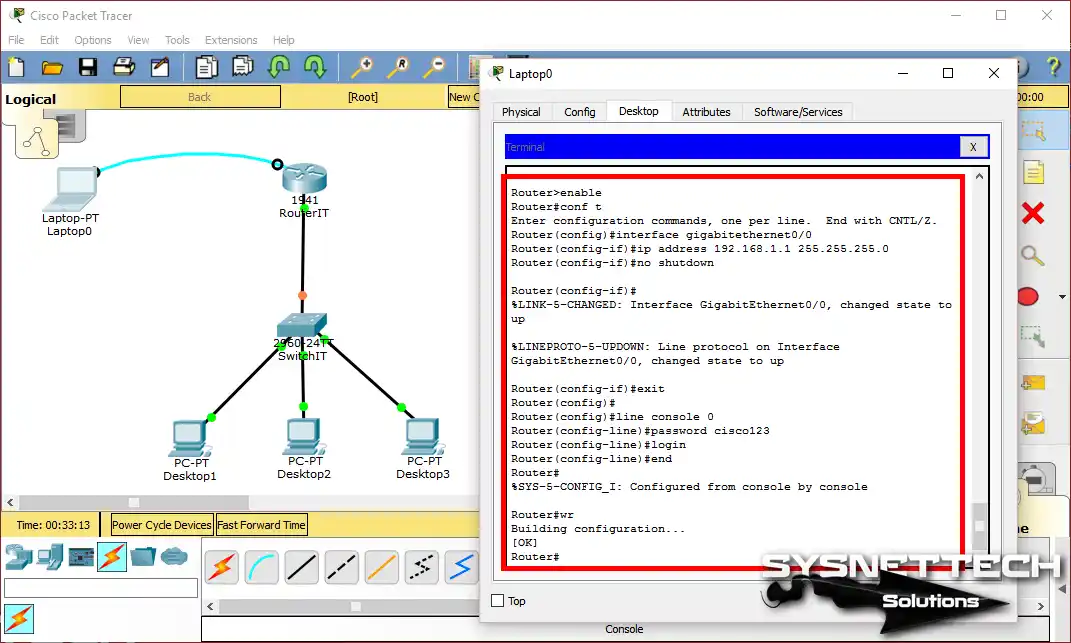
Step 4
I really think you should set a password for console entry. Thus, you will stop unwanted access to the Router. So, to make a password, use these commands one after the other:
R1> enable
R1# conf t
R1(config)# interface gigabitethernet 0/0
R1(config-if)# ip address 192.168.1.1 255.255.255.0
R1(config-if)# no shutdown
R1(config-if)# exit
R1(config)# line console 0
R1(config-line)# password cisco123
R1(config-line)# login
R1(config-line)# end
R1# wr
Step 5
Type the exit command in the Cisco Router CLI. This will leave the current mode. You will then go back to user setup mode by itself.

Step 6
When you reconnect to the router, the CLI will prompt you for a password. Enter the console password you previously set and press Enter to log in.

Step 7
Once you enter the password, the system gets you ready. You can now safely set up your Router.

How to Use Rollover Wire in Packet Tracer | YouTube Training Video
Watch our clear YouTube guide to control your Router from the Console easily. It will walk you through every part of the process. So, you can begin right away for a smooth experience.
Follow our YouTube channel to know about new tips and updates. Also, you help us make more content!
You can do these simple things in Packet Tracer. First, connect your device to the console. Next, turn on Telnet on the Router to link to it over the network. If you don’t like Telnet, you can enable SSH on your Cisco device.
Frequently Asked Questions (FAQ) About Console Cables
- What equipment do I need to connect to the Cisco Router console?
- How do I plug into the Router console?
- What settings do I need in the terminal software?
- How do I connect using PuTTY?
Conclusion
To finish, setting up your Cisco Router from the console is easy and essential. This skill is key to managing and fixing networks.
By doing the steps I have shown, you can make a connection on Packet Tracer. You can also protect access with a password and choose who can use it.
Whether you use a console cable or USB, the setup is as simple as it is in real life.
Keep building your networking skills. Get to know tools like Telnet and SSH. In short, this lets you control your network devices from far away.
You can also watch our video guides while you learn about Cisco. You can also keep up with group help. In short, by understanding these setups, you are close to being a great network manager!

Be the first to share your comment