
In this article, we will build a small network for Telnet with the Cisco Packet Tracer program. This program shows network setups and actions in a simple way. Next, we will make a network topology.
After that, we will make a Telnet link to the Router. This link lets us reach the Router from far away. So, we can change its settings easily. In the end, this shows the real use of network tools.
How to Enable Telnet on a Cisco Router
Telnet stands for Telecommunication Network. This is the name of a network protocol used to access and operate a computer remotely.
Access to another computer is done in terminal mode (without any graphical interface). It allows remote troubleshooting so that the technician can solve the problem without being physically close to the equipment in question.
Telnet also makes it possible to query data remotely or start a session with the UNIX device (in this case, multiple users can log on simultaneously and work with the same computer).
The only disadvantage of Telnet is security. It sends data over the network without encrypting it, allowing spies to access data such as user names and passwords. Therefore, Secure Shell (SSH) emerged as a kind of encrypted Telnet in the mid-1990s.
With PT software used to prepare for exams, you can set up Telnet on a Router and access the Router from computers in the work environment.
The most significant benefit of enabling the Telnet or SSH protocol is that there is no need to make a console connection to the Router. This way, you can easily access and manage the Router over the local network via Telnet.
Turning On Telnet Service on Cisco Router in Packet Tracer
Follow the steps below to configure Telnet for the Router.
Step 1
After adding a Cisco Router, Switch, and PC to the Packet Tracer workspace, all devices are connected.

Step 2
Double-click Cisco Router1 to open the CLI prompt, type No to skip the initial configuration, and press Enter.

Step 3
To enable Telnet on the Router, execute the following commands in order.
Router> enable
Router#conf t
Enter configuration commands, one per line. End with CNTL/Z.
Router(config)#interface gigabitethernet0/0
Router(config-if)#ip address 192.168.1.1 255.255.255.0
Router(config-if)#no shutdown
%LINK-5-CHANGED: Interface GigabitEthernet0/0, changed state to up
%LINEPROTO-5-UPDOWN: Line protocol on Interface GigabitEthernet0/0, changed state to up
Router(config-if)#exit
Router(config)#username cisco privilege 15 password cisco123
Router(config)#line vty 0 4
Router(config-line)#login local
Router(config-line)#privilege level 15
Router(config-line)#end
Router#
%SYS-5-CONFIG_I: Configured from console by console
Router#wr
Building configuration...
[OK]
Router#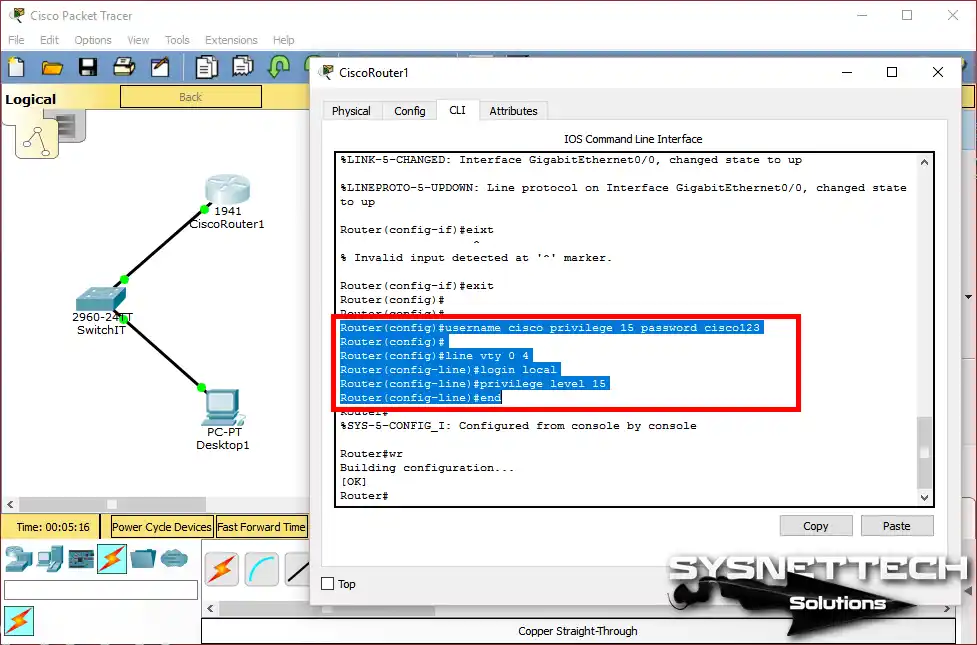
Connecting to a Router via Telnet on a PC
Steps:
Step 1
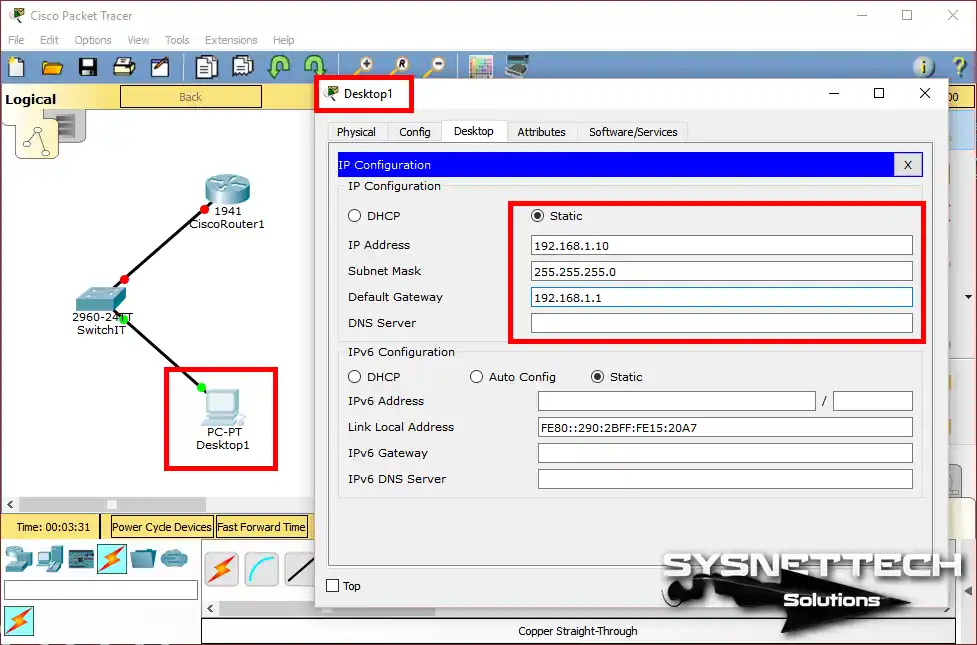
After configuring the Cisco Router interface, we created a username and password for the Telnet connection. Before connecting to Cisco Router1, configure the TCP/IP configuration of Desktop1 in the workspace as follows.
Step 2
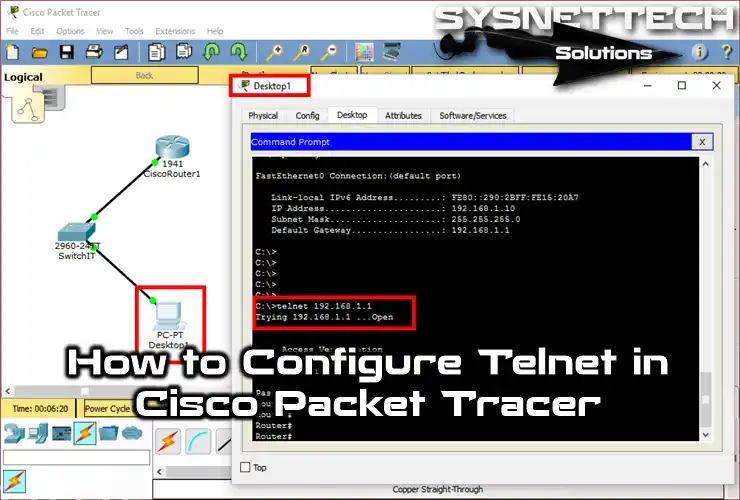
Click on the PC, click the Desktop tab, and then click CMD Command Prompt.
At the CMD prompt, type telnet 192.168.1.1 and press Enter to connect to the device. Enter the username and password you created during the connection setup.

Step 3
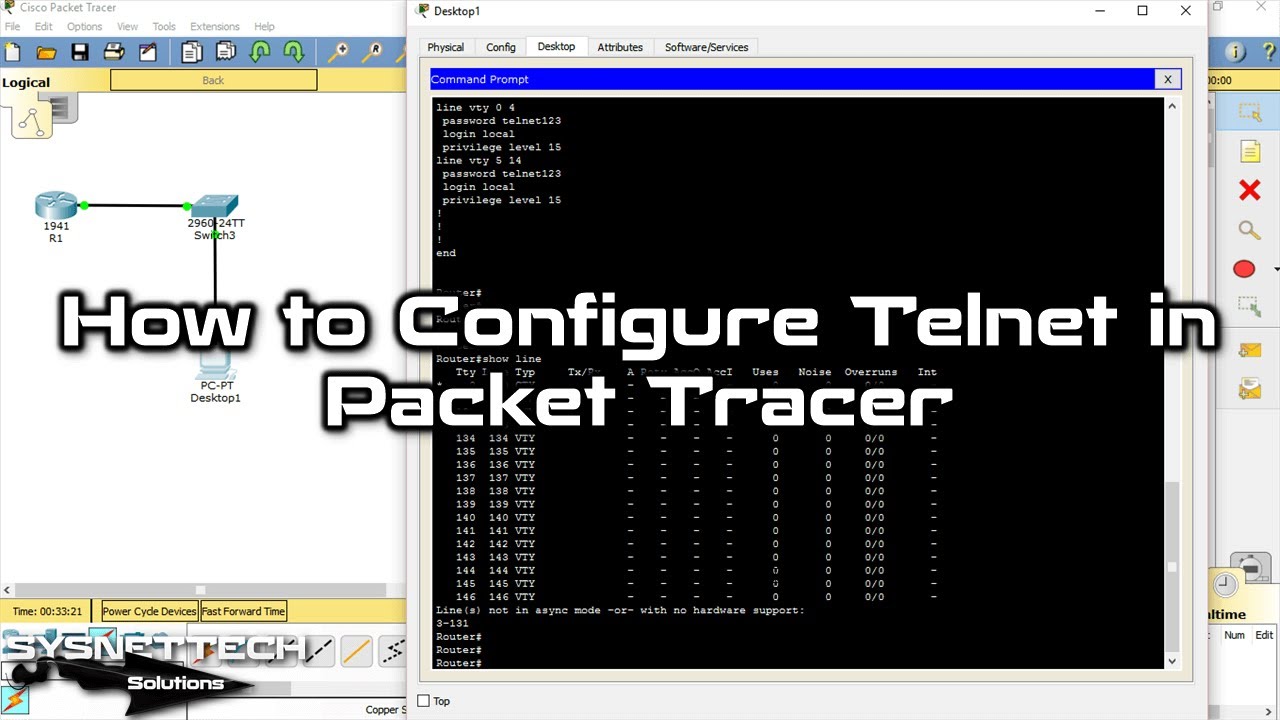
Once connected to the Cisco Router, you can now manage your device by accessing it through LAN or WAN. To view the connections to the device, run the show line command.

Step 4
You can review open sessions on the Cisco Router.

Reviewing the Running Configuration File
Router#show running-config
Building configuration...

Current configuration : 696 bytes
!
version 15.1
no service timestamps log datetime msec
no service timestamps debug datetime msec
no service password-encryption
!
hostname Router
!
ip cef
no ipv6 cef
!
username cisco privilege 15 password 0 cisco123
!
license udi pid CISCO1941/K9 sn FTX15241Q66
!
spanning-tree mode pvst
!
interface GigabitEthernet0/0
ip address 192.168.1.1 255.255.255.0
duplex auto
speed auto
!
interface GigabitEthernet0/1
no ip address
duplex auto
speed auto
shutdown
!
interface Vlan1
no ip address
shutdown
!
ip classless
!
ip flow-export version 9
!
line con 0
!
line aux 0
!
line vty 0 4
login local
privilege level 15
!
end
Router#
Video
You can watch the video below to connect and manage your Router from your PC via Telnet. Also, subscribe to our YouTube channel to support us!
Conclusion
In this article, we examined how to configure Cisco Telnet. First, we enabled Telnet on our device. Next, if we prefer, we can turn it off if needed.
To do this, use the command: transport input ssh. This command should be executed in line vty 0 4. Following these steps will help you manage your Telnet settings effectively.
When you set up Telnet for remote access, think about using SSH instead. SSH makes security better by locking the data sent on the network. Also, it gives you a safer way to manage Cisco devices from afar. If you want to know how to set up SSH in Packet Tracer, read our complete guide. It will show you each step in a simple way.

Be the first to share your comment