
In this guide, I will explain how to install Wine Crossover. Wine is a strong helper for your macOS 15 Sequoia system. It lets you run Windows apps and games with no problems.
It doesn’t matter if you have a Mac with Apple Silicon M1, M2, M3, or M4 chips. You will get the best speed and fit with Wine software.
So, it will help you make the most of Windows EXEs on macOS. I have shown each step to install it, so you can soon start to set it up.
Really, if you want to play a game or use an app not on Mac, it’s fine! WineHQ will make your computer better!
How to Run Windows Applications on Apple Mac & macOS PCs
As you know, Macs cannot run Windows programs alone. Many games will not work either. So, you need tools like Wine or Crossover.
Some developers build apps for both Windows and Mac. But many apps and games are just for Windows. So, if you use a Mac, you might need extra help.
Computers that are not Macs often have Windows 10 or 11. If you have used Windows for years, you know apps like Microsoft Office.
However, you may need to use an Apple computer due to a job change. You might also need this to manage a project. In this case, you may want to use the Office applications you’re familiar with.
For example, you may have an old camera or printer. For this, you may need to install the developer application on your Mac.
In such cases, you may want to use Windows apps on your Mac. Luckily, there are easy fixes for this. For instance, Wine Crossover will surely help you here.
Apple’s Boot Camp tool is also a simple solution. It allows you to install a Windows 10 & 11 virtual machine on your existing macOS. This way, you can use your software without any issues.
Using a virtual PC on your Mac can be hard. It takes time to start, and it might run slow. So, I do not suggest this way for real use.
Best Choice: Wine Crossover
That’s why I say the WineHQ framework is an excellent option for your Mac. You can quickly install any 64-bit or 32-bit applications you want. You can also play many games with no problems.
Also, WineHQ might have problems on M1 and M2 Macs. Then, you can test the Crossover app. Crossover costs money but works well.
macOS 15 Sequoia has free choices too. For example, you can use open Wine apps like Wineskin or the PlayOnMac emulator. With these, you do not need to pay anything.
How to Install Wine Crossover on macOS in Mac with M1, M2, M3 & M4
There are two ways to install applications on your Mac. You can use the App Store if you prefer.
Or, you can use Homebrew on the Terminal. Homebrew is a free and open tool manager.
With Homebrew’s big list, you can get packages easily. You can also add Wine to run Windows programs on your Mac.
Using Homebrew for this is quite easy. As a result, you can open EXE or MSI files without any issues.
1. How to Install Homebrew
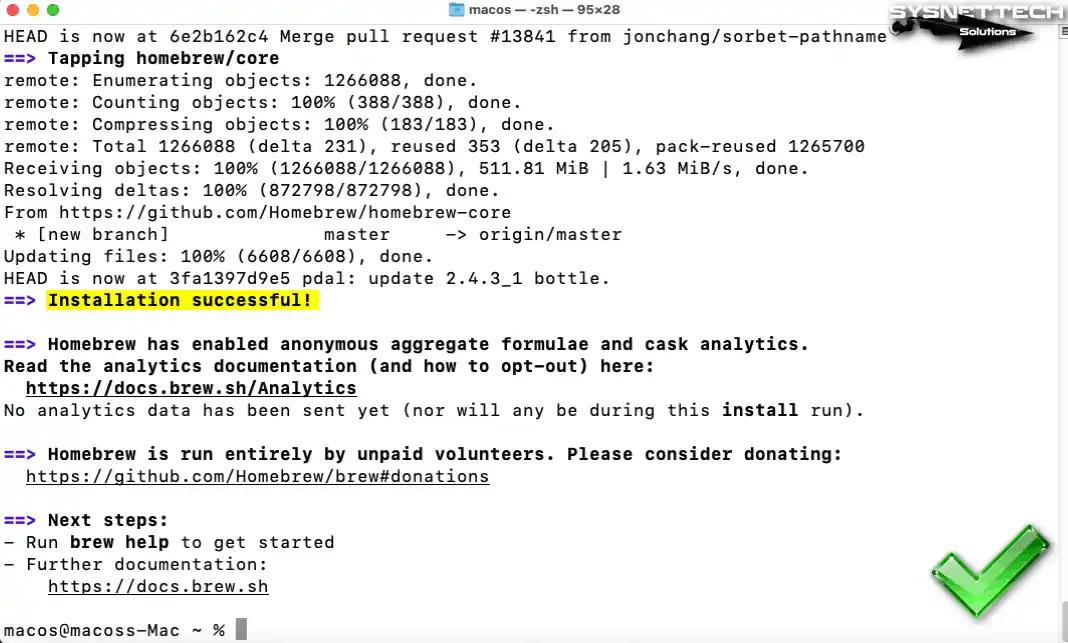
Step 1
To add Wine, you first need the Xcode tools. When you type a special command in the terminal, Homebrew will put it in for you. This way, you will get the Xcode tools with no trouble.
/bin/bash -c "$(curl -fsSL https://raw.githubusercontent.com/Homebrew/install/master/install.sh)"
Step 2
After Homebrew is in, you will get an “Installation successful!” note in Terminal. You can learn more on its leading site. For one, you can see complete guides on the Homebrew Docs page.
Step 3
After you put in Xcode and Homebrew, you can add WineHQ. Just type “brew install –no-quarantine gcenx/wine/wine-crossover” in the terminal. In short, this will let you set up Crossover with no issues.
brew install --no-quarantine gcenx/wine/wine-crossoverWhen you read the warning in the terminal output, you will see that it creates a default 64-bit prefix.
But you must set up things by hand for 32-bit apps. For example, you can make a 32-bit space with the command “WINEARCH=win32 WINEPREFIX=~/.wine32 winecfg”. So, this will fix EXE file problems.
WINEARCH=win32 WINEPREFIX=~/.wine32 winecfg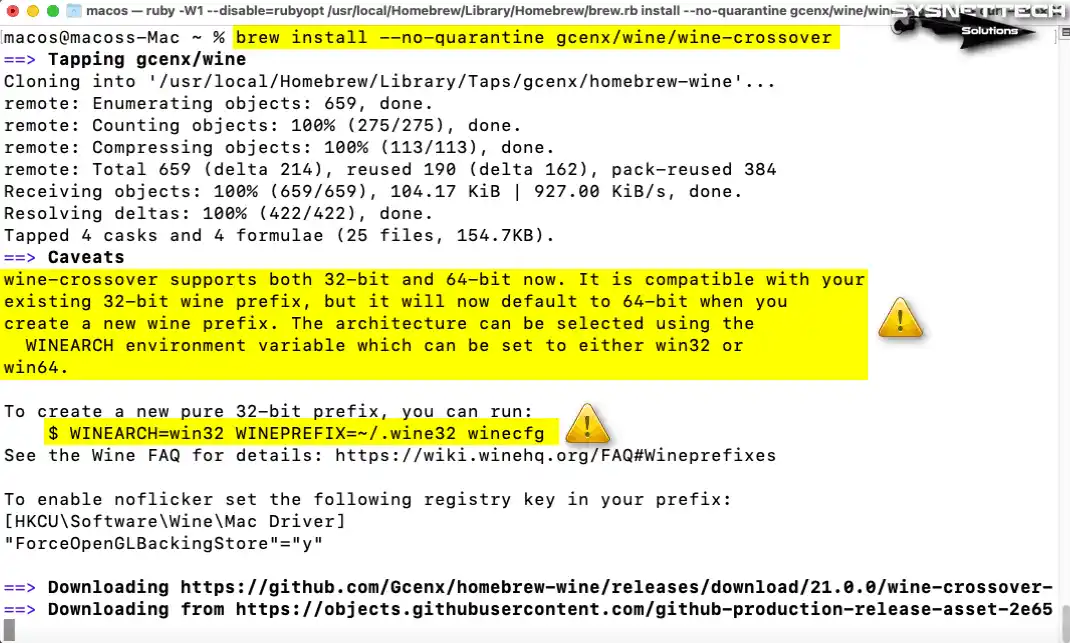
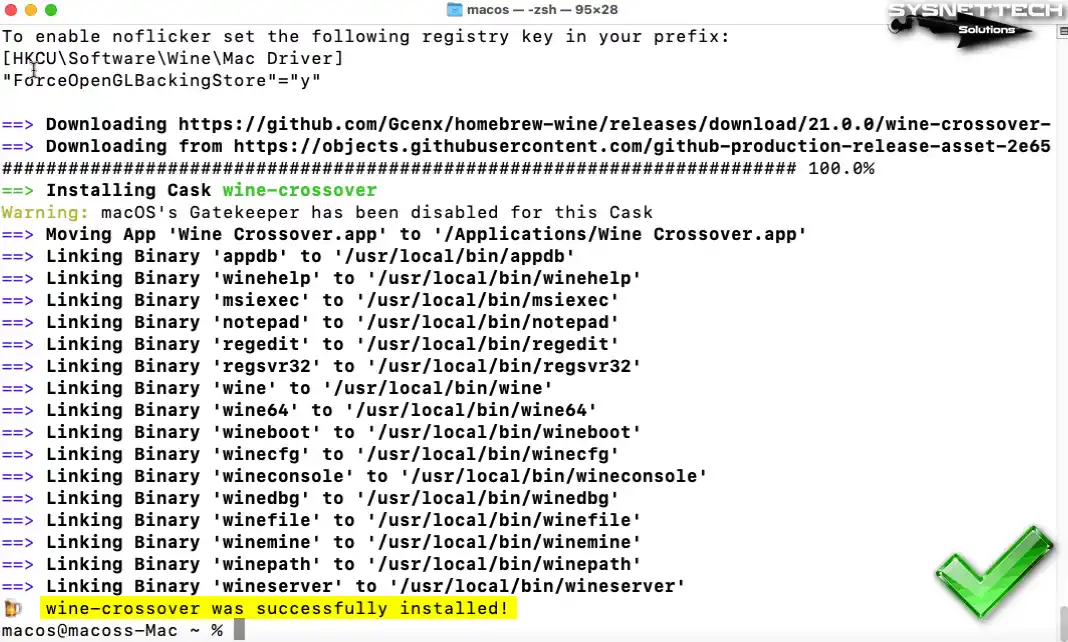
Step 4
When you put Wine-Crossover into help apps run well, the Gatekeeper is off. This allows you to see in the terminal that the cross tool has finished.
Step 5
To start Wine, open the Apps folder. Then click twice on the Crossover app sign. You can know the program is on by the terminal box that shows up with no screen. Here you can see the version facts and the use steps.

Step 6
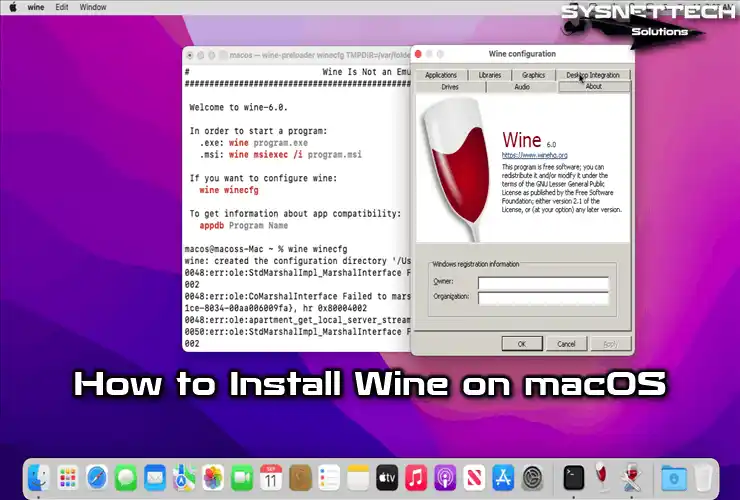
To see the WineHQ setup screen, type “wine winecfg” in the terminal, and then press the “About” tab.
Here you can check the program version. You can also pick a new default OS version.
wine winecfg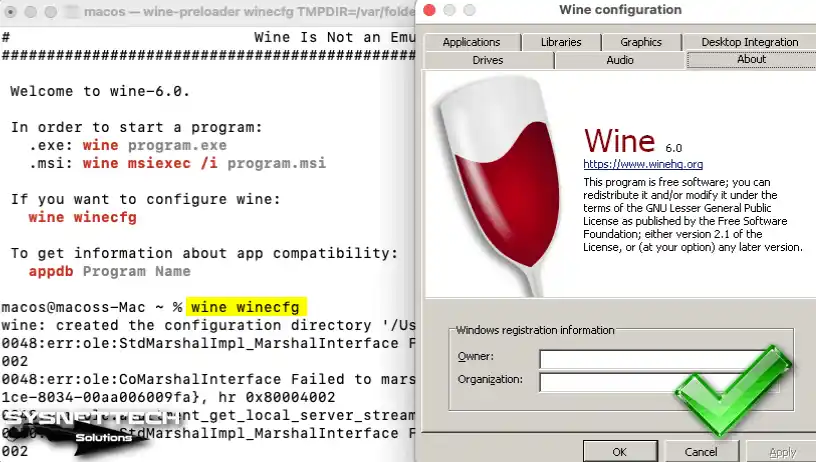
2. How to Install a Windows Program
After you put Wine on your Mac, you can finish putting in EXE files. For one, when you double-click on a 64-bit app to open it, the setup helper will begin at once.
Step 1
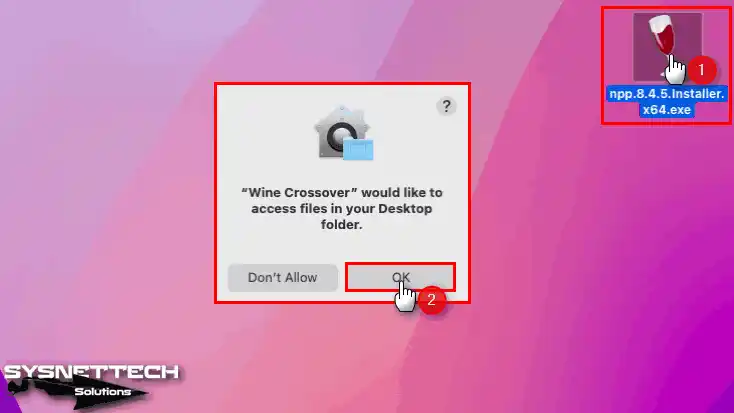
You can put in Notepad++, a good note app, with WineHQ. First, get the newest copy from the leading site. Then, click the EXE file two times to begin the setup.
The Installer.exe file you got will show the Wine sign as its picture. Click twice to begin the setup, then WineHQ will ask to use your desktop folder. You must say yes to this, so press OK.
Step 2
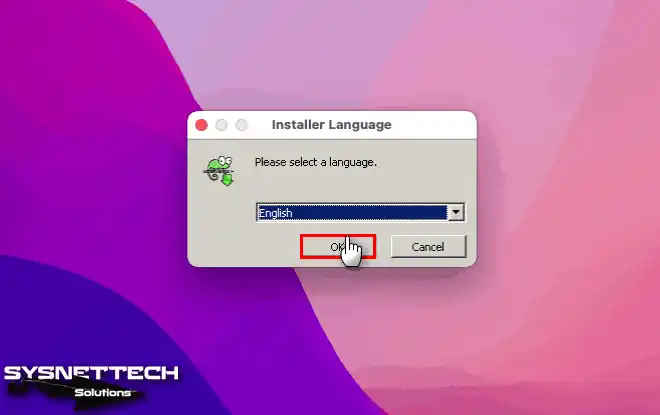
When you start the Notepad++ setup helper on your Mac, pick the language for your app.
Step 3
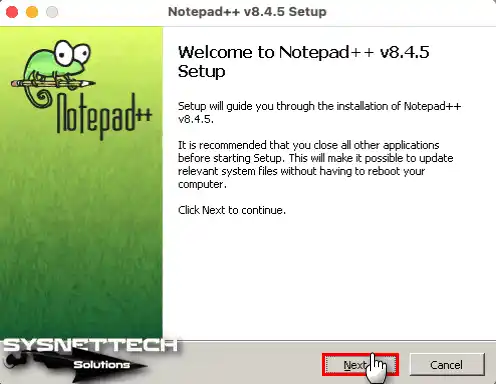
After you pick your language, press the “Next” button to begin the setup.
Step 4
Click the I Agree button to read and accept the license agreement of the Note application.

Step 5
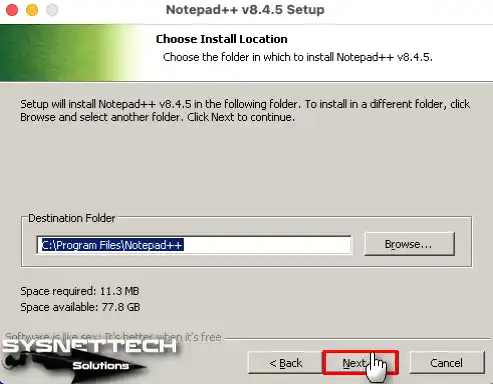
Please do not change the program’s install place. Then, let the install happen in the spot the wizard says and click Next.
Step 6
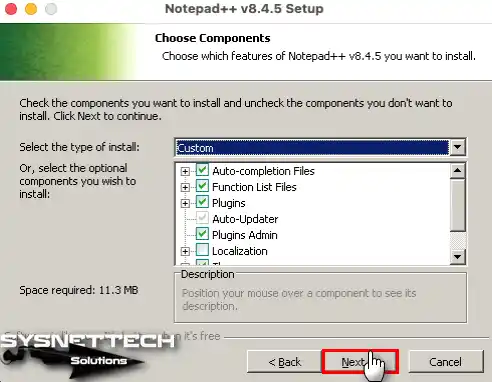
If you use this program for work, I think you should set up the parts.
Step 7
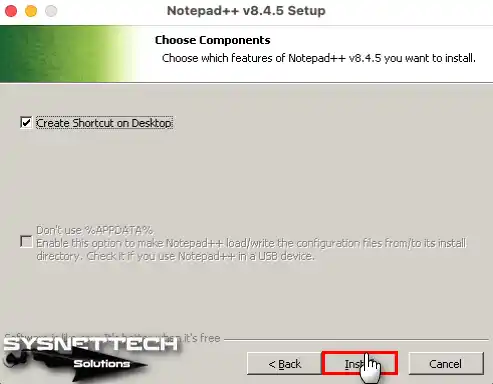
Please choose to create a desktop shortcut and press Install.
Step 8
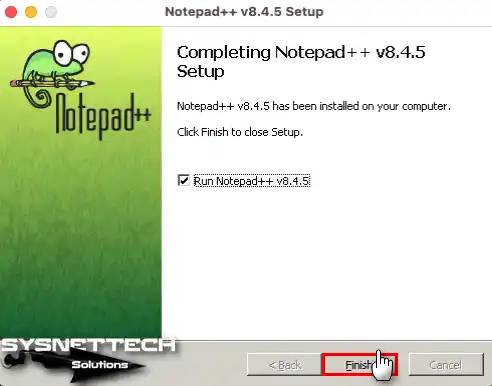
Install Notepad on your Mac. Then, click Finish to open it right away.
Step 9
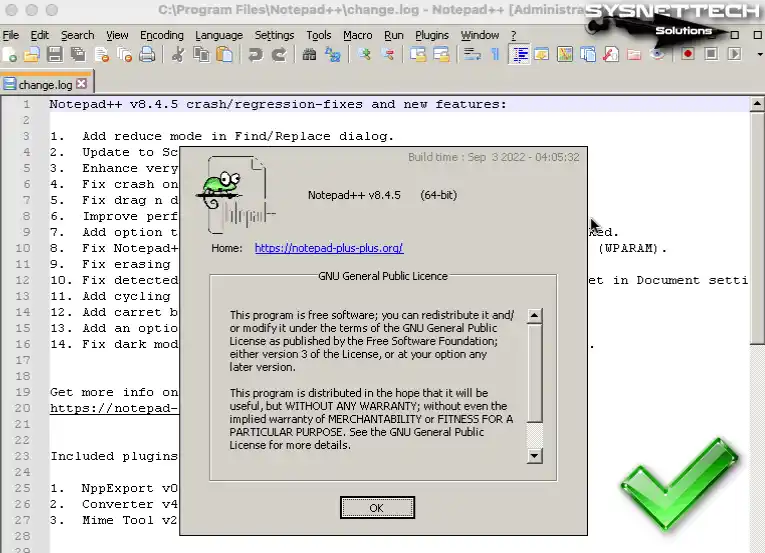
Once the program opens, go to the Tools menu. Then, select “?” and then “About.” This way, you can easily check the software version.
Step 10
If you want to rerun the Windows program, first open the terminal. Then, run the command “wine start ProgramName.exe”.
wine start notepad++.exe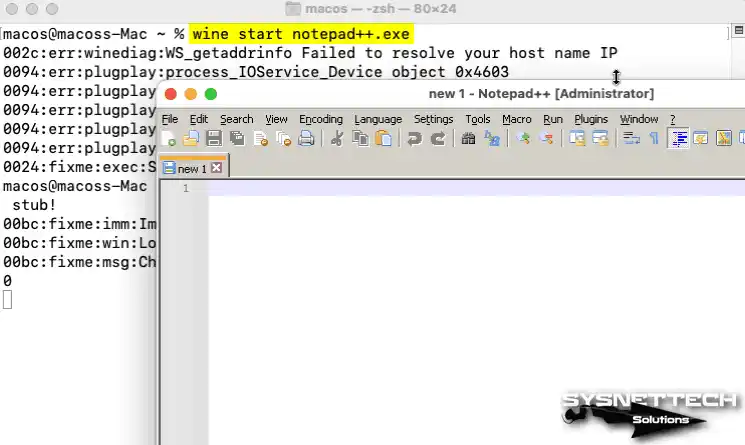
3. How to Uninstall Wine from macOS on a Mac PC
If you do not want Wine-Crossover, you can take it off. You should delete all of it, if you will use a different program you pay for.
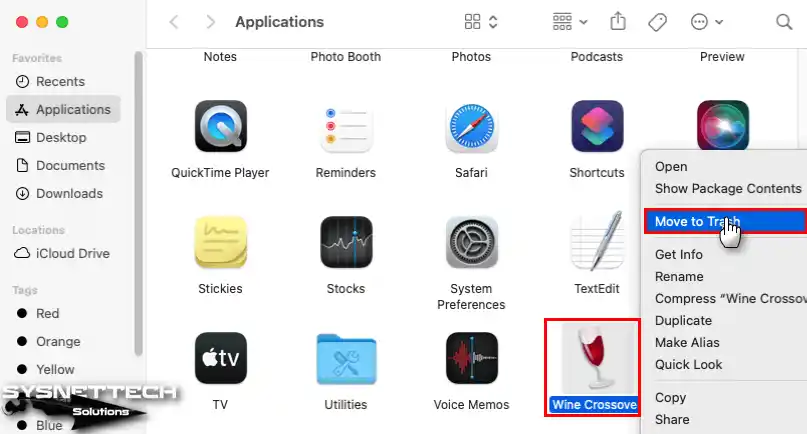
Step 1
First, open the Apps folder. Then, right-click on Wine Crossover. Then, click “Move to Trash.” After you remove the app, remember to take out the trash.
Step 2
Open the terminal to take out Wine-Crossover links. Right after, type the command “brew uninstall gcenx/wine/wine-crossover”.
brew uninstall gcenx/wine/wine-crossover
Step 3
If you no longer need Homebrew, you can also remove it. First, open the terminal and then run the command below. Finally, answer the question that appears with “Y”.
/bin/bash -c "$(curl -fsSL https://raw.githubusercontent.com/Homebrew/install/master/uninstall.sh)"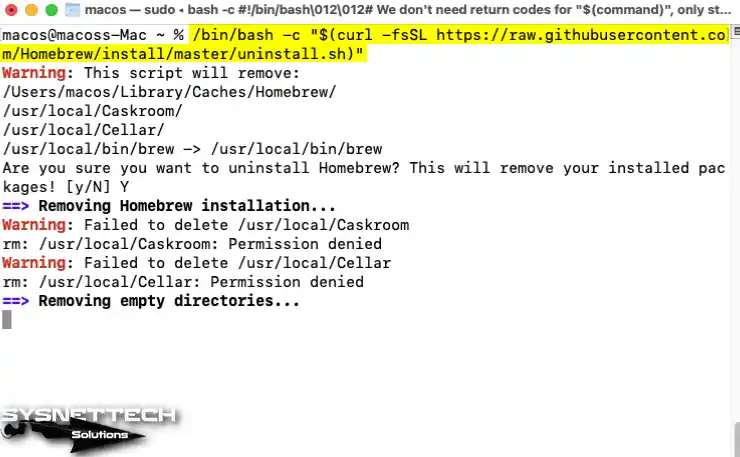
Step 4
Finally, delete the remaining files related to WineHQ. First, locate them using the “mdfind Wine” command. Then, delete these files using the “sudo rm -rf” command.
sudo rm -rf '/usr/local/Homebrew/Library/Taps/gcenx/'
sudo rm -rf '/usr/local/Homebrew/Library/homebrew'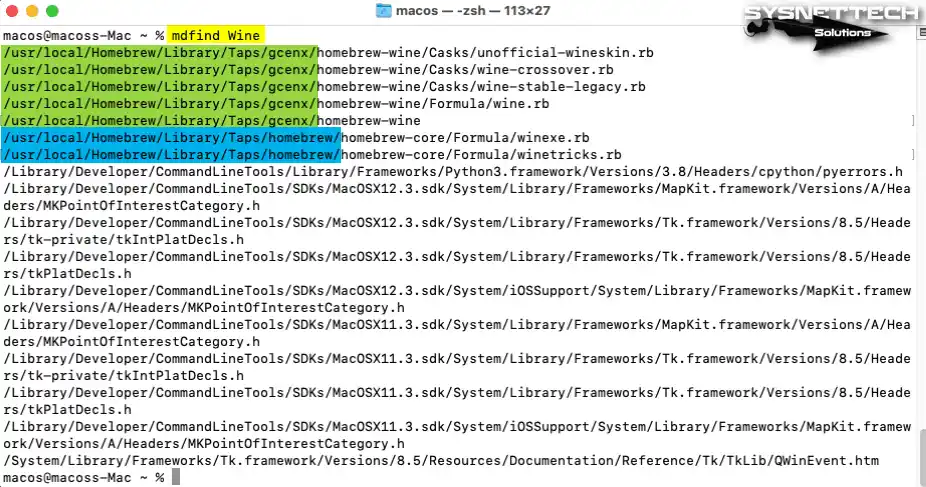
Video

Installing WineBottler on the Old Version of macOS
- Click the Wine-for-Mac.zip file and wait for it to open.
- Click the program two times to start WineHQ. Then, shut the Winetricks and General Choices windows.
- First, click the Add button on the Change Prefix screen.
- First, enter a folder name for a Windows program or game. Now, specify where this folder is. As the last action, hit Save to apply changes.
- Please wait while the wizard makes the prefix. Press OK when the prefix is OK.
- First, get a Windows app. Then, click the setup file twice to open it with WineHQ. Next, click the Go button.
- When the Windows app setup runs, set up the program.
Installing Old Versions
Frequently Asked Questions (FAQ) About Wine
- What is Wine Crossover?
- Why won’t my Mac computer run Windows programs on its own?
- What are the advantages of using Wine over Boot Camp?
- Can I run 32-bit Windows software on my Mac?
- Can I run all Windows EXE files?
Conclusion
In conclusion, Wine Crossover is an excellent solution for macOS 15 Sequoia. It is especially ideal for Mac users with M1 and M2 chips.
This helps you run your Windows programs, like EXEs, with no trouble. Also, this helpful tool is perfect for daily use.
You can also use things like Wine, Boot Camp, or a virtual machine. However, it stands out for its efficiency and ease of use.
This way, you don’t need to dual-boot. In other words, you will not face hard-to-do, heavy work installations.
Simply follow the steps I mentioned to install Wine or Crossover. As a result, you will regain access to your essential Windows software. Plus, you will have made a seamless transition to the Mac environment.
In short, you may want to use productivity tools like Microsoft Office. So, by learning how to use WineHQ, you can do more work on your Apple device.
To be clear, Wine is not just for simple apps. You can also run professional network tools and terminals like SecureCRT with good results. I want to stress this point. It works as a great bridge for system administrators. You can have a similar experience soon.

11 People Shared Their Experience
Is it compatible with Mac Mojave 10.14 tho . cause I tried to use app PKHEX and the scroll and move function didn’t work and it crashed …..
The version of WINE compiled by gcenx from the open-source Crossover code is for MacOS 10.15 Catalina and later, it will not work on MacOS 10.14 Mojave or earlier. If you are running MacOS 10.14 Mojave, you should use gcenx’s modified version of the latest wine-stable which addresses a bug in the version of wine-stable currently being distributed. You can install gcenx’s version by running this Terminal command after installing Homebrew:
brew install –cask –no-quarantine gcenx/wine/wine-stable-legacy
Hi, when I click on the Download software link I get the following error message.
Sorry, the file you have requested does not exist.
Please advise. Much thanks
Hey, when installing wine-crossover, you need to use the command “brew install –cask –no-quarantine gcenx/wine/wine-crossover” now. Just thought you’d like to know
It’s very useful! After I installed wine-crossover, I tried to run some exe. apps on it. But there’s an issue, how to install other languages on wine-crossover?
After using the command “brew install –no-quarantine gcenx/wine/wine-crossover” I get a message “command not found; brew”
Any ideas to get past this?
never mind, I figured it out.
How did you solve it?
I got the same message and
I noticed that I had this message when I re installed it to start all over again
HEAD is now at 518fb4311 Merge pull request #15656 from osalbahr/silverbrew
Warning: /opt/homebrew/bin is not in your PATH.
Instructions on how to configure your shell for Homebrew
can be found in the ‘Next steps’ section below.
==> Installation successful!
Looks like the wine crossover cask is not available any more, I’m getting No casks found