

In this article, we will examine Windows Vista setup on a new virtual machine. Then we will use VMware Workstation 17 Pro on a Windows 10 PC.
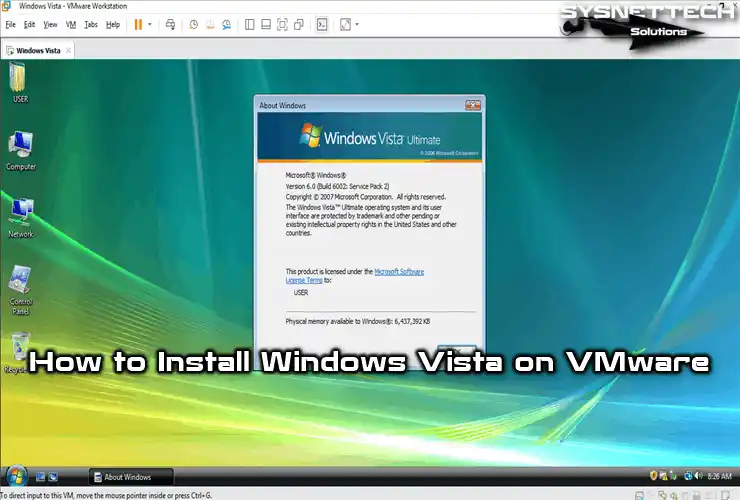
How to Set Up Windows Vista on Windows 10 using VMware Workstation 17 Pro
Microsoft released Windows Vista on January 30, 2007. This OS is a member of the Microsoft operating system family. However, Microsoft retired it entirely on April 11, 2017.
The main goal of Windows Vista was to fix security issues in Windows XP. Microsoft also designed the Aero feature for the first time with this system. Moreover, the most prominent feature of Vista was the Sidebar.
Windows Vista Ultimate 64 Bit is an old operating system. For this reason, you can install and run it on a virtual machine. You do not need to install this system on your physical computer. Thus, you can use the Workstation program.
You can start running virtual machines right away by following our VMware Workstation Installation guide. We break down every step clearly so you can get set up in minutes.
How to Create a New Virtual Machine for Windows Vista
After installing VMware Pro, open the program. Then follow the steps below to create a new virtual computer for Vista. After creating and preparing the VM, you only need an ISO image file.
Download the Windows Vista Ultimate x64 SP2 ISO file for VM Workstation. Then follow the steps below.
Step 1
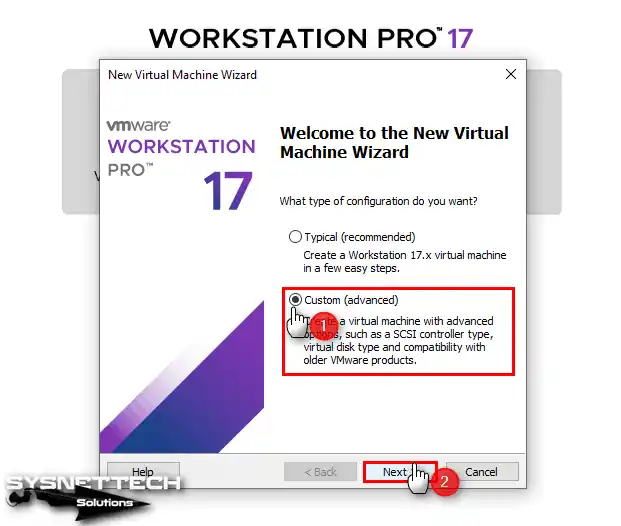
Run VMware Workstation 17 Pro. Click the Create a New Virtual Machine option on the homepage. In the wizard window, select Custom (Advanced). Then click the Next button.
Step 2
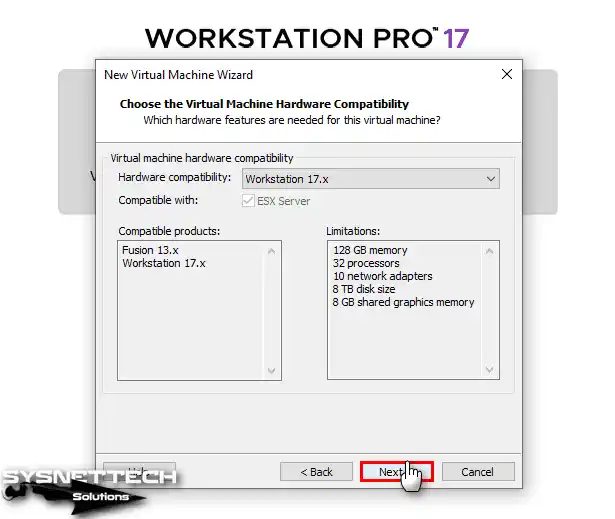
Configure the hardware compatibility as Workstation 17.x. If your host has an older VMware version, you will see that version in Hardware Compatibility.
Step 3
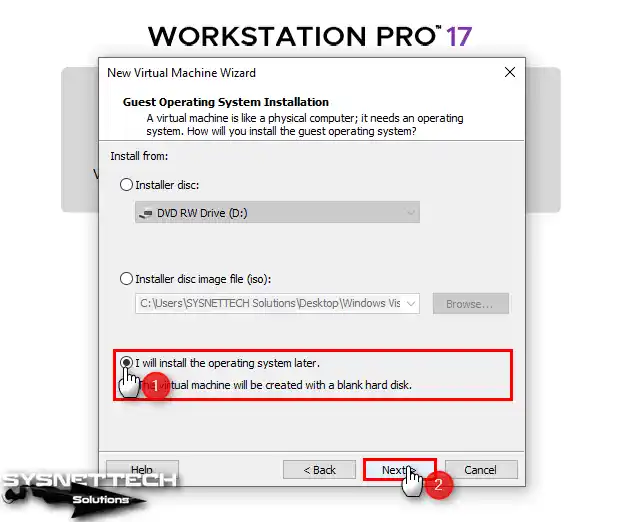
In this window, choose how to install the Guest operating system. For more detailed configuration, check I will install the operating system later. Then click Next.
Step 4
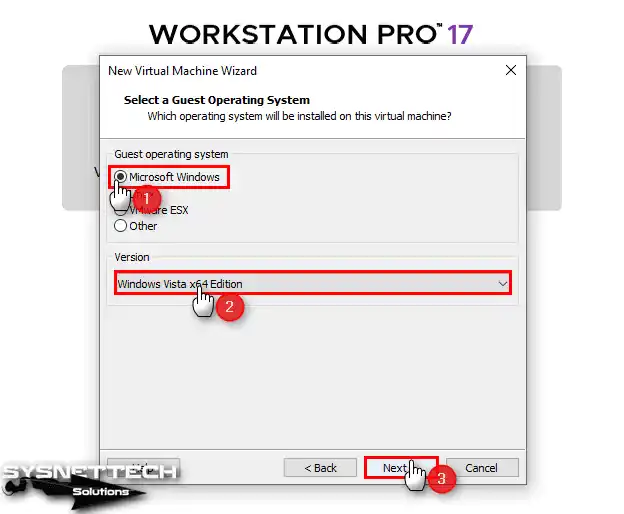
In the Guest operating system type window, first select Microsoft Windows. Then select Windows Vista x64 Edition from the Version section. Finally click Next.
Step 5
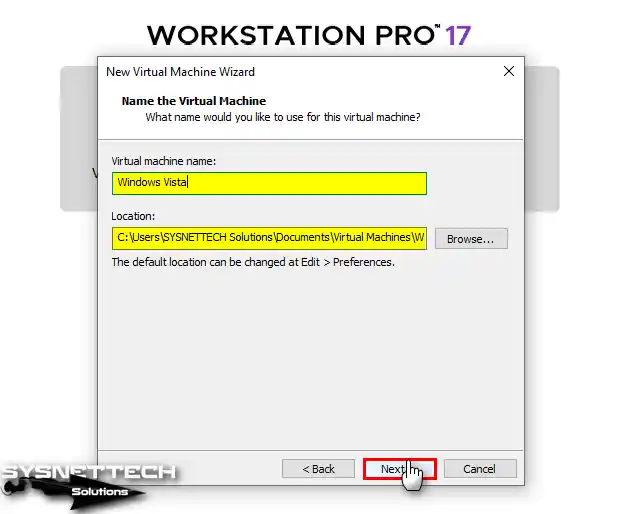
Type a name for the VM in the library. Select the location where you will install it. Also, we recommend an external hard drive for better performance.
Configuring Virtual Hardware and Firmware
Step 1
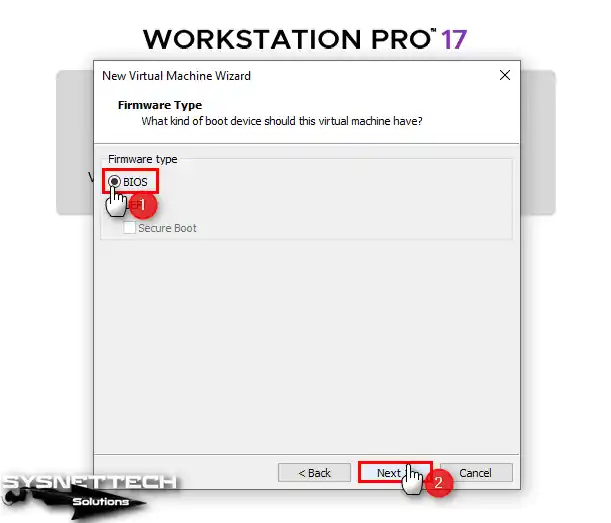
Vista is an old system. For this reason, select BIOS as the firmware type. Then click Next.
Step 2
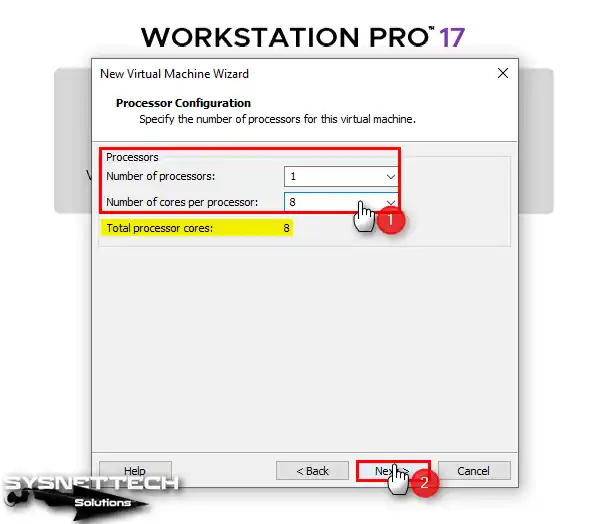
Configure as many processors and cores as your host supports. However, old operating systems may not support multiple processors. For this reason, set the number of processors to 1. Also set the number of cores to 1. This value suits your host’s processor hardware.
Step 3
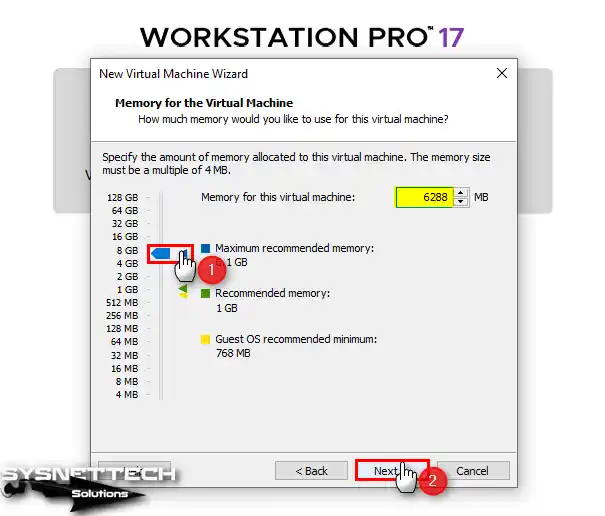
Likewise, set a RAM value for the VM according to your host’s RAM capacity. Then click Next to continue.
Step 4
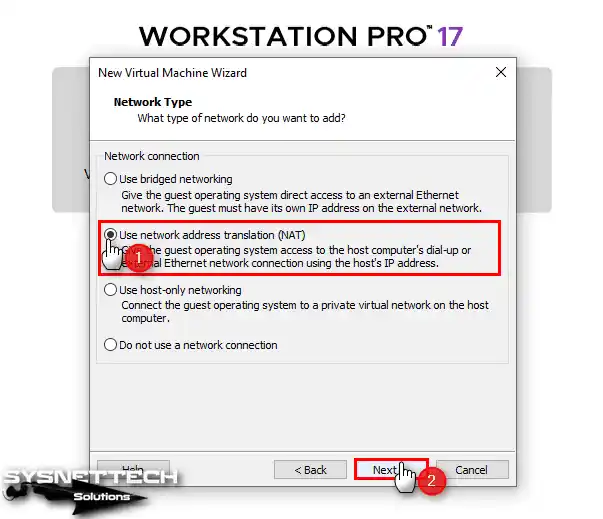
As the network type, continue with NAT selected by default. However, to get an IP address from your host’s IP block, use the Bridged network type.
Step 5
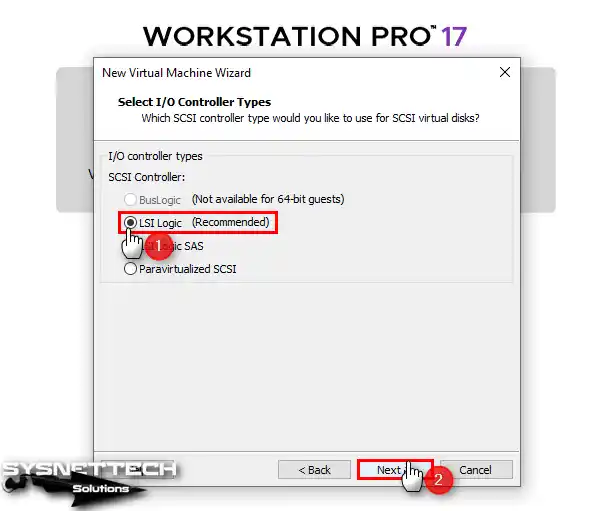
In the I/O Controller window, select the controller type for SCSI virtual disks. Here, proceed with LSI Logic selected by default.
Configuring Disk Type and Creating Virtual Disk
Step 1
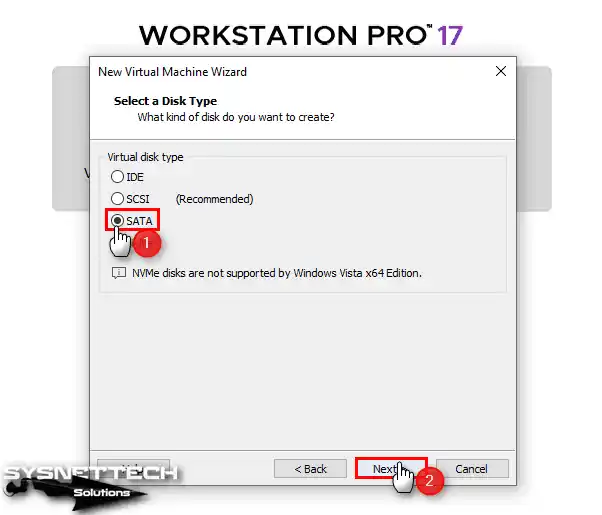
In the disk type window, you can select IDE, SCSI, and SATA. The NVMe disk type is inactive because it is new. Older operating systems do not support it. Select SATA as the most suitable disk type. Then click Next.
Step 2
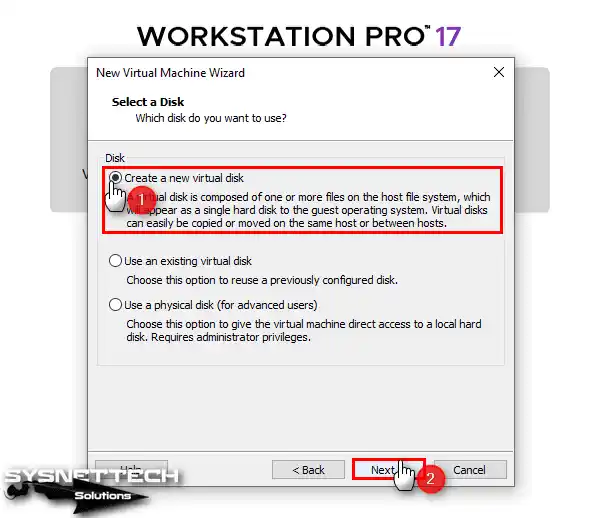
You are installing the system on the VM from scratch. Therefore, you need to create a new disk for the VM. In the Select a Disk window, check Create a New Virtual Disk. Then click Next.
Step 3
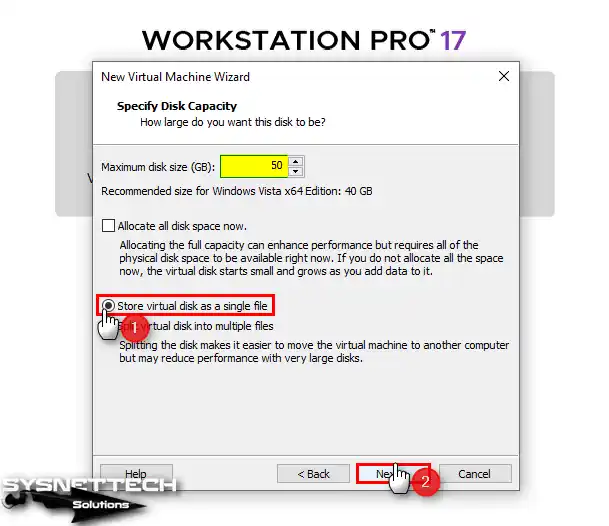
In the disk capacity window, use the recommended 50 GB size for Windows Vista. If you specify a lower capacity, you will see a warning later.
Also, check Store virtual disk as a single file. Then click Next. This backs up the virtual disk file as a single file type on your host.
Step 4
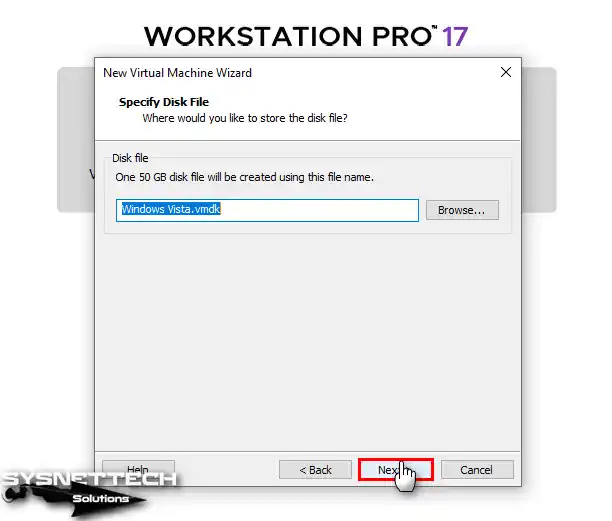
You can configure the backup location for the virtual disk file. If you install the VM on an external HDD, VMware backs up the file there too. Additionally, you can change the virtual disk file name.
Customizing Hardware and Adding the ISO File
Step 1
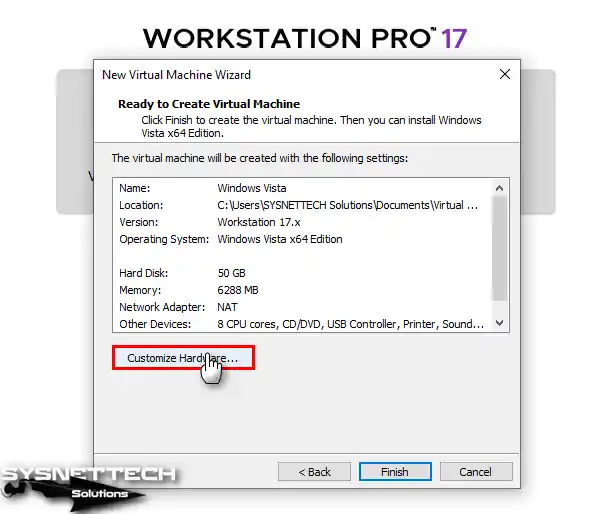
Click Customize Hardware to make changes in the summary window.
Step 2
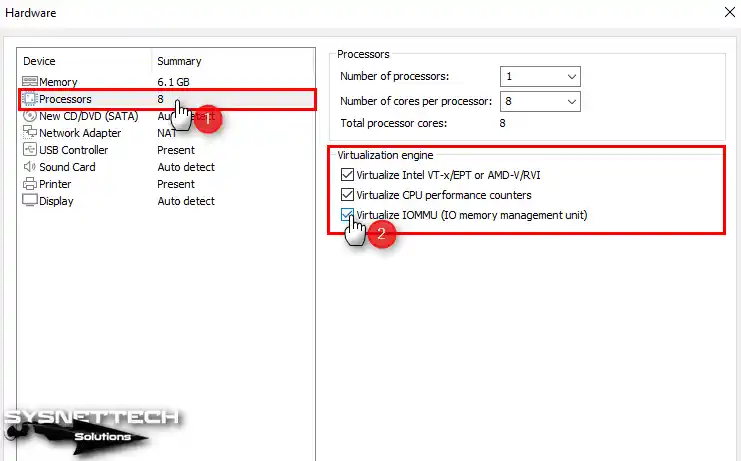
To enable virtualization for better Vista VM efficiency, select Processors from Device. Then tick all options in the Virtualization Engine tab on the right.
- Virtualize Intel VT-x/EPT or AMD-V/RVI
- Virtualize CPU Performance Counters
- Virtualize IOMMU (IO Memory Management Unit)
Step 3
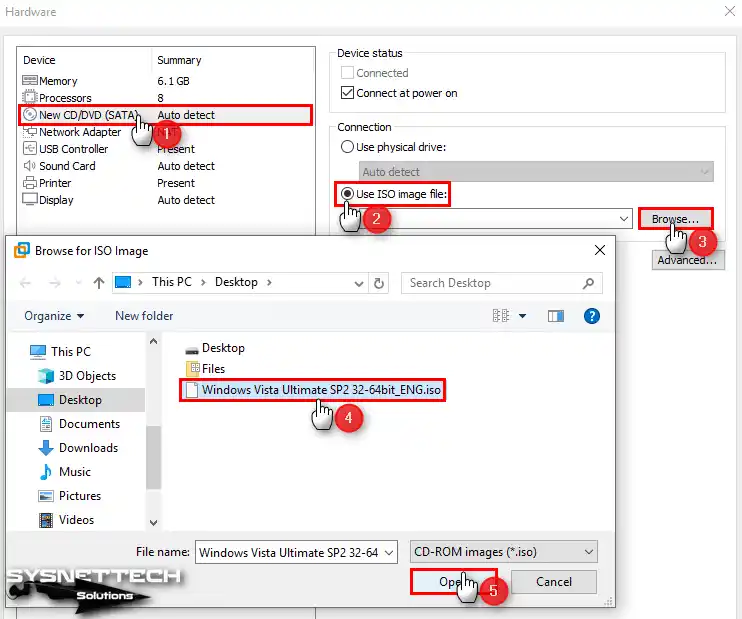
Now, click the CD/DVD device to add the ISO file. In the Connection section, enable Use ISO Image File. Then click Browse.
Select the Windows Vista Ultimate SP2 ISO file you downloaded. Click Open to add it to VMware. Then close the hardware window.
Configuring USB, Graphics, and Finalizing
Step 1
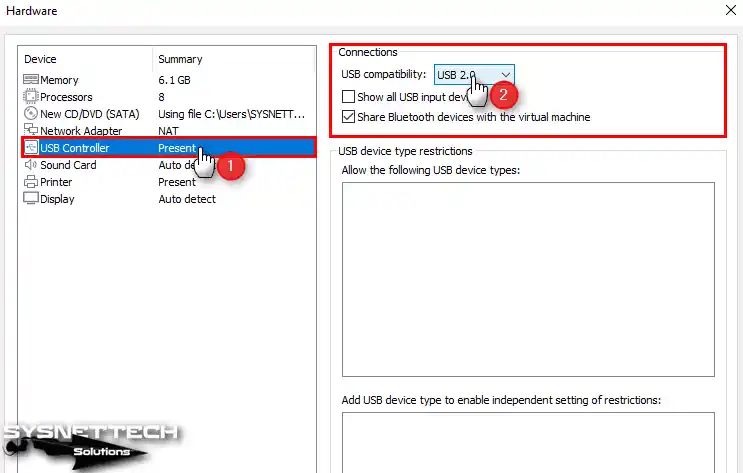
Check that the compatibility mode is USB 2.0 in the USB Controller settings.
Step 2
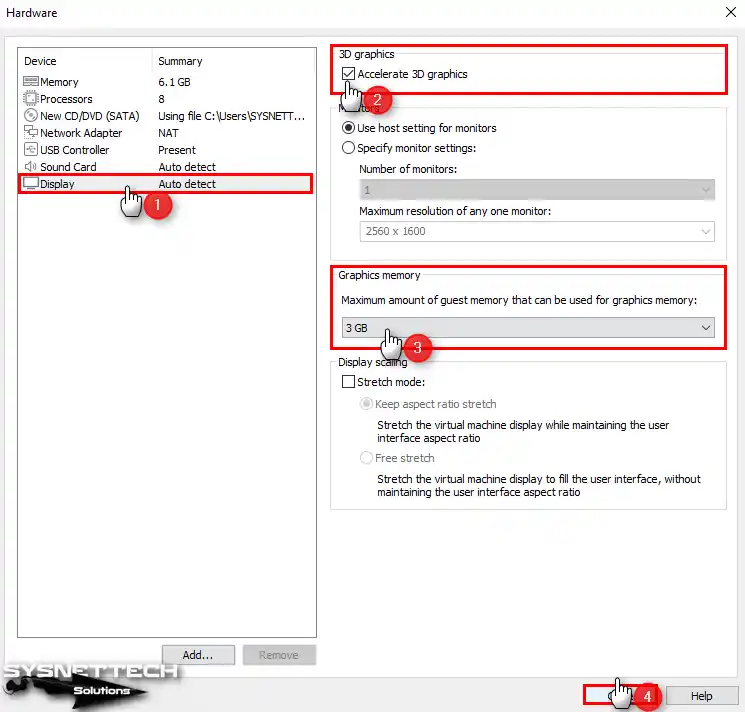
Increase the graphics memory of the virtual computer. This gives more efficiency from programs on the VM. Select the display device. Then set a value equal to half of the VM’s RAM in Graphics Memory.
Step 3
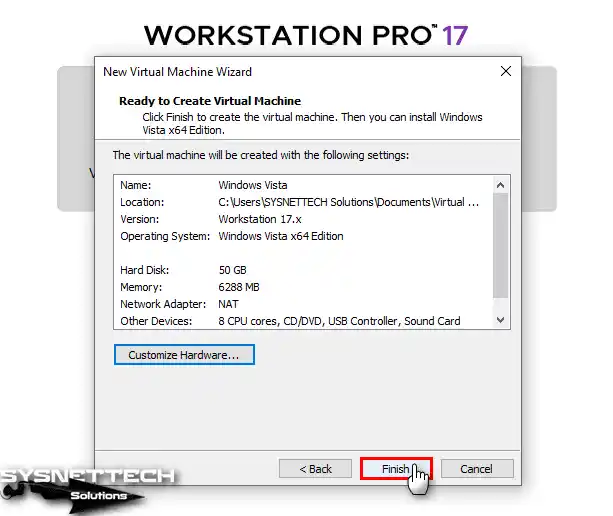
After making all the necessary preparations to install Windows Vista with VMware, click the Finish button.
Step 4
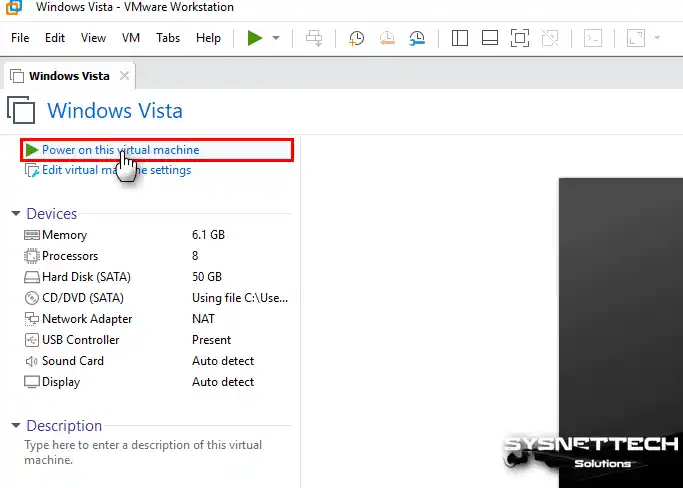
The virtual PC appears automatically in Workstation Pro. Click Power on this virtual machine to run it.
How to Install Windows Vista
After completing the virtual machine creation, start the installation by running the VM. From this step, proceed as if you are installing on a physical computer. So, the Windows installation here uses the ISO image file.
Step 1
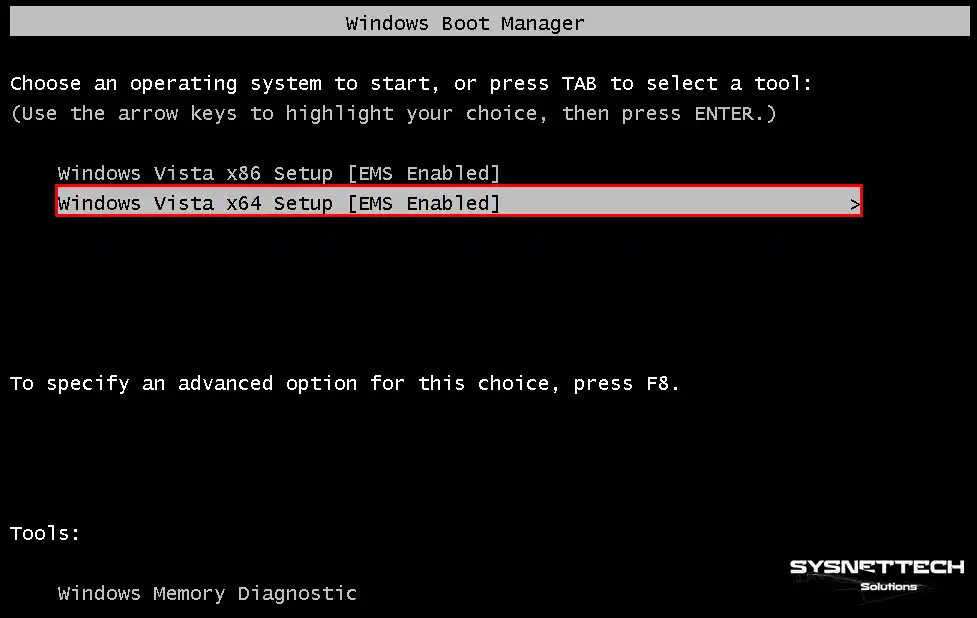
Press Enter on Windows Vista x64 Setup [EMS Enabled] in the Windows Boot Manager screen.
Step 2
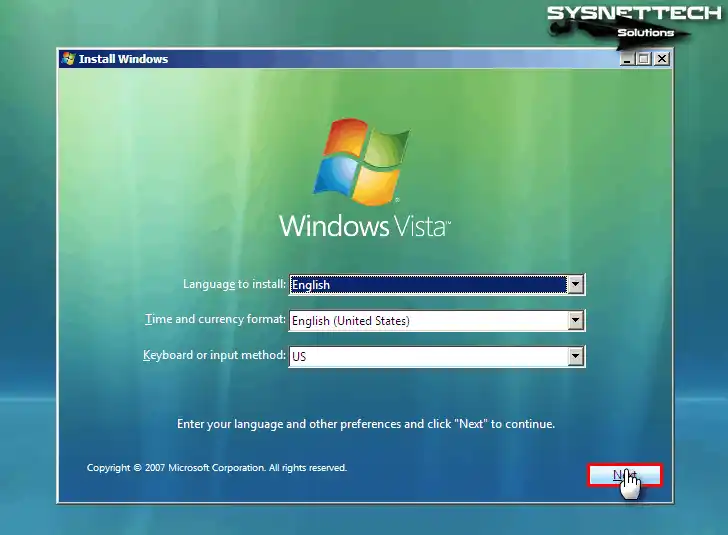
For Windows Vista, select the system language, time, and currency. Also select the keyboard layout. Then click Next.
Step 3
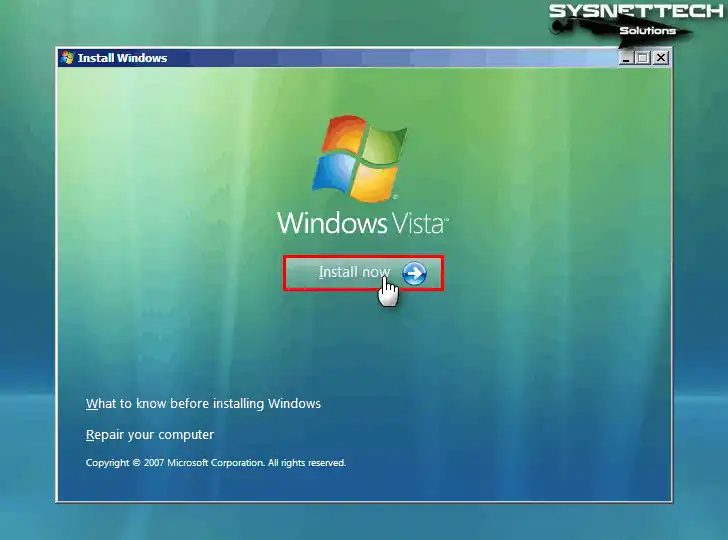
Click the Install Now button to start the installation of the operating system.
Step 4
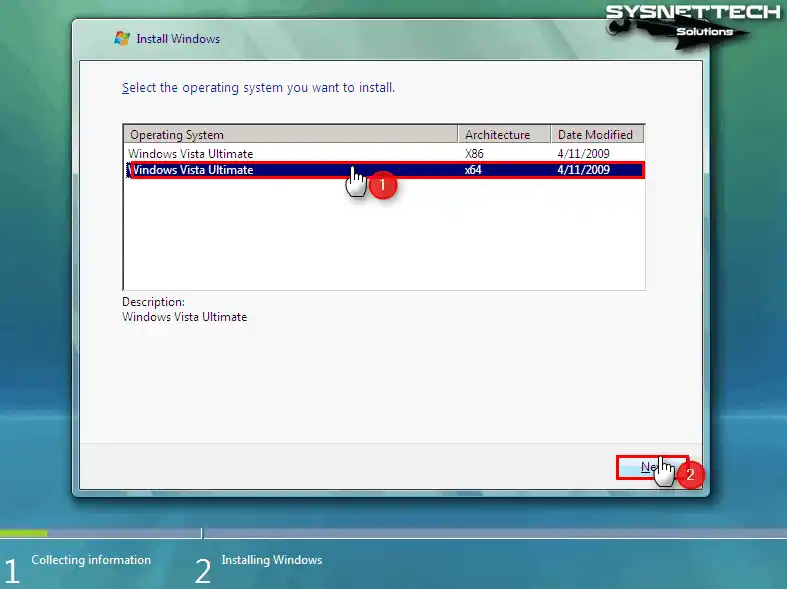
Select the architecture type of the operating system you want to install. If you use other ISO files, you may not see x86 or x64 here. Since you configured the Guest OS version as x64, select x64 here. Then click Next.
Step 5
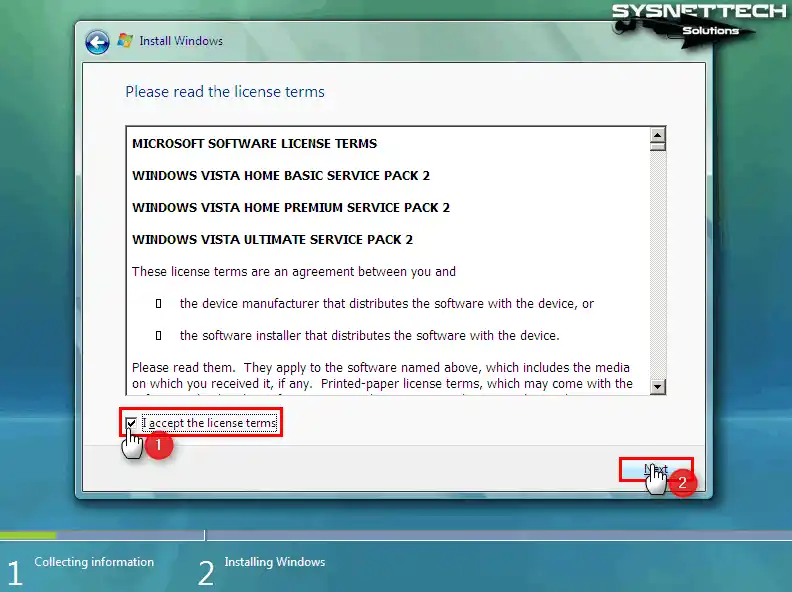
Check I accept the license terms for Windows Vista Service Pack 2. Then click Next.
Partitioning the Virtual Disk
Step 1
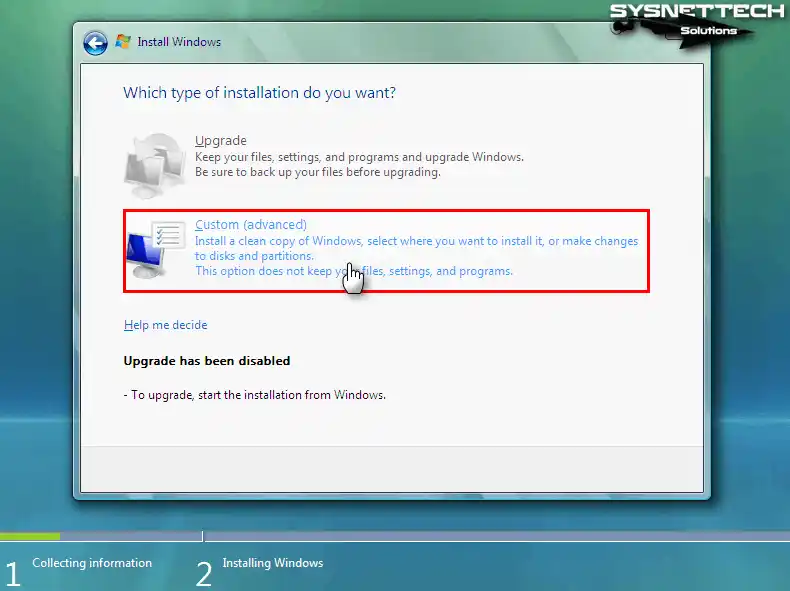
If you had a previous system, you could use the Upgrade option. However, you are installing from scratch on the VM. For this reason, click Custom (Advanced).
Step 2
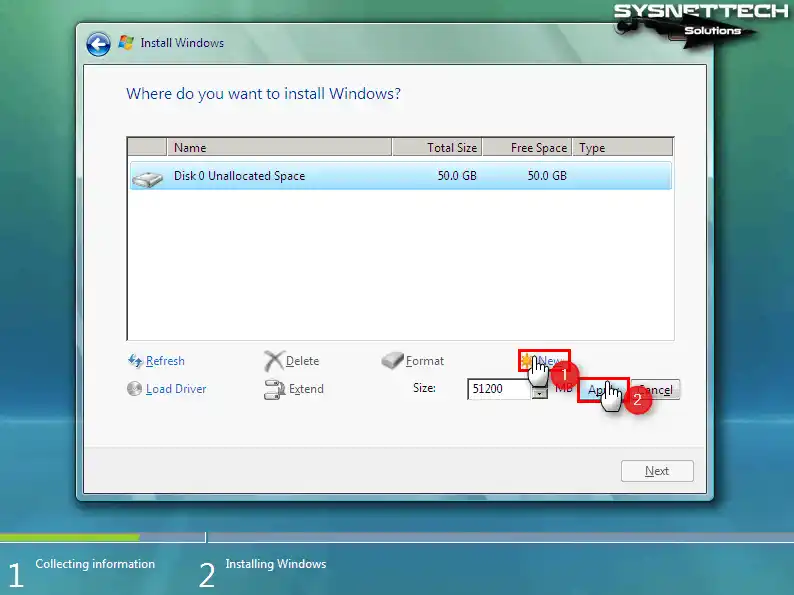
Click Drive Options to configure the virtual disk. Then click New and Apply to edit the unallocated space.
Step 3
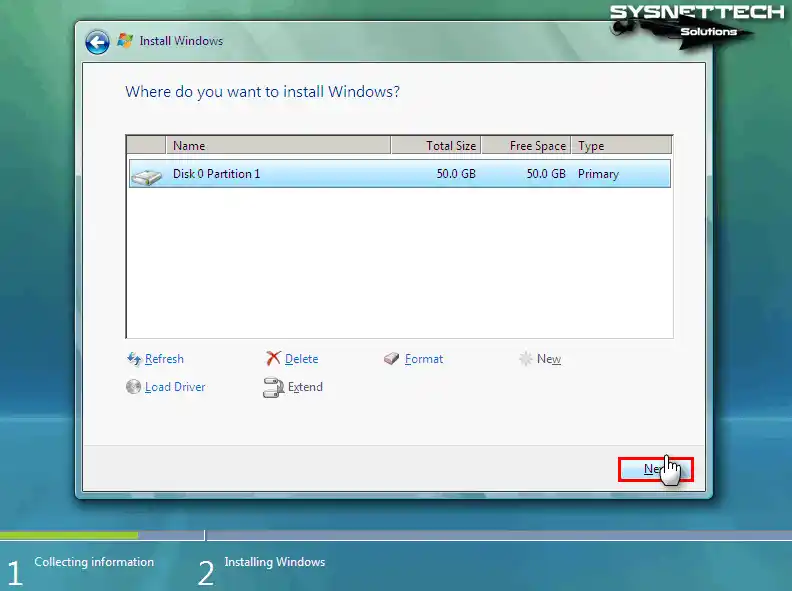
After editing the virtual disk, select Disk 0 Partition 1 and click Next.
Expanding Files and Restarting
Step 1
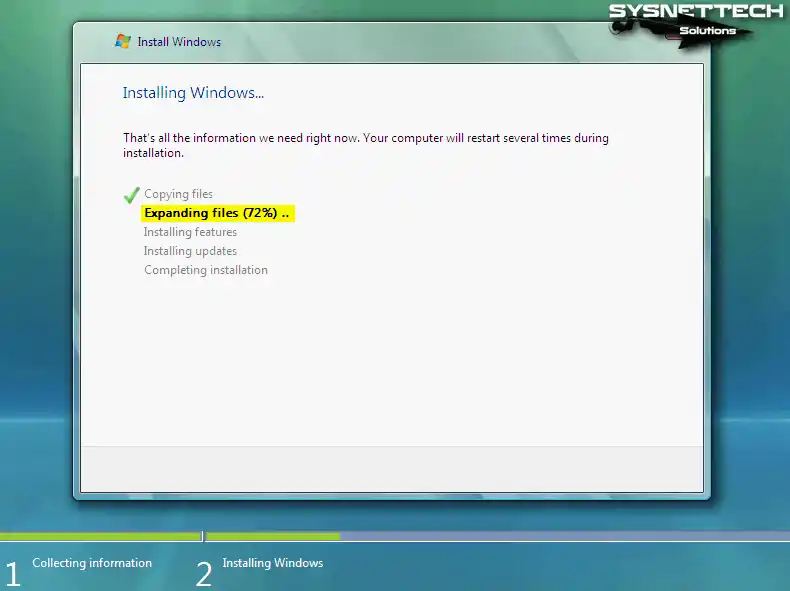
Wait while the setup wizard expands the Windows files.
Step 2
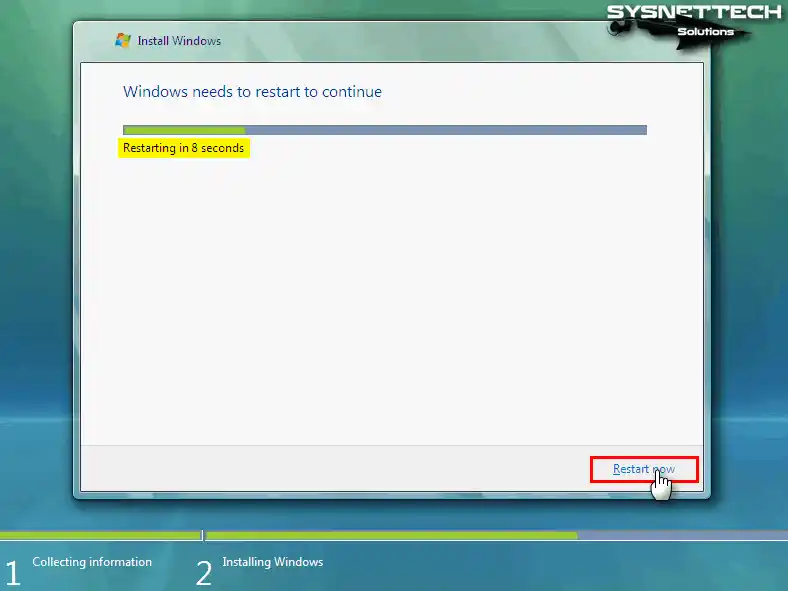
Your system will restart according to the set time. However, click Restart Now to reboot directly.
Configuring User and System Settings
Step 1
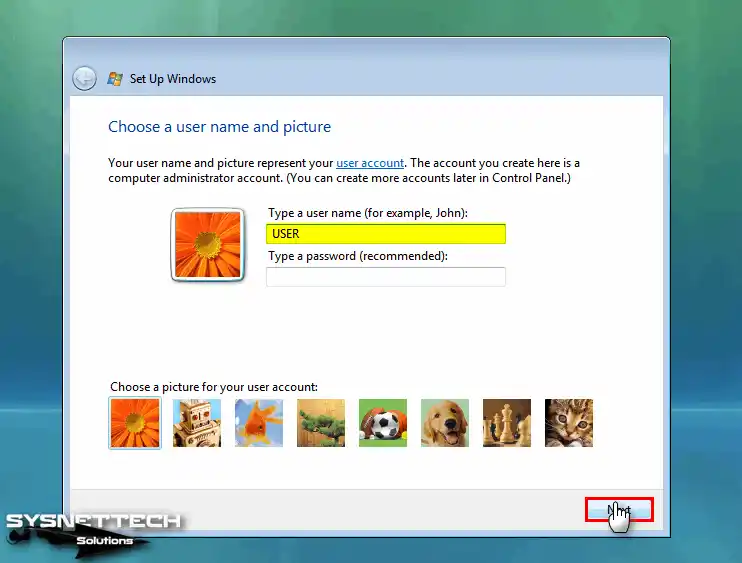
Configure a new username and password in the window that opens. You can also change the user image for your account.
Step 2
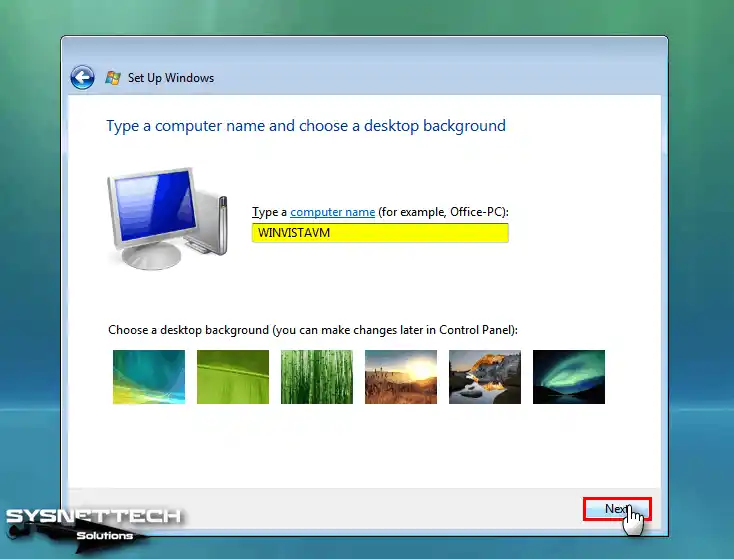
Type the computer name for the virtual PC. You can also change the desktop background here. Later, you can configure it via the Control Panel.
Step 3
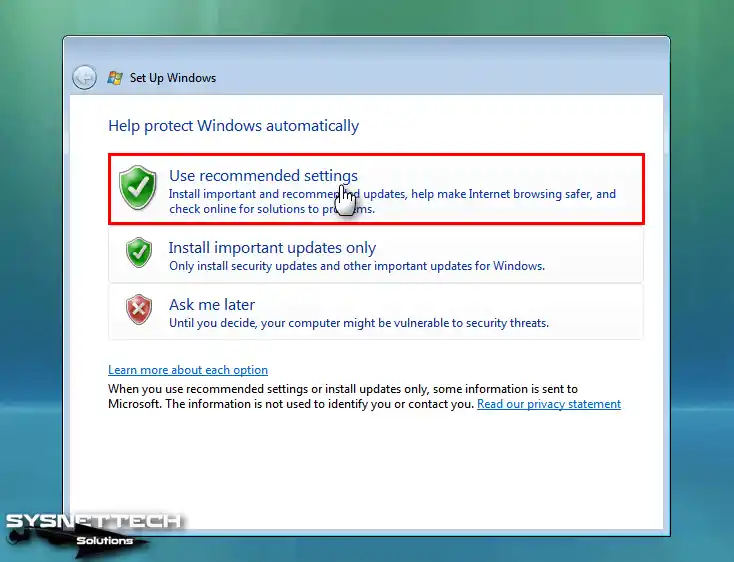
Select Use Recommended Settings to protect your Windows system from external threats and continue.
Step 4
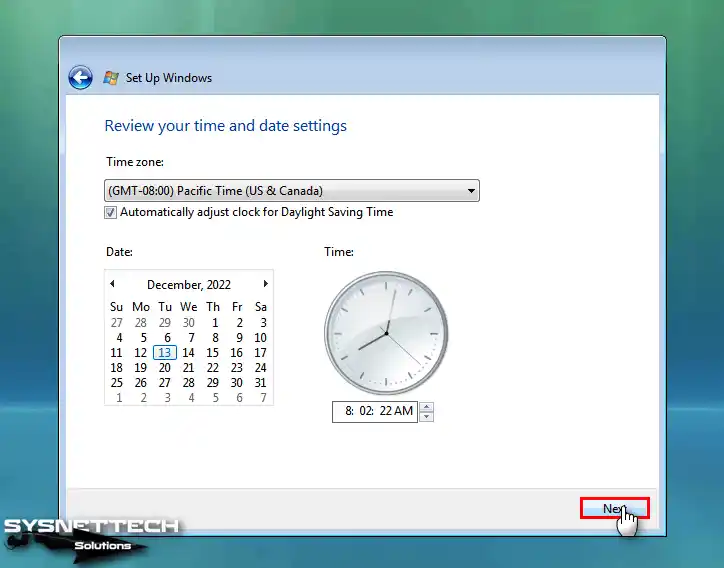
Select the region for your Vista clock settings according to where you live. Make sure the system time is correct.
Step 5
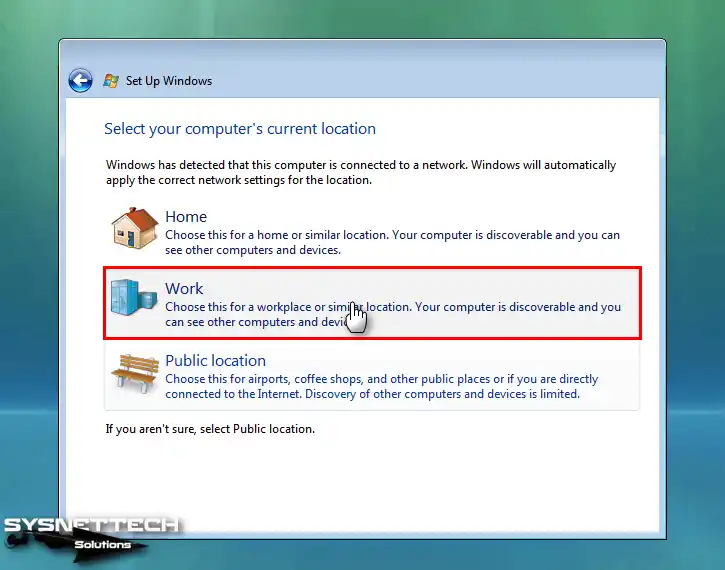
You can configure the physical location of your computer as Home, Work, or Public Location.
Completing Setup and First Boot
Step 1
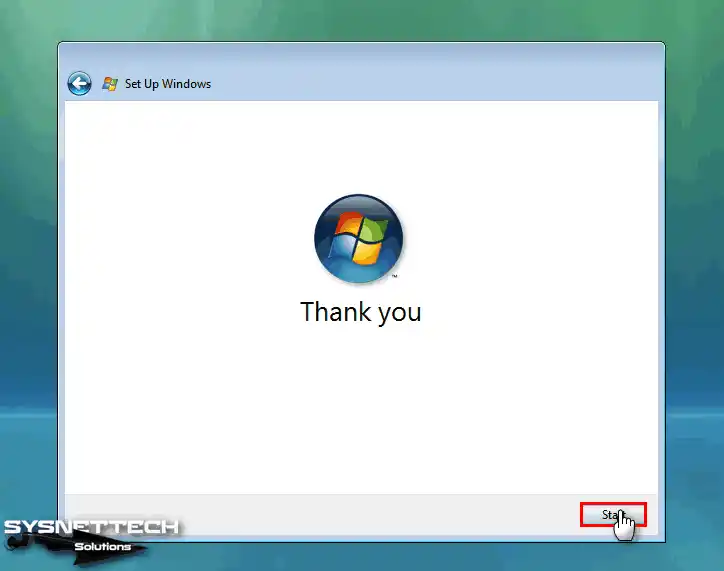
After making the necessary system settings, click the Start button and wait for your system to boot.
Step 2
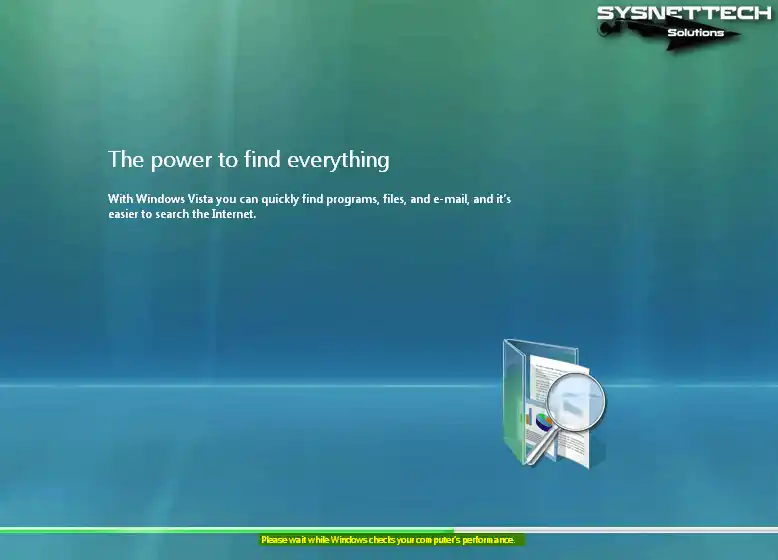
Wait while Windows checks your computer’s performance.
Step 3
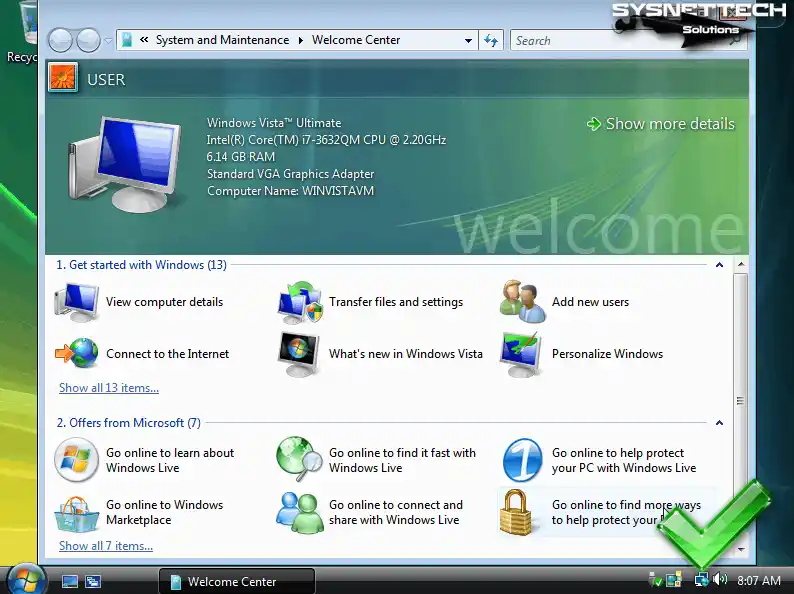
After installation, the Windows Vista desktop screen will look like the image below!
How to Install VMware Tools
After installing Windows or other systems with VMware, you must install VMware Tools. This enables screen resolution, file sharing, and host devices.
Before installing VMware Tools, open Device Manager on your virtual system. Check if the video card and other devices have drivers.
Step 1
Click VM / Install VMware Tools to install drivers for Vista. You may get the error below because Workstation no longer supports this system with its included Tools version. To fix this issue, download version 11.0.6 of VM Tools.
If the VM Tools setup wizard does not open automatically, open My Computer. Then double-click the CD/DVD icon.
Setup cannot contine. This program requires that you have Windows 7 Service Pack 1 (SP1) or greater installed in this virtual machine.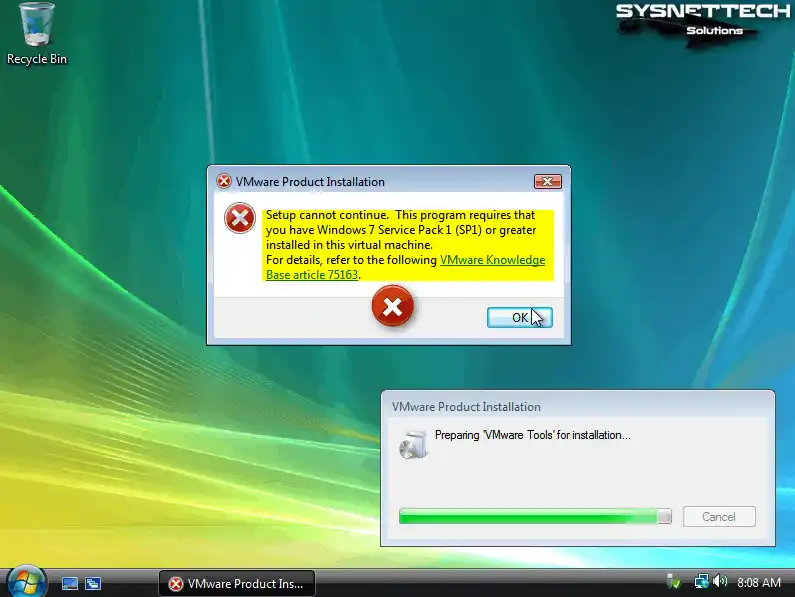
Step 2
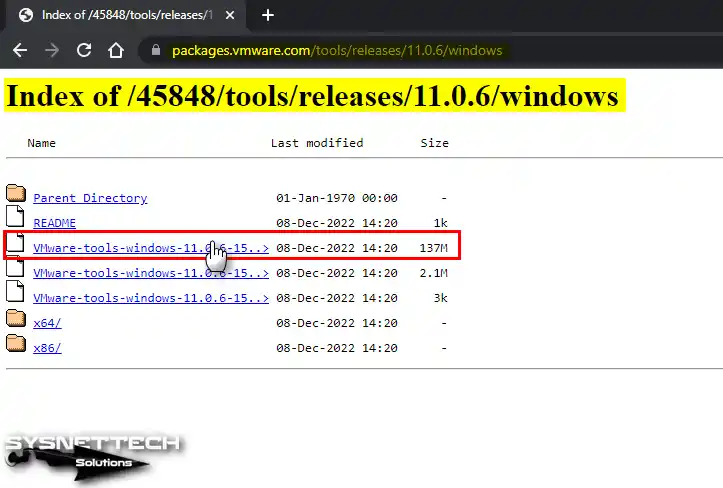
To manually download old VMware Tools 11.0.6, visit the address below. Then download the ISO image file to your computer.
VMware Tools 11.0.6: https://packages.vmware.com/tools/releases/11.0.6/windows/
Step 3
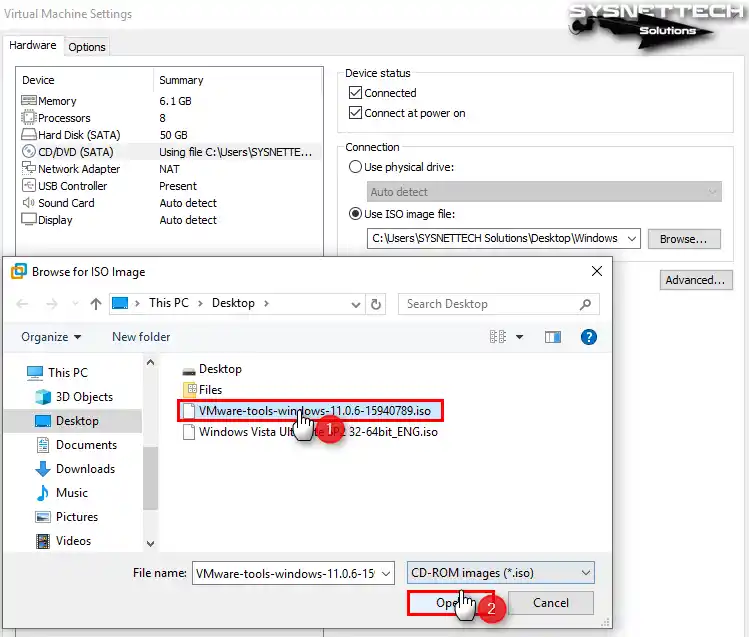
Click VM / Removable Devices / CD/DVD (SATA) / Settings. Then add the VMware Tools 11.0.6 ISO file to the virtual machine. In the Virtual Machine Settings window, click Browse.
Select the VMware-Tools-Windows-11.0.6-15940789.iso image file and click the Open button.
Step 4
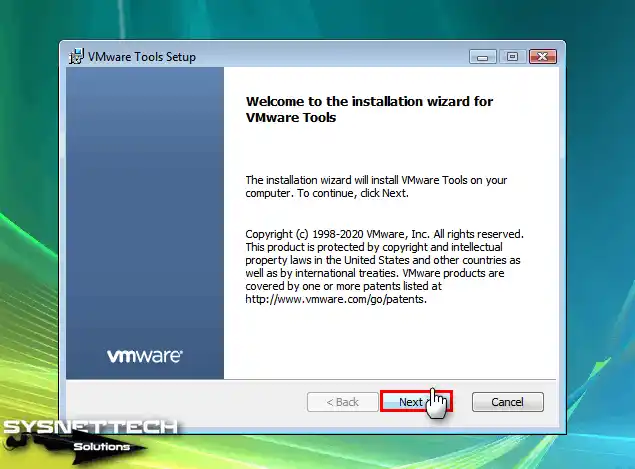
Double-click the DVD icon on My Computer again. Then start the installation wizard. Click Next when the wizard opens.
Step 5
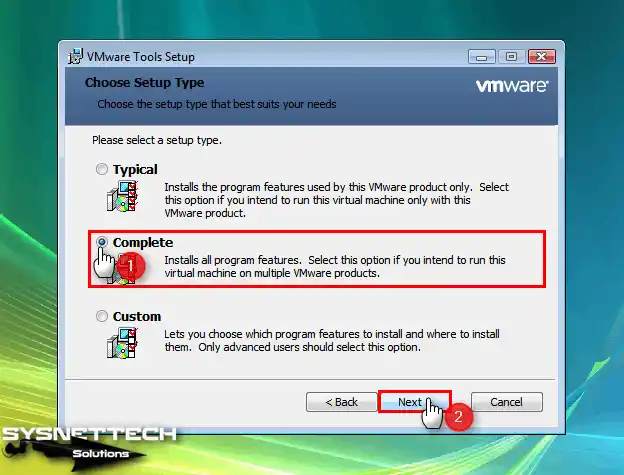
Select Complete as the installation type and click Next.
Step 6
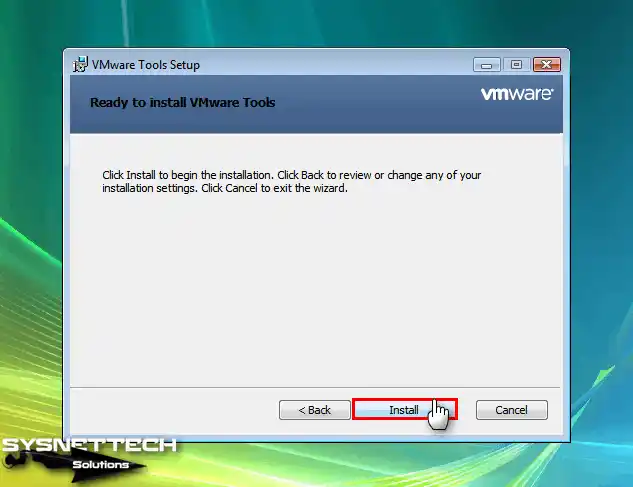
Click the Install button to start installing VM Tools for the Vista virtual machine.
Step 7
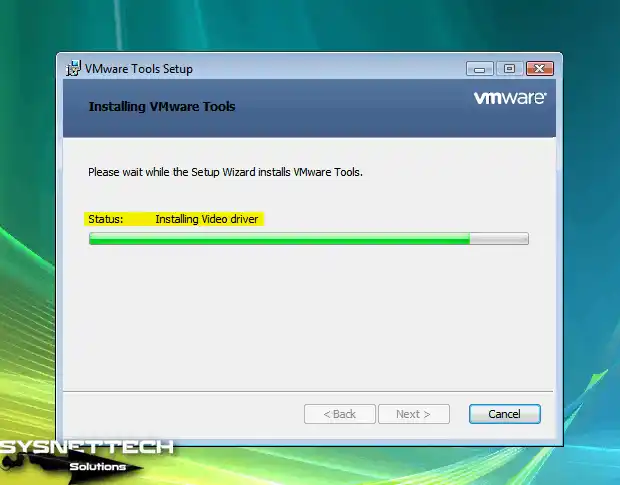
Wait while the necessary drivers for the virtual PC are installed.
Step 8
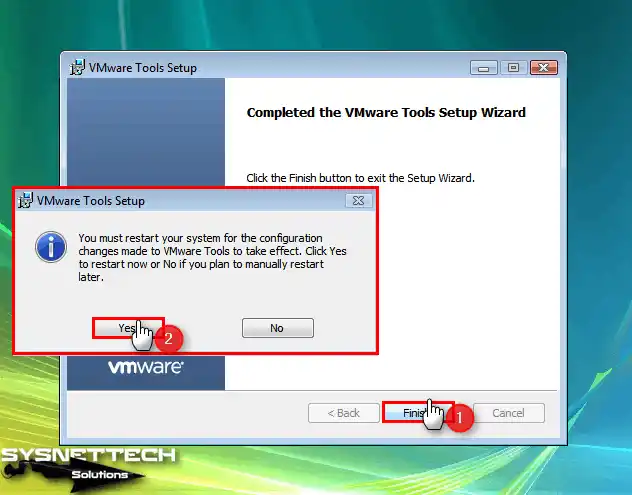
After completing VM Tools installation, click Yes to restart your virtual system. This makes the changes take effect and configures the drivers.
Verifying VMware Tools Service
Step 1
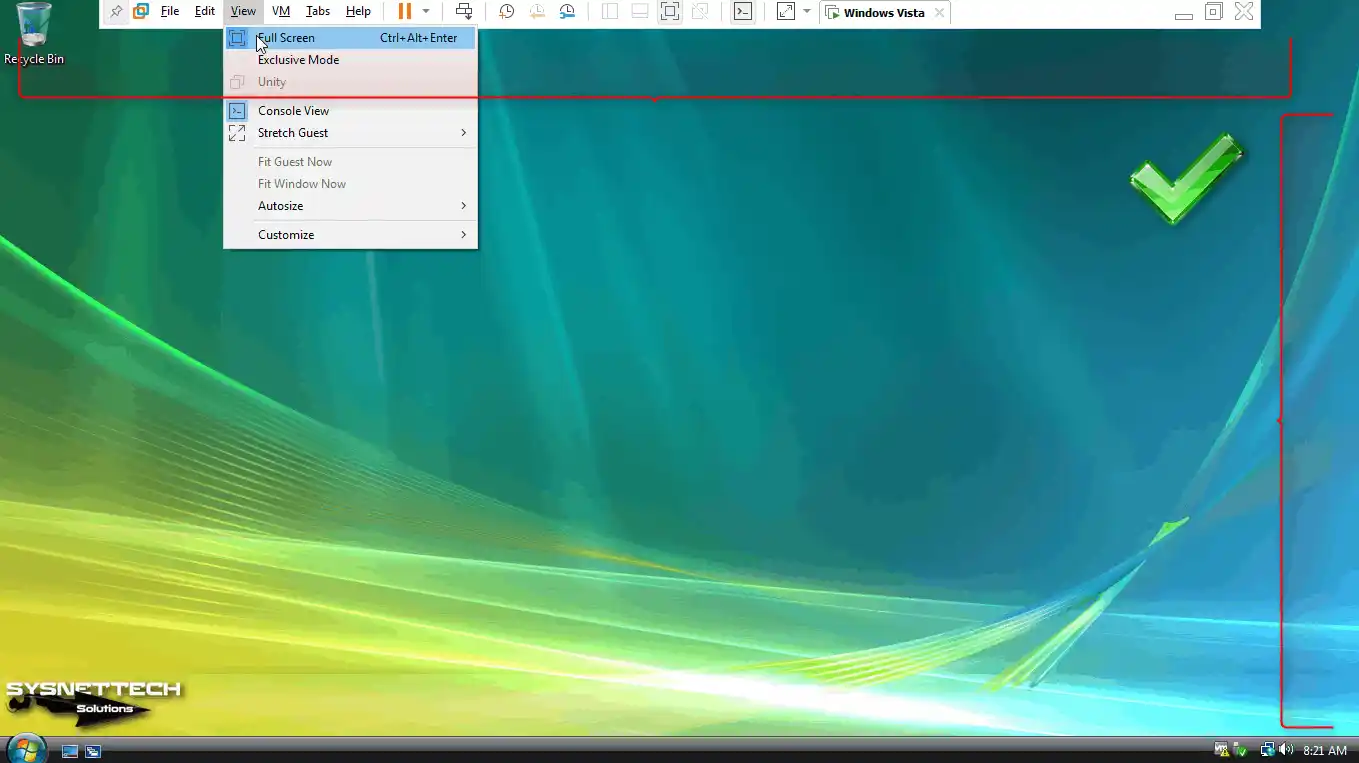
After your guest machine turns on, click View / Full Screen. This uses the screen resolution in full-screen mode. Or click View / Fit Guest Now to fit full screen.
Step 2
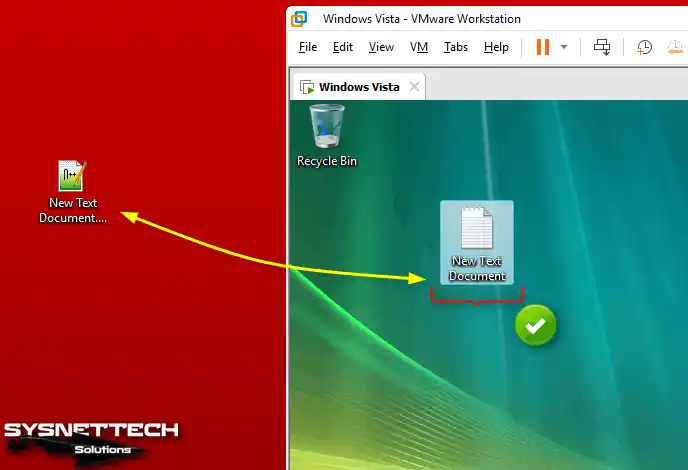
You can also see success when you transfer files between the VM and host. Use the drag-and-drop method.
How to Configure Shared Folder
Creating a Shared Folder for Windows Vista is simple. However, you must do this after installing VM Tools. Then you can share a folder between host and VM using Shared Folder.
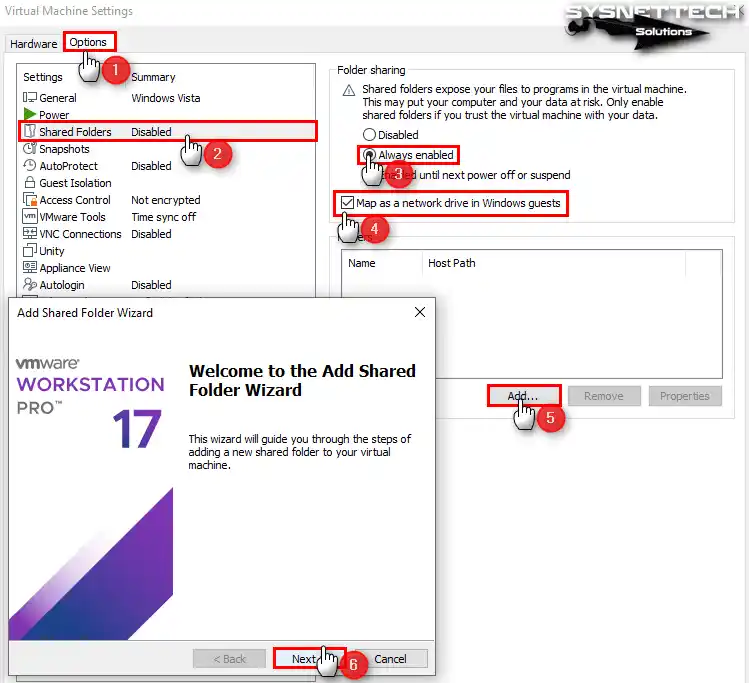
Click VM / Settings from the menu to enable the Shared Folders feature on your virtual PC.
Click Shared Folders in the virtual machine settings window. Then check Always Enabled under Folder Sharing.
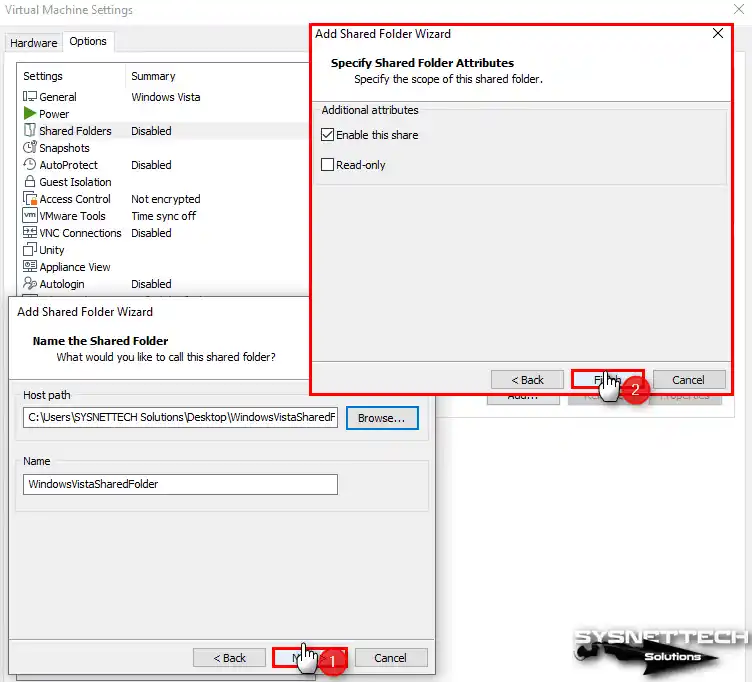
Also, check Map as a network drive in Windows guests. Then click Add and Next in the wizard.
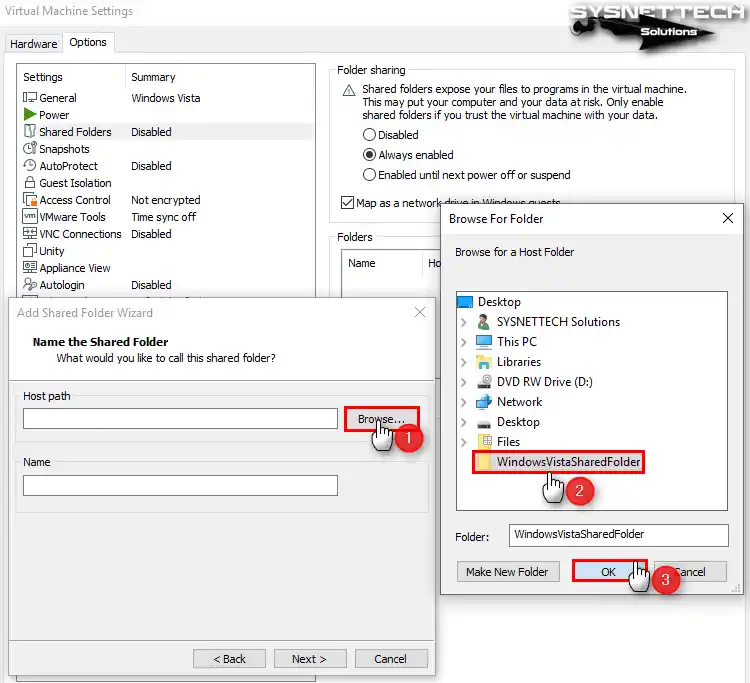
Click the Browse button to select the folder you have specified on your host and select the location.
Check Enable this share and click Next. After checking the folder location on the host, click OK to close VM settings.
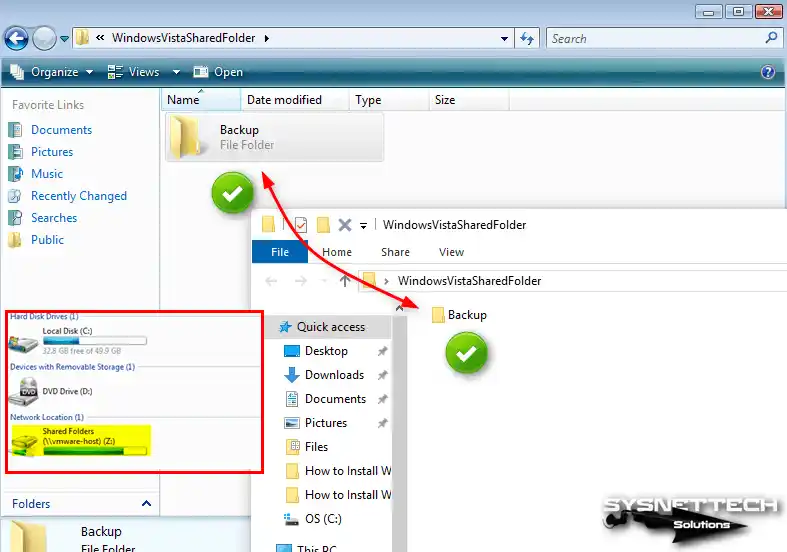
Check that Shared Folder is added as a network drive on my computer.
Make sure vmware-host is visible when you check Shared Folder over Network. If vmware-host appears, Shared Folder works fine.
How to Use USB Flash Memory
You can use USB 2.0 flash drives for larger file transfers in Windows Vista.
Step 1
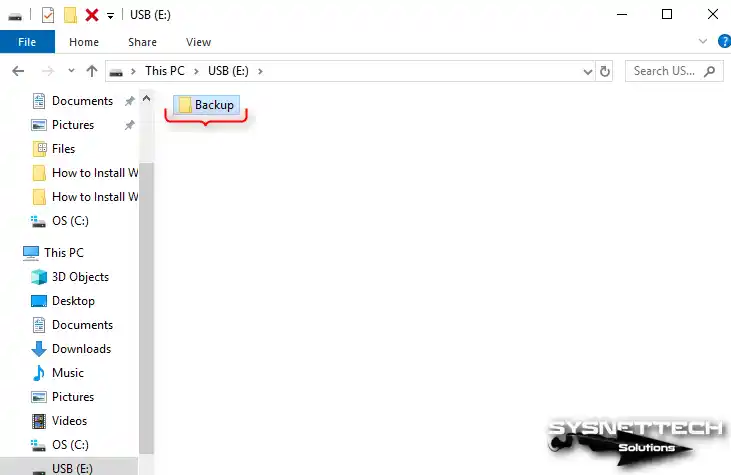
First, insert your flash memory into a USB port on your host PC. Then create a folder in it as an example.
Step 2
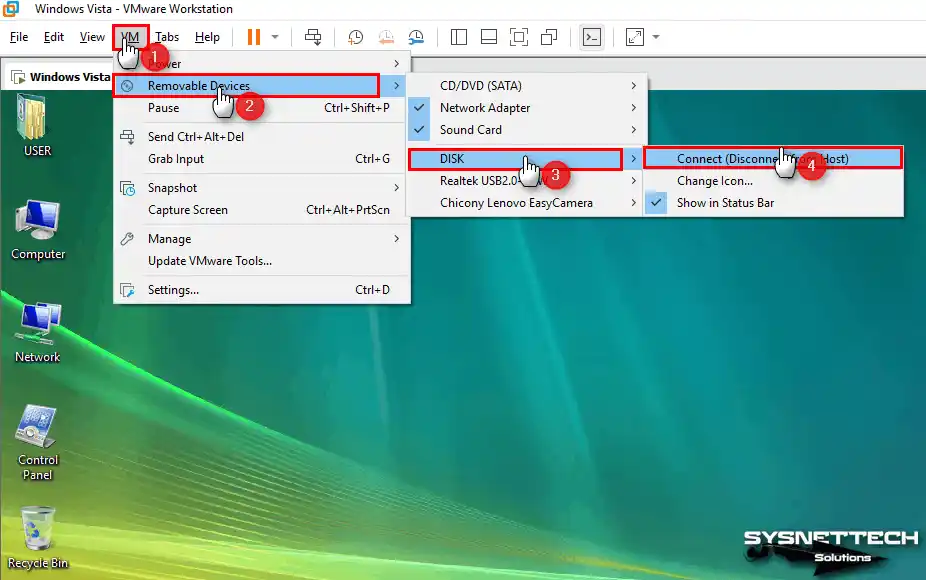
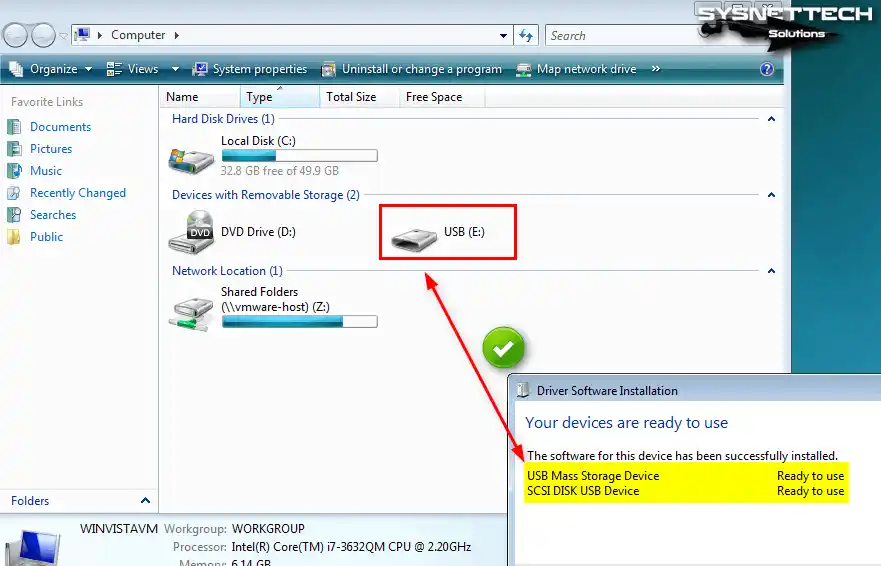
To connect your USB disk to the virtual OS, click VM / Removable Devices / Your USB / Connect.
Step 3
After you insert the USB stick into the VM, the system installs its drivers automatically. You can access your disk shortly after.
How to Delete the Virtual Machine
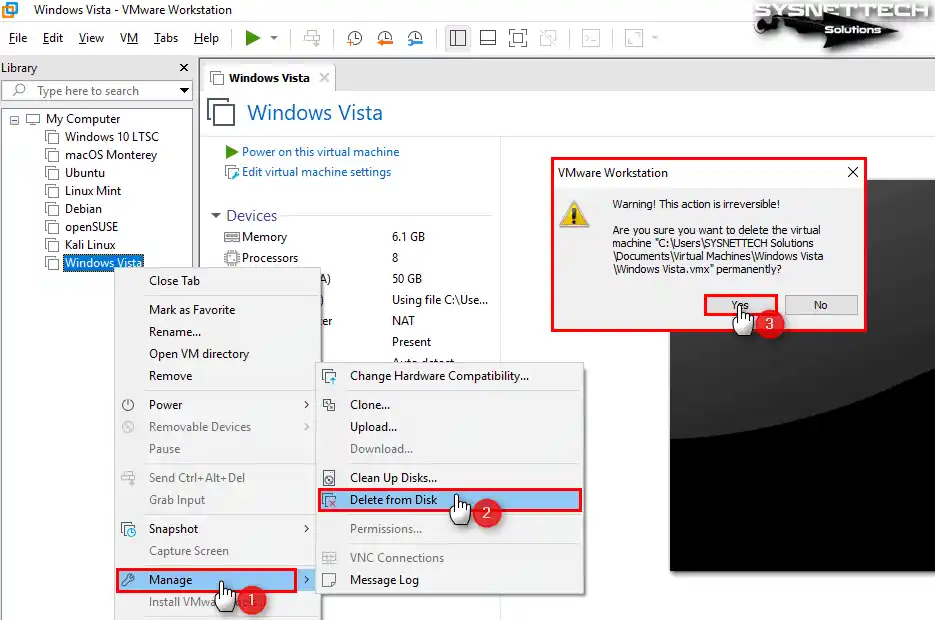
If you want to delete your Vista VM, open Workstation Pro. Then right-click on it in the left panel.
Click Manage / Delete From Disk. Then click Yes to confirm complete deletion. The warning says this action is irreversible.
Video
Installing Old Versions
| Workstation Version | YouTube Video | Slide |
|---|---|---|
| 14 Pro | Watch | – |
| 16 Pro | Watch | View |
| 17 Pro (NEW) | Watch | – |
6 Traps Most People Fall Into When Trying to Revive Vista in a Virtual Machine
VMware Tools installation gives a ‘Windows 7 SP1 required’ error, how do I fix it?
How many GB should I allocate for disk capacity? Is 20 GB enough?
Should I choose BIOS or UEFI as firmware?
Will the Aero interface work in the virtual machine? Or won’t I see it?
How should I configure the number of processors and cores? Will it speed up if I give too many?
Shared Folder doesn’t show up in the VM, what am I missing?
Conclusion
In conclusion, installing Windows Vista on a virtual machine with VMware Workstation 17 Pro is excellent. Additionally, this method lets you use an old OS without installing it physically.
However, you can create a seamless virtual environment on your Windows 10 PC. Follow the steps I explained. All in all, this method is effective for nostalgia, testing, or special apps. It offers a convenient way to experience Windows Vista today.

Be the first to share your comment