
Welcome to our comprehensive guide to installing and using VMware Workstation 17 Pro on Ubuntu 23.10 & 22.04. This software makes it easy for you to create virtual machines on a single computer. In addition, it allows you to run more than one identical or different operating system.
In this article, I will explain how to download and install VMware Workstation in Ubuntu. Additionally, I will cover the process of configuring and creating virtual machines. However, I will guide you on managing virtual machines.
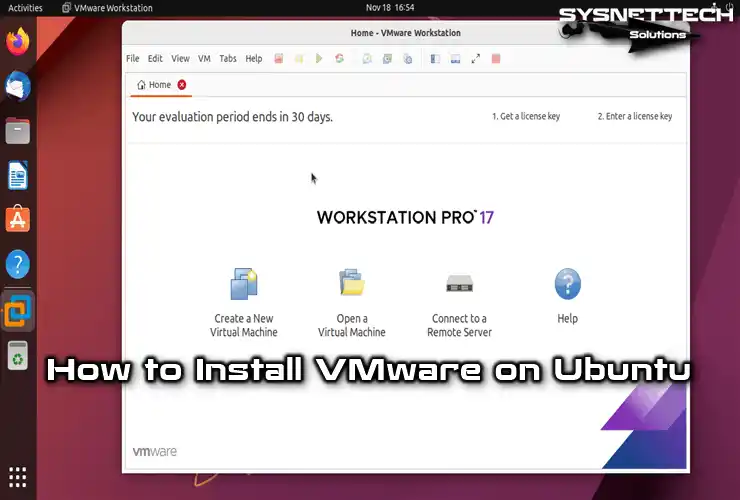
How to Set Up VMware Workstation 17 Pro to Run a Virtual Machine on Ubuntu 23.10 & 22.04
As you know, VMware Workstation is the most popular virtualization program, and this software works on Microsoft Windows operating systems as well as on the Ubuntu Linux distribution.
Installing VMware on the Windows 10 platform is as simple as it only takes a few steps; however, although the installation process on Linux-based systems is simple, in some cases, you may need to install dependent packages.
With VMware Workstation, you can create virtual machines and run multiple virtual computers on your computer at the same time. Also, this virtualization program is not an open-source or free program, but you can purchase it after taking advantage of a 30-day free trial period.
How to Download and Install VMware Pro on Ubuntu PC
First of all, if you are using both Windows and Ubuntu with a dual boot configuration on your computer, do not install them directly on your running system whenever new versions of this virtualization software or other 3rd party software are released. First, install Ubuntu on a virtual machine, install new versions of the relevant programs, check system compatibility, and then install them on your current system.
Step 1
To download VMware for Linux, visit this resource and start the download by clicking “Download Now,” as in the image below.
You can easily download Workstation software via a web browser from VMware’s official website. But you can also do this with a single command from the terminal.
cd ~/Downloads
wget https://download3.vmware.com/software/WKST-1700-LX/VMware-Workstation-Full-17.0.0-20800274.x86_64.bundle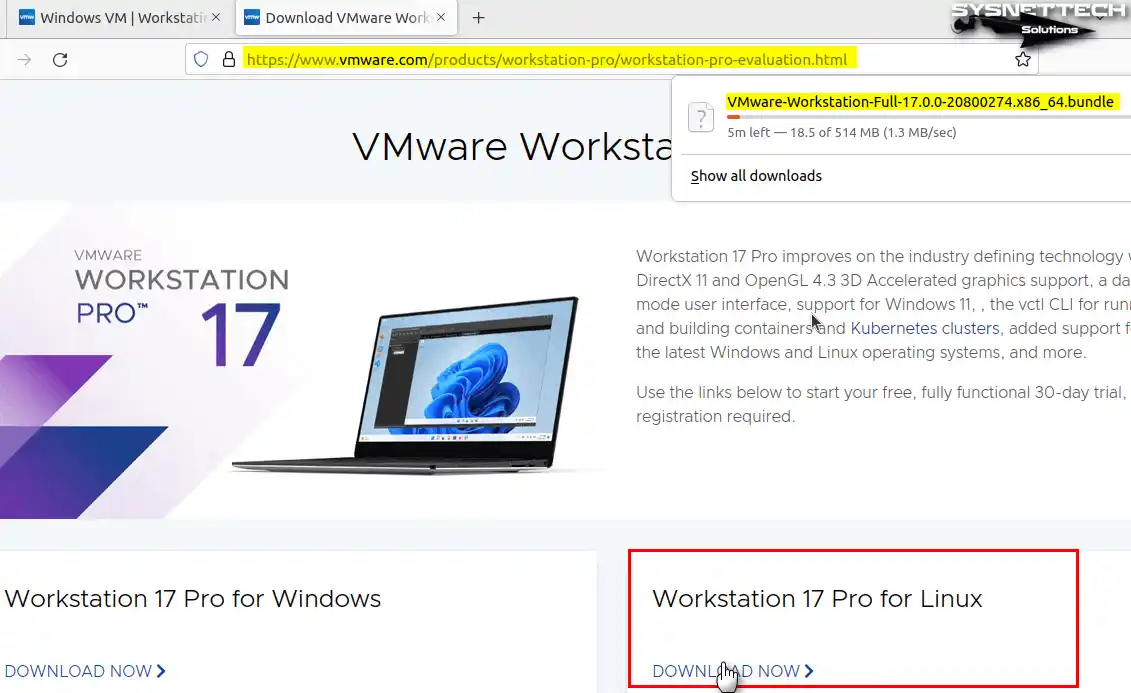
Step 2
After downloading the bundle extension setup file, execute the “sudo apt update” and “sudo apt upgrade” commands in the terminal to update the package list of the applications and components installed on your system.
sudo apt update
sudo apt upgrade
Now, you need to download and install the necessary Linux kernel packages on your system for the VMware program to run smoothly. Otherwise, you will get the GNU C Compiler error and will not be able to start the program.
To fix the GNU C Compiler error and install the dependent packages required to run the virtual machine program, execute the “sudo apt install build-essential” command in the terminal, and then press Y and Enter to confirm the installation of the dependent packages.
sudo apt install build-essential dkms
Step 3
After downloading the VMware virtual machine software to the Downloads location, execute the commands below in the terminal to edit the executable permissions of the file and start the installation.
chmod +x VMware-Workstation-Full-17.0.0-20800274.x86_64.bundle
sudo ./VMware-Workstation-Full-17.0.0-20800274.x86_64.bundle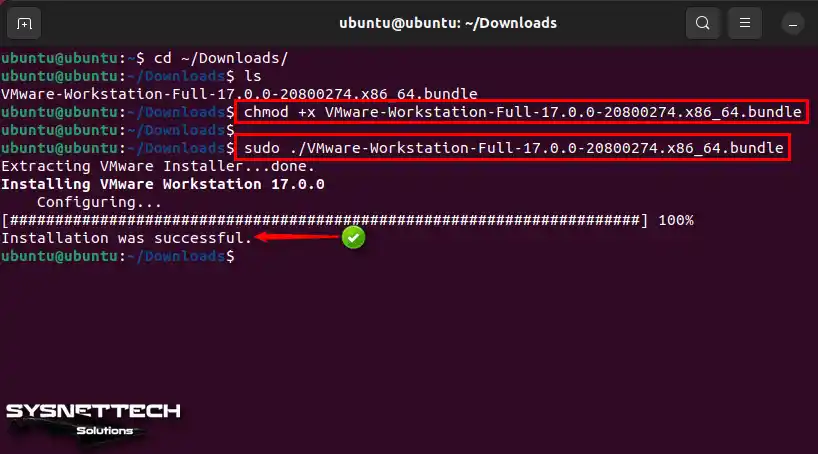
Step 4
After the installation process is completed, find the VMware Workstation program from the Show Applications section and run it. You can also see that the Virtual Network Editor and VMware Player software are installed after the installation.
NOTE: If you encounter the error “Unable to install all modules” when you run the VMware program at this stage, you need to manually download and compile the vmmon and vmnet modules of the Workstation program.
To solve the “Unable to install all modules” error in Ubuntu, execute the commands below in the order in the terminal to download the required modules from Github and copy them to the relevant location.
sudo apt install git
git clone https://github.com/mkubecek/vmware-host-modules
cd vmware-host-modules
git checkout workstation-17
sudo make && sudo make install
tar -cf vmnet.tar vmnet-only && tar -cf vmmon.tar vmmon-only
sudo cp -v vmmon.tar vmnet.tar /usr/lib/vmware/modules/source/
sudo vmware-modconfig --console --install-all
Step 5
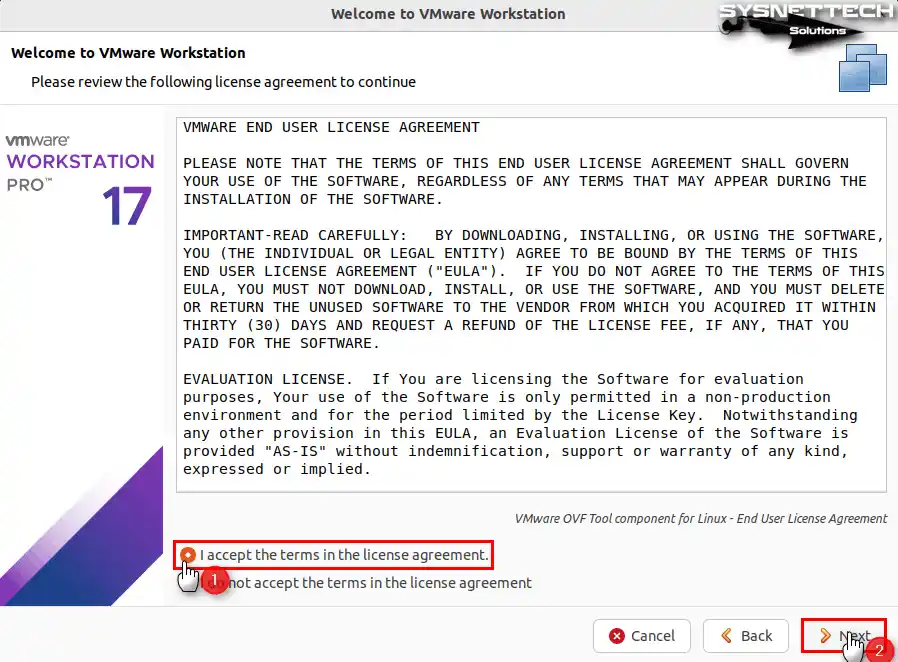
After installing the necessary packages, when the VMware End User License Agreement window opens, read the license terms, select “I accept the terms in the license agreement” to accept, and click the Next button.

Step 6
Also, accept the OVF Tool component for the Linux license agreement and click Next.
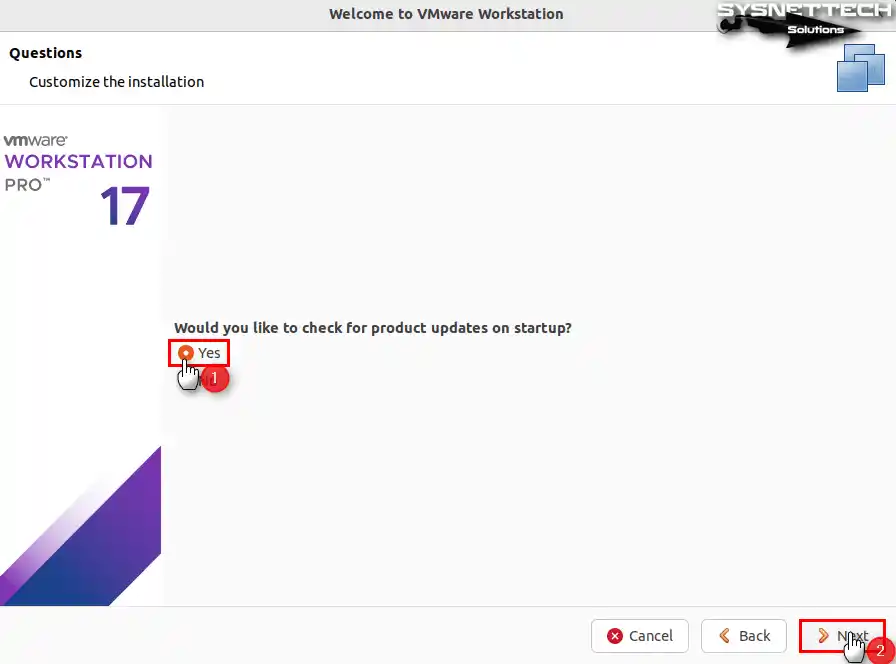
Step 7
If you want the virtual machine software to check for updates at system startup, select Yes and click Next.
Step 8
Select Yes to confirm participation in the VMware customer experience program, and then click Next.

Step 9
If you purchased the Linux program, enter your license key. If you want to use and try the virtualization program for 30 days free of charge, select “I want to try VMware Workstation 17 for 30 days” and click the Finish button.

Step 10
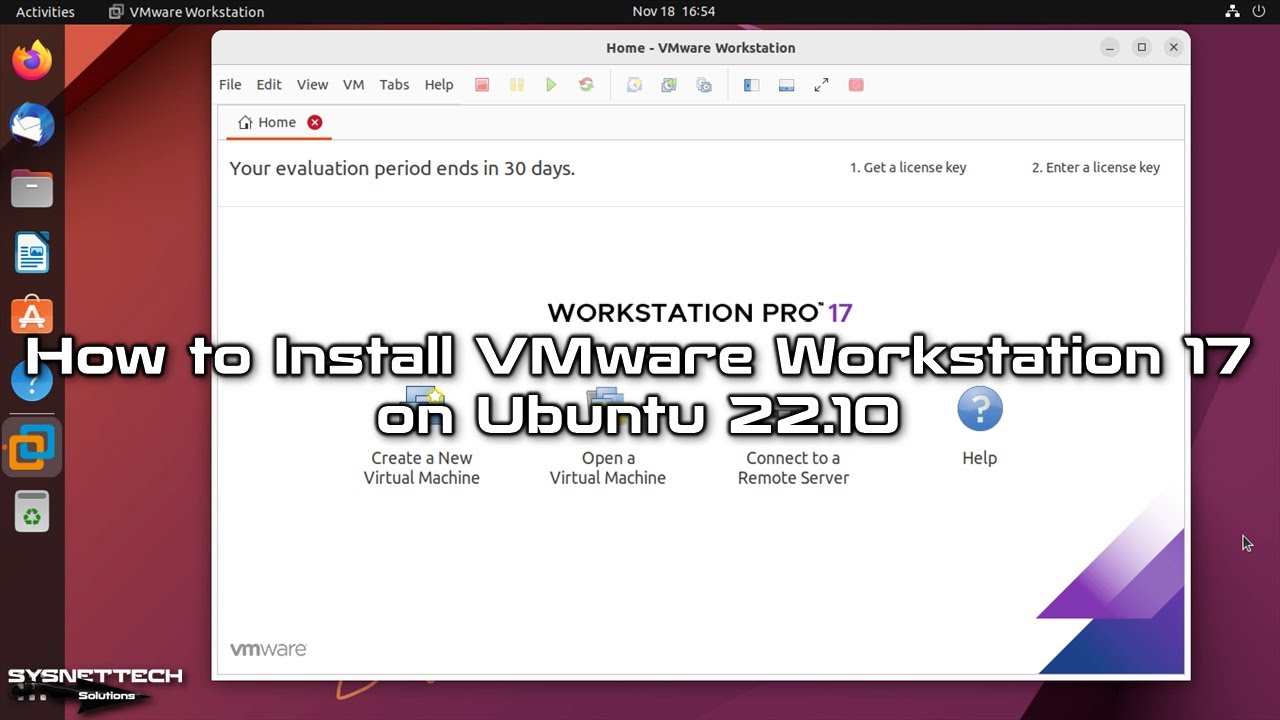
After successfully installing VMware Pro software, you can now install and test new or old versions of Windows, Linux, or macOS operating systems on your host computer.

How to Create a Virtual Machine on Ubuntu
After installing VMware Workstation on Ubuntu, you can start installing the operating system you want by creating a new VM.
Step 1
Open the VMware Workstation 17 Pro software on your Linux system and click Create a New Virtual Machine.

Step 2
To configure the virtual machine with advanced settings, tick Custom (Advanced) and click Next.

Step 3
Configure the hardware compatibility of the virtual computer as the latest version of your VMware software and click Next.

Step 4
You can use your physical drive or ISO installation media to install the operating system. However, to better configure the virtual machine’s settings, select I will install the operating system later and click Next.

Step 5
If you have planned to install Windows 10 as the guest operating system, select Microsoft Windows, then select Windows 10 and later x64 from the Version section and click Next.

Step 6
Please create a new folder in the location where you want to install the Windows 10 virtual computer and select it.

Step 7
Select UEFI as the firmware type and continue.

Step 8
In the virtual processor configuration, determine the number of processors and cores according to the power of your host computer.

Step 9
Likewise, configure the virtual memory size for the Windows 10 guest machine according to the RAM capacity of your host.

Step 10
If you want to connect the guest machine to your physical network, you can choose Bridged Network. If you do not wish for your virtual computer to obtain an IP address from your local network, continue with the default option, Network Address Translation (NAT).

Step 11
Continue with the recommended LSI Logic SAS option as the I/O controller type.

Step 12
You can specify the type of virtual machine’s virtual disk as IDE, SCSI, SATA, or NVMe. Since NVMe is a newer technology, your guest operating system is more efficient. Therefore, select the NVMe disk type for the virtual disk type and click Next.

Step 13
When choosing the disk structure you want to use, select the Create a new virtual disk option and continue as you will install a Windows 10 from scratch.

Step 14
Determine the virtual disk capacity of the guest machine depending on the actions you will take and choose to backup the virtual disk as a single file type.

Step 15
Leave the virtual disk location at default and continue.

Step 16
You can see the hardware information of the Windows 10 virtual computer you have configured in the summary window. After checking the hardware information of your virtual system for the last time, click Finish and close the wizard.

Step 17
After installing your guest system, close the warning window to inform you that the first thing you need to do is install the VMware Tools software and continue.

Step 18
To further configure the hardware settings of your Windows 10 guest system, click Edit Virtual Machine Settings from the Workstation interface.

Step 19
To increase the performance of the Windows 10 virtual PC, open the processor’s hardware settings, tick all the features in the Virtualization Engine section, and close the window.

Step 20
After selecting the CD/DVD device from the Hardware section, select the Use ISO Image option and then click Browse to specify the location of the image file. Next, select the Windows 10 image file you downloaded to your Linux computer and click Open.

Step 21
For faster file transfer on your Windows 10 VM, select the USB 3.x controller from the USB hardware settings and close the settings window.

Step 22
Click the “Start up this guest operating system” to run your Windows 10 x64 virtual machine.

Step 23
The Windows setup window will open after pressing any key on your keyboard to start the installation during the Windows 10 operating system boot phase.

How to Delete the Virtual Machine
When you decide not to use the guest virtual systems you have installed on Ubuntu or other Linux platforms, you can quickly delete them entirely from the virtual machine library of the Workstation software.
To thoroughly delete all files related to Windows 10 VM from your host disk, right-click on it, click Manage / Delete From Disk, and click Yes to confirm the deletion of all files in the window that opens.

How to Uninstall VMware Workstation
You can quickly remove the VMware virtualization software that you have installed on your Linux/Ubuntu system by using the terminal.
Open the terminal and execute the command “vmware-installer –list-products” to list the VMware products installed on your system.
vmware-installer --list-products
OR
vmware-installer -l
Then, after checking that the VMware Workstation program is installed on your system, execute the “sudo vmware-installer -u vmware-workstation” command to remove it from your system entirely.
sudo vmware-installer -u vmware-workstation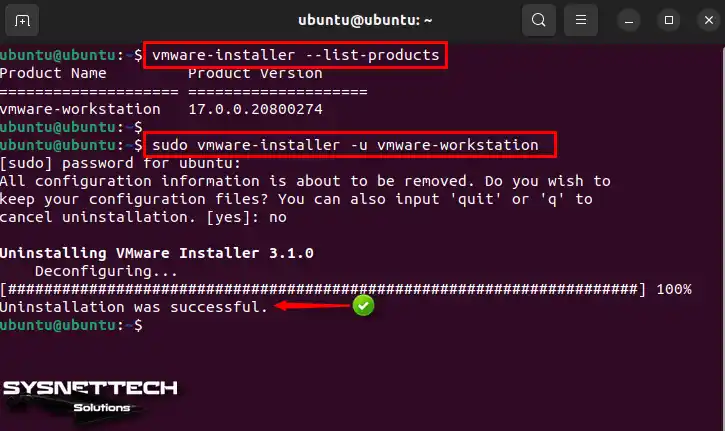
Video
Installing Old Versions
| Ubuntu | VMware Workstation | YouTube Video | Slide |
|---|---|---|---|
| 17.04 | 14 Pro | Watch | – |
| 17.10 | 14 Pro | Watch | View |
| 18.04 | 14 Pro | Watch | View |
| 18.10 | 14 Pro | Watch | – |
| 18.10 | 15 Pro | Watch | View |
| 20.10 | 16 Pro | Watch | – |
| 21.10 | 16 Pro | Watch | View |
| 22.04 | 16 Pro | Watch | View |
| 22.10 | 16 Pro | Watch | View |
| 22.10 | 17 Pro (NEW) | Watch | – |
Possible Installation Errors
Unable to copy the user’s Xauthorization File Error
This error usually appeared when installing on Ubuntu 17.04 and 17.10. To resolve the Xauthorization error, execute the commands below in the order in the terminal and try to open the VM again.
touch ~/.Xauthority
chmod 600 ~/.Xauthority
GCC7 Error
The GCC7 error appeared during installation on Ubuntu 18.04 or 18.10. To resolve this error, it will be sufficient to execute the following command in the terminal.
sudo apt install gcc-7Conclusion
In conclusion, VMware Workstation 17 Pro gives you a powerful virtualization solution in Ubuntu 23.10 & 22.04. Additionally, it is ideal for running multiple operating systems. By following the steps I have professionally outlined in this article, you can install VMware Workstation without any problems. However, you can create virtual machines and install various operating systems on your host system.
Also, if you are testing any software or developing applications, VMware Workstation provides flexibility. It is also suitable for those who want to explore different operating systems. In this way, you can run multiple virtual computers simultaneously. All in all, this VM software is a valuable tool for both personal and professional use.

14 People Shared Their Experience
Thanks for the tutorial, its helped alot
Thanks for your comment!
Thanks for the tip on the Xauthority file!!!
You’re welcome! Very thanks for your feedback!
Thank you for the help on Xauthorization tip sir. But now I am unable to open the License key Page in order to activate the VMWare
You’re welcome, Seraj Ahmad! To resolve the key page error of VMware Workstation, open the terminal and switch to root access. After that, execute the vmware command.
Thank you for your reply sir. But when I tried I got this Error message
seraj@seraj-Inspiron-3537:~$ sudo -i
root@seraj-Inspiron-3537:~# vmware
No protocol specified
xcb_connection_has_error() returned true
No protocol specified
xcb_connection_has_error() returned true
No protocol specified
** (vmware-modconfig:12139): WARNING **: Could not open X display
No protocol specified
(vmware-modconfig:12139): Gtk-WARNING **: cannot open display: :0
.
Really thanks for the post !
You’re welcome Gabriel! Also thank you for your comment!
Sorry to say this, but the git instructions do not work: git checkout workstation-17
Stuck at that point.
Trying to install VMware on a Ubuntu 22.10 system and it will not load the kernal. at the end of the install I get:
Starting VMware services:
Virtual machine monitor failed
Virtual machine communication interface done
VM communication interface socket family done
Virtual ethernet failed
VMware Authentication Daemon done
Unable to start services
For Byron
It has to be ….. workstation 17.0.0
While installing vmware-modconfig – Virtual machine monitor & Virtual ethernet are getting failed and unable to start the services. Please suggest
Same error here with same Ubuntu 22.10