
If you’re looking to put Linux Mint 21 on a new pretend computer using VMware Workstation 17 Pro, and you have Windows 11 or 10 (the 64-bit version), you’re in the right spot. In this article, we will guide you through leveraging VMware’s virtualization capabilities. Additionally, we will use Mint’s stability and user-friendliness. It’s a popular choice for home users and professionals alike.
However, suppose you’re new to virtualization or want to explore advanced settings. In that case, our step-by-step guide will have you covered. As a result, your virtual machine installation process for Linux Mint will be smooth and efficient.

How to Run Linux Mint on a Virtual Machine in Windows 11 & 10 using VMware
Faster and more stable than other Linux distributions, Linux Mint is an operating system that appeals to both home users and professionals. This system, which is basically derived from the Ubuntu package structure, aims to provide users with a more secure and stable distribution.
Linux Mint uses Cinnamon for its desktop environment by default but also has lighter and performance-oriented Mate and Xfce environments. Users can set up their system using one of these three desktop types.
You can run the Mint system virtually without dual boot configuration on Windows 10 or other Microsoft systems by using the VMware Workstation virtualization software.
Workstation software, a paid VMware program, allows users to configure more advanced settings on guest machines. However, users can also choose to use the free and non-commercial versions of the Player.
How to Create a New Virtual Machine for Linux Mint
After installing VMware Pro on your computer, you can create new virtual machines and install a Linux and Windows-based operating system.
Step 1
After running the Workstation 17 software, click on the Create a New Virtual Machine choice from the options on the homepage, and select the Custom (Advanced) option to configure more advanced settings for the Linux system in the VM wizard that opens and click Next.

Step 2
For Linux guest machine compatibility, select the latest version of the Workstation software from the Hardware Compatibility section.

Step 3
You can install the guest OS using one of three methods. Suppose you add the Linux Mint ISO file to this window. In that case, some settings on the guest computer will be configured automatically.
Therefore, so that you can configure more advanced settings, check I will install the operating system later and continue.

Step 4
Select the Linux platform as the guest operating system and Ubuntu 64-bit from the version section.

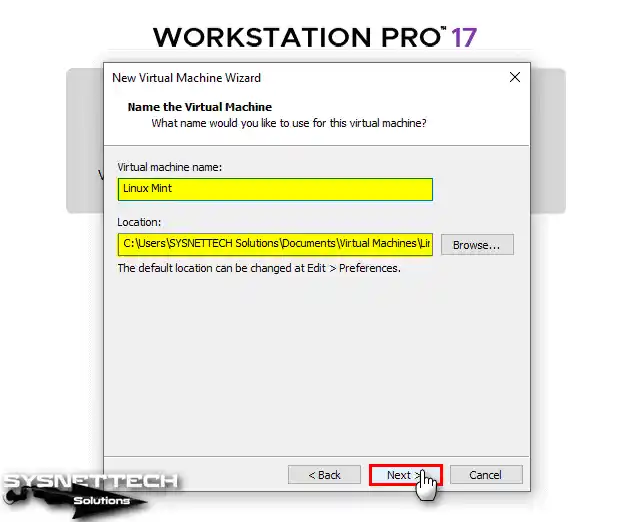
Step 5
After typing a name for your Mint guest machine, please specify the location where you will install it and continue.
Step 6
Configure the number of vCPUs and the number of virtual cores for your VM according to the processor characteristics of your host PC.

Step 7
Select the maximum recommended memory size for the RAM size of the guest PC. Suppose you have a higher amount of memory in your computer. In that case, a more extensive size configuration will be beneficial for performance.

Step 8
Select the NAT network adapter for your Mint VM.

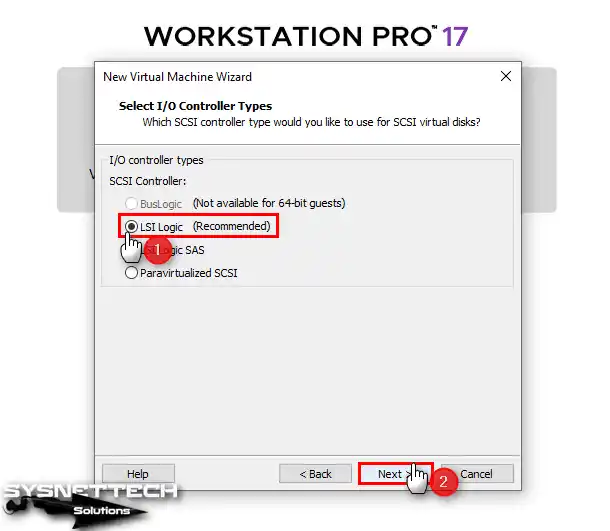
Step 9
Select the default LSI Logic as the I/O controller type and continue.
Step 10
By configuring the type of vdisk as NVMe, you will significantly increase the performance of your virtual computer. Therefore, select NVMe from the disk types and click Next.

Step 11
Since you will install Mint VM from scratch, select Create a new vdisk and click Next. Suppose you have previously installed this Linux distribution and backed up its virtual disk. In that case, you can add it using the Use an existing virtual disk option.

Step 12
You can adjust the size of the vdisk according to the recommended size. Still, you can specify a higher disk size according to the work you will do on your system. Also, if you choose to back up the vdisk file as a single file, you can import your VM more quickly in the future.

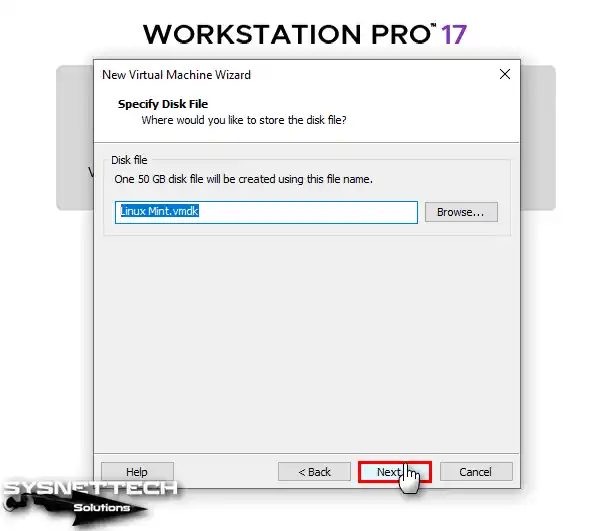
Step 13
Continue without changing the name and location of the Linux virtual disk file.
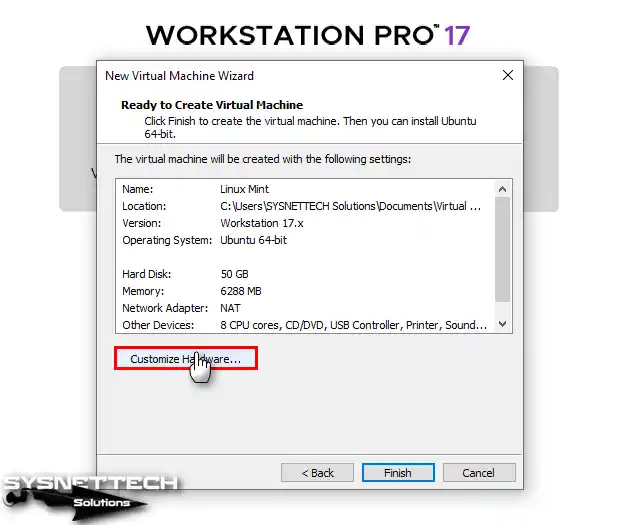
Step 14
Click Customize Hardware to configure the advanced settings of the Mint guest machine.
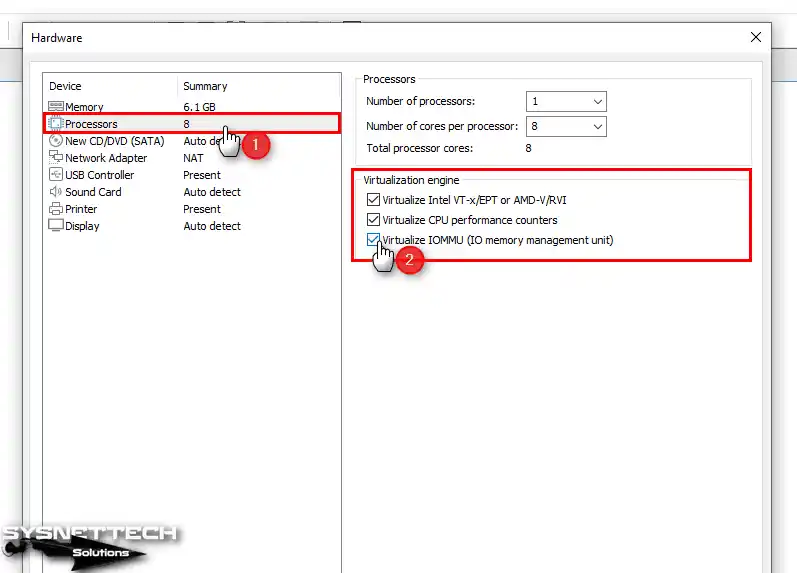
Step 15
After clicking on the Processor virtual hardware, enable all the features in the Virtualization Engine section.
- Virtualize Intel VT-x/EPT or AMD-V/RVI
- Virtualize CPU Performance Counters
- Virtualize IOMMU (IO Memory Management Unit)
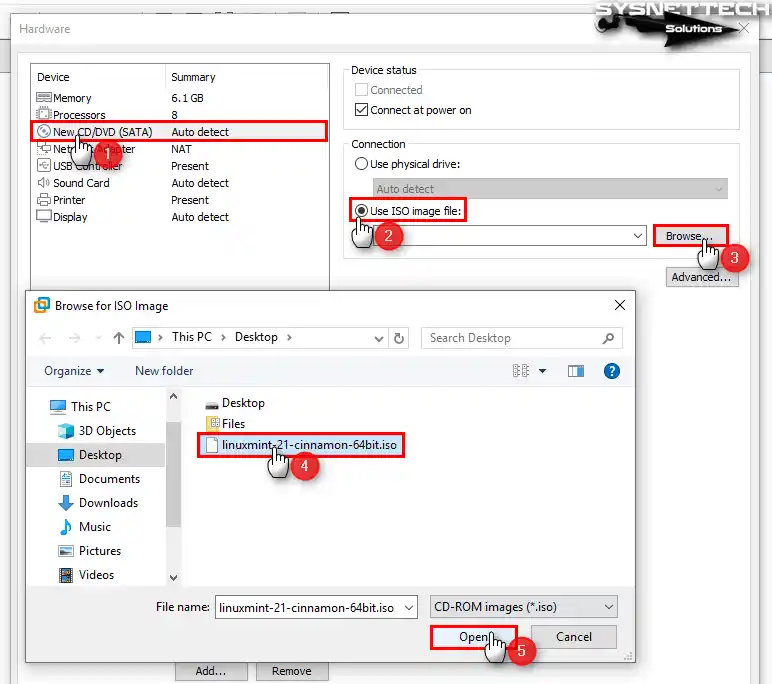
Step 16
To download the Linux Mint ISO file, visit the official website and then click CD/DVD (SATA) / Use ISO Image File / Browse to add the ISO file to the guest OS and select the downloaded image file.
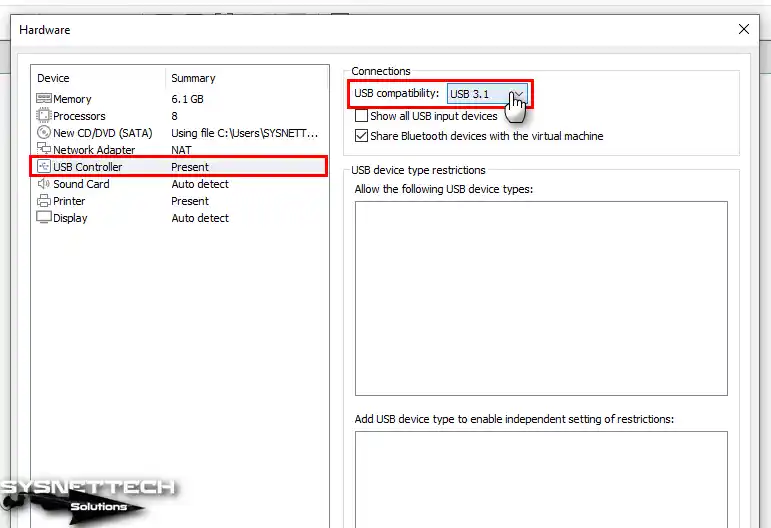
Step 17
Change the Compatibility setting to 3.1 in the USB Controller settings.
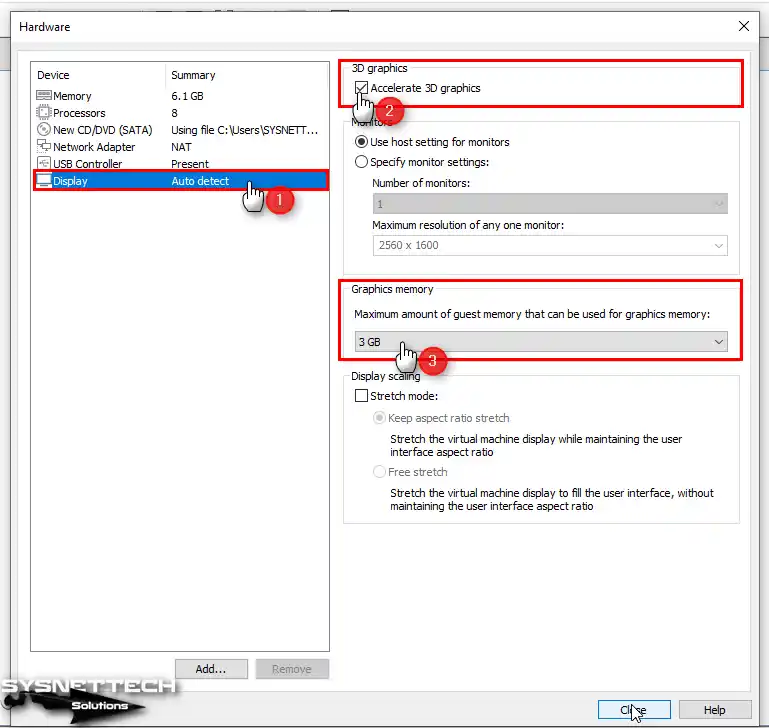
Step 18
View the display hardware settings, enable Accelerate 3D Graphics, and adjust the graphics memory size according to the capacity of your host GPU.
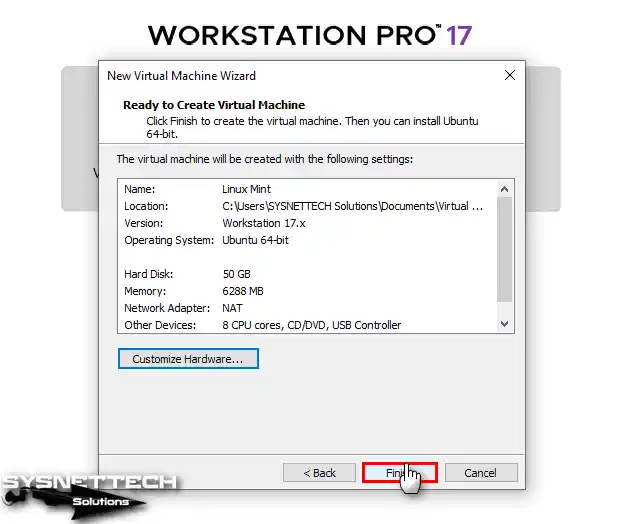
Step 19
After configuring the hardware settings of your Linux Mint virtual computer, check the changes you have made in the summary window and close the wizard.
Step 20
Click Power on this VM to start installing the Linux system on the virtual machine you have prepared.

How to Install Linux Mint using VMware
After running the virtual computer, when it boots with the ISO file, you can set up your system as if you were installing it on a physical PC.
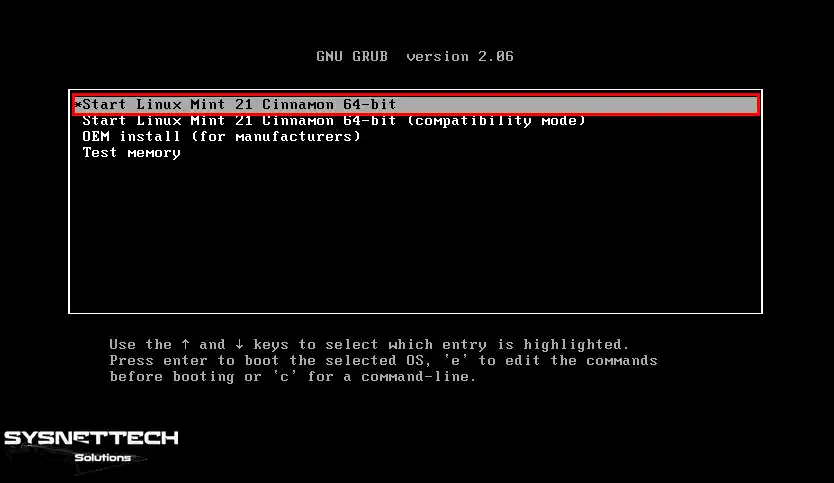
Step 1
You can check system integrity, perform hardware tests, or do memory checks from Cinnamon 64-bit options. Press Enter in the Start Linux Mint option to start installing the system.
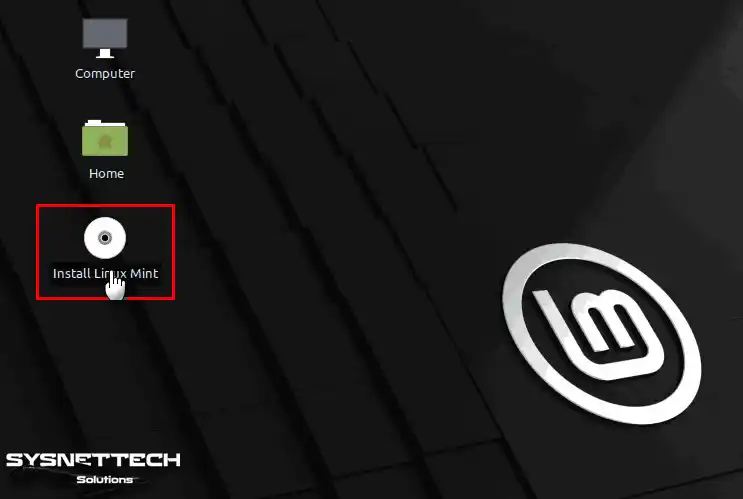
Step 2
When the system boots up, double-click Install Linux Mint on the desktop to begin the setup wizard.
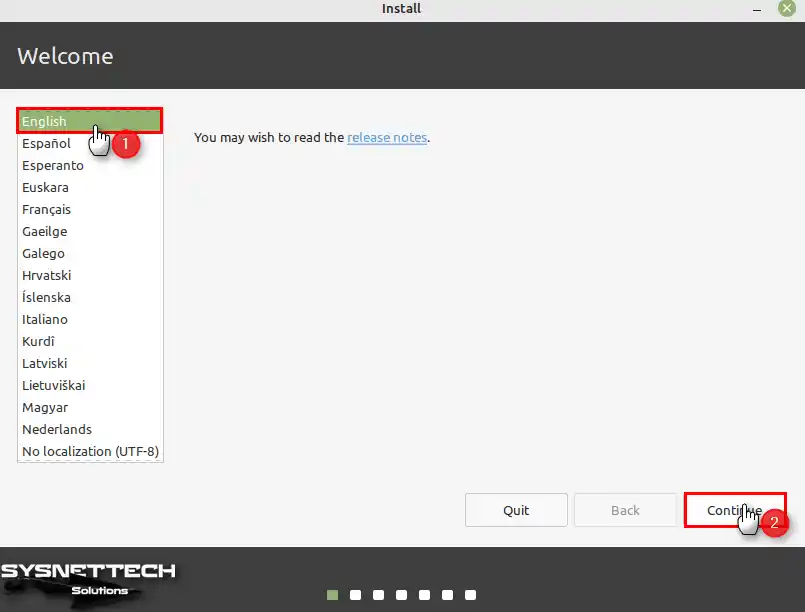
Step 3
After opening the setup wizard, select the language in which you want to use your Linux system and click Continue.
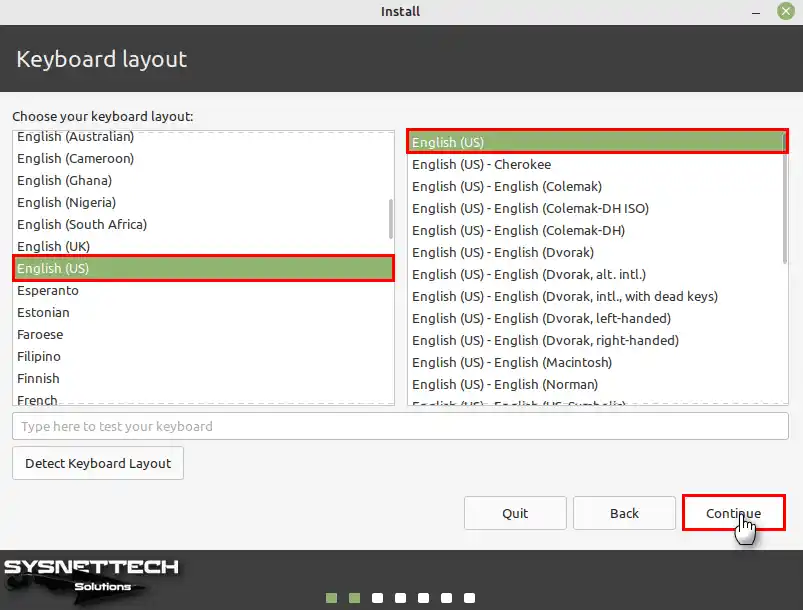
Step 4
Select the keyboard layout of your virtual PC according to the hardware of your physical computer and click Continue.
Step 5
Tick to install multimedia codecs so that you can play videos on your Mint guest machine, and click Continue.

Step 6
Since you will be installing a system from scratch, select the Erase Disk and Install Linux Mint option, click Install Now, and then click Continue to confirm the changes on the virtual disk.

Step 7
After choosing the location where you live, click Continue.

Step 8
Configure the user account settings for your Linux system according to your personal information and create a characteristic password.

Step 9
Wait while the files of the Mint system are copied and the necessary applications are installed.

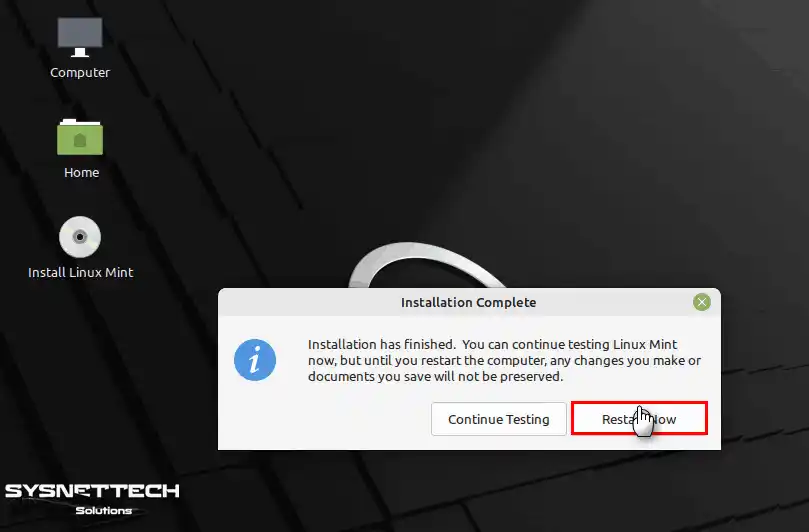
Step 10
After installing Linux Mint, restart your virtual system.
Step 11
Press Enter to remove the ISO installation media from the virtual machine.

Step 12
Execute the “lsb_release -a” command in the terminal to check the Linux system version.
lsb_release -a
How to Install VMware Tools
When you install Linux Mint on VMware Workstation, VMware Tools sets itself up automatically. But if your main computer isn’t online while you’re installing, the VM tools won’t get installed.
Steps:
Step 1
After connecting the guest operating system to the Internet, open the terminal by pressing CTRL + Alt + T, execute the “sudo apt install open-vm-tools-desktop” command, and confirm the additional disk space usage by pressing Y.
sudo apt install open-vm-tools-desktop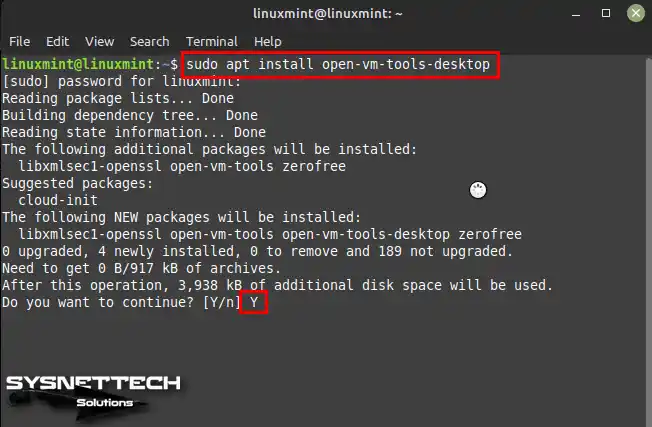
Step 2
After restarting your Linux machine, you can use the “vmware-toolbox-cmd –version” command in the terminal to check the VMware Tools version.
vmware-toolbox-cmd --version
Step 3
When you try to copy a file from the desktop location of your host operating system by dragging and dropping it to the virtual machine, you can see that the operation is successful.

Step 4
You can also use your Mint virtual PC in full-screen resolution.

How to Configure Shared Folder in the Mint VM
Another way to transfer files from your host computer to your VM is to use Shared Folder. Please note that VMware Tools must be installed in order to use this feature of VMware software.
Click VM / Settings from the VMware Pro tool menu and open the virtual machine settings. Click on Shared Folders on the Options tab, and after marking Always Enabled, click the Add button to start the wizard.

Create a new folder named SharedFolder in a location you specify on your host system. To add the location of the folder you created, click Browse in the Host Path section, select the folder, and click OK.

After adding the location of the shared folder, check that the Enable This Share option is selected in the next window, and click Finish.

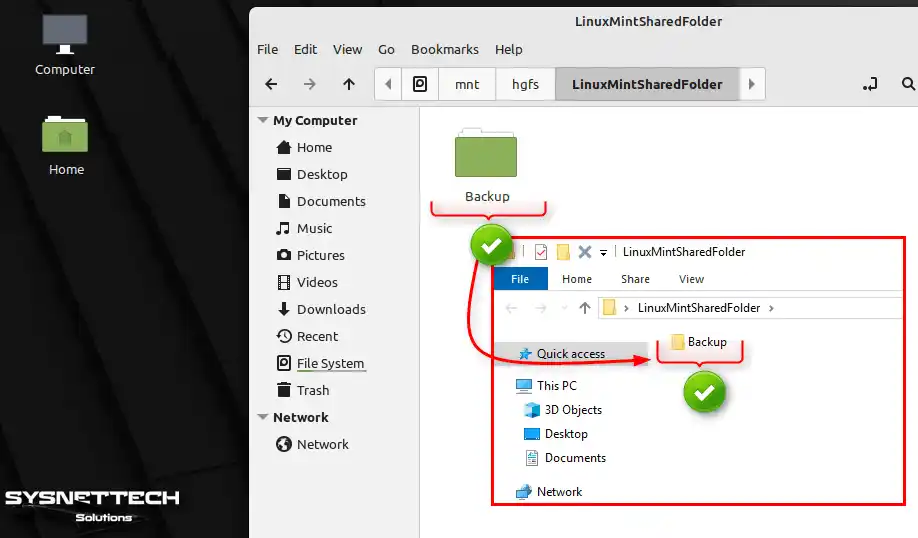
Go to File System/mnt/hgfs on your virtual computer and check that the shared folder exists. For testing, create a new text document in the folder and check that the document has been made after opening the folder on your host.
To create a Shared Folder shortcut to the desktop location, execute the “sudo ln -s /mnt/hgfs/SharedFolder/ ~/Desktop/” command in the terminal.
sudo ln -s /mnt/hgfs/SharedFolder/ ~/Desktop/
When you restart your virtual computer, if you encounter the Shared Folder error as in the image below, you need to enable the folder again and set the automatic mount.

Execute the following command in the terminal to re-enable the shared folder.
sudo mount -t fuse.vmhgfs-fuse .host:/ /mnt/hgfs/ -o allow_other
It would be best if you edited/etc/fstab to automatically mount the shared folder every time you reboot your system.
sudo nano /etc/fstab
Add this command to the /etc/fstab file. Then press CTRL + X, then Y, and finally Enter to save the file.
.host:/SharedFolder /mnt/hgfs/SharedFolder fuse.vmhgfs-fuse allow_other
Restart your Mint VM, and you will no longer encounter the Shared Folder error.

How to Use USB Flash Memory in Linux Mint VM
You can transfer files faster by connecting your USB flash drives or storage devices to your Linux virtual computer.
Step 1
Plug a USB 3.0/3.1 supported flash memory into your host computer and create a folder named Backup in it.

Step 2
Plug your flash memory into the virtual machine by clicking VM / Removable Devices / Your USB / Connect from the tool menu. However, if you see the Connect option grayed out, as in the image below, turn off your virtual computer.

Step 3
Go to where you put the VM, open the VMX file with Notepad, and change the value (USB.restrictions.defaultAllow = “FALSE”) to TRUE.
usb.restrictions.defaultAllow = "TRUE"
Step 4
After restarting your virtual computer, you can now connect your USB disk.

Step 5
You can see the folder you created when you view the contents of your USB on your Mint system.

Video
Frequently Asked Questions (FAQ)
- Does Linux Mint work with VMware?
- How do I remove Workstation & Player from Linux Mint?
- Is VMware Workstation Pro or Player better for Linux Mint?
Installing Old Versions
| Mint & VM Version | YouTube Video | Slide |
|---|---|---|
| 18 / 14 Pro | Watch | View |
| 19/ 14 Pro | Watch | – |
| 19.1/ 15 Pro | Watch | View |
| 19.2/ 15 Pro | Watch | – |
| 20.3 / 16 Pro | Watch | View |
| 21 / 16 Pro | Watch | View |
| 21 / 17 Pro (NEW) | Watch | – |
Conclusion
In conclusion, I would like to summarize that installing Linux Mint 21 on a virtual machine with VMware Workstation 17 Pro is quite effective. Additionally, this process provides a seamless way to experience stability and user-friendliness. What’s more, you can create a virtual environment according to your specific needs by following our step-by-step guide.
However, you can also adjust advanced settings on virtual systems. Whether you’re a home user or a professional, you can explore virtualization with Linux Mint and VMware. In short, it opens up new possibilities for your computing journey.

4 People Shared Their Experience
Thank you for your guide. Very helpful. I bookmarked it.
You’re welcome, bro!
Great tutorial and video. Thanks
Awesome tutorial! Great job and thank you for putting it together. I’m done with Windows 11 and AI intruding on every aspect of digital life.