
As online dangers keep changing, we need good ways to keep our networks safe. That’s why we have to look at the weaknesses in both our system and our network. We usually use Kali Linux to test how easy it is for someone to break in rather than find security problems.
In this article, we’ll install Kali Linux 2024 using VMware Workstation 17 Pro on a Windows 11 or 10 computer that uses 64-bit. VMware Workstation is the most popular VTx software, and it’s faster than other options. Plus, it’s easy to use, even if you’re starting. With this tool, you can work with virtual machines quickly.
How to Run Kali Linux on a Virtual Machine in Windows 10 using VMware Workstation 17 Pro
The folks who made Kali Linux, which originates from Debian, are a company called Offensive Security. This practical OS has lots of free tools that are super useful. Specifically, we use it to find out if PC networks or systems have any weak spots.
I said this OS has lots of free tools to keep systems and networks safe. That’s why it’s solid, and we often use it for tests. You can use it from a USB stick without putting it on your computer. Additionally, you can use it portablely.
You can download Kali’s ISO file from the official website or other sources. Plus, you can then install it on your PC with CD/DVD or USB installation media. However, since the purpose of this guide is to use a virtual machine, we will use the ISO directly.
But before you put Kali on your computer’s disk, it’s good to practice. I suggest trying it out on a virtual machine first. You can do this with VMware Workstation Pro or Player, which many people use for virtualization.
How to Create a New Virtual Machine for Kali Linux
Let’s say you installed VMware Workstation on your Windows 11 & 10 computer. Immediately afterward, you created a new virtual machine. After this stage, you must determine the operating system you want to install.
For example, you planned to run Kali Linux on a VMware virtual machine. So we don’t need to reboot your host system to use it. Additionally, you do not need to install this system on your PC using the dual-boot method.
Now, let’s create a new virtual machine for this OS from start to Finish. Let’s start!
Step 1
I assume you have installed VMware Workstation 17 Pro. Now, start this virtualization software. On the first screen, click Create a New Virtual Machine. When you do this, you will open the virtual machine wizard.
After you start the wizard, you are now in the configuration phase. The steps on this screen are specific to Kali, but the general steps for creating a virtual machine are almost the same for every operating system.
Let’s prepare a more advanced system for this OS using the virtual machine wizard. In fact, if you proceed directly with Typical, you do not need to select extra things. However, I will set it in more detail with Custom (Advanced).

Step 2
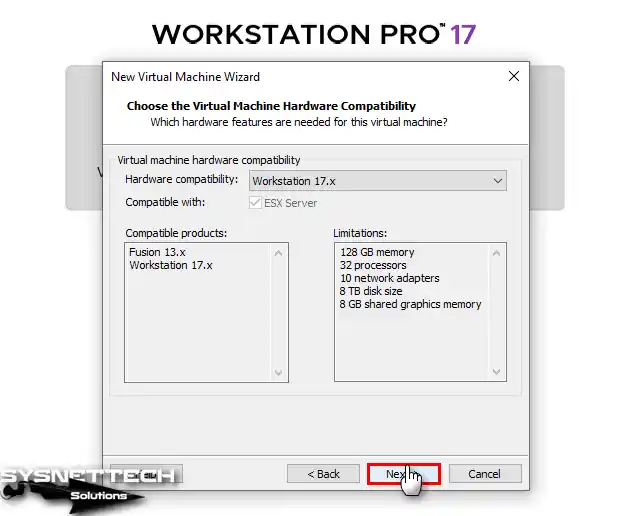
Choosing the correct HDW version for your VM is very important. For this reason, this setting will improve performance. So, choose the newest version of VMware Workstation and click Next.
Step 3
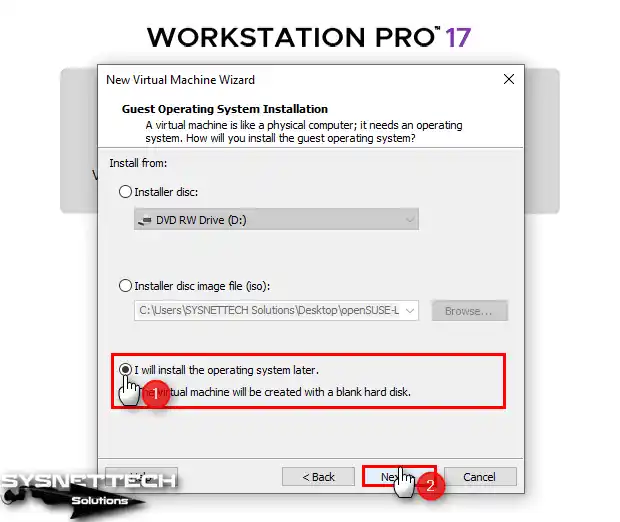
First, let’s set up the virtual hardware. Later, we’ll add the ISO file to the virtual machine. Just pick the “I will install the operating system later” option and keep going.
Step 4
First, select the operating system platform you will install with Workstation. Then select Debian 12.x 64-bit version for Kali Linux.
NOTE: You may not see Kali Linux here; don’t worry! On such platforms, you usually see Debian because they developed this OS on this system.
In truth, if you know the simple steps for creating a virtual computer for Debian, all the choices here will feel known to you. This basic know-how will also be useful when you work with other types of Linux systems later on.

Step 5
Since you’re making a Kali virtual machine, pick a name for it. Then, decide where you want to put it on your computer’s disk.

Step 6
Now, let’s tune the performance of VM. For this, you need to choose the number of virtual processors and the number of virtual cores. But keep in mind that this depends on the performance of your host PC’s processor hardware.
For this reason, 1 processor and 8 cores are sufficient for the guest machine. In short, configure the processor settings as shown in the image below and continue.

Step 7
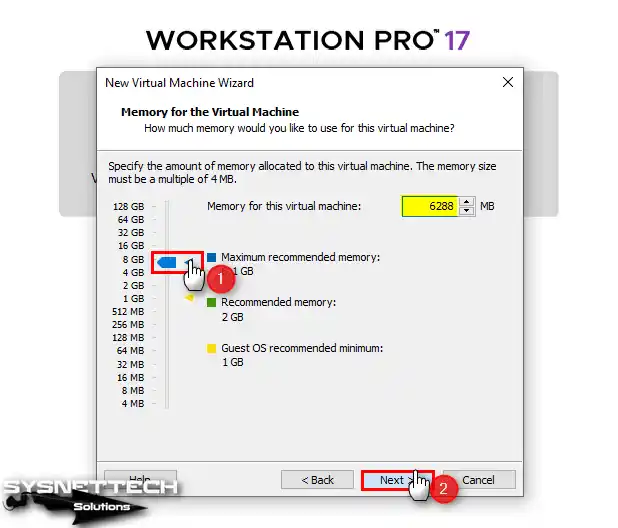
Likewise, determine the RAM size according to your host computer. If your PC is one of the 2024 models, select maximum. The VMware Workstation program will adjust the virtual memory size for maximum efficiency.
Proceed by clicking on the blue icon for the maximum value, as shown in the image below.
Step 8
You can select the IP block you want to use on the virtual computer from the Network Type settings.
When you choose a bridged network, you assign an IP address to your VM from the DHCP server on your physical network. However, if you select the NAT adapter type, you will assign addresses from a different IP block. In this case, you will not receive an IP address from your physical network.
After you set up the network settings, you need to pay attention to the hardware side. You follow a similar process when you set up virtual hardware on a different system, like Ubuntu on VMware. Based on my experience, the right choices here have a direct effect on performance. In particular, you should adjust CPU and memory allocation based on your host’s limits.

Step 9
Please stick with the default option, LSI Logic, for reliable disk access. In short, default settings are usually best unless you have special needs.

Step 10
We all want our virtual machines to run faster and better. That’s why we picked NVMe, the newest and fastest technology for virtual disks.

Step 11
Since you will install Kali Linux from scratch, you must create a new virtual disk. If you have previously installed Linux on a virtual disk, you can use the existing disk. To do this, you can select Use an existing virtual disk.
However, a new disc is always good. Therefore, choose “Create a new virtual disk” suitable for your Linux system.

Step 12
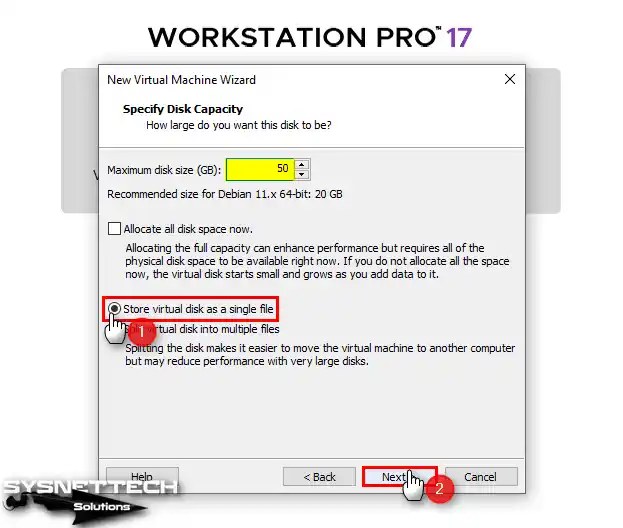
There are operations you can perform or software you can install on your Kali virtual machine. Therefore, change the size of the virtual disk to something other than the recommended size.
You can also store the virtual disk file as a single file type on your host PC. To do this, select storage as below and continue.
Step 13
Specify the name and location of the disk file in the Specify Disk File window. Or continue by choosing the default set by the VMware Workstation.

Step 14
Let’s further adjust the hardware features of the Kali virtual computer we have prepared. To do this, click Customize Hardware.

Step 15
Click on “Processors” in the virtual machine’s hardware settings. Then, check out the Virtualization Engine properties. Make sure to turn on all the settings in the section below.
- Virtualize Intel VT-x/EPT or AMD-V/RVI
- Virtualize CPU Performance Counters
- Virtualize IOMMU (IO Memory Management Unit)

Step 16
We must add the Kali Linux ISO file to the virtual machine. To do this, enable Use ISO Image File from the settings of the CD/DVD device.
Finally, select and add the ISO image file you downloaded from this link with Browse.

Step 17
We should be able to use your USB 3.0/3.1 devices on your Kali guest machine. Therefore, open the USB Controller device settings. At this point, select USB 3.1 from the Compatibility options.

Step 18
For a smoother graphics experience on your virtual machine, go to Display settings. Turn on the “Accelerate 3D Graphics” option. Also, adjust the graphics memory based on your PC’s graphics card.

Step 19
You have prepared your Kali Linux system. Now close the wizard by checking the settings one last time.

Step 20
Run your Kali Linux 2024 guest machine.

How to Install Kali Linux on a New Virtual Machine
You have made all the settings for Kali using VMware Workstation virtualization software. Now, you should boot the ISO image you added to your VM. When you start your virtual PC, you will see the boot screen.
Step 1
You booted your system with the Kali ISO image. Meanwhile, you will see the Kali Linux Installer Menu (BIOS Mode) as below.
On this screen, choose to perform the system setup using the graphical interface. So, press Enter using the Graphical Install option.

Step 2
Pick the language you want for your Kali system from the Language options.

Step 3
To make sure your system has the right time, set your location correctly. Your PC will set the correct time zone and save daylight by itself.

Step 4
It is crucial to choose the keyboard layout of the virtual PC. Therefore, you should select whatever keyboard type your host has. On this screen, configure the keymap location for Kali.

Step 5
You can configure the name under which your Kali system will appear on the network from the hostname section.
The installation wizard assigns the name “Kali” by default. However, you can change this name according to your network environment.

Step 6
Let’s say you have an Active Directory server in your structure. In this case, you can make your virtual system a member of the domain. If not, continue by leaving the domain name blank.

Step 7
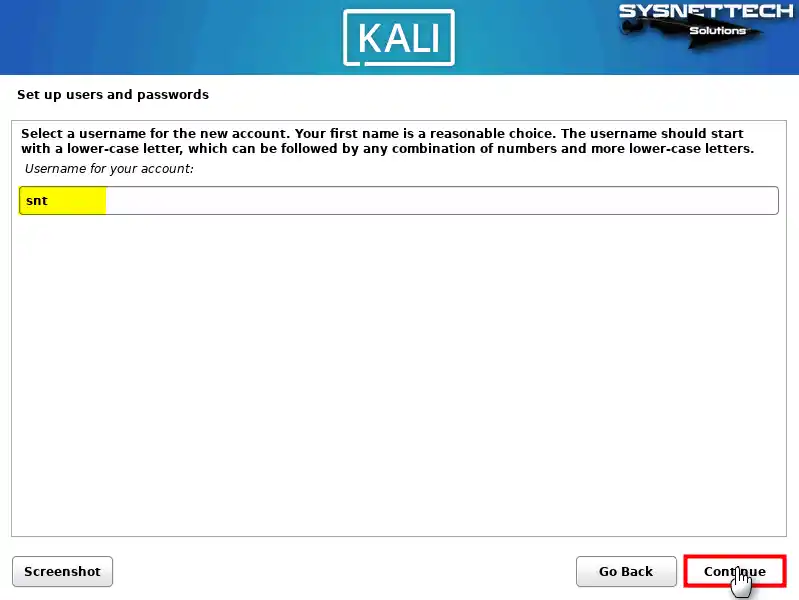
Type the name of the user account that you will use for non-administrative operations.

Step 8
Type the user account name you created in lowercase letters.
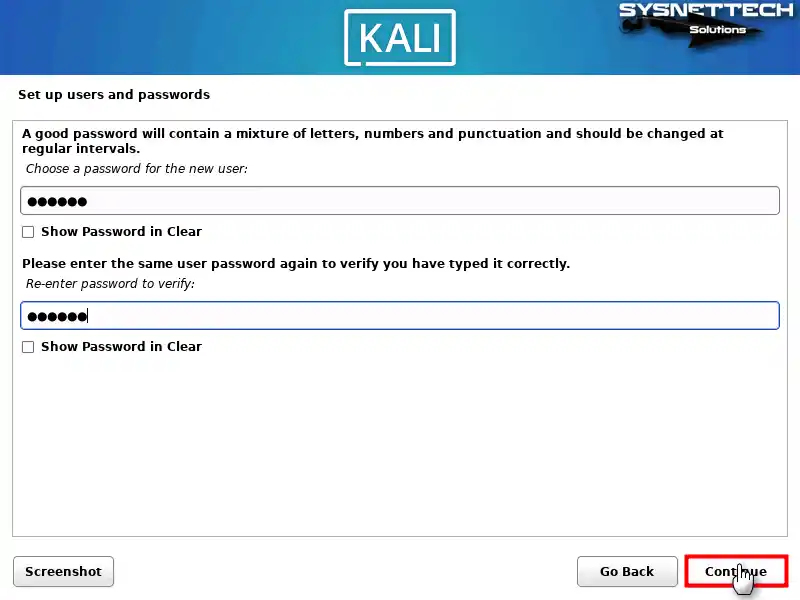
Step 9
Create a solid and hard-to-guess password for your user account.
Step 10
Select your time zone to configure your system clock correctly according to the location you live in.

Step 11
Since you will install a clean Kali system, you should use the entire virtual disk you created. In this case, continue with the Guided – Use Entire Disk option.

Step 12
Please choose the specific virtual disk that you wish to divide into multiple partitions.

Step 13
You can partition your system’s disk using different disk schema structures. However, you may not be sure about the action you will take. Then, select the first choice, All Files In One Partition.

Step 14
Check the changes to be made to your NVMe virtual disk on the disk partitioning screen. Afterward, continue with the Finish Partitioning and Write Changes to Disk options.

Step 15
You have examined the partitions to be formatted. Now select Yes to confirm writing the changes to disk.

Step 16
You can choose the desktop environment you like to use on your Kali Linux guest operating system. In this screen, the default desktop environment is XFCE. However, you can also choose GNOME or KDE based on your personal preference.

Step 17
Select Yes to install GRUB Boot Loader on the primary partition and click Continue.

Step 18
Select your NVMe virtual disk to choose to install the GRUB menu on a bootable device and continue.

Step 19
You have completed the setup of Kali Linux on the VM. Now remove your media, that is, the ISO, and restart the virtual PC.

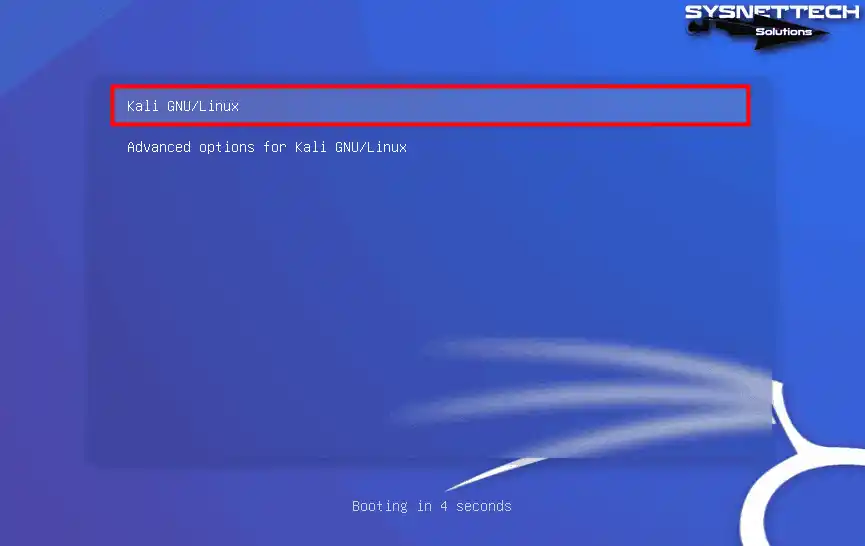
Step 20
When Kali guests restart your machine, you will see the screen below. You can directly select Kali GNU/Linux in this boot menu. Plus, you can also wait for the countdown value in the GUI.
Step 21
After typing your user account name and password, click the login button.

How to Install VMware Tools for Kali Linux VM
You have completed all the steps to install Kali Linux with VMware Workstation. But there is a problem!
You need to install the drivers for the guest system. So you should be able to use full-screen resolution, Shared Folder, or USB devices. That’s why you need to install VMware Tools on your virtual system.
Let’s say you have Internet on your host while installing the Kali operating system. At this point, the wizard will automatically install VMware Tools. However, if you do not have Internet access, you can do this through Workstation Pro.
Suppose you get an error or can’t connect your VM to the Internet. After this step, you can add the needed plugins with one command.
Steps:
Step 1
To install VM tools on Kali Linux, open the terminal. Then type in the ‘sudo apt install open-vm-tools-desktop’ and hit Enter. Then it asks you a question, so type Y and hit Enter to confirm and install the necessary packages.
sudo apt install open-vm-tools-desktop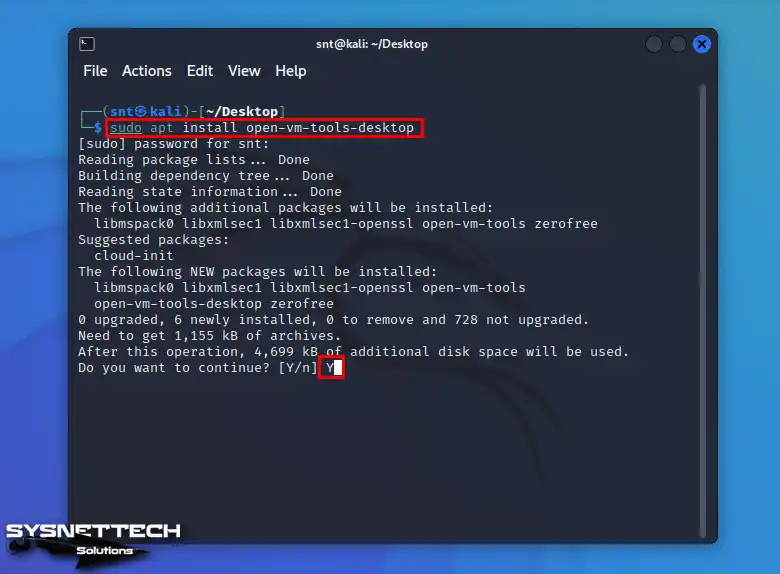
Step 2
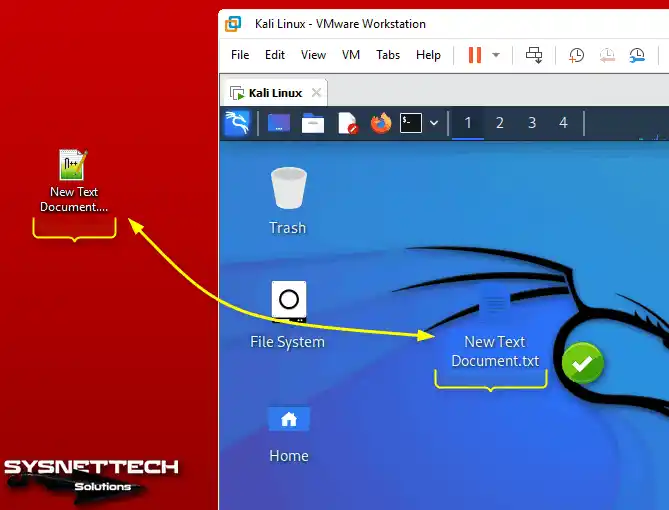
After installing VMware Tools, restart your Kali VM. To test, try a file transfer. To do this, drag and drop a text document from the desktop of your host system to your guest system.
Step 3
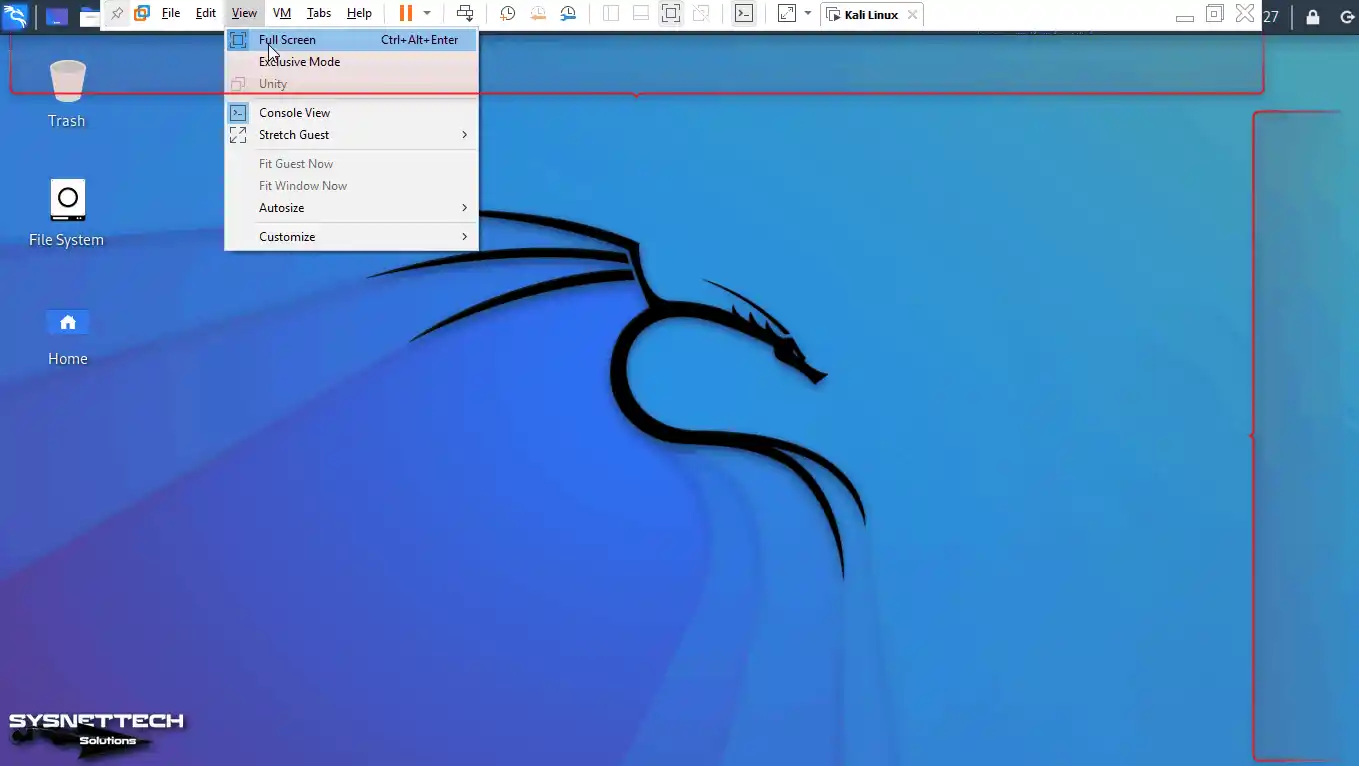
Once the file transfer check is OK, try using your virtual PC in full-screen mode to make sure everything works.
How to Configure Shared Folders in Kali Linux
You are using your Kali machine on the operating system of your host PC. However, you need to transfer larger files quickly. This is where the Shared Folder feature comes into play.
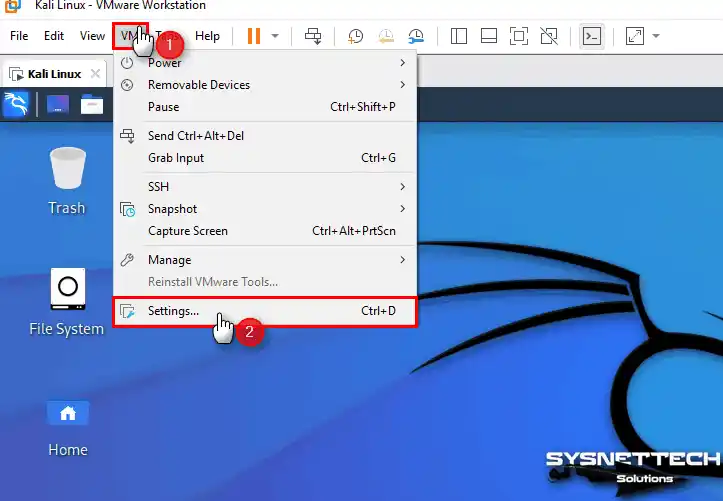
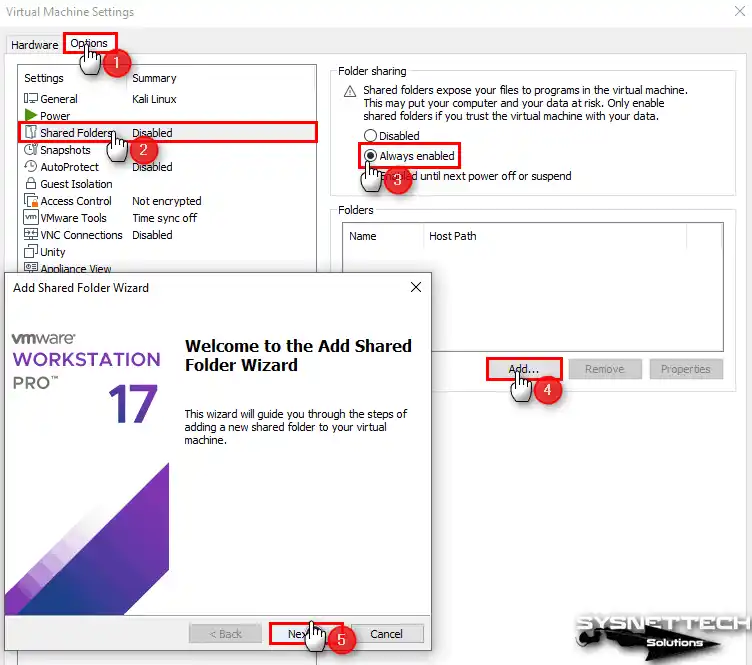
With your Kali VM running, click VM / Settings from the tool menu.
After opening the virtual machine settings, click the Options tab. Then, select Shared Folders from the settings listed on the left panel.
Set Folder Sharing to Always Enabled. Finally, click the Add button to specify the location of a folder from your host system.
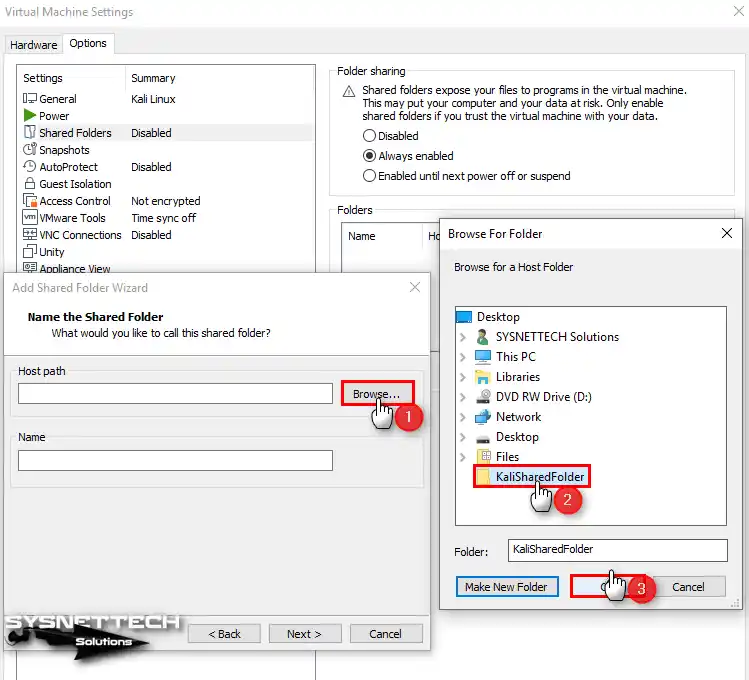
In the Name the Shared Folder window, click Browse in the Host Path section. Then, in the window that opens, create a new folder in the desktop location of your host OS.
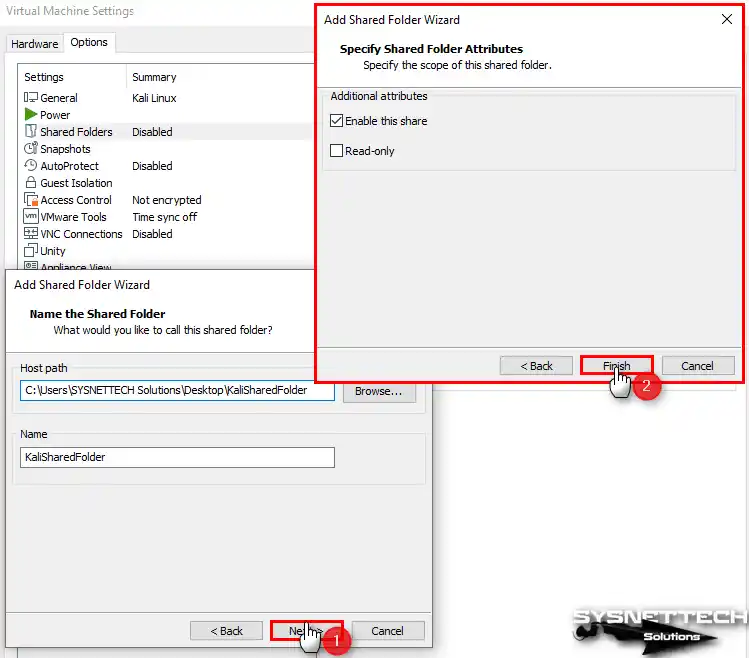
You must share the folder you created. To do this, select the Enable This Share option.
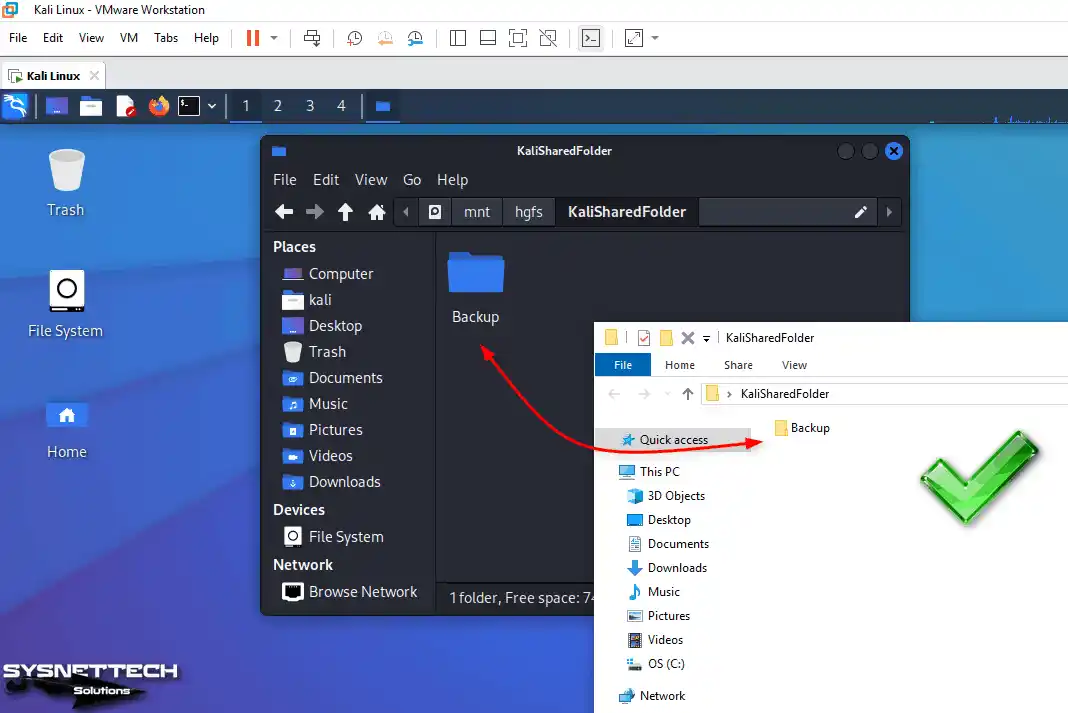
We need to check the Shared Folder between the host and the VM. Check that you can see the contents of the folder from both systems. Additionally, you can access the shared folder from /mnt/hgfs/FolderName.
To create a shortcut for the shared folder on your VM’s desktop location, open the terminal and execute the command below.
sudo ls -s /mnt/hgfs/KaliSharedFolder ~/Desktop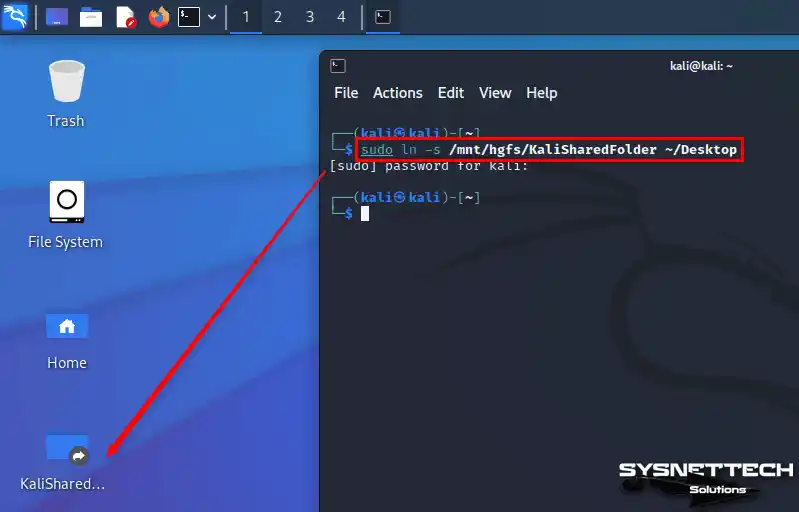
When you restart your Linux VM, the shortcut you created in the desktop location may disappear. If you find that it is not working, you need to enable it again. Thus, it would be best if you mounted it automatically every time you restart your system.
Let’s use the terminal to re-enable the public folder on your Linux system. Edit /etc/fstab for automatic mounting by following the command below.
sudo mount -f fuse.vmhgfs-fuse .host:/ /mnt/hgfs -o allow_other
sudo nano /etc/fstab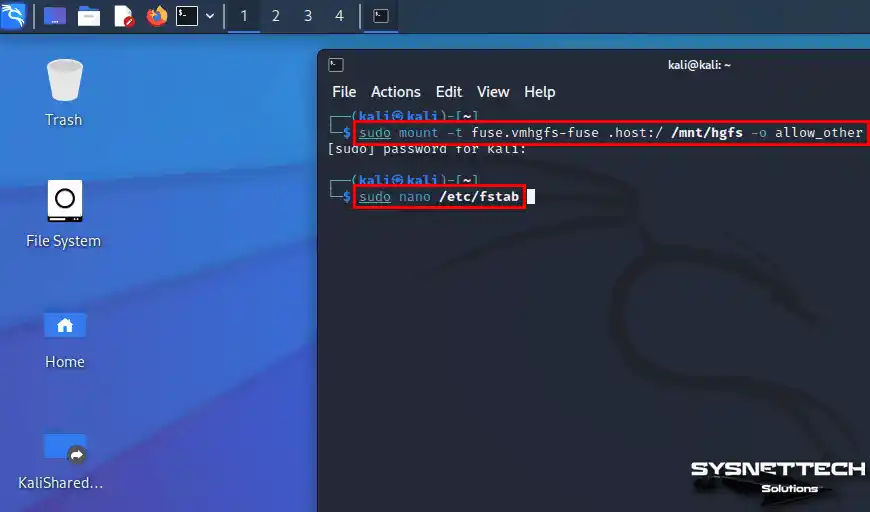
Let’s automatically re-enable Shared Folder when you reboot the system. To do this, add the following command to /etc/fstab. Then, press CTRL + X / Y / Enter to save the file.
.host:/KaliSharedFolder /mnt/hgfs/KaliSharedFolder fuse.vmhgfs-fuse allow_other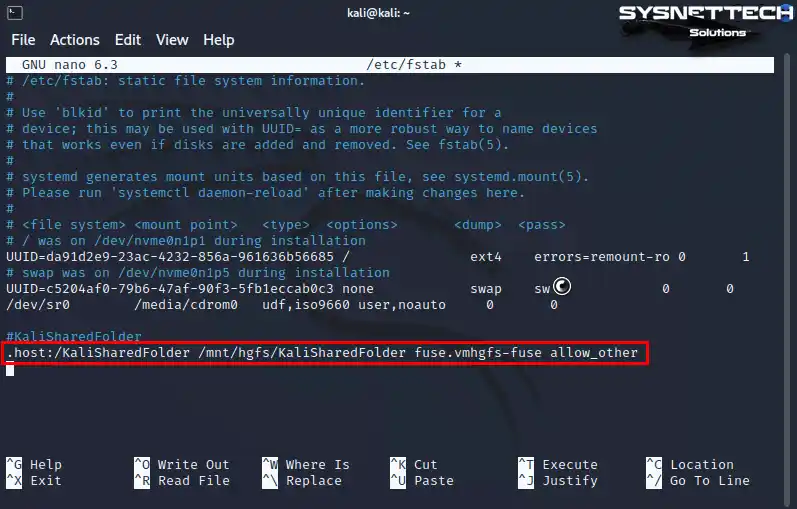
How to Use USB Flash Memory
When you change the USB controller compatibility to 3.1 while preparing the virtual machine, you can use your USB 3.0/3.1 storage devices or flash memories in your virtual system.
Step 1
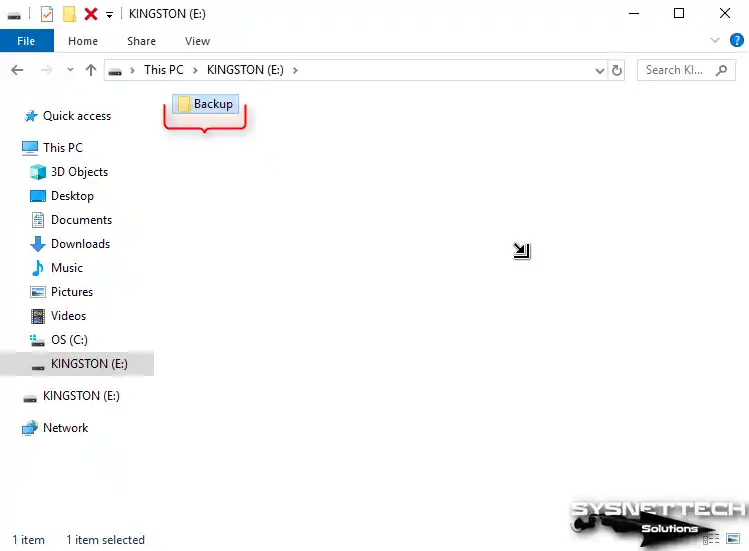
Insert a USB flash memory into the USB 3.0/3.1 port of your host computer and create a folder named Backup in it.
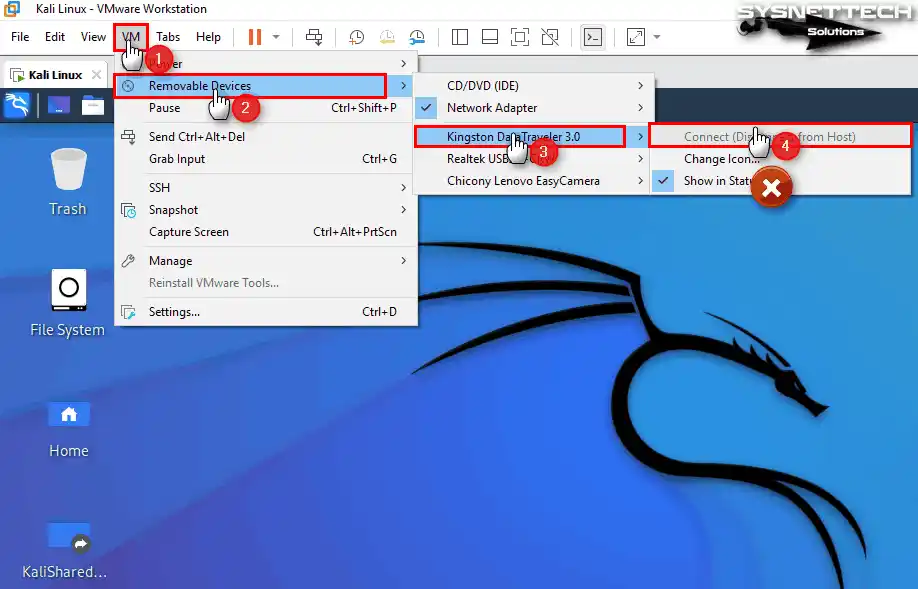
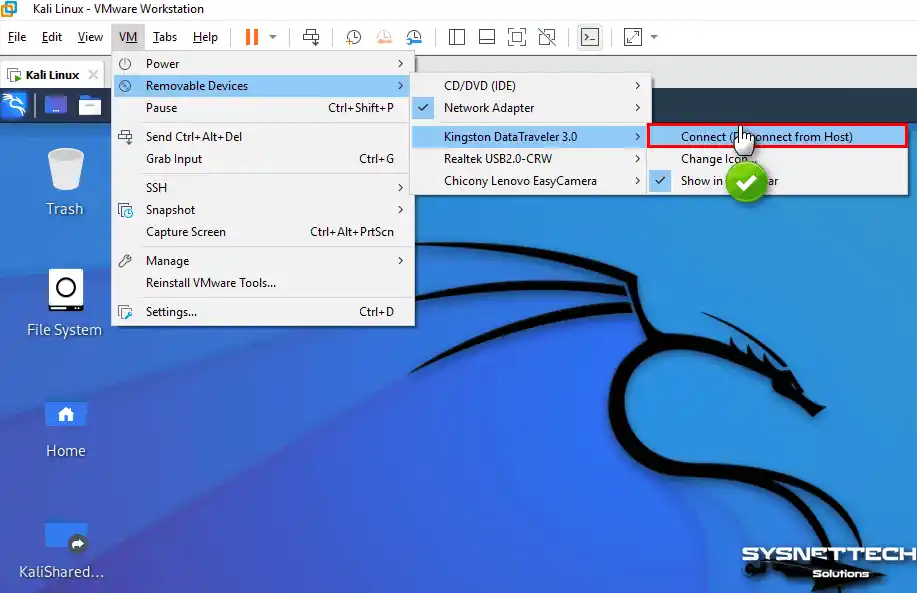
Step 2
To connect your USB to your virtual machine, click on VM, then select Removable Devices. At this point, choose the name of your USB and click Connect from the tool menu.
If you see the Connect option grayed out or inactive, as in the image below, turn off your virtual computer and proceed to the next step.
Step 3
Open the Kali Linux 2022.VMX file and change (usb.restrictions.defaultAllow = “FALSE”) to “TRUE” and save the file.

Step 4
Restart your virtual computer, and you can connect your USB disk to your VM.
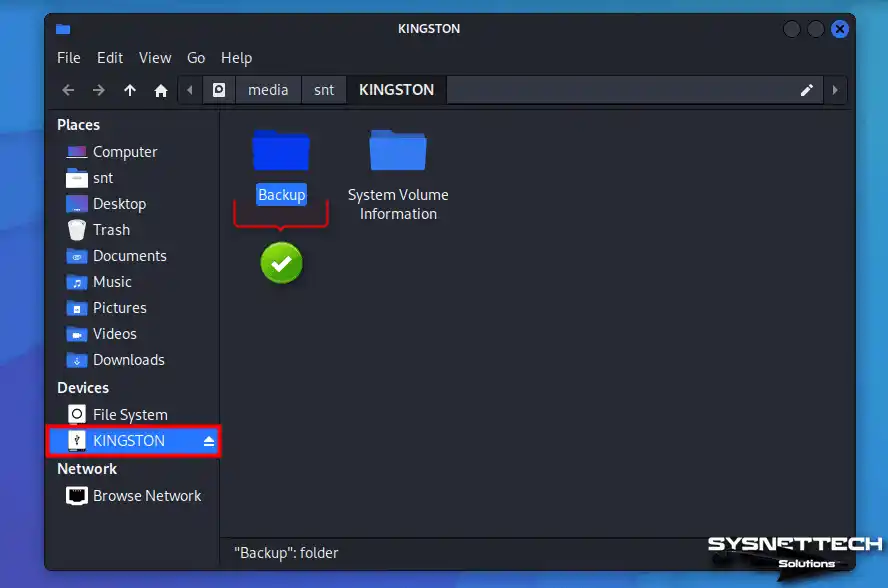
Step 5
When you check the contents of your USB stick in your VM, you can see that the folder you created called Backup exists.
Video
Installing Old Versions
| Kali / VM Version | YouTube Video | Slide |
|---|---|---|
| 2019 / 15 Pro | Watch | – |
| 2020 / 15.5 Pro | Watch | View |
| 2022 / 16 Pro | Watch | View |
| 2022.3 / 16 Pro | Watch | View |
| 2022.3 / 17 Pro (NEW) | Watch | – |
Frequently Asked Questions (FAQ) About VMware Kali Linux
- What are the system requirements for using Kali Linux on a VM?
- Can I use Kali Linux on VMware Workstation?
- Is it better to run Kali Linux in VMware?
Conclusion
In summary, you can run Kali Linux on your Windows 11 or 10 PC with VMware Workstation. Using this system, you can start discovering vulnerabilities in both your network and your system. Also, you can use this OS on a virtual machine without damaging your actual system. So, you can practice using it without any risks.
You can use your Kali VM most efficiently using all the steps I have explained in this article. For example, you can import a file from your USB disk or use a shared folder. Plus, you can try various projects to stay ahead of online dangers.

4 People Shared Their Experience
In the picture it says Kali Linux 2018, but in the Title it says Kali Linux 2019..
There is no 2019.2 version tutorial only the 2018 tutorial in SYSnettech
Yes, you are right. However, you can also install new versions of Kali by following the steps in this article.
you are awesome but when i tried installing vmtools it says package cannot be located