
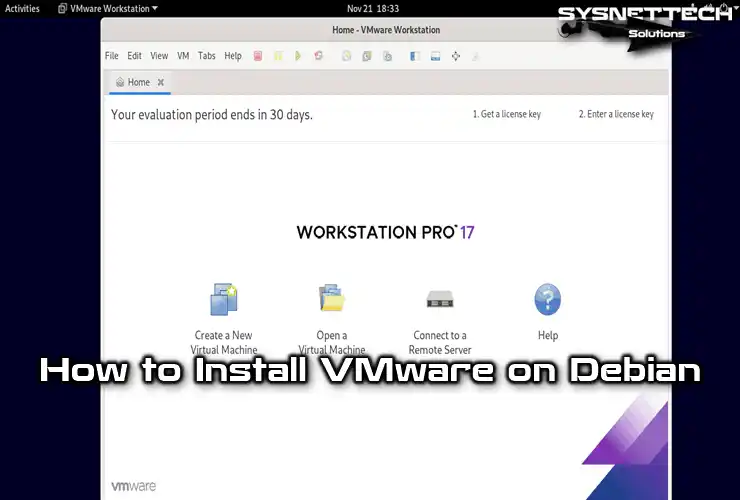
In this article, we will look at VMware Workstation 17 Pro on the Debian 13 Trixie system. This program is a strong virtualization tool that can run many operating systems. For example, you can use Windows, macOS, and Linux at the same time.
We will work with Debian 13 Trixie. First, you will learn to make and run virtual machines. Setting up the network is also very important. I will show system repair with snapshots.
Also, with help for fixing problems, our guide gives you every fact you need. So, you will make the best use of VMware computer software!
How to Set Up VMware Workstation 17 to Run VMs on Debian
You can use Debian, a perfect Linux system. You can make fake computers on it. For example, you can run Windows or other computer systems.
The best part is that you don’t need to restart your computer. This way, you can work efficiently without wasting time.
You can add a new system using the two-boot method. You can put this new system on your current computer. But you must turn off and on your PC to change systems. This can take a lot of time.
So, use a fake computer for a quicker fix. You can add the system you need to a fake PC. This lets you use it at the same time as your first system. Now, you can work well without losing time.
Do you want to use Windows apps on your Debian machine? First, make a virtual system. For example, you can add Windows 10 or an old system. This lets you use your job programs with no trouble.
You can use virtualization software on your Linux machine. You can pay or not pay for them. But pick an app that has many good tools. This way, you will help you do more work with your job.
For example, you can save a snapshot of a system you made yourself. Then, you can make the virtual computer parts work better. That is, this helps the system run much, much faster.
Using VMware Workstation on Debian OS
First, you need to download VMware Pro to your Linux system. You can use the official website or other sources.
First, visit the site with your web browser. Then, download it from the relevant page. Or, you can also use the command line. You can easily obtain the program with the “wget” command and perform a quick & smooth installation.
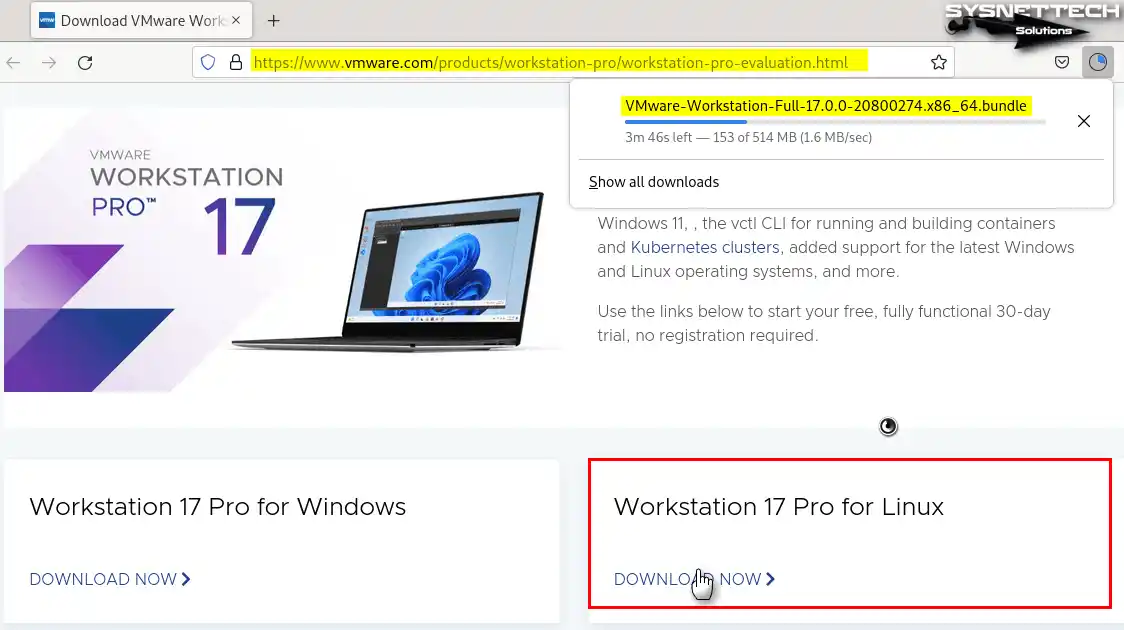
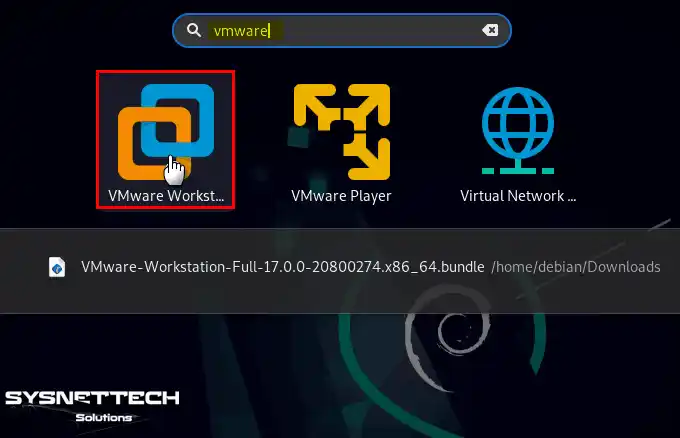
1. How to Download and Install VMware Pro
Step 1
The file extension for VMware Pro for Linux is Bundle. Visit the download page and locate the “Workstation 17 Pro for Linux” heading. Then, click the Download Now link. Save the Bundle file to your computer.
You can download the VMware bundle file from the website. As an alternative, you can use the wget command. This way, you can quickly get the Workstation program.
cd ~/Downloads
wget https://download3.vmware.com/software/WKST-1700-LX/VMware-Workstation-Full-17.0.0-20800274.x86_64.bundle
Step 2
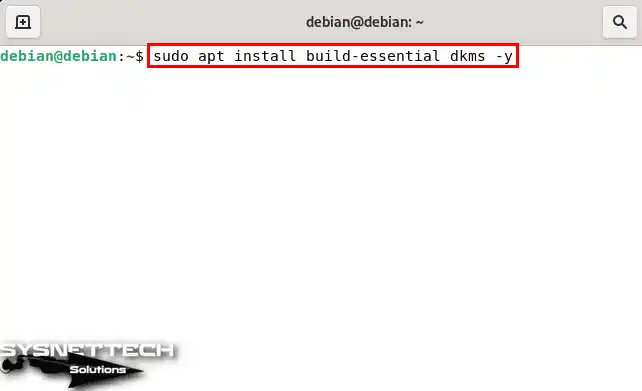
We need GCC packs for the Workstation app. Open the command line and type “sudo apt install build-essential.” This will add all the required packs for Debian.
NOTE: Do not go on without adding this pack. If you do, you will see the VMware Kernel Module Updater screen. In this window, you will see that the GNU C Compiler (gcc) package is missing.
Also, if you got the GCC pack as a deb file, press the Browse button. Then show where the file is and add it. Or, you can also get it using the command line. For this, shut the window by pressing Cancel.
sudo apt install build-essential dkms
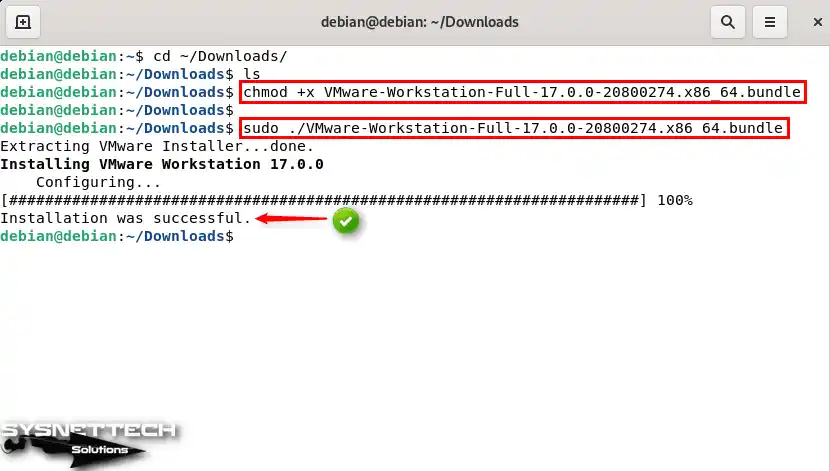
Step 3
Get the VMware bundle file to Downloads. Then, begin the setup by changing the file’s rights.
chmod +x VMware-Workstation-Full-17.0.0-20800274.x86_64.bundle
sudo ./VMware-Workstation-Full-17.0.0-20800274.x86_64.bundle
2. Running VMware Workstation & Resolving Kernel Issues
Step 1
After you finish the setup, press on Activities. Here, find and run the program by typing its name in the search box.
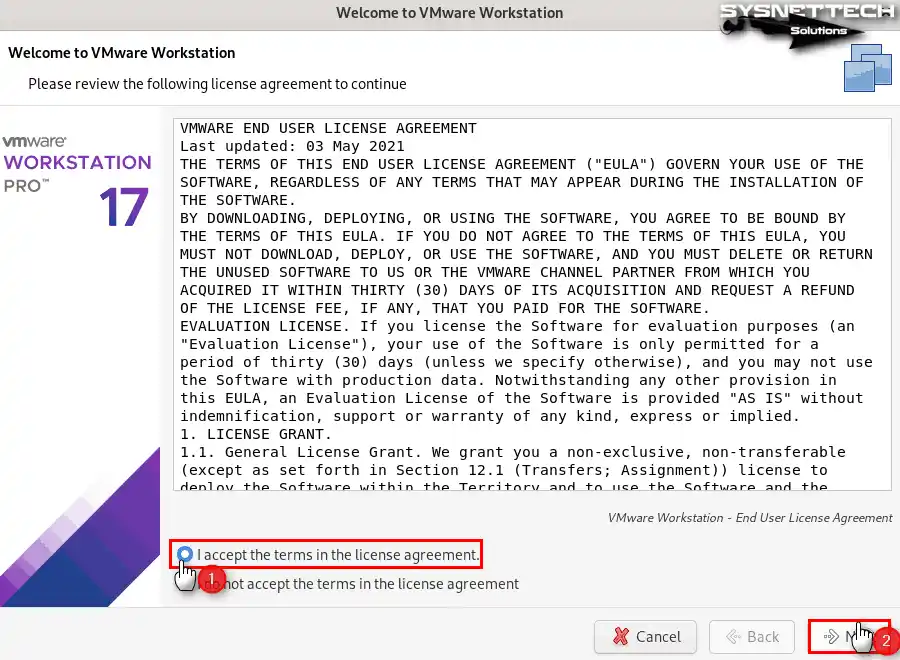
Step 2
As soon as you install the kernel modules, you will open the VMware VM software. First, click Next, choosing to accept the license agreement.
NOTE: After you add the kernel parts, start VMware again. This time, you might get the “Kernel Headers 5.10.0-14-amd64” mistake. To fix this, you need a few packs. First, you have to add these packs to your system.
Open the command line again and first go to the Downloads folder. Then, type the command “cd ~/Downloads && mkdir LinuxHeaders && cd LinuxHeaders”. This makes a new folder. Now, get the needed packs using the wget order. Keep the gotten packs in this folder.
cd ~/Downloads && mkdir LinuxHeaders && cd LinuxHeaders
wget https://the.earth.li/debian/pool/main/l/linux/linux-headers-5.10.0-14-amd64_5.10.113-1_amd64.deb | wget https://the.earth.li/debian/pool/main/l/linux/linux-kbuild-5.10_5.10.113-1_amd64.deb | wget https://the.earth.li/debian/pool/main/l/linux/linux-headers-5.10.0-14-common_5.10.113-1_all.deb | wget https://the.earth.li/debian/pool/main/l/linux/linux-compiler-gcc-10-x86_5.10.113-1_amd64.deb
Install all the deb packs inside the LinuxHeaders folder. Type “sudo dpkg -i .deb” into the terminal and run it. Restart VMware Workstation Pro and click the Install button this time.
Wait for the Linux kernel to compile and install. Be patient while the VMmon and VMnet modules are loading.
sudo dpkg -i *.deb
3. Configuring VMware Pro License Settings
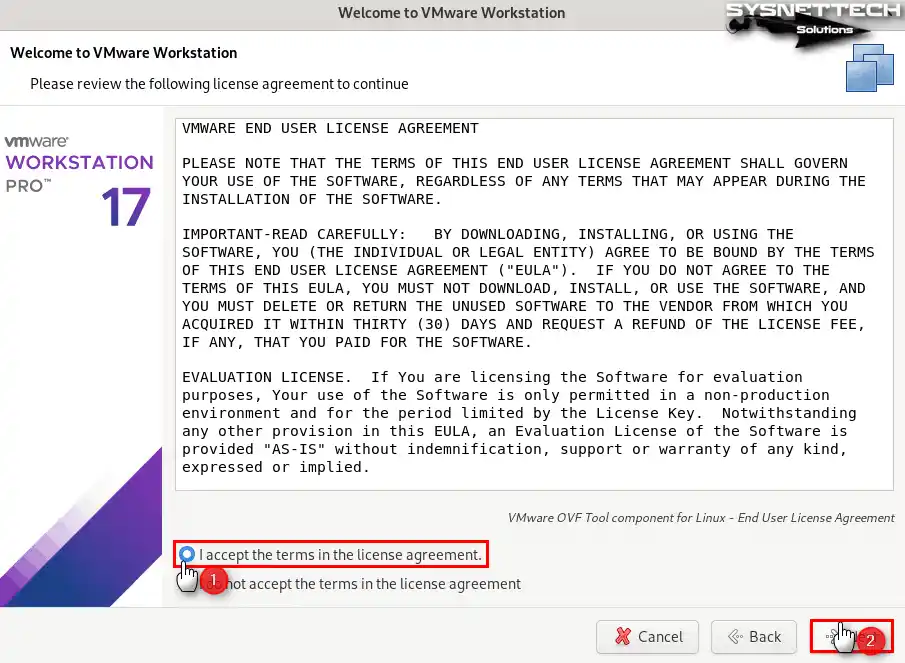
Step 1
Install the VMware OVF Tools components for Debian Linux. In the relevant window, read and accept the license terms, then click Next.
Step 2
I say you should look for new stuff each time you use Workstation Pro. So, go on by picking the “Yes” choice for that question.

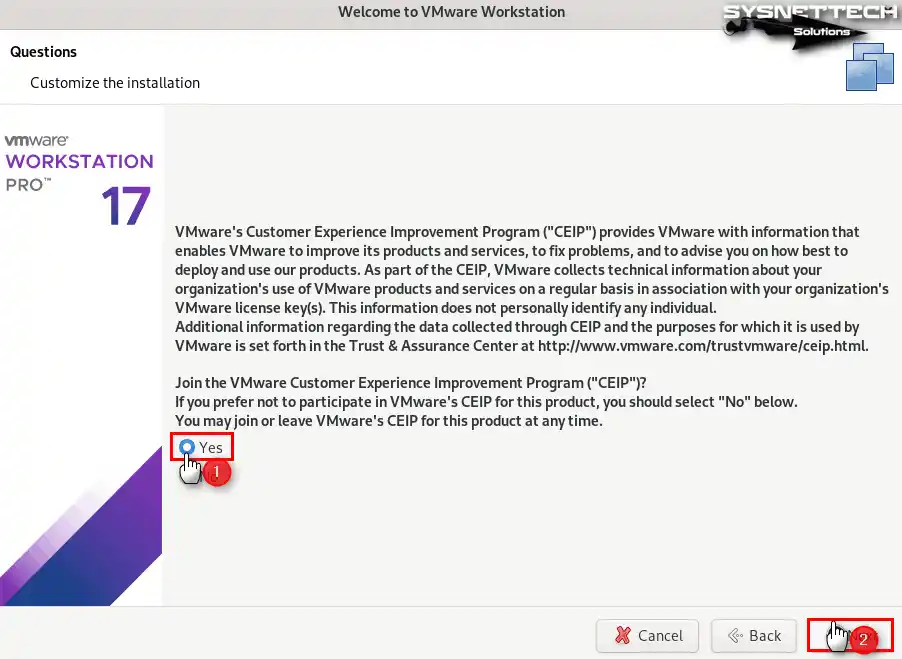
Step 3
I think you should join the VMware User Help Program (CEIP). This shows you like the Workstation app. But, if you do not want to, that is okay—you can keep going with the setup by picking “No.”
Step 4
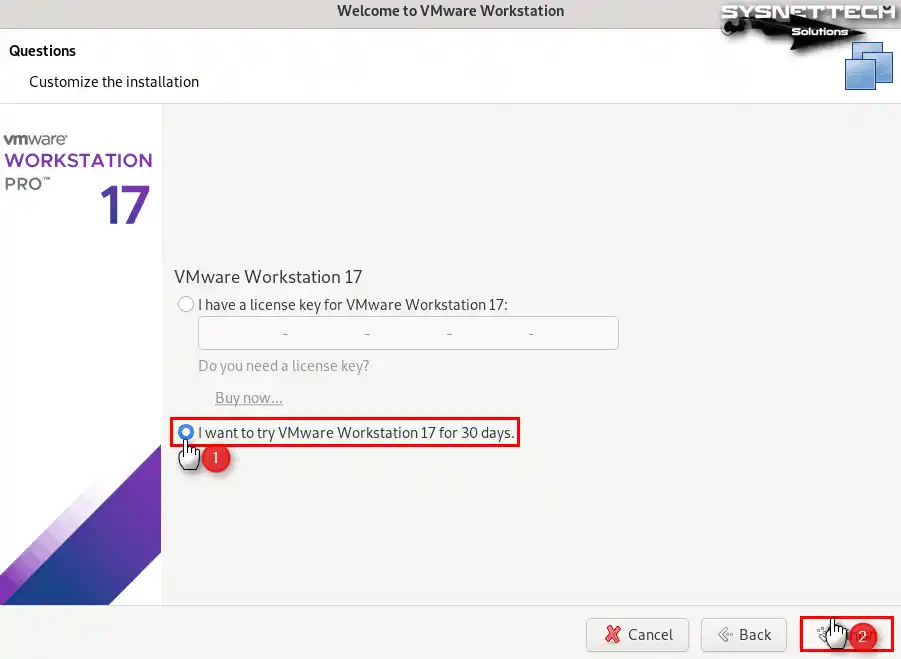
If you purchased VMware Workstation Pro for Debian, enter the license key. Here, you can activate the program. If you will be using the 30-day trial version, select the relevant option and click Finish.
Step 5
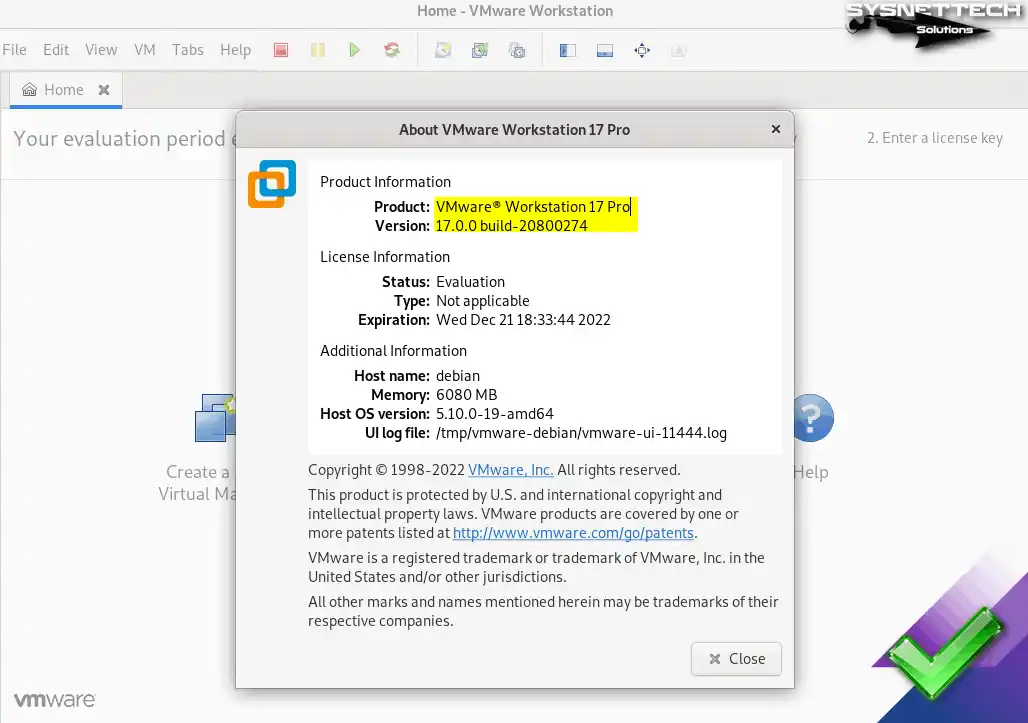
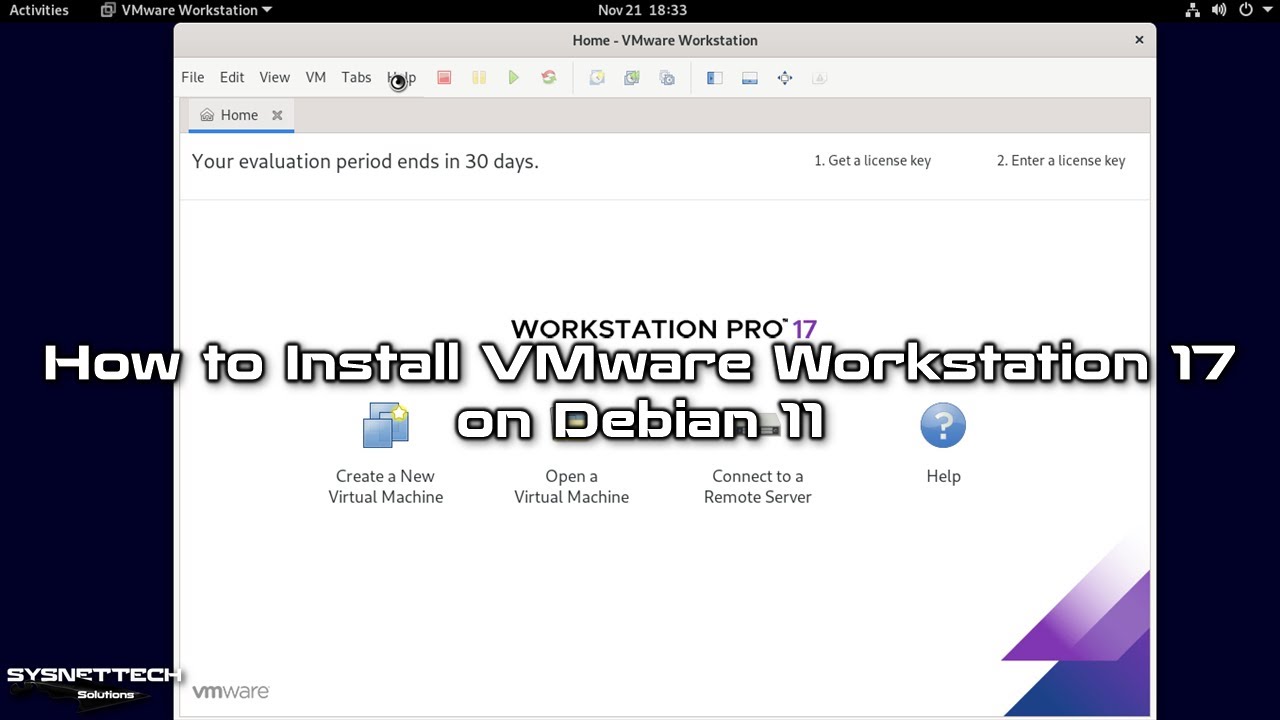
After you start the VMware desktop virtualization, see what version it is. Go to Help / About in the Tools menu. This way, you will check that the setup worked right.
How to Create a New Virtual Machine on Debian
After you install VMware Workstation on Debian, you can make virtual PCs. So, you can add any system you like and use your main computer well.
1. Configuring the Basic Settings of the Virtual Machine
Step 1
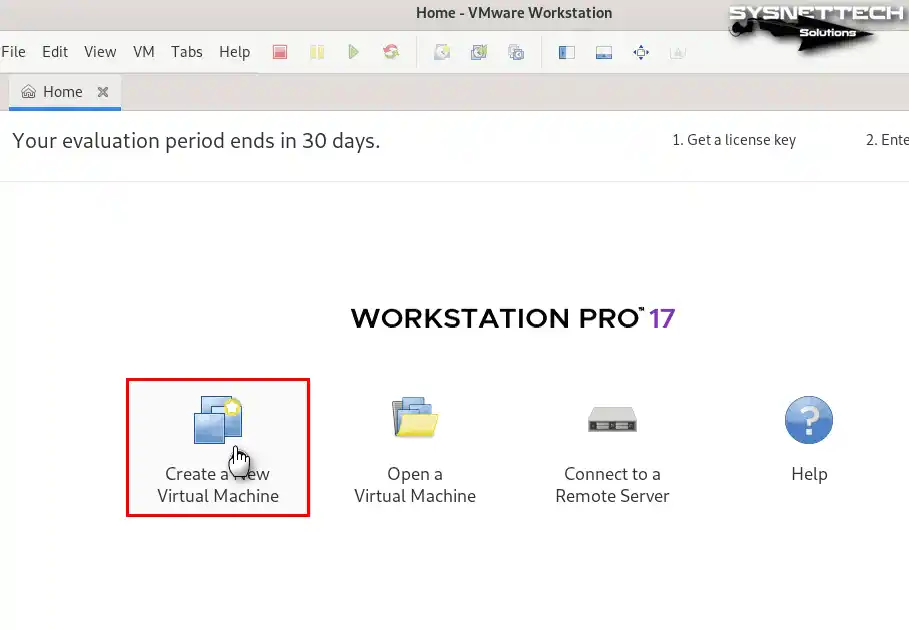
Open the VMware virtual machine manager on your Debian OS. Look at the options on the main page. Click the option “Create a New Virtual Machine” here. This will quickly launch the VM wizard.
Step 2
When you see the new virtual machine wizard, wait a bit. If you want to set up the Guest system in a harder way, pick “Custom (Advanced).” Or, press Next to keep going with the standard virtual hardware parts.

Step 3
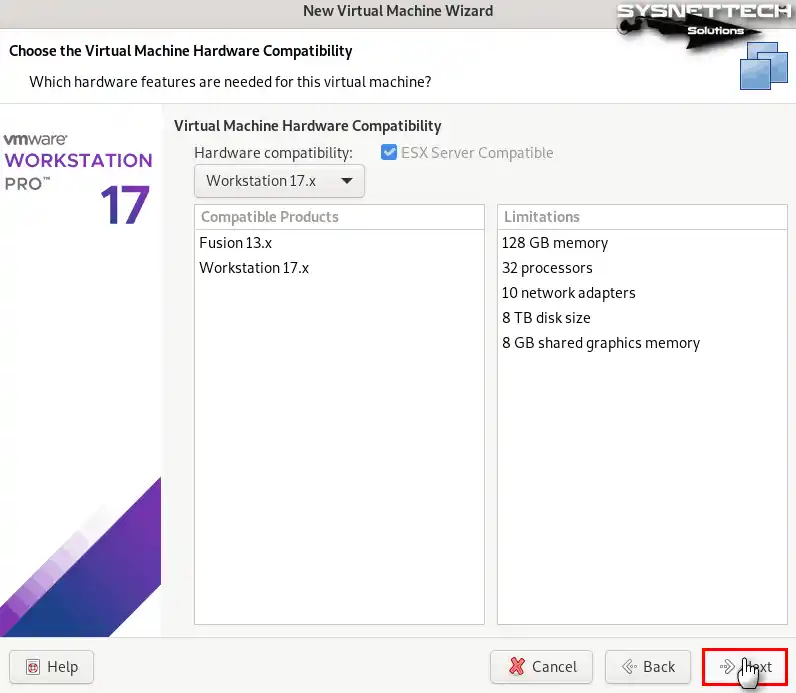
Leave the VM hardware compatibility as they are. Then, keep going with the steps.
Step 4
Insert the CD/DVD for the system you want to add. Right after, pick the “Use a Physical Drive” choice. Then, choose the right drive. This way, you can do the setup from your main DVD drive.
If you have an ISO file, you can add it from this screen. If you do this, a few settings will turn on by themselves.
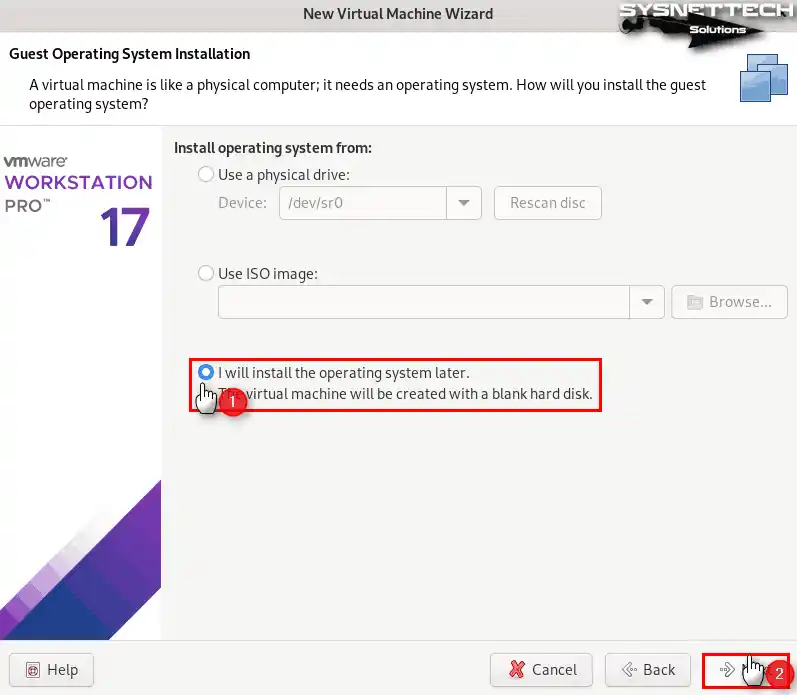
Let’s get a more advanced fake computer ready. To do this, pick the “I will install the operating system later” choice.
Step 5
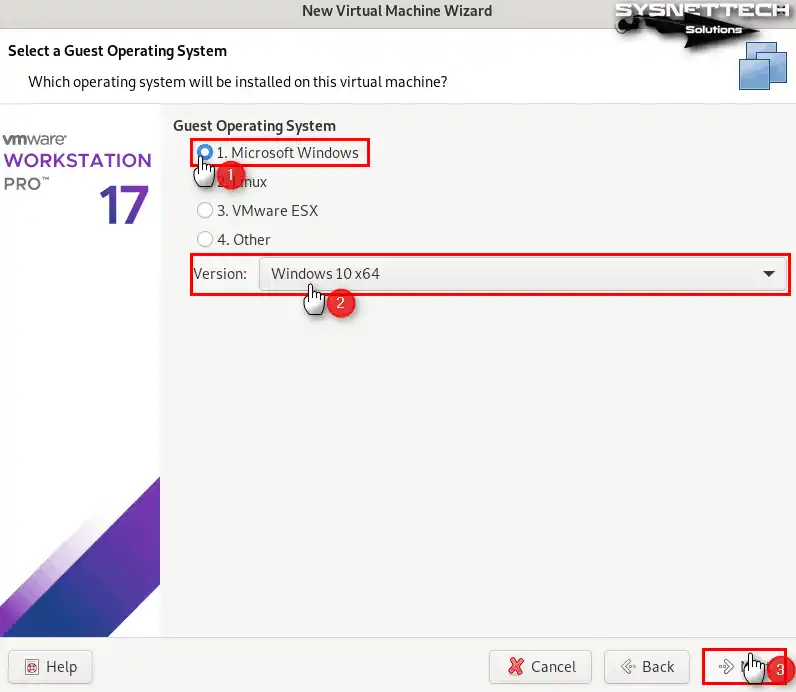
Open the window to pick the guest system. First, select the system platform. View the version settings. For example, if you are going to set up a Windows 10 virtual machine, select the “Windows 10 x64” option.
Step 6
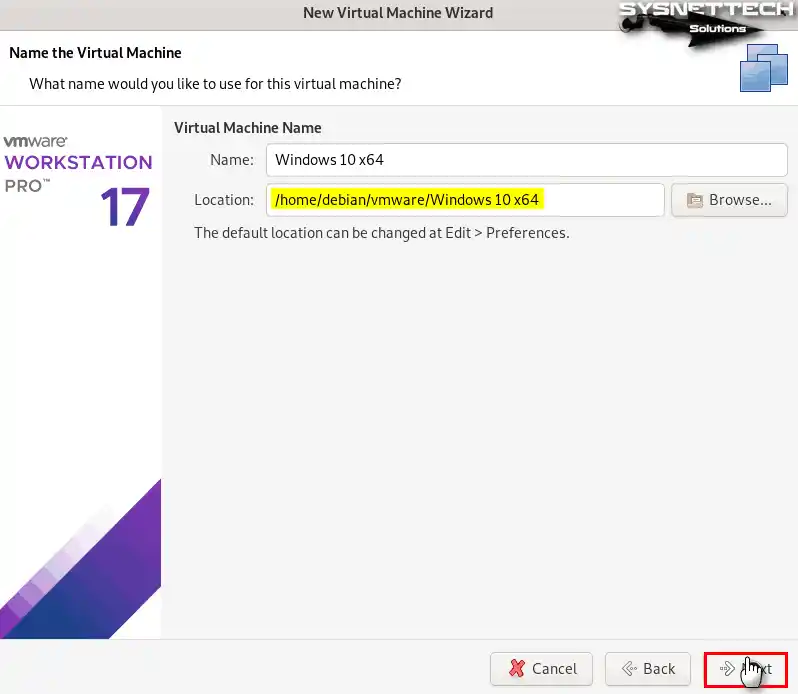
Type any name you want for the Windows system. Then, say where to keep it on your primary disk.
Step 7
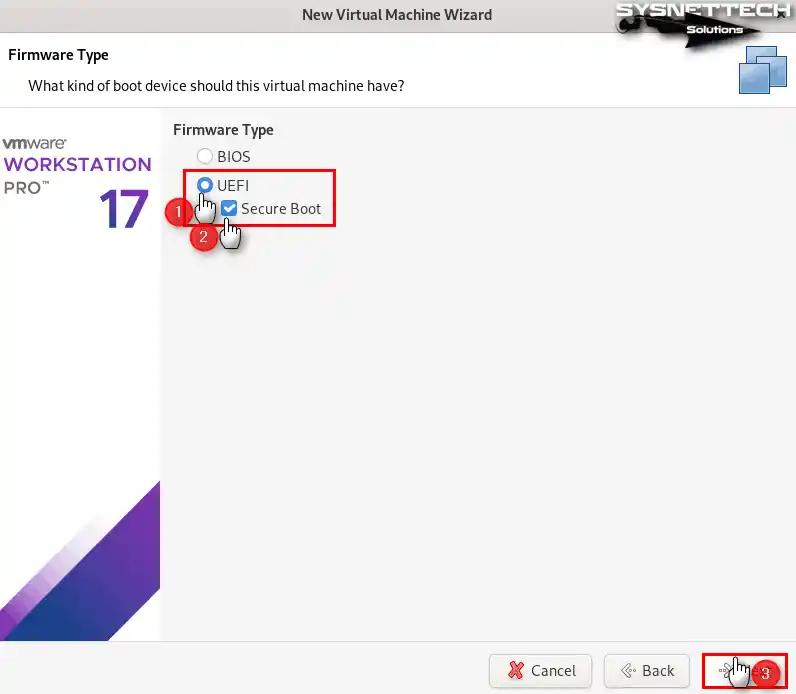
Set the Firmware type for your Windows 10 guest system. For a more secure option, select “UEFI / Secure Boot” and proceed.
2. Configuring Virtual Hardware Settings
Step 1
Here, think about what your Debian computer can do based on its CPU hardware. Pick a good number for the virtual processor. That is, you will get power from your real machine’s brain.
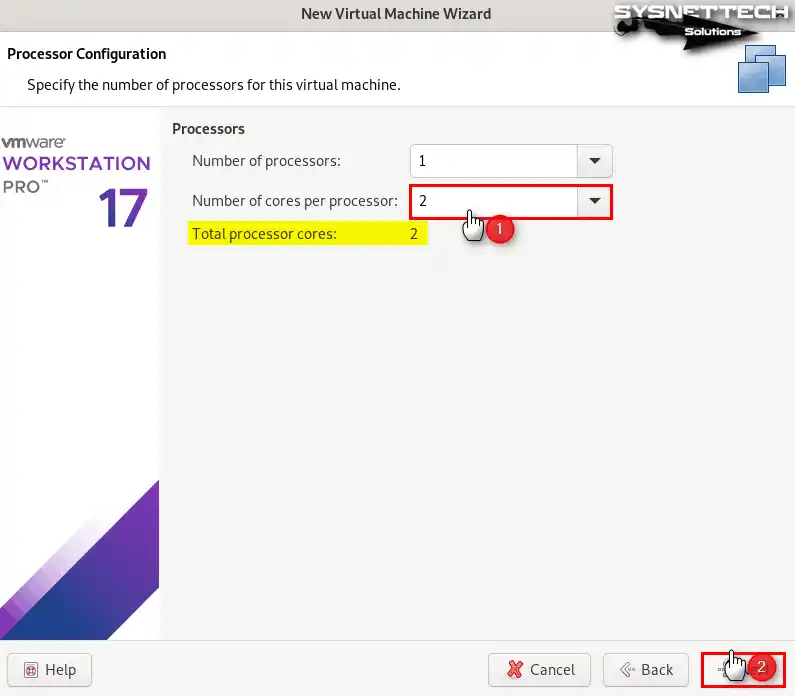
Step 2
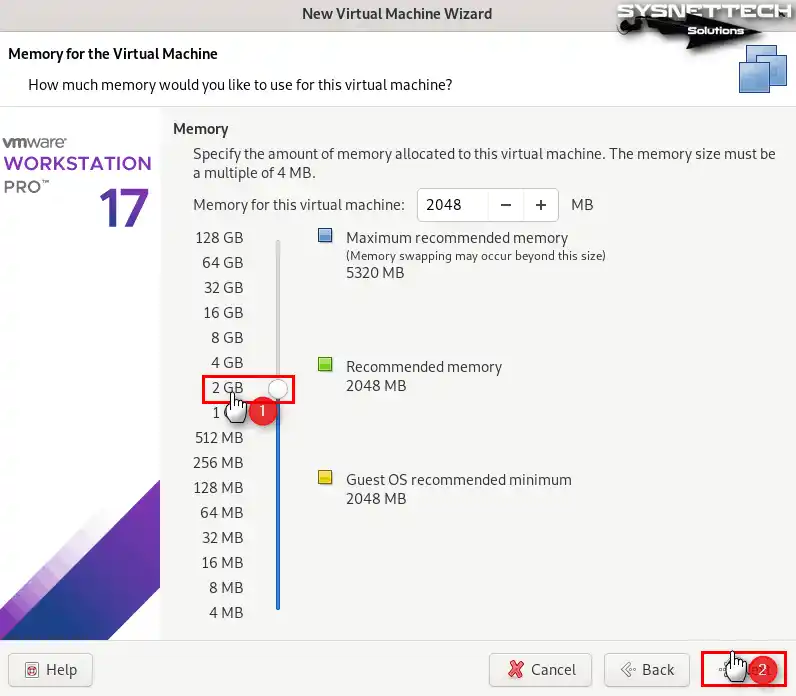
In the same way, change the memory size so your virtual system runs well. Pick the correct RAM value. So, you will also help your fake PC work better.
Step 3
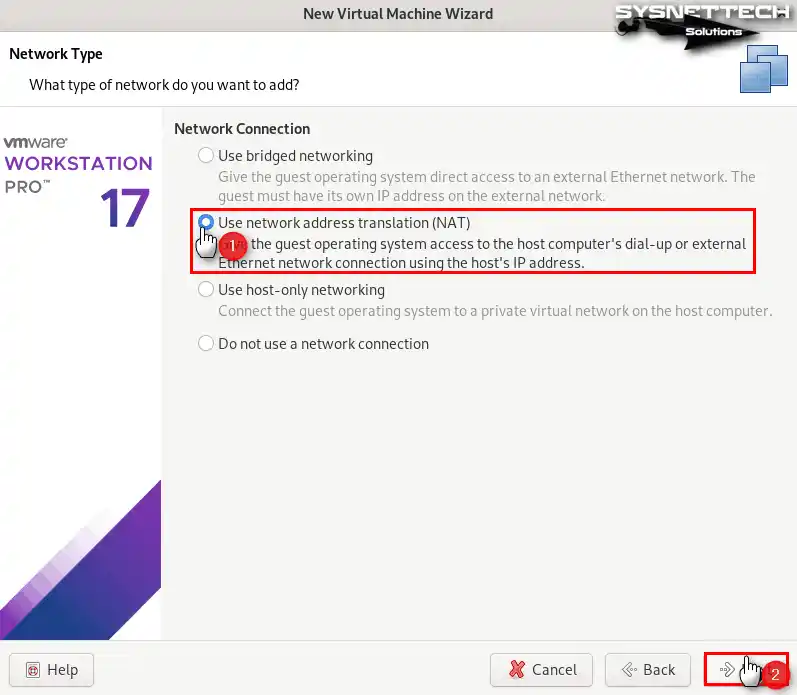
I recommend that you set up the virtual machine’s network to fit what you need. For example, you see the NAT part as usual. If the VMnet choices are hard for you, press Next to go on.
Step 4
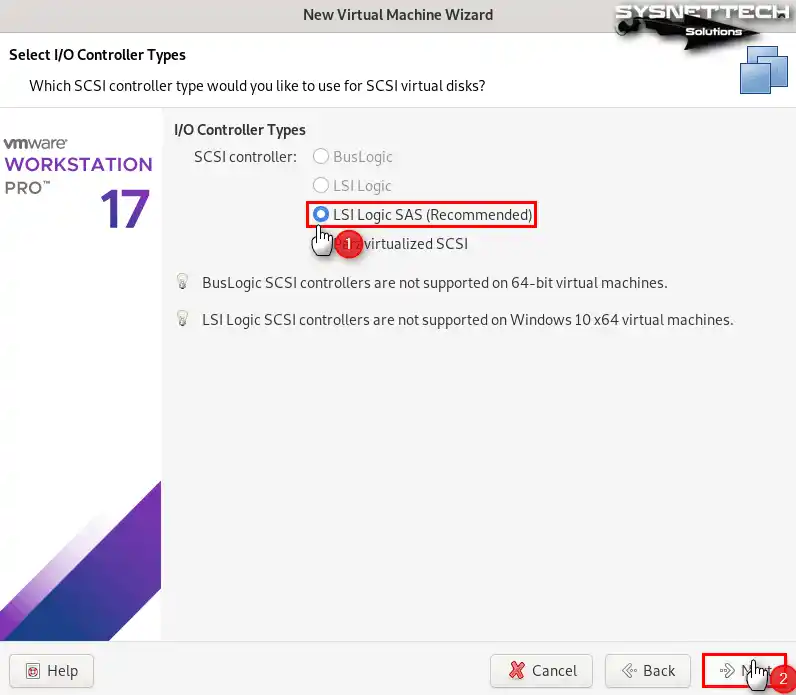
Pick the I/O Controller kind for the virtual disk. Say yes to the default “LSI Logic SAS” choice and go on.
Step 5
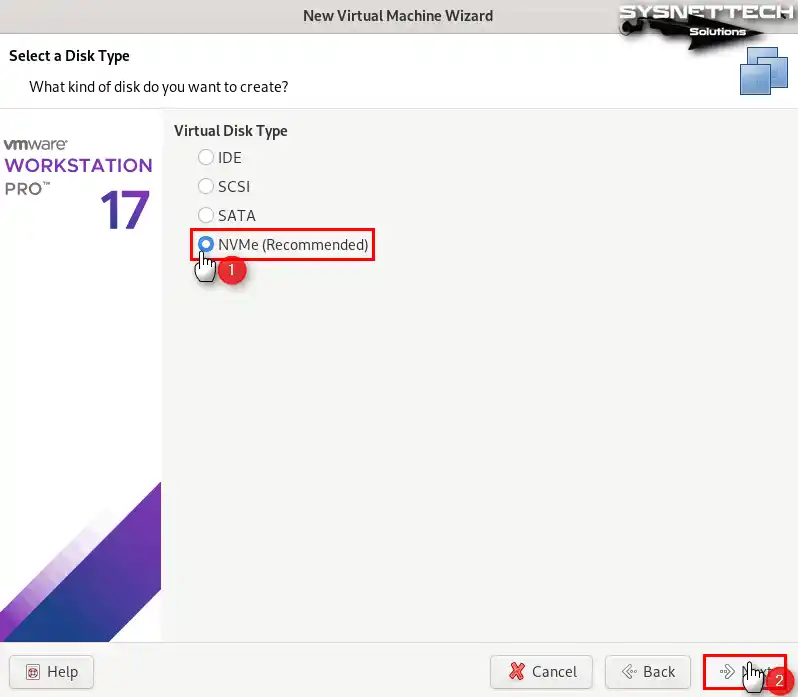
Set the virtual disk type for Windows 10. If you select NVMe, the performance you’ll get on a fast host will be incredible.
3. Creating a Virtual Disk for Windows 10 VM
Step 1
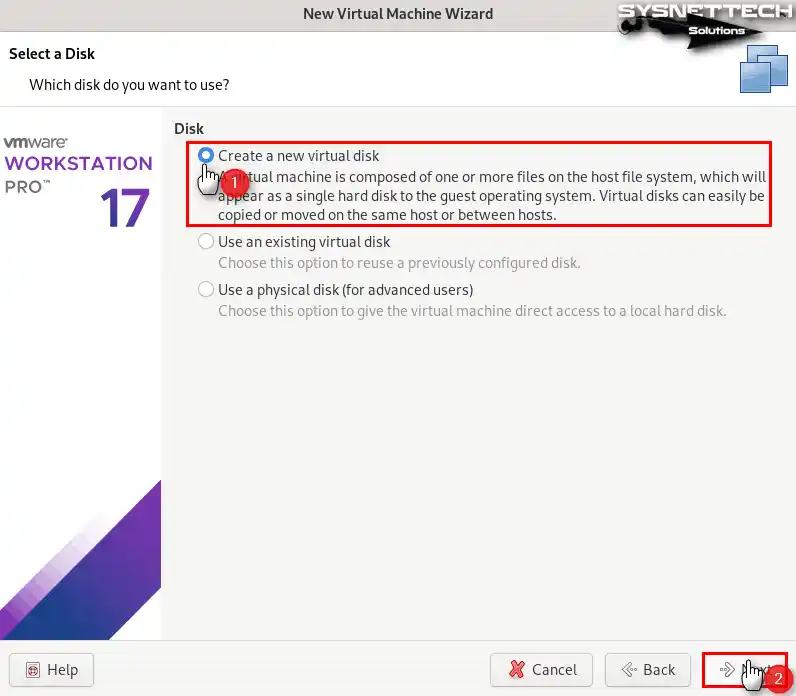
Let’s say you want to install a clean Windows operating system. In this case, proceed with the “Create a New Virtual Disk” option.
Step 2
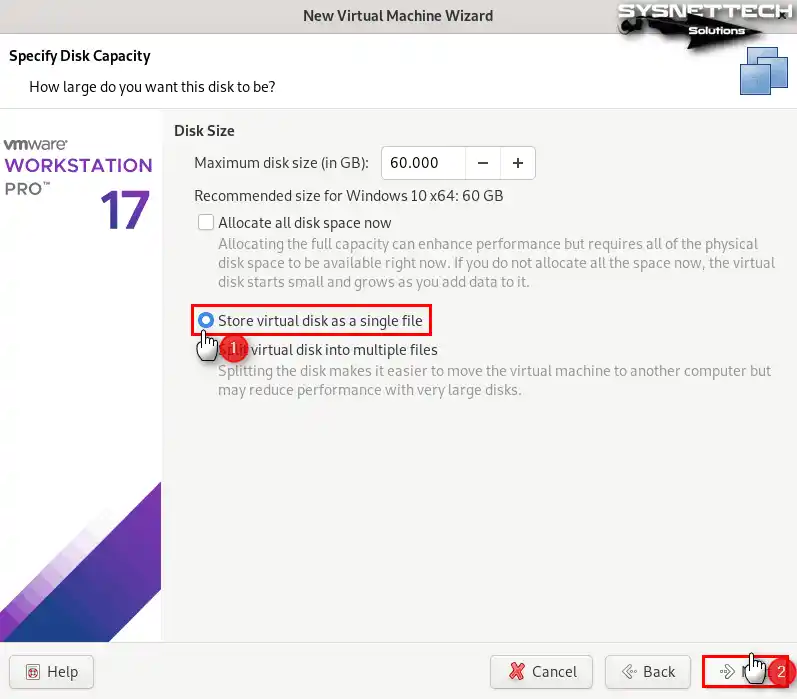
Now choose the size for your guest system’s fake disk. But, I suggest you should pick backup as the single file type.
Step 3
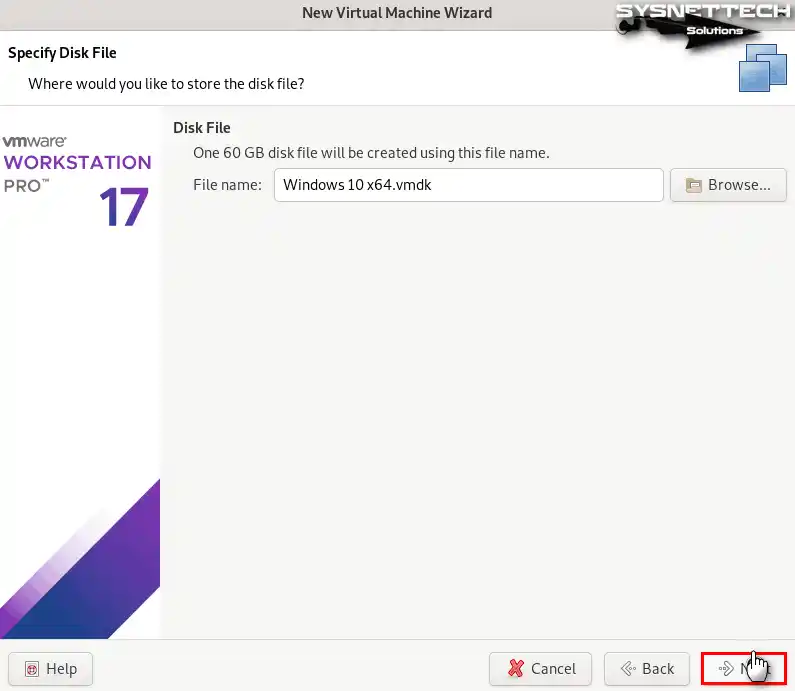
Do not move the Windows 10 x64.vmdk file. First, leave the virtual disk where it is. Then you can keep going without a stop.
Step 4
First, check the hardware settings of your Windows 10 machine in the summary window. Then, make sure everything is correct and click Finish.
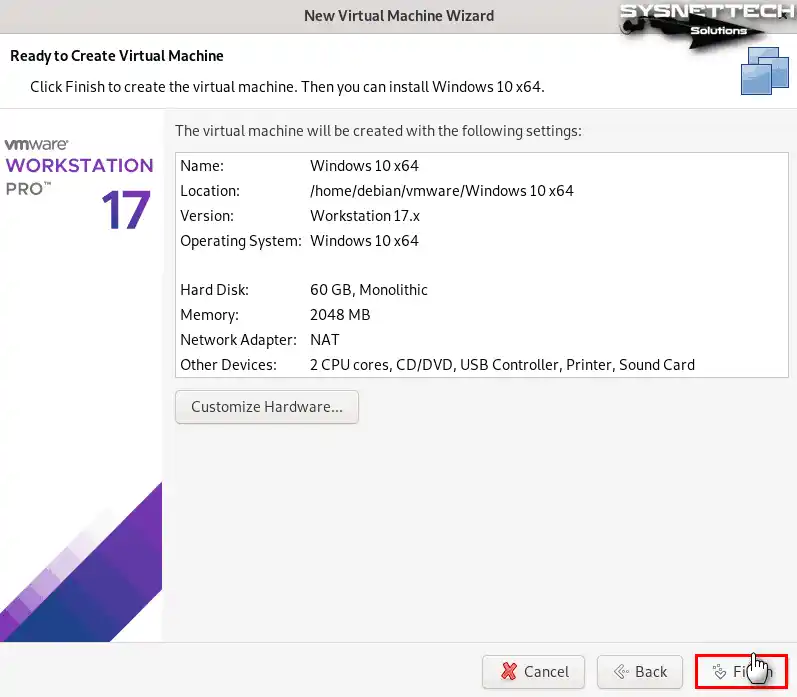
Step 5
The wizard indicates that you need to install VMware Tools after installing the Windows 10 VM. Since we will handle the VM’s drivers later, click Finish here.

4. Configuring the Advanced Settings of the Virtual PC
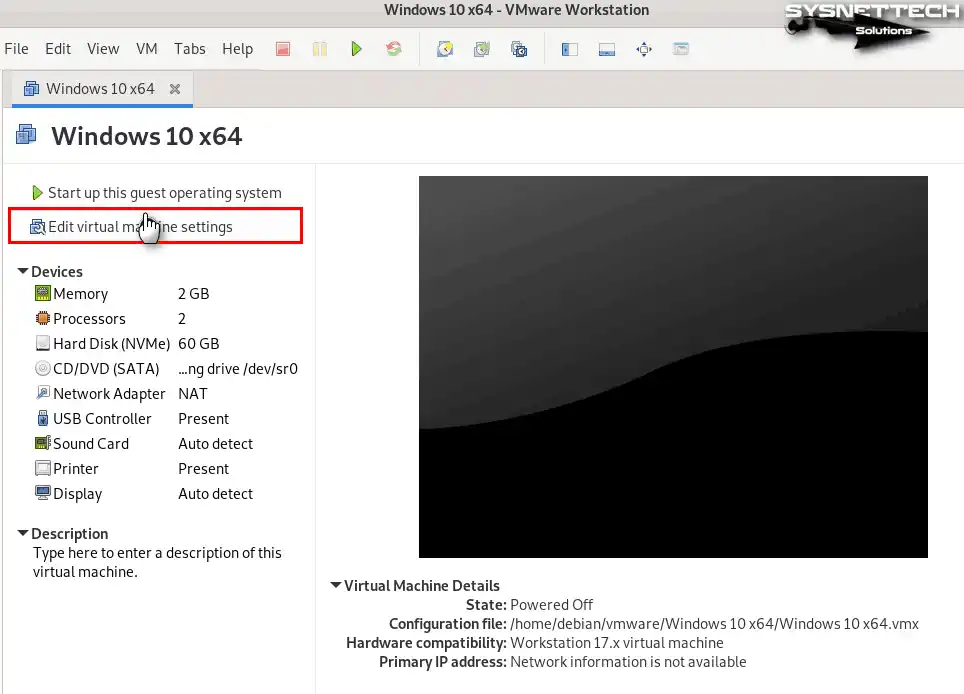
Step 1
Change the settings to set up your VM better. First, press the “Edit Virtual Machine Settings” choice. Then you can make your hardware settings better or add an ISO file.
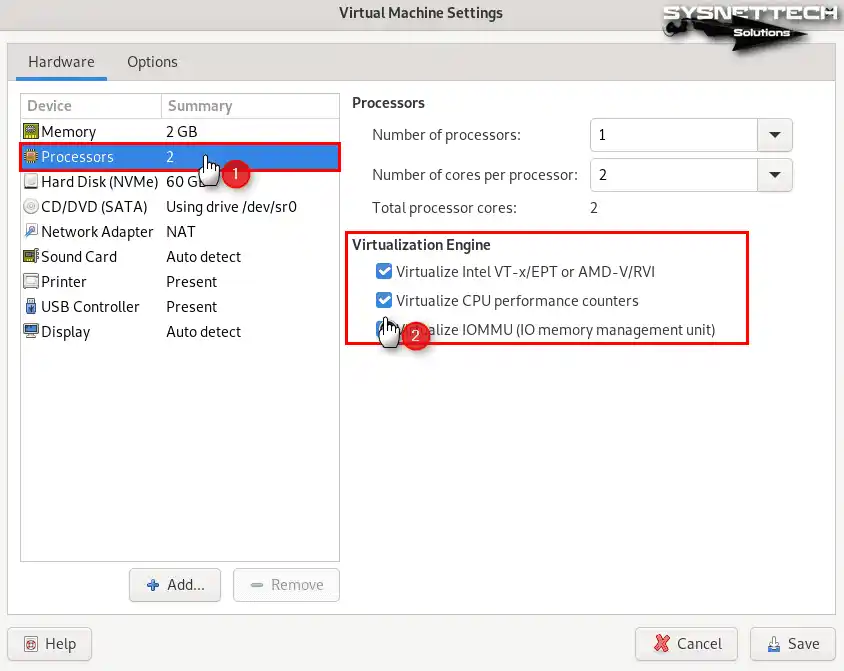
Step 2
First, pick Processors from the virtual hardware settings. Here, go to the Virtualization Engine part. Last, turn on everything here.
- Virtualize Intel VT-x/EPT or AMD-V/RVI
- Virtualize CPU Performance Counters
- Virtualize IOMMU (IO Memory Management Unit)
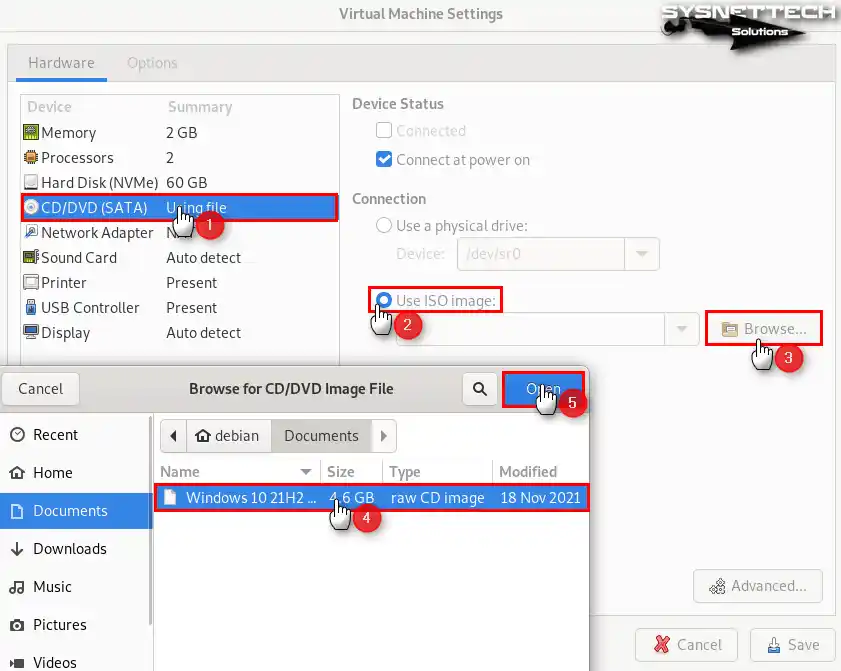
Step 3
To add an ISO file to the Windows 10 VM, select CD/DVD (SATA). Then, under Connection settings, check Use ISO Image. Here, use Browse to open the Windows 10 ISO you downloaded to your PC.
Step 4
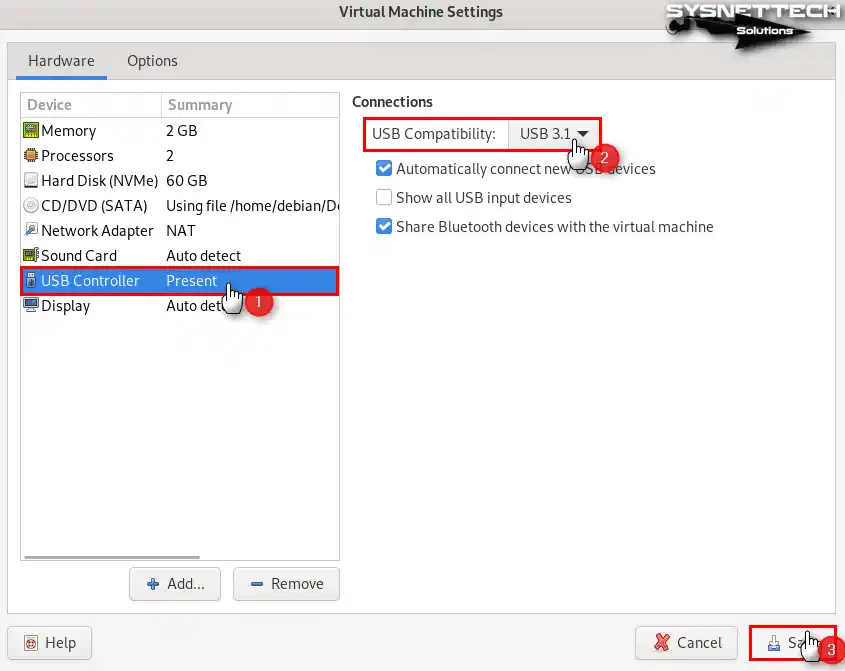
Let’s say you want to use your USB 3.0/3.1 devices on your VM. If so, change the Compatibility setting in the USB Controller settings to 3.1 and save it.
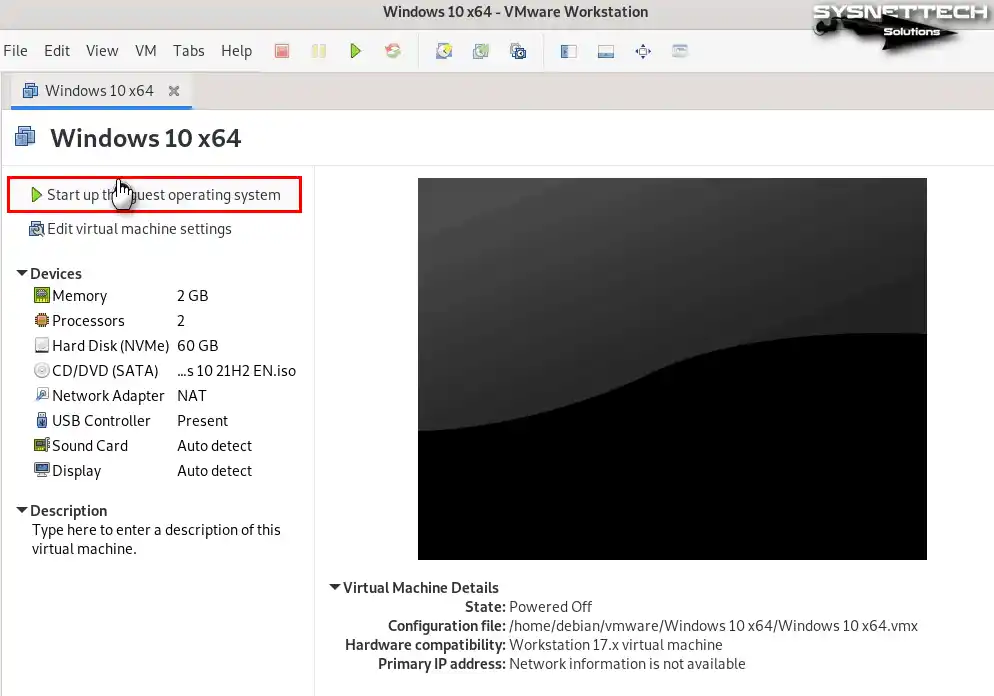
Step 5
Finally, begin the Windows system setup on your Debian machine. To do this, press “Start up this guest operating system.”
Step 6
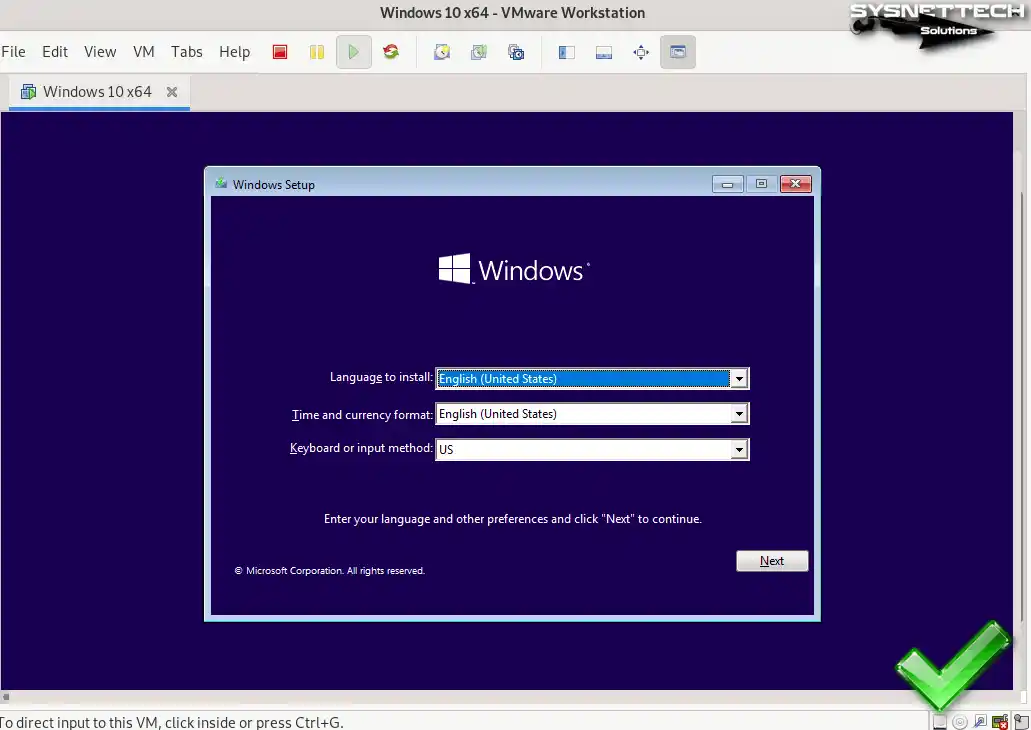
As a result, you have chosen to boot your guest system with the ISO file. That is why you will open the installation wizard for your Windows 10 OS with the image file.
How to Uninstall VMware Workstation & Delete VMs on Debian
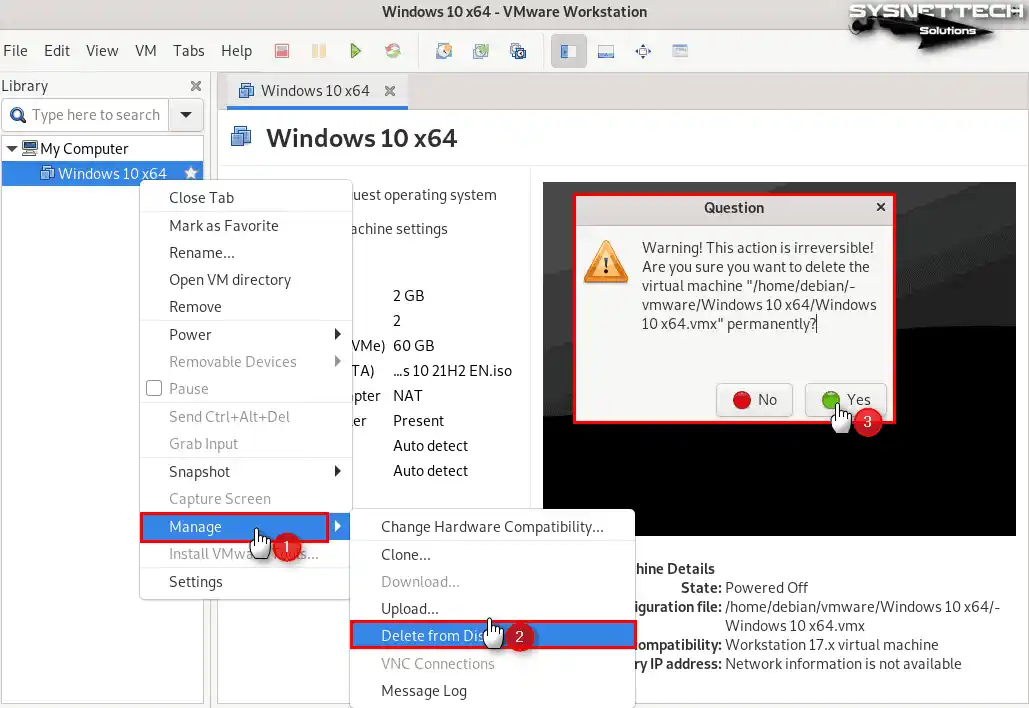
Getting rid of a virtual machine in Debian is simple. First, you do not need the terminal. Instead, open the Workstation app. Then, find the right VM in the VM list. Last, you can entirely remove it from your disk.
Open Workstation Pro and look at the virtual systems on the left side. Right-click on the guest system you want to remove. Then, pick Manage and then Delete from Disk. Last, press “Yes” in the okay box to erase the files.
You erased the virtual computer you made with VMware from your Debian disk. Now go to the place where you did the setup. Here, check that the place is now all gone.
How to Uninstall VMware Workstation
Uninstalling VMware Workstation from your Debian PC is very simple! You can finish the delete job fast by using the command line.
First, open the terminal on your host system. Next, check the installed VMware products. To do this, run the command “vmware-installer –list-products.”
vmware-installer --list-productsYou have seen the VMware app on your system with that order. Now, type “sudo vmware-installer -u vmware-workstation” in the command line to remove VMware Client Hypervisor.
sudo vmware-installer -u vmware-workstation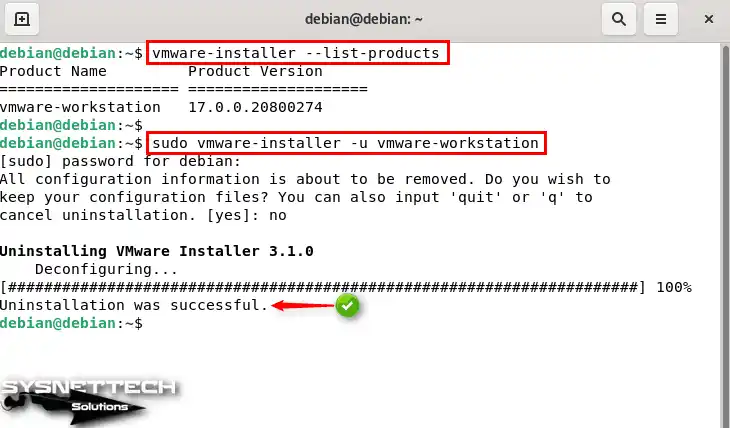
Video
Installing Old Versions
| Debian / VM Version | YouTube Video | Slide |
|---|---|---|
| 9 / 14 Pro | Watch | View |
| 11 / 16 Pro | Watch | View |
| 11 / 17 Pro (NEW) | Watch | – |
Frequently Asked Questions (FAQ)
- What do you need to have before you can install VMware Workstation on Debian 13?
- How do I get the dependencies I need before running in VMware Pro?
- What should I do if I see a problem during installation?
- Is it safe to run VMware Workstation on Debian 13?
Conclusion
To end, you can do great things with Debian 13 on your machine using VMware Workstation 17 Pro. Also, these steps will let you run virtual computers with no trouble. In all, you can use other systems without restarting your main PC.
Next to others, the VMware virtualization platform has more tools. So, you can know it will significantly help your work. Also, it gives you a soft fake PC fix as it lets you run many systems on one machine.
We also have the same program to help people using fake computers on Ubuntu. You can also see our steps for installing VMware Workstation on Ubuntu. This way, if you are new or skilled, you can run many systems on your machine!

1 Reader Comment
Sorry, but for debian 13 this do not work. The information about kernel headers and where they are is too old.
Best regards Helmut