
In our previous article, we looked at how to configure DHCP servers on Cisco Routers. In this article, we will examine how automatic IP addresses are assigned to clients from servers on a different network.
How to Configure a DHCP Relay Agent on a Router
If the DHCP server configured on a network becomes unresponsive for any reason, a DHCP server can be configured as a backup on a different network.
Thus, when the DHCP server on LAN1 fails to respond to clients’ IP address request messages, the DHCP server on LAN2 will automatically respond.
In this article, we will configure the Relay Agent service by creating a small network topology using VMware Workstation and GNS3.
Create two virtual machines with VMware and configure VMnet settings. In the GNS3 program, Cloud Node is added to these virtual machines.
How to Enable DHCP Relay Agent
Follow the steps below to configure the DHCP Relay Agent service on Cisco Routers.
Step 1
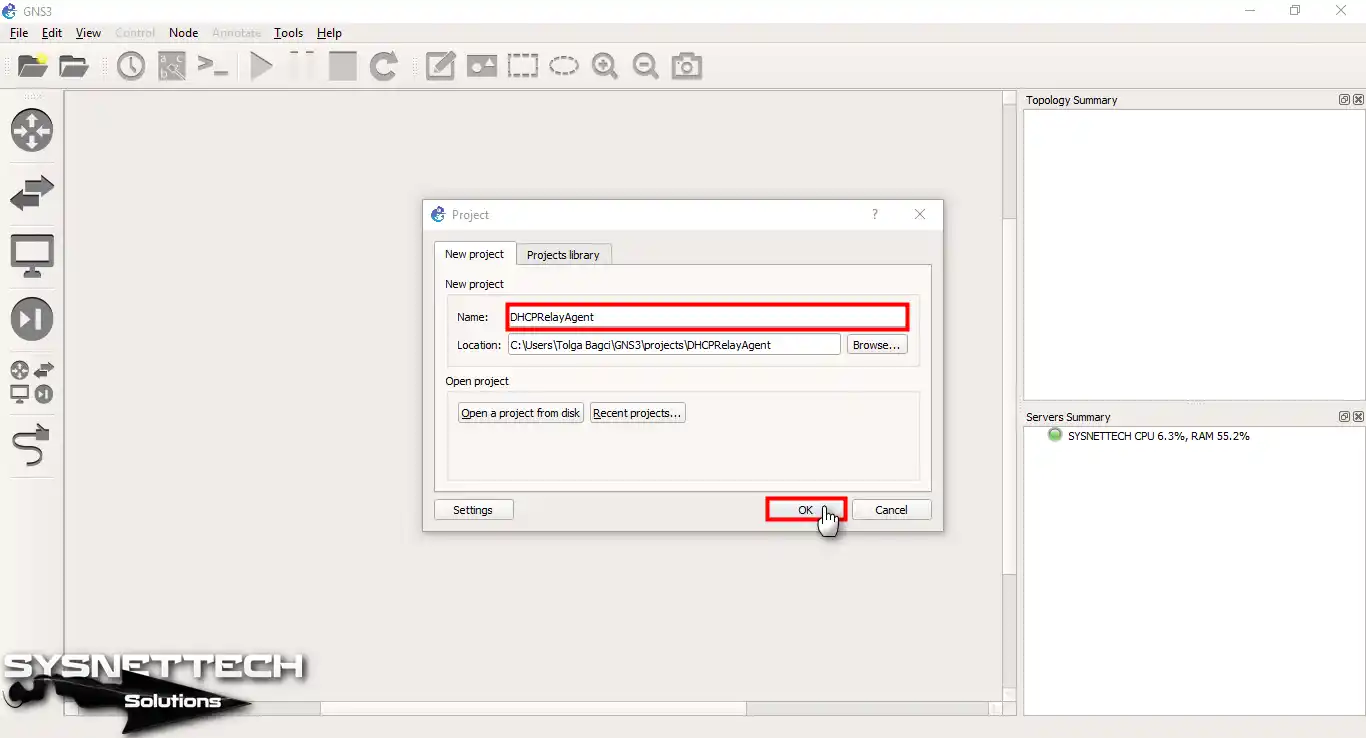
Open the GNS3 program installed on your computer and create a new project.
Step 2
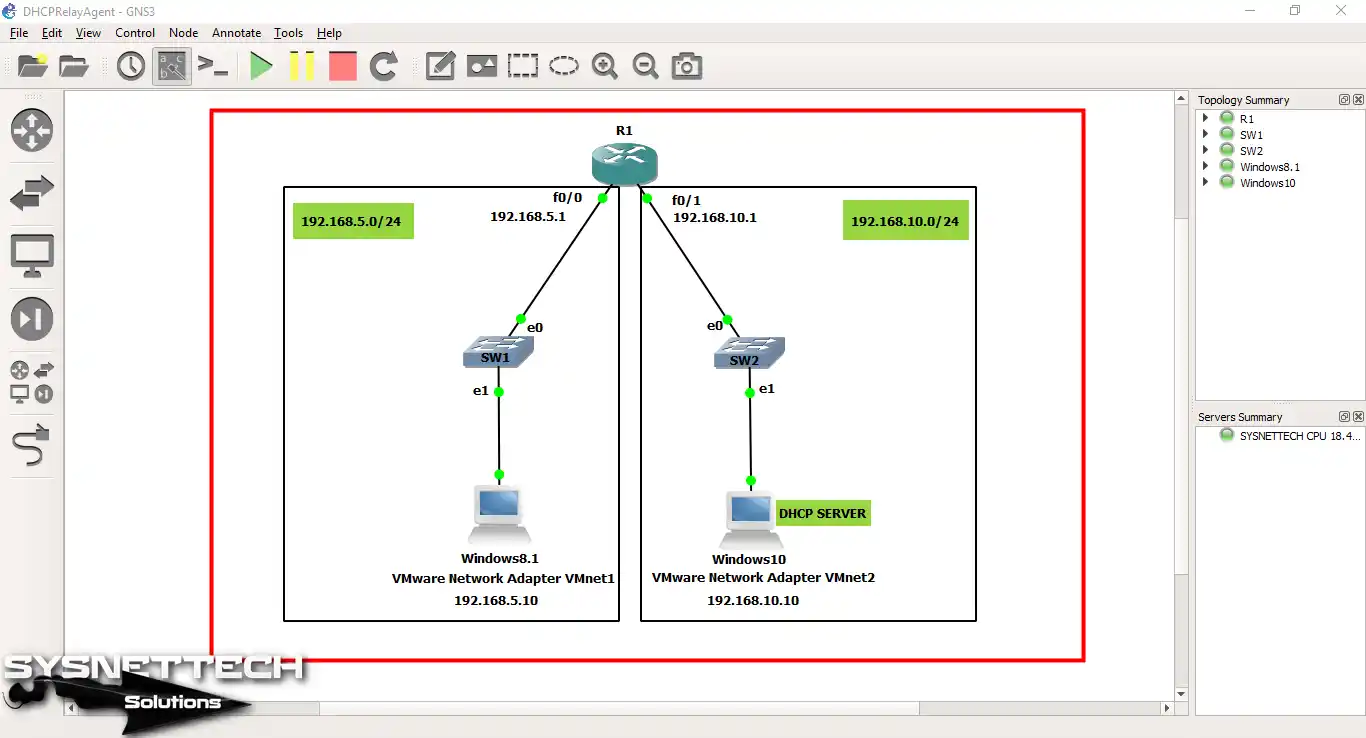
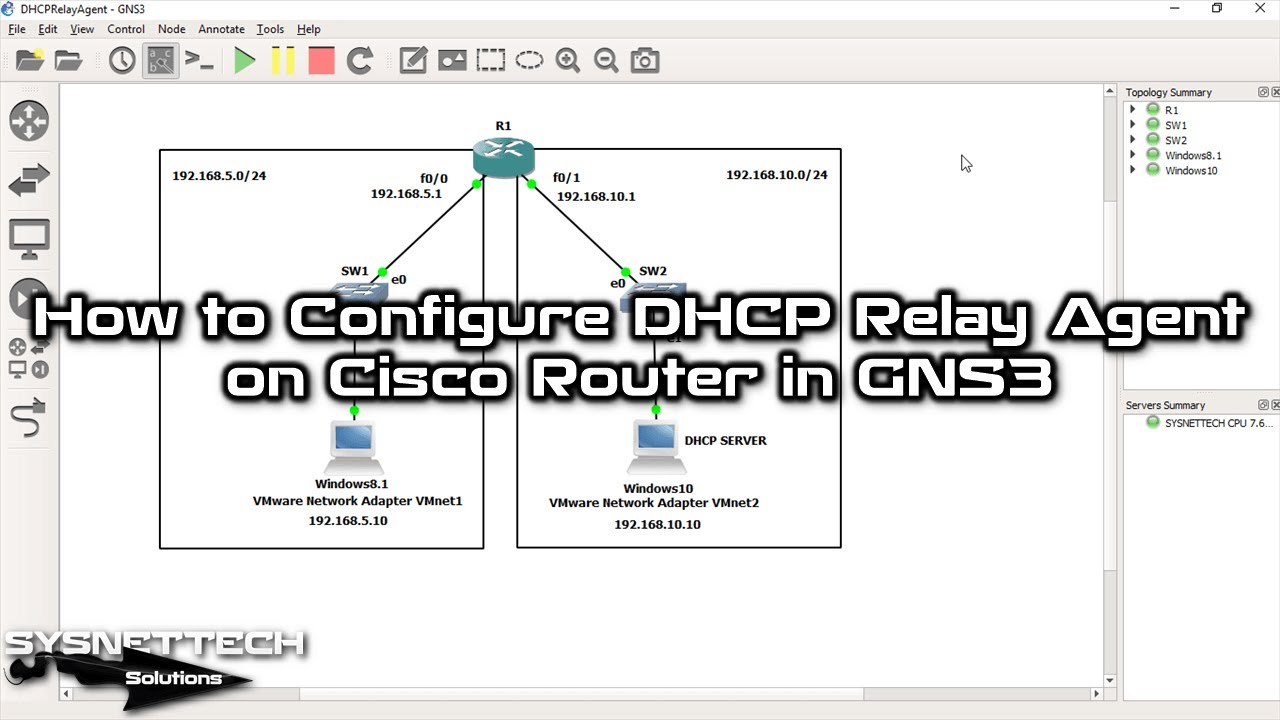
Create a network topology for the DHCP Relay Agent as in the following image.
Step 3
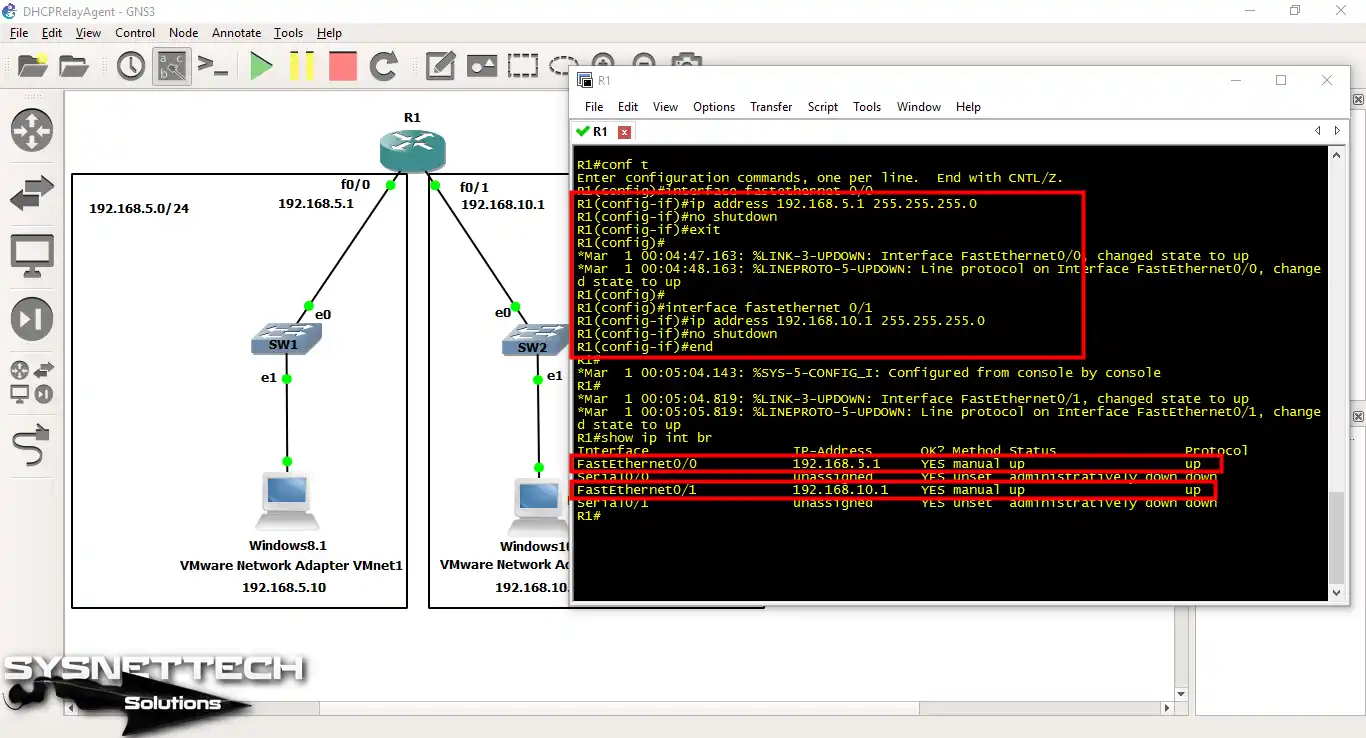
Configure the FastEthernet 0/0 and FastEthernet 0/1 interfaces on the Cisco Router.
R1# conf t
R1(config)# interface fastethernet 0/0
R1(config-if)# ip address 192.168.5.1 255.255.255.0
R1(config-if)# no shutdown
R1(config-if)# exit
R1(config)# interface fastethernet 0/1
R1(config-if)# ip address 192.168.10.1 255.255.255.0
R1(config-if)# no shutdown
R1(config-if)# end
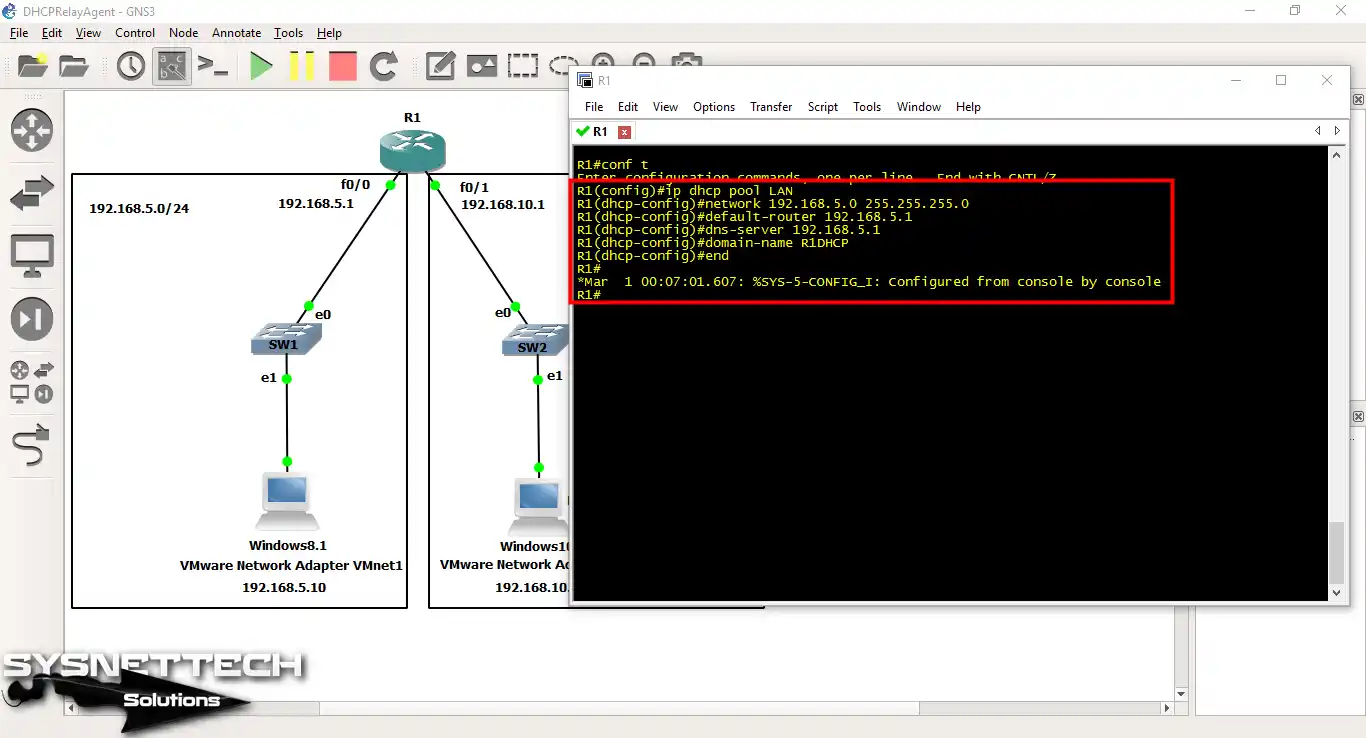
Step 4
Create a DHCP pool as an example on Router R1 and enter R1DHCP as the domain name. First, we will configure the DHCP server running on the Cisco Router to assign an automatic IP address to the Windows 8.1 virtual machine.
We will then install a 3rd party DHCP server application on the Windows 10 virtual machine and configure the necessary settings for the DHCP Relay Agent on the Router.
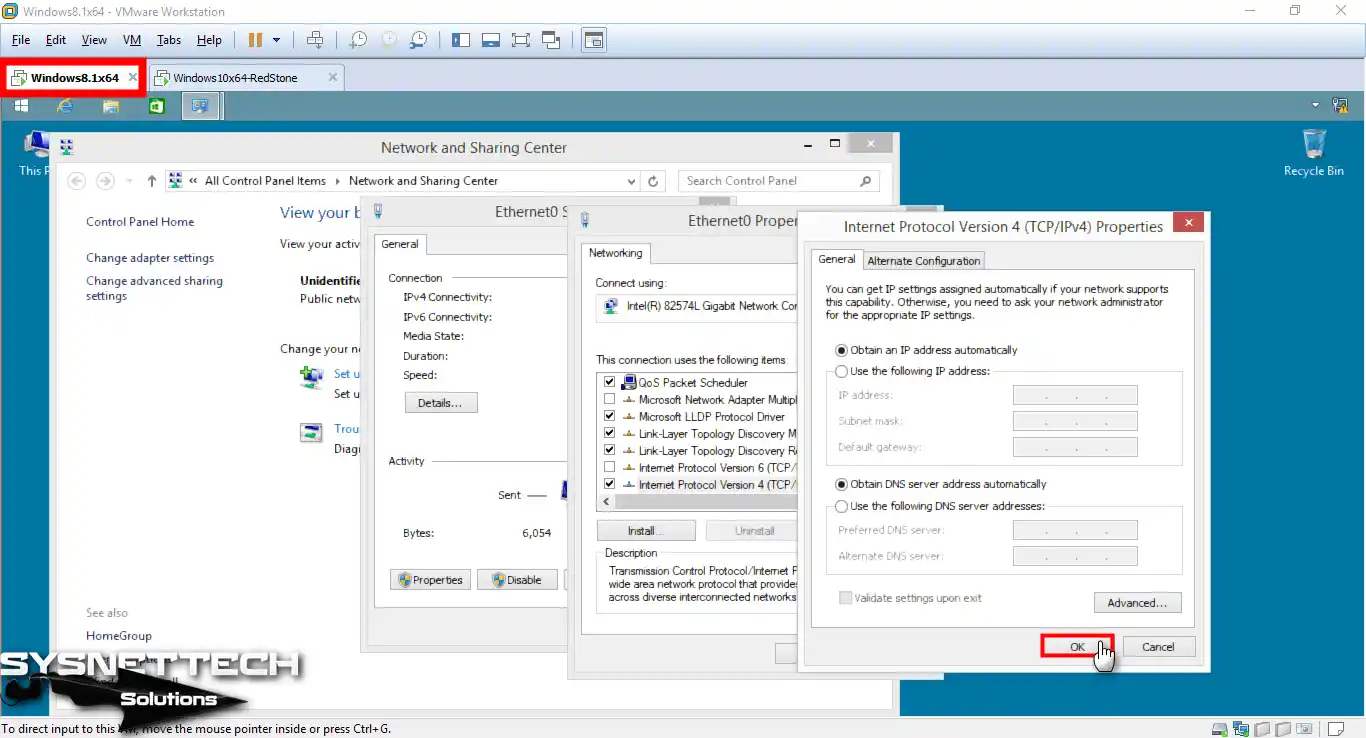
Step 5
Enable the automatic IP address option in the TCP/IP settings of the Windows 8.1 virtual machine.

Step 6
Close the TCP/IPv4 preferences window by clicking the OK button.
Step 7
In the Windows 8.1 VM, click the Ethernet Details button and check the IP address settings. Verify that an automatic IP address is obtained from the DHCP server configured on the Cisco Router, as shown in the image below.

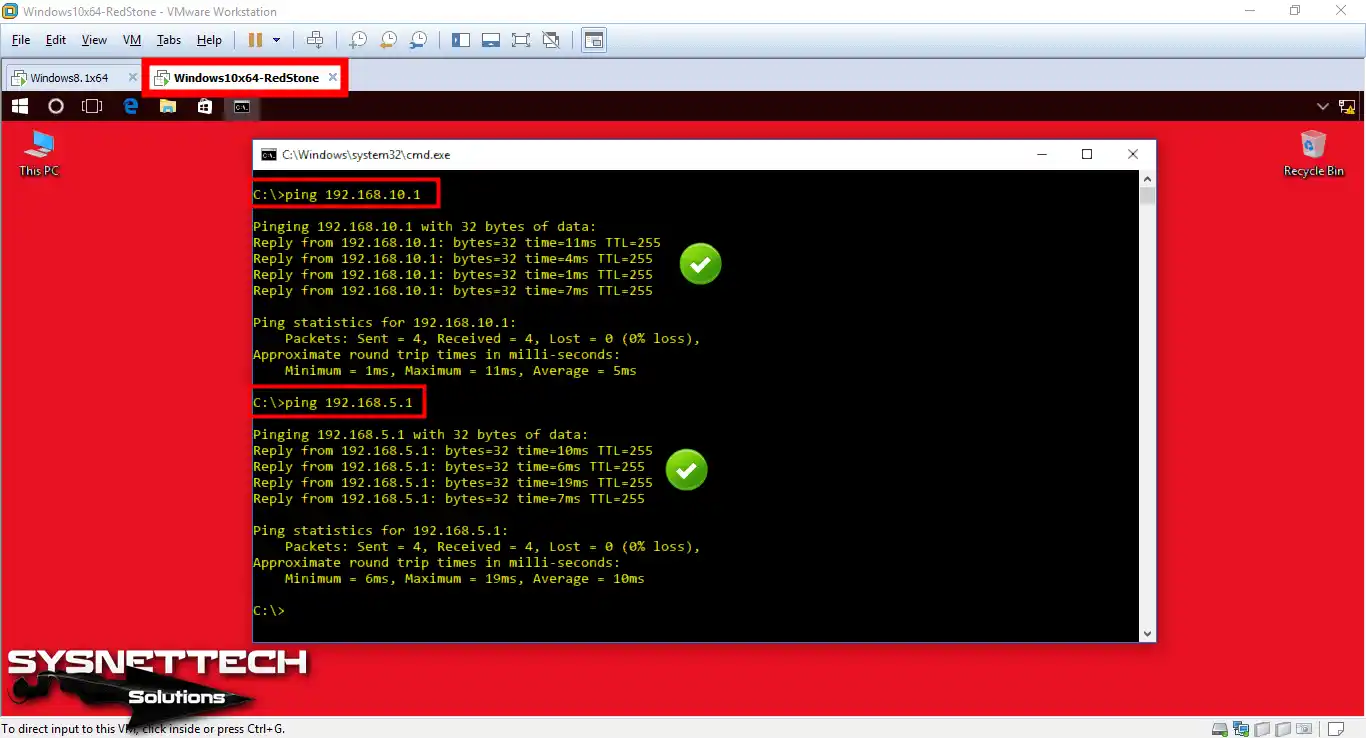
Step 8
Go to the Windows 10 virtual machine and test the network connection by pinging the Win8.1 VM.
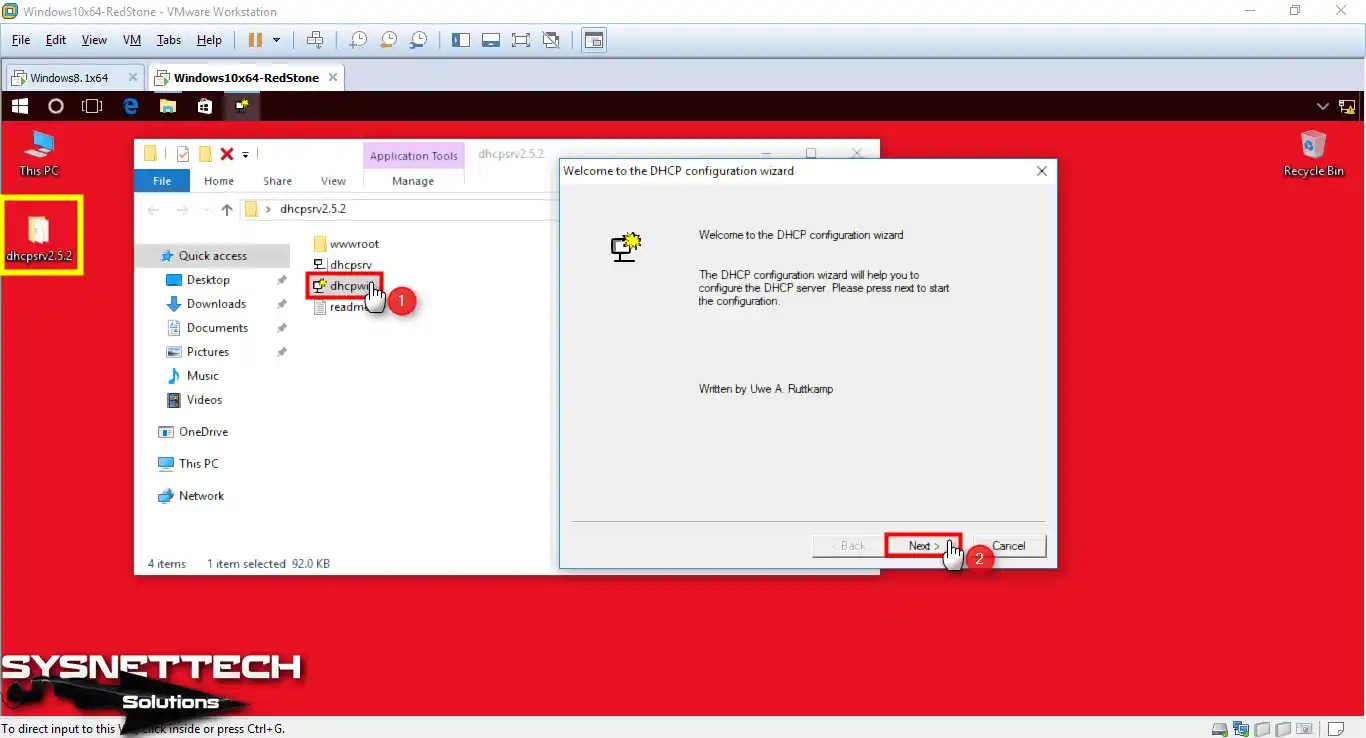
Step 9
Download the 3rd Party DHCP Server from the button at the bottom of the text. Run the dhcpwiz.exe file in the folder and click Next to continue.
Step 10
Pay attention to the setting here! The 192.168.10.10 IP address will be the IP address of the DHCP server.

Step 11
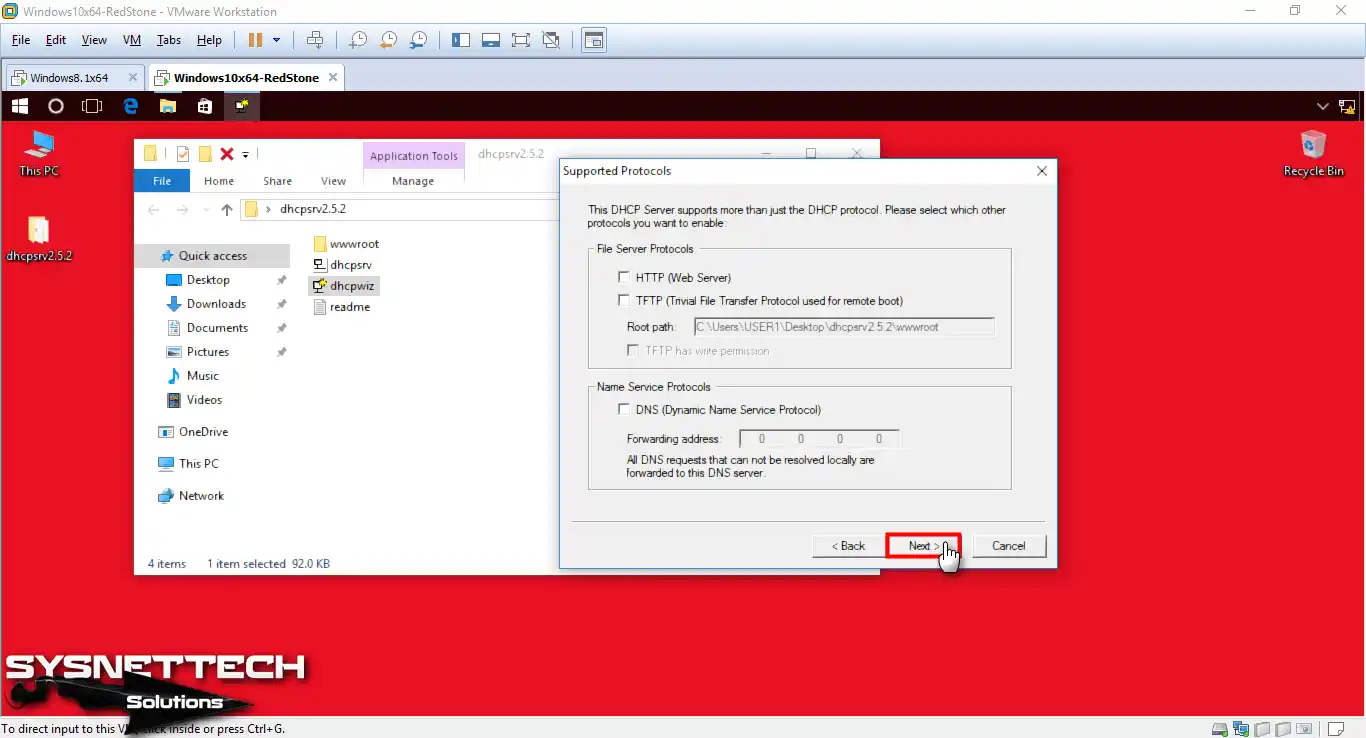
You can examine the protocol and services supported by the program from the image below. Here, continue with Next without selecting any service.
Step 12
Because the Switch to which the Windows 8.1 VM is connected to the FastEthernet 0/0 interface of the Cisco Router, any device to be connected to this Switch will receive an IP address from the 192.168.5.0/24 IP address block.
However, if the DHCP configuration configured for FastEthernet 0/0 on the Router cannot serve for any reason, at this point, you must enable a DHCP Relay service that provides services in the FastEthernet 0/1 area to maintain network connectivity.
Therefore, you must install the DHCP Server program on a computer in the FastEthernet 0/1 domain to create an IP pool for block 192.168.5.0/24.
After configuring the DHCP Pool as in the image below, click the DHCP Options button.

Step 13
In the DHCP Options window, type DHCPRELAY in the domain name field and click OK.

Step 14
In the DHCP Server Advanced window, configure the Subnet Mask and Default Gateway options as follows.

Step 15
After configuring the DHCP Server on the Windows 10 VM, click Next to continue to the next step.

Step 16
It is important to note that the information shown in the summary must be saved to a file. Select the Overwrite existing file option, and then click the Write INI file button to save the settings.

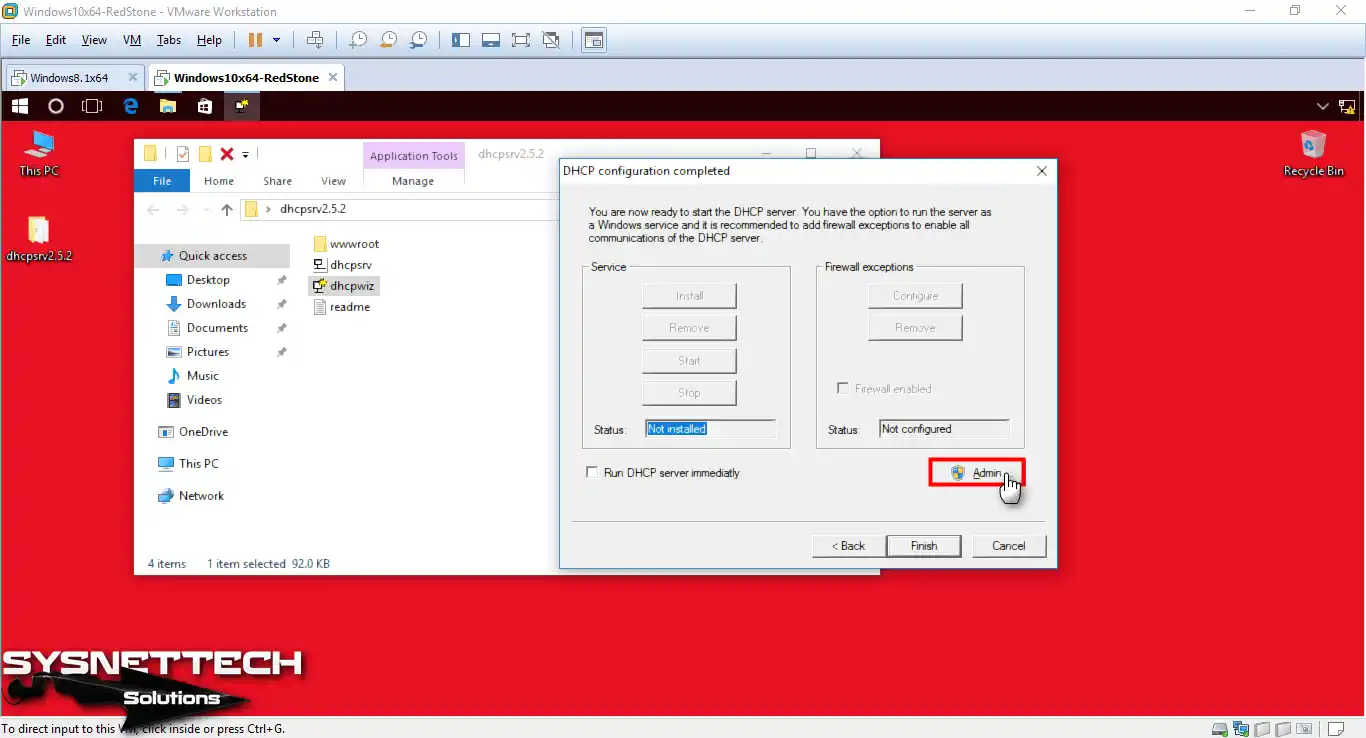
Step 17
The following window will pop up to start the DHCP service. Click the Admin button.
Step 18
From the Service section, click Install.

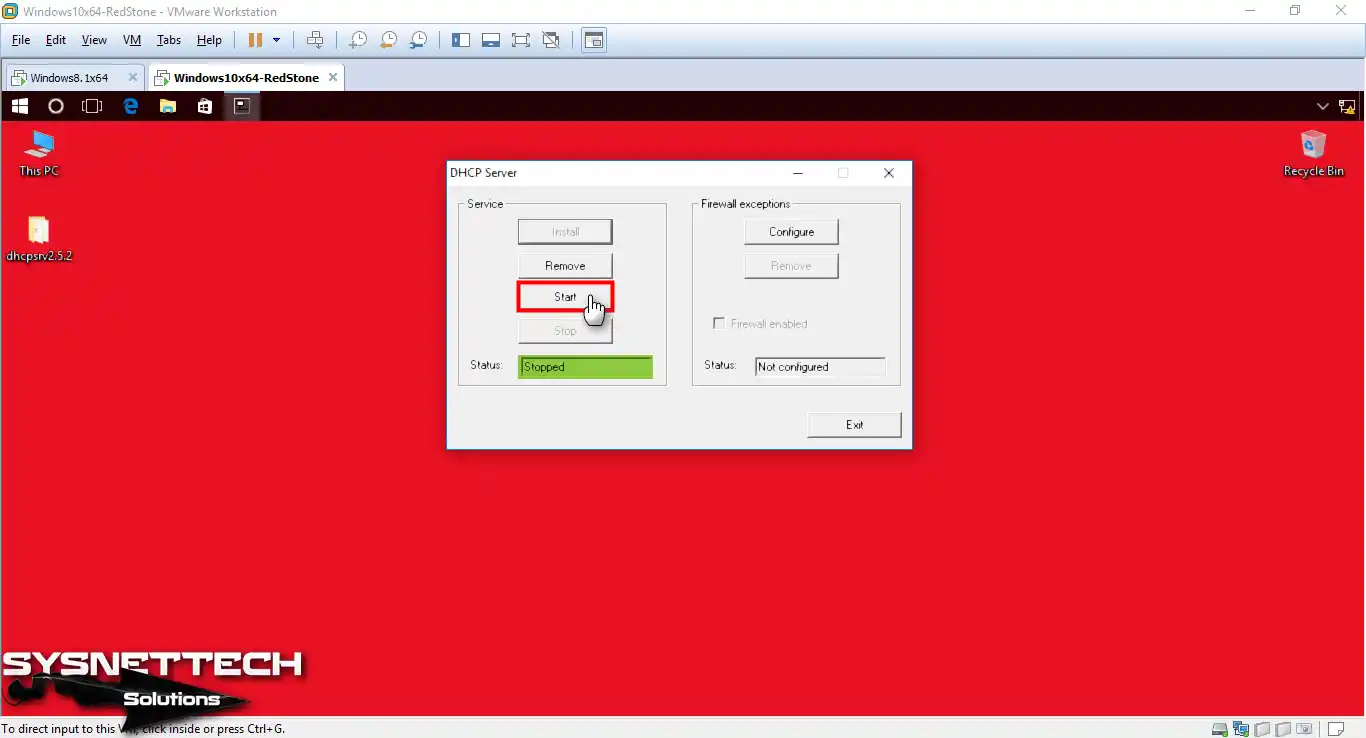
Step 19
The DHCP service is currently down. Click the Start button to start the DHCP service.
Step 20
In the Status section, you can see that the DHCP Server is running smoothly!

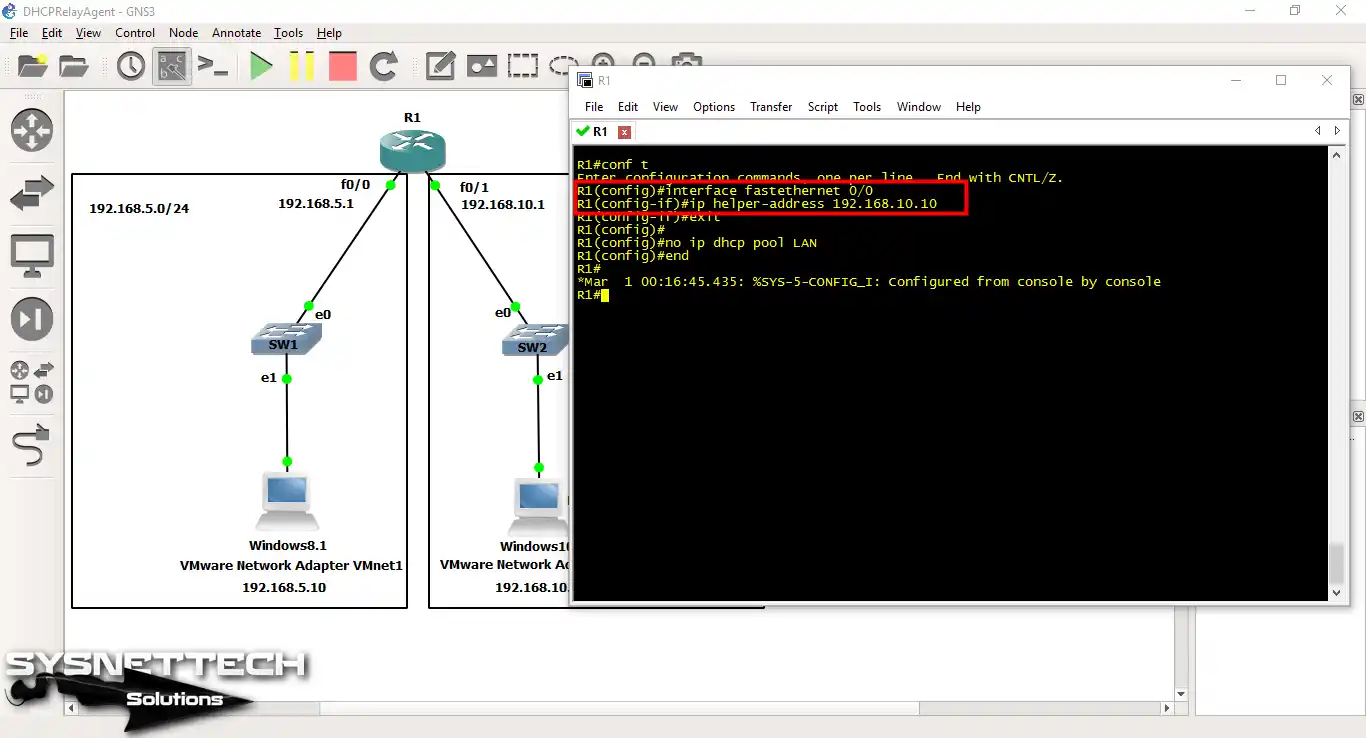
Step 21
Now open the Cisco Router CLI command prompt and type the 3rd Party DHCP server IP address using the ip helper-address command on the FastEthernet 0/0 interface.
Use the no ip dhcp pool LAN command to turn off the DHCP service running on the Router’s Fa0/0 interface, assuming it has encountered an error.
R1# conf t
R1(config)# interface fastethernet 0/0
R1(config-if)# ip helper-address 192.168.10.10
R1(config-if)# exit
R1(config)# no ip dhcp pool LAN
Step 22
To allocate another IP address from the DHCP server on the Windows 8.1 VM, open the CMD prompt and execute the ipconfig /release command.

Step 23
Now, let’s get a new IP address by applying the ipconfig /renew command.

Step 24
The virtual machine successfully obtained IP address information from the DHCP server with the IP address 192.168.10.10 running on the Windows 10 VM on the 192.168.10.0/24 network.
Please pay attention to the domain name in the image below.

How to Use Relay Agent to Obtain an IP Address from a Different Network ⇒ Video
You can watch the video below to use the DHCP Relay Agent and also subscribe to our YouTube channel to support us!
Conclusion
In this article, we have examined how to obtain an automatic IP address from a DHCP server on a different network. You can consider the Relay Agent service as an auxiliary DHCP server.
If we had not configured Relay Agent on the Router, the Windows 8.1 machine would not be able to obtain the IP address! Thanks for following us!
Download Software
You can download the 3rd Party DHCP Server program from the button below.

Be the first to share your comment