

If you’re having trouble accessing a website, clearing your PC’s DNS cache helps. This Domain Name System cache provides information about websites you have previously visited.
This makes it easier for your computer to reaccess these addresses. In fact, this is a temporary database that speeds up the work.
However, sometimes, these stored addresses need to be updated because they become corrupted. In short, this prevents us from surfing the Internet. In this article, we will explain how to clear the DNS cache on Windows 11 or 10.

Why Is It Necessary to Clear DNS Cache on PC?
We access a website on the Internet using the domain name. At this stage, our PC uses DNS, or Domain Name System, to convert the domain name into an IP address. At this point, our device communicates with the DNS servers. It then connects to the website’s server to perform the conversion and display its content.
If we reaccess the same website another time, our PC looks at the DNS info this time. That is, it does not contact the website’s server again. It looks directly at the records it stores locally. That’s why we access the relevant resources faster. Another plus of this process is that it reduces the load on servers.
However, in some cases, administrators make server changes on their websites. At this point, sometimes the hostname info has an old or incorrect IP address. Therefore, we need help accessing the website. When we encounter such situations, we need to clear the name server information.
How to Clear DNS Cache on Windows PCs and Improve Internet Connectivity
Clearing the DNS cache is simple. For example, we have Windows 11 or Windows 10 installed on our PC. These systems are so easy to use that we can do this in seconds. At this point, the tool that comes to our aid is the CMD tool.
We can use CMD to clear old registered IP address records on our PC. Frankly, I always get the job done cleaning using this tool. That’s why I advise you to refrain from unnecessarily installing a 3rd party program on your system.
Even if you are using Windows XP, Vista, 7, 8, 8.1, 10, or 11, the cleaning process is the same for all of them.
For example, if you can’t access Facebook.com, the first thing I recommend you do is to perform a DNS flush. To do this, you immediately open CMD and use the ipconfig /flushdns command.
You can then test the connection by pinging Facebook first. So, you send a request to the website’s server and measure the response time. If it responds, you can now access it from your web browser.
However, let me make a footnote for you. When you first visit the web page after deleting the name server information, the loading time will be slow. This is because it communicates with the server during the connection phase and adds new records to the cache.
How to Empty DNS Cache on Windows 11 & 10
After some explanations, let’s start the steps to reset, delete, or clear the DNS cache.
However, you may first want to see the existing records on your platform. To find out, use the ipconfig /displaydns command and see the results.
Step 1: Open CMD Command Prompt
The first step to removing your name resolution memory is to open Command Prompt (CMD). You may ask how I open this, but the answer is straightforward!
First, regardless of your system, press Windows Key + X on your keyboard. Then select Window Terminal or CMD tool from the menu that opens. This is called Terminal in Windows 11. However, in older versions, such as Windows 10, it is referred to as CMD or Command Prompt.
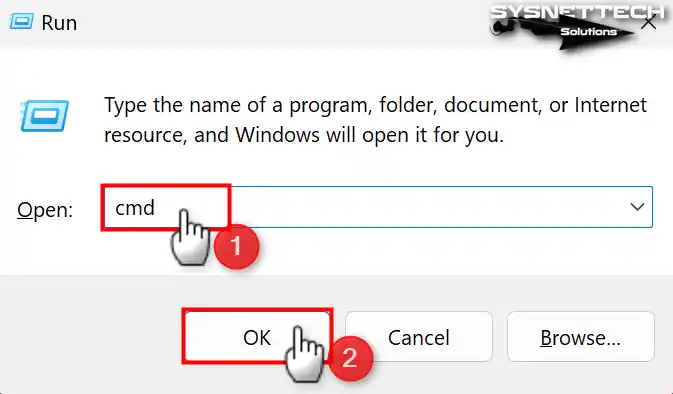
As a faster method, press Windows Key + R to open the screen in the image below. Thus, you will open the screen where you can quickly access almost all Microsoft settings.

Now, type the “cmd” expression in the search box of the Windows 11 or 10 Run tool and click OK.
Step 2: Run the Command
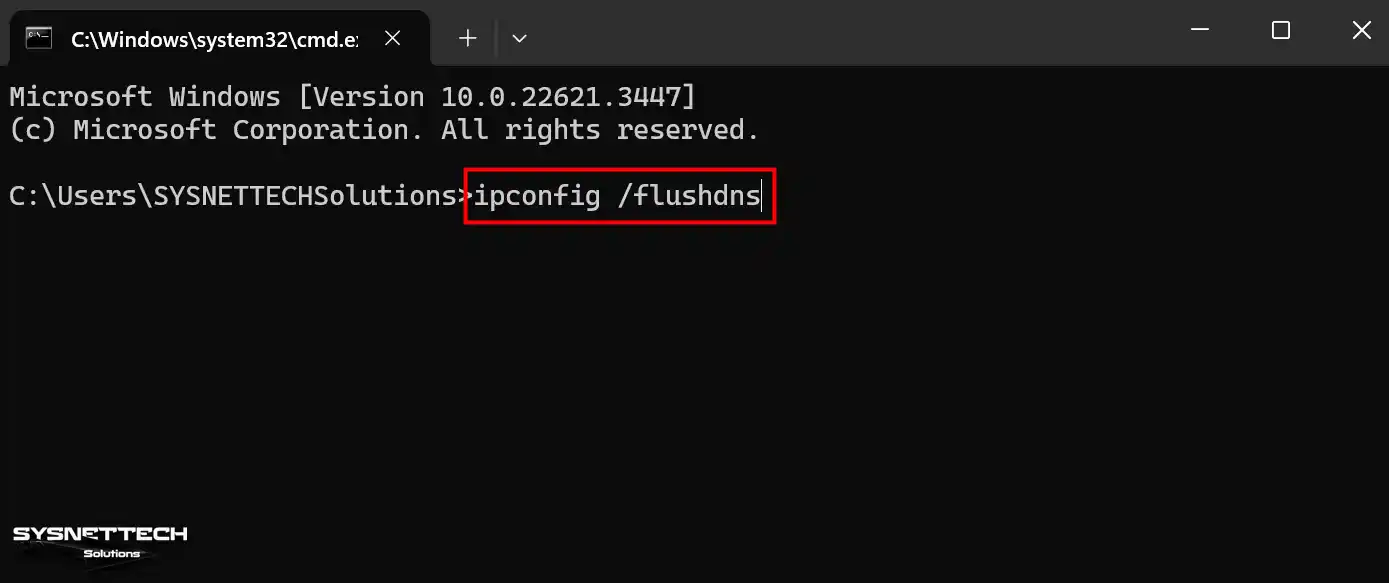
After opening CMD, that is, Command Prompt, type the following command and press Enter.
ipconfig /flushdns
At this point, you will delete all the name system records you have previously visited on your PC using this command! Thus, you will refresh the IP addresses of the websites you are trying to access again.
NOTE: You may want to delete Cache records from the Windows Server system. Then, you should use this different command: dnscmd /clearcache.
Some networks give you IP addresses automatically. DHCP does this job. Use the guide to turn on DHCP and check your network settings.
Step 3: Verify Cache Clearing
The flushdns command clears the entire table. However, it would be best if you verified this on the CMD screen.
In short, as soon as you run the command, you should see the following text on the Windows IP Configuration screen:
- Successfully flushed the DNS Resolver Cache
If you see the warning text above, it means you have successfully deleted the cache.

Step 4: Restart Your Computer
Finally, I recommend restarting your Windows 11 or 10 computer. Because of that, you minimize the problems that may occur during the DNS deletion process.
This way, you can be more confident that you are entirely deleting cached entries. It also means that when you reboot your PC, you will now use the new DNS information.
How to View and Delete DNS Records with PowerShell
We can both see and clear the DNS cache with CMD on Windows PCs. We can also choose to use the PowerShell tool as a different method.
Step 1: Run PowerShell
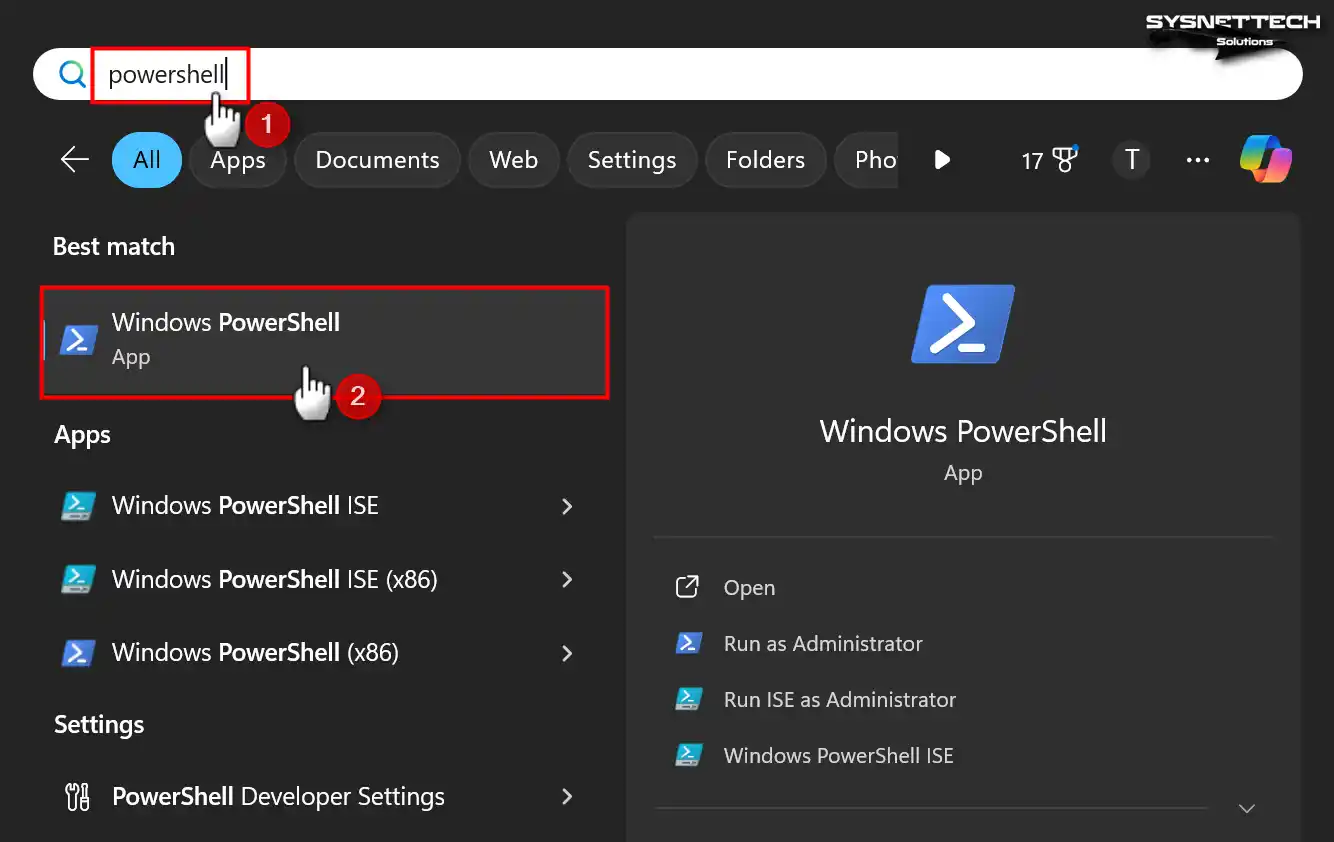
This great PowerShell software from Microsoft is easy to run. First, press Windows Key + X or S again from your PC keyboard. In the options or menu you open, type PowerShell, search for it, and select it.
I used the Windows 11 search feature by pressing Win+S, as shown in the image below.
Step 2: See IP Records
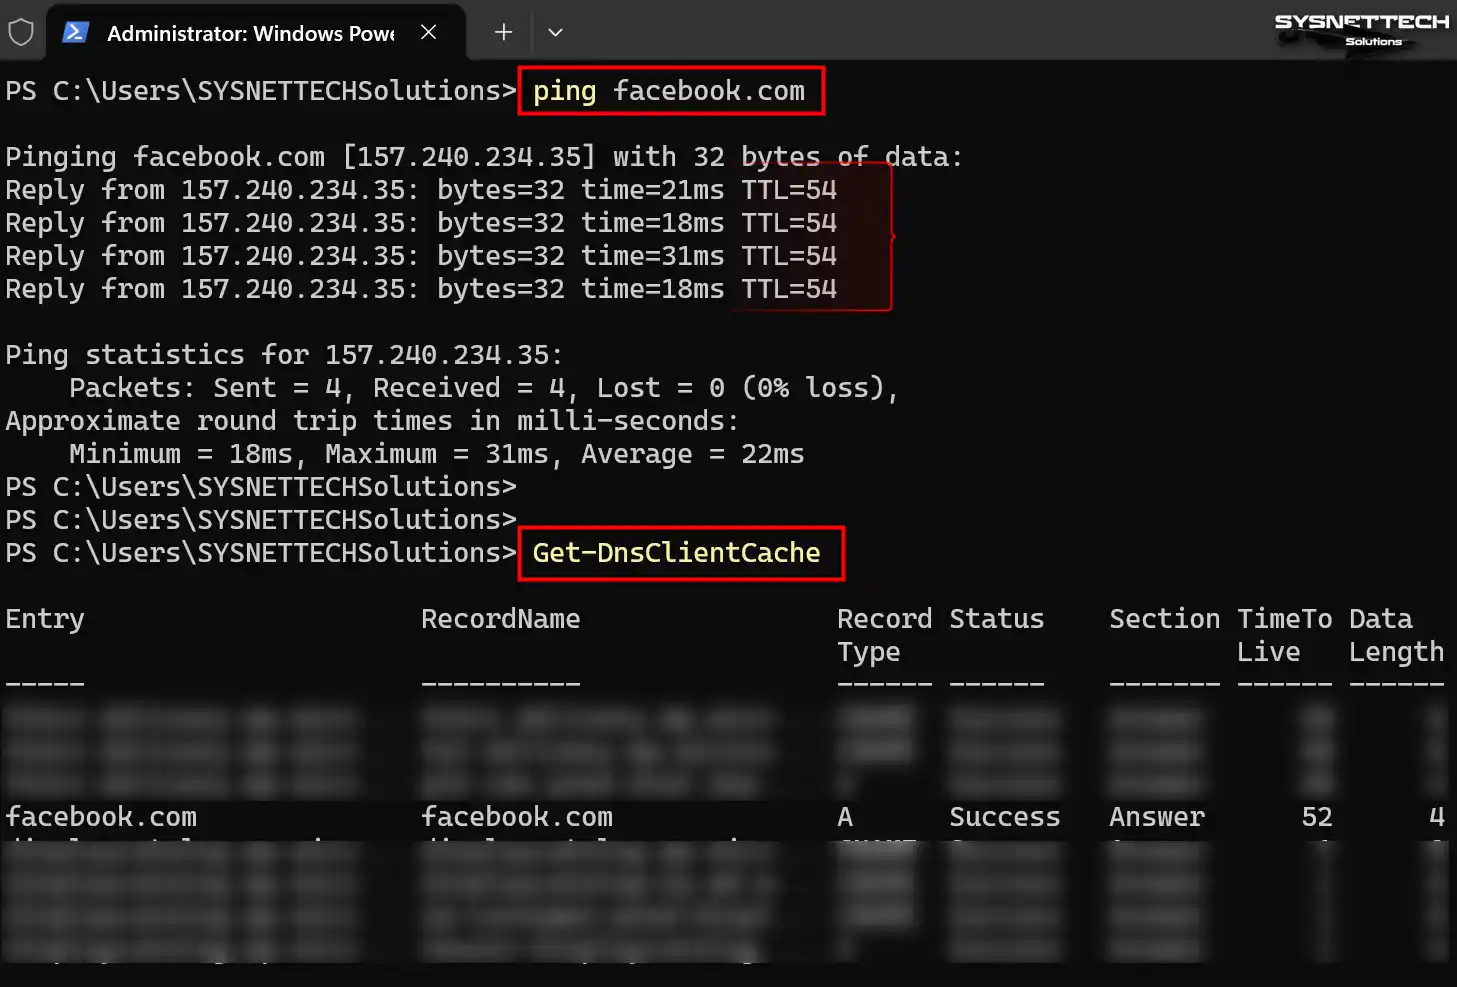
First, ping facebook.com as an example to see older IP address information.
ping facebook.com
Now, check the records with IP addresses we got from looking up domain names.
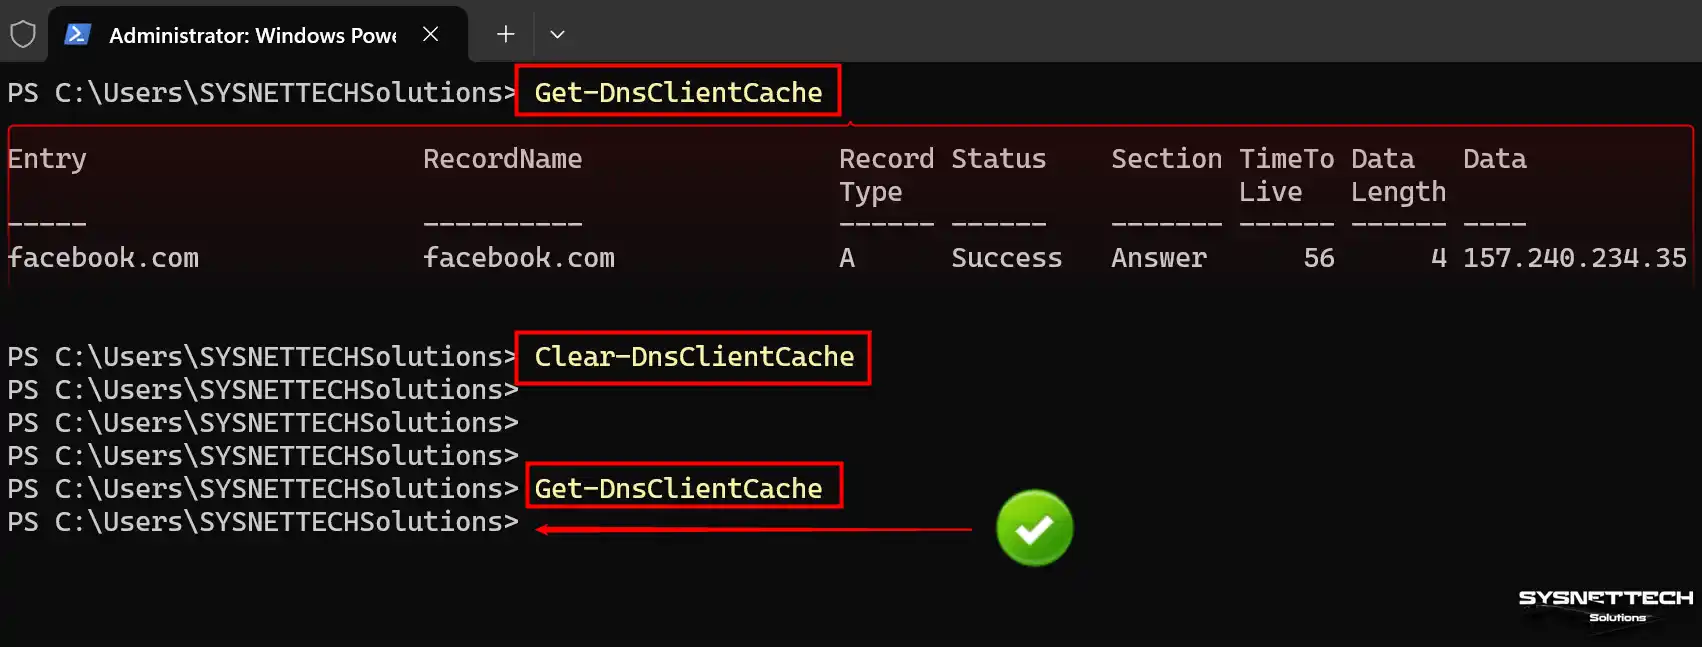
Get-DnsClientCache
Step 3: Clear and Verify Cache with PowerShell
You viewed IP information in PowerShell and now want to delete it. So, quickly run the command below to get rid of them immediately.
Clear-DnsClientCache
This PowerShell command will clear your DNS repository. It will then reset your computer to get new IP info from your ISP.
Also, execute Get-DnsClientCache again. This time, you can verify that you have deleted Facebook’s IP address.
Video
FAQ About DNS Cache
Does clearing the DNS cache harm my computer?
How do I open the command prompt as admin in Windows 7?
What should I do if the ipconfig /flushdns command gives an “Access denied” error?
Why does the internet slow down after clearing the DNS cache?
Do I need to clear the browser’s own DNS cache too?
Is changing the DNS server better than clearing the cache?
How can I view current DNS records before clearing?
Does restarting the computer clear the DNS cache?
Do I need permission from the network admin at work?
When do deleted records rebuild, and can I shorten that time?
Conclusion
To sum up, we have examined the solution to the DNS server not responding to the error you encounter while researching on the Internet. In fact, the cause of this error is the changes made by web admins on their servers. For this reason, the old domain name system’s records remain on our desktop or laptop computers.
I recommend clearing the DNS cache to fix problems on our systems, such as Windows 11 or 10. Whether you use CMD or PowerShell, both methods are ideal. Experience whichever is easiest for you and see the results!

Be the first to share your comment