
In today’s world, remote jobs are becoming increasingly popular, and remote access such as SSH is critical. We must use such secure protocols. Such a protocol provides a safe and encrypted connection for remote server management.
In this article, we will look at the details of the SSH or Secure Shell protocol. We will briefly examine its history, security, and authentication methods. Finally, we will install SSH Server on Windows 10 to make a remote connection.
What is SSH Protocol?
SSH, or Secure Shell, is a way to control and change your remote servers over the internet.
The SSH (Secure Shell) protocol we use for encrypted data transmission uses 22 port numbers. Thus, it provides machine control management by providing remote connection.
They created this protocol as a secure backup connection for unencrypted telnet. This means we encrypt all communications to the remote server. However, it uses some safe and secure encryption techniques.
It is the name of the program that implements it and is used to access remote devices over the network. It allows us to fully manage the computer through a command interpreter. Therefore, if we have an SSH server running (on Unix and Windows systems), it can redirect X traffic to execute graphics programs.
In addition to connecting to other machines, SSH allows us to copy data securely. This allows us to simulate both single files and encrypted FTP sessions. It also allows us to manage RSA keys and pass them through the data channel from another application to avoid writing keys when connecting to devices.
SSH Security
SSH works the same way as telnet. The primary difference is that SSH uses encryption methods that make information traveling on media unreadable.
At the same time, no third party can find the username and password of the connection or the texts throughout the entire session.
It is possible to attack such systems with REPLAY attacks and thus change information between targets.
SSH History
At first, there were only r commands based on the rlogin program, which worked similarly to telnet.
The first version of the SSH protocol was free. However, Tatu Ylönen changed it and licensed it. Thus, the company SSH Communications Security was born. As a result, he offered it free for local and academic use. Apart from these, he requested payment for usage.
They proposed it in draft form at the IETF in 1997. So they made this two years after the first version.
In early 1999, they began writing a version of OpenBSH that would become an excellent implementation called OpenSSH.
SSH Protocol Authentication
Password Authentication
SSH allows the user to authenticate using the regular Unix password. The only difference is that it ensures that the password never travels clearly over the network. On the other hand, if we use SSH to exchange telnet, rlogin, or FTP, we will avoid the danger of possible “sniffers” of our password on the network.
However, we’ll still be at risk of password “dictionary attacks.” If someone gets into the /etc/passwd file, it’s easy for them to find passwords made up of common words.
To make sure this doesn’t happen, the administrator needs to keep the /etc/passwd file safe. And users should always use strong passwords to stay protected.
Public Key Authentication
The other way to authenticate uses something called a public/private key system, also known as an asymmetric key. It works with a pair of keys:
- A public key that it copies to all the servers we want to connect to.
- It is a private key that only we have. It encrypts this key with a password for additional security.
These two keys have an essential feature. It decrypts the text encrypted with the public key using only the private key.
Let’s see how this feature applies to the authentication process:
- The server sends us a message that we need to return encrypted with our private key.
- The server decrypts the reply message using our public key.
- The server compares the message obtained with the original text; if they match, the server will see us as authentication correctly.
Of course, you don’t have to think about all this when you’re using the system. It would help if you typed in your password when the program tells you to. But the tricky part is getting our public key to the server. Right now, there’s no automatic way to do it, so we have to do it manually.
The big plus with this way of authenticating is that if someone hacks into the server, all they can get is our public key. They can’t touch our private key. So, as long as we have a strong password guarding our private key, there’s no risk to us. Even if someone gets their hands on it, they can’t use it.
It has a secondary advantage if we connect from a Unix machine. It uses an authentication agent to prevent the password from being typed on every connection.
The biggest drawback of public key authentication is the pre-configuration phase, which is cumbersome. The steps to follow are:
- Creation of keys.
- Propagation of the public key.
- Selection of the key pair
Connecting to a Remote Server
We can make a remote SSH connection from a Unix/Linux-type client. For example, to access the server, type the following command in a console:
$ ssh example.com
If you want to connect as root to the remote server, type this. However, in this connection type, as clients, we are like other users.
$ ssh -l root example.com
It transfers data from the client to the device, authenticating a remote user. It then provides a mechanism to forward it back to the client.
So, you have installed an SSH server on your computer. Next, you need to use SSH Client to access your server over LAN or WAN.
Let’s say you established a connection to a server on the network from a remote location. In this case, you transfer your data with a robust encryption algorithm.
Secure data transfer occurs over TCP using the SSH protocol. If you want to access the host from a remote location, you need to configure the TCP/22 Port on your ADSL Modem or Router.
Is SSH Connection Secure?
This connection type uses an SSL certificate for data security.
Here’s an example: when you go to a website, you might notice a little green icon in the top left corner. That icon means the website has an SSL certificate, and it’s safe to send your information there. It simply protects your data both when sending and receiving.
How to Install SSH Server on Windows Computer
We defined the Secure Shell protocol. Now, let’s look at how to install SSH on Windows operating systems.
In our previous articles, we examined the telnet protocol. We enabled telnet Client from Windows Features on Windows 7,8,8.1 and Windows 10. However, we cannot simply enable SSH Client on Windows from Windows Features.
Therefore, we need a 3rd party program like Putty to establish a connection to the server.
If we compare this protocol with telnet, you can see that it is much more secure.
To run an SSH server on your Windows computer, we need two programs. These are OpenSSH and Putty software.
Putty Download
OpenSSH Download
Download and install OpenSSH and Putty programs on your computer. Then, first, install the Windows 10 virtual machine on your virtualization program.
Steps:
To use the VMware virtual machine as a server, we will install and configure OpenSSH. For SSH server installation, follow the steps below.
Step 1
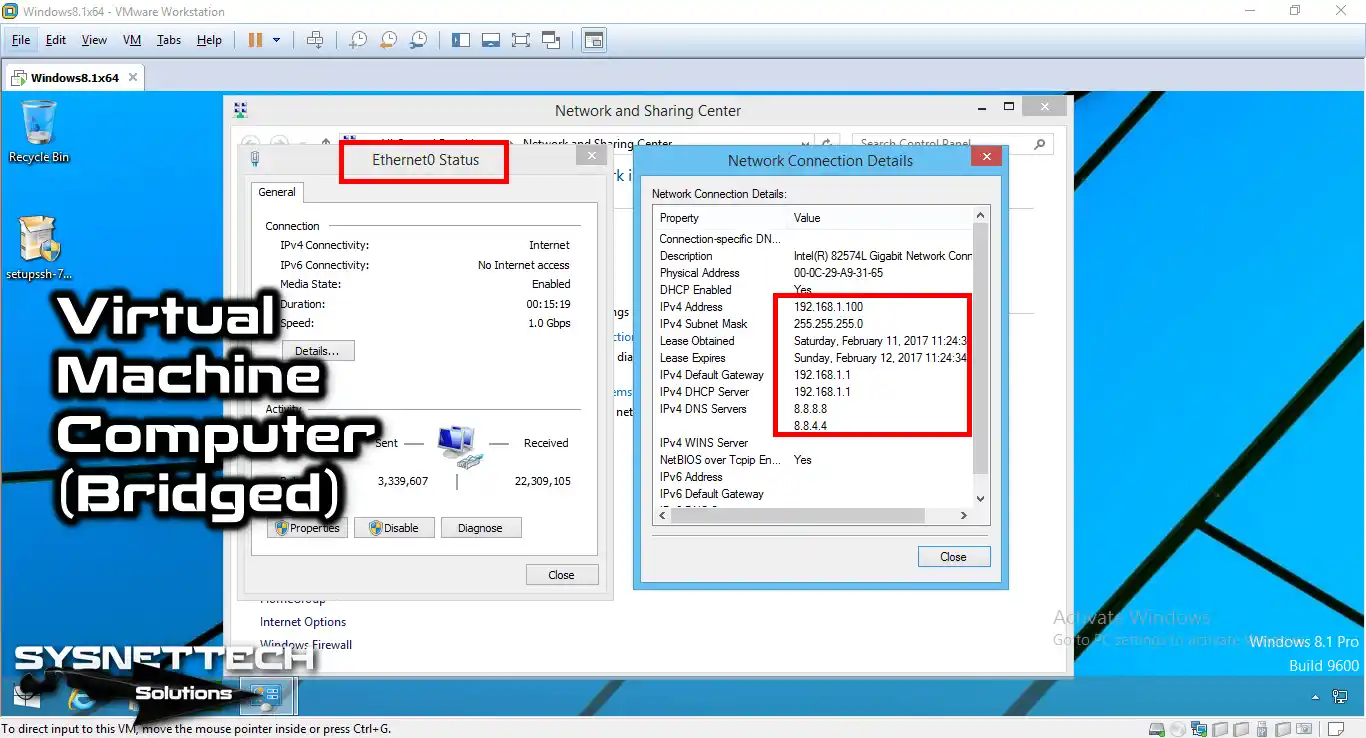
Look at the IP address of your computer’s network adapter.

Step 2
Configure the network settings of the Windows 10 VM as VMnet4/Bridged. After this, check the IP address that the machine received from the DHCP server.
Step 3
Now, we need to configure the network adapter setting of the Windows 10 VM. So check this in Virtual Network Editor.

Step 4
In VMware Virtual Network Editor, you can create VMnet4 or a new VMnet. Check that you have set the VMnet4 adapter card to Bridged.

Step 5
Copy the OpenSSH program you downloaded to your computer and send it to the VM. Then, run the setupssh.exe file as an administrator to install.

Step 6
Select the language of the program to be installed and click OK.

Step 7
Now, the OpenSSH program is preparing for installation.

Step 8
In the OpenSSH installation window, click Next.

Step 9
Afterward, accept the OpenSSH license agreement.

Step 10
In the Components window, select the Server option.

Step 11
In the installation location window, leave the default settings.

Step 12
In the Select Start menu folder, hit the Next button.

Step 13
In the Run as LOCAL_SYSTEM window, select this setting.

Step 14
We have specified that the default port number for the SSH connection is 22.

Step 15
It will generate a key for a secure connection. Continue by selecting the default setting here.

Step 16
In the User Setup window, continue by selecting Local Users.

Step 17
Wait while installing OpenSSH on Windows 10.

Step 18
After the OpenSSH installation is complete, go to the next step.

Step 19
After installing it, you must create a new user for the customer.
Open Computer Management to create a new user.

Step 20
In the Computer Management window, click Users, then Right-click on the free space.

Step 21
When the user creation window opens, click New User here.

Step 22
After configuring a new user, password, and description, click the Create button.

Step 23
After creating a new user for the client, click Close to close the window.

Step 24
Double-click SSHUser to make an administrator.

Step 25
Click the Add button on the Membership tab to continue.

Step 26
In the Select Group window, click the Advanced button at the bottom.

Step 27
You will then click Find to search for groups on the operating system.

Step 28
Select the Administrator account and click OK.

Step 29
In the SSHUser Properties window, click OK again.

Step 30
After making the user a member of the Administrator group, click the OK button.

Step 31
Now, we will use the Putty program to connect to the Server from the Host PC. Putty will provide us with an SSH Client service—Double-click Putty to open it.

Step 32
After opening Putty, type the IP address of the VM (OpenSSH Server) and click the Open button.

Step 33
You can examine the connection to the OpenSSH Server from the image below.

Step 34
Type the SSHUser user name that you created on the virtual machine.

Step 35
Type the password of SSHUser and press Enter.

Step 36
You have successfully connected to the SSH Server using Putty!

Step 37
To obtain the hostname of the server, use the “hostname” command.

Step 38
You can also check your Hostname through Windows 10 OpenSSH Server.

Step 39
Run the “md FolderName” command to create a new folder on the Server.

Step 40
Go to the virtual machine and check the C: drive to make sure you have created a new folder.

How to Use the Secure Shell Protocol ⇒ Video
To install and configure the OpenSSH Server on your computer or VMware virtual machine, you can watch the video below and subscribe to our YouTube channel to support us!
Frequently Asked Questions About SSH (FAQ)
- What is SSH, and why is it used?
- How does SSH work?
- What is the distinction between SSH and SSL?
- How to use SSH command in Windows?
Conclusion
In this article, we reviewed how to install a free SSH Server on Microsoft Win 7, 8, 8.1, and 10 operating systems.
Using OpenSSH, you can securely connect to your server from a remote location and transfer files. Thanks for following us!

Be the first to share your comment