
Sometimes you might need to remove Hyper-V from your Windows 11 & 10. For example, if you do not want it anymore or want to use another program, you can do this. Also, in this guide, I will show you how to disable Hyper-V on your PC.
You can also follow these steps to free up your computer’s system resources. Also, if you want to use a different VM program, you can try Microsoft’s VM app again later.
How to Uninstall Hyper-V from Windows 11 & 10
Hyper-V is a standard virtual machine tool used by many PC managers. The best part is that it is free. It is good to know that Windows 8, 10, and 11 have it built right in.
You can install this VM program on your computer. First, if you want to install Hyper-V, I suggest using Windows Features. But before you begin the install, you should check whether your PC supports virtualization technology.
Click the link below to determine whether a computer’s CPU supports the virtualization feature.
- How to Enable Virtualization Technology in a Computer
Furthermore, Hyper-V gives you three different ways to install it on Windows. You can do a Hyper-V install using the links below.
- How to Install the Hyper-V Software on Windows 10 OS
- How to Enable Hyper-V using PowerShell
- How to Configure Hyper-V using CMD
In this article, I will show you how to remove Hyper-V and Windows’ emulation features.
How to Disable Hyper-V
To uninstall Hyper-V from your PC, follow the steps summarized below.
1. Open Windows Features
Step 1
Pick Programs and Features by right-clicking on the Start button on your desktop.

Step 2
In the Programs and Features screen, look for the button labeled Turn Windows features on or off.

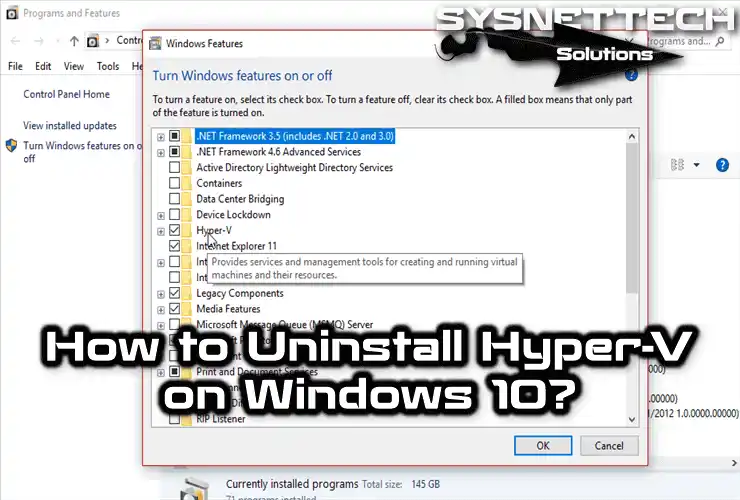
2. Confirm Hyper-V Removal
Step 1
When you open Windows Features as shown in the image below, you will see Hyper-V checked here. Now, first, uncheck the Hyper-V main box. Then, make sure you have turned off all the sub-options and press OK.

Step 2
To deactivate Hyper-V, uncheck the checkbox that you see and click OK.

Step 3
Please wait while we take off the Microsoft virtual software from your PC.

Step 4
If you turn off Hyper-V, the change is not right away. But the new setting will only work when you restart your computer. So, you must restart your PC to finish this.

3. Verify the Uninstallation of Microsoft Virtualization Software
Step 1
Let’s say you are using Windows 11, which is a newer version of Windows 10. In this case, you may not see the Windows Hypervisor Platform option under Hyper-V in Step 4. But this is okay and is likely because of the version change.
In this case, if you are using version 1809 or later, please be careful. As shown in the image below, you need to remove the relevant check mark.

Step 2
After you finish the steps above, you can now use VirtualBox or VMware. This way, they will run without Hyper-V getting in the way. But if Hyper-V is still on, open CMD as an admin to use the command below and fix the problem.
bcdedit /set {current} hypervisorlaunchtype offSuppose you wish to re-enable the Hypervisor and use Hyper-V again. If that is the case, you can execute the command below to do so:
bcdedit /set {current} hypervisorlaunchtype autoIn addition, instead of using the commands above, get the regedit file from. After you get the Windows-ready reg file, double-click it to start regedit. After it starts, click Yes to make the change. You can then restart your computer to use the change.
How to Delete Hyper-V ⇒ Video
Watch the video below to begin learning how to turn off Hyper-V fully. You can think about joining our YouTube channel if you like the things we show you.
Conclusion
In conclusion, you can easily remove Microsoft Hyper-V from your PC. This will give you the opportunity to explore other alternative software. You can safely turn it off by following the steps I have explained in this guide.
Also, you can start to try new virtualization experiences on your Windows 11 and 10 PC. If you have any trouble during the removal, please feel free to ask for help.
Also, if you have any problems with uninstalling the application, please refer to this resource from Microsoft. In conclusion, I wish you success in your virtualization journey!

Be the first to share your comment