
This article confidently delves into seamlessly running Windows XP on a state-of-the-art virtual machine using Microsoft Hyper-V virtualization software on the cutting-edge Windows 10 or 11 operating system.

How to Set Up Windows XP Pro x64 on Windows 10 OS using Hyper-V
After Microsoft released Windows XP on October 20, 2001, it started becoming a viral operating system among users. Since its release, it has been widely used in all workplaces and homes.
This operating system uses NT technology and micro-kernel architecture and has versions developed for various purposes. These versions are Professional, Home, Media Center (MCE), Tablet PC Edition, Starter Edition, and Home Edition (ULCPC – Ultra Low-Cost Personal Computer).
The Windows XP operating system, which has reached a large audience, is rarely used today. Since Microsoft ended support for this system on April 8, 2014, most users or institutions could not get new system updates, so they ended the use.
The XP system, which has received support for 12 years, will no longer accept new updates, as Microsoft stated in this article.
Despite the end of support for Windows XP, some system administrators may use this system for legacy applications or other scenarios in test environments. Instead of running XP on a physical PC, you can experience this system on a more powerful computer using HyperV, VMware Workstation, or VirtualBox virtualization software.
How to Create a New Virtual Machine for Windows XP OS
After successfully establishing Hyper-V on your Windows 10 system, with the assurance of virtualization support, you can effortlessly generate a new virtual PC and install either Windows or Linux operating systems in this virtual environment.
Step 1
After running the Hyper-V Client software, creating a new External Switch using Virtual Switch Manager before operating system installation is recommended. Because the Default Switch, which is enabled by default by the program, uses the NAT connection to expose the VM to the host network, which can cause network problems in many cases.
To minimize network problems, you can use your host’s adapter with an External Switch, and both get an IP address from the DHCP device in your local network and connect to the guest machine via remote desktop.
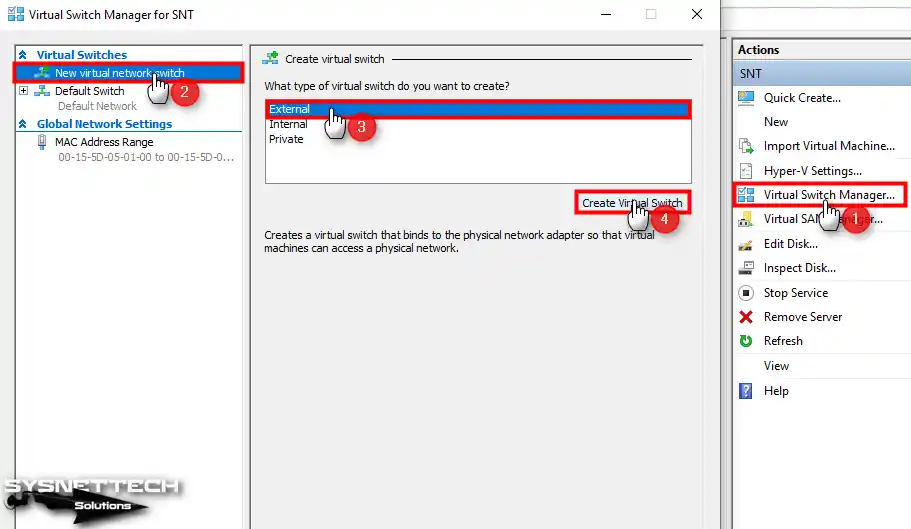
Step 2
After creating the External Switch, type a name according to your desire in the Name field, and then select the network adapter you use to access the Internet on your host in the External Network setting and click OK.

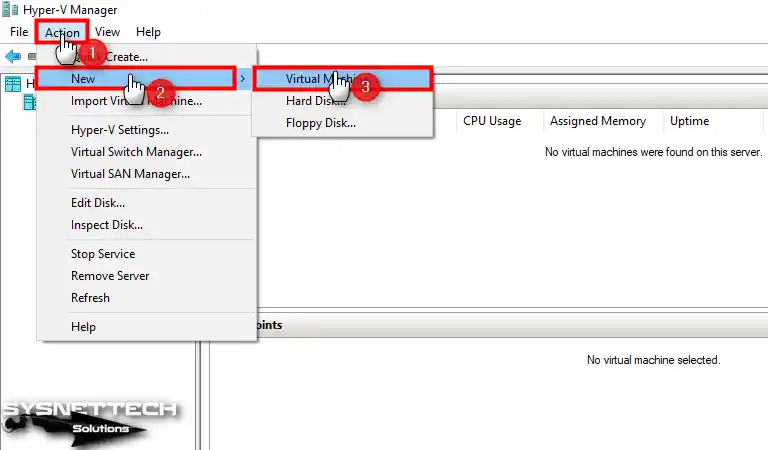
Step 3
After configuring the Virtual Switch, click Action / New / Virtual Machine from the program tool menu to start the virtual machine setup wizard.
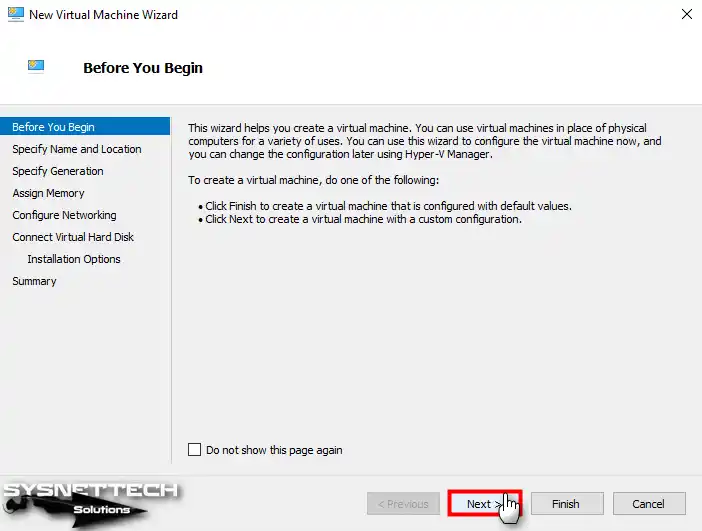
Step 4
You can quickly click Finish to create a virtual computer with the settings specified by the program in the VM wizard. Alternatively, you can continue by clicking the Next button to create a manual guest machine.
If you do not want this window to appear during the next VM creation, do not show this page again, and click Next.
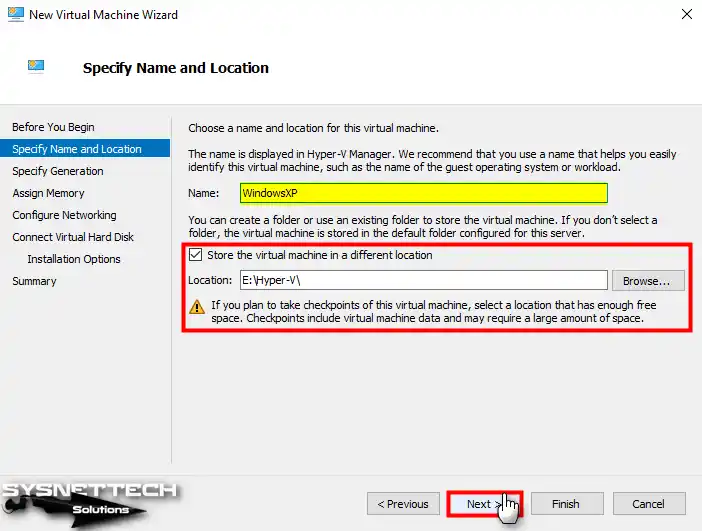
Step 5
After typing the name of the operating system you will install on the guest machine, it is recommended that the installation location of the VM be configured on an external disk to fill the capacity of your host disk appropriately.
Step 6
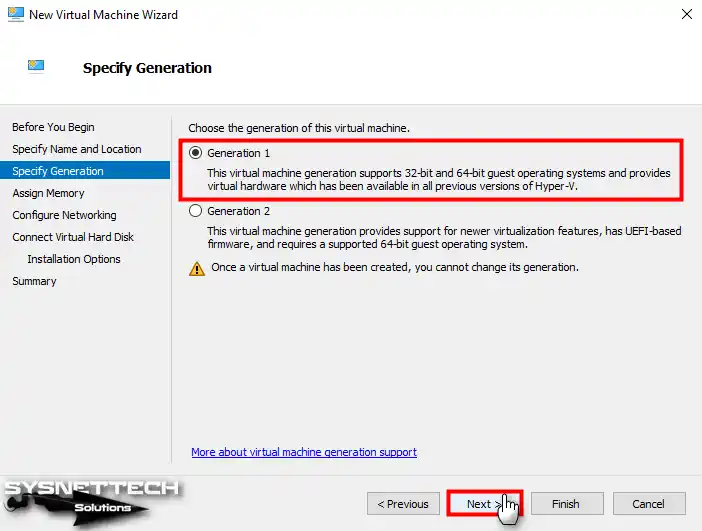
When installing one of the old Windows operating systems, you need to choose Generation. You can select Generation 2 when you try to install a UEFI-supported OS. Still, if you install Windows XP, you should choose Generation 1, which supports BIOS firmware.
Step 7
Suppose you handle multiple VMs simultaneously using Hyper-V on your Windows system. In that case, you can create more efficient RAM resource management thanks to the Dynamic Memory feature. However, you are only going to use a single virtual computer. In that case, you can disable this feature and assign a specific RAM size to the VM for more performance gains.

Step 8
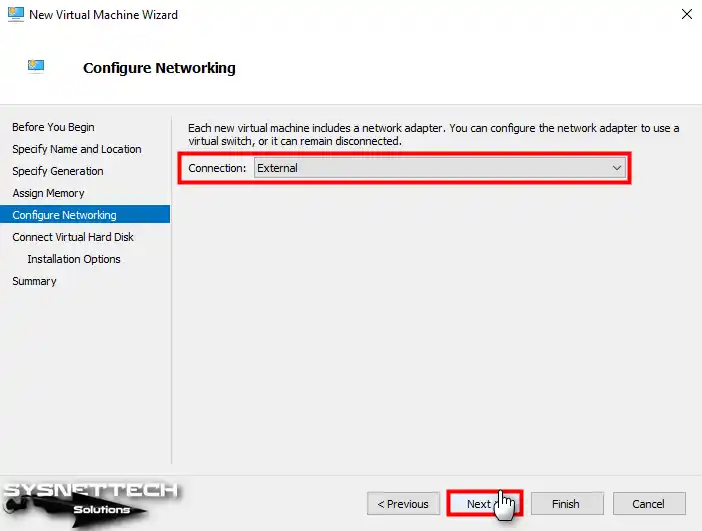
For the virtual machine’s network settings, select the External Switch you created using the Virtual Switch Manager tool.
Step 9
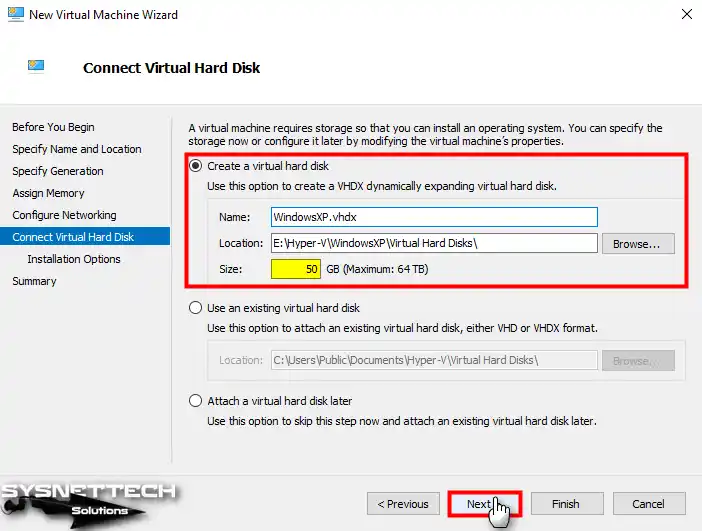
You must create a new virtual disk while preparing a new guest system. Leverage the “Use an existing virtual hard disk” option to incorporate a pre-installed virtual disk from a VM seamlessly. This straightforward approach allows you to effortlessly integrate the desired virtual disk into your virtual machine setup.
In addition, you can change the virtual disk size automatically, as determined by the program, from the Size section as you wish.
Step 10
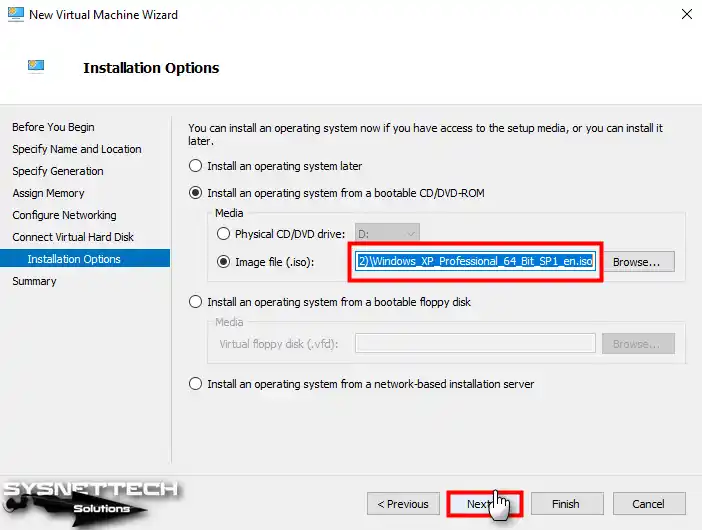
To seamlessly incorporate the Windows XP ISO file into your virtual machine, confidently opt for the “Bootable CD/DVD-ROM” option. Subsequently, select the “Image File (.iso)” format and conveniently specify the ISO file’s location by utilizing the Browse button.

Step 11
Opt for the Windows XP Professional 64 Bit SP1 ISO file you have securely downloaded to your computer by following. Assertively click on the Open button to proceed with the selection process.

Step 12
After checking the location of the Windows image file, proceed to the next step with Next.
Step 13
You can check the settings you have made in the Virtual PC in the Summary window. Should there be a specific setting within the virtual machine that you wish to modify, you can conveniently navigate back to the corresponding settings by confidently utilizing the Previous button. This allows you to access and adjust the desired configurations as needed effortlessly.
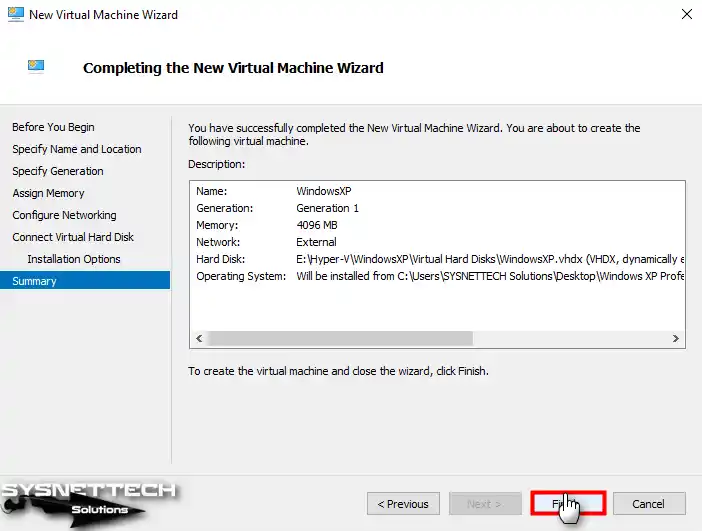
Step 14
After preparing the Windows XP virtual machine, open its settings and increase the number of virtual processors according to the power of your host computer’s processor hardware.

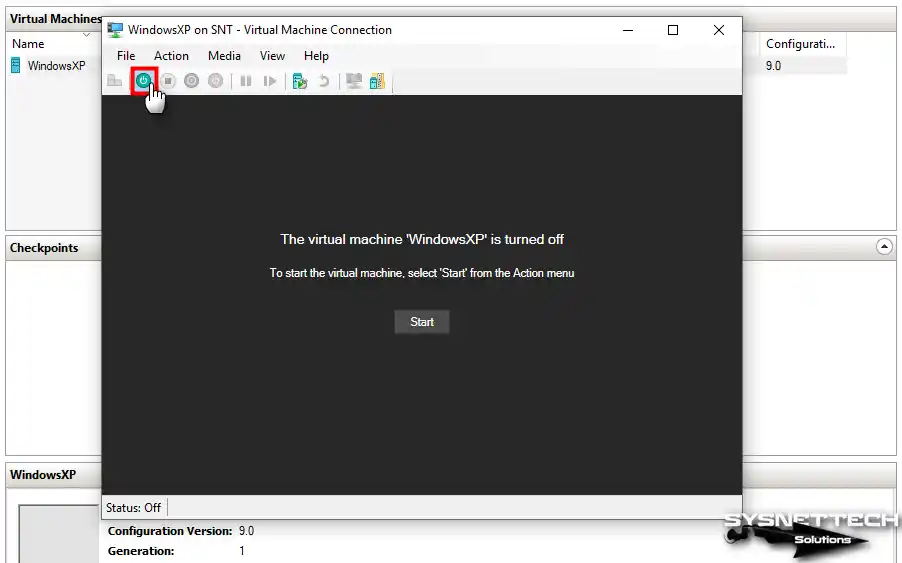
Step 15
Finally, click the correct button / connect option on the virtual machine created in the Virtual Machines section, click the Start button in the window that opens as in the image below, and proceed to the Windows installation.
How to Install Windows XP
Once you have completed the necessary preparations and initiated the virtual PC for Windows XP installation via Hyper-V, you can confidently proceed with the subsequent steps, mirroring the installation process as you would on a physical computer.
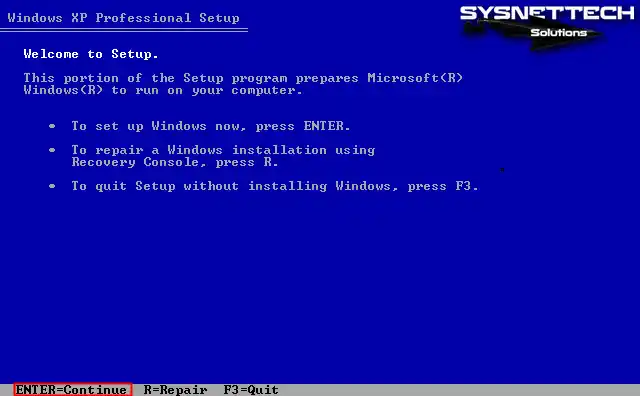
Step 1
Press Enter on the Windows XP Professional Setup screen to start the installation immediately. Use Recovery Console by pressing R to repair your system.
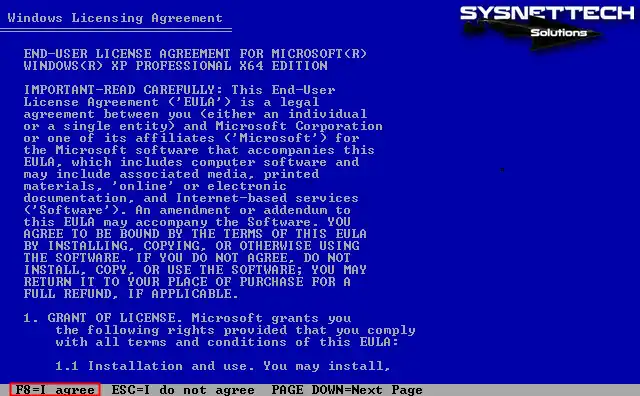
Step 2
You can scroll down the page by pressing PAGE DOWN to read the full text of the Windows XP license agreement. After reading the license terms, press F8 to accept and continue.
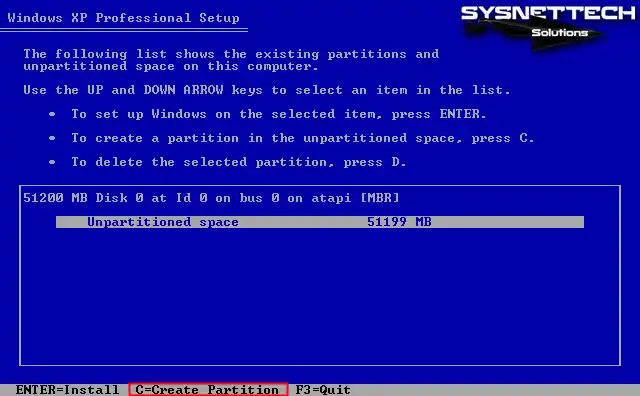
Step 3
You can see the unallocated space in the disk configuration window. Press C to create a new partition on this disk space. Or, if you want the disk to be configured automatically by the installation wizard, press Enter directly and start the installation.
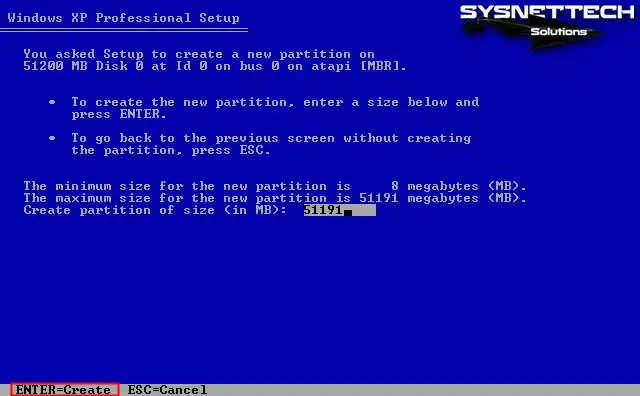
Step 4
Press Enter to accept the automatically edited disk size and use all disk space.
Step 5
After creating the C drive on the virtual HDD, press Enter to start the Windows installation.

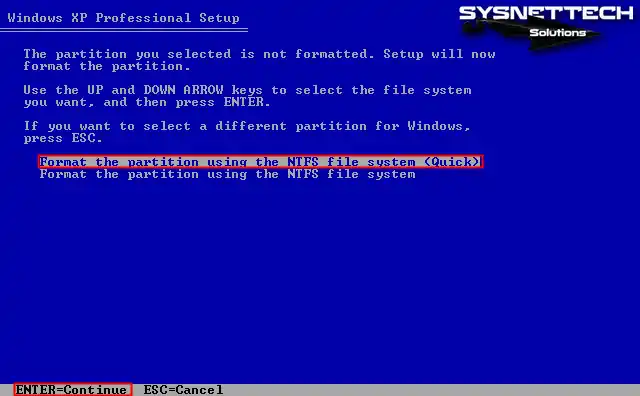
Step 6
Before installation, format the virtual disk using the NTFS file system.
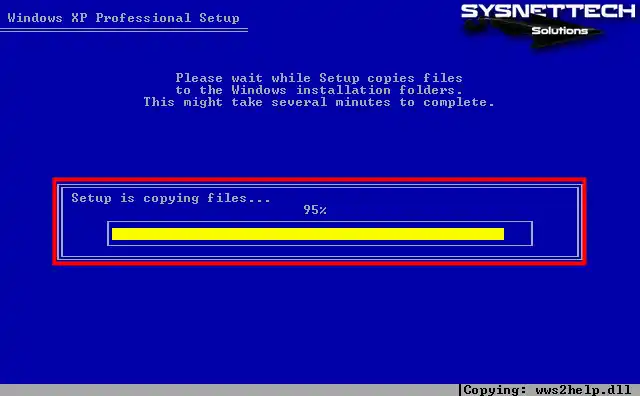
Step 7
After formatting the virtual disk, wait while the setup wizard copies the system files.
Step 8
After the first stage of Windows XP installation is completed, press Enter to reboot the guest machine.
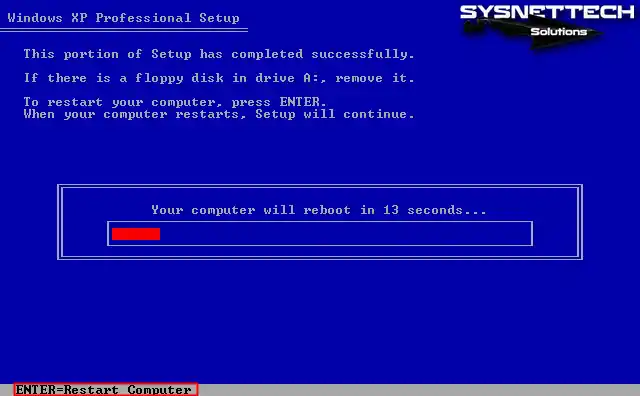
Step 9
Wait while Microsoft Windows XP x64 Edition boots up.

Step 10
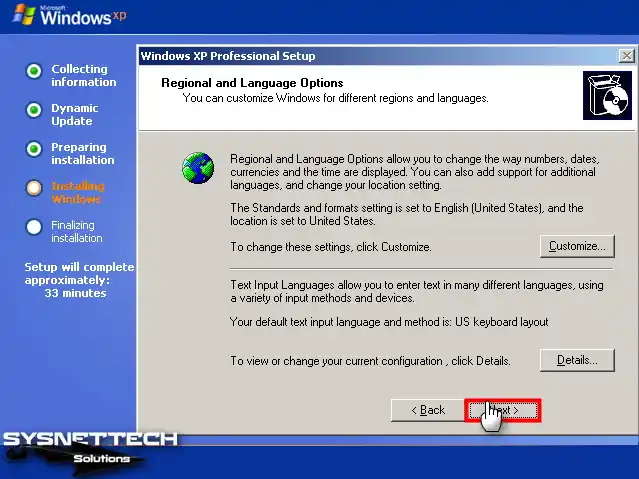
Select your guest operating system’s display language and region setting in this window and continue.
Step 11
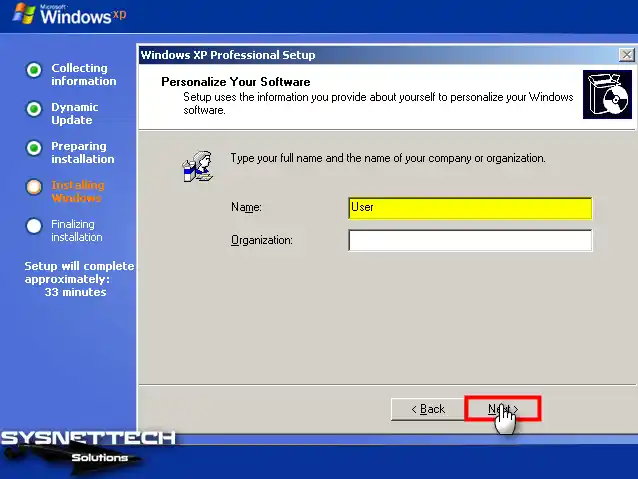
Type a name for the user account of your virtual system. If you are using the VM in an organization, type the company name in the relevant section and click Next.
Step 12
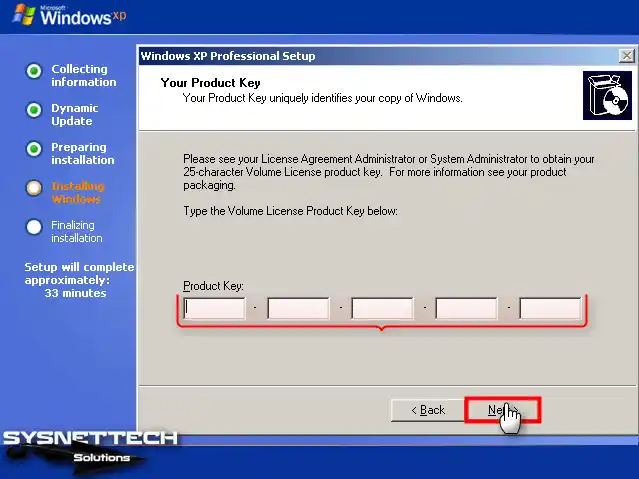
Type your 25-character Windows XP Pro product key and click Next.
Step 13
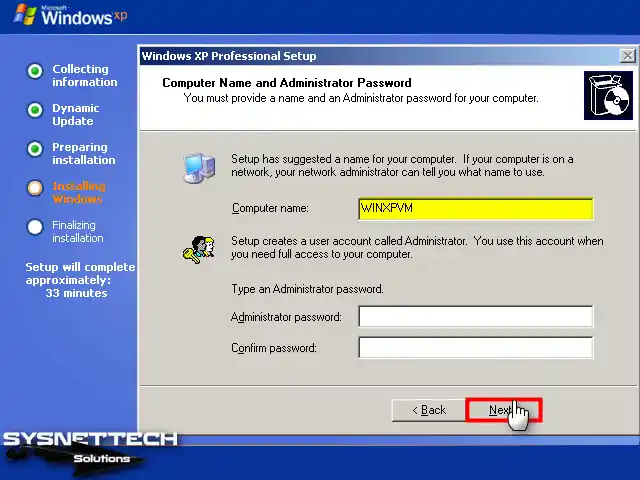
When prompted, input a different computer name that differentiates it from other virtual or physical computers in your network environment. Furthermore, if you desire to establish a password for the administrator account, securely enter your preferred new password and proceed by clicking on the Next button.
Step 14
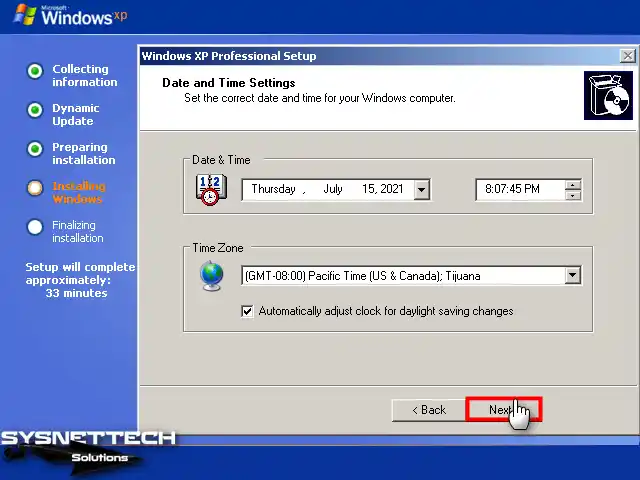
Configure your guest operating system’s date and time settings according to where you live and continue.
Step 15
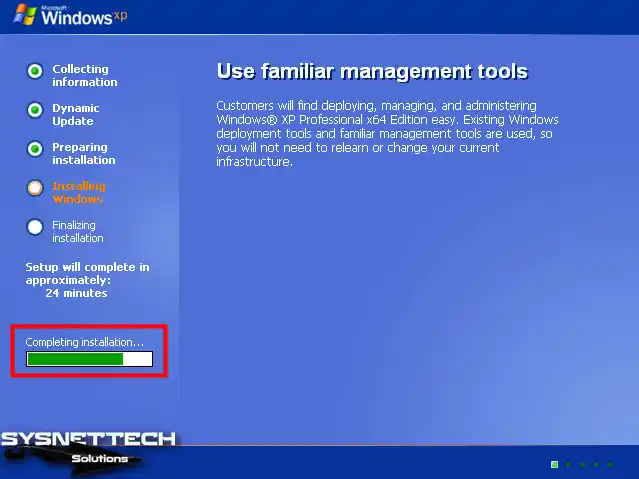
The installation will continue after editing system settings such as product key, region, and language settings.
Step 16
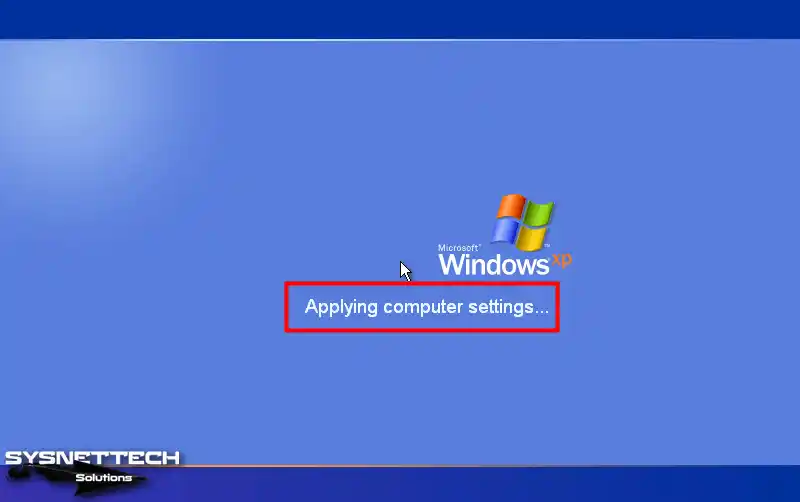
After the setup wizard has copied the Windows XP system files, wait while the computer settings are applied.
Step 17
After applying the computer settings, the Windows XP desktop will be ready.

How to Upgrade the Windows XP System SP1 to SP2
Once successfully establish Windows XP SP1 on the virtual device, you must upgrade your virtual system to Service Pack 2 (SP2) to install Integration Services. Nevertheless, if you have utilized an SP2 ISO, you can skip this stage, as it is optional.
Step 1
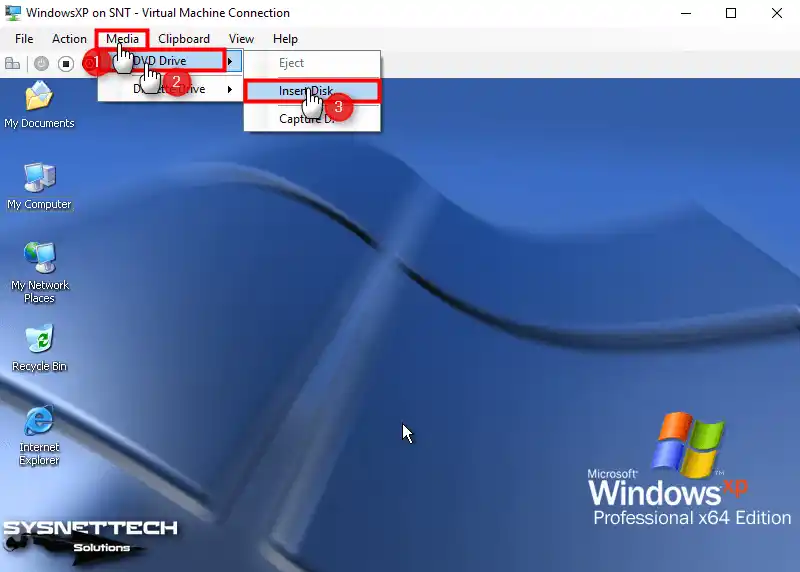
Click Media / DVD Drive / Insert Disk in the guest machine’s tool menu to add the SP2 Upgrade ISO file.
Step 2
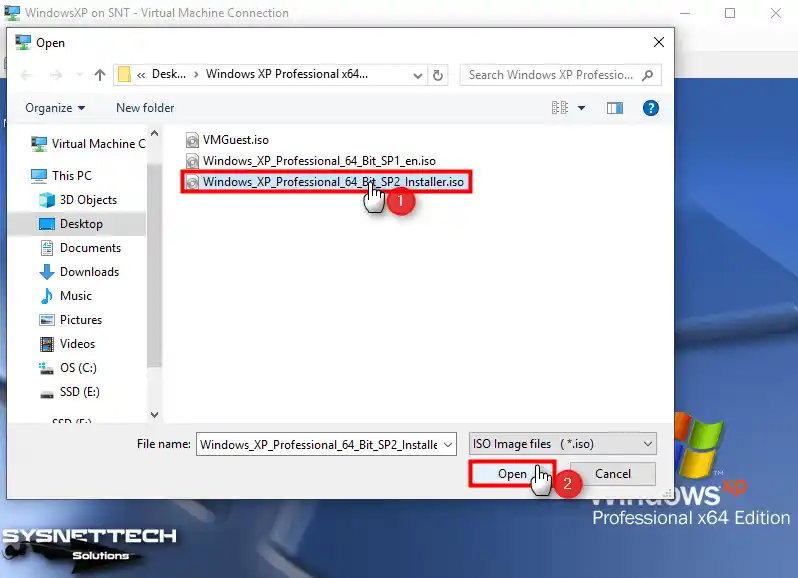
Select the Windows XP 64 Bit SP2 Installer ISO file you downloaded to your PC and click Open.
Step 3
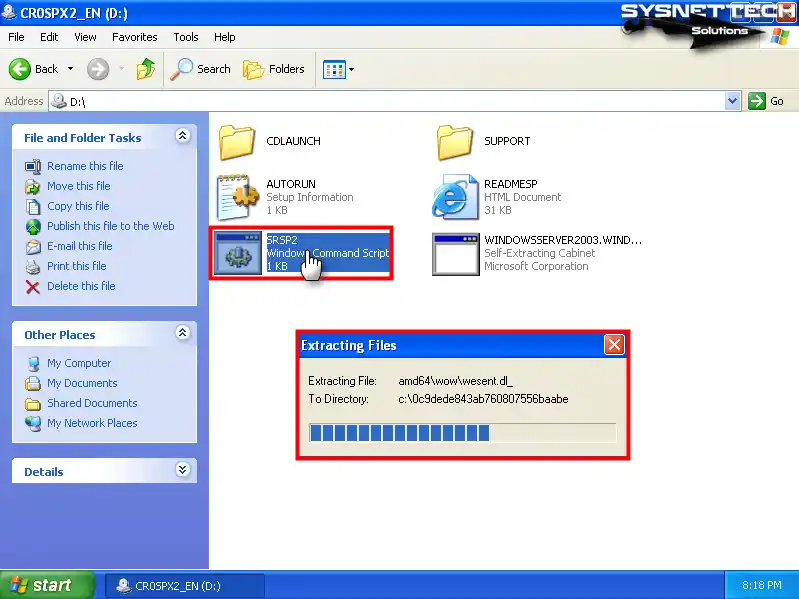
Open My Computer and right-click/open on the CD content, then double-click the SRSP2 command script to run it.
Step 4
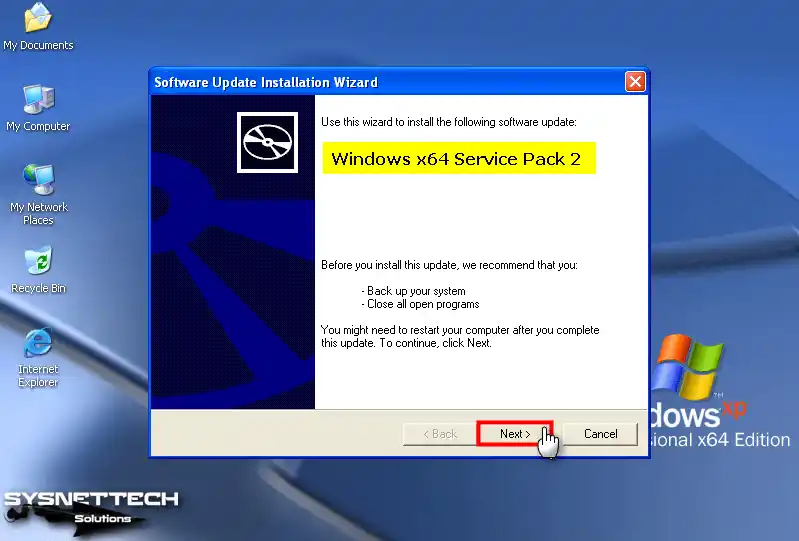
After extracting the files, click Next in the Windows x64 Service Pack 2 wizard.
Step 5
Accept the Service Pack 2 (SP2) license agreement and click Next.

Step 6
Wait while Windows XP SP1 updates to SP2.

Step 7
After the system upgrade is complete, restart your guest operating system.

Step 8
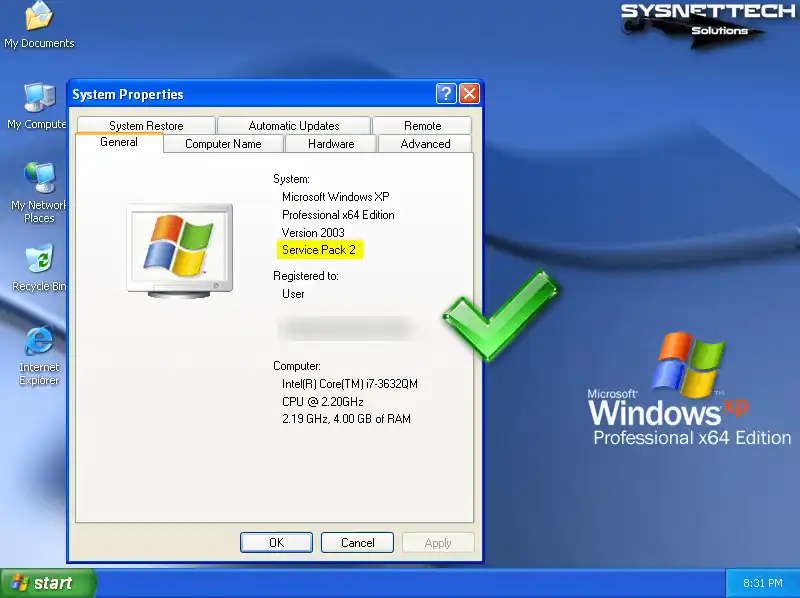
After right-clicking on My Computer, click System Properties and check that Service Pack 2 is specified in the System section.
How to Install Hyper-V Integration Services
After you upgrade your Windows XP virtual system to SP2, you must install Integration Services to update or enable the VM’s display and network adapter.
First, download the Windows XP Integration Services (VMGuest.iso) ISO file to your computer, and then follow the installation steps.
Step 1
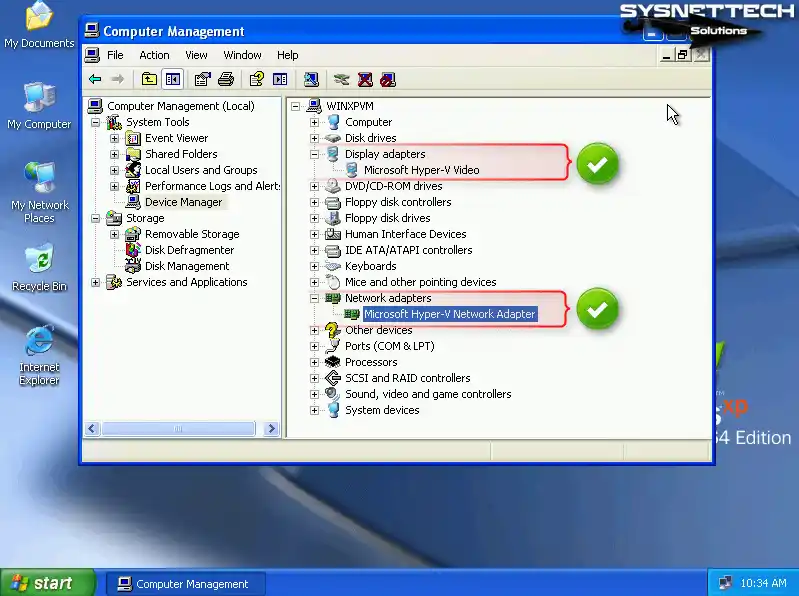
Right-click My Computer on the guest machine, then click Manage and check that the display adapter is not enabled and that the network adapter is not defined in the Device Manager interface in the Computer Management window.

Step 2
Add the Integration Services (VMGuest.iso) ISO file to the Windows XP virtual machine.

Step 3
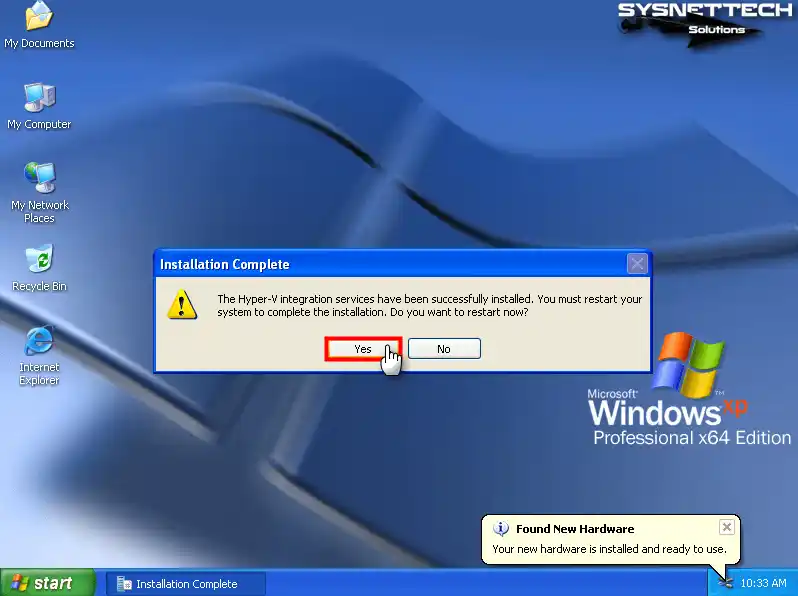
As soon as you add the VMGuest.iso file, Integration Services will be installed automatically on the virtual machine.

Step 4
After the Windows XP Integration Services installation is complete, restart your virtual system.
Step 5
Open Device Manager again and check that the display and network adapter is updated. With the Microsoft Hyper-V Network Adapter now enabled, you can seamlessly establish an Internet connection within the virtual appliance. This lets you connect and access online resources, ensuring a smooth and uninterrupted virtual experience.
How to Test Internet Connection
After enabling the Microsoft Hyper-V Network Adapter, you must check that the virtual system can access your local network and the Internet.
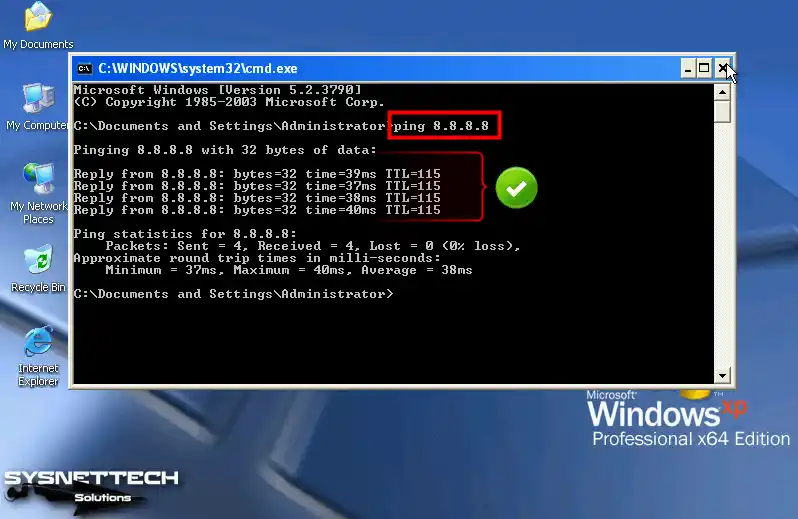
Step 1
In Windows XP virtual PC, press Windows Key + R to open Run, execute the CMD command, and ping Google servers by executing the ping 8.8.8.8 command and test network connectivity.
Step 2
If the ping to the Google servers is successful, open Internet Explorer and check the connection by visiting the search engine’s homepage.

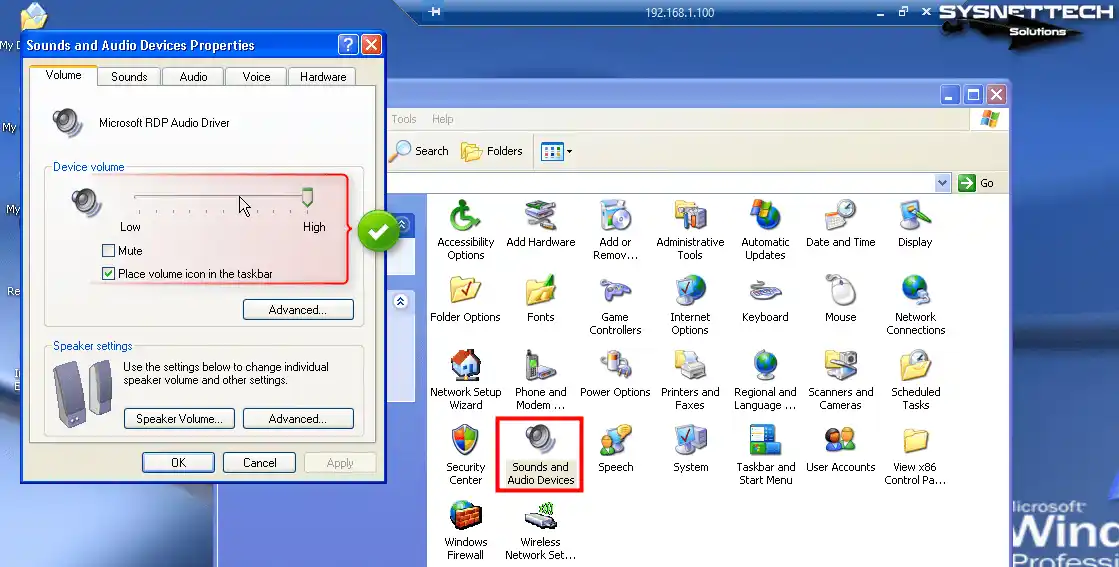
How to Use the Virtual Machine in Full Resolution with Remote Desktop Connection
Even if you install Integration Services on the XP guest machine, you may not be able to use the VM in full-screen resolution. You can connect from the host to the VM using Remote Desktop Connection to use both the screen resolution and the audio device.
Step 1
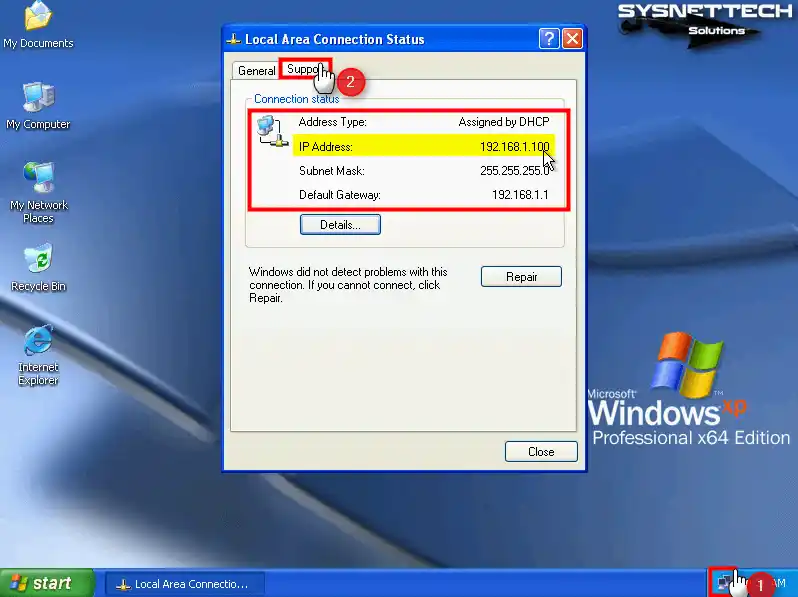
To effortlessly establish a remote desktop connection with the VM, it is crucial to acquire the IP address of the guest machine. To accomplish this, confidently double-click the network icon in the lower right corner and inspect the IP address within the Support tab of the Local Area Connection Status window. This seamless process ensures you quickly obtain the necessary information to establish a remote desktop connection.
Step 2
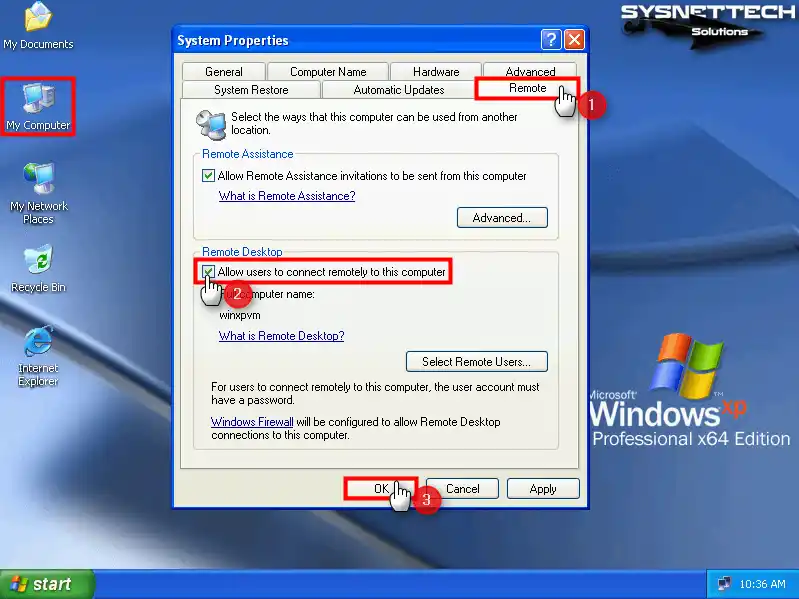
Once you know the IP address of the virtual computer, you need to allow remote desktop connections. Proceed by right-clicking “My Computer” and navigating to the System Properties. Within the System Properties window, access the Remote tab. Next, under the Remote Desktop zone, determine the “Allow users to connect remotely” option. Finally, solidify your preference by hitting the OK button.
Step 3
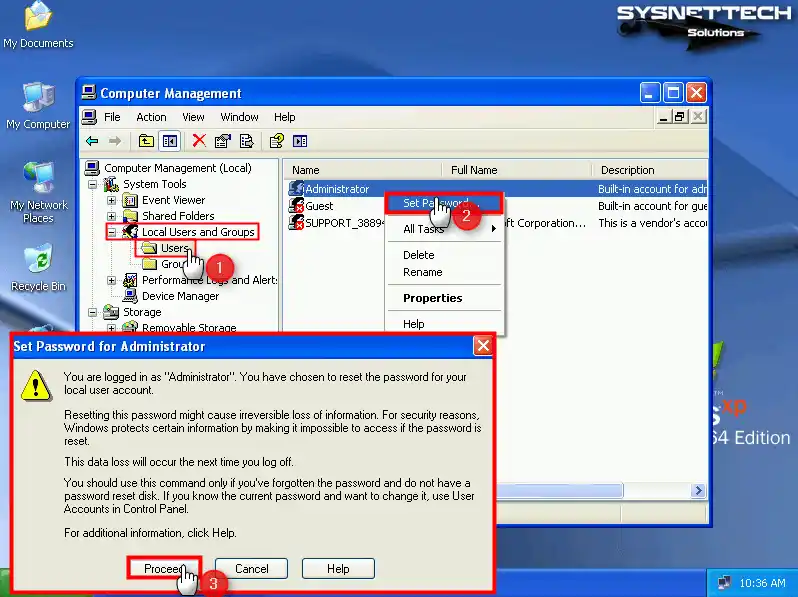
After enabling remote desktop connection in Windows XP, you must create a password for the user account, as the password will be requested when connecting from the host to the VM.
Click Users under Local Users and Groups in the Computer Management window, right-click / Set Password on the Administrator account on the right, and click the Proceed button in the open window.
Step 4
Ensure you create a memorable password for your user account, followed by a decisive click on the OK button.

Step 5
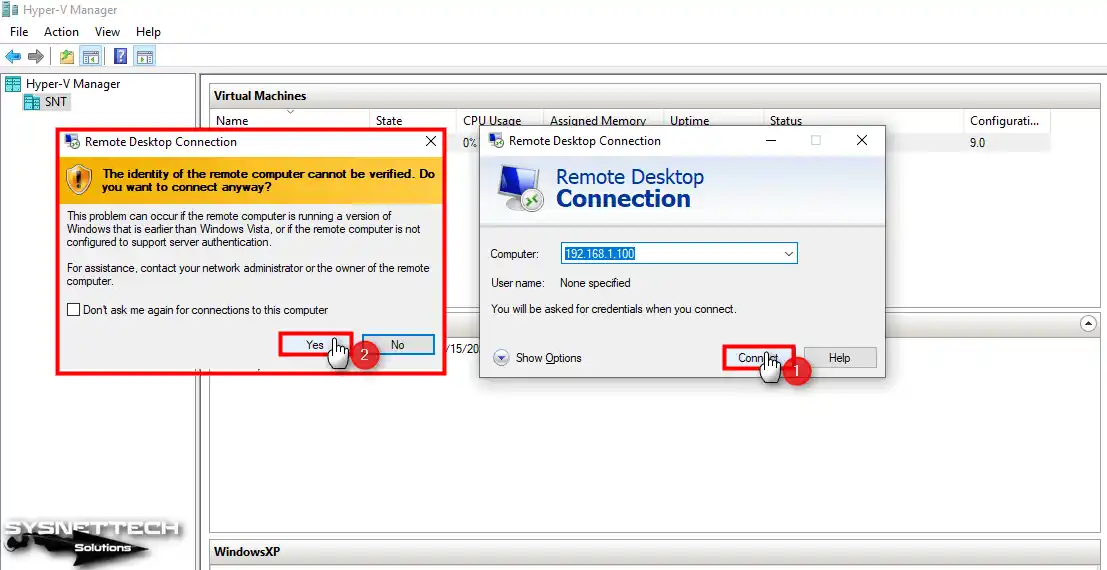
Find and run the Remote Desktop Connection tool on your host operating system.

Step 6
Type the IP address of the virtual machine in the Computer section, and after clicking Connect, click Yes to skip the certificate warning.
Step 7
After connecting to the VM, type the user credentials of the virtual system and click OK.

Step 8
You can now use the Windows XP virtual computer in full resolution and hear system sounds.
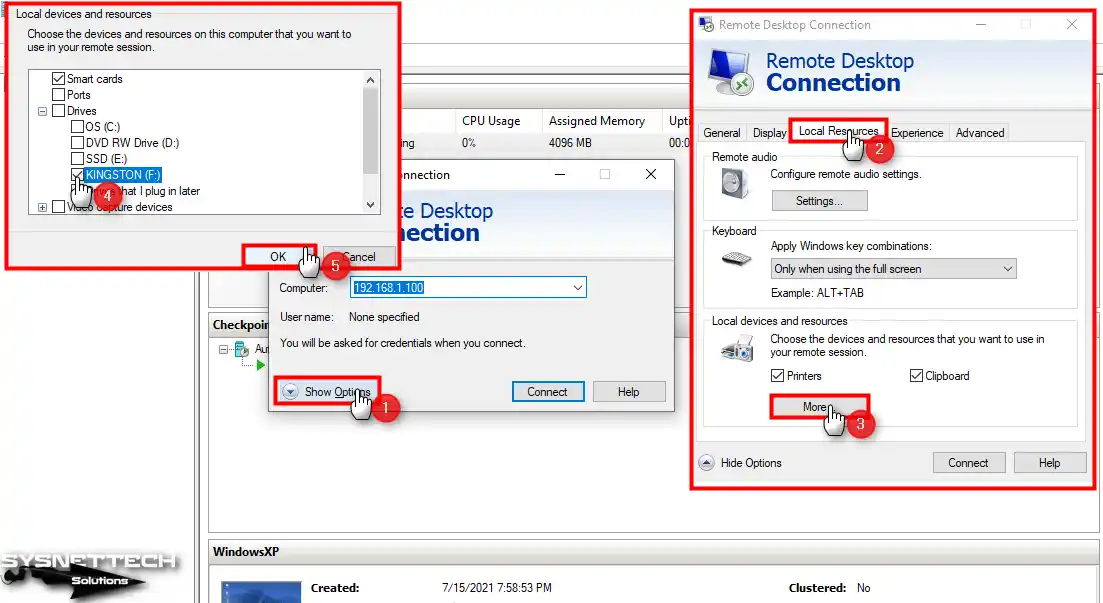
How to Use USB Flash Memory in Virtual Machine
For expedient file transfer between the host and the virtual machine, leveraging a USB flash drive on the remote machine is the most straightforward approach. This method allows you to efficiently share your files with the VM, enabling swift and seamless data transfer.
Step 1
Open the remote desktop tool again. After clicking Show Options, click the Local Resources tab in the open window, then click More.
In the Local Devices and Resources list, under Drives, tick the flash memory you will use in the VM and click OK.
Step 2
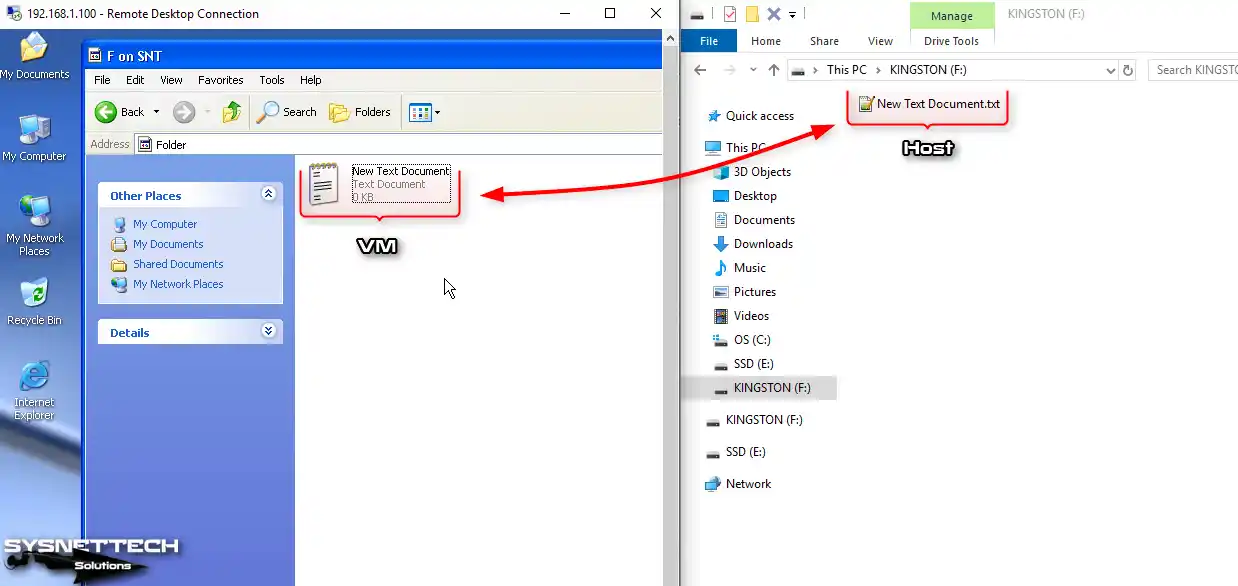
When you tick the flash memory and try to connect to the VM, click Connect again in the Do you trust remote connection warning window.

Step 3
Open My Computer in the VM and check that your USB stick is active under Other.

Step 4
Enabling flash memory on the VM simplifies transferring files between the host and the virtual device. By taking advantage of this functionality, you can seamlessly and effortlessly transfer
Video

13 People Shared Their Experience
Coudl you explain how to make Internet Connection beetwen Windows 10 and VM XP couse i can’t do it.
WHAT IF THE WIN XP INSTAL ASK FOR A LICENCE KEY?
no ethernet connections
After installing Windows XP there are still several drivers that are not recognized in my PC, as the network driver.
Very helpful. Thank you
You’re welcome!
very very nice guide thank Tolga
You’re welcome!
I have error server found error
Windows XP is not connected to Internet.
Very useful, thankyou.
How did you get the “Microsoft Hyper-V Network Adapter” installed in an XP VM?! Everywhere else on the net, and Microsoft themselves state that it won’t work. I have an XP VM running under Windows 10 Hyper-V, and only the legacy adapter (i.e. “Intel 21140-Based PCI Fast Ethernet Adapter (Generic)”) is available and what shows up in the XP Device Manager.
Did Microsoft update the Hyper-V Integration Services ISO recently, or did you make some custom version? Mine is stuck with the legacy adapter, clipped at 100mbps. Please explain, and elaborate if the “Microsoft Hyper-V Network Adapter” you show in the screenshot is capable of allowing XP to network at 1 gbps.
Guess we’ll never know, as it’s been a month and no answer. AFAIK, installing the “Microsoft Hyper-V Network Adapter” in XP is not possible.