

In this guide, we’ll walk you through Oracle VM VirtualBox 7. First, I’ll show you how to create a new virtual machine. Then, I’ll explain how to install Windows 98. Specifically, I’ll share the drivers for First Edition (FE) and Second Edition (SE).
We all want to know about old computer systems, mostly. We want to go back and experience how they were and how they worked. But for older systems like Windows 98, we need older hardware. In fact, we don’t need to, since we can use free tools like VirtualBox.
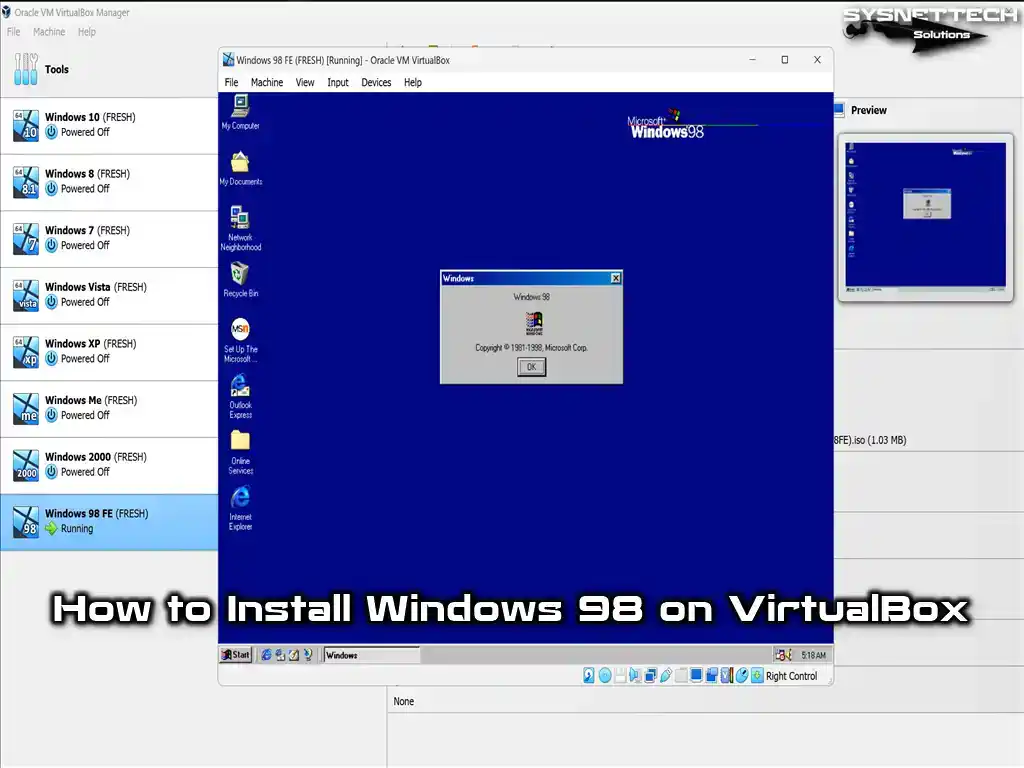
How to Set Up Windows 98 FE (First Edition) or SE (Second Edition) on Windows 10 & 11 Using Oracle VM VirtualBox?
Windows 98 is a distribution of Microsoft’s 9x versions. Microsoft officially released it for commercial use on June 25, 1998.
Win98 is a system with a graphical user interface. Thus, it lets people open programs by clicking on icons.
One of the most significant innovations is the FAT32 file system, which supports longer file names. What’s more, this OS works better because it uses resources more efficiently.
It also finds and connects USB devices faster. So, this makes it easy to use things like printers and scanners.
Windows 98 makes going online easier than older versions. So, this removes the need for complex network settings.
Thanks to improvements in the user interface, we can now manage software with a GUI. However, if we want to configure some advanced settings, we still need to use MS-DOS.
Microsoft ended mainstream support for First Edition on June 30, 2002. It also ended extended support on July 11, 2006.
The first version of this system had many safety problems and errors. For this reason, Microsoft released the Second Edition on May 5, 1999. However, they also ended support for this system on June 30, 2002.
If you want to try out an old OS like this, virtual machines can help. In particular, you can see this especially in programs like VirtualBox or VMware.
This means you don’t need to install a system on an old computer. Instead, you can efficiently run old systems on your device with Windows 10 or Windows 11 installed.
How to Prepare a New Virtual Machine for Windows 98
After putting VirtualBox on your main computer, you may want to set up Windows 9x. But before you begin, you must set the virtual machine options right.
1. Creating a Basic VM
Step 1
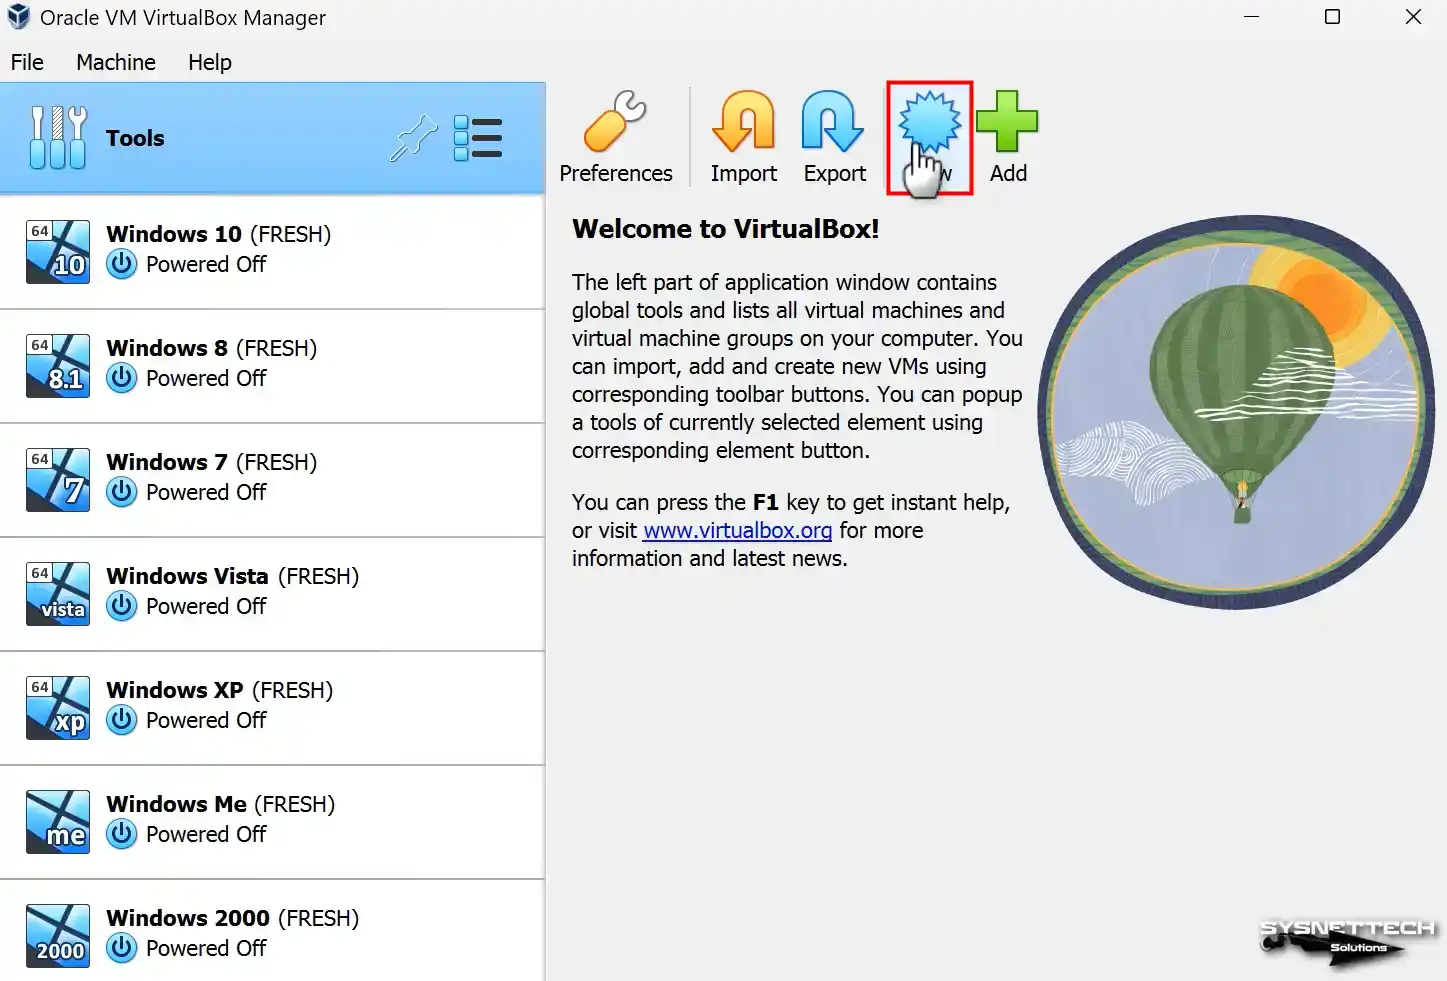
After opening VirtualBox, click Machine > New on the top bar. Or, you can start the virtual machine wizard by clicking the New icon on the right.
Step 2
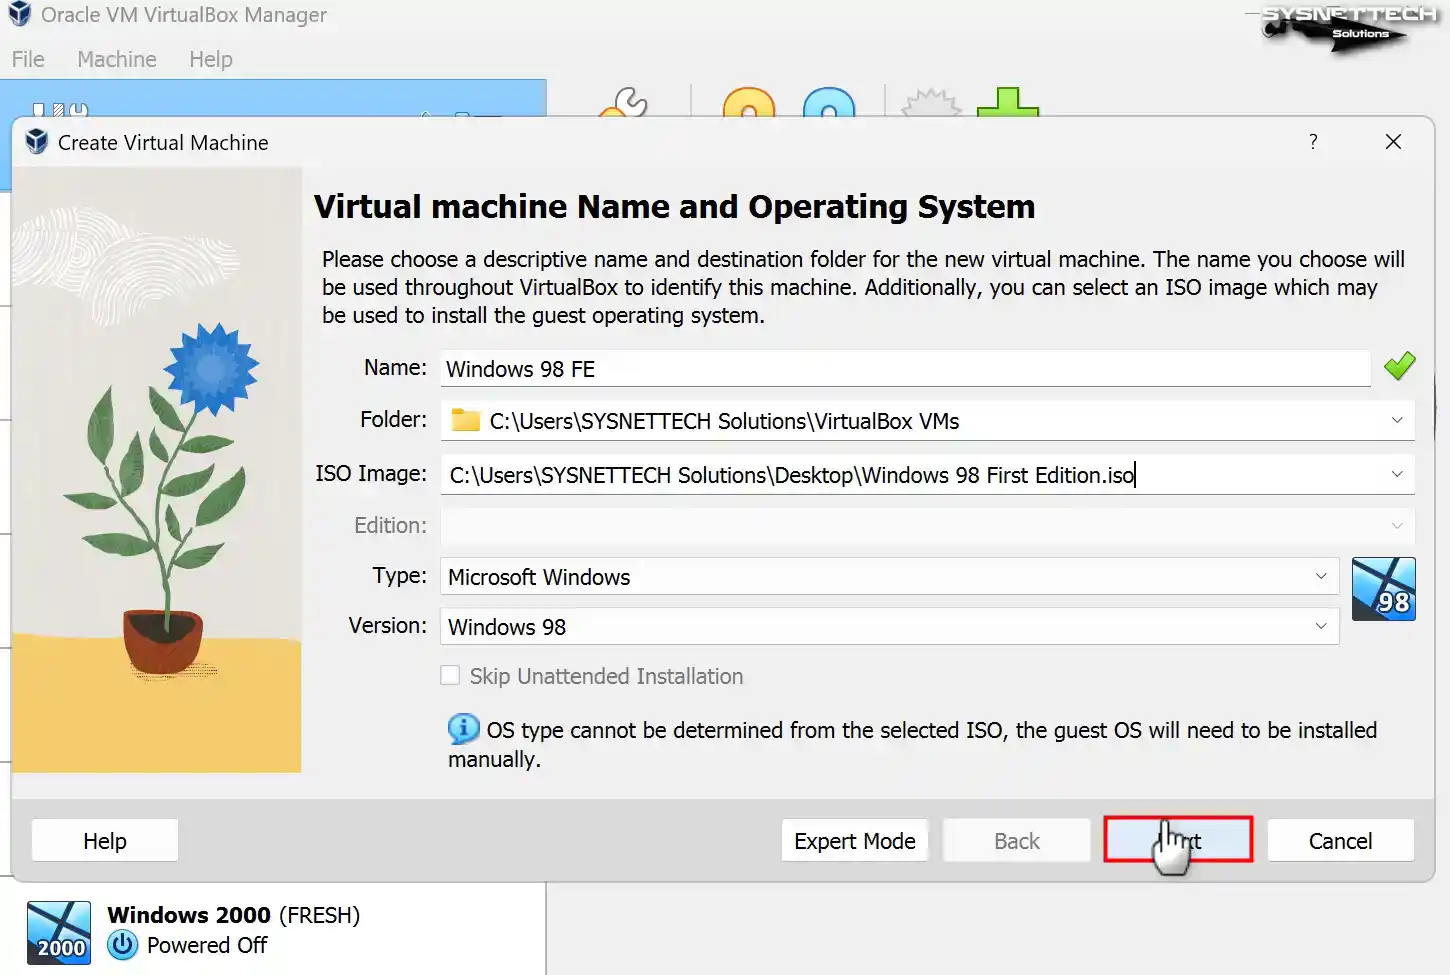
In the virtual machine wizard, type the system name in the Name box. This way, it will automatically set the Type & Version values.
If you see 32-bit in the Version section when installing the latest versions of Windows, change the architecture. In other words, set the computer type by hand for the system you are installing.
If you want to store Win98 on your host disk, leave the folder location as the default. But I suggest using an external disk to stop filling your disk for no reason.
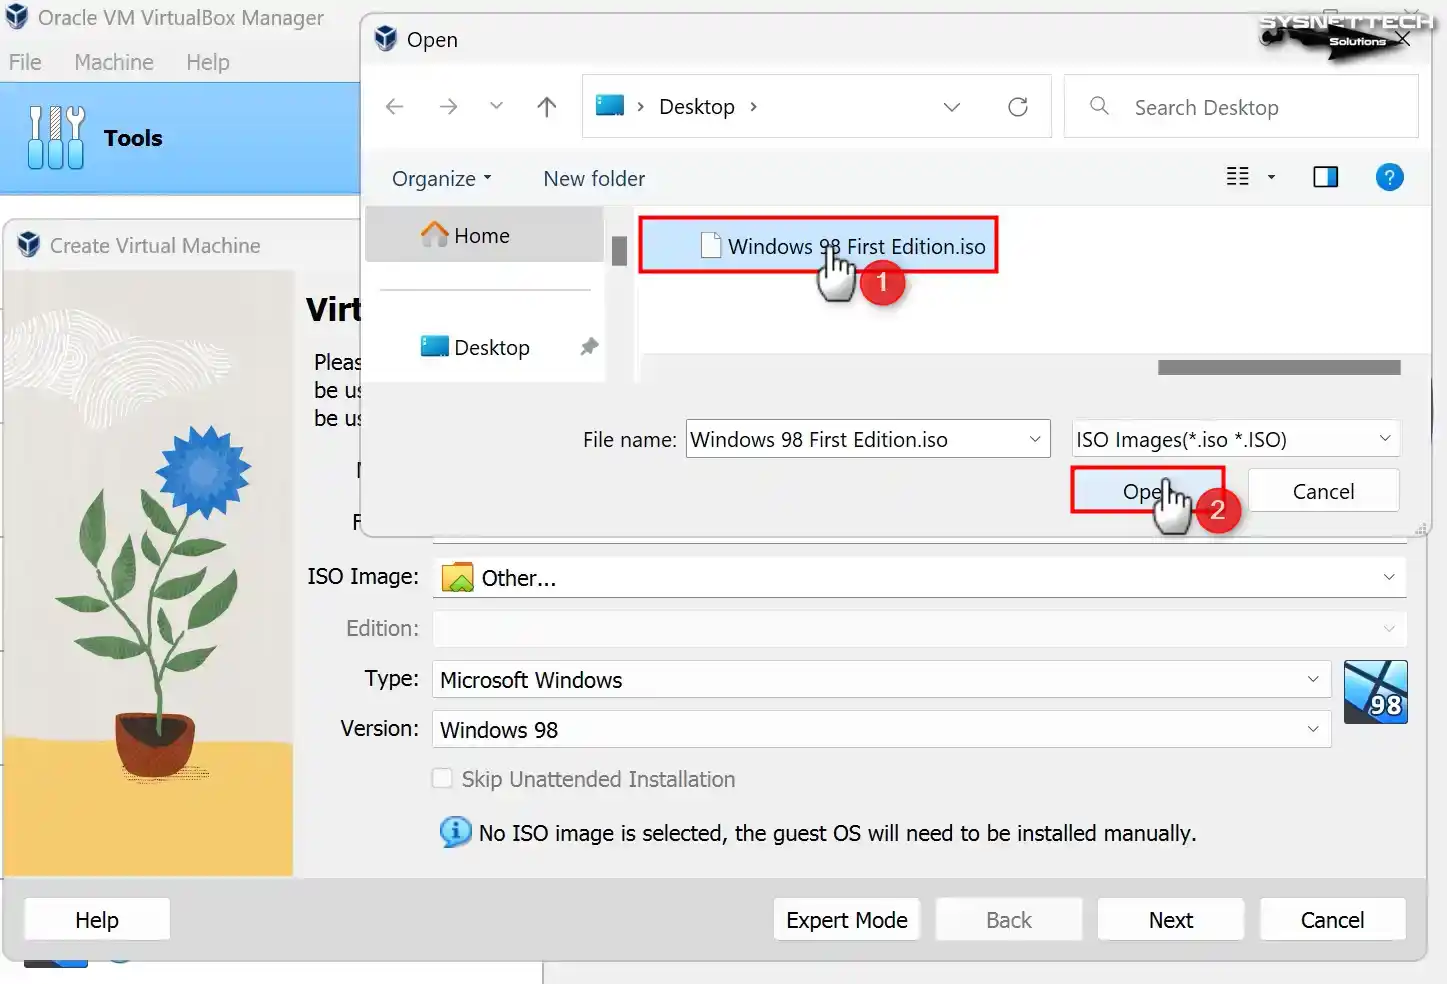
We need to add the Windows 98 FE or SE ISO file to the virtual machine you have created. To do this, click on the Other option in the ISO Image section. You can then easily select the ISO file you want from here.

Step 3
Download the Win98 FE or SE ISO file from the table below the article. Then, add this image file to the virtual machine.
Step 4
With VirtualBox 7.x, you can quickly set up systems with unattended install. But this feature may not work on old systems. So, click the Next button for manual install.
Step 5
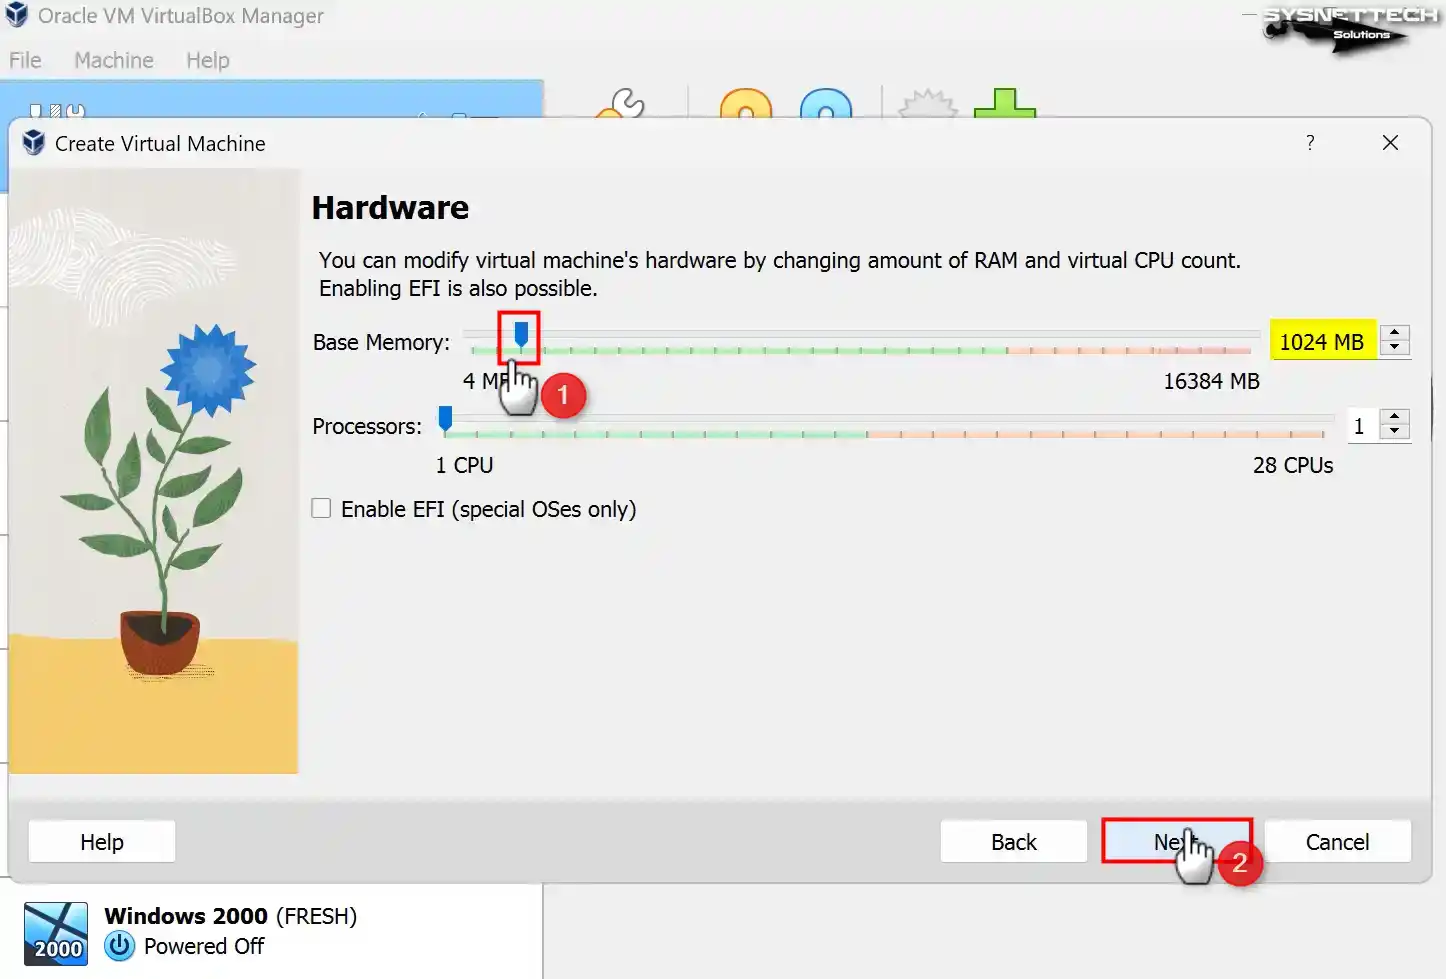
The maximum RAM size for the Win98 system on a physical computer is 1.5 GB. But we need to make a more stable setup on a virtual machine. For this reason, I suggest setting a smaller RAM size.
In the Hardware window, look at the Base Memory section. Here, set 1024 MB RAM for Win98. Then click Next to review the other settings.
Step 6
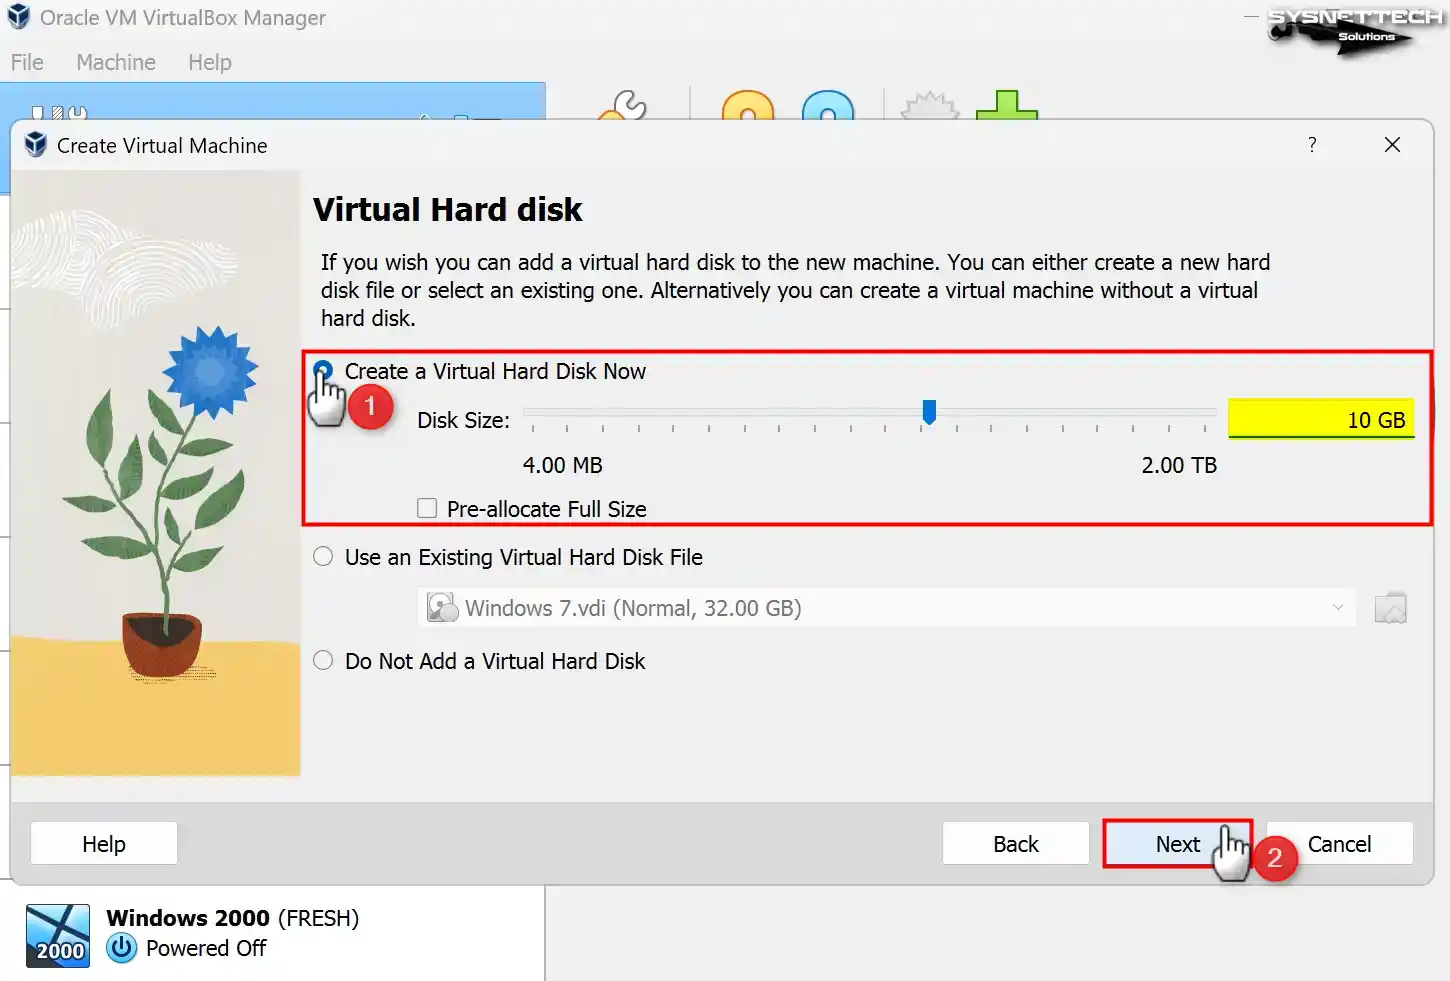
You need to create a new virtual hard disk for a clean installation. But it is also possible to add a disk from one of your old virtual machines.
Therefore, set up a new virtual disk with a size of 10 GB for Win98.
Step 7
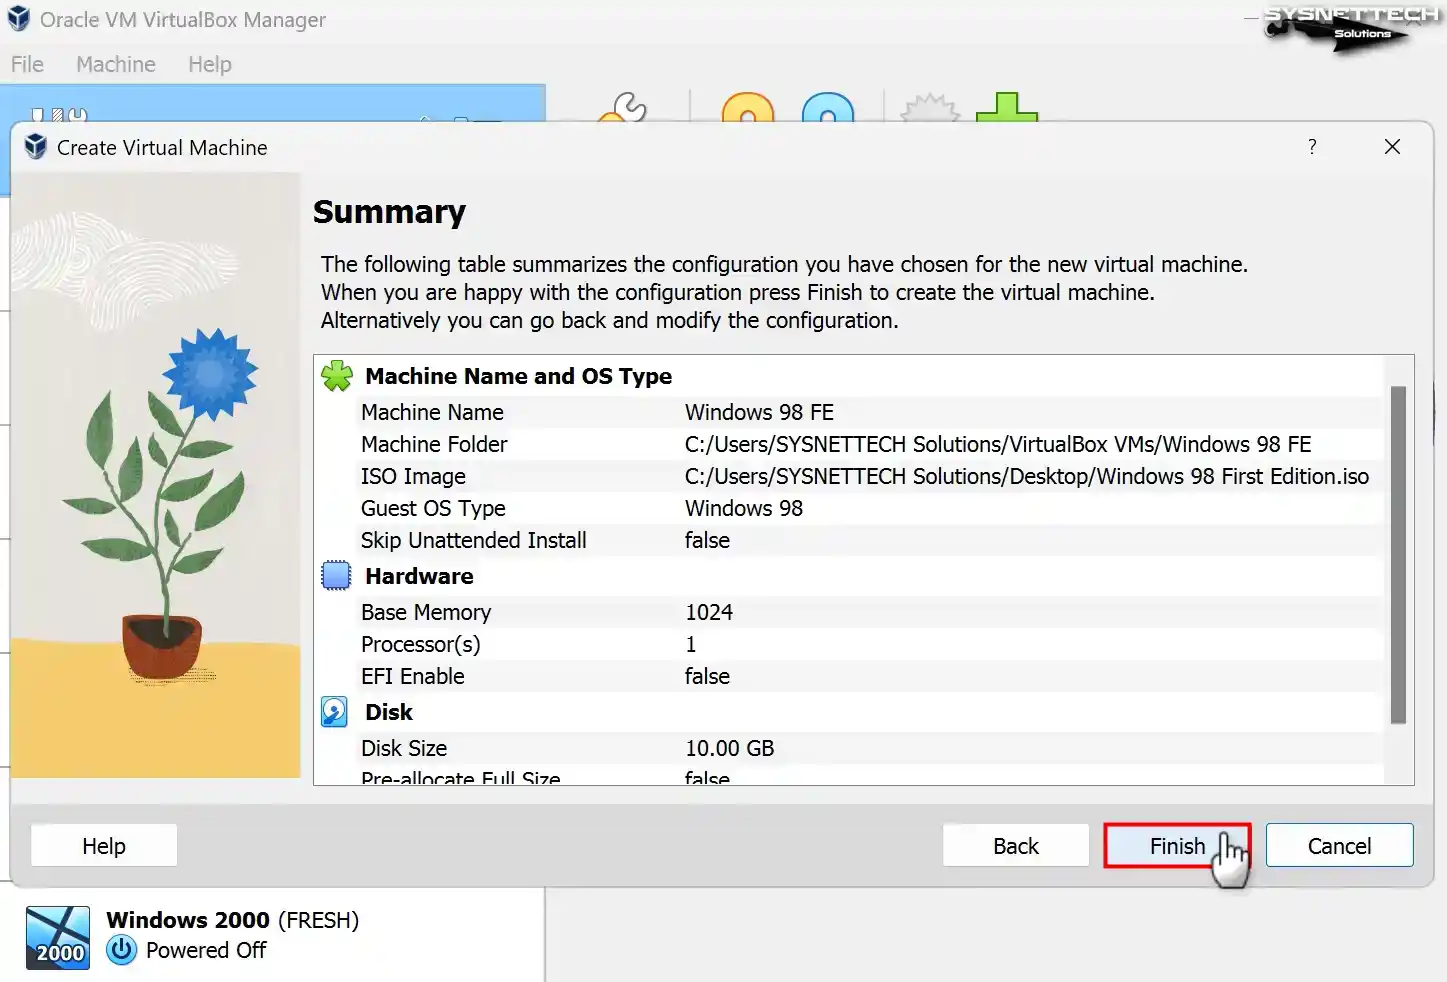
Check the virtual hardware summary of the Win98 guest system you created. After completing all the steps, click Finish to close the wizard.
2. Configuring Advanced Settings for the Virtual Machine
Step 1
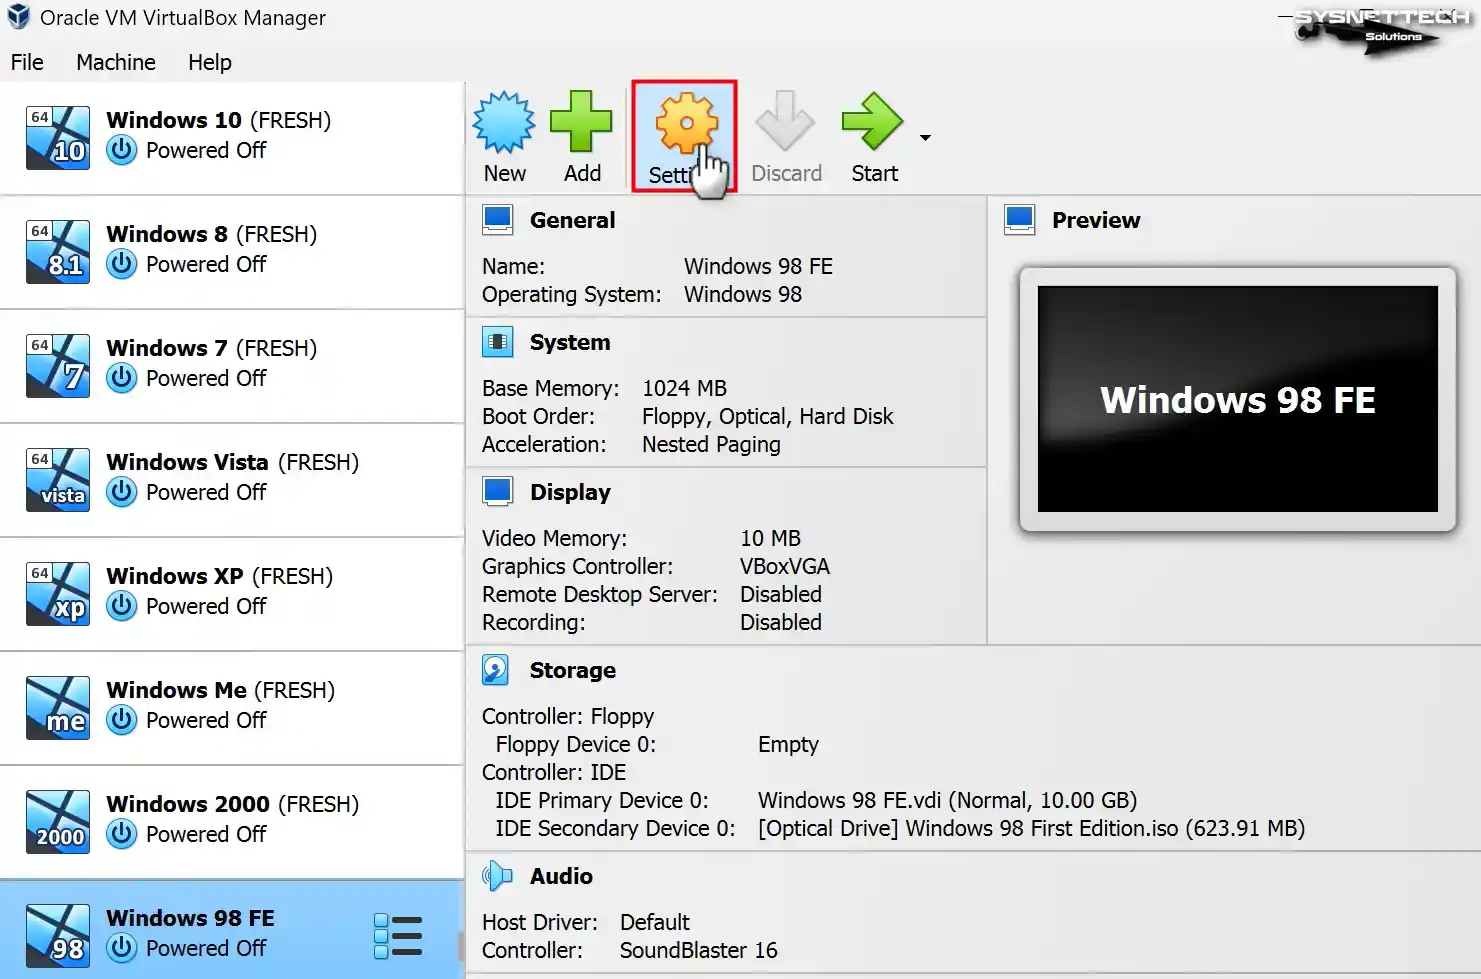
After setting up the Win98 virtual machine, you need to set the performance options. So, click on the Settings section before starting the virtual PC.
Step 2
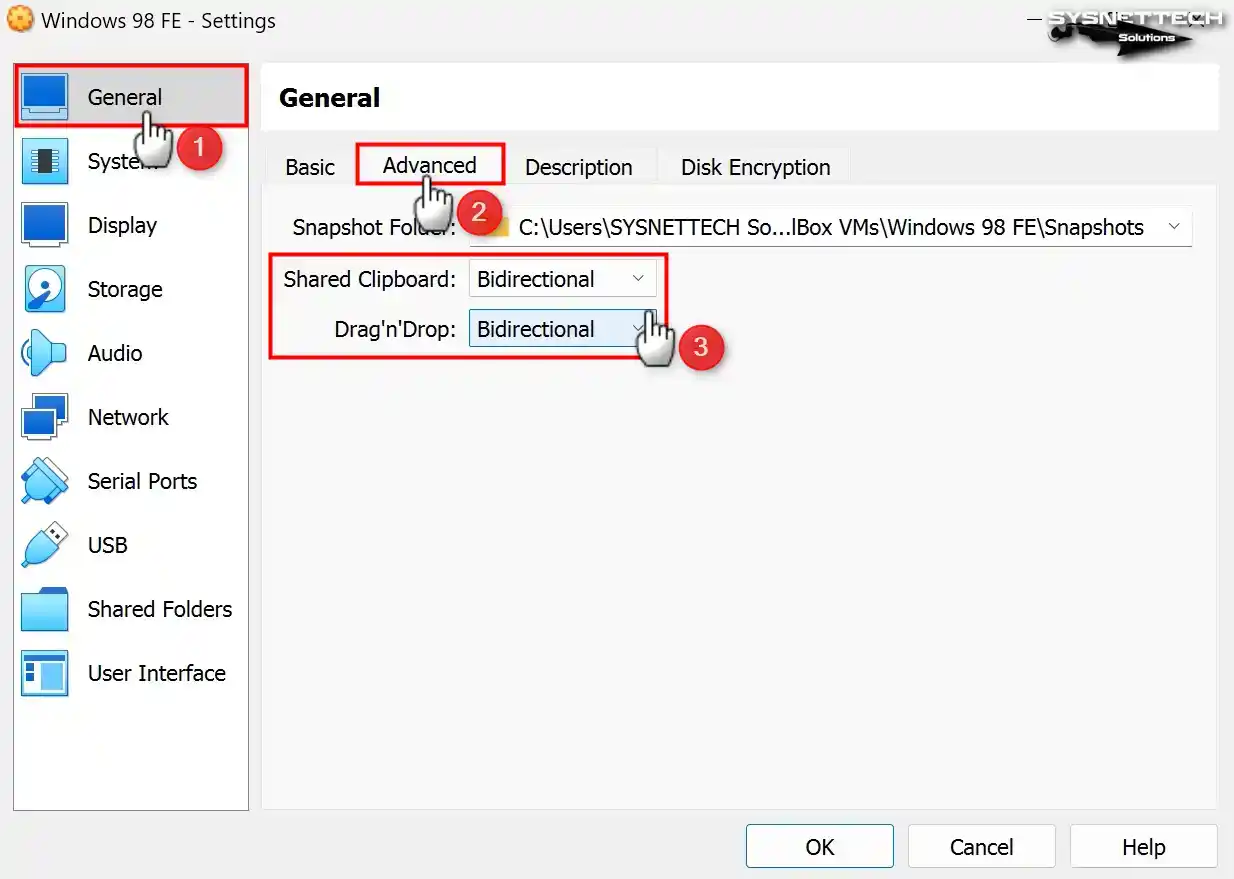
In the General settings of the virtual machine, go to the Advanced tab. Here you can enable Shared Clipboard and Drag’n’Drop. However, I must mention that these features do not work in Win98.
If you use older versions of VirtualBox, you will have Guest Additions support. In fact, you can use your virtual machine better by turning on these features.
If you installed VirtualBox 7.x on your host computer, do not enable file transfer. But I only suggest this for old versions in this article.
Step 3
Open the System / Motherboard tab in the VM settings. From here, you can configure the boot devices. Also, turn on the I/O APIC feature for better performance.
NOTE: If the virtual system keeps crashing, check the system settings. Especially, try to turn on the Nested Paging feature in the Acceleration tab.

Step 4
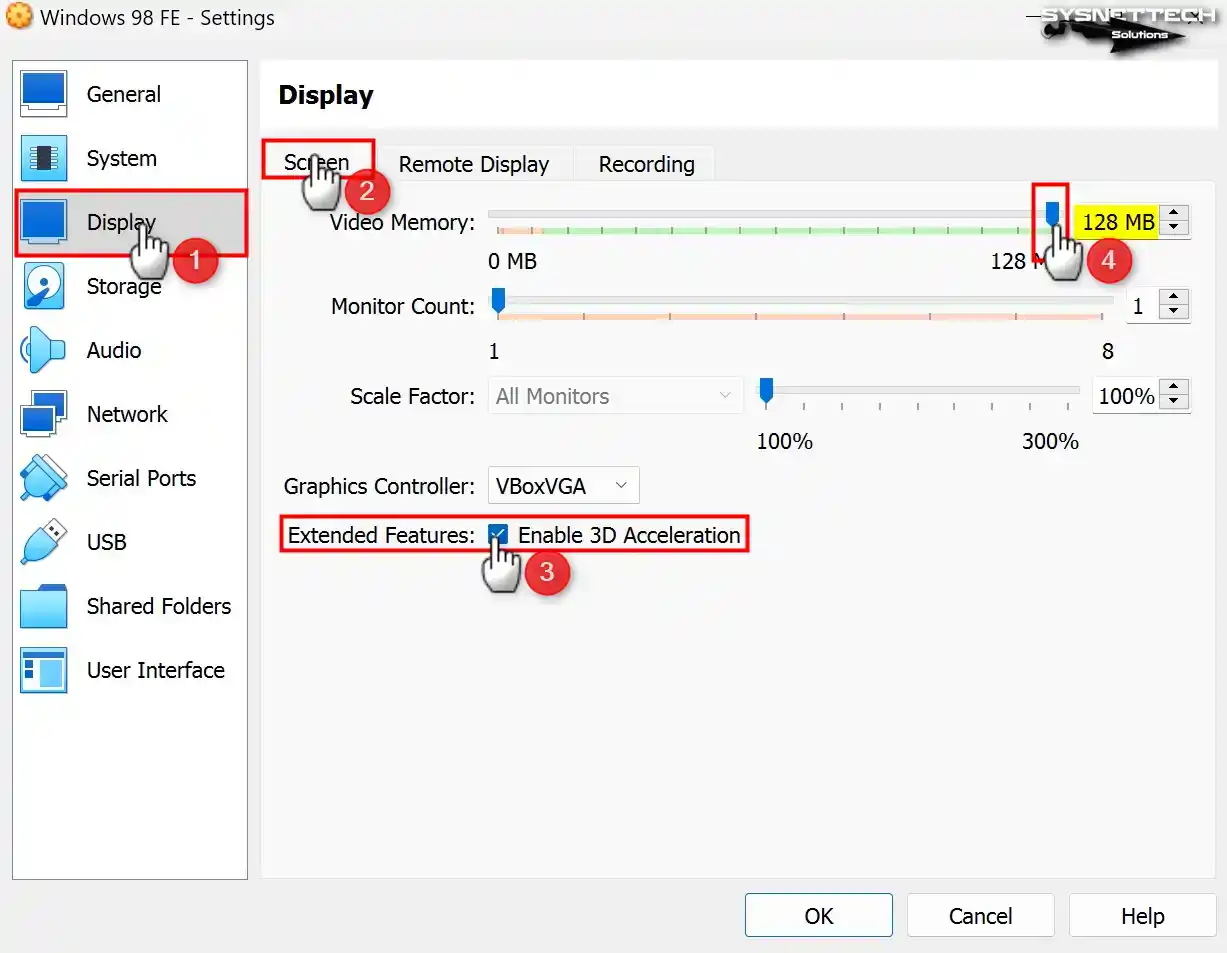
As I said, the new Oracle virtualization versions do not fully support Win98. That is why you may not be able to use the image & 3D acceleration settings.
If you have a version that fully supports Win98, go to Display > Screen settings. Then turn on 3D acceleration and set the video memory to 128 MB.
Step 5
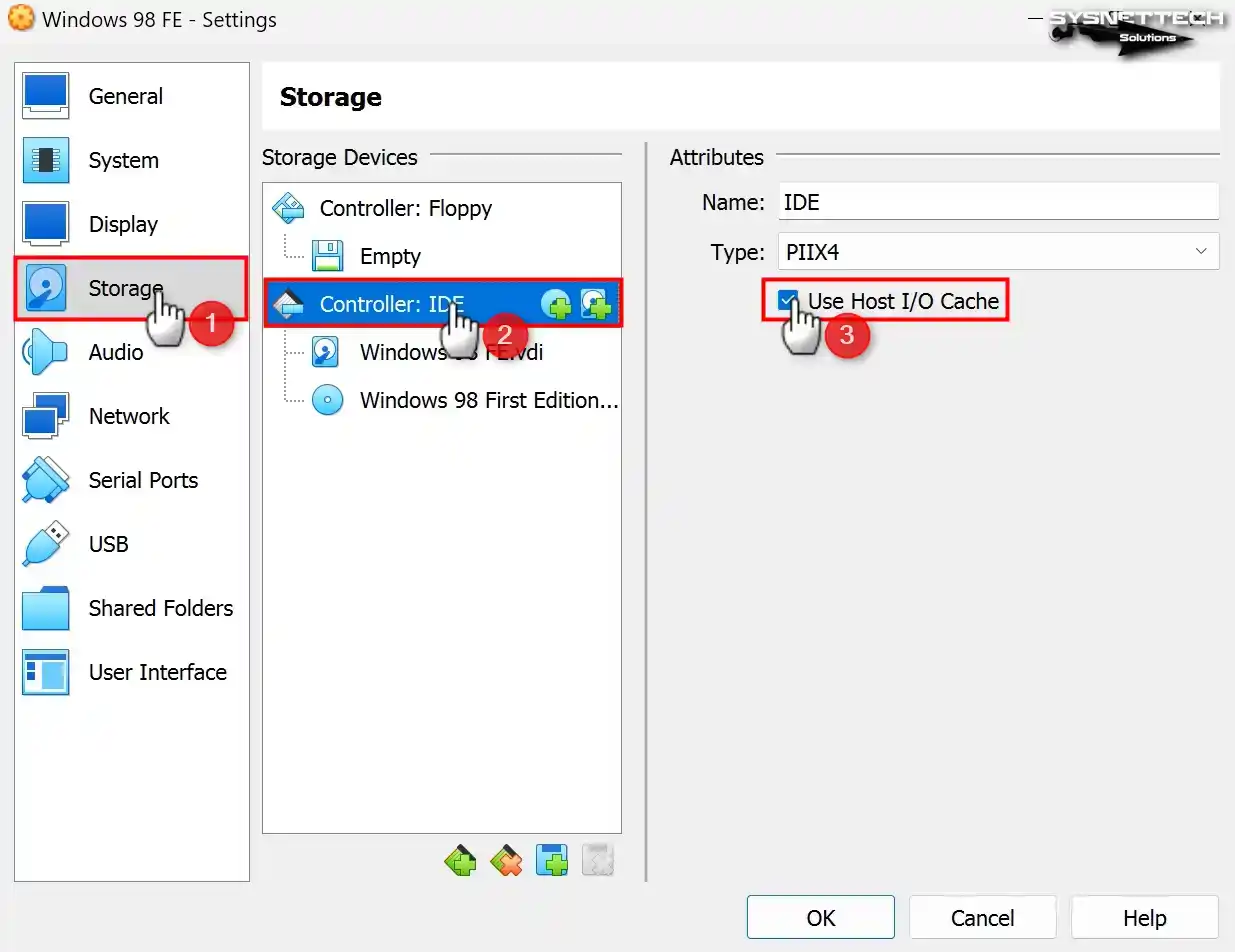
Select the IDE controller in the VirtualBox Windows 98 VM. Then check the Host I/O Cache feature on the right. I strongly suggest you check if this feature is on, as it helps with performance.
Step 6
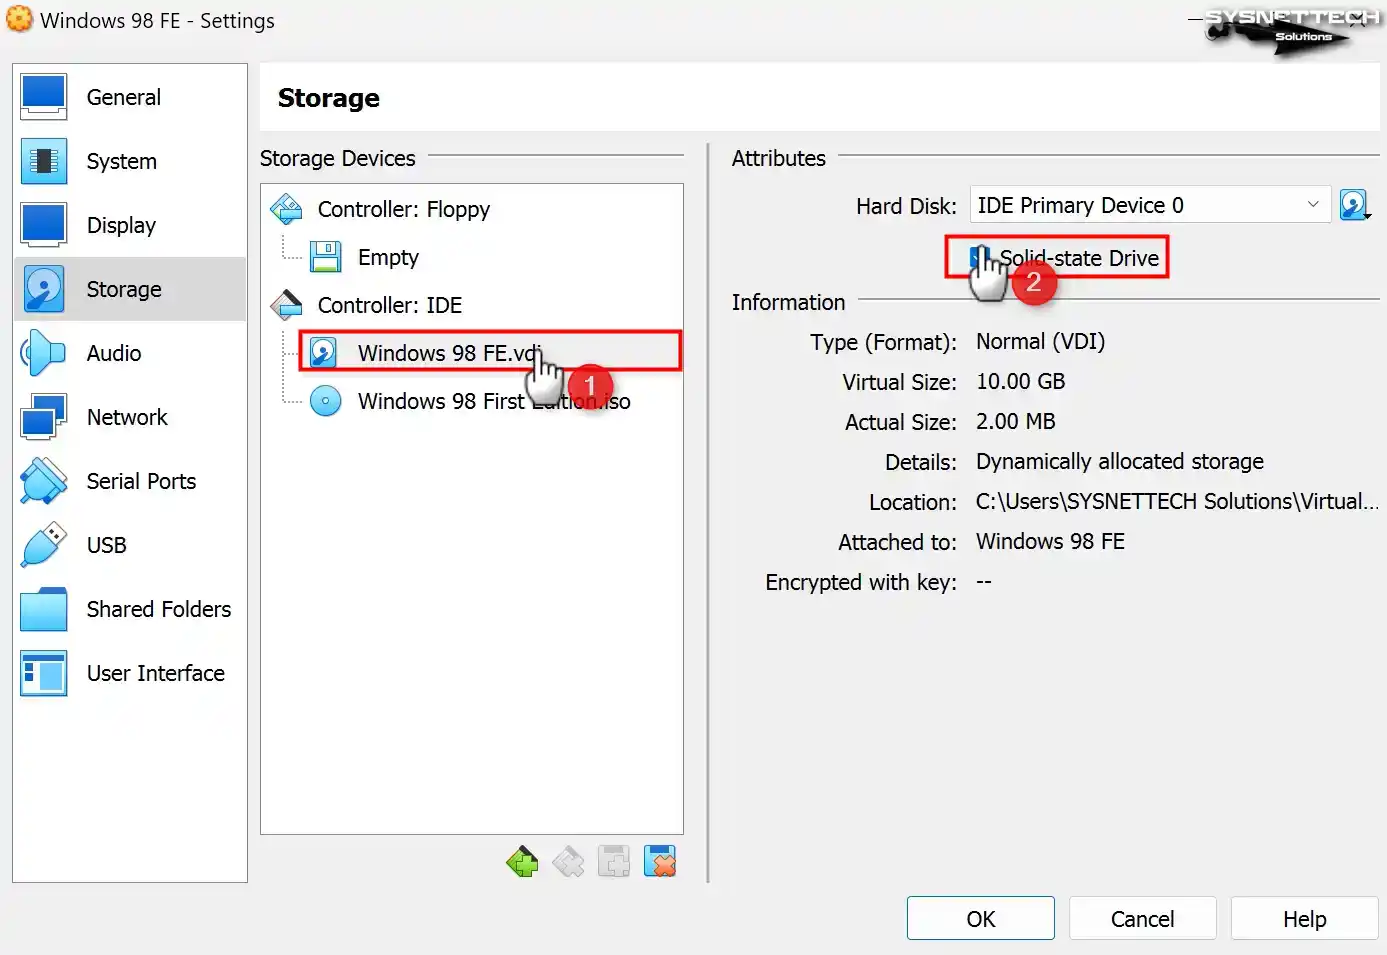
You may want to use the Windows98.vdi virtual disk as if it were an SSD. To do this, pick the Solid-State Drive option to make your virtual disk faster.
Step 7
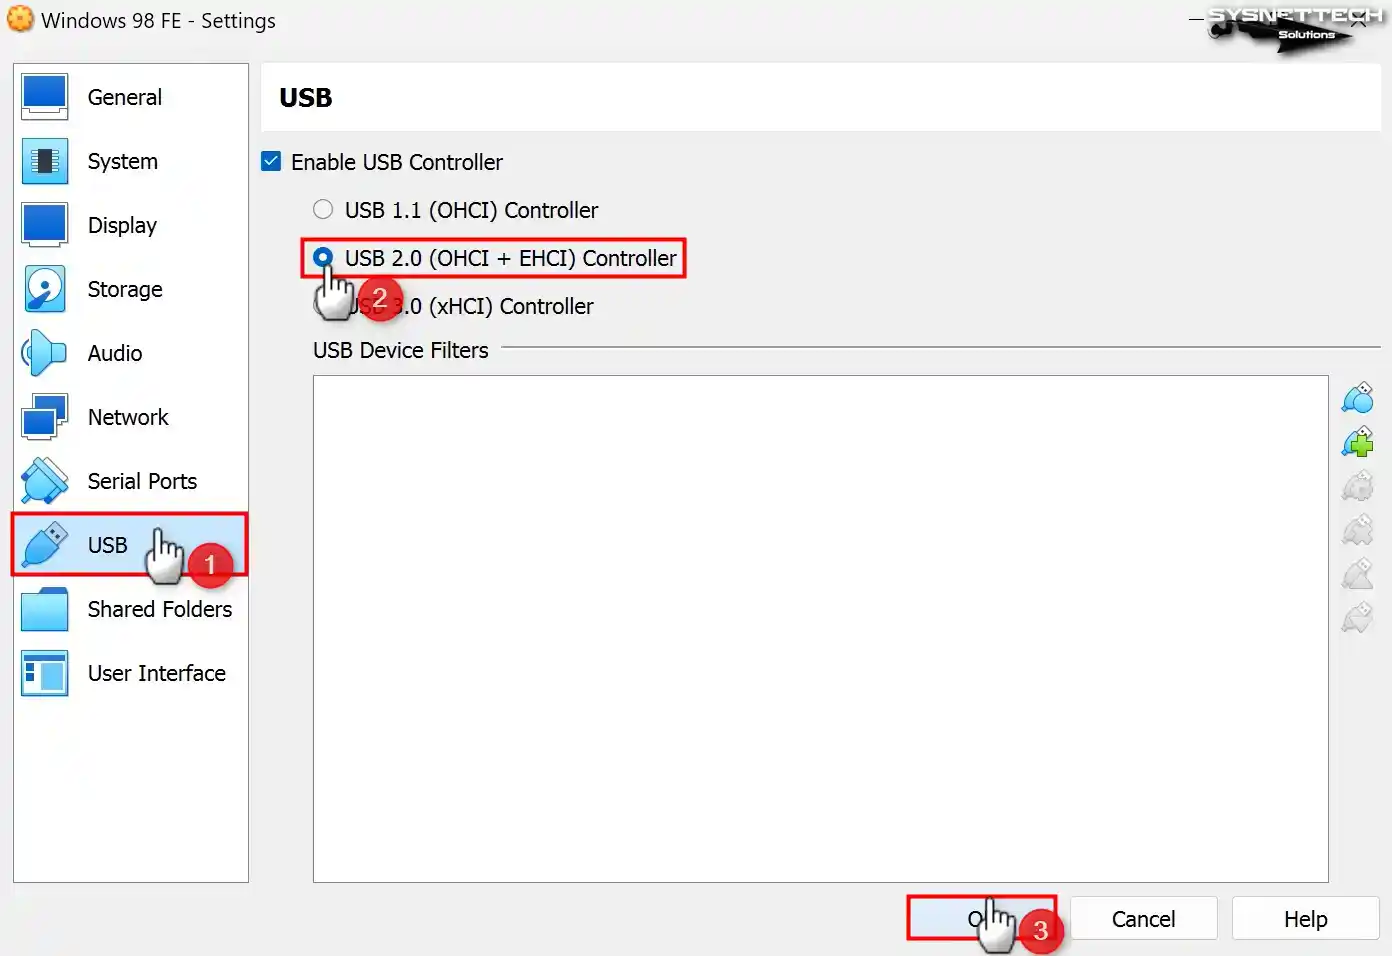
Let’s say you want to use your USB devices on your Win98 virtual guest machine. In this case, close your VM settings by selecting the 2.0 (OHCI + EHCI) Controller to transfer files.
Step 8
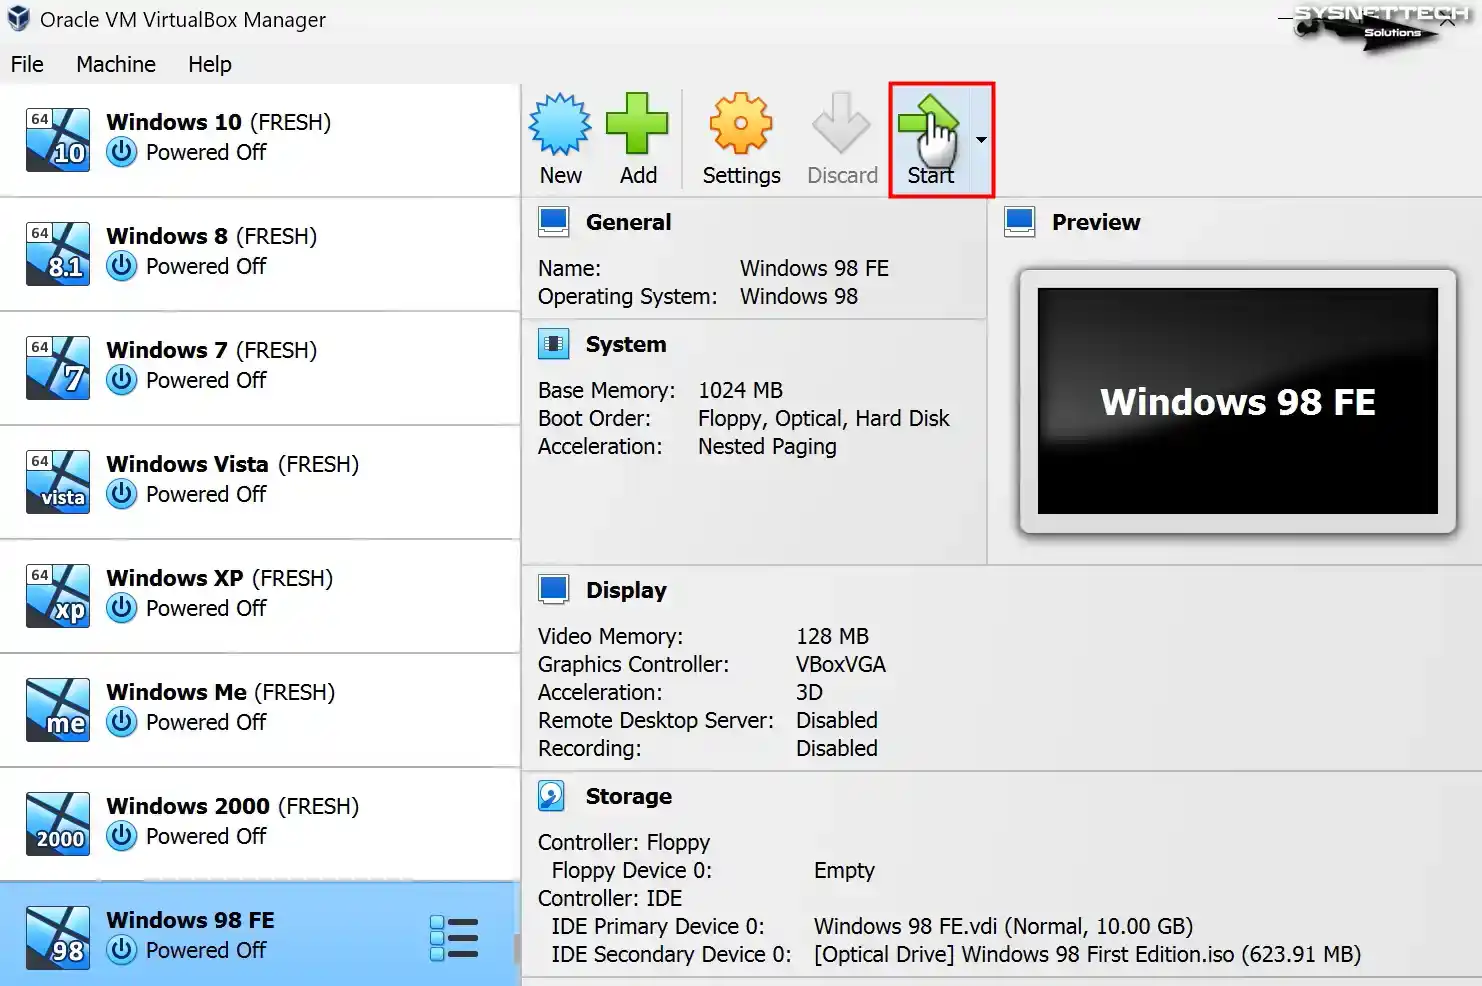
Once everything is OK, launch Windows 98 in VirtualBox. Your virtual PC will then be ready to use.
After launching the VM, you will see the Select Start-Up Disk window. Here, select the ISO image you added to the guest machine. Then, proceed again with the Start button.
3. Booting Windows 98 on VirtualBox and Disk Configuration
After starting the virtual machine with the boot disk, you can begin the install. Thus, this allows you to install Windows just like installing it on a real machine.
Step 1
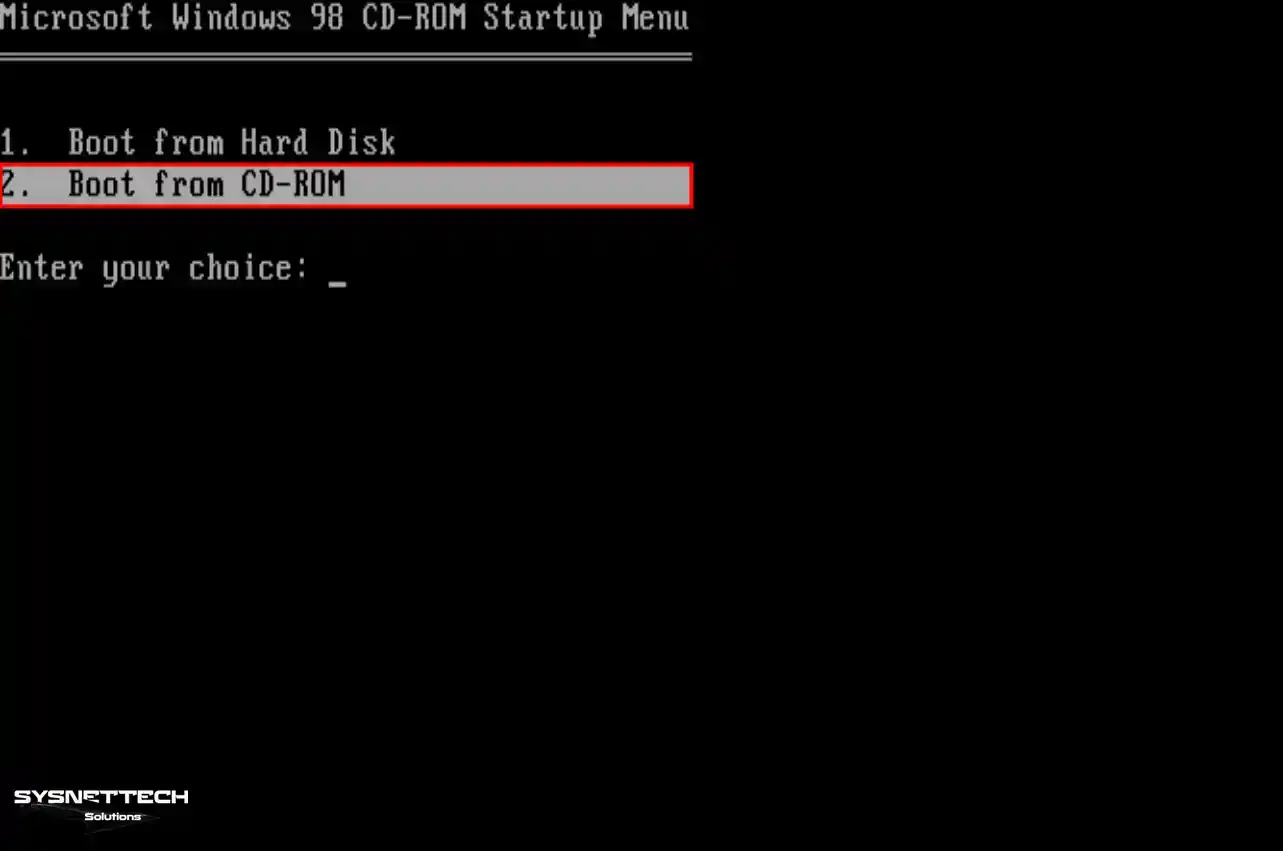
When the Microsoft Win98 start menu opens, you can begin the installation. To do this, select the Boot from CD-ROM option and press Enter.
Step 2
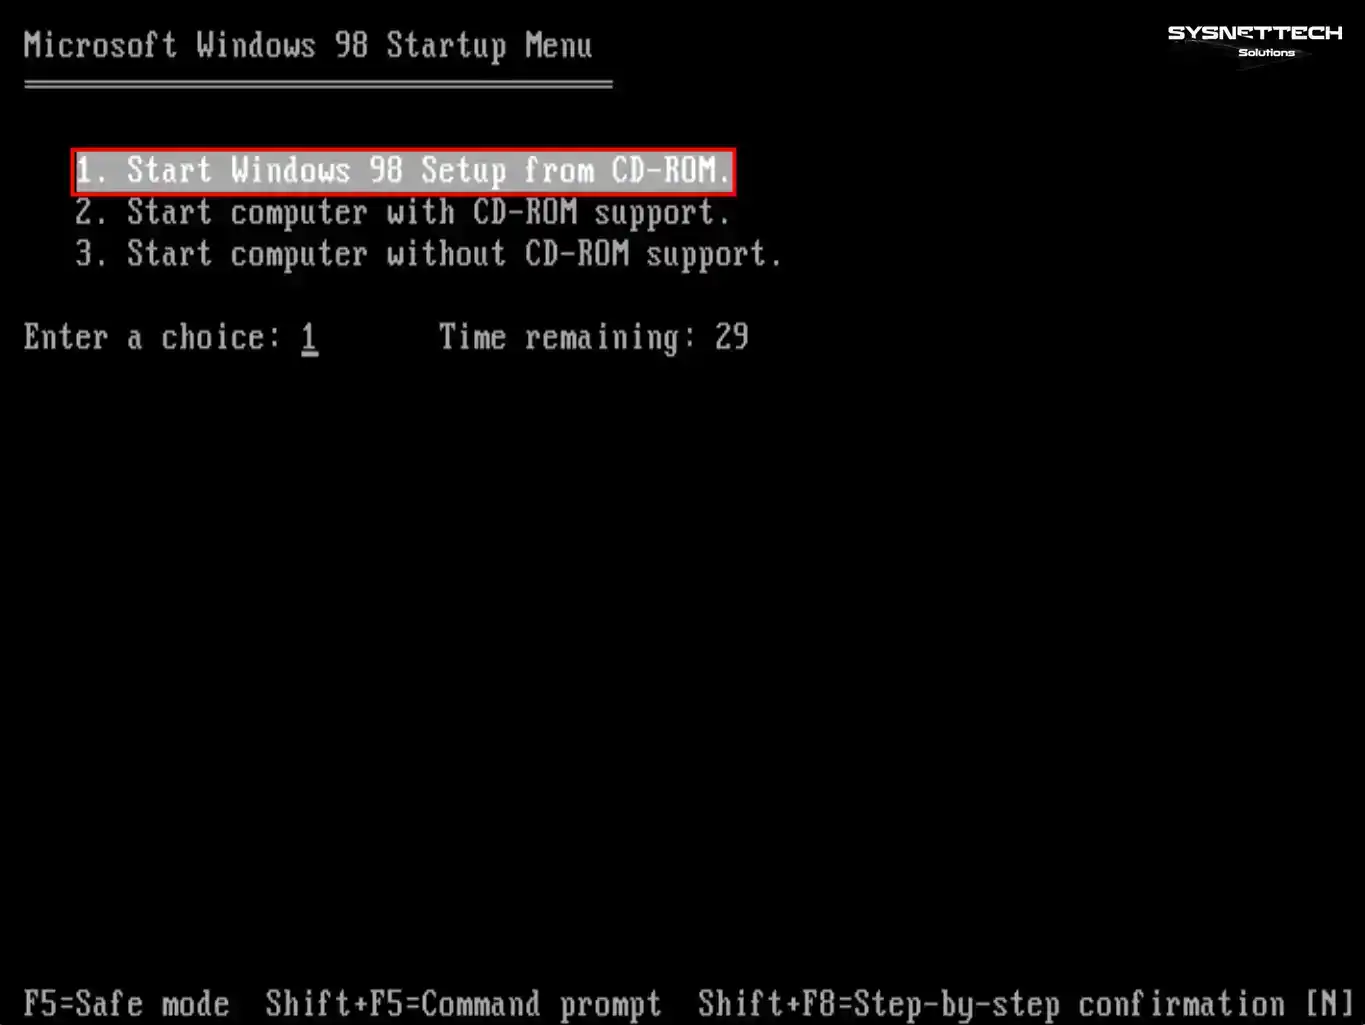
Start Windows 98 Setup from CD-ROM option, press Enter again to start the installation process.
Step 3
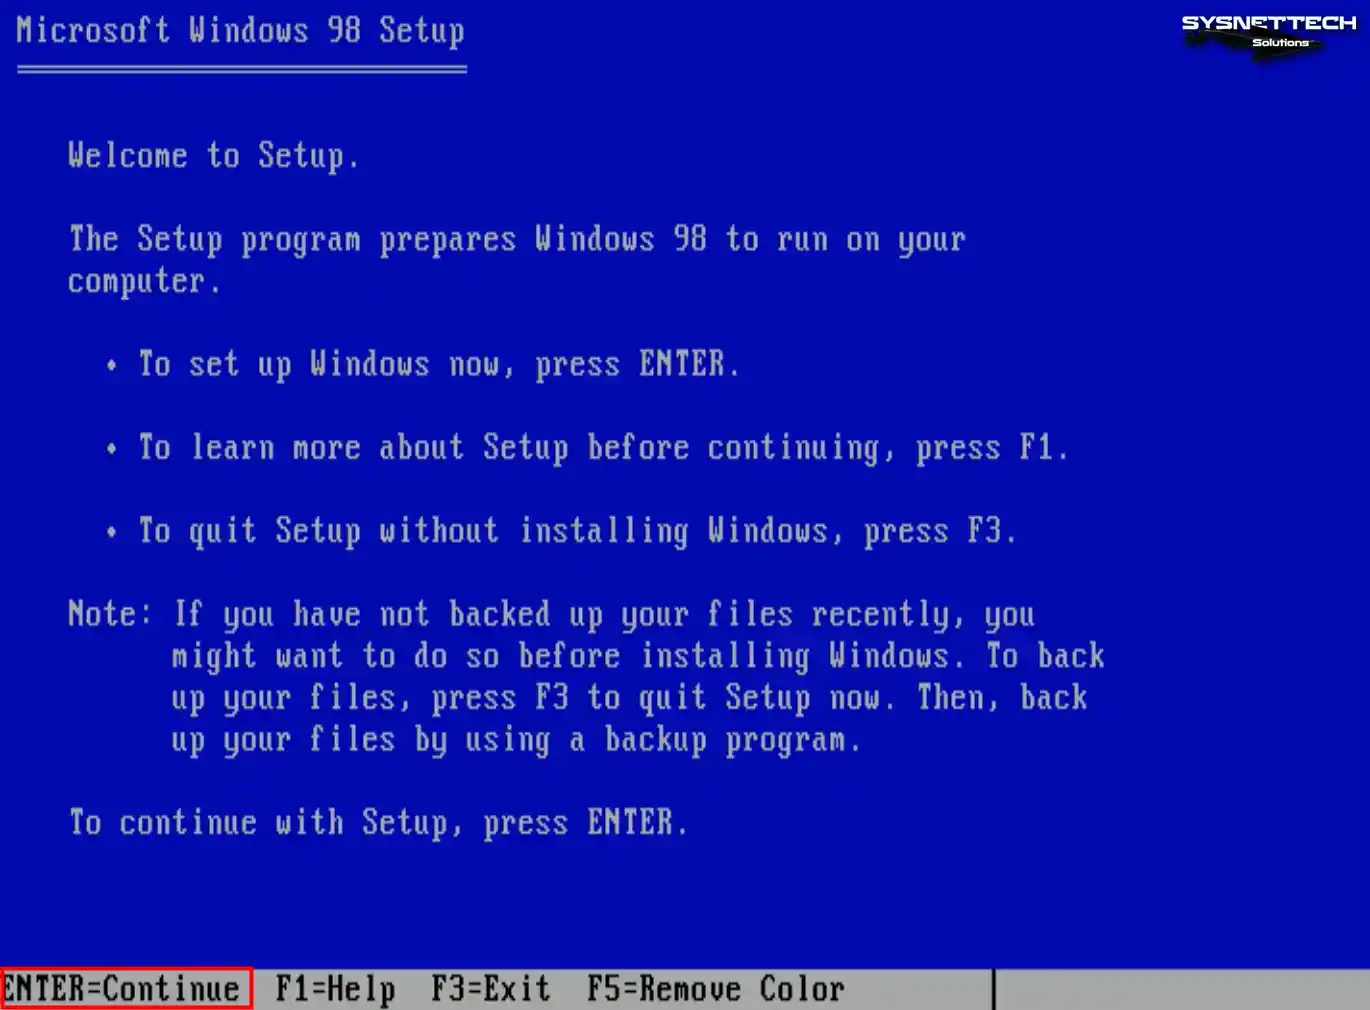
On the Microsoft Win98 Setup screen, press Enter to start the installation. At this point, you can press F1 for information about the process or F3 to exit.
Step 4
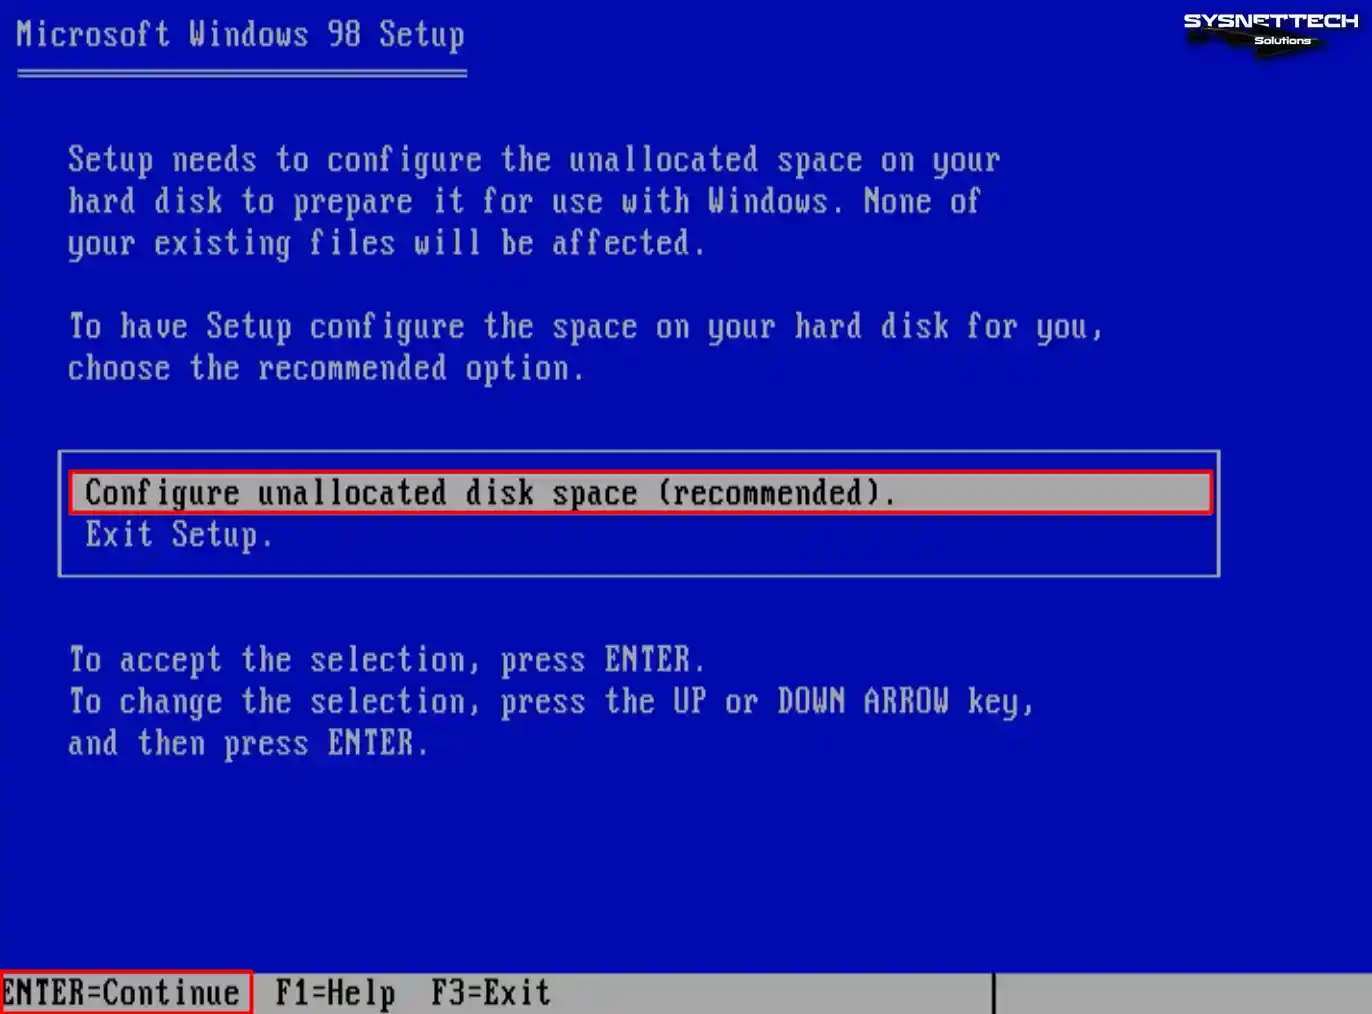
You must set up the space to format the virtual machine’s disk. To do this, press Enter on the Configure unallocated disk space option.
Step 5
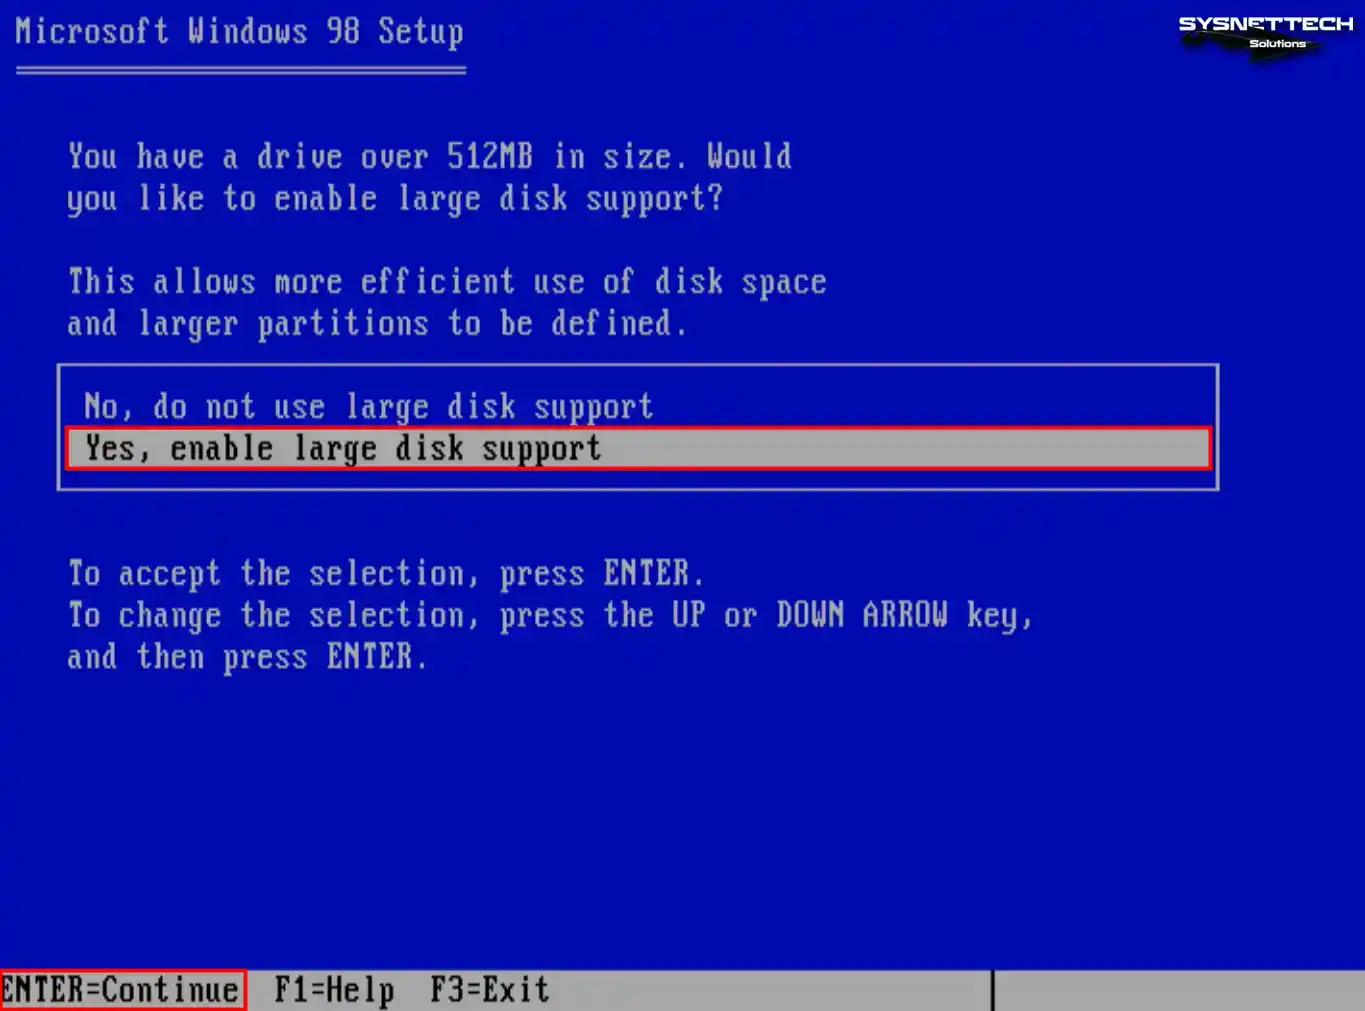
If the disk capacity of the virtual PC is higher than 512 MB, enable large disk support. Thus, you will run your system more efficiently.
Step 6
If the disk capacity of the virtual PC is higher than 512 MB, enable large disk support. This way, you will be able to use your system in a better way.
Step 7
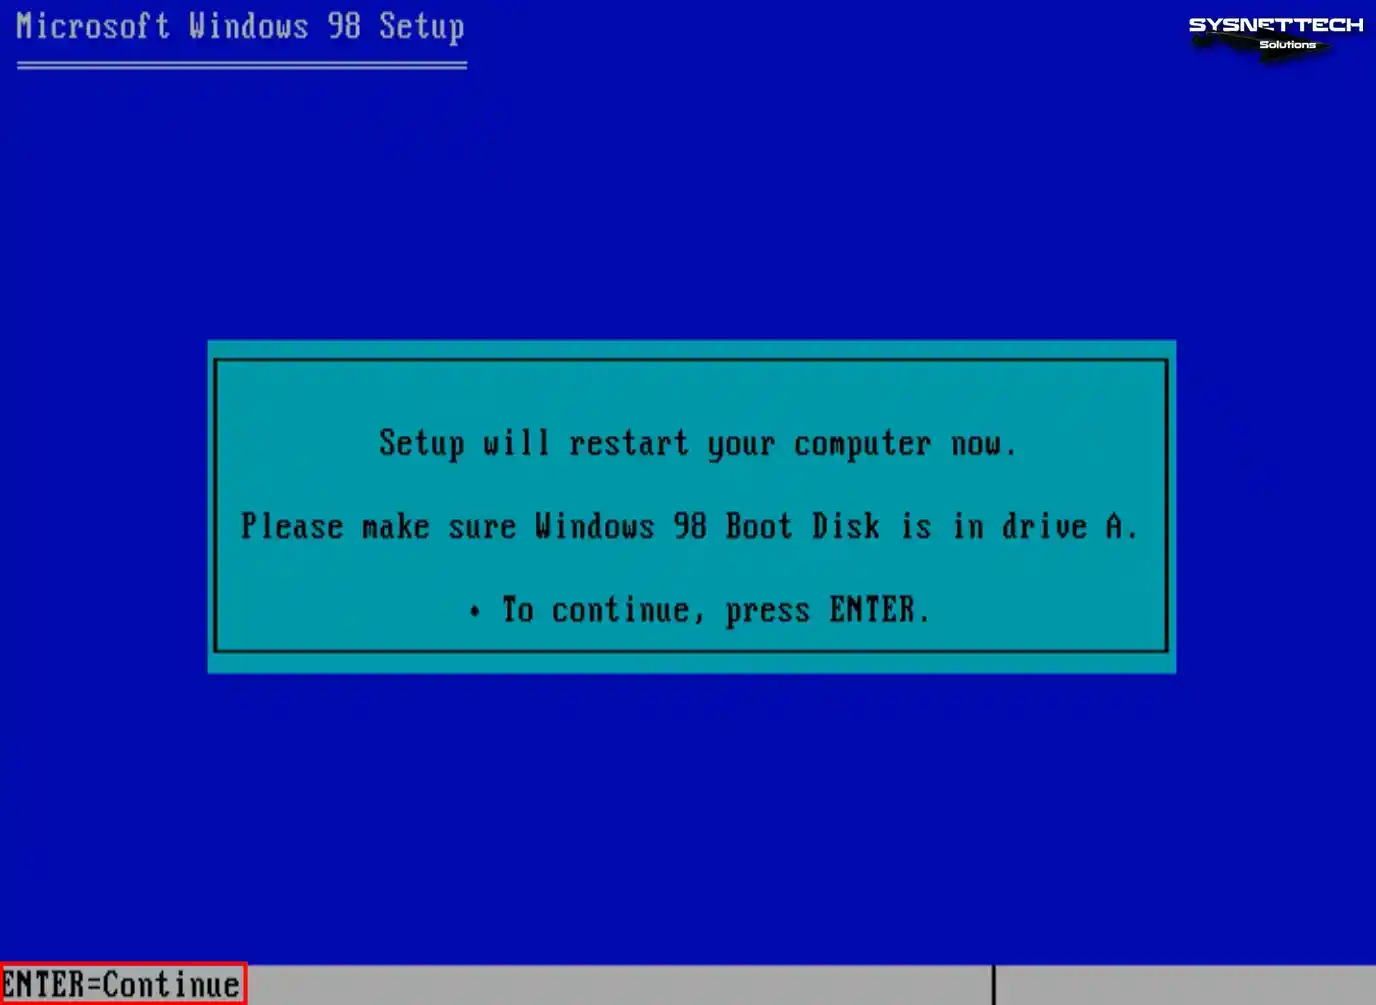
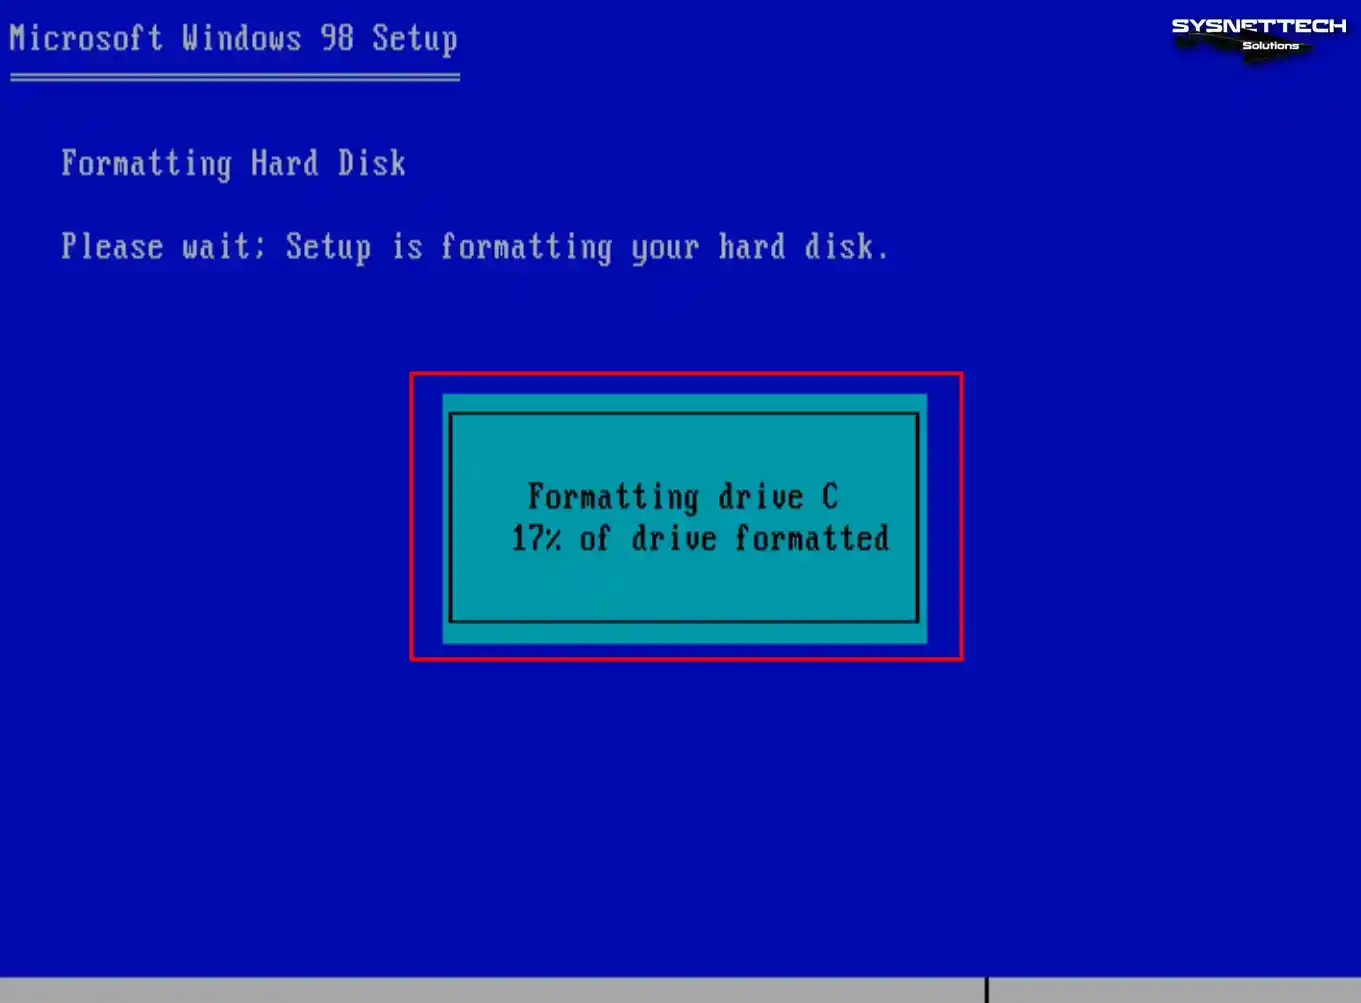
As soon as you restart the virtual machine, the wizard will format the C drive by itself. So, this will prepare your disk for installation.
Step 8
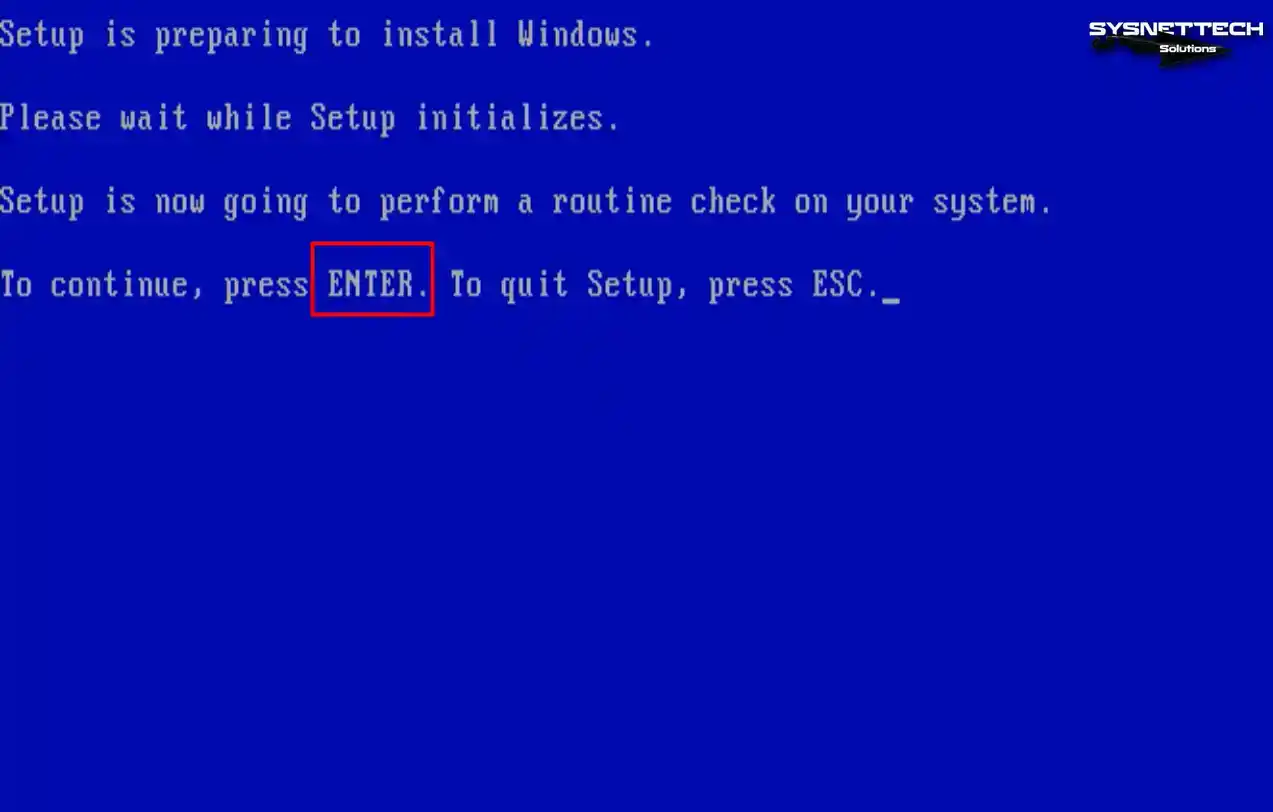
When the disk is ready, press Enter to keep going with the install.
Step 9
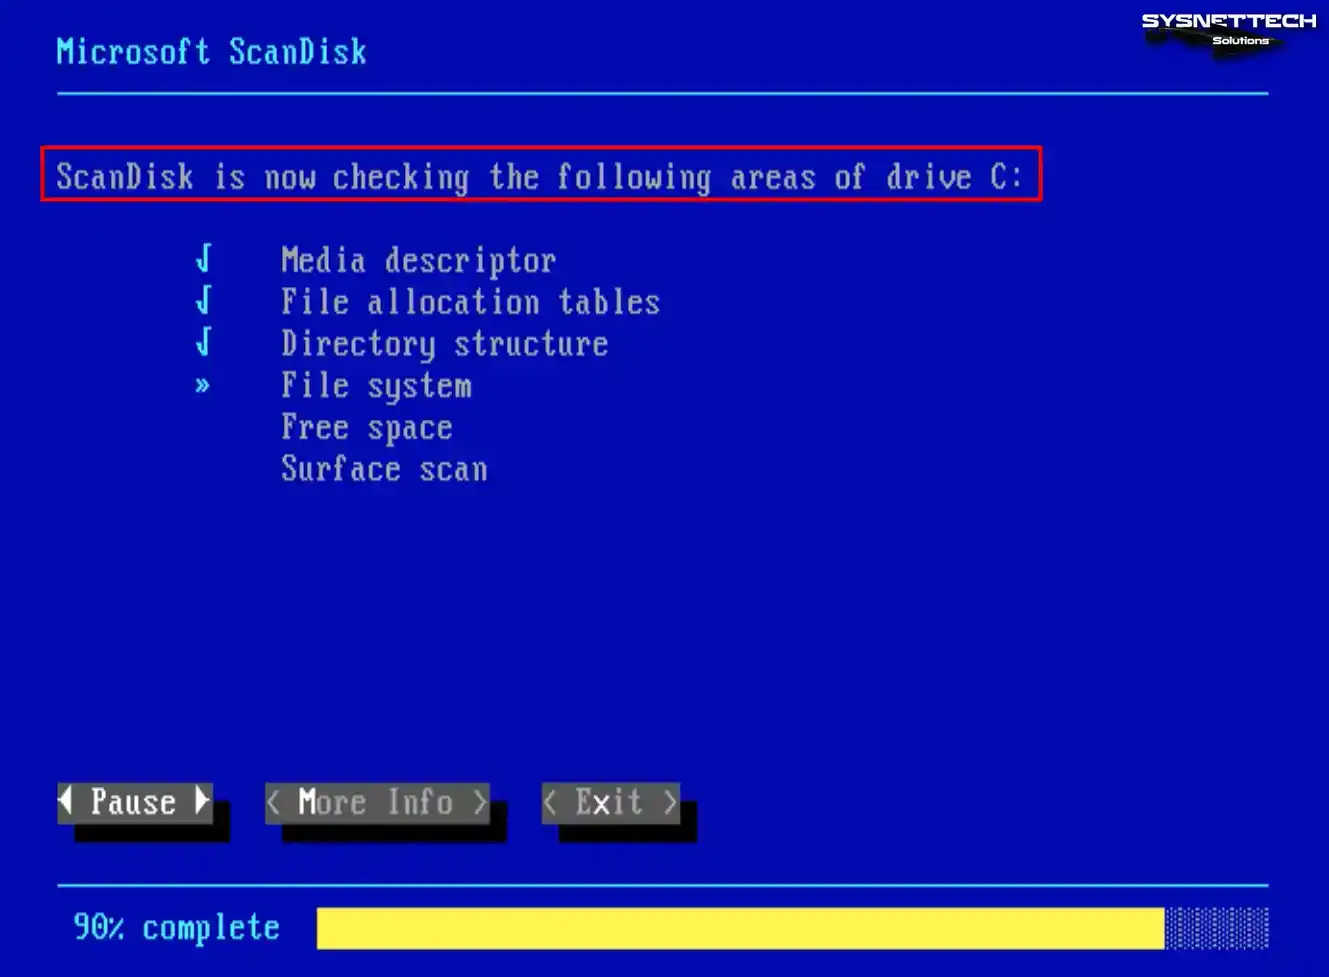
When the Microsoft ScanDisk screen opens, you will see it check the file structure on drive C by itself. In this case, the wizard will detect any potential errors on the disk and repair them.
4. Installing Windows 98 with the VirtualBox GUI Interface
Step 1
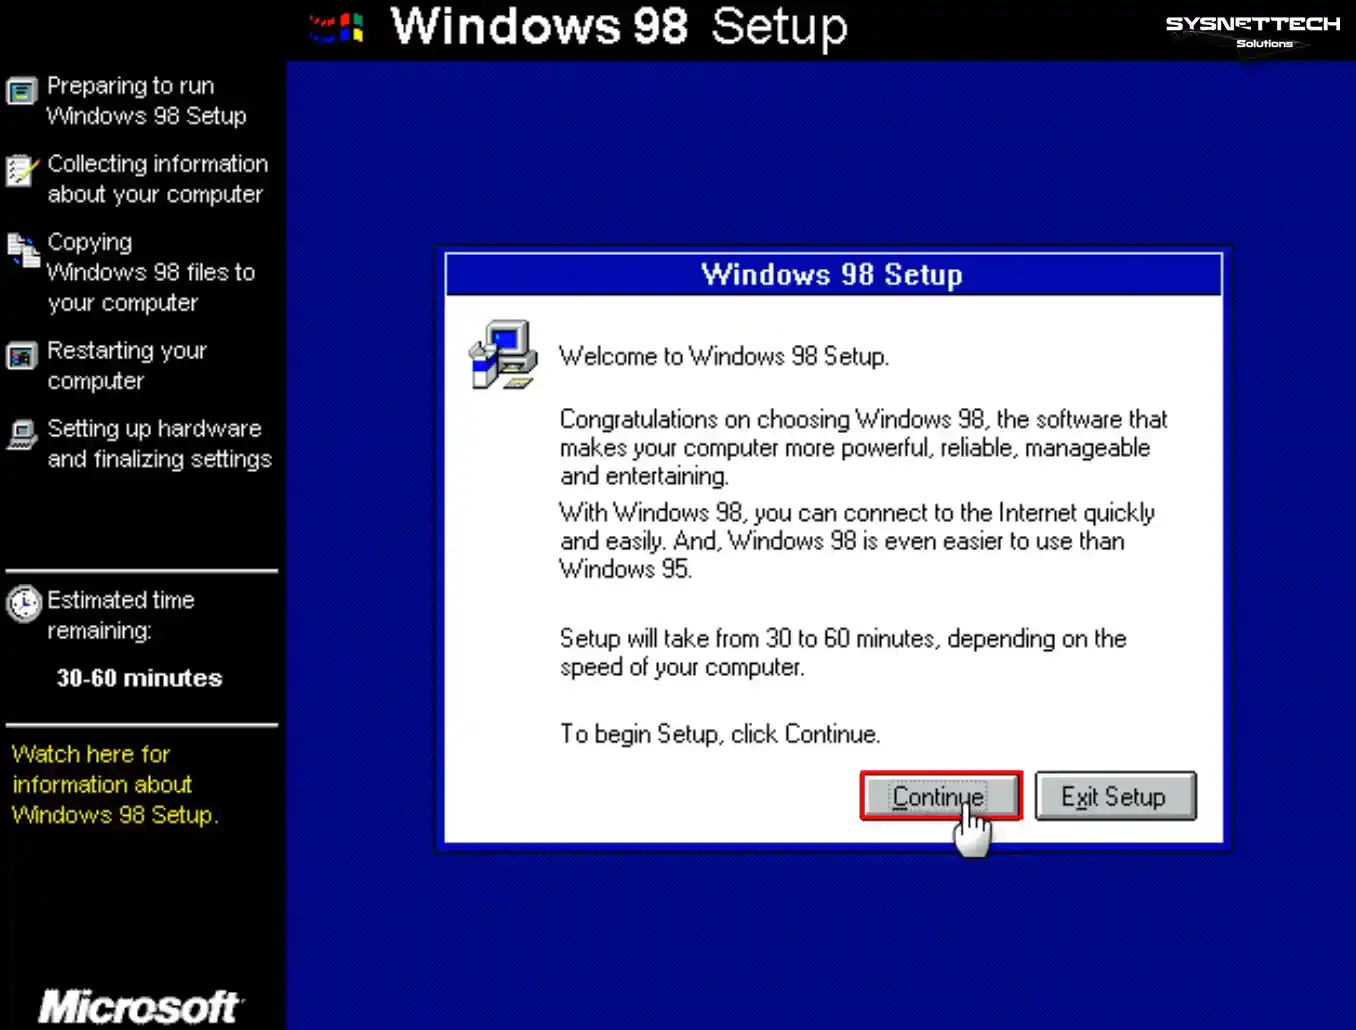
After checking the disk structure, you will encounter the Win98 Setup wizard. Here, keep going by clicking the Continue button.
Step 2
Wait while the wizard prepares the installation of the Win98 OS.
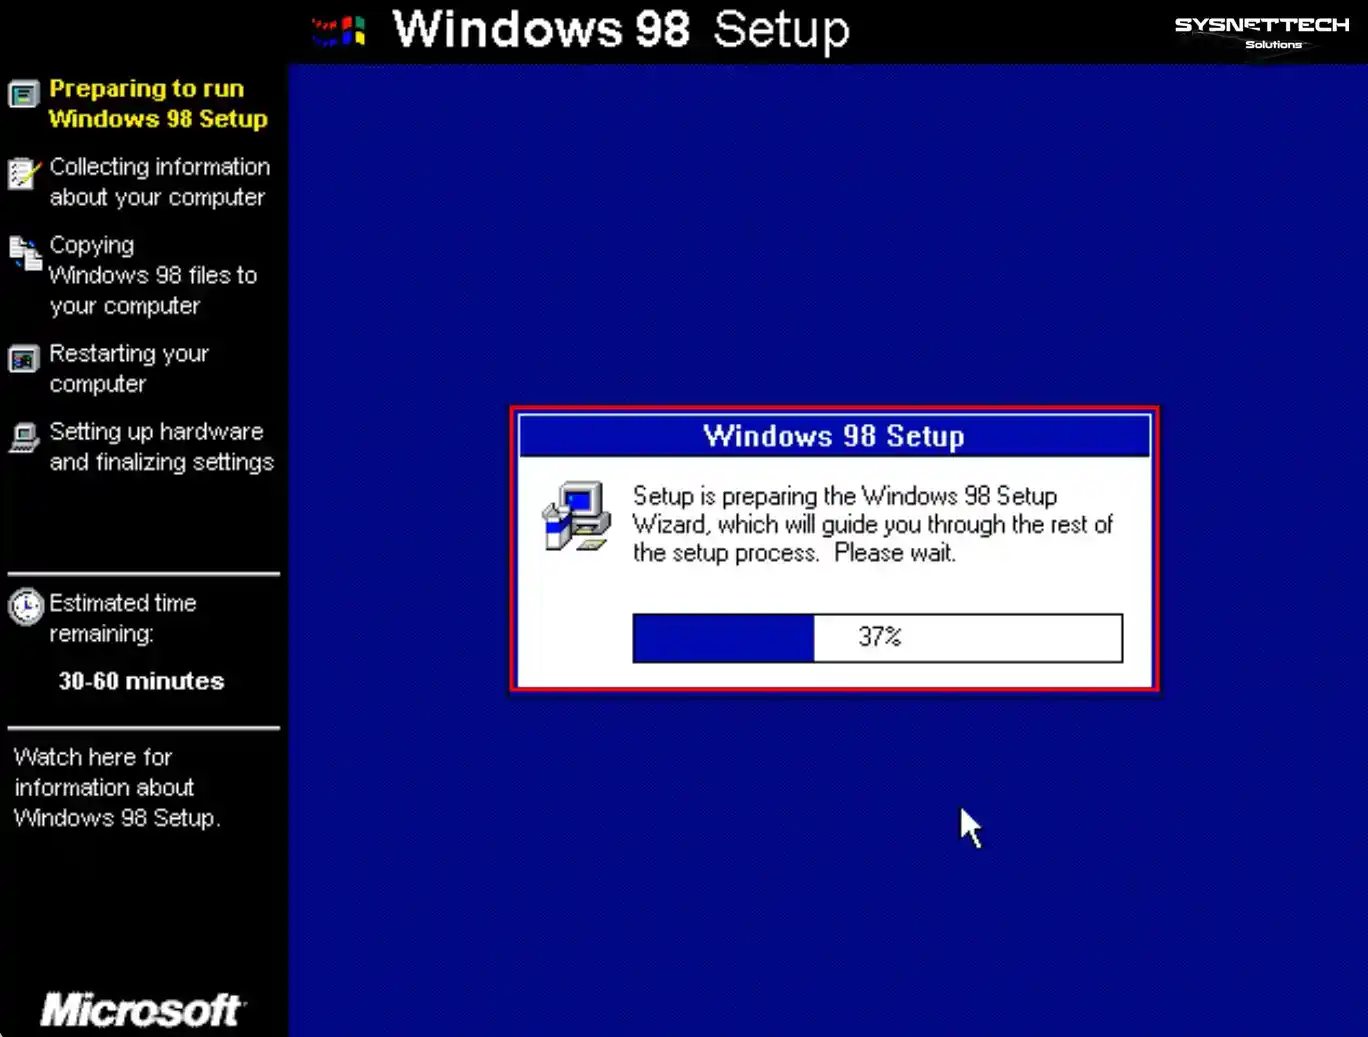
Step 3
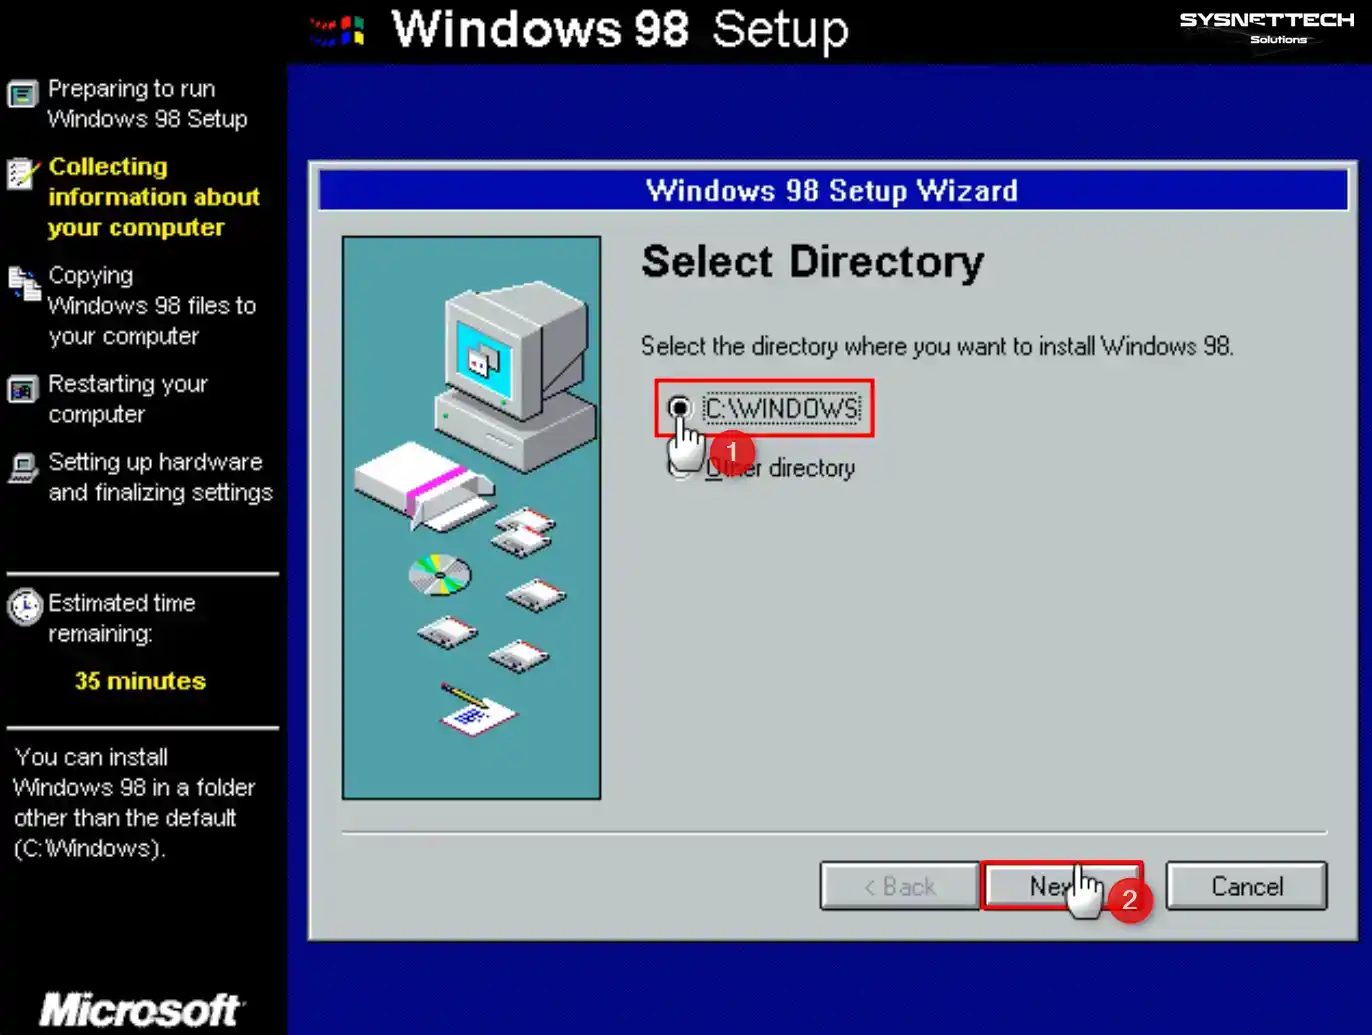
You can change the folder where you want to install Win98 with the Other Directory option. But to install Windows in the regular C:\WINDOWS folder, keep going straight.
Step 4
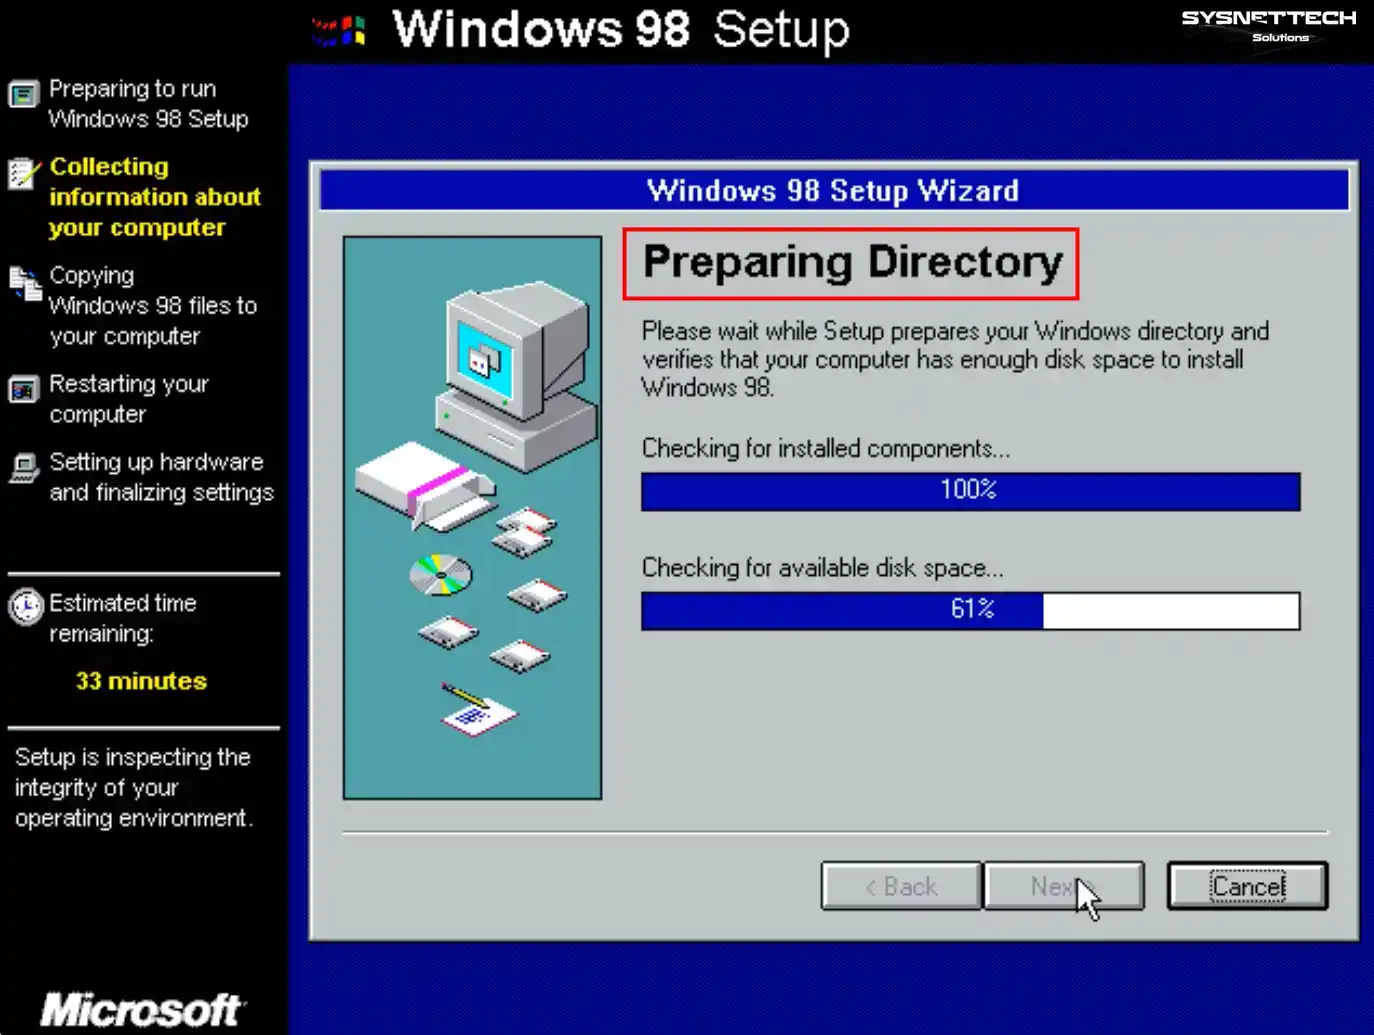
Wait while the installation wizard checks the installed components and disk space.
Step 5
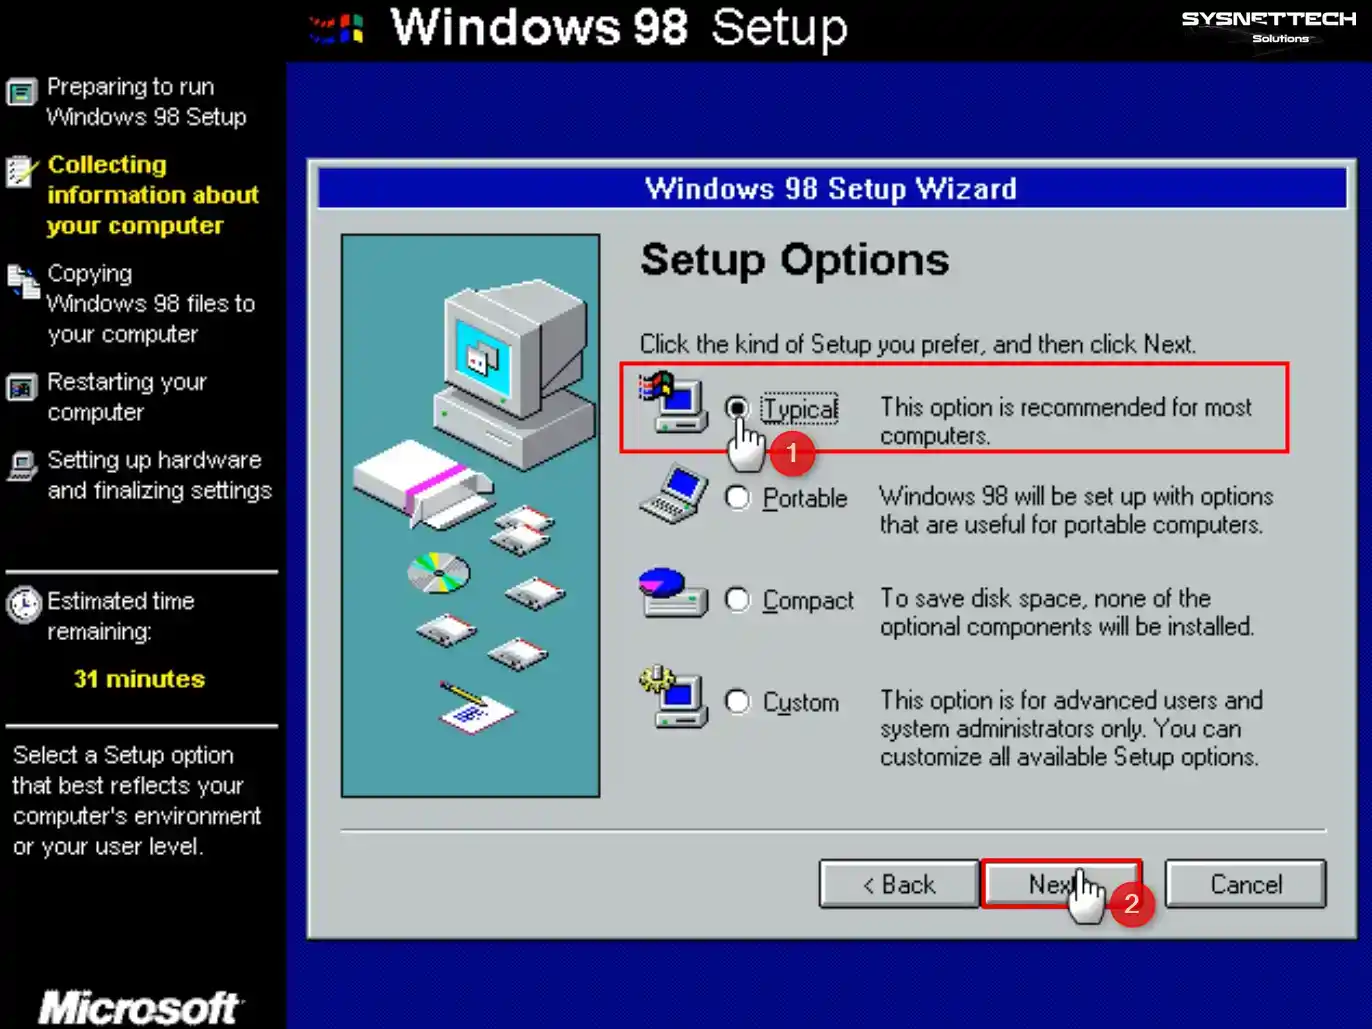
In the Windows setup options window, pick Typical, which is chosen by default.
Step 6
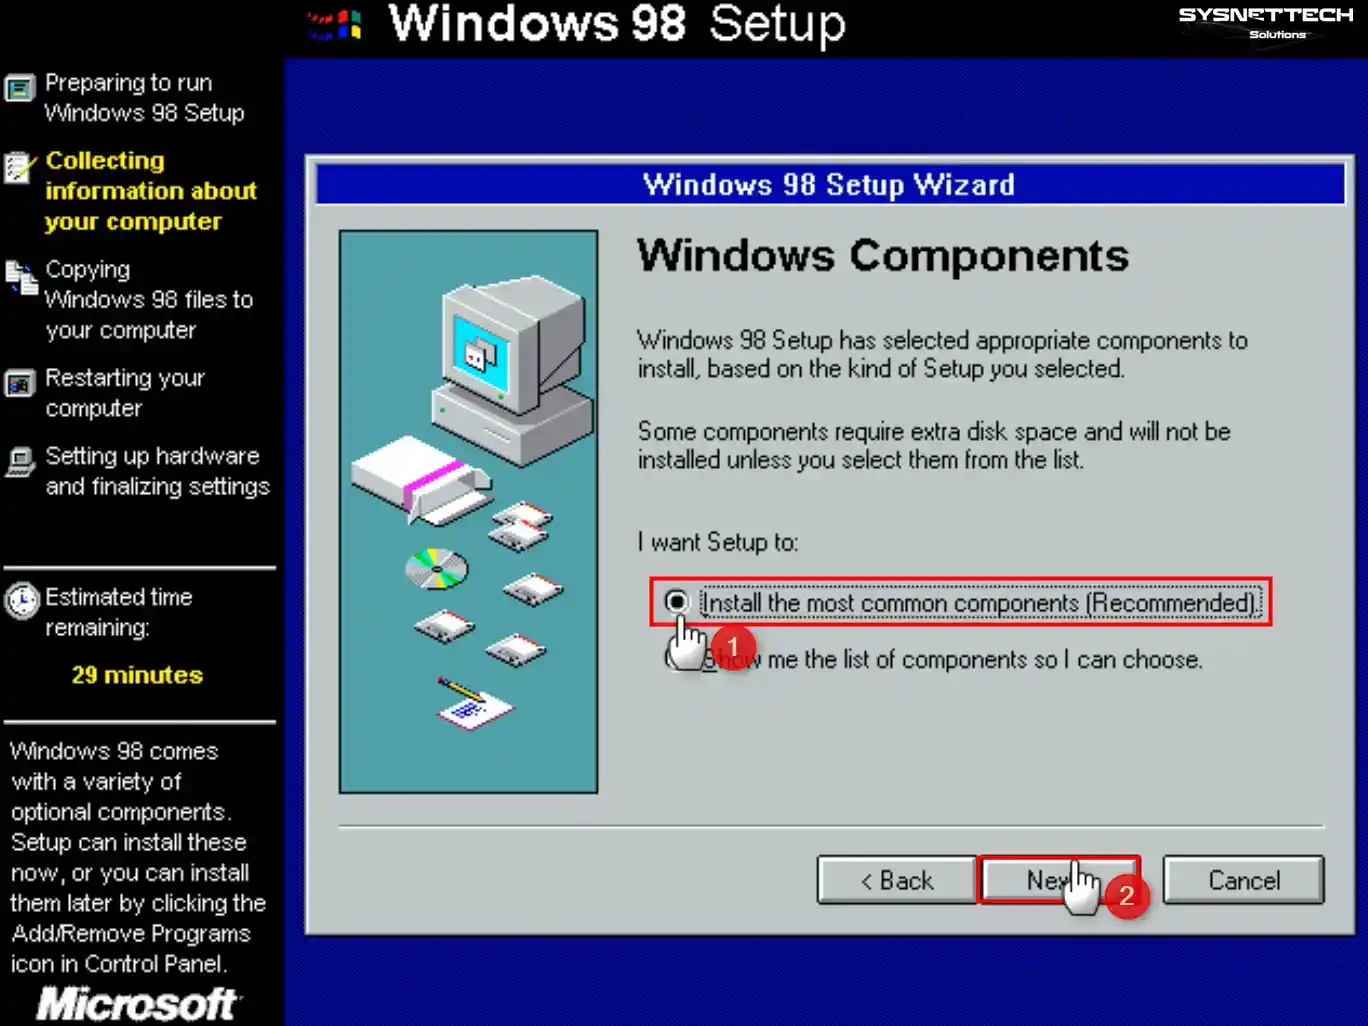
Select the option to install the most common Windows components and click Next.
Step 7
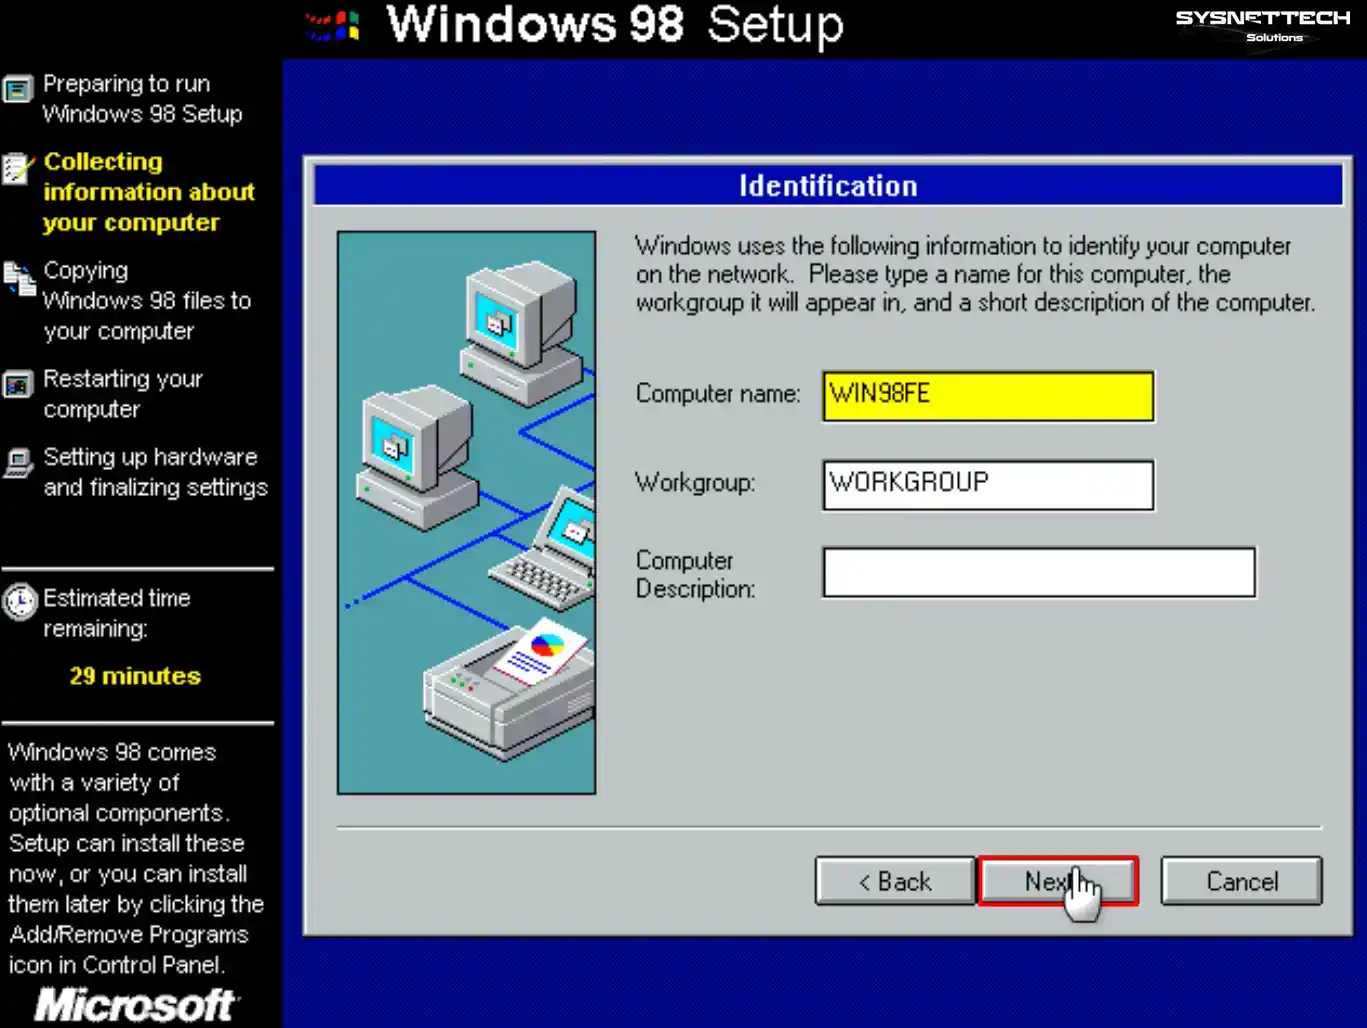
Type a computer name and description that is not the same as other computers on the network.
Step 8
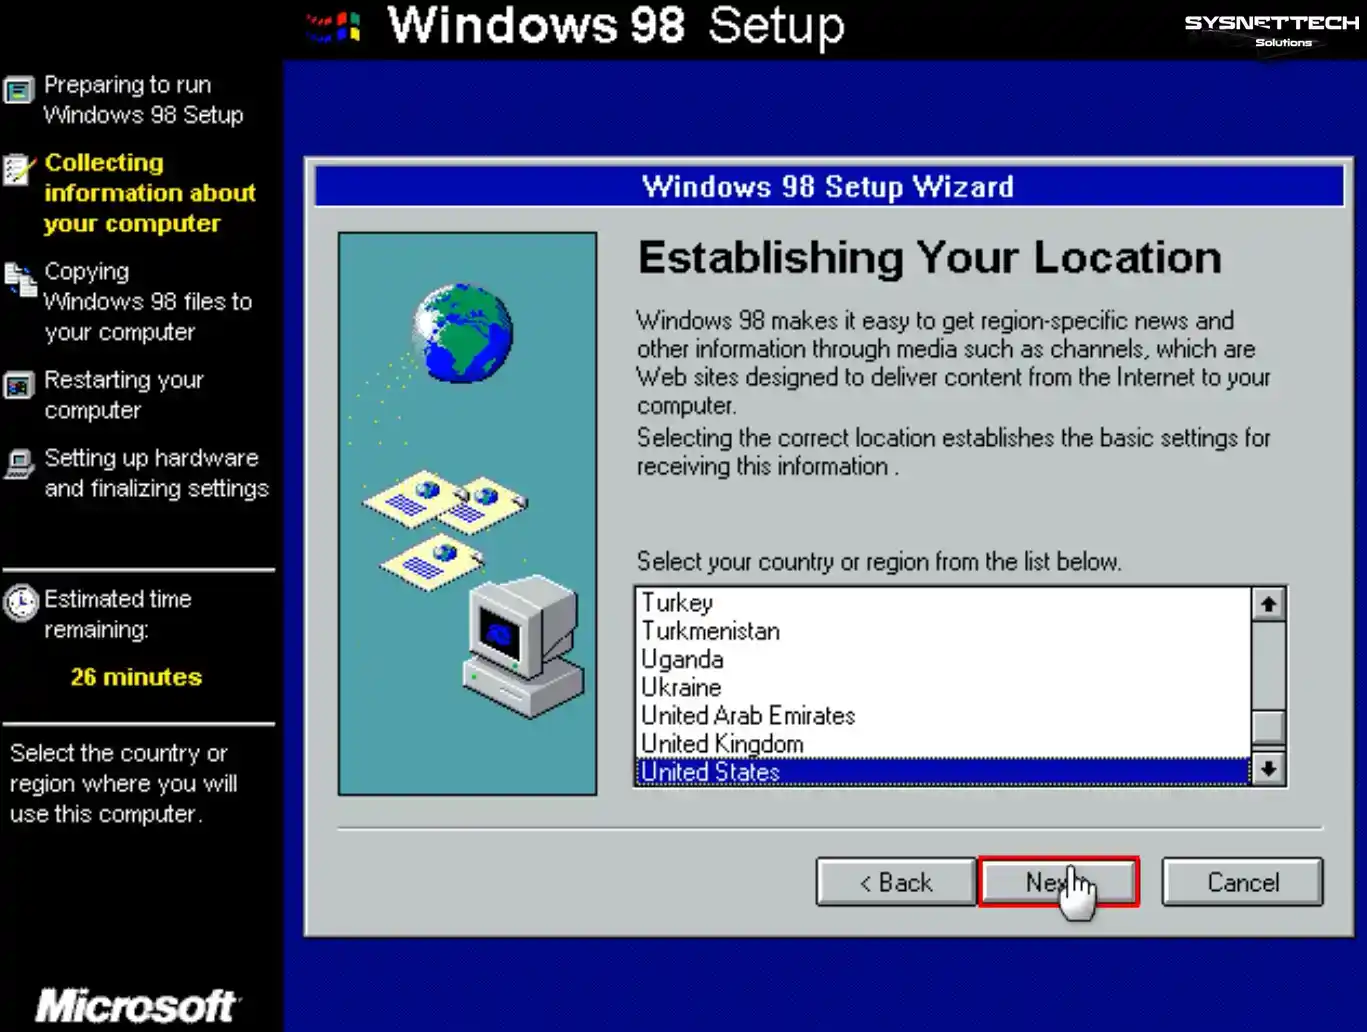
Select your country for regional news and content from around the world. This way, you can see the information most relevant to you.
Step 9
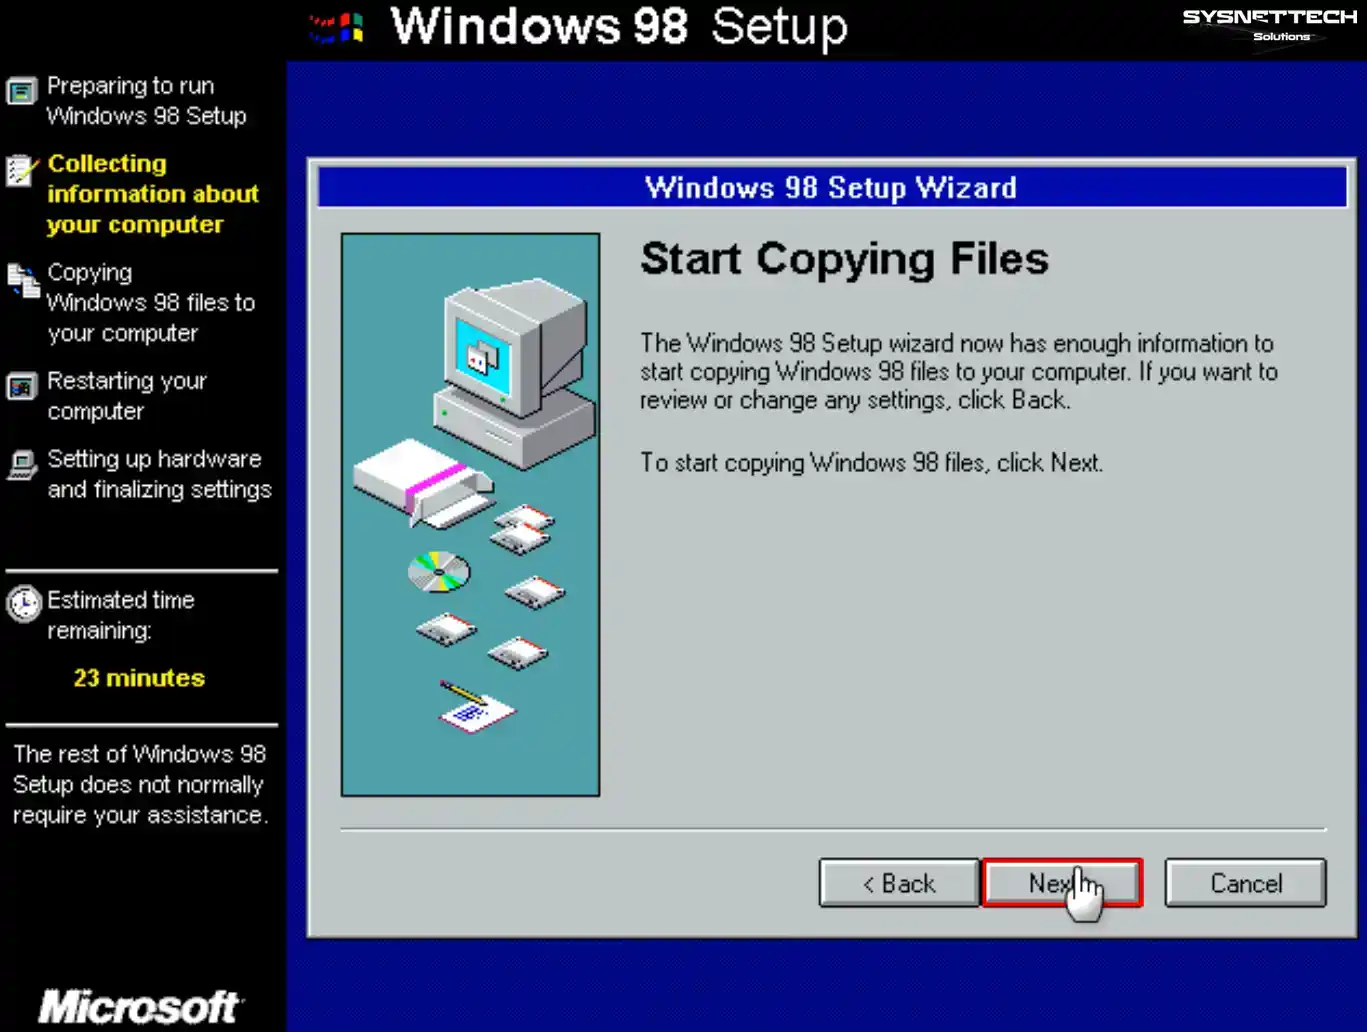
Click Next to copy the files of the Win98 operating system.
Step 10
Installing Windows 98 in a virtual machine depends on your host PC’s hardware. So, please be patient for the installation to go smoothly.
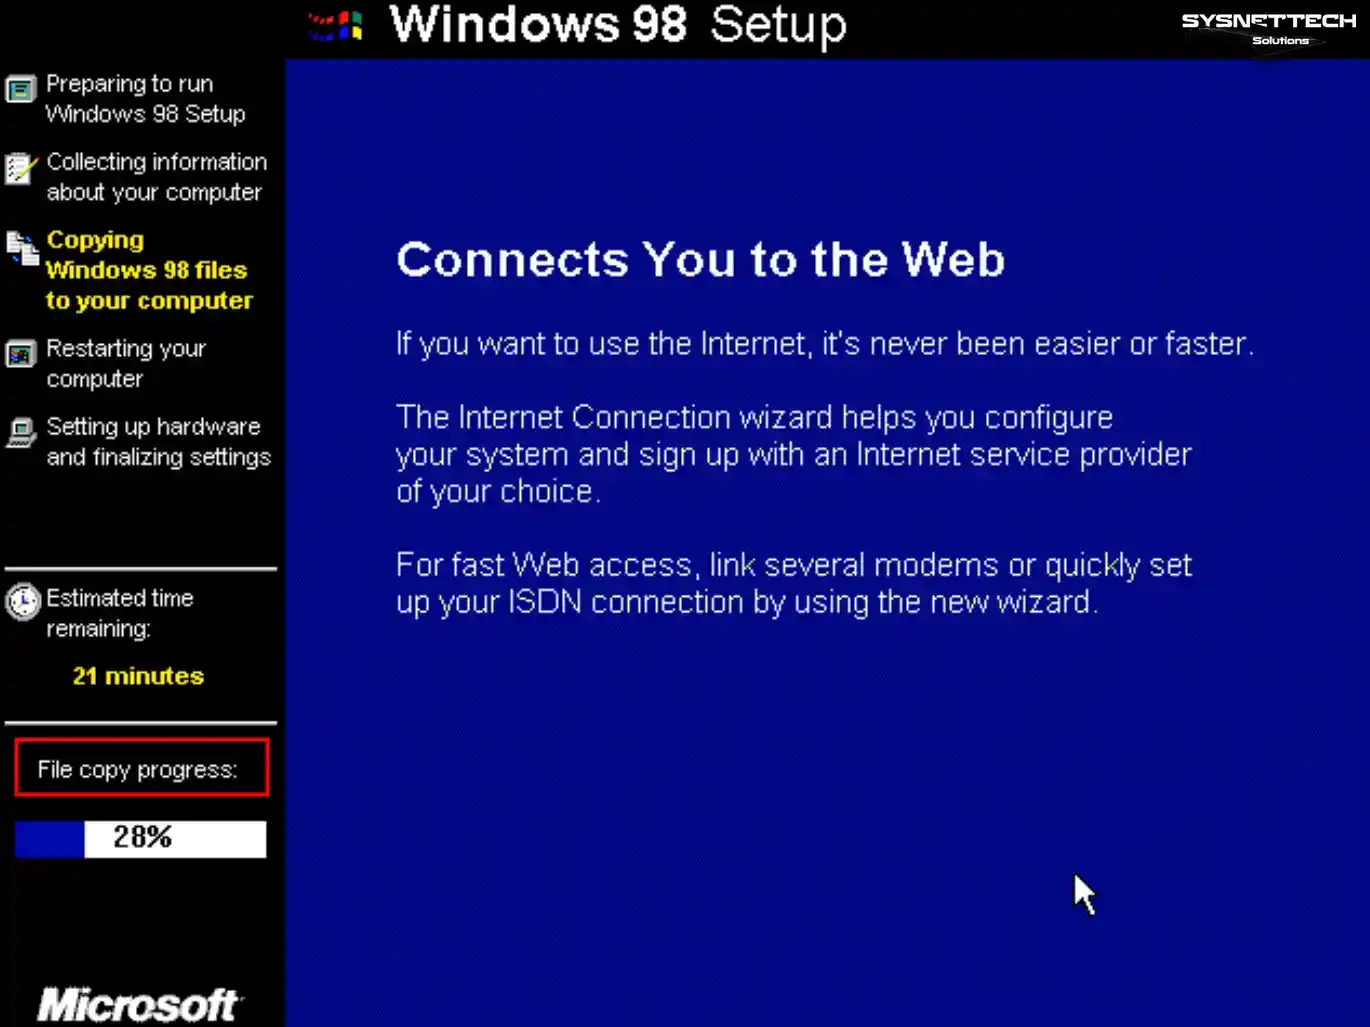
Step 11
Once the wizard copies the system files, reboot your virtual machine.
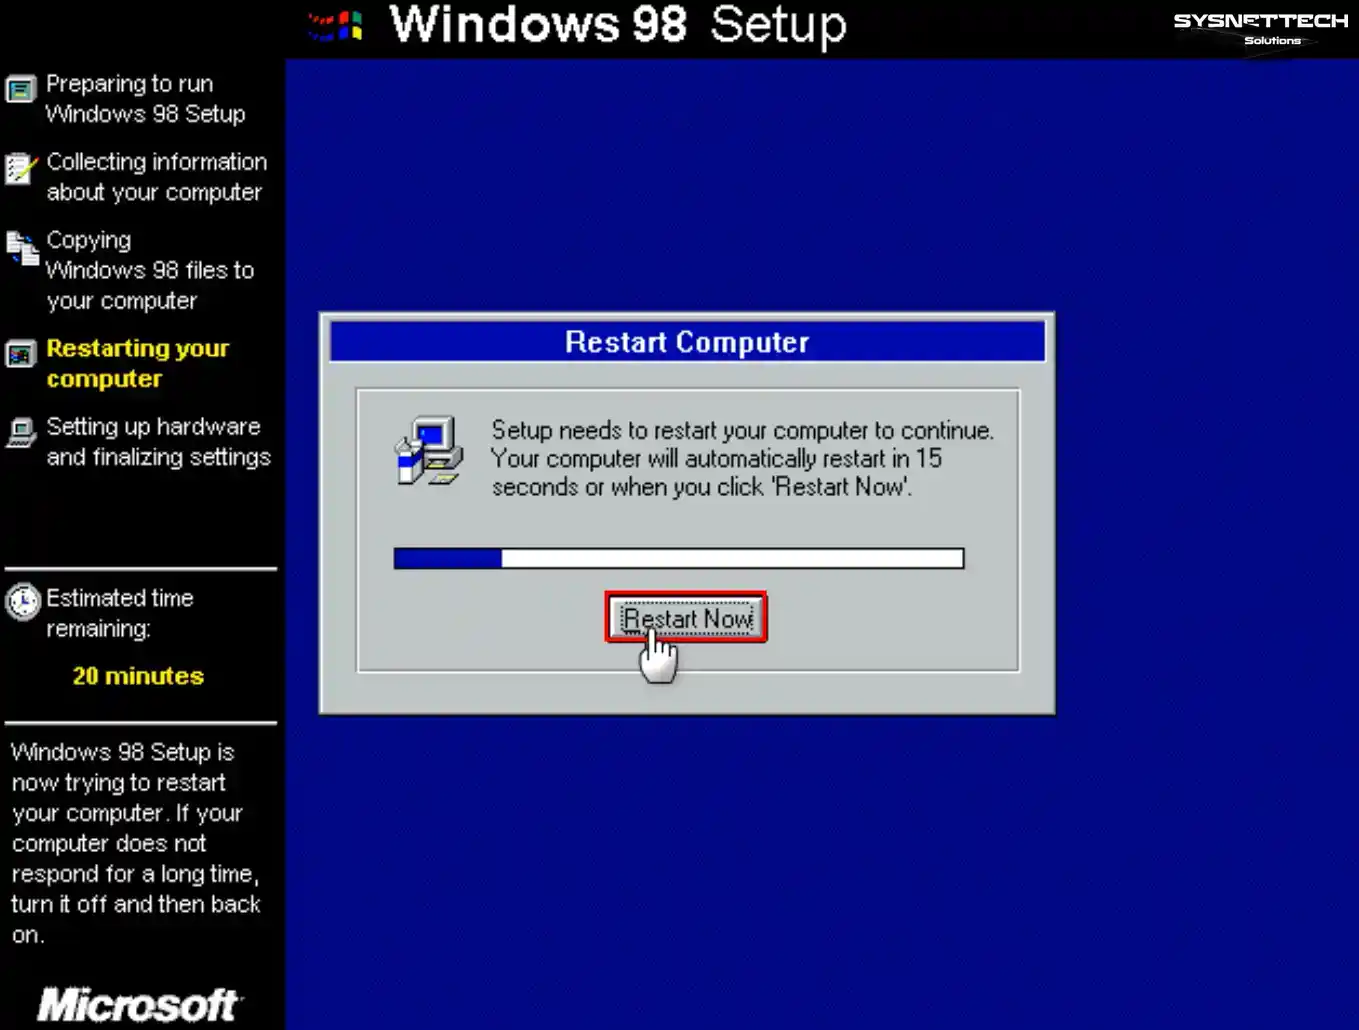
Step 12
If the ISO file is mounted when you restart the Win98 virtual machine, boot from the hard drive this time. Then, enter a new username when you open your virtual PC.
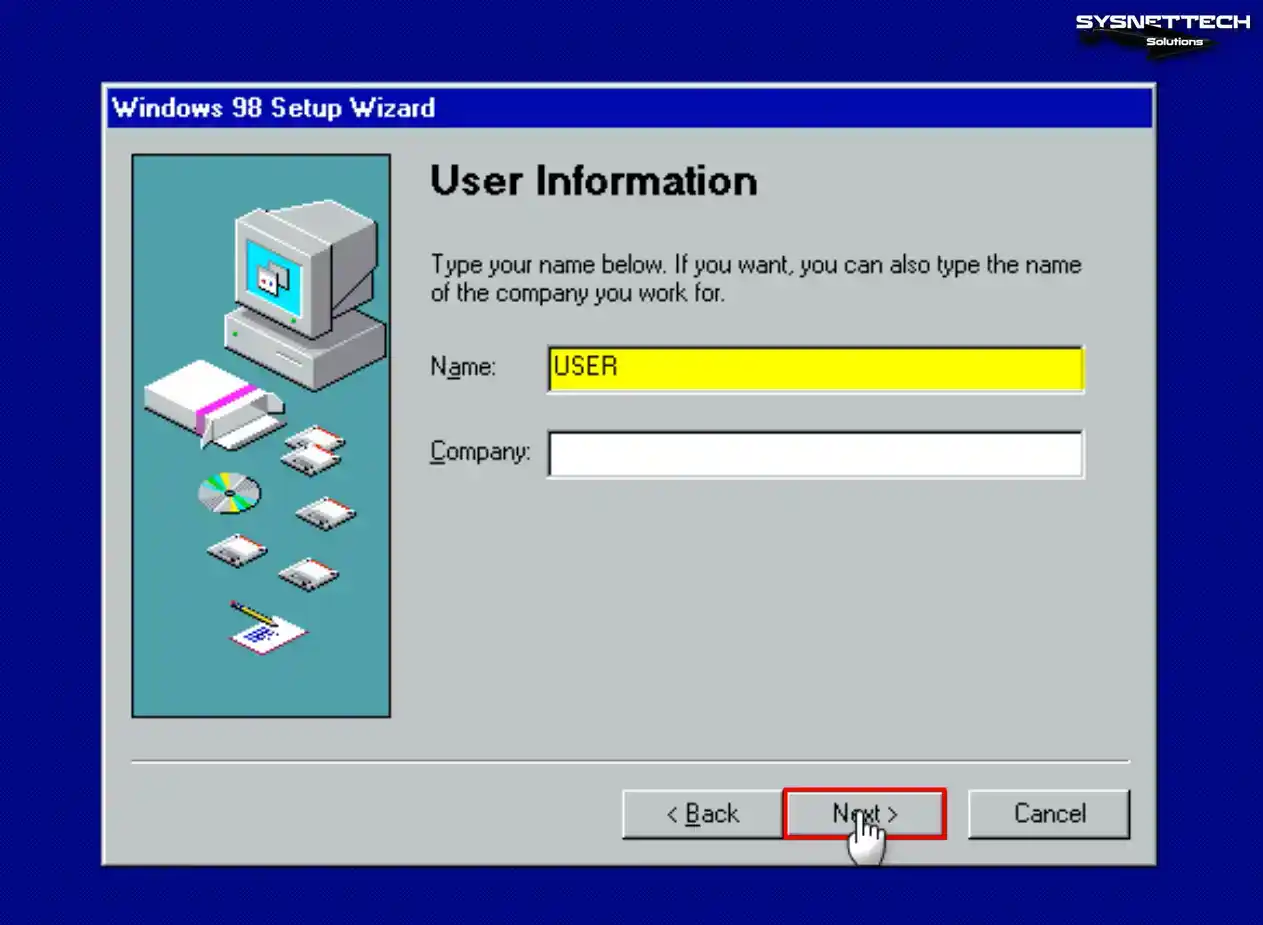
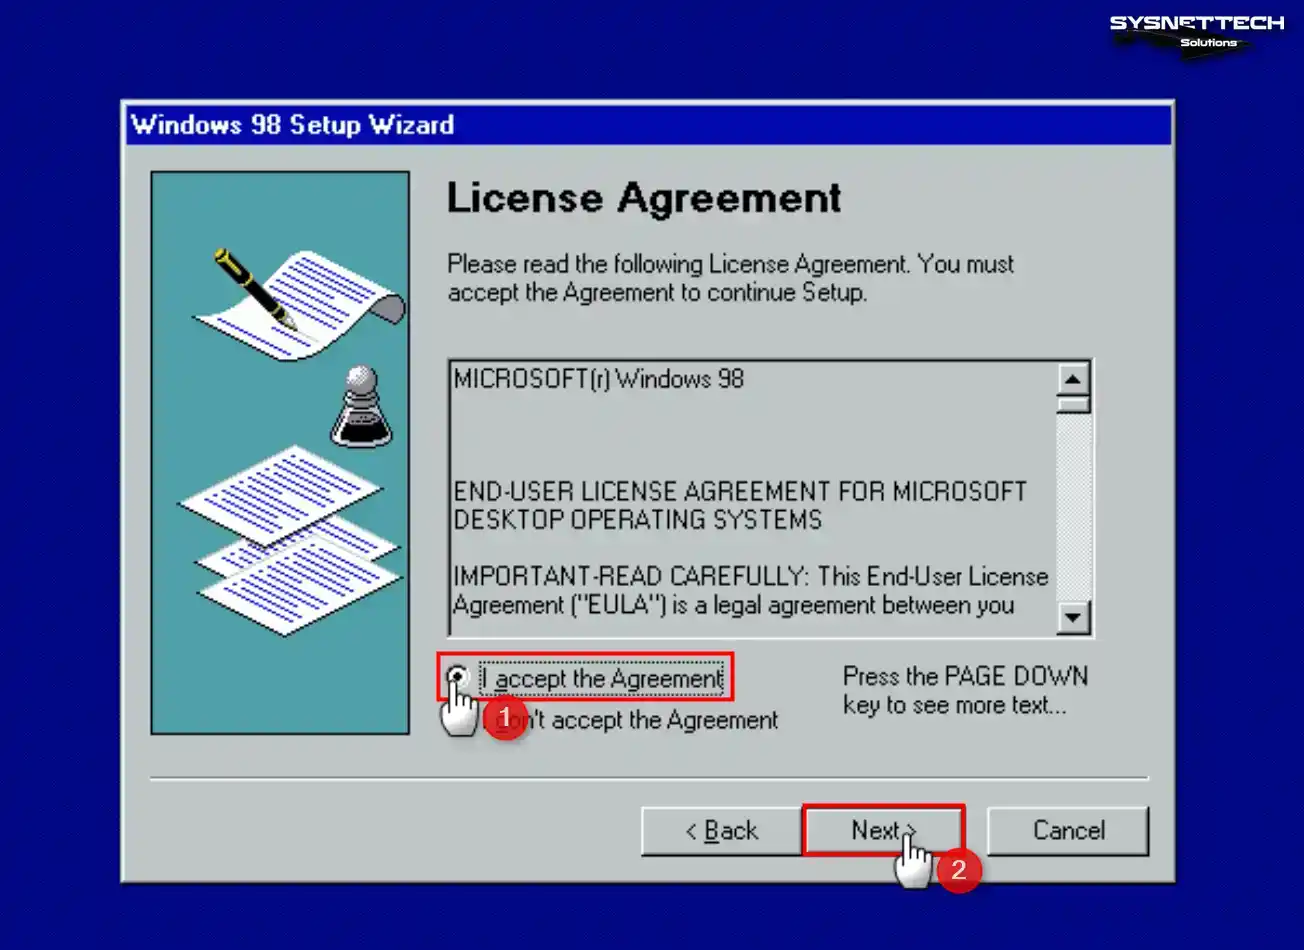
Step 13
Keep going by saying yes to the Microsoft Win98 license agreement.
Step 14
Confirm by typing the Win98 FE product key.
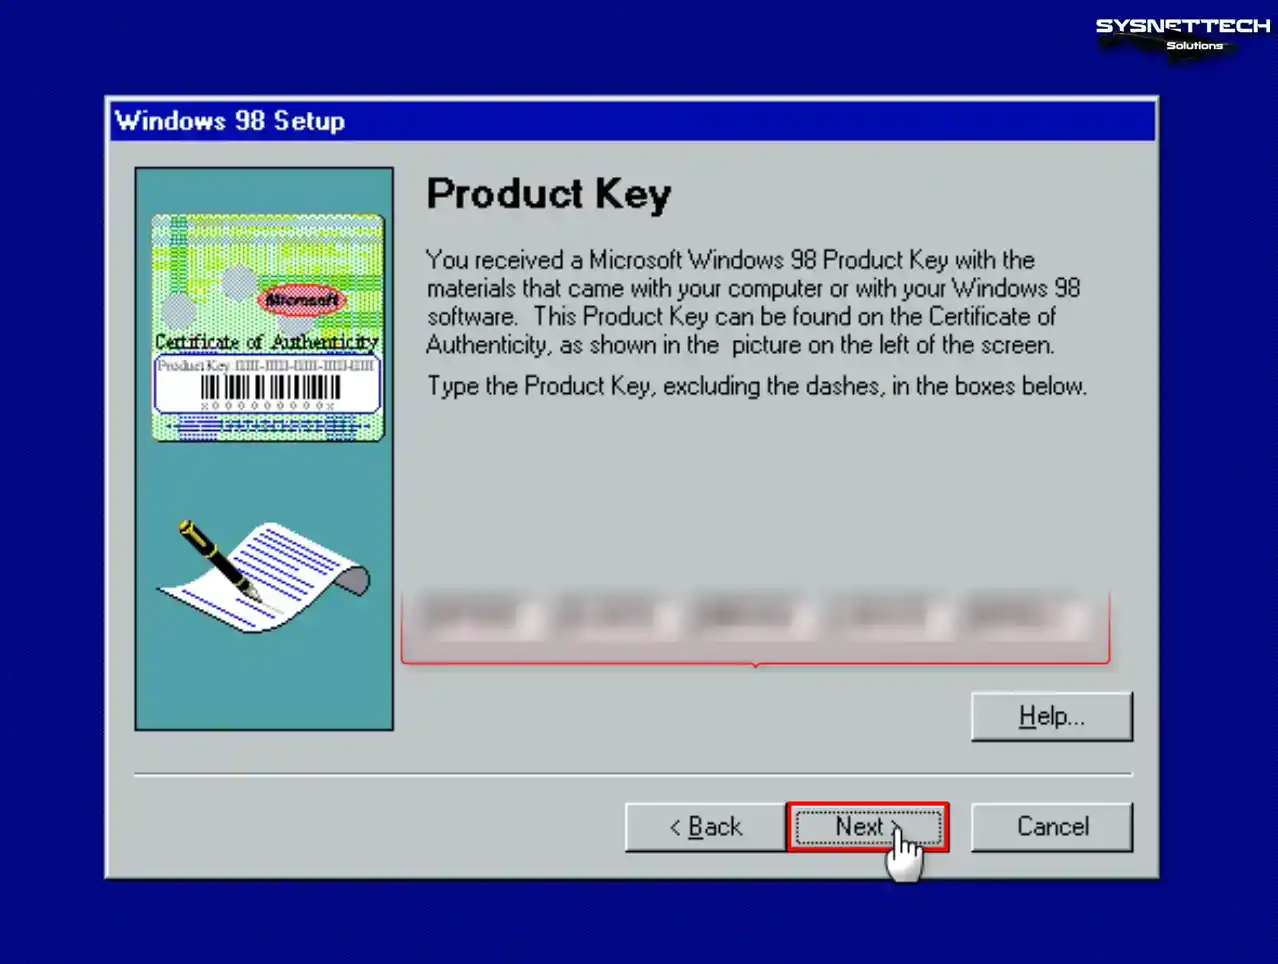
Step 15
After the wizard has entered the needed info, click Finish.
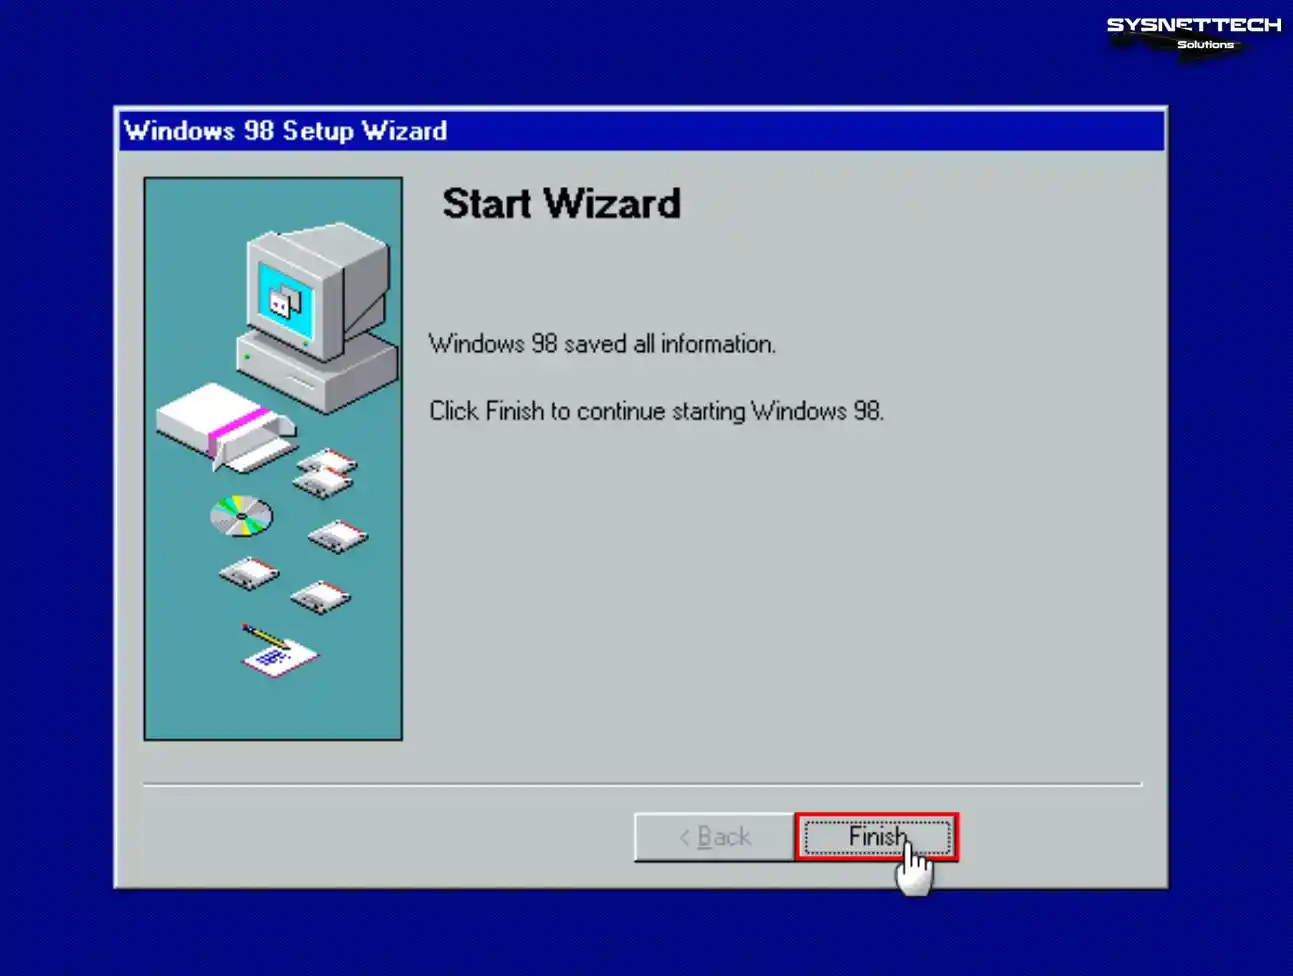
Step 16
When your virtual machine restarts, the setup wizard opens again, and it will set up plug-and-play devices. Please wait while the wizard checks the guest machine for hardware. This is very important for devices that are not plug-and-play.
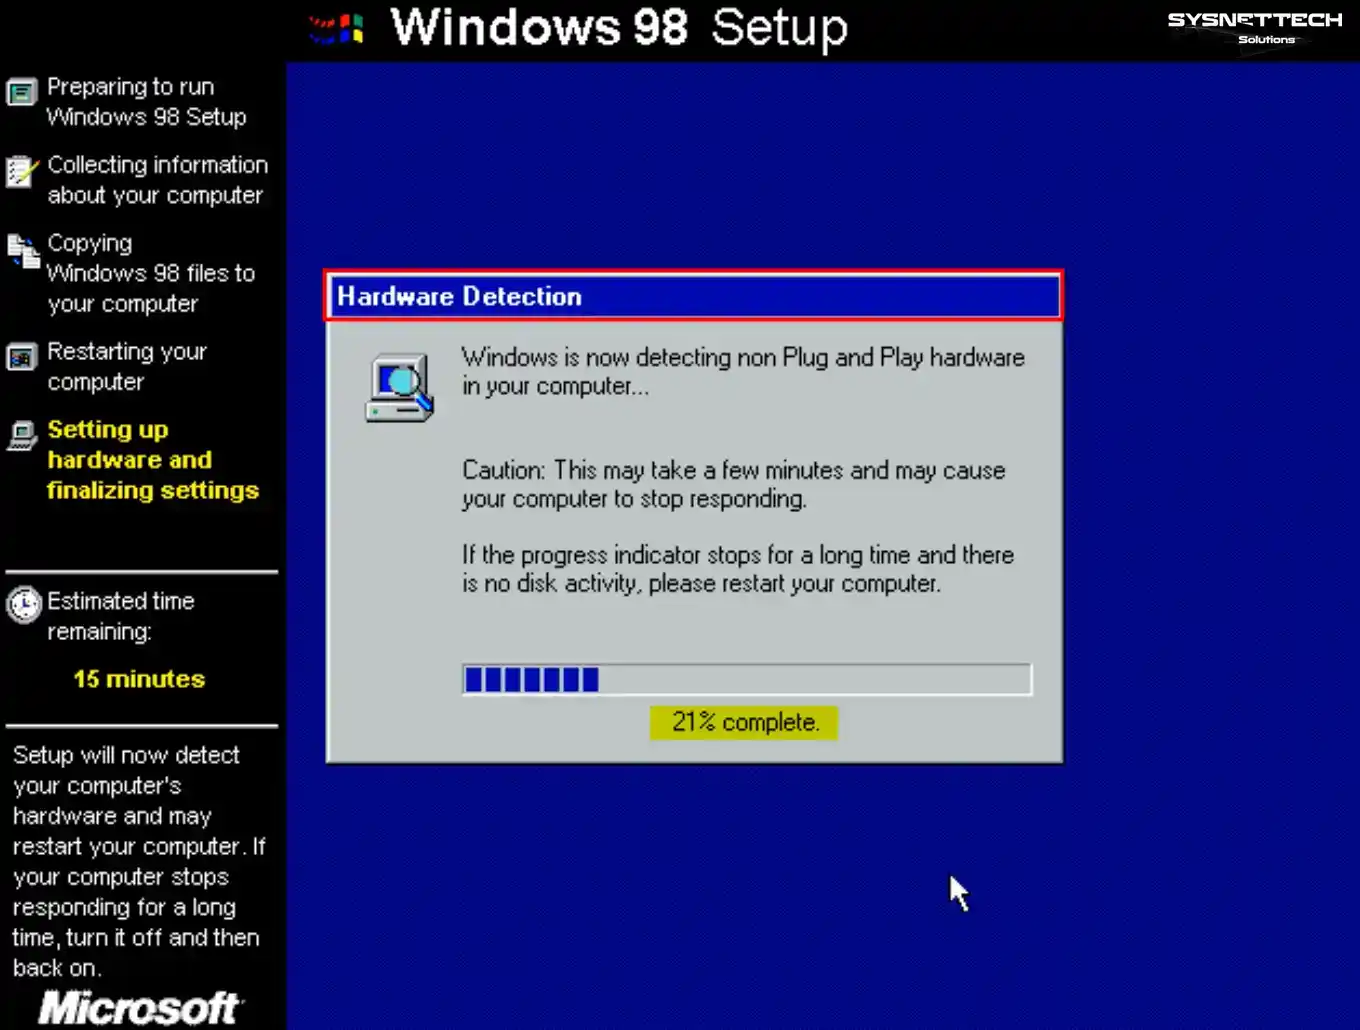
Step 17
Once the hardware scan is complete, restart your virtual system.
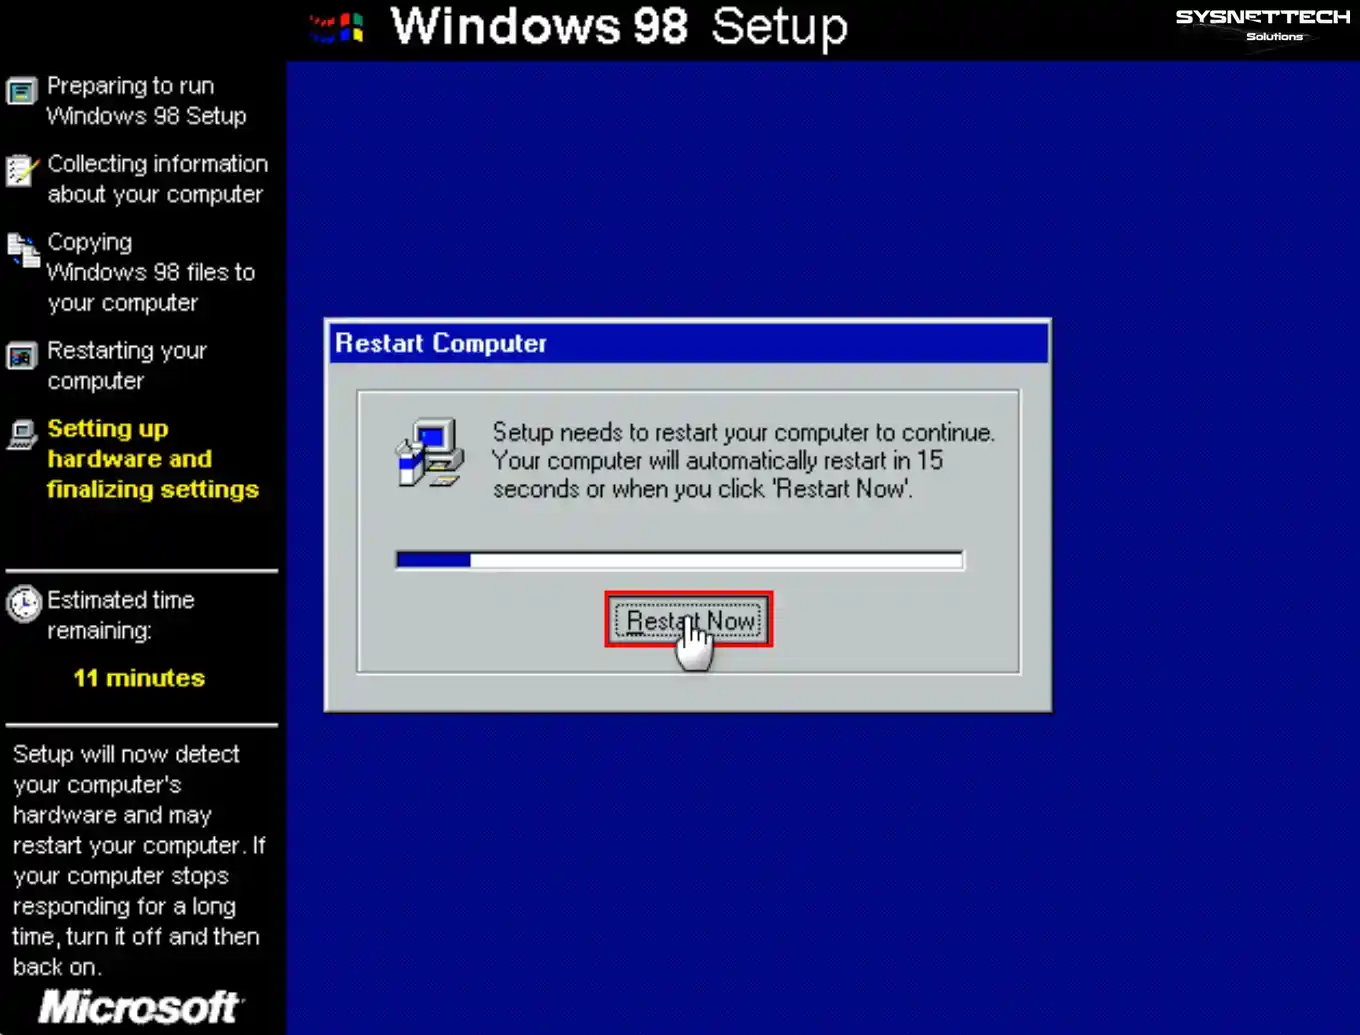
Step 18
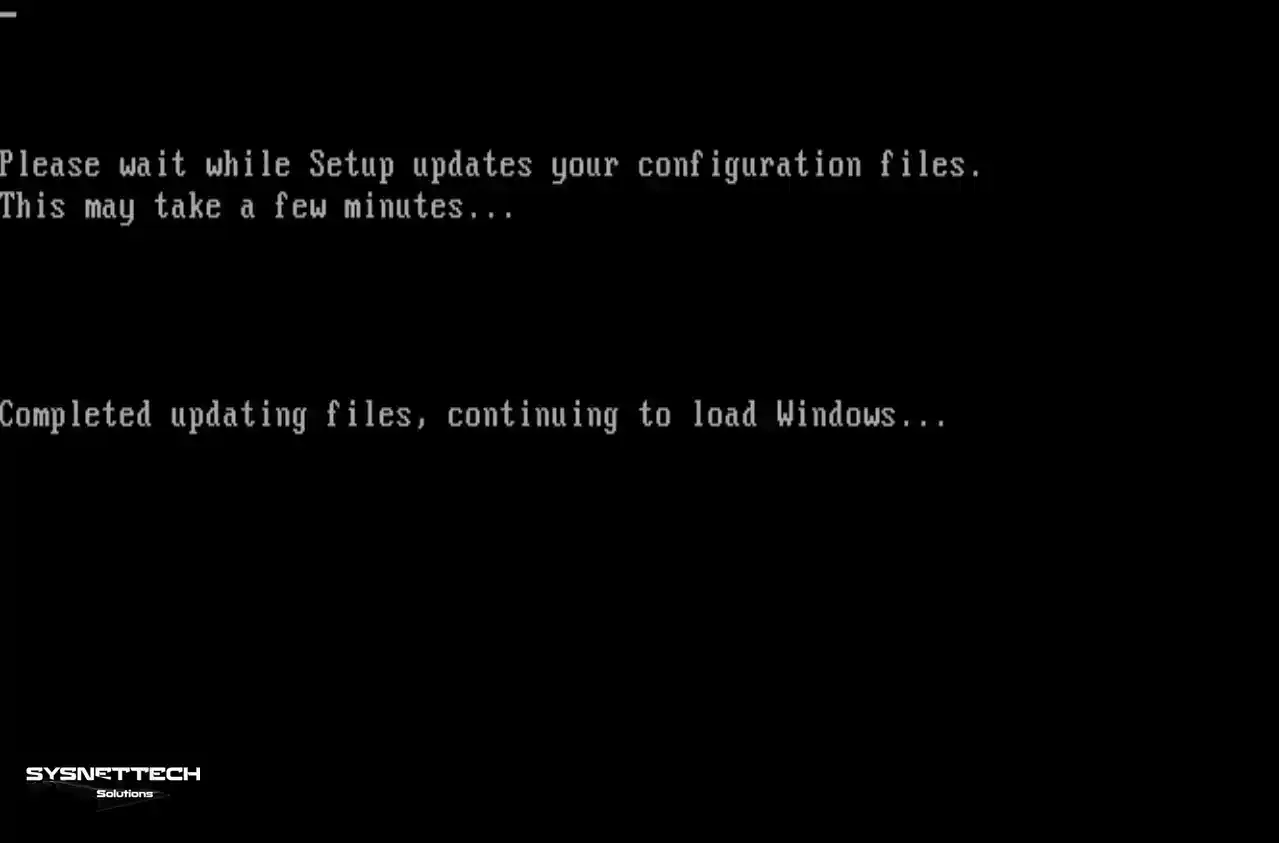
Wait while the setup wizard updates the files.
5. “This program has performed an illegal operation and will be shut down” Solution
Step 1
When the Win98 system restarts, it will start configuring the system settings.
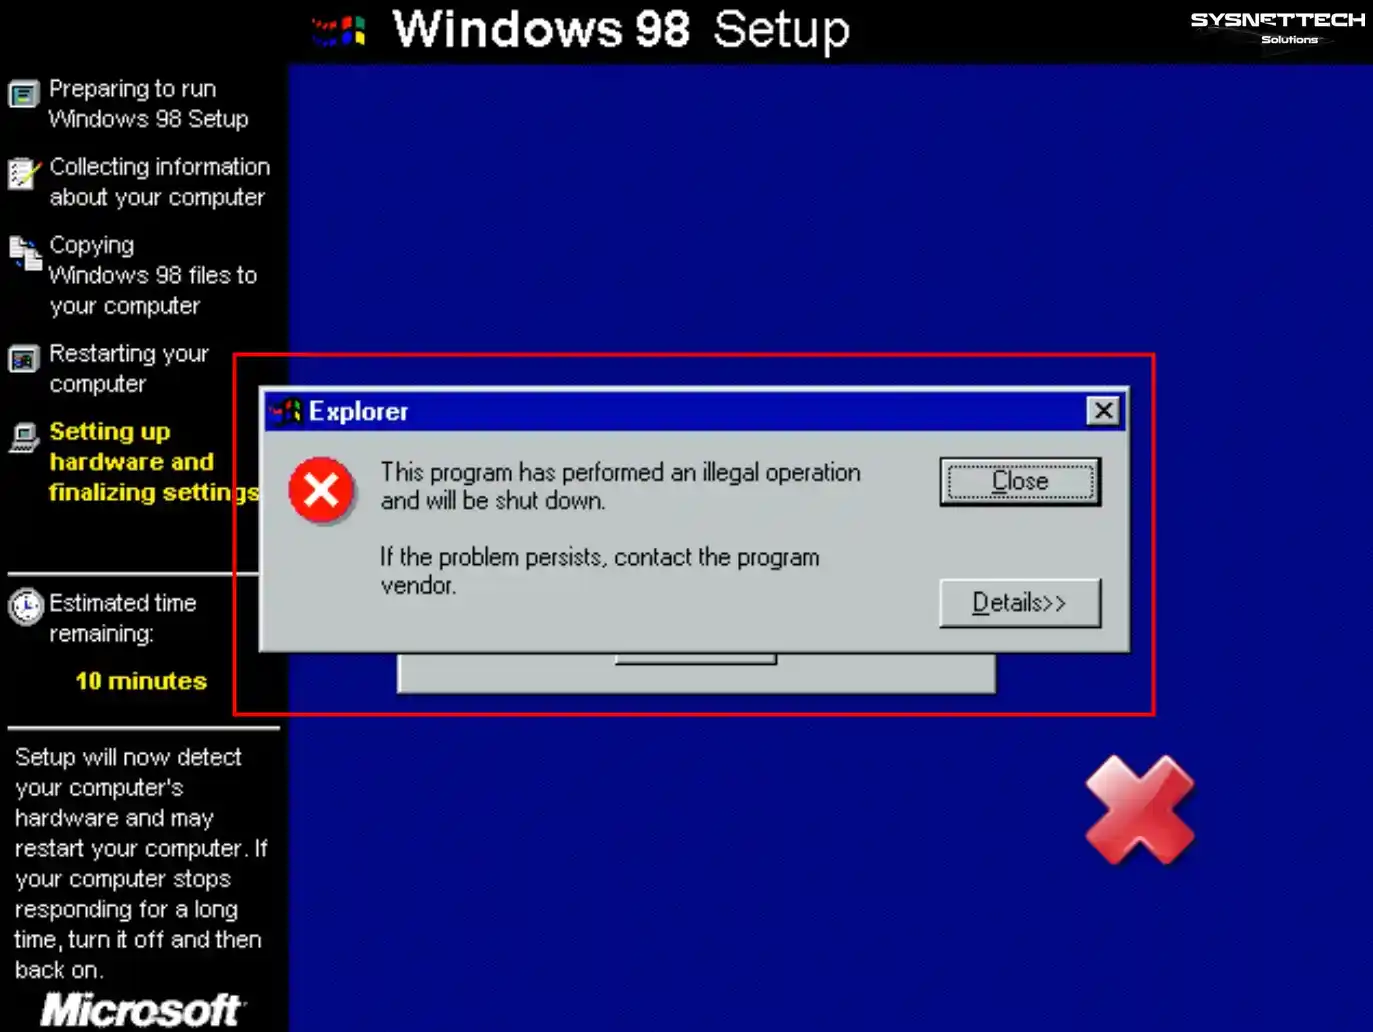
At this stage, you may encounter an error. For example, you may see the message (This program has performed an illegal operation). Now, you need to apply patches to the guest OS.
Now, you need to shut down the virtual Win98 PC. To do this, first you must click on the X icon. After that, you can proceed by choosing Power Off.
Step 2
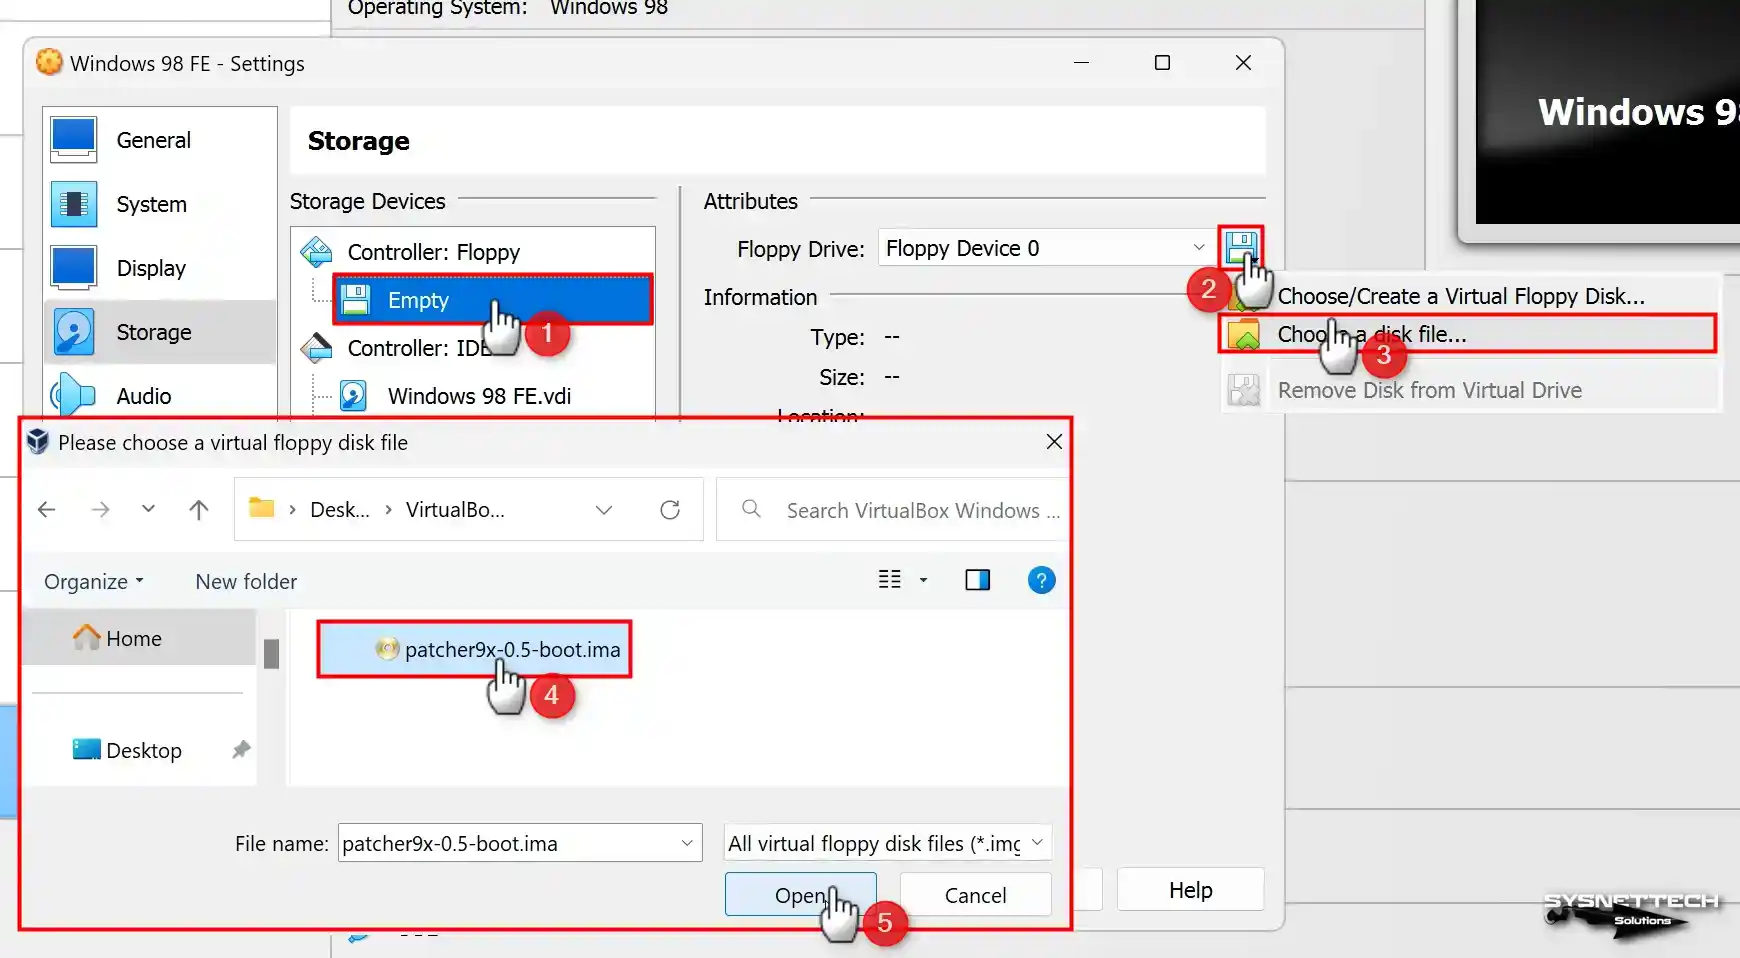
After you turn off the VM, open its settings. Then, go to the Storage tab and select the Floppy device.
Here, add the Patcher9x-0.5-boot.ima file you downloaded. Finally, restart the Win98 virtual machine.
NOTE: At this stage, make sure that the floppy device is set as the primary boot device. If not, press F12 when you start the guest machine. Here, press the “F” key to select Floppy from the Oracle Boot menu.
First, you need to download the Patcher9x-0.5-boot.ima file. You can do this from the developer’s GitHub page. Alternatively, you can use the download table we have prepared for you. So, you will download the file directly to your computer.
Step 3
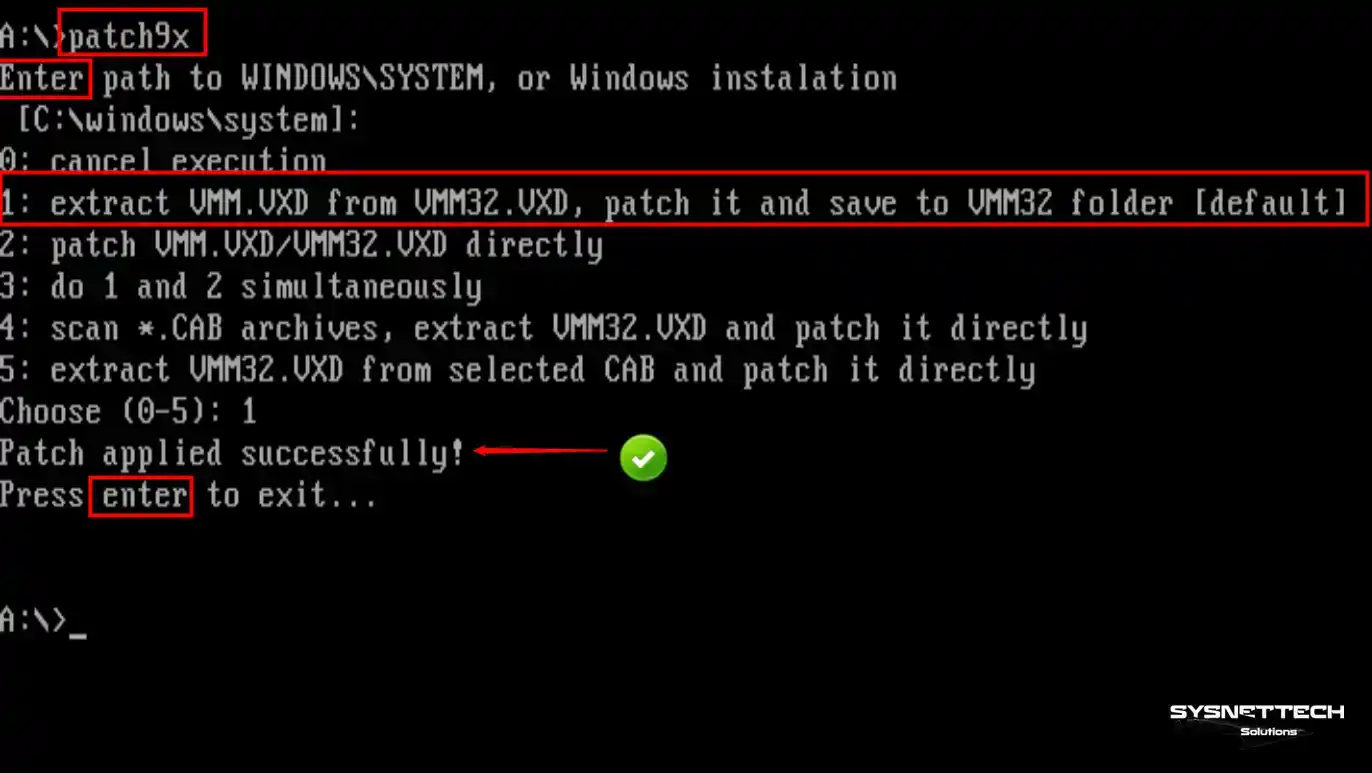
First, boot the guest machine from the floppy disk. Then, type “patch9x” at the A:\ command prompt. Finally, press Enter to patch the WINDOWS\SYSTEM location.
patch9xFirst, select option 1 from the options that appear. This is the default option recommended by the developer. Then press Enter to adjust the processor settings of the virtual PC. After this process, you can restart your Win98 VM.
Step 4
When you start your Win98 system, you will see the login screen. Then, type in the user name you created and click OK.
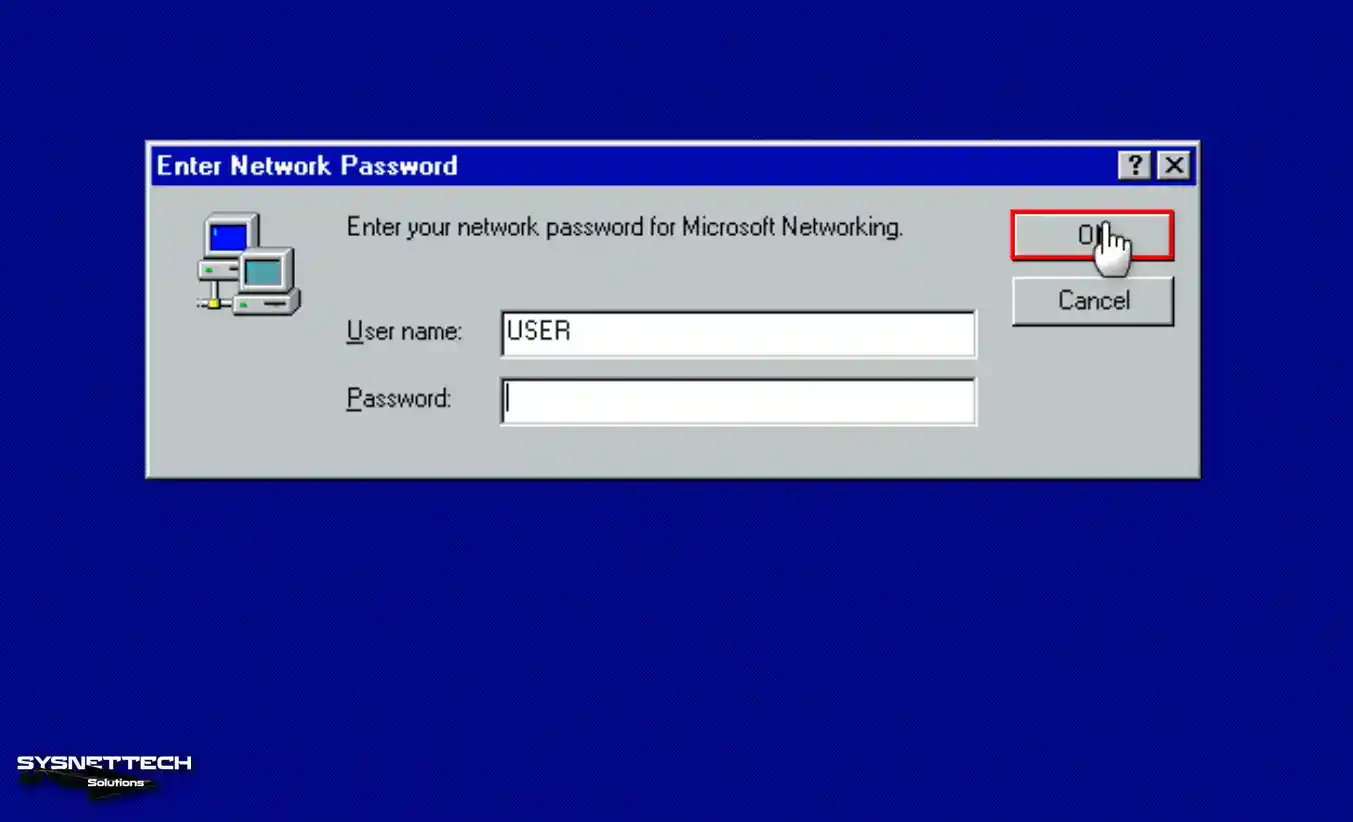
Step 5
Configure your system’s time and date settings, then click Close.
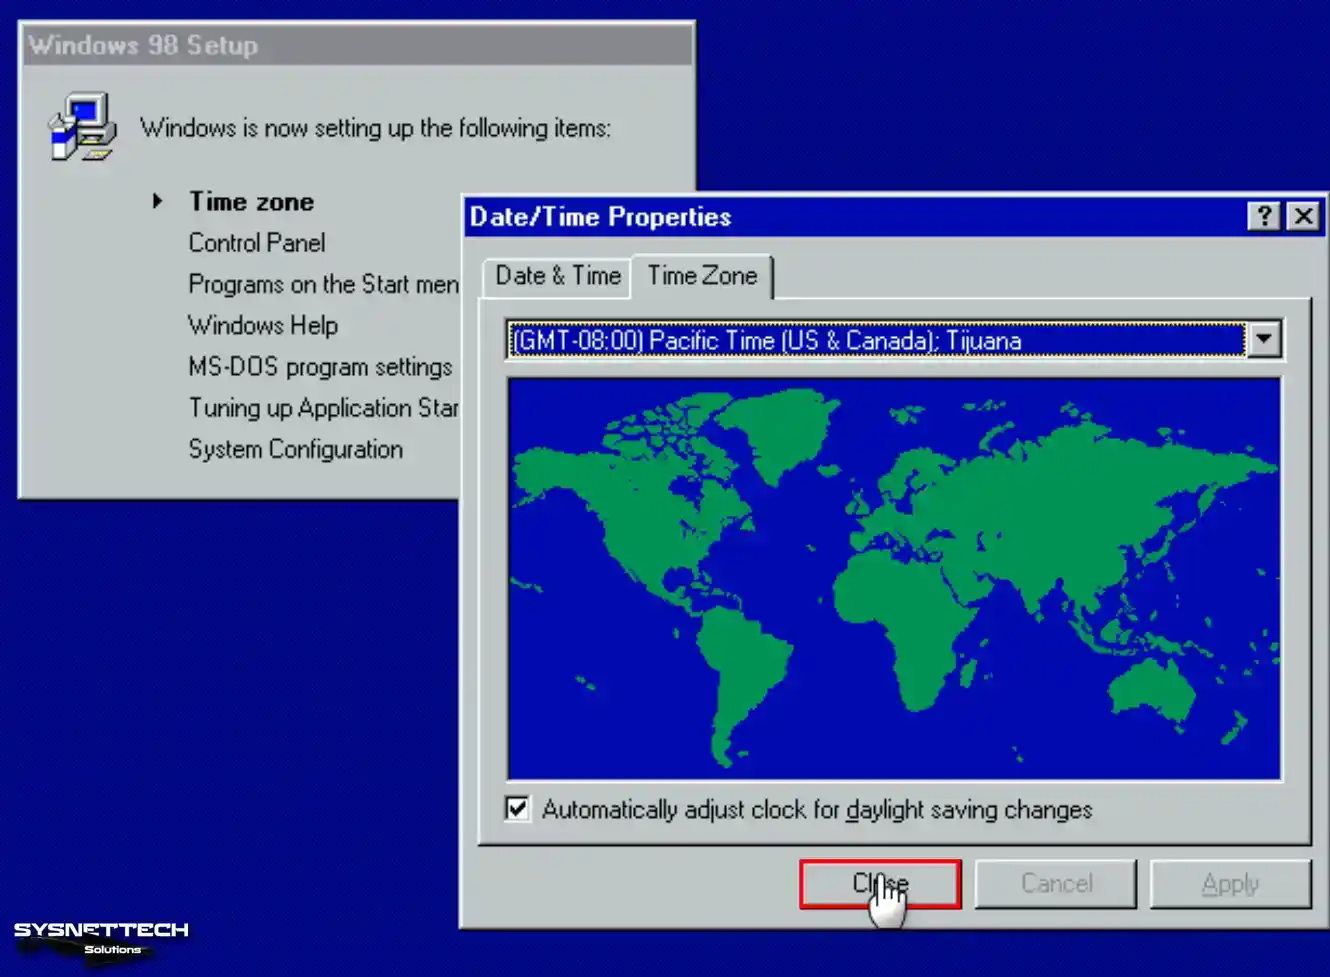
Step 6
Wait for the setup wizard to run. During this time, it is setting up the operating system. It is setting up the control panel items. It is also adjusting the time and date options.
In addition, it is preparing Windows help and programs in the Start menu. Please wait until these processes are complete.

Step 7
You will see the Welcome to Win98 window. To prevent this window from appearing the next time you start up, uncheck the relevant option.
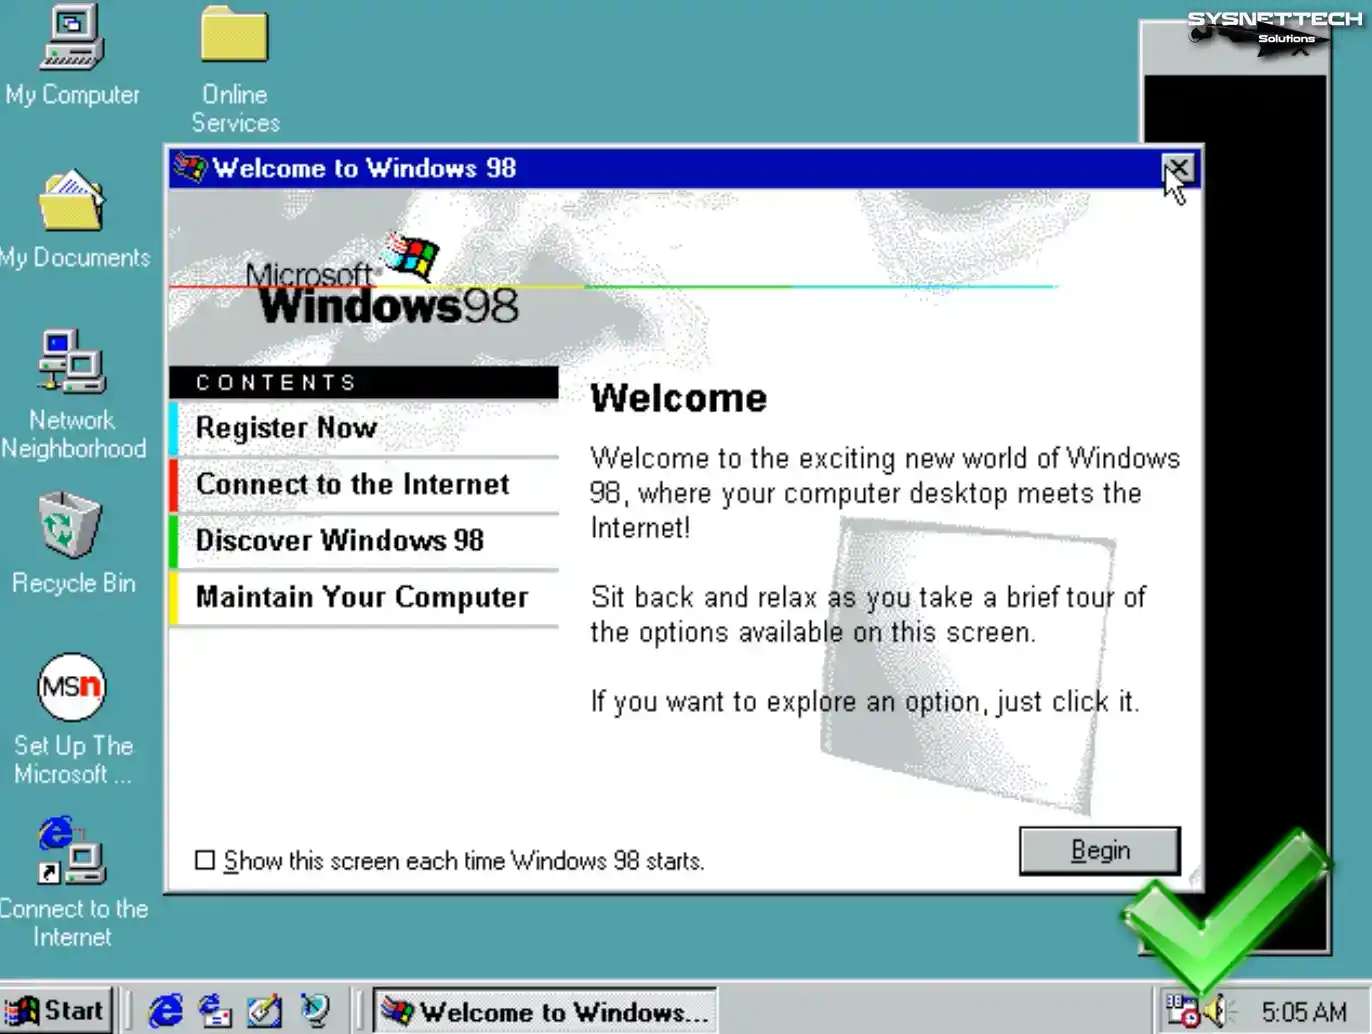
Step 8
To see Windows system info, first right-click on My Computer. Then look at “Properties” in the menu that appears.
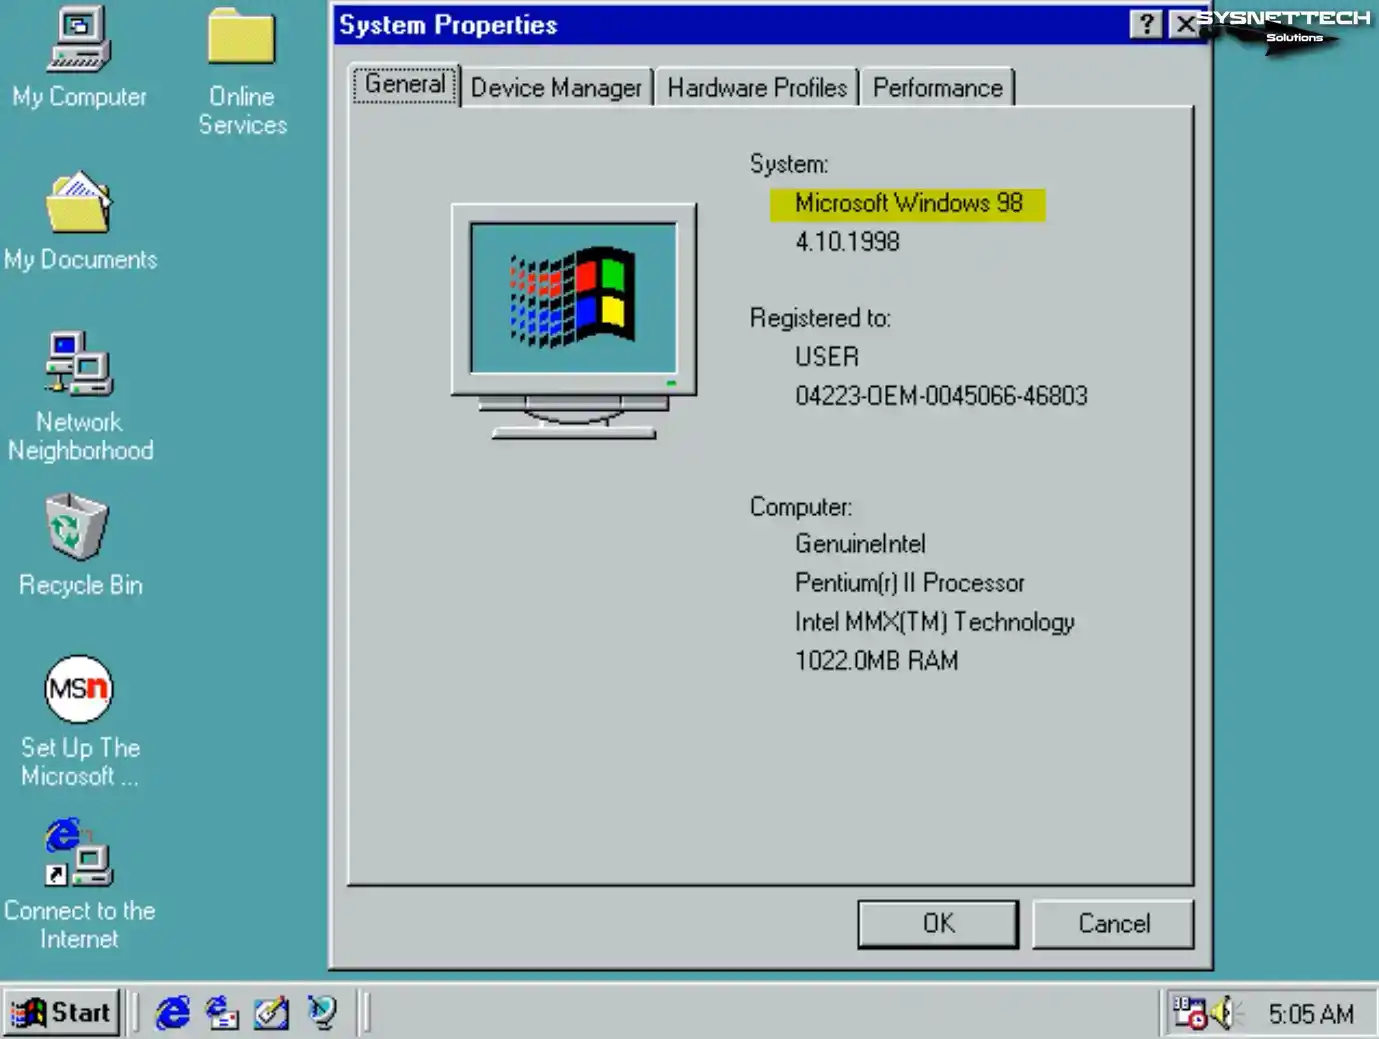
VirtualBox Windows 98 Driver Installation
1. Display Driver Installation and Changing Screen Resolution/Color
VirtualBox does not support Guest Additions for Windows 9x versions. So, drivers may not work well on old systems in virtual machines.
Let’s say you want to adjust the screen resolution after installing Win98. At this point, you must first configure the display adapter.
Step 1
First, open My Computer on the guest machine. Then go to Properties. Next, select Device Manager. Then, check the device under Display Adapters.
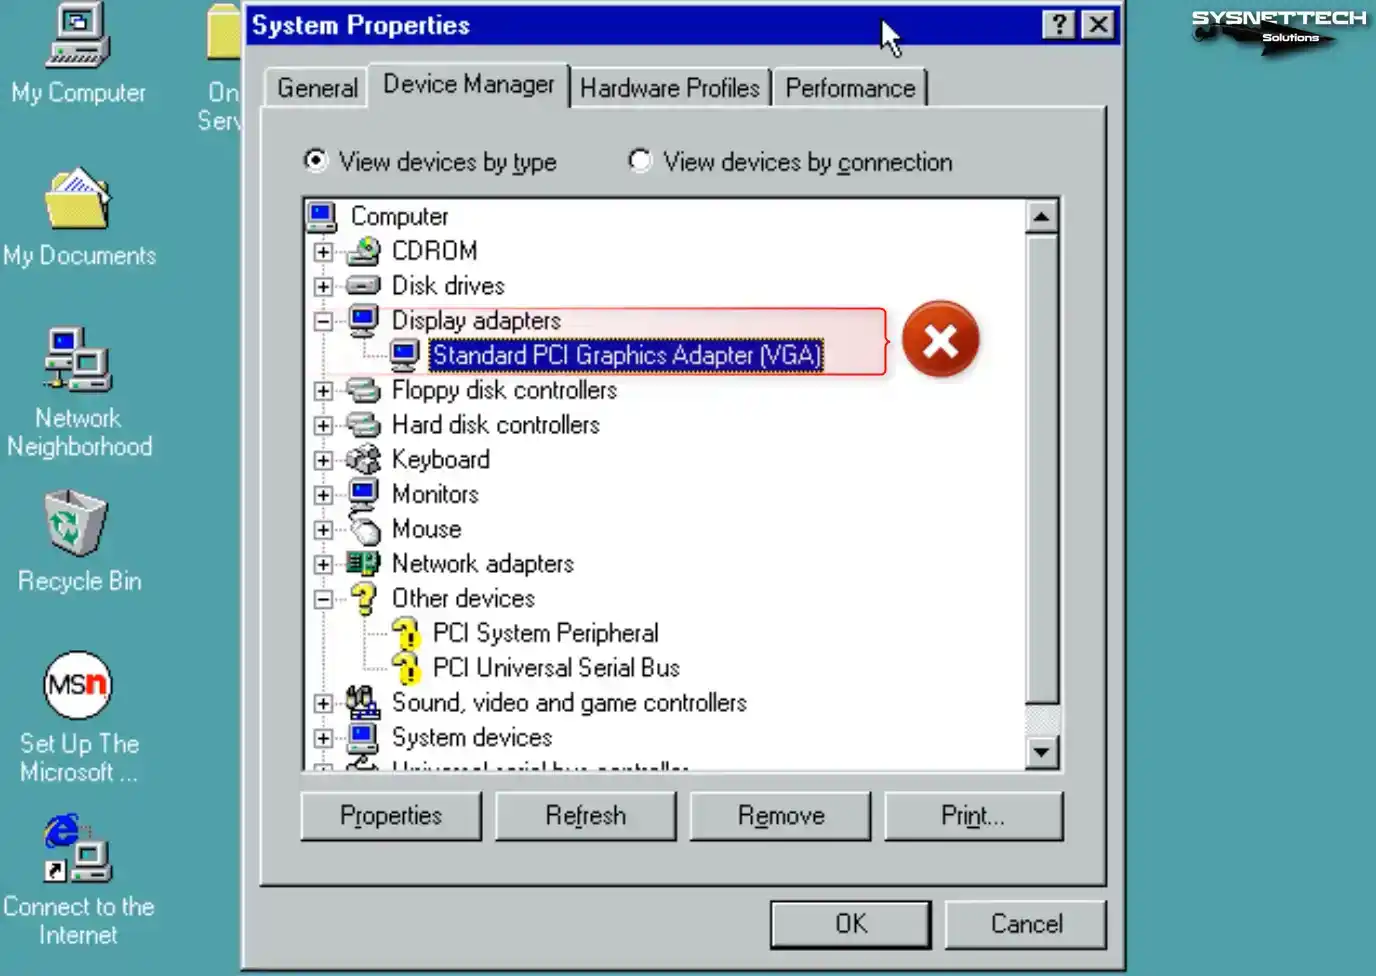
Step 2
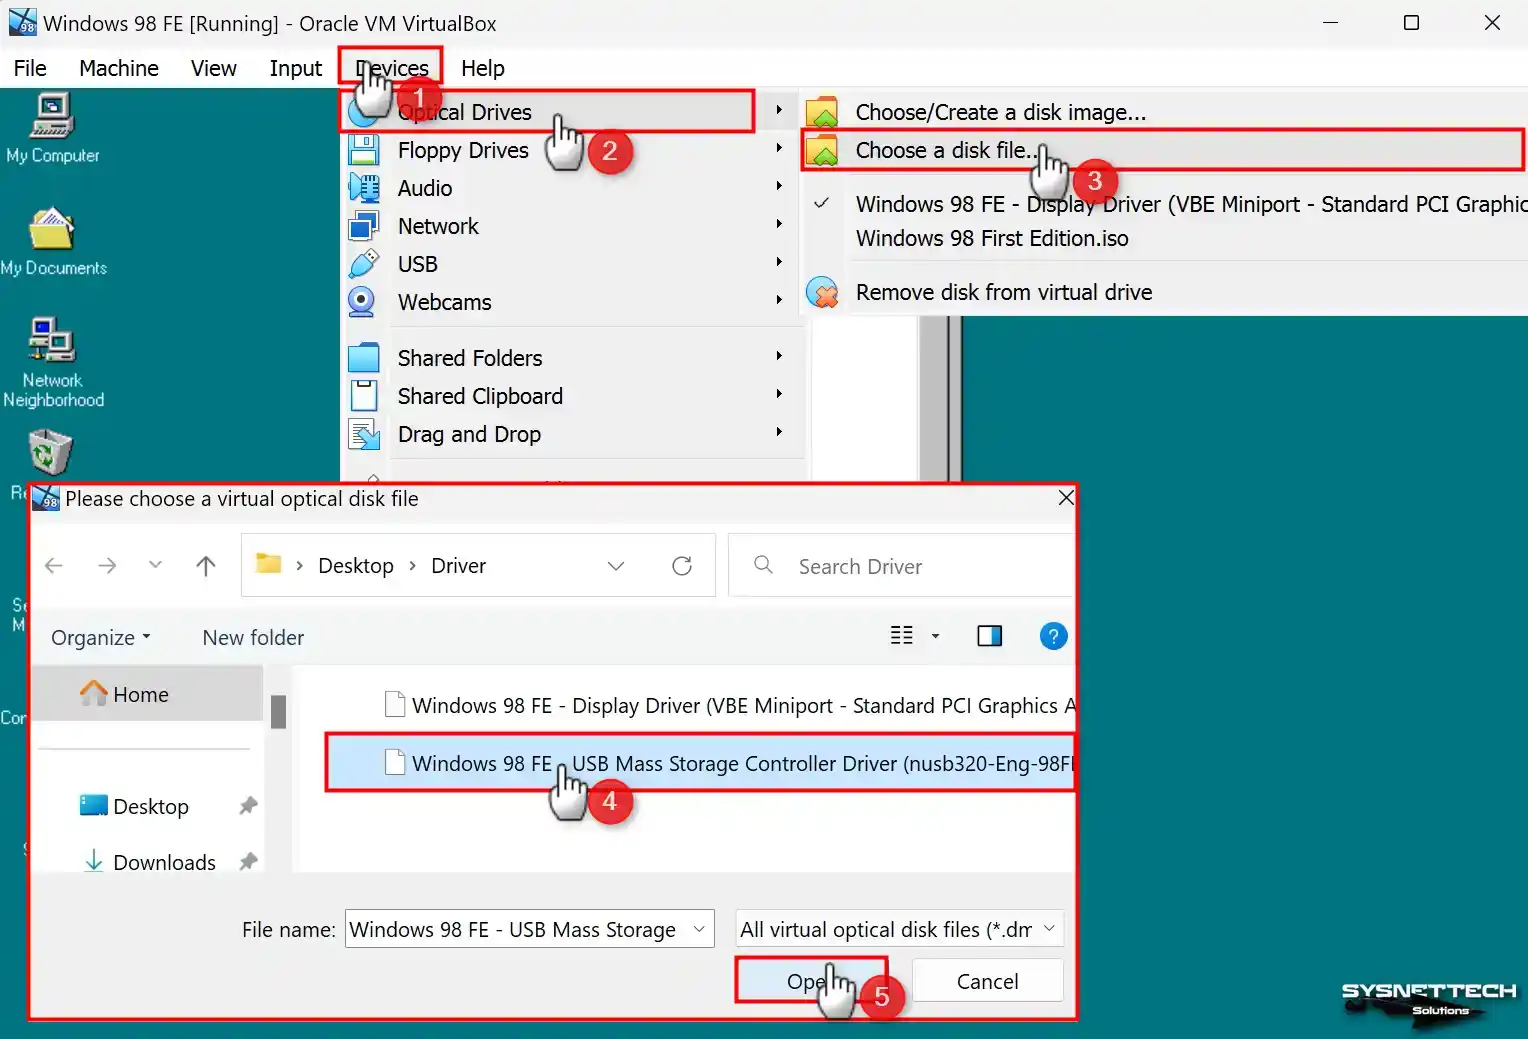
First, click on the CD/DVD icon while the guest machine is running. At this point, select the option labeled ‘Choose a disk file’. Next, find the Windows FE Display Driver (VBE Miniport) ISO you downloaded from the table. Finally, click the “Open” button.
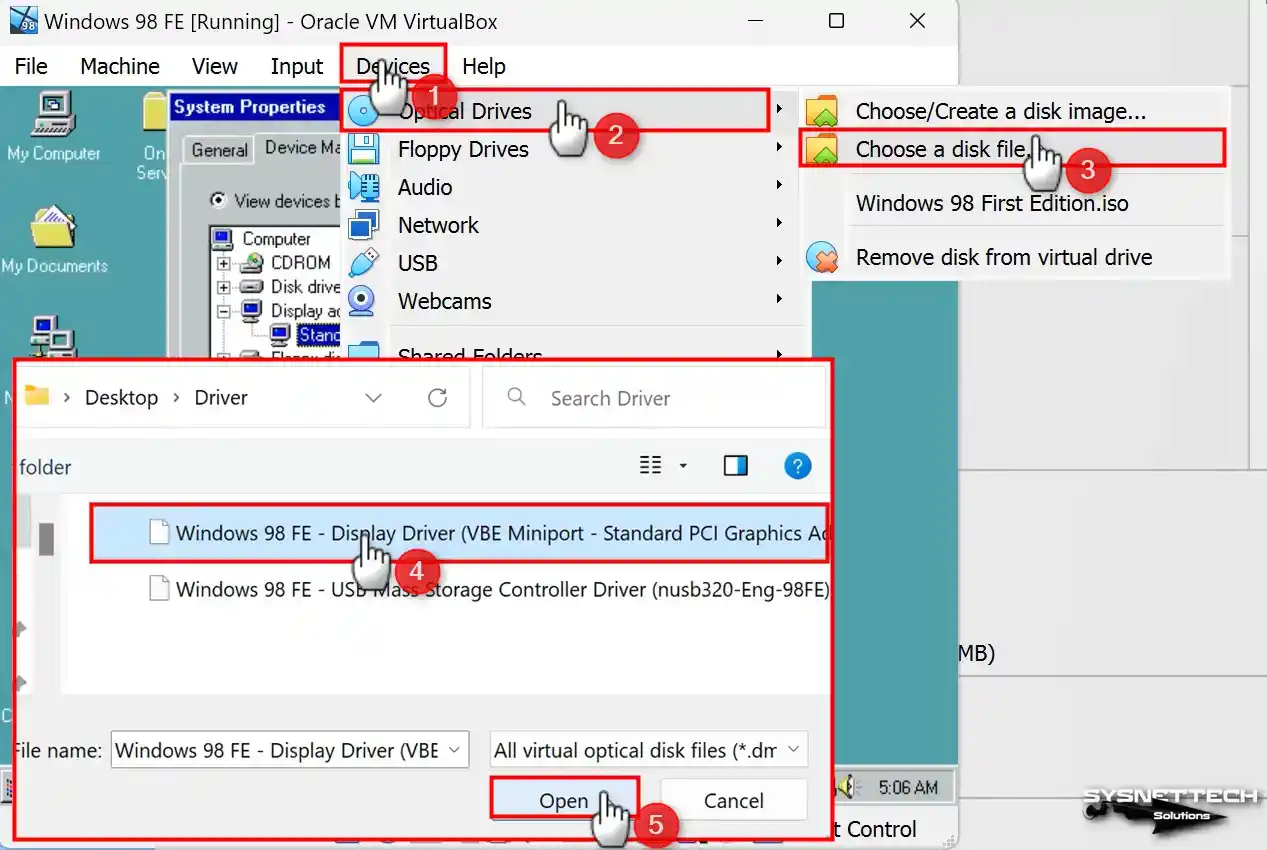
Step 3
First, double-click on “Standard PCI Graphics Adapter (VGA)”. In the window that opens, go to the “Driver” tab. Then click on the Update Driver button. Next, click Next in the driver update wizard.
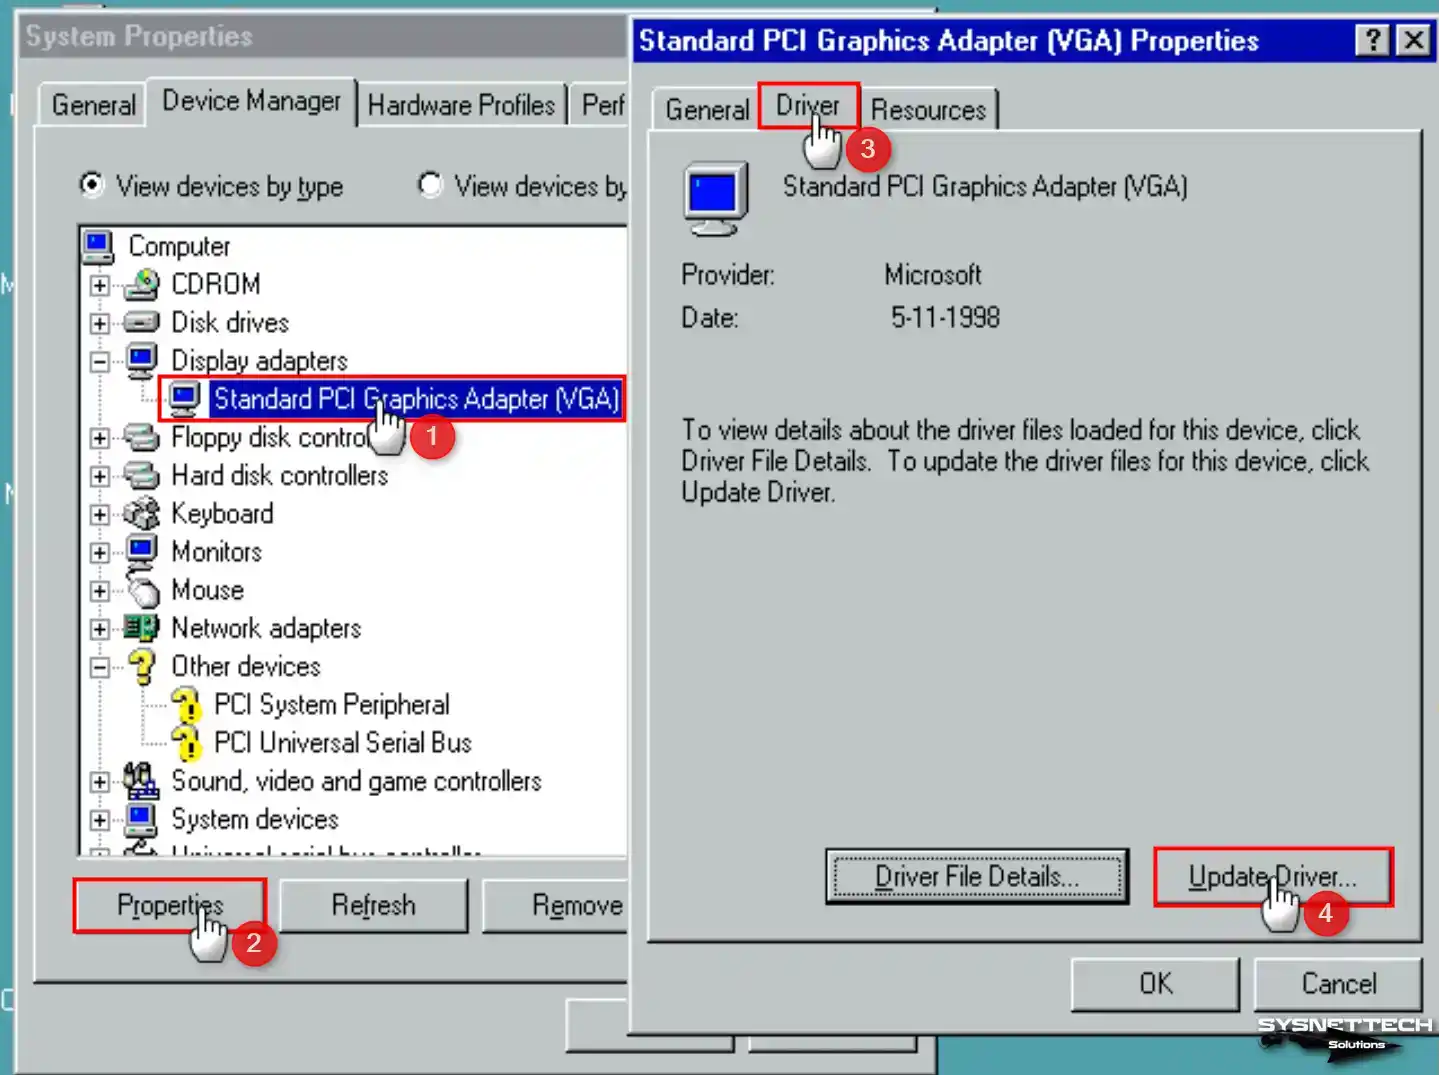
Step 4
Choose the option to show the list of all drivers. Then, proceed to the Update Device Driver Wizard window.
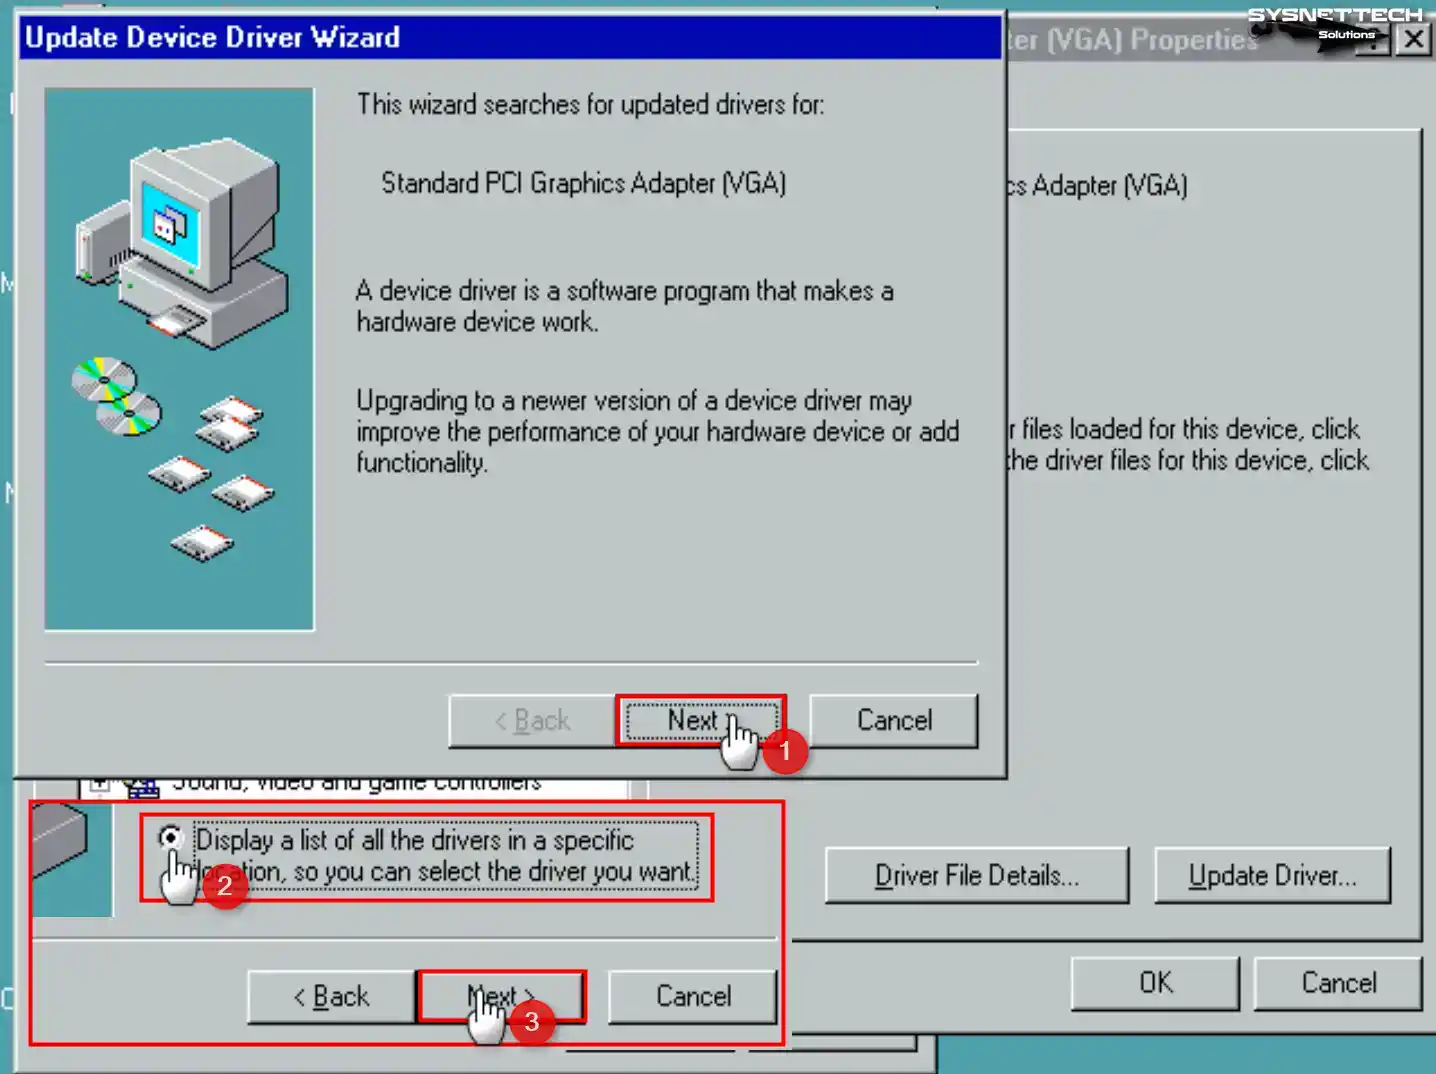
Step 5
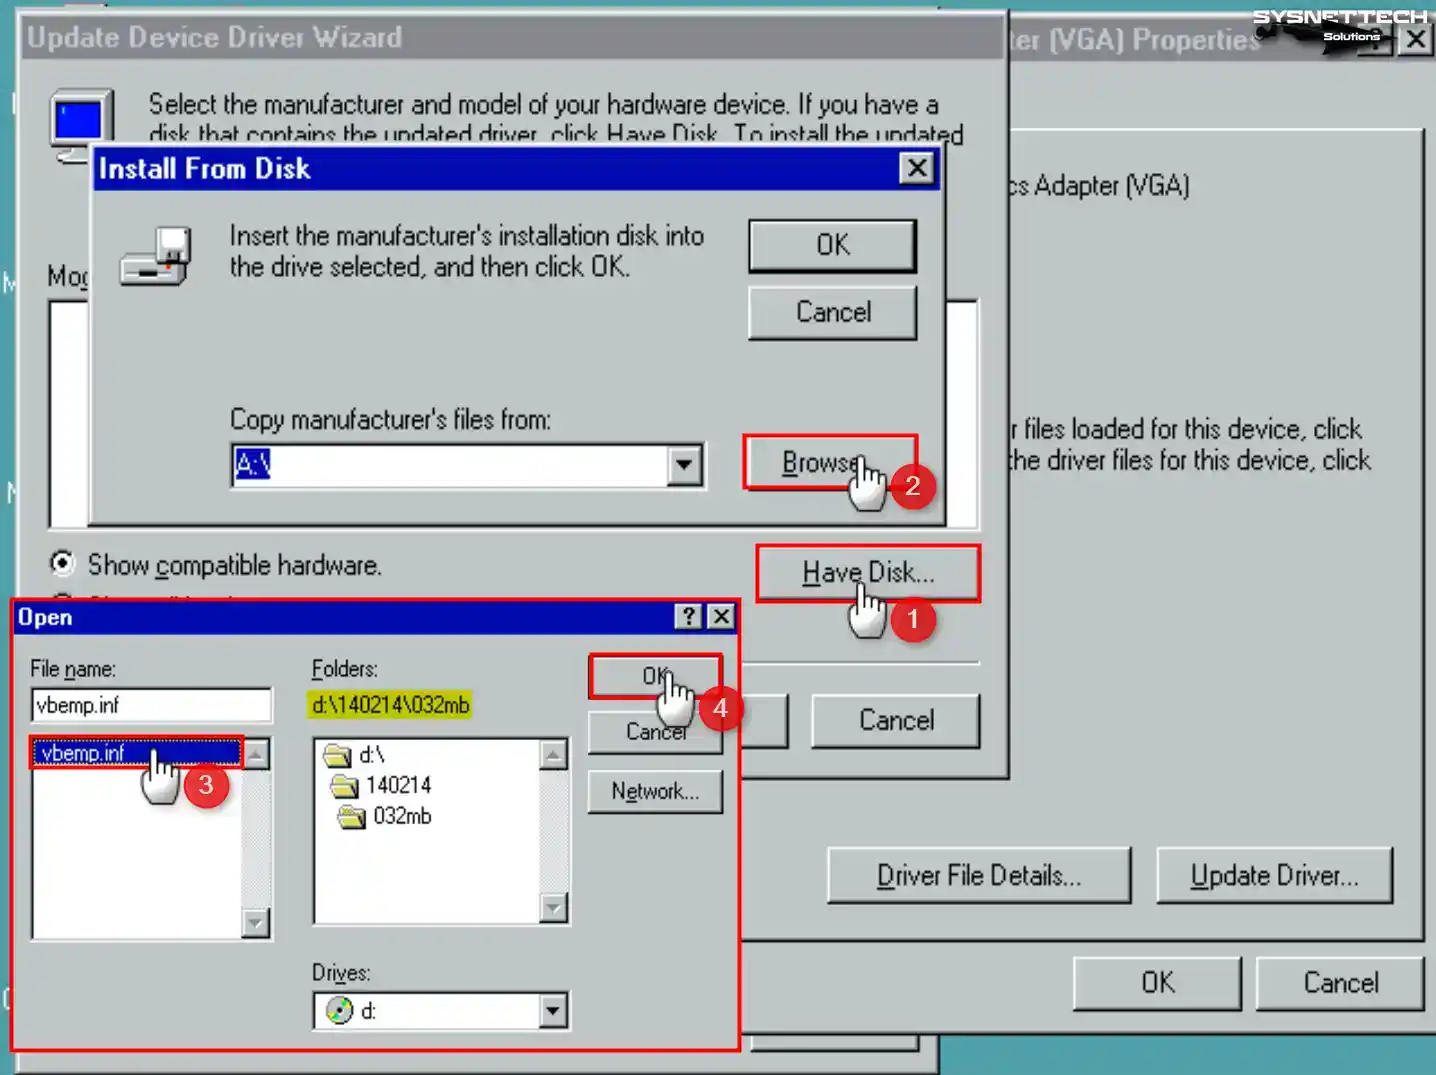
This time, click the Have Disk button in the window that opens. Then select the Browse option. Go to the location of the ISO file to update the driver.
Then locate the “vbemp.inf” file in the “032mb” folder and click OK.
Step 6
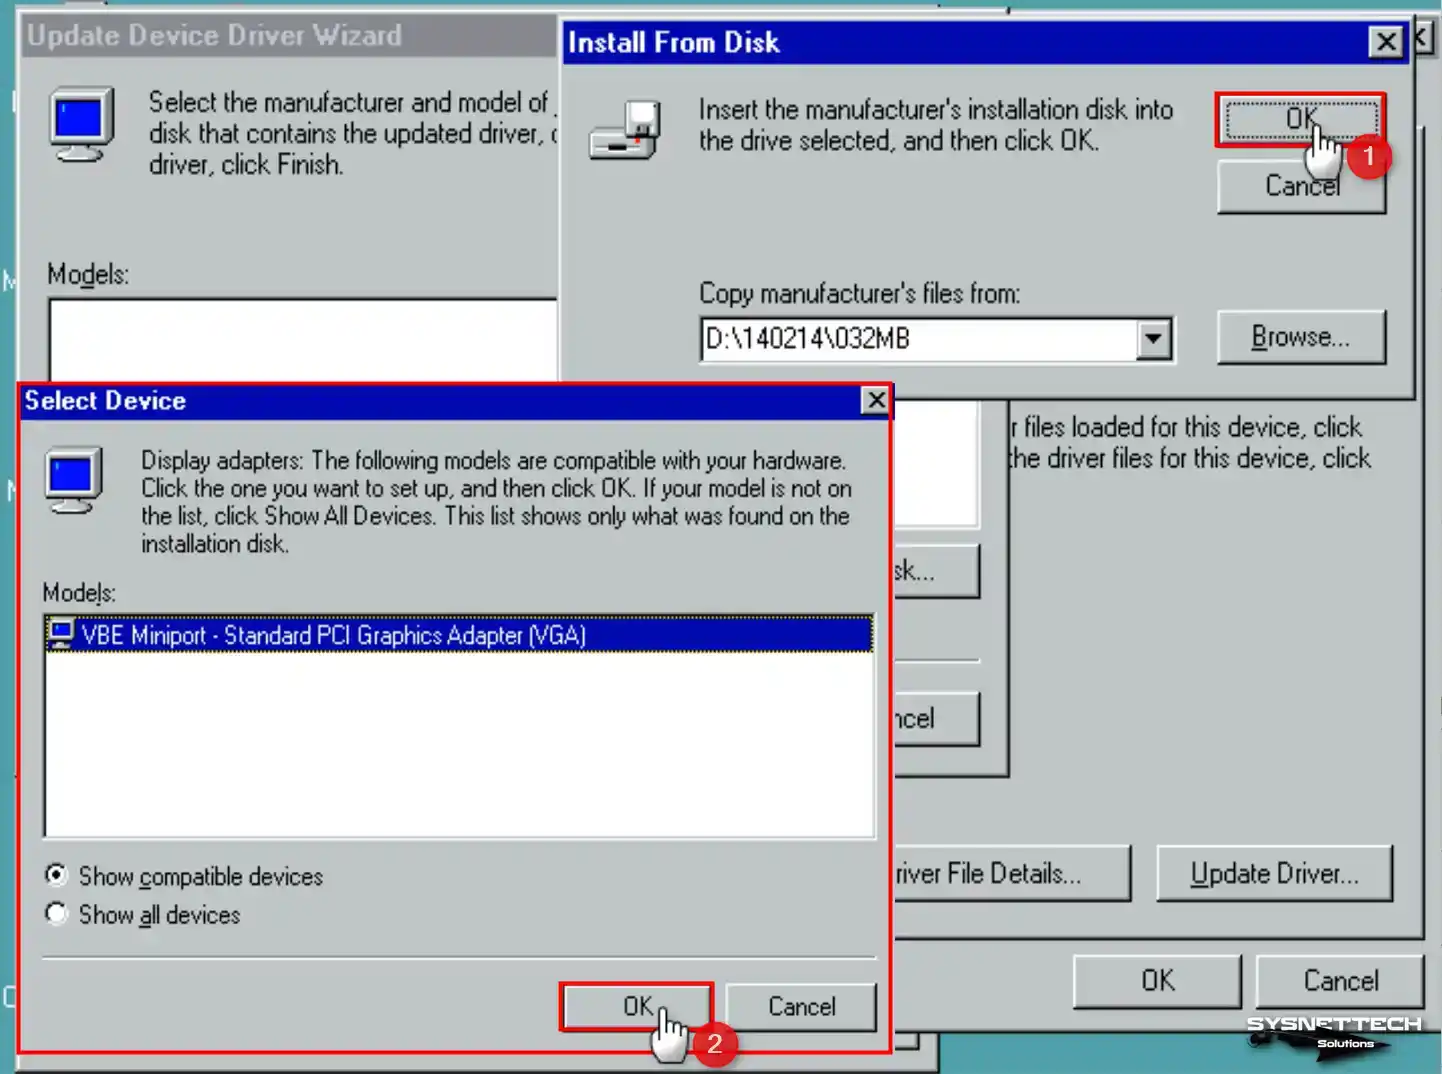
Select VBE Miniport – Standard PCI Graphics Adapter (VGA). Then, keep going by checking the driver’s location.
Step 7
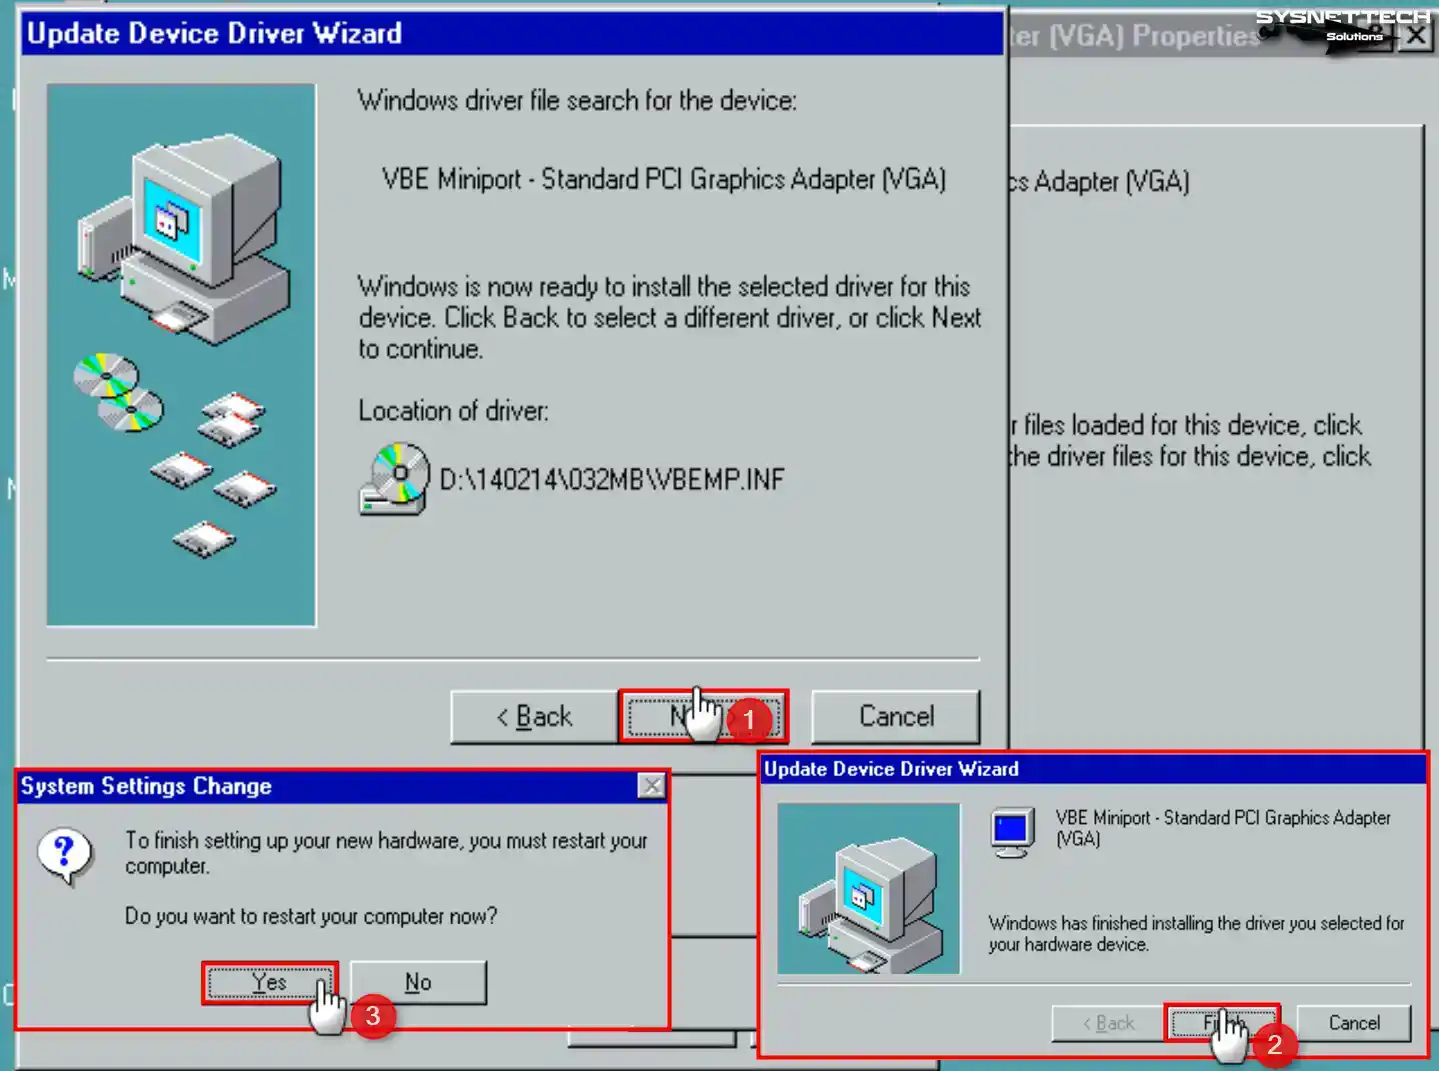
Restart your virtual machine after updating the Win98 screen device.
Step 8
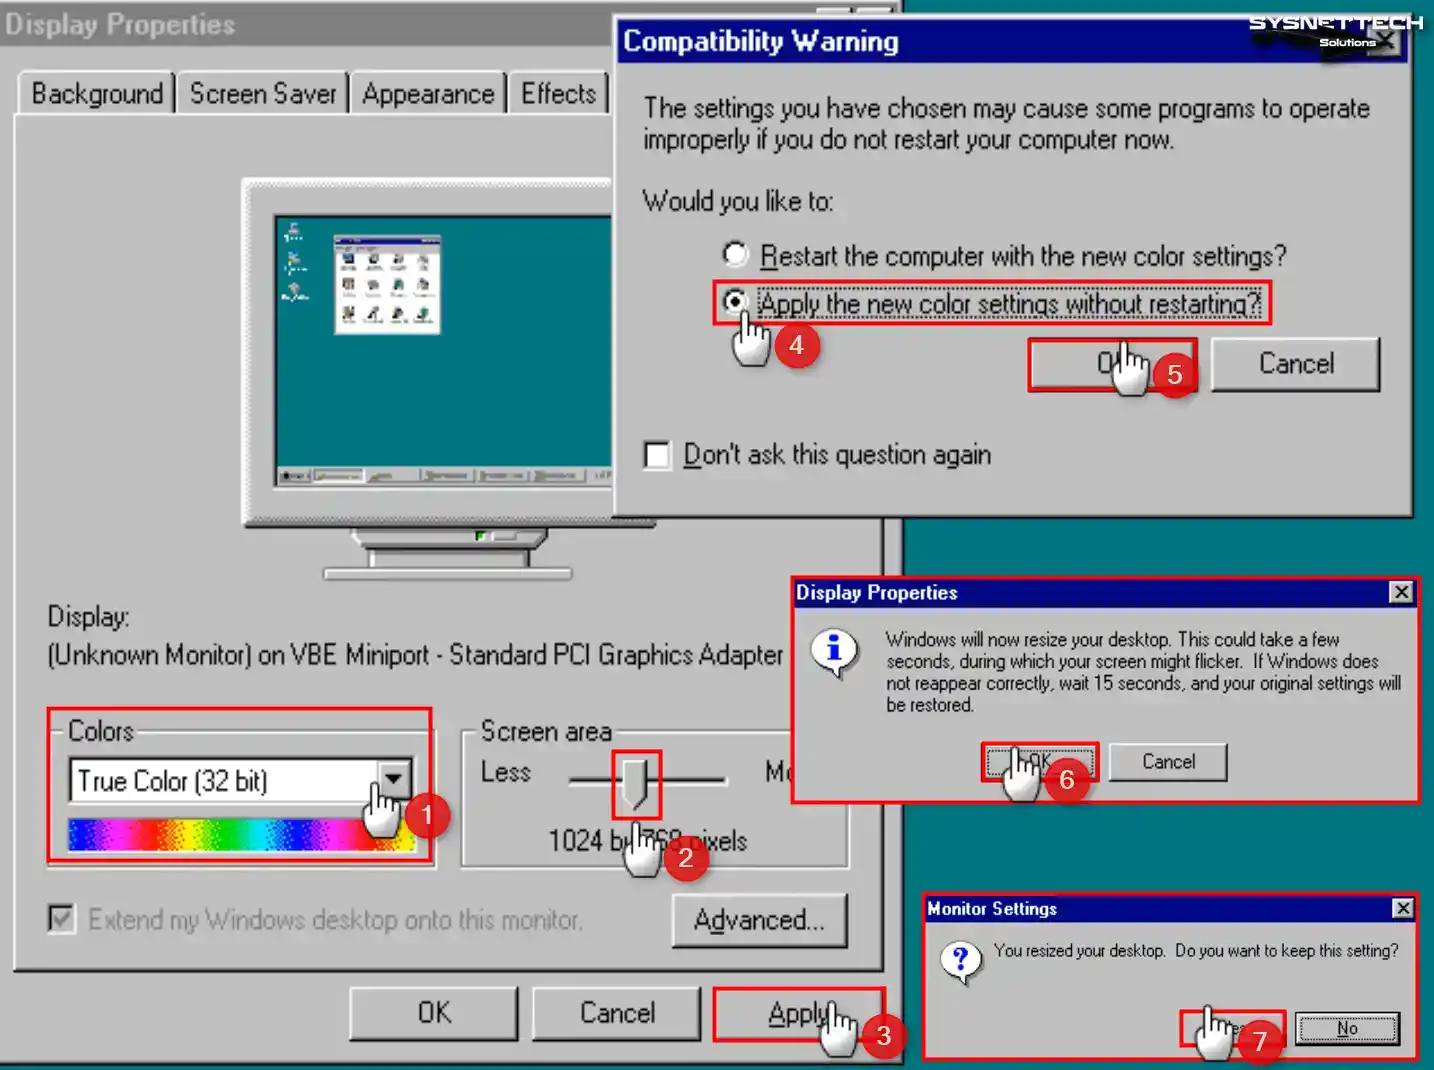
When the system starts up, right-click on the desktop. Open the “Display Properties” option. Select “True Color (32 bit)” from the “Colors” section. Set the resolution to 1024×768. Finally, apply the changes. You do not need to restart your Win98 VM.
2. USB 2.0 Driver Installation
You cannot automatically install USB 2.0 drivers in Win98. So, you must install them by hand to use flash memory. First, download the USB drivers. Then, install them on the virtual machine.
Step 1
Look at the table below the article and find “USB Mass Storage Controller Driver.” Select the “nusb320-Eng-98FE” ISO file and click Open.
Step 2
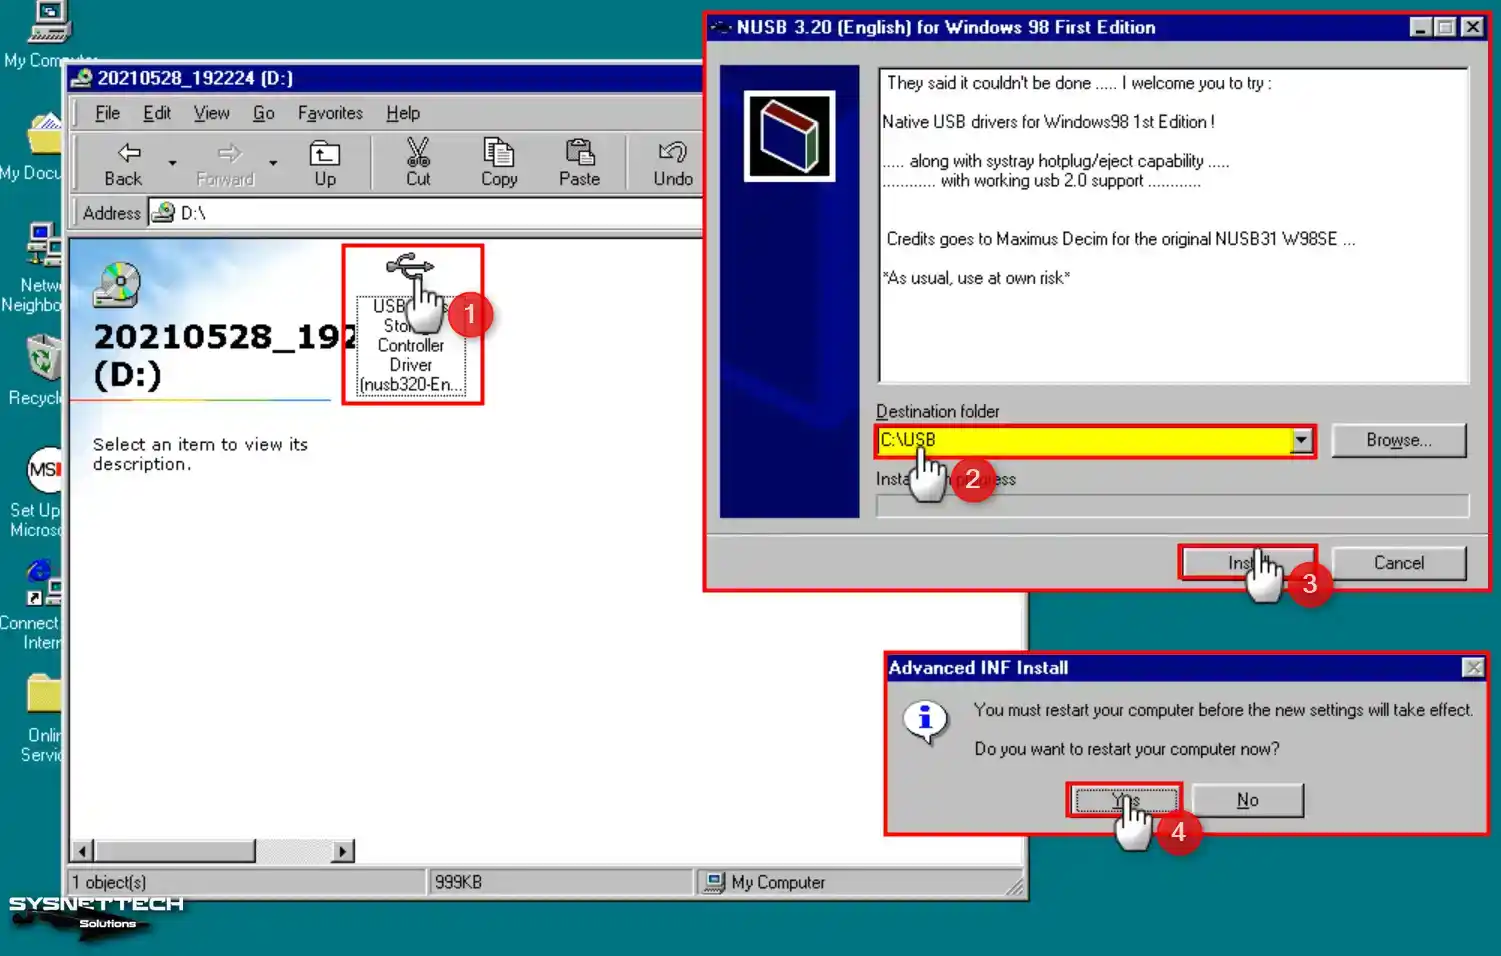
Now, create a new folder called “USB” on your desktop. Then view the contents of the CD. Next, double-click on the USB drive. Finally, extract the file to the “C:\USB” location.
Step 3
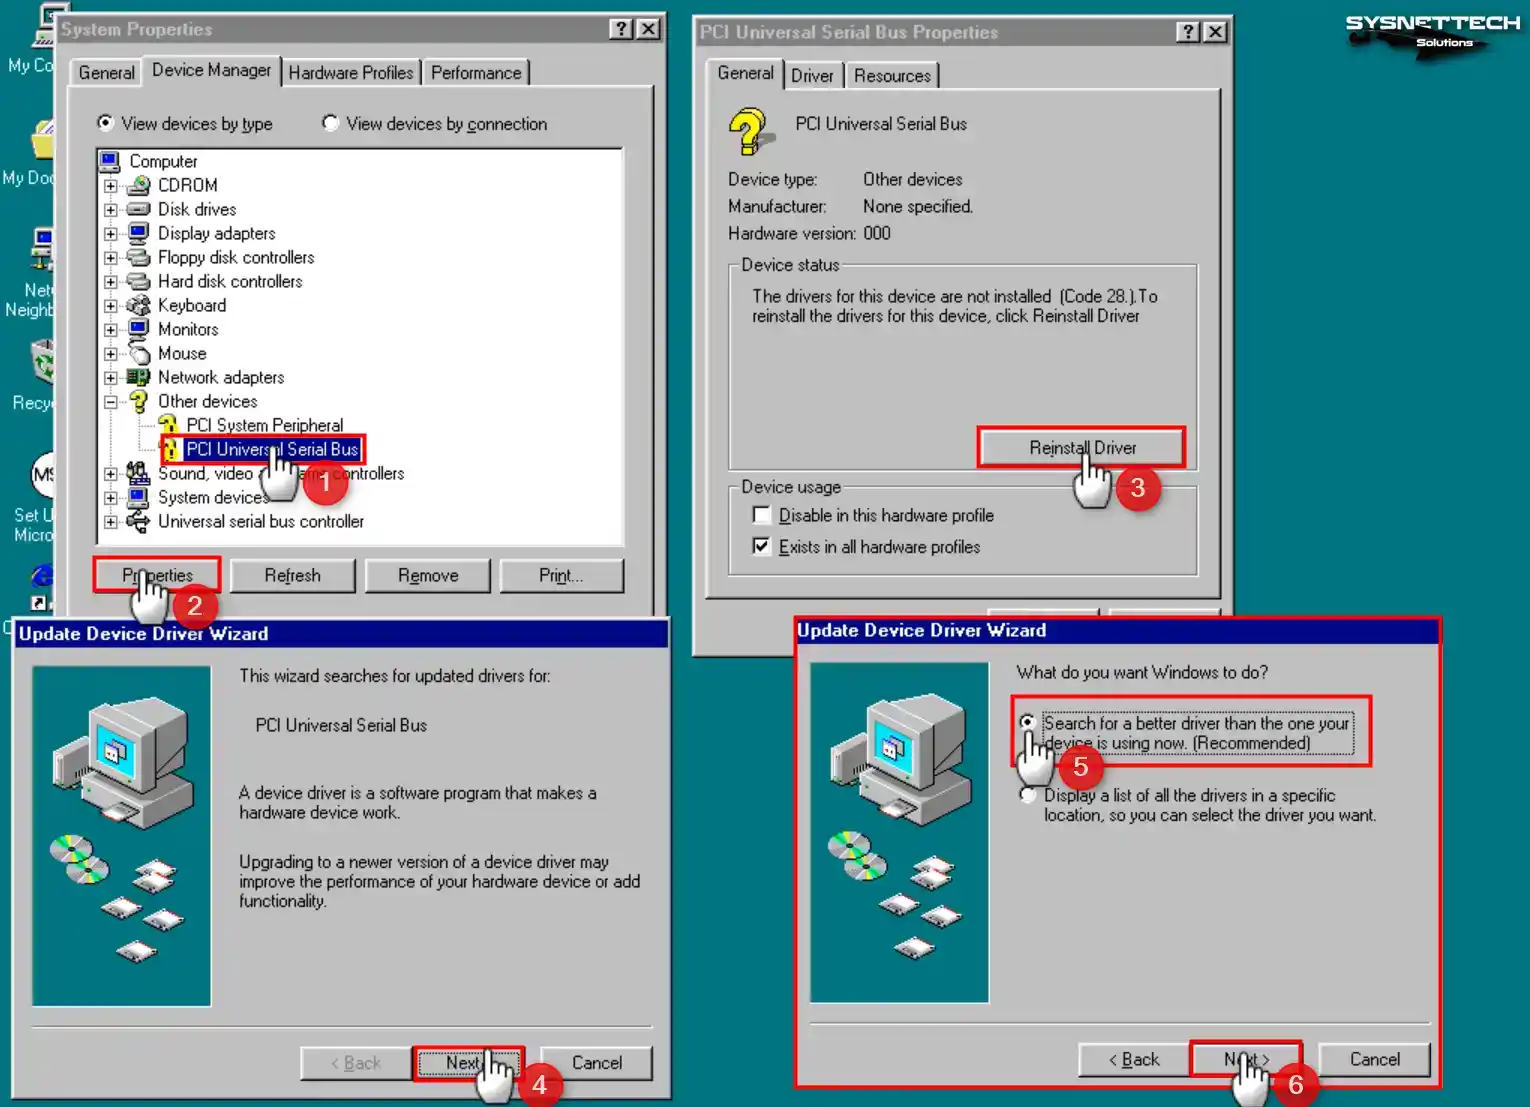
We need to install the driver for the PCI Universal Serial Bus device in Device Manager. To do this, click Reinstall Driver and then click Next in the next window.
Step 4
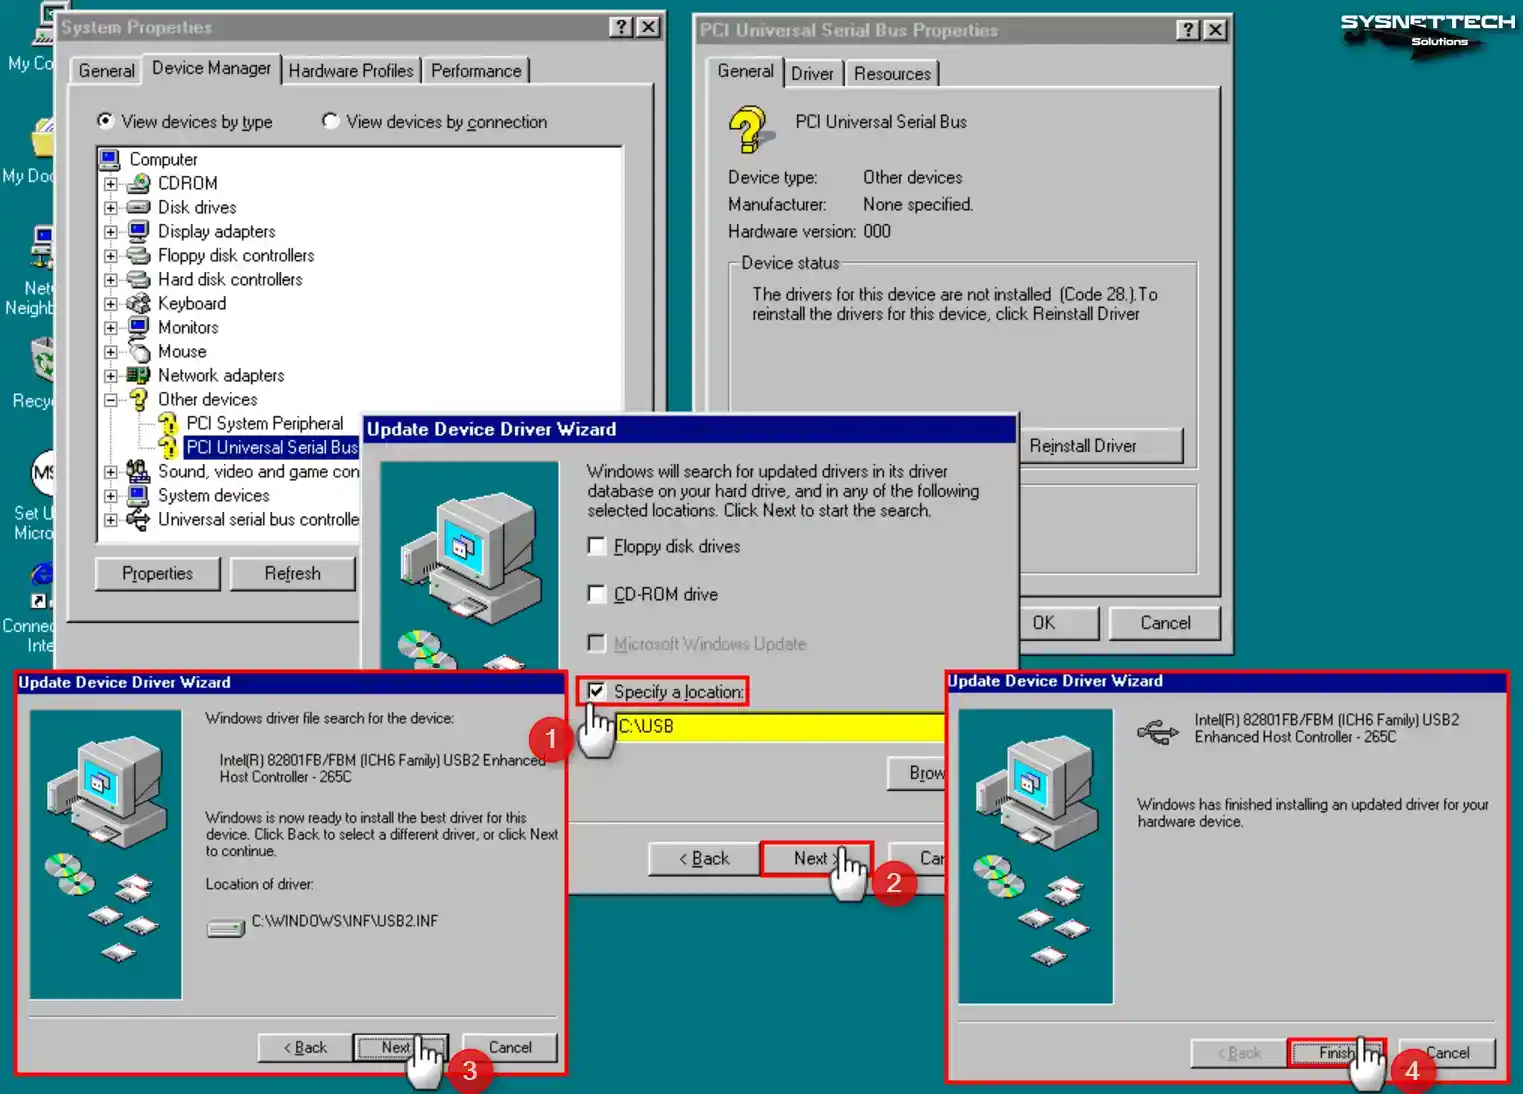
If you put your driver files into folders, you must choose their location. First, pick the Specify a location option. Then click the Browse button. Choose the USB folder location. Finally, install the driver.
Step 5
First, plug your flash drive into your computer’s USB 2.0 port. Then format the drive as FAT32. Finally, create a folder inside it called “Backup.”
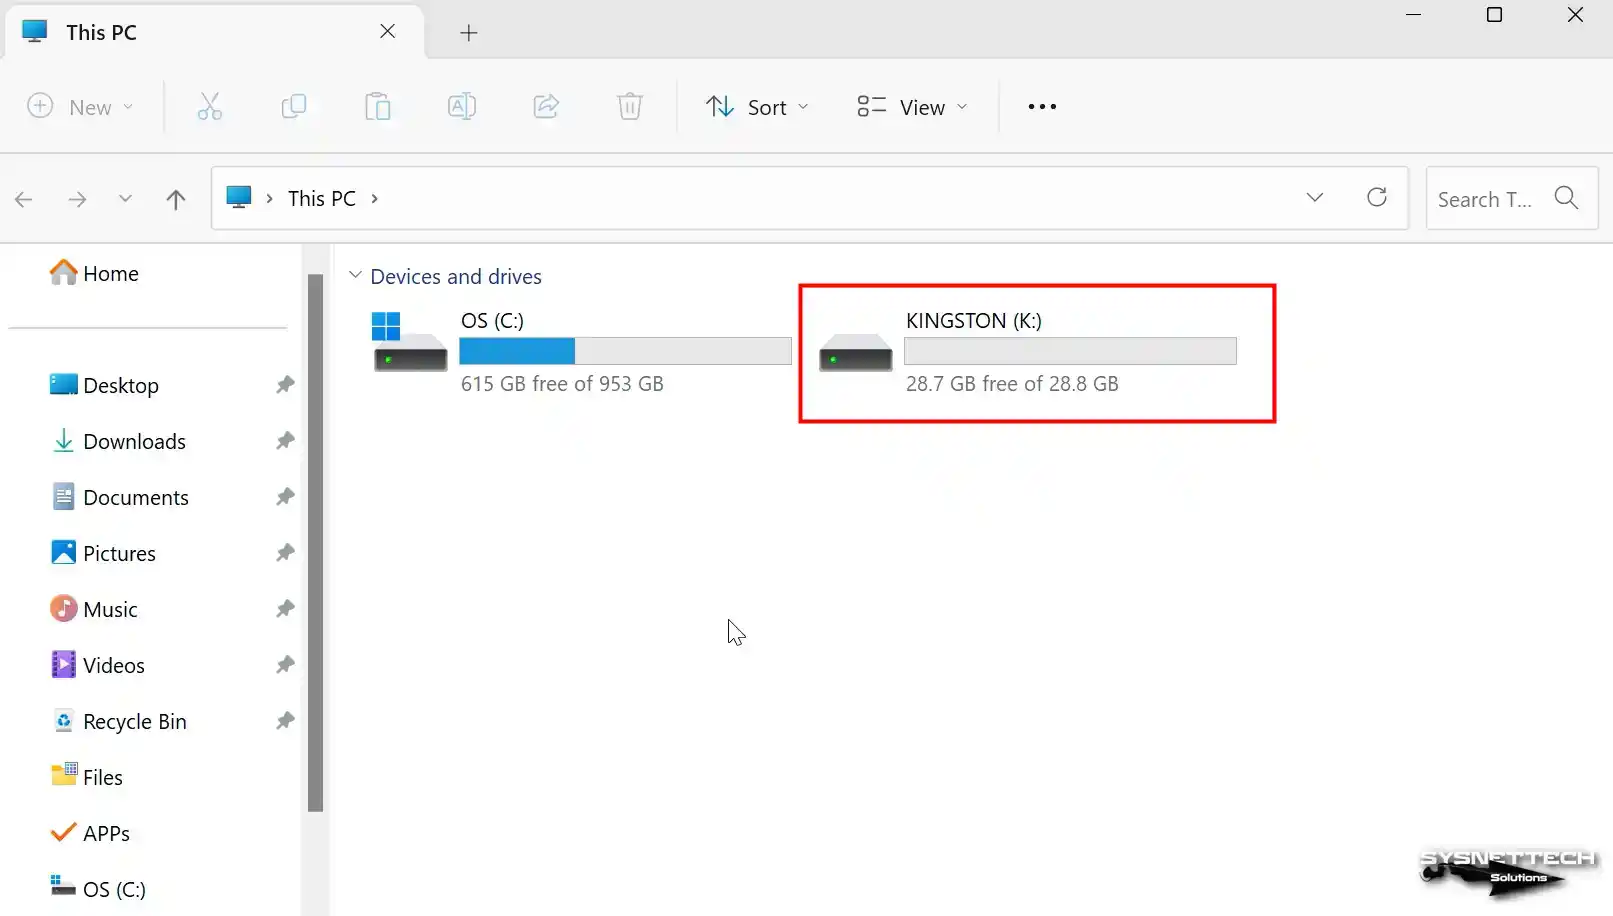
Step 6
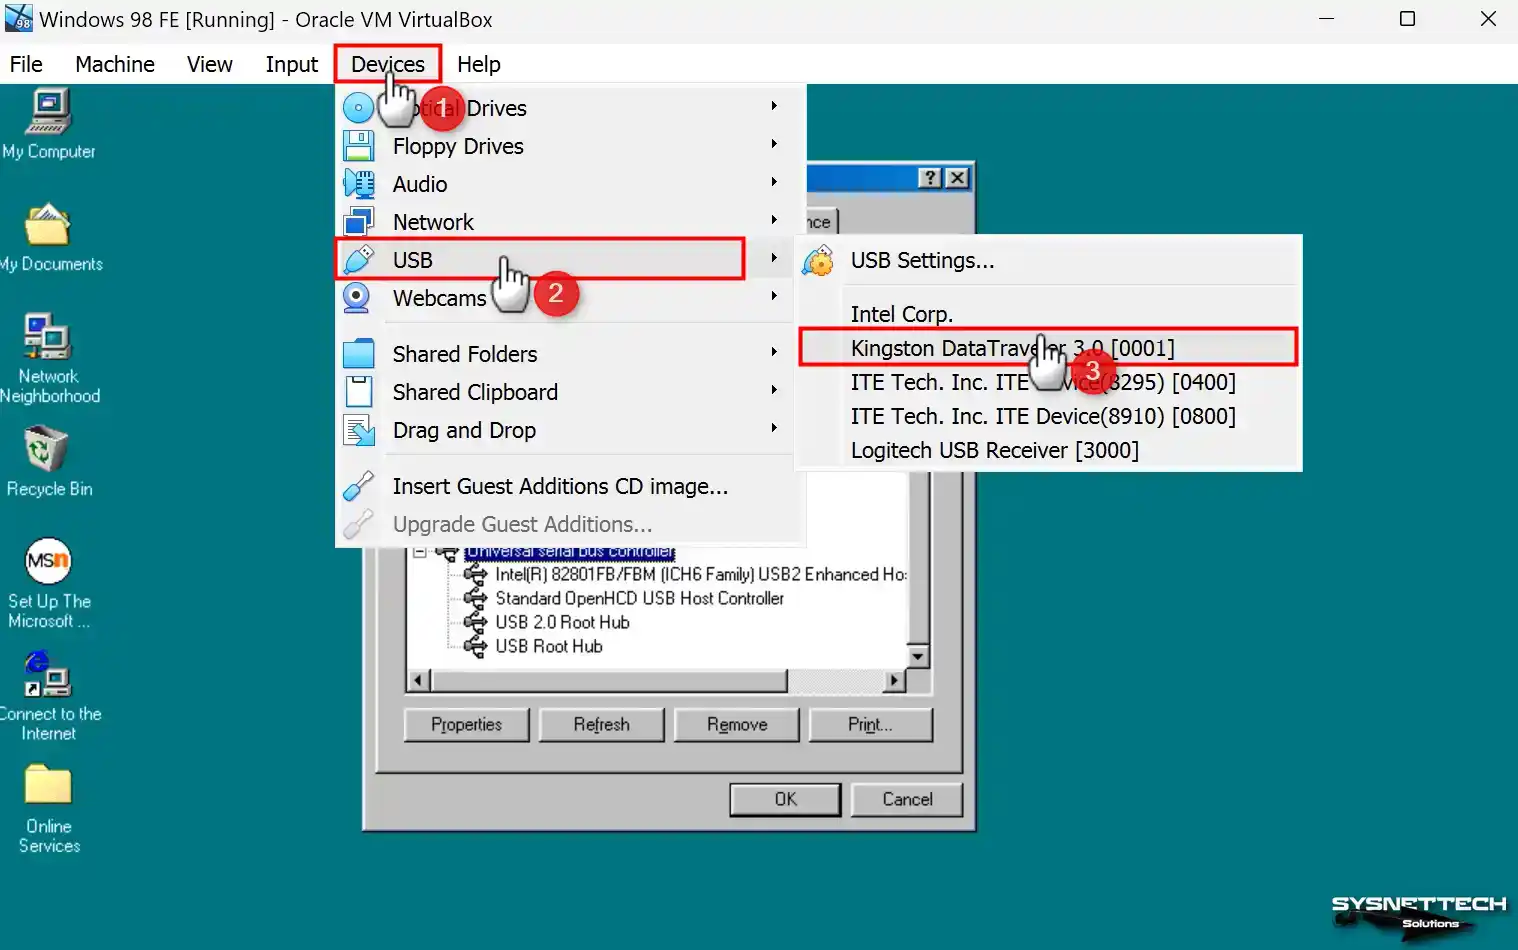
Go to the Devices menu on the guest machine. Then click on the USB option. Finally, select Kingston DataTraveler or the name of your device. This will connect your USB flash drive.
Step 7
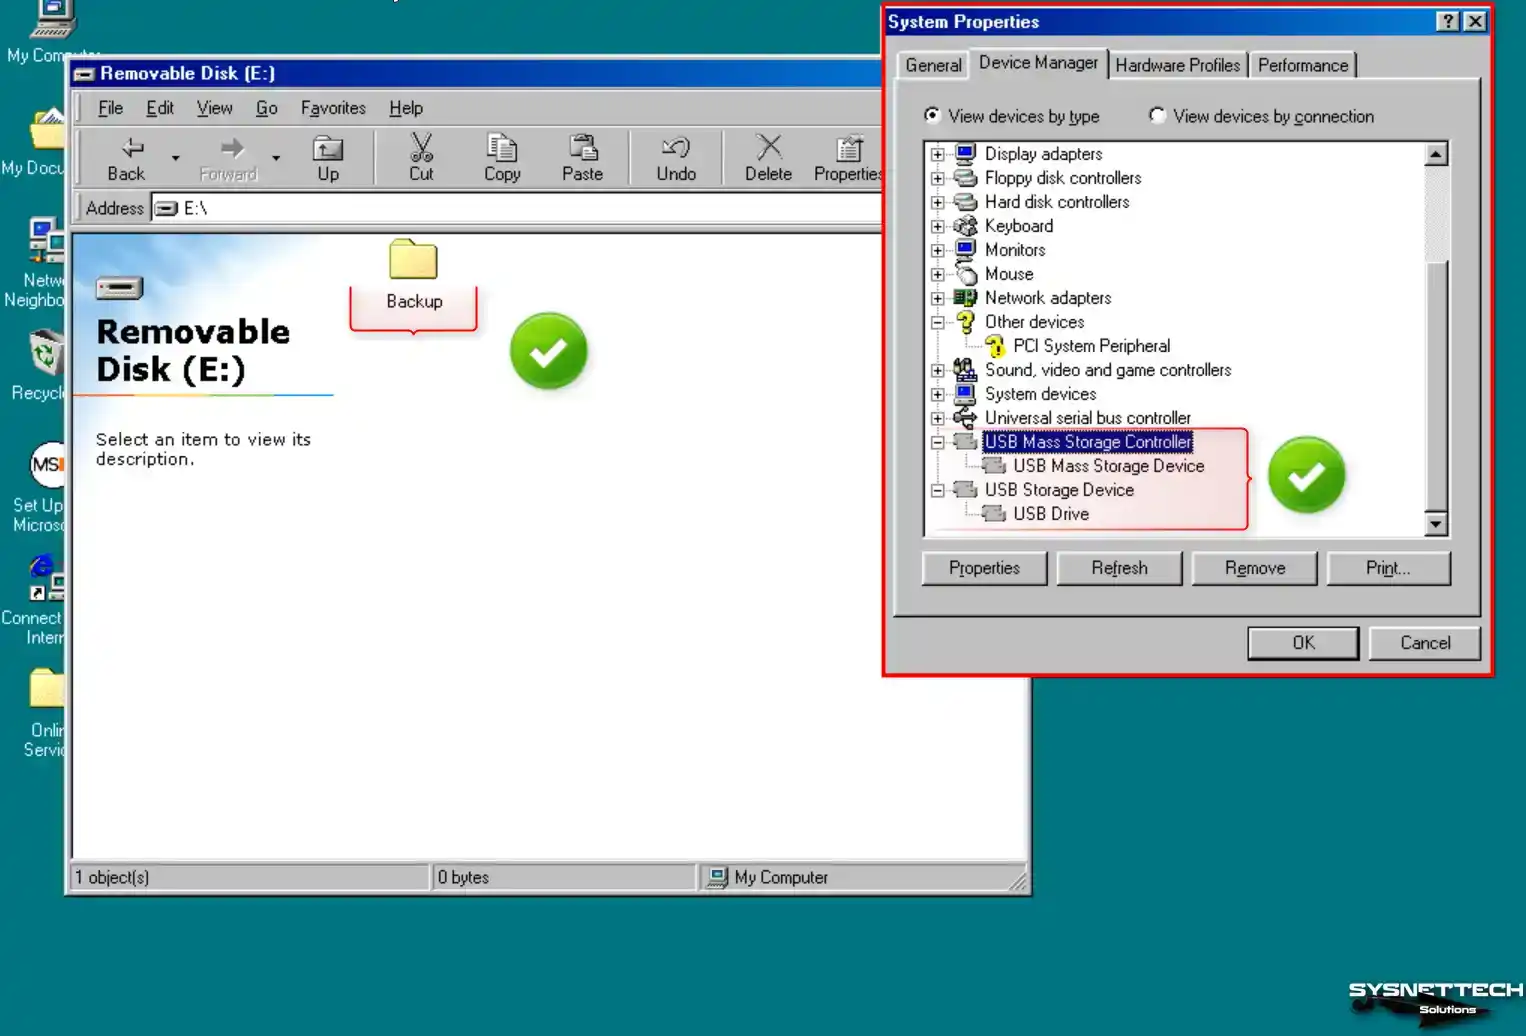
First, go to My Computer. Or, open Device Manager. Then check that your USB flash drive works properly.
3. PCI System Peripheral Driver Installation
VBox does not fully support Windows 98. Therefore, you may not be able to install some drivers. But most devices will work with no problems. You can use your system normally and without any issues.
Step 1
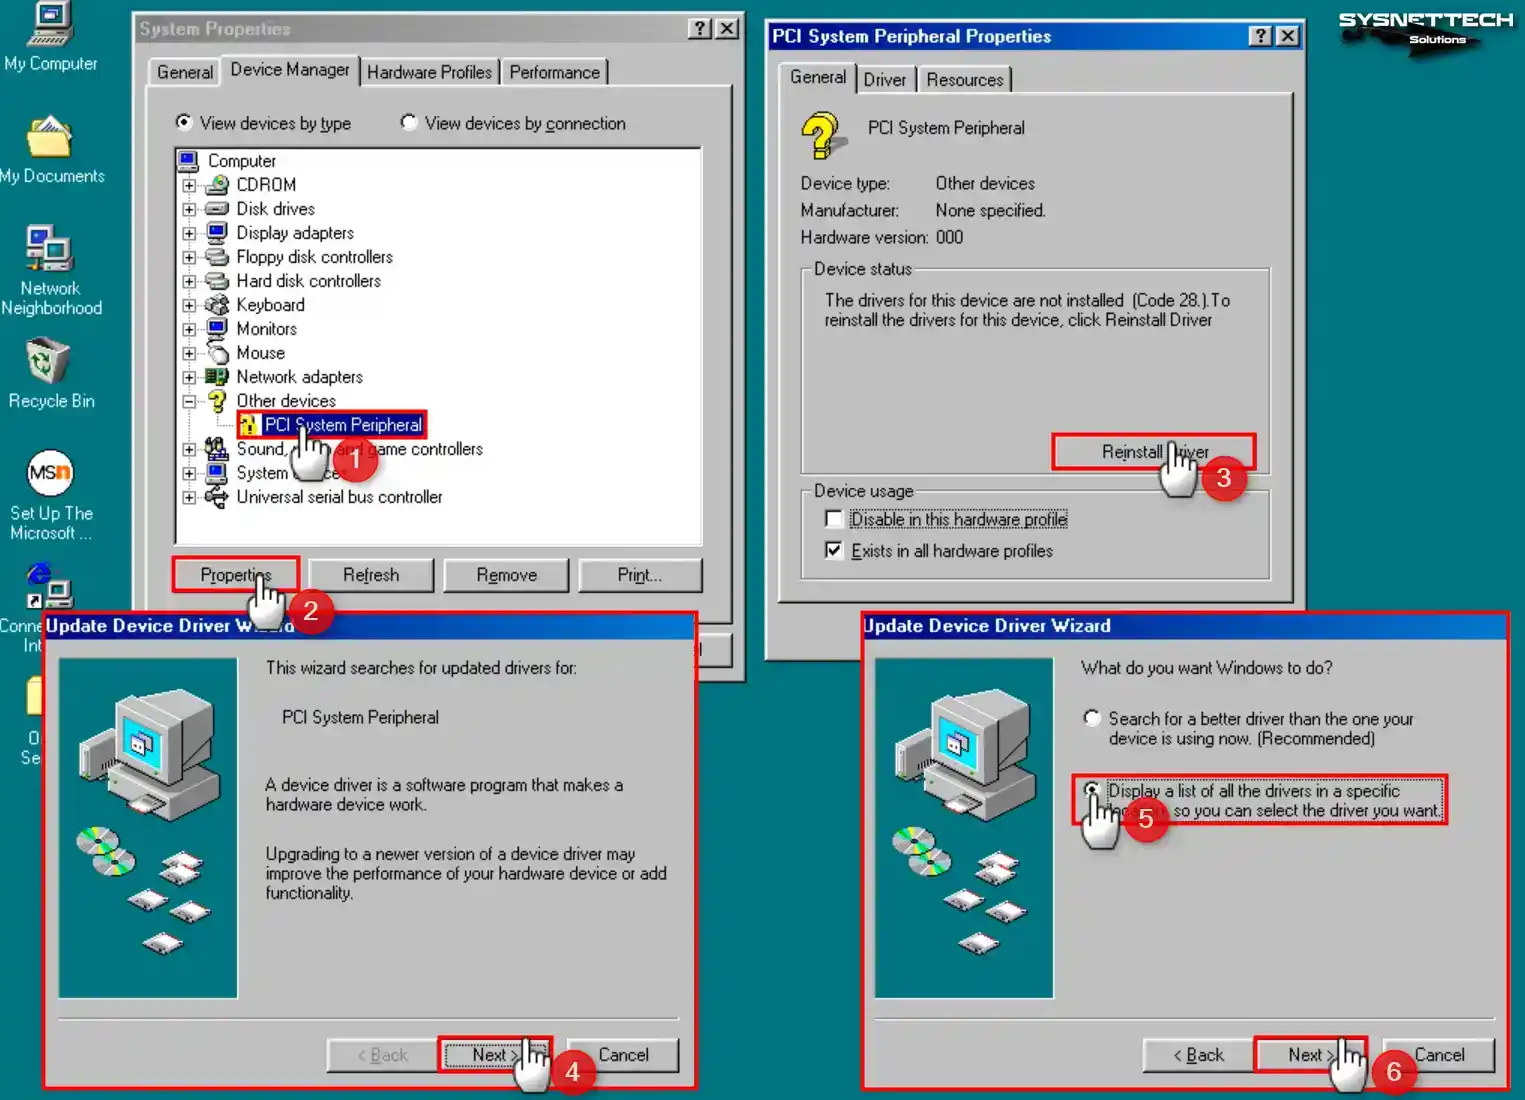
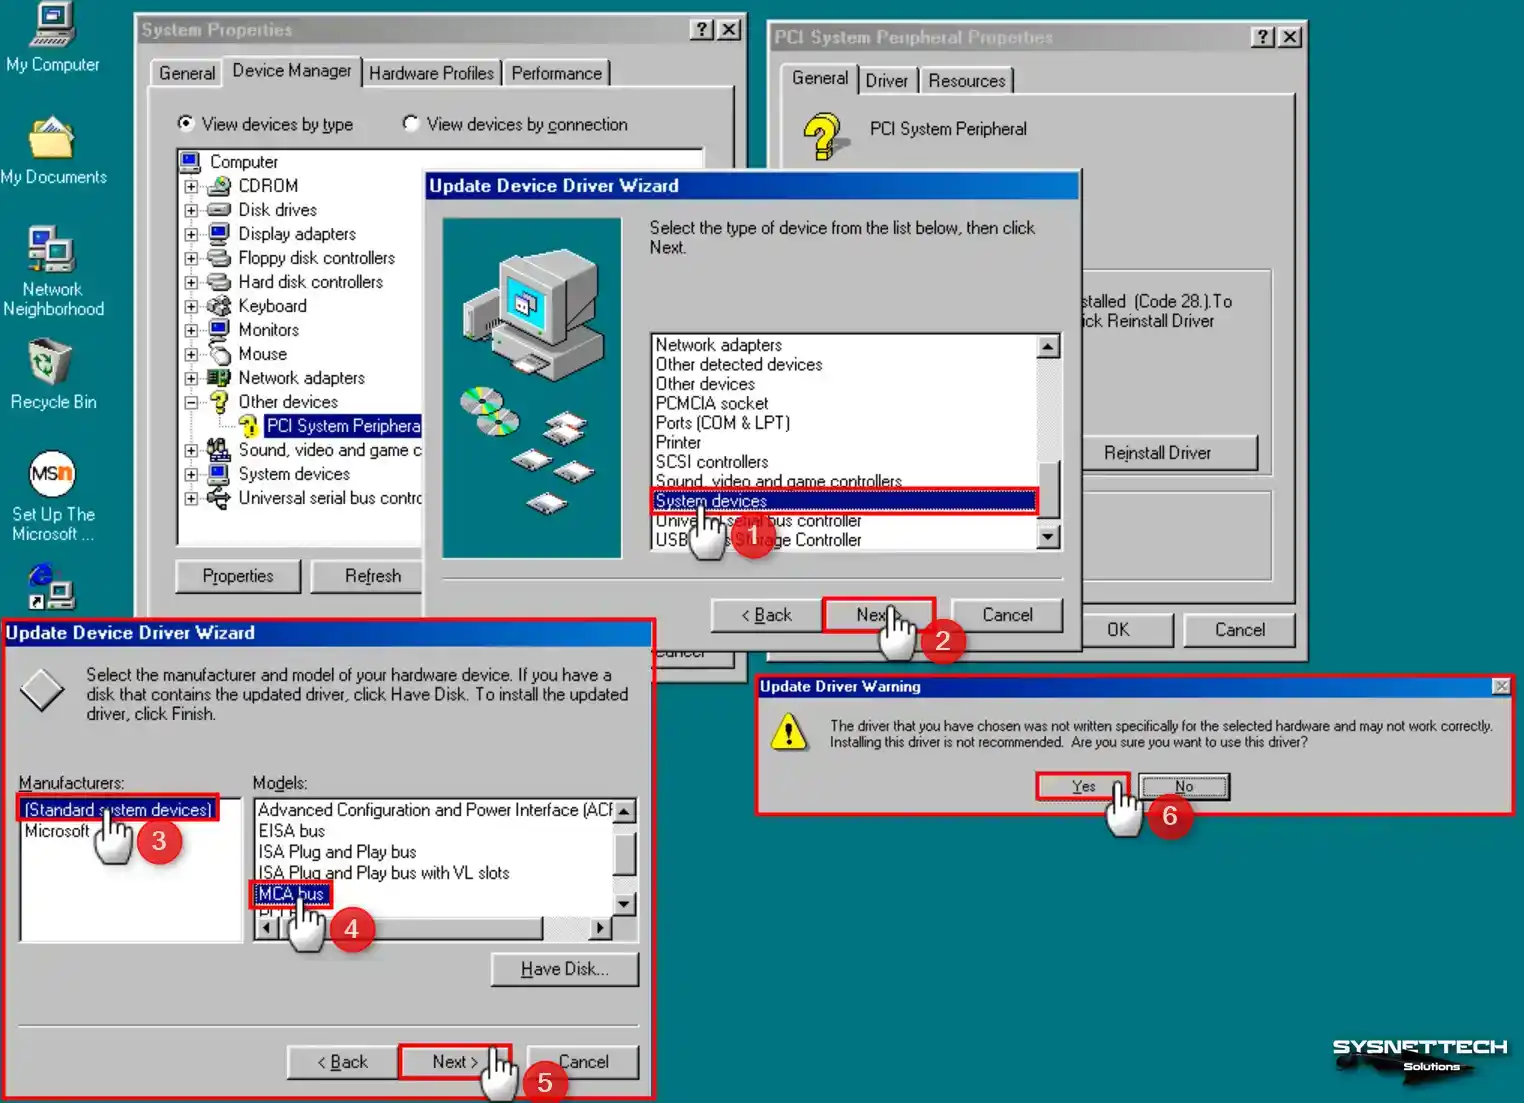
To install the PCI System Peripheral driver, first go to Properties. Then click the Reinstall Driver button.
Next, click Next and select the “View all drivers” option. Finally, complete the Win98 VM driver installation.
Step 2
Pick System Devices from the driver list. Then go to the Manufacturers section. Here, choose “Standard System Devices” and “MCA Bus”. Finally, confirm the driver install.
Step 3
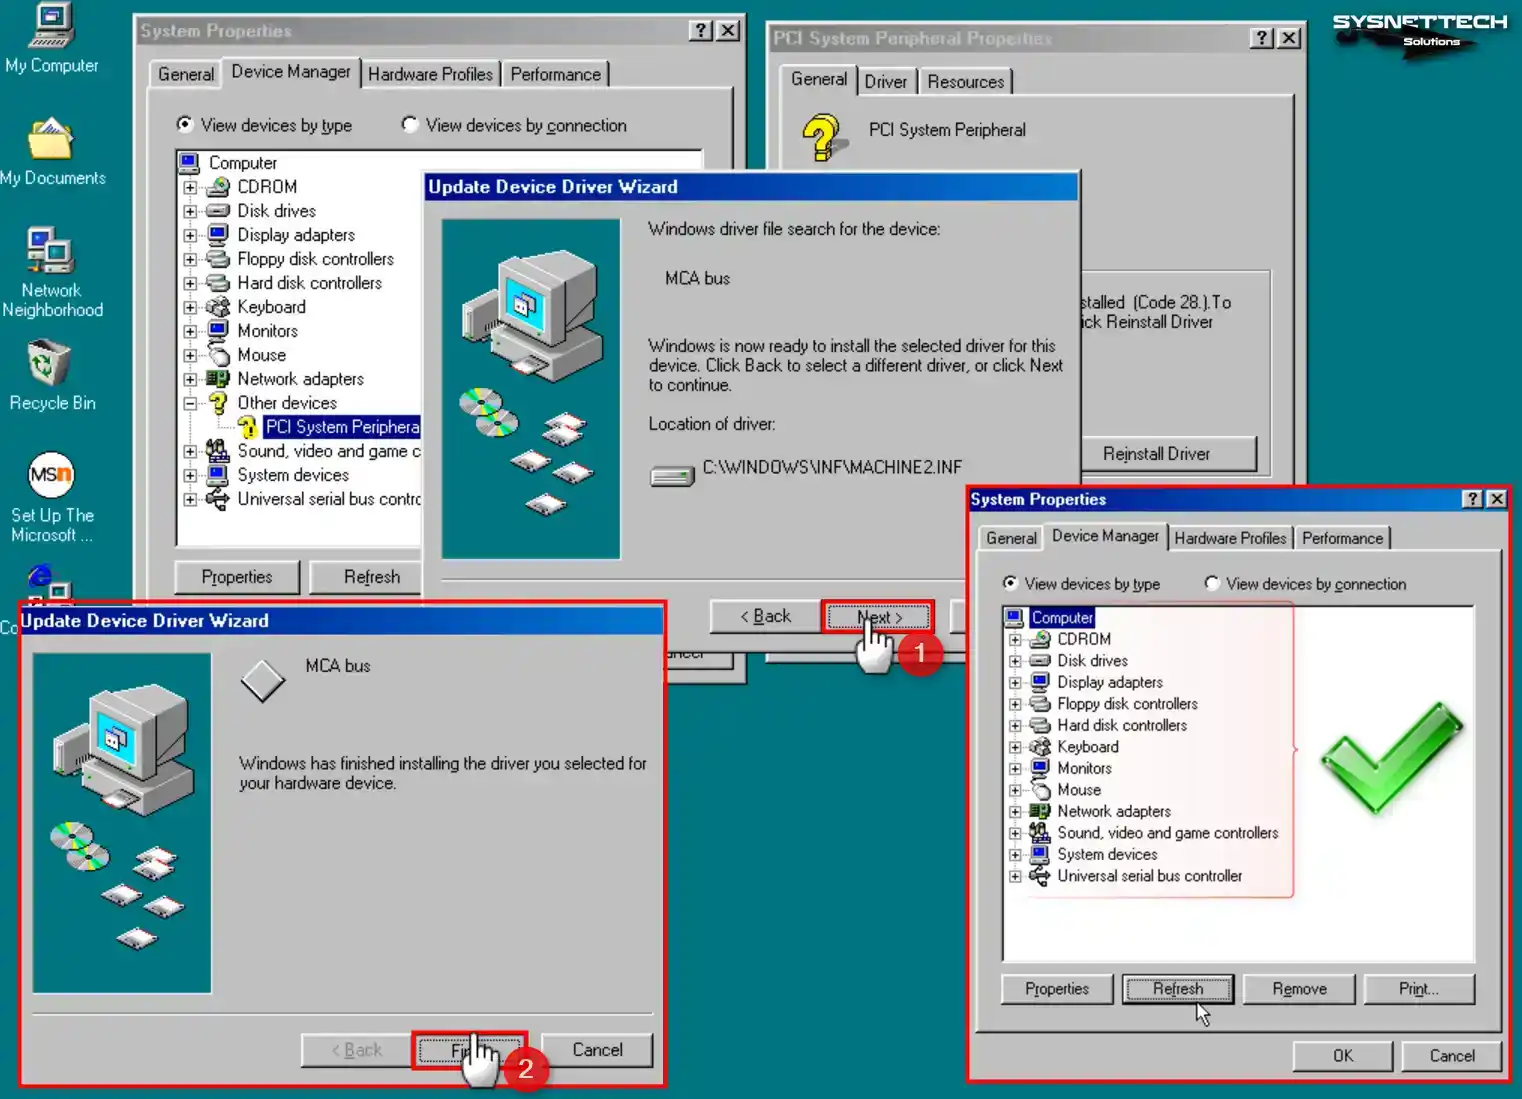
Click the Refresh button in Device Manager. This will search for drivers not installed. Finally, you will see that all drivers are installed successfully.
Configuring and Testing Internet Connectivity in Windows 98 VM
Network settings are automatic in Oracle VM VirtualBox. So, you can easily connect all guest machines you create to the Internet. In short, you don’t need to do any extra settings.
Step 1
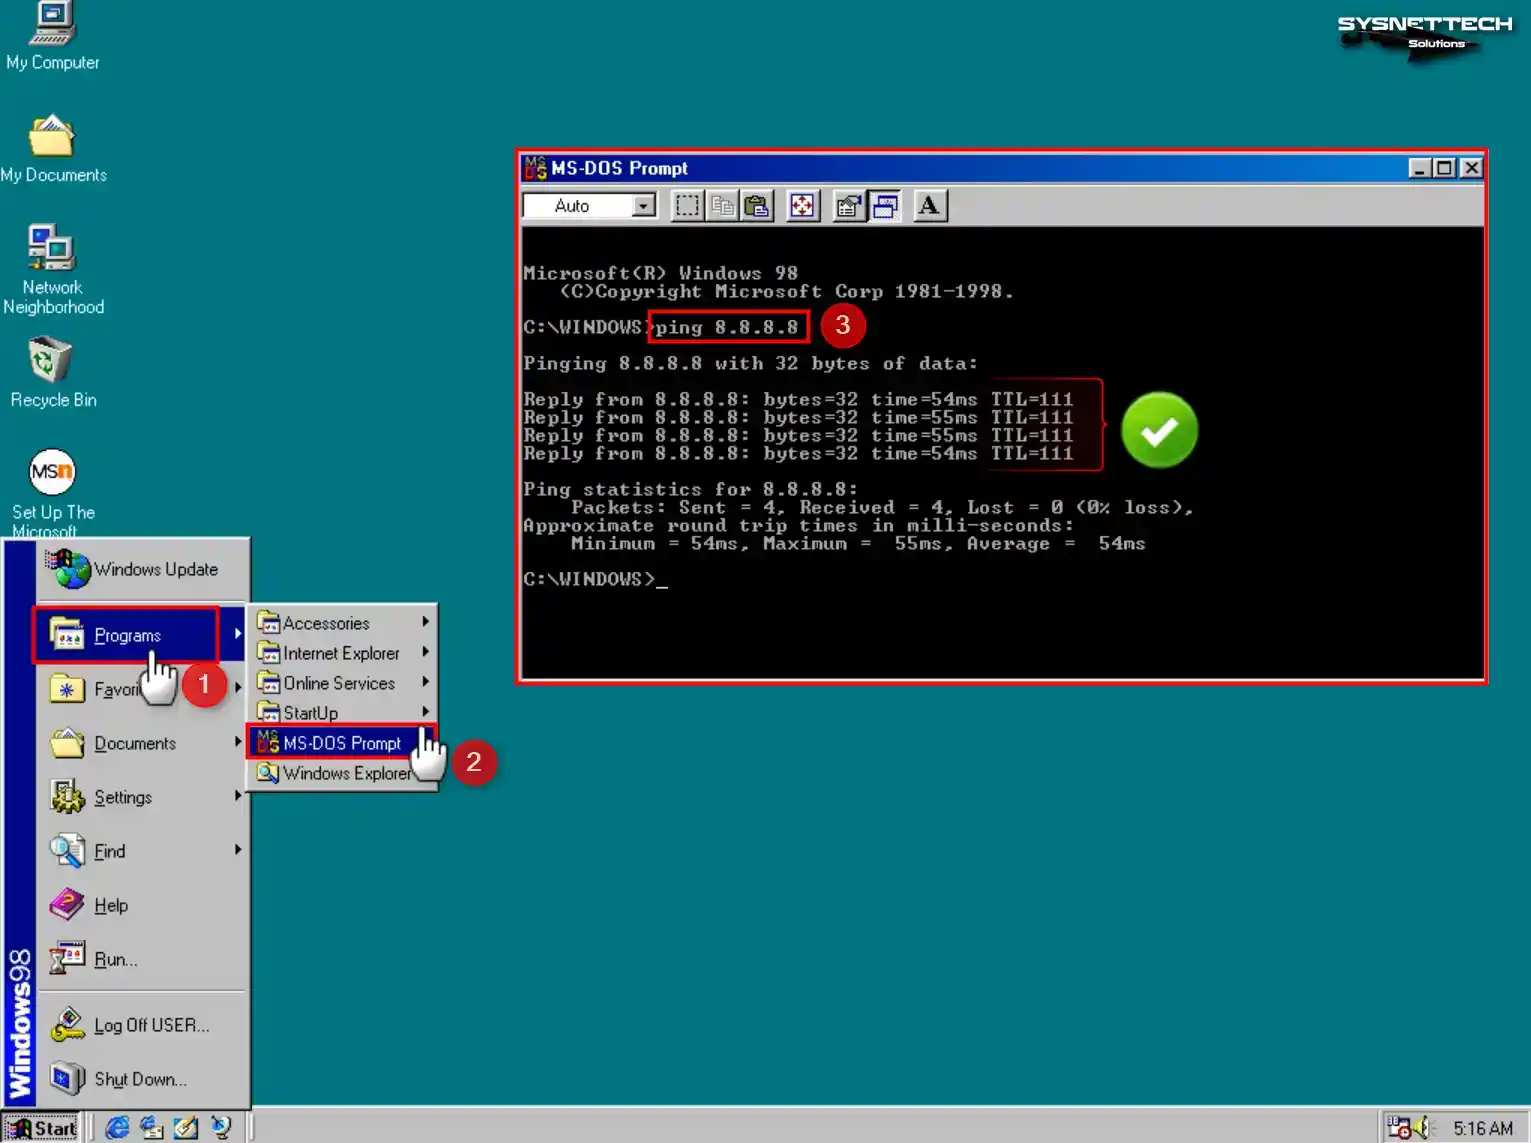
Open Start / Programs / MS-DOS Prompt. To check if your Internet’s working, ping Google’s servers with ping 8.8.8.8.
Step 2
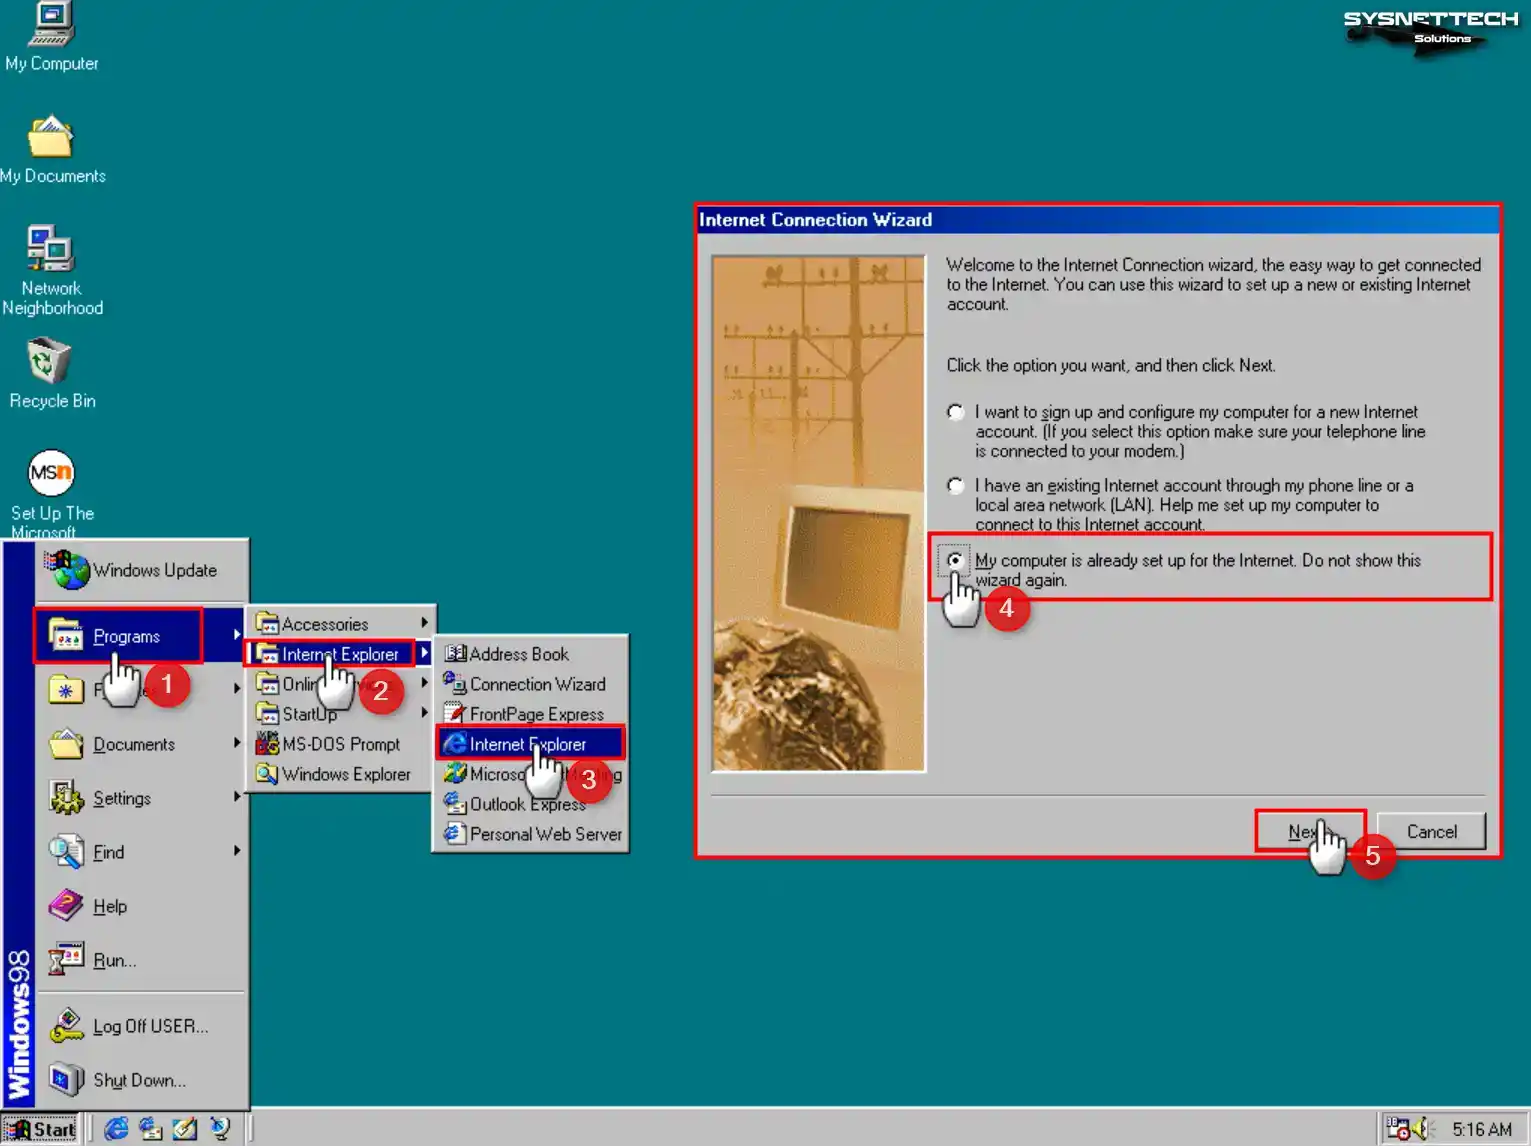
Go to Programs from the Start menu. Open Internet Explorer. Pick the first option in the Connection Wizard that shows. Check the box that says My computer is already set up for the Internet.
Step 3
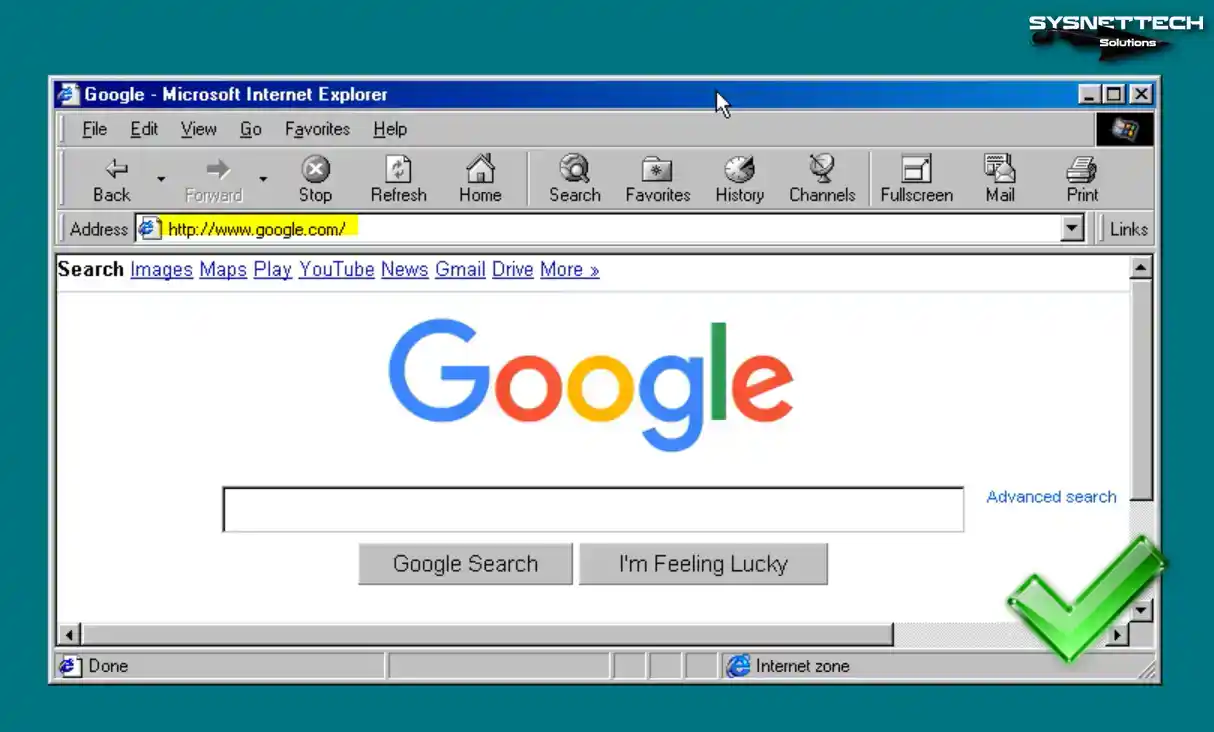
Now Internet Explorer will open by itself. Go to Google right away. Thus, this lets you easily test your Internet connection.
Video 1
Video 2
Installing Older Versions
| VirtualBox Version | YouTube Video | Slide |
|---|---|---|
| 5 | Watch | View |
| 6 | Watch 1, Watch 2 | View |
| 7 (NEW) | Watch 1, Watch 2 | – |
Windows 98 FE (First Edition) Driver Download
| Drivers | Links |
|---|---|
| Windows 98 FE (First Edition) ISO | Download |
| Display Driver (VBE Miniport – Standard PCI Graphics Adapter VGA) | Download |
| USB Mass Storage Controller Driver (nusb320-Eng-98FE) | Download |
| Windows 98 FE Fix CPU – Floppy Boot – (patcher9x-0.5-boot.ima) | Download |
Windows 98 SE (Second Edition) Driver Download
| Drivers | Links |
|---|---|
| Windows 98 SE (Second Edition) ISO | Download |
| Display Driver (VBE Miniport – Standard PCI Graphics Adapter VGA) | Download |
| USB Mass Storage Controller Driver (nusb36e-2694) | Download |
| Windows 98 SE Fix CPU – Floppy Boot – (patcher9x-0.5-boot.ima) | Download |
Frequently Asked Questions (FAQ)
- Can I install Windows 98 on the latest version of VirtualBox?
- How do I create a new virtual machine for Win98?
- What kind of disk image do I need for installation?
- What steps should I follow to install Windows 98?
- Can I save my Windows 98 VM state?
- What can I do about performance issues?
Conclusion
In short, you can run Windows 98 easily with Oracle VM VirtualBox 7. You can install both the FE and SE versions. This lets you try older Windows systems in a virtual space.
Now you can easily use your old operating systems. Since it works well with your new computer, you don’t need your old hardware anymore. You can easily enjoy that old feeling.
You can install Win98 on modern Windows 10 & 11 OS by following all the steps I have summarized in this article.
With tools like VirtualBox, you can use old and new systems together. You can try both new and old operating systems. In short, we like the ease of this flexibility given by VMs!
You can also install Windows 95 with VirtualBox by following the simple steps in this guide. In the same way, you can use a nostalgic OS next to the Win98 VM.

49 People Shared Their Experience
It asks for a product key. None are included with the files.
Search for Windows XP key on the Internet.
XP, not 98?
I got lt working, thanks. Still not sure why you said XP though.
I’m so sorry I wrote wrong 🙂
1GB RAM for Win98; a native installation would not even boot up! :p
Hi, I came across youre article and followed the steps you did in order to create a win 98 virtual machine using virtualbox version 6.012 My purpose is to be able to create a win 98se virtual machine xp virtual machine, in order to continue using older games and other applications I just cant part with. I just built a new windows 7 machine, with latest hardware that supports that. Works great, but the compatibility wizard just wont work on really older games. I first started with the free microsoft virtual machine, and winxp component. They will not work. I can create a virtual machine but it wont boot from the install disk (optical drive) No amount of playing with settings works. I later notice that there is an integration package that is not available, and I guess it may hold the key to why vms wont boot.
i then proceeded to use virtual box. Same story. VM wont boot from cd, iso or any settings. I was however able to get winxp vm installed, and win 2000.
I also tried the vmware workstation 15. That wont boot either, no matter how much you play with settings. I was wondering if I am doing something wrong. I discovered vmware has no tech support unless you buy the pro version, and its forums are filled with people asking why they cant get the VM’s they made to boot, and install operating systems. On the virtual machines with xp and win 2000, that were sucessfully installed on virtual box are sort of useless, because they are isolated from interacting with outside world, or host operating system resources such as files, drives, etc. They only have old veersions of internet explorer that can not function with most websites, making it impossible to say download firefox or chrome that will work on accessing internet. Also impossible to simply use chrome install files from host system.
Virtual box creators only have a forum loaded with people like me looking for solutions to get the thing to work. No tech support. Same goes for microsoft.
I was disappointed after trying youre guide to see if I was missing some critical step or setting. Youre guide did not work for me. One thing that occurs to me is that these virtual machines attempt to boot from a newly created hard drive that has nothing on it. They do not seem to allow a first boot from a device with the installation media on it.
I think I will just go and build a system from new on shelf older parts, so I can use my older games. It would be much more easy. I do have a hard drive on the shelf that I have installed windows 10 on. (on shelf because windows 10 sucks) But I do seem to have come across some info that windows 10 also has a version of virtual machines. Maybe I will give that a try see if it works. Just as an experiment.
Thank you for your review.
Boot problems encountered when installing an operating system in VMware or VirtualBox virtual machine programs usually cause by the processor virtualization feature being turned off and using an incorrect IOS file.
Can you try the installation by downloading the Windows 98 ISO file I shared from the button at the bottom of the article?
Hi,
Near the top of your article you write “In this article, we will use the Oracle VM VBox virtualization program to perform the Windows 98 installation and finally install the guest additions.” However, I can find no information on installing Guest Additions. Other sources say GA can’t be installed for Win 98. Is there a way to install GA or can you tell me another way to enable file and floppy drive sharing please?
Regards,
Ian
I am very very sorry. I will update the article as soon as possible, and I will send you a special mail.
I have been using Windows 98 in a virtual machine without any problems.
Hello,
Like another poster asked, I wonder about the guest additions? Everything I have found tells me there isn’t a way to install the guest additions for Windows 98 in the latest Virtual Box versions. However, I do remember that guest additions were available in the early releases of virtual box, although there were disclaimers as to how compatible they would be with some processors. A lot of the virtualization for Windows 98 is done in software, whereas later OS’s can capitalize on the hardware virtualization features included in newer systems. It seems that the current versions of Virtual Box do not include virtualization for Windows 98 at all. Probably because of the 16-bit to 32-bit compatibility methods that Windows 98 had, along with no real OS security to speak of.
That said, it is possible to install Windows 98 in a Virtual Box virtual machine. Your guide is excellent. It does presume that the reader is familiar with how to work with .iso images, the types of virtual disks, and is also familiar with how the hypervisor allows the guest and host to communicate with each other.
My final point is that for people who wish to use Windows 98 in a Virtual Box virtual machine, I recommend that you take your time, and read, read, read, and read some more of the many how-to’s
of working with virtual machines of all kinds. The basic ideas apply to all of the hypervisors, and to most of the types of OS’s that can be installed. I suggest they also get a copy of disk2vhd from sysinternals.
It can be used to create virtual disks from working systems that can be modified to work in a virtual machine. I recently did this with a disk from an AST Premium EXEC 386SX notebook pc (very old)
and it had Windows 95 on it. The virtual machine booted first time with NO modification at all.
Thank you for your guide. It is correct.
I have read your comment and appreciate your experience. Thanks a lot for your feedback!
I used your iso but when i boot it up it gives me an error that explorer has performed an illeagl action and it doesn’t boot up.
Hi,
Thank you for your post. I followed it as written and worked perfectly. Having worked with Win98 on physical PCs back in the day, I can say that I’ve never seen 98 run this fast!
Thanks for your feedback. Glad to hear you were able to run Win98.
I have go to the win98 download link but when i zip the flie, i can’t see the iso file plz help…
Try extracting the zip file to the folder.
Will not install/boot up. I followed your directions using your files, and it keeps wanting to re-install over and over again. Trying to start it from a hard disk I get “ While initializing device NDIS, Windows protection error. You need to restart your computer. “ While booting from the “CD-Rom”, it starts the installation process over and over and over…..etc…..
Hello,
I stuck at Step 30 of How to Install 98.
First, I downloaded the patch9x and installed it.
But, instead of shutting down after pressing “enter”, nothing happens.
Ok, I press Enter again.
Then the line
“A:\>” appears.
And when I press enter again, just the next line “A:\>” appears. And again and again.
Ok, I shut down the VM per “close”.
And when I (first time) restarted, I got a command box with this:
“Patch Windows 95/98/ME for run on actual CPUs – AMD ZEN2+, Intel Tiker Lake+ Version 0.5.0-BETA
Usage:
patcher9x [path] [batch options]
path: path to installed windows directory or directory with windows instalation options:
-h,/?: print this help
-auto,-y: use default actions (if path given) and not bother user
-cab-extract: extract WMM32.WXD from MS cab archive
-wx-extract: extract WMM.VXD from WMM32. VXD
patch: apply to file patch
-force-w3: when patching WMM32. VXD, leave it as W3 file
-force-w4: when patching WMM32. VXD, always compress to W4 file
-no-backup: dont backup overwrited files
-i : override input file name
-o : override outputt file name
Options can be chained:
example: patcher9x D:WIN98 -cab-extract -wx-extract -patch -o C:\windows\system\VMM32\VMM.FXD
results patched VMM.VXD copied to system from instalation drive
When running without options program operate in interactive mode (ask user)
A.\>
So.
First I did the simple things. Pressing Enter, or, close it and start it again.
Then I tried to install the patch9x again.
I typed after the A:\> “patch9x”
And the same text like in your picture in step 30 appears.
Enter path to WINDOWS\SYSTEM etc…
And that´s a loop. I tried everything, even reinstalling it completly, but I always stuck in this step.
I hope, someone can help me.
With regards
Have you tried with another Patch? It may not be compatible with the speed of the processor of the computer you are using. By trial and error, you can find the appropriate Patcher application.
Thank you for your advice,
but I don´t know how to find an other patch.
I have an 12700 Alder Lake, so it should fit. That was my thought.
For trial and error I need a list with (all) patches. Can you recommend a link where to find them?
You’re welcome I understand that you have a 12700h processor. However, some laptop manufacturers are trying to achieve better thermal cooling by limiting the maximum Ghz speeds of 12th generation 12700h or 13th generation 13700H processors. I think this can cause problems running older systems of Windows. Therefore, if you are using a different model of PC, I recommend you try a different patch from the patch I used in this article. Here is the source of all patches for you: https://github.com/JHRobotics/patcher9x/releases
The patch files contain an exe not an ima. how to I change it?
what I meant is not all the RAR’S are not working
thanks so much for doing this Unfortunately, with my luck, it’s not working. Not surprised. just like the other comment when the patch is finished, I hit enter and just keep getting an A prompt. I shut down and remove the patch from the floppy and then I get “while initializing device NDIS: windows protection error. you need to restart your computer. I want to try other patch files but their exes.
I’m guessing my 5700X is not included in the patch yet
I think Google drive, which you are using to host all the files, has blocked them since whenever I try to download a file, it ither says it has a virus or it violates terms and service.
I’m so sorry for this situation. I will update the links as soon as possible.
The link to USB Mass Storage Controller Driver (nusb320-Eng-98FE) is giving me a google drive error for violating the terms of service and I have not been able to find the iso for nusb329-Eng-98FE. I have found several instances of nusb320-Eng-98FE.exe but unsure how to make it work with the virtual installation.
Any help would be appreciated. These the instructions have been most useful.
Thank you.
I don’t understand why the download links give such an unnecessary error. I’m so sorry for this situation. I will update the links as soon as possible.
Thank you for updating the links. I was able to open the link to USB Mass Storage Controller Driver (nusb320-Eng-98FE) and download the rar file. Not sure what to do next. I extracted the USB Mass Storage Controller Driver (nusb320-Eng-98FE) .exe file from the USB Driver folder and ran it on windows 11 and it created a series of files. What file(s) do I need to make available to the windows 98 FE virtual installation? I tried to choose the USB Mass Storage Controller Driver (nusb320-Eng-98FE)}.exe from the device tab under optical drives but it failed to open the file. Not sure how to install the drivers. Thank you for any help.
Looks like I found a similar webpage that you created and may not have downloaded the drivers I need for usb after all. I will wait and use the links on this page when they are updated. Thank you very much.
Hi Tolga,
Have you had a chance to look into fixing the links for the USB Mass Storage Controller Driver (nusb320-Eng-98FE)? Thank you.
Hello. I have updated the links to the relevant drivers. Have a nice day.
Tolga, excellent instructions. I clicked on the display driver and the USB driver links for Windows 98SE and I got this Google error: “We’re sorry. You can’t access this item because it is in violation of our Terms of Service”. Can you fix the links? Or, can you steer me to where I can get these drivers? Thanks!
Hello. I updated the download links as soon as I saw your comment. You can check the table in the same way.
Have a nice day.
Thank you so much for publishing this webpage and updating the links. It was invaluable to my efforts to install window xp and windows 98SE and 98FE on virtual box. I now have the 3 Windows platforms installed on both windows 11 and windows 10.
Cheers.
TK
Thank you so much for your comment. I’m so glad to hear that.
Thanks Tolga. I also had U-Block Origin interfering with with the download. After turning it off all downloads became available. This may help others with their downloads.
Thank you for the instructions. Are you able to update the link for the USB Mass Storage Controller Driver (nusb320-Eng-98FE)?
Hi! So, before i installed the display driver, everything was ok, but after i installed it and rebooted, the VM was in a black screen…
Hello. Thank you for an excellent article. I downloaded your ISO file. However in the Windows 98 setup, I am using Win 98 SE activation code for media that I purchased back in the day – out of three, all are saying they are invalid. Can you advise? Everything else has gone flawlessly.
Thank you.
hey you can please update drive link it says Sorry, the file you have requested does not exist.
Make sure that you have the correct URL and the file exists. please update it
Thanks very much for the very easy to follow instructions. I tried several times to install Windows 98 unsuccessfully, even though with previous versions of Virtualbox, I was able to. When the installation fails it is difficult to find out why and how to proceed. Your instructions are very thorough and complete. Thanks again.
Both links for the drivers are DEAD
UPDATE PLEASE
Thank you so much Tolga! I have been trying to get this to work for 5 hours. I kept trying to trouble shoot around the .dll issues not even thinking to look for a patch, that was the big missing link I needed to get it working!
Awesome step by step instructions! I will be sure to pass this page along to anyone looking for help down the road.
I’m really happy to hear that it worked for you! 😊
I know how relieving it feels when a solution finally works after hours of troubleshooting.
You did a great job spotting that the patch was the missing link — the Windows 98 + VirtualBox combination definitely requires some patience.
Thank you so much for the kind comment and for considering sharing it. Feel free to reach out anytime if you run into any other issues. 🙌
BIG THANKS!!!! Easy to follow and worked for me!!!!
The websites for the Windows 98 FE link shows that the archive was probably DELETED.