
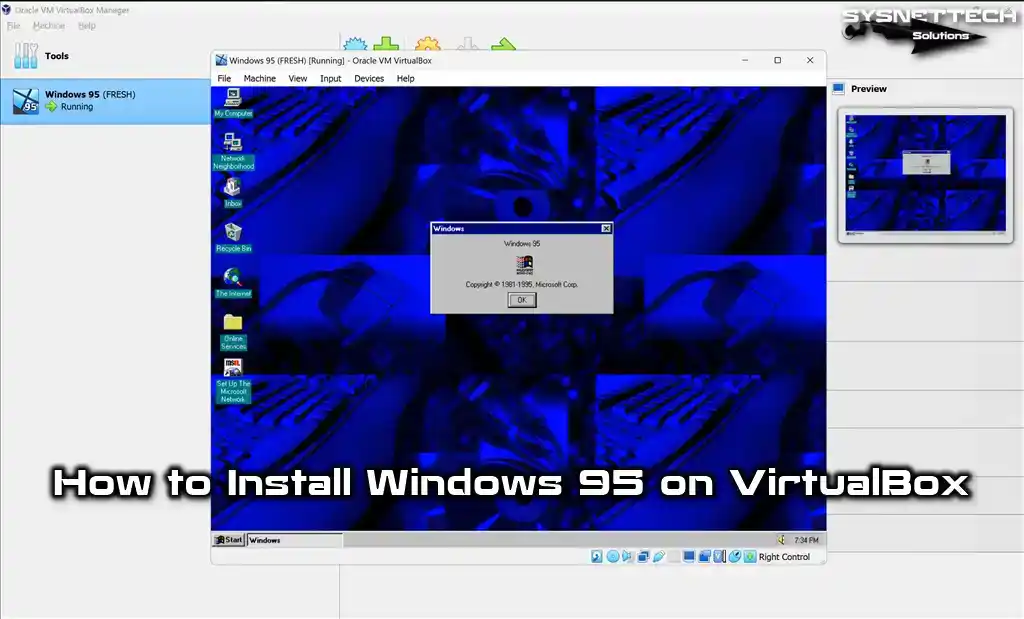
Would you like to install Windows 95 on Windows 10 or 11 using VirtualBox 7? This guide will help you. You will learn how to install Win95 step by step. So, I recommend that you follow it to make the setup easy.
Microsoft put out Windows 95 on August 24, 1995. This vital system brought prominent new features. People liked it because it was easy to use. We can say this change was a big moment in Microsoft’s story.
But even if it is not supported now, many people still feel fond of it. So let’s set up this excellent system that many once loved!
How to Set Up Windows 95 on Windows 10/11 Using Oracle VM VirtualBox 7?
Windows 95 is Microsoft’s most successful product. It was released on August 24, 1995. It achieved record sales figures. In short, it changed the operating system in a big way.
Win95 added plug-and-play support. This made setting up hardware easier. Extra devices now get found faster. It stopped many problems and made things much simpler.
Microsoft made the system look and work much better. I think this was one of the most significant changes. They also added TCP/IP support. This helped us connect to networks more easily. So, going online became much easier.
Microsoft stopped helping with Windows 95 on December 31, 2001. This system is now ancient, and we don’t use it anymore. But many people still remember it with warm feelings. Tech fans, in particular, still remember this old system.
If you still want to use this system, you can run it on a virtual machine. This way, you can experience this old system on a modern computer. But it is better to choose new technology for speed and safety.
Staying safe online is very important now. Because of this, the team fixes system weaknesses quickly. So, you should not use systems that are no longer supported.
Instead, you can choose virtualization software like VirtualBox or VMware. Be sure that using a virtual machine is a safer choice.
How to Create a New Virtual Machine for Windows 95
First, install Oracle VM VirtualBox on your host computer. Then you can run your old Windows or Linux systems on the virtual machine.
But you should know that you must set the virtual machine settings right for old Windows versions. This way, you will have a smooth operation.
1. Creating a Simple VM
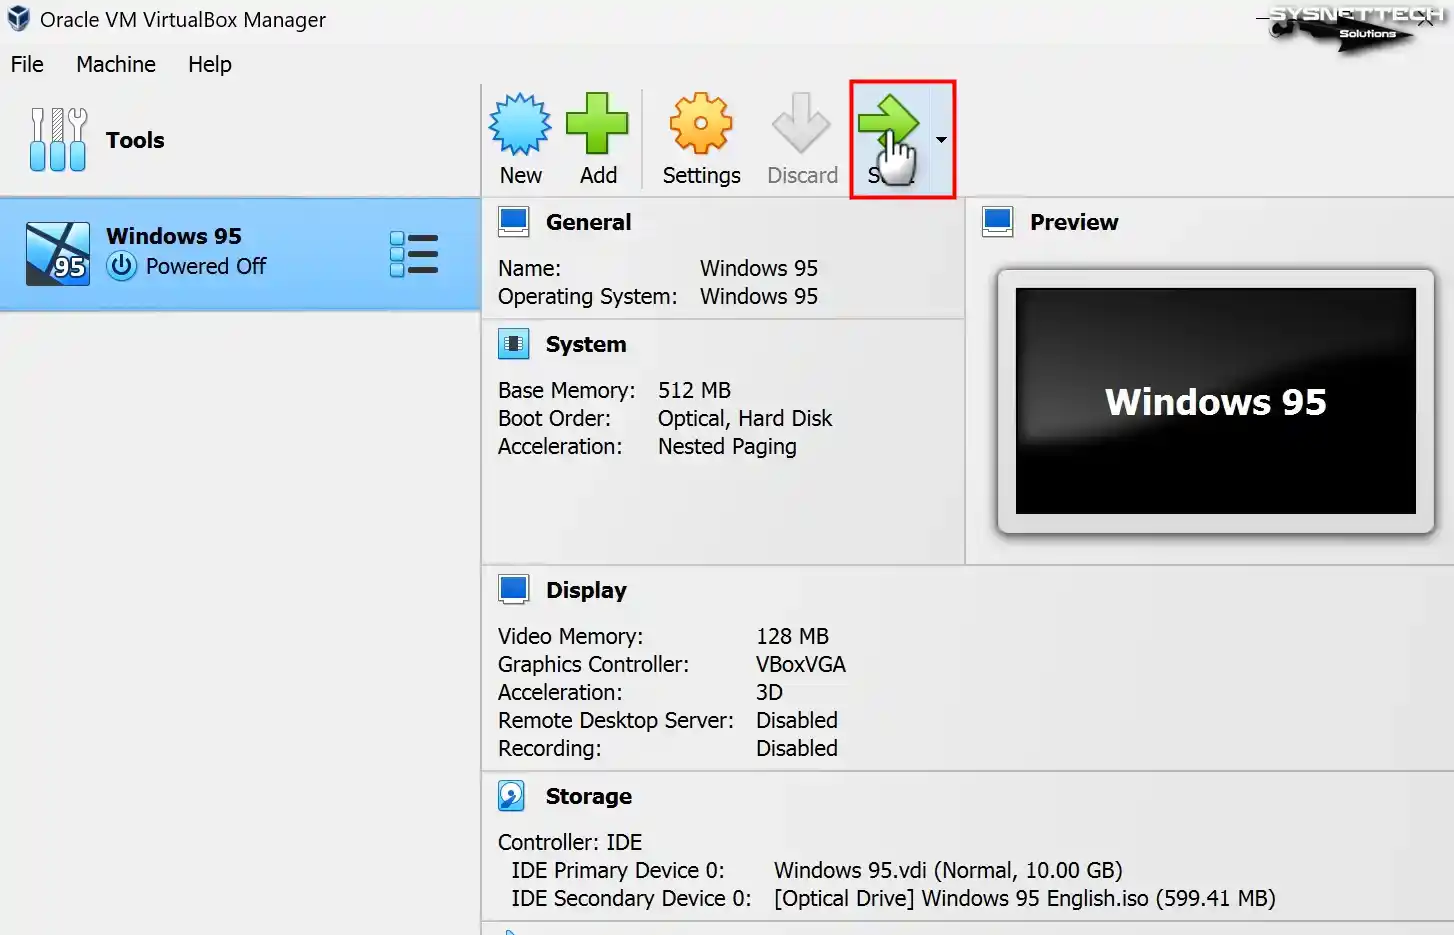
Step 1
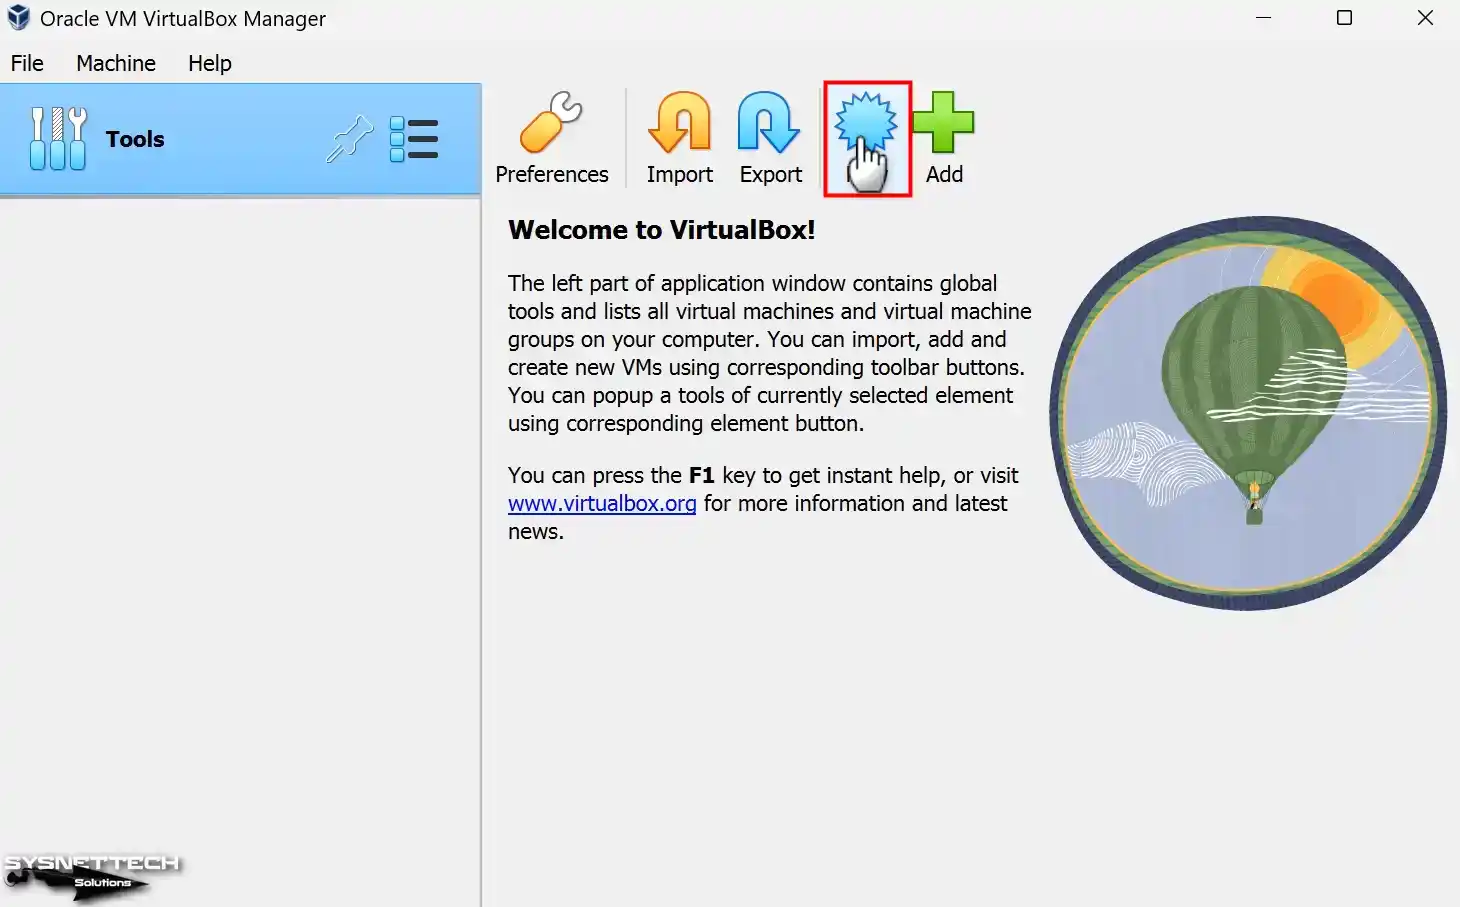
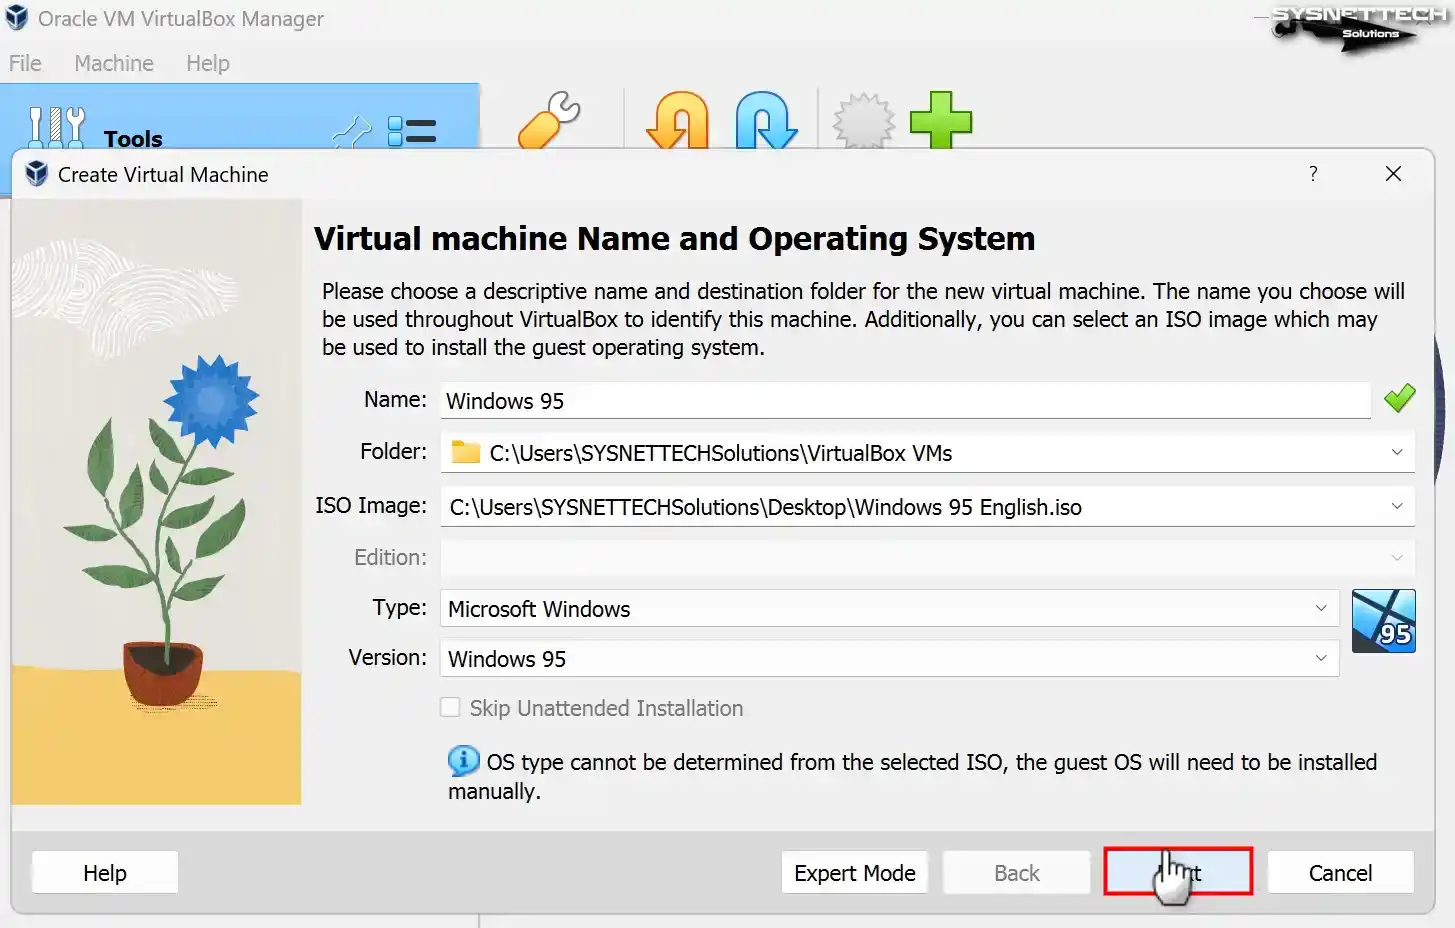
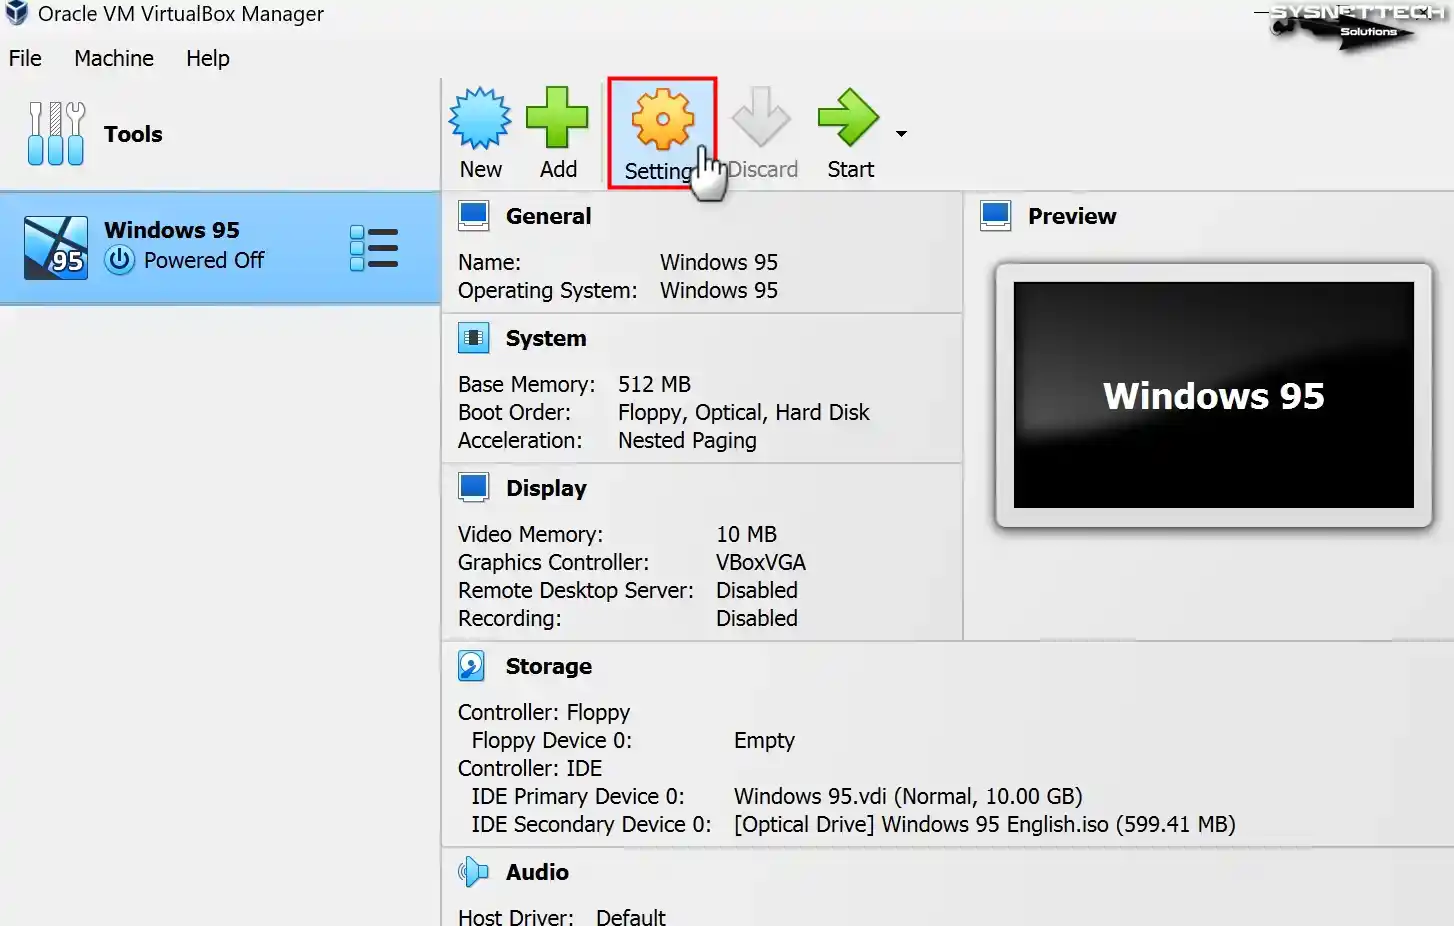
Preparing a virtual machine in Oracle VirtualBox is easy. First, click the “New” button. So, this will start the setup wizard. This step applies to all operating systems.
There are two easy ways to create a virtual machine. First, go to the program’s tool menu. Then click on the “Machine/New” option. Alternatively, you can press Ctrl+N on your keyboard. Either method will launch the wizard.
Step 2
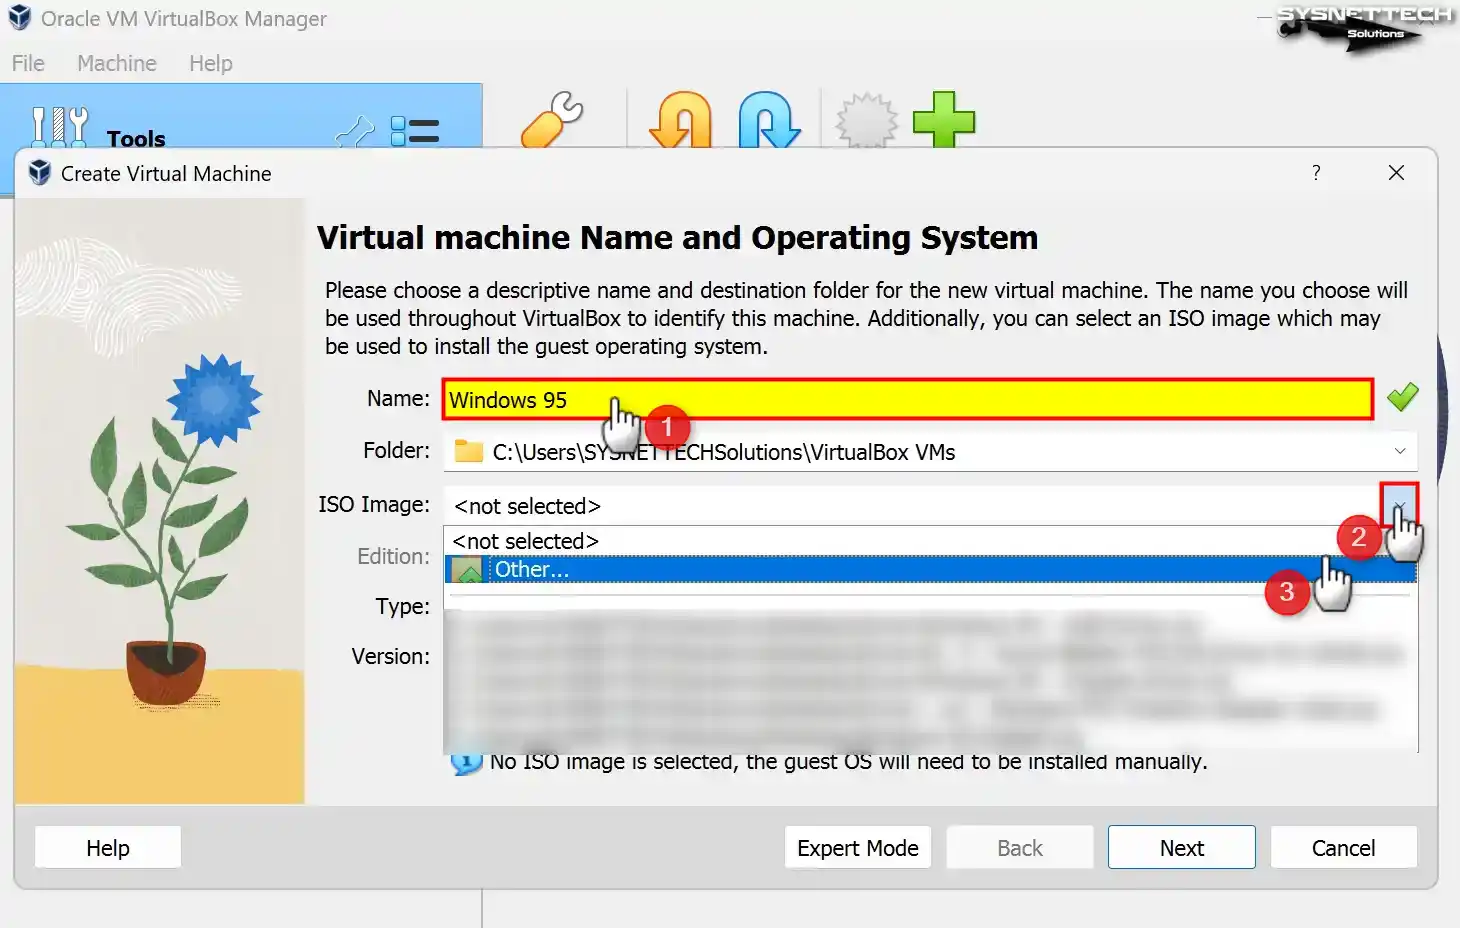
Enter “Windows 95” as the virtual PC name. The system will automatically fill in the Type and Version fields. Then, proceed to add the ISO file.
To do this, click on the Other option in the ISO Image section. You can keep going with the setup by following these steps.
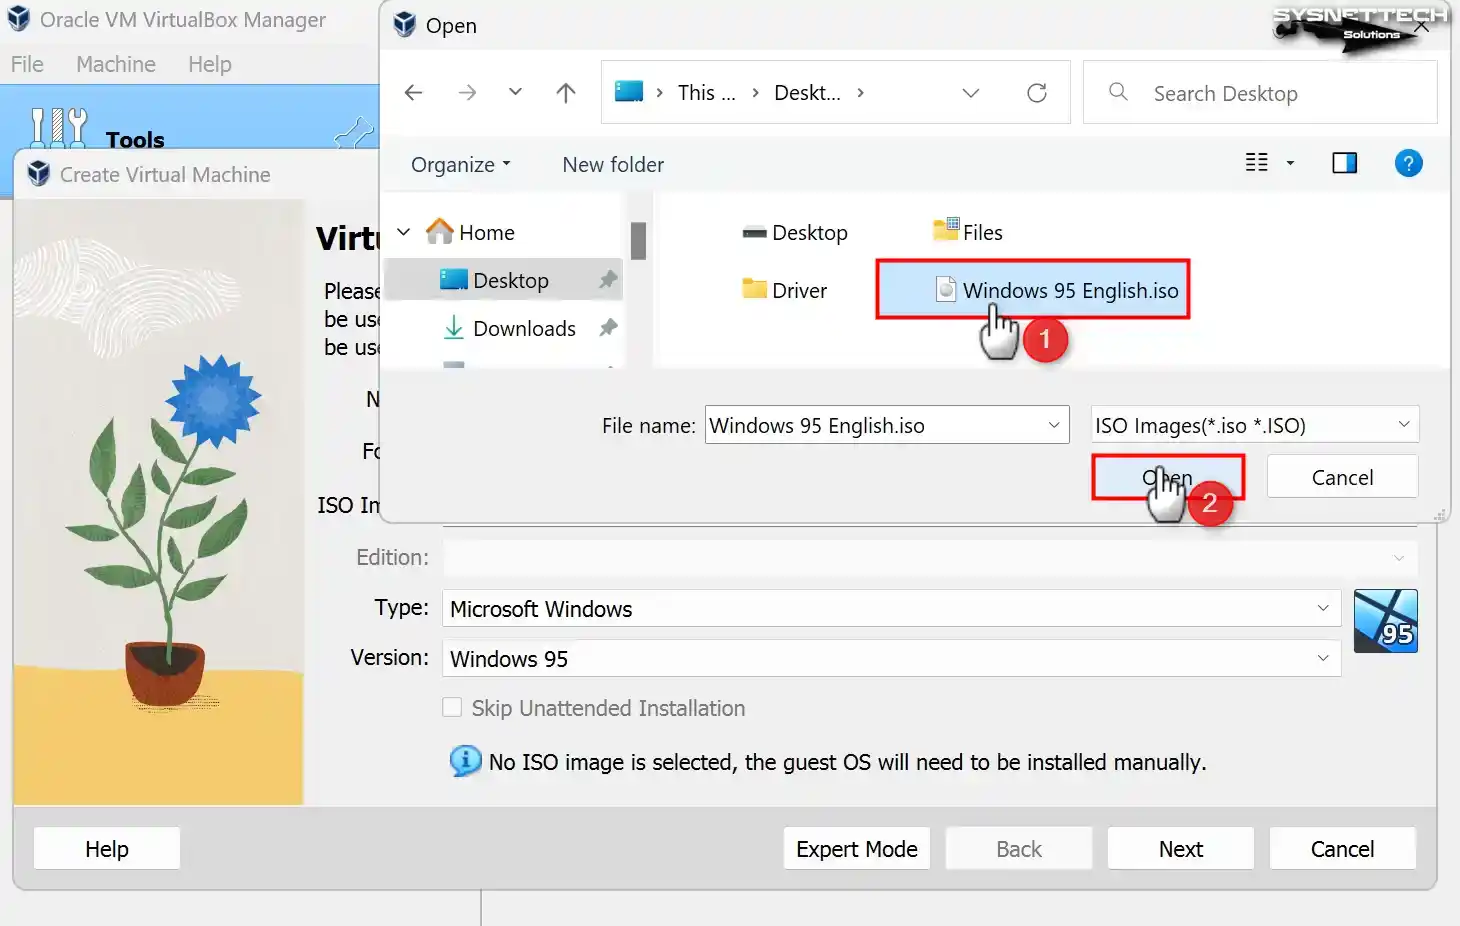
Step 3
Selecting the Windows 95 ISO file is easy. First, go to the table in the article and obtain it. Then select the file you downloaded to your computer. Finally, click the Open button. With these steps, you will be ready to install.
Step 4
VirtualBox 7.x versions have a new feature. Now, you can do unattended installations. This helps you install new systems faster. You can also set things up easily.
If your virtual machine does not find the image file, you may have problems. In this case, you must install it by hand. First, pick the operating system type yourself. Then, go on with the setup step by step.
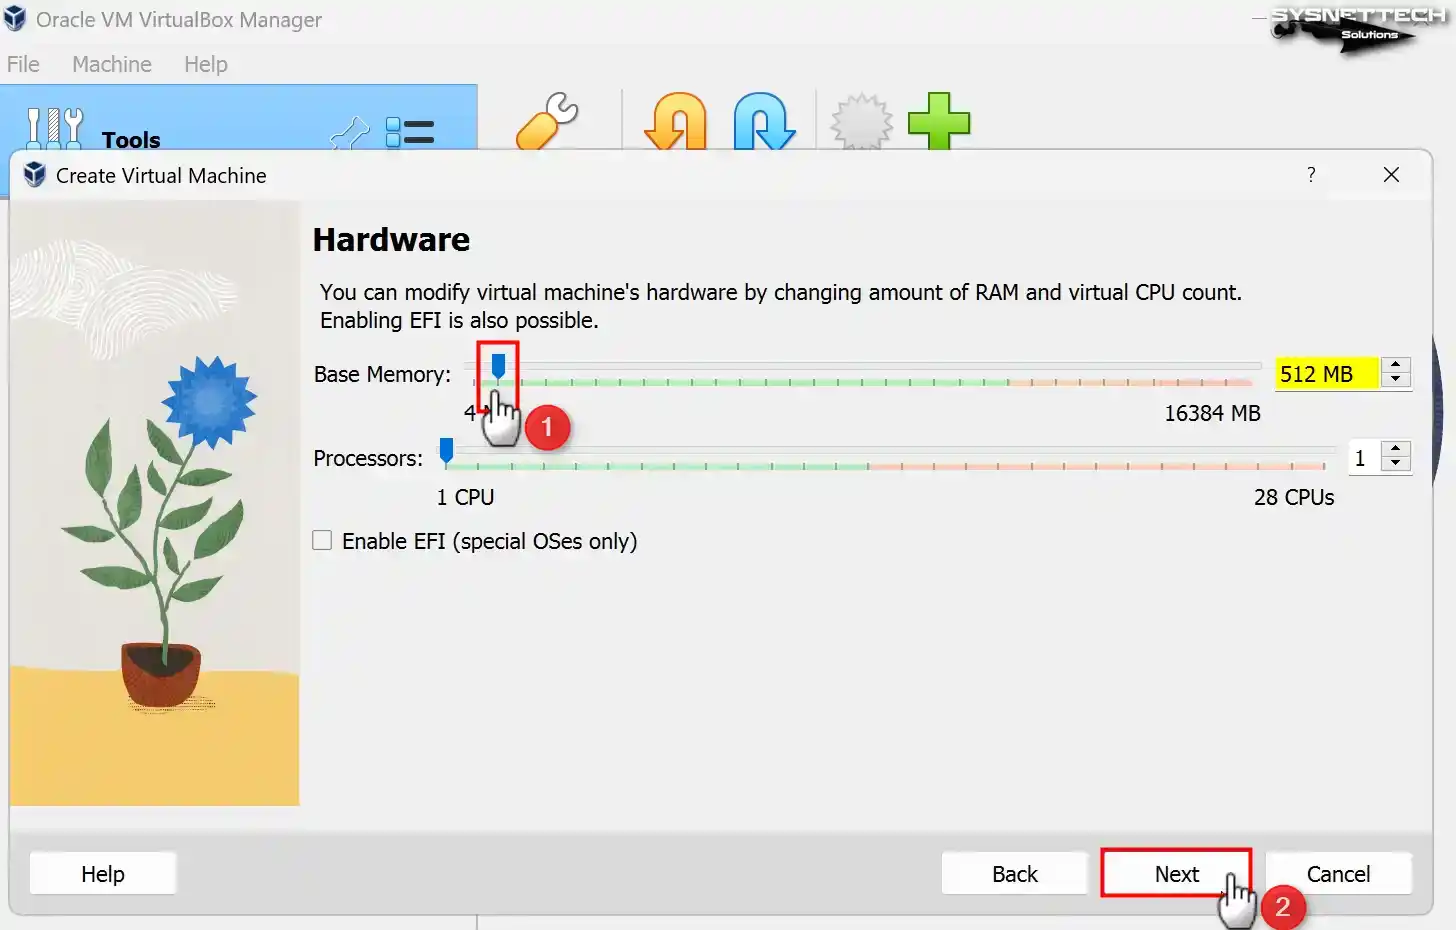
Step 5
Be careful when configuring RAM for Win95. If you allocate more than 512 MB of memory, problems may arise. You may receive an “Insufficient memory to initialize Windows” error. This is because older systems do not support high RAM. In short, it is best to stick to the recommended settings.
Therefore, it would be more appropriate to configure the RAM size of the virtual machine to 512 MB.
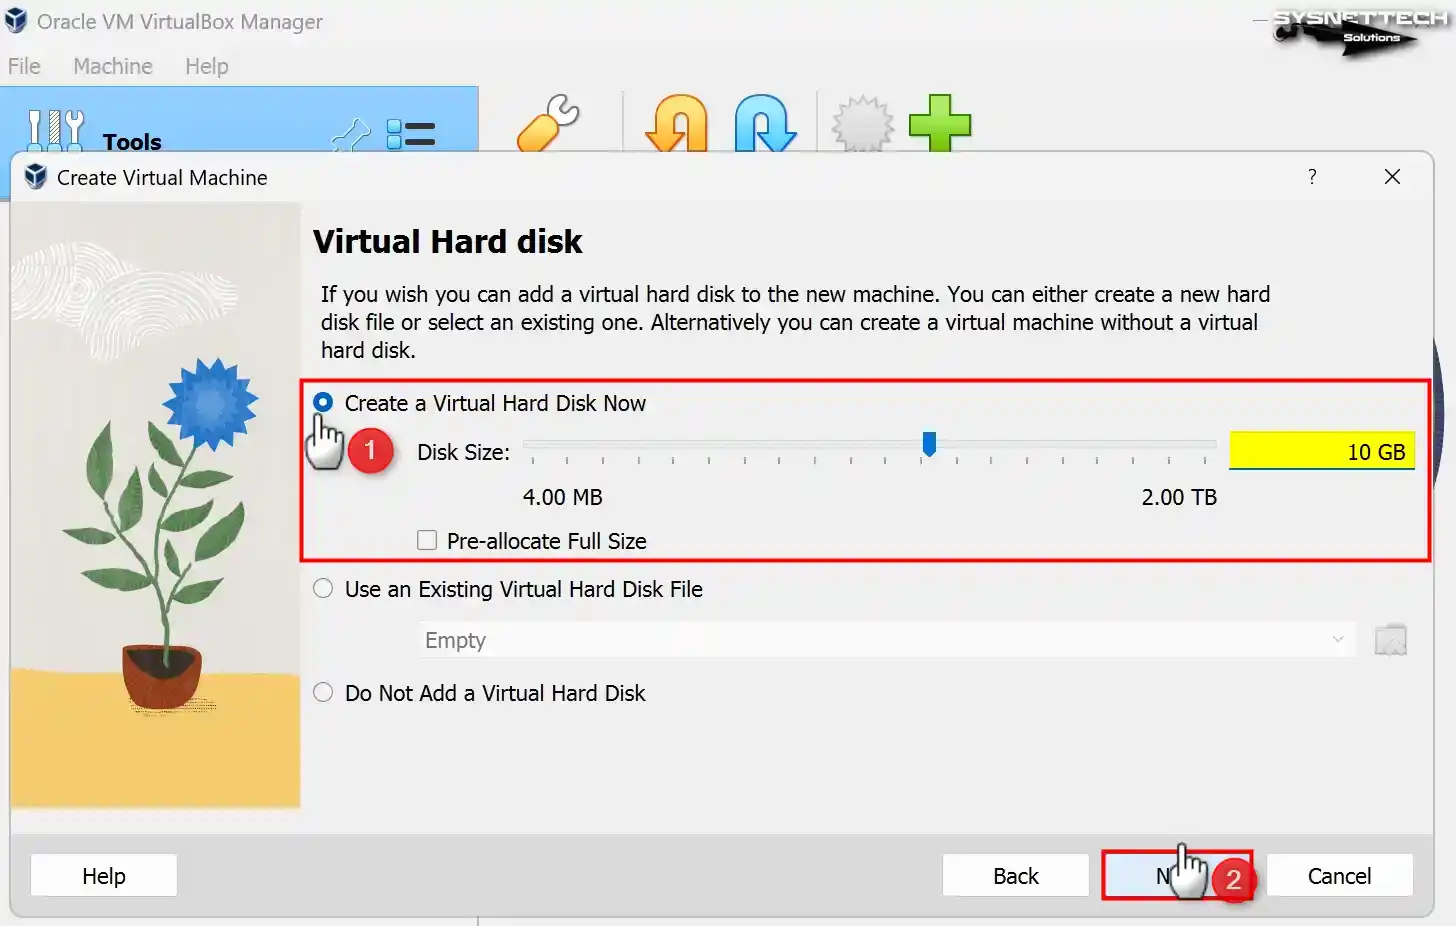
Step 6
If you are setting up a new system, you must make the right choice. Select Create a Virtual Hard Disk Now. Then specify a disk size of 10 GB. Finally, go on with the setup to do a clean installation.
Don’t forget: the interface is different in VirtualBox 6.x versions. You should watch out for this. Pick VDI (VirtualBox Disk Image) as the virtual hard drive type. This is the choice VirtualBox suggests, then click Next to continue.
If you have a low-performance computer, you should optimize your Windows 95 VM. To do this, use the Fixed Size disk option. This setting improves the performance of the virtual disk. You will notice the difference, especially on slow hard disks.
The Fixed Size disk option improves performance. The reason for this is simple. You allocate all disk space at the outset. This means the system does not need extra space during setup. As a result, your virtual machine runs faster. In short, you will put less strain on your host disk.
If you have a new computer, you have different choices. If you use an SSD or NVMe disk, you get a benefit. In this case, pick the Dynamically Allocated option. This way, you use disk space better. That is, you will not lose speed or power.
Step 7
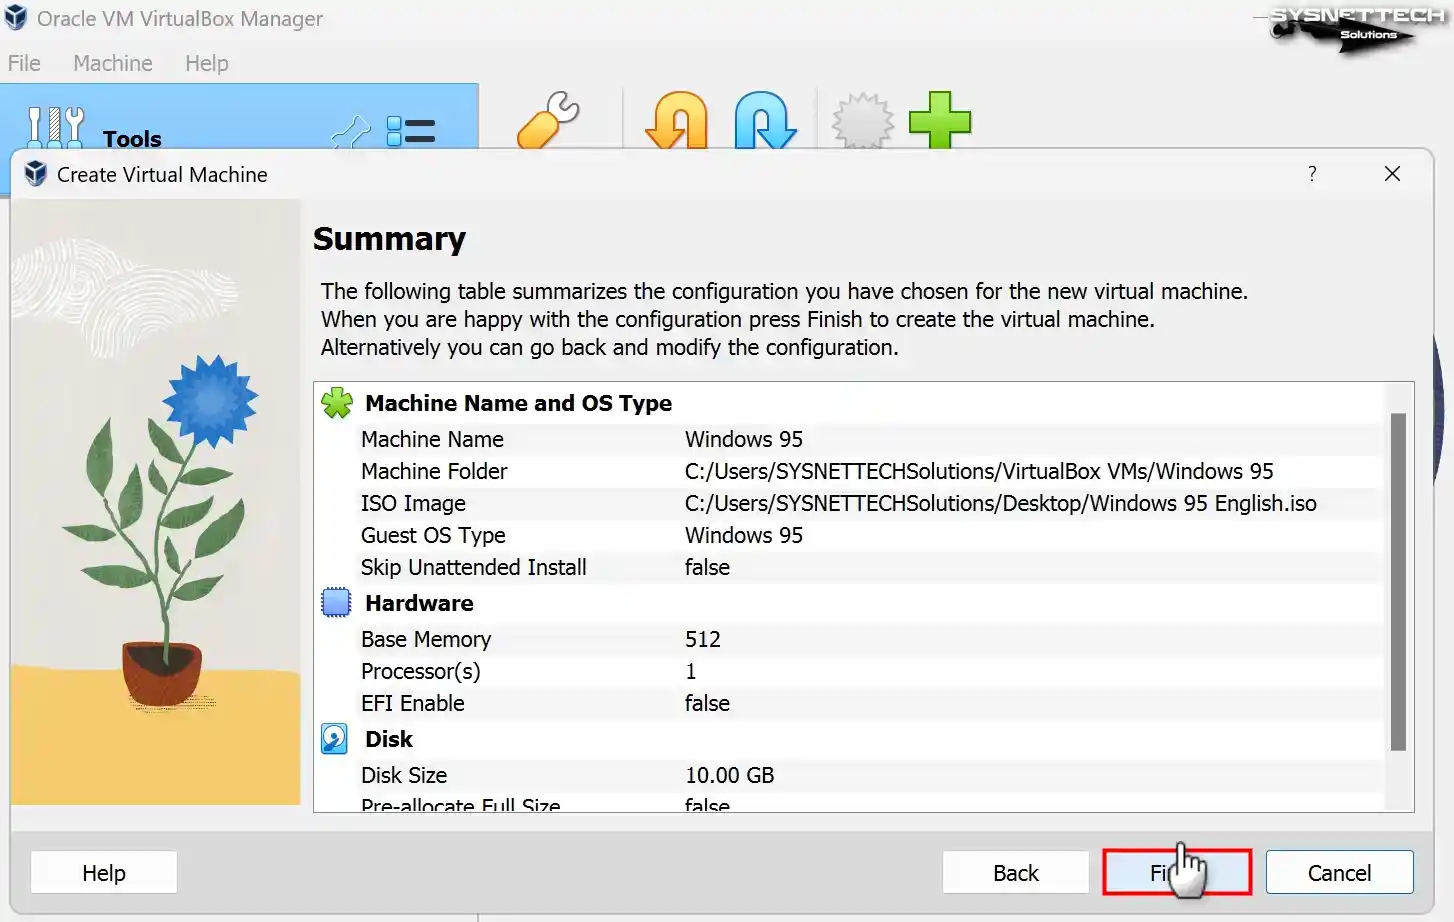
Check the hardware settings of the Windows 95 virtual machine one last time and close the wizard.
2. Configuring Windows 95 VM Settings
Step 1
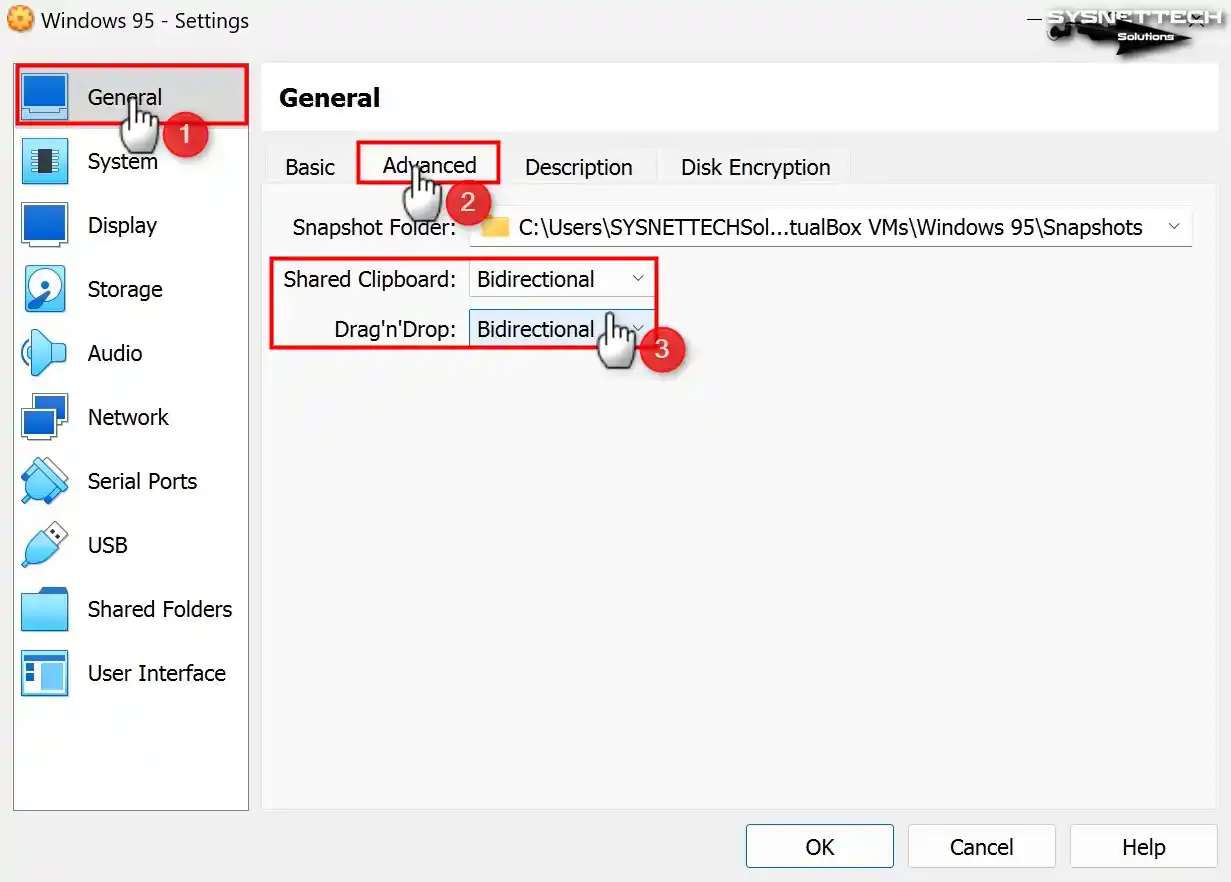
Open the Settings window to set up the guest operating system better.
Step 2
Be careful when installing old Windows versions with VirtualBox 7.x. You might face some problems. Windows 95 has special limits. Guest Additions will not work. So, Shared Clipboard and Drag’n’Drop won’t work. But basic features will work fine.
In this article, I suggest setting the settings to “Bidirectional.” This is because you are likely using VirtualBox 5.x or 6.x. These old versions need other settings. In newer versions, it works on its own. So, this lets you use sharing features without trouble.
Step 3
Change the Motherboard settings of your virtual machine. First, open the Boot Order menu. Move the optical drive to the first place. Then turn on the I/O APIC feature. This will let the system use more than one processor. These settings will make your VirtualBox Windows 95 VM work better.

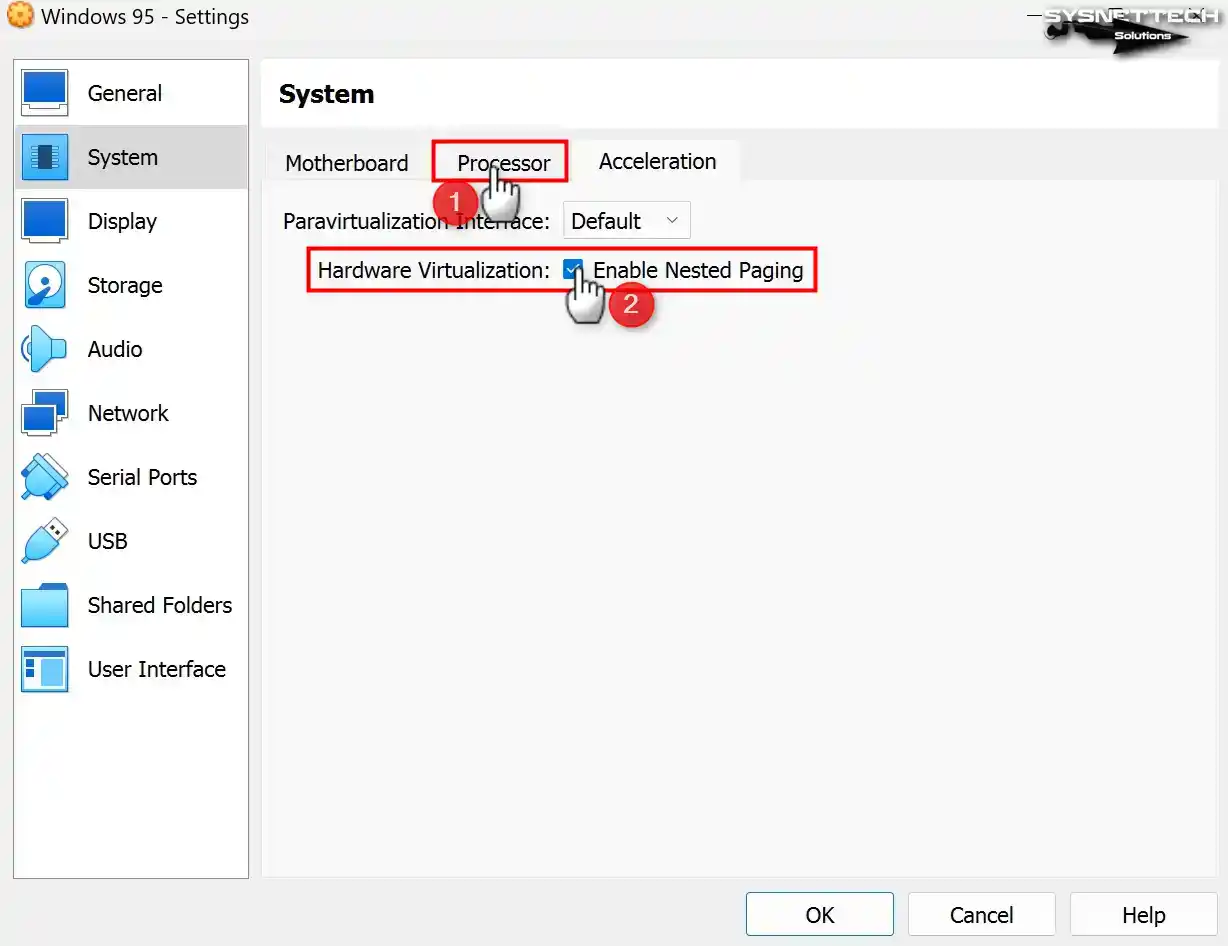
Step 4
Be careful when changing processor settings. Look at the Hardware Virtualization feature. I suggest turning on Nested Paging, especially. This setting helps speed up in some cases. But it may not be needed for all systems.
Be careful with older systems such as Windows 95. Nested Paging can sometimes cause problems. However, it can also ensure that the system runs smoothly. So, you should try different settings to find the best one. After all, each system can work in its own way.
I enabled Nested Paging in the tests in this article. I ran Win95 on a virtual machine with these settings. You can try the same setup. However, keep in mind that results may vary from system to system. Ultimately, don’t forget to check the settings.
Step 5
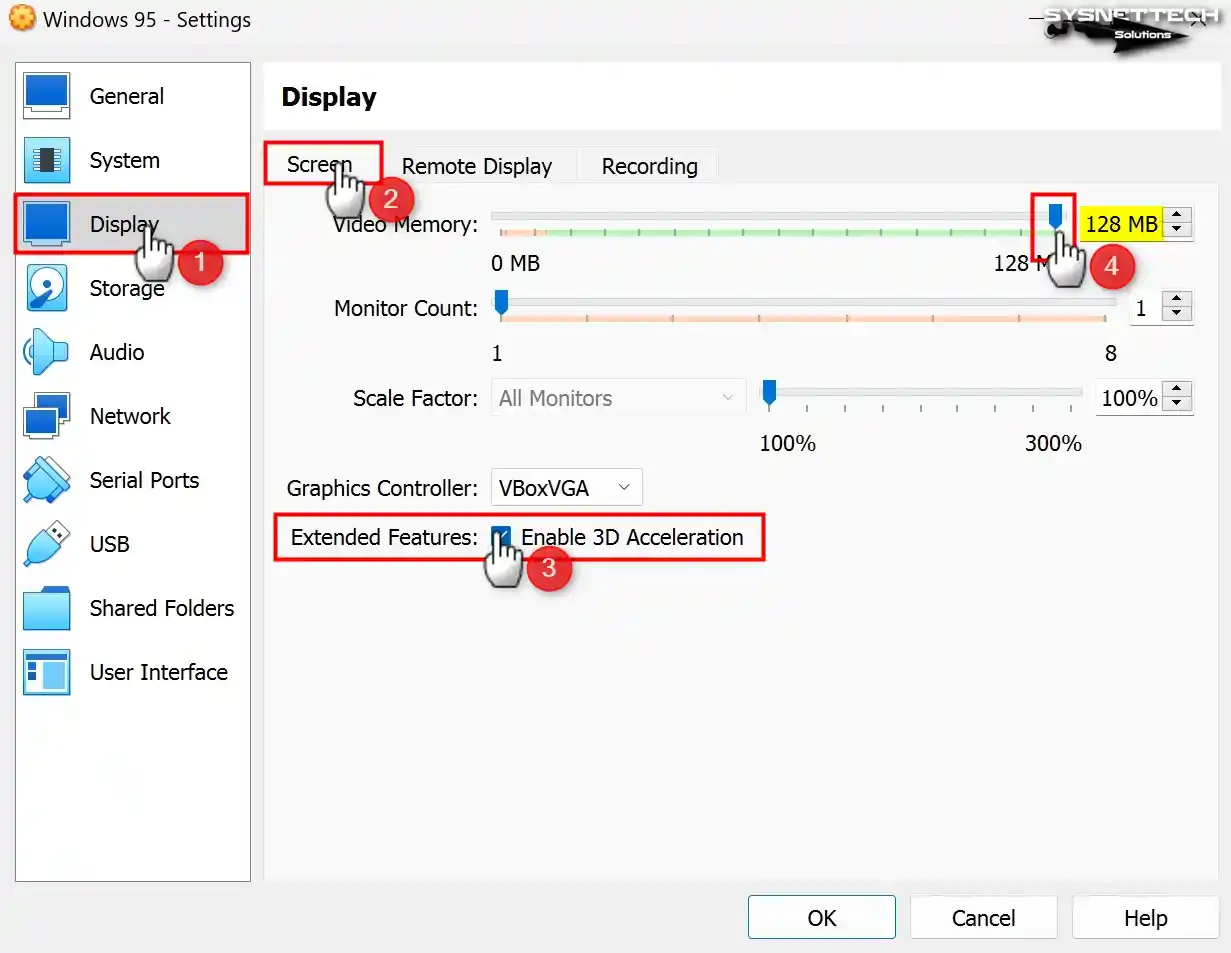
If you use VirtualBox 5.x or 6.x, remember you have an advantage if you install a supported system. First, turn on the 3D Acceleration feature. Then set the graphics memory to 128 MB. Thus, you will have better graphics performance.
Different rules apply for VirtualBox 7.x. Windows 95 is not fully supported. So, the system does not need 3D acceleration. You will not have any speed problems because the automatic settings are good in the new versions.
Step 6
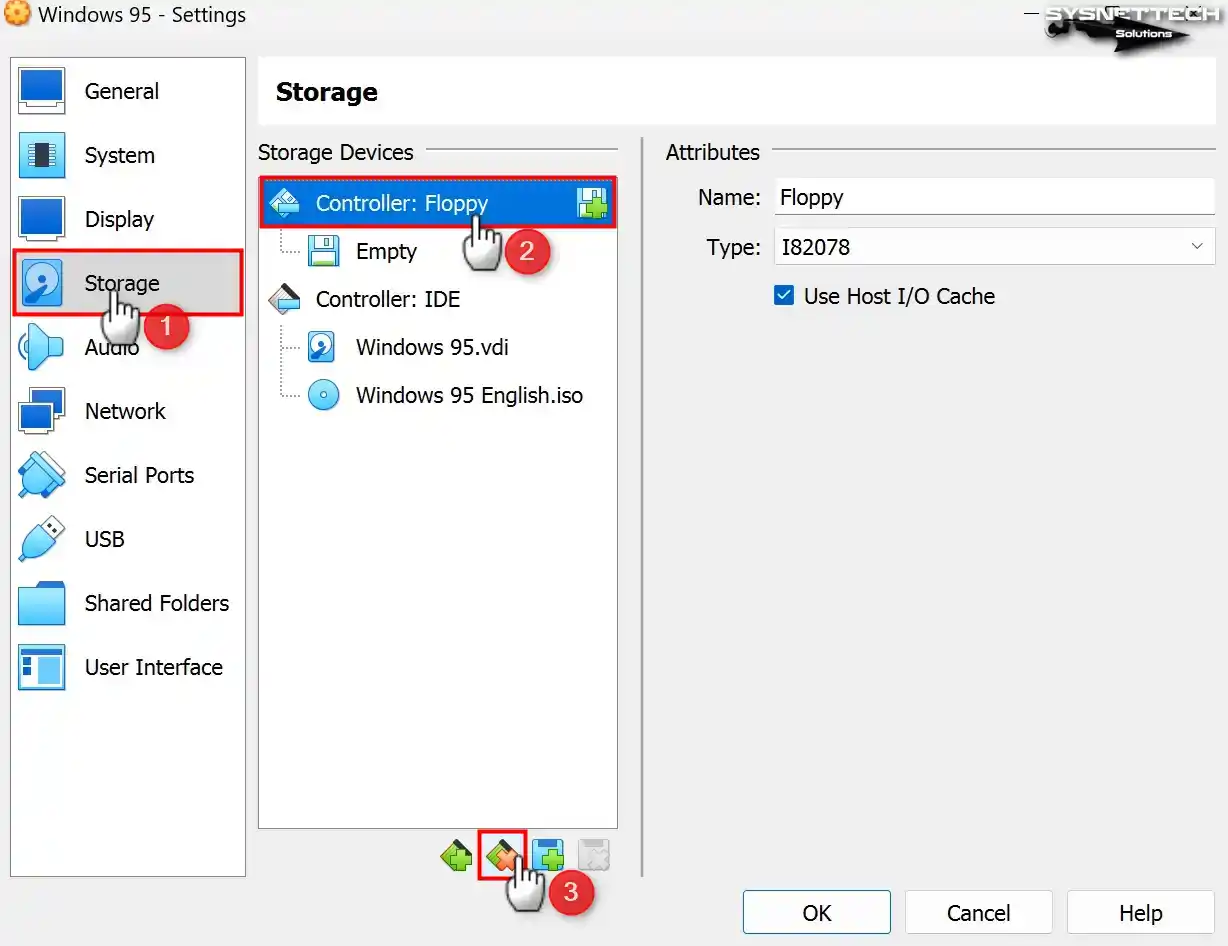
The ISO file in our article will make your job easier. You no longer need a floppy disk drive. You can install Win95 directly.
So, remove the Floppy Controller. After you change the Storage settings, the setup will go smoothly.
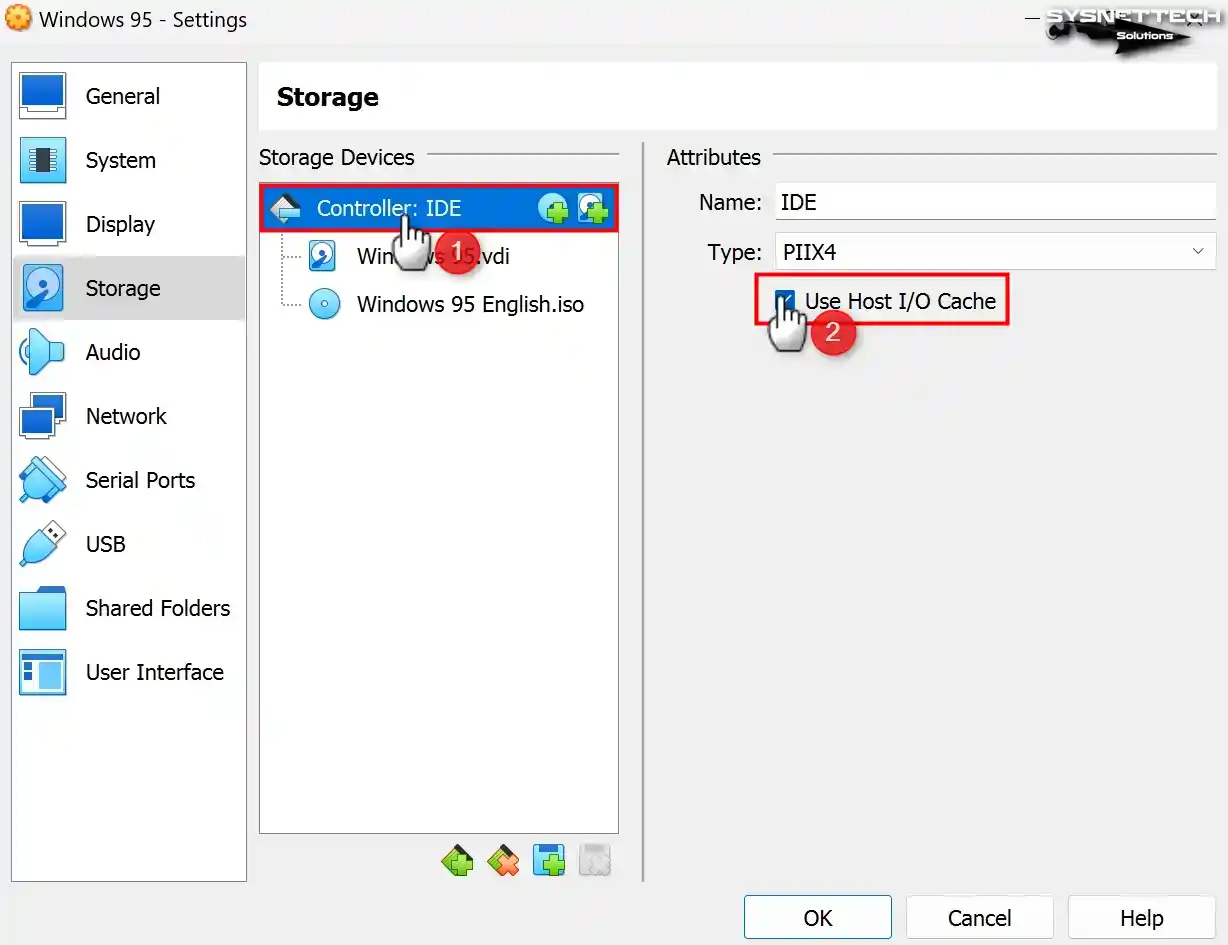
Step 7
Check your virtual HDD settings. First, click on the disk controller. Then, check the Host I/O Cache feature. Make sure this feature is enabled. Thus, your little tip will help you improve disk performance.
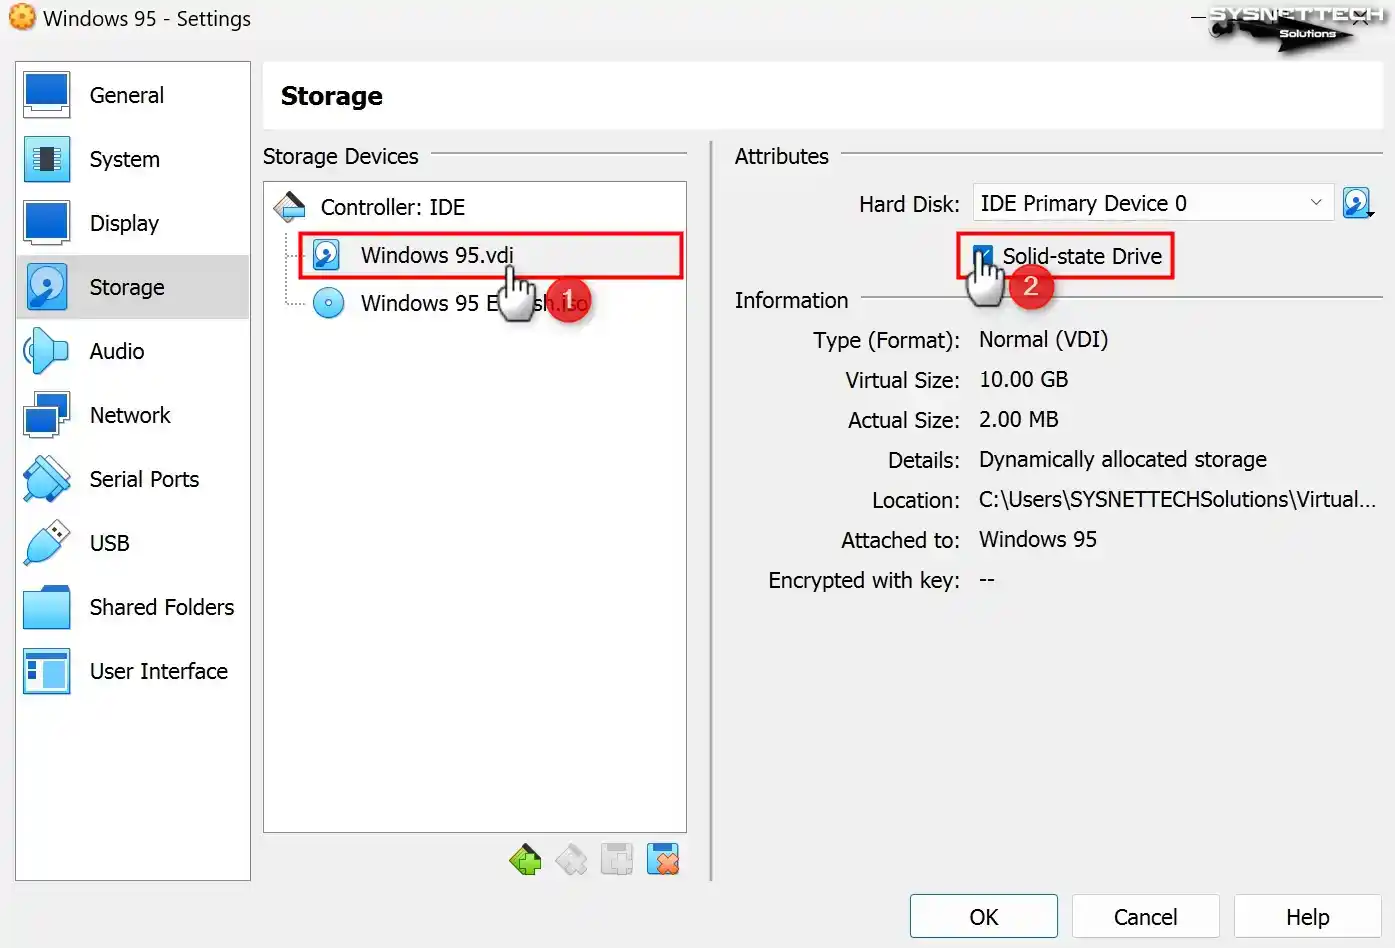
Step 8
Be careful when selecting your virtual disk. Locate the Windows95.vdi file. Then set the IDE disk type to SSD. This will make performance better, especially your read and write speeds.
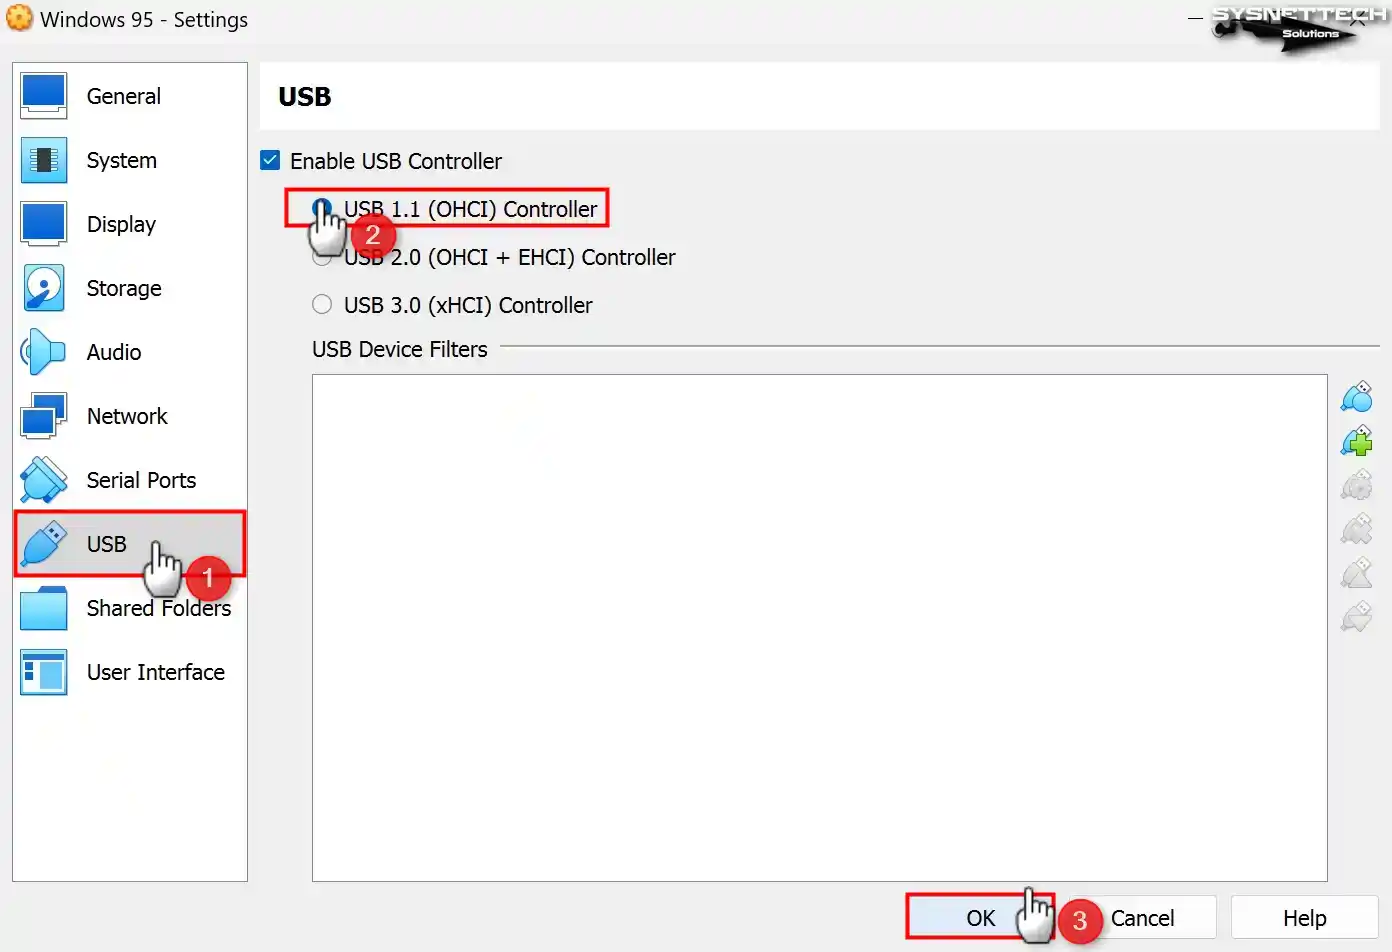
Step 9
Microsoft Win95 is an old system. Therefore, it does not support USB 2.0. For this reason, you should select the USB 1.1 Controller. Look closely at the OHCI option here. So, you will allow your USB devices to function correctly.
Step 10
Now, follow the steps to install Windows 95. First, start your guest VM. Then open the Select Start-Up Disk window. Select your ISO file here and click the Start button.
3. Installing Windows 95 with VirtualBox
Your virtual machine is now ready. You can now continue with the normal setup. Do the steps like you are installing on a real computer. The steps will be the same.
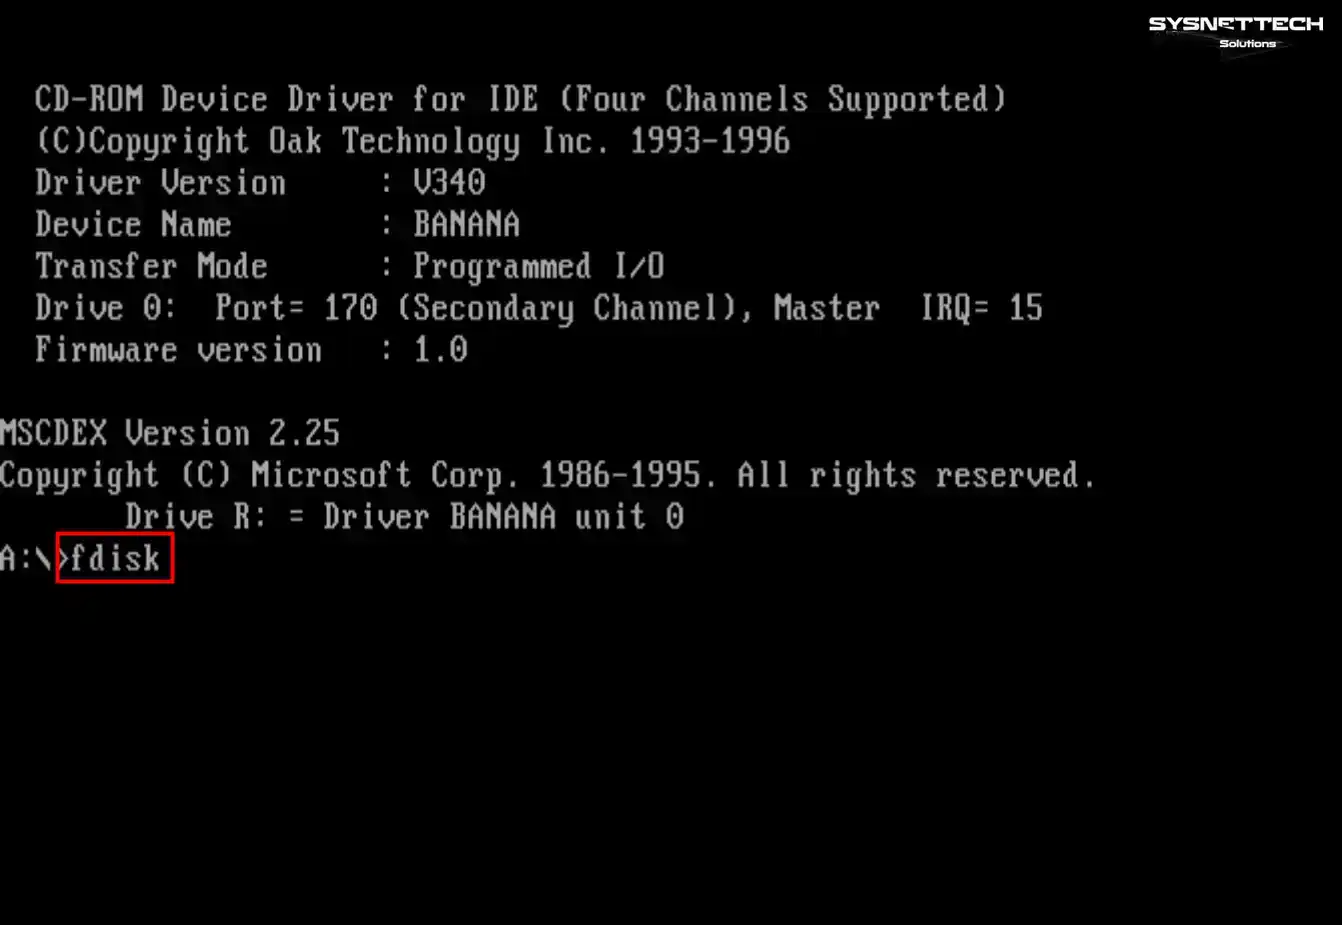
Step 1
After starting the virtual machine with the image file, you will see the following screen. On this screen, you need to run the FDISK tool and format the virtual disk before installing Windows.
Step 2
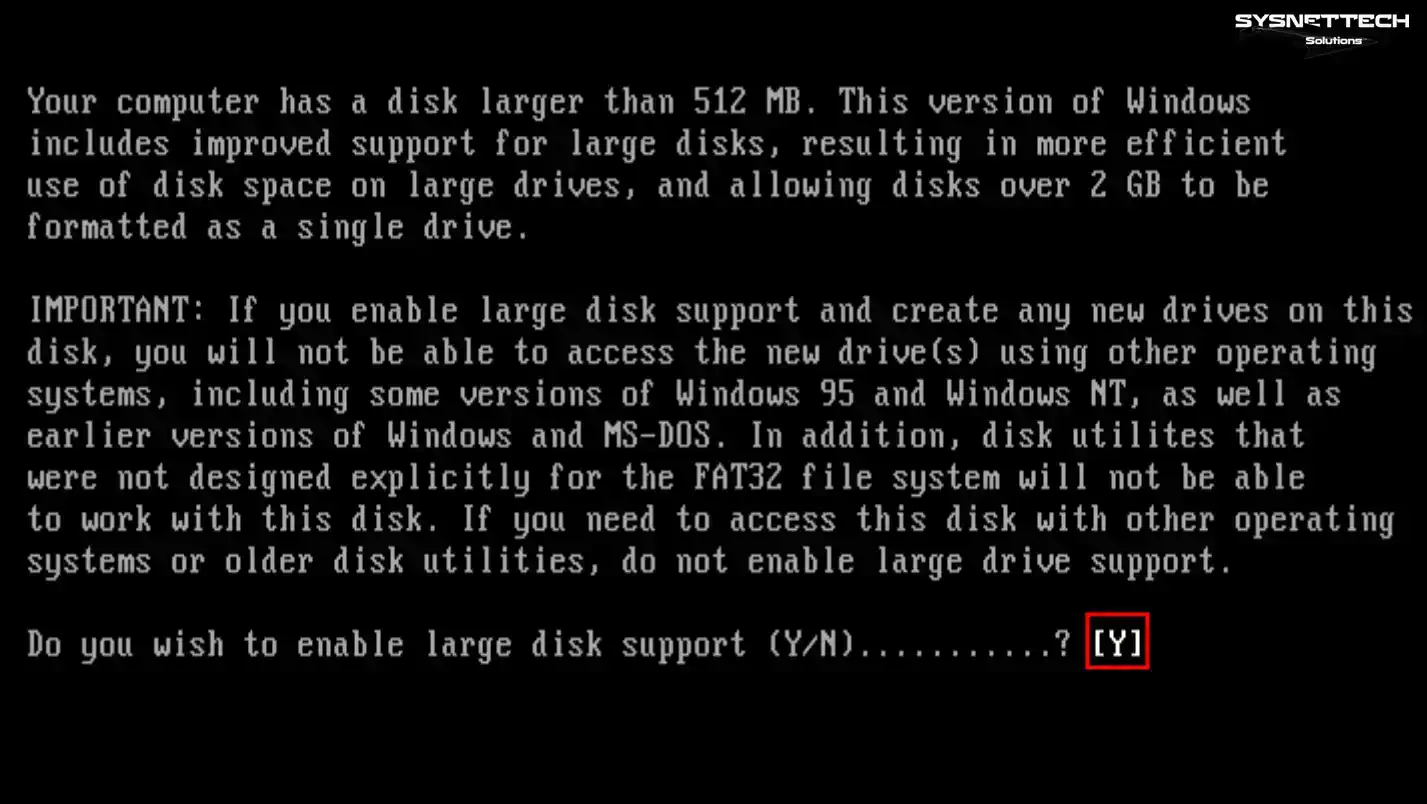
If your virtual machine’s disk size is larger than 512 MB, please note that you must enable the large disk feature. This setting provides more storage space. Otherwise, you will not be able to use the entire space.
Step 3
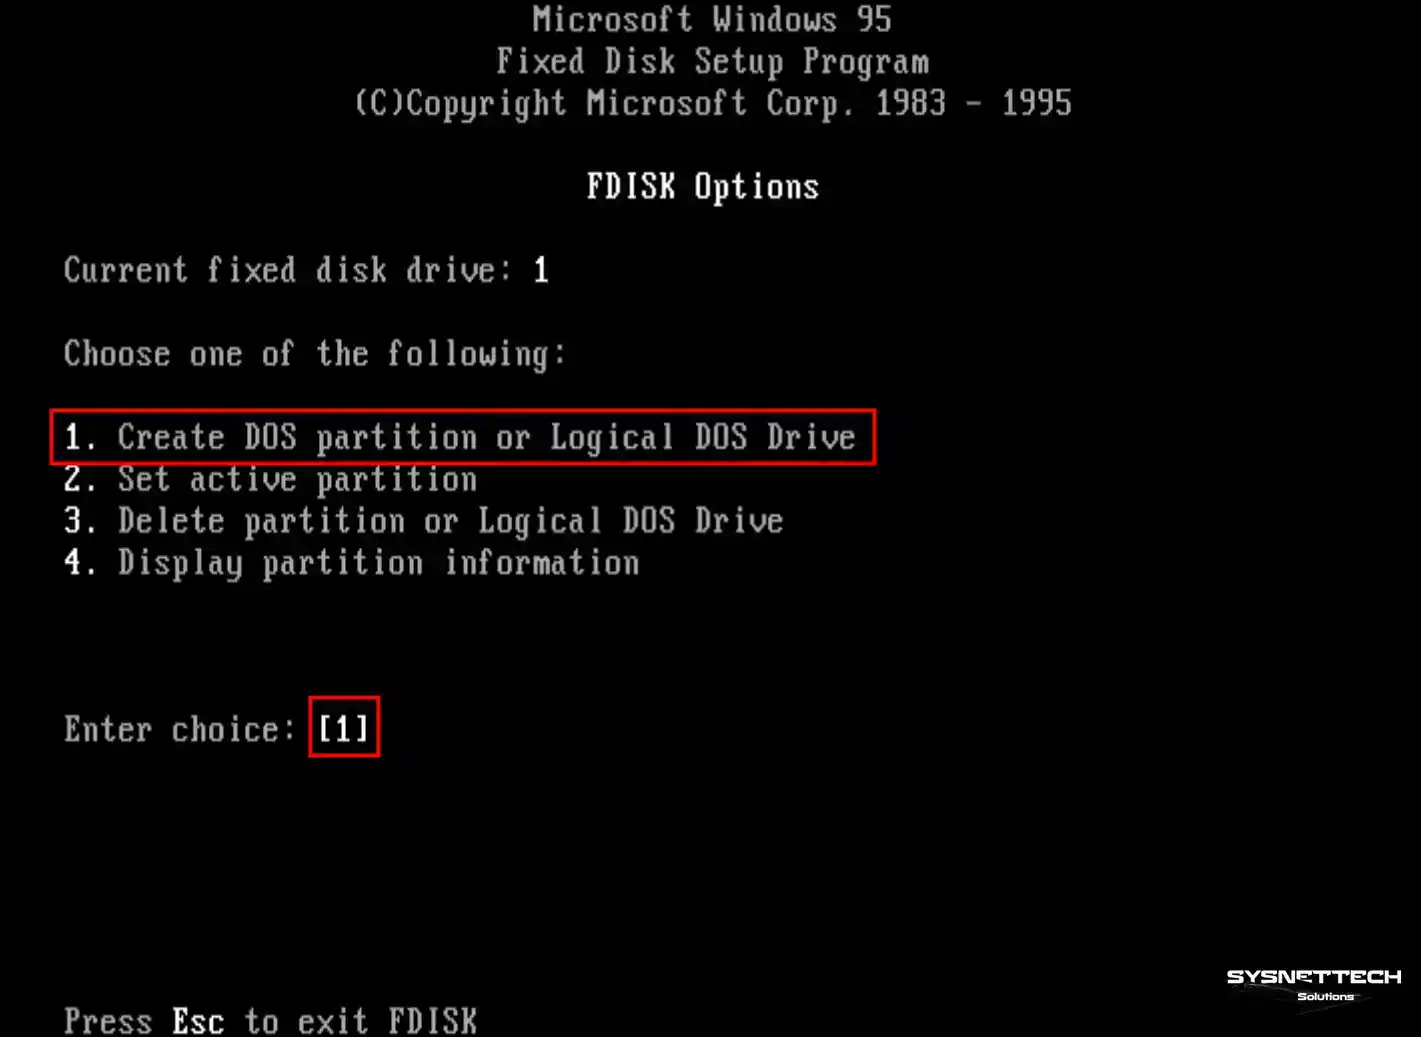
After confirming the large disk usage, the FDISK tool will open. Since you are going to perform a clean system installation, you must first create a new partition on the disk.
You must make the correct selection on the FDISK screen. First, pick Create DOS Partition or Logical DOS Drive. Finally, press Enter to begin the disk partitioning.
Step 4
Let’s keep going with the disk partitioning. First, pick the Create Primary DOS Partition option. This lets you make a main partition. Then press Enter to get your new partition ready.

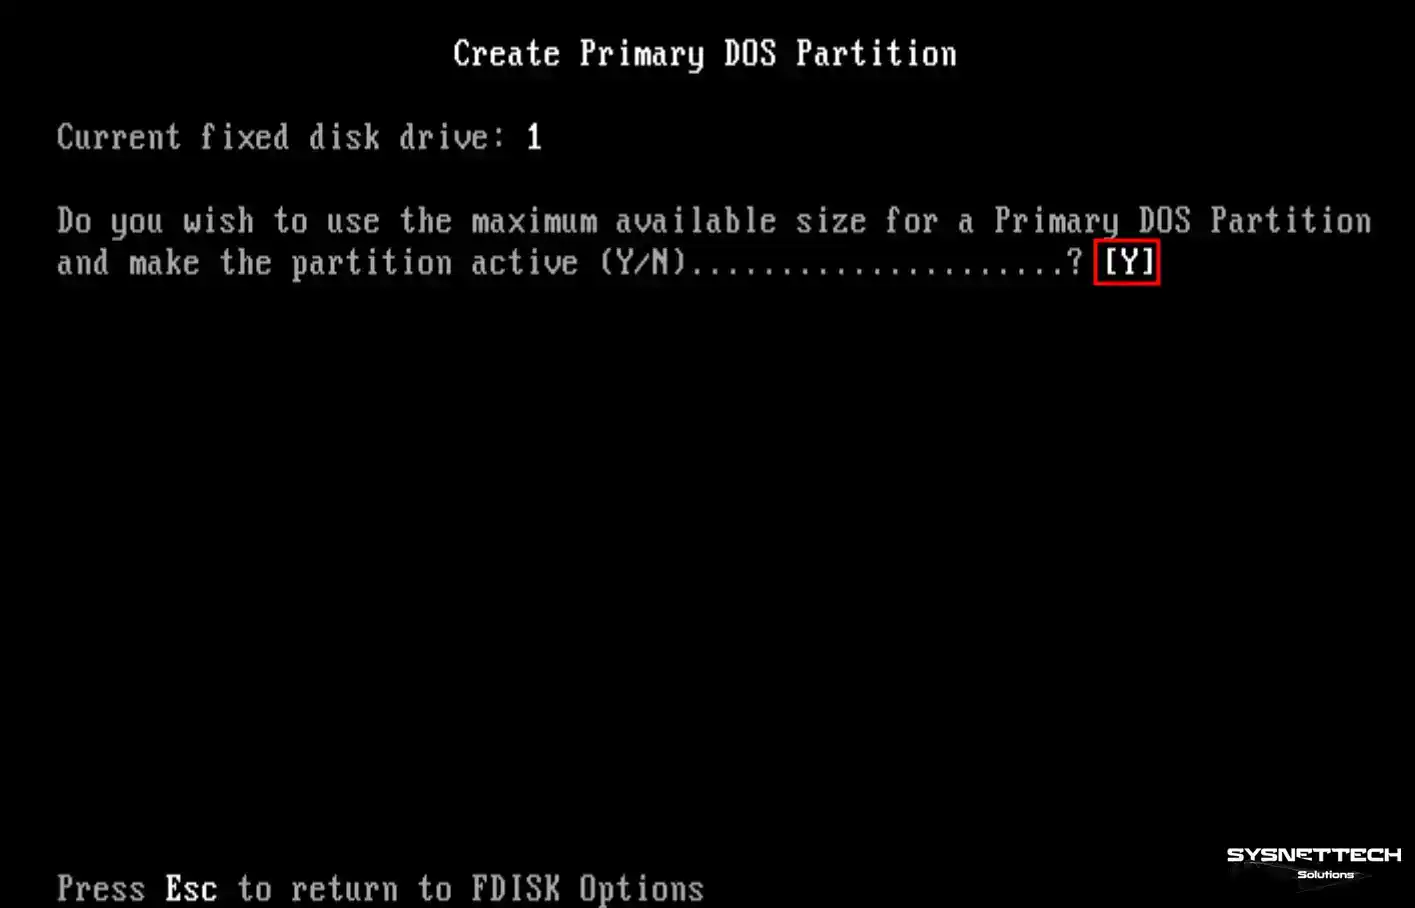
Step 5
To set the primary disk partition as active, answer the question with Y.
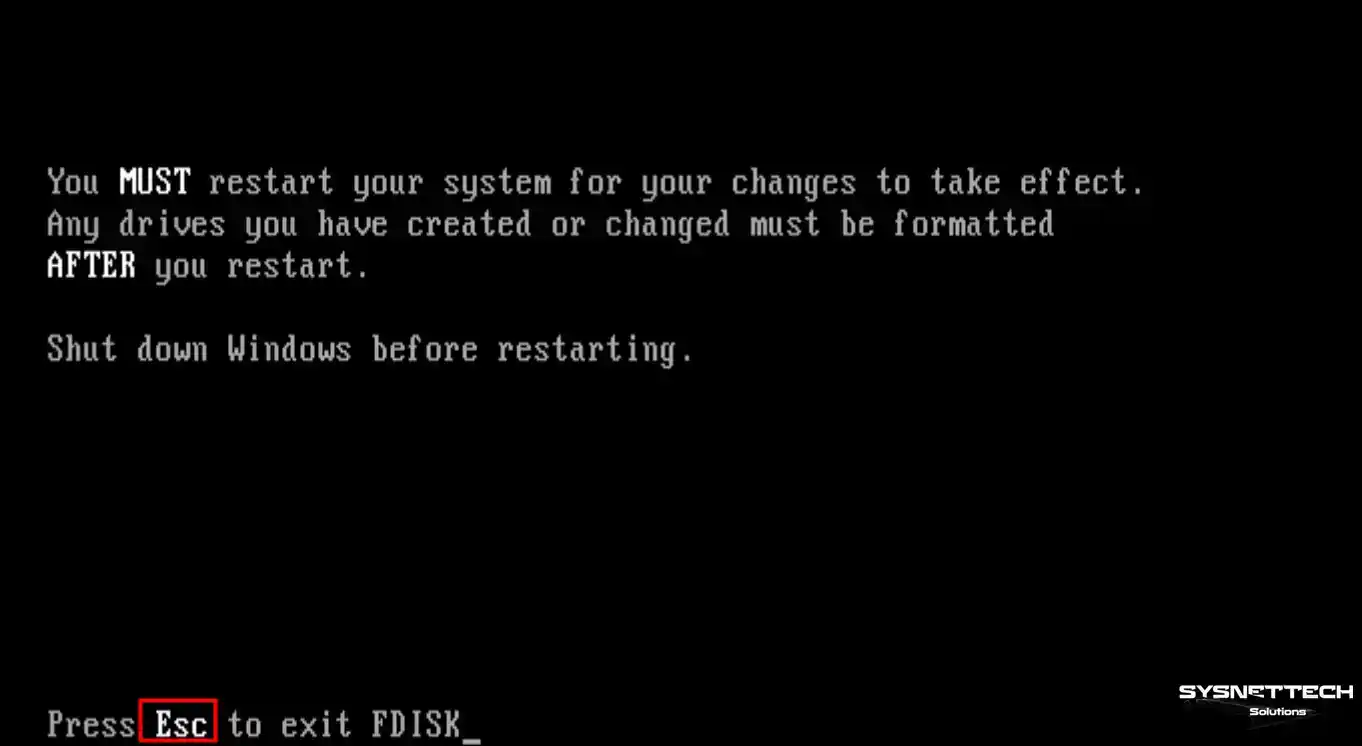
Step 6
After creating an active new disk partition for your Win95 VM, restart the VM. You can use Ctrl + R to restart it directly.
Step 7
After rebooting your virtual machine, format the disk partition you made. To do this, run the command format C: in the A:\ folder and say yes to confirm.
format C: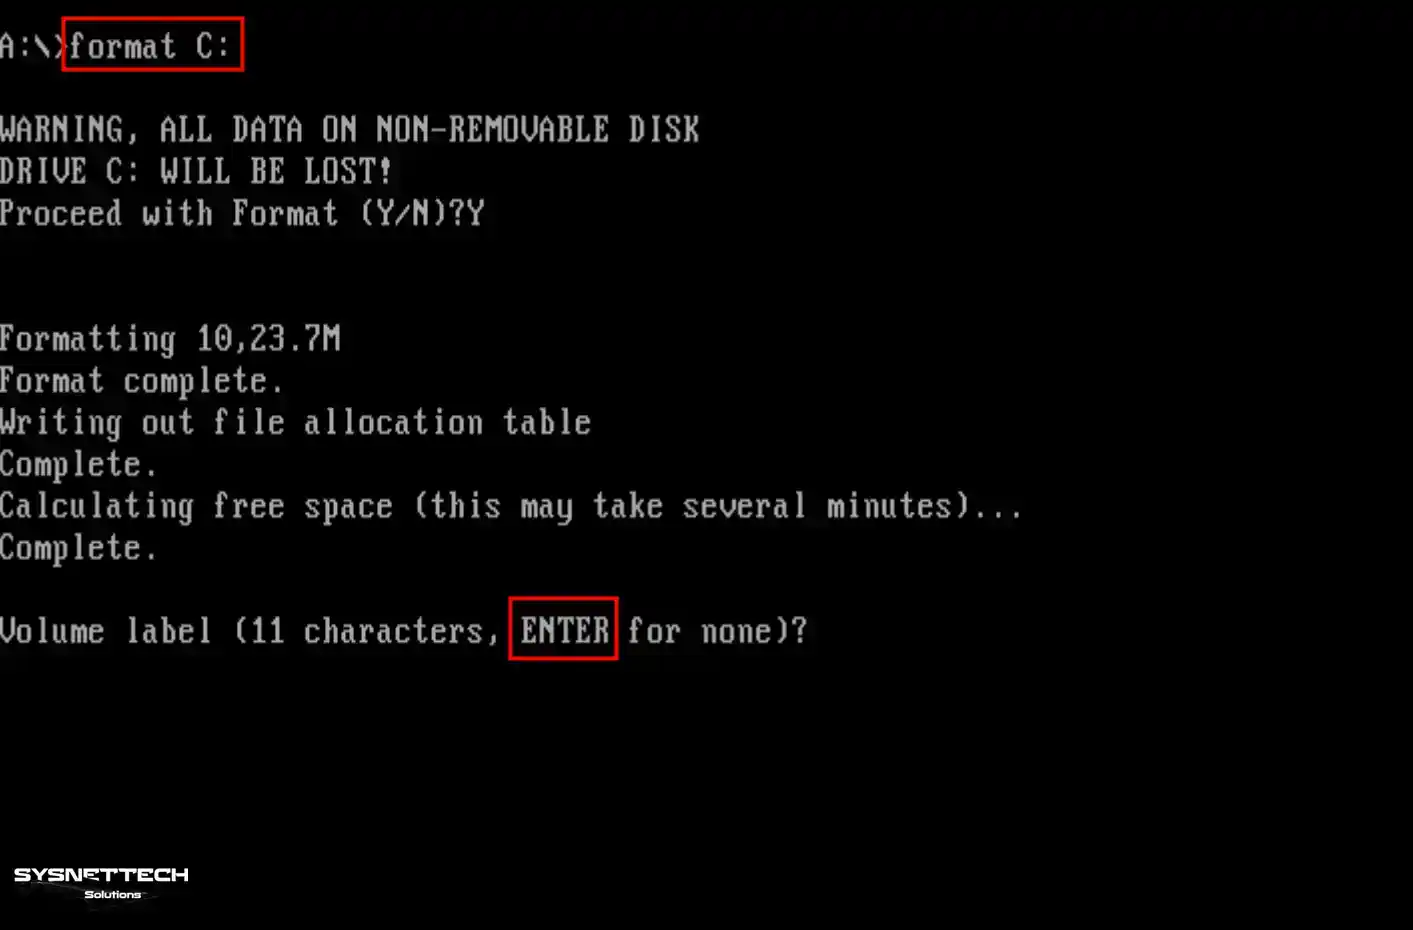
Step 8
First, format the C drive. Then prepare for Win95 files. You need to create a new folder. You will copy the system files to this folder. Thus, you will continue the installation from this stage.
Go to the C drive and use the dir command to check if there are any folders or files. Since you are going to install a clean system, there will be no files on the C drive.
To create a new folder in a DOS environment, we use the mkdir command. Therefore, to create a folder named WIN95 on the C drive, execute the “mkdir WIN95” command.
mkdir WIN95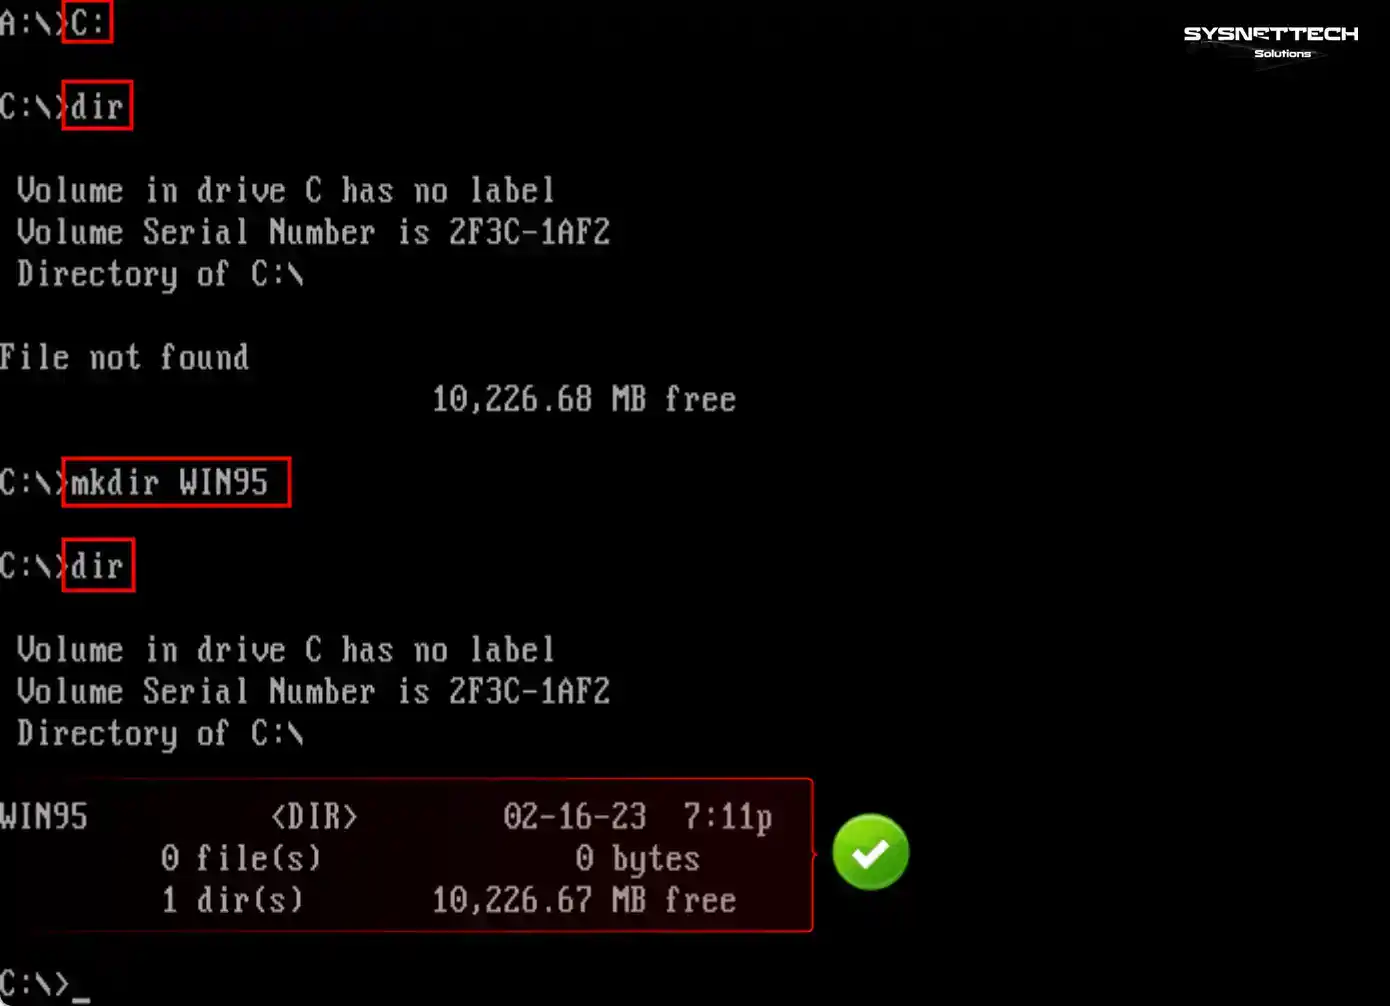
Step 9
The drive letter assigned to the ISO image file is R. You must copy the entire contents of the WIN95 folder in the R directory to the folder you created.
copy R:\WIN95\*.* C:\WIN95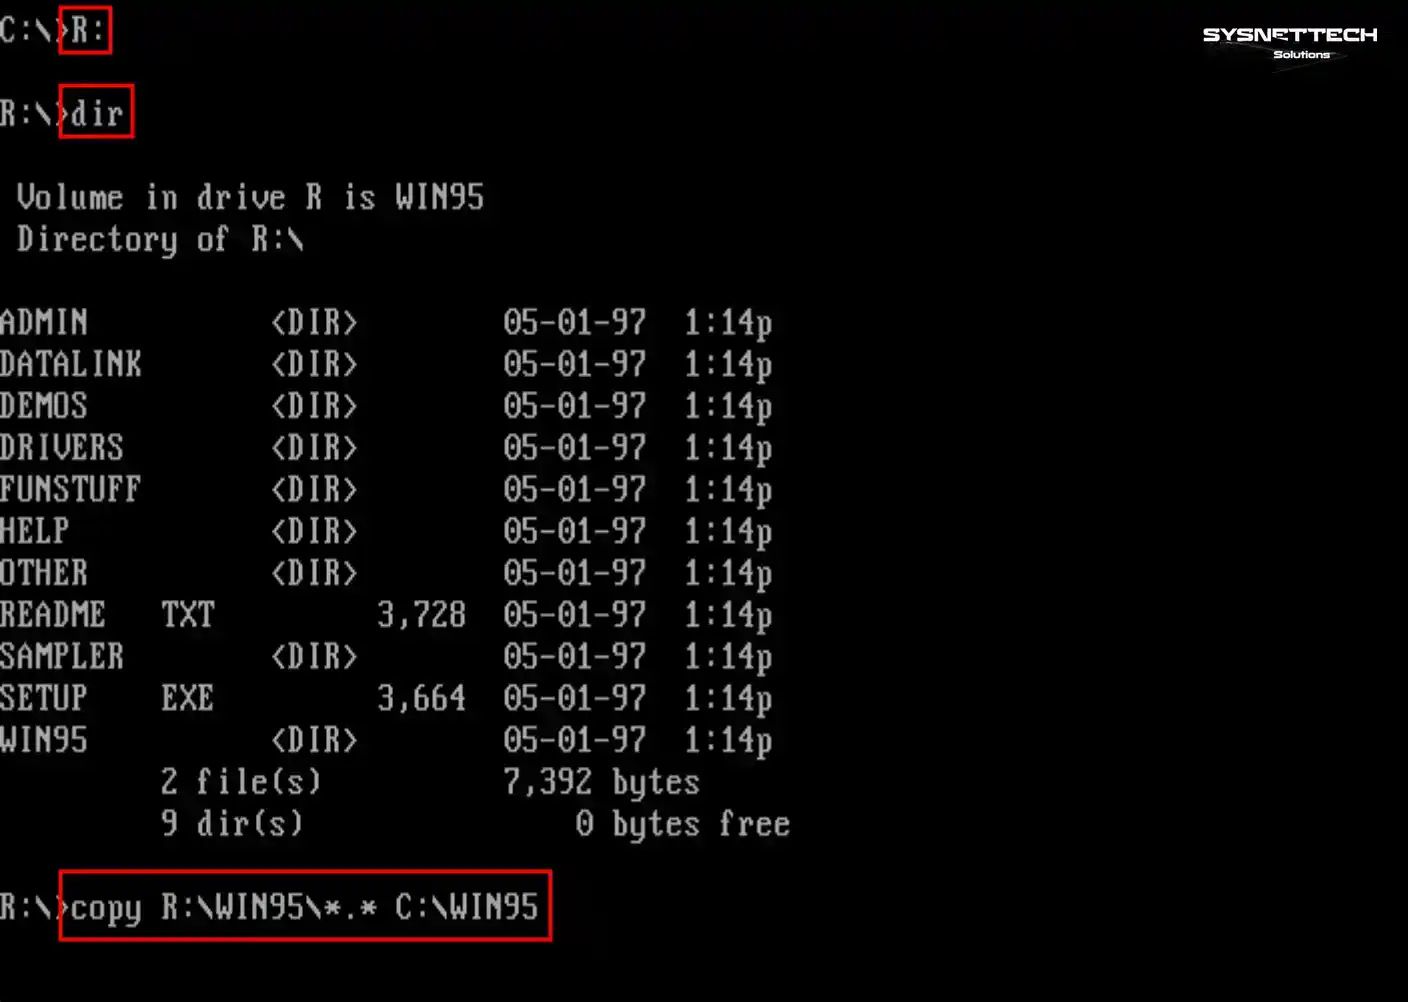
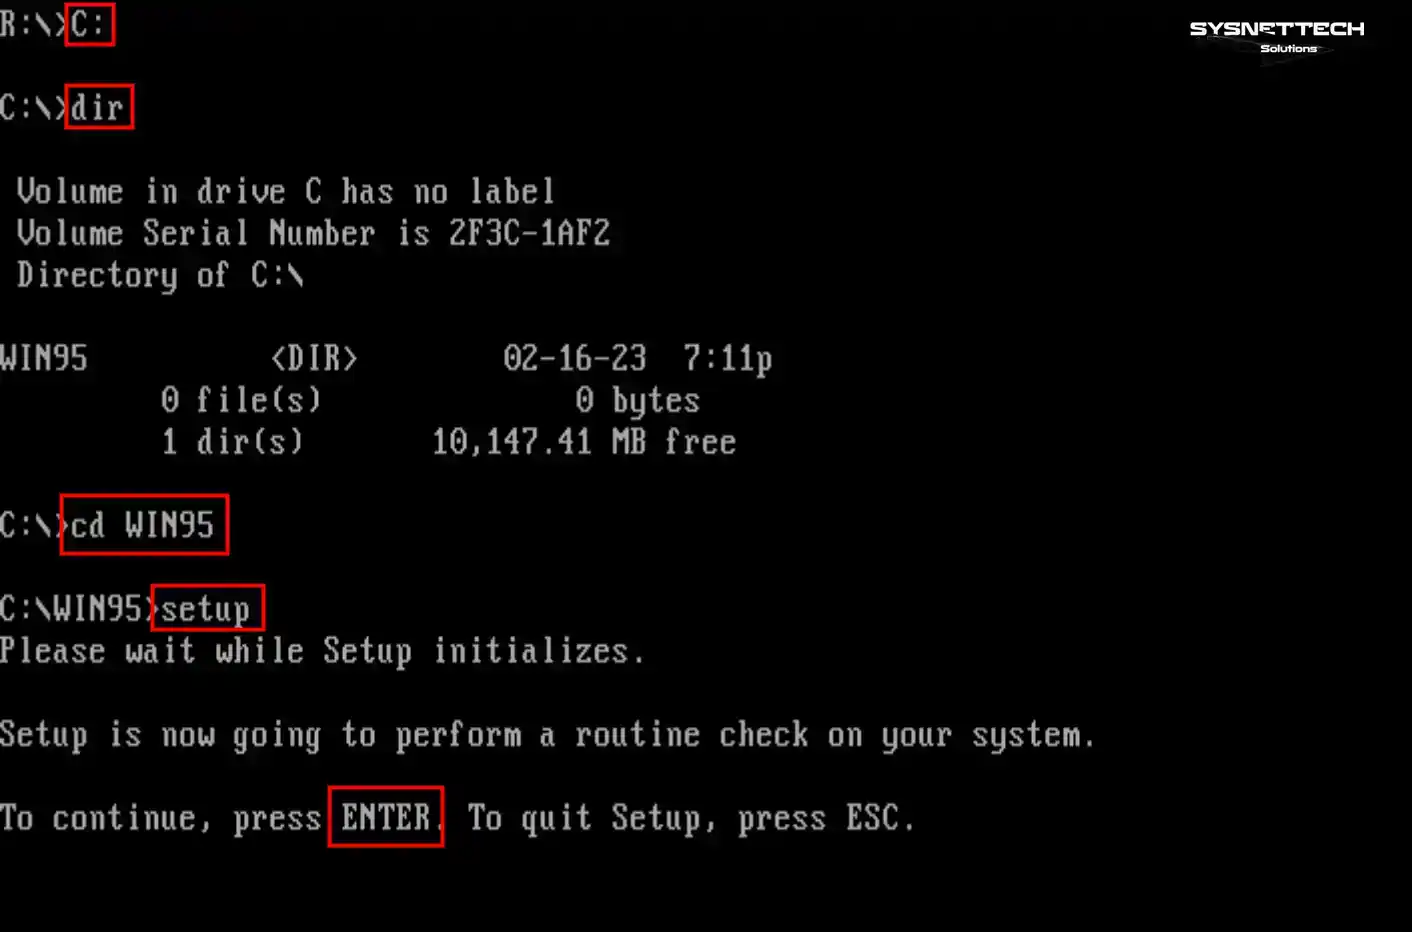
Step 10
Starting the Windows 95 installation is easy. First, go to the C:\WIN95 directory. Then run the “setup” command. Wait for the wizard to check the system. Press Enter to confirm and start the process.
Step 11
Please wait while Microsoft ScanDisk scans the file system and free disk space on the C drive.

Step 12
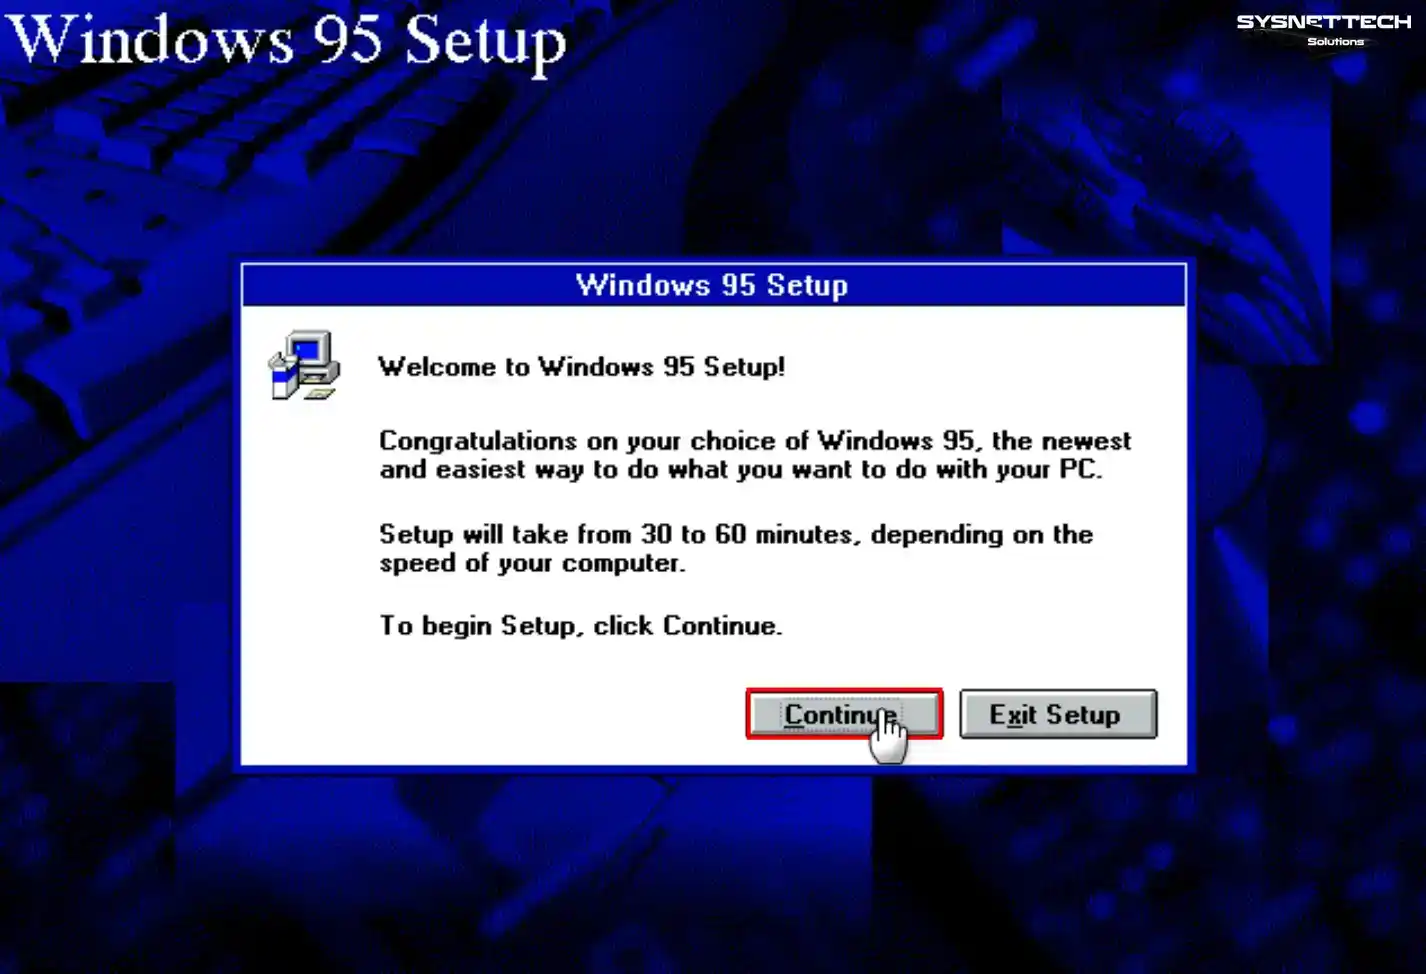
When the Windows 95 setup screen shows up, click the Continue button.
Step 13
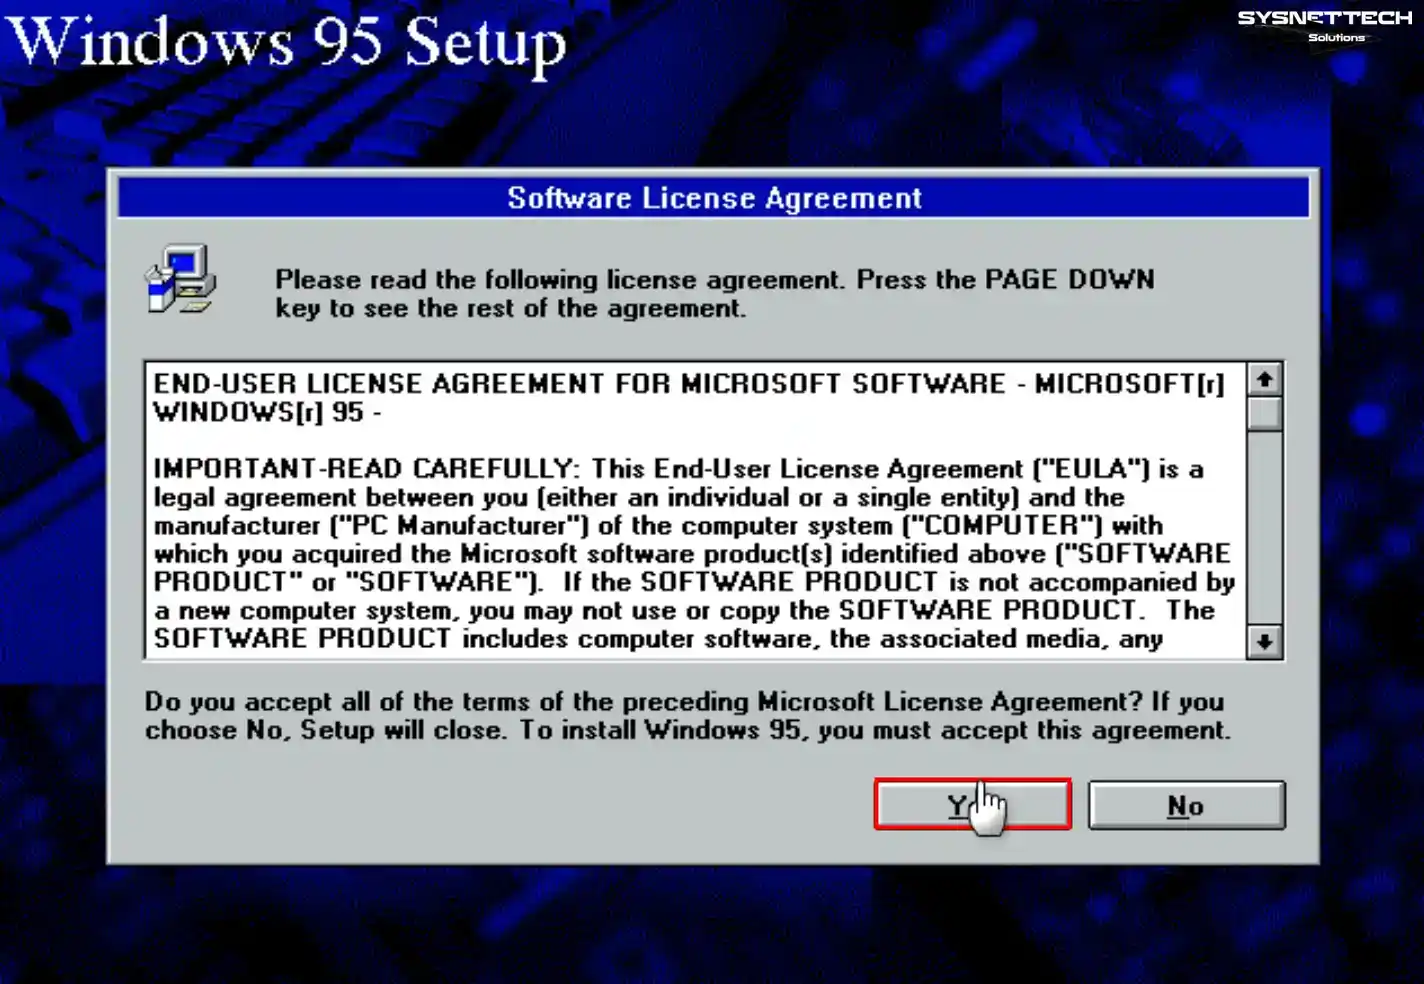
You can hit the Page Down key to read the entire text of the Windows operating system license agreement. To agree right away, click Yes to keep going.
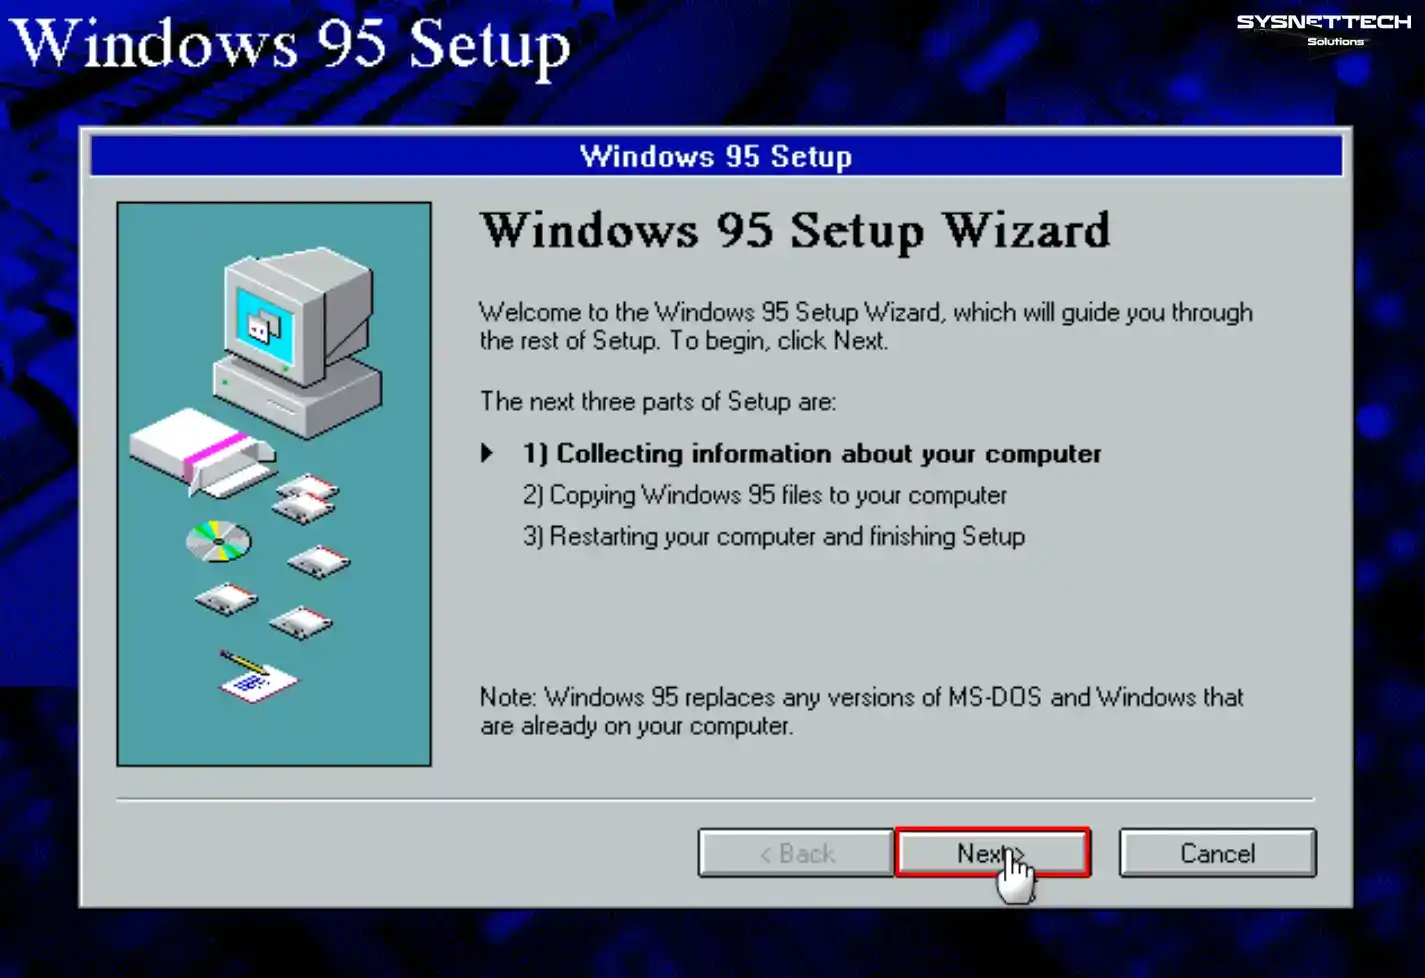
Step 14
Click Next to keep going in the window that says the setup has three steps.
Step 15
If you want to install Win95 on another drive, do these steps. First, pick the Other Directory option. Next, choose where to install, then click OK to go on.
If you want to use the C:\WINDOWS directory by default, click Next.

Step 16
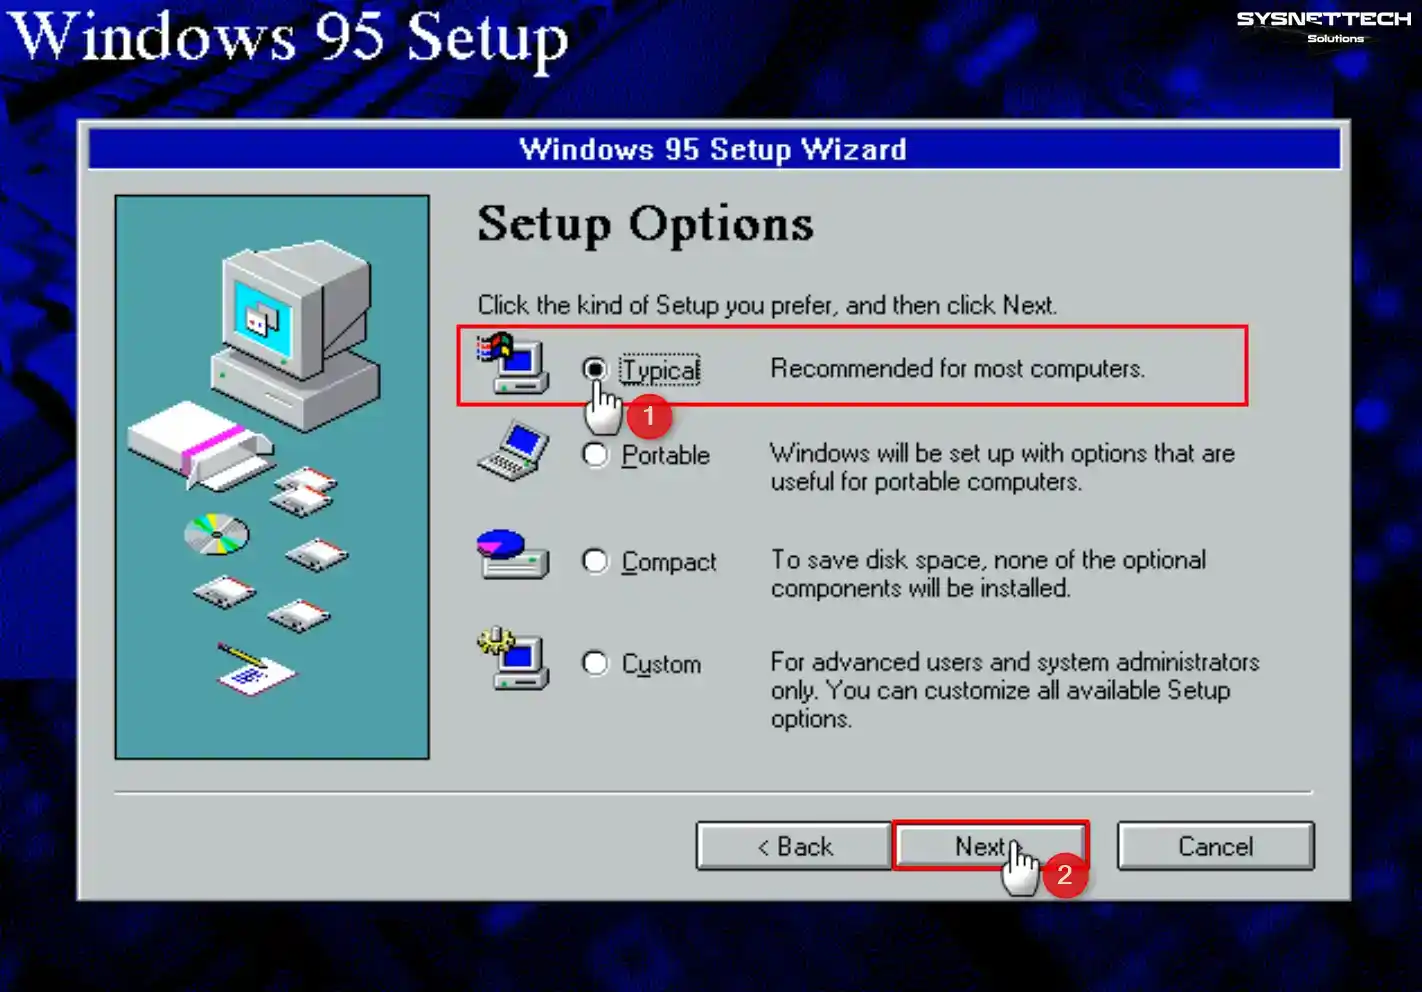
The setup wizard will check the disk space. You will need to wait while this is happening. When you get to the Setup Options window, choose the default Typical option.
Step 17
You need your product key for the Win95 installation. Enter your key first. Make sure you have entered it correctly, then click Next.

Step 18
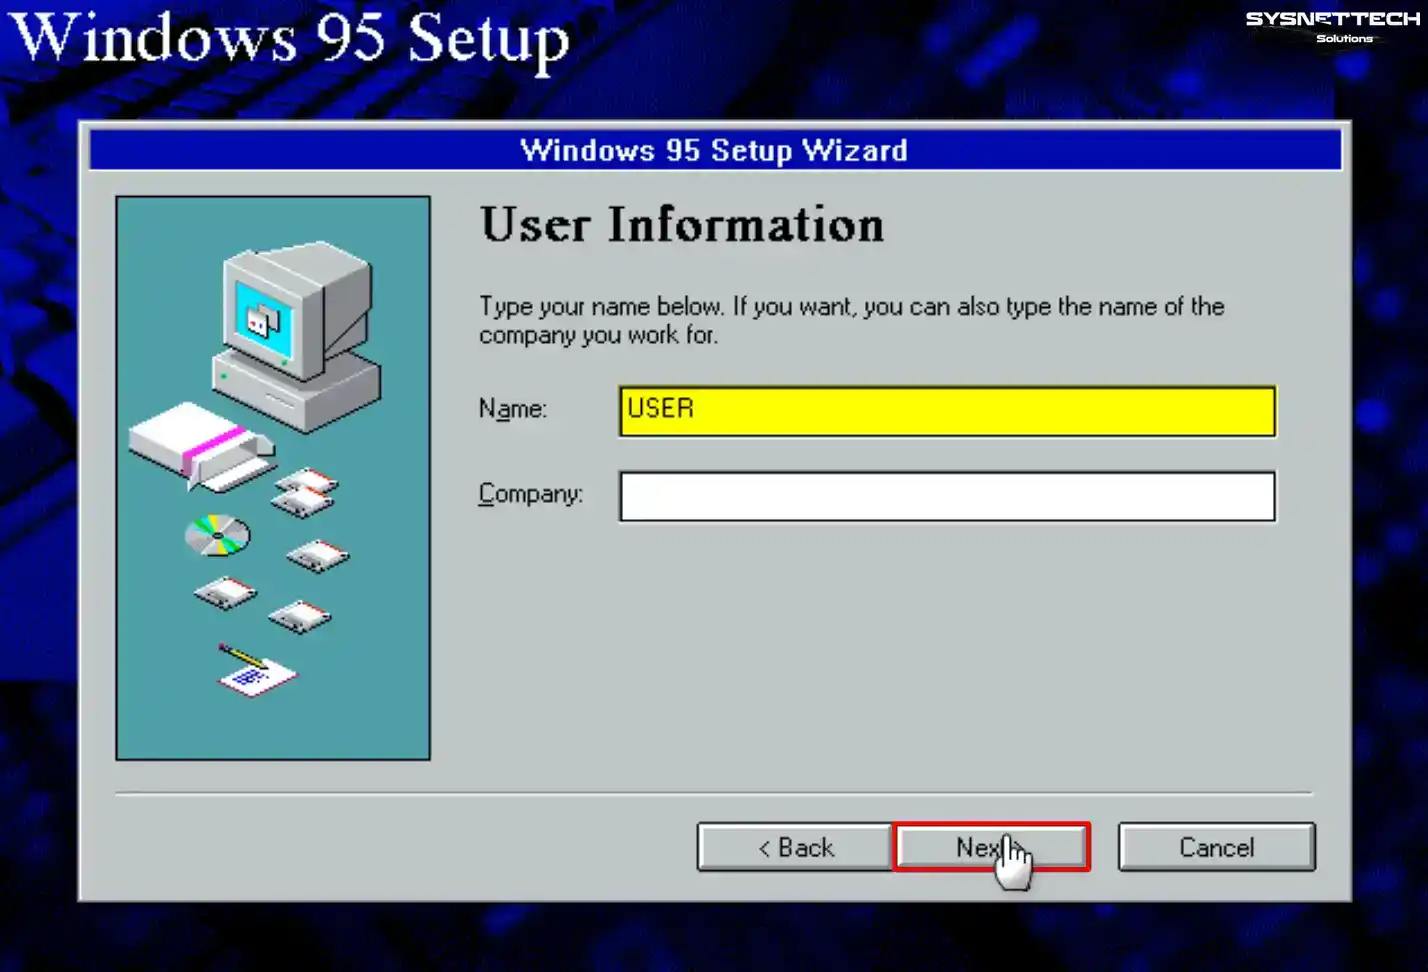
Pick a username for your virtual system. Choose this name carefully. Add your company name if it is for work. This makes the setup seem pro, then check the details.
Step 19
Click Next to let the setup wizard look at the virtual hardware in your virtual machine.
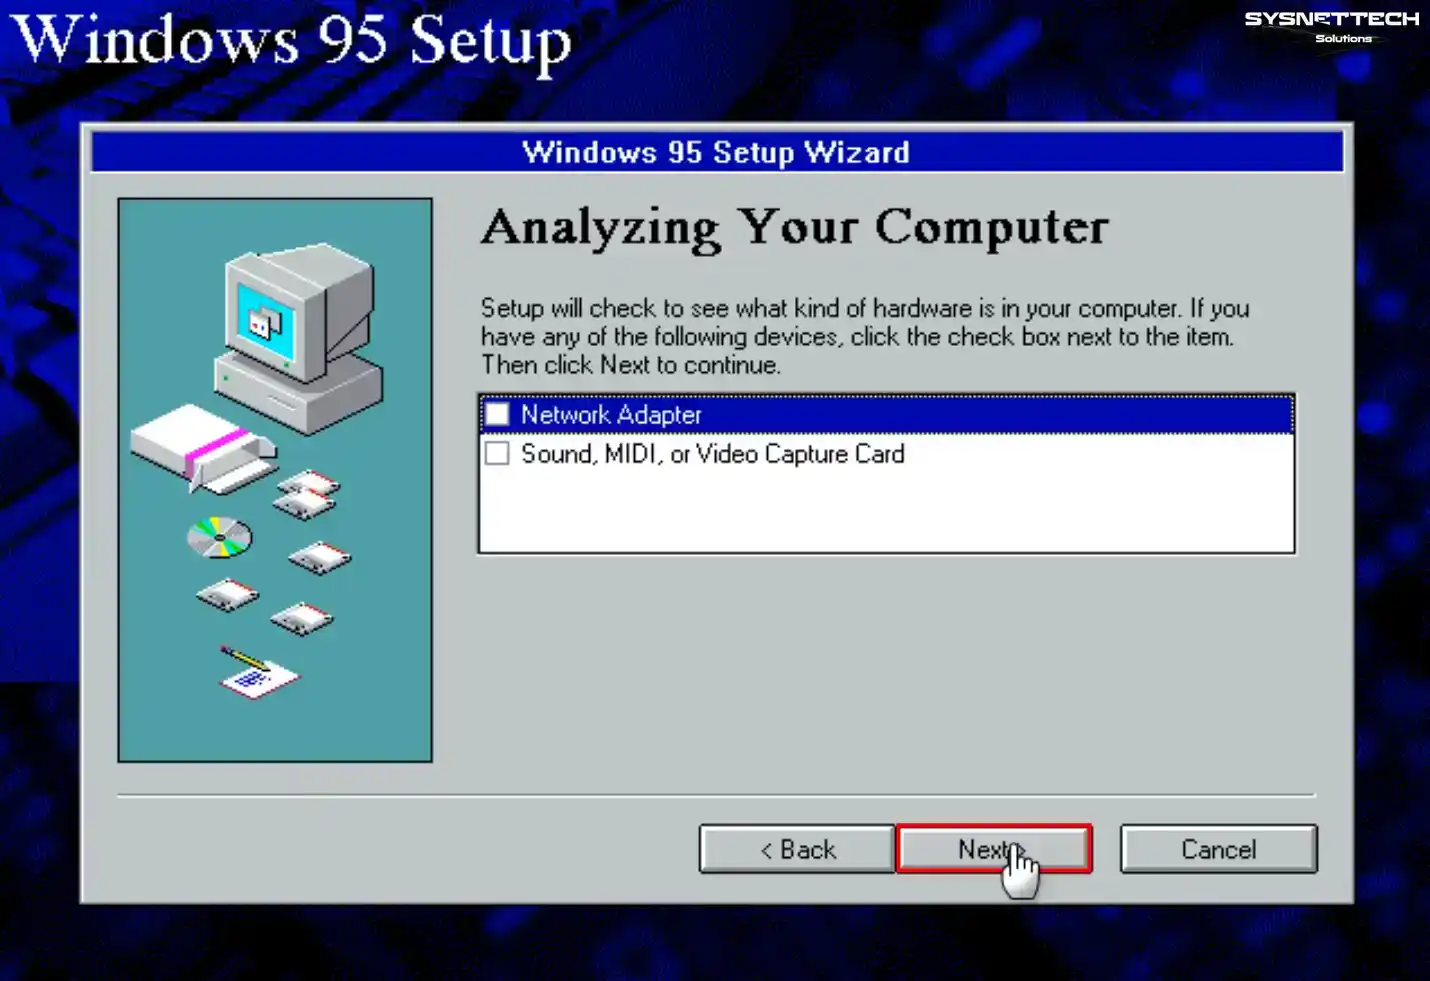
Step 20
Please be patient while the system analysis is in progress. This process may take a while. Please do not shut down your Win95 virtual machine. Do not press CTRL+ALT+DEL.

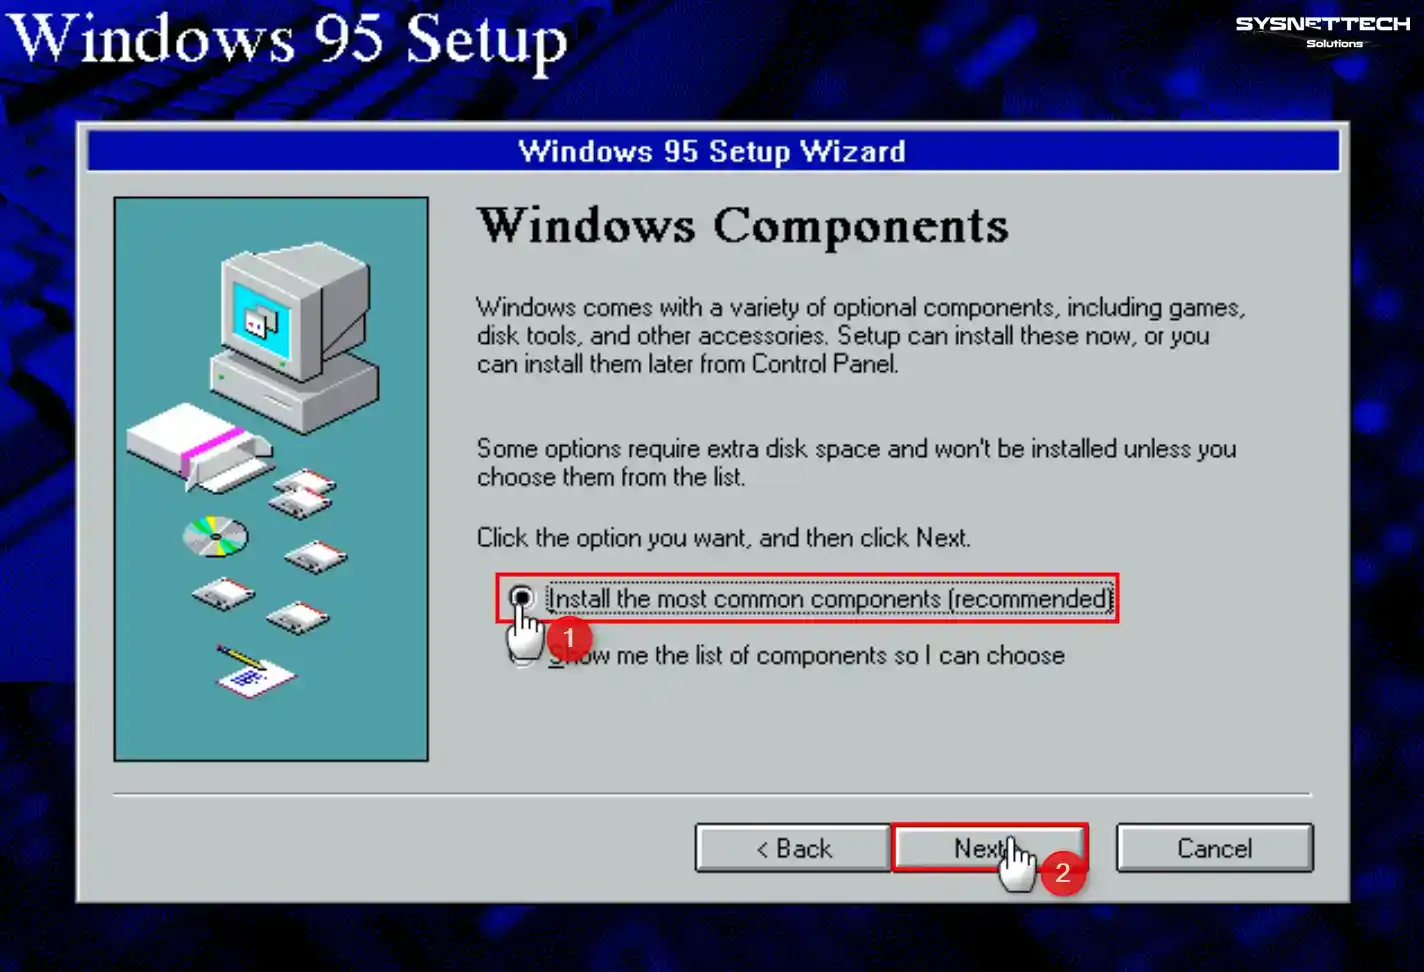
Step 21
Here, you can change Windows parts. First, pick the parts you want. This way, you install only what you need.
Step 22
Sometimes you may not be able to start Microsoft Win95. In this case, you will need a startup disk. Be ready, especially if you see system errors. The startup disk will help you solve the problem. Therefore, always keep it in reserve.
However, since virtual machines do not require a boot disk, select the No option.

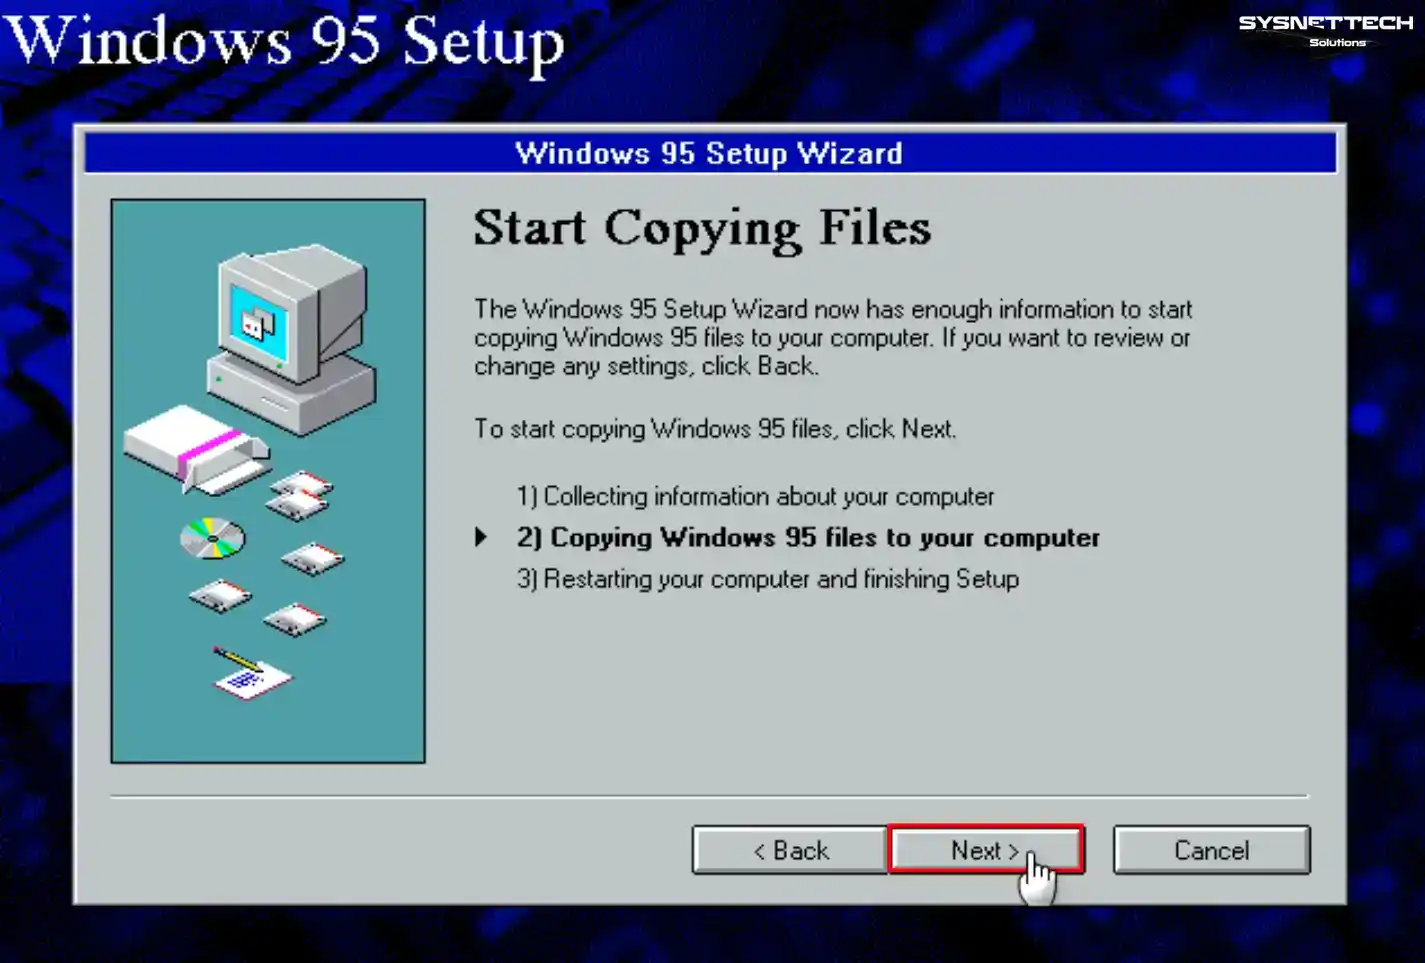
Step 23
Click Next to start the installation wizard’s second step, which is copying the system files.
Step 24
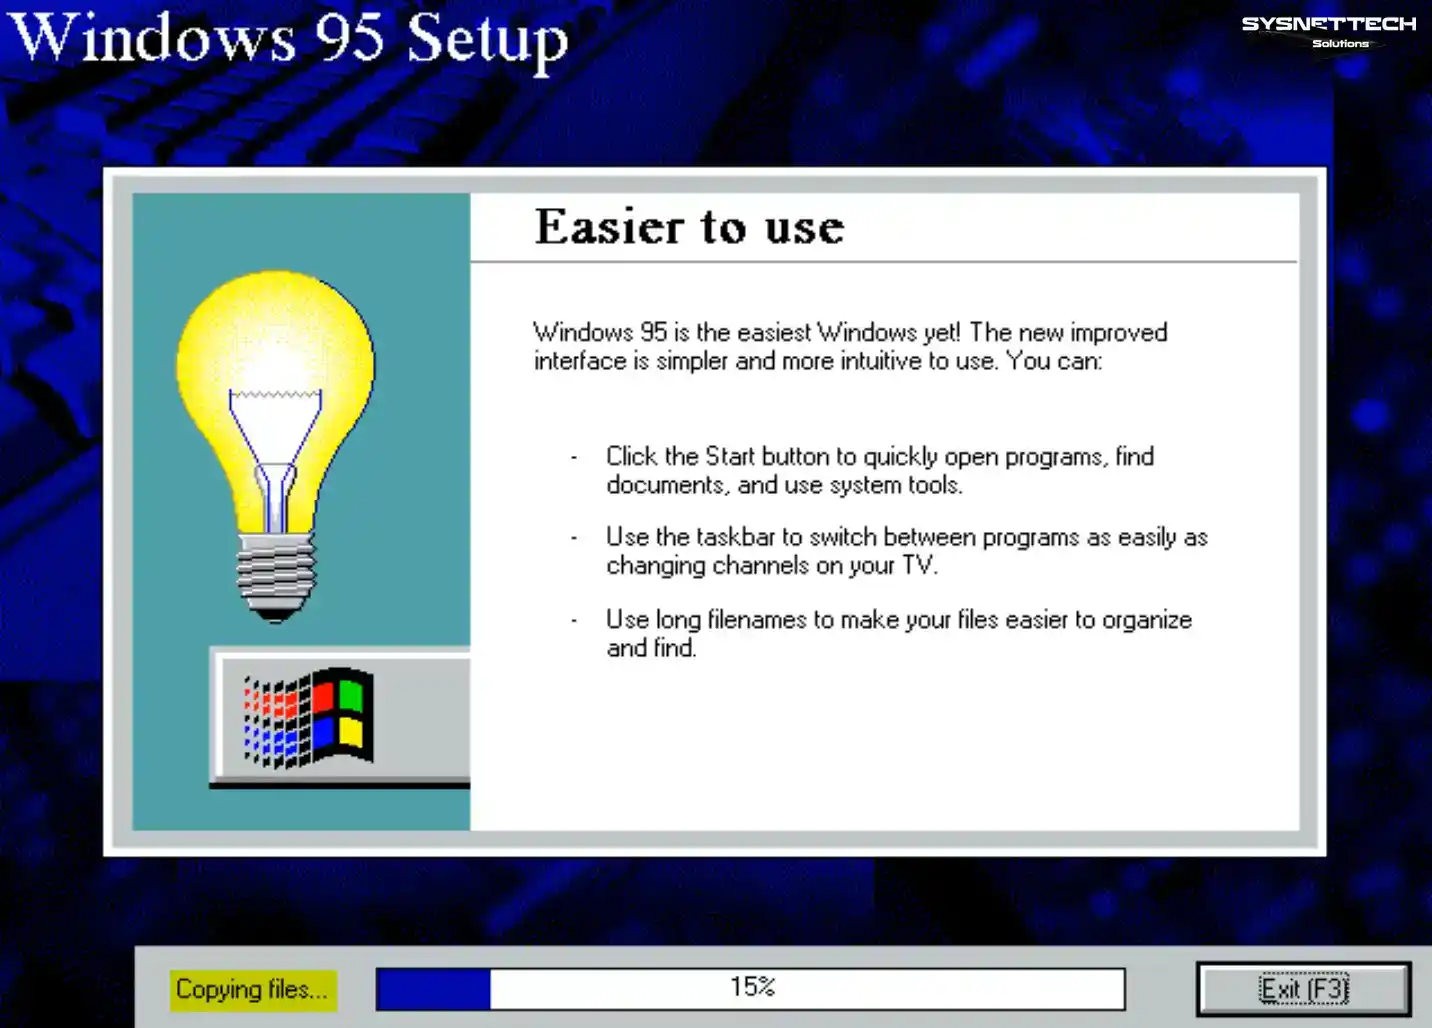
Please wait while you install Windows 95 on the virtual machine using VirtualBox.
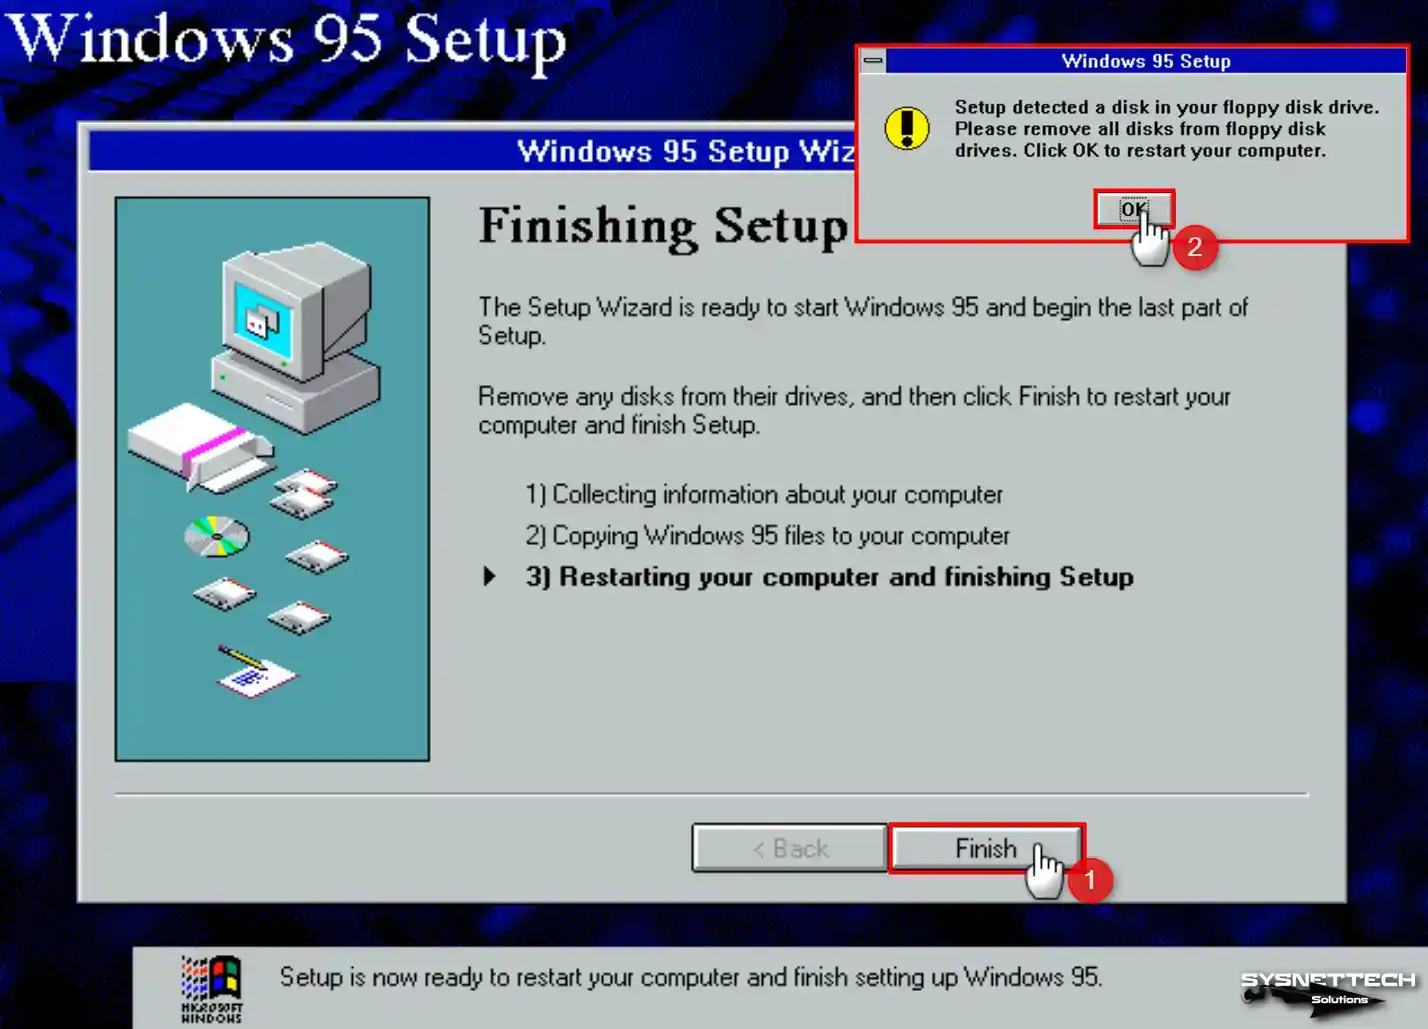
Step 25
You have reached the final step of the installation. First, click the “Finish” button. The system will then restart by itself. The setup process will finish. Win95 will now be ready for use.
Step 26
When your guest machine restarts, you will need to enter a computer and network name for Win95. To do this, click OK in the Network Information window.
Be careful when setting up network settings here. First, type a unique computer name. This name must not be the same as others. Then join the network by typing WORKGROUP.
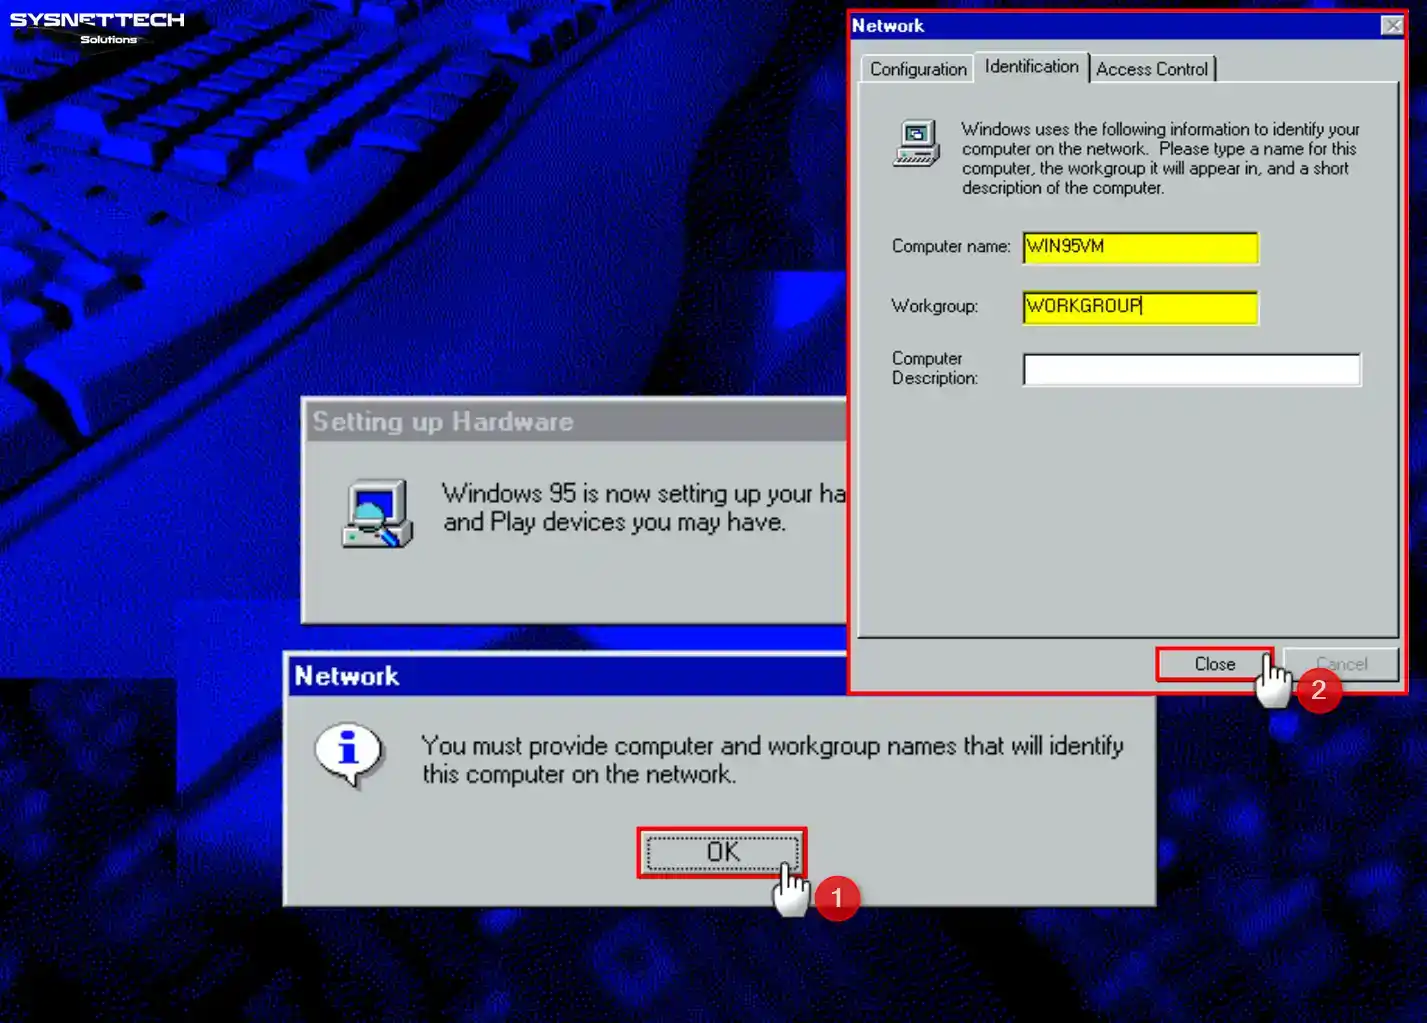
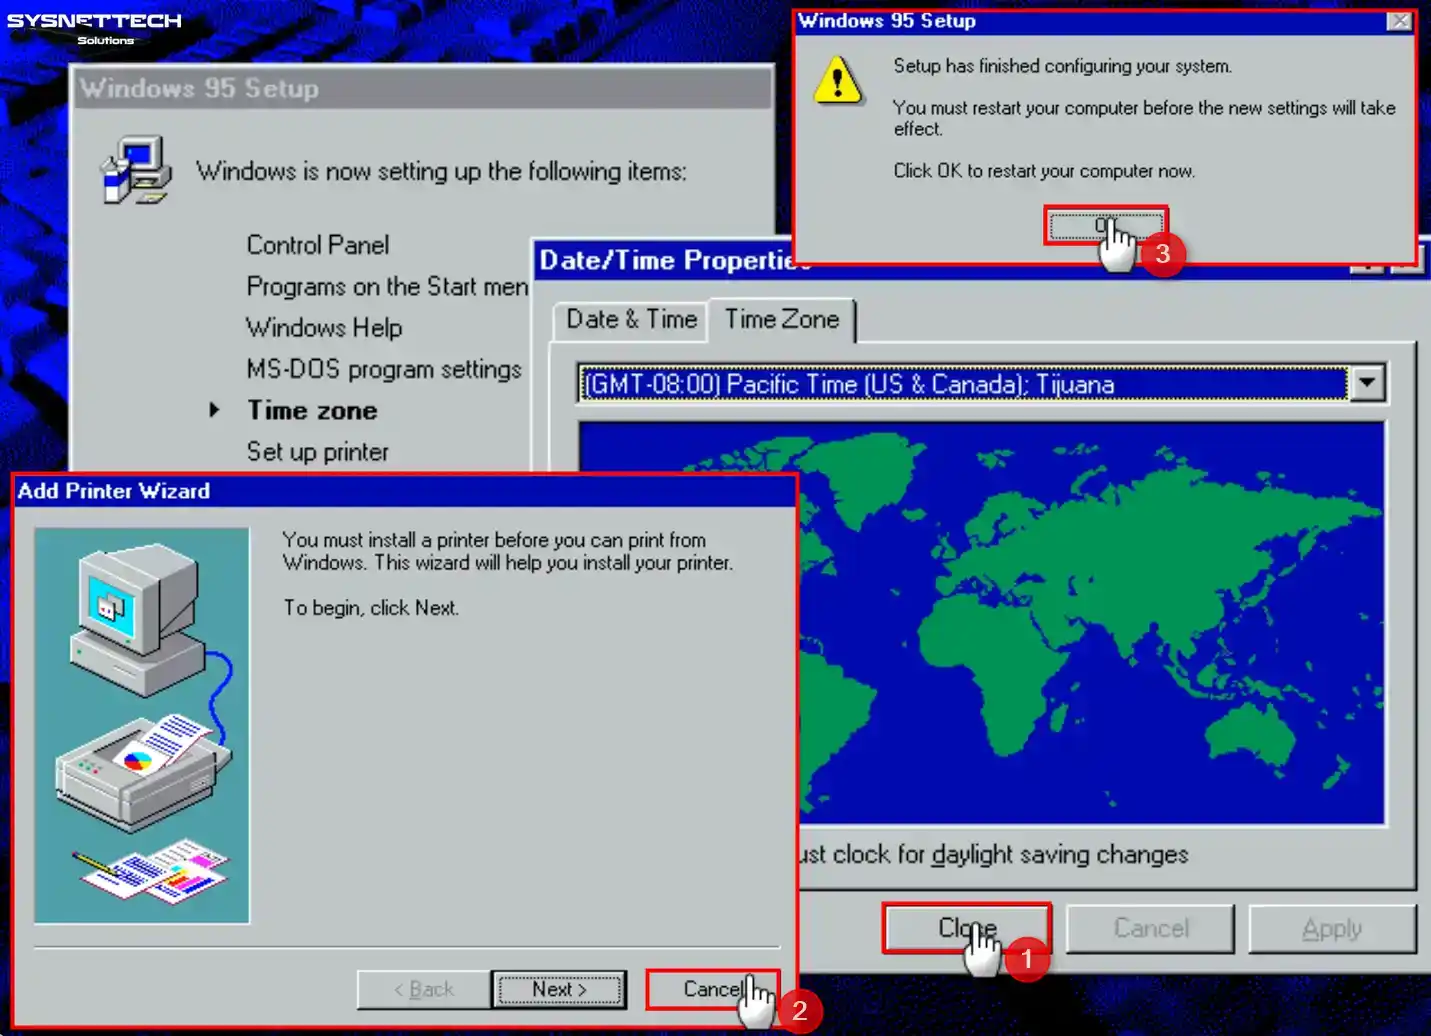
Step 27
Please wait while Windows configures the control panel tools, shortcuts in the Start menu, and programs. When the date and time window opens, select the time zone for your country and click the Close button.
Would you like to add a printer? If you need to, click Next. Otherwise, select the Cancel button. So, this will close the printer wizard. You can add it later if you wish.
You have completed the Win95 installation. Now it’s time to restart the system. To do this, click OK to let Windows restart itself. After that, you can start using the system.
Step 28
Please wait while the Microsoft 95 OS restarts. This process may take some time, so do not press the power button under any circumstances.
Step 29
Log in to the system by entering the username you created and clicking OK.

Step 30
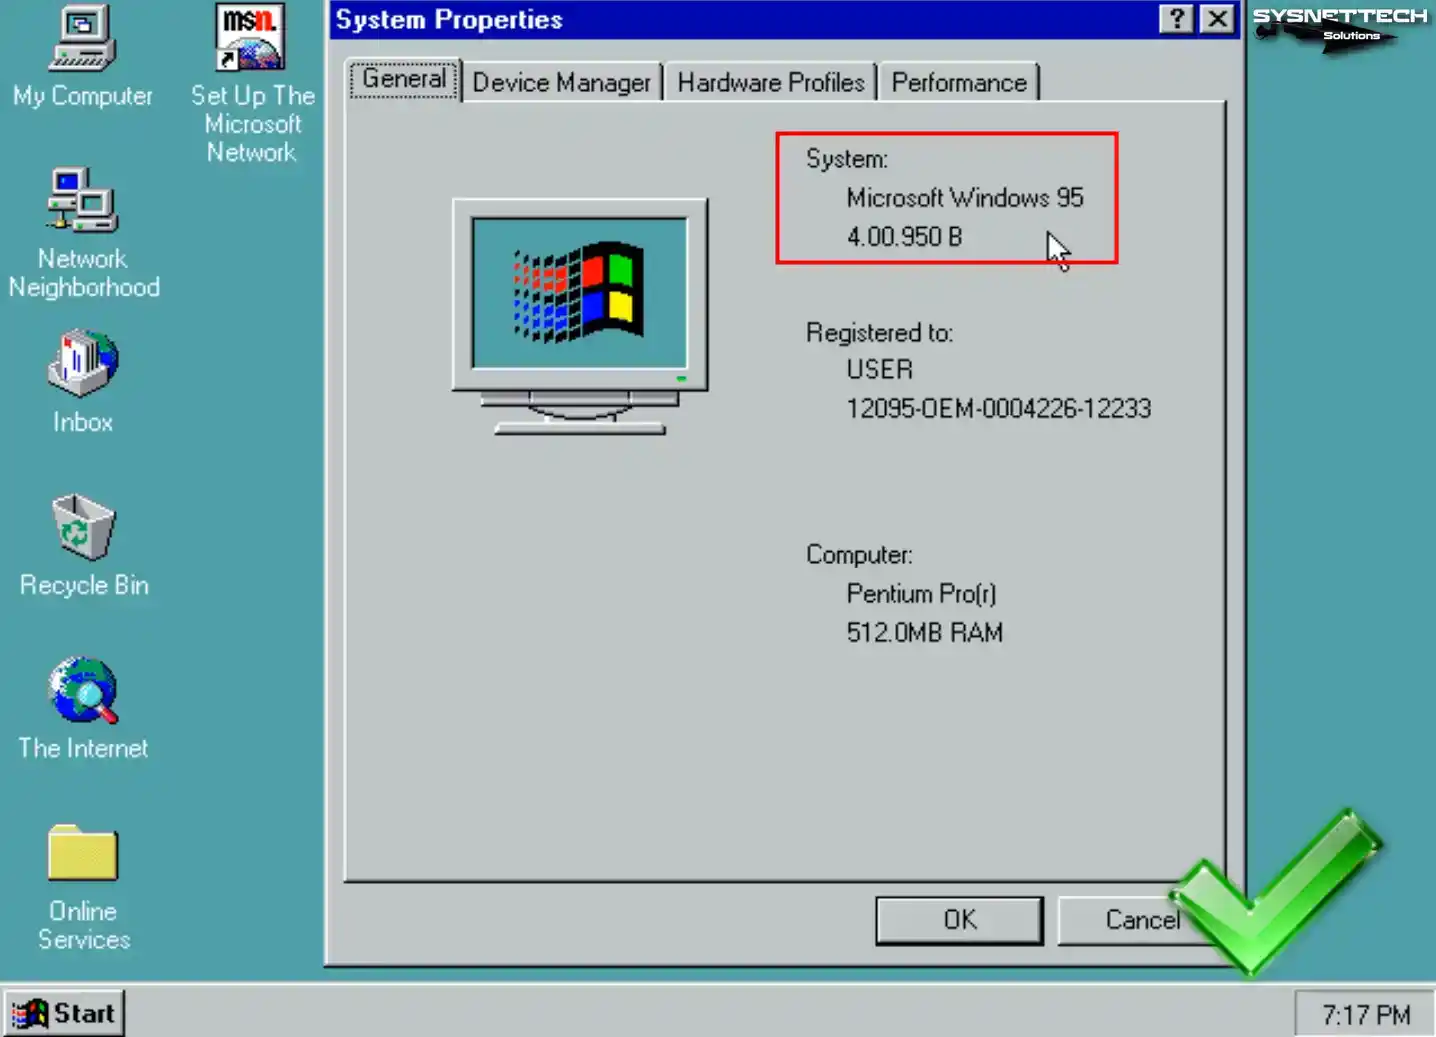
Right-click on My Computer, then pick Properties from the list. Thus, this will allow you to view your system information. Also, check the Win95 installation details.
Windows 95 Virtual Machine Driver Installation
1. Display Adapter Driver Installation and Changing Screen Resolution and Color Bit
After finishing the Windows 95 setup in VirtualBox, there is one more step. You need to use the Guest Additions software. This tool helps a lot, mostly with screen size and sharing.
But sadly, this software is not officially made for older Windows versions.
You need special drivers to make your virtual machine’s screen look better. Try SciTech Display Driver first. Or, you can also install the VBE Miniport Driver.
VBE Miniport works better than other programs. A software service will run in the background each time you restart your system.
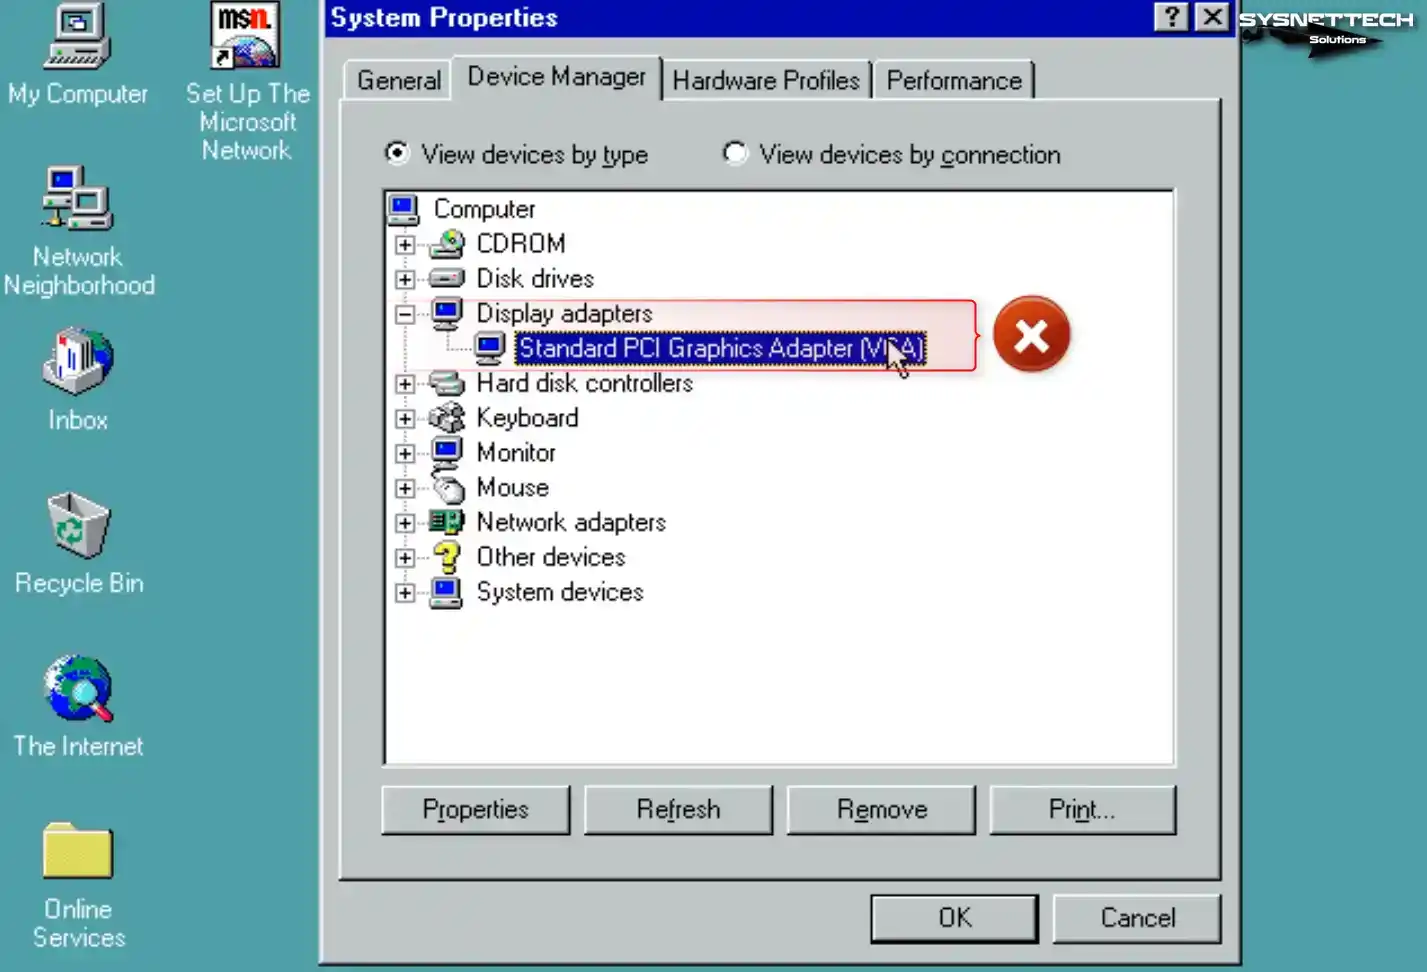
Step 1
Open Device Manager on your Win95 virtual PC. Look at the Display Adapters tab. Here you will see a standard display driver. This fundamental driver gives only a few features. For better performance, you need to install a custom driver.
For this reason, it does not change the screen resolution on Windows 95 or Windows 98 systems.
Step 2
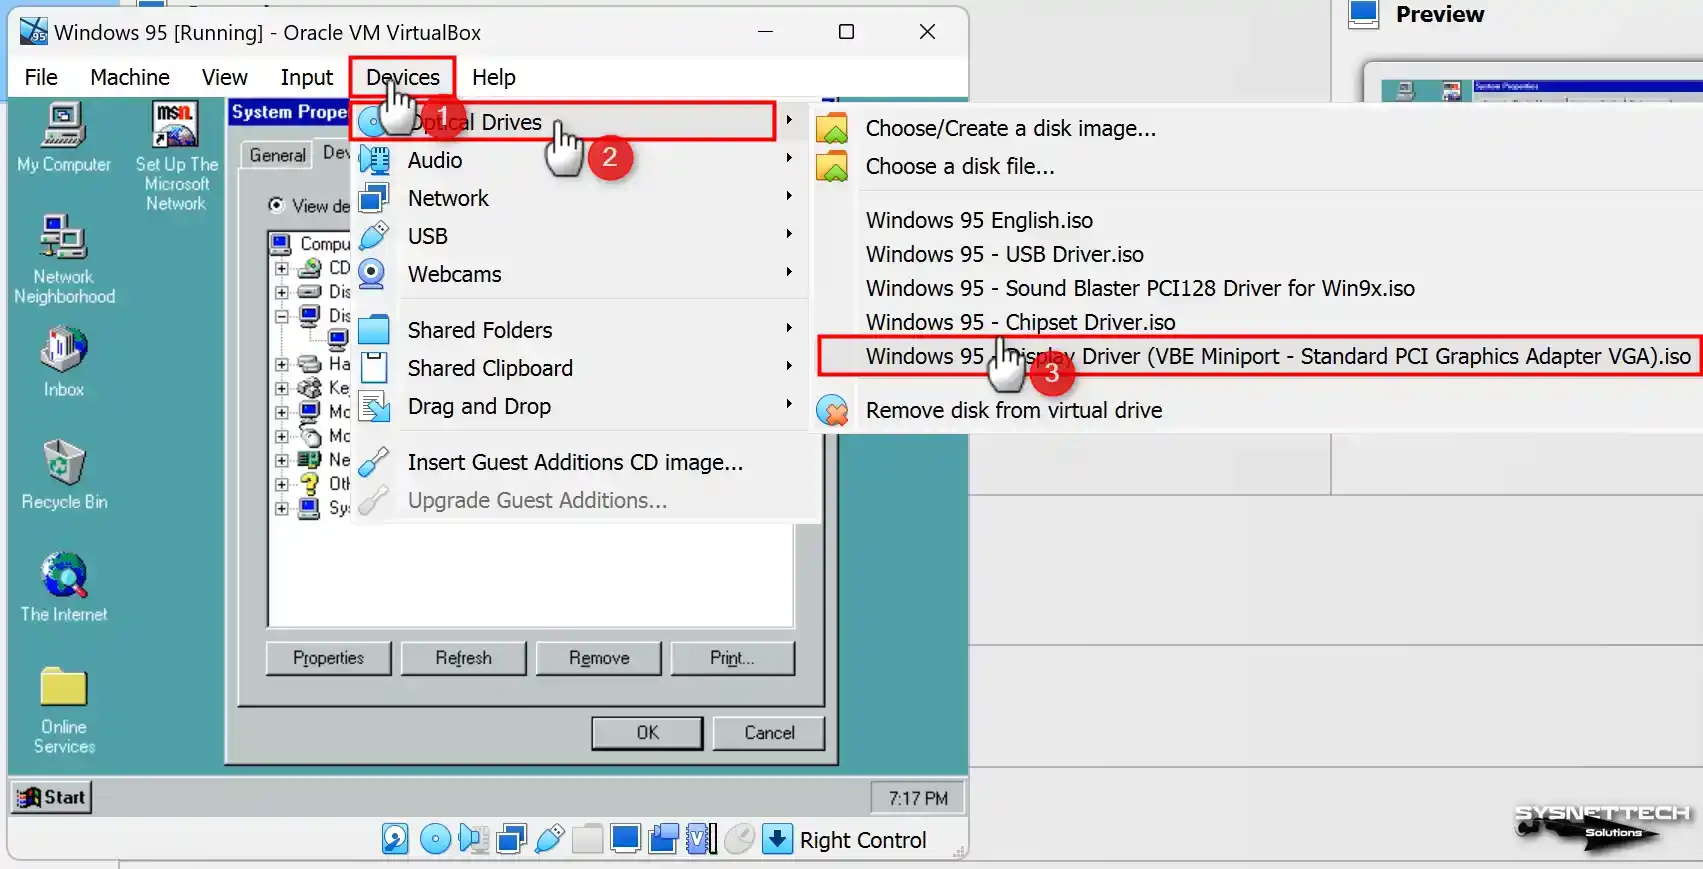
First, download the VBE Miniport driver from the table in the article. Then go to the Devices menu. Select Optical Drivers. Click the Choose a disk file option.
In the window that opens, find Display Driver (VBE Miniport) ISO and click the Open button.
Step 3
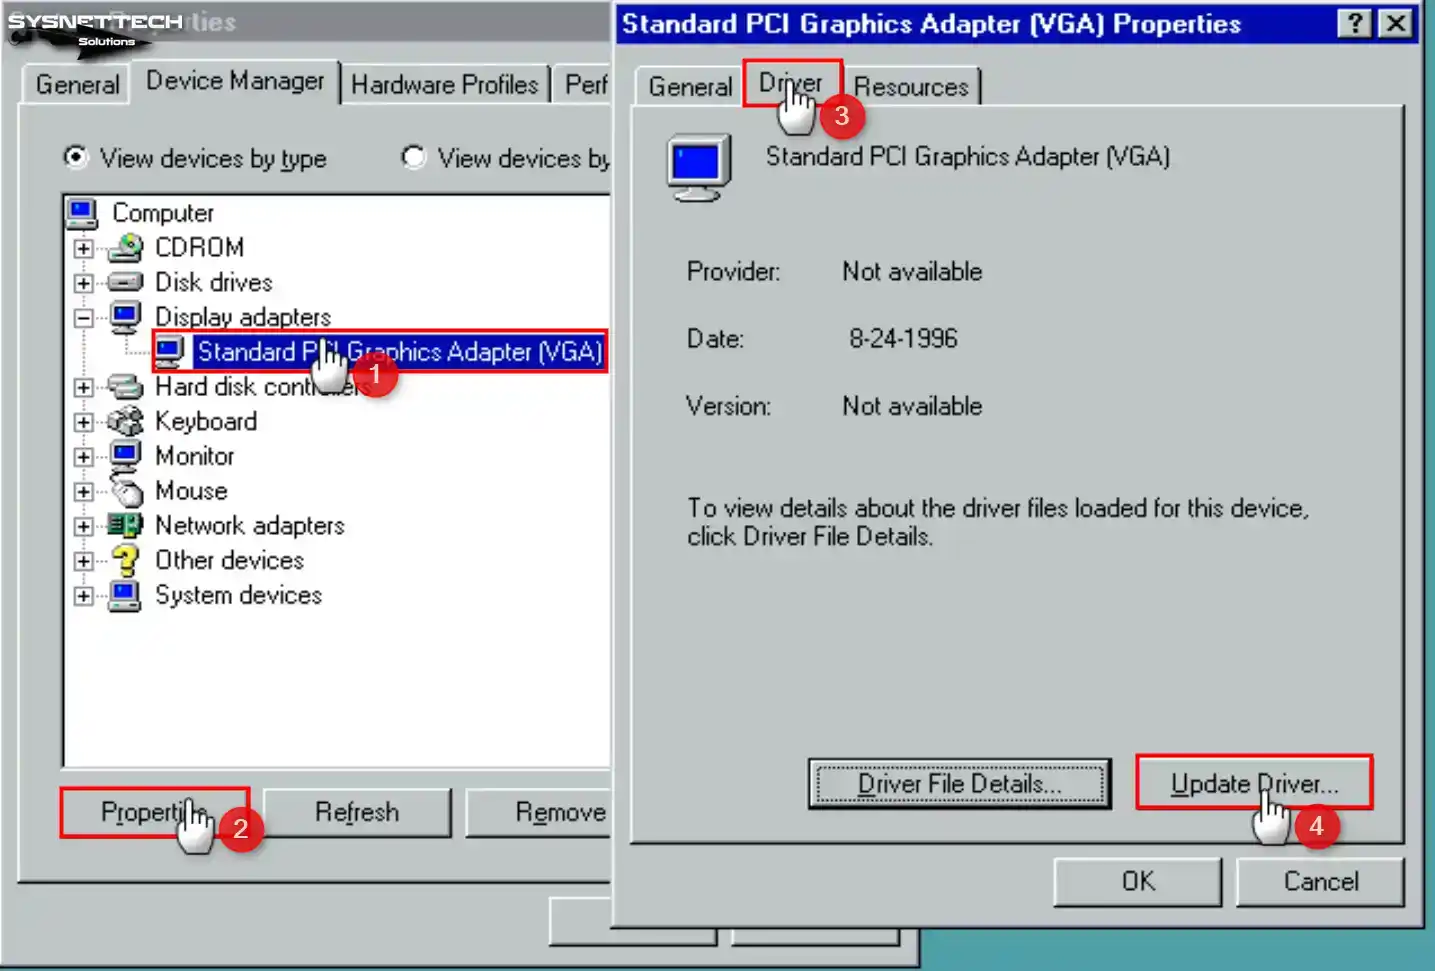
Double-click on Standard PCI Graphics Adapter. This will open the Properties window. Then select the Driver tab. Here you can change the driver settings. You can install the new driver from here.
However, click Update Driver to start the wizard.
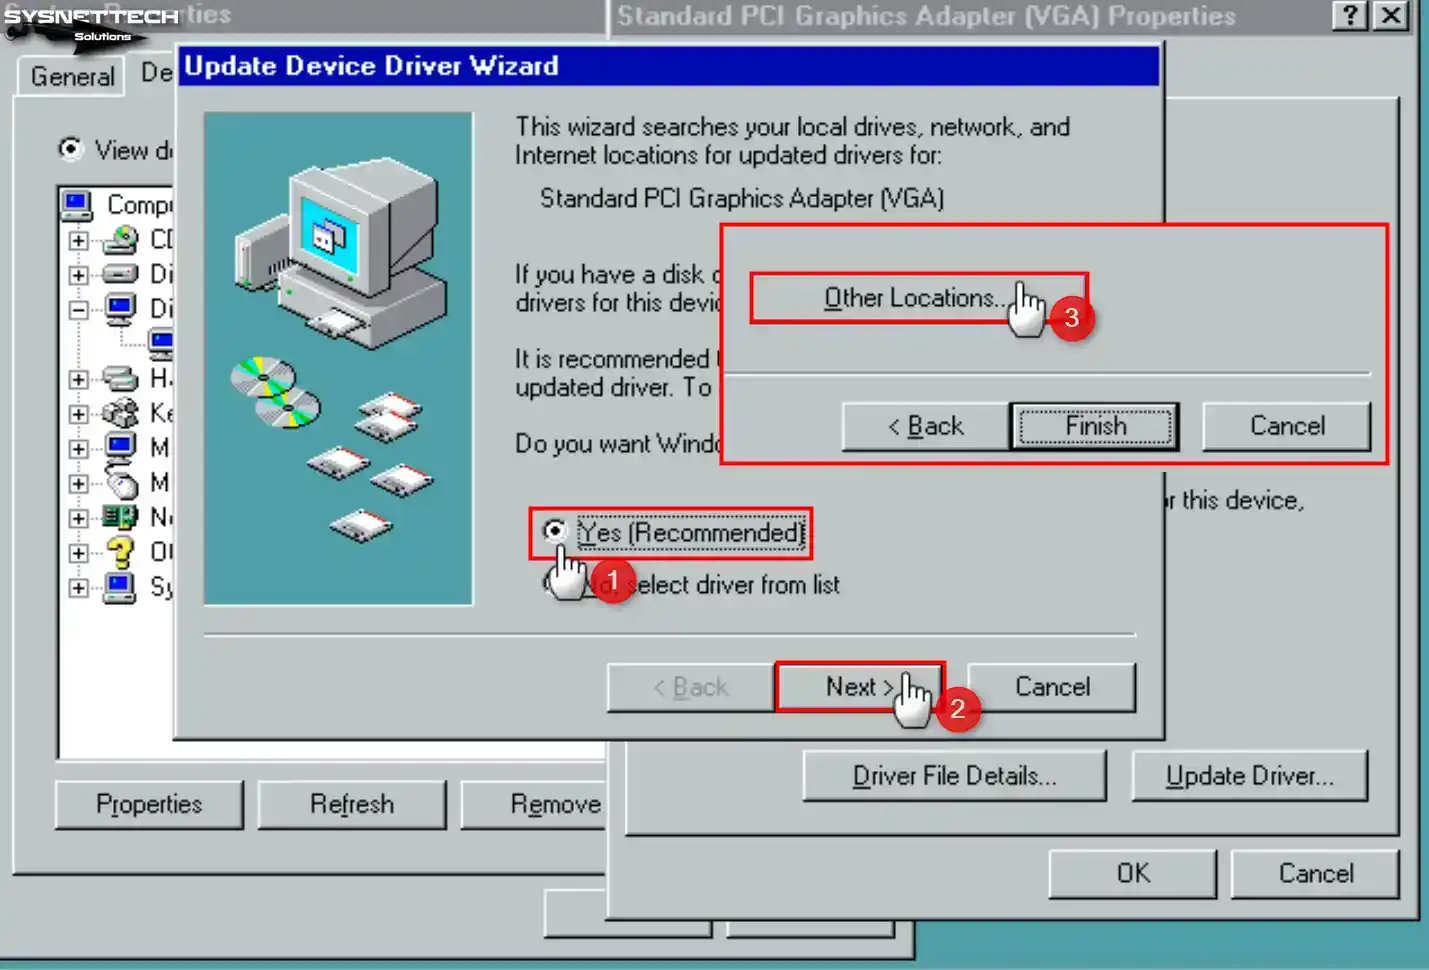
Step 4
Open the driver update window. First, choose the “Yes (Recommended)” option. Then click Next and find the Other Locations option in the new window.
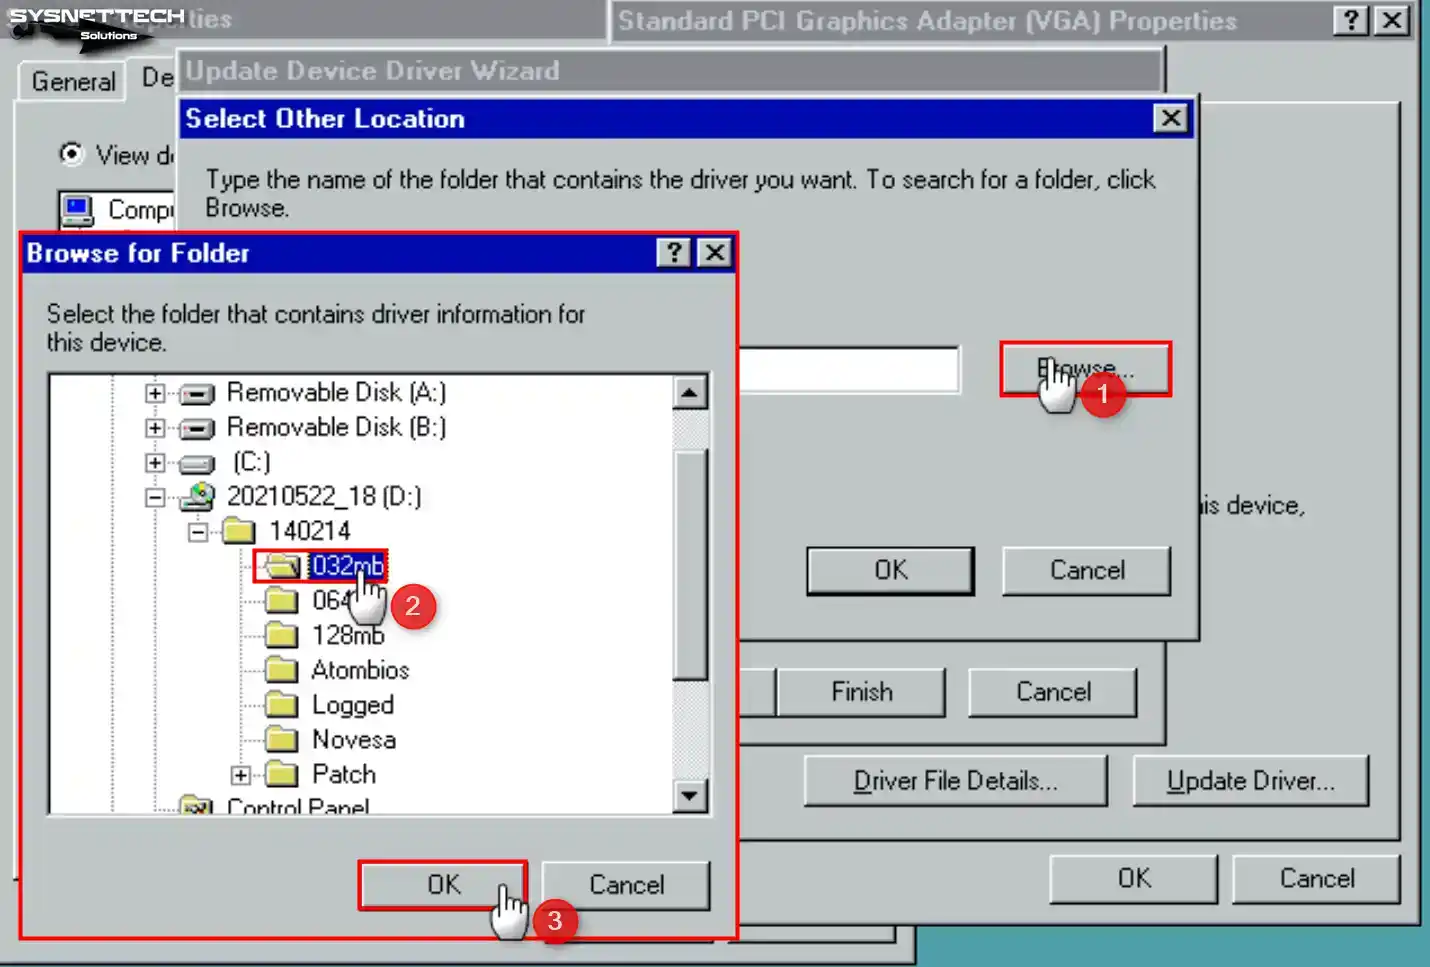
Step 5
Proceed to the “Select Other Location” window. First, click the “Browse” button. Locate the ISO file you added to your virtual machine. Select the “032mb” file in the optical drive.
Step 6
You have added the location of the screen driver. If you receive an “Insert Disk” error as soon as you close the window, don’t worry. If you click OK to go on, you will see the installation finish by itself.
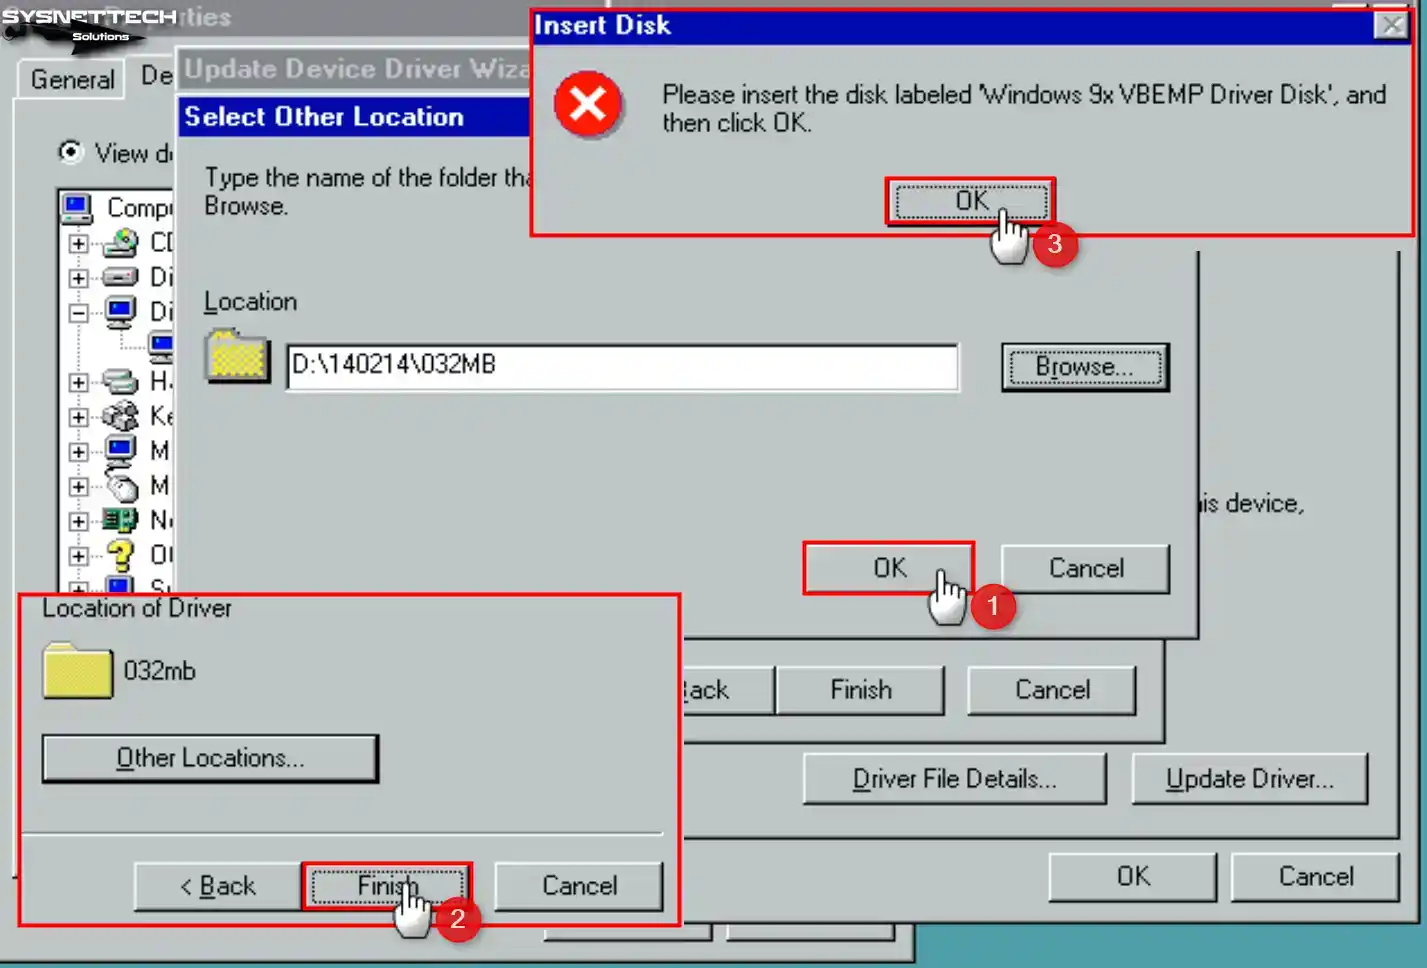
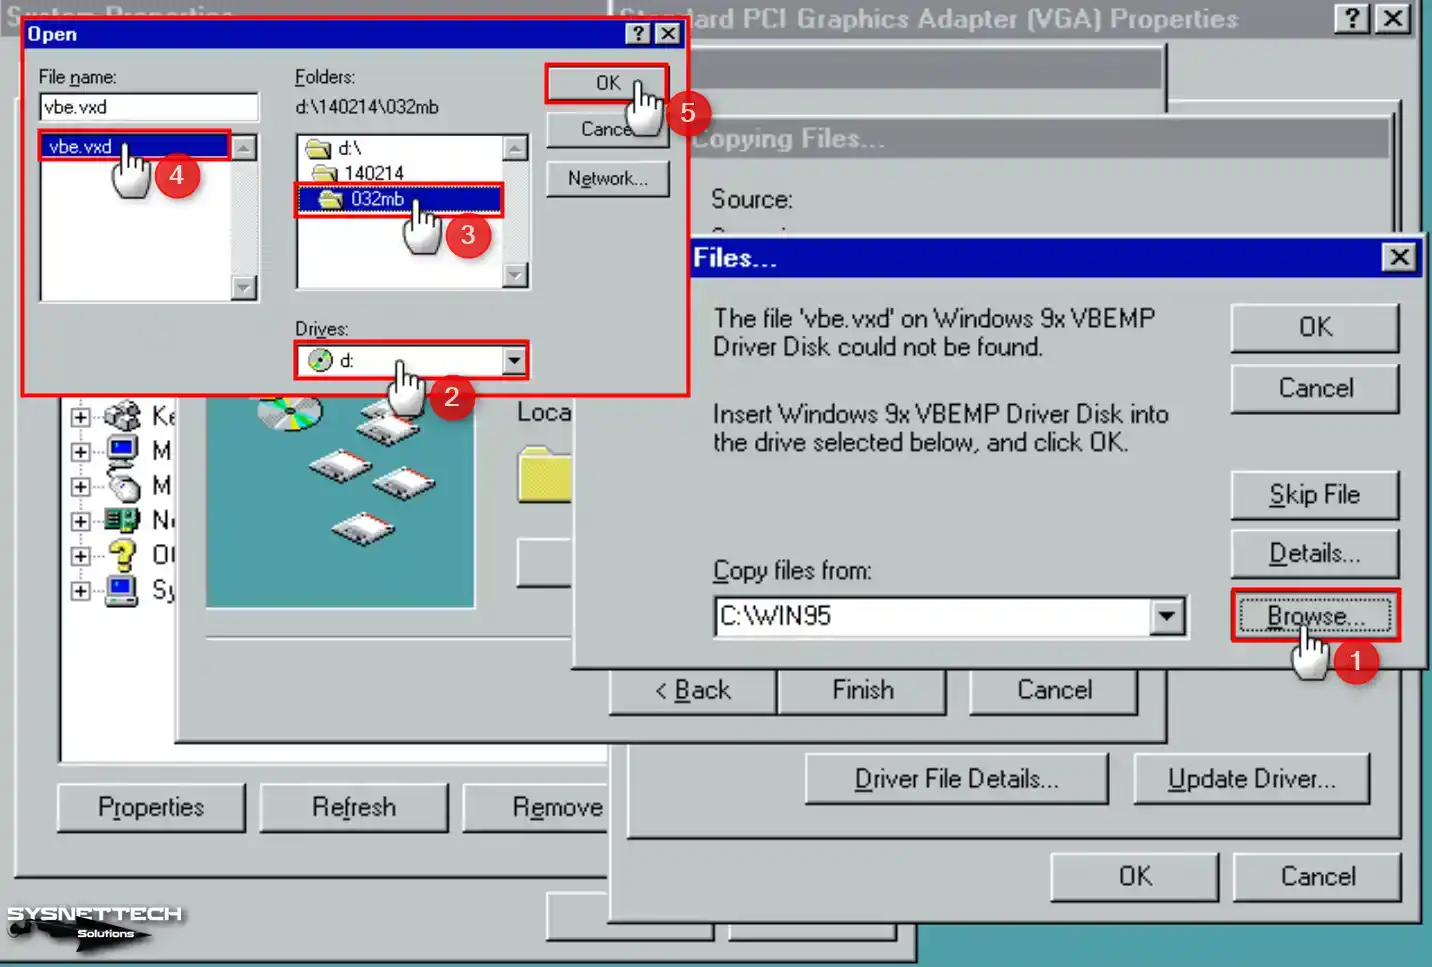
Step 7
If you receive a “VBEMP Driver Disk” error, don’t panic. First, close the window and then go back to the 032mb folder. From there, select the “vbe.vxd” file.
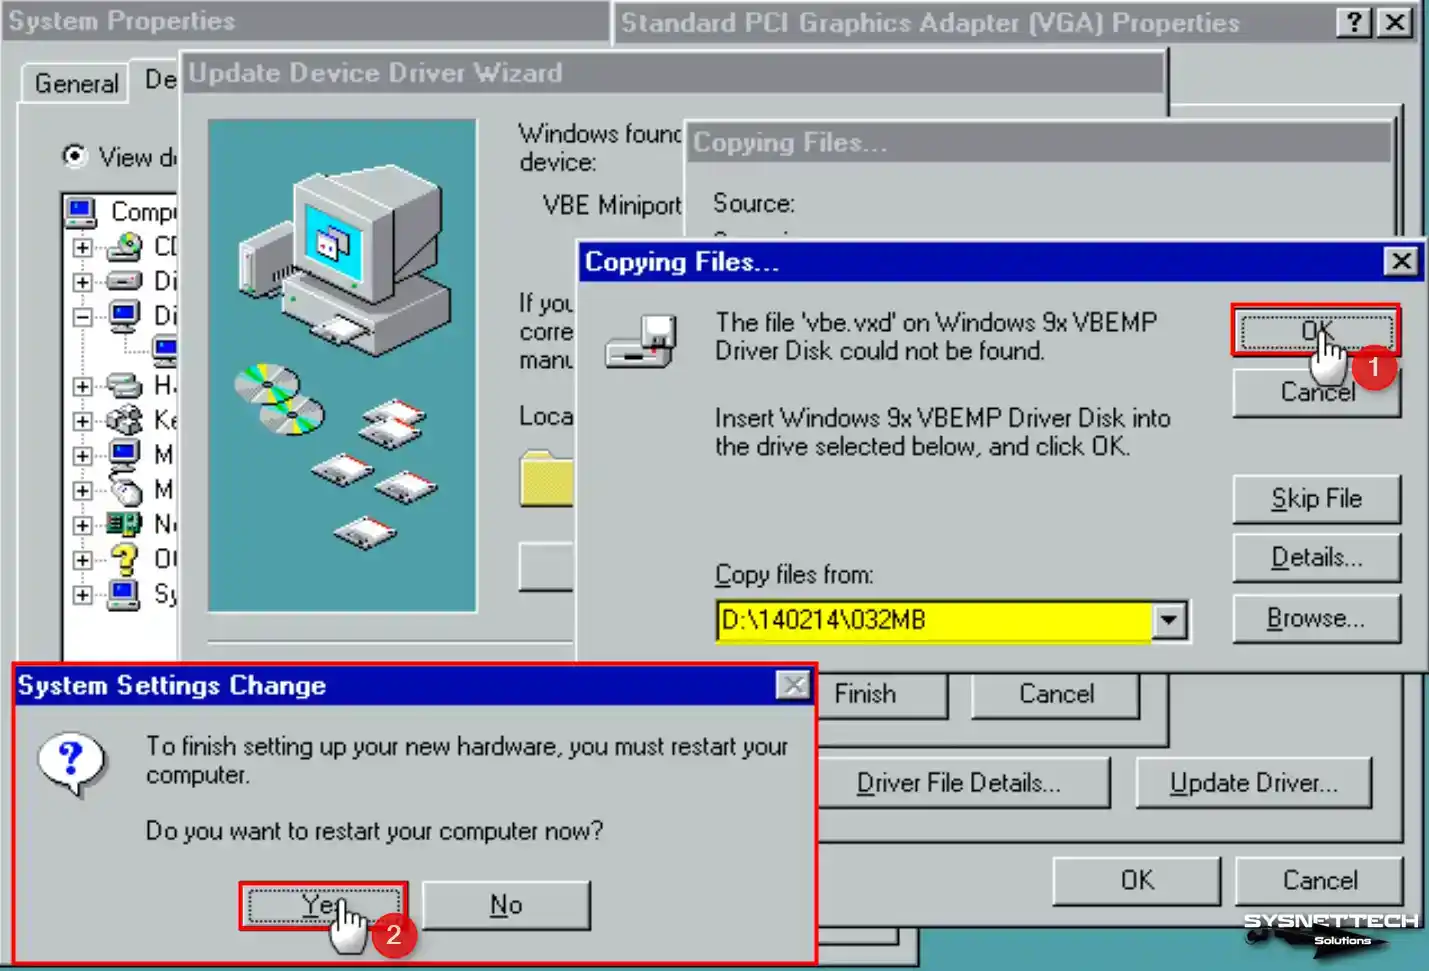
Step 8
After Windows updates the display driver from the place you chose, restart your virtual system.
Step 9
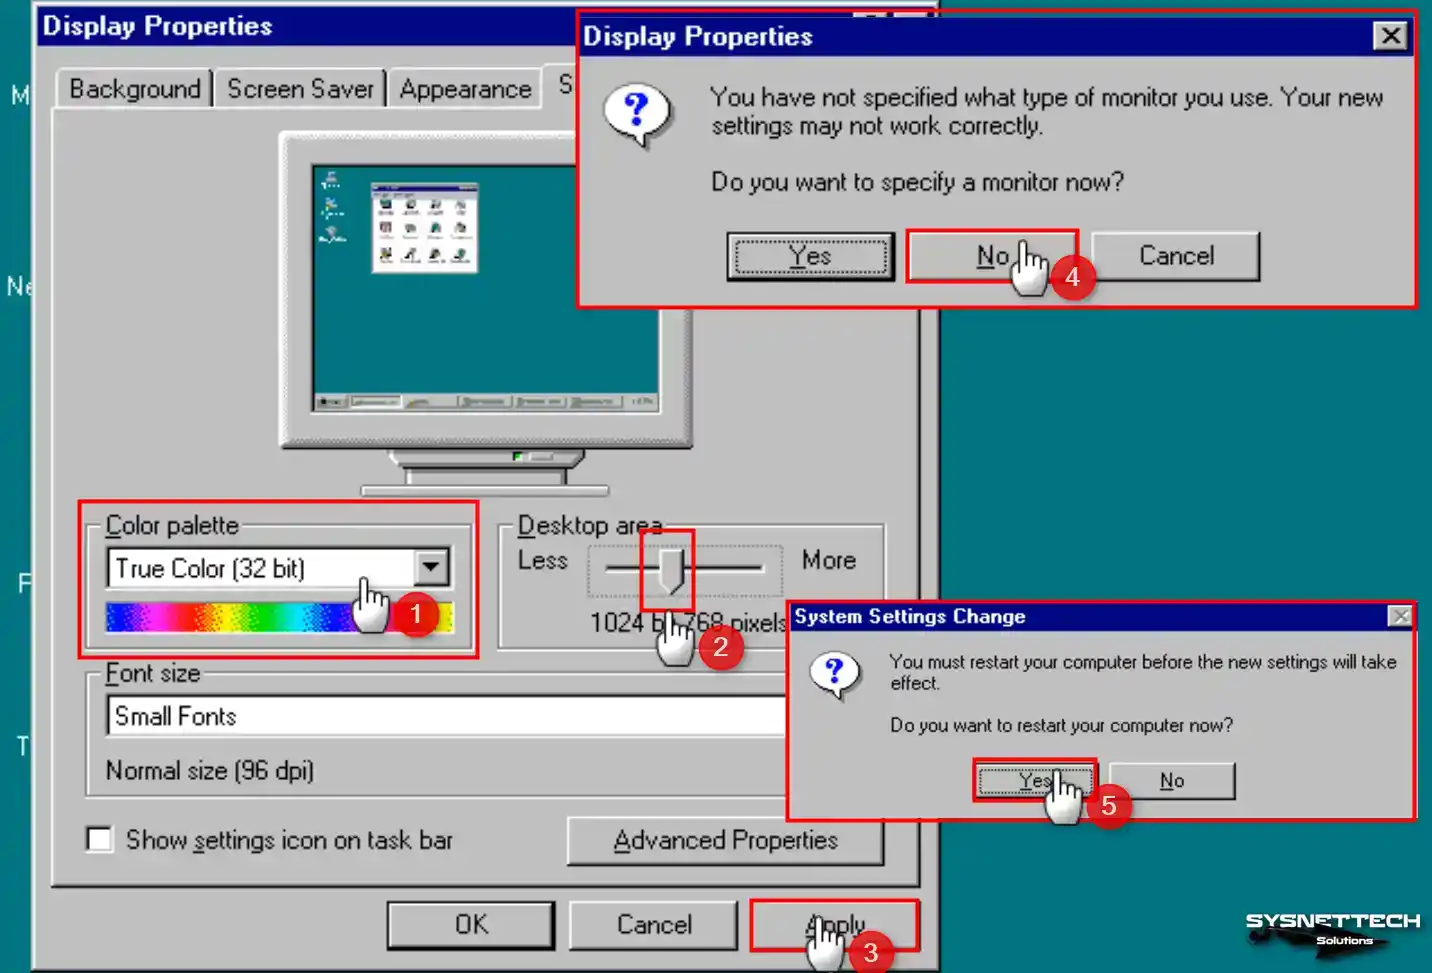
Right-click on the desktop and open Display Properties. Then set the screen resolution to 800 x 600.
From the Color Palette section, select True Color (32-bit). At last, save changes and stop adding the monitor.
After rebooting the VM, see if Device Manager shows the new graphics driver.
2. Chipset Driver Installation
You might see that some device drivers did not install correctly on the virtual machine. If Guest Additions worked, these drivers would install by themselves.
If you have problems with old Windows systems, there is a fix. First, install the Chipset Driver on your virtual machine. This will fix many issues, and your system will then work better.
Step 1
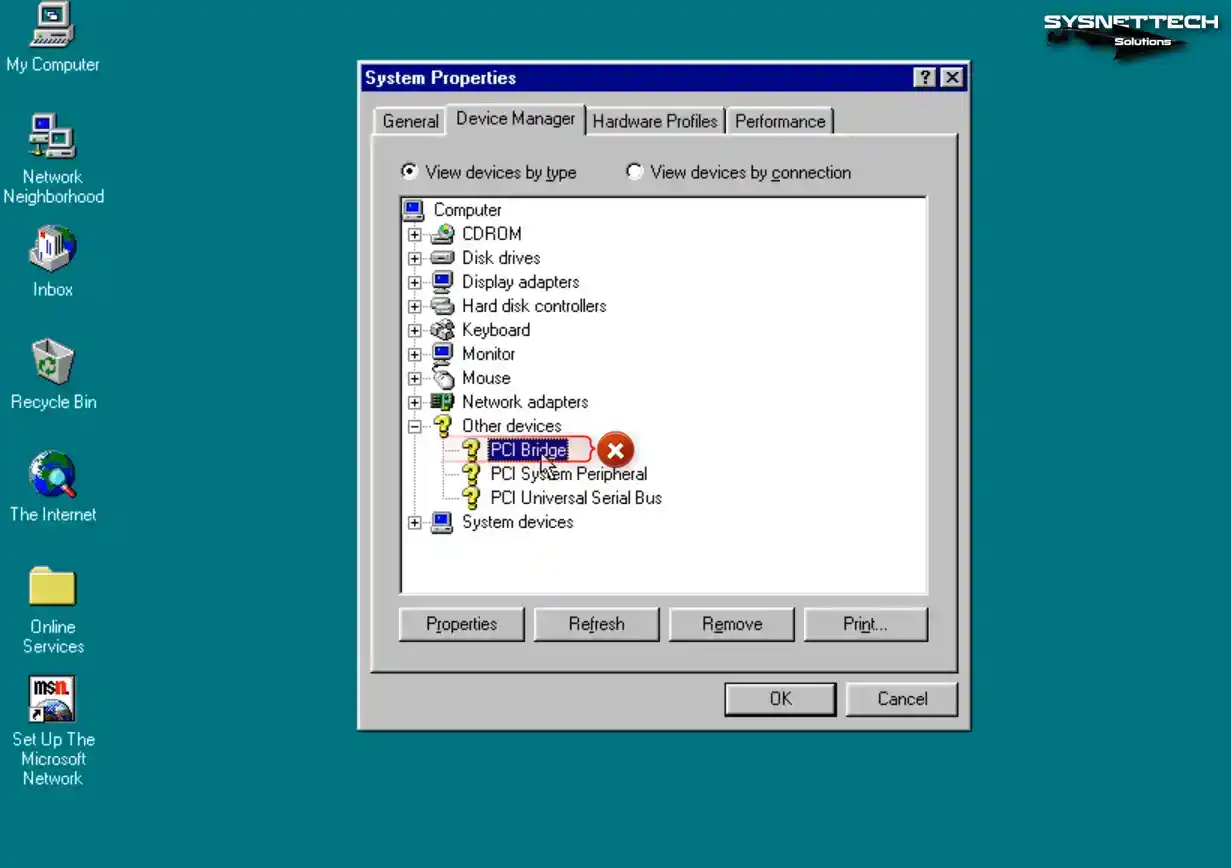
When you recheck the device manager, you will see that the PCI Bridge has not been installed.
Step 2
Download the Intel Chipset driver from the table below. Then add the ISO file to the virtual machine.
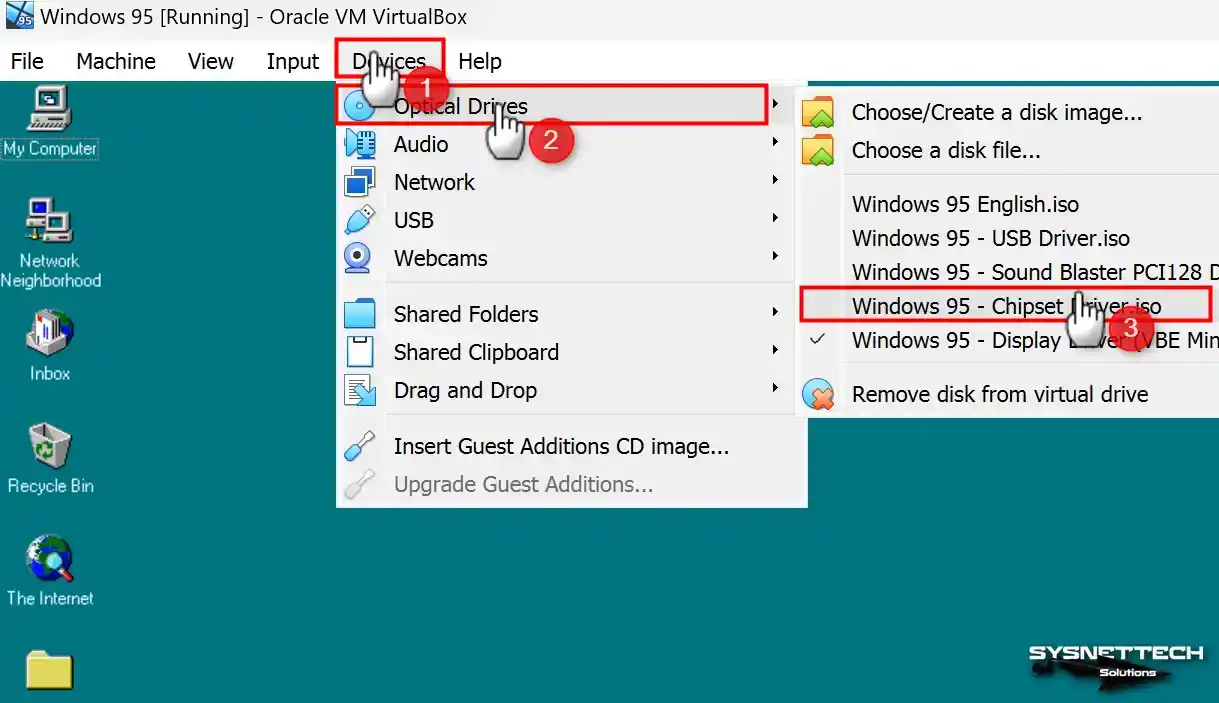
Step 3
View the contents of the CD on your computer. Then go to Chipset Driver / infinst_280_win32 / Disk1. Here, double-click the Setup file to start the install helper.

Step 4
When you open Intel Chipset Software Installation Utility V2.80.008, click Next to continue. Press Yes to agree to the license for this software.
Go on by looking at the supported chipset types in the Readme window.
After you install the chipset driver, restart your virtual PC so the changes can take effect.

Step 5
When the Win95 VM starts up, it will display a window indicating that it has detected new hardware. At this step, Windows will install the drivers for the latest hardware by itself.
When the driver update helper opens, click Next and choose the default driver location.

Step 6
When your PC boots, Device Manager will show that the PCI Bridge driver is working.

3. Sound Blaster Audio PCI128 Driver (Sound Card) Installation
You may encounter problems playing media files in Win95. In particular, you may experience sound problems with MP3 and MP4 files. This is because the driver does not work well. As a result, your sound device may not work correctly.
In other words, Windows cannot install the drivers for the hardware by itself.
Step 1
First, download the Sound Blaster PCI128 driver. Then add the ISO file to your Windows 95 virtual PC.

Step 2
Then click My Computer to view the CD contents and run the Setup file.

Step 3
Click on My Computer to find and open the Control Panel. Then start the Add New Hardware wizard.
To stop Windows from searching for new hardware, select No.
To add the sound device by hand, first pick Creative Labs in the manufacturer tab. Then select Creative Labs Sound Blaster 16 or AWE-32.

Step 4
After choosing your VM’s sound device, reboot the guest system.

Step 5
Check that the system sounds are working. Also, take a look at the device manager. Here, look at the Sound, Video, and Game Controllers section. Here you will see that the Sound Blaster device is now listed.

4. Installing the PCI Peripheral Serial Bus Driver and Enabling USB Support
Win95 does not support USB 2.0. For this reason, you must select the USB 1.1 Controller option when creating a virtual machine.
During system setup, Windows does not install the USB 1.1 driver by itself, so you have to do this by hand.
Step 1
First, open Other Devices in Device Manager. Find the PCI USB device, then click Remove.

Step 2
Put the USB Driver ISO file you got on your main computer into your virtual computer.
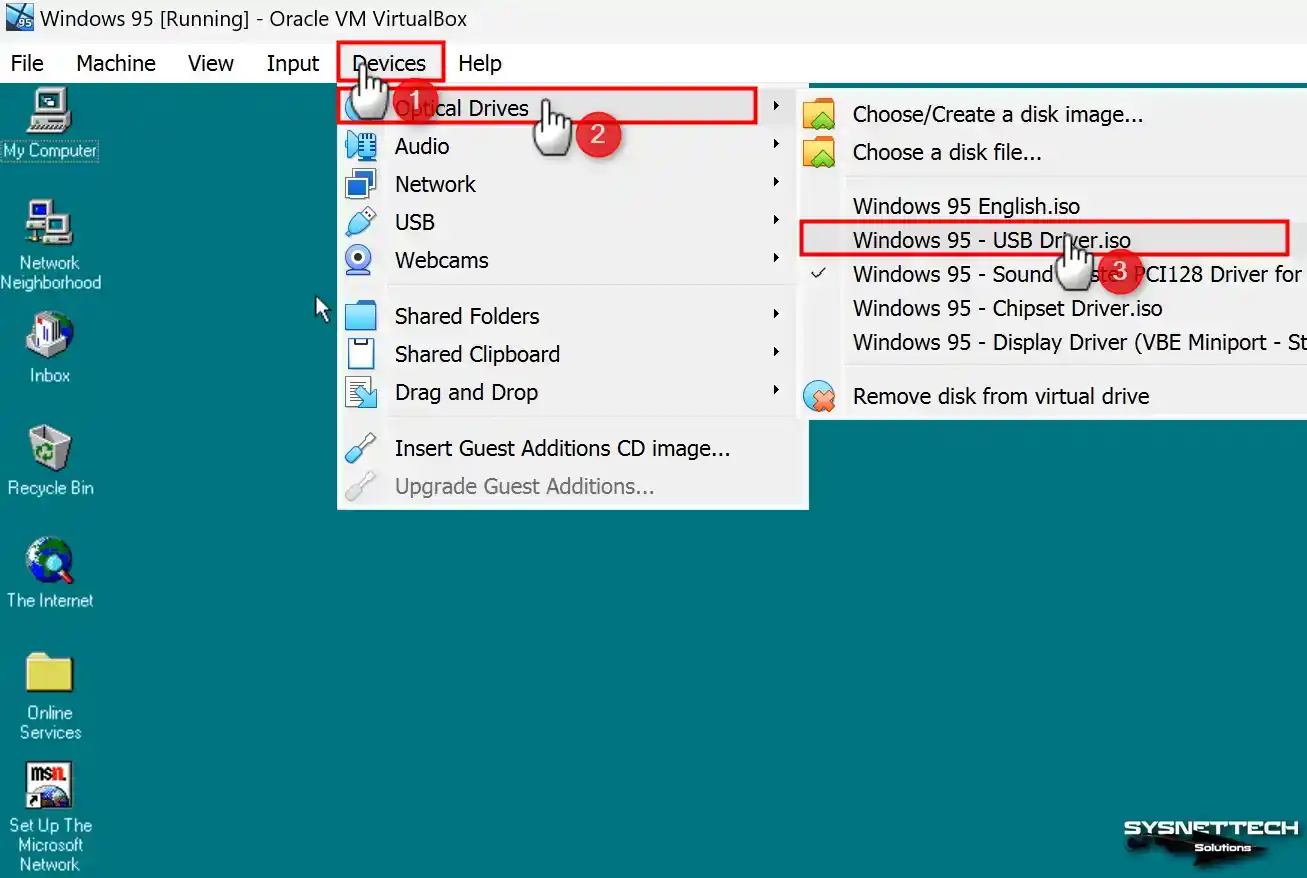
Step 3
Next, after viewing the contents of the CD, run the Xusbsupp file and click Yes in the window that opens. After enabling USB support for Microsoft 95, restart your guest machine.

Step 4
When your system starts up, it will find the Standard OpenHCI USB Controller device. In this window, click Next to install the driver, and then click Finish to install it in the default location.

Step 5
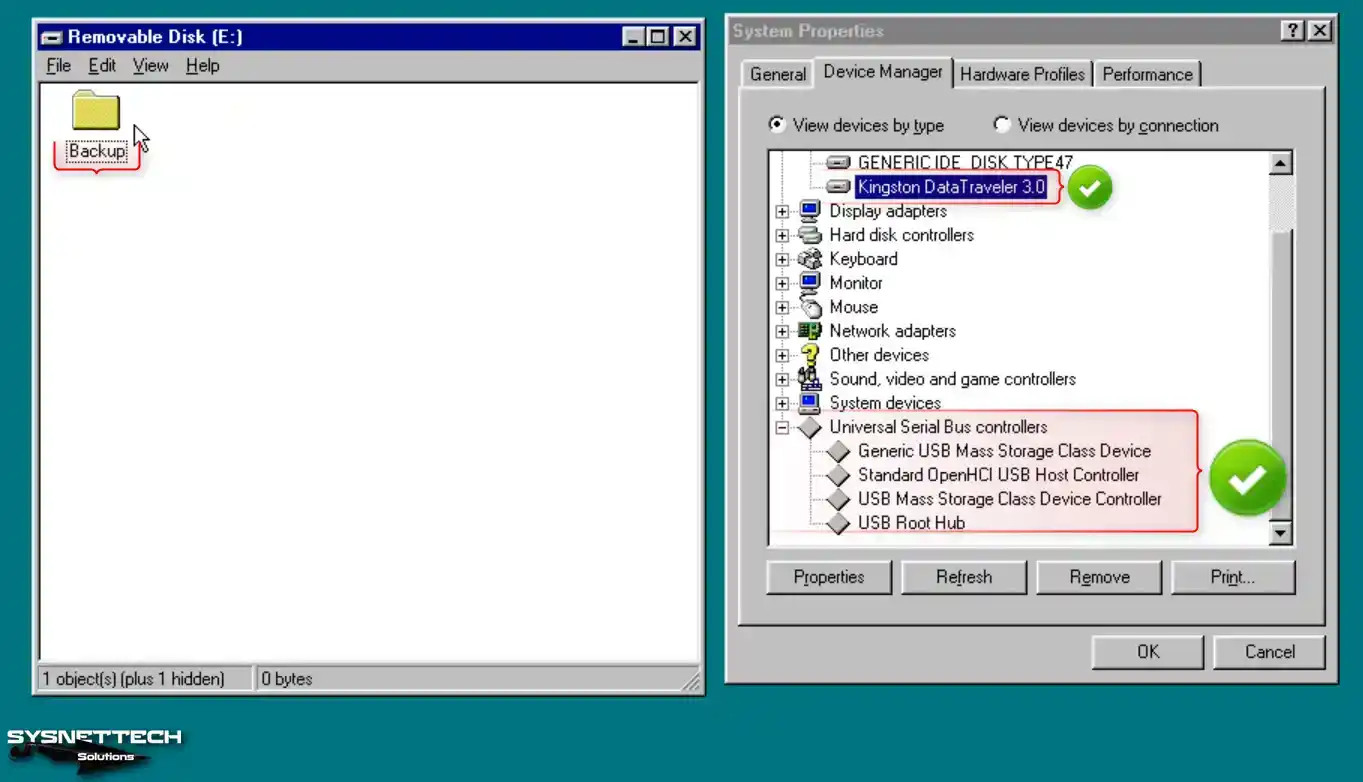
Plug a flash device into the USB port of your host computer. Then, format it as FAT32 and create a folder inside it.

Step 6
To connect your USB flash stick to your VM, click Devices / USB / Name of your USB.

Step 7
After inserting your USB flash drive into the VM, install the Generic USB Mass Storage Class Device driver.

Step 8
You can access your USB flash drive through My Computer and check its functionality. Device Manager will also list the flash drive under disk drives.
5. PCI System Peripheral Driver Installation
VirtualBox may not work well with old Windows systems. In this case, some device drivers will not install by themselves. So, I suggest you install them by hand.
For example, you see a yellow exclamation mark on the PCI System Peripheral device. This means the system has not installed the drivers. First, try to install the driver by hand. Or, you can use other ways to remove this warning.
Step 1
Select the PCI System Peripheral device in Device Manager and click Properties. In the driver update helper that opens, pick “No, select driver from list.”
In the next window, click Back in the Unsupported Device section.

Step 2
In the Manufacturers window, pick System Devices. Next, pick Standard System Devices / MCA Bus and click Finish.

Step 3
After adding the MCA Bus driver, no errors will show in Device Manager.

TCP/IP Protocol Setup and Internet Connection Configuration
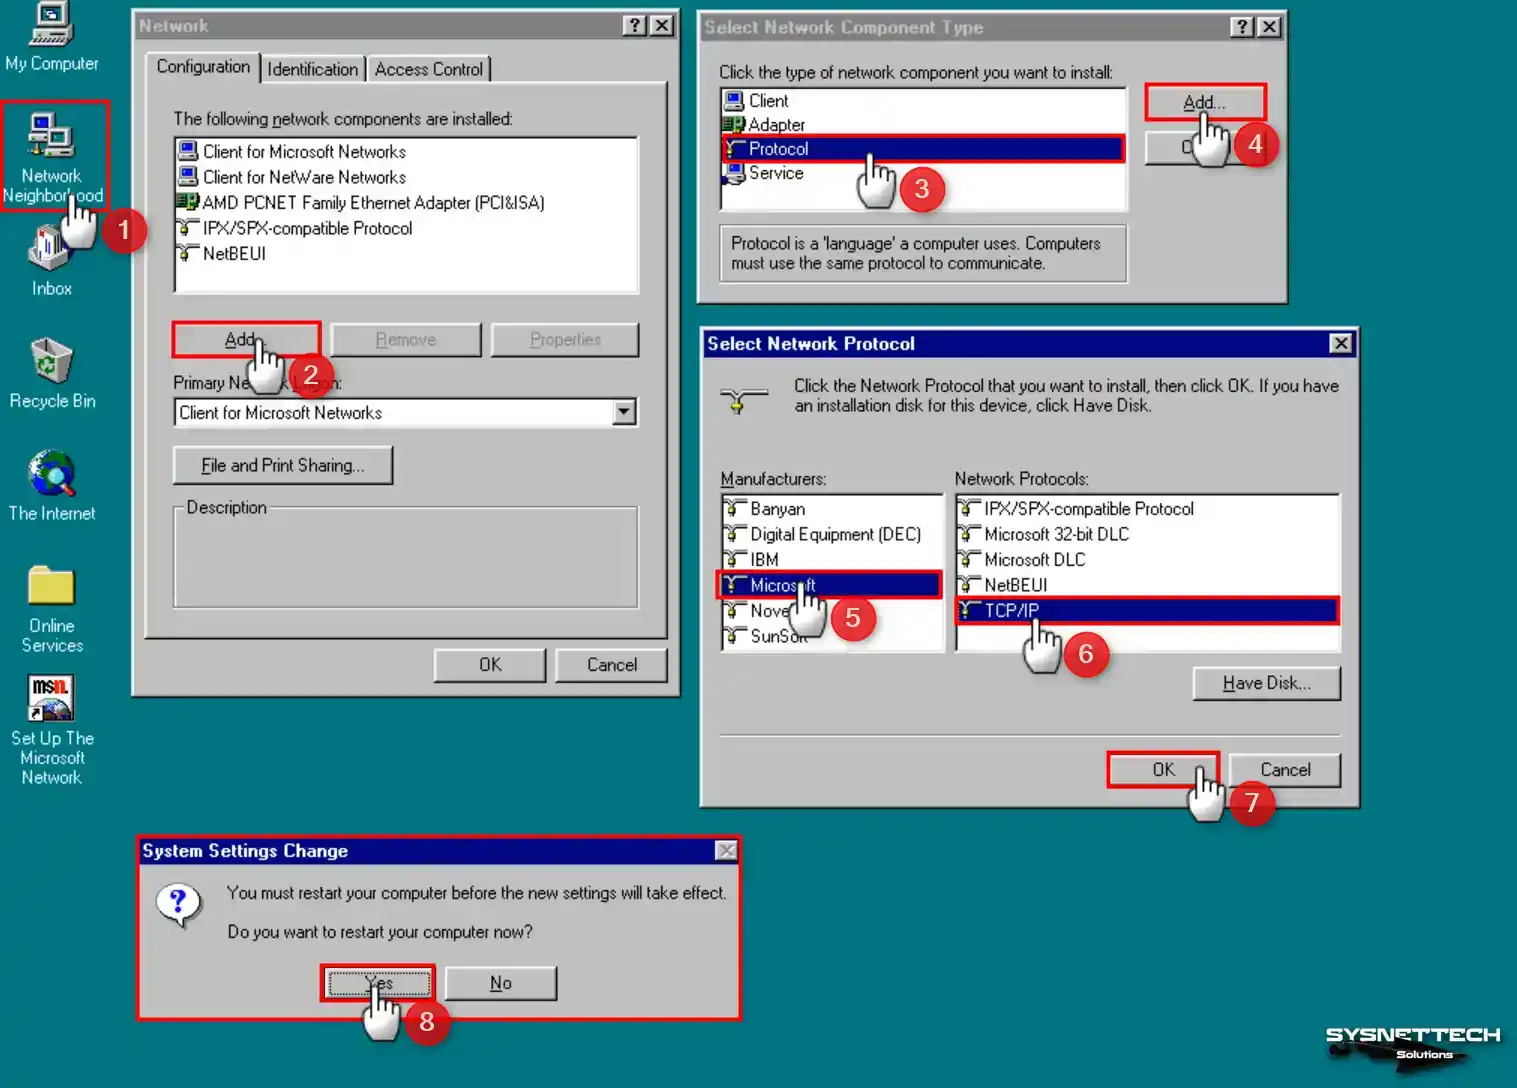
After installing Windows 95, you need to set up the TCP/IP protocol to use the Internet.
Step 1
To check your Internet connection, first use the MS-DOS Prompt. First, go to Programs in the Start menu and open it. Then type “ping 8.8.8.8” in the command screen. So, this will allow you to test your connection to Google servers using the ping method.

Step 2
If the ping operation fails and you see the “Bad command or file name” error, you need to set up the TCP/IP protocol. Open the settings of the Network Neighborhood tool on the desktop.
Now, click the Add button in the Network window. Right after that, pick Protocol from the component types and click Add again.
Select Microsoft / TCP/IP from the list of network protocols and restart your VM by clicking OK.
Step 3
After opening the Internet, go to the next screen in the setup helper. Then pick the Current option from the choices and continue.

Step 4
When Microsoft Internet Explorer opens, go to google.com to check if the Internet works.

Video
Installing Older Versions
| VirtualBox Version | YouTube Video | Slide |
|---|---|---|
| 5 | Watch | View |
| 6 | Watch | View |
| 7 (NEW) | Watch | – |
Download Windows 95 ISO and Driver
| Driver | Download Links |
|---|---|
| Windows 95 EN ISO | Download |
| Display Driver (VBE Miniport) | Download |
| Chipset Driver | Download |
| Sound Blaster PCI128 Driver | Download |
| USB Driver | Download |
Frequently Asked Questions (FAQ)
- What do I need to start installing Windows 95 on VirtualBox?
- Is Windows 95 still usable today, or is it just for entertainment purposes?
- Can I run Win95 on a modern computer?
- Are there any legal issues when using Win95?
Conclusion
As a result, you can install Windows 95 on a virtual PC with Oracle VM VirtualBox 7. This lets you see old technology from the past. Also, with this complete guide I made, you can run Retro Win95 efficiently.
Also, virtualization software like VirtualBox works with these operating systems. It lets us use old software. You can also use it for learning, memories, or trying new things. In short, making a virtual Windows 95 takes you back in time and brings back your memories.
If you want to try more old operating systems, see our guide to installing Windows 98 with VirtualBox. In this guide, I explain the steps to install Win98 in a virtual machine. This way, you can enjoy classic systems like Win95 again.

40 People Shared Their Experience
Great tutorial except that you FORGOT TO PROVIDE/POST THE INSTALLATION SERIAL NUMBERS FOR THAT PARTICULAR VERSION OF WINDOWS! OOPS!
Thanks for your comment, Ed!
Cmon dude i also need the serial number for the machine why
the downloads are corrupted
downloads don’t work
The download link works fine. The button will direct you to Yandex Disk, and you will be able to download files to your computer with the Download button.
I downloaded and followed the guidance via the Youtube video. After setting up a Windows 95 VB presence and going through settings, my experience was that VB opens and the word “STARTING” appeared in the VB window, then it froze.
thanks a lot for your impute I need another help from you using VMware station I get that annoy thing protection error can you help me
tolqabaqci trying to install windows 95 the installation was going fine until I got to step 49 its not copying the files from drivers folder
everything was going fine until i saw the insufficient memory thing
Thankyou It worked for me!!
inbetween steps 28 and 29 it asks for the OEM certificate numbers . any advice?
Try using 12095 0004226 12233
my Enable VT-x/AMD-V is greyed out and under System > Processor > Extended Features … i have and intel core but the update i’m using allows nested virtualizations for intel… what do i do???
Run the CMD command prompt as an administrator and execute these two commands.
1) cd C:\Program Files\Oracle\VirtualBox
2) VBoxManage modifyvm “VMName” –nested-hw-virt on
You must type the full name of the virtual machine you created in the VMName part.
Hi Tolga Bagci,
I cannot THANK YOU enough for writing such a thorough and easy to understand article with detailed photos on How to Install Windows 95 in VirtualBox, and for also providing links to the .iso files!! The world needs more writers like yourself!!
1000 THANK YOUs,
-Dan
Thank you very much for this nice comment. It makes me very happy to learn how to be helpful to people with your feedback. Preparing a detailed article can sometimes take 4-5 working days, but some people reduce the motivation of the authors. Believe that people like you write such a nice comment, it helps the authors to prepare more professional articles.
Thanks a lot again! Stay well!
The download links for the drivers are not on the table but the install was easy thanks to your tutorial.
Download links are in the table and working fine.
Help when i run cd WIN95 it says Invalid Directory so i cant start the stup. Pls respond i wanted to run this
You need to copy the contents of the ISO file to C:\WIN95. Before that, you have to create the folder named WIN95 in the C drive.
I followed everything. when after win95 setup the vm reboots, shows windows 95 is starting then I get
WHILE INITIALIZING DEVICE IOS:
WINDOWS PROTECTION ERROR. YOU NEED TO RESTART THGE COMPUTER
The vm restart in safe mode then then the same error occurs
You may experience this issue on more modern computers. So you can get rid of this error with an older CPU version by booting the virtual machine with the .
Hi, I cannot access the download links to the drivers and other stuff in the table (I don’t know why, they do not appear there). Can you send me the links to all of the required files by replying to this message? Thank you .
There is no problem with the download links. Try to open it in the incognito tab.
I get the WINDOWS PROTECTION ERROR too. What do you mean by your response to Daniel on 29 June 2021 “You may experience this issue on more modern computers. So you can get rid of this error with an older CPU version by bootring the virtual machine with the .” What does that mean?
Hi!
When you see the error message, right click on the same disk button as step 26 but choose a new ISO file (you may have to filter with AllFiles) you downloaded from the comment you cited.
You can then restart the machine. follow the instructions in readMe.txt but before/ instead of restarting, remove the ISO just like in step 26. Then restart (not in safe mode, in the normal one.)
I use Ubuntu, so it may differ a little bit, but not so much.
Excuse my poor english, I’m not native 😉
good day
The drivers are downloading at .RAR files for me. Am I doing something incorrectly with them?
No, after downloading the driver, extract the RAR file to the folder.
How do i get the product key?
I have done several of these guides and my virtual machine is still giving me the “No bootable medium found! please insert a bootable medium and reboot.” i have tried different Iso files and uninstalled virtualbox and the VMs to no avail. I was sure your guide was going to work as there was more details the others didnt have, but unfortunately not.
Thanks Allah for guys like you Tolga, I don’t have any experience doing this deep job, but following your steps one by one, I was able to get it done from the 1st attempt which means you have done great job putting all these information and software together for us low IQ guys to have no troubles doing it. Thank you. All links are working, all drivers and glitch less and above all, no headache talking, just listening to a smooth acoustic melody while having fun feeling like a genius installing almost a 30 years old windows. I’ve one question my brother, I am running this virtual box on Win10 64x, I wasn’t able to get the Win95 to access the shared folder on the Win10. Please help on how to do that. Highly appreciating your time and effort. Keep the great work.
I’m trying to reinstall WIN95 again, following your instructions. I have downloaded and converted your .rar file to .iso. When I follow your instructions to install Windows 95 on VirtualBox Step 17, I get a VirtualBox VM dialog box (failure to boot) message. When I try to Mount and Retry Boot, your converted Windows 95 English.iso file does not mount.
You only need to extract the .rar file you downloaded to your computer to the folder with Winrar.
Hi !
Thanks for this tutorial. It’s perfect !
Unfortunately, I cannot download the drivers because the files are considered to contain viruses and the links are disabled except for the owners. Could you put them back somewhere else or with a password-protected archive to avoid Google’s analysis?
Thanks
Hello. Thanks for your feedback. I will update the links as soon as possible.
Have a nice day.
I found your tutorial much easier to complete – after I had downloaded all the necessary files to a single thumb drive. Then, before completing Step 25 of the Install Windows 95 section, I simply removed the thumb drive from my USB port and then continued with your tutorial. That resolved all the previous issues that I was having.
Hi !
The links work again. ^^
Thanks
I’ve followed the directions to the letter, and find that nothing, absolutely nothing will make this VM make sound. I am running it on a Win. 11 Laptop. Any ideas?
Great tutorial. Download links seem to be broken again, though. Tried in many different browsers.