
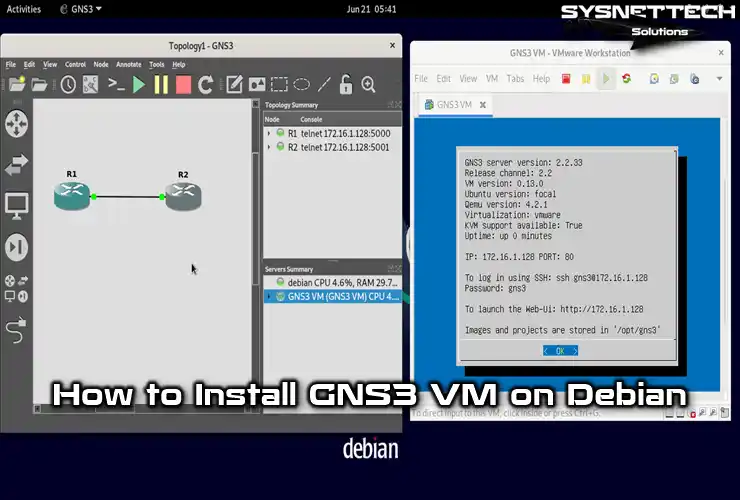
In this article, I will show how to install GNS3 VM 2.2 in detail. This setup makes the Cisco Router IOS work much better. It also lets you run L2 & L3 images on a Linux Debian system.
This means you will have a much easier time running network tests. I will also list the steps for moving the GNS3 VM to VMware Workstation.
I will also give the needed setup choices for speed. This will help you build a strong and steady virtual environment. In the end, this guide will help you use GNS3 well in your network work.
Why Should I Use a GNS3 VM on Debian OS?
Using the GNS3 network simulator software is very helpful. First, you can copy a real Cisco IOS onto your own computer. Also, you can make both simple and complex advanced plans.
If your own computer’s power is good, you will run the GNS3 tool well. But things are different when you want a pro network design. Then, your PC’s power will drop a lot. Also, you cannot use IOU images.
Because of this, importing the GNS3 VM into a virtual machine is very advantageous. You can try this way mostly for hard network jobs. In the end, you will run your Routers or Switches with more power.
Requirements
If your Linux distribution is installed, first install GNS3. Then install VMware Workstation. As a result, you can use the GNS3 VM with these software packages.
- Installing GNS3 on Debian
- Installing VMware Pro on Debian
How to Set Up GNS3 VM using VMware Pro in Debian
After you put the needed software on Debian, go to the next part. First, you must get the GNS3 VM. Then, you have to bring it into the VMware tool.
Next, you need to open the GNS3 simulator settings. From here, you need to activate the virtual server. After that, you can add an IOS Router to the activated server.
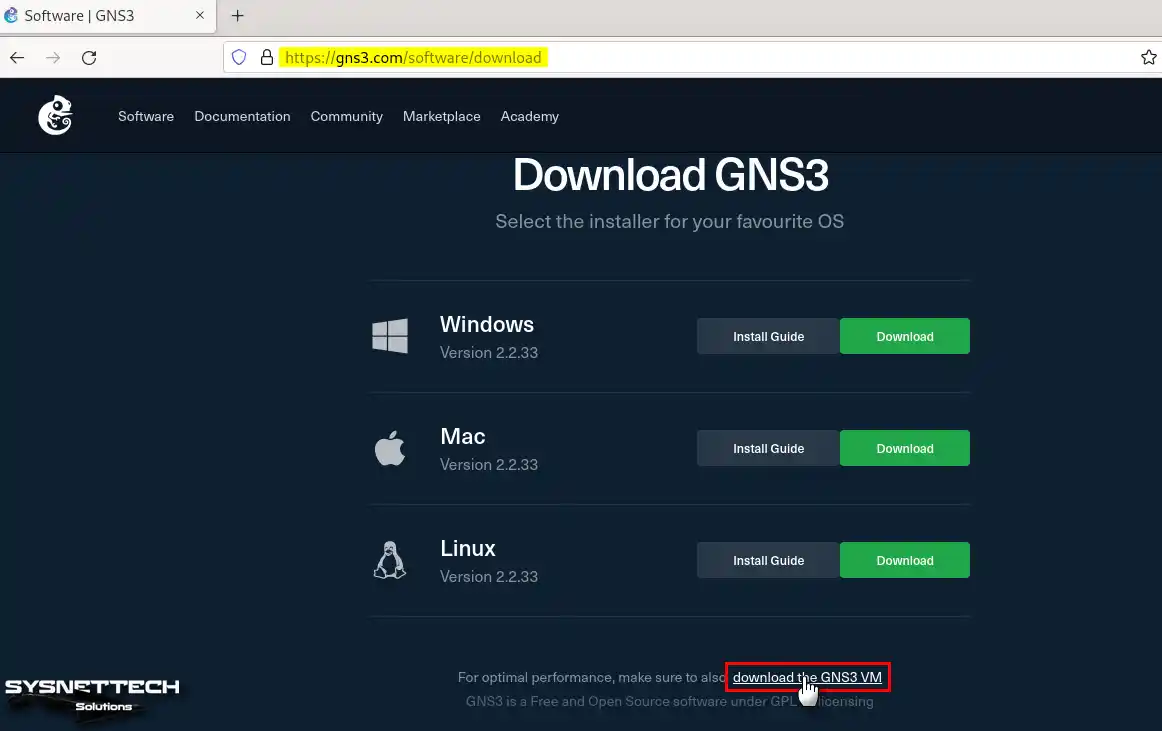
1. Download GNS3 VM
Step 1
To download the GNS3 VM virtual machine, visit the official website. Then, click the Download the GNS3 VM link under the download options.
Step 2
According to the virtualization software you have installed on your Debian PC, click the Download button next to the appropriate option, “VMware Workstation and Fusion.”
In the window that opens, save the virtual machine file with the zip extension to your computer and wait for the download process to complete.
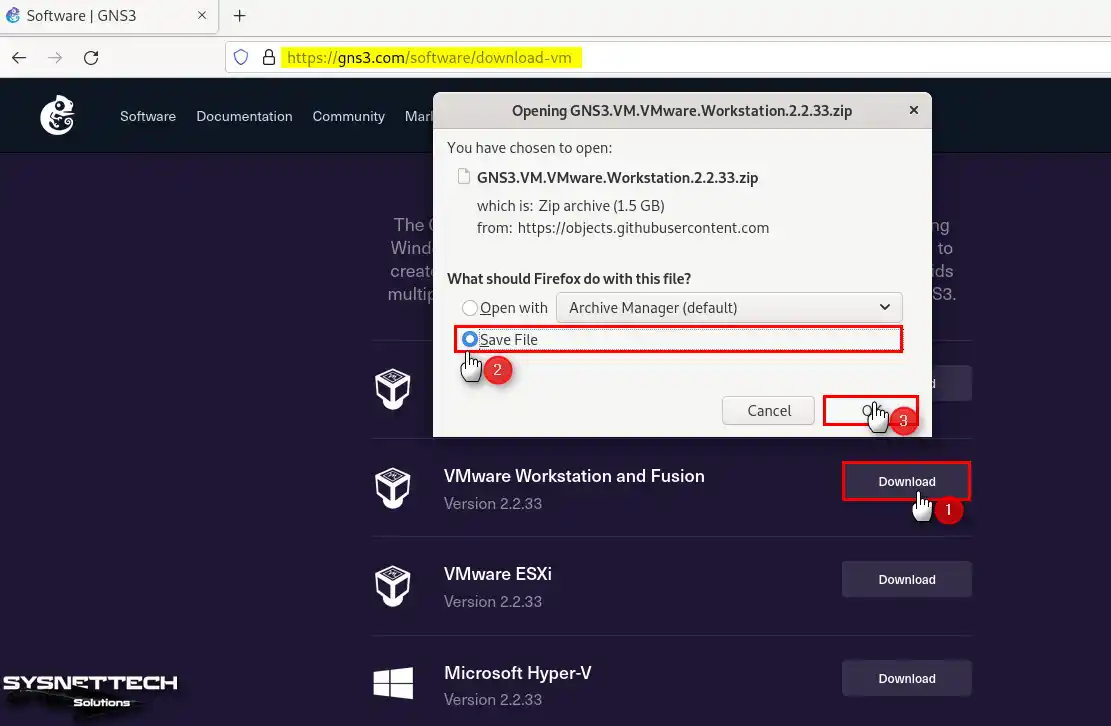
Step 3
After downloading the zip file, open the terminal in the relevant location, execute the “unzip GNS3.VM.VMware.Workstation.2.2.33.zip” command, and extract the archived file to the folder.
unzip GNS3.VM.VMware.Workstation.2.2.33.zip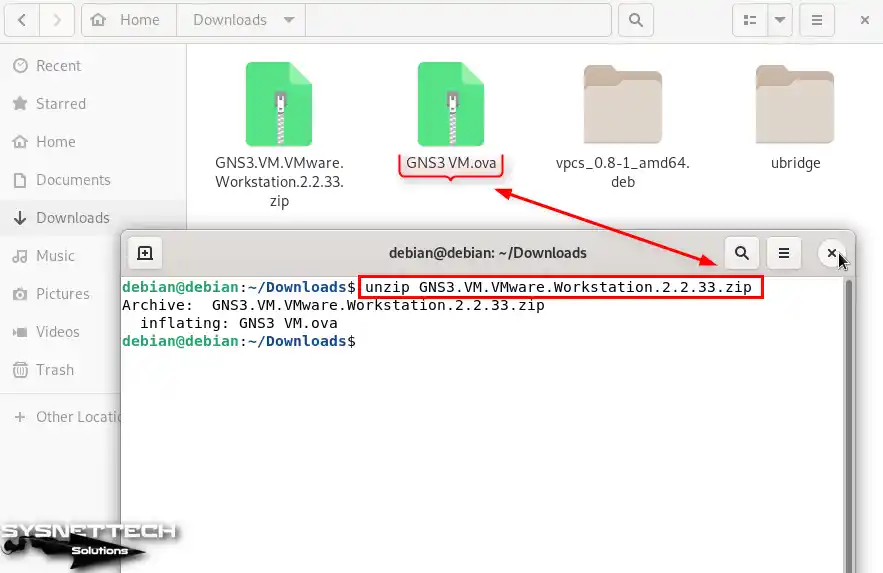
2. Import the GNS3 VM.ova File
Step 1
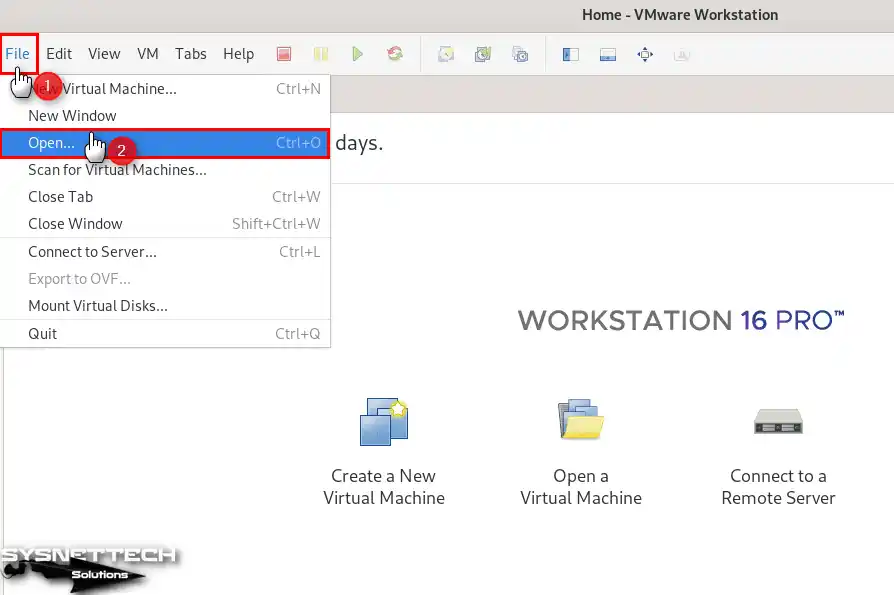
After extracting the GNS3 VM.ova file, open the VMware Workstation 16 Pro software and click File / Open from the tool menu.
Step 2
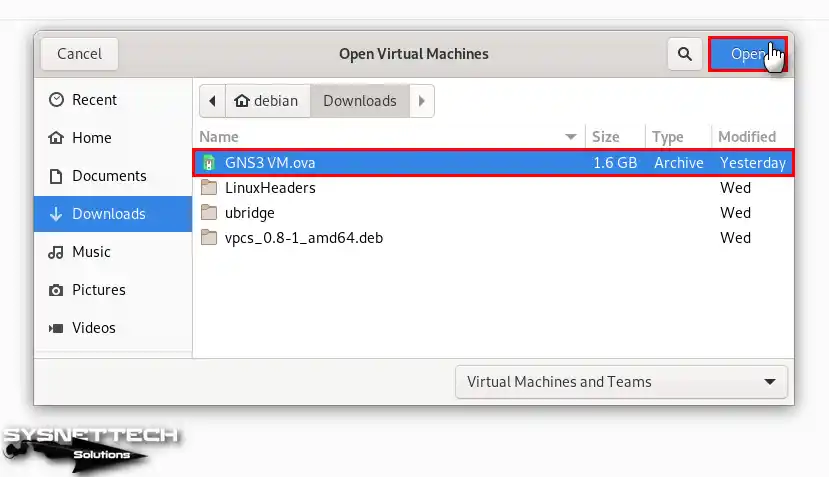
Select the GNS3 VM.ova file in Downloads and open it.
Step 3
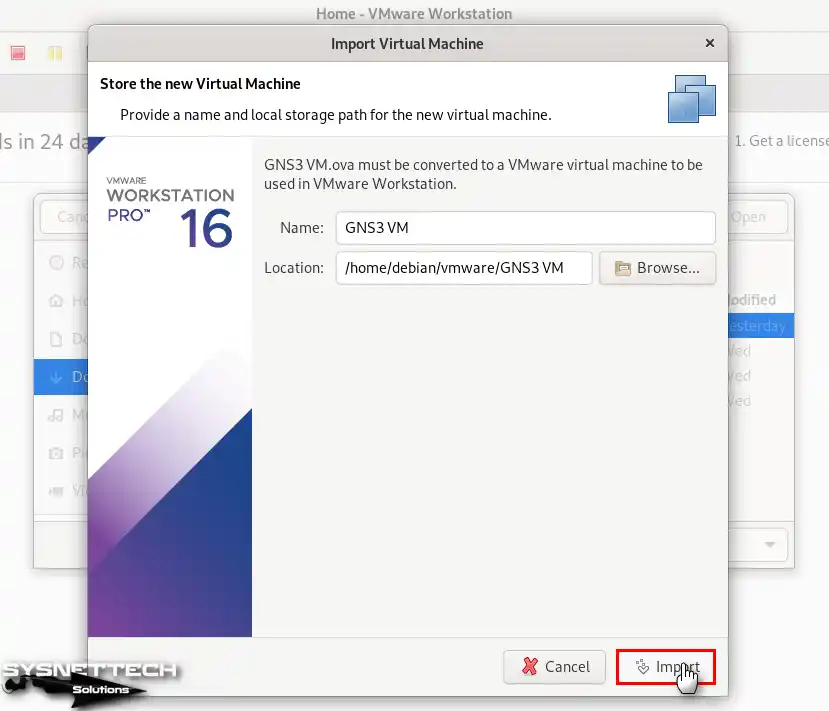
Configure the location where you want to back up the virtual machine and click the Import button.
Step 4
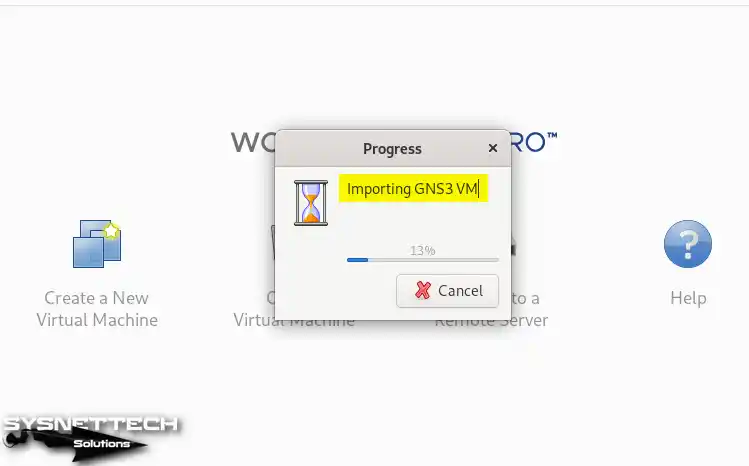
Wait while the GNS3 virtual machine is installed in the location you specified.
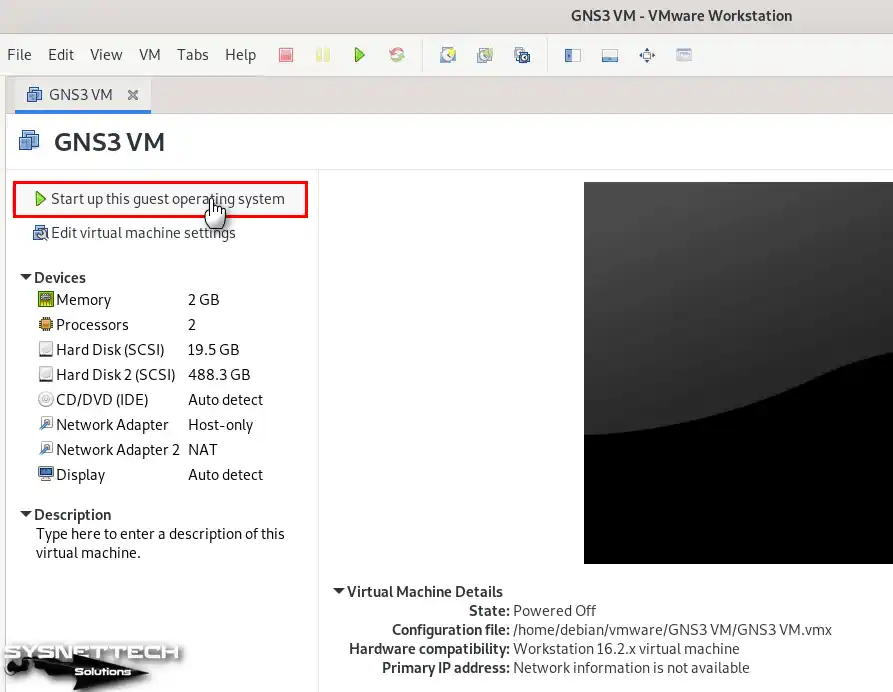
Step 5
After importing the GNS3 VM, click “Start up this guest operating system” to run it.
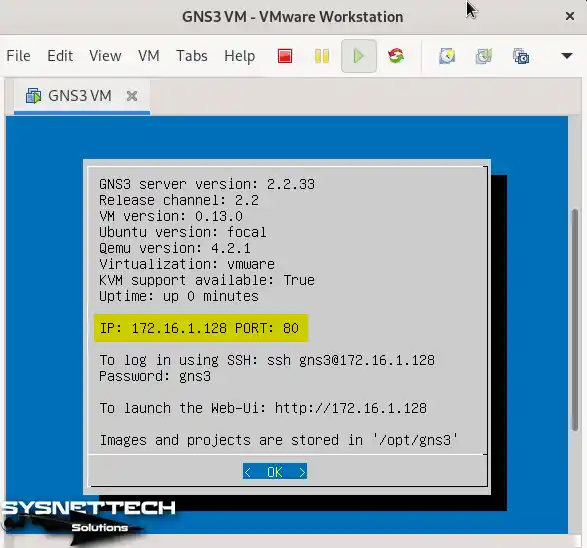
Step 6
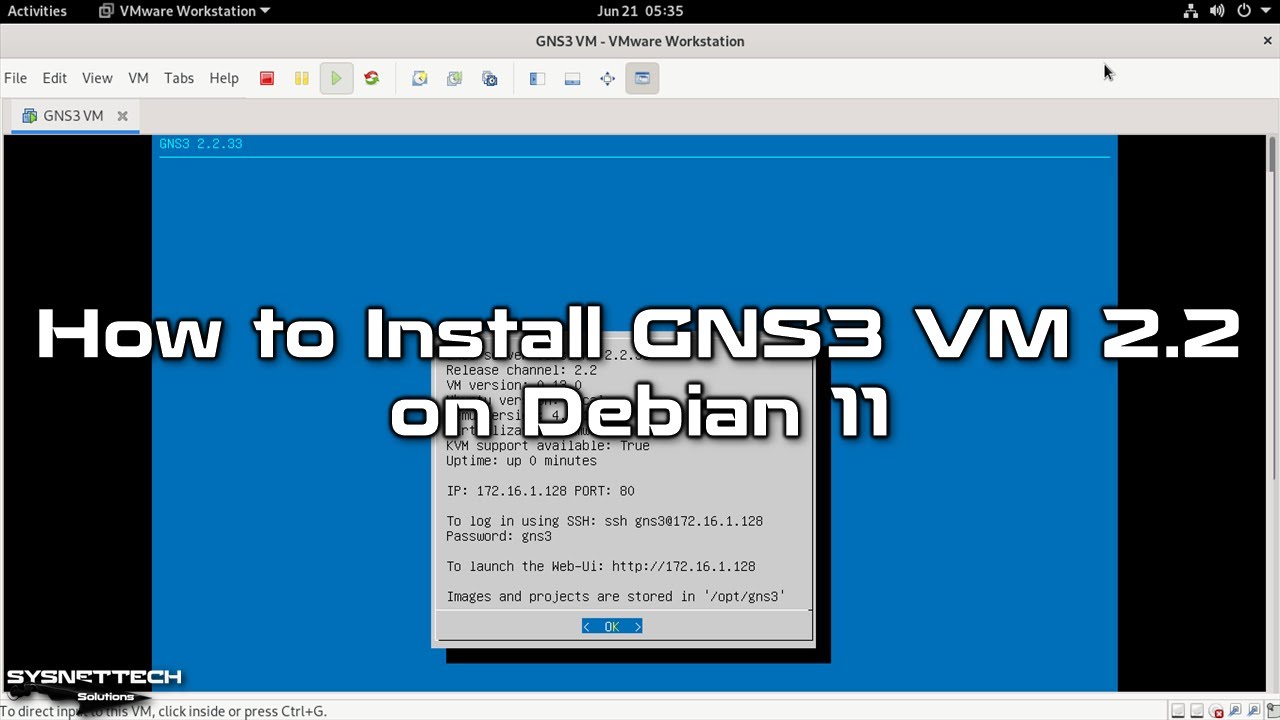
When you run the GNS3 virtual server, you can see the IP address and other information when the system is ready.
3. Enabling the GNS3 Virtual Machine
After installing the GNS3 VM on Debian, you need to enable it in the simulator program’s settings. Thus, you can upload your IOS devices to the server and run them from there.
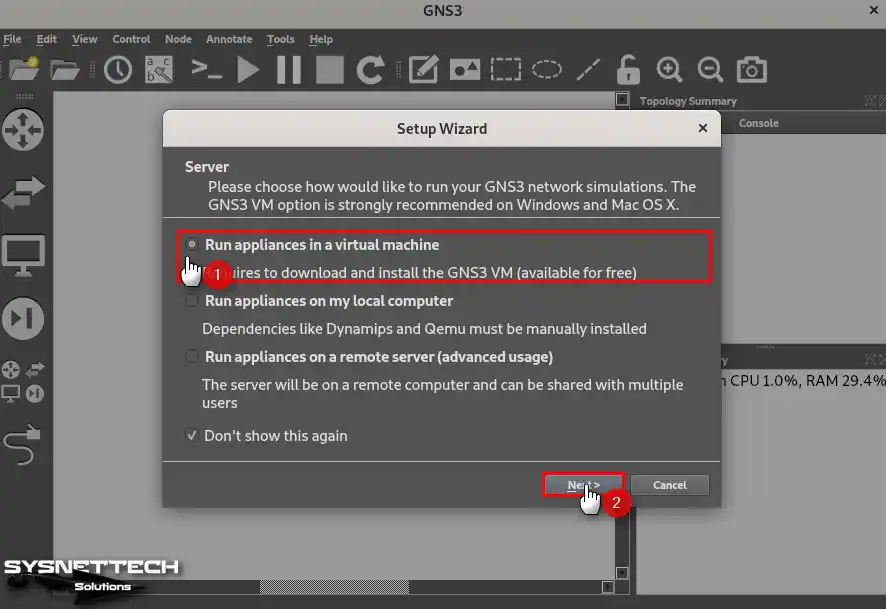
Step 1
After running the GNS3 software, select the Run appliances in a virtual machine option in the Setup Wizard window that opens and click Next.
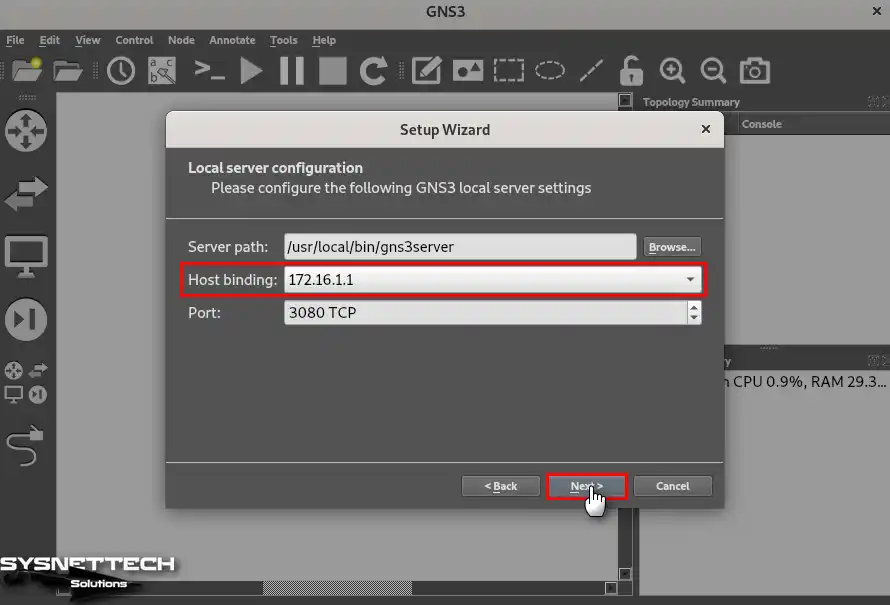
Step 2
To connect GNS3 to GNS3 VM correctly, change the Host Binding IP address according to the virtual server’s IP address block and click Next.
Step 3
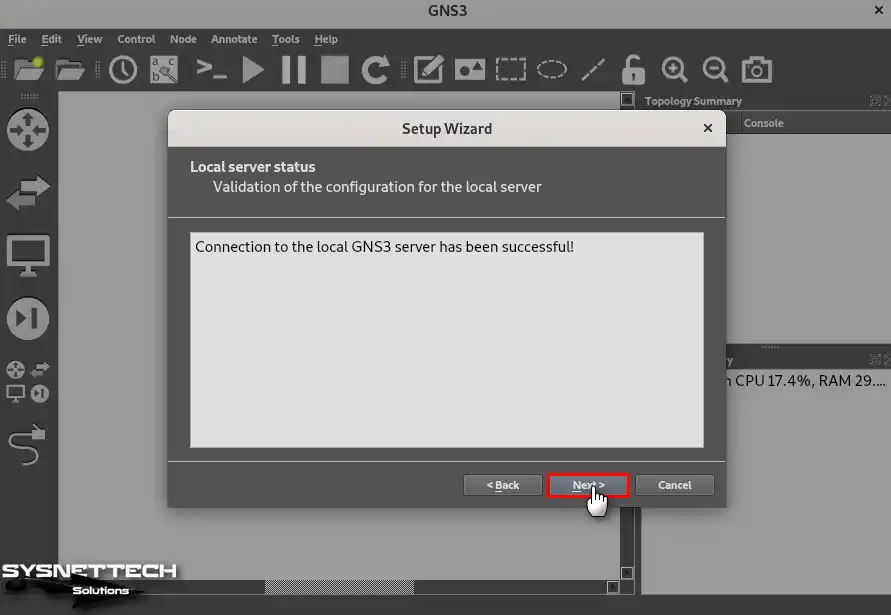
After the virtual server verification is successful, click Next.
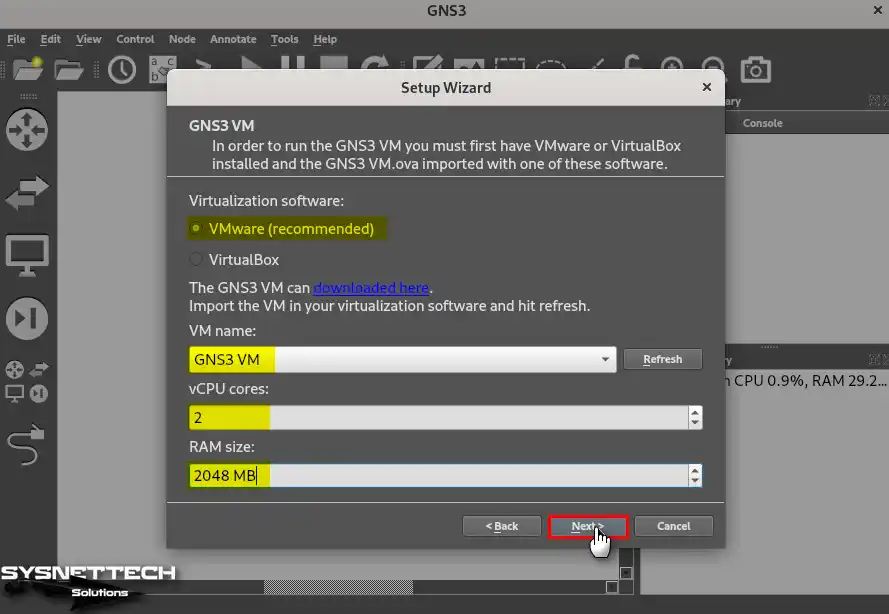
Step 4
In the GNS3 VM settings, select VMware as the virtualization software, configure the vCPU value to 2, and click Next.
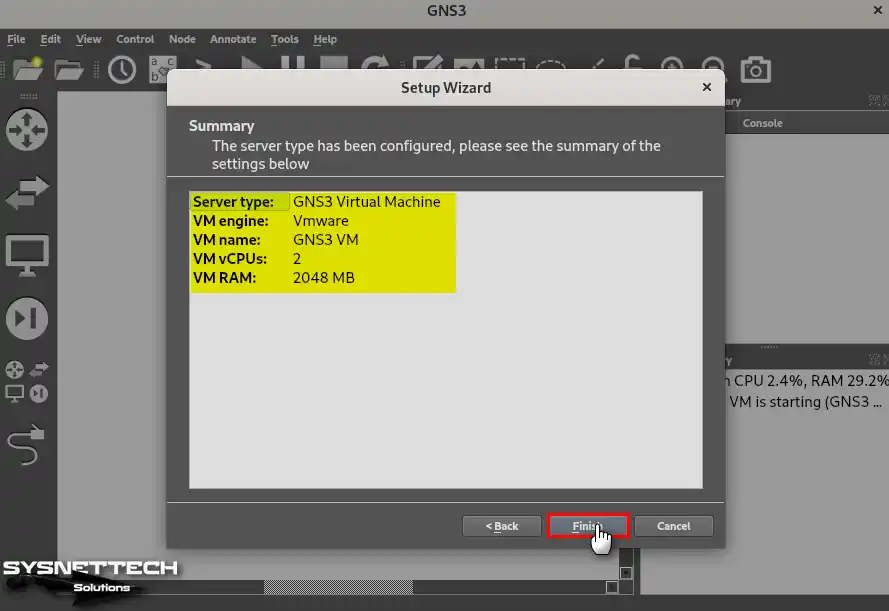
Step 5
Check the GNS3 Virtual Machine settings one last time and click Finish.
4. Add Router IOS to the GNS3 Server
After connecting the GNS3 and GNS3 virtual servers, you need to add the IOS Routers.
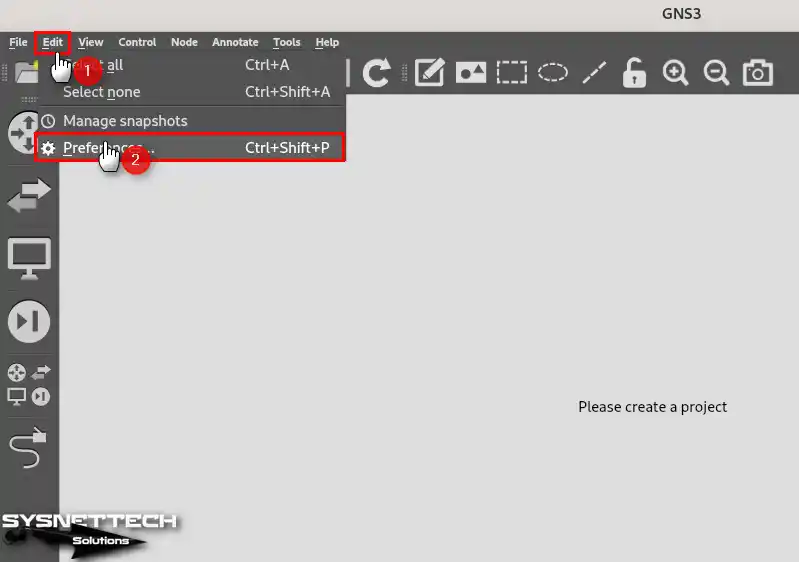
Step 1
Click Edit / Preferences from the tool menu of the GNS3 simulator software and open its settings.
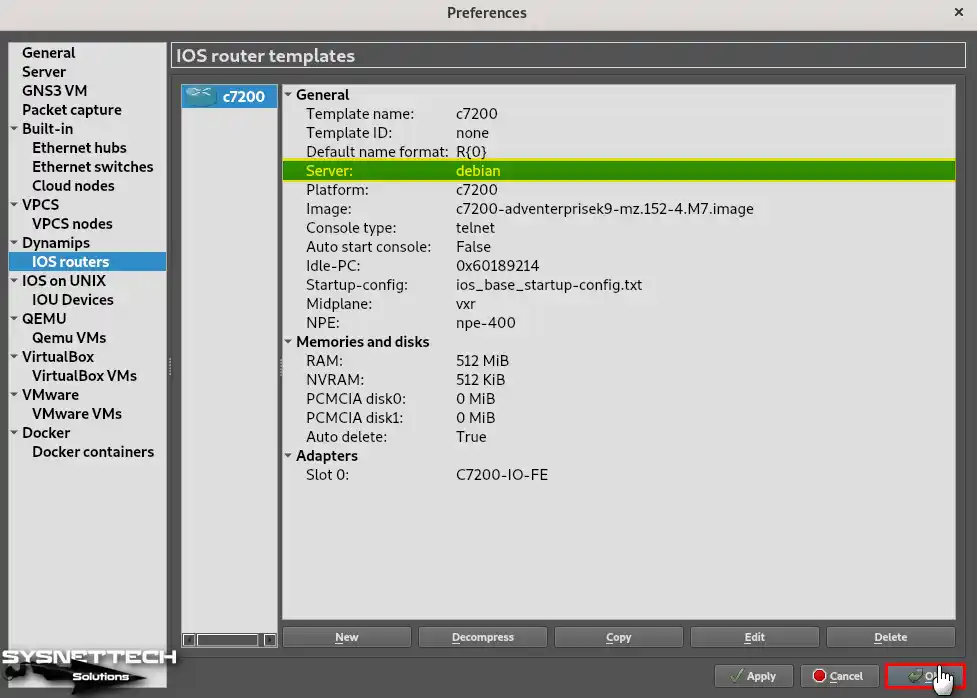
Step 2
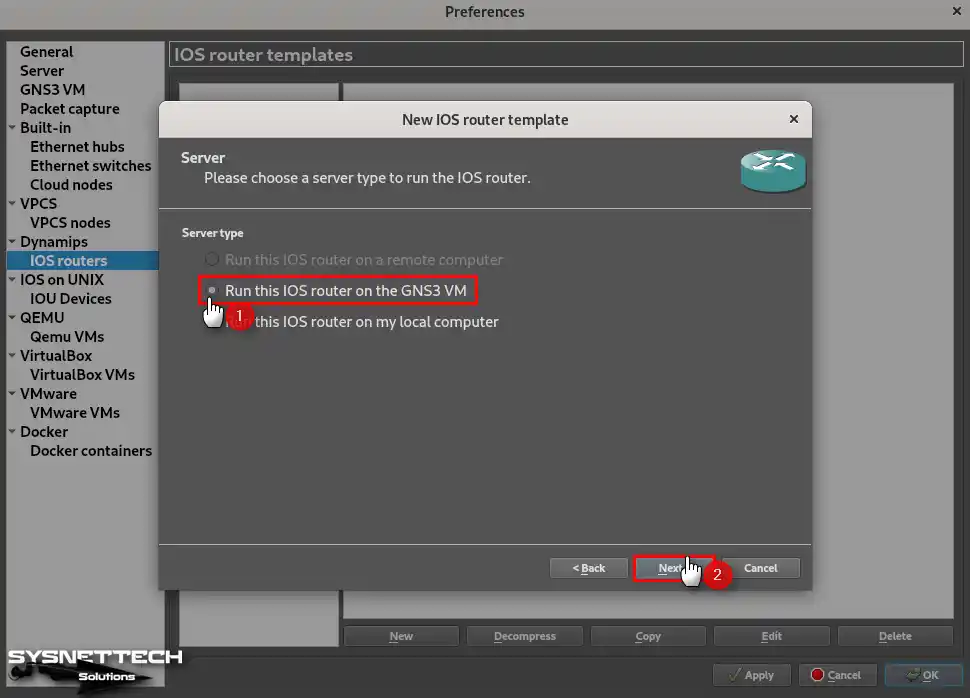
You need to select the platform on which you want to run the IOS Router. In the Server window, select the Run this IOS router on the GNS3 VM option and click Next.
Step 3
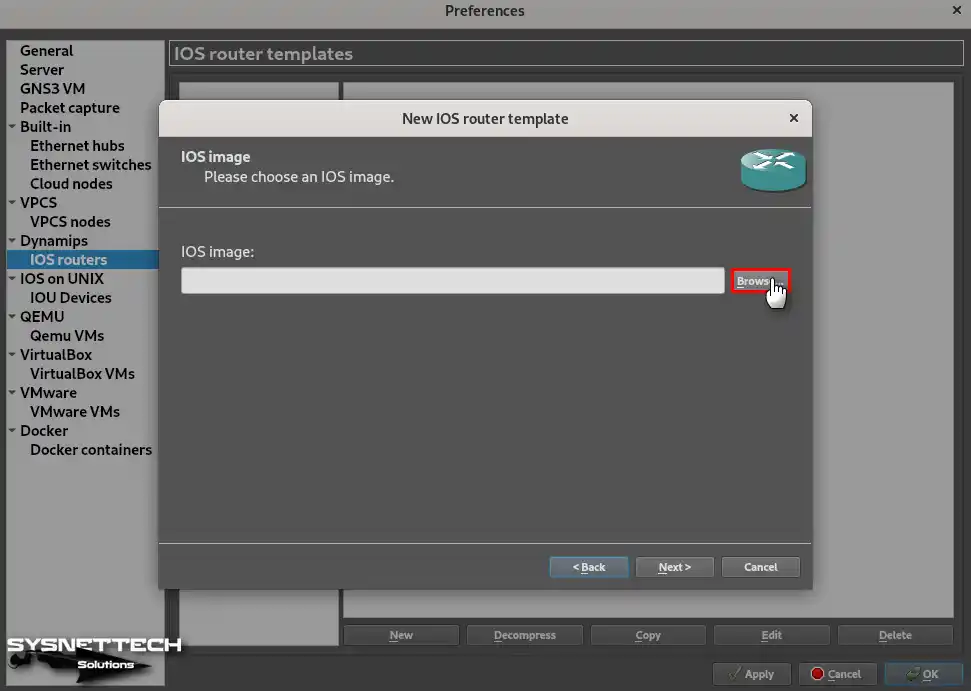
Click the Browse button to specify the location of the IOS image.
Step 4
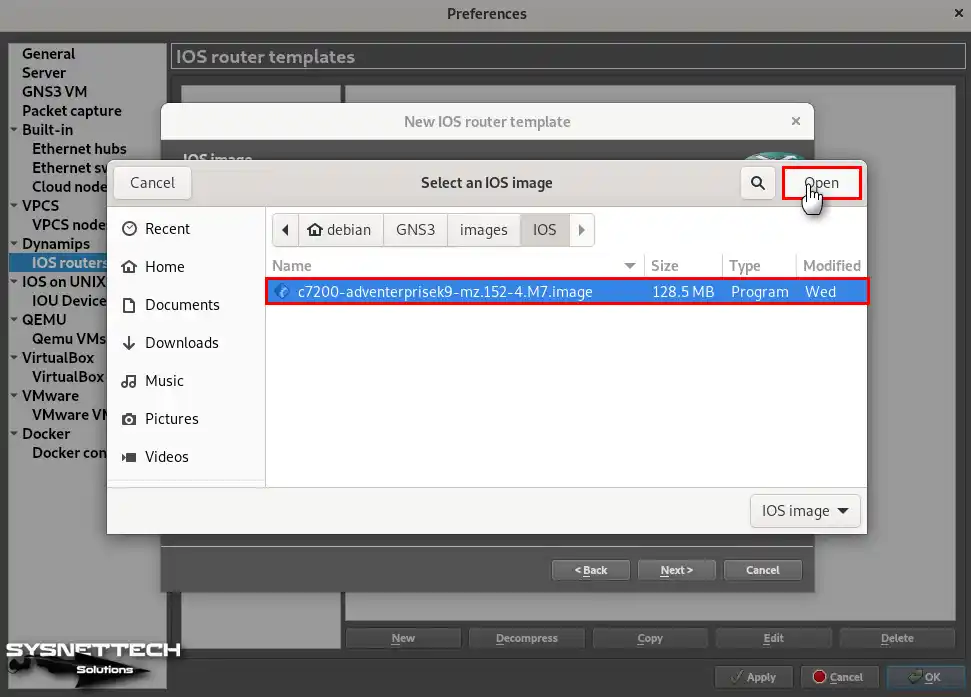
Select and open an IOS image you downloaded to your computer.
Step 5
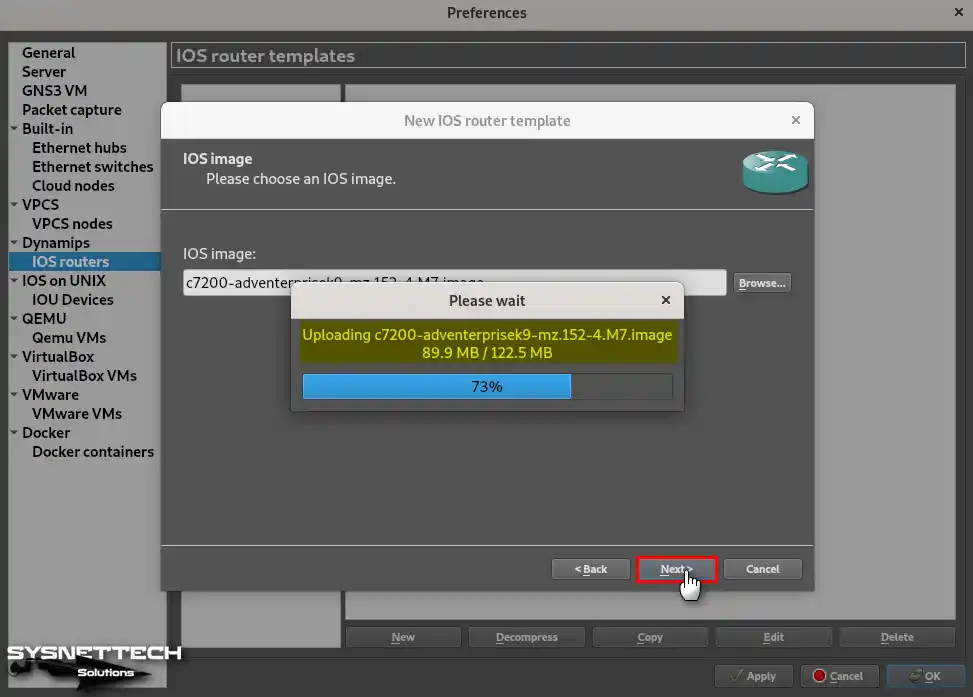
Wait while the c7200 model Router’s IOS is being uploaded to the GNS3 virtual server.
Step 6
Edit the name and platform of the Router you added.

Step 7
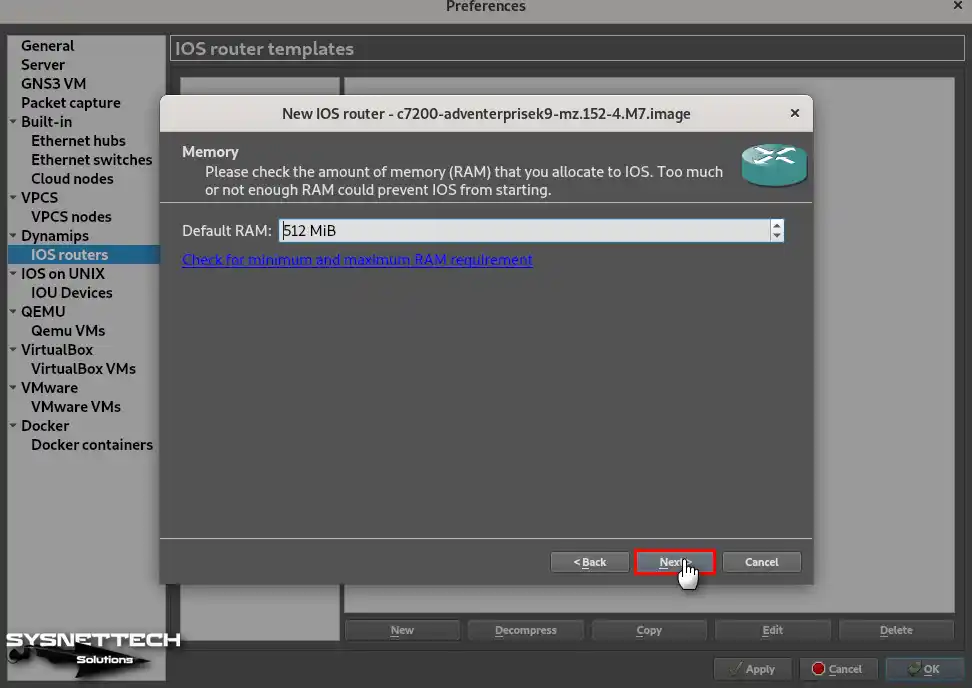
Determine a suitable RAM size for the Router to work efficiently on the virtual server.
Step 8
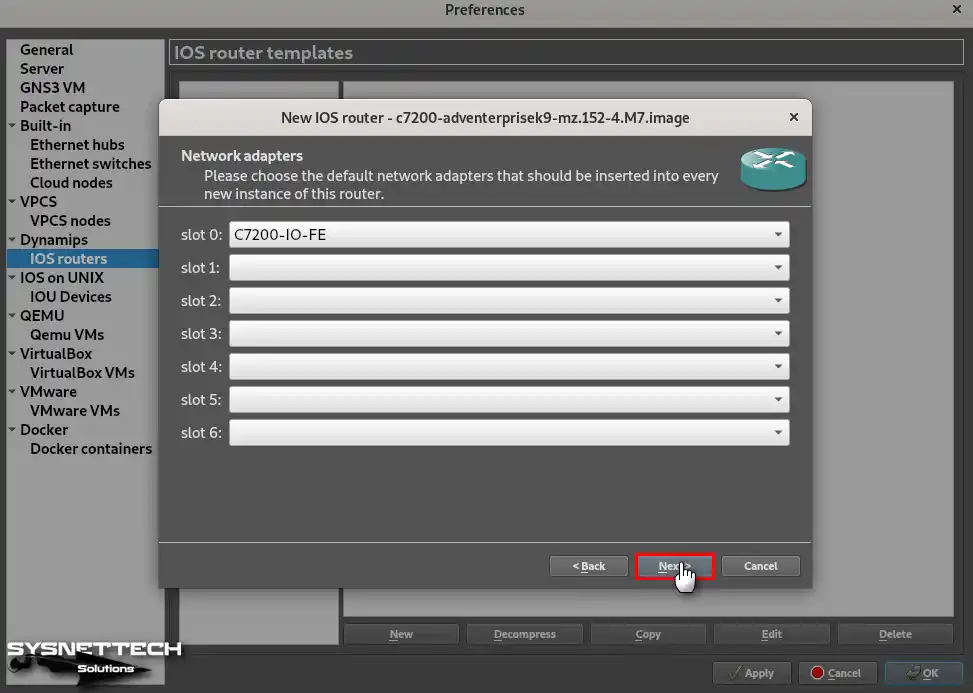
You can add interfaces to your device by making changes in the Network Adapters settings.
Step 9
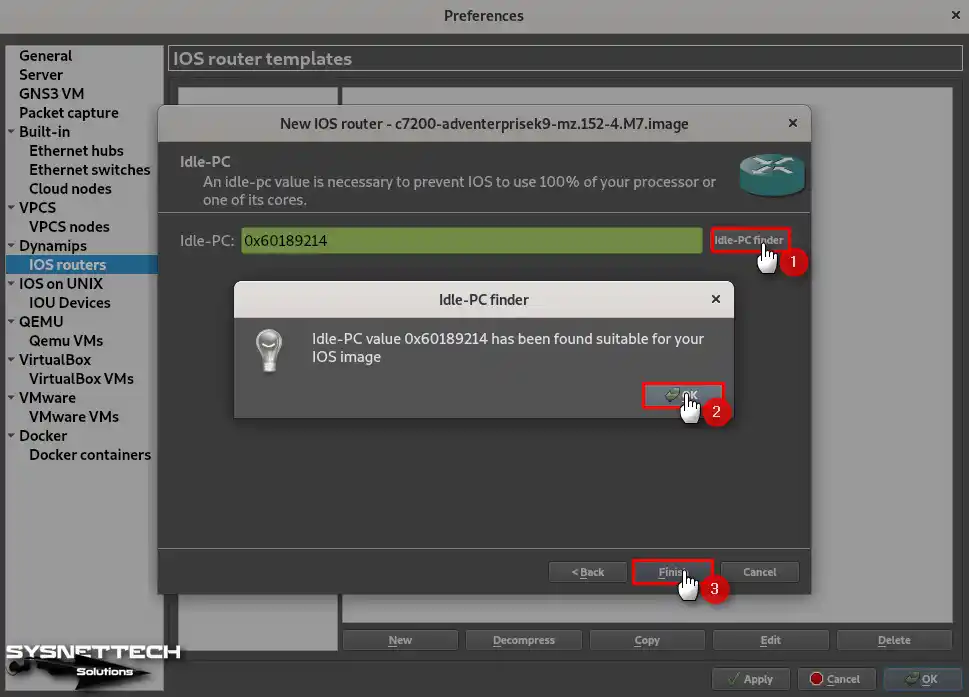
Click the Idle-PC Finder button and find a suitable Idle-PC value for the Router that will run on the virtual server.
Step 10
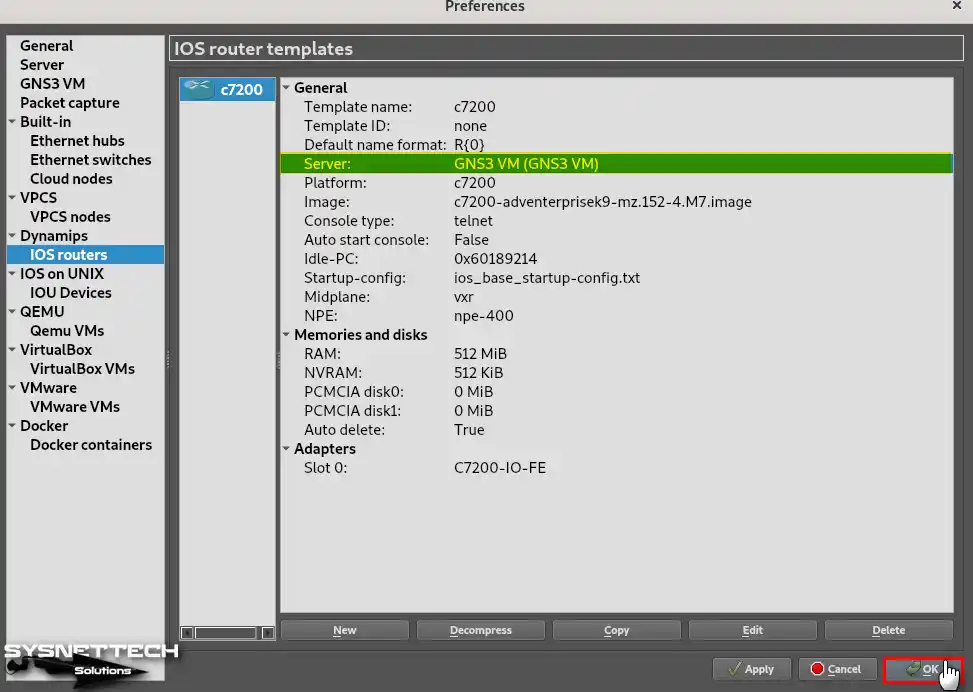
After adding the Router to the virtual server, you can check the server location in the template section.
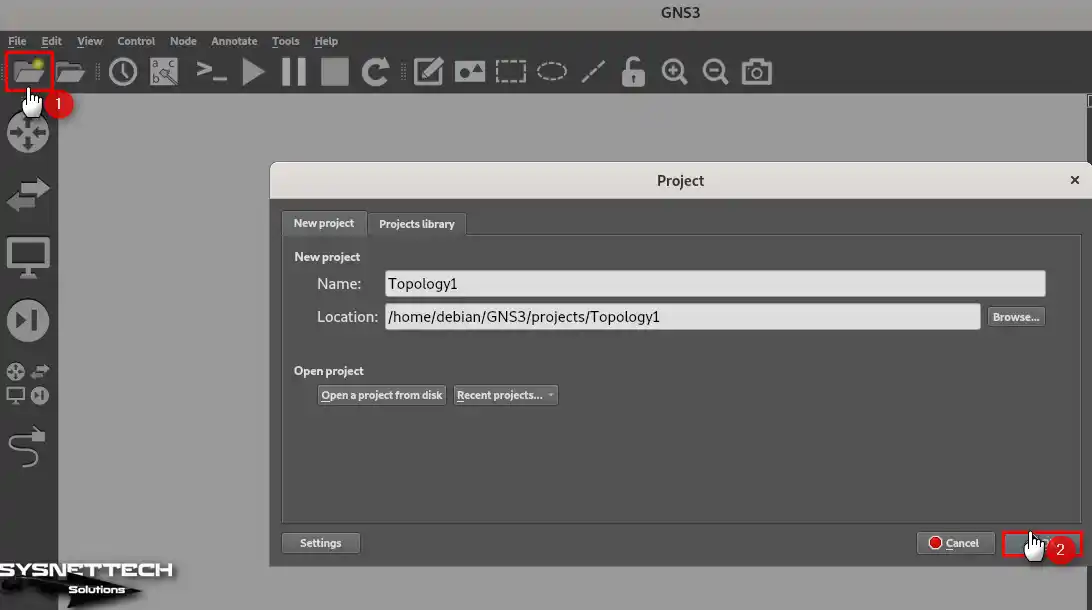
5. Creating a New Project in Debian OS
After configuring the GNS3 server, you can create a new project to test it and start creating new projects.
Step 1
Open the project wizard by clicking the new icon or CTRL + N from the tool menu of the GNS3 software.
Then, type a suitable name for the project you will create and configure the location where it will be saved.
Step 2
Click on the Routers category and drag and drop two c7200 Routers into the workspace.
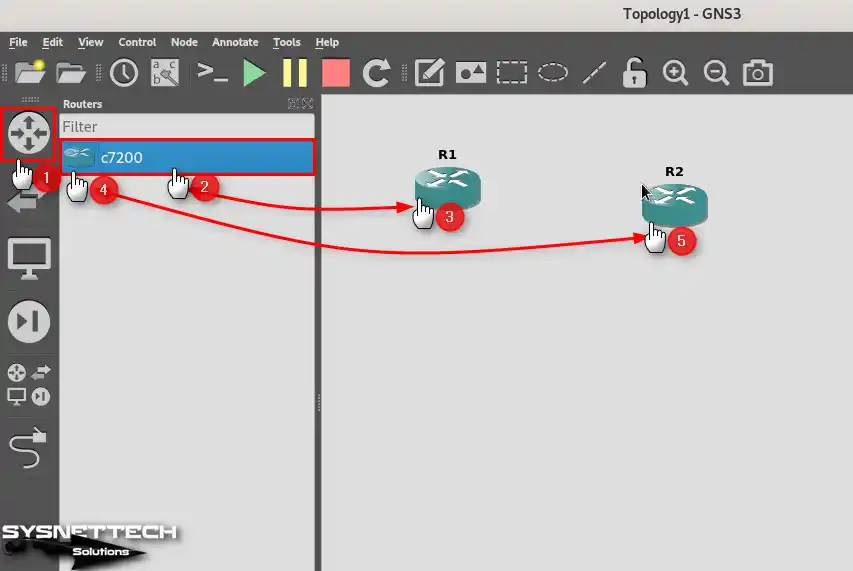
Step 3
Activate the cabling option from the left panel and connect one end of the cable to the FastEthernet0/0 port of R1 and the other end to the FastEthernet 0/0 port of R2.

Step 4
Click the green arrow from the tool menu to run all the Routers you have added to the workspace, and click the Yes button to confirm the operation.

Step 5
Assign an IP address to the FastEthernet interfaces of Router R1 and R2 and open the ports.
R1# conf t
R1(config)# interface fastethernet 0/0
R1(config-if)# ip address 192.168.1.1 255.255.255.0
R1(config-if)# no shutdown
R2# conf t
R2(config)# interface fastethernet 0/0
R2(config-if)# ip address 192.168.1.2 255.255.255.0
R2(config-if)# no shutdown
Step 6
Use the ping command to test the network connection between R1 and R2.
R1# ping 192.168.1.2R2# ping 192.168.1.1
6. Disabling the GNS3 Server
When you turn off the virtual server and want to run your IOS devices on your local PC, you need to do this from the settings window: delete the Router you added and add it again.
Step 1
Open Edit / Preferences and click GNS3 VM from the left panel, then uncheck Enable the GNS3 VM from the listed options and click OK.

Step 2
Open Help / Setup Wizard from the tool menu. This time, select Run Appliances on my local computer and click Next.

Step 3
Change the Host Binding IP address to Localhost in the Local Server configuration and click Next.

Step 4
After making the local server connection, click Next.

Step 5
In the Summary window, you can now check that the IOS will work on your local computer, Localhost.

Step 6
In the template section, you can see that the C7200 device is running on the GNS3 VM. Since you have turned off the GNS3 server, delete this Router.

Step 7
To add IOS again, click the New button to open the wizard. However, this time select Run this IOS Router on my local computer.

Step 8
When you add the c7200 Router again, you can see that the server part is Debian.
How to Delete the GNS3 VM
After you stop the GNS3 VM connection, open VMware Workstation. Then, expand the left panel to delete the VM from your host disk completely.
Next, click the “Manage” tab. From there, select the “Delete from Disk” option. In the window that opens, click Yes to confirm the deletion.

Video
Possible Errors
Version Error
- => Error while getting the VMs: GNS3 version 2.2.32.1 is not the same as the GNS3 VM version 2.2.32. Please upgrade the GNS3 VM.
GNS3 version 2.2.32.1 is not the same as the GNS3 VM version 2.2.32. Please upgrade the GNS3 VM. - Error while getting templates list: Client version 2.2.32 is not the same as server (controller) version 2.2.32.1
If you see any of these mistakes in your GNS3 server link, know that the client and server must be the same version.
Because of this, you need to make one of the versions new to fix the problem. Or, you can also put on an older version that will work.
If you see this mistake on your Debian system, the problem is probably from loading the network tool with pip3. To fix this problem, first open your terminal. Then, make your present software version new.
pip install gns3-gui==2.2.33pip install gns3-server==2.2.33Conclusion
To finish, installing a GNS3 VM on Debian with VMware Workstation is very helpful. This makes it better for you to copy the Cisco Router IOS.
It also helps you learn and try things in network design. GNS3 VM joining makes it work best. It also lets you use more network tools.
This makes it simpler to build complex network tests. You can get a good setup by doing the steps I have listed.
This lets you see all that GNS3 can do in your network work. You can also get ready for real network problems.

Be the first to share your comment