
You might see speed problems when using the GNS3 network tool. This usually happens when you add Cisco Router IOS files to your computer.
Adding these files can be very hard. First, there is the problem of storage capacity. Big IOS files take up a lot of disk space. This gets worse when you add many files. Also, running tests with these files uses a lot of computer power.
Because of this, your computer will slow down. This causes lag and makes it less responsive when you set up and test. To help with these problems, I suggest you run your IOS files on a GNS3 VM remote server.
Why Should I Use GNS3 VM?
GNS3 VM is a special Linux-based virtual machine. The dev team fine-tuned this structure. Its goal is to speed up your network simulations. So what does this virtual machine do?
Think about running IOS images straight on your PC. Each of them takes up gigabytes of disk space.
Moreover, your processor must handle these images alone. As a result, your system slows down and your simulations lag.
GNS3 VM lifts this load from you. You move your IOS images to this virtual server. Next, the images run on the Linux kernel. Linux is far better at processing network packets than Windows. Therefore, your simulation speed rises sharply.
Moreover, you gather all your images in one spot. When starting a new project, you don’t hunt for images. They all sit ready in the GNS3 VM.
Also, an external SSD drive doubles read and write speeds. Above all, with an NVMe SSD, you can boot a topology in seconds.
On the other hand, GNS3 VM works smoothly with VMware Workstation and VirtualBox. The dev team provides the OVA file in a standard format.
No matter which virtualization platform you choose, you can install it. Most importantly, this structure lets you run complex lab environments. You can even launch them on your laptop.
How to Build the GNS3 VM on VMware
After installing VMware Workstation, download the VM.ova file from the developer’s website. Then, extract the archived file you downloaded to a folder. However, follow the steps below for installation.
1. Import GNS3 VM.ova File
First, get the VM.ova file from GNS3’s official site. Next, extract the archive to your desktop or an extra drive. Now let’s follow the steps one by one.
So, double-click the OVA file. VMware Workstation opens on its own. An import wizard appears.
Now, on this screen, I suggest you click the Browse button. Create a new folder on your extra drive. For instance, name it “GNS3_VM_Server”. This way, you avoid mix-ups with other OVA files later.
Then, check the disk path closely. If you choose a wrong spot, the import can fail. Once you confirm the right path, hit the Import button.
This job may take a few minutes. However, the exact time depends on your drive’s speed. On an NVMe SSD, it finishes in seconds. Still, if you use a mechanical HDD, you must wait.
Note that you must not put the computer to sleep during the import. If the write process stops halfway, the VM image can break. You would have to start over. So, the best move is to start the process and wait for it to finish.
Once the import completes, you see a new virtual machine in the VMware library. Now you are ready to move on to network settings. However, don’t start the virtual machine yet. First, let’s configure the adapter.
Step 1
Double-click the GNS3 VM.ova file you downloaded.

Step 2
VMware Workstation will open like this. If you want to import it to an external disk, click the Browse button.

Step 3
I recommend selecting your external disk from the disk options. So, proceed by creating a new folder here.

Step 4
Check the location of the external disk. After that, hit the “Import” button to start the process.

Step 5
GNS3 Server import started.

2. Configure the GNS3 Server’s Network Settings
Step 1
After importing the virtual machine, configure the network settings. To do this, click on the “Network Adapter” section, as shown in the image below. Then, select Network Adapter 2 and delete it.

Step 2
Configure the Network Adapter 1 setting to VMnet0 (Bridged). Don’t forget to configure VMnet0 as a Bridged Network in the Virtual Network Editor.

3. Run & Control GNS3 Virtual Server
Step 1
After completing the above steps, run the GNS3 virtual machine.

Step 2
We are opening the GNS3 server.

Step 3
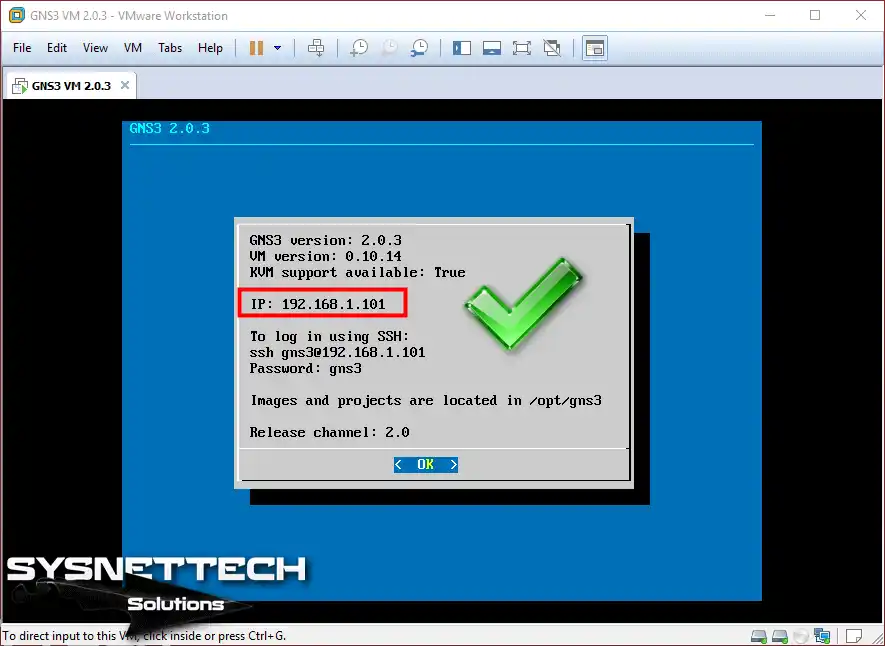
The first boot image after the GNS3 virtual machine is turned on is as follows. Click OK to access the advanced settings section.
As you can see, the GNS3 server acquires an IP address issued by the DHCP server on the local network.
Step 4
After the import process is complete, open the Command Prompt. Now, go to the command line and test the connection by pinging the IP address.

Tuning GNS3 VM Settings
You can use GNS3 VM with default settings. However, a few fine tweaks can boost its speed. These tweaks make a big difference, mainly in large topologies. Now let me tell you which settings to change, step by step.
First, increase the CPU core count. In VMware settings, assign at least 2 cores to your virtual machine. If your real CPU has 4 cores, 2 cores are ideal.
If you have an 8-core CPU, you can go up to 4 cores. However, don’t assign all real cores to the VM. Your main OS also needs room to breathe.
Next, review the RAM amount. By default, it may be set to 2 GB. This amount is far too low. Assign at least 4 GB, or even 6 GB of RAM.
If you plan to run large topologies, I suggest going up to 8 GB. But don’t give more than half of your total system RAM.
Next, tune the disk cache settings. In the VM settings, go to disk options. Set the disk type to “Pre-allocated”.
This option reserves disk space upfront. Read-write speed shoots up. Also, defrag the disk often. This is key if you use an HDD.
Finally, check the virtual machine’s power settings. Set VMware’s power management to “High Performance”. This way, the processor frequency doesn’t drop. You get full speed throughout the simulation. With these small touches, you can get the most out of your GNS3 VM.
Setting a Static IP Address
By default, GNS3 VM gets an IP from DHCP. This method is easy but has a downside. After each reboot, the IP address may change. Your GNS3 client always expects the same IP. When the IP changes, the connection drops. So I urge you to set a static IP.
First, access the GNS3 VM console to set a static IP. After the VM boots, press the OK button. An advanced settings menu appears. Next, choose the “Shell” option. You drop to the command line. Now let’s edit the network config file.
Type the command: sudo nano /etc/netplan/01-netcfg.yaml. If it asks for a password, type “gns3”. When the file opens, find the DHCP line. Change the part that says “dhcp4: true” to “dhcp4: false”. Below it, add this line: addresses: [192.168.1.100/24]. Next, add gateway4: 192.168.1.1. Also, add nameservers: addresses: [8.8.8.8, 8.8.4.4].
You must adapt these IP values to your own network. Check your modem’s IP range. Often, it’s 192.168.1.1 or 192.168.0.1. Pick an empty IP in the same network block. Be sure there’s no clash. Save the file and exit. Then, run the command sudo netplan apply.
Finally, test the connection with the new IP. Ping the new IP address from CMD. If you get a reply, the static IP is set. Use this new IP in the GNS3 client as well. Now you connect to the same address after each reboot. This small tweak saves you a lot of hassle.
Common GNS3 VM Errors and Fixes
You may run into some errors during the GNS3 VM import. Don’t worry, most of these are easy to fix. I’ve been helping my clients solve these problems for years. Now let me share the most common errors and their quick fixes.
First common error: “VMware Workstation cannot connect to the virtual machine.” This error often stems from stopped VMware services.
To fix it, restart the services. Open services.msc in Windows. Find all services that start with VMware. Right-click each one and choose Restart. Plus, a reboot also works.
Second common error: “Kernel panic” or the VM freezes at startup. The cause is often not enough RAM. Go to the VM settings.
Increase the RAM to at least 4 GB. Also, make sure you select the correct OS type as “Ubuntu 64-bit”. Picking the wrong OS type causes a kernel panic.
Third common issue: You can’t ping, or you get “Destination Host Unreachable”. The most common cause is the network mode staying in NAT. Next, check the VM settings. Make sure to set the network adapter to Bridged mode. Also, briefly turn off your firewall and test again.
Fourth error: The GNS3 client doesn’t connect to the server. First, check that you entered the correct IP address. In the server settings, confirm that the port number is 3080.
Also, don’t forget to check the “Enable GNS3 VM” option in the GNS3 client. Skipping this small checkbox is the most common mistake.
Finally, you might get a disk space error. The virtual machine grows over time. The disk fills up if you add many IOS images. To fix it, use VMware’s disk cleanup tool.
Next, in the VM settings, find the “Compact” option. This process reclaims wasted space. I advise doing this cleanup often.
How to Add a GNS3 VM to a Virtual Machine ⇒ Video
You can learn how to move the GNS3.ova file to your VM in our YouTube video. This video will show you the needed setup and choices for an easy install.
If you liked our content, please remember to follow our YouTube channel! By following, you can help us and know about our newest videos and tools.
Conclusion
In this article, we outline several steps to enhance the efficiency of using the GNS3 program.
Plus, we have installed the GNS3 VM server on VMware to provide centralized IOS management. In short, you can now organize your network designs more professionally and with advanced performance.
Now, you can use all the features of an L2 Switch and an L3 Switch.
To make your GNS3 better, I strongly suggest that you build the GNS3 VM. If you use Windows, please read our article, Installing the GNS3 VM on Windows. This guide will make the setup easy if you follow all the simple steps.

Be the first to share your comment