In this article, we will examine how to set up and use GNS3 VM 2.2.33.1, which allows you to use network devices such as Cisco Router and Switch with more performance and stability on Linux Mint 21 Vanessa distribution.
How to Configure and Use GNS3 VM 2.2 (2.2.33.1) on Linux Mint
Compared to other simulator programs, you can prepare for Cisco exams more professionally by using the GNS3 software. When you first set up the GNS3 simulator, you run the Router IOS images you added on your host computer over localhost, but in this case, your system will be more affected in terms of performance while emulating IOS images.
Therefore, the use of GNS3 with the GNS3 virtual machine is preferred both in terms of performance and ease of project management.
After downloading the GNS3 VM from the developer website for free, you can start using it by integrating the OVA extension virtual machine file into your virtualization program by using one of the VMware Workstation, Fusion, or VirtualBox virtualization programs.
The GNS3 server can run smoothly on Windows and macOS operating systems, as well as compatible with Linux distributions such as Linux Mint and work smoothly.
Requirements
In order to configure the GNS3 server, take a look at the articles below and install the GNS3 and VMware Workstation programs on your computer.
How to Download and Install GNS3 VM
Before downloading the GNS3 virtual machine to your computer, you must first register on the GNS3 official website. When you log in after the registration phase, as soon as you click the Free Download button, you can access the web page containing the virtualization software by clicking Download the GNS3 VM on the web page of the operating systems where you can download GNS3.
Step 1
After logging in to GNS3, visit https://www.gns3.com/software/download-vm to access the web page of virtual machine platforms directly, and then click the Download button in the category appropriate for the virtualization program installed on your computer, and save the zip file to your computer.

Step 2
After downloading the GNS3.VM.Workstation.2.2.33.1.zip file to your computer, open the terminal by pressing CTRL + ALT + T and execute the “unzip FileName.zip” command to extract the archived file to the folder.
unzip GNS3.VM.Workstation.2.2.33.1.zip
Step 3
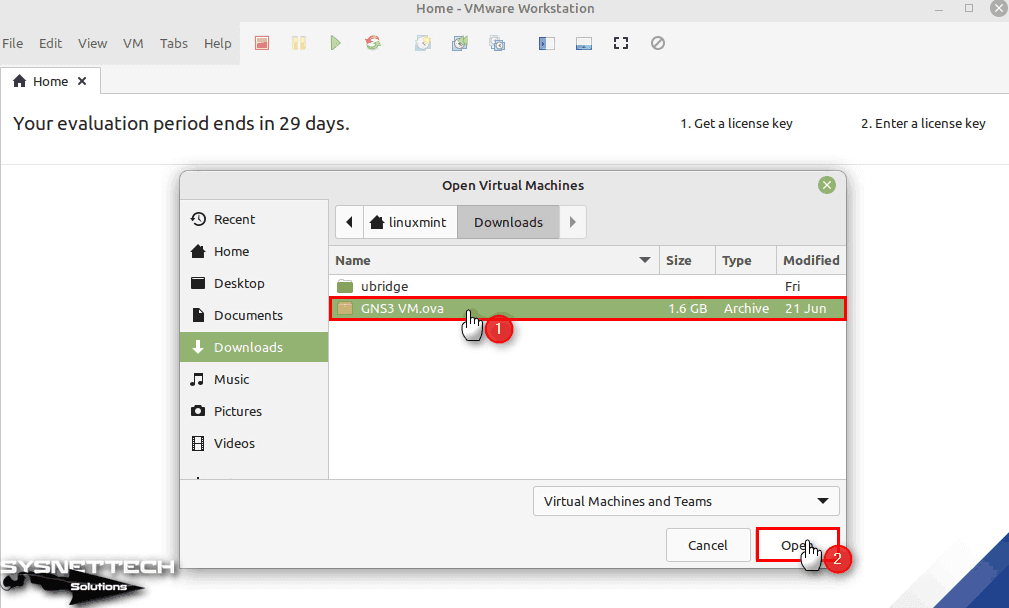
Open your VMware Workstation 16 Pro software, and click File / Open from the tool menu to import the GNS3 VM.ova file.

Step 4
Select and open the GNS3 VM.ova file, which is an installed virtual machine file.
Step 5
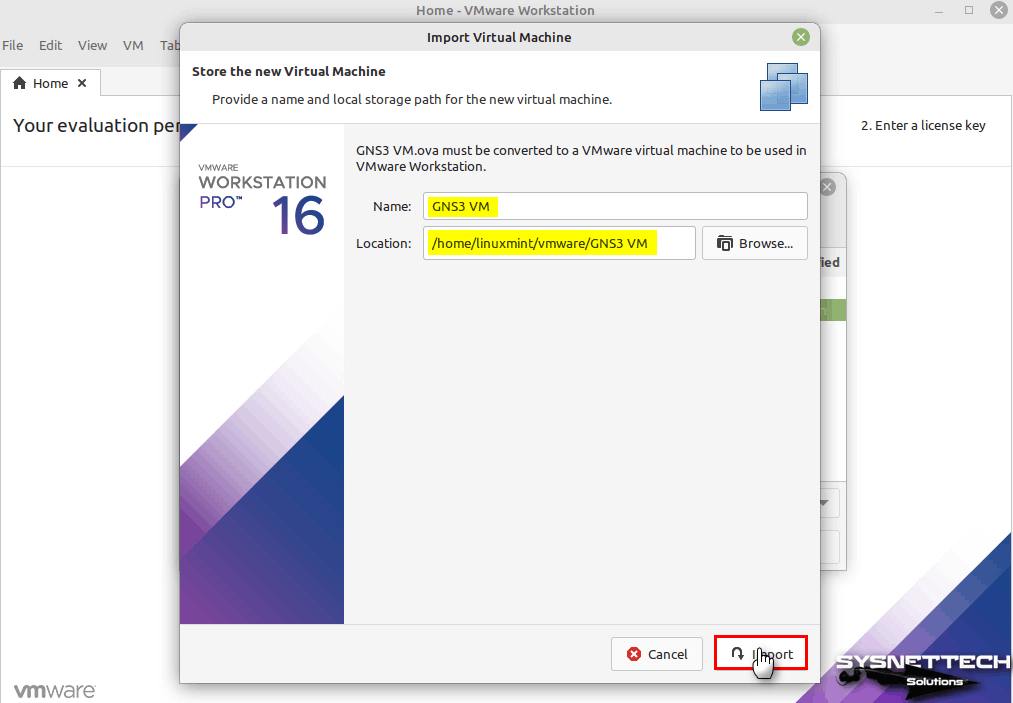
When the Import Virtual Machine window opens, select a location where you want to back up the VM, or you can choose to back up to the default location.
After configuring the server name and location, click the Import button.
Step 6
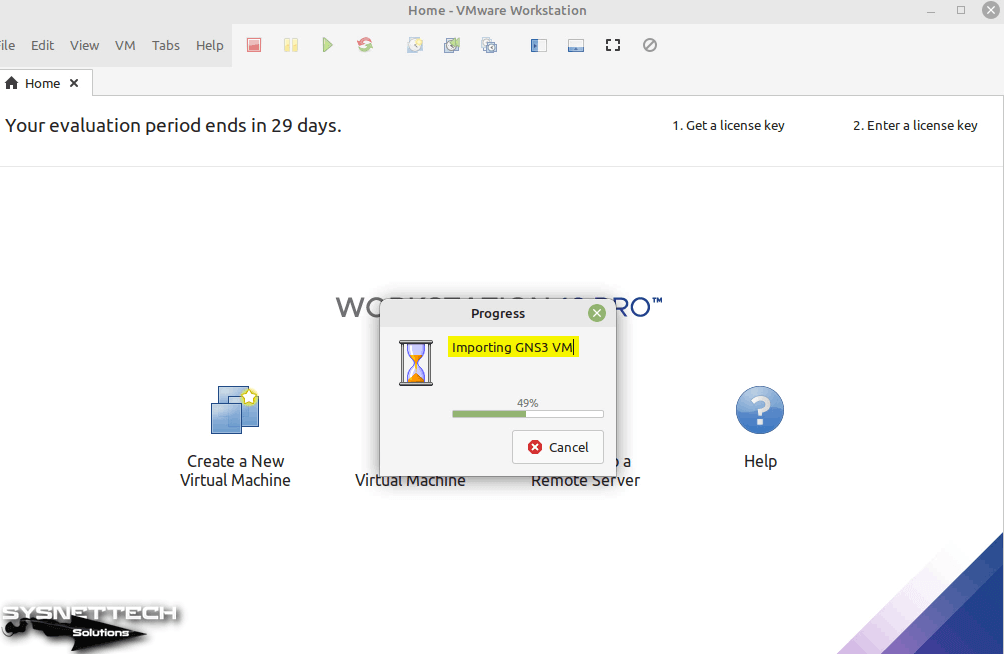
Wait while importing GNS3 Server VM on VMware on your Linux Mint system.
Step 7
After adding the GNS3 virtual machine, open its settings and after viewing the Processors hardware settings, increase the number of virtual processors and cores and enable the features under Virtualization Engine.
- Virtualize Intel VT-x/EPT or AMD-V/RVI
- Virtualize CPU Performance Counters
- Virtualize IOMMU (IO Memory Management Unit)

Step 8
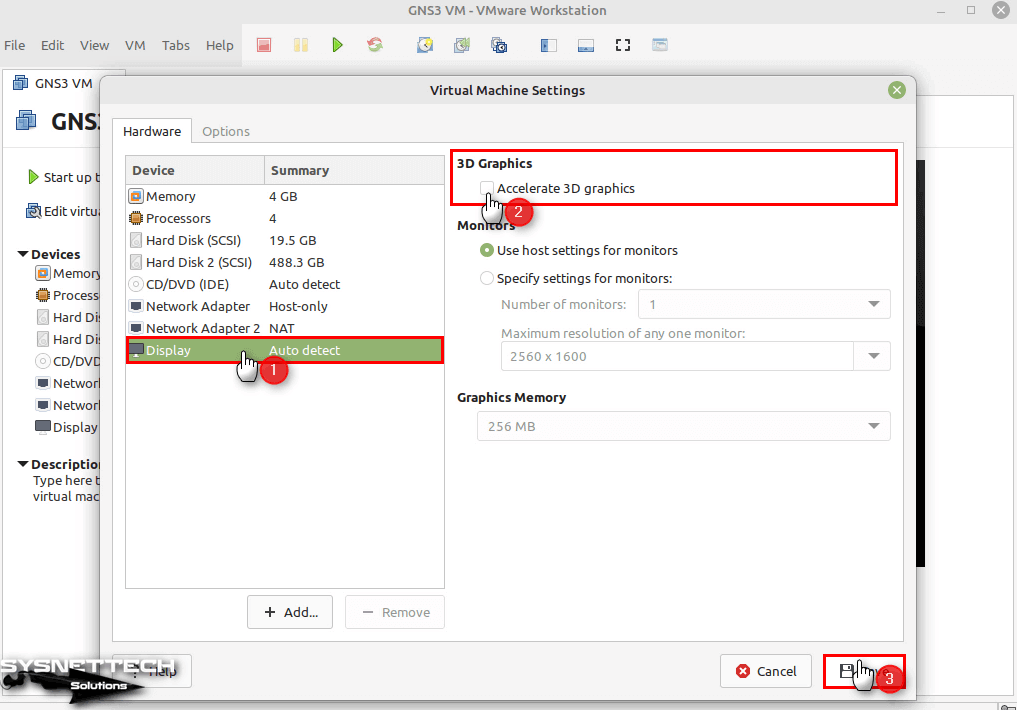
Since there is no need for 3D graphics acceleration on the GNS3 server, it is useful to disable this feature in terms of performance.
Step 9
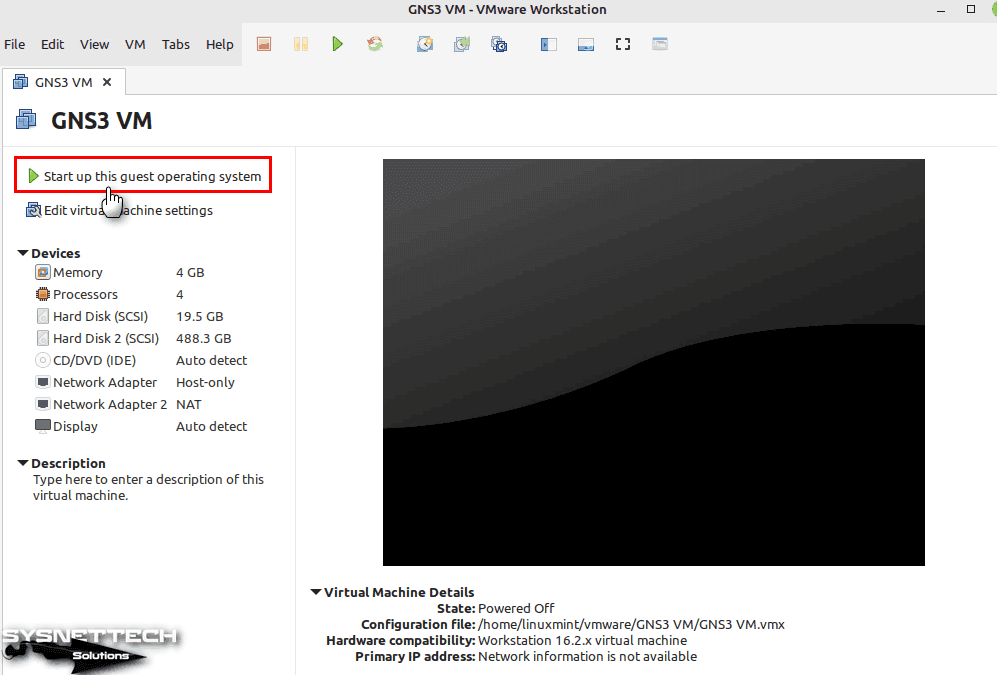
After configuring the GNS3 VM virtual server, click Start up this guest operating system and run it.
Step 10
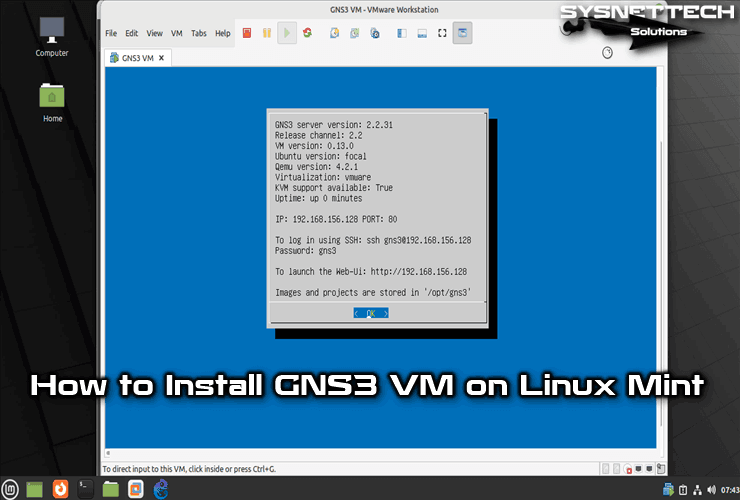
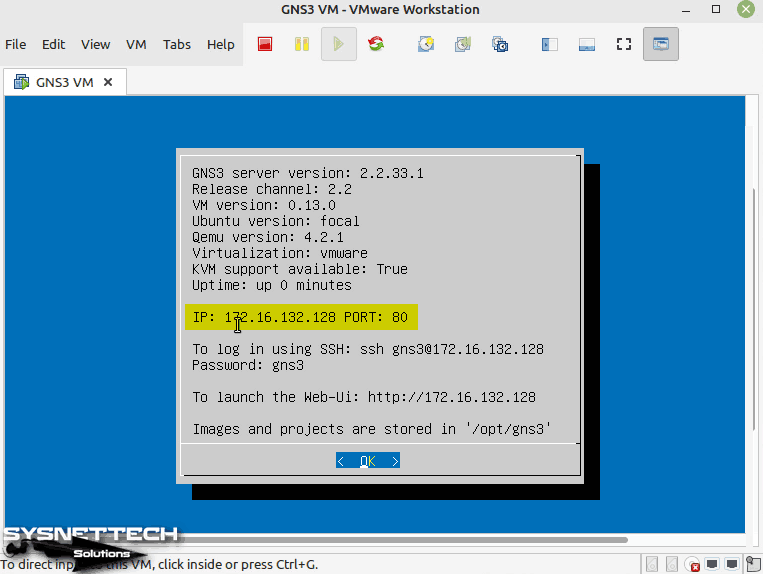
After turning on the GNS3 server, you can check its version, virtualization platform, IP address, and port number or Web-Ui address.
How to Enable the GNS3 VM
After installing and running the GNS3 VM, you need to make the connection to your GNS3 simulator software.
Step 1
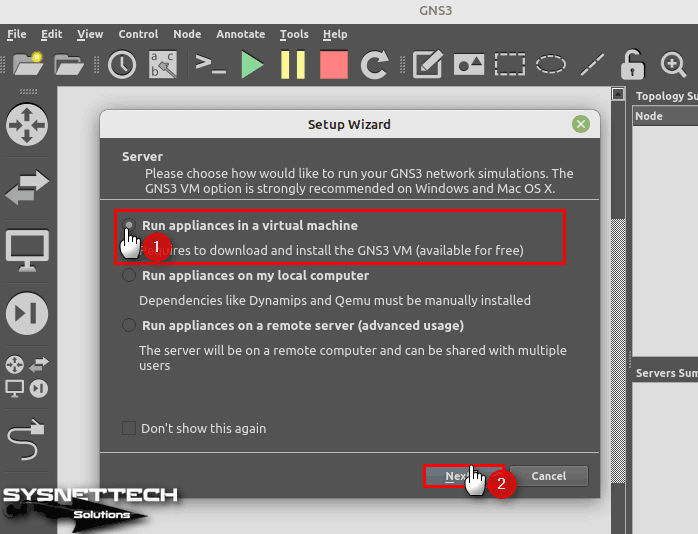
In the server configuration window that opens after clicking Help / Setup Wizard from the GNS3 tool menu, select the Run appliances in a virtual machine option so that you can run the network devices on the server and click Next.
Step 2
Configure the Host Binding IP address in the local server configuration as the IP address block of the GNS3 VM.

Step 3
Continue after establishing a connection with the GNS3 server.

Step 4
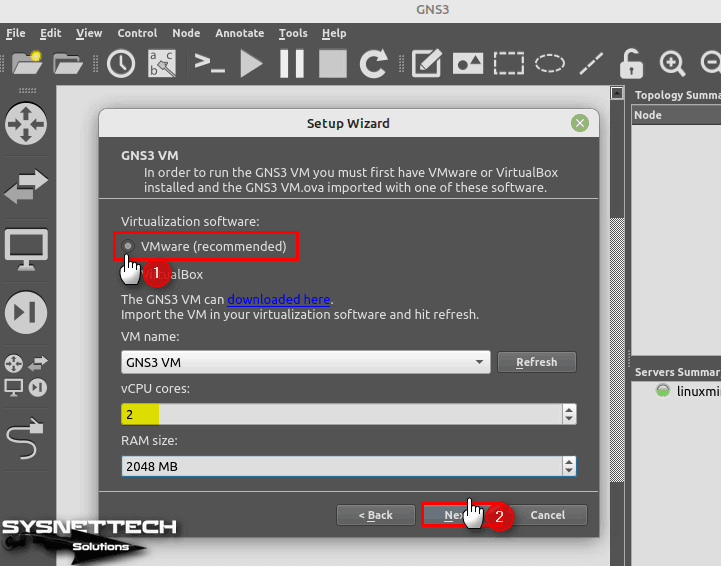
In the GNS3 VM window, select one of the VMware or VirtualBox virtualization programs that you have imported the OVA file from. If you have more than one virtual server, you can change it from VM Name.
Change the number of vCPUs to 2 for the virtual server to work more efficiently and set a suitable RAM size according to the memory capacity of your host computer.
Step 5
After activating the GNS3 virtual machine, you will see that the server is started in the Servers Summary section. After checking the settings in the Summary window, close it.

How to Add Cisco Router IOS
After adding the GNS3 VM to GNS3, you need to add an IOS image of Cisco Router or Switch devices on the server.
Step 1
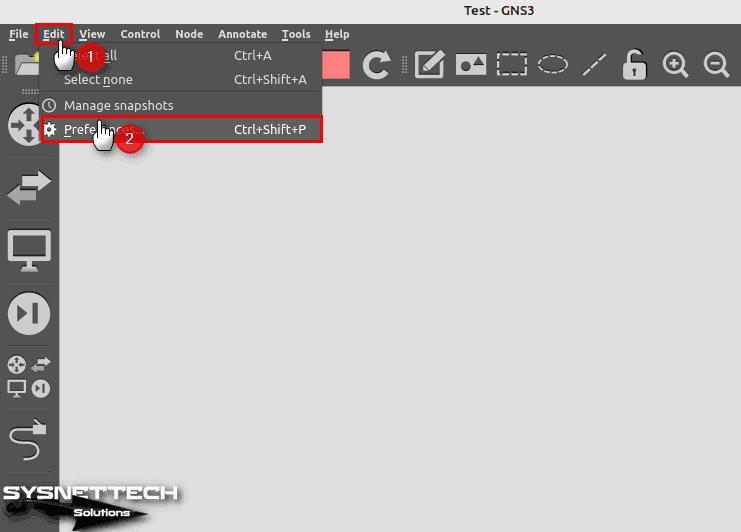
Click File / Preferences from the GNS3 tool menu to add the IOS image.
Step 2
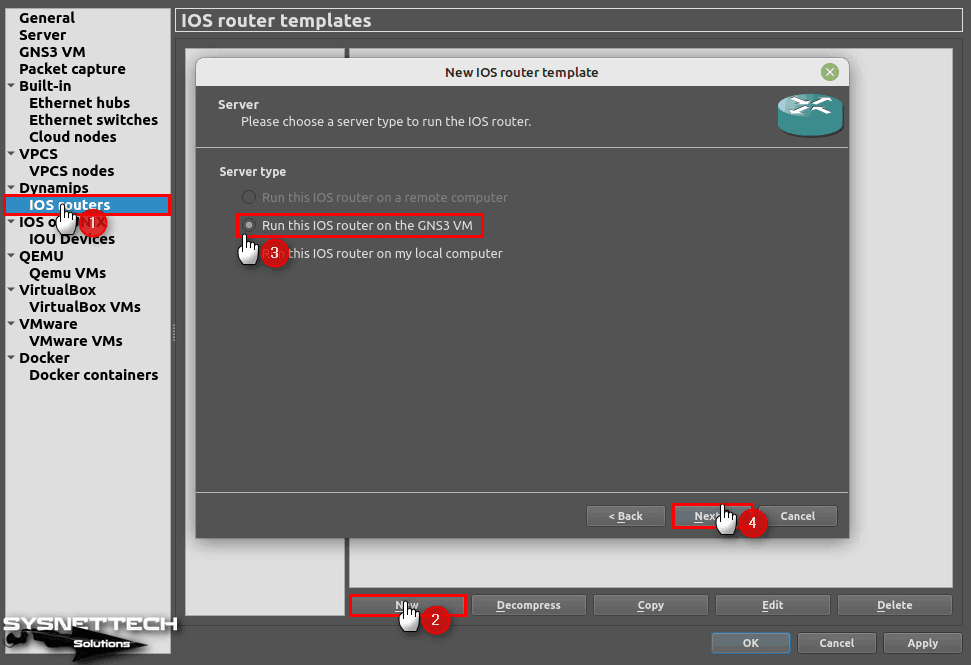
When you open the New IOS Router Template window, you need to select the server type to which you will add the IOS images. In order to run the routers on the GNS3 server, select the Run this IOS router on the GNS3 VM option and click Next.
Step 3
Click Browse to add a Cisco IOS image you downloaded from our article here.

Step 4
Select the c7200 IOS image and open it.

Step 5
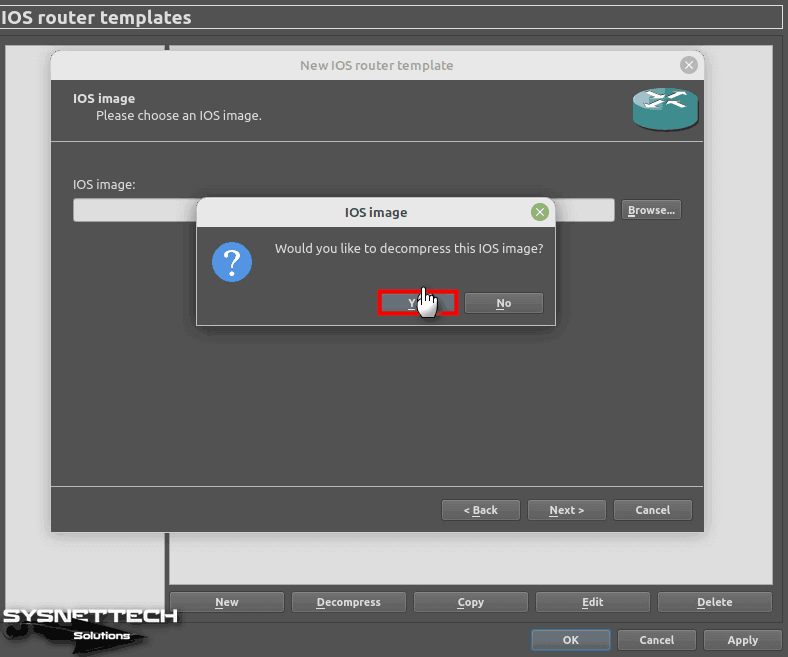
Click Yes to decompress iOS.
Step 6
Wait while the Router c7200 image is being uploaded to the GNS3 server.

Step 7
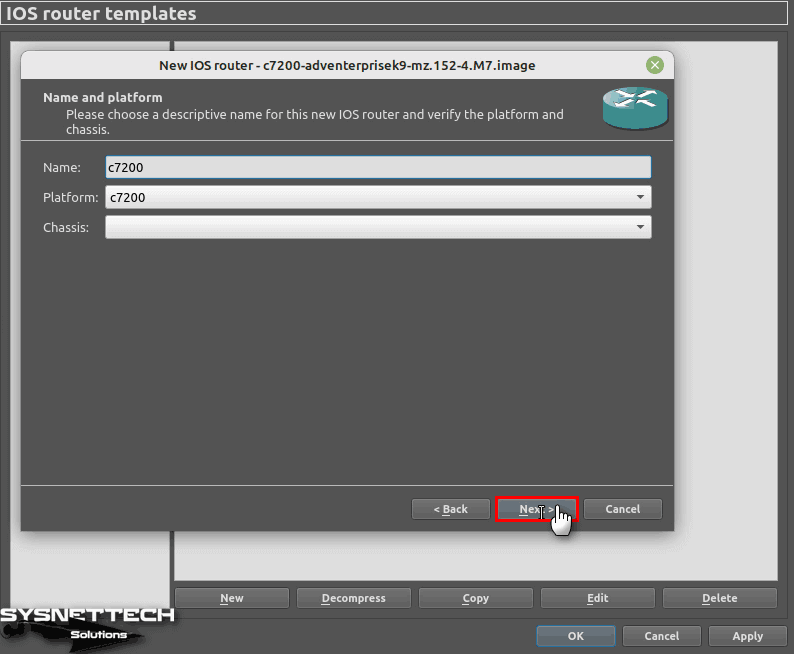
You can change the name and platform of the Router you added or continue with the default values.
Step 8
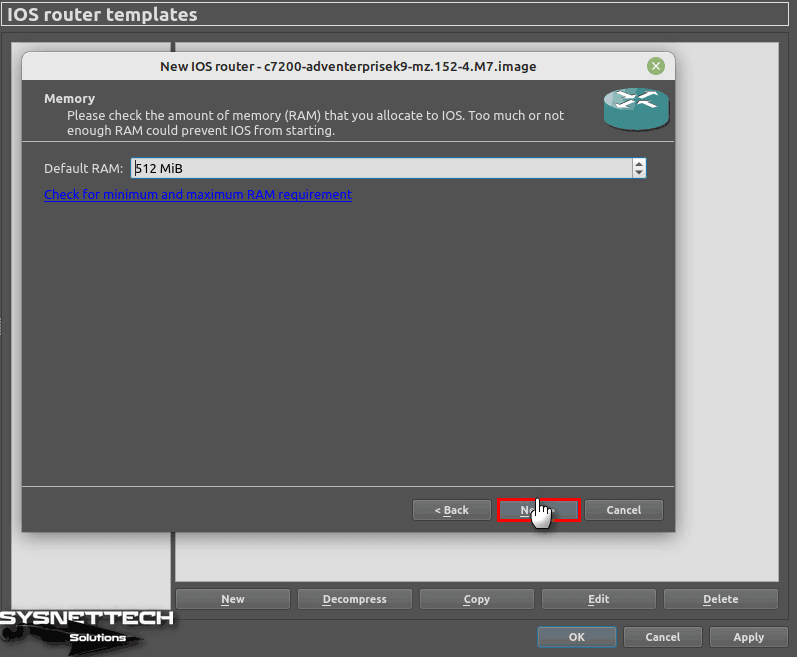
Configure a suitable memory size for the Router according to the performance of your host computer.
Step 9
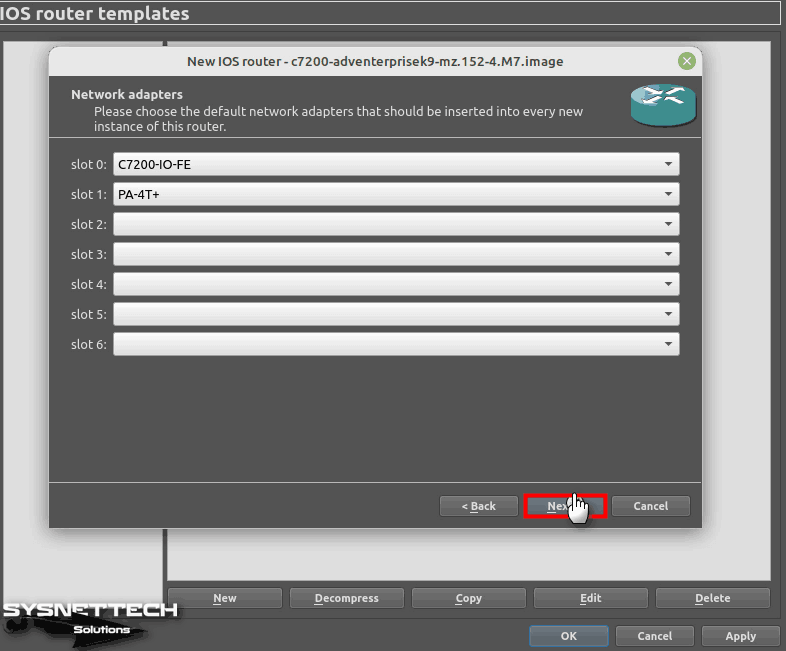
You can add FastEthernet, GigabitEthernet, or Serial Interface network adapters to the empty slots of the router.
Step 10
Determine an appropriate Idle-PC value according to your computer not to use 100% of your host CPU and reduce its performance.

Step 11
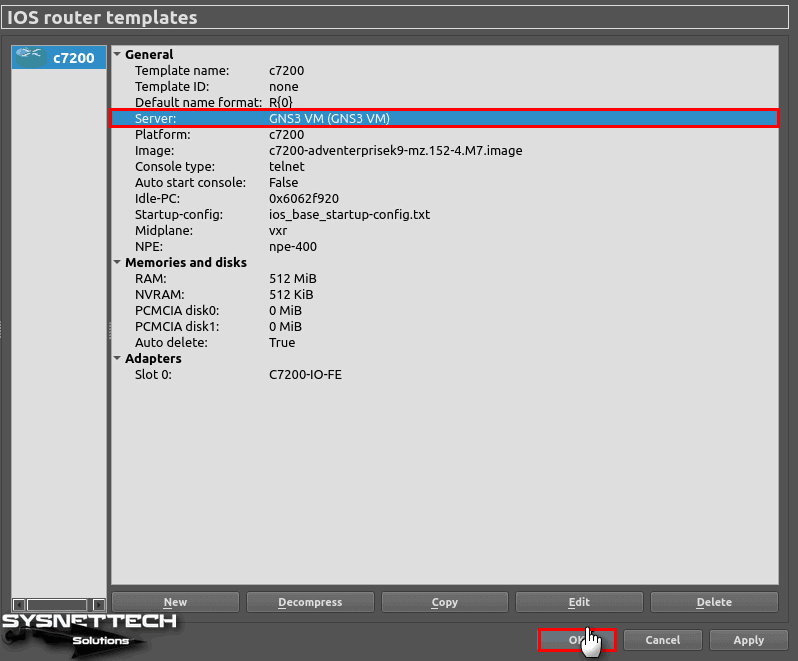
After checking the information of the IOS image you added in the router template window, close the wizard.
How to Create a New Project
After installing GNS3 VM on Linux Mint, you can create a new project and start creating basic or advanced network topologies to prepare for your Cisco exams.
Step 1
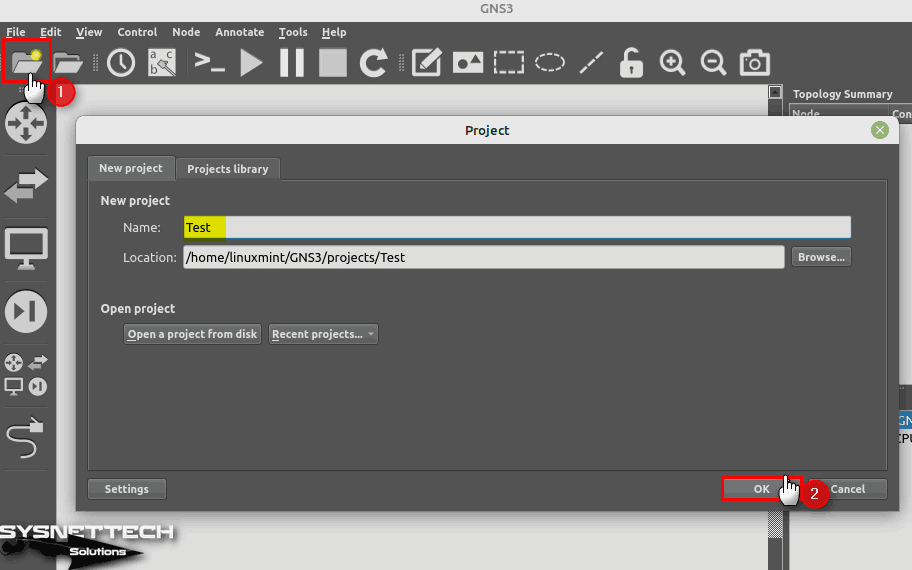
Open the project creation window by clicking CTRL + N or the icon in the tool menu and configure your project name and backup location and click OK.
Step 2
Drag and drop the c7200 device you added from the routers panel to the workspace.

Step 3
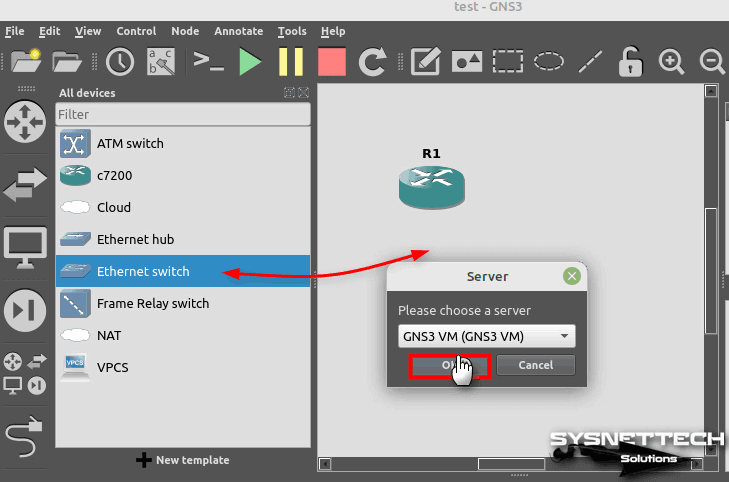
When you add an Ethernet Switch to the workspace from the All Devices panel, select the GNS3 VM in the window that opens.
Step 4
Add the VPCS device as a virtual computer to the workspace and select your server.

Step 5
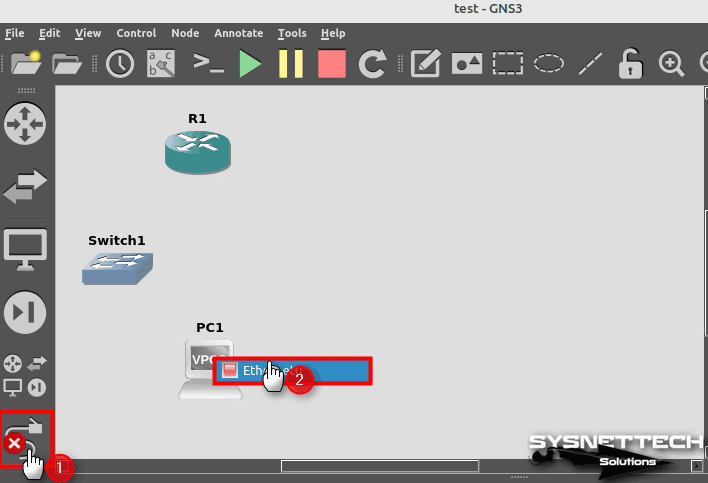
After activating the cabling option from the left panel, plug one end of the cable into the Ethernet port of the VPCS and the other end into one of the empty slots of the Switch.
Step 6
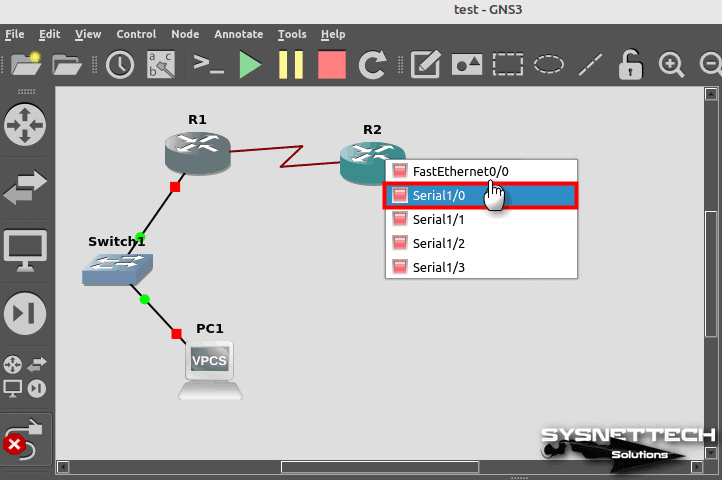
Likewise, plug the Switch into the FastEthernet0/0 port instead of the Router’s Serial interface.

Step 7
Add one more Router to the workspace and connect R1 and R2 via serial interfaces.
Step 8
Open the console by double-clicking on VPCS PC1 after running all devices, and execute the command “ip 192.168.1.10/24” to assign an IP address. Also, you can use the “show ip” command to check the IP address information.
ip 192.168.1.10/24
Step 9
To assign an IP address to Router R1 and activate the port, execute the commands below on the terminal.
R1# conf t
R1(config)# interface fastethernet 0/0
R1(config-if)# ip address 192.168.1.1 255.255.255.0
R1(config-if)# no shutdown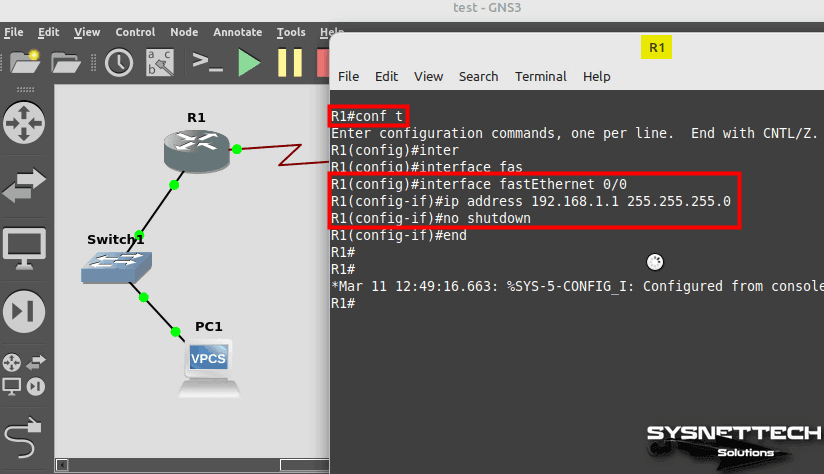
Step 10
After configuring R1’s FastEthernet 0/0 port, also configure the Serial port connected to R2.
R1# conf t
R1(config)# interface serial 1/0
R1(config-if)# ip address 192.168.2.1 255.255.255.0
R1(config-if)# no shutdown
Step 11
Assign an IP address to the serial port of R2 connected to R1.
R2# conf t
R2(config)# interface serial 1/1
R2(config-if)# ip address 192.168.2.2 255.255.255.0
R2(config-if)# no shutdown
Step 12
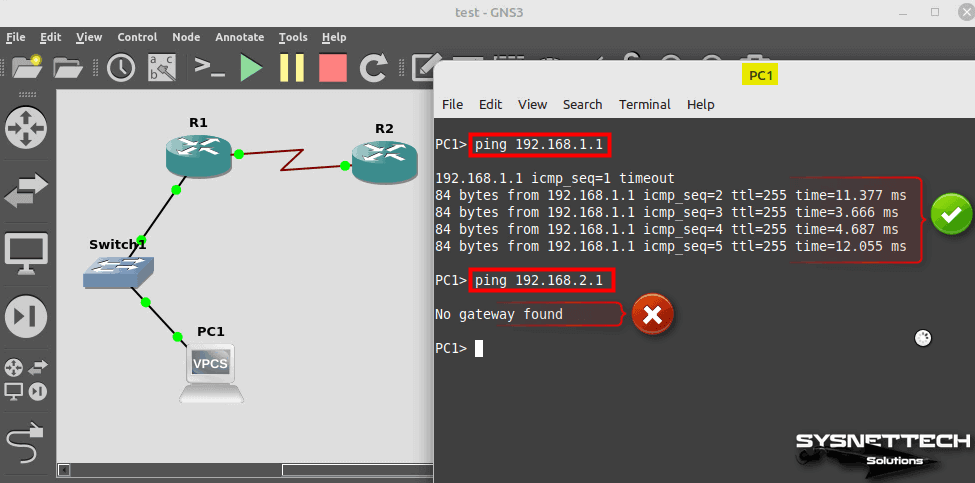
When you ping the FastEthernet 0/0 port of Router R1 from PC1, you will see that the connection is successful, but you will not be able to ping the serial port because the default gateway is not configured in PC1.
Step 13
According to the topology you created, VPCS PC1’s Default Gateway IP address should be the IP address of Router R1’s FastEthernet 0/0 port.
ip 192.168.1.10/24 192.168.1.1After assigning a default gateway address to PC1, you will see that the connection is successful when pinging the serial port of R1 again.

Step 14
You can also see that the connection is fine when you ping the serial port of PC1 and R2 from Router R1.

Step 15
Add one more VPCS to the workspace and connect it to the FastEthernet 0/0 interface of Router R2, and assign an address from a different IP block.

Step 16
Assign an IP address from the 192.168.3.0/24 block to the FastEthernet 0/0 port of Router R2.
R2# conf t
R2(config)# interface fastethernet 0/0
R2(config-if)# ip address 192.168.3.1 255.255.255.0
R2(config-if)# no shutdown
Step 17
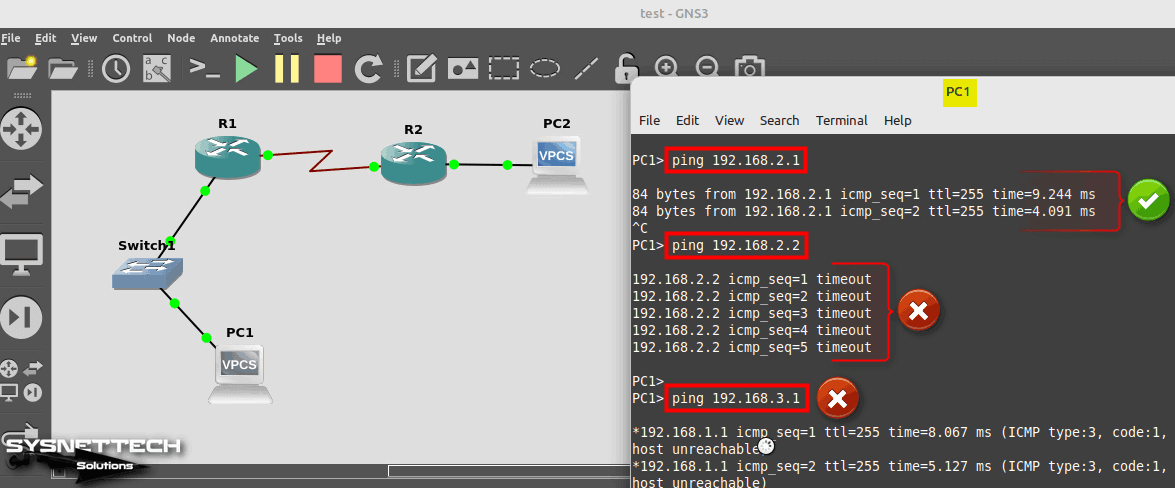
When you ping R2 and PC2 from PC1, you will see that you cannot reach them. This is because different subnets need routing to communicate.
Step 18
To add a static route from Router R1 to R2, execute the “ip route 192.168.3.0 255.255.255.0 192.168.2.2” command in config mode.
ip route 192.168.3.0 255.255.255.0 192.168.2.2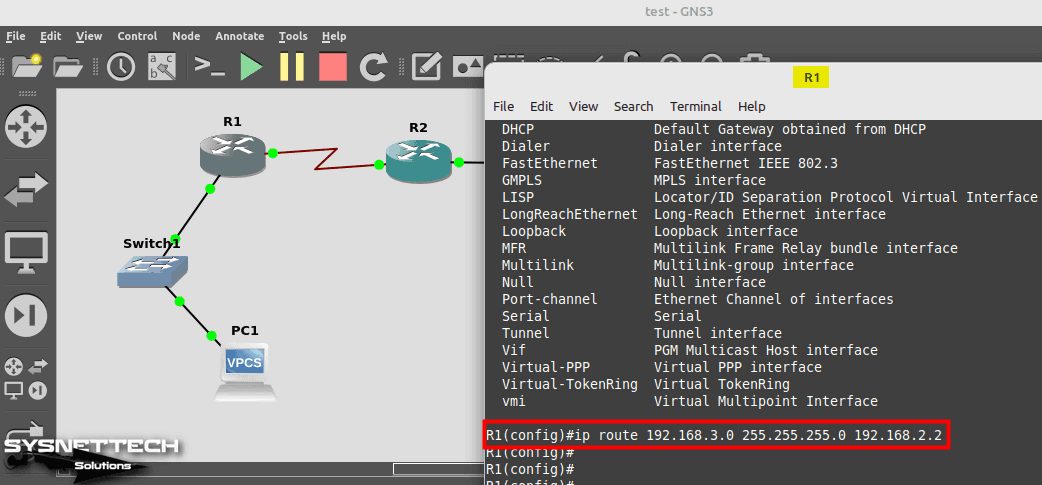
Step 19
Execute the “ip route 192.168.1.0 255.255.255.0 192.168.2.1” command to add a static route from R2 to R1 as well.
ip route 192.168.1.0 255.255.255.0 192.168.2.1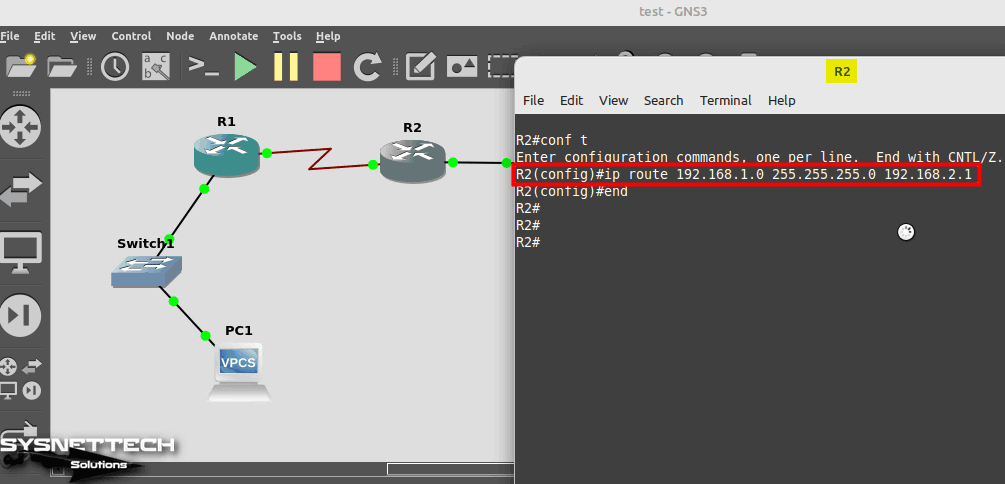
Step 20
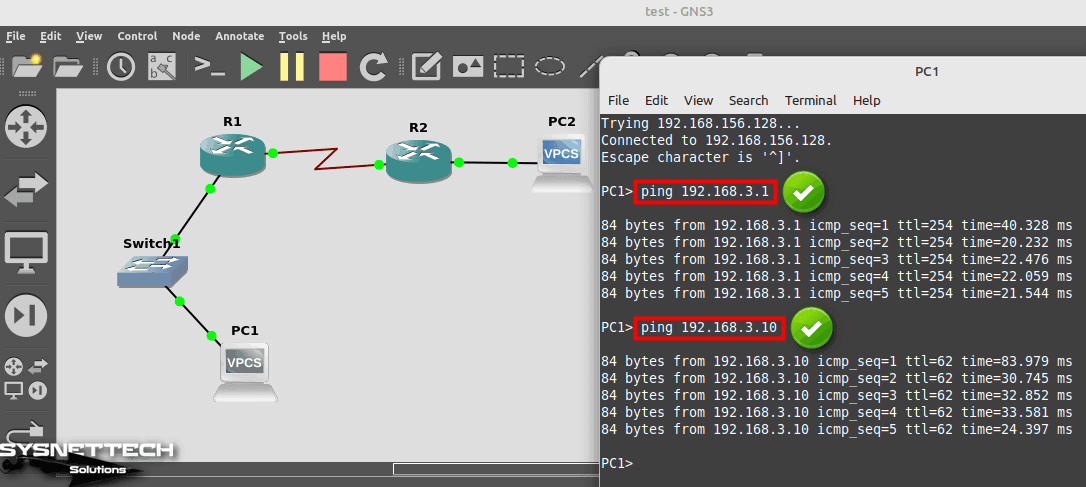
When you ping the 192.168.3.0 network from PC1, you can see that the connection is available this time.
Step 21
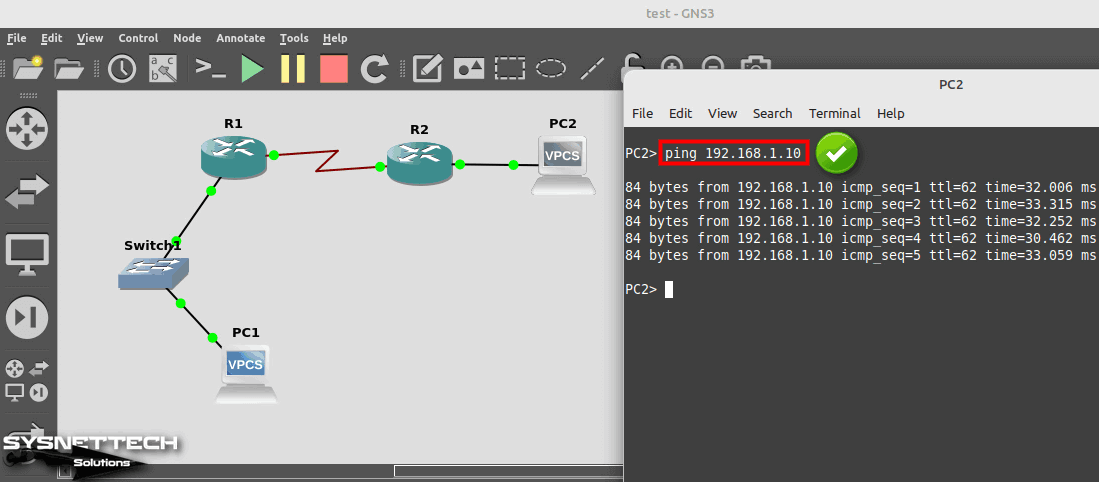
Likewise, you can check the network connection by pinging the network 192.168.1.0 from PC2.
How to Disable GNS3 VM
When you want to remove the GNS3 virtual server from your Linux computer, you can easily do this from the settings of the simulator program.
Step 1
Click Edit / Preferences again from the GNS3 tool menu and select the GNS3 VM from the left panel. After viewing the GNS3 VM settings, uncheck “Enable the GNS3 VM” and click OK.

Step 2
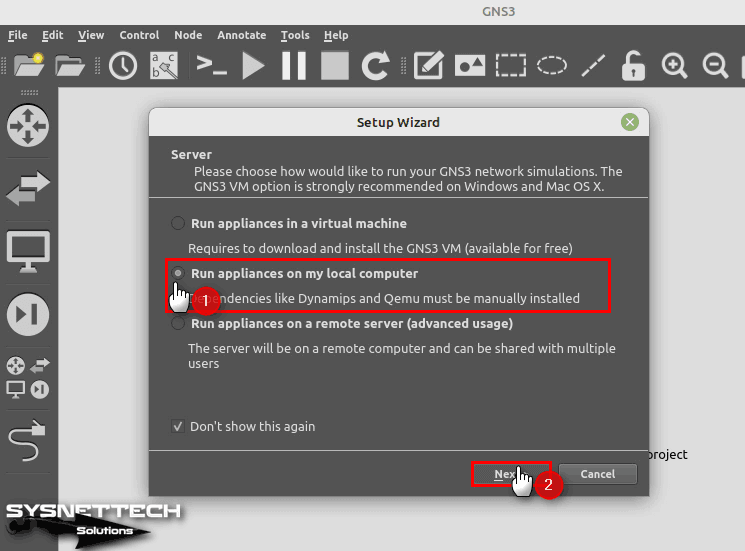
When you disable the GNS3 virtual server, you must also re-enable the local server connection. Click Help / Setup Wizard from the tool menu and select “Run appliances on my local computer” in the window that opens and click Next.
Step 3
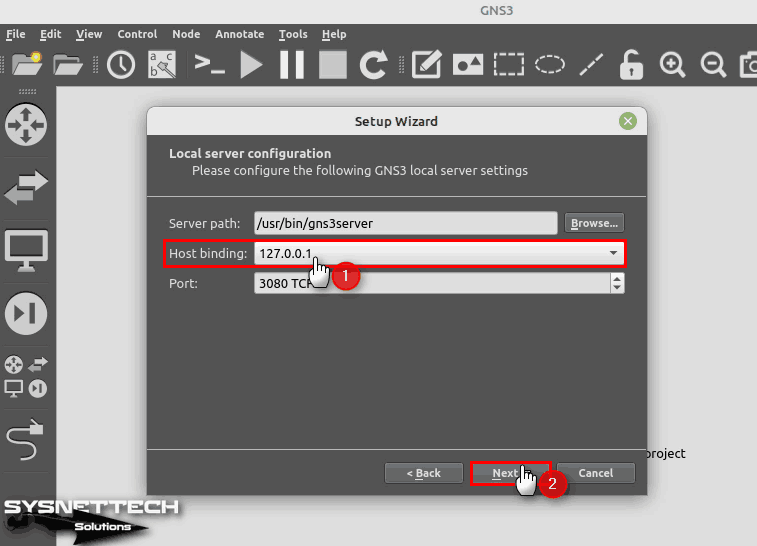
In the Local server configuration window, change the Host Binding IP address to 127.0.0.1 ie Localhost, and click Next.
Step 4
After connecting to the local server, check the status and close the wizard.

How to Delete GNS3 VM
After disabling the connection of the GNS3 virtual machine, it is recommended to delete it from VMware so that it does not take up space on your computer’s disk.
Step 1
Open the VMware Workstation program, right-click the GNS3 VM in the virtual machine library, click Manage / Delete from Disk, and then confirm the deletion.

Step 2
Go to the location where the GNS3 VM is installed and check if the files have been deleted.

Video
Installing Old Versions
Related Articles
♦ How to Configure GNS3 VM on Ubuntu
♦ How to Configure GNS3 VM on macOS
♦ How to Configure L2 Switch in GNS3
♦ How to Configure L3 Switch in GNS3
♦ How to Install GNS3 VM on Kali

