
In this article, we’ll look at how to install and use the GNS3 simulator. It’s essential if you’re getting ready for Cisco Routing or Switching exams. We’ll mainly talk about using it with Linux Mint 22.

How to Run GNS3 Software on Linux Mint 22
If you want to improve your skills in systems and networking, you might study for Cisco’s CCNA exams. You can do these exams online. To practice, use simulation programs like GNS3 or Packet Tracer.
GNS3 is considered more professional than other software. Therefore, most users prefer this software. However, you need authentic Router IOS images to use this software.
First of all, download IOS images from the table in this article. If you want, you can get them from any website.
The network emulator works on both Microsoft’s Windows and Linux distributions. If you have Linux Mint on your PC, installing it is easy. Therefore, you can start using the software right away.
How to Download and Install GNS3
On Windows, you install GNS3 using its setup file. But on Linux OSes, you can do it using commands in the terminal.
Step 1
Open the terminal on your Linux Mint desktop. Type in “sudo add-apt-repository ppa:gns3/ppa” to add GNS3 to the Repository. Then, hit Enter to finish adding PPA.
sudo add-apt-repository ppa:gns3/ppa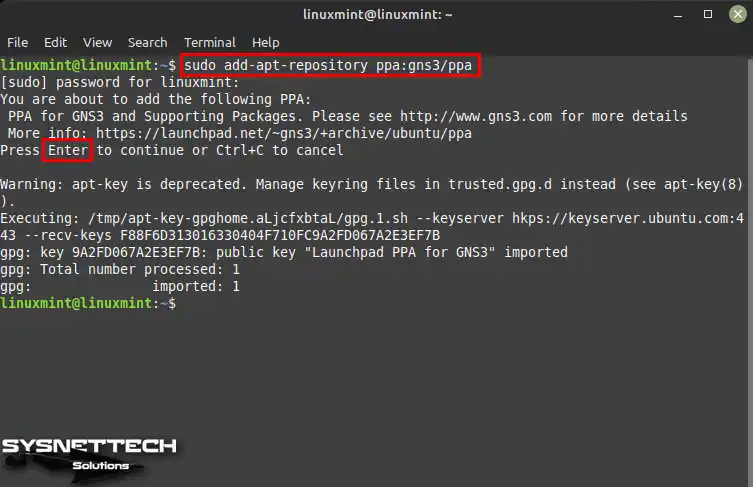
Step 2
After adding GNS3 to the repo, update the software list. Then, use the “sudo apt update” command.
sudo apt updateNOTE: If you see a certificate error when updating the package database, run this command. It fixes the trust.gpg file.
ERROR: The key is stored in legacy trusted.gpg keyring (/etc/apt/trusted.gpg), see the DEPRECATION section in apt-key(8) for details.
cd /etc/apt
sudo cp trusted.gpg trusted.gpg.d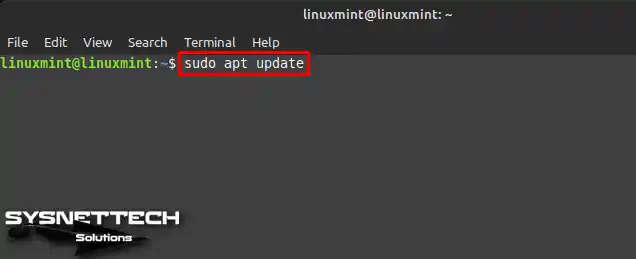
Step 3
After updating the package list, execute the “sudo apt install gns3-server gns3-gui” command in the terminal to install GNS3.
sudo apt install gns3-server gns3-gui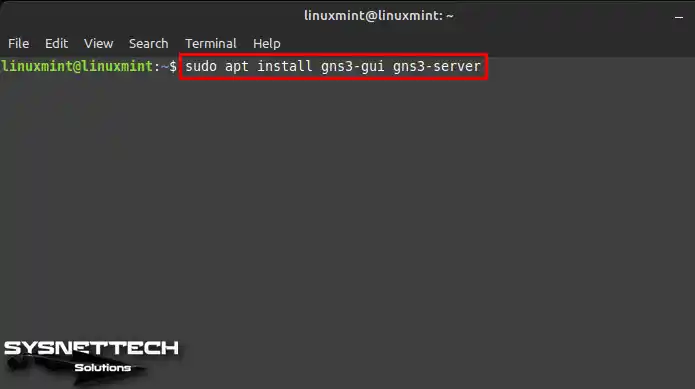
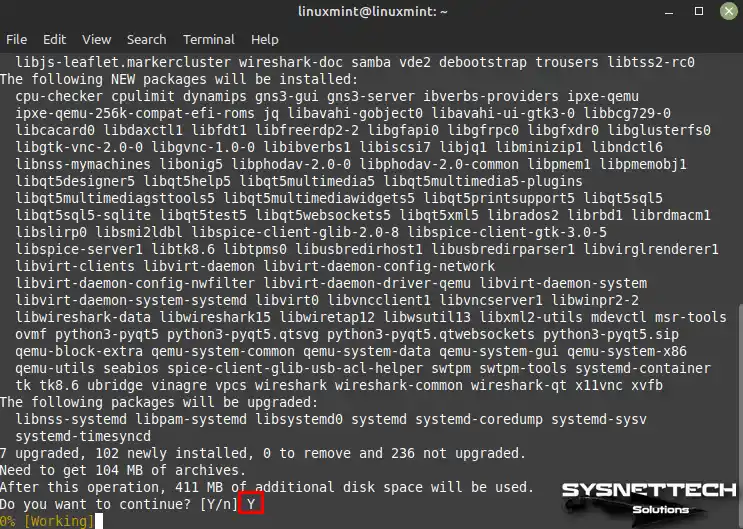
Step 4
Answer the relevant question with Y and press Enter to confirm the installation of the dependent packages required for GNS3.
Step 5
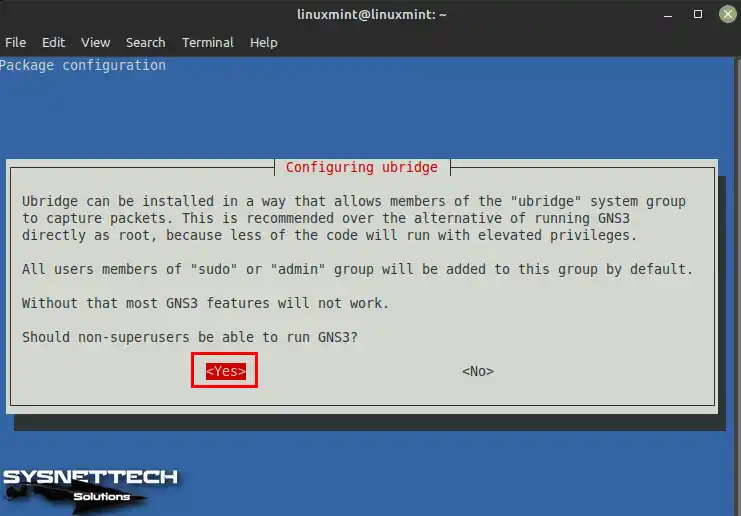
If you want non-superuser users to run the GNS3 program, press Enter on the Yes option.
Step 6
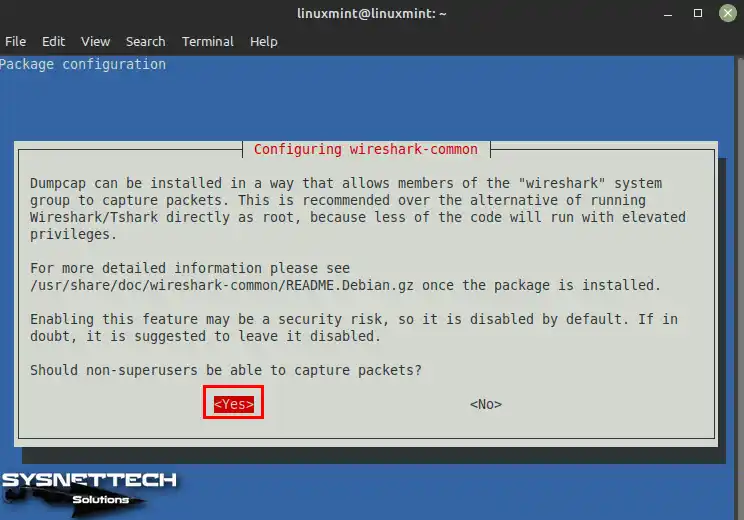
If you want non-superuser users to Capture Packets using the Wireshark program, press Enter on Yes.
Step 7
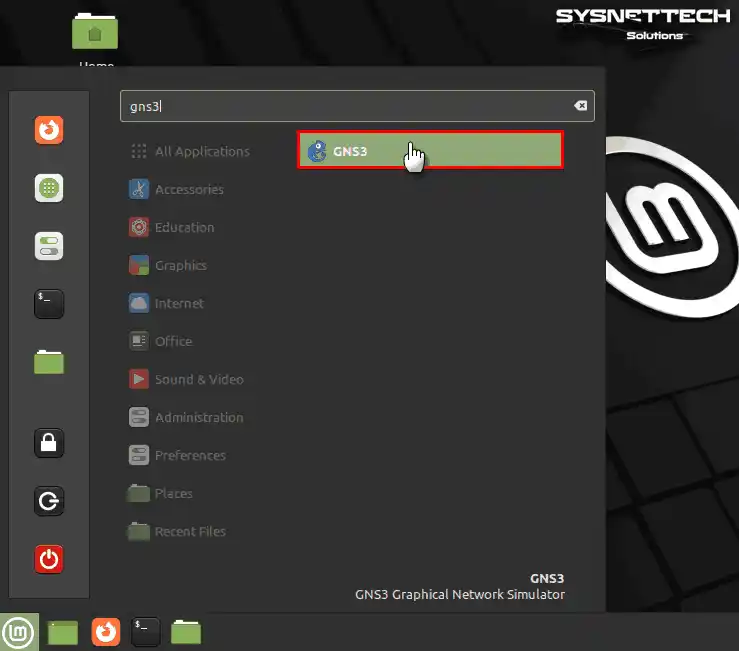
You can quickly run the program using the gns3 command in the terminal or from the start menu.
Step 8
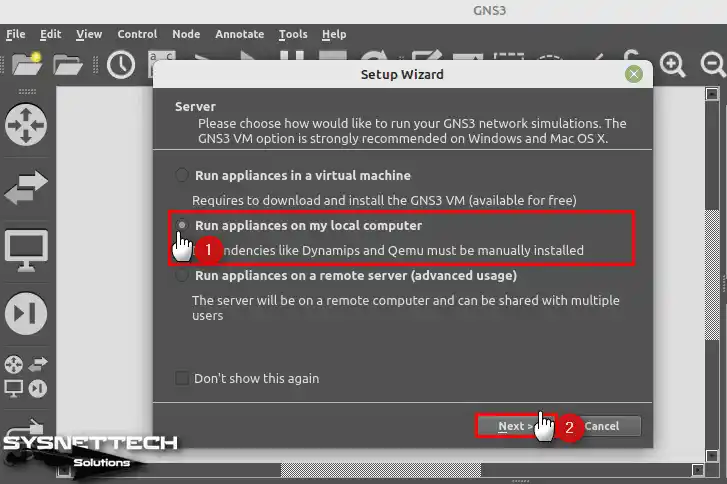
After opening the GNS3 program, select “Run appliances on my local computer” in the Setup Wizard window and click Next.
Step 9
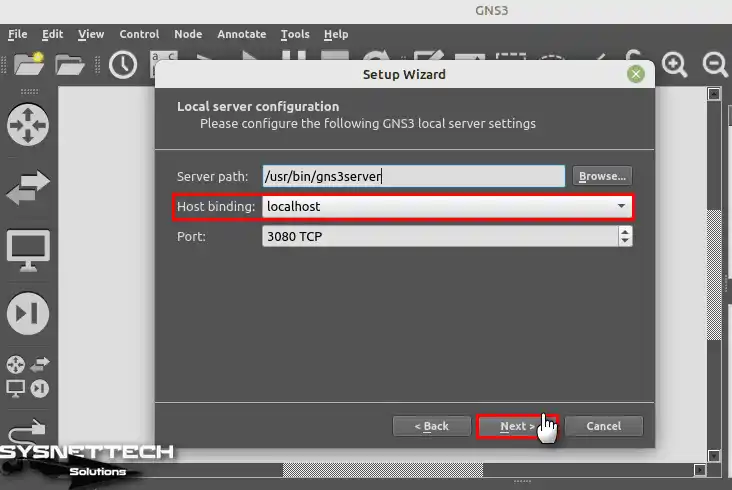
Since you will run the Router or other devices in the network software on your physical computer, continue without changing the values in the Local Server Configuration window.
Step 10
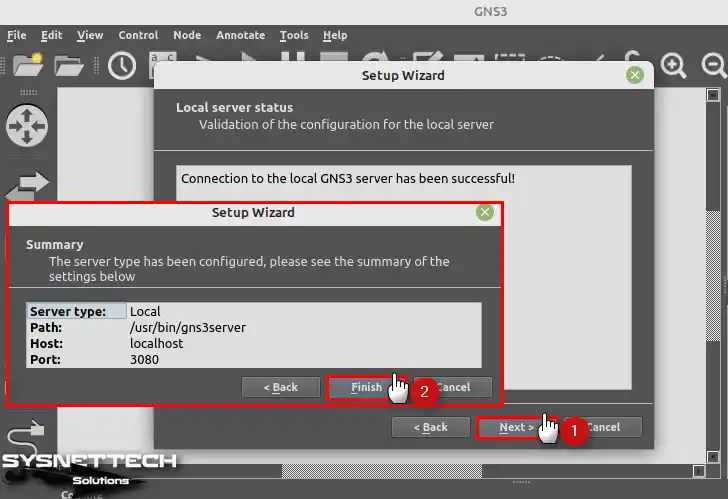
After checking that the connection is successful in the Local Server Status window, check the server type settings in the next Summary window and close the wizard.
How to Add Cisco IOS
The first thing you need to do after installing GNS3 on Linux Mint is to add a Cisco IOS image. After downloading these images to your computer, you can easily add them from the program’s preferences.
Step 1
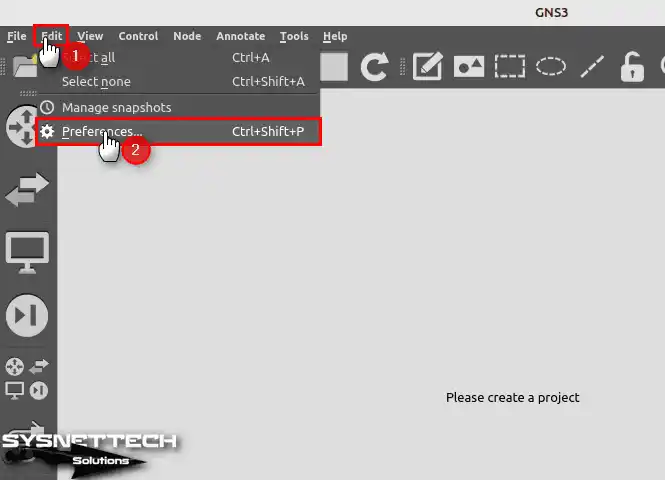
Click Edit / Preferences from the tool menu of GNS3 to add an IOS Router.
Step 2
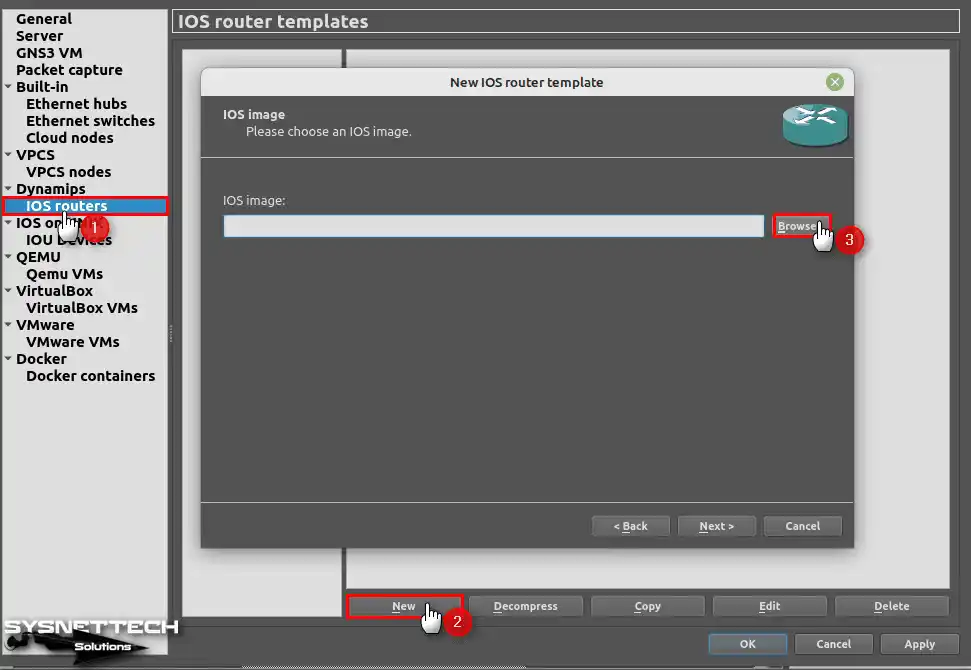
In the IOS Router Templates window, select IOS Routers under Dynamips from the left panel, and then click the New button. In the IOS image window that opens, click Browse to add the Router image.
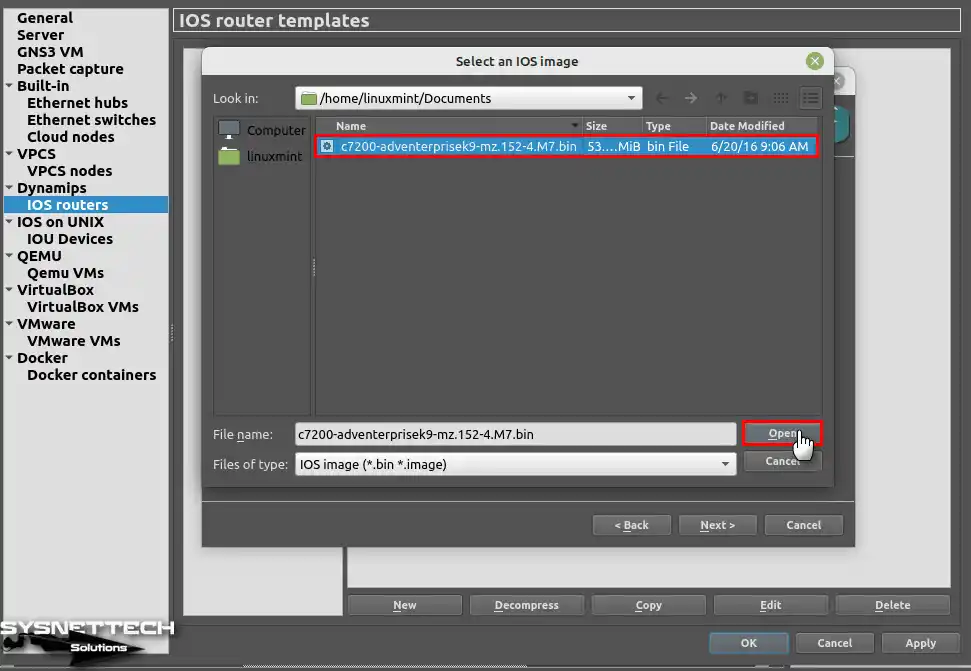
Step 3
Please navigate to the location of the c7200 IOS image from your Linux system and open it after selecting it.
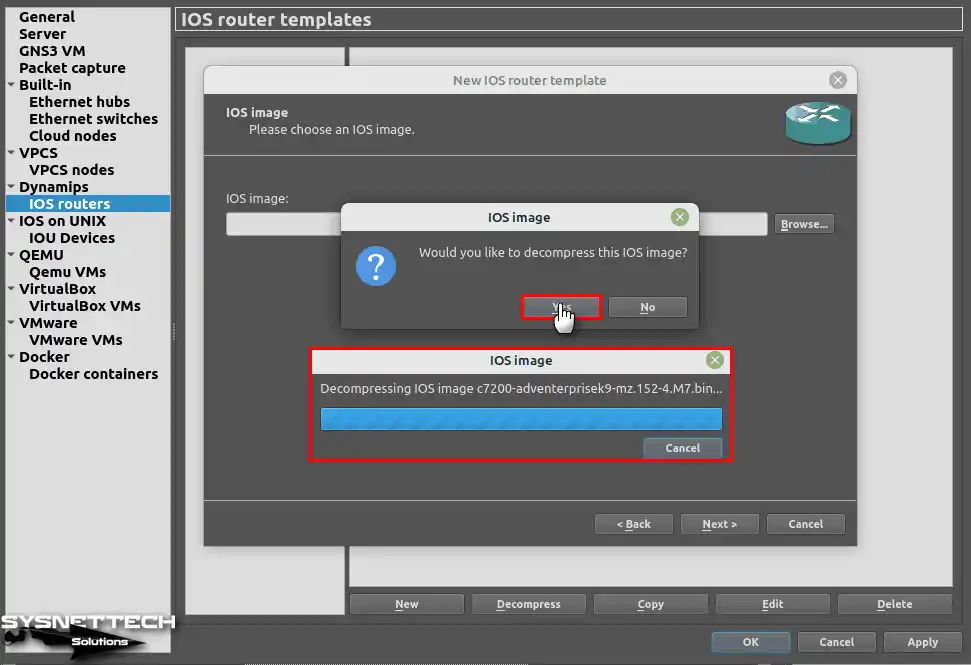
Step 4
Wait for a while after clicking Yes to decompress iOS.
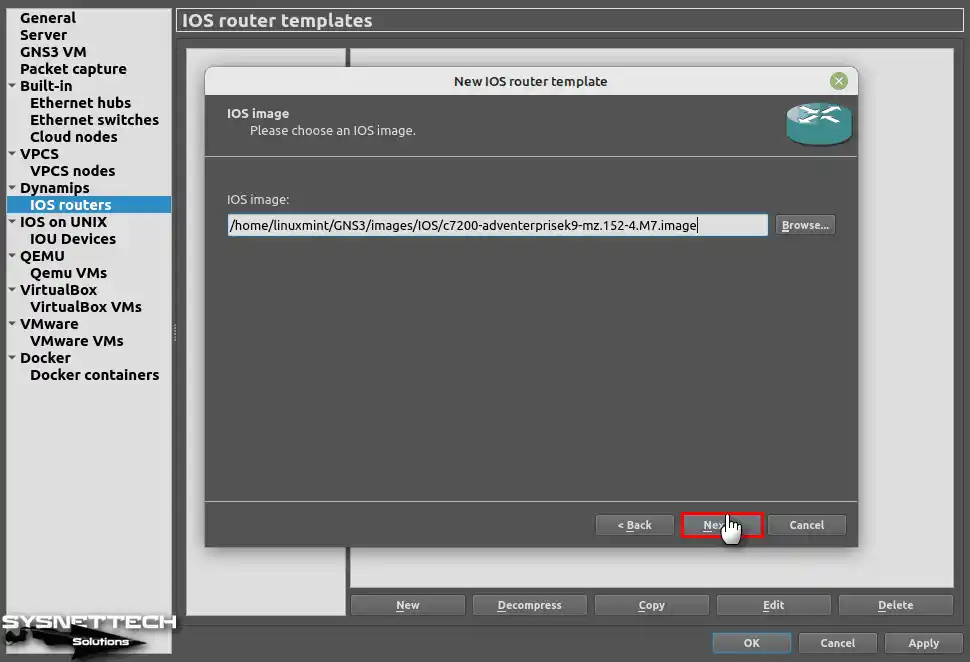
Step 5
Continue after adding the IOS image to your network simulation program.
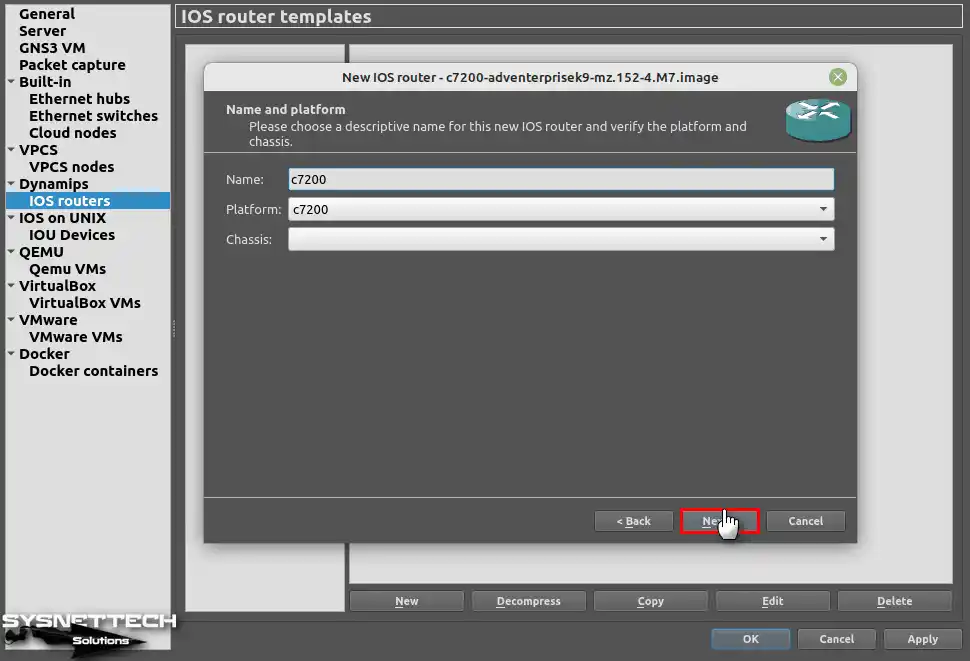
Step 6
Configure the name and platform of the Router and click Next.
Step 7
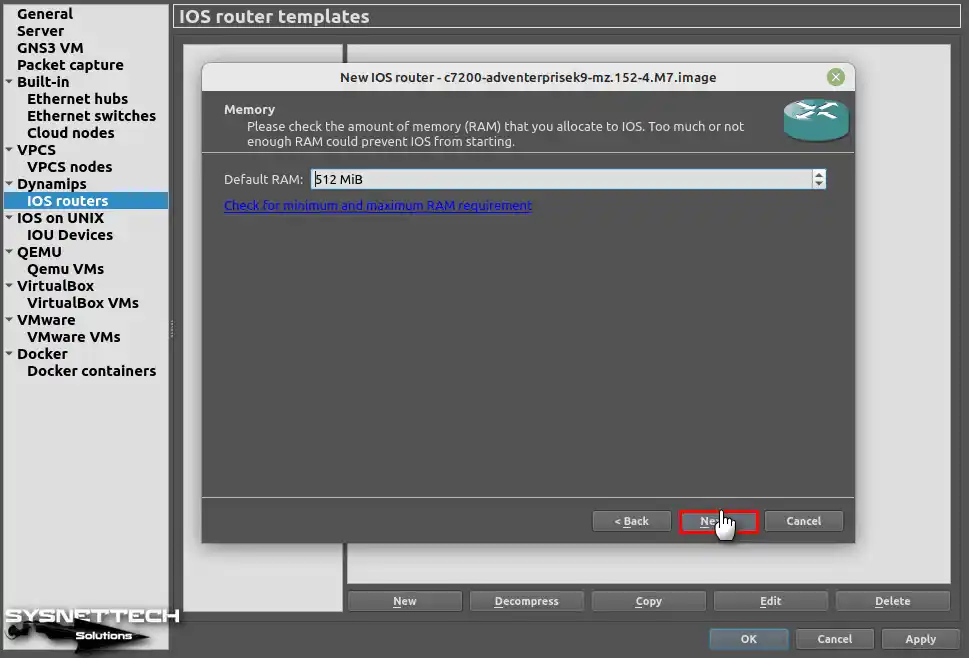
Depending on the hardware performance of your Linux Mint host computer, configure the virtual memory value so that the Router can work more efficiently and faster. Since the default RAM size for the Router c7200 you added is 512 MB, you can use this value and test it.
Step 8
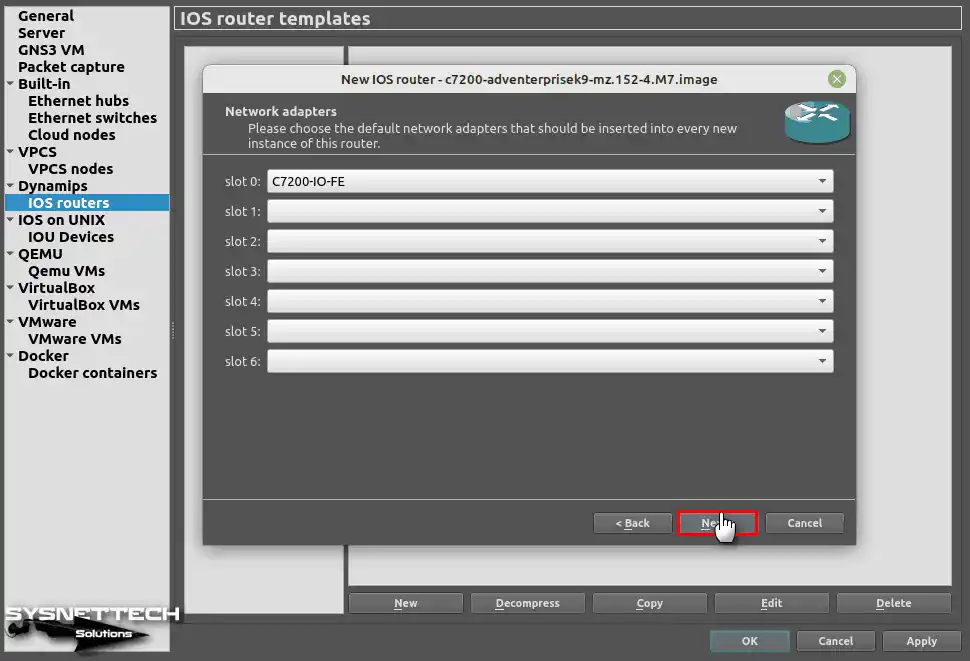
You can add or delete the network adapters that you will use in the Router c7200 from this window. As Slot 0 has the FastEthernet interface by default, you can add a Serial interface.
Step 9
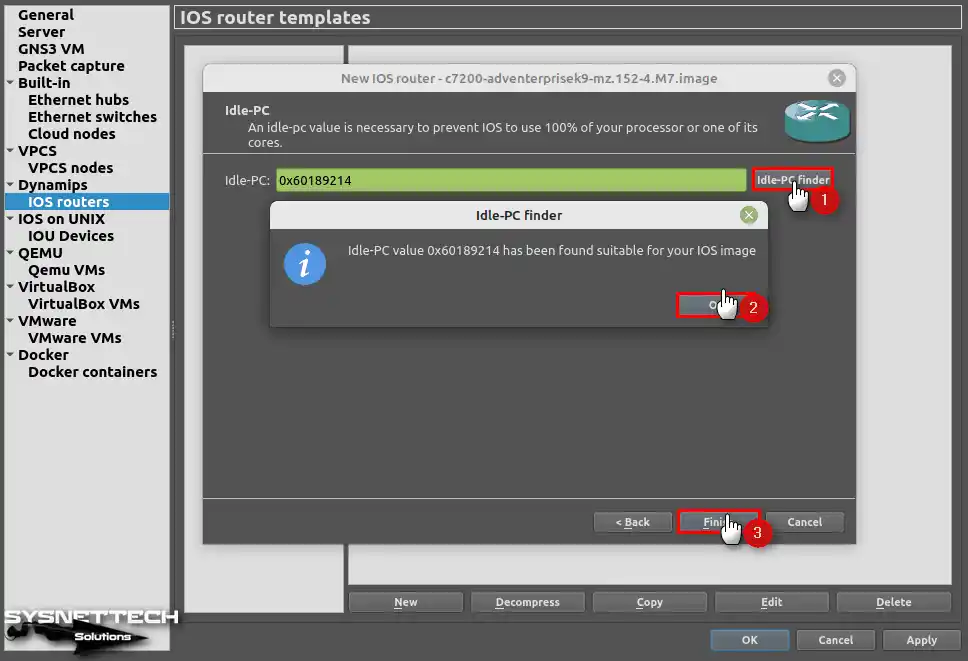
The Idle-PC value is essential so that the IOS Router does not use 100% of your computer’s processor. So, click Idle-PC Finder to find a value suitable for your host’s hardware.
After finding a suitable Idle-PC value for your computer, click OK and continue.
Step 10
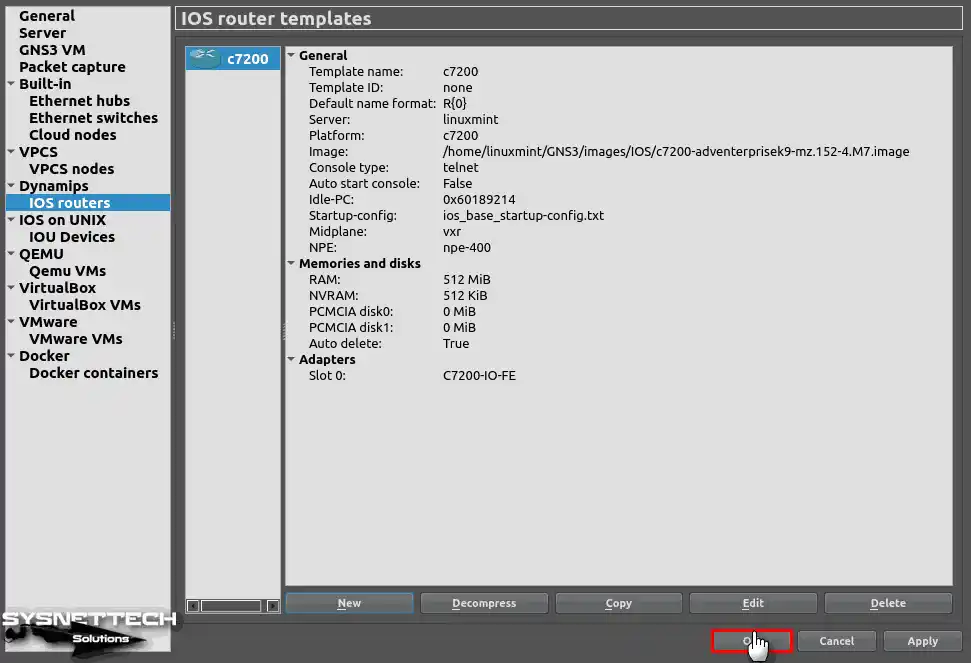
After adding the Router IOS image, check the settings in the template window.
How to Create a New Project
After adding a Cisco Router or Switch IOS image to your network simulator program, you can start preparing network topologies by creating a new project.
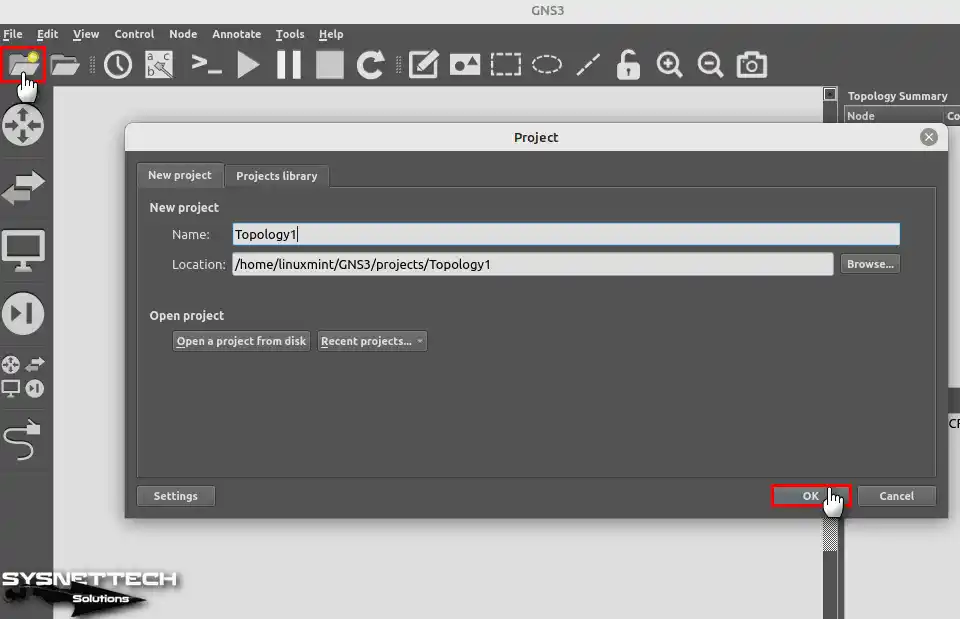
Step 1
Open the new project wizard by pressing the new project icon or CTRL + N together from the tool menu, and after configuring your project name and location, click OK.
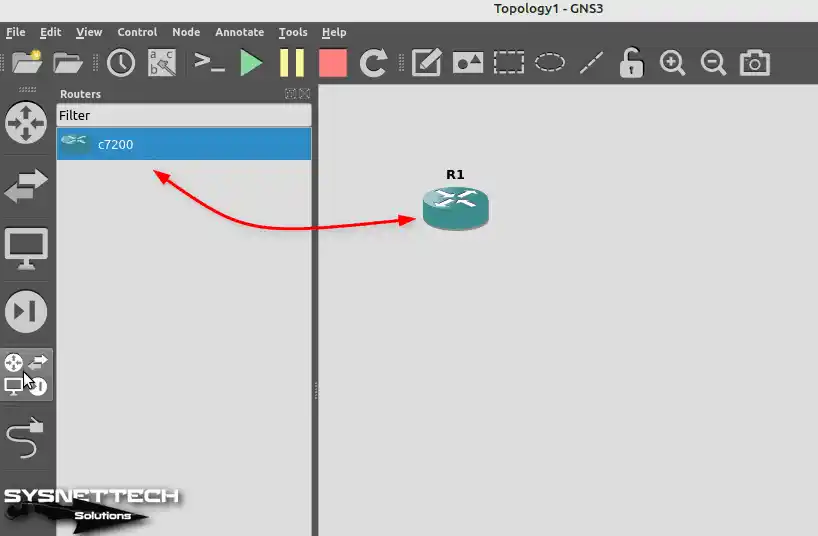
Step 2
Drag and drop the c7200 from the Routers panel to the workspace.
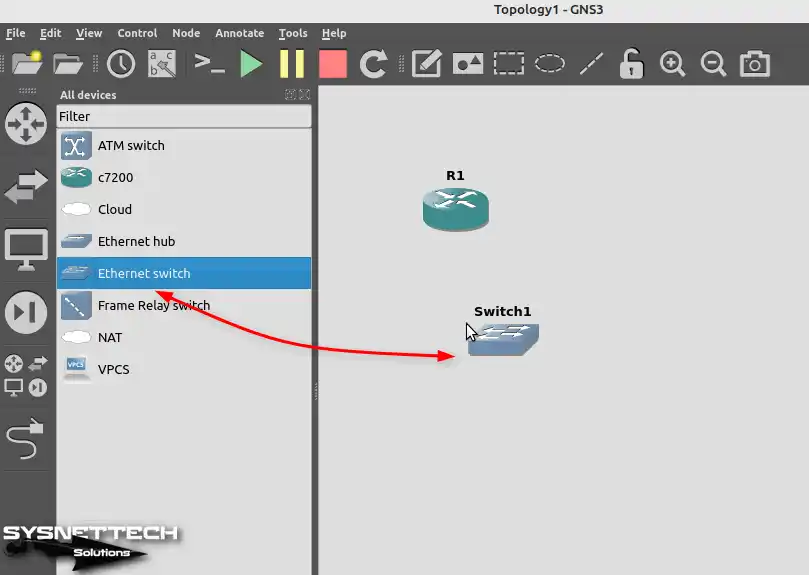
Step 3
After clicking All Devices, drag and drop the Ethernet Switch from the listed devices to the workspace.
Step 4
Add two VPCS to the workspace as a virtual PC.

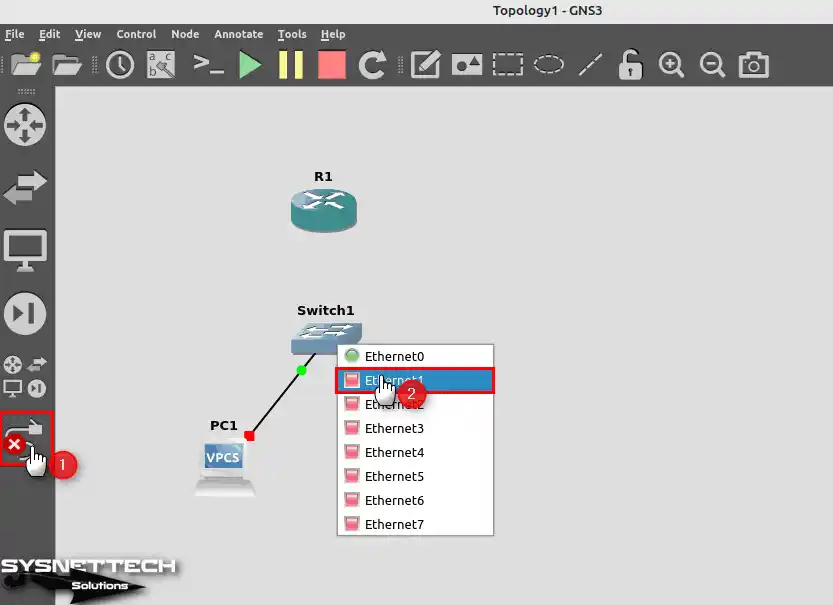
Step 5
After enabling the cabling option, connect the VPCSs to the Switch’s accessible Ethernet interfaces.
Step 6
Cable the Cisco Switch to the FastEthernet 0/0 interface of Router R1.
NOTE: You may get a uBridge error when you try to connect the Cisco Switch to FastEthernet 0/0 or one of the other ports of the Router. In this case, open the terminal and re-download and compile the uBridge software for GNS3 from Github to fix the problem.
ERROR: => Error while creating a link: uBridge is not available, the path doesn’t exist, or you just installed GNS3 and need to restart your user session to refresh user permissions.
sudo apt install git
sudo apt install libpcap-dev
cd ~/Downloads
git clone https://github.com/GNS3/ubridge.git
cd ubridge && make
sudo make install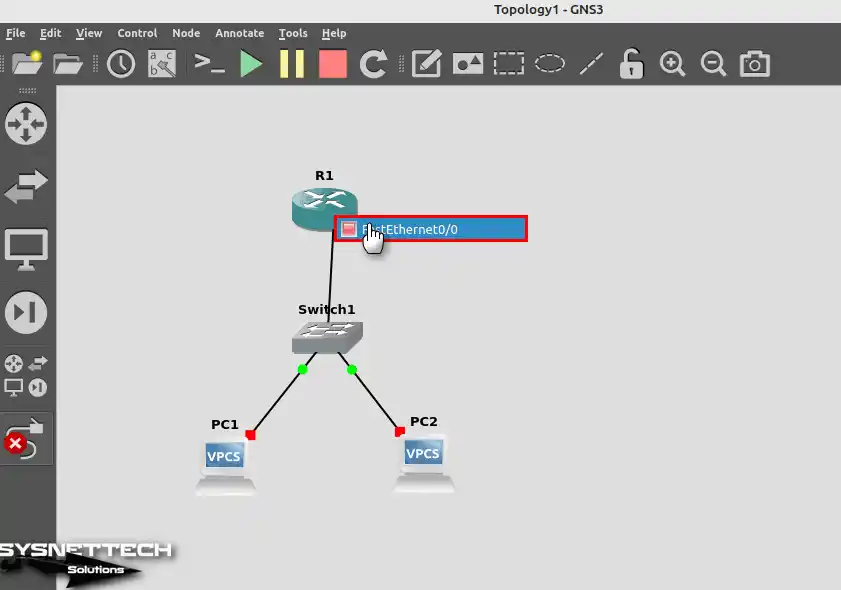
Step 7
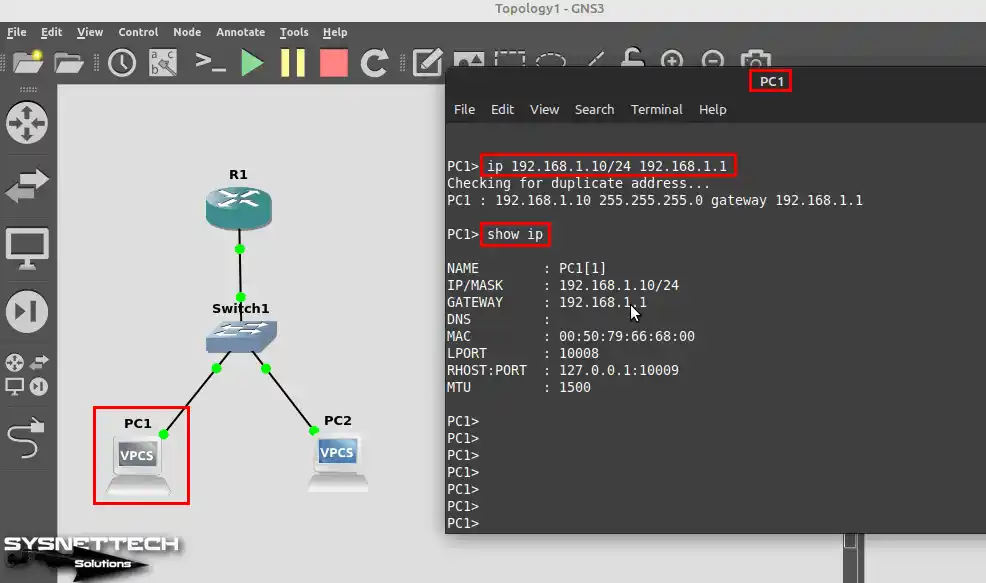
To assign IP addresses to computers in the network environment, open the console by double-clicking on VPCS PC1 and then execute the “ip 192.168.1.10/24” command.
ip 192.168.1.10/24 192.168.1.1NOTE: If you see that the telnet console cannot be started when you want to configure the VPCSs after running all the devices in the topology, click Edit / Preferences from the tool menu of the emulator software. Then open Console Applications in the General tab and change XTERM to GNOME TERMINAL.
ERROR: Could not start Telnet console with the command ‘xterm -T “PC1” -e “telnet localhost 5002″‘: [Errno 2] No such file or directory: ‘xterm.’
Step 8
Likewise, execute the “ip 192.168.1.20/24” command to assign an IP address from the same IP block to VPCS PC2.
ip 192.168.1.20/24 192.168.1.1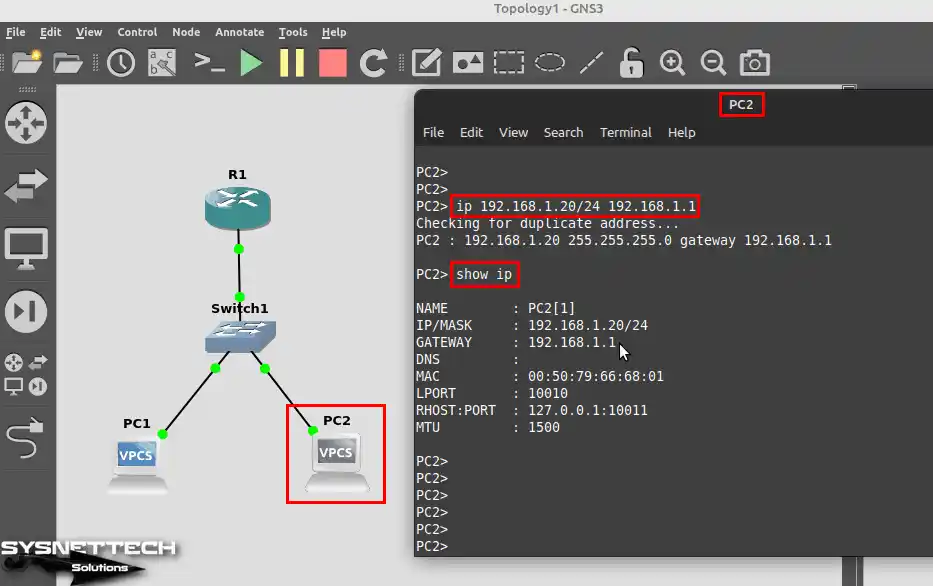
Step 9
Finally, execute these commands on the console. They assign an IP address to the Router’s Fa0/0 interface.
R1# conf t
R1(config)# interface fastEthernet 0/0
R1(config-if)# ip address 192.168.1.1 255.255.255.0
R1(config-if)# no shutdown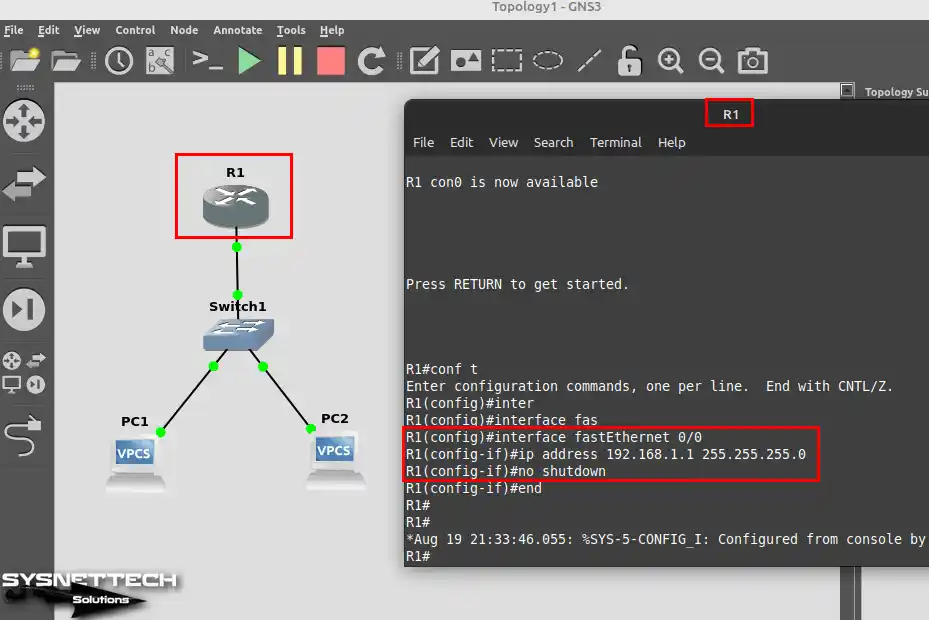
Step 10
After assigning IP addresses to all devices, test the connection. So, you can do this by pinging PC1 to R1’s Fa0/0 interface and PC2.
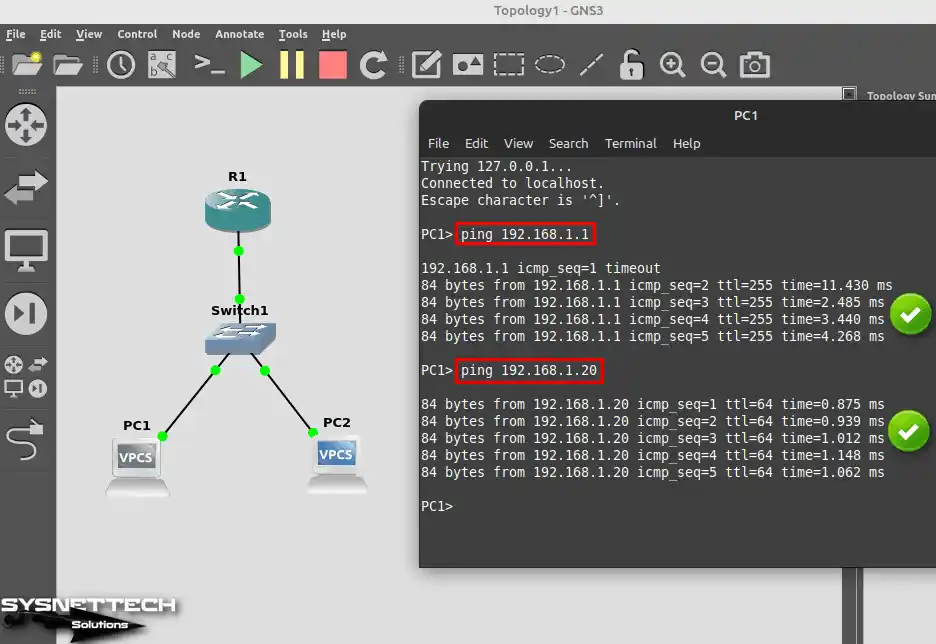
Step 11
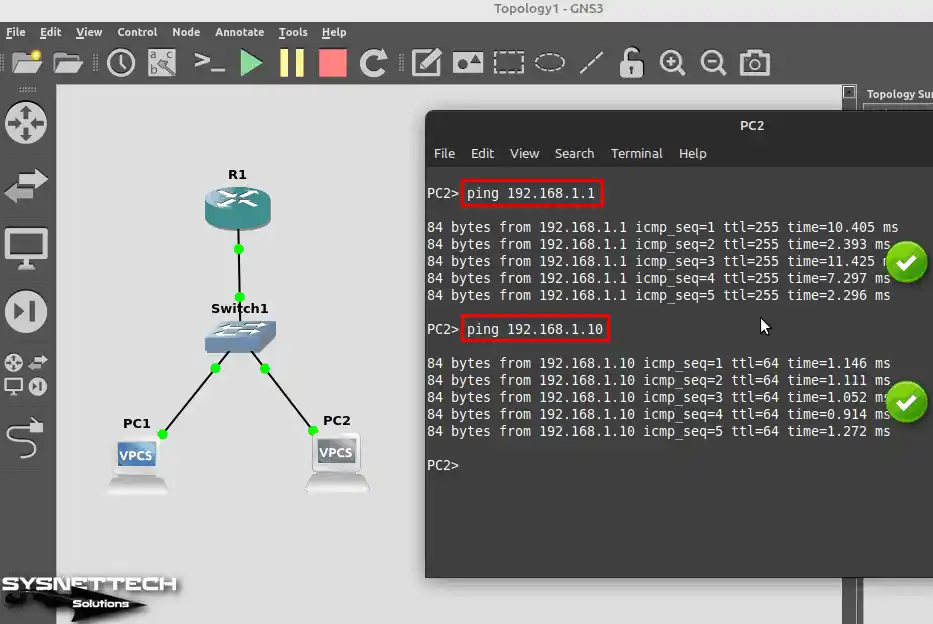
To test the network connection from PC2, ping R1’s Fa0/0 interface and PC1.
How to Uninstall GNS3 from Linux Mint
After backing up network projects, removing GNS3 is simple. You can accomplish this with a single command in your Linux Mint OS.
Steps:
Step 1
To remove the simulator and its dependencies, execute “sudo apt remove gns3-server gns3-gui”. Then, confirm the deletion by pressing Y and Enter.
sudo apt remove gns3-server gns3-gui
Step 2
You can also use the “sudo apt autoclean && sudo apt autoremove” command. It gets rid of leftover files from the simulator program on your Linux Mint system.
sudo apt autoclean && sudo apt autoremove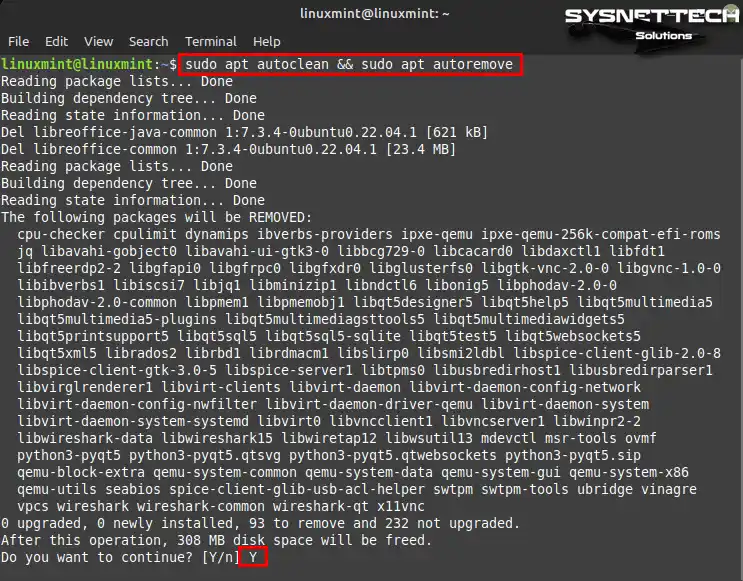
Video
Installing Old Versions
| Mint / GNS3 Version | YouTube Video | Slide |
|---|---|---|
| 19 / 2.1 | Watch | View |
| 20 / 2.2 | Watch | View |
| 21 / 2.2 (NEW) | Watch | – |
Conclusion
To summarize, GNS3 are people who are specifically preparing for Cisco’s CCNA exams. Therefore, it is an excellent program for simulating networks. It runs fine on Linux Mint 22. It also allows users to create network designs quickly. Consequently, it comes with many features that will help them test it.
The article showed how to install GNS3 on Linux Mint so you can start using it right away. It’s easy to add Cisco IOS images, which helps you start projects fast. In short, this makes it an excellent tool for improving your networking skills.

2 People Shared Their Experience
Thanks a lot for this article. Just starting with GNS3 and information about how to install in Linux Mint.
You’re welcome, thanks for your comment.