
In this article, we will examine how to set up and use the GNS3 (Graphical Network Simulator 3) network software, which is used to prepare professionally for Cisco exams on a computer with the famous Debian 11 Bullseye operating system among Linux distributions.
How to Set Up GNS3 2.2 to Run Cisco Router & Switch on Debian PC
In order to use the devices that form the basis of computer networks in a virtual environment, you must use one of the network simulator programs, such as GNS3. GNS3 software allows you to run a genuine Cisco Router or Switch by emulating it on your computer.
You can easily install the GNS3 network emulator on Windows, Linux, or macOS platforms and create a basic or advanced network topology. However, since you need to add a network device, you need to add one of the different sources on the Internet or one of the IOS images we have published in this article to GNS3.
If you are using the Debian system instead of Microsoft’s Windows operating system, you should master the basic Linux commands for the software’s installation stages. Installing any program on Windows systems is pretty simple, but on Linux systems, you need to follow the appropriate script, depending on the distribution.
You can follow the installation instructions for GNS3 by browsing the guides published on the official website. However, sometimes, you may need to read more detailed technical articles, as you may also need to install dependent packages during installation.
How to Download and Install GNS3
Before installing the network simulator program on Bullseye version 11 of Debian, you need to update your repo addresses and then download and install the software via PyPI (Python Package Index) via pip3.
Step 1
On your Debian system, please search for the terminal from the Activities section, find it, and run it. After opening the terminal in your Gnome desktop environment, execute the “sudo apt update” command and update the software list.
sudo apt update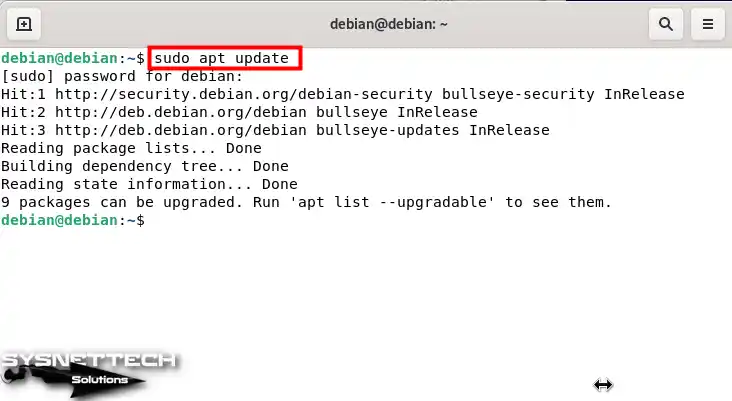
Step 2
After refreshing the repo addresses, since you will download GNS3 to your system using pip3, execute the command below in the terminal to install python3 and additional packages.
sudo apt install python3-pip python3-pyqt5 python3-pyqt5.qtsvg python3-pyqt5.qtwebsockets qemu qemu-kvm qemu-utils libvirt-clients libvirt-daemon-system virtinst wireshark xtightvncviewer apt-transport-https ca-certificates curl gnupg2 software-properties-common -y
Step 3
To download and install the GNS3 network software on your computer using pip3, execute the “sudo pip3 install gns3-server gns3-gui” command in the terminal and wait for the download to complete.
sudo pip3 install gns3-server gns3-gui
Step 4
You must also install the necessary Dynamips software for GNS3. Otherwise, you will not be able to emulate the Router or Switch images on your computer.
To download and install Dynamips from the Debian repository, execute the commands below in the terminal.
wget http://ftp.us.debian.org/debian/pool/non-free/d/dynamips/dynamips_0.2.14-1_amd64.deb
sudo dpkg -i dynamips_0.2.14-1_amd64.deb
Step 5
After installing the GNS3 network software on your Linux computer, please find it in the start menu and run it.

Step 6
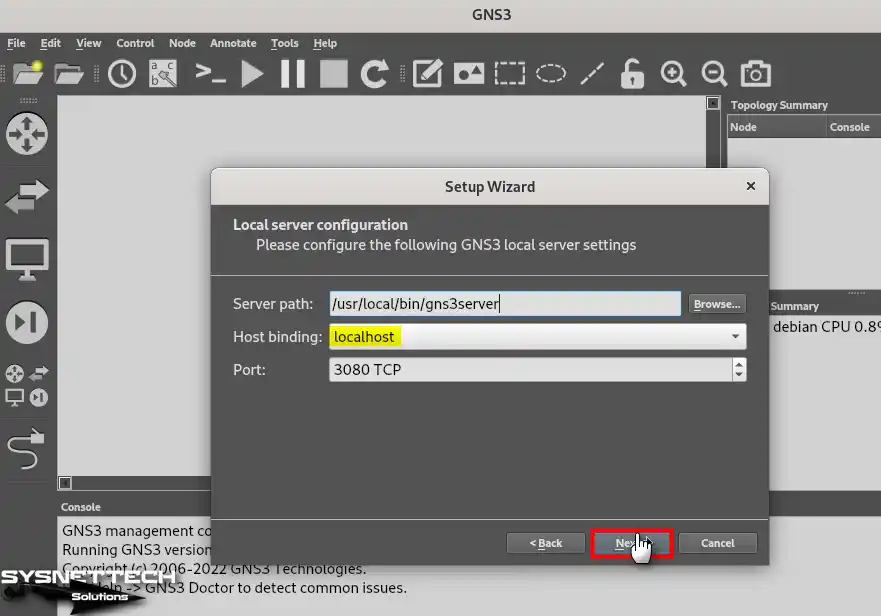
After opening GNS3, the Setup Wizard will appear. In this window, you must choose whether to run the IOS images on the local or virtual server.
To run IOS devices on Localhost, select Run appliances on my local computer and click Next.

Step 7
Do not change the Server Path setting in the Local Server Configuration window. After checking that the Host Binding setting is Localhost, click Next.
Also, if you have other third-party software installed on your system and it is using the TCP 3080 port, you can change the port number so that the software will work correctly.
Step 8
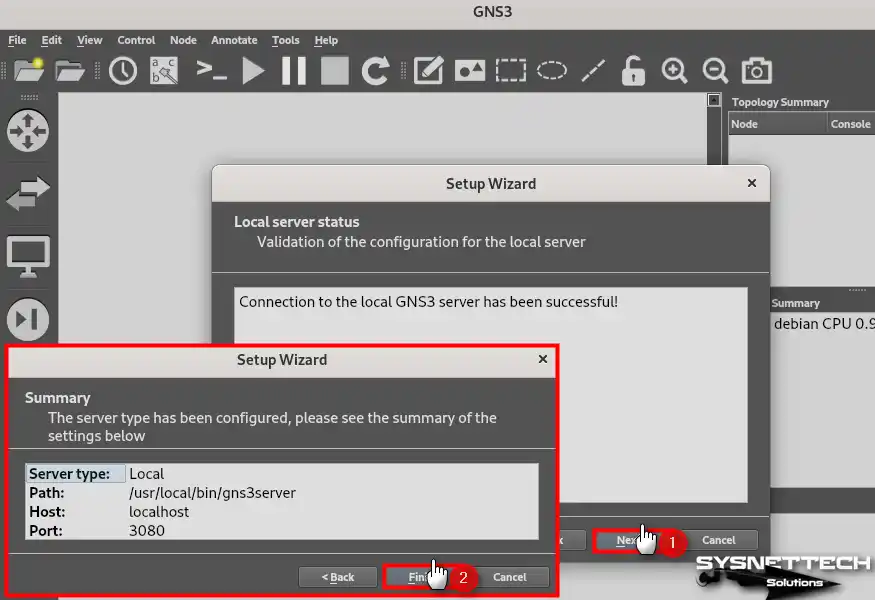
In the Local Server Status window, check that the connection is successful. Then click Next. In the Summary window, review the settings you have made and close the wizard.
How to Add a Cisco IOS Image
After installing GNS3 on your Debian computer and connecting to the local server, you can add a Router or Switch IOS image to the program.
Step 1
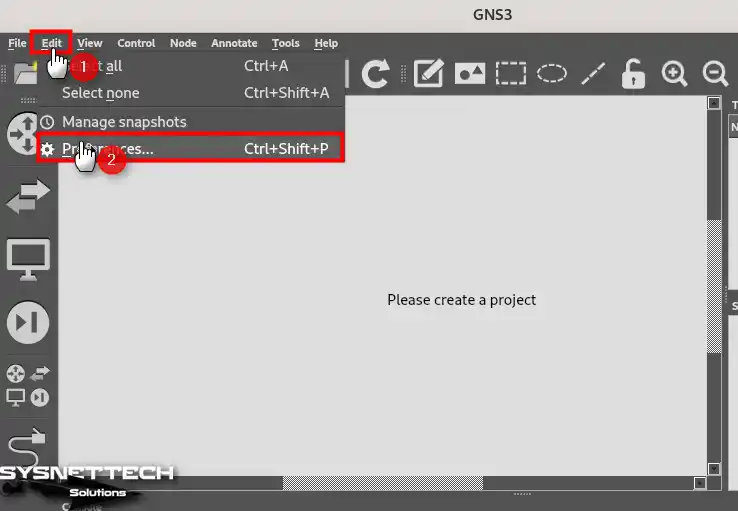
Click Edit / Preferences from the tool menu of the GNS3 program.
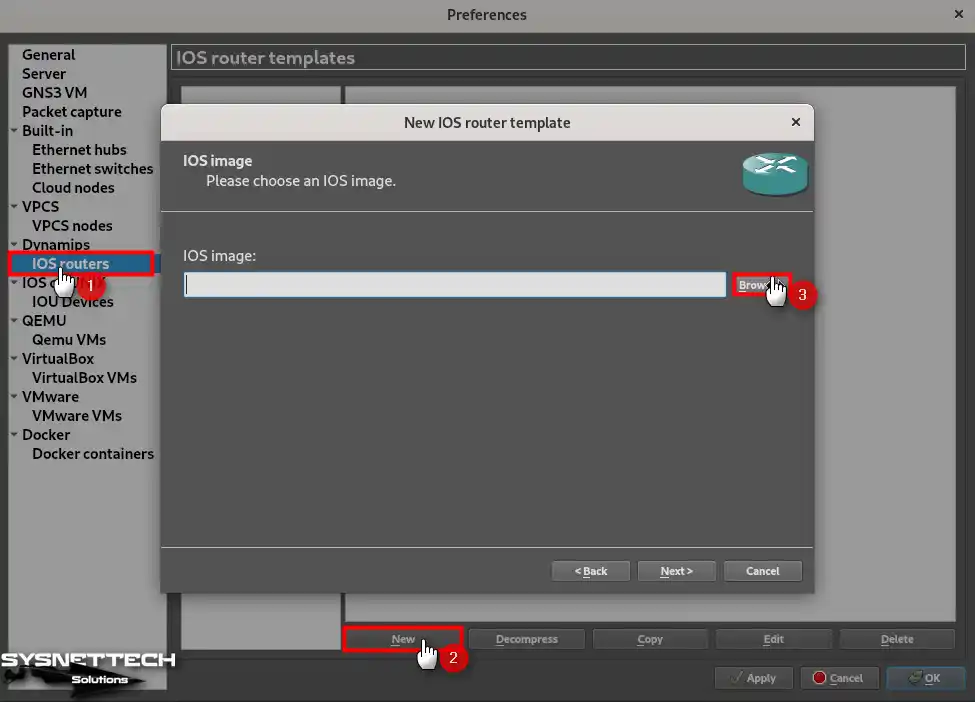
Step 2
You can check that there are multiple settings in the Preferences window from the left panel. To add an iOS device, click IOS Routers under Dynamips and then click the New button to open the wizard.
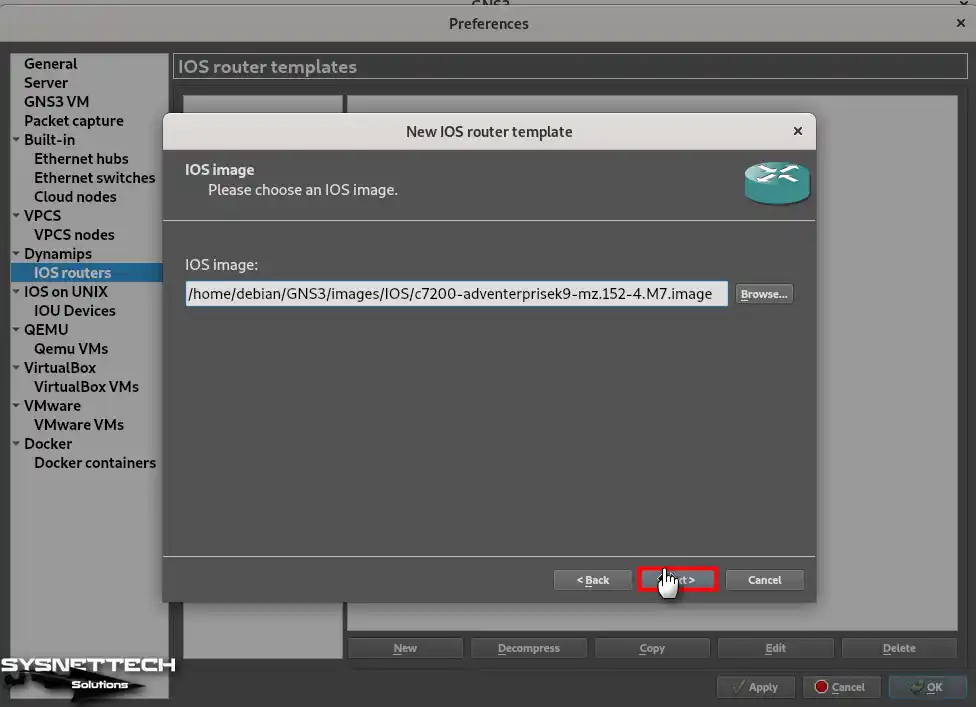
When the New IOS Router Template wizard opens, click Browse to add the IOS file.
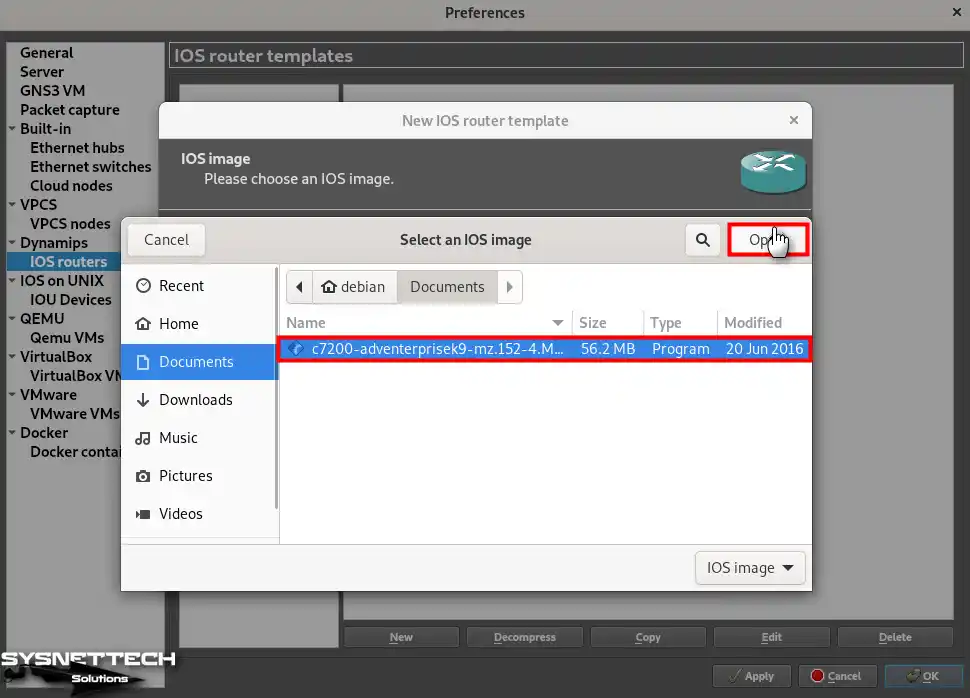
Step 3
Select the c7200-adventerprisek9-mz.152-4.M7.bin IOS file or any other file you downloaded to your computer and open it.
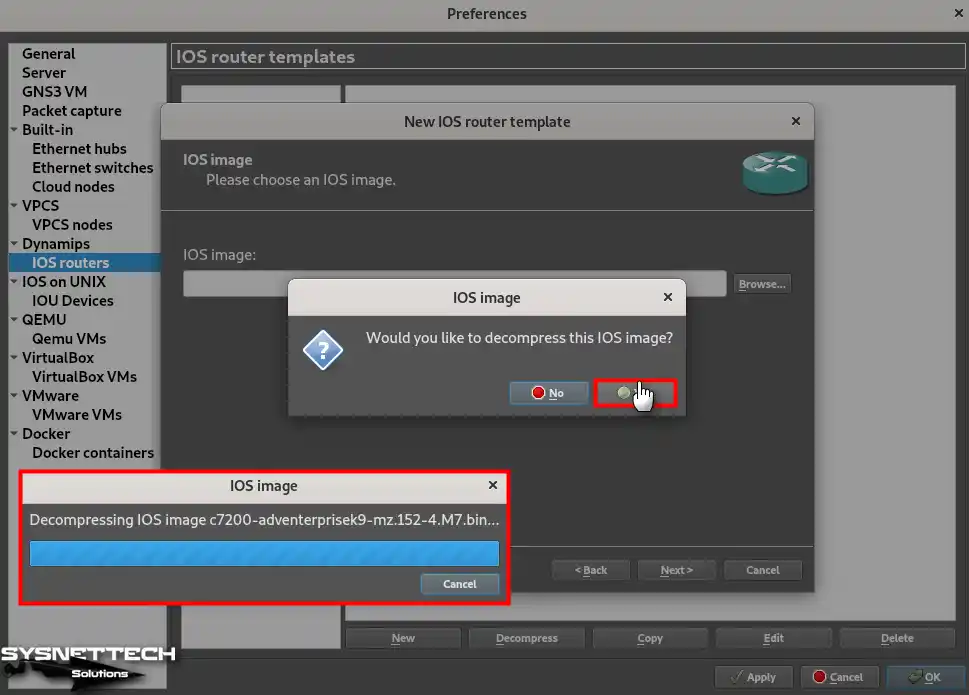
Step 4
Click Yes to confirm decompressing the IOS image and wait for the decompression process.
Step 5
After specifying the IOS location, click Next and proceed to other settings.
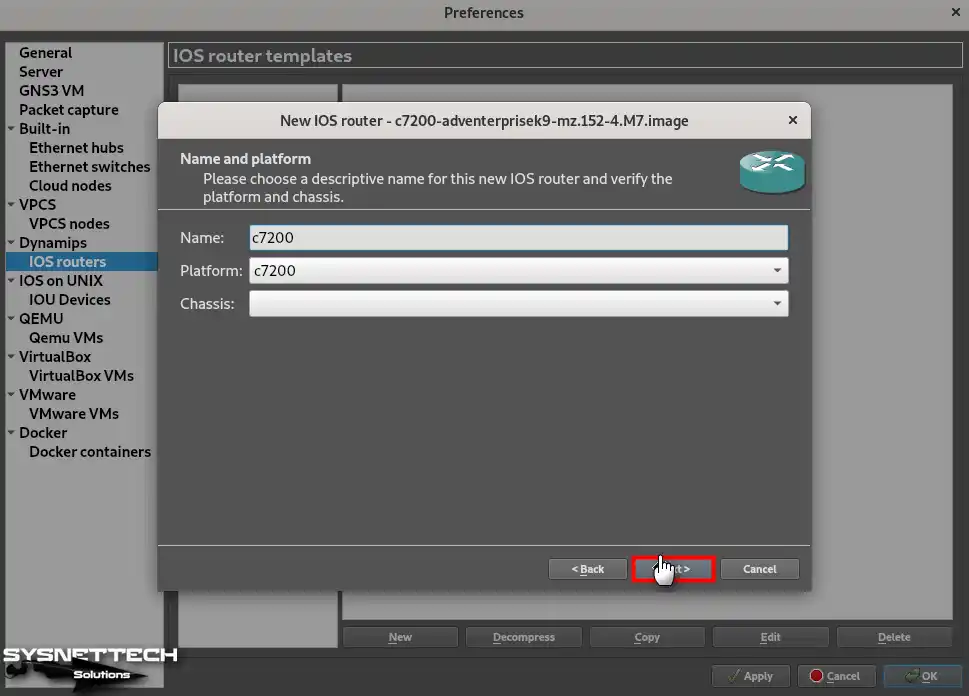
Step 6
The name of the iOS device you selected is displayed in the Name section of the Name and Platform window. If you are adding more than one device model to the program, change the device name from the Name section and edit its platform.
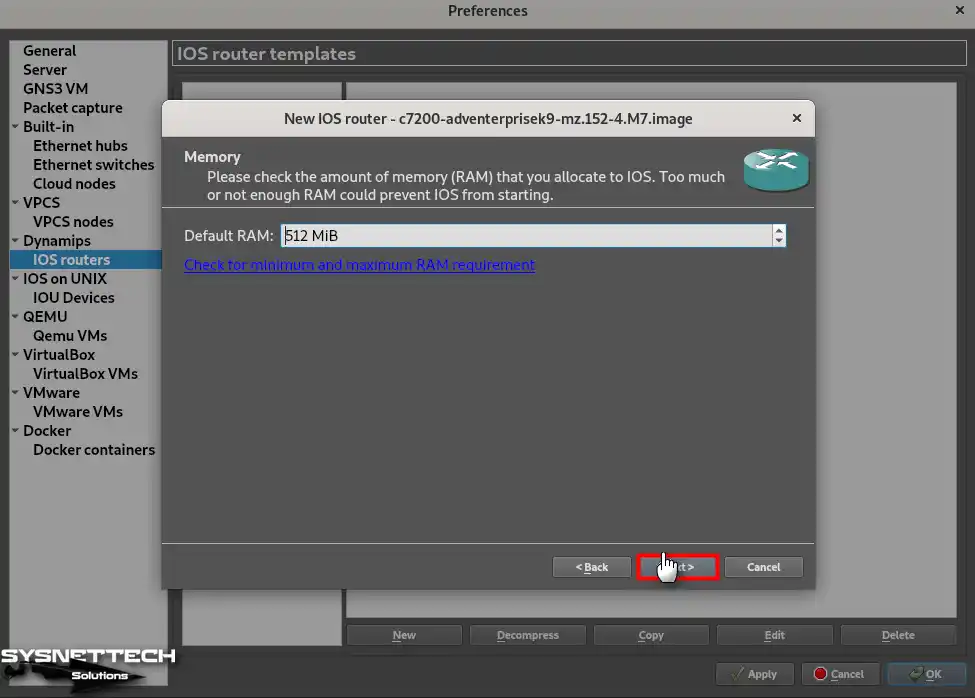
Step 7
According to the RAM size of your host computer, configure a suitable memory size so that the Router IOS device can work more efficiently and perform.
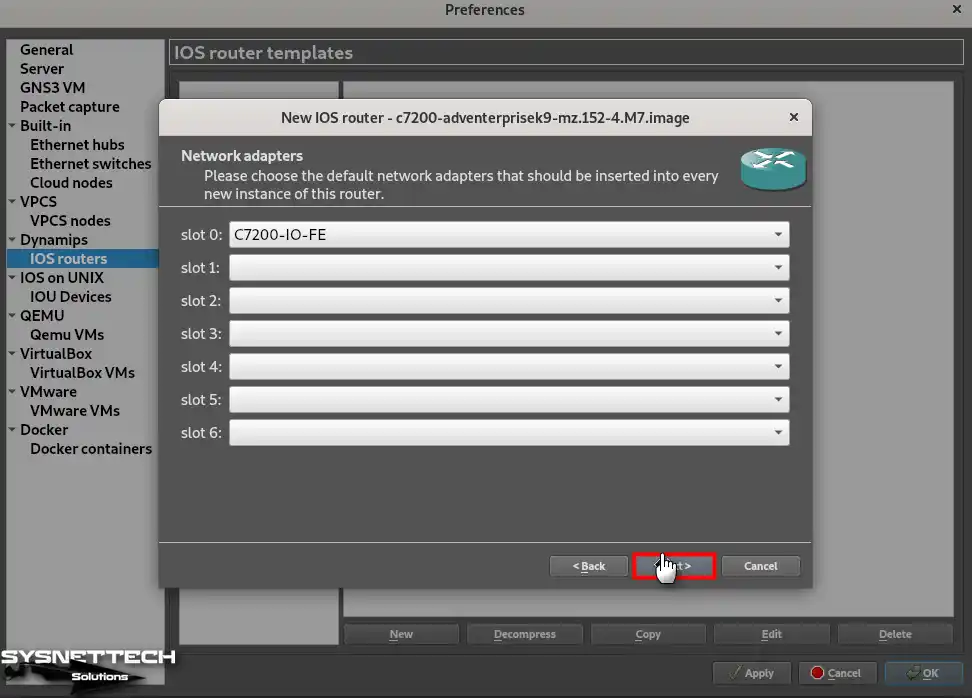
Step 8
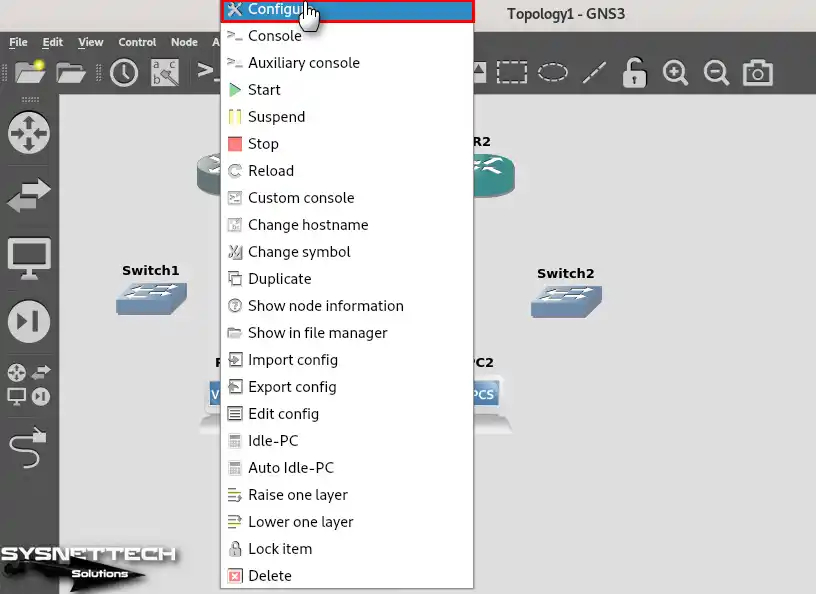
If you want to add additional interfaces to the Router you have already added, you can select them from the Slot sections in the Network Adapters window.
Step 9
The idle-PC value is necessary so that the IOS device does not use 100% of your computer’s processor. Therefore, to determine the idle-PC value for the C7200 based on your PC’s performance, click the idle-PC Finder button and wait for the appropriate value to be found.
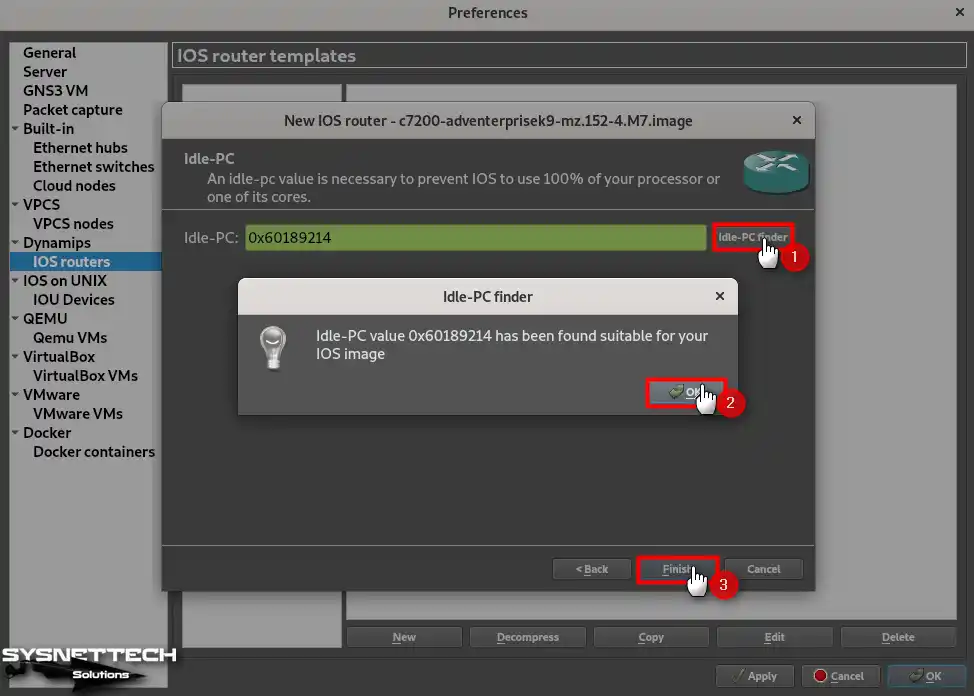
Step 10
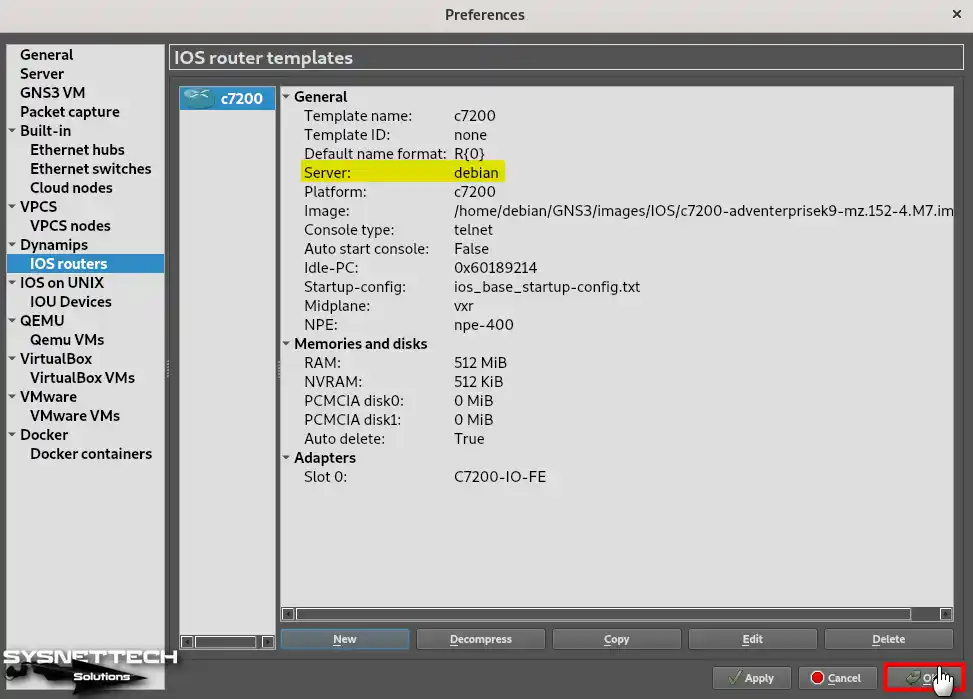
After adding the Router c7200 device, when you check the Server setting, you can see that the device will work in Localhost.
How to Fix uBridge Error
You may encounter a uBridge error when you try to connect the Router and Switch devices you have added to the GNS3 logical workspace. This error occurs because the uBridge package is not compatible with your Linux distribution’s version.
Step 1
When connecting the Switch to the Router, you may get the error “Error while creating link: uBridge is not available, the path doesn’t exist, or you just installed GNS3 and need to restart your user session to refresh user permissions, ” as in the image below.
Error while creating link: uBridge is not available, path doesn't exist, or you just installed GNS3 and need to restart your user session to refresh user permissions.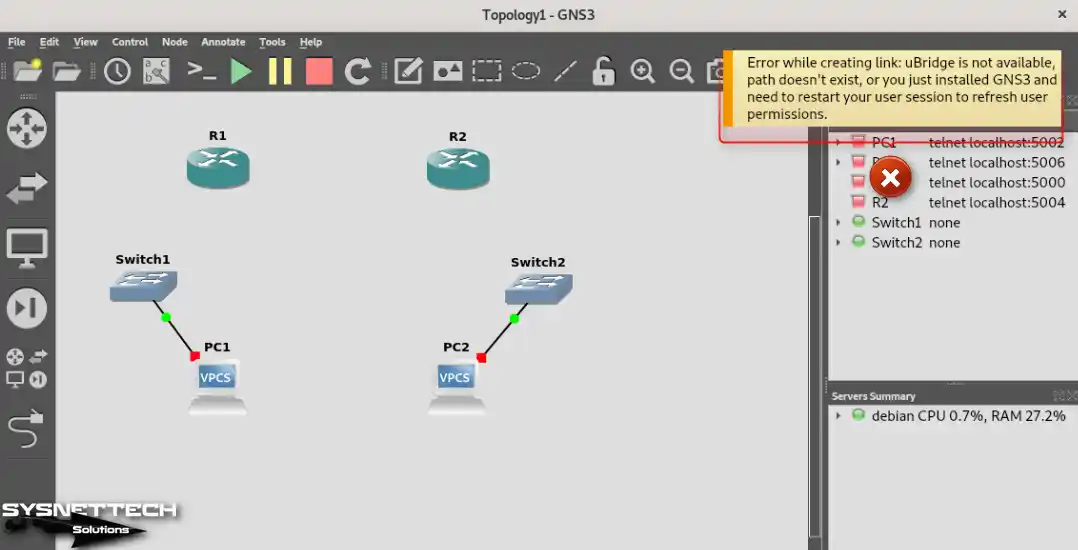
Step 2
To fix the uBridge error on your Debian system, you must first install the necessary packages. To install the libpcap package, execute the “sudo apt install libpcap-dev -y” command in the terminal.
sudo apt install libpcap-dev -y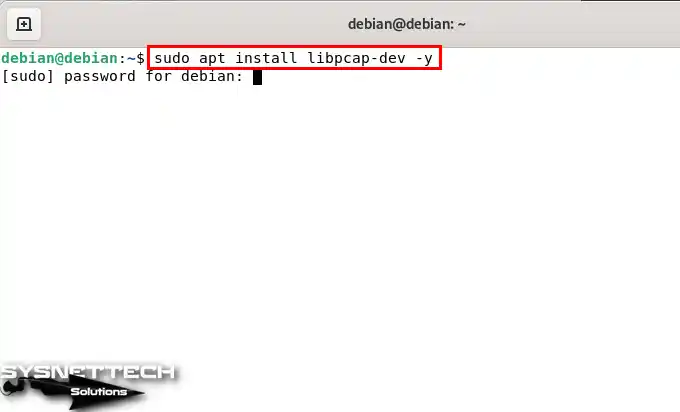
Step 3
After installing the libpcap package, you must also install the Git software on your system to download and compile the uBridge package via Git. To install Git, execute the “sudo apt install git -y” command in the terminal.
sudo apt install git -y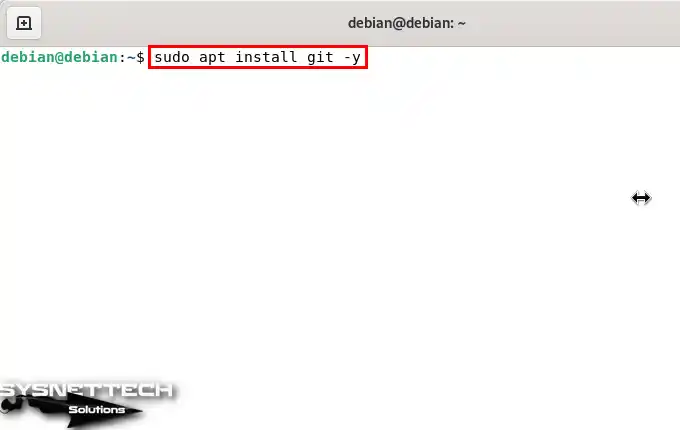
Step 4
To clone uBridge via Github, first go to the Downloads location in the terminal with the “cd ~/Downloads” command and then execute the “git clone https://github.com/GNS3/ubridge.git” command.
After cloning uBridge, go into the folder with the “cd ubridge” command and execute the “make” command to compile it in the directory.
cd ~/Downloads
git clone https://github.com/GNS3/ubridge.git
cd ubridge
make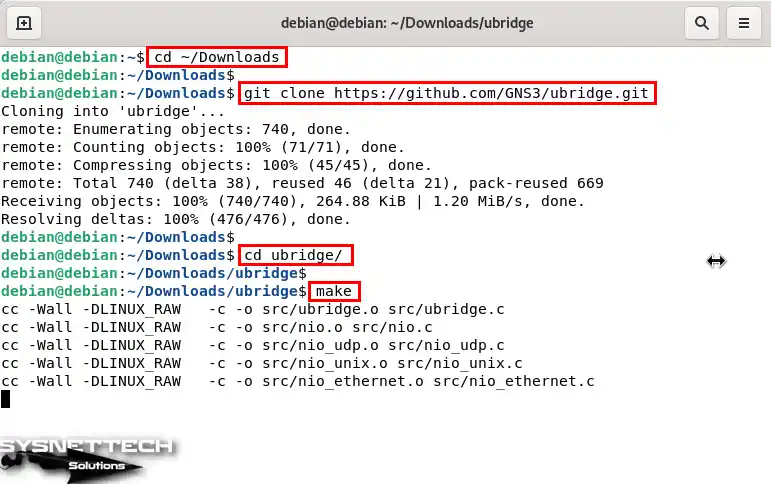
Step 5
Finally, execute the “sudo make install” command in the terminal to configure the necessary permissions and settings.
sudo make install
How to Fix No path to a VPCS executable has been set error
After fixing the ubridge problem, when you run all the devices in the workspace, the VPCS you added to the topology sometimes does not work, depending on the Linux distribution you are using.
Step 1
When you run all the devices in the topology, you will get the error “No path to a VPCS executable has been set,” as in the image below. This is because the VPCS device has not been set up correctly.
No path to a VPCS executable has been set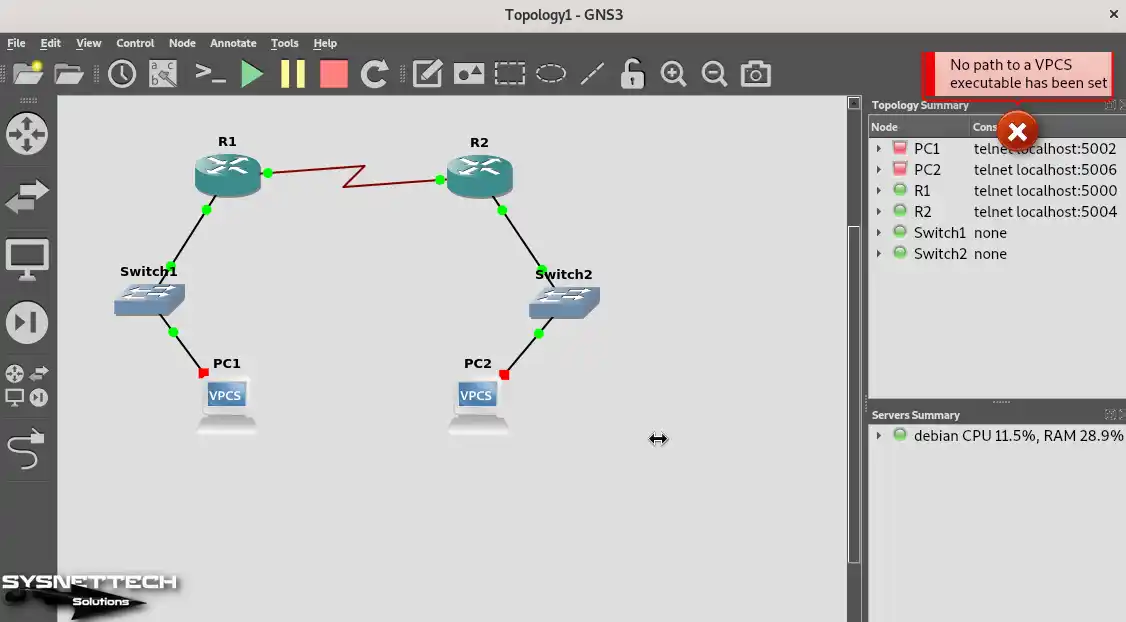
Step 2
To install VPCS on your Debian computer, execute the “sudo apt install vpcs” command in the terminal.
sudo apt install vpcs
How to Fix VPCS Executable Version Error
When you rerun the network devices after installing VPCS, you may receive an error about the VPCS version. The virtual computer’s version error is due to the Debian 11 version.
Step 1
When you run the VPCSs in the topology, you will get the error “VPCS executable version must be >= 0.6.1 but not 0.8” (see image below), and you will not be able to operate the devices.

Step 2
To fix the VPCS problem on Linux platforms, you need to download and install an appropriate version. To install VPCS version 0.8.1, execute the commands below in the order in the terminal.
cd ~/Downloads
git clone https://github.com/TolgaBagci/vpcs_0.8-1_amd64.deb.git
cd vpcs_0.8-1_amd64.deb
sudo dpkg -i vpcs_0.8-1_amd64.deb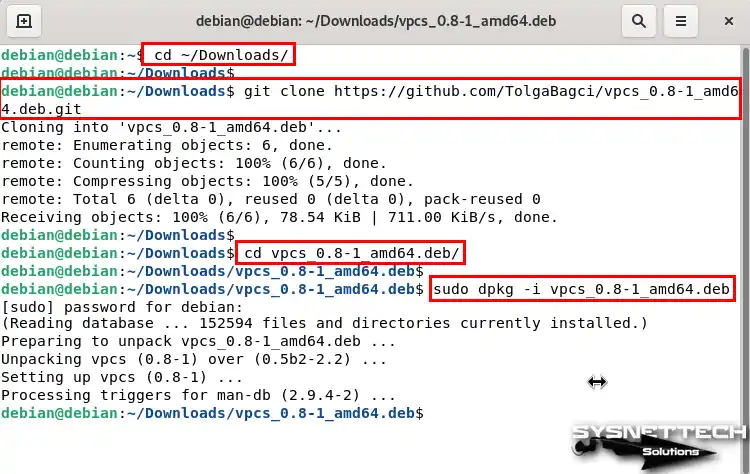
Step 3
After installing the old version of VPCS, you can see that all devices in the topology are working properly.
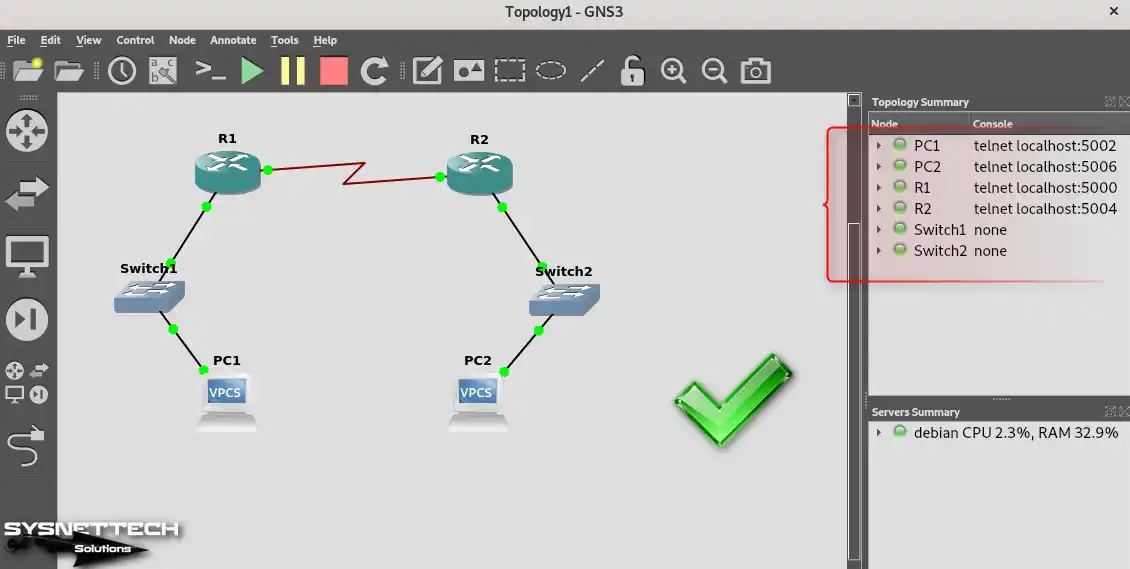
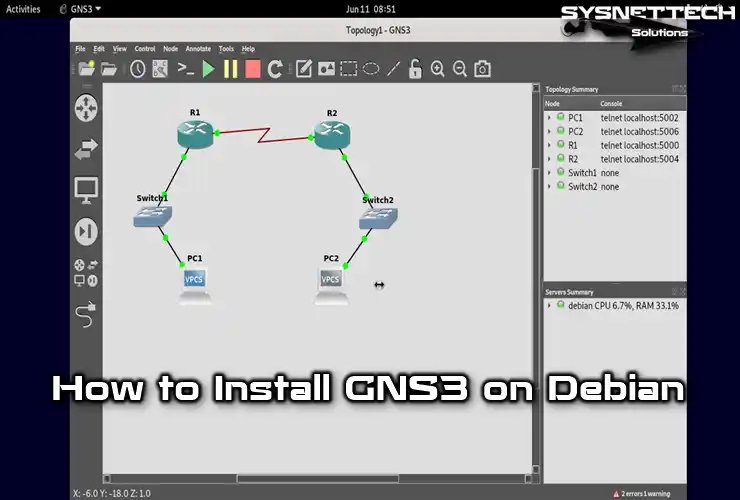
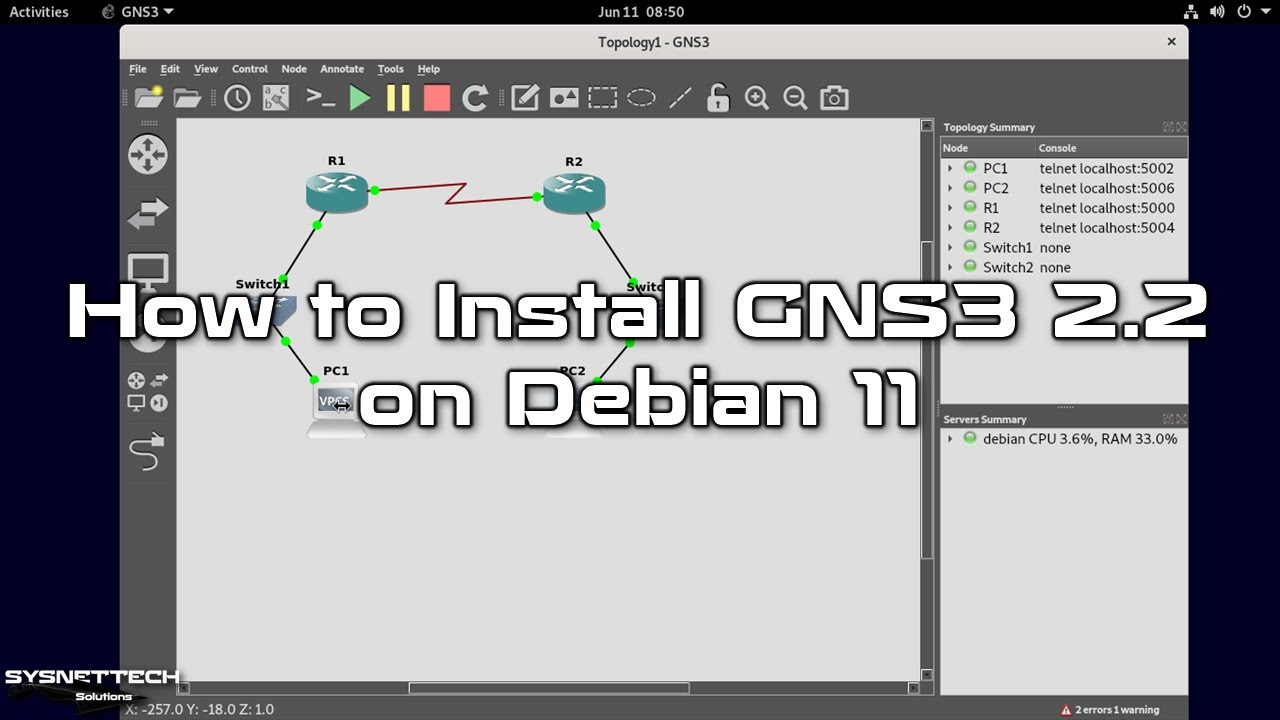
How to Create a Network Topology
Using GNS3 software, you can analyze how computers on the network communicate by creating a simple and professional network design.
Step 1
Click the New icon or CTRL + N from the GNS3 tool menu to open the project wizard. Name the network topology you will design, specify the location where you want to save it, and click OK.

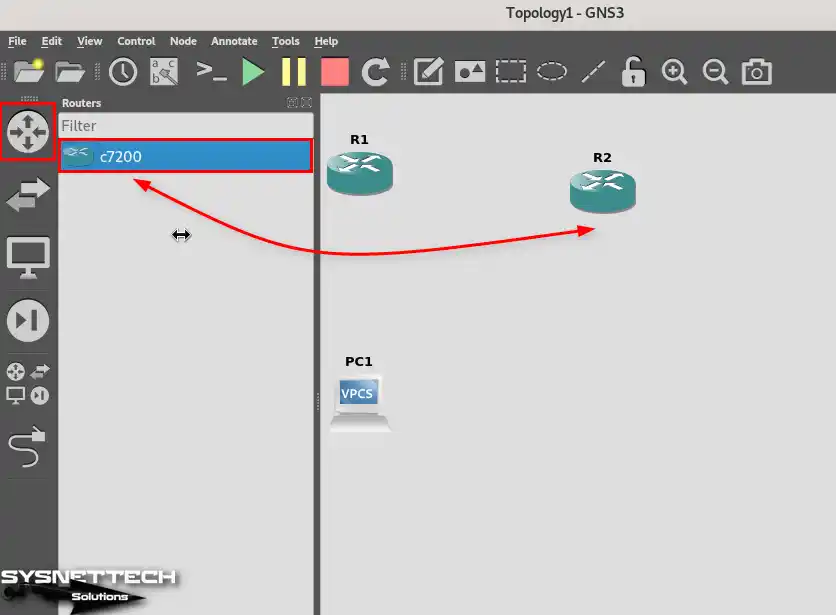
Step 2
To add two c7200 Routers to your project, click Routers on the left panel and drag and drop the device to the workspace.
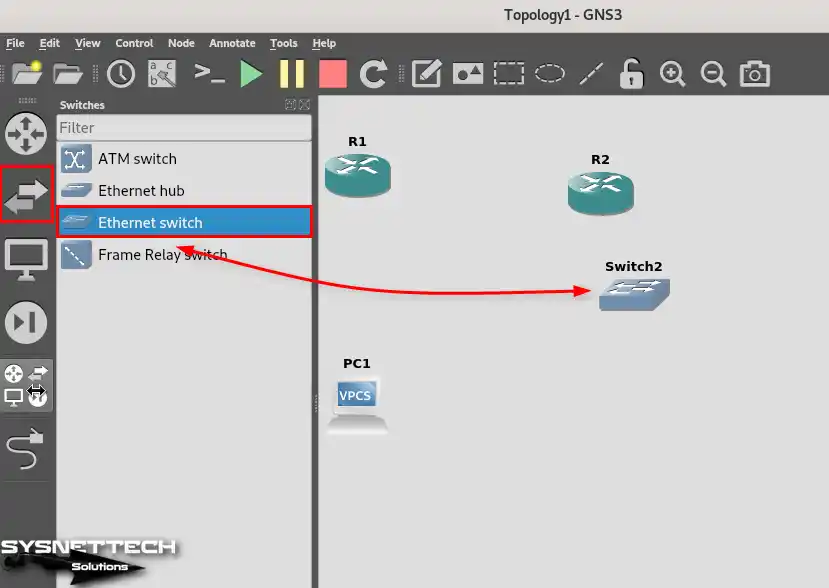
Step 3
Select Ethernet Switch from the Switches category and add two Switches to the workspace.
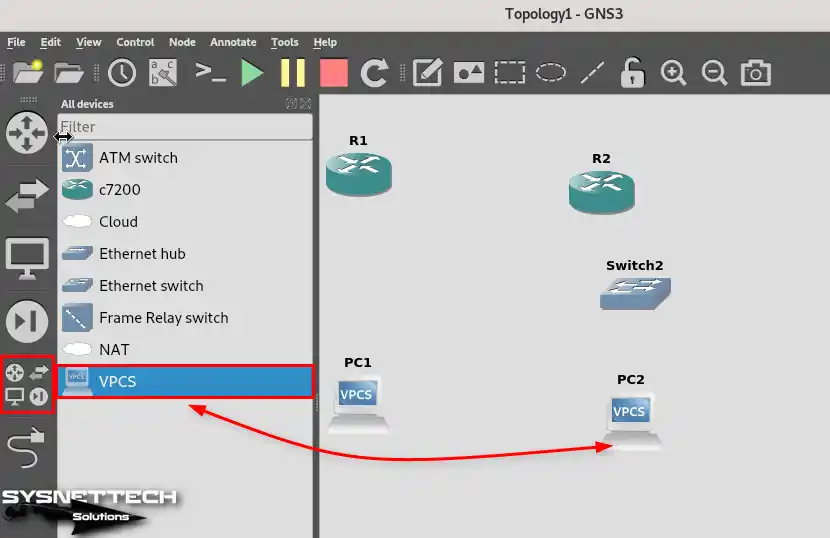
Step 4
Open the All Devices category and add two VPCS (Virtual PC Simulator) to the workspace.
Step 5
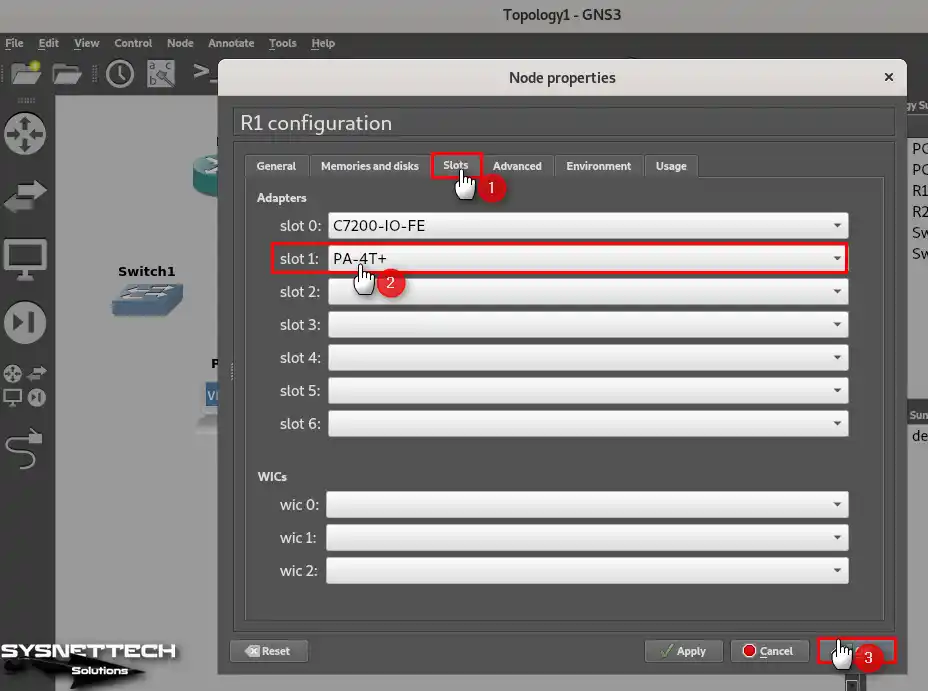
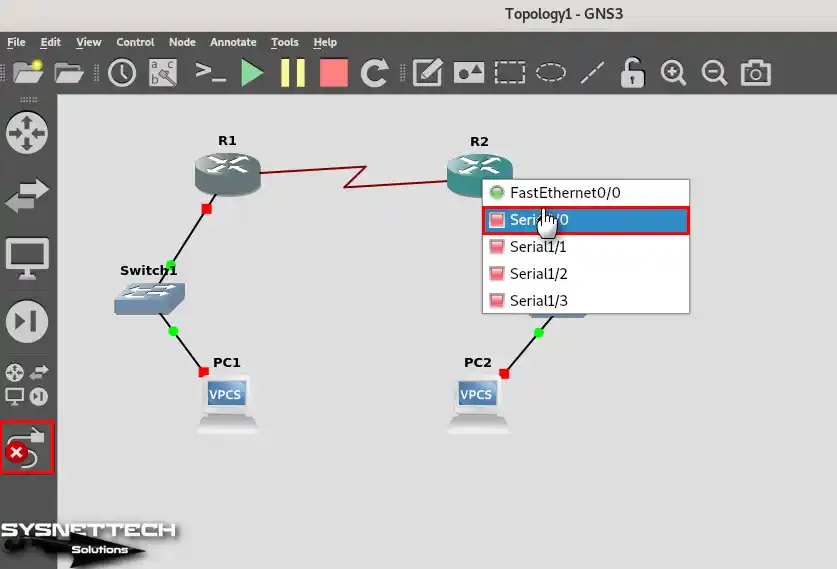
Right-click and configure the empty ports of the routers in the topology to add a serial interface.
Step 6
In the Node Properties window, on the Slots tab, add PA-4T+ (Serial Interface) to the Slot1 port in the Adapters section and click OK.
Step 7
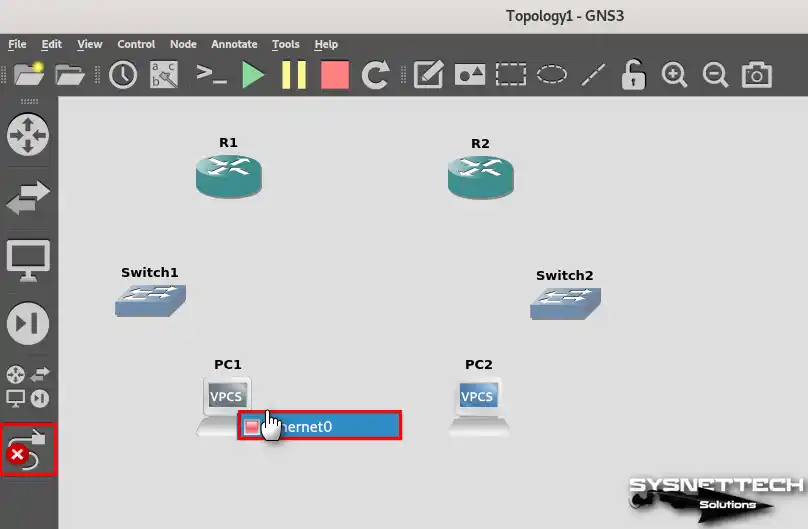
After adding a serial interface to the routers, activate the cabling option to connect the VPCSs to the Switches. Plug one end of the cable into the Ethernet0 port of the PCs and the other end into one of the switches’ free ports.
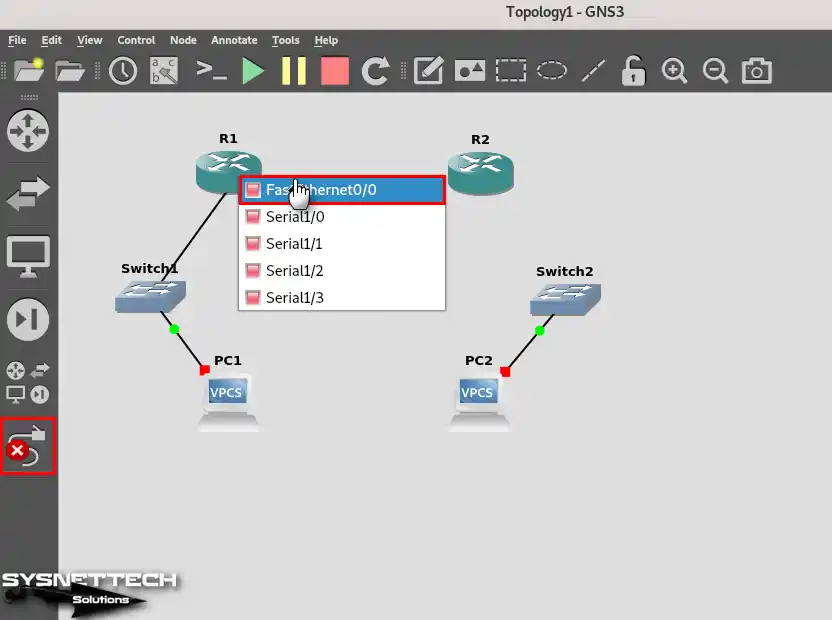
Step 8
Likewise, to connect the Switches to the Routers, plug one end of the cable into the Switches and the other end into the FastEthernet0/0 ports of the Routers.
Step 9
To connect Cisco Routers, plug one end of the cable into R1’s Serial 1/0 port and the other end into R2’s Serial 1/0 port.
Step 10
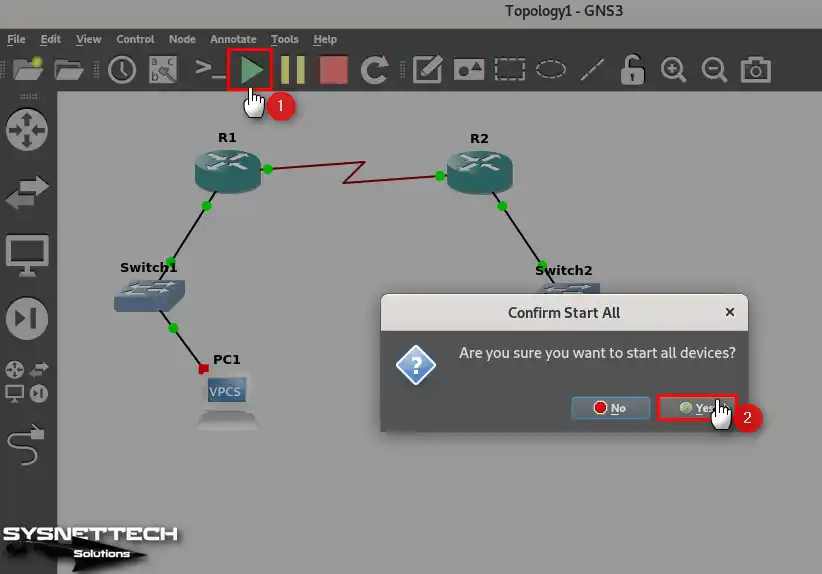
After wiring all the devices, click the green arrow from the tool menu and click Yes in the pop-up window to run them.
Step 11
To add static IP addresses to VPCS PCs, click on them to open the CLI prompt and configure the TCP/IP settings of PC1 and PC2.
PC1> ip 192.168.1.10/24 192.168.1.1
PC1> show ip
PC1> ip 192.168.2.20/24 192.168.2.1
PC1> show ip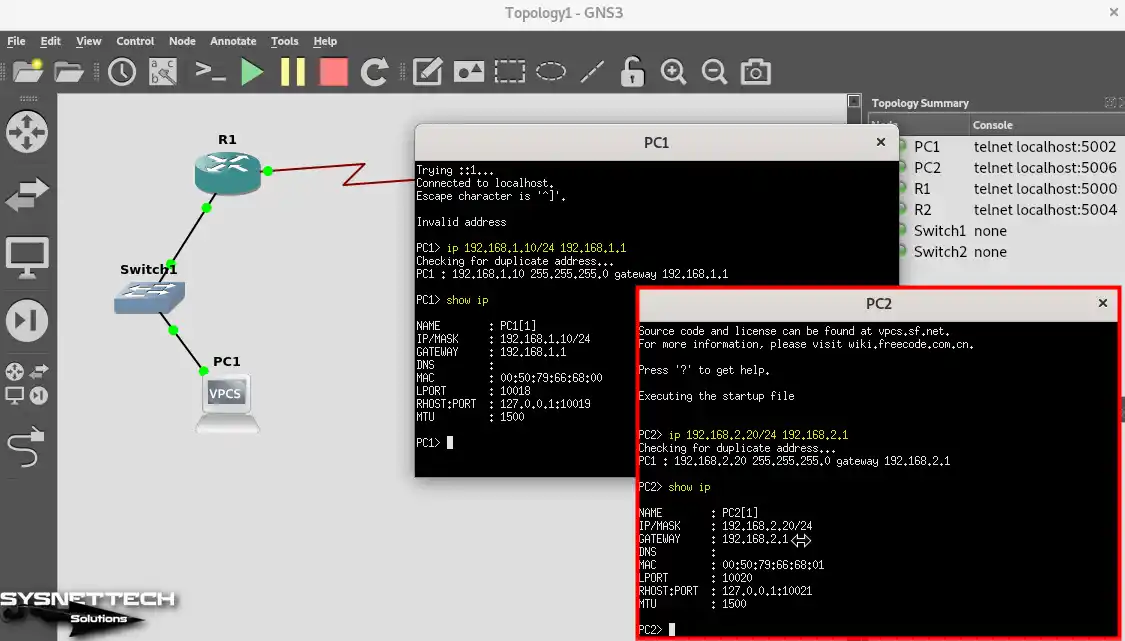
Step 12
To assign IP addresses to and open Cisco routers’ FastEthernet ports, execute the commands below in the CLI.
R1# conf t
R1(config)# interface fastethernet 0/0
R1(config-if)# ip address 192.168.1.1 255.255.255.0
R1(config-if)# no shutdown
R2# conf t
R2(config)# interface fastethernet 0/0
R2(config-if)# ip address 192.168.2.1 255.255.255.0
R2(config-if)# no shutdown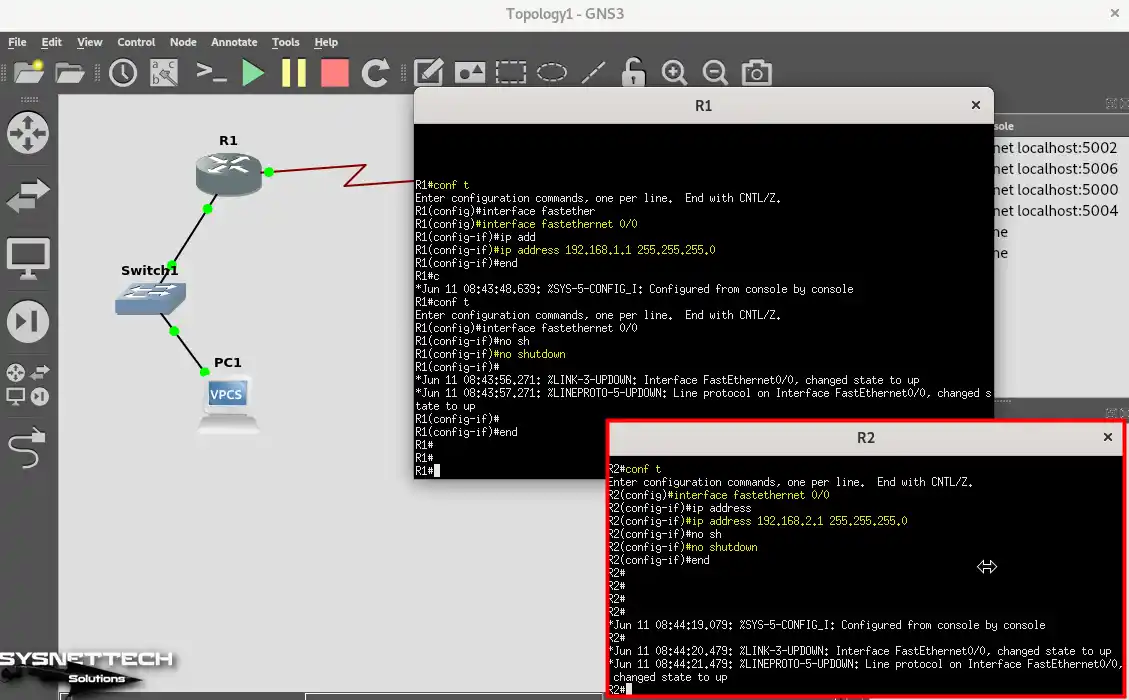
Step 13
Since you connect Router R1 and R2 with Serial Interface port, configure those ports as well.
R1# conf t
R1(config)# interface serial 1/0
R1(config-if)# ip address 192.168.3.1 255.255.255.0
R1(config-if)# no shutdown
R2# conf t
R2(config)# interface serial 1/0
R2(config-if)# ip address 192.168.3.2 255.255.255.0
R2(config-if)# no shutdown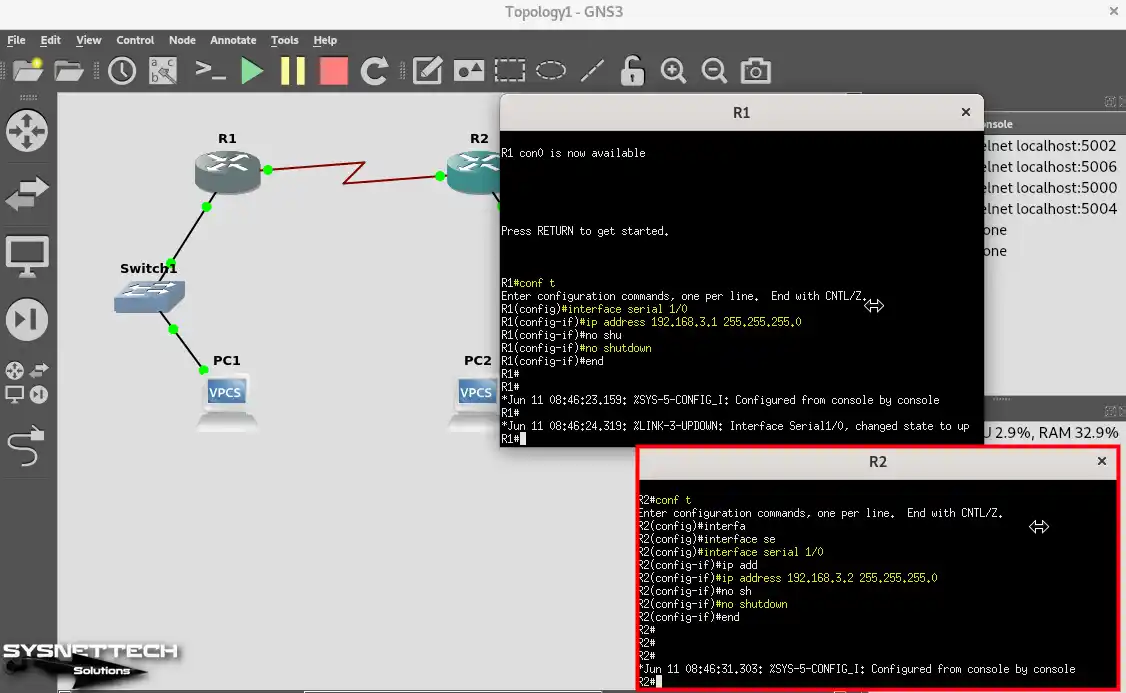
Step 14
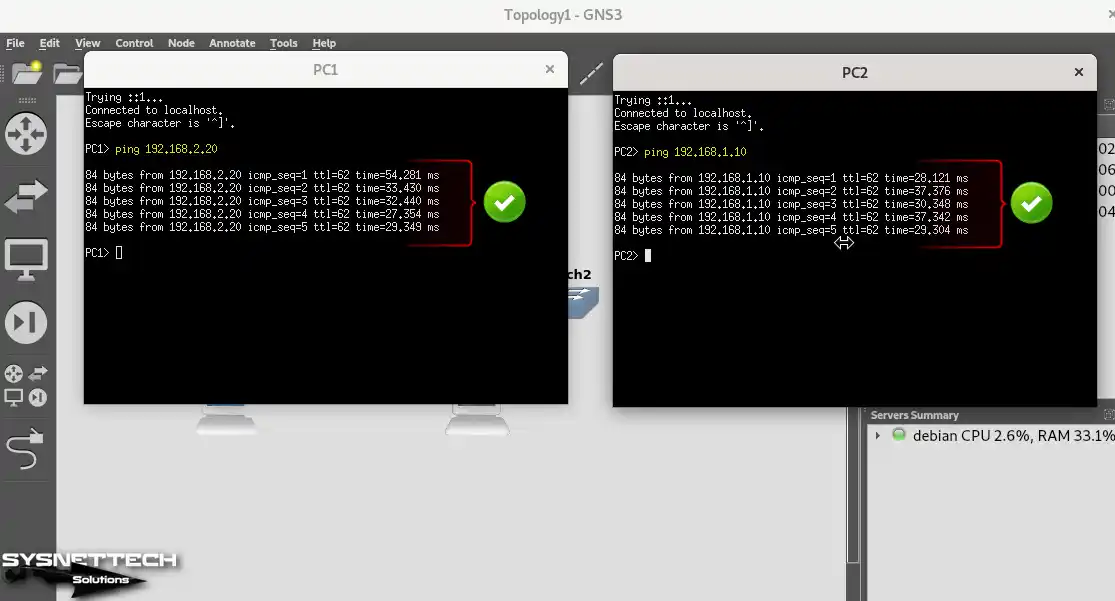
When you ping the routers’ external serial ports from the PCs, you can see that there is a network connection.
PC1> ping 192.168.3.1PC2> ping 192.168.3.2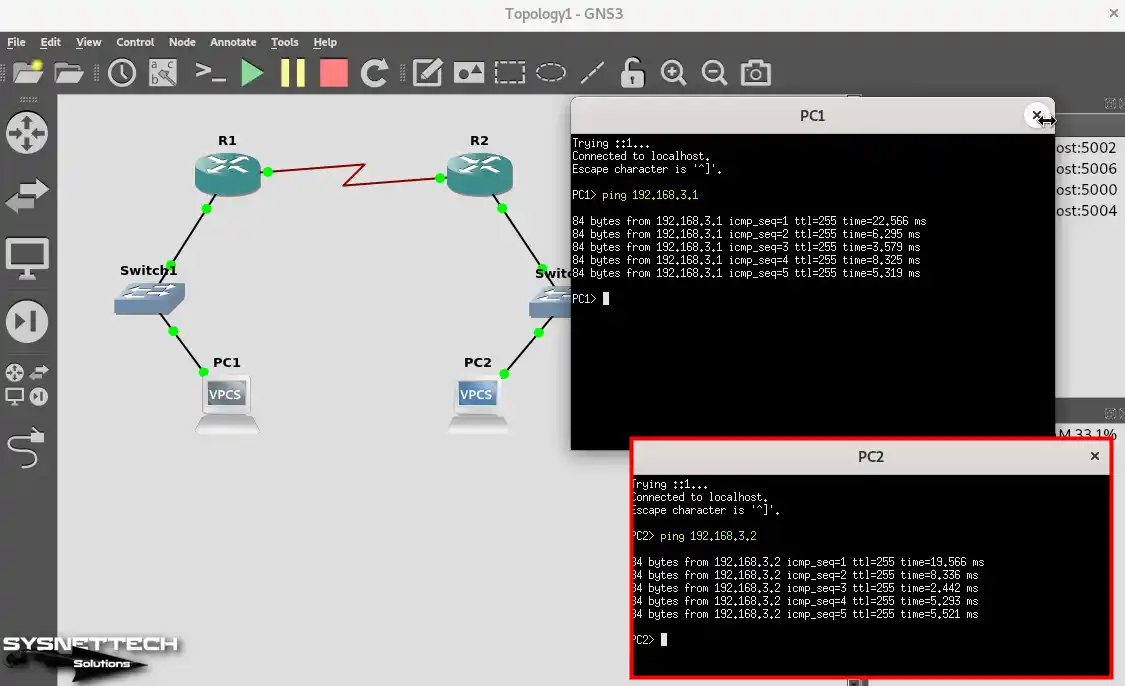
Step 15
However, if the routers do not have one of the RIPv1/v2, IGRP, EIGRP, or OSPF routing protocols or a static route configured, you will not be able to ping each other from PCs, and you will get a Destination host unreachable error, as in the image below.
PC1> ping 192.168.2.20PC2> ping 192.168.1.10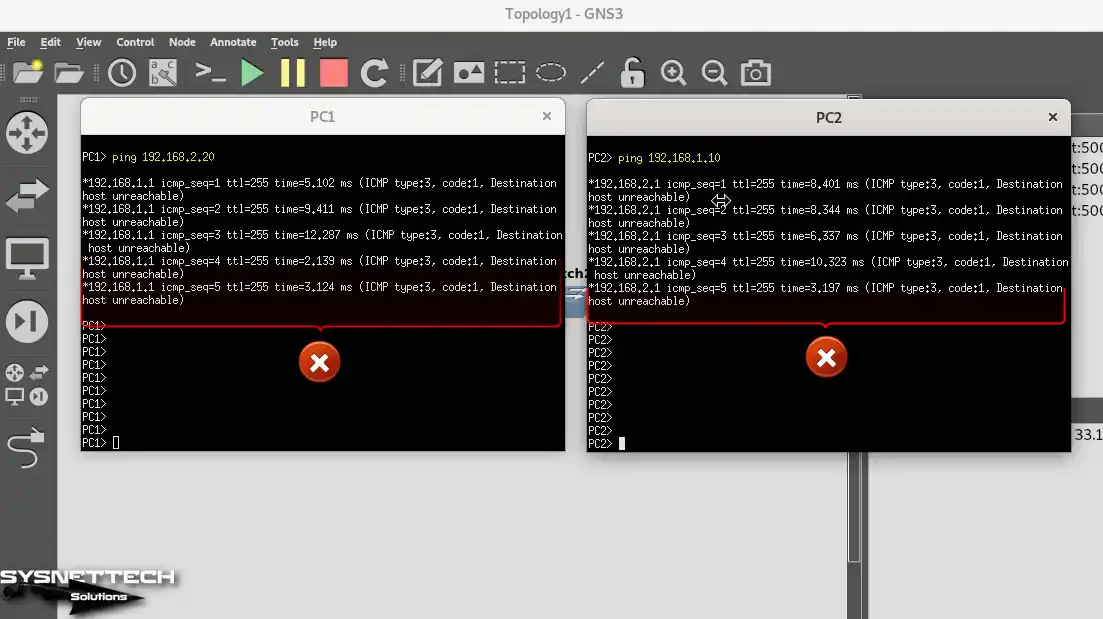
Step 16
You can connect to computers in both subnets by configuring the EIGRP protocol on the routers. Execute the commands below to enable EIGRP in the Router R1 and R2 CLI command prompt.
R1# conf t
R1(config)# router eigrp 10
R1(config-router)# network 192.168.3.0 0.0.0.255
R1(config-router)# network 192.168.1.0 0.0.0.255
R2# conf t
R2(config)# router eigrp 10
R2(config-router)# network 192.168.3.0 0.0.0.255
R2(config-router)# network 192.168.2.0 0.0.0.255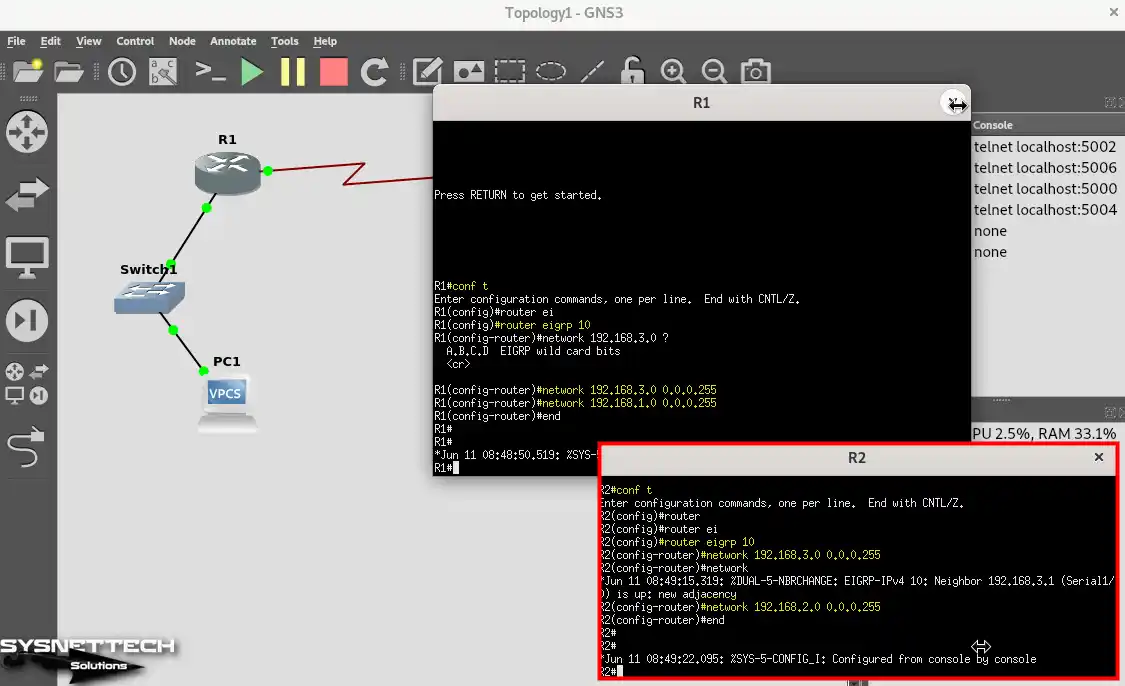
Step 17
After configuring the EIGRP protocol, you can see that the network connection is successful when you ping each other from the PCs again.
How to Uninstall GNS3 from Debian
If you want to remove the GNS3 software from your Linux operating system, you must also remove the necessary packages that you installed during the installation phase.
Steps:
Step 1
After backing up the projects you have created with GNS3, open the terminal and execute the “sudo pip3 uninstall gns3-server gns3-gui—y” command to uninstall the program.
sudo pip3 uninstall gns3-server gns3-gui -y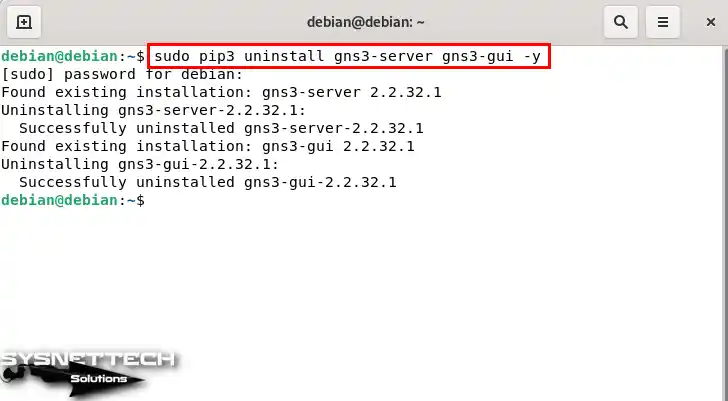
Step 2
To remove VPCS and Dynamips from your Debian system, execute the “sudo apt purge vpcs -y && sudo apt purge dynamips -y” command in the terminal.
sudo apt purge vpcs -y && sudo apt purge dynamips -y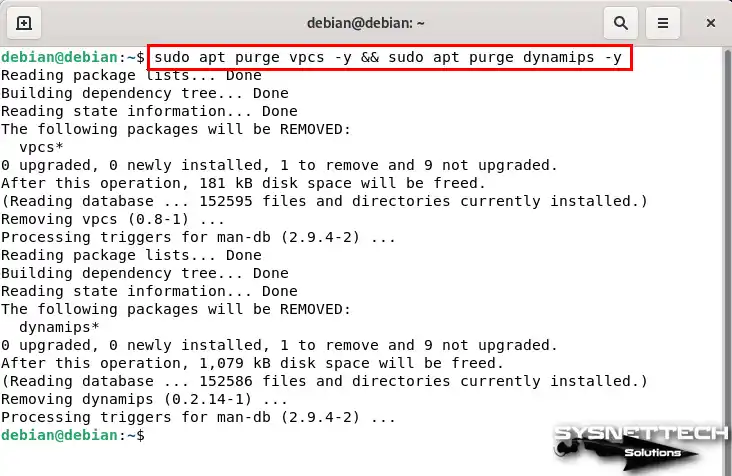
Step 3
Execute the “sudo apt purge python3-pip python3-pyqt5 python3-pyqt5.qtsvg python3-pyqt5.qtwebsockets qemu qemu-kvm qemu-utils libvirt-clients libvirt-daemon-system virtinst wireshark xtightvncviewer apt-transport-https ca-certificates curl gnupg2 software-properties-common -y” command in terminal to delete all dependent packages related to GNS3 from your system.
sudo apt purge python3-pip python3-pyqt5 python3-pyqt5.qtsvg python3-pyqt5.qtwebsockets qemu qemu-kvm qemu-utils libvirt-clients libvirt-daemon-system virtinst wireshark xtightvncviewer apt-transport-https ca-certificates curl gnupg2 software-properties-common -y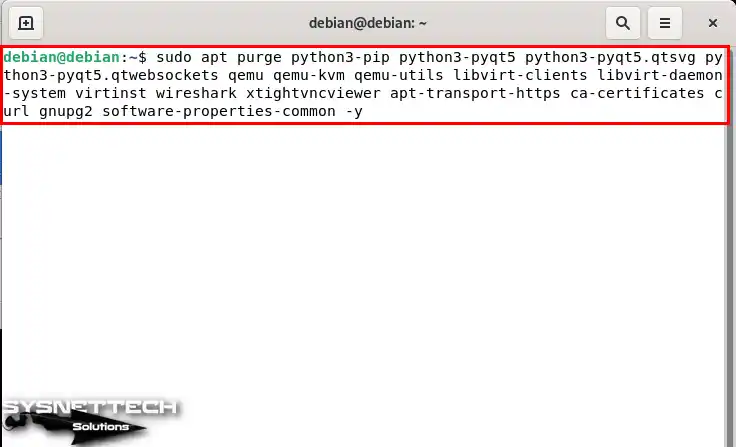
Step 4
After uninstalling GNS3, execute the “sudo apt autoremove && sudo apt autoclean” command in the terminal to remove and delete unnecessary packages still installed on your system.
sudo apt autoremove && sudo apt autoclean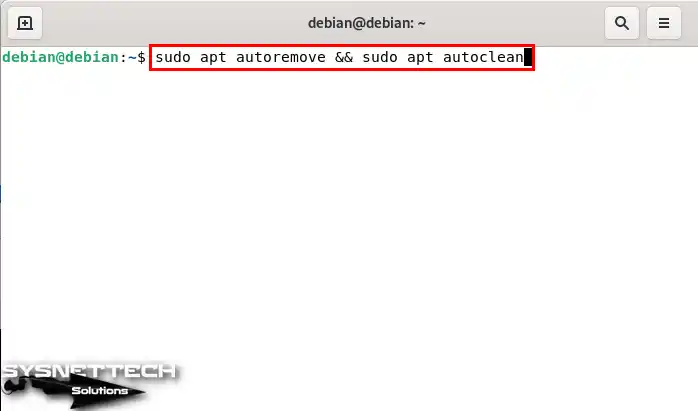
Step 5
Finally, delete the uBridge and VPCS installation files you downloaded to your system.
sudo rm -rf ~/Downloads/ubridge
sudo rm -rf ~/Downloads/vpcs_0.8-1_amd64.deb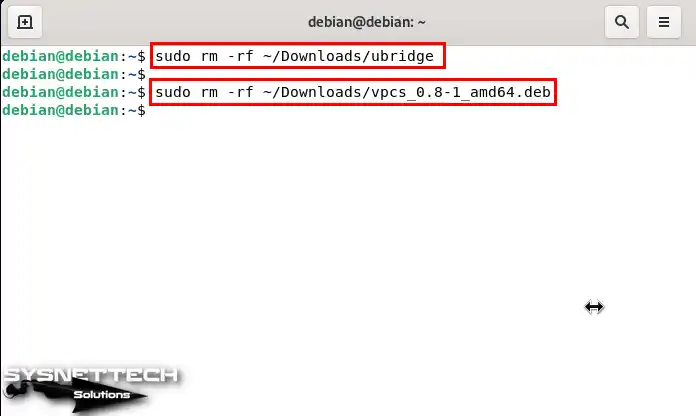
Video
Installing Old Versions
Debian 8 Jessie
deb http://ppa.launchpad.net/gns3/ppa/ubuntu trusty main
deb-src http://ppa.launchpad.net/gns3/ppa/ubuntu trusty main
sudo apt-get update
sudo apt-get install gns3-gui gns3-server -y
Debian 9 Stretch
deb http://ppa.launchpad.net/gns3/ppa/ubuntu xenial main
deb-src http://ppa.launchpad.net/gns3/ppa/ubuntu xenial main
sudo apt-get update
sudo apt-get install gns3-gui gns3-server -y
Debian 10 Buster
sudo apt install -y python3-pip python3-pyqt5 python3-pyqt5.qtsvg python3-pyqt5.qtwebsockets qemu qemu-kvm qemu-utils libvirt-clients libvirt-daemon-system virtinst wireshark xtightvncviewer apt-transport-https ca-certificates curl gnupg2 software-properties-common -y
sudo pip3 install gns3-server gns3-gui
Installing Old Versions – Video
| Debian Version | YouTube Video | Slide |
|---|---|---|
| 9 / 2.1 | Watch | – |
| 10 / 2.1 | Watch | View |
| 11 / 2.2 (NEW) | Watch | – |
Conclusion
In conclusion, if you are using Debian OS, I recommend installing GNS3. This way, you will experience networking professionalism in a virtual environment and gain more advanced practical experience with Cisco devices.
In summary, following the steps I have explained, you can easily install the GNS3 simulation, create a dynamic network lab, and add IOS images.
As a result, you will improve your technical skills. This way, you will be prepared for real-world networking challenges. This is why tools like GNS3 are so valuable today. As a result, these tools will help you stand out in network engineering and achieve your goals.

2 People Shared Their Experience
I have used a similar method to you, however on my last update I discovered that pip3 install gns3-server gns3-gui installs gns3 v3 over gns3v2. This broke most of my projects and failed to recognize my IOU devices.
Thank you for your guides, saves us time and headaches.