
With Cisco Packet Tracer, you can create network topologies and gain experience. This software is a Cisco network simulator program and is entirely free.
How to Enable and Configure DHCP on a Cisco Router
The easiest way to configure a network is to take advantage of DHCP servers located on routers. The DHCP server is responsible for providing an IP address and network parameters (subnet mask and gateway) to all equipment and devices connected to it.
This server is also responsible for configuring the DNS servers of the connected equipment. Still, because of the firmware installed by the providers on their routers, the default DNS added is the manufacturer’s DNS.
Dynamic Host Configuration Protocol is the protocol that allows the automatic assignment of IP addresses.
The DHCP protocol uses UDP as the transport protocol; UDP port 67 is the destination port of a server, and the client uses UDP port 68.
With the DHCP service, you can configure the following parameters automatically:
- IP Address
- Subnet Mask
- Default Gateway
- DNS
By using Cisco’s network simulator software to create a new network topology and add multiple clients and one Cisco Router to the network, you can automatically configure it with the DHCP service instead of manually configuring the TCP/IP configuration of all clients that will be connected to the network.
Enabling DHCP Service on Router with Packet Tracer
Step 1
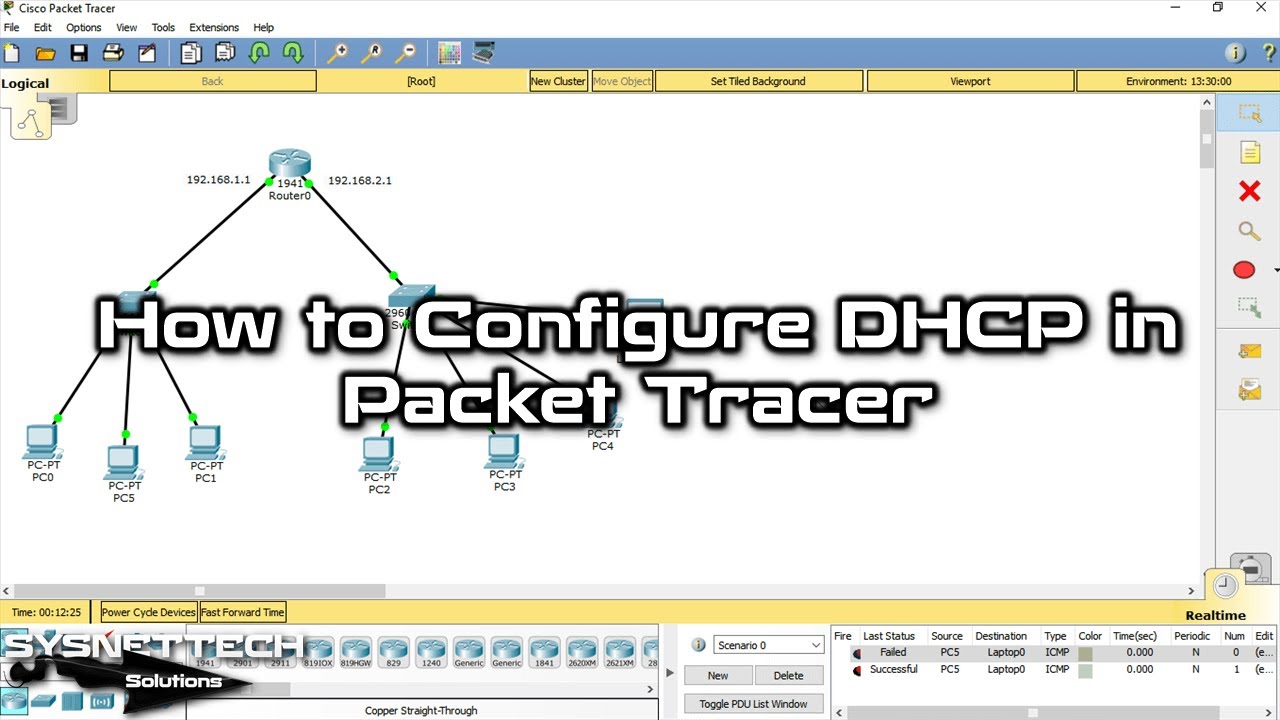
First, create a network topology with two separate segments (192.168.1.0/24 and 192.168.2.0/24) in Packet Tracer.

Step 2
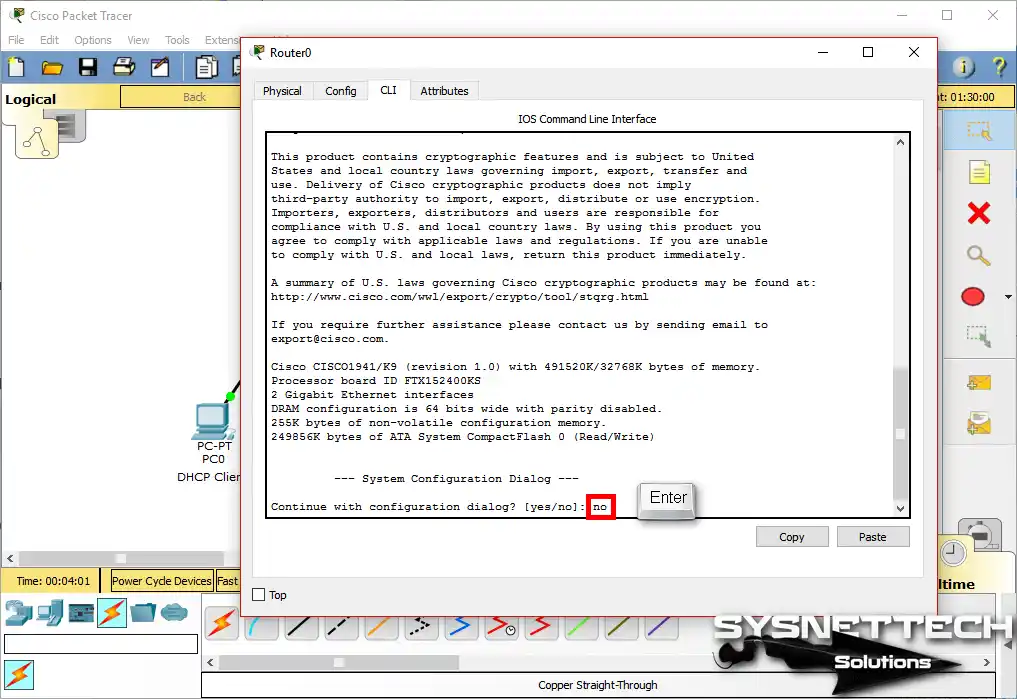
In the Router0 window, click the CLI command prompt tab, and on the initial configuration screen, type No and press Enter. If you select Yes on this screen, the Cisco router will ask you step-by-step to make basic settings.
Step 3
Assign IP addresses and open ports to Cisco router interfaces according to the network topology you create. Then, enable DHCP by executing the following commands to distribute IP information from the Router to the clients automatically.
Router>enable
Router#conf t
Enter configuration commands, one per line. End with CNTL/Z.
Router(config)#interface gigabitethernet 0/0
Router(config-if)#ip address 192.168.1.1 255.255.255.0
Router(config-if)#no shutdown
%LINK-5-CHANGED: Interface GigabitEthernet0/0, changed state to up
%LINEPROTO-5-UPDOWN: Line protocol on Interface GigabitEthernet0/0, changed state to up
Router(config-if)#exit
Router(config)#interface gigabitethernet 0/1
Router(config-if)#ip address 192.168.2.1 255.255.255.0
Router(config-if)#no shutdown
%LINK-5-CHANGED: Interface GigabitEthernet0/1, changed state to up
%LINEPROTO-5-UPDOWN: Line protocol on Interface GigabitEthernet0/1, changed state to up
Router(config-if)#exit
Router(config)#ip dhcp pool LAN1
Router(dhcp-config)#network 192.168.1.0 255.255.255.0
Router(dhcp-config)#default-router 192.168.1.1
Router(dhcp-config)#dns-server 192.168.1.1
Router(dhcp-config)#exit
Router(config)#ip dhcp excluded-address 192.168.1.1
Router(config)#ip dhcp pool LAN2
Router(dhcp-config)#network 192.168.2.0 255.255.255.0
Router(dhcp-config)#default-router 192.168.2.1
Router(dhcp-config)#dns-server 192.168.2.1
Router(dhcp-config)#exit
Router(config)#ip dhcp excluded-address 192.168.2.1
Router(config)#end
Router#
%SYS-5-CONFIG_I: Configured from console by console
Router#wr
Building configuration...
[OK]
Router#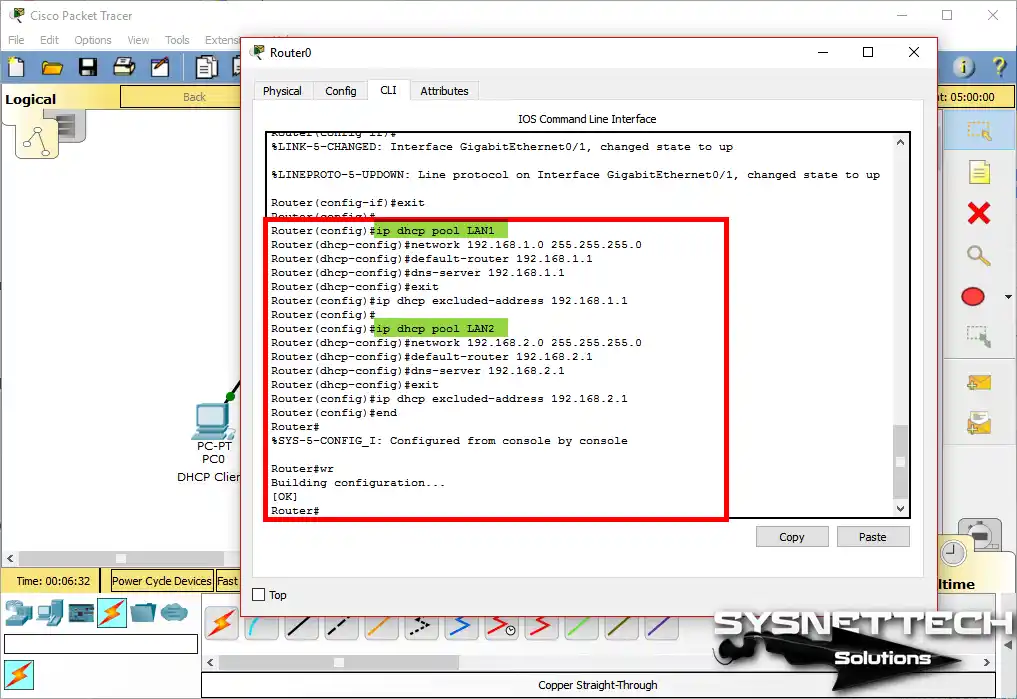
Step 4
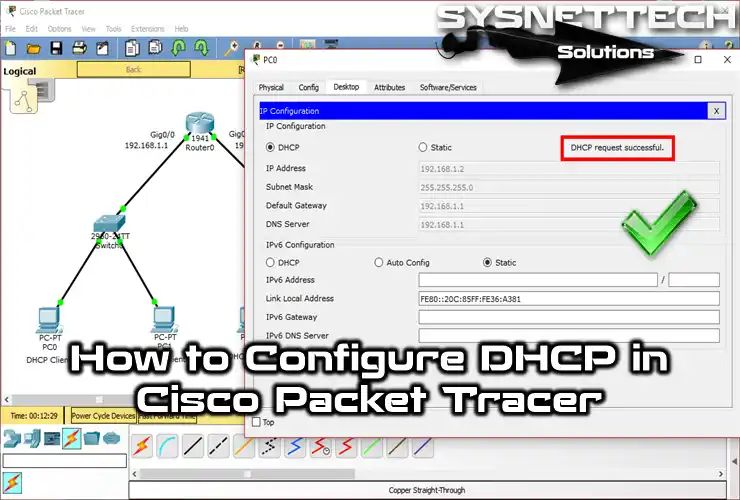
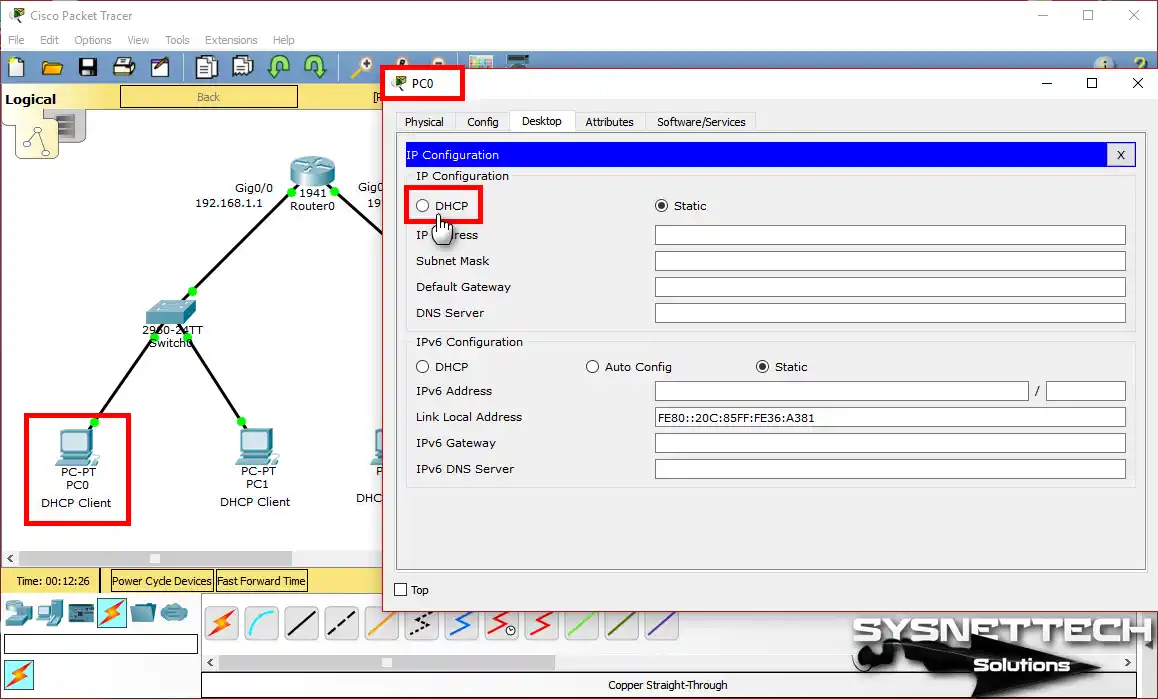
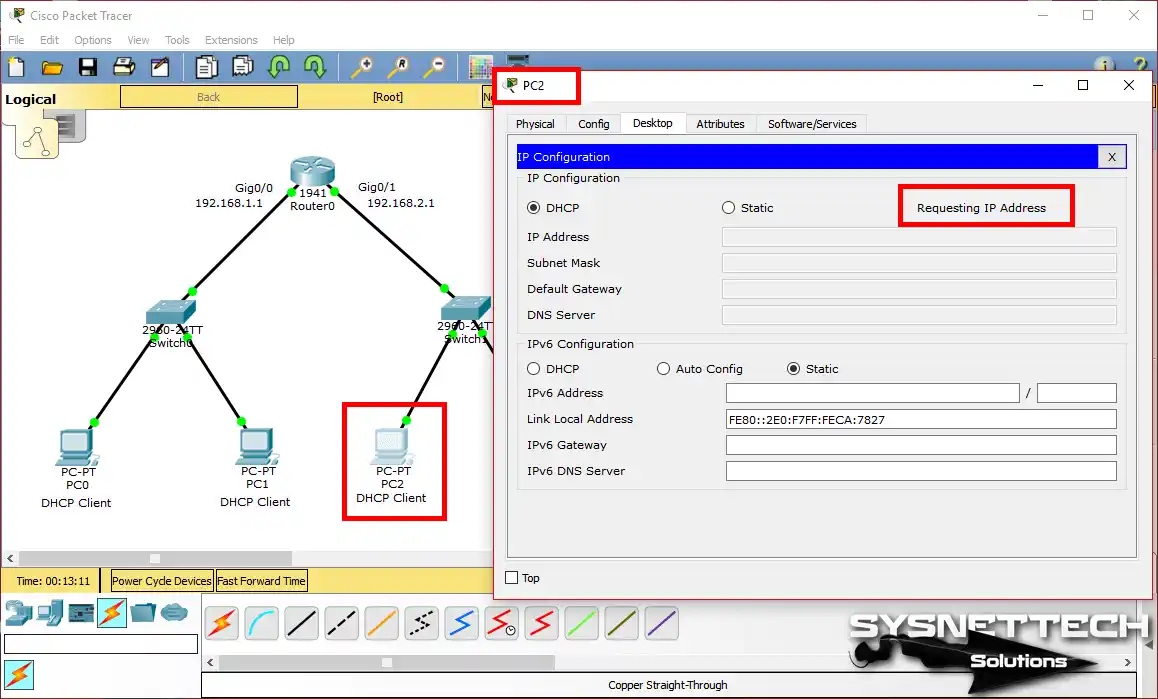
After you apply the Cisco DHCP commands, you must set up the computers that you add to the Packet Tracer workspace for an automatic IP address. To do this, click on PC0, click IP Configuration in the window that opens, and then activate the DHCP option.
Step 5
After enabling DHCP on PC0, an IP address request will be sent as shown in the following image.

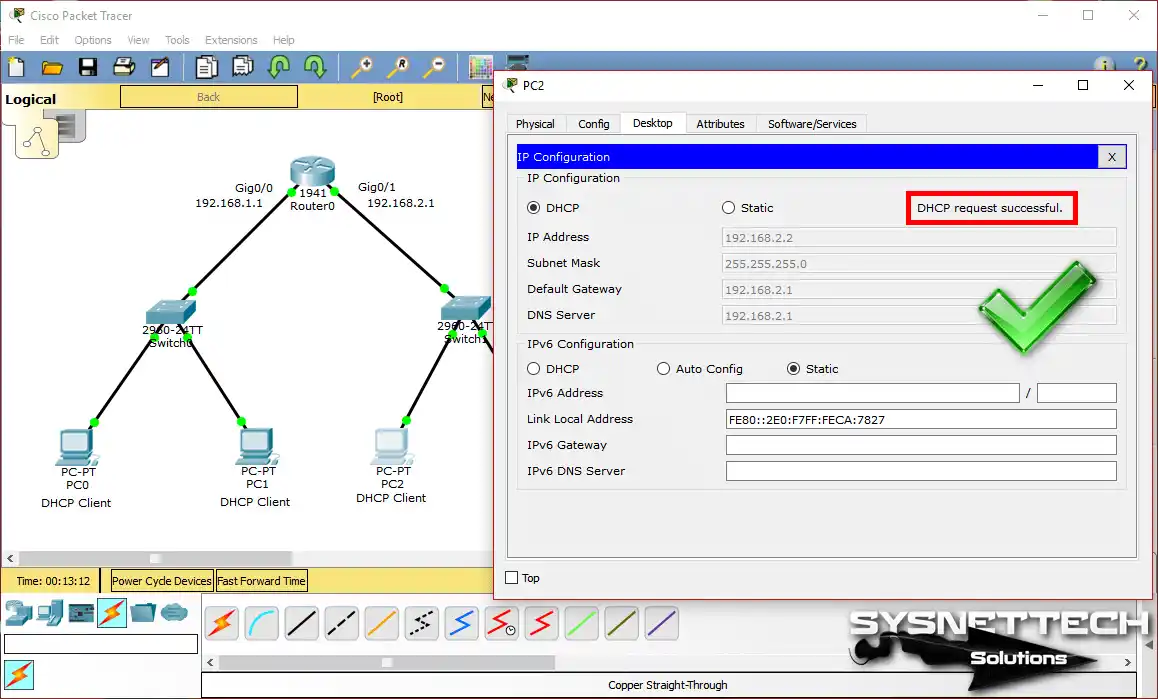
Step 6
DHCP will allocate an IP address by responding to PC0’s request.

Step 7
Enable the DHCP option for computers on the 192.168.2.0/24 network and check the status.
Step 8
PC2 will also obtain the IP address successfully because the DHCP pool is configured for the 192.168.2.0/24 network on the Cisco router.
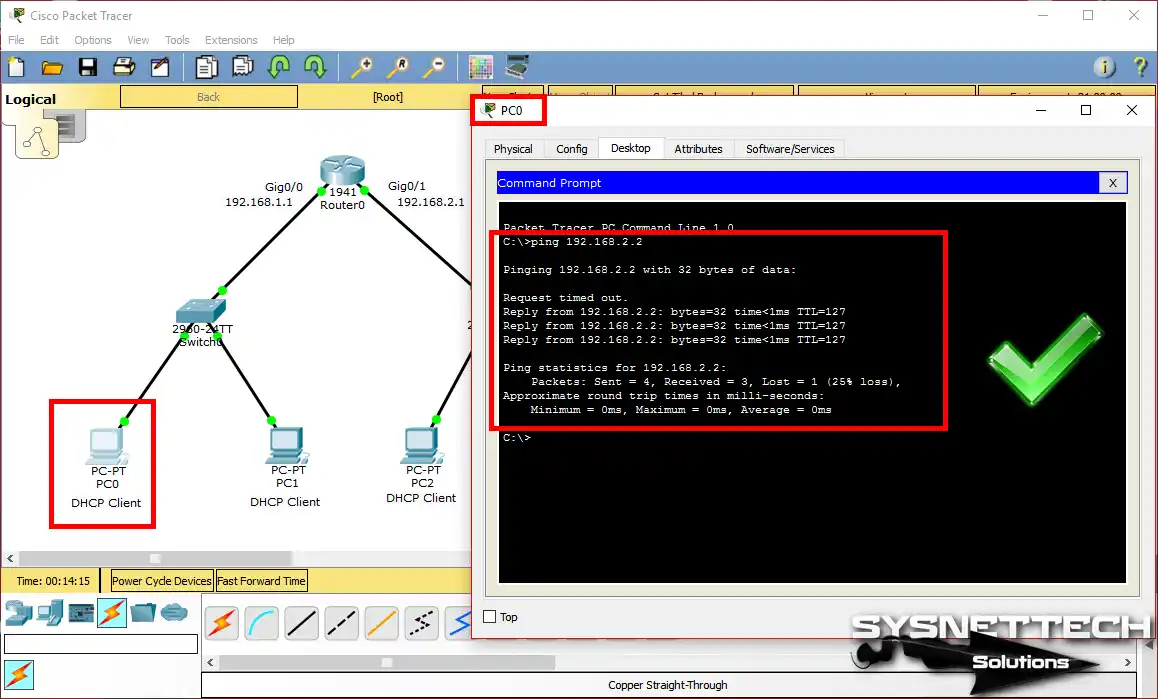
Step 9
When you test the network connection by pinging PC0 to 2.0, this will be successful as follows.
Step 10
Ping over PC3 to the 1.0 network will also be successful.

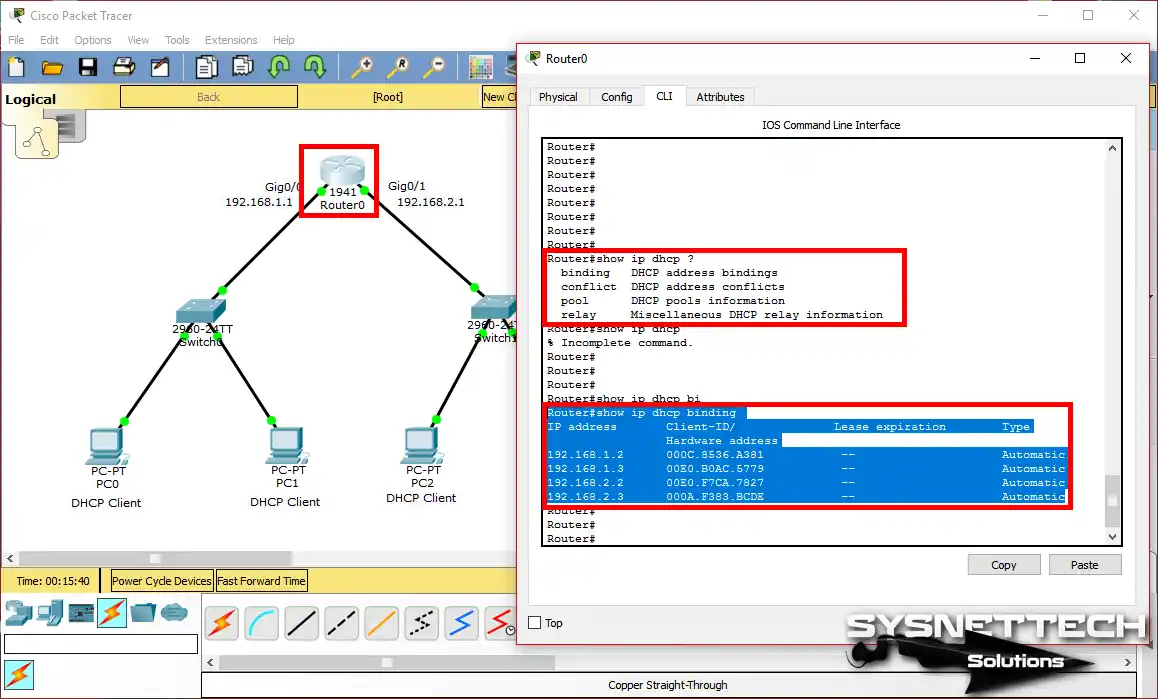
Step 11
You can see the IP addresses and MAC addresses assigned to the clients with the show ip dhcp binding command on the Router.
Step 12
You can also review the DHCP pool details, as shown in the image below, when you execute the show ip dhcp pool command.

Easy Fixes for Devices Not Getting an IP in Packet Tracer
In Cisco Packet Tracer, sometimes devices don’t get IPs from the DHCP server. First, see if the DHCP server is on. Then, look at the server’s settings. Make sure the right range of IPs is set. Also, check that the device is set to get an IP automatically.
Look at the wires too. Be sure all devices are linked correctly. If it still fails, restart both the device and the server. Last, check the rest of the setup for issues. These steps can help fix DHCP problems.
1. Check the Router’s DHCP Setup
To check your router’s DHCP, first see if the service is on. Then, look at the DHCP pool to be sure it is set right. Check the network range is correct.
Also, look at the subnet mask, gateway, and DNS. This helps your network work well.
2. Look at the Interface Status
Be sure the router’s interfaces are on. First, open the router’s CLI in Packet Tracer. Then, type “show ip interface brief.” This shows if the interfaces are “up”.
Also, check that they have the right IPs. These steps help you check the setup.
3. Check the Cables
Be sure the links between the router and devices are good. First, check the cables in Packet Tracer. For Ethernet, use a straight cable between a switch and devices.
Use a cross cable between two of the same, like router to router. This helps them talk right. Always check your setup for best results.
4. Set the Right IP on Devices
Check that devices get an IP automatically. First, click on each device. Then, go to the IP settings.
Next, be sure DHCP is on. This step makes sure all devices can connect. Using DHCP makes the network easy to run.
5. Restart the Device
In Packet Tracer, you can reset the devices. Sometimes, a reset helps them ask for a new IP. Click the reset icon on the device to start fresh.
6. See if the DHCP Pool is Full
Check if the DHCP pool has no more IPs. First, type “show ip dhcp pool” on the router’s CLI. This shows how many IPs are in use.
If the pool is full, you have two choices. You can make the range of IPs bigger. Or, you can free up old leases. Both can help your DHCP work.
7. Use Simulation Mode
Go to simulation mode in Packet Tracer. This lets you watch the DHCP process. You can see the DHCP request and offer packets move. Then, look for any lost packets. Also, check for problems in the talk flow. This helps you find issues fast.
8. Look at Firewall Settings
Packet Tracer does not have real firewalls. So, check the Access Lists (ACLs) on the router.
Be sure they do not stop DHCP broadcasts. This lets broadcasts reach devices. Keeping ACLs right helps the network talk well.
9. Check for Same IPs
Be sure no two devices have the same IP. Problems can happen if they do. So, new devices may not get an IP.
To see active IPs, use “show ip dhcp binding”. This helps you keep things neat and working.
10. Test with New Devices
To fix device issues in Packet Tracer, first make new ones. Then, link these to the same network. If the new devices get IPs, but the others do not, there is a problem. Look at the setup of the device that fails.
Follow these steps one by one to find the issue. First, check the network settings of the old device.
Then, look at the DHCP server settings. Also, be sure there are enough IPs free. If all seems good, restart the old device.
By doing this, you can find and fix IP address problems. This way, your network simulation will work well.
Show Commands Statistics for DHCP
- DHCP Commands
- DHCP Bindings
- DHCP Pools
Router#show ip dhcp ?
binding DHCP address bindings
conflict DHCP address conflicts
pool DHCP pools information
relay Miscellaneous DHCP relay information
Router#show ip dhcp binding
IP address Client-ID/ Lease expiration Type
Hardware address
192.168.1.2 000C.8536.A381 -- Automatic
192.168.1.3 00E0.B0AC.5779 -- Automatic
192.168.2.2 00E0.F7CA.7827 -- Automatic
192.168.2.3 000A.F383.BCDE -- AutomaticRouter#show ip dhcp pool
Pool LAN1 :
Utilization mark (high/low) : 100 / 0
Subnet size (first/next) : 0 / 0
Total addresses : 254
Leased addresses : 2
Excluded addresses : 2
Pending event : none
1 subnet is currently in the pool
Current index IP address range Leased/Excluded/Total
192.168.1.1 192.168.1.1 - 192.168.1.254 2 / 2 / 254
Pool LAN2 :
Utilization mark (high/low) : 100 / 0
Subnet size (first/next) : 0 / 0
Total addresses : 254
Leased addresses : 2
Excluded addresses : 2
Pending event : none
1 subnet is currently in the pool
Current index IP address range Leased/Excluded/Total
192.168.2.1 192.168.2.1 - 192.168.2.254 2 / 2 / 254
Router#DHCP Configuration YouTube Tutorial Video
PT yazılımını kullanarak Cisco yönlendirici üzerinde DHCP’yi yapılandırmak için aşağıdaki videoyu izleyebilir ve ayrıca bize destek olmak için YouTube kanalımıza abone olabilirsiniz!
Conclusion
In a growing network topology, manually configuring TCP/IP settings on network devices can be time-consuming, so you can add a DHCP server to distribute IP addresses to clients automatically.
Or, you can accomplish this by enabling the server on your router. Thank you for following us!

Be the first to share your comment