
In today’s online world, network setup is key to easy talking. One big part is NAT, and most of all, static NAT lets inside devices use public IPs. Here, I will show how to set up static NAT on a Cisco Router. So, I will use the Packet Tracer tool to do this.
Whether you are making a home network or a work one, knowing static NAT matters. It can make your network work better and be safer. So, let’s go through the steps to put it in place in a simple way!
Why Do We Use Static NAT on a Router?
Static NAT lets local network computers talk to outside networks. When a device sends a data packet, the router changes the packet’s target IP to a set port. This lets the inside network and outside resources talk easily.
But each device in the private network must have its own public IP. This rule limits how many devices can go online. Also, you must set up routing for each device by hand. This adds more admin work and can cause too few IPs.
Another key fact is that static NAT can’t be used for safe links, like VPNs. This limit hurts network bendiness, most of all in safe places.
To set up static NAT, do these steps with care. First, make the Inside and Outside areas clear. Use the “ip nat inside” order on the inner interface. This tags it as the safe side. Then, set the outer interface with the “ip nat outside” order. This shows it is the unsafe side.
By doing this, you make clear LAN paths. It also makes network safety better by splitting inside and outside traffic.
How to Set Up Static NAT on a Cisco Router in GNS3
You can follow the steps below to configure a static NAT record on the Router.
Steps:
Step 1
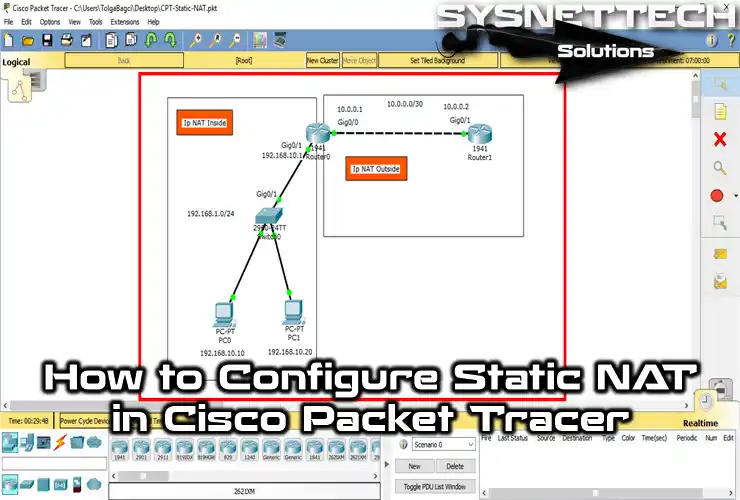
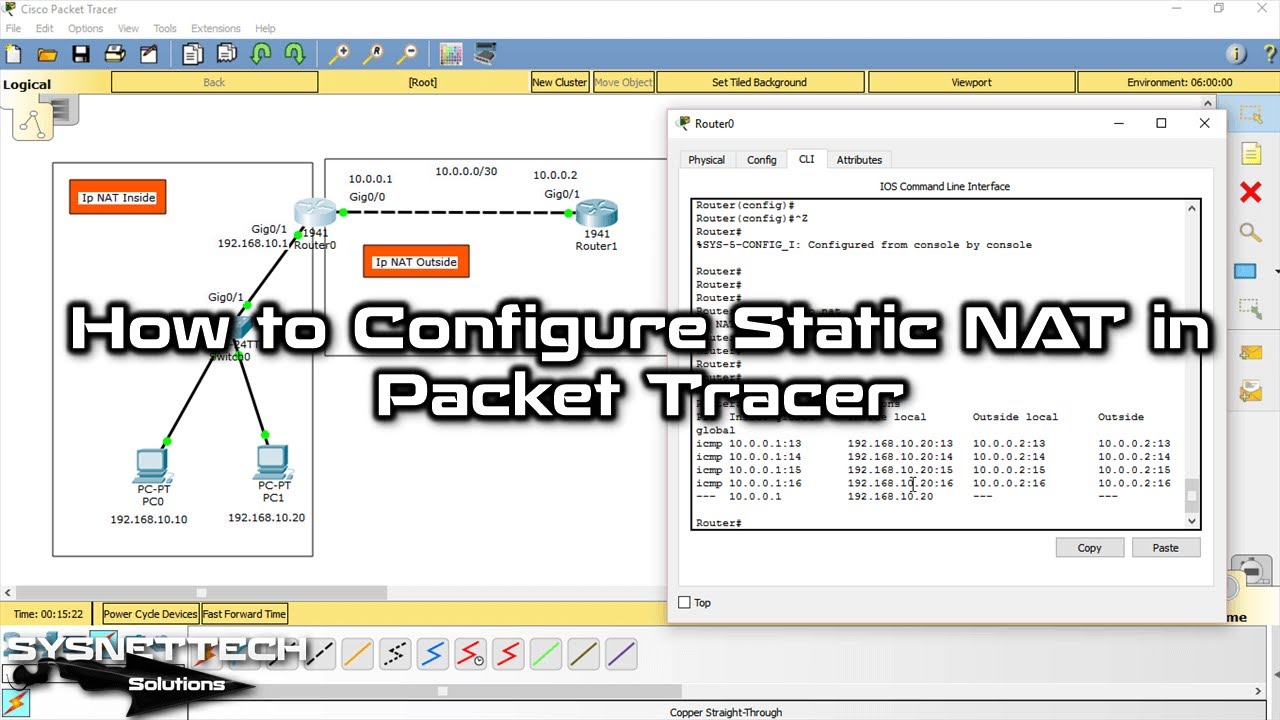
First, open Packet Tracer and make the network layout you see in the picture. Then, write notes on the workspace by naming the Inside and Outside areas.
In the layout below, I named the port going to the web as GigabitEthernet0/0. So, I picked that port as Outside.
Step 2
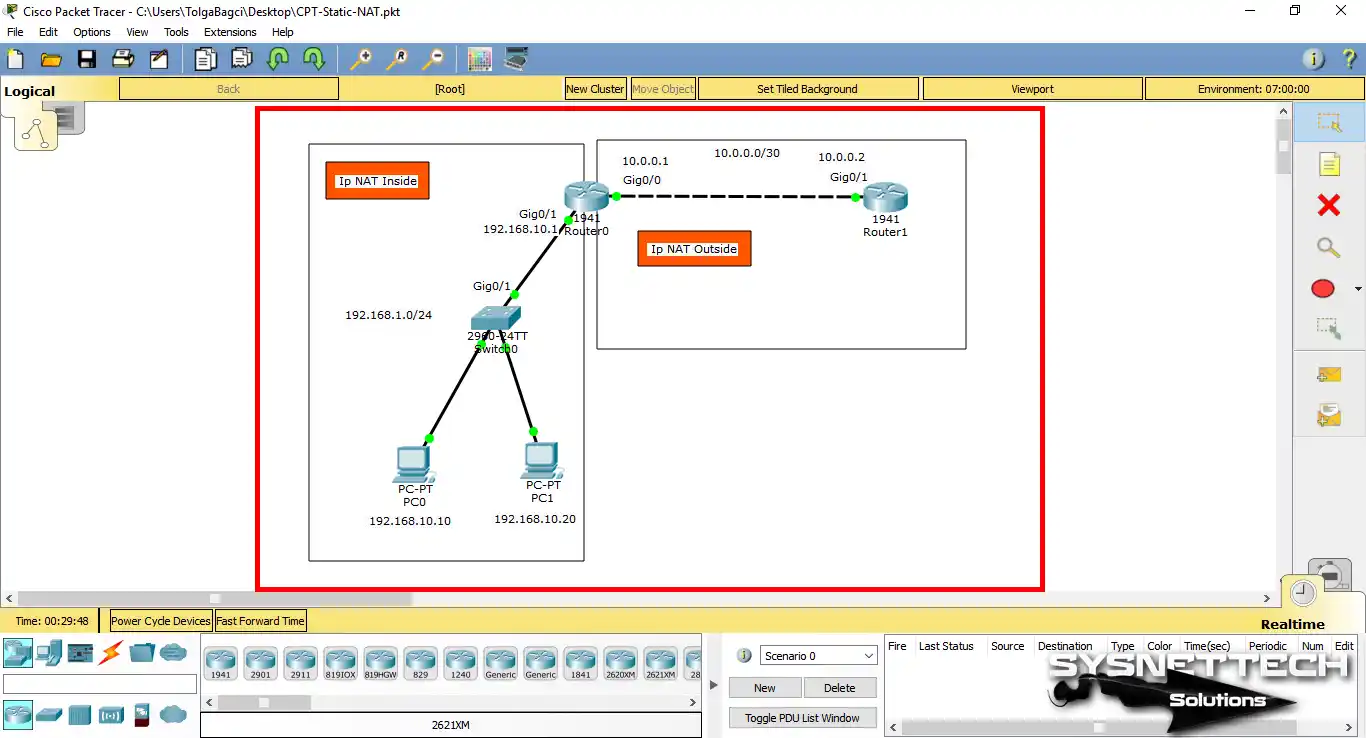
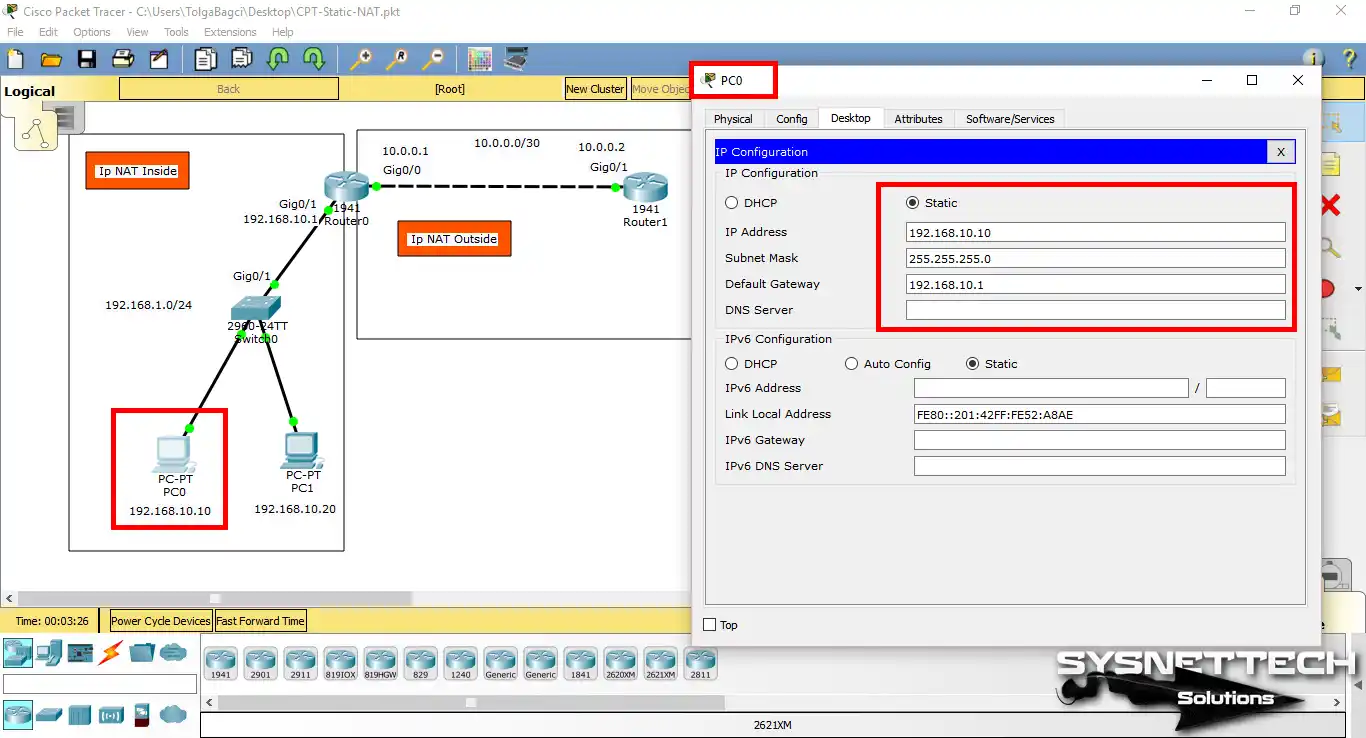
Set up and configure the IP groups for the network. Then, put two PCs on the workspace & set up their TCP/IP settings.
Step 3
Now, select the Inside and Outside interfaces at the Router0 CLI command prompt.
Now we need to add static records to the Router. Therefore, we will configure them for the PCs with the IP addresses 192.168.10.1 and 192.168.20.1. Now, run the proper Cisco command below, one after the other.
You can use the command (write / wr) in privileged mode to save your settings.
Router# enable
Router(config)# interface gigabitethernet 0/0
Router(config-if)# ip address 10.0.0.1 255.255.255.252
Router(config-if)# ip nat outside
Router(config-if)# no shutdown
Router(config-if)# exit
Router(config)# interface gigabitethernet 0/1
Router(config-if)# ip address  192.168.10.1 255.255.255.0
Router(config-if)# ip nat inside
Router(config-if)# no shutdown
Router(config-if)# exit
Router(config)# ip nat inside source static 192.168.10.1 10.0.0.1
Router(config)# ip nat inside source static 192.168.20.1 10.0.0.1
Router(config)# end
Router# wr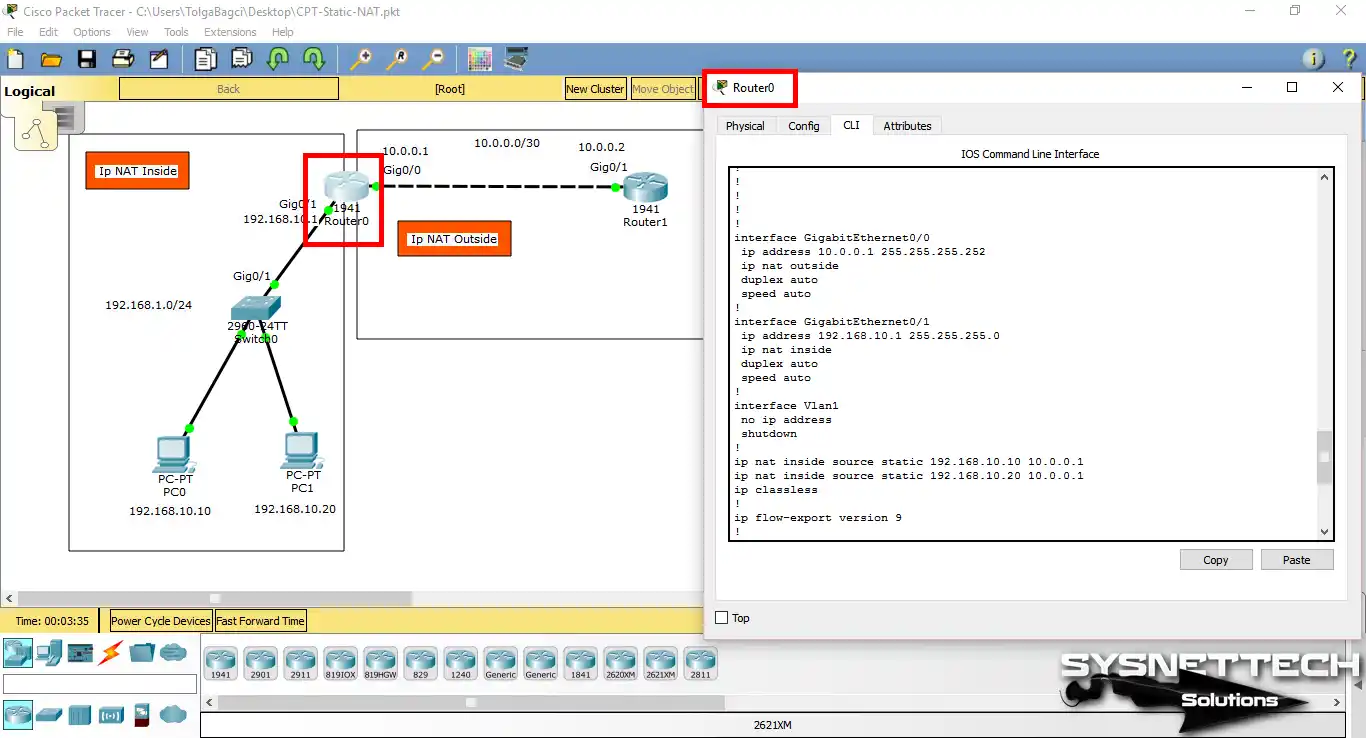
Step 4
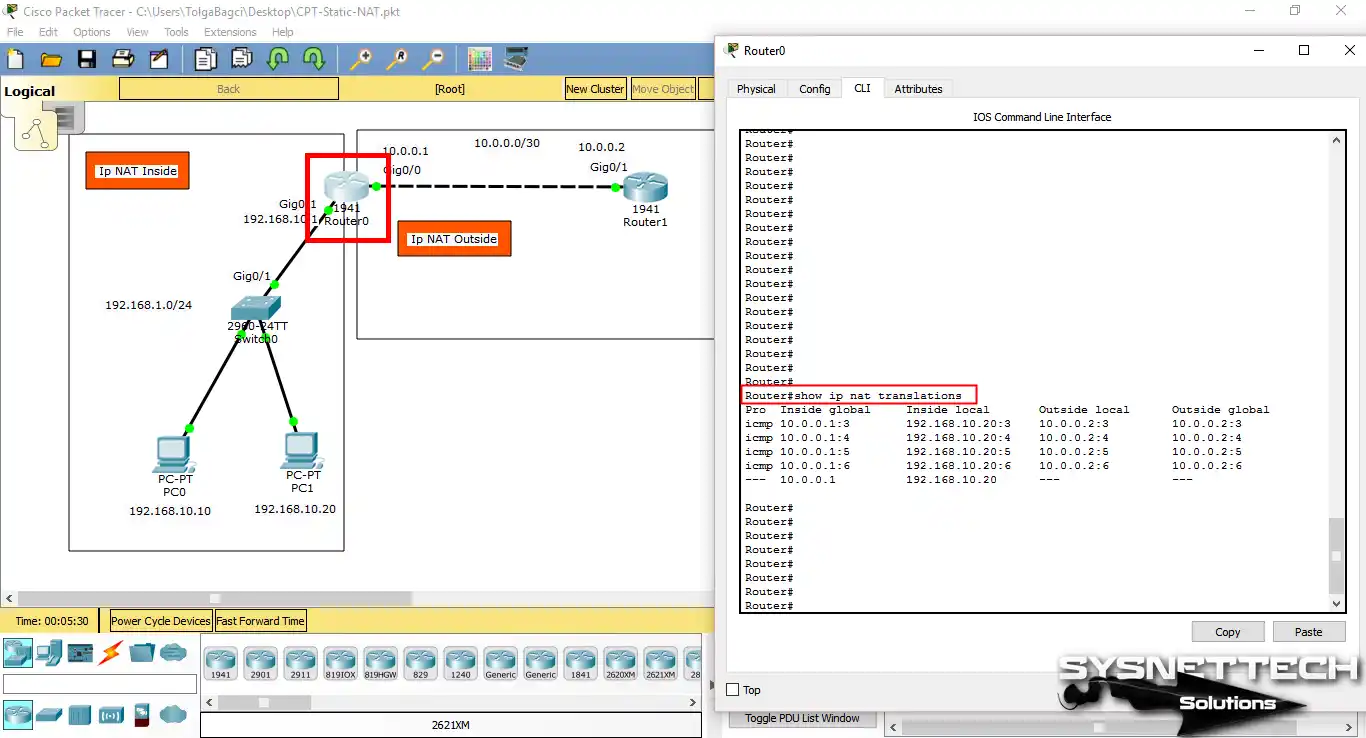
Now ping Router1 from computers in the LAN. Then, examine the NAT records using the “show ip nat translations” command in the CLI.
Show Command Output for Static NAT
- NAT Translations
- Router0 Running Config
- NAT Statistics
- Router1 Running Config
Router#show ip nat translations
Pro Inside global Inside local Outside local Outside global
icmp 10.0.0.1:3 192.168.10.20:3 10.0.0.2:3 10.0.0.2:3
icmp 10.0.0.1:4 192.168.10.20:4 10.0.0.2:4 10.0.0.2:4
icmp 10.0.0.1:5 192.168.10.20:5 10.0.0.2:5 10.0.0.2:5
icmp 10.0.0.1:6 192.168.10.20:6 10.0.0.2:6 10.0.0.2:6
--- 10.0.0.1 192.168.10.20 --- ---
Router#show running-config
Building configuration...
Current configuration : 768 bytes
!
version 15.1
no service timestamps log datetime msec
no service timestamps debug datetime msec
no service password-encryption
!
hostname Router
!
ip cef
no ipv6 cef
!
license udi pid CISCO1941/K9 sn FTX1524T6MD
!
spanning-tree mode pvst
!
interface GigabitEthernet0/0
ip address 10.0.0.1 255.255.255.252
ip nat outside
duplex auto
speed auto
!
interface GigabitEthernet0/1
ip address 192.168.10.1 255.255.255.0
ip nat inside
duplex auto
speed auto
!
interface Vlan1
no ip address
shutdown
!
ip nat inside source static 192.168.10.10 10.0.0.1
ip nat inside source static 192.168.10.20 10.0.0.1
ip classless
!
ip flow-export version 9
!
line con 0
!
line aux 0
!
line vty 0 4
login
!
end
Router#Router#show ip nat statistics
Total translations: 3 (2 static, 1 dynamic, 3 extended)
Outside Interfaces: GigabitEthernet0/0
Inside Interfaces: GigabitEthernet0/1
Hits: 11 Misses: 12
Expired translations: 6
Dynamic mappings:Router#show running-config
Building configuration...
Current configuration : 619 bytes
!
version 15.1
no service timestamps log datetime msec
no service timestamps debug datetime msec
no service password-encryption
!
hostname Router
!
ip cef
no ipv6 cef
!
license udi pid CISCO1941/K9 sn FTX1524B4CT
!
spanning-tree mode pvst
!
interface GigabitEthernet0/0
no ip address
duplex auto
speed auto
shutdown
!
interface GigabitEthernet0/1
ip address 10.0.0.2 255.255.255.252
duplex auto
speed auto
!
interface Vlan1
no ip address
shutdown
!
ip classless
!
ip flow-export version 9
!
line con 0
!
line aux 0
!
line vty 0 4
login
!
end
Router#Static NAT YouTube Tutorial Video
To enable Static NAT on your Router, see our useful video. This guide shows each part clearly. It makes sure you set your choices right. Doing this will make your network work better.
Also, join our YouTube channel. This lets you know about new guides. You will also get ideas that help our group. Your help lets us make more good stuff!
Conclusion
To end, putting static NAT on a Cisco Router is vital for your network. First, it makes speed better and safety stronger. You can do the steps in this guide to set it up nicely. This lets your inside network and outside resources talk easily.
Also, learning static NAT boosts your network skills. It gets you ready for more complex setups later. Whether you run a home net or a big company, this know-how is handy.
In the end, making a faster and safer network is something you can do. Thanks for looking into this with us! We hope your network work goes well!
To get better at network contact, see our configuration of dynamic NAT in Packet Tracer. This helps you handle IP addresses correctly. It lets devices on your network use a set of public IPs as required.
Then, see our PAT setup guide in Packet Tracer. PAT lets many devices on one local net share one public IP. Knowing PAT is key to making your net quicker and bigger. Be sure to look at it!

Be the first to share your comment